#How to download mysql on mac
Explore tagged Tumblr posts
Visit Tumblr Blog
Explore Tumblr blogs with no restrictions, modern design and the best experience.
Last Seen Tumblr Blogs


Fun Fact
Tumblr has been banned in Indonesia for providing people with access to pornographic content.
Text
🚀 Power BI MySQL Integration: The Ultimate No-Code Guide to Real-Time Analytics
📈 Why Power BI MySQL Integration is a Game-Changer
In today’s data-first world, real-time insights are more than a luxury—they’re a necessity. According to recent studies, 80% of companies are investing in data analytics to gain a competitive edge. Without accurate, up-to-date data, business decisions can miss the mark.
That's why integrating your MySQL database with Power BI can be a total game-changer.
Imagine pulling live sales data from MySQL straight into Power BI dashboards—no manual exports, no code, no delays. It’s not just about saving time (though it can cut reporting time in half)—it’s about making better, faster, smarter decisions.

🔍 What is Power BI and MySQL? Why Should You Care?
Before jumping into the “how,” let’s understand the “why.”
💡 Power BI: The Visual Storyteller
Power BI is a powerful data visualization tool by Microsoft. It helps you create interactive dashboards, reports, and analytics that help decision-makers see the bigger picture.
🗃️ MySQL: The Backbone of Your Data
MySQL is one of the world’s most popular open-source relational database systems. It can handle massive amounts of structured data—and it’s the go-to for many organizations' back-end systems.
🤝 The Magic of Integration
By connecting Power BI to MySQL, you combine MySQL’s data storage strength with Power BI’s visualization brilliance. That means:
Real-time reporting
Automated dashboards
Zero manual effort
And the best part? With Konnectify, you don’t need to write a single line of code to get started.
⚙️ What You Need for Power BI MySQL Integration
To get your integration up and running, you’ll need:

🧩 How to Connect Power BI to MySQL (Step-by-Step)
Let’s walk through how to get everything set up—whether you’re a data novice or a pro.
Step 1: Download MySQL Workbench
Start by managing your MySQL databases with MySQL Workbench. You can download it from the official MySQL site.
Step 2: Install the MySQL ODBC Connector
You’ll need the MySQL ODBC driver so Power BI can connect to your MySQL database.
Go to MySQL's official site and download the ODBC Connector for Windows or Mac.
Install it and take note of the DSN name you create.
Step 3: Connect MySQL to Power BI Desktop
Open Power BI Desktop
Click Get Data > MySQL Database
Enter your server address and database name
Authenticate using your credentials
Click Connect, and boom—your MySQL tables are now visible in Power BI
🔄 Automate Data Sync Between Power BI and MySQL with Konnectify
Manual syncing is a thing of the past. Here’s how to automate the entire workflow using Konnectify:
Step-by-Step Konnectify Setup
Log into Konnectify Go to your Konnectify dashboard and sign in.
Choose MySQL from the App Marketplace
Set Your Trigger Example: "New data entry in MySQL."
Create Your Action Example: "Create row in Power BI dashboard."
Customize Workflow Use Konnectify’s visual editor to map fields, add filters, and set conditions.
Activate It Click "Activate" and your workflow starts running 24/7.
Now, every time your MySQL database updates, Power BI reflects it instantly—zero manual work.
🔎 Real-World Use Cases for Power BI and MySQL Integration
Let’s explore how different departments can use this integration to transform workflows and drive results.
1. 📊 Automate Financial Reports in Power BI
With Konnectify pulling MySQL data into Power BI:
Financial dashboards update automatically
No need to manually extract CSV files
Get real-time metrics like revenue, expenses, and profit margins
Organizations using real-time analytics saw a 20% increase in operational efficiency.
2. 💸 Analyze Sales Performance with Live MySQL Data
Sales teams can monitor:
Conversion rates
Customer acquisition cost
Regional performance
Power BI helps visualize this sales data and spot trends or bottlenecks—all in real-time, thanks to MySQL integration.
3. 🏷️ Manage Inventory with Real-Time Dashboards
Inventory dips below minimum stock? Trigger alerts.
With Power BI + MySQL:
Track current stock levels
Monitor restocking needs
Visualize inventory turnover
Set up Power BI dashboards that refresh automatically as MySQL updates your stock records.
4. 🛠️ Track Customer Support KPIs
Integrate your helpdesk MySQL tables and watch:
Response times
Ticket resolution rates
SLA compliance metrics
All of this is visualized in Power BI without pulling a single report manually.
5. 📅 Project Management & Timelines
By integrating MySQL with Power BI:
Track project deadlines
Monitor team performance
Visualize tasks at risk of delay
Project managers can act faster using data-driven alerts and Gantt-style dashboards in Power BI.
📅 How to Set Up Real-Time Dashboards in Power BI
Once your integration is live:
Go to Power BI Service
Create a dashboard using your connected MySQL data
Pin visuals and set refresh schedules
Optional: Set up alerts for KPIs
With Konnectify automating your backend sync, your Power BI dashboards are always accurate.
🔒 Is It Secure to Integrate Power BI with MySQL?
Yes if you follow best practices:
Use secure credentials (OAuth or 2FA if possible)
Install the latest ODBC Connector versions
Limit data access to essential users
Monitor logs via Konnectify’s dashboard
Both Power BI and MySQL are enterprise-grade platforms with robust compliance and encryption standards.
✨ Why Konnectify is the Best Tool for Power BI MySQL Integration
Konnectify is more than just a connector. It’s a complete automation platform that lets you:
Connect 150+ apps, including CRMs, email tools, cloud storage, and ERPs
Build visual workflows with drag-and-drop logic
Monitor errors, delays, and sync status
Save hundreds of hours on manual tasks
And yes no coding required.
🧠 FAQs: Power BI MySQL Integration
Q1: Is Power BI compatible with MySQL? ✅ Yes. Power BI supports MySQL through ODBC and native connectors.
Q2: Do I need a premium Power BI account? ❌ No. Power BI Desktop works with MySQL even on the free tier.
Q3: Can I connect multiple MySQL databases? ✅ Yes. Konnectify allows multiple workflows across various databases.
Q4: What if MySQL has sensitive data? 🔐 Use encryption, access control, and filtered queries to secure data.
Q5: Will the integration slow down MySQL? ❌ No. With proper indexing and sync schedules, performance remains stable.
Q6: Is Konnectify safe to use? ✅ Absolutely. It uses encrypted tokens, secure OAuth, and follows GDPR compliance.
🏁 Final Thoughts: It’s Time to Sync Smarter
Gone are the days of juggling spreadsheets, exporting CSVs, or waiting on IT teams to build custom connectors. With Power BI MySQL integration via Konnectify, you unlock:
Real-time analytics
Fully automated dashboards
Insights that move your business forward
Stop manually syncing data—start automating it today.
#it services#saas#saas development company#saas platform#information technology#saas technology#b2b saas#software#software development#ipaas
0 notes
Text
Apple is well known for its simple design and excellent performance. Simplicity and high performance are the main reasons that all web designers prefer MACs as their working computer. They are many tools that are built to stay entertained and being highly productive. Mac acts as a great platform for making a great development because of its popular apps that are easily available to download. Here is a list of some popular applications that are beneficial for web designers and developers. Streamline Your Workflow With Must-Have Mac OS X Applications Website development is a time taking process, and creating even a single one requires dedication and time. And so, web developers offering iPhone Application Development Services usually have to make more deliberate efforts and spend a lot of time, in order to successfully complete the development process. Fortunately, there are numerous applications available on the web that help web developers to better web development productivity for every platform. In this post, we will discuss some of the must-have OS X Applications that developers should consider adding to their web development toolbox. Xcode Xcode has everything that you'll need to build great applications for Apple's devices. You can download it for free from the Mac App Store. It's a must-have application for developers who're serious about app development. Xcode enables developers to design, code, test and debug their apps in a unified workflow. It boasts exemplary features Xcode IDE, Swift language, iOS Simulators and many more. Espresso Whether you're working on a small or a large-scale project, Espresso can boost your workflow with the help of its rich set of features. It's a web editor that provides developers with a better development environment. It boasts a Navigator that sketch out your documents hierarchical structure. No matter, how complex your code may be Espresso can help you manage it without any hassle. This application comes packed with several programmer-centric features that helps web professionals to have better control over complicated documents. It's available for a 15 day trial period, and after the trial period is over you can choose to purchase it for $75. Sequel Pro MySQL is one of the most popular open-source database, which is used by a number of websites for storing their databases. In case you're a MAC OS X developer and want to manage databases in MySQL (on your local or remote server), then Sequel Pro is the right application for you. This is an easy-to-use, native Mac OS X application, built with Cocoa. Inlets you create, export, import, filter databases, and execute MySQL queries via your app. ImageOptim Sometimes the size of your app can become pretty heavy – when it comprises of plenty of images. ImageOptim is a great application that makes it easy for the developers to cut down the app's size. Additionally, you can also use ImageOptim to shrink down the size of your images. This will eventually help to lessen the time that images take to load. Cloud If you're a developer and working on any project, then you might want to share your work with your team. Cloud application makes it extremely easy for web professionals to share their files online in the fastest way. Once you've uploaded this application, you can easily share anything like the screenshots, documents, code snippets and so much more for free. It even helps you keep a track of how many people have viewed your file. Firebug While working on your site's web page design, Firebug renders the ability to make changes to your code and view what happens once the changes are made instantly. With the Firebug extension added into your browser, you can find the defined elements, style them and then tweak them to perfection. Dropbox Next on our list is Dropbox, an ideal application for storing or keeping a backup of your files. Often when working on Mac OS X web development project, there are chances that you might accidentally modify or delete a file.
But, what if you need the file for reference again? A viable option is to sync your documents and files with Dropbox. And so, in case you got any of your file or document deleted, you can easily restore it (remember that the deleted files are kept for 30 days). Keka Most of the file packages that we want to download are often compressed either in zip, or rar formats. Though Mac system comes with a built-in feature that helps extract the different file formats, it is limited. Keka is an open-source Mac OS X app – that can be used for the compression and extraction of any files. It primarily supports three main file formats such as zip, rar, and tar. Other than that, the Keka application also compresses several other file formats like Gzip, DMG, ISO, etc., and can extract EXE, PAX and ACE file formats as well. IPhone Emulator Nowadays, the need for developing a mobile-optimized website has become inevitable. More and more people today are using their mobile devices to access the web, and thus you certainly require some tool that tests your site optimization on mobile platforms. You can test your site by accessing it via a mobile phone and tablet or just use a simulator application such as the iPhone Simulator. Alfred If you're a developer and want to save your time that you otherwise spend on finding files and information on your Mac, then Alfred is the perfect application for you. It's a highly recognized Mac OS X productivity app that makes finding files and information become a breeze. That's not it! It even helps to make you more productive, by bringing up hotkeys, and several essential file actions easily accessible. Developer Color Picker Every web project involves a lot of work, and thus remembering color values may make you rack your brains, especially when you're using different color schemes in your project. This is where Panic’s developer color picker comes to your rescue. It lets you copy the declaration of color in formats such as “NSColor” and “UIColor”. Coda Coda is the major reason for web designers to switch over to Mac. This intuitive app of Mac makes the web development workflow to move like a breeze. The main purpose of this application is to partition the website building process for better team collaboration. This comes for an affordable cost only. TextMate This broad text editor application is purposely designed for Mac Computers. This clearly explains the working functionality of text editors. It is the must-have the application of all web designers. Think This remarkable application let to focus on the task that is in the current process. The “Illumination Panel” of this application replaces Mac OS dock by creating a numerous application, which is preferred by the user to focus on. This is a perfect application for those who get easily distracted by other applications like Facebook, Twitter, Emails, Instant messaging, Instagram. Paparazzi This basic tool of Mac OS X enables the user to capture screenshots of whole web pages without any external editing. Paparazzi rely on Webkit Framework and Cocoa API and written in C. This application acts as a great tool for web designers who frequently need to seize the web page for representing design mockup presentation or to fix simple web graphics on the web page they are crafting. Aquamacs Emac Aquamacs Emac is a robust text editor of Emac and also an extended version of Original Emac text editor. This comes with a new look of Aqua and renders a look-and-feel comfort in order to make the application blend right into Mac OS UI (User Interface). This Aquamac Emac editor is great to the web designers who repeatedly work with HTML, Java, Python, C, C++, PHP, Ruby, Perl, LaTeX and many more. Nvu This is a high-performance WYSIWYG editor, which offers better What You See Is What You Get effect. This application is built around rendering engine of Mozilla based browsers called Gecko. Also, this application runs over Mac X 10.2.8 and other higher versions which can make the web design even better for beginner level web designers.
Smultron This gratuitous text editor is the best substitution for a default text editor that comes along with Mac OS in default. Smultron is easy to use and also this text editor is versatile. This application is meant to use in Mac OS X Leopard 10.5 and can also be used as a basic text editor to complete Script and HTML editors. Scribus This is the open source application for crafting high-quality page layouts for Linux and Mac users. Scribus is the most intensive aspect set of impressive and clean GUI. The publishing features of this colossal application includes Editing, Separations, CMYK color, ICC Color Management, and stretchy PDF Authoring characteristics. Legacy Apps: Not Available Anymore Xee This straightforward Mac application let people browse images directly with ease. This is the best replacement for existing Image viewer applications that are pre-installed on Mac Operating system. It works in a smooth and fast manner by using very little system resource as well. The application offers a load of shortcuts and also a streamlined user interface to represent the list of available features. Seashore This is the most popular image editor that completely uses Mac OS X's Cocoa Framework. This fully fledged image editor, which offers Photoshop a run to for gaining money, renders loads of features to all its end users. The characteristics include Gradient, Textures and other anti-aliasing options for tools like brush and text. Other than those options, it also supports the alpha channel and editing over multiple layers. This impressive image editor is on the budget for all Mac users. Wrapping Up! If you're a developer and looking for Mac OS X applications that enables you to streamline your workflow and increase your productivity, then the aforementioned list of top Max OS X applications will definitely help you accomplish your objectives. Do you have any Mac application that you can’t live without? Have you tried any of the above-listed applications? Please do share your experience with us! We would love to hear your comments!! This is article is contributed by Addison Cohen & Raji Chidu. Addison Cohen is a blogger cum iPhone app developer. At present, he is employed with Appsted Ltd, a renowned company delivering top-notch mobile apps development services. He loves sharing the latest information on mobile app development processes. Raji Chidu is a web content writer in ChennaiWebDevelopment and all time blogger who loves to expose her thoughts and information founded by her day to day life as well as surfing from the internet. She enjoys writing content for famous blogs. Article Updates Updated on June 2019: Fixed broken links and updated to HTTPS links.
0 notes
Text
Getting Started with PHP: A Beginner's Guide to Your First "Hello World" Program

Introduction
PHP tutorial for beginners and professionals provides in-depth knowledge of PHP scripting language. Our PHP tutorial will help you to learn PHP scripting language easily.
This PHP tutorial covers all the topics of PHP such as introduction, control statements, functions, array, string, file handling, form handling, regular expression, date and time, object-oriented programming in PHP, math, PHP MySQL, PHP with Ajax, PHP with jQuery and PHP with XML.
What is PHP
PHP is an open-source, interpreted, and object-oriented scripting language that can be executed at the server side. PHP is well suited for web development. Therefore, it is used to develop web applications (an application that executes on the server and generates the dynamic page.).
PHP was created by Rasmus Lerdorf in 1994 but appeared in the market in 1995. PHP 7.0 is the latest version of PHP, which was released on 28 November. Some important points need to be noticed about PHP are as follows:
PHP stands for Hypertext Preprocessor.
PHP is an interpreted language, i.e., there is no need for compilation.
PHP can be embedded into HTML.
PHP is an object-oriented language.
PHP is an open-source scripting language.
PHP is simple and easy to learn language.

Why use PHP
PHP is a server-side scripting language, which is used to design dynamic web applications with MySQL database.
It handles dynamic content, database as well as session tracking for the website.
You can create sessions in PHP.
It can access cookies variables and also set cookies.
Using PHP language, you can control the user's to access some pages of your website.
It helps to encrypt the data and apply validation.
PHP supports several protocols such as HTTP, POP3, SNMP, LDAP, IMAP, and many more.
PHP Features

Install PHP
To install PHP, we will suggest you to install AMP (Apache, MySQL, PHP) software stack. It is available for all operating systems. There are many AMP options available in the market that are given below:
WAMP for Windows
LAMP for Linux
MAMP for Mac
SAMP for Solaris
FAMP for FreeBSD
XAMPP (Cross, Apache, MySQL, PHP, Perl) for Cross Platform: It includes some other components too such as FileZilla, OpenSSL, Webalizer, Mercury Mail, etc.
How to install XAMPP server on windows
We will learn how to install the XAMPP server on windows platform step by step. Follow the below steps and install the XAMPP server on your system.
Step 1: Click on the above link provided to download the XAMPP server according to your window requirement.
Step 2: After downloading XAMPP, double click on the downloaded file and allow XAMPP to make changes in your system. A window will pop-up, where you have to click on the Next button.
Step 3: Here, select the components, which you want to install and click Next.

Step 4: Choose a folder where you want to install the XAMPP in your system and click Next
Step 5: Click Next and move ahead
Step 6: XAMPP is ready to install, so click on the Next button and install the XAMPP.
Step 7: A finish window will display after successful installation. Click on the Finish button
Step 8: Choose your preferred language
Step 9: XAMPP is ready to use. Start the Apache server and MySQL and run the php program on the localhost.
Step 10: If no error is shown, then XAMPP is running successfully

How to run PHP code in XAMPP
Generally, a PHP file contains HTML tags and some PHP scripting code. It is very easy to create a simple PHP example. To do so, create a file and write HTML tags + PHP code and save this file with .php extension.
All PHP code goes between the php tag. It starts with <?php and ends with ?>. The syntax of PHP tag is given below:
<?php
//your code here
?>
How to run PHP programs in XAMPP PHP is a popular backend programming language. PHP programs can be written on any editor, such as - Notepad, Notepad++, Dreamweaver, etc. These programs save with .php extension, i.e., filename.php inside the htdocs folder.
For example - p1.php.
As I'm using window, and my XAMPP server is installed in D drive. So, the path for the htdocs directory will be "D:\xampp\htdocs".
Step 1: Create a simple PHP program like hello world.
<?php
echo "Hello World!";
?>
Step 2: Save the file with hello.php name in the htdocs folder, which resides inside the xampp folder.
Step 3: Run the XAMPP server and start the Apache and MySQL.
Step4: Now, open the web browser and type localhost http://localhost/hello.php on your browser window.
Step 5: The output for the above hello.php program will be shown as the screenshot below

Most of the time, PHP programs run as a web server module. However, PHP can also be run on CLI (Command Line Interface).
Credits – Shweta Patil (Backend)
MetricsViews Pvt. Ltd.
MetricsViews specializes in building a solid DevOps strategy with cloud-native including AWS, GCP, Azure, Salesforce, and many more. We excel in microservice adoption, CI/CD, Orchestration, and Provisioning of Infrastructure - with Smart DevOps tools like Terraform, and CloudFormation on the cloud.
www.metricsviews.com
0 notes
Text
Master WordPress: Setting up your local Development Environment
WordPress is a popular and powerful platform for creating websites, blogs, and online stores. But before you can start building your WordPress site, you need to set up a development environment where you can work on your site without affecting the live version.
A development environment is a safe and private space where you can install WordPress, test new features, experiment with plugins and themes, and debug any issues. It also allows you to work offline, without relying on an internet connection or a web server.
In this article, I will show you how to set up a local development environment for WordPress using a free tool called Local by Flywheel.

Local by Flywheel is an easy-to-use application that lets you create and manage multiple WordPress sites on your own computer.
What You Need to Set up a Local Development Environment for WordPress
To set up a local development environment for WordPress, you need the following:
A computer running Windows, Mac, or Linux.
A web browser such as Google Chrome, Firefox, or Microsoft Edge.
A text editor or an integrated development environment (IDE) such as Visual Studio Code, Atom, or Sublime Text. (I personally prefer VS Code because easy to customize and use 😁)
A local server stack that includes PHP, MySQL, and Apache or Nginx. This is what powers your WordPress site locally.
A WordPress installation package that includes the core files and the database.
You can download and install all these components separately, but that can be time-consuming and complicated. That’s why I recommend using Local by Flywheel, which bundles everything you need in one convenient package.

How to Install Local by Flywheel
Local by Flywheel is a free application that you can download from the official website: https://localwp.com/
To install Local by Flywheel, follow these steps:
Download the installer for your operating system from the website.
Run the installer and follow the instructions on the screen.
Once the installation is complete, launch the application and create an account or log in with your existing account.
You will see the main dashboard of Local by Flywheel, where you can create and manage your local WordPress sites.
How to Create a Local WordPress Site with Local by Flywheel
To create a local WordPress site with Local by Flywheel, follow these steps:
Click on the + button at the top left corner of the dashboard.
Choose a name for your site and click on Advanced Options to customize the domain name, path, and environment type. You can leave the default settings if you want.
Click on Continue to proceed to the next step.
Choose a username, password, and email address for your WordPress admin account. You can also choose whether to install WordPress multisite or not.
Click on Add Site to start creating your site. This may take a few minutes depending on your internet speed and computer performance.
Once your site is ready, you will see it listed on the dashboard. You can click on Admin to access the WordPress dashboard, or click on Open Site to view the front-end of your site in your browser.
How to Work on Your Local WordPress Site
Now that you have created your local WordPress site, you can start working on it as you would on any other WordPress site. You can install plugins and themes, create posts and pages, customize settings, and more.
Some of the benefits of working on a local WordPress site are:
You can work faster and see changes instantly in your browser.
You can work offline without needing an internet connection or a web server.
You can test new features and updates without affecting the live version of your site.
You can experiment with different plugins and themes without worrying about breaking your site or losing data.
You can debug any issues more easily using tools such as WP_DEBUG or Query Monitor.
How to Make Your Site Live
Once you are happy with your local WordPress site, you may want to make it live so that other people can access it on the internet. To do this, you need to migrate your site from your local environment to a web hosting service.
There are different ways to migrate your site from Local by Flywheel to a web host, but one of the easiest ways is to use the Connect feature of Local by Flywheel.
The Connect feature allows you to connect your local site to a web host such as WP Engine or Flywheel (both owned by the same company as Local by Flywheel) and push or pull changes between them.
To use the Connect feature of Local by Flywheel, follow these steps:
Click on the name of your local site on the dashboard and go to the Connect tab.
Choose a web host that you want to connect to. You will need to have an account with them and create a site on their platform first.
Follow the instructions on the screen to link your local site and your web host site.
Once the connection is established, you can push or pull changes between your local site and your web host site. Pushing changes means sending your local site to your web host site, while pulling changes means receiving your web host site to your local site.
You can also choose whether to push or pull the entire site or only specific parts such as the database, files, or plugins and themes.
Conclusion
Setting up a local development environment for WordPress is a smart and efficient way to work on your WordPress site. It gives you more control, flexibility, and security over your site.
Using Local by Flywheel, you can easily create and manage multiple WordPress sites on your own computer, without needing any technical skills or extra software.
You can also migrate your site from Local by Flywheel to a web host using the Connect feature, and sync changes between them.
I hope this article helped you learn how to set up a local development environment for WordPress using Local by Flywheel. If you have any questions or feedback, feel free to leave a comment below. Happy WordPressing!

#wordpress#wordpress development#webdevelopment#localenvironment#flywheel#blogging#tutorial#techniki tantram#technikitantram#wordpressdeveloper
1 note
·
View note
Text
Easy TYPO3 installation: Manual & Composer methods!
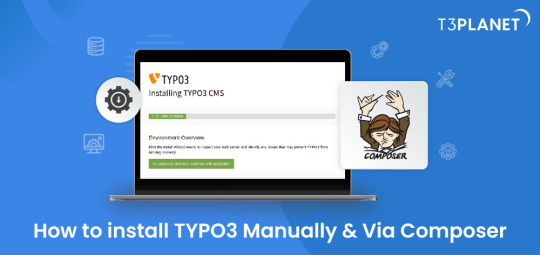
TYPO3 is the most secure, fast and robust CMS that is powered by easy installation which makes it easy for anyone to create a website. Leading TYPO3 web hosting providers facilitate quick and straightforward TYPO3 installations, typically requiring less than five minutes to set up.
In this Step by step Tutorial We are looking into how to install TYPO3 Manually and Via Composer .
Let's Look How?
System Requirement for installing TYPO3
It's essential to ensure the proper prerequisites for CMS installation are in place.
This process primarily necessitates two key components: a web server and a database server.
Operating System : Linux, Windows or Mac, or cloud infrastructure
Web Server : Apache httpd, Nginx, Microsoft IIS, Caddy Server ,
Supported Browser : Chrome (latest) , Edge (latest) , Firefox (latest) , Safari (latest)
Composer Requirement : Composer >= 2.1
Database : MariaDB >= 10.2.7 <= 10.5.99 Microsoft SQL Server MySQL >= 5.7.9 <= 8.0.99 PostgreSQL SQLite
Hardware Requirement RAM >= 256 MB
PHP Version Support PHP >= 7.4.1 <= 8.1.99
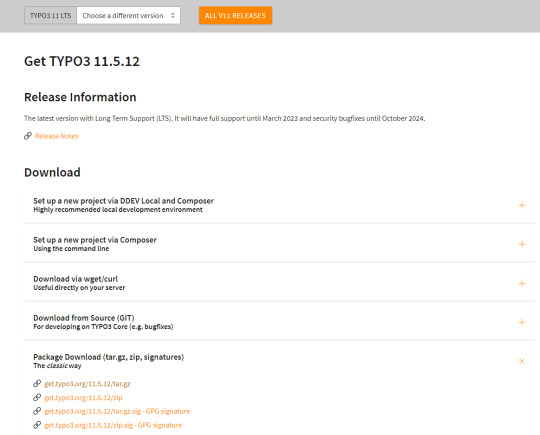
How to Install Via Composer
Step 1 Download TYPO3 From Website
The first step involves obtaining TYPO3 from its official website. You can acquire your preferred TYPO3 version from there.
2. Configure the Installation Files
Following Steps can be followed to setup the installation file of TYPO3.Begin by extracting the TYPO3 Zip file that you downloaded from TYPO3's official website. This will create a folder on your system containing all the necessary files for TYPO3.
Next, transfer these items to the server's designated folder Further , it is critical to decide the installation location for TYPO3. If you intend to Access it through main domains , this means you will need to Upload TYPO3 Files directly to public_html/ directory of your account..
However, if you have a different setup in mind, the location may vary accordingly.
there two different ways to transfer your records first is Utilising an FTP or second way of directly through cpanel account.
3.Initiate the Installation Process
To begin the installation process, generate a file named 'FIRST_INSTALL' within the same directory where you've uploaded your TYPO3 files.
This serves as a security checkpoint that grants permission to proceed with the installation. You can create this file using FTP or utilise the File Manager in your cPanel account.
4.Verification of System Requirements
To access the TYPO3 installation wizard, visit
“ https://www.MY_INSTALL.com/typo3/install.php." This tool is designed to facilitate the TYPO3 installation process, which consists of five phases.
In the initial phase, the tool conducts a thorough examination of your system environment. If any issues arise as a result of system settings, you can utilize the troubleshooting function to address them. If no problems are detected, you can continue with the installation process.
5.Configuring TYPO3 Setup
For Configuring TYPO3 Setup You can follow this steps :
You'll integrate the MySQL database. Log in using the username 'root,' and note that no password is necessary when using the XAMPP installer.
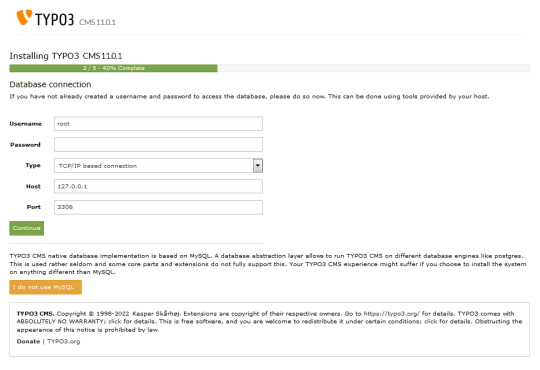
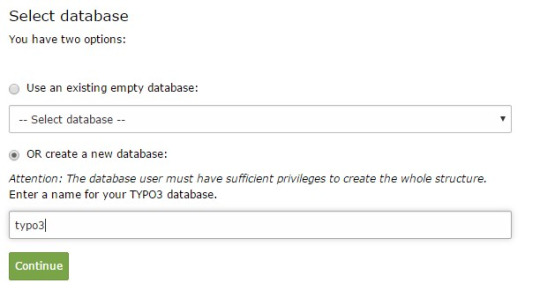
Next, you can either select an existing database or create a new one It's worth noting that you now have the option to use a different database implementation other than MySQL.
Next, you'll create an admin user for the TYPO3 backend. The password you set for this user will also be utilised for the install tool.
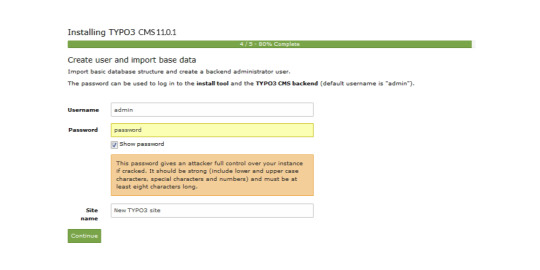
Now the installation itself is completed.
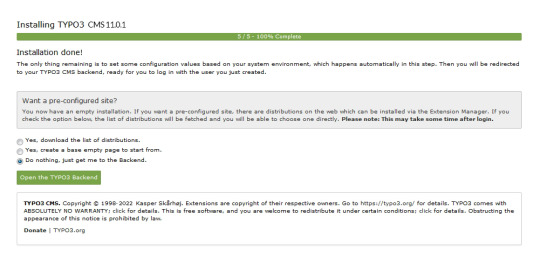
Lastly , the installation wizard finalises by automatically adjusting certain configurations to match your system environment.
However , You still have the option to choose whether TYPO3 will create an empty website or remain inactive temporarily.
By selecting 'Open the TYPO3 Backend,' you'll access the admin area, where you can log in using the account you just created.
Congratulations ! You have Completed and installed TYPO3 manually .
Install TYPO3 Via Composer Mode
For detailed instructions on installing TYPO3 using Composer, you can find a comprehensive step-by-step guide here: How to install TYPO3 - Manually & Via Composer
0 notes
Text
How to download mysql on mac

#How to download mysql on mac for mac#
#How to download mysql on mac mac os x#
#How to download mysql on mac full#
#How to download mysql on mac mac os x#
Operating Systems: Windows 8, Windows 7, XP (All 32 Bit / 64 Bit Systems), Linux, Mac OS X.System Requirements For MySQL Database Serverīefore starting MySQL download, I suggest you should have a look on MySQL minimum system requirements: Partitioning Function Included For Huge Database Performance.Performance in MySQL can be seen in detailed here.MYSQL Workbench provides complete Integrated Development Environment.Popular Open Source Data Management Software.Complete connectivity with All Major Development Tools.Free of cost Relational Database Management Systems.Get MySQL download to see below features of Database Management software:. You can use MySQL connectors to integrate MySQL DB with worlds most popular IDE using ODBC and JDBC.įeatures of MySQL Data Management Software MySQL can be connected with Visual Studio 2012 or Visual Studio 2010 using MySQL data connecter. You’ll be surprised to know that some of huge internet giants are using MySQL to power High volume websites. MySQL is preferred for OLTP (online Transaction processing). You can improve performance of database software. This will require technical knowledge of SQL and RDBMS. But if you want to have MySQL download separately then this article is for you. After installing MySQL you can do mysql performance tuning. You can create database ER diagrams in MySQL workbench as well.Īlthough you can get XAMPP download which provides all in one solution which includes Apache, PHP, MySQL. Although level of scalability in My Sql database server is not at the level of Teradata, Microsoft SQL Server or other premium Enterprise database management Systems but still MySQL is preferred for simplicity and free of cost. The small websites which cannot afford the annual licenses of premium database management software. MySQL is popular database management systems among the web community. MySQL is free database management system. Companies which require Enterprise database management want a solution which is cost effective and high performing. SQL Server, Oracle, MySQL or Teradata etc. They have many options of relational database management systems e.g. Clients need good data management software. There are many popular database management systems in Market. MySQL Database Management System Overview
#How to download mysql on mac full#
MySQL Download Full Setup Free with direct link. MySQL is popular database management system.
#How to download mysql on mac for mac#
Get MySQL Download For Mac & Windows 32 / 64 Bit.
0 notes
Text
PHP Training Institute in Bhubaneswar|Shopweb
PHP Training Institute in Bhubaneswar
Shopweb Training
Shop web is the Best PHP Training Institute in Bhubaneswar, which gives training in frameworks like Unix, Linux, Microsoft Windows, Solaris, Mac OS, and some more, PHP content can be utilized. Among any remaining programming dialects, PHP is a champion among the most remarkable prearranging dialects. Numerous little associations have created after the methodology of PHP. They have extended the foundation of youth work to manifolds. Developing money managers who guarantee a degree in planning effectively start such a business Stunning is it not it? Coding abilities for web improvement and plan close by capacities for SEO are needed to start an association dependent on PHP. Along these lines, PHP's importance is building up, no question. If you can pick the right PHP preparing foundation, you can without a very remarkable stretch make an astonishing calling here.
Effective PHP Training For Better Career Prospects
PHP preparing in itself is an extraordinary alternative for any individual who is hoping to upgrade his profession openings over the long haul. It assists you with find out about various data set practical determinations. Through this kind of preparing, one can without much of a stretch figure out how PHP upholds a better association than MySQL. One can even become more acquainted with about the most common way of introducing PHP. Nonetheless, for that, you should get a fitting web worker design. On the off chance that you wish to utilize Linux and UNIX, you ought to consider downloading the PHP source code viably. There are a few things that one can learn in PHP preparing. A portion of these things are examined underneath.
Get Smart With the Apt PHP Training
PHP preparing would make you acquainted with a few data set practical particulars. Through the preparation, you can figure out how PHP upholds a superior association with MySQL. Through the preparation, you would get comfortable with how best you can introduce PHP. For this, you need to have an adept web worker setup. In the event that you utilize UNIX and Linux, you might require downloading the PHP source code. You can even introduce PHP with installer CD. This is accessible for all working frameworks. In the preparation, you would will find out with regards to the manual advances which would make you realize how to introduce the web worker.
1 note
·
View note
Text
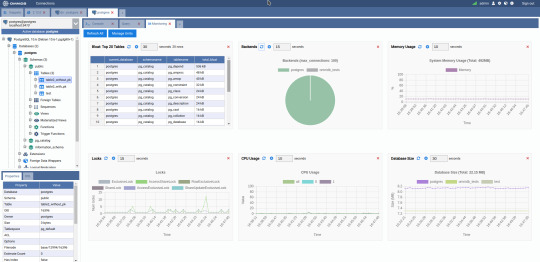
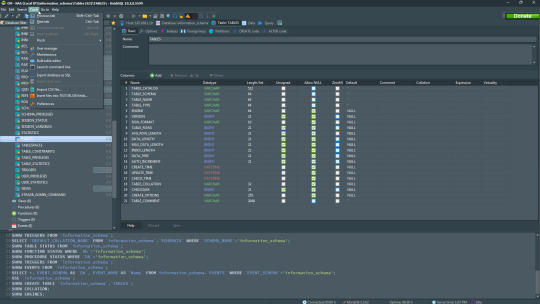
Mysql Workbench Download Mac

MySQL Database Service. MySQL Database Service is a fully managed database service to deploy cloud-native applications using the world’s most popular open source database. It is 100% developed, managed and supported by the MySQL Team.
Mysql Workbench Commands
Workbench For Mac
Please note that SQL Workbench/J has no relation to the product MySQL Workbench which is maintained and owned by Oracle. If you are looking for MySQL Workbench support please contact Oracle.
SQL Workbench/J - Downloads. Please note that SQL Workbench/J has no relation to the product MySQL Workbench which is maintained and owned by Oracle. If you are looking for MySQL Workbench support please contact Oracle. SQL Workbench/J requires Java 8 or later. Using Java 11 or later is highly recommended, especially with High-DPI screens. MySQL Workbench for macOS is distributed as a DMG file. The file is named mysql-workbench-community-version-osx.dmg, where version is the MySQL Workbench version. MySQL Workbench provides platform support for the latest version of macOS only (see supported platforms).The previous version continues to be supported for a transition period of six months after each new version of. Oct 08, 2018 Steps to Install MySQL Workbench 8.0 on Mac OS X Mojave Step 1. Download the Installer. Follow this link to download the latest version of MySQL Workbench 8.0 for Mac. When I write this article, the Workbench version 8.0.12 is available. Download mysql workbench mac, mysql workbench mac, mysql workbench mac download free.
SQL Workbench/J requires Java 8 or later
Using Java 11 or later is highly recommended, especially with High-DPI screens. Build 127 is the last build to support Java 8. Starting with the next build, Java 11 will be required.
Stable release
Current stable release: Build 127, 2020-08-22 (Release History)
The generic package contains the jar file, the manual (HTML and PDF), shell scripts for Linux/Unix based systems (including MacOS) to start the application as well as a Windows® launcher and sample XSLT scripts.
The download includes the language files for English and German. The application's language can be changed from within the options dialog (Tools -> Options).
If you want to import or export Microsoft Excel files (XLS, XLSX) or import OpenOffice Calc documents, download the 'Generic package including all optional libraries' (approx. 30MB). If you are in doubt which one to use, download that.
Please see Creating a macOS executable for a short description on how to build a macOS executable using 'Automator'.
Change in the directory layout!
Starting with build 125 all additional libraries (e.g. for Excel exports) are expected in the sub-directory ext relative to the directory where sqlworkbench.jar is located. The location of the JDBC drivers is not affected by this.
If you download the archive 'with optional libraries', the libraries will automatically be extracted into the ext subdirectory and you can remove the existing libraries from directory where sqlworkbench.jar is located.
Generic package for all systems including all optional libraries (sha1)
Generic package for all systems without support for importing or exporting Excel or OpenOffice spreadsheets (sha1)
Source code (sha1)
Please note:
If you have copied the jar files for the Excel and OpenOffice support before, please delete all existing files from the ext subdirectory before extracting the new archive as some of the library names have changed.
Older versions can be downloaded from the download archive
You can subscribe to the RSS Feed to receive information about new releases
If you are having problems unzipping the distribution archive with WinZip, please read this.
Mysql Workbench Commands
Current development build: 127.1 ( 2020-10-18)
Workbench For Mac
1 note
·
View note
Text
How to Install MySQL on Your PC in 3 Easy Steps
In this instructional exercise, I'm demonstrating how to introduce MySQL on your PC. Presently, I'm utilizing a Mac. So first I'll tell you the best way to introduce MySQL on a Mac PC. In case you're a Windows client, go ahead and skirt this instructional exercise.
In the event that you are excessively occupied with your school papers and have no an ideal opportunity to try and introduce MySQL, go to this ace PHP task help.
Step #1 – Download MySQL
Presently, open up your program and head over to MySQL.com. Then, at that point, go to the downloads page and look down to the base. Here you should see MySQL people group version. This is totally free. It turns out absolutely great.
So how about we feel free to take a gander at that. Presently on this page, click on MySQL, people group worker. On the following page, you should see accessible deliveries for Mac OS.
Along these lines, in this rundown, download the main thing which is a dmg file. Okay, presently, on the following page, click on the No Thanks button. The download should begin in almost no time. OK, you will get a dmg document, which is essentially an arrangement wizard.
Step #2 – Launch the Installation Wizard
When the DMG is downloaded, how about we open it. Double tap on this bundle. In no time flat, you'll see an establishment wizard. It's not difficult to utilize. So just snap on proceed and once more, and once more, concur with the permit arrangement, and introduce MySQL. It will request your secret word. This is the secret word that you used to sign into your PC. So we should put that here.
In the event that the musings like "Who can assist me with doing my PHP schoolwork?" trouble you and intrude on a smooth MySQL arrangement measure, go ahead and go to master help.
Step #3 – Set a Password to the Root for the Admin User
Okay, here you need to set a secret phrase to the root for the administrator client. So click straightaway, and in this container, type a mind boggling secret word. Very much done.
Presently, we should complete the establishment, and enter your PC's secret word once again,
furthermore, you're finished! That was really simple and sweet.
Similarly, you can adapt to each PHP task on the off chance that you pick proficient help from the genuine geniuses. Farewell to every one of those irritating "Who will do my PHP task help for me" considerations unequivocally.
Reward Tip: How to Connect the Graphical Tool with a Server
Alright, you introduced MySQL people group worker. Presently you need the graphical device to interface with a worker. Whenever you are associated, you need to deal with your data sets.
Along these lines, you need to go to MySQL people group release. On this page, you should see MySQL workbench. This is a graphical device that you use to interface with your data set worker. So we should feel free to download this too.
Presently by and by on this page, you need to download a dmg document. Thus, download it. By and by you need to say no. You would prefer not to sign in or join. So how about we feel free to download the dmg. Presently open it.
Okay, drag this MySQL workbench and drop it onto the applications envelope. We should proceed with that. Presently it will duplicate this into the applications organizer. Lovely.
So you're finished with the establishment. That was really simple.
Presently press order and space, and quest for MySQL workbench. There you go, we should open it.
Presently the first occasion when you get this message since this is an application you downloaded from the web. For this situation, you ought to demonstrate to Mac that you confide in it, we should proceed with that. So this is MySQL workbench. Presently of course, you see an association here. In the event that you don't see that, you need to make it.
Allow me to tell you the best way to do that. So for this demo, I will right-click this and
erase this association. Okay, presently we should make an association without any preparation.
Snap on this in addition to symbol. On this page, give this association a name. Suppose a neighborhood occasion. Presently the association strategy you will utilize is TCP IP, which is set of course. The hostname is the location of the neighborhood machine. Also, the port is 3306, this is the default port for MySQL worker. That is the client name of the administrator.
Presently you need to enter the secret key. This is the secret key that you set during the establishment. Along these lines, click on Store in a keychain, and in this case, type the secret key for the MySQL worker.
Okay lastly, how about we test the association. OK, you effectively associated with the MySQL
worker on the nearby machine. Wonderful. How about we click OK.
Furthermore, here you have an association on the landing page of MySQL workbench. Each time you'd prefer to open MySQL workbench, you will utilize the association interfacing with your nearby worker. Okay, you're finished.
Read more
1 note
·
View note
Text
Which Is The Best PostgreSQL GUI? 2021 Comparison
PostgreSQL graphical user interface (GUI) tools help open source database users to manage, manipulate, and visualize their data. In this post, we discuss the top 6 GUI tools for administering your PostgreSQL hosting deployments. PostgreSQL is the fourth most popular database management system in the world, and heavily used in all sizes of applications from small to large. The traditional method to work with databases is using the command-line interface (CLI) tool, however, this interface presents a number of issues:
It requires a big learning curve to get the best out of the DBMS.
Console display may not be something of your liking, and it only gives very little information at a time.
It is difficult to browse databases and tables, check indexes, and monitor databases through the console.
Many still prefer CLIs over GUIs, but this set is ever so shrinking. I believe anyone who comes into programming after 2010 will tell you GUI tools increase their productivity over a CLI solution.
Why Use a GUI Tool?
Now that we understand the issues users face with the CLI, let’s take a look at the advantages of using a PostgreSQL GUI:
Shortcut keys make it easier to use, and much easier to learn for new users.
Offers great visualization to help you interpret your data.
You can remotely access and navigate another database server.
The window-based interface makes it much easier to manage your PostgreSQL data.
Easier access to files, features, and the operating system.
So, bottom line, GUI tools make PostgreSQL developers’ lives easier.
Top PostgreSQL GUI Tools
Today I will tell you about the 6 best PostgreSQL GUI tools. If you want a quick overview of this article, feel free to check out our infographic at the end of this post. Let’s start with the first and most popular one.
1. pgAdmin
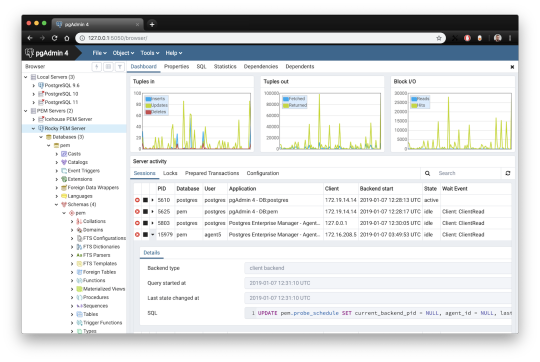
pgAdmin is the de facto GUI tool for PostgreSQL, and the first tool anyone would use for PostgreSQL. It supports all PostgreSQL operations and features while being free and open source. pgAdmin is used by both novice and seasoned DBAs and developers for database administration.
Here are some of the top reasons why PostgreSQL users love pgAdmin:
Create, view and edit on all common PostgreSQL objects.
Offers a graphical query planning tool with color syntax highlighting.
The dashboard lets you monitor server activities such as database locks, connected sessions, and prepared transactions.
Since pgAdmin is a web application, you can deploy it on any server and access it remotely.
pgAdmin UI consists of detachable panels that you can arrange according to your likings.
Provides a procedural language debugger to help you debug your code.
pgAdmin has a portable version which can help you easily move your data between machines.
There are several cons of pgAdmin that users have generally complained about:
The UI is slow and non-intuitive compared to paid GUI tools.
pgAdmin uses too many resources.
pgAdmin can be used on Windows, Linux, and Mac OS. We listed it first as it’s the most used GUI tool for PostgreSQL, and the only native PostgreSQL GUI tool in our list. As it’s dedicated exclusively to PostgreSQL, you can expect it to update with the latest features of each version. pgAdmin can be downloaded from their official website.
pgAdmin Pricing: Free (open source)
2. DBeaver

DBeaver is a major cross-platform GUI tool for PostgreSQL that both developers and database administrators love. DBeaver is not a native GUI tool for PostgreSQL, as it supports all the popular databases like MySQL, MariaDB, Sybase, SQLite, Oracle, SQL Server, DB2, MS Access, Firebird, Teradata, Apache Hive, Phoenix, Presto, and Derby – any database which has a JDBC driver (over 80 databases!).
Here are some of the top DBeaver GUI features for PostgreSQL:
Visual Query builder helps you to construct complex SQL queries without actual knowledge of SQL.
It has one of the best editors – multiple data views are available to support a variety of user needs.
Convenient navigation among data.
In DBeaver, you can generate fake data that looks like real data allowing you to test your systems.
Full-text data search against all chosen tables/views with search results shown as filtered tables/views.
Metadata search among rows in database system tables.
Import and export data with many file formats such as CSV, HTML, XML, JSON, XLS, XLSX.
Provides advanced security for your databases by storing passwords in secured storage protected by a master password.
Automatically generated ER diagrams for a database/schema.
Enterprise Edition provides a special online support system.
One of the cons of DBeaver is it may be slow when dealing with large data sets compared to some expensive GUI tools like Navicat and DataGrip.
You can run DBeaver on Windows, Linux, and macOS, and easily connect DBeaver PostgreSQL with or without SSL. It has a free open-source edition as well an enterprise edition. You can buy the standard license for enterprise edition at $199, or by subscription at $19/month. The free version is good enough for most companies, as many of the DBeaver users will tell you the free edition is better than pgAdmin.
DBeaver Pricing
: Free community, $199 standard license
3. OmniDB
The next PostgreSQL GUI we’re going to review is OmniDB. OmniDB lets you add, edit, and manage data and all other necessary features in a unified workspace. Although OmniDB supports other database systems like MySQL, Oracle, and MariaDB, their primary target is PostgreSQL. This open source tool is mainly sponsored by 2ndQuadrant. OmniDB supports all three major platforms, namely Windows, Linux, and Mac OS X.
There are many reasons why you should use OmniDB for your Postgres developments:
You can easily configure it by adding and removing connections, and leverage encrypted connections when remote connections are necessary.
Smart SQL editor helps you to write SQL codes through autocomplete and syntax highlighting features.
Add-on support available for debugging capabilities to PostgreSQL functions and procedures.
You can monitor the dashboard from customizable charts that show real-time information about your database.
Query plan visualization helps you find bottlenecks in your SQL queries.
It allows access from multiple computers with encrypted personal information.
Developers can add and share new features via plugins.
There are a couple of cons with OmniDB:
OmniDB lacks community support in comparison to pgAdmin and DBeaver. So, you might find it difficult to learn this tool, and could feel a bit alone when you face an issue.
It doesn’t have as many features as paid GUI tools like Navicat and DataGrip.
OmniDB users have favorable opinions about it, and you can download OmniDB for PostgreSQL from here.
OmniDB Pricing: Free (open source)
4. DataGrip

DataGrip is a cross-platform integrated development environment (IDE) that supports multiple database environments. The most important thing to note about DataGrip is that it’s developed by JetBrains, one of the leading brands for developing IDEs. If you have ever used PhpStorm, IntelliJ IDEA, PyCharm, WebStorm, you won’t need an introduction on how good JetBrains IDEs are.
There are many exciting features to like in the DataGrip PostgreSQL GUI:
The context-sensitive and schema-aware auto-complete feature suggests more relevant code completions.
It has a beautiful and customizable UI along with an intelligent query console that keeps track of all your activities so you won’t lose your work. Moreover, you can easily add, remove, edit, and clone data rows with its powerful editor.
There are many ways to navigate schema between tables, views, and procedures.
It can immediately detect bugs in your code and suggest the best options to fix them.
It has an advanced refactoring process – when you rename a variable or an object, it can resolve all references automatically.
DataGrip is not just a GUI tool for PostgreSQL, but a full-featured IDE that has features like version control systems.
There are a few cons in DataGrip:
The obvious issue is that it’s not native to PostgreSQL, so it lacks PostgreSQL-specific features. For example, it is not easy to debug errors as not all are able to be shown.
Not only DataGrip, but most JetBrains IDEs have a big learning curve making it a bit overwhelming for beginner developers.
It consumes a lot of resources, like RAM, from your system.
DataGrip supports a tremendous list of database management systems, including SQL Server, MySQL, Oracle, SQLite, Azure Database, DB2, H2, MariaDB, Cassandra, HyperSQL, Apache Derby, and many more.
DataGrip supports all three major operating systems, Windows, Linux, and Mac OS. One of the downsides is that JetBrains products are comparatively costly. DataGrip has two different prices for organizations and individuals. DataGrip for Organizations will cost you $19.90/month, or $199 for the first year, $159 for the second year, and $119 for the third year onwards. The individual package will cost you $8.90/month, or $89 for the first year. You can test it out during the free 30 day trial period.
DataGrip Pricing
: $8.90/month to $199/year
5. Navicat

Navicat is an easy-to-use graphical tool that targets both beginner and experienced developers. It supports several database systems such as MySQL, PostgreSQL, and MongoDB. One of the special features of Navicat is its collaboration with cloud databases like Amazon Redshift, Amazon RDS, Amazon Aurora, Microsoft Azure, Google Cloud, Tencent Cloud, Alibaba Cloud, and Huawei Cloud.
Important features of Navicat for Postgres include:
It has a very intuitive and fast UI. You can easily create and edit SQL statements with its visual SQL builder, and the powerful code auto-completion saves you a lot of time and helps you avoid mistakes.
Navicat has a powerful data modeling tool for visualizing database structures, making changes, and designing entire schemas from scratch. You can manipulate almost any database object visually through diagrams.
Navicat can run scheduled jobs and notify you via email when the job is done running.
Navicat is capable of synchronizing different data sources and schemas.
Navicat has an add-on feature (Navicat Cloud) that offers project-based team collaboration.
It establishes secure connections through SSH tunneling and SSL ensuring every connection is secure, stable, and reliable.
You can import and export data to diverse formats like Excel, Access, CSV, and more.
Despite all the good features, there are a few cons that you need to consider before buying Navicat:
The license is locked to a single platform. You need to buy different licenses for PostgreSQL and MySQL. Considering its heavy price, this is a bit difficult for a small company or a freelancer.
It has many features that will take some time for a newbie to get going.
You can use Navicat in Windows, Linux, Mac OS, and iOS environments. The quality of Navicat is endorsed by its world-popular clients, including Apple, Oracle, Google, Microsoft, Facebook, Disney, and Adobe. Navicat comes in three editions called enterprise edition, standard edition, and non-commercial edition. Enterprise edition costs you $14.99/month up to $299 for a perpetual license, the standard edition is $9.99/month up to $199 for a perpetual license, and then the non-commercial edition costs $5.99/month up to $119 for its perpetual license. You can get full price details here, and download the Navicat trial version for 14 days from here.
Navicat Pricing
: $5.99/month up to $299/license
6. HeidiSQL
HeidiSQL is a new addition to our best PostgreSQL GUI tools list in 2021. It is a lightweight, free open source GUI that helps you manage tables, logs and users, edit data, views, procedures and scheduled events, and is continuously enhanced by the active group of contributors. HeidiSQL was initially developed for MySQL, and later added support for MS SQL Server, PostgreSQL, SQLite and MariaDB. Invented in 2002 by Ansgar Becker, HeidiSQL aims to be easy to learn and provide the simplest way to connect to a database, fire queries, and see what’s in a database.
Some of the advantages of HeidiSQL for PostgreSQL include:
Connects to multiple servers in one window.
Generates nice SQL-exports, and allows you to export from one server/database directly to another server/database.
Provides a comfortable grid to browse and edit table data, and perform bulk table edits such as move to database, change engine or ollation.
You can write queries with customizable syntax-highlighting and code-completion.
It has an active community helping to support other users and GUI improvements.
Allows you to find specific text in all tables of all databases on a single server, and optimize repair tables in a batch manner.
Provides a dialog for quick grid/data exports to Excel, HTML, JSON, PHP, even LaTeX.
There are a few cons to HeidiSQL:
Does not offer a procedural language debugger to help you debug your code.
Built for Windows, and currently only supports Windows (which is not a con for our Windors readers!)
HeidiSQL does have a lot of bugs, but the author is very attentive and active in addressing issues.
If HeidiSQL is right for you, you can download it here and follow updates on their GitHub page.
HeidiSQL Pricing: Free (open source)
Conclusion
Let’s summarize our top PostgreSQL GUI comparison. Almost everyone starts PostgreSQL with pgAdmin. It has great community support, and there are a lot of resources to help you if you face an issue. Usually, pgAdmin satisfies the needs of many developers to a great extent and thus, most developers do not look for other GUI tools. That’s why pgAdmin remains to be the most popular GUI tool.
If you are looking for an open source solution that has a better UI and visual editor, then DBeaver and OmniDB are great solutions for you. For users looking for a free lightweight GUI that supports multiple database types, HeidiSQL may be right for you. If you are looking for more features than what’s provided by an open source tool, and you’re ready to pay a good price for it, then Navicat and DataGrip are the best GUI products on the market.
Ready for some PostgreSQL automation?
See how you can get your time back with fully managed PostgreSQL hosting. Pricing starts at just $10/month.
While I believe one of these tools should surely support your requirements, there are other popular GUI tools for PostgreSQL that you might like, including Valentina Studio, Adminer, DB visualizer, and SQL workbench. I hope this article will help you decide which GUI tool suits your needs.
Which Is The Best PostgreSQL GUI? 2019 Comparison
Here are the top PostgreSQL GUI tools covered in our previous 2019 post:
pgAdmin
DBeaver
Navicat
DataGrip
OmniDB
Original source: ScaleGrid Blog
3 notes
·
View notes
Text
Looking for best PHP IDE? We have shortlisted some of the best PHP editors including paid, free and open source options. These PHP IDE may help you be even more productive on web development. The use of an IDE eliminates a lot of efforts that go in web development. A PHP language aware editor can certainly help you focus your attention on a real job. Some of these IDE is very popular and used by thousands of PHP developers and programmers on a regular basis. In order to get success in developing PHP sites, it is necessary to have a good development environment. While producing web sites it is often necessary to edit HTML, CSS and JavaScript files. That is why usable IDE should supply all those file types and provide a full set of tools for effective development. PHP is one of the most popular web programming languages on the planet. The open source community of PHP has contributed many good tools for developers productivity, however, there is no one size fits all. Every project is unique and the requirements and preferences of developers are different. This article includes a list of some most popular PHP IDEs: Codelobster PHP Edition, Eclipse PDT, Komodo IDE, NetBeans IDE, PHPStorm, NuSphere PhpED. Below are the best PHP IDEs in our opinion, (not necessarily in any order) Codelobster PHP Edition Codelobster PHP Edition is accessible from CodeLobster Software. CodeLobster PHP maintains a Windows platform. Plug-ins are not free but the registration is absolutely free. CodeLobster makes possible to install the debugger automatically. To get help on how to configure the debugger, please, visit the official site. You have an ability to deploy projects on your local web server or remote server by FTP. By downloading free version of the mentioned software you get PHP, HTML, JavaScript, and CSS code highlighting; JavaScript, HTML, PHP, and CSS code collapsing; HTML and CSS autocomplete; PHP and JavaScript Advanced autocomplete; HTML toolbar; Bookmarks; PHP Debugger; Context and Dynamic Help with search functionality for work with PHP, MySQL, HTML; Portable option; Pair highlighting; Pair selection, tags and attributes selection commands; Tooltip; Navigation by holding CTRL key; HTML/CSS code inspector; Class View; Project manager; Preview in a browser; File Explorer with FTP/SFTP support; Incremental find and other possible functionalities of similar programs. These plug-ins allow operating with famous CMS and Frameworks: Facebook, CakePHP, Joomla, WordPress, Drupal, Smarty, JQuery, Symfony, CodeIgniter, Yii. Eclipse PDT Eclipse is designed to allow developers to choose the language, platform, and vendor environment. Eclipse Platform includes a wide range of plug-ins, tools, and examples. Eclipse is a program that makes available to construct, integrate, and use software tools. Supported operating systems: Linux, Windows, and Mac OS X. Installation includes all necessary tools to elaborate on PHP. It also involves Data Tools Platform to control the databank, plug-ins for interaction with JavaScript, C / C + +, XML editor, and other different tools. You can use Zend debugger or Xdebug for Debugging PHP applications on Eclipse PDT. Komodo ActiveState Komodo ActiveState is a PHP IDE that can be used as an international language development environment and supply Ruby, Perl, and Tcl Python. It can be installed using Smarty and Zend PHP frameworks. You can also use integration involving version control systems (CVS, Subversion and Perforce). Supported operating systems: Linux, Windows and Mac OS X. Komodo allows you to begin CGI Environment Simulation and construct web server holodeck. It simulates activities on a real web server. One of the advantages of CGI Environment Simulation is a very fast installation. It is possible to download free 21-day version of Komodo from ActiveState site. PhpStorm PhpStorm provides qualitative and rich facilities for PHP code editing including highlighting, the conformation of code formatting, fast error checking, intensive code autocomplete.
PhpStorm editor is compatible with PHPDoc in your code and provides appropriate code ending based on proprietary, device and var annotations. PHP code refactoring also reviews PHPDocs to keep them up-to-date. Supported operating systems: Linux, Windows, and Mac OS X. PhpStorm is focused on developer’s productive capacity that profoundly co-operates your code, assures smart code ending, quick navigation and very fast error checking. It will help you to form your code, run unit-tests or perform full debugging. PhpStorm is an IDE for HTML, JavaScript, and PHP. PhpStorm code ending functionality (Ctrl + Space) completes classes, functions, variable names, PHP keywords, and besides often used names for fields and variables depending on their types. NuSphere PhpED NuSphere PhpED works on Windows environment. If NuSphere is certificated you can use IDE with OS MAC or Linux via Wine emulator. Supported operating systems: Windows 2000, XP, 2003, 2008, Vista, Windows7. PhpED is provided with Advanced PHP Editor, PHP Debugger and PHP Profiler, Code Insight, Database Client, Integrated Help System, Code Insight. It completely supports JavaScript, HTML, CSS, XML, SMARTY, XHTML and others. IDE maintains PHP from 4.2 to 5.3 version and the Editor - from features and variables to spaces and aliases, Dynamic Syntax Highlighting, Multiple Language Syntax Highlighting, Auto Highlight variables, etc. IDE PhpED provides customers with a lot of tools and features useful for elaboration on PHP. There is a database management client, separate window to manage Telnet or SSH connections, NuSOAP window to work with web services. PhpED supports its own embedded web server adjusted in IDE, but the server is available for small applications only. Full web applications should be adjusted on the outer web server. Debuggers PhpED, DBG can interact with Apache, IIS, web server which maintains standard PHP utilization. Zend Studio Zend Studio is one of the very comprehensive PHP IDE available. It has very powerful PHP and Javascript debugging, team collaboration and remote server tools. The Zend studio is one of the highest priced PHP IDEs, though it has a free version however that does not come with very good features. +2 Open Source Free PHP IDEs NetBeans IDE(Free) Elaboration of NetBeans IDE is performed by independent NetBeans community and NetBeans Org Company. Oracle maintains and invests in NetBeans IDE. The program allows editing several files at once by dividing the screen into several parts. In order to do it, you need to open two files and drag a marker of any file to the bottom of the screen. Then you can see a red framework in the text box in the lower part of the screen. Supported operating systems: Linux, Windows and Mac OS X. All the tools necessary for the construction of professional desktop, web, and mobile applications with the Java platform, C/C++, PHP, JavaScript, and Groovy are accessible. A library of free source codes is integrated for software developers. NetBeans IDE 7.0, produced with language supporting to elaborate on Java SE 7, supports GlassFish 3.1, Oracle Database, Maven 3, Oracle WebLogic, HTML 5. Aptana Studio PHP Editor(Free) Aptana Studio, Developed by Aptana Inc. is a leading open-source HTML editor and many people are not aware that it also comes with a PHP support. Aptana Studio is developed on the Eclipse platform. Supported operating systems: Linux, Windows and Mac OS X. It has inbuilt support for Smarty and the recent versions for Aptana also include a Debugger for PHP developers. Aptana Studio is built on top of the Eclipse platform and is very stable and powerful. Summary Most of the IDEs have the opportunity to add and parse any library or framework. After this well-read work autocomplete feature works for the corresponding classes. However Codelobster PHP Edition, thanks to a special plug-in, has a possibility to create PHP projects using many open source PHP frameworks automatically, add new modules and components,
look-ahead Templates in special Theme Editor and serve Context with help original sites. The choice is yours! There are a number of other productivity PHP IDEs too, besides the ones mentioned. Do let us know if you have used some other tools or plug-ins which you were impressed with. Article Updates Updated on May 2019: Minor changes and updates to the introduction section. Images are updated to HTTPS.
0 notes
Text
Sql Tools For Mac

Download SQL Server Data Tools (SSDT) for Visual Studio.; 6 minutes to read +32; In this article. APPLIES TO: SQL Server Azure SQL Database Azure Synapse Analytics (SQL Data Warehouse) Parallel Data Warehouse SQL Server Data Tools (SSDT) is a modern development tool for building SQL Server relational databases, databases in Azure SQL, Analysis Services (AS) data models, Integration. SQLite's code is in the public domain, which makes it free for commercial or private use. I use MySQL GUI clients mostly for SQL programming, and I often keep SQL in files. My current favorites are: DBVisualizer Not free but I now use. Oracle SQL Developer is a free, development environment that simplifies the management of Oracle Database in both traditional and Cloud deployments. It offers development of your PL/SQL applications, query tools, a DBA console, a reports interface, and more.
Full MySQL Support
Sequel Pro is a fast, easy-to-use Mac database management application for working with MySQL databases.
Perfect Web Development Companion
Whether you are a Mac Web Developer, Programmer or Software Developer your workflow will be streamlined with a native Mac OS X Application!
Flexible Connectivity
Sequel Pro gives you direct access to your MySQL Databases on local and remote servers.
Easy Installation
Simply download, and connect to your database. Use these guides to get started:
Get Involved
Sequel Pro is open source and built by people like you. We’d love your input – whether you’ve found a bug, have a suggestion or want to contribute some code.
Get Started
New to Sequel Pro and need some help getting started? No problem.
-->
APPLIES TO: SQL Server Azure SQL Database Azure Synapse Analytics (SQL Data Warehouse) Parallel Data Warehouse
SQL Server Data Tools (SSDT) is a modern development tool for building SQL Server relational databases, databases in Azure SQL, Analysis Services (AS) data models, Integration Services (IS) packages, and Reporting Services (RS) reports. With SSDT, you can design and deploy any SQL Server content type with the same ease as you would develop an application in Visual Studio.
SSDT for Visual Studio 2019
Changes in SSDT for Visual Studio 2019
The core SSDT functionality to create database projects has remained integral to Visual Studio.
With Visual Studio 2019, the required functionality to enable Analysis Services, Integration Services, and Reporting Services projects has moved into the respective Visual Studio (VSIX) extensions only.
Note
There's no SSDT standalone installer for Visual Studio 2019.
Install SSDT with Visual Studio 2019
If Visual Studio 2019 is already installed, you can edit the list of workloads to include SSDT. If you don’t have Visual Studio 2019 installed, then you can download and install Visual Studio 2019 Community.
To modify the installed Visual Studio workloads to include SSDT, use the Visual Studio Installer.

Launch the Visual Studio Installer. In the Windows Start menu, you can search for 'installer'.
In the installer, select for the edition of Visual Studio that you want to add SSDT to, and then choose Modify.
Select SQL Server Data Tools under Data storage and processing in the list of workloads.

For Analysis Services, Integration Services, or Reporting Services projects, you can install the appropriate extensions from within Visual Studio with Extensions > Manage Extensions or from the Marketplace.
SSDT for Visual Studio 2017
Changes in SSDT for Visual Studio 2017
Sql Server Data Tools For Mac
Starting with Visual Studio 2017, the functionality of creating Database Projects has been integrated into the Visual Studio installation. There's no need to install the SSDT standalone installer for the core SSDT experience.
Now to create Analysis Services, Integration Services, or Reporting Services projects, you still need the SSDT standalone installer.
Install SSDT with Visual Studio 2017
To install SSDT during Visual Studio installation, select the Data storage and processing workload, and then select SQL Server Data Tools.
Sql Management Studio For Mac
If Visual Studio is already installed, use the Visual Studio Installer to modify the installed workloads to include SSDT.
Launch the Visual Studio Installer. In the Windows Start menu, you can search for 'installer'.
In the installer, select for the edition of Visual Studio that you want to add SSDT to, and then choose Modify.
Select SQL Server Data Tools under Data storage and processing in the list of workloads.
Install Analysis Services, Integration Services, and Reporting Services tools
To install Analysis Services, Integration Services, and Reporting Services project support, run the SSDT standalone installer.
The installer lists available Visual Studio instances to add SSDT tools. If Visual Studio isn't already installed, selecting Install a new SQL Server Data Tools instance installs SSDT with a minimal version of Visual Studio, but for the best experience, we recommend using SSDT with the latest version of Visual Studio.
SSDT for VS 2017 (standalone installer)
Important
Before installing SSDT for Visual Studio 2017 (15.9.6), uninstall Analysis Services Projects and Reporting Services Projects extensions if they are already installed, and close all VS instances.
Removed the inbox component Power Query Source for SQL Server 2017. Now we have announced Power Query Source for SQL Server 2017 & 2019 as out-of-box component, which can be downloaded here.
To design packages using Oracle and Teradata connectors and targeting an earlier version of SQL Server prior to SQL 2019, in addition to the Microsoft Oracle Connector for SQL 2019 and Microsoft Teradata Connector for SQL 2019, you need to also install the corresponding version of Microsoft Connector for Oracle and Teradata by Attunity.
Release Notes
For a complete list of changes, see Release notes for SQL Server Data Tools (SSDT).
System requirements
Microsoft Sql Tools For Mac
SSDT for Visual Studio 2017 has the same system requirements as Visual Studio.
Available Languages - SSDT for VS 2017
Sql Server Tools For Mac
This release of SSDT for VS 2017 can be installed in the following languages:
Considerations and limitations
You can’t install the community version offline
To upgrade SSDT, you need to follow the same path used to install SSDT. For example, if you added SSDT using the VSIX extensions, then you must upgrade via the VSIX extensions. If you installed SSDT via a separate install, then you need to upgrade using that method.
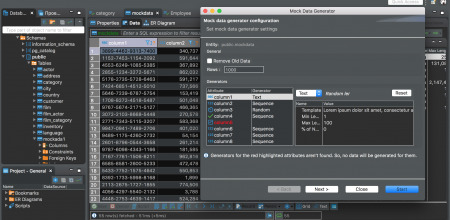
Offline install
To install SSDT when you’re not connected to the internet, follow the steps in this section. For more information, see Create a network installation of Visual Studio 2017.
First, complete the following steps while online:
Download the SSDT standalone installer.
Download vs_sql.exe.
While still online, execute one of the following commands to download all the files required for installing offline. Using the --layout option is the key, it downloads the actual files for the offline installation. Replace <filepath> with the actual layouts path to save the files.
For a specific language, pass the locale: vs_sql.exe --layout c:<filepath> --lang en-us (a single language is ~1 GB).
For all languages, omit the --lang argument: vs_sql.exe --layout c:<filepath> (all languages are ~3.9 GB).
After completing the previous steps, the following steps below can be done offline:
Run vs_setup.exe --NoWeb to install the VS2017 Shell and SQL Server Data Project.
From the layouts folder, run SSDT-Setup-ENU.exe /install and select SSIS/SSRS/SSAS.a. For an unattended installation, run SSDT-Setup-ENU.exe /INSTALLALL[:vsinstances] /passive.
For available options, run SSDT-Setup-ENU.exe /help
Note
If using a full version of Visual Studio 2017, create an offline folder for SSDT only, and run SSDT-Setup-ENU.exe from this newly created folder (don’t add SSDT to another Visual Studio 2017 offline layout). If you add the SSDT layout to an existing Visual Studio offline layout, the necessary runtime (.exe) components are not created there.
Supported SQL versions
Project TemplatesSQL Platforms SupportedRelational databasesSQL Server 2005* - SQL Server 2017 (use SSDT 17.x or SSDT for Visual Studio 2017 to connect to SQL Server on Linux) Azure SQL Database Azure Synapse Analytics (supports queries only; database projects aren't yet supported) * SQL Server 2005 support is deprecated, move to an officially supported SQL versionAnalysis Services models Reporting Services reportsSQL Server 2008 - SQL Server 2017Integration Services packagesSQL Server 2012 - SQL Server 2019
DacFx
SSDT for Visual Studio 2015 and 2017 both use DacFx 17.4.1: Download Data-Tier Application Framework (DacFx) 17.4.1.
Previous versions
Unix Tools For Mac
To download and install SSDT for Visual Studio 2015, or an older version of SSDT, see Previous releases of SQL Server Data Tools (SSDT and SSDT-BI).
See Also
Next steps
After installing SSDT, work through these tutorials to learn how to create databases, packages, data models, and reports using SSDT.
Get help
1 note
·
View note
Text
Mac Os Torrent Downloader

Mac Os Torrent Downloader
Mac Os For Pc Torrent
Mac Os Torrent Downloader Download
There are two different types of OS one is Mac OS X Lion 10.7 ISO, DMG and the other one is OS X mountain lion. So please don’t get confused in both OS.
Mac OS X Lion 10.7 is the eighth major release of Mac OS X is a completely different version from the for windows because it is a version that is totally based on the productivity suite for mac os x. This for mac is one of the best and successors of 2011 and it is followed by the for mac of 2007.
Download Transmission The current release version is. Mac OS X Nightly builds Previous Releases. Source Code Nightly tarballs Previous tarballs How to build. Windows (early preview) Nightly builds. SHA256 Hashes Code Signing Policy Windows MSI packages: free code signing provided by SignPath.io, certificate by SignPath Foundation. Mar 19, 2020.
Magnet 2.4.6 Crack for Mac OS Torrent Free Download from link given below: Download Now. Magnet 2.4.6 Crack for Mac OS Torrent Free Download. Window Magnet 2.4.6 Crack for Mac will change the way you work with Mac! Easily combine windows in different sizes and positions by simply dragging them to the edges and corners of the screen. Remember, when you download a torrent for Mac computers using Vuze, it not only plays on a MacBook or iMac, it runs on portable devices. Those of you who utilize Apple TV will also be able to share files and playback downloads with Vuze. Vuze is a great way to download torrents on a Mac, share files with friends or the bittorrent community,. Download Torrent File. Mac OS X Mountain Lion 10.8 is the ninth major release of the OS family. The goal behind the operating system was to create an OS with better management and synchronizing between different Apple products. The old Mac OS X is now called macOS. As, Apple has released the operating system with the only available only on the.
Mac os x lion was released in the month of June on the date of 22nd and in the year of 2011 in the Apple worldwide developers conference. It was announced to release officially in the month of July but due to there technicals problems and due to there technical errors they have to release it earlier.
Download: Mac OS X Mountain Lion 10.8 DMG & ISO Image
License Official Installer
File Size 4.4GB / 3.5GB
Language English
Developer Apple Inc.
Tutorials: How to Clean Install Mac OS using a USB drive on Mac
On June 6, 2011, at the Apple Worldwide Developers Conference, it was reported that the official discharge for Lion would be in July 2011. The particular discharge date of July 20 was not affirmed until the day preceding, July 19, by Apple CFO, Peter Oppenheimer, as a major aspect of Apple’s 2011 second from last quarter income announcement.
Apple did not at first report any physical media circulation for Lion, for example, a lot of CD-ROMs or a DVD-ROM as utilized for past discharges. Rather, the working framework was said to be accessible only as a download from the Mac App Store for US$29.99. The main earlier form of OS X that underpins the Mac App Store in Snow Leopard, which suggested that any machines that help Lion at present running Tiger or Leopard would initially be moved up to Snow Leopard, instead of enabling an immediate move up to Lion.
System requirements
x86-64 CPU (64 bit Macs, with an intel core 2 duo, Intel core i5, intel core i7, or processor.)
At least 2 GB of memory.
Mac OS X 10.6.6 or later (Mac OS X 10.6.8 is recommended) .
7 GB of available space.
Airdrop is supported on the following Mac models:MacBook Pro (late 2008 or newer), MacBook Air (late 2010 or newer), MacBook (late 2008 or newer), iMac (early 2009 or newer), Mac Mini (mid-2010 or newer), Mac Pro (early 2009 with AirPort Extreme card and mid-2010 or newer).
Features
Server features
Mac os x lion
Wiki Server 3 – Making it easier to collaborate, share, and exchange information. Users can quickly switch between a server’s home page, My Page, Updates, Wikis, People, and Podcasts. File sharing is simpler, and a new Page Editor is added for easy customization.
Web DAV File Sharing – Lion Server delivers wireless file sharing for clients that support WebDAV. Enabling WebDAV in Lion Server gives iOS users the ability to access, copy, and share documents on the server from applications such as Keynote, Numbers, and Pages.
Profile Manager – Profile Manager delivers simple, profile-based setup and management for Mac OS X Lion, iPhone, iPad, and iPod touch devices. It also integrates with existing directory services and delivers automatic over-the-air profile updates using the Apple Push Notification service.
Mac Os Torrent Downloader
Features of Macintosh OS X Lion
The principal variant of Mac OS X was Mac OS X Lion. Macintosh OS X lion – 1.2v3 depended on Rhapsody, a half and half of OPENSTEP from NeXT Computer and Mac OS 8.5.1. The GUI resembled a blend of Mac OS 8’s Platinum appearance with OPENSTEP’s NeXT-based interface. It incorporated a runtime layer called Blue Box for running inheritance Mac OS-based applications inside a different window. There was the talk of executing a ‘straightforward blue box’ which would intermix Mac OS applications with those composed for Rhapsody’s Yellow Box condition, yet this would not occur until Mac OS X’s Classic condition. Apple File Services, Macintosh Manager, QuickTime Streaming Server, WebObjects, and NetBoot were incorporated with Mac OS X lion 1.0 – 1.2v3. We couldn’t utilize FireWire gadgets in Macintosh OS X lion 10.7 iso/dmg.
Macintosh OS X lion 10.7 incorporated the new Aqua UI, Apache, PHP, MySQL, Tomcat, WebDAV bolster Macintosh Manager and NetBoot.
macOS x lion 10.7 is the most recent rendition of Mac with new highlights. Nonetheless, this refresh will keep running on Mac 2012 or later forms. On the off chance that you are running macOS X lion 10.7 or prior, you ought to probably move up to the most recent rendition of mac os x lion 10.7 from the App Store.
Downloading Mac OSX Lion 10.7 ISO/DMG
The main reason for which people preferred downloading apps from the App Store is that it would just download the stub installer (web installer) which is little in size. The real Operating System will begin introducing after running the stub installer.
In this article, you will most likely download MacOS X Lion 10.7 full installer. You can make a bootable USB from the given record and complete a new introduce just as update the present establishment of your Mac OS.
About Apple Security Updates
For their clients’ insurance, Apple doesn’t uncover, examine, or affirm security issues until an examination has happened and fixes or discharges are accessible. Ongoing discharges are recorded on the Apple security refreshes page. For more data about security, see the Apple Product Security page. You can encode interchanges with Apple utilizing the Apple Product Security PGP Key.
If the download fails
If so, the only thing you ought to do is to pause and retry later. Or on the other hand, change from a remote to a satellite web association. If it is the case that this doesn’t help, go to App Store > View My Account and restart the download from the Unfinished Downloads segment.
Mac Os For Pc Torrent

Alternatively, you can also download Mac OS X Lion 10.7 ISO/DMG from our website for free. The installation process will be similar to the installation process of the images downloaded from the app store.
Mac Os Torrent Downloader Download
Mac OS X Lion 10.7 ISO / DMG file Direct Download - ISORIVER
There are two different types of OS one is Mac OS X Lion 10.7 ISO, DMG and the other one is OS X mountain lion. So please don't get confused in both OS.
Price Currency: USD
Operating System: Mac OS X Lion 10.7
Application Category: OS
1 note
·
View note
Text
Mysql Download For Mac Mojave

Mysql Workbench Download For Mac
Mysql Install Mac Mojave
I am more of a command line user when accessing MySQL, but MySQLWorkBench is by far a great tool. However, I am not a fan of installing a database on my local machine and prefer to use an old computer on my network to handle that. If you have an old Mac or PC, wipe it and install Linux Server command line only software on it. Machines as old as 10/15 years and older can support Linux easily. You don't even need that much RAM either but I'd got with minimum of 4GB for MySQL.
The Mojave installer app will be in your Applications folder, so you can go there and launch it later to upgrade your Mac to the new operating system. Make a bootable installer drive: The quick way. Sep 27, 2018 So before you download and install macOS 10.14 Mojave, make sure your Mac is backed up. For information on how to do this, head over to our ultimate guide to backing up your Mac. How to download.
Apr 24, 2020 Download macOS Mojave For the strongest security and latest features, find out whether you can upgrade to macOS Catalina, the latest version of the Mac operating system. If you still need macOS Mojave, use this App Store link: Get macOS Mojave.
Oct 08, 2018 Steps to Install MySQL Workbench 8.0 on Mac OS X Mojave Step 1. Download the Installer. Follow this link to download the latest version of MySQL Workbench 8.0 for Mac. When I write this article, the Workbench version 8.0.12 is available. Save the file to your download directory.
Or...
Use Virtualbox by Oracle to create a virtual server on your local machine. I recommend Centos 7 or Ubuntu 18.04. The latter I used to use exclusively but it has too many updates every other week, whereas Centos 7 updates less often and is as secure regardless. But you will need to learn about firewalls, and securing SSH because SSH is how you will access the virtual machine for maintenance. You will have to learn how to add/delete users, how to use sudo so you can perform root based commands etc. There is a lot more to the picture than meets the eye when you want to use a database.
I strongly recommend not installing MySQL on your local machine but use a Virtual Machine or an old machine that you can connect to on your local area network. It will give you a better understanding of security when you have to deal with a firewall and it is always a good practice to never have a database on the same server/computer as your project. Databases are for the backend where access is secure and severely limited to just one machine via ssh-keys or machine id. If you don't have the key or ID you ain't getting access to the DB.
There are plenty of tutorials online that will show you how to do this. If you have the passion to learn it will come easy.
Posted on
Apple released every update for macOS, whether major or minor, via Mac App Store. Digital delivery to users makes it easy to download and update, however, it is not convenient in certain scenarios. Some users might need to keep a physical copy of macOS due to slow Internet connectivity. Others might need to create a physical copy to format their Mac and perform a clean install. Specially with the upcoming releasee of macOS Mojave, it is important to know how the full installer can be downloaded.
We have already covered different methods before which let you create a bootable USB installer for macOS. The first method was via a terminal, while the second method involved the usage of some third-party apps, that make the whole process simple. However, in that guide, we mentioned that the installer has to be downloaded from the Mac App Store. The installer files can be used after download, by cancelling the installation wizard for macOS. However, for some users, this might not be the complete download. Many users report that they receive installation files which are just a few MB in size.
Luckily, there is a tool called macOS Mojave Patcher. While this tool has been developed to help users run macOS Mojave/macOS 10.14 on unsupported Macs, it has a brilliant little feature that lets you download the full macOS Mojave dmg installer too. Because Mojave will only download on supported Macs, this tool lets users download it using a supported Mac, created a bootable USB installer and install it on an unsupported Mac. Here is how you can use this app.
Download macOS Mojave installer using macOS Mojave Patcher

Download the app from here. (Always use the latest version from this link.)
Opening it might show a warning dialogue. You’ll have to go to System Preferences > Security & Privacy to allow the app to run.Click Open Anyway in Security & Privacy.
Once you are able to open the app, you’ll get a message that your machine is natively supported. Click ok.
Go to Tools> Download macOS Mojave, to start the download. The app will ask you where you want to save the installer file. Note that the files are downloaded directly from Apple, so you wouldn’t have to worry about them being corrupted.The download will be around 6GB+ so make sure that you have enough space on your Mac.Once the download starts, the app will show you a progress bar. This might take a while, depending on your Internet connection speed.
Mysql Workbench Download For Mac
Once the download is complete, you can use this installer file to create a bootable USB.
Mysql Install Mac Mojave
P.S. if you just want to download a combo update for Mojave, they are available as small installers from Apple and can be downloaded here.
1 note
·
View note
Text
How to Set Up a Local Server on Mac for Beginners #NotADeveloper #WordPress
Let’s start by inserting a disclaimer, I am not a developer or coder in any way. I am not “tech savvy” or futuristic. I can work a computer enough to get online and manage my daily tasks or watch youtube videos. Oh ,and of course email. But l wanted to learn more about what Landon and Cliff do, to enter their world and understand their nerd talk. So they walked me through setting up a local server running WordPress on my mac laptop, and I took notes. Stay tuned for more blogs to come, including setting up divi builder (the fun stuff)! It was difficult to understand at some points, and others straight up made no sense, but alas! We made it through and I am here to share that experience. Sharing it with the hope that someone out there like me, can find this useful and motivating. Or the rest of you smarties find it amusing!
First things first, download WordPress. This is a commonly used CMS or content management system where you can login in to your site and make changes etc.

Once you download WordPress, you will want to move the file into your Sites Folder in Finder. (You can check for the download on your desktop or in Finder under downloads.) This is located in the Home folder. ( the one with the little house next to it.) If this folder does not yet exist, just right click and create a new one.

Once you add the WordPress download (drag and drop the folder here), you can rename if you’d like. Here in my test run, I named it “HairByKelseyAnn”. This can keep you more organized if you want to create multiple sites. (This will be talked about in another blog post to come. For now, let’s just stick with one!)

Next, download MAMP (”Stands for "Mac OS X, Apache, MySQL, and PHP." MAMP is a variation of the LAMP software package that can be installed on Mac OS X. It can be used to run a live web server from a Mac, but is most commonly used for web development and local testing purposes” Description from techterms.com) In this case, we are using it for testing purposes. You can download MAMP (I downloaded MAMP instead of MAMP pro because it’s free) Once you have that downloaded, open it up . If you are having trouble finding it, or any applications, hit command key (⌘) and the space bar at the same time. This will pull up a search bar so you can just type in MAMP and hit enter.

Once you have MAMP open, there are two ways to get to your preferences. You can either select MAMP in the top bar of your computer (next to the apple in the top left corner) or you can hit command key (⌘) and comma(,) at the same time. You will get a drop down like in the image below.
Select the Web Server tab, and this is where you make your document root to the folder you created. (Hit select and add the folder you created from your WordPress download.) This is basically creating a starting point for your localhost server so it knows what files to work from.
After you have your document root folder linked, click ok and it will bring you back to the “home screen”. At this point, you can click Start Servers.

Open a new tab or window, and go to- http://localhost:8888/phpMyAdmin From here you will click the database tab and create new. I chose to name my new DB the same name as the other folders I created. (This is where you create a custom database that WordPress will use. This is highly advanced and you should not find yourself here, beyond initial creation. )

After you have created your DB (DataBase), go to http://localhost:8888/ and follow through the WordPress setup. This is where you are setting up the foundation for your site.
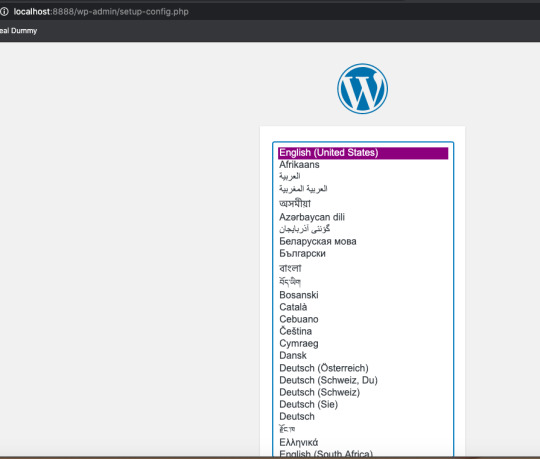
Once you get to this screen (see below) your DataBase Name should be the same as the DB name you previously created a local host file for. Username and Password set to “root” This is a general password for WordPress to login. This is not your personal account or information. Submit this, and on the next screen, click Run the Installation.

The next page will ask you for your Site name and username/ password. This is your personal information. Do Not Share! There is a checkbox asking if you want to discourage search engines ( Google, Yahoo, Bing, etc) from finding your site. You want to check this box because you are only trying to build your website on your computer (For now!). Launching your website to “go live” is separate documentation. This is for building your “rough draft” so you make sure your site is perfect before you let the world see it. After you submit this, you should have this screen.

At this point, you have set up a local server (YAY!) and created the skeleton of a WordPress website, on your computer. From here you can see my next blog post on how to customize and what your different sidebar tabs can do.
Setting up a local host on your computer gives you the ability to work on your website without being connected to the internet. The link below is how you can visualize your saved changes. (Refresh the page to see new changes made)
http://localhost:8888/
Below is the link to your WordPress dashboard. This is where you can start to mess around with themes and layouts. You can end here, or you can download the divi theme builder to really customize your site. Divi builder makes it easier to see the layout and customize as you’re looking at your site.
http://localhost:8888/wp-admin/index.php
Be sure to have your server turned on in MAMP to access your site!
I hope that you enjoyed this article and found it useful! Ideal Dummy is all about sharing knowledge and educating people on how to manage their websites. Or just computer knowledge in general! This is a tech savvy era, and we are here to help! So from one beginner to another, you can do it!
For more information, check out our website.
Written and Documented By: Kelsey Ann
#idealdummy#wordpress#computer#localhost#serversetup#localserver#software development#phpmyadmin#MAMP#macintosh#mac#database#website build#education#computer education#developers & startups#beginner#technology#kansascity
1 note
·
View note
Text
Php training course
PHP Course Overview
PHP is a widely-used general-purpose scripting language that is especially suited for Web development and can be embedded into HTML.
PHP can generate the dynamic page content
PHP can create, open, read, write, and close files on the server
PHP can collect form data
PHP can send and receive cookies
PHP can add, delete, modify data in your database
PHP can restrict users to access some pages on your website
PHP can encrypt data
With PHP you are not limited to output HTML. You can output images, PDF files, and even Flash movies. You can also output any text, such as XHTML and XML.
PHP Training Course Prerequisite
HTML
CSS
Javascript
Objectives of the Course
PHP runs on different platforms (Windows, Linux, Unix, Mac OS X, etc.)
PHP is compatible with almost all servers used today (Apache, IIS, etc.)
PHP has support for a wide range of databases
PHP is free. Download it from the official PHP resource: www.php.net
PHP is easy to learn and runs efficiently on the server-side
PHP Training Course Duration
45 Working days, daily 1.30 hours
PHP Training Course Overview
An Introduction to PHP
History of PHP
Versions and Differences between them
Practicality
Power
Installation and configuring Apache and PHP
PHP Basics
Default Syntax
Styles of PHP Tags
Comments in PHP
Output functions in PHP
Datatypes in PHP
Configuration Settings
Error Types
Variables in PHP
Variable Declarations
Variable Scope
PHP’s Superglobal Variables
Variable Variables
Constants in PHP
Magic Constants
Standard Pre-defined Constants
Core Pre-defined Languages
User-defined Constants
Control Structures
Execution Control Statements
Conditional Statements
Looping Statements with Real-time Examples
Functions
Creating Functions
Passing Arguments by Value and Reference
Recursive Functions
Arrays
What is an Array?
How to create an Array
Traversing Arrays
Array Functions
Include Functions
Include, Include_once
Require, Require_once
Regular Expressions
Validating text boxes,emails,phone number,etc
Creating custom regular expressions
Object-Oriented Programming in PHP
Classes, Objects, Fields, Properties, _set(), Constants, Methods
Encapsulation
Inheritance and types
Polymorphism
Constructor and Destructor
Static Class Members, Instance of Keyword, Helper Functions
Object Cloning and Copy
Reflections
PHP with MySQL
What is MySQL
Integration with MySQL
MySQL functions
Gmail Data Grid options
SQL Injection
Uploading and downloading images in Database
Registration and Login forms with validations
Pegging, Sorting,…..
Strings and Regular Expressions
Declarations styles of String Variables
Heredoc style
String Functions
Regular Expression Syntax(POSIX)
PHP’s Regular Expression Functions(POSIX Extended)
Working with the Files and Operating System
File Functions
Open, Create and Delete files
Create Directories and Manipulate them
Information about Hard Disk
Directory Functions
Calculating File, Directory and Disk Sizes
Error and Exception Handling
Error Logging
Configuration Directives
PHP’s Exception Class
Throw New Exception
Custom Exceptions
Date and Time Functions
Authentication
HTTP Authentication
PHP Authentication
Authentication Methodologies
Cookies
Why Cookies
Types of Cookies
How to Create and Access Cookies
Sessions
Session Variables
Creating and Destroying a Session
Retrieving and Setting the Session ID
Encoding and Decoding Session Data
Auto-Login
Recently Viewed Document Index
Web Services
Why Web Services
RSS Syntax
SOAP
How to Access Web Services
XML Integration
What is XML
Create an XML file from PHP with Database records
Reading Information from XML File
MySQL Concepts
Introduction
Storage Engines
Functions
Operators
Constraints
DDL commands
DML Commands
DCL Command
TCL Commands
Views
Joins
Cursors
Indexing
Stored Procedures
Mysql with PHP Programming
Mysql with Sqlserver(Optional)
SPECIAL DELIVERY
Protocols
HTTP Headers and types
Sending Mails using PHP
Email with Attachment
File Uploading and Downloading using Headers
Implementing Chating Applications using PHP
and Ajax
SMS Gateways and sending SMS to Mobiles
Payments gateways and How to Integrate them
With Complete
MVC Architecture
DRUPAL
JOOMLA
Word Press
AJAX
CSS
JQUERY (Introduction and few plugins only)
1 note
·
View note