#How to make tables in html tr into another
Explore tagged Tumblr posts
Visit Tumblr Blog
Explore Tumblr blogs with no restrictions, modern design and the best experience.
Last Seen Tumblr Blogs


Fun Fact
Tumblr has been banned in Indonesia for providing people with access to pornographic content.
Text
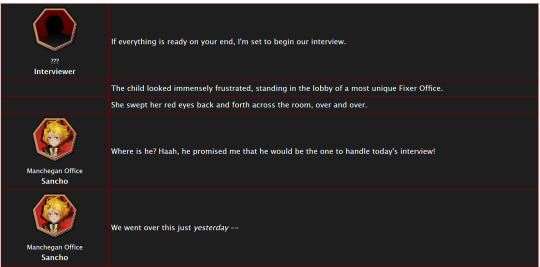
Limbus Company Wiki Style for AO3
Note: This post contains spoilers (... can I call it that?) for Glimpsing a Certain Mirror World.
While I was writing this story, I wrote some in-game dialogue for an identity based on the text just to get into the spirit of what I was trying to capture.
Then I thought - what if I shared that in a bonus chapter, just for fun?
Then I thought even more that it kind of looked like an imaginary wiki page.
Then I had Carmen help me present a wiki page from another reality.
Seems like readers got as much of a kick out of it as I did writing it!
Now I'll show you how to style an AO3 page to look a little bit like the wonderful Limbus Company Wiki, too!
If a CSS and HTML snippet demonstration is all you need, grab them here:
🔗HTML (Inside your story)
🔗CSS (Inside a Work Skin, made on your dashboard)
Next, I'll go over everything step by step from the beginning.
Jump into the cut for the tutorial!
(Then show me your fan identity stories when you make some, okay?)
Step 1: Create a Work Skin
After logging in, go to your Dashboard.
Then click Skins
Then go to My Work Skins
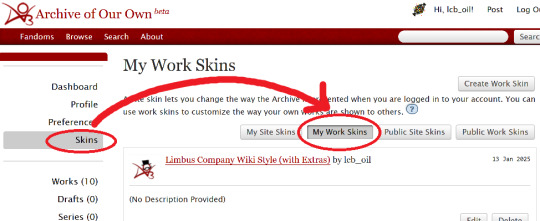
Click Create Work Skin
Give it any name and description you like
Paste the following into the CSS text area:
🔗Pastebin Link for easy copy / paste
#workskin td, #workskin th { padding: 5px; border: 1px solid #810000; } #workskin td { color: white; background-color: #1e1e1e; vertical-align: middle; } #workskin td.title-column { width: 20%; text-align: center; } #workskin div.affiliation { font-size: small; } #workskin .userstuff p.carmen { color: red; }
I will explain what this means when we get to the next step so that you can tweak it if you wish. Think of this as your starter style.
Click Submit to save your skin
Step 2: Apply the Skin to Your Work
When creating or editing a work, you can set the work skin in the Associations section.
Click the dropdown, and you'll see whatever name you gave your work skin in the first step mixed in with the default ones provided by AO3.

Step 3: Format Your Story
You'll need to add HTML to your story to see any of the new styles applied.
I'll show you a few examples of how this is done.
Change the color of text
I used red text to indicate Carmen speaking through the author's note.
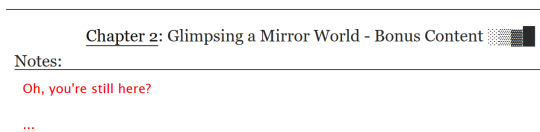
Here is the HTML I used in the Chapter Notes section to do this:
<p class="carmen">Could it be that you, too, wish to glimpse the mirror world these two envisioned?</p>
This creates a paragraph (p) with the carmen class applied.
If we look at the CSS from up above:
#workskin .userstuff p.carmen { color: red; }
The p.carmen section is called the selector. This tells the CSS that if there's a paragraph with the class of carmen, make it red!
You can copy this line to create classes with any name you wish for paragraphs so that you can have as many colors and effects at your disposal as you want.
Of course you can change the color from red to any other color you need, too.
Wiki Tables
This next part is a little bit more involved. I'm not sure if there's a better way to make a table on AO3 or not, but here's a snippet to get you started:
🔗Pastebin Link for easy copy / paste
<table> <tbody> <tr> <td class="title-column"> </td> <td> The child looked immensely frustrated, standing in the lobby of a most unique Fixer Office. </td> </tr> <tr> <td class="title-column"> <img src="your image URL here" alt="Sancho Story Portrait"> <div class="affiliation">Manchegan Office</div> <b>Sancho</b> </td> <td> We went over this just <em>yesterday</em> -- </td> </tr> </tbody> </table>
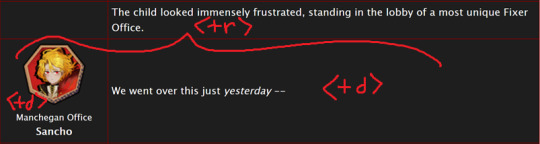
This creates a table (<table>) with two table rows (<tr>).
Each table row has two table cells (<td>).
The first cell in each row has the character image, affiliation, and name.
The class "affiliation" is defined in the style sheet to make that section of text just a bit smaller, like on the wiki:
#workskin div.affiliation { font-size: small; }
In the first example table row (<tr>) above, you can see that you can even leave it blank to allow for the narration portions of the story.
You'll need to copy the section between the <tr> and </tr> tags to create new rows for your table. Copy it once per line in your identity story and change the text and images inside as needed.
I highly suggest that you do this in a text editor on your own computer rather than on AO3, because it can quickly get overwhelming.

Just looking at this in AO3 is making me nervous 💦
(Fun side note, I originally spelled "Manchegan" incorrectly in my first draft all over that huge table... thank goodness for find and replace...)
Hosting Images
You'll see I left a section on the table template for "your image URL here".
You'll have to find a place to host your images on your own, because AO3 doesn't provide any image hosting...
I saw someone suggested https://imgbb.com/, so that's what I used. It seems to have held up so far.
Keep in mind if you link an image from Discord or Imgur, they could remove your image sometime in the future and then it will no longer appear properly in your story.
(Be sure to include an alt text in the image as shown - if the image can't be loaded some day in the future users will see that text instead so that they can understand what they're missing!)
Step 4: Adjust Away!
Once your work skin is applied and you have the right HTML classes in place, you can edit your Work Skin and see your story change, even if it is in your drafts.
You can use this to adjust other things in my CSS example, like colors and the padding in the table.
---
Have fun, and let me know if you have any questions!
“Would you care for some tea?” Yi Sang offered. The evening’s chill was somehow present, even inside his closed room. “Nay,” Don Quixote took in a sharp breath, “I was hoping that you might… assist me, with a look into thy mirror. For there is something that I have need to see.” Yi Sang creased his eyebrows. Unfortunately, this was exactly what he worried would occur. ——— In the aftermath of La Manchaland, Don Quixote asks Yi Sang for a favor. Yi Sang guides her through the process of glimpsing a certain mirror world.
Limbus Company leaves so much unsaid by not showing us what happens immediately after the end of a canto. But, that's a lot of opportunity space to play with in a story.
I've been working on this one for quite some time as I've always wanted to explore the dynamic between Don Quixote and Yi Sang, even though I find Yi Sang really tough to write for.
If you like mirror worlds and AUs, you might especially enjoy this one. I hope you like it! 🎠🪶
---
... Also, hmm, something strange seems to have happened with my upload?
This is a one shot story, but for some reason there's a second chapter? That's odd.
Well, if you check it out, I should note that it might look better on a PC or tablet than on a mobile phone -- though it will probably look ok either way.
#limbus company#lcb-oil-table-talk#tutorial#ao3#canto 7 spoilers#canto vii spoilers#I'm honestly surprised that Tumblr doesn't have support for code blocks#That's a little disappointing
47 notes
·
View notes
Text
HTML Intro & Basics Tags Session 1 [ Home Trainer ~ Watch | Learn | Share ]
HTML Intro & Basics Tags Session 1 [ Home Trainer ~ Watch | Learn | Share ]
Home Trainer started in the early 2015 to share and provide FREE videos and online training tutorials for all the students in the field of Creative & Digital Graphics Designing, Website Design+Development, Architectural, 2D-3D Animation, Audio-Video Editing, Programming & Visual Effects Com-positing. This website is to share about online learning and to show people “How to Learn Graphic Designing…
View On WordPress
#Cel-span+html#Colspan and Rowspan in Html#How to create Table in Html#How to create tables in html#How to design a table in Html#How to make tables in html tr into another#HTML#Html Basics in India#Html Table#Html Table Attributes#Html table body with background use design#Html table Colspan#Html Table Design#Html Table Tag#Html tables#Html Tags Videos#Php Table Design#Table in Html#Table making for Html#Table Tag#Table Tag Html#Table Tag in Html#Video and Audio Html and CSS
0 notes
Text
YOU USED WHAT???
February 15 - 19 , 2021 ( Week 18)
Welcome back to another blog with me, NIx! Sounds like a YouTube vlogger, aye? Well, I can’t think of another intro so imma use that for now! How’s your day? Your week? Or your month? Well as for me, I have a rollercoaster ride for a week! Imagine getting lots of good surprises outside the school but when once it’s school time, we get to have lots of surprise modules! Like what in the underworld do y’all think of us? Robots?! Geez!
So I remember saying last blog that it will be our blog evaluation for the 2nd quarter, right? Well, good news again! We all did great with our blogs! A lot of us created a new website, including me, and I really like how they designed their own sites! It was all superb! Congrats bbs!
Okay so not did I only have good news for you guys, but I also have some new lessons for us to ponder on! Are y’all excited now? If yes, then let’s start!
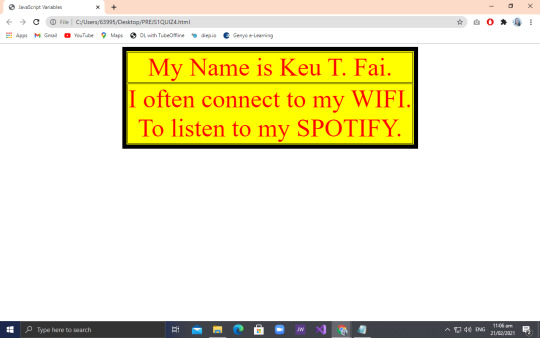
So to start our lesson blog for this week, Take a look at the picture wherein you can see the code and output Sir Richard made us do.
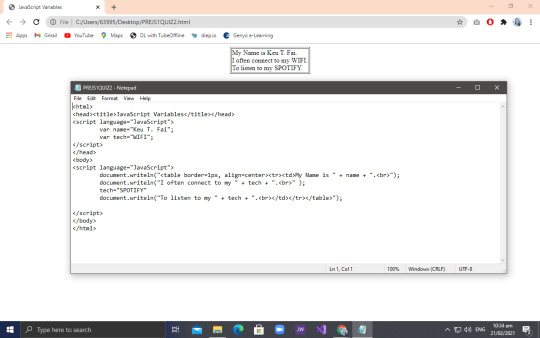
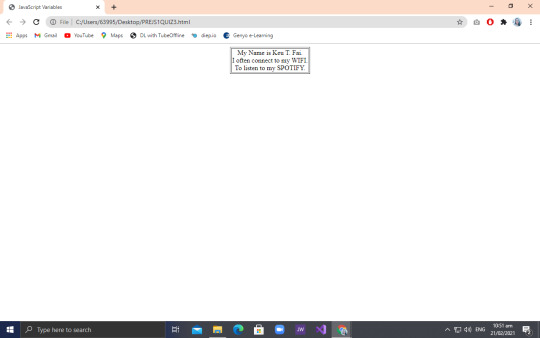
So for that output, you can see that the texts were enclose in a square with a border. In order for us to come up with that output, Sir Peralta Challenged us that whoever will get the right code with the correct output will gain 10 points for our hands on quiz next week. And me, being competitive but a loser at the same time, I was thinking of using <div> tag to create that square. Why did I even thought of using so? Well, Sir Peralta gave us a clue that we’ll use a css or html (idk which one) tag in order to create that.
Me being stupid, I used <div> tag just like what I said and the output was so breathtaking that you can only see nothing but white! But I didn’t give up so easily. I even tried fixing my code, still using the <div> tag! How stupid could I get? You can laugh at me now :((
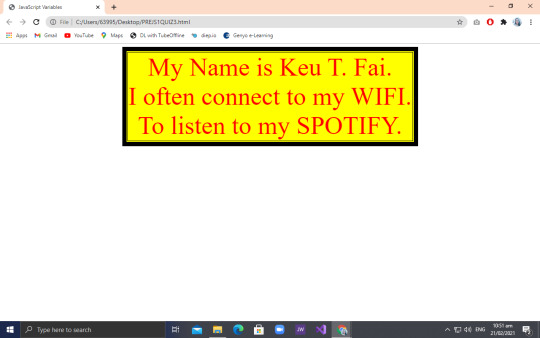
So as I was fixing my useless code, Sylvana already got the right code and output because how in the underworld did she came up with the idea of using <table> tag to do so! Upon my own understanding of her codes, she used table to create the box like effect and only used one <tr> and <td> so no extra cells will be added.
And when I realized that it was just that easy... I felt more stupid than before! But nah, at least I tried coding it HAHA! Lemme just justify my stupidity for once thank you so much.
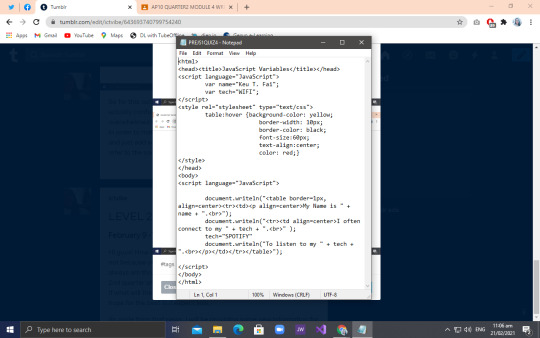
After that, another output should be done for us to acquire a merit of 10 for our hands on quiz next week. For this output, Micaella got the right codes. Pertain to the codes and outputs below:
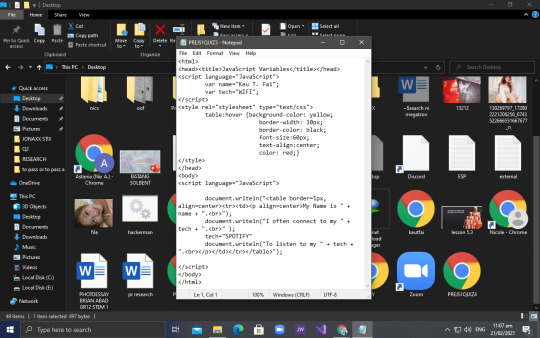
So for this output, we must add a hover effect on the box. I was actually confused at first on how to do that because I was still overwhelmed by the first one but nonetheless, I got by. I learned that in order to make that table have a hover effect I must use table:hover and just add some property name and property value after. You can refer to the code above for you to understand more.
Next and last output is this:

So for this output, we used two <tr> and <td> so we could come up with the output. Nothing much change on the code from the second one to this so you guys will easily get by. Herxie got the right code for this so she also received a plus 10 points! Why do they all have such big brains while mine is of the size of the rat’s?
So I actually tried my luck for this code, but I got confused that instead of just using <tr> and <tr> I used table instead making it wrong. So I guess that will be all for this week, huh? We’ll have our hands on quiz next week so wish me luck guys! Enjoy your day, bye~!
0 notes
Text
RuPaul’s Drag Race UK season 2 spoiler-free review: God Save The Queens with strongest line-up ever?

God save the queens (Picture: BBC)
RuPaul’s Drag Race UK is back in for another round in all its wonderfully bonkers glory – just when we needed something fabulous to fill our evenings with.
While the OG US series continues on with its 13th season simultaneously, the World Of Wonder team were taking a risk running the two shows at the same time.
We would be lying if we didn’t worry about the risk of over-dragging things out, with so many queens to be keeping track of between the two seasons.
But thankfully, Drag Race UK doesn’t only remind us just how much we love this show, it’s also providing one of the strongest line-ups in the franchise ever at the same time.
Advertisement
Advertisement
There is no major weak link in the 12 queens that arrive for Drag Race UK. While queens like Joe Black and A’Whorea are more polished, others – like Bimini Bon Boulash and Veronica Green – have so much charisma you don’t really care about their looks being less than 100.
Some, like Lawrence Chaney and Tayce, are there to win and their determination shines, while others (Tia Kofi and Cherry Valentine) are just having so much fun that you are dragged along for the ride with them.

Wimbled-hun is our new fave sport (Picture: BBC)
Similar to last year, after intros the queens are given a photoshoot challenge – this time inspired by Wimbledon – and all the ball gags write themselves as our Wimbled-huns are thrown onto the court with a racket and two pants-clad members of the Pit Crew.
As Liz Hurley joins the judging panel as this week’s extra special guest judge, each queen has to leave their mark with two looks – a gay icon outfit, and a performance representing their hometown.
It’s a real shame that the only thing up for grabs for the winners remains the RuPeter badges, as these performers are way up there in everything that makes Drag Race so beautifully Drag Race.
The show has stepped its p***y up (Picture: BBC)
The camp is turned up to 11, the comedy is shovelled in and there’s beauty found even in the most hodge-podge of moments and queens.
This season has launched in a way that’s much betta than season one – and seeing as that was incredible, we cannot even begin to tell you how excited we are for the upcoming episodes.
Key Moments:
RuPaul’s rainbow dress is just pure *chef’s kiss*
We need more Liz Hurley in things. She’s fabulous and has far more cheeky charm than we were expecting.
Is there any way we can keep all the queens forever?
We’re sensing some serious shadiness brewing though, we can’t wait to see how this plays out…
Verdict:
Maybe it’s our home country bias but RuPaul’s Drag Race UK may have just brought the best line-up of queens ever to the franchise.
While some may be a little bit more seasoned than others, there is fight and charm, charisma, uniqueness, nerve and talent in all of them to the point you don’t actually want anyone going home.
It’s going to be a seriously tough season, we can feel it. And we cannot wait for all the drama to come onto our screens.
RuPaul’s Drag Race UK launches Thursday at 7pm on BBCiPlayer and WOW Presents Plus.
Got A Story?
If you’ve got a celebrity story, video or pictures get in touch with the Metro.co.uk entertainment team by emailing us [email protected] calling 020 3615 2145 or by visiting our Submit Stuff page – we’d love to hear from you.
Advertisement
Advertisement
MORE: RuPaul’s Drag Race: The fatal flaw queens make in Snatch Game choices
MORE: TV guide: From It’s A Sin to Drag Race UK – the best shows coming your way in lockdown 3
Advertisement
Advertisement
a,abbr,acronym,address,applet,article,aside,audio,b,big,blockquote,body,canvas,caption,center,cite,code,dd,del,details,dfn,div,dl,dt,em,embed,fieldset,figcaption,figure,footer,form,h1,h2,h3,h4,h5,h6,header,html,i,iframe,img,ins,kbd,label,legend,li,mark,menu,nav,object,ol,output,p,pre,q,ruby,s,samp,section,small,span,strike,strong,sub,summary,sup,table,tbody,td,tfoot,th,thead,time,tr,tt,u,ul,var,video{margin:0;padding:0;border:0;font-size:100%;font:inherit;vertical-align:baseline}h1,h2,h3{font-weight:400}article,aside,details,figcaption,figure,footer,header,menu,nav,section{display:block}body{line-height:1}ol,ul{list-style:none}blockquote,q{quotes:none}blockquote:after,blockquote:before,q:after,q:before{content:””;content:none}table{border-collapse:collapse;border-spacing:0} img{width:100%;height:auto;}
source https://bbcbreakingnews.com/2021/01/09/rupauls-drag-race-uk-season-2-spoiler-free-review-god-save-the-queens-with-strongest-line-up-ever/
0 notes
Text
Blog search application in Vespa
Introduction
This is the first of a series of blog posts where data from WordPress.com (WP) is used to highlight how Vespa can be used to store, search and recommend blog posts. The data was made available during a Kaggle challenge to predict which blog posts someone would like based on their past behavior. It contains many ingredients that are necessary to showcase needs, challenges and possible solutions that are useful for those interested in building and deploying such applications in production.
The end goal is to build an application where:
Users will be able to search and manipulate the pool of blog posts available.
Users will get blog post recommendations from the content pool based on their interest.
This part addresses:
How to describe the dataset used as well as any information connected to the data.
How to set up a basic blog post search engine using Vespa.
The next parts show how to extend this basic search engine application with machine learned models to create a blog recommendation engine.
Dataset
The dataset contains blog posts written by WP bloggers and actions, in this case ‘likes’, performed by WP readers in blog posts they have interacted with. The dataset is publicly available at Kaggle and was released during a challenge to develop algorithms to help predict which blog posts users would most likely ‘like’ if they were exposed to them. The data includes these fields per blog post:
post_id - unique numerical id identifying the blog post
date_gmt - string representing date of blog post creation in GMT format yyyy-mm-dd hh:mm:ss
author - unique numerical id identifying the author of the blog post
url - blog post URL
title - blog post title
blog - unique numerical id identifying the blog that the blog post belongs to
tags - array of strings representing the tags of the blog posts
content - body text of the blog post, in html format
categories - array of strings representing the categories the blog post was assigned to
For the user actions:
post_id - unique numerical id identifying the blog post
uid - unique numerical id identifying the user that liked post_id
dt - date of the interaction in GMT format yyyy-mm-dd hh:mm:ss
Downloading raw data
For the purposes of this post, it is sufficient to use the first release of training data that consists of 5 weeks of posts as well as all the ‘like’ actions that occurred during those 5 weeks.
This first release of training data is available here - once downloaded, unzip it. The 1,196,111 line trainPosts.json will be our practice document data. This file is around 5GB in size.
Requirements
Indexing the full data set requires 23GB disk space. We have tested with a Docker container with 10GB RAM. We used similar settings as described in the vespa quick start guide. As in the guide we assume that the $VESPA_SAMPLE_APPS env variable points to the directory with your local clone of the vespa sample apps:
$ docker run -m 10G --detach --name vespa --hostname vespa --privileged --volume $VESPA_SAMPLE_APPS:/vespa-sample-apps --publish 8080:8080 vespaengine/vespa
Searching blog posts
Functional specification:
Blog post title, content, tags and categories must all be searchable
Allow blog posts to be sorted by both relevance and date
Allow grouping of search results by tag or category
In terms of data, Vespa operates with the notion of documents. A document represents a single, searchable item in your system, e.g., a blog post, a photo, or a news article. Each document type must be defined in the Vespa configuration through a search definition. Think of a search definition as being similar to a table definition in a relational database; it consists of a set of fields, each with a given name, a specific type, and some optional properties.
As an example, for this simple blog post search application, we could create the document type blog_post with the following fields:
url - of type uri
title - of type string
content - of type string (string fields can be of any length)
date_gmt - of type string (to store the creation date in GMT format)
The data fed into Vespa must match the structure of the search definition, and the hits returned when searching will be on this format as well.
Application Packages
A Vespa application package is the set of configuration files and Java plugins that together define the behavior of a Vespa system: what functionality to use, the available document types, how ranking will be done and how data will be processed during feeding and indexing. The search definition, e.g., blog_post.sd, is a required part of an application package — the other required files are services.xml and hosts.xml.
The sample application blog search creates a simple but functional blog post search engine. The application package is found in src/main/application.
Services Specification
services.xml defines the services that make up the Vespa application — which services to run and how many nodes per service:
<?xml version='1.0' encoding='UTF-8'?> <services version='1.0'> <container id='default' version='1.0'> <search/> <document-api/> <nodes> <node hostalias='node1'/> </nodes> </container> <content id='blog_post' version='1.0'> <search> <visibility-delay>1.0</visibility-delay> </search> <redundancy>1</redundancy> <documents> <document mode='index' type='blog_post'/> </documents> <nodes> <node hostalias='node1'/> </nodes> <engine> <proton> <searchable-copies>1</searchable-copies> </proton> </engine> </content> </services>
<container> defines the container cluster for document, query and result processing
<search> sets up the search endpoint for Vespa queries. The default port is 8080.
<document-api> sets up the document endpoint for feeding.
<nodes> defines the nodes required per service. (See the reference for more on container cluster setup.)
<content> defines how documents are stored and searched
<redundancy> denotes how many copies to keep of each document.
<documents> assigns the document types in the search definition — the content cluster capacity can be increased by adding node elements — see elastic Vespa. (See also the reference for more on content cluster setup.)
<nodes> defines the hosts for the content cluster.
Deployment Specification
hosts.xml contains a list of all the hosts/nodes that is part of the application, with an alias for each of them. Here we use a single node:
<?xml version="1.0" encoding="utf-8" ?> <hosts> <host name="localhost"> <alias>node1</alias> </host> </hosts>
Search Definition
The blog_post document type mentioned in src/main/application/service.xml is defined in the search definition. src/main/application/searchdefinitions/blog_post.sd contains the search definition for a document of type blog_post:
search blog_post { document blog_post { field date_gmt type string { indexing: summary } field language type string { indexing: summary } field author type string { indexing: summary } field url type string { indexing: summary } field title type string { indexing: summary | index } field blog type string { indexing: summary } field post_id type string { indexing: summary } field tags type array<string> { indexing: summary } field blogname type string { indexing: summary } field content type string { indexing: summary | index } field categories type array<string> { indexing: summary } field date type int { indexing: summary | attribute } } fieldset default { fields: title, content } rank-profile post inherits default { first-phase { expression:nativeRank(title, content) } } }
document is wrapped inside another element called search. The name following these elements, here blog_post, must be exactly the same for both.
The field property indexing configures the indexing pipeline for a field, which defines how Vespa will treat input during indexing — see indexing language. Each part of the indexing pipeline is separated by the pipe character ‘|’:
index: Create a search index for this field
attribute: Store this field in memory as an attribute — for sorting, searching and grouping
summary: Let this field be part of the document summary in the result set
Deploy the Application Package
Once done with the application package, deploy the Vespa application — build and start Vespa as in the quick start. Deploy the application:
$ cd /vespa-sample-apps/blog-search $ vespa-deploy prepare src/main/application && vespa-deploy activate
This prints that the application was activated successfully and also the checksum, timestamp and generation for this deployment (more on that later). Pointing a browser to http://localhost:8080/ApplicationStatus returns JSON-formatted information about the active application, including its checksum, timestamp and generation (and should be the same as the values when vespa-deploy activate was run). The generation will increase by 1 each time a new application is successfully deployed, and is the easiest way to verify that the correct version is active.
The Vespa node is now configured and ready for use.
Feeding Data
The data fed to Vespa must match the search definition for the document type. The data downloaded from Kaggle, contained in trainPosts.json, must be converted to a valid Vespa document format before it can be fed to Vespa. Find a parser in the utility repository. Since the full data set is unnecessarily large for the purposes of this first part of this post, we use only the first 10,000 lines of it, but feel free to load all 1,1M entries:
$ head -10000 trainPosts.json > trainPostsSmall.json $ python parse.py trainPostsSmall.json > feed.json
Send this to Vespa using one of the tools Vespa provides for feeding. Here we will use the Java feeding API:
$ java -jar $VESPA_HOME/lib/jars/vespa-http-client-jar-with-dependencies.jar --verbose --file feed.json --host localhost --port 8080
Note that in the sample-apps/blog-search directory, there is a file with sample data. You may also feed this file using this method.
Track feeding progress
Use the Metrics API to track number of documents indexed:
$ curl -s 'http://localhost:19112/state/v1/metrics' | tr ',' '\n' | grep -A 2 proton.doctypes.blog_post.numdocs
You can also inspect the search node state by
$ vespa-proton-cmd --local getState
Fetch documents
Fetch documents by document id using the Document API:
$ curl -s 'http://localhost:8080/document/v1/blog-search/blog_post/docid/1750271' | python -m json.tool
The first query
Searching with Vespa is done using a HTTP GET requests, like:
<host:port>/<search>?<yql=value1>&<param2=value2>...
The only mandatory parameter is the query, using yql=<yql query>. More details can be found in the Search API.
Given the above search definition, where the fields title and content are part of the fieldset default, any document containing the word “music” in one or more of these two fields matches our query below:
$ curl -s 'http://localhost:8080/search/?yql=select+*+from+sources+*+where+default+contains+%22music%22%3B' | python -m json.tool
Looking at the output, please note:
The field documentid in the output and how it matches the value we assigned to each put operation when feeding data to Vespa.
Each hit has a property named relevance, which indicates how well the given document matches our query, using a pre-defined default ranking function. You have full control over ranking — more about ranking and ordering later. The hits are sorted by this value.
When multiple hits have the same relevance score their internal ordering is undefined. However, their internal ordering will not change unless the documents are re-indexed.
Add &tracelevel=9 to dump query parsing details
Other examples
yql=select+title+from+sources+*+where+title+contains+%22music%22%3B
Once more a search for the single term “music”, but this time with the explicit field title. This means that we only want to match documents that contain the word “music” in the field title. As expected, you will see fewer hits for this query, than for the previous one.
yql=select+*+from+sources+*+where+default+contains+%22music%22+AND+default+contains+%22festival%22%3B
This is a query for the two terms “music” and “festival”, combined with an AND operation; it finds documents that match both terms — but not just one of them.
yql=select+*+from+sources+*+where+sddocname+contains+%22blog_post%22%3B
This is a single-term query in the special field sddocname for the value “blog_post”. This is a common and useful Vespa trick to get the number of indexed documents for a certain document type (search definition): sddocname is a special and reserved field which is always set to the name of the document type for a given document. The documents are all of type blog_post, and will therefore automatically have the field sddocname set to that value.
This means that the query above really means “Return all documents of type blog_post”, and as such all documents in the index are returned.
Relevance and Ranking
Ranking and relevance were briefly mentioned above; what is really the relevance of a hit, and how can one change the relevance calculations? It is time to introduce rank profiles and rank expressions — simple, yet powerful methods for tuning the relevance.
Relevance is a measure of how well a given document matches a query. The default relevance is calculated by a formula that takes several factors into consideration, but it computes, in essence, how well the document matches the terms in the query. Sample use cases for tweaking the relevance calculations:
Personalize search results based on some property; age, nationality, language, friends and friends of friends.
Rank fresh (age) documents higher, while still considering other relevance measures.
Rank documents by geographical location, searching for relevant resources nearby.
Vespa allows creating any number of rank profiles: named collections of ranking and relevance calculations that one can choose from at query time. A number of built-in functions and expressions are available to create highly specialized rank expressions.
Blog popularity signal
It is time to include the notion of blog popularity into the ranking function. Do this by including the post_popularity rank profile below at the bottom of src/main/application/searchdefinitions/blog_post.sd, just below the post rank profile.
rank-profile post_popularity inherits default { first-phase { expression: nativeRank(title, content) + 10 * if(isNan(attribute(popularity)), 0, attribute(popularity)) } }
Also, add a popularity field at the end of the document definition:
field popularity type double { indexing: summary | attribute }
Notes (more information can be found in the search definition reference):
rank-profile post_popularity inherits default This configures Vespa to create a new rank profile named post_popularity, which inherits all the properties of the default rank-profile; only properties that are explicitly defined, or overridden, will differ from those of the default rank-profile.
first-phase Relevance calculations in Vespa are two-phased. The calculations done in the first phase are performed on every single document matching your query, while the second phase calculations are only done on the top n documents as determined by the calculations done in the first phase.
expression: nativeRank(title, content) + 10 * if(isNan(attribute(popularity)), 0, attribute(popularity)) Still using the basic search relevance for title and content, boosting documents based on some document level popularity signal. This expression is used to rank documents. Here, the default ranking expression — the nativeRank of the default field set — is included to make the query relevant, while the custom, second term includes the document value attribute(popularity), if this is set. The weighted sum of these two terms is the final relevance for each document.
Deploy the configuration:
$ vespa-deploy prepare src/main/application && vespa-deploy activate
Use parse.py — which has a -p option to calculate and add a popularity field — and then feed the parsed data:
$ python parse.py -p trainPostsSmall.json > feed_with_popularity.json $ java -jar $VESPA_HOME/lib/jars/vespa-http-client-jar-with-dependencies.jar --file feed_with_popularity.json --host localhost --port 8080
After feeding, query
$ curl -s 'http://localhost:8080/search/?yql=select+*+from+sources+*+where+default+contains+%22music%22%3B&ranking=post_popularity' | python -m json.tool
and find documents with high popularity values at the top.
Sorting and Grouping
What is an attribute?
An attribute is an in-memory field - this is different from index fields, which may be moved to a disk-based index as more documents are added and the index grows. Since attributes are kept in memory, they are excellent for fields which require fast access, e.g., fields used for sorting or grouping query results. The downside is higher memory usage. By default, no index is generated for attributes, and search over these defaults to a linear scan - to build an index for an attribute field, include attribute:fast-search in the field definition.
Defining an attribute field
An example is found in blog_post.sd:
field date type int { indexing: summary | attribute }
The data has format YYYYMMDD. And since the field is an int, it can be used for range searches.
Example queries using attribute field
yql=select+*+from+sources+*+where+default+contains+%2220120426%22%3B
This is a single-term query for the term 20120426 in the default field set. (The strings %22 and %3B are URL encodings for " and ;.) In the search definition, the field date is not included in the default field set. Nevertheless, the string “20120426” is found in the content of many posts, which are returned then as results.
yql=select+*+from+sources+*+where+date+contains+%2220120426%22%3B
To get documents that were created 26 April 2012, and whose date field is 20120426, replace default with date in the YQL query string. Note that since date has not been defined with attribute:fast-search, searching will be done by scanning all documents.
yql=select+*+from+sources+*+where+default+contains+%22recipe%22+AND+date+contains+%2220120426%22%3B
A query with two terms; a search in the default field set for the term “recipe” combined with a search in the date field for the value 20120426. This search will be faster than the previous example, as the term “recipe” is for a field for which there is an index, and for which the search core will evaluate the query first. (This speedup is only noticeable with the full data set!)
Range searches
The examples above searched over date just as any other field, and requested documents where the value was exactly 20120426. Since the field is of type int, however, we can use it for range searches as well, using the “less than” and “greater than” operators (< and >, or %3C and %3E URL encoded). The query
yql=select+*+from+sources+*+where+date+%3C+20120401%3B
finds all documents where the value of date is less than 20120401, i.e., all documents from before April 2012, while
yql=select+*+from+sources+*+where+date+%3C+20120401+AND+date+%3E+20120229%3B
finds all documents exactly from March 2012.
Sorting
The first feature we will look at is how an attribute can be used to change the hit order. By now, you have probably noticed that hits are returned in order of descending relevance, i.e., how well the document matches the query — if not, take a moment to verify this.
Now try to send the following query to Vespa, and look at the order of the hits:
$ curl -s 'http://localhost:8080/search/?yql=select+*+from+sources+*+where+default+contains+%22music%22+AND+default+contains+%22festival%22+order+by+date%3B' | python -m json.tool
By default, sorting is done in ascending order. This can also be specified by appending asc after the sort attribute name. Use desc to sort the in descending order:
$ curl -s 'http://localhost:8080/search/?yql=select+*+from+sources+*+where+default+contains+%22music%22+AND+default+contains+%22festival%22+order+by+date+desc%3B' | python -m json.tool
Query time data grouping
Grouping is the concept of looking through all matching documents at query-time and then performing operations with specified fields across all the documents — some common use cases include:
Find all the unique values for a given field, make one group per unique value, and return the count of documents per group.
Group documents by time and date in fixed-width or custom-width buckets. An example of fixed-width buckets could be to group all documents by year, while an example of custom buckets could be to sort bug tickets by date of creation into the buckets Today, Past Week, Past Month, Past Year, and Everything else.
Calculate the minimum/maximum/average value for a given field.
Displaying such groups and their sizes (in terms of matching documents per group) on a search result page, with a link to each such group, is a common way to let users refine searches. For now we will only do a very simple grouping query to get a list of unique values for date ordered by the number of documents they occur in and top 3 is shown:
$ curl -s 'http://localhost:8080/search/?yql=select%20*%20from%20sources%20*%20where%20sddocname%20contains%20%22blog_post%22%20limit%200%20%7C%20all(group(date)%20max(3)%20order(-count())each(output(count())))%3B' | python -m json.tool
With the full data set, you will get the following output:
{ "root": { "children": [ { "children": [ { "children": [ { "fields": { "count()": 43 }, "id": "group:long:20120419", "relevance": 1.0, "value": "20120419" }, { "fields": { "count()": 40 }, "id": "group:long:20120424", "relevance": 0.6666666666666666, "value": "20120424" }, { "fields": { "count()": 39 }, "id": "group:long:20120417", "relevance": 0.3333333333333333, "value": "20120417" } ], "continuation": { "next": "BGAAABEBGBC" }, "id": "grouplist:date", "label": "date", "relevance": 1.0 } ], "continuation": { "this": "" }, "id": "group:root:0", ��"relevance": 1.0 } ], "coverage": { "coverage": 100, "documents": 1000, "full": true, "nodes": 0, "results": 1, "resultsFull": 1 }, "fields": { "totalCount": 1000 }, "id": "toplevel", "relevance": 1.0 } }
The three most common unique values of date are listed, along with their respective counts.
Try to change the filter part of the YQL+ expression — the where clause — to a text match of “recipe”, or restrict date to be less than 20120401, and see how the list of unique values changes as the set of matching documents for your query changes. Try to search for the single term “Verizon” as well — a word we know is not present in the document set, and as such will match no documents — and you will see that the list of groups is empty.
Attribute limitations
Memory usage
Attributes are kept in memory at all time, as opposed to normal indexes where the data is mostly kept on disk. Even with large search nodes, one will notice that it is not practical to define all the search definition fields as attributes, as it will heavily restrict the number of documents per search node. Some Vespa installations have more than 1 billion documents per node — having megabytes of text in memory per document is not an option.
Matching
Another limitation is the way matching is done for attributes. Consider the field blogname from our search definition, and the document for the blog called “Thinking about museums”. In the original input, the value for blogname is a string built of up the three words “Thinking”, “about”, and “museums”, with a single whitespace character between them. How should we be able to search this field?
For normal index fields, Vespa does something called tokenization on the string. In our case this means that the string above is split into the three tokens “Thinking”, “about” and “museums”, enabling Vespa to match this document both for the single-term queries “Thinking”, “about” and “museums”, the exact phrase query “Thinking about museums”, and a query with two or more tokens in either order (e.g. “museums thinking”). This is how we all have come to expect normal free text search to work.
However, there is a limitation in Vespa when it comes to attribute fields and matching; attributes do not support normal token-based matching — only exact matching or prefix matching. Exact matching is the default, and, as the name implies, it requires you to search for the exact contents of the field in order to get a match.
When to use attributes
There are both advantages and drawbacks of using attributes — it enables sorting and grouping, but requires more memory and gives limited matching capabilities. When to use attributes depends on the application; in general, use attributes for:
fields used for sorting, e.g., a last-update timestamp,
fields used for grouping, e.g., problem severity, and
fields that are not long string fields.
Finally, all numeric fields should always be attributes.
Clean environment by removing all documents
vespa-remove-index removes all documents:
$ vespa-stop-services $ vespa-remove-index $ vespa-start-services
Conclusion
You should now have a basic understanding of how Vespa can help build your application. In the next blog post we will proceed to show how can we use Statistics and Machine Learning to extend a basic search application into a recommendation system.
2 notes
·
View notes
Photo

Building With Vue.js 2 and Firebase
Introduction
Firebase is Google's mobile platform that helps you develop high-quality apps and grow your business. In this tutorial, you will make good use of one of Firebase's awesome features: the Realtime Database.
You will build a single page application to create books. This book will be saved to your Firebase database, and you will be able to retrieve and delete books you have created.
Let's get started.
Set Up Firebase
Go to Google's Firebase page to create a new account. When done with that, log in to your console. Click on the option to add a project. Enter your project details and click on the button CREATE PROJECT.
This will lead you to your console. The Firebase console helps you manage your Firebase configuration settings.
For this tutorial, you'll need to make access to your database public. From the panel on the left, select Database. Select Realtime Database from the options that show next by clicking GET STARTED. Making your database public involves editing the rules. So click RULES on the page that loads next.
Make your rules look like this.
{ "rules": { ".read": true, ".write": true } }
Click the option to PUBLISH when done.
With this rule, authentication is not required to perform read and write actions on your database. This is needful for the application you will be building in this tutorial.
Set Up a Project Using Vue CLI
Vue CLI allows you to scaffold Vue.js projects. If you do not have it on your machine, you can get it by running:
npm install -g vue-cli
This will install it globally on your machine. Here is how Vue-CLI is used.
vue init <template-name> <project-name>
To learn more about Vue-CLI, check the GitHub page.
For this project you will use webpack templates, so run the command below from your terminal.
vue init webpack vue-book
These are the installation options I used.
? Project name vue-book ? Project description A Vue.js project ? Author izuchukwu1 <[email protected]> ? Vue build standalone ? Install vue-router? No ? Use ESLint to lint your code? Yes ? Pick an ESLint preset Standard ? Setup unit tests with Karma + Mocha? No ? Setup e2e tests with Nightwatch? No vue-cli · Generated "vue-book". To get started: cd vue-book npm install npm run dev Documentation can be found at http://ift.tt/28JYKuJ
Navigate to your project folder. The files and folders generated by Vue-CLI have a tree like this.
├── build │ ├── build.js │ ├── check-versions.js │ ├── dev-client.js │ ├── dev-server.js │ ├── utils.js │ ├── vue-loader.conf.js │ ├── webpack.base.conf.js │ ├── webpack.dev.conf.js │ └── webpack.prod.conf.js ├── config │ ├── dev.env.js │ ├── index.js │ └── prod.env.js ├── index.html ├── package.json ├── README.md ├── src │ ├── App.vue │ ├── assets │ │ └── logo.png │ ├── components │ │ └── HelloWorld.vue │ └── main.js └── static 6 directories, 19 files
Now run the command to install your dependencies.
npm install
When done, you can start your dev server by running:
npm run dev
Add Firebase to the Project
To bind Firebase data to Vue.js data properties, we will make use of the VueFire library. You can check more about it on GitHub.
Run the command below:
npm install firebase vuefire --save
Open up main.js to add VueFire. Make your main.js file look like what I have below.
#src/main.js // The Vue build version to load with the `import` command // (runtime-only or standalone) has been set in webpack.base.conf with an alias. import Vue from 'vue' import App from './App' import VueFire from 'vuefire' Vue.use(VueFire) Vue.config.productionTip = false /* eslint-disable no-new */ new Vue({ el: '#app', template: '<App/>', components: { App } })
Set Up the Firebase Connection
Go to your Firebase console, and click on the Overview link on the left panel. Select the option to add Firebase to your web app. Copy the snippet that pops up in the window to a text file. The snippet contains your apiKey, authDomain, databaseURL, projectId, storageBucket, and messagingSenderId. You need these details to be able to access your Firebase database.
You start by importing Firebase from the core Firebase library. A Firebase instance is created using the initializeApp method. The snippet you copied has to be passed to this method as an object. This has to be done in the script section of your App.vue, like this.
#src/App.vue import Firebase from 'firebase' let config = { apiKey: "...", authDomain: "...", databaseURL: "...", storageBucket: "...", messagingSenderId: "..." }; let app = Firebase.initializeApp(config) let db = app.database() let booksRef = db.ref('books')
After creating the Firebase instance, the database reference is obtained by using app.database().
Book Listing
Since VueFire makes it easy to bind Vue.js data properties to Firebase, implementing the books listing feature requires you to add this.
firebase: { books: booksRef },
You add that below:
name: 'app',
Now you have access to the book items from your database. The template will look like this.
<div class="panel-body"> <table class="table table-striped"> <thead> <tr> <th>Title</th> <th>Author</th> </tr> </thead> <tbody> <tr v-for="book in books"> <td><a v-bind:href="book.url"></a></td> <td></td> </tr> </tbody> </table> </div>
The v-for directive is used to iterate through the available books. Each book will be outputted in a new table row.
Adding a New Book
To put in place the addition of new books, you need to first define the data model that will be used.
data () { return { newBook: { title: '', author: '', url: 'http://', isbn: '' } } }
Next, set up the template to look like this.
<div class="panel panel-default"> <div class="panel-heading"> <h3 class="panel-title">Add New Books</h3> </div> <div class="panel-body"> <form id="form" class="form-inline" v-on:submit.prevent="addBook"> <div class="form-group"> <label for="bookTitle">Title:</label> <input type="text" id="bookTitle" class="form-control" v-model="newBook.title"> </div> <div class="form-group"> <label for="bookAuthor">Author:</label> <input type="text" id="bookAuthor" class="form-control" v-model="newBook.author"> </div> <div class="form-group"> <label for="bookUrl">Url:</label> <input type="text" id="bookUrl" class="form-control" v-model="newBook.url"> </div> <input type="submit" class="btn btn-primary" value="Add Book"> </form> </div> </div>
The v-model directive is used to bind the newBook properties to the corresponding input.
The v-on directive will lead us to create an event handler method that gets called whenever a new book is to be created. Here is what the event handler should look like.
methods: { addBook: function() { booksRef.push(this.newBook) this.newBook.title = '', this.newBook.author = '', this.newBook.url = 'http://', this.newBook.isbn = '' }, },
The addBook method helps insert new book objects into the Firebase database. The data is also synced across all clients.
Deleting Books
Let's add the ability to delete books. Add another column to the book listing.
<td> <span class="glyphicon glyphicon-trash" aria-hidden="true" v-on:click="removeBook(book)"></span> </td>
Let's put in place a method that gets called each time the button is clicked. The method is passed the book you intend to delete, which is actually the key to the book, as you will see soon. The remove() is called on the returned book to delete it from the database.
Here is what the method looks like.
removeBook: function (book) { booksRef.child(book['.key']).remove() }
With that, you are done with App.vue. Putting everything together, here is how your App.vue file should look.
<template> <div id="app" class="container"> <div class="page-header"> <h1>Vue Book</h1> </div> <div class="panel panel-default"> <div class="panel-heading"> <h3>Add Book</h3> </div> <div class="panel-body"> <form id="form" class="form-inline" v-on:submit.prevent="addBook"> <div class="form-group"> <label for="bookTitle">Title:</label> <input type="text" id="bookTitle" class="form-control" v-model="newBook.title"> </div> <div class="form-group"> <label for="bookAuthor">Author:</label> <input type="text" id="bookAuthor" class="form-control" v-model="newBook.author"> </div> <div class="form-group"> <label for="bookUrl">URL:</label> <input type="text" id="bookUrl" class="form-control" v-model="newBook.url"> </div> <div class="form-group"> <label for="bookIsbn">ISBN:</label> <input type="text" id="bookIsbn" class="form-control" v-model="newBook.isbn"> </div> <input type="submit" class="btn btn-primary" value="Add Book"> </form> </div> </div> <div class="panel panel-default"> <div class="panel-heading"> <h3>Books Lists</h3> </div> <div class="panel-body"> <table class="table table-stripped"> <thead> <tr> <th>Title</th> <th>Author</th> <th></th> </tr> </thead> <tbody> <tr v-for="book in books"> <td> <a v-bind:href="book.url"></a> </td> <td> </td> <td> <span class="glyphicon glyphicon-trash" aria-hidden="true" v-on:click="removeBook(book)"></span> </td> </tr> </tbody> </table> </div> </div> </div> </template> <script> import Firebase from 'firebase' let config = { apiKey: "...", authDomain: "...", databaseURL: "...", storageBucket: "...", messagingSenderId: "..." } let app = Firebase.initializeApp(config) let db = app.database() let booksRef = db.ref('books') export default { name: 'app', firebase: { books: booksRef }, data () { return { newBook: { title: '', author: '', url: 'http://', isbn: '' } } }, methods: { addBook: function() { booksRef.push(this.newBook) this.newBook.title = '', this.newBook.author = '', this.newBook.url = 'http://', this.newBook.isbn = '' }, removeBook: function(book) { booksRef.child(book['.key']).remove() } } } </script> <style> #app { font-family: 'Avenir', Helvetica, Arial, sans-serif; -webkit-font-smoothing: antialiased; -moz-osx-font-smoothing: grayscale; color: #2c3e50; margin-top: 60px; } </style>
In the template, I added some Bootstrap classes. For these to work, open your index.html file and make it look like this.
<!DOCTYPE html> <html> <head> <meta charset="utf-8"> <title>vue-book</title> <link rel="stylesheet" href="http://ift.tt/2apRjw3" integrity="sha384-BVYiiSIFeK1dGmJRAkycuHAHRg32OmUcww7on3RYdg4Va+PmSTsz/K68vbdEjh4u" crossorigin="anonymous"> <link rel="stylesheet" href="http://ift.tt/2hbdoRr" /> </head> <body> <div id="app"></div> <!-- built files will be auto injected --> <script src="http://ift.tt/2nfnDrE" integrity="sha256-hwg4gsxgFZhOsEEamdOYGBf13FyQuiTwlAQgxVSNgt4=" crossorigin="anonymous"></script> <script src="http://ift.tt/2aHTozy" integrity="sha384-Tc5IQib027qvyjSMfHjOMaLkfuWVxZxUPnCJA7l2mCWNIpG9mGCD8wGNIcPD7Txa" crossorigin="anonymous"></script> </body> </html>
Conclusion
JavaScript has become extremely popular and is now capable of building mature applications (as we've seen above). If you’re looking for additional resources to study or to use in your work, check out what we have available in the Envato Market.
In this tutorial, you learned about Firebase. You were able to connect Vue.js and Firebase using VueFire. Your application can make read and write requests to your Firebase database.
You can go further by adding more features like categories and description.
by Chinedu Izuchukwu via Envato Tuts+ Code http://ift.tt/2zGQubw
3 notes
·
View notes
Text
Creating A Shopping Cart With HTML5 Web Storage
Creating A Shopping Cart With HTML5 Web Storage
Matt Zand
2019-08-26T14:30:59+02:002019-08-26T13:06:56+00:00
With the advent of HTML5, many sites were able to replace JavaScript plugin and codes with simple more efficient HTML codes such as audio, video, geolocation, etc. HTML5 tags made the job of developers much easier while enhancing page load time and site performance. In particular, HTML5 web storage was a game changer as they allow users’ browsers to store user data without using a server. So the creation of web storage, allowed front-end developers to accomplish more on their website without knowing or using server-side coding or database.
Online e-commerce websites predominantly use server-side languages such as PHP to store users’ data and pass them from one page to another. Using JavaScript back-end frameworks such as Node.js, we can achieve the same goal. However, in this tutorial, we’ll show you step by step how to build a shopping cart with HTML5 and some minor JavaScript code. Other uses of the techniques in this tutorial would be to store user preferences, the user’s favorite content, wish lists, and user settings like name and password on websites and native mobile apps without using a database.
Many high-traffic websites rely on complex techniques such as server clustering, DNS load balancers, client-side and server-side caching, distributed databases, and microservices to optimize performance and availability. Indeed, the major challenge for dynamic websites is to fetch data from a database and use a server-side language such as PHP to process them. However, remote database storage should be used only for essential website content, such as articles and user credentials. Features such as user preferences can be stored in the user’s browser, similar to cookies. Likewise, when you build a native mobile app, you can use HTML5 web storage in conjunction with a local database to increase the speed of your app. Thus, as front-end developers, we need to explore ways in which we can exploit the power of HTML5 web storage in our applications in the early stages of development.
I have been a part of a team developing a large-scale social website, and we used HTML5 web storage heavily. For instance, when a user logs in, we store the hashed user ID in an HTML5 session and use it to authenticate the user on protected pages. We also use this feature to store all new push notifications — such as new chat messages, website messages, and new feeds — and pass them from one page to another. When a social website gets high traffic, total reliance on the server for load balancing might not work, so you have to identify tasks and data that can be handled by the user’s browser instead of your servers.
Project Background
A shopping cart allows a website’s visitor to view product pages and add items to their basket. The visitor can review all of their items and update their basket (such as to add or remove items). To achieve this, the website needs to store the visitor’s data and pass them from one page to another, until the visitor goes to the checkout page and makes a purchase. Storing data can be done via a server-side language or a client-side one. With a server-side language, the server bears the weight of the data storage, whereas with a client-side language, the visitor’s computer (desktop, tablet or smartphone) stores and processes the data. Each approach has its pros and cons. In this tutorial, we’ll focus on a simple client-side approach, based on HTML5 and JavaScript.
Note: In order to be able to follow this tutorial, basic knowledge of HTML5, CSS and JavaScript is required.
Project Files
Click here to download the project’s source files. You can see a live demo, too.
Overview Of HTML5 Web Storage
HTML5 web storage allows web applications to store values locally in the browser that can survive the browser session, just like cookies. Unlike cookies that need to be sent with every HTTP request, web storage data is never transferred to the server; thus, web storage outperforms cookies in web performance. Furthermore, cookies allow you to store only 4 KB of data per domain, whereas web storage allows at least 5 MB per domain. Web storage works like a simple array, mapping keys to values, and they have two types:
Session storage This stores data in one browser session, where it becomes available until the browser or browser tab is closed. Popup windows opened from the same window can see session storage, and so can iframes inside the same window. However, multiple windows from the same origin (URL) cannot see each other’s session storage.
Local storage This stores data in the web browser with no expiration date. The data is available to all windows with the same origin (domain), even when the browser or browser tabs are reopened or closed.
Both storage types are currently supported in all major web browsers. Keep in mind that you cannot pass storage data from one browser to another, even if both browsers are visiting the same domain.
Build A Basic Shopping Cart
To build our shopping cart, we first create an HTML page with a simple cart to show items, and a simple form to add or edit the basket. Then, we add HTML web storage to it, followed by JavaScript coding. Although we are using HTML5 local storage tags, all steps are identical to those of HTML5 session storage and can be applied to HTML5 session storage tags. Lastly, we’ll go over some jQuery code, as an alternative to JavaScript code, for those interested in using jQuery.
Add HTML5 Local Storage To Shopping Cart
Our HTML page is a basic page, with tags for external JavaScript and CSS referenced in the head.
<!DOCTYPE HTML> <html lang="en-US"> <head> <title>HTML5 Local Storage Project</title> <META charset="UTF-8"> <META name="viewport" content="width=device-width, initial-scale=1, shrink-to-fit=no"> <META NAME='rating' CONTENT='General' /> <META NAME='expires' CONTENT='never' /> <META NAME='language' CONTENT='English, EN' /> <META name="description" content="shopping cart project with HTML5 and JavaScript"> <META name="keywords" content="HTML5,CSS,JavaScript, html5 session storage, html5 local storage"> <META name="author" content="dcwebmakers.com"> <script src="Storage.js"></script> <link rel="stylesheet" href="StorageStyle.css"> </head>
Below is the HTML content for the page’s body:
<form name=ShoppingList> <div id="main"> <table> <tr> <td><b>Item:</b><input type=text name=name></td> <td><b>Quantity:</b><input type=text name=data></td> </tr> <tr> <td> <input type=button value="Save" onclick="SaveItem()"> <input type=button value="Update" onclick="ModifyItem()"> <input type=button value="Delete" onclick="RemoveItem()"> </td> </tr> </table> </div> <div id="items_table"> <h3>Shopping List</h3> <table id=list></table> <p> <label><input type=button value="Clear" onclick="ClearAll()"> <i>* Delete all items</i></label> </p> </div> </form>
Adding JavaScript To The Shopping Cart
We’ll create and call the JavaScript function doShowAll() in the onload() event to check for browser support and to dynamically create the table that shows the storage name-value pair.
<body onload="doShowAll()">
Alternatively, you can use the JavaScript onload event by adding this to the JavaScript code:
window.load=doShowAll();
Or use this for jQuery:
$( window ).load(function() { doShowAll(); });
In the CheckBrowser() function, we would like to check whether the browser supports HTML5 storage. Note that this step might not be required because most modern web browsers support it.
/* =====> Checking browser support. //This step might not be required because most modern browsers do support HTML5. */ //Function below might be redundant. function CheckBrowser() { if ('localStorage' in window && window['localStorage'] !== null) { // We can use localStorage object to store data. return true; } else { return false; } }
Inside the doShowAll(), if the CheckBrowser() function evaluates first for browser support, then it will dynamically create the table for the shopping list during page load. You can iterate the keys (property names) of the key-value pairs stored in local storage inside a JavaScript loop, as shown below. Based on the storage value, this method populates the table dynamically to show the key-value pair stored in local storage.
// Dynamically populate the table with shopping list items. //Step below can be done via PHP and AJAX, too. function doShowAll() { if (CheckBrowser()) { var key = ""; var list = "<tr><th>Item</th><th>Value</th></tr>\n"; var i = 0; //For a more advanced feature, you can set a cap on max items in the cart. for (i = 0; i <= localStorage.length-1; i++) { key = localStorage.key(i); list += "<tr><td>" + key + "</td>\n<td>" + localStorage.getItem(key) + "</td></tr>\n"; } //If no item exists in the cart. if (list == "<tr><th>Item</th><th>Value</th></tr>\n") { list += "<tr><td><i>empty</i></td>\n<td><i>empty</i></td></tr>\n"; } //Bind the data to HTML table. //You can use jQuery, too. document.getElementById('list').innerHTML = list; } else { alert('Cannot save shopping list as your browser does not support HTML 5'); } }
Note: Either you or your framework will have a preferred method of creating new DOM nodes. To keep things clear and focused, our example uses .innerHTML even though we’d normally avoid that in production code.
Tip: If you’d like to use jQuery to bind data, you can just replace document.getElementById('list').innerHTML = list; with $(‘#list’).html()=list;.
Run And Test The Shopping Cart
In the previous two sections, we added code to the HTML head, and we added HTML to the shopping cart form and basket. We also created a JavaScript function to check for browser support and to populate the basket with the items in the cart. In populating the basket items, the JavaScript fetches values from HTML web storage, instead of a database. In this part, we’ll show you how the data are inserted into the HTML5 storage engine. That is, we’ll use HTML5 local storage in conjunction with JavaScript to insert new items to the shopping cart, as well as edit an existing item in the cart.
Note: I’ve added tips sections below to show jQuery code, as an alternative to the JavaScript ones.
We’ll create a separate HTML div element to capture user input and submission. We’ll attach the corresponding JavaScript function in the onClick event for the buttons.
<input type="button" value="Save" onclick="SaveItem()"> <input type="button" value="Update" onclick="ModifyItem()"> <input type="button" value="Delete" onclick="RemoveItem()">
You can set properties on the localStorage object similar to a normal JavaScript object. Here is an example of how we can set the local storage property myProperty to the value myValue:
localStorage.myProperty="myValue";
You can delete local storage property like this:
delete localStorage.myProperty;
Alternately, you can use the following methods to access local storage:
localStorage.setItem('propertyName','value'); localStorage.getItem('propertyName'); localStorage.removeItem('propertyName');
To save the key-value pair, get the value of the corresponding JavaScript object and call the setItem method:
function SaveItem() { var name = document.forms.ShoppingList.name.value; var data = document.forms.ShoppingList.data.value; localStorage.setItem(name, data); doShowAll(); }
Below is the jQuery alternative for the SaveItem function. First, add an ID to the form inputs:
<td><b>Item:</b><input type=text name="name" id="name"></td> <td><b>Quantity:</b><input type=text name="data" id="data"></td>
Then, select the form inputs by ID, and get their values. As you can see below, it is much simpler than JavaScript:
function SaveItem() { var name = $("#name").val(); var data = $("#data").val(); localStorage.setItem(name, data); doShowAll(); }
To update an item in the shopping cart, you have to first check whether that item’s key already exists in local storage, and then update its value, as shown below:
//Change an existing key-value in HTML5 storage. function ModifyItem() { var name1 = document.forms.ShoppingList.name.value; var data1 = document.forms.ShoppingList.data.value; //check if name1 is already exists //Check if key exists. if (localStorage.getItem(name1) !=null) { //update localStorage.setItem(name1,data1); document.forms.ShoppingList.data.value = localStorage.getItem(name1); } doShowAll(); }
Below shows the jQuery alternative.
function ModifyItem() { var name1 = $("#name").val(); var data1 = $("#data").val(); //Check if name already exists. //Check if key exists. if (localStorage.getItem(name1) !=null) { //update localStorage.setItem(name1,data1); var new_info=localStorage.getItem(name1); $("#data").val(new_info); } doShowAll(); }
We will use the removeItem method to delete an item from storage.
function RemoveItem() { var name=document.forms.ShoppingList.name.value; document.forms.ShoppingList.data.value=localStorage.removeItem(name); doShowAll(); }
Tip: Similar to the previous two functions, you can use jQuery selectors in the RemoveItem function.
There is another method for local storage that allows you to clear the entire local storage. We call the ClearAll() function in the onClick event of the “Clear” button:
<input type="button" value="Clear" onclick="ClearAll()">
We use the clear method to clear the local storage, as shown below:
function ClearAll() { localStorage.clear(); doShowAll(); }
Session Storage
The sessionStorage object works in the same way as localStorage. You can replace the above example with the sessionStorage object to expire the data after one session. Once the user closes the browser window, the storage will be cleared. In short, the APIs for localStorage and sessionStorage are identical, allowing you to use the following methods:
setItem(key, value)
getItem(key)
removeItem(key)
clear()
key(index)
length
Shopping Carts With Arrays And Objects
Because HTML5 web storage only supports single name-value storage, you have to use JSON or another method to convert your arrays or objects into a single string. You might need an array or object if you have a category and subcategories of items, or if you have a shopping cart with multiple data, like customer info, item info, etc. You just need to implode your array or object items into a string to store them in web storage, and then explode (or split) them back to an array to show them on another page. Let’s go through a basic example of a shopping cart that has three sets of info: customer info, item info and custom mailing address. First, we use JSON.stringify to convert the object into a string. Then, we use JSON.parse to reverse it back.
Hint: Keep in mind that the key-name should be unique for each domain.
//Customer info //You can use array in addition to object. var obj1 = { firstname: "John", lastname: "thomson" }; var cust = JSON.stringify(obj1); //Mailing info var obj2 = { state: "VA", city: "Arlington" }; var mail = JSON.stringify(obj2); //Item info var obj3 = { item: "milk", quantity: 2 }; var basket = JSON.stringify(obj3); //Next, push three strings into key-value of HTML5 storage. //Use JSON parse function below to convert string back into object or array. var New_cust=JSON.parse(cust);
Summary
In this tutorial, we have learned how to build a shopping cart step by step using HTML5 web storage and JavaScript. We’ve seen how to use jQuery as an alternative to JavaScript. We’ve also discussed JSON functions like stringify and parse to handle arrays and objects in a shopping cart. You can build on this tutorial by adding more features, like adding product categories and subcategories while storing data in a JavaScript multi-dimensional array. Moreover, you can replace the whole JavaScript code with jQuery.
We’ve seen what other things developers can accomplish with HTML5 web storage and what other features they can add to their websites. For example, you can use this tutorial to store user preferences, favorited content, wish lists, and user settings like names and passwords on websites and native mobile apps, without using a database.
To conclude, here are a few issues to consider when implementing HTML5 web storage:
Some users might have privacy settings that prevent the browser from storing data.
Some users might use their browser in incognito mode.
Be aware of a few security issues, like DNS spoofing attacks, cross-directory attacks, and sensitive data compromise.
Related Reading
“Browser Storage Limits And Eviction Criteria,” MDN web docs, Mozilla
“Web Storage,” HTML Living Standard,
“This Week In HTML 5,” The WHATWG Blog

(dm, il)
0 notes
Text
Practical Use Cases for JavaScript’s closest() Method
Have you ever had the problem of finding the parent of a DOM node in JavaScript, but aren’t sure how many levels you have to traverse up to get to it? Let’s look at this HTML for instance:
<div data-id="123"> <button>Click me</button> </div>
That’s pretty straightforward, right? Say you want to get the value of data-id after a user clicks the button:
var button = document.querySelector("button");
button.addEventListener("click", (evt) => { console.log(evt.target.parentNode.dataset.id); // prints "123" });
In this very case, the Node.parentNode API is sufficient. What it does is return the parent node of a given element. In the above example, evt.targetis the button clicked; its parent node is the div with the data attribute.
But what if the HTML structure is nested deeper than that? It could even be dynamic, depending on its content.
<div data-id="123"> <article> <header> <h1>Some title</h1> <button>Click me</button> </header> <!-- ... --> </article> </div>
Our job just got considerably more difficult by adding a few more HTML elements. Sure, we could do something like element.parentNode.parentNode.parentNode.dataset.id, but come on… that isn’t elegant, reusable or scalable.
The old way: Using a while-loop
One solution would be to make use of a while loop that runs until the parent node has been found.
function getParentNode(el, tagName) { while (el && el.parentNode) { el = el.parentNode; if (el && el.tagName == tagName.toUpperCase()) { return el; } } return null; }
Using the same HTML example from above again, it would look like this:
var button = document.querySelector("button");
console.log(getParentNode(button, 'div').dataset.id); // prints "123"
This solution is far from perfect. Imagine if you want to use IDs or classes or any other type of selector, instead of the tag name. At least it allows for a variable number of child nodes between the parent and our source.
There’s also jQuery
Back in the day, if you didn’t wanted to deal with writing the sort of function we did above for each application (and let’s be real, who wants that?), then a library like jQuery came in handy (and it still does). It offers a .closest() method for exactly that:
$("button").closest("[data-id='123']")
The new way: Using Element.closest()
Even though jQuery is still a valid approach (hey, some of us are beholden to it), adding it to a project only for this one method is overkill, especially if you can have the same with native JavaScript.
And that’s where Element.closest comes into action:
var button = document.querySelector("button");
console.log(button.closest("div")); // prints the HTMLDivElement
There we go! That’s how easy it can be, and without any libraries or extra code.
Element.closest() allows us to traverse up the DOM until we get an element that matches the given selector. The awesomeness is that we can pass any selector we would also give to Element.querySelector or Element.querySelectorAll. It can be an ID, class, data attribute, tag, or whatever.
element.closest("#my-id"); // yep element.closest(".some-class"); // yep element.closest("[data-id]:not(article)") // hell yeah
If Element.closest finds the parent node based on the given selector, it returns it the same way as document.querySelector. Otherwise, if it doesn’t find a parent, it returns null instead, making it easy to use with if conditions:
var button = document.querySelector("button");
console.log(button.closest(".i-am-in-the-dom")); // prints HTMLElement
console.log(button.closest(".i-am-not-here")); // prints null
if (button.closest(".i-am-in-the-dom")) { console.log("Hello there!"); } else { console.log(":("); }
Ready for a few real-life examples? Let’s go!
Use Case 1: Dropdowns
CodePen Embed Fallback
Our first demo is a basic (and far from perfect) implementation of a dropdown menu that opens after clicking one of the top-level menu items. Notice how the menu stays open even when clicking anywhere inside the dropdown or selecting text? But click somewhere on the outside, and it closes.
The Element.closest API is what detects that outside click. The dropdown itself is a <ul> element with a .menu-dropdown class, so clicking anywhere outside the menu will close it. That’s because the value for evt.target.closest(".menu-dropdown") is going to be null since there is no parent node with this class.
function handleClick(evt) { // ... // if a click happens somewhere outside the dropdown, close it. if (!evt.target.closest(".menu-dropdown")) { menu.classList.add("is-hidden"); navigation.classList.remove("is-expanded"); } }
Inside the handleClick callback function, a condition decides what to do: close the dropdown. If somewhere else inside the unordered list is clicked, Element.closest will find and return it, causing the dropdown to stay open.
Use Case 2: Tables
CodePen Embed Fallback
This second example renders a table that displays user information, let’s say as a component in a dashboard. Each user has an ID, but instead of showing it, we save it as a data attribute for each <tr> element.
<table> <!-- ... --> <tr data-userid="1"> <td> <input type="checkbox" data-action="select"> </td> <td>John Doe</td> <td>[email protected]</td> <td> <button type="button" data-action="edit">Edit</button> <button type="button" data-action="delete">Delete</button> </td> </tr> </table>
The last column contains two buttons for editing and deleting a user from the table. The first button has a data-action attribute of edit, and the second button is delete. When we click on either of them, we want to trigger some action (like sending a request to a server), but for that, the user ID is needed.
A click event listener is attached to the global window object, so whenever the user clicks somewhere on the page, the callback function handleClick is called.
function handleClick(evt) { var { action } = evt.target.dataset; if (action) { // `action` only exists on buttons and checkboxes in the table. let userId = getUserId(evt.target); if (action == "edit") { alert(`Edit user with ID of ${userId}`); } else if (action == "delete") { alert(`Delete user with ID of ${userId}`); } else if (action == "select") { alert(`Selected user with ID of ${userId}`); } } }
If a click happens somewhere else other than one of these buttons, no data-action attribute exists, hence nothing happens. However, when clicking on either button, the action will be determined (that’s called event delegation by the way), and as the next step, the user ID will be retrieved by calling getUserId:
function getUserId(target) { // `target` is always a button or checkbox. return target.closest("[data-userid]").dataset.userid; }
This function expects a DOM node as the only parameter and, when called, uses Element.closest to find the table row that contains the pressed button. It then returns the data-userid value, which can now be used to send a request to a server.
Use Case 3: Tables in React
Let’s stick with the table example and see how we’d handle it on a React project. Here’s the code for a component that returns a table:
function TableView({ users }) { function handleClick(evt) { var userId = evt.currentTarget .closest("[data-userid]") .getAttribute("data-userid");
// do something with `userId` }
return ( <table> {users.map((user) => ( <tr key={user.id} data-userid={user.id}> <td>{user.name}</td> <td>{user.email}</td> <td> <button onClick={handleClick}>Edit</button> </td> </tr> ))} </table> ); }
I find that this use case comes up frequently — it’s fairly common to map over a set of data and display it in a list or table, then allow the user to do something with it. Many people use inline arrow-functions, like so:
<button onClick={() => handleClick(user.id)}>Edit</button>
While this is also a valid way of solving the issue, I prefer to use the data-userid technique. One of the drawbacks of the inline arrow-function is that each time React re-renders the list, it needs to create the callback function again, resulting in a possible performance issue when dealing with large amounts of data.
In the callback function, we simply deal with the event by extracting the target (the button) and getting the parent <tr> element that contains the data-userid value.
function handleClick(evt) { var userId = evt.target .closest("[data-userid]") .getAttribute("data-userid");
// do something with `userId` }
Use Case 4: Modals
CodePen Embed Fallback
This last example is another component I’m sure you’ve all encountered at some point: a modal. Modals are often challenging to implement since they need to provide a lot of features while being accessible and (ideally) good looking.
We want to focus on how to close the modal. In this example, that’s possible by either pressing Esc on a keyboard, clicking on a button in the modal, or clicking anywhere outside the modal.
In our JavaScript, we want to listen for clicks somewhere in the modal:
var modal = document.querySelector(".modal-outer"); modal.addEventListener("click", handleModalClick);
The modal is hidden by default through a .is-hidden utility class. It’s only when a user clicks the big red button that the modal opens by removing this class. And once the modal is open, clicking anywhere inside it — with the exception of the close button — will not inadvertently close it. The event listener callback function is responsible for that:
function handleModalClick(evt) { // `evt.target` is the DOM node the user clicked on. if (!evt.target.closest(".modal-inner")) { handleModalClose(); } }
evt.target is the DOM node that’s clicked which, in this example, is the entire backdrop behind the modal, <div class="modal-outer">. This DOM node is not within <div class="modal-inner">, hence Element.closest() can bubble up all it wants and won’t find it. The condition checks for that and triggers the handleModalClose function.
Clicking somewhere inside the nodal, say the heading, would make <div class="modal-inner"> the parent node. In that case, the condition isn’t truthy, leaving the modal in its open state.
Oh, and about browser support…
As with any cool “new” JavaScript API, browser support is something to consider. The good news is that Element.closest is not that new and is supported in all of the major browsers for quite some time, with a whopping 94% support coverage. I’d say this qualifies as safe to use in a production environment.
The only browser not offering any support whatsoever is Internet Explorer (all versions). If you have to support IE, then you might be better off with the jQuery approach.
As you can see, there are some pretty solid use cases for Element.closest. What libraries, like jQuery, made relatively easy for us in the past can now be used natively with vanilla JavaScript.
Thanks to the good browser support and easy-to-use API, I heavily depend on this little method in many applications and haven’t been disappointed, yet.
Do you have any other interesting use cases? Feel free to let me know.
The post Practical Use Cases for JavaScript’s closest() Method appeared first on CSS-Tricks.
You can support CSS-Tricks by being an MVP Supporter.
via CSS-Tricks https://ift.tt/31OtbMB
0 notes
Text
Last, Insert Data into MySQL using PHP and Arduino IDE
Hello! Perhaps this is my last project for this semester because the semester has finished! And all I must do is only pass the examination and hoping for the best result of this semester. Aamiin.
I want to start this post with expressing my greatest thank to my Embedded System’s lecturer, Mr Kusprasapta Mutijarsa for encouraging my class to mess with ESP32, learn a much about it, and soon to be implementing to our life. I hope so. Last year when I was a fresh year student, I had PRD class (similar to this class) but I think I didn’t get anything from the class. I’m still feeling strange with Arduino, I don’t know how embedded system works, even I don’t know there is a development board exist in this world except for Arduino Board. But after I take Embedded System class this semester, I’m feeling enlightened by the hands-on. I feel familiar with Arduino IDE, I know more about the embedded system, and also I FEEL THE BURNING SENSOR FOR MY LIFE okay this is a very interesting experience for me.
And also I want to deliver my thank to my group partner, Grace and Naomi for helping the project from the start until now. You can check their blog on this link!
Grace’s blog: https://coretangrace.blogspot.com/
Naomi’s blog: https://naomiylnd.wixsite.com/mysite
Okay, next. Enough for chitchat.
So this project is building an ESP32 client that makes an HTTP post request to a PHP script to insert data into MySQL Database. As usual this project according to randomnerdtutorial.com link. But I’m using DHT 11 sensor which is quite different from the link. If you using DHT 11 too, you can follow my code for Arduino IDE because the code provided by randomnerdtutorial is for BME280 sensor.
Okay let’s get started with these steps: 1. Hosting your PHP application and MySQL Database. For this step, you can use Bluehost/digital ocean. But for this project, my classmate initiates to use his old domain for all class participant so I join to his domain.
2. Prepare MySQL Database
3. Insert Data in MySQL Database You can use cPanel or other to set the MySQL Database. But my friend domain using cPanel so I’ll show the step using cPanel. Search “File Manager”, select public_html option and press the “+ File” to create a new PHP file.
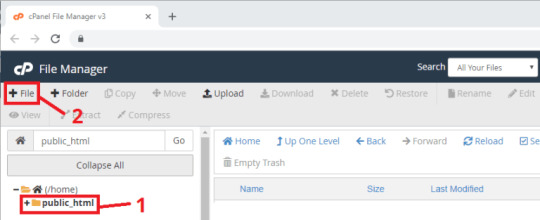
Create a new file and right-click the file that you’ve to create to edit the script. Copy this following code:
<?php /* Rui Santos Complete project details at https://RandomNerdTutorials.com/esp32-esp8266-mysql-database-php/ Permission is hereby granted, free of charge, to any person obtaining a copy of this software and associated documentation files. The above copyright notice and this permission notice shall be included in all copies or substantial portions of the Software. */ $servername = "localhost"; // REPLACE with your Database name $dbname = "REPLACE_WITH_YOUR_DATABASE_NAME"; // REPLACE with Database user $username = "REPLACE_WITH_YOUR_USERNAME"; // REPLACE with Database user password $password = "REPLACE_WITH_YOUR_PASSWORD"; // Keep this API Key value to be compatible with the ESP32 code provided in the project page. // If you change this value, the ESP32 sketch needs to match $api_key_value = "tPmAT5Ab3j7F9"; $api_key= $sensor = $location = $value1 = $value2 = $value3 = ""; if ($_SERVER["REQUEST_METHOD"] == "POST") { $api_key = test_input($_POST["api_key"]); if($api_key == $api_key_value) { $sensor = test_input($_POST["sensor"]); $location = test_input($_POST["location"]); $value1 = test_input($_POST["value1"]); $value2 = test_input($_POST["value2"]); $value3 = test_input($_POST["value3"]); // Create connection $conn = new mysqli($servername, $username, $password, $dbname); // Check connection if ($conn->connect_error) { die("Connection failed: " . $conn->connect_error); } $sql = "INSERT INTO SensorData (sensor, location, value1, value2, value3) VALUES ('" . $sensor . "', '" . $location . "', '" . $value1 . "', '" . $value2 . "', '" . $value3 . "')"; if ($conn->query($sql) === TRUE) { echo "New record created successfully"; } else { echo "Error: " . $sql . "<br>" . $conn->error; } $conn->close(); } else { echo "Wrong API Key provided."; } } else { echo "No data posted with HTTP POST."; } function test_input($data) { $data = trim($data); $data = stripslashes($data); $data = htmlspecialchars($data); return $data; }
Don’t forget to modify the dbname, username, and password with your credentials.
4. Display Database Content Create another PHP file (the step is same with step 3) and copy this code:
<!DOCTYPE html> <html><body> <?php /* Rui Santos Complete project details at https://RandomNerdTutorials.com/esp32-esp8266-mysql-database-php/ Permission is hereby granted, free of charge, to any person obtaining a copy of this software and associated documentation files. The above copyright notice and this permission notice shall be included in all copies or substantial portions of the Software. */ $servername = "localhost"; // REPLACE with your Database name $dbname = "REPLACE_WITH_YOUR_DATABASE_NAME"; // REPLACE with Database user $username = "REPLACE_WITH_YOUR_USERNAME"; // REPLACE with Database user password $password = "REPLACE_WITH_YOUR_PASSWORD"; // Create connection $conn = new mysqli($servername, $username, $password, $dbname); // Check connection if ($conn->connect_error) { die("Connection failed: " . $conn->connect_error); } $sql = "SELECT id, sensor, location, value1, value2, value3, reading_time FROM SensorData ORDER BY id DESC"; echo '<table cellspacing="5" cellpadding="5"> <tr> <td>ID</td> <td>Sensor</td> <td>Location</td> <td>Value 1</td> <td>Value 2</td> <td>Value 3</td> <td>Timestamp</td> </tr>'; if ($result = $conn->query($sql)) { while ($row = $result->fetch_assoc()) { $row_id = $row["id"]; $row_sensor = $row["sensor"]; $row_location = $row["location"]; $row_value1 = $row["value1"]; $row_value2 = $row["value2"]; $row_value3 = $row["value3"]; $row_reading_time = $row["reading_time"]; // Uncomment to set timezone to - 1 hour (you can change 1 to any number) //$row_reading_time = date("Y-m-d H:i:s", strtotime("$row_reading_time - 1 hours")); // Uncomment to set timezone to + 4 hours (you can change 4 to any number) //$row_reading_time = date("Y-m-d H:i:s", strtotime("$row_reading_time + 4 hours")); echo '<tr> <td>' . $row_id . '</td> <td>' . $row_sensor . '</td> <td>' . $row_location . '</td> <td>' . $row_value1 . '</td> <td>' . $row_value2 . '</td> <td>' . $row_value3 . '</td> ��<td>' . $row_reading_time . '</td> </tr>'; } $result->free(); } $conn->close(); ?> </table> </body> </html>
Again, don’t forget to change dbname, username and password!
5. Prepare EPS32
You only need the ESP32 board, jumping wires, USB type-A cable, and DHT 11 sensor to do this project. The schematic is as usual, connect the + port from DHT 11 to 3V3 on ESP32, the out port to GPIO port and the - port to GROUND on ESP32.
After that, you can open your Arduino IDE and copy this code:
/* Rui Santos Complete project details at https://RandomNerdTutorials.com/esp32-esp8266-mysql-database-php/
Permission is hereby granted, free of charge, to any person obtaining a copy of this software and associated documentation files.
The above copyright notice and this permission notice shall be included in all copies or substantial portions of the Software. */ #ifdef ESP32 #include <WiFi.h> #include <HTTPClient.h> #else #include <ESP8266WiFi.h> #include <ESP8266HTTPClient.h> #include <WiFiClient.h> #endif #include <Wire.h> #include <DHT.h> #define DHTPIN 21 // Digital pin connected to the DHT sensor #define DHTTYPE DHT11 // DHT 11 DHT dht(DHTPIN, DHTTYPE); // Replace with your network credentials const char* ssid = "BK28"; const char* password = "Nisa123Rafif"; // REPLACE with your Domain name and URL path or IP address with path const char* serverName = "https://hardyvalen.my.id/new_post_esp_data.php"; // Keep this API Key value to be compatible with the PHP code provided in the project page. // If you change the apiKeyValue value, the PHP file /post-esp-data.php also needs to have the same key String apiKeyValue = "tPmAT5Ab3j7F9"; String sensorName = "DHT11"; String sensorLocation = "Tangsel";
void setup() { Serial.begin(115200);
WiFi.begin(ssid, password); Serial.println("Connecting"); while(WiFi.status() != WL_CONNECTED) { delay(500); Serial.print("."); } Serial.println(""); Serial.print("Connected to WiFi network with IP Address: "); Serial.println(WiFi.localIP()); // (you can also pass in a Wire library object like &Wire2) dht.begin(); } void loop() { //Check WiFi connection status if(WiFi.status()== WL_CONNECTED){ HTTPClient http;
// Your Domain name with URL path or IP address with path http.begin(serverName);
// Specify content-type header http.addHeader("Content-Type", "application/x-www-form-urlencoded");
// Prepare your HTTP POST request data String httpRequestData = "api_key=" + apiKeyValue + "&sensor=" + sensorName + "&location=" + sensorLocation + "&value1=" + String(dht.readTemperature()) + "&value2=" + String(dht.readHumidity()) + ""; Serial.print("httpRequestData: "); Serial.println(httpRequestData);
// You can comment the httpRequestData variable above // then, use the httpRequestData variable below (for testing purposes without the BME280 sensor) //String httpRequestData = "api_key=tPmAT5Ab3j7F9&sensor=BME280&location=Office&value1=24.75&value2=49.54&value3=1005.14"; // Send HTTP POST request int httpResponseCode = http.POST(httpRequestData);
// If you need an HTTP request with a content type: text/plain //http.addHeader("Content-Type", "text/plain"); //int httpResponseCode = http.POST("Hello, World!");
// If you need an HTTP request with a content type: application/json, use the following: //http.addHeader("Content-Type", "application/json"); //int httpResponseCode = http.POST("{\"value1\":\"19\",\"value2\":\"67\",\"value3\":\"78\"}");
if (httpResponseCode>0) { Serial.print("HTTP Response code: "); Serial.println(httpResponseCode); } else { Serial.print("Error code: "); Serial.println(httpResponseCode); } // Free resources http.end(); } else { Serial.println("WiFi Disconnected"); } //Send an HTTP POST request every 30 seconds delay(30000); }
Okay, after modifying the credentials and hosting name, you can upload your code and TARAAA! Open your domain name to see the miracle and this one is mine!
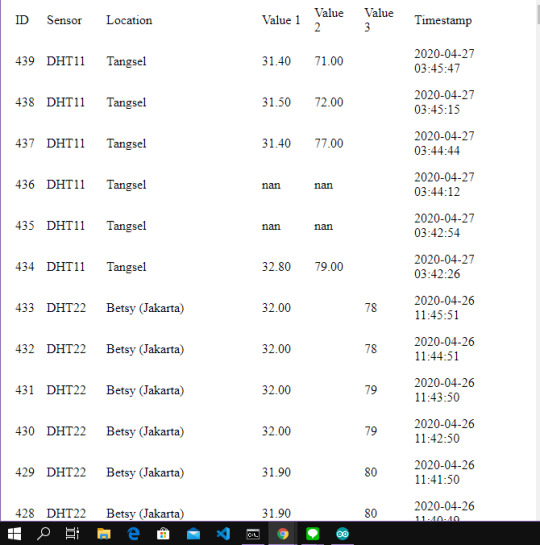
Because the domain is for all participant in the class, I can see the result from all of my friend.
Fiuh. Finally, I have finished all of my assignment for this semester. Last but not least, I will explore more about the embedded system because I found this one is pretty interesting! Okay, wait for my next post, all! See you again!!
0 notes
Quote
The internet has been around for a long while, and over time we’ve changed the way we think about web design. Many old techniques and ways of doing things have gotten phased out as newer and better alternatives have been created, and we say that they have been deprecated. Deprecated. It’s a word we use and see often. But have you stopped to think about what it means in practice? What are some examples of deprecated web elements, and why don’t we use them any more? What is deprecation? In everyday English, to “deprecate” something is to express disapproval of it. For example, you might be inclined to deprecate a news story you don’t like. When we’re speaking in a technical sense, however, deprecation is the discouragement of use for an old feature. Often, the old feature remains functional in the interests of backward compatibility (so legacy projects don’t break). In essence, this means that you can technically still do things the legacy way. It’ll probably still work, but maybe it’s better to use the new way. Another common scenario is when technical elements get deprecated as a prelude to their future removal (which we sometimes call “sunsetting” a feature). This provides everybody time to transition from the old way of working to the new system before the transition happens. If you follow WordPress at all, they recently did this with their radically new Gutenberg editor. They shipped it, but kept an option available to revert to the “classic” editor so users could take time to transition. Someday, the “classic” editor will likely be removed, leaving Gutenberg as the only option for editing posts. In other words, WordPress is sunsetting the “classic” editor. That’s merely one example. We can also look at HTML features that were once essential staples but became deprecated at some point in time. Why do HTML elements get deprecated? Over the years, our way of thinking about HTML has evolved. Originally, it was an all-purpose markup language for displaying and styling content online. Over time, as external stylesheets became more of a thing, it began to make more sense to think about web development differently — as a separation of concerns where HTML defines the content of a page, and CSS handles the presentation of it. This separation of style and content brings numerous benefits: Avoiding duplication: Repeating code for every instance of red-colored text on a page is unwieldy and inefficient when you can have a single CSS class to handle all of it at once. Ease of management: With all of the presentation controlled from a central stylesheet, you can make site-wide changes with little effort. Readability: When viewing a website’s source, it’s a lot easier to understand the code that has been neatly abstracted into separate files for content and style. Caching: The vast majority of websites have consistent styling across all pages, so why make the browser download those style definitions again and again? Putting the presentation code in a dedicated stylesheet allows for caching and reuse to save bandwidth. Developer specialization: Big website projects may have multiple designers and developers working on them, each with their individual areas of expertise. Allowing a CSS specialist to work on their part of the project in their own separate files can be a lot easier for everybody involved. User options: Separating styling from content can allow the developer to easily offer display options to the end user (the increasingly popular ‘night mode’ is a good example of this) or different display modes for accessibility. Responsiveness and device independence: separating the code for content and visual presentation makes it much easier to build websites that display in very different ways on different screen resolutions. However, in the early days of HTML there was a fair amount of markup designed to control the look of the page right alongside the content. You might see code like this: Hello world! …all of which is now deprecated due to the aforementioned separation of concerns. Which HTML elements are now deprecated? As of the release of HTML5, use of the following elements is discouraged: (use instead) (use ) (use CSS font properties, like font-size, font-family, etc.) (use CSS font-size) (use CSS text-align) (use ) (use CSS font properties) (use ) (not needed any more) (not needed any more) (not needed any more) (use text-decoration: line-through in CSS) (use text-decoration: line-through in CSS) (use ) There is also a long list of deprecated attributes, including many elements that continue to be otherwise valid (such as the align attribute used by many elements). The W3C has the full list of deprecated attributes. Why don’t we use table for layouts any more? Before CSS became widespread, it was common to see website layouts constructed with the element. While the element is not deprecated, using them for layout is strongly discouraged. In fact, pretty much all HTML table attributes that were used for layouts have been deprecated, such as cellpadding, bgcolor and width. At one time, tables seemed to be a pretty good way to lay out a web page. We could make rows and columns any size we wanted, meaning we could put everything inside. Headers, navigation, footers… you name it! That would create a lot of website code that looked like this: Blah blah blah! There are numerous problems with this approach: Complicated layouts often end up with tables nested inside other tables, which creates a headache-inducing mess of code. Just look at the source of any email newsletter. Accessibility is problematic, as screen readers tend to get befuddled by the overuse of tables. Tables are slow to render, as the browser waits for the entire table to download before showing it on the screen. Responsible and mobile-friendly layouts are very difficult to create with a table-based layout. We still have not found a silver bullet for responsive tables (though many clever ideas exist). Continuing the theme of separating content and presentation, CSS is a much more efficient way to create the visual layout without cluttering the code of the main HTML document. So, when should we use? Actual tabular data, of course! If you need to display a list of baseball scores, statistics or anything else in that vein, is your friend. Why do we still use and tags? “Hang on just a moment,” you might say. “How come bold and italic HTML tags are still considered OK? Aren’t those forms of visual styling that ought to be handled with CSS?” It’s a good question, and one that seems difficult to answer when we consider that other tags like and are deprecated. What’s going on here? The short and simple answer is that and would probably have been deprecated if they weren’t so widespread and useful. CSS alternatives seem somewhat unwieldy by comparison: .emphasis { font-weight:bold } This is a bold word! This is a bold word! This is a bold word! The long answer is that these tags have now been assigned some semantic meaning, giving them value beyond pure visual presentation and allowing designers to use them to confer additional information about the text they contain. This is important because it helps screen readers and search crawlers better understand the purpose of the content wrapped in these tags. We might italicize a word for several reasons, like adding emphasis, invoking the title of a creative work, referring to a scientific name, and so on. How does a screen reader know whether to place spoken emphasis on the word or not? and have companions, including , and . Together, these tags make the meaning context of text clearer: is for drawing attention to text without giving it any additional importance. It’s used when we want to draw attention to something without changing the inflection of the text when it is read by a screen reader or without adding any additional weight or meaning to the content for search engines. is a lot like but signals the importance of something. It’s the same as changing the inflection of your voice when adding emphasis on a certain word. italicizes text without given it any additional meaning or emphasis. It’s perfect for writing out something that is normally italicized, like the scientific name of an animal. is like in that it italicizes text, but it provides adds additional emphasis (hence the tag name) without adding more importance in context. (‘I’m sure I didn’t forget to feed the cat’). is what we use to refer to the title of a creative work, say a movie like The Silence of the Lambs. This way, text is styled but doesn’t affect the way the sentence would be read aloud. In general, the rule is that and are to be used only as a last resort if you can’t find anything more appropriate for your needs. This semantic meaning allows and to continue to have a place in our modern array of HTML elements and survive the deprecation that has befallen other, similar style tags. On a related note, — the underline tag — was at one time deprecated, but has since been restored in HTML5 because it has some semantic uses (such as annotating spelling errors). There are many other HTML elements that might lend styling to content, but primarily serve to provide semantic meaning to content. Mandy Michael has an excellent write-up that covers those and how they can be used (and even combined!) to make the most semantic markup possible. Undead HTML attributes Some deprecated elements are still in widespread use around the web today. After all, they still work — they’re just discouraged. This is sometimes because word hasn’t gotten around that that thing you’ve been using for ages isn’t actually the way it’s done any more. Other times, it’s due to folks who don’t see a compelling reason to change from doing something that works perfectly well. Hey, CSS-Tricks still uses the teletype element for certain reasons. One such undead HTML relic is the align attribute in otherwise valid tags, especially images. You may see tags with a border attribute, although that attribute has long been deprecated. CSS, of course, is the preferred and modern method for that kind of styling presentation. Staying up to date with deprecation is key for any web developer. Making sure your code follows the current recommendations while avoiding legacy elements is an essential best practice. It not only ensures that your site will continue to work in the long run, but that it will play nicely with the web of the future.
http://damianfallon.blogspot.com/2020/04/why-do-some-html-elements-become_4.html
0 notes
Text
[Latest News] freecreditscore
h1 a:hover {background-color:#888;color:#fff ! important;} div#emailbody table#itemcontentlist tr td div ul { list-style-type:square; padding-left:1em; } div#emailbody table#itemcontentlist tr td div blockquote { padding-left:6px; border-left: 6px solid #dadada; margin-left:1em; } div#emailbody table#itemcontentlist tr td div li { margin-bottom:1em; margin-left:1em; } table#itemcontentlist tr td a:link, table#itemcontentlist tr td a:visited, table#itemcontentlist tr td a:active, ul#summarylist li a { color:#000099; font-weight:bold; text-decoration:none; } img {border:none;}
freecreditscore
Auto Borrowing Rises Amid Low Interest Rates, Solid Economy
Met police examine fraud allegations at Spac Nation church
6 Things to Know About Student Loan Amortization
Student Loan Interest Deduction
In New Hampshire, Biden Talks Increased Education Spending
How Fintech’s Third Wave Will Change How You Bank
2 Times When Saving for Retirement Is Actually Harmful
5 Surprising Facts About Your Student Loans
Figuring Out a Budget for Your College Student
Purdue ‘Back a Boiler’ fund helping students pay for school, by selling stock in themselves
Auto Borrowing Rises Amid Low Interest Rates, Solid Economy
Posted: 13 Nov 2019 08:36 AM PST
The increase came amid growth in auto loans with terms longer than six … Automotive loan debt balances rose, as did student loans and credit-card …
from https://www.facebook.com/Consumer-Credit-Counseling-Texas-call-800-254-4100-709000709268308/ November 13, 2019 at 06:04AM
Met police examine fraud allegations at Spac Nation church
Posted: 13 Nov 2019 08:36 AM PST
Two mothers said this week that their children had been pressured into handing over entire student loan funds, as well as money from personal loans …
from https://www.facebook.com/Consumer-Credit-Counseling-Texas-call-800-254-4100-709000709268308/ November 13, 2019 at 06:00AM
6 Things to Know About Student Loan Amortization
Posted: 13 Nov 2019 08:36 AM PST
Making a financial plan to repay your college student loans can be overwhelming, but it doesn't have to be. Amortization is one of many technical …
from https://www.facebook.com/Consumer-Credit-Counseling-Texas-call-800-254-4100-709000709268308/ November 13, 2019 at 05:07AM
Student Loan Interest Deduction
Posted: 13 Nov 2019 08:36 AM PST
Borrowers of qualified education loans may deduct up to $2,500 in interest on their federal income tax returns as an above-the-line exclusion from …
from https://www.facebook.com/Consumer-Credit-Counseling-Texas-call-800-254-4100-709000709268308/ November 13, 2019 at 05:06AM
In New Hampshire, Biden Talks Increased Education Spending
Posted: 13 Nov 2019 08:36 AM PST
In New Hampshire, Biden Talks Increased Education Spending … The focus on education by Biden and audience members is a reminder that this is a … of free college tuition and the almost or complete elimination of all student debt.
from https://www.facebook.com/Consumer-Credit-Counseling-Texas-call-800-254-4100-709000709268308/ November 13, 2019 at 04:16AM
How Fintech’s Third Wave Will Change How You Bank
Posted: 13 Nov 2019 08:36 AM PST
Online and peer-to-peer marketplaces, such as Prosper and LendingClub, flourished, while laid-off workers seeking to re-skill buoyed student loan …
from https://www.facebook.com/Consumer-Credit-Counseling-Texas-call-800-254-4100-709000709268308/ November 13, 2019 at 03:32AM
2 Times When Saving for Retirement Is Actually Harmful
Posted: 13 Nov 2019 08:36 AM PST
Most people have debt in some form or another, whether it's a mortgage, student loan, or car loan. But some types of debt are more dangerous than …
from https://www.facebook.com/Consumer-Credit-Counseling-Texas-call-800-254-4100-709000709268308/ November 13, 2019 at 03:30AM
5 Surprising Facts About Your Student Loans
Posted: 13 Nov 2019 08:36 AM PST
These 5 facts about your student loans may come as a surprise. Here's what you need to know. Student Loans: 5 Surprising Facts. New research from …
from https://www.facebook.com/Consumer-Credit-Counseling-Texas-call-800-254-4100-709000709268308/ November 13, 2019 at 03:30AM
Figuring Out a Budget for Your College Student
Posted: 13 Nov 2019 08:35 AM PST
Experts like Todd Christensen, education manager at Money Fit by DRS, a nonprofit debt relief agency in Boise, say a student who's able to stay on …
from https://www.facebook.com/Consumer-Credit-Counseling-Texas-call-800-254-4100-709000709268308/ November 13, 2019 at 03:02AM
Purdue ‘Back a Boiler’ fund helping students pay for school, by selling stock in themselves
Posted: 13 Nov 2019 08:35 AM PST
"There's a lot of people facing 20 years of student debt, and I don't want to be paying stuff off for that long,” said recent Purdue graduate Charlotte …
from https://www.facebook.com/Consumer-Credit-Counseling-Texas-call-800-254-4100-709000709268308/ November 13, 2019 at 02:37AM
You are subscribed to email updates from Credit Repair | (888) 630-5917. To stop receiving these emails, you may unsubscribe now. Email delivery powered by Google Google, 1600 Amphitheatre Parkway, Mountain View, CA 94043, United States
from https://unitedstatesconsumercreditcounseling.blogspot.com/2019/11/latest-news-freecreditscore_13.html
from https://postalmailbox.wordpress.com November 13, 2019 at 01:54PM
0 notes
Link
h1 a:hover {background-color:#888;color:#fff ! important;} div#emailbody table#itemcontentlist tr td div ul { list-style-type:square; padding-left:1em; } div#emailbody table#itemcontentlist tr td div blockquote { padding-left:6px; border-left: 6px solid #dadada; margin-left:1em; } div#emailbody table#itemcontentlist tr td div li { margin-bottom:1em; margin-left:1em; } table#itemcontentlist tr td a:link, table#itemcontentlist tr td a:visited, table#itemcontentlist tr td a:active, ul#summarylist li a { color:#000099; font-weight:bold; text-decoration:none; } img {border:none;}
freecreditscore
Auto Borrowing Rises Amid Low Interest Rates, Solid Economy
Met police examine fraud allegations at Spac Nation church
6 Things to Know About Student Loan Amortization
Student Loan Interest Deduction
In New Hampshire, Biden Talks Increased Education Spending
How Fintech’s Third Wave Will Change How You Bank
2 Times When Saving for Retirement Is Actually Harmful
5 Surprising Facts About Your Student Loans
Figuring Out a Budget for Your College Student
Purdue ‘Back a Boiler’ fund helping students pay for school, by selling stock in themselves
Auto Borrowing Rises Amid Low Interest Rates, Solid Economy
Posted: 13 Nov 2019 08:36 AM PST
The increase came amid growth in auto loans with terms longer than six … Automotive loan debt balances rose, as did student loans and credit-card …
from https://www.facebook.com/Consumer-Credit-Counseling-Texas-call-800-254-4100-709000709268308/ November 13, 2019 at 06:04AM
Met police examine fraud allegations at Spac Nation church
Posted: 13 Nov 2019 08:36 AM PST
Two mothers said this week that their children had been pressured into handing over entire student loan funds, as well as money from personal loans …
from https://www.facebook.com/Consumer-Credit-Counseling-Texas-call-800-254-4100-709000709268308/ November 13, 2019 at 06:00AM
6 Things to Know About Student Loan Amortization
Posted: 13 Nov 2019 08:36 AM PST
Making a financial plan to repay your college student loans can be overwhelming, but it doesn't have to be. Amortization is one of many technical …
from https://www.facebook.com/Consumer-Credit-Counseling-Texas-call-800-254-4100-709000709268308/ November 13, 2019 at 05:07AM
Student Loan Interest Deduction
Posted: 13 Nov 2019 08:36 AM PST
Borrowers of qualified education loans may deduct up to $2,500 in interest on their federal income tax returns as an above-the-line exclusion from …
from https://www.facebook.com/Consumer-Credit-Counseling-Texas-call-800-254-4100-709000709268308/ November 13, 2019 at 05:06AM
In New Hampshire, Biden Talks Increased Education Spending
Posted: 13 Nov 2019 08:36 AM PST
In New Hampshire, Biden Talks Increased Education Spending … The focus on education by Biden and audience members is a reminder that this is a … of free college tuition and the almost or complete elimination of all student debt.
from https://www.facebook.com/Consumer-Credit-Counseling-Texas-call-800-254-4100-709000709268308/ November 13, 2019 at 04:16AM
How Fintech’s Third Wave Will Change How You Bank
Posted: 13 Nov 2019 08:36 AM PST
Online and peer-to-peer marketplaces, such as Prosper and LendingClub, flourished, while laid-off workers seeking to re-skill buoyed student loan …
from https://www.facebook.com/Consumer-Credit-Counseling-Texas-call-800-254-4100-709000709268308/ November 13, 2019 at 03:32AM
2 Times When Saving for Retirement Is Actually Harmful
Posted: 13 Nov 2019 08:36 AM PST
Most people have debt in some form or another, whether it's a mortgage, student loan, or car loan. But some types of debt are more dangerous than …
from https://www.facebook.com/Consumer-Credit-Counseling-Texas-call-800-254-4100-709000709268308/ November 13, 2019 at 03:30AM
5 Surprising Facts About Your Student Loans
Posted: 13 Nov 2019 08:36 AM PST
These 5 facts about your student loans may come as a surprise. Here's what you need to know. Student Loans: 5 Surprising Facts. New research from …
from https://www.facebook.com/Consumer-Credit-Counseling-Texas-call-800-254-4100-709000709268308/ November 13, 2019 at 03:30AM
Figuring Out a Budget for Your College Student
Posted: 13 Nov 2019 08:35 AM PST
Experts like Todd Christensen, education manager at Money Fit by DRS, a nonprofit debt relief agency in Boise, say a student who's able to stay on …
from https://www.facebook.com/Consumer-Credit-Counseling-Texas-call-800-254-4100-709000709268308/ November 13, 2019 at 03:02AM
Purdue ‘Back a Boiler’ fund helping students pay for school, by selling stock in themselves
Posted: 13 Nov 2019 08:35 AM PST
"There's a lot of people facing 20 years of student debt, and I don't want to be paying stuff off for that long," said recent Purdue graduate Charlotte …
from https://www.facebook.com/Consumer-Credit-Counseling-Texas-call-800-254-4100-709000709268308/ November 13, 2019 at 02:37AM
You are subscribed to email updates from Credit Repair | (888) 630-5917. To stop receiving these emails, you may unsubscribe now. Email delivery powered by Google Google, 1600 Amphitheatre Parkway, Mountain View, CA 94043, United States
from [Latest News] freecreditscore via [Latest News] freecreditscore November 13, 2019 at 01:42PM Copyright © November 13, 2019 at 01:42PM
0 notes
Link
Tutorial on How to reset The engine oil Life Display Honda Cr-v 2006-2011
Your vehicle displays engine oil life and maintenance service items on the information display to show you when you should have your dealer do engine oil replacement and indicated maintenance service. Based on the engine operating conditions, the onboard computer in your vehicle calculates the remaining engine oil life and displays it as a percentage.
Engine Oil Life Display To see the current engine oil life,turn the ignition switch to the ON (II) position, then press and release the select/reset knob repeatedly until the engine oil life indicator appears.The remaining engine oil life is shown on the display according to this table:
Calculated Engine
Engine Oil Life (%)
Oil Life (%) 100.00% 100% − 91% 90.00% 90% − 81% 80.00% 80% − 71% 70.00% 70% − 61% 60.00% 60% − 51% 50.00% 50% − 41% 40.00% 40% − 31% 30.00% 30% − 21% 20.00% 20% − 16% 15.00% 15% − 11% 10.00% 10% − 6% 5.00% 5% − 1% 0.00% If the remaining engine oil life is 15 to 6 percent, you will see the engine oil life indicator every time you turn the ignition switch to the ON (II) position. The Maintenance Minder indicator will also come on, and the maintenance item code(s) for other scheduled maintenance items needing service will be displayed below the engine oil life indicator.
body,div,table,thead,tbody,tfoot,tr,th,td,p { font-family:"Liberation Sans"; font-size:x-small } a.comment-indicator:hover + comment { background:#ffd; position:absolute; display:block; border:1px solid black; padding:0.5em; } a.comment-indicator { background:red; display:inline-block; border:1px solid black; width:0.5em; height:0.5em; } comment { display:none; }
The 15 and 10 percent oil life indicators remind you that your vehicle will soon be due for scheduled maintenance.
When the remaining engine oil life is 5 to 1 percent, you will see a ‘‘SERVICE’’ message along with the same maintenance item code(s), every time you turn the ignition switch to the ON (II) position.
The maintenance item code or codes indicate the main and sub items required at the time of the oil change.
You can switch the information display from the engine oil life display to the odometer or the average fuel mileage, press and release the select/reset knob on the instrument panel.
When the engine oil life is 15 to 1 percent, the Maintenance Minder indicator (Wrench Symbol ) comes on every time you turn the ignition switch to the ON (II) position, then it goes out if you switch the information display.
When you see this message, have the indicated maintenance performed by your dealer as soon as possible.
When the remaining engine oil life is 0 percent, the engine oil life indicator will blink. The display comes on every time you turn the ignition switch to the ON (II) position. The Maintenance Minder indicator ( Wrench Symbol ) also comes on and remains on in the instrument panel. When you see this message, immediately have the indicated maintenance done by your dealer.
If you do not perform the indicated maintenance, negative distance traveled is displayed and begins to blink after the vehicle has been driven 10 miles (10 km) or more. Negative distance traveled means your vehicle has passed the maintenance required point. Immediately have the indicated maintenance done by your dealer. To change the information display from the engine oil life display to the odometer or the average fuel mileage, press and release the select/reset knob. When the engine oil life is 0 percent or negative distance traveled, the Maintenance Minder indicator ( Wrench Symbol ) remains on even if you change the information display. Immediately have the service performed, and make sure to reset the display as described as follows. Maintenance Main Items and Sub Items
All maintenance items displayed on the information display are in code.For an explanation of these maintenance codes.
Resetting the Engine Oil Life Display Honda Cr-V 2006-2011
Your dealer will reset the display after completing the required maintenance service. You will see ‘‘OIL LIFE 100%’’ on the information display the next time you turn the ignition switch to the ON (II) position. If maintenance service is done by someone other than your dealer,
reset the Maintenance Minder as follows:
1. Turn the ignition switch to the ON(II) position. 2. Press the select/reset knob repeatedly until the engine oil life is displayed.
3. Press the select/reset knob for about 10 seconds. The information display shows the reset mode initial display as shown.
4. Select the ‘‘OIL LIFE’’ indicator by turning the select/reset knob. The display begins to blink. Push the same knob to enter this setting.
5. The engine oil life and the maintenance item code(s) will begin to blink. Press the select/reset knob for another 5 seconds.
6. The maintenance item code(s) will disappear, and the engine oil life will reset to ‘‘100.’’
Important Maintenance
Precautions If you have the required service done but do not reset the display, or reset the display without doing the service, the system will not show the correct maintenance intervals. This can lead to serious mechanical problems because you will no longer have an accurate record of when maintenance is needed.
Your authorized Honda dealer knows your vehicle best and can provide competent, efficient service.
0 notes
Photo

Redesigning a Site to Use CSS Grid Layout
In this article, we’re going to see CSS Grid in action by creating a responsive multi-column website layout.
CSS Grid is a new, hot trend in web development these days. Forget about table layouts and floats: a new way to design websites is already here! This technology introduces two-dimensional grids which define multiple areas of layout with a handful of CSS rules.
Grid can make third-party frameworks such as 960gs or Bootstrap grid redundant, as you may easily do everything yourself! This feature is supported by all major browsers, though Internet Explorer implements an older version of the specification.
What We’re Going to Build
So, we were asked to create a typical website layout with a header, main content area, sidebar to the right, a list of sponsors, and a footer:
Another developer has already tried to solve this task and came up with a solution that involves floats, display: table, and some clearfix hacks. We’re going to refer to this existing layout as "initial":
See the Pen SP: Multi-Column Layout With Floats by SitePoint (@SitePoint) on CodePen.
Until recently, floats were considered to be the best option to create such layouts. Prior to that, we had to utilize HTML tables, but they had a number of downsides. Specifically, such table layout is very rigid, requiring lots of tags (table, tr, td, th etc), and semantically these tags are used to present table data, not to design layouts.
But CSS continues to evolve, and now we have CSS Grid. Conceptually, it’s similar to an old table layout but can use semantic HTML elements with a more flexible layout.
Planning the Grid
First things first: we need to define a basic HTML structure for our document. Before that, let’s briefly talk about how the initial example works. It has the following main blocks:
.container is the global wrapper that has small margins to the left and to the right.
.main-header is the header that contains the .logo (occupying 20% of the space, floating to the left) and the .main-menu (occupying 79% of the space, floating to the right). The header is also assigned a hacky fix to clear the floats.
.content-area-wrapper wraps the main .content-area (occupying 66.6% of the space minus 1rem reserved for margin, floating to the left) and the .sidebar (occupying 33.3% of the space, floating to the right). The wrapper itself is also assigned with a clearfix.
.sponsors-wrapper contains the logos of the sponsors. Inside, there’s a .sponsors section with the display property set to table. Each sponsor, in turn, is displayed as a table cell.
.footer is our footer and spans to 100% of the space.
Our new layout will be very similar to the initial one, but with one exception: we won’t add the .main-header and .content-area-wrapper wrappers because the clearfixes won’t be required anymore. Here is the new version of the HTML:
<div class="container"> <header class="logo"> <h1><a href="#">DemoSite</a></h1> </header> <nav class="main-menu"> <ul> <li class="main-menu__item"><a href="#">Our clients</a></li> <li class="main-menu__item"><a href="#">Products</a></li> <li class="main-menu__item"><a href="#">Contact</a></li> </ul> </nav> <main class="content-area"> <h2>Welcome!</h2> <p> Content </p> </main> <aside class="sidebar"> <h3>Additional stuff</h3> <ul> <li>Items</li> <li>Are</li> <li>Listed</li> <li>Here</li> <li>Wow!</li> </ul> </aside> <section class="sponsors-wrapper"> <h2>Our sponsors</h2> <section class="sponsors"> <figure class="sponsor"> <img src="https://via.placeholder.com/150x150"> </figure> <figure class="sponsor"> <img src="https://via.placeholder.com/200x150"> </figure> <figure class="sponsor"> <img src="https://via.placeholder.com/100x200"> </figure> <figure class="sponsor"> <img src="https://via.placeholder.com/100x100"> </figure> <figure class="sponsor"> <img src="https://via.placeholder.com/200x200"> </figure> </section> </section> <footer class="footer"> <p> © 2018 DemoSite. White&Sons LLC. All rights (perhaps) reserved. </p> </footer> </div>
Note that you may utilize the body as the global .container; that’s just a matter of preference in this case. All in all, we have six main areas:
Logo
Menu
Main content
Sidebar
Sponsors
Footer
Usually it’s recommended that you implement a mobile-first approach. That is, you start from the mobile layout and then add styles for larger screens. This isn’t necessary in this case, since we’re adapting an initial layout that already falls back to a linearized view on small-screen devices. Therefore, let’s start by focusing on the grid’s implementation, and after that talk about responsiveness and fallback rules. So, return to our scheme and see how the grid columns can be arranged:
So, I propose having three columns (highlighted in red) and four rows (highlighted in blue). Some areas, like the logo, are going to occupy only one column, whereas others, like main content, are going to span multiple columns. Later we can easily modify the layout, move the areas around, or add new ones.
Following the scheme, give each area a unique name. These will be used in the layout defined below:
.logo { grid-area: logo; } .main-menu { grid-area: menu; } .content-area { grid-area: content; } .sidebar { grid-area: sidebar; } .sponsors-wrapper { grid-area: sponsors; } .footer { grid-area: footer; }
Now set the display property to grid, define three columns and add small margins to the left and right of the main container:
.container { display: grid; margin: 0 2rem; grid-template-columns: 2fr 6fr 4fr; }
display: grid defines a grid container and sets a special formatting context for its children. fr is a special unit that means "fraction of the free space of the grid container". 2 + 6 + 4 gives us 12, and 6 / 12 = 0.5. It means that the middle column is going to occupy 50% of the free space.
I would also like to add some spacing between the rows and columns:
.container { // ... grid-gap: 2rem 1rem; }
Having done this, we can work with individual areas. But before wrapping up this section, let’s quickly add some common styles:
* { box-sizing: border-box; } html { font-size: 16px; font-family: Georgia, serif; } body { background-color: #fbfbfb; } h1, h2, h3 { margin-top: 0; } header h1 { margin: 0; } main p { margin-bottom: 0; }
Good! Now we can proceed to the first target, which is going to be the header.
The post Redesigning a Site to Use CSS Grid Layout appeared first on SitePoint.
by Ilya Bodrov-Krukowski via SitePoint https://ift.tt/2KUyjnT
0 notes
Text
Practical Use Cases for JavaScript’s closest() Method
Have you ever had the problem of finding the parent of a DOM node in JavaScript, but aren’t sure how many levels you have to traverse up to get to it? Let’s look at this HTML for instance:
<div data-id="123"> <button>Click me</button> </div>
That’s pretty straightforward, right? Say you want to get the value of data-id after a user clicks the button:
var button = document.querySelector("button");
button.addEventListener("click", (evt) => { console.log(evt.target.parentNode.dataset.id); // prints "123" });
In this very case, the Node.parentNode API is sufficient. What it does is return the parent node of a given element. In the above example, evt.targetis the button clicked; its parent node is the div with the data attribute.
But what if the HTML structure is nested deeper than that? It could even be dynamic, depending on its content.
<div data-id="123"> <article> <header> <h1>Some title</h1> <button>Click me</button> </header> <!-- ... --> </article> </div>
Our job just got considerably more difficult by adding a few more HTML elements. Sure, we could do something like element.parentNode.parentNode.parentNode.dataset.id, but come on… that isn’t elegant, reusable or scalable.
The old way: Using a while-loop
One solution would be to make use of a while loop that runs until the parent node has been found.
function getParentNode(el, tagName) { while (el && el.parentNode) { el = el.parentNode; if (el && el.tagName == tagName.toUpperCase()) { return el; } } return null; }
Using the same HTML example from above again, it would look like this:
var button = document.querySelector("button");
console.log(getParentNode(button, 'div').dataset.id); // prints "123"
This solution is far from perfect. Imagine if you want to use IDs or classes or any other type of selector, instead of the tag name. At least it allows for a variable number of child nodes between the parent and our source.
There’s also jQuery
Back in the day, if you didn’t wanted to deal with writing the sort of function we did above for each application (and let’s be real, who wants that?), then a library like jQuery came in handy (and it still does). It offers a .closest() method for exactly that:
$("button").closest("[data-id='123']")
The new way: Using Element.closest()
Even though jQuery is still a valid approach (hey, some of us are beholden to it), adding it to a project only for this one method is overkill, especially if you can have the same with native JavaScript.
And that’s where Element.closest comes into action:
var button = document.querySelector("button");
console.log(button.closest("div")); // prints the HTMLDivElement
There we go! That’s how easy it can be, and without any libraries or extra code.
Element.closest() allows us to traverse up the DOM until we get an element that matches the given selector. The awesomeness is that we can pass any selector we would also give to Element.querySelector or Element.querySelectorAll. It can be an ID, class, data attribute, tag, or whatever.
element.closest("#my-id"); // yep element.closest(".some-class"); // yep element.closest("[data-id]:not(article)") // hell yeah
If Element.closest finds the parent node based on the given selector, it returns it the same way as document.querySelector. Otherwise, if it doesn’t find a parent, it returns null instead, making it easy to use with if conditions:
var button = document.querySelector("button");
console.log(button.closest(".i-am-in-the-dom")); // prints HTMLElement
console.log(button.closest(".i-am-not-here")); // prints null
if (button.closest(".i-am-in-the-dom")) { console.log("Hello there!"); } else { console.log(":("); }
Ready for a few real-life examples? Let’s go!
Use Case 1: Dropdowns
CodePen Embed Fallback
Our first demo is a basic (and far from perfect) implementation of a dropdown menu that opens after clicking one of the top-level menu items. Notice how the menu stays open even when clicking anywhere inside the dropdown or selecting text? But click somewhere on the outside, and it closes.
The Element.closest API is what detects that outside click. The dropdown itself is a <ul> element with a .menu-dropdown class, so clicking anywhere outside the menu will close it. That’s because the value for evt.target.closest(".menu-dropdown") is going to be null since there is no parent node with this class.
function handleClick(evt) { // ... // if a click happens somewhere outside the dropdown, close it. if (!evt.target.closest(".menu-dropdown")) { menu.classList.add("is-hidden"); navigation.classList.remove("is-expanded"); } }
Inside the handleClick callback function, a condition decides what to do: close the dropdown. If somewhere else inside the unordered list is clicked, Element.closest will find and return it, causing the dropdown to stay open.
Use Case 2: Tables
CodePen Embed Fallback
This second example renders a table that displays user information, let’s say as a component in a dashboard. Each user has an ID, but instead of showing it, we save it as a data attribute for each <tr> element.
<table> <!-- ... --> <tr data-userid="1"> <td> <input type="checkbox" data-action="select"> </td> <td>John Doe</td> <td>[email protected]</td> <td> <button type="button" data-action="edit">Edit</button> <button type="button" data-action="delete">Delete</button> </td> </tr> </table>
The last column contains two buttons for editing and deleting a user from the table. The first button has a data-action attribute of edit, and the second button is delete. When we click on either of them, we want to trigger some action (like sending a request to a server), but for that, the user ID is needed.
A click event listener is attached to the global window object, so whenever the user clicks somewhere on the page, the callback function handleClick is called.
function handleClick(evt) { var { action } = evt.target.dataset; if (action) { // `action` only exists on buttons and checkboxes in the table. let userId = getUserId(evt.target); if (action == "edit") { alert(`Edit user with ID of ${userId}`); } else if (action == "delete") { alert(`Delete user with ID of ${userId}`); } else if (action == "select") { alert(`Selected user with ID of ${userId}`); } } }
If a click happens somewhere else other than one of these buttons, no data-action attribute exists, hence nothing happens. However, when clicking on either button, the action will be determined (that’s called event delegation by the way), and as the next step, the user ID will be retrieved by calling getUserId:
function getUserId(target) { // `target` is always a button or checkbox. return target.closest("[data-userid]").dataset.userid; }
This function expects a DOM node as the only parameter and, when called, uses Element.closest to find the table row that contains the pressed button. It then returns the data-userid value, which can now be used to send a request to a server.
Use Case 3: Tables in React
Let’s stick with the table example and see how we’d handle it on a React project. Here’s the code for a component that returns a table:
function TableView({ users }) { function handleClick(evt) { var userId = evt.currentTarget .closest("[data-userid]") .getAttribute("data-userid");
// do something with `userId` }
return ( <table> {users.map((user) => ( <tr key={user.id} data-userid={user.id}> <td>{user.name}</td> <td>{user.email}</td> <td> <button onClick={handleClick}>Edit</button> </td> </tr> ))} </table> ); }
I find that this use case comes up frequently — it’s fairly common to map over a set of data and display it in a list or table, then allow the user to do something with it. Many people use inline arrow-functions, like so:
<button onClick={() => handleClick(user.id)}>Edit</button>
While this is also a valid way of solving the issue, I prefer to use the data-userid technique. One of the drawbacks of the inline arrow-function is that each time React re-renders the list, it needs to create the callback function again, resulting in a possible performance issue when dealing with large amounts of data.
In the callback function, we simply deal with the event by extracting the target (the button) and getting the parent <tr> element that contains the data-userid value.
function handleClick(evt) { var userId = evt.target .closest("[data-userid]") .getAttribute("data-userid");
// do something with `userId` }
Use Case 4: Modals
CodePen Embed Fallback
This last example is another component I’m sure you’ve all encountered at some point: a modal. Modals are often challenging to implement since they need to provide a lot of features while being accessible and (ideally) good looking.
We want to focus on how to close the modal. In this example, that’s possible by either pressing Esc on a keyboard, clicking on a button in the modal, or clicking anywhere outside the modal.
In our JavaScript, we want to listen for clicks somewhere in the modal:
var modal = document.querySelector(".modal-outer"); modal.addEventListener("click", handleModalClick);
The modal is hidden by default through a .is-hidden utility class. It’s only when a user clicks the big red button that the modal opens by removing this class. And once the modal is open, clicking anywhere inside it — with the exception of the close button — will not inadvertently close it. The event listener callback function is responsible for that:
function handleModalClick(evt) { // `evt.target` is the DOM node the user clicked on. if (!evt.target.closest(".modal-inner")) { handleModalClose(); } }
evt.target is the DOM node that’s clicked which, in this example, is the entire backdrop behind the modal, <div class="modal-outer">. This DOM node is not within <div class="modal-inner">, hence Element.closest() can bubble up all it wants and won’t find it. The condition checks for that and triggers the handleModalClose function.
Clicking somewhere inside the nodal, say the heading, would make <div class="modal-inner"> the parent node. In that case, the condition isn’t truthy, leaving the modal in its open state.
Oh, and about browser support…
As with any cool “new” JavaScript API, browser support is something to consider. The good news is that Element.closest is not that new and is supported in all of the major browsers for quite some time, with a whopping 94% support coverage. I’d say this qualifies as safe to use in a production environment.
The only browser not offering any support whatsoever is Internet Explorer (all versions). If you have to support IE, then you might be better off with the jQuery approach.
As you can see, there are some pretty solid use cases for Element.closest. What libraries, like jQuery, made relatively easy for us in the past can now be used natively with vanilla JavaScript.
Thanks to the good browser support and easy-to-use API, I heavily depend on this little method in many applications and haven’t been disappointed, yet.
Do you have any other interesting use cases? Feel free to let me know.
The post Practical Use Cases for JavaScript’s closest() Method appeared first on CSS-Tricks.
You can support CSS-Tricks by being an MVP Supporter.
Practical Use Cases for JavaScript’s closest() Method published first on https://deskbysnafu.tumblr.com/
0 notes
Text
Main Basics Syntax License Dingus Overview Philosophy Inline HTML Automatic Escaping for Special Characters Block Elements Paragraphs and Line Breaks Headers Blockquotes Lists Code Blocks Horizontal Rules Span Elements Links Emphasis Code Images Miscellaneous Backslash Escapes Automatic Links
Note: This document is itself written using Markdown; you can see the source for it by adding ‘.text’ to the URL. Overview Philosophy
Markdown is intended to be as easy-to-read and easy-to-write as is feasible.
Readability, however, is emphasized above all else. A Markdown-formatted document should be publishable as-is, as plain text, without looking like it’s been marked up with tags or formatting instructions. While Markdown’s syntax has been influenced by several existing text-to-HTML filters — including Setext, atx, Textile, reStructuredText, Grutatext, and EtText — the single biggest source of inspiration for Markdown’s syntax is the format of plain text email.
To this end, Markdown’s syntax is comprised entirely of punctuation characters, which punctuation characters have been carefully chosen so as to look like what they mean. E.g., asterisks around a word actually look like emphasis. Markdown lists look like, well, lists. Even blockquotes look like quoted passages of text, assuming you’ve ever used email. Inline HTML
Markdown’s syntax is intended for one purpose: to be used as a format for writing for the web.
Markdown is not a replacement for HTML, or even close to it. Its syntax is very small, corresponding only to a very small subset of HTML tags. The idea is not to create a syntax that makes it easier to insert HTML tags. In my opinion, HTML tags are already easy to insert. The idea for Markdown is to make it easy to read, write, and edit prose. HTML is a publishing format; Markdown is a writing format. Thus, Markdown’s formatting syntax only addresses issues that can be conveyed in plain text.
For any markup that is not covered by Markdown’s syntax, you simply use HTML itself. There’s no need to preface it or delimit it to indicate that you’re switching from Markdown to HTML; you just use the tags.
The only restrictions are that block-level HTML elements — e.g.
<
div>,
<
table>,
<
pre>,
<
p>, etc. — must be separated from surrounding content by blank lines, and the start and end tags of the block should not be indented with tabs or spaces. Markdown is smart enough not to add extra (unwanted)
<
p> tags around HTML block-level tags.
For example, to add an HTML table to a Markdown article:
This is a regular paragraph.
Foo
This is another regular paragraph.
Note that Markdown formatting syntax is not processed within block-level HTML tags. E.g., you can’t use Markdown-style emphasis inside an HTML block.
Span-level HTML tags — e.g. , , or — can be used anywhere in a Markdown paragraph, list item, or header. If you want, you can even use HTML tags instead of Markdown formatting; e.g. if you’d prefer to use HTML or tags instead of Markdown’s link or image syntax, go right ahead.
Unlike block-level HTML tags, Markdown syntax is processed within span-level tags. Automatic Escaping for Special Characters
In HTML, there are two characters that demand special treatment: < and &. Left angle brackets are used to start tags; ampersands are used to denote HTML entities. If you want to use them as literal characters, you must escape them as entities, e.g. <, and &.
Ampersands in particular are bedeviling for web writers. If you want to write about ‘AT&T’, you need to write ‘AT&T’. You even need to escape ampersands within URLs. Thus, if you want to link to:
http://images.google.com/images?num=30&q=larry+bird
you need to encode the URL as:
http://images.google.com/images?num=30&q=larry+bird
in your anchor tag href attribute. Needless to say, this is easy to forget, and is probably the single most common source of HTML validation errors in otherwise well-marked-up web sites.
Markdown allows you to use these characters naturally, taking care of all the necessary escaping for you. If you use an ampersand as part of an HTML entity, it remains unchanged; otherwise it will be translated into &.
So, if you want to include a copyright symbol in your article, you can write:
©
and Markdown will leave it alone. But if you write:
AT&T
Markdown will translate it to:
AT&T
Similarly, because Markdown supports inline HTML, if you use angle brackets as delimiters for HTML tags, Markdown will treat them as such. But if you write:
4 < 5
Markdown will translate it to:
4 < 5
However, inside Markdown code spans and blocks, angle brackets and ampersands are always encoded automatically. This makes it easy to use Markdown to write about HTML code. (As opposed to raw HTML, which is a terrible format for writing about HTML syntax, because every single < and & in your example code needs to be escaped.) Block Elements Paragraphs and Line Breaks
A paragraph is simply one or more consecutive lines of text, separated by one or more blank lines. (A blank line is any line that looks like a blank line — a line containing nothing but spaces or tabs is considered blank.) Normal paragraphs should not be indented with spaces or tabs.
The implication of the “one or more consecutive lines of text” rule is that Markdown supports “hard-wrapped” text paragraphs. This differs significantly from most other text-to-HTML formatters (including Movable Type’s “Convert Line Breaks” option) which translate every line break character in a paragraph into a tag.
When you do want to insert a break tag using Markdown, you end a line with two or more spaces, then type return.
Yes, this takes a tad more effort to create a , but a simplistic “every line break is a ” rule wouldn’t work for Markdown. Markdown’s email-style blockquoting and multi-paragraph list items work best — and look better — when you format them with hard breaks. Headers
Markdown supports two styles of headers, Setext and atx.
Setext-style headers are “underlined” using equal signs (for first-level headers) and dashes (for second-level headers). For example:
This is an H1
This is an H2
Any number of underlining =’s or -’s will work.
Atx-style headers use 1-6 hash characters at the start of the line, corresponding to header levels 1-6. For example:
This is an H1
This is an H2
This is an H6
Optionally, you may “close” atx-style headers. This is purely cosmetic — you can use this if you think it looks better. The closing hashes don’t even need to match the number of hashes used to open the header. (The number of opening hashes determines the header level.) :
This is an H1
This is an H2
This is an H3
Blockquotes
Markdown uses email-style > characters for blockquoting. If you’re familiar with quoting passages of text in an email message, then you know how to create a blockquote in Markdown. It looks best if you hard wrap the text and put a > before every line:
This is a blockquote with two paragraphs. Lorem ipsum dolor sit amet, consectetuer adipiscing elit. Aliquam hendrerit mi posuere lectus. Vestibulum enim wisi, viverra nec, fringilla in, laoreet vitae, risus.
Donec sit amet nisl. Aliquam semper ipsum sit amet velit. Suspendisse id sem consectetuer libero luctus adipiscing.
Markdown allows you to be lazy and only put the > before the first line of a hard-wrapped paragraph:
This is a blockquote with two paragraphs. Lorem ipsum dolor sit amet, consectetuer adipiscing elit. Aliquam hendrerit mi posuere lectus. Vestibulum enim wisi, viverra nec, fringilla in, laoreet vitae, risus.
Donec sit amet nisl. Aliquam semper ipsum sit amet velit. Suspendisse id sem consectetuer libero luctus adipiscing.
Blockquotes can be nested (i.e. a blockquote-in-a-blockquote) by adding additional levels of >:
This is the first level of quoting.
This is nested blockquote.
Back to the first level.
Blockquotes can contain other Markdown elements, including headers, lists, and code blocks:
This is a header.
This is the first list item.
This is the second list item.
Here's some example code:
return shell_exec("echo $input | $markdown_script");
Any decent text editor should make email-style quoting easy. For example, with BBEdit, you can make a selection and choose Increase Quote Level from the Text menu. Lists
Markdown supports ordered (numbered) and unordered (bulleted) lists.
Unordered lists use asterisks, pluses, and hyphens — interchangably — as list markers:
Red
Green
Blue
is equivalent to:
Red
Green
Blue
and:
Red
Green
Blue
Ordered lists use numbers followed by periods:
Bird
McHale
Parish
It’s important to note that the actual numbers you use to mark the list have no effect on the HTML output Markdown produces. The HTML Markdown produces from the above list is:
Bird
McHale
Parish
If you instead wrote the list in Markdown like this:
Bird
McHale
Parish
or even:
Bird
McHale
Parish
you’d get the exact same HTML output. The point is, if you want to, you can use ordinal numbers in your ordered Markdown lists, so that the numbers in your source match the numbers in your published HTML. But if you want to be lazy, you don’t have to.
If you do use lazy list numbering, however, you should still start the list with the number 1. At some point in the future, Markdown may support starting ordered lists at an arbitrary number.
List markers typically start at the left margin, but may be indented by up to three spaces. List markers must be followed by one or more spaces or a tab.
To make lists look nice, you can wrap items with hanging indents:
Lorem ipsum dolor sit amet, consectetuer adipiscing elit. Aliquam hendrerit mi posuere lectus. Vestibulum enim wisi, viverra nec, fringilla in, laoreet vitae, risus.
Donec sit amet nisl. Aliquam semper ipsum sit amet velit. Suspendisse id sem consectetuer libero luctus adipiscing.
But if you want to be lazy, you don’t have to:
Lorem ipsum dolor sit amet, consectetuer adipiscing elit. Aliquam hendrerit mi posuere lectus. Vestibulum enim wisi, viverra nec, fringilla in, laoreet vitae, risus.
Donec sit amet nisl. Aliquam semper ipsum sit amet velit. Suspendisse id sem consectetuer libero luctus adipiscing.
If list items are separated by blank lines, Markdown will wrap the items in
<
p> tags in the HTML output. For example, this input:
Bird
Magic
will turn into:
Bird
Magic
But this:
Bird
Magic
will turn into:
Bird
Magic
List items may consist of multiple paragraphs. Each subsequent paragraph in a list item must be indented by either 4 spaces or one tab:
This is a list item with two paragraphs. Lorem ipsum dolor sit amet, consectetuer adipiscing elit. Aliquam hendrerit mi posuere lectus.
Vestibulum enim wisi, viverra nec, fringilla in, laoreet vitae, risus. Donec sit amet nisl. Aliquam semper ipsum sit amet velit.
Suspendisse id sem consectetuer libero luctus adipiscing.
It looks nice if you indent every line of the subsequent paragraphs, but here again, Markdown will allow you to be lazy:
This is a list item with two paragraphs.
This is the second paragraph in the list item. You're only required to indent the first line. Lorem ipsum dolor sit amet, consectetuer adipiscing elit.
Another item in the same list.
To put a blockquote within a list item, the blockquote’s > delimiters need to be indented:
A list item with a blockquote:
This is a blockquote inside a list item.
To put a code block within a list item, the code block needs to be indented twice — 8 spaces or two tabs:
A list item with a code block:
<code goes here>
It’s worth noting that it’s possible to trigger an ordered list by accident, by writing something like this:
What a great season.
In other words, a number-period-space sequence at the beginning of a line. To avoid this, you can backslash-escape the period:
1986. What a great season.
Code Blocks
Pre-formatted code blocks are used for writing about programming or markup source code. Rather than forming normal paragraphs, the lines of a code block are interpreted literally. Markdown wraps a code block in both
<
pre> and tags.
To produce a code block in Markdown, simply indent every line of the block by at least 4 spaces or 1 tab. For example, given this input:
This is a normal paragraph:
This is a code block.
Markdown will generate:
This is a normal paragraph:
This is a code block.
One level of indentation — 4 spaces or 1 tab — is removed from each line of the code block. For example, this:
Here is an example of AppleScript:
tell application "Foo" beep end tell
will turn into:
Here is an example of AppleScript:
tell application "Foo" beep end tell
A code block continues until it reaches a line that is not indented (or the end of the article).
Within a code block, ampersands (&) and angle brackets (< and >) are automatically converted into HTML entities. This makes it very easy to include example HTML source code using Markdown — just paste it and indent it, and Markdown will handle the hassle of encoding the ampersands and angle brackets. For example, this:
<div class="footer"> © 2004 Foo Corporation </div>
will turn into:
<div class="footer"> © 2004 Foo Corporation </div>
Regular Markdown syntax is not processed within code blocks. E.g., asterisks are just literal asterisks within a code block. This means it’s also easy to use Markdown to write about Markdown’s own syntax. Horizontal Rules
You can produce a horizontal rule tag (
) by placing three or more hyphens, asterisks, or underscores on a line by themselves. If you wish, you may use spaces between the hyphens or asterisks. Each of the following lines will produce a horizontal rule:
Span Elements Links
Markdown supports two style of links: inline and reference.
In both styles, the link text is delimited by [square brackets].
To create an inline link, use a set of regular parentheses immediately after the link text’s closing square bracket. Inside the parentheses, put the URL where you want the link to point, along with an optional title for the link, surrounded in quotes. For example:
This is an example inline link.
This link has no title attribute.
Will produce:
This is an example inline link.
This link has no title attribute.
If you’re referring to a local resource on the same server, you can use relative paths:
See my About page for details.
Reference-style links use a second set of square brackets, inside which you place a label of your choosing to identify the link:
This is an example reference-style link.
You can optionally use a space to separate the sets of brackets:
This is an example reference-style link.
Then, anywhere in the document, you define your link label like this, on a line by itself:
That is:
Square brackets containing the link identifier (optionally indented from the left margin using up to three spaces); followed by a colon; followed by one or more spaces (or tabs); followed by the URL for the link; optionally followed by a title attribute for the link, enclosed in double or single quotes, or enclosed in parentheses.
The following three link definitions are equivalent:
foo: http://example.com/ 'Optional Title Here' Note: There is a known bug in Markdown.pl 1.0.1 which prevents single quotes from being used to delimit link titles.
The link URL may, optionally, be surrounded by angle brackets:
You can put the title attribute on the next line and use extra spaces or tabs for padding, which tends to look better with longer URLs:
Link definitions are only used for creating links during Markdown processing, and are stripped from your document in the HTML output.
Link definition names may consist of letters, numbers, spaces, and punctuation — but they are not case sensitive. E.g. these two links:
[link text][a] [link text][A]
are equivalent.
The implicit link name shortcut allows you to omit the name of the link, in which case the link text itself is used as the name. Just use an empty set of square brackets — e.g., to link the word “Google” to the google.com web site, you could simply write:
Google
And then define the link:
Because link names may contain spaces, this shortcut even works for multiple words in the link text:
Visit Daring Fireball for more information.
And then define the link:
Link definitions can be placed anywhere in your Markdown document. I tend to put them immediately after each paragraph in which they’re used, but if you want, you can put them all at the end of your document, sort of like footnotes.
Here’s an example of reference links in action:
I get 10 times more traffic from Google than from Yahoo or MSN.
Using the implicit link name shortcut, you could instead write:
I get 10 times more traffic from Google than from Yahoo or MSN.
Both of the above examples will produce the following HTML output:
I get 10 times more traffic from Google than from Yahoo or MSN.
For comparison, here is the same paragraph written using Markdown’s inline link style:
I get 10 times more traffic from Google than from Yahoo or MSN.
The point of reference-style links is not that they’re easier to write. The point is that with reference-style links, your document source is vastly more readable. Compare the above examples: using reference-style links, the paragraph itself is only 81 characters long; with inline-style links, it’s 176 characters; and as raw HTML, it’s 234 characters. In the raw HTML, there’s more markup than there is text.
With Markdown’s reference-style links, a source document much more closely resembles the final output, as rendered in a browser. By allowing you to move the markup-related metadata out of the paragraph, you can add links without interrupting the narrative flow of your prose. Emphasis
Markdown treats asterisks (*) and underscores (_) as indicators of emphasis. Text wrapped with one * or _ will be wrapped with an HTML tag; double *’s or _’s will be wrapped with an HTML tag. E.g., this input:
single asterisks
single underscores
double asterisks
double underscores
will produce:
single asterisks
single underscores
double asterisks
double underscores
You can use whichever style you prefer; the lone restriction is that the same character must be used to open and close an emphasis span.
Emphasis can be used in the middle of a word:
unfriggingbelievable
But if you surround an * or _ with spaces, it’ll be treated as a literal asterisk or underscore.
To produce a literal asterisk or underscore at a position where it would otherwise be used as an emphasis delimiter, you can backslash escape it:
*this text is surrounded by literal asterisks*
Code
To indicate a span of code, wrap it with backtick quotes (`). Unlike a pre-formatted code block, a code span indicates code within a normal paragraph. For example:
Use the printf() function.
will produce:
Use the printf() function.
To include a literal backtick character within a code span, you can use multiple backticks as the opening and closing delimiters:
There is a literal backtick (`) here.
which will produce this:
There is a literal backtick (`) here.
The backtick delimiters surrounding a code span may include spaces — one after the opening, one before the closing. This allows you to place literal backtick characters at the beginning or end of a code span:
A single backtick in a code span: `
A backtick-delimited string in a code span: `foo`
will produce:
A single backtick in a code span: `
A backtick-delimited string in a code span: `foo`
With a code span, ampersands and angle brackets are encoded as HTML entities automatically, which makes it easy to include example HTML tags. Markdown will turn this:
Please don't use any <blink> tags.
into:
Please don't use any <blink> tags.
You can write this:
— is the decimal-encoded equivalent of —.
to produce:
— is the decimal-encoded equivalent of —.
Images
Admittedly, it’s fairly difficult to devise a “natural” syntax for placing images into a plain text document format.
Markdown uses an image syntax that is intended to resemble the syntax for links, allowing for two styles: inline and reference.
Inline image syntax looks like this:
That is:
An exclamation mark: !; followed by a set of square brackets, containing the alt attribute text for the image; followed by a set of parentheses, containing the URL or path to the image, and an optional title attribute enclosed in double or single quotes.
Reference-style image syntax looks like this:
Where “id” is the name of a defined image reference. Image references are defined using syntax identical to link references:
As of this writing, Markdown has no syntax for specifying the dimensions of an image; if this is important to you, you can simply use regular HTML tags. Miscellaneous Automatic Links
Markdown supports a shortcut style for creating “automatic” links for URLs and email addresses: simply surround the URL or email address with angle brackets. What this means is that if you want to show the actual text of a URL or email address, and also have it be a clickable link, you can do this:
http://example.com/
Markdown will turn this into:
http://example.com/
Automatic links for email addresses work similarly, except that Markdown will also perform a bit of randomized decimal and hex entity-encoding to help obscure your address from address-harvesting spambots. For example, Markdown will turn this:
into something like this:
address@exa mple.com
which will render in a browser as a clickable link to “[email protected]”.
(This sort of entity-encoding trick will indeed fool many, if not most, address-harvesting bots, but it definitely won’t fool all of them. It’s better than nothing, but an address published in this way will probably eventually start receiving spam.) Backslash Escapes
Markdown allows you to use backslash escapes to generate literal characters which would otherwise have special meaning in Markdown’s formatting syntax. For example, if you wanted to surround a word with literal asterisks (instead of an HTML tag), you can use backslashes before the asterisks, like this:
*literal asterisks*
Markdown provides backslash escapes for the following characters:
\ backslash ` backtick * asterisk _ underscore {} curly braces [] square brackets () parentheses
hash mark
plus sign
minus sign (hyphen) . dot ! exclamation mark
0 notes