#How to update headers in python flask
Explore tagged Tumblr posts
Visit Tumblr Blog
Explore Tumblr blogs with no restrictions, modern design and the best experience.
Last Seen Tumblr Blogs


Fun Fact
The average Tumblr user visits about 67 pages every month.
Text
Python Development Unleashed: SEO-Friendly Practices for Success
In the ever-evolving landscape of web development, Python has emerged as a powerful and versatile programming language. Its simplicity, readability, and extensive ecosystem make it a top choice for developers worldwide. As businesses strive to enhance their online presence, search engine optimization (SEO) becomes a crucial factor. In this article, we'll explore how Python programming development can be unleashed with SEO-friendly practices to ensure online success.
1. The Python Advantage in SEO
Python's readability and clean syntax provide a solid foundation for writing SEO-friendly code. Search engines prioritize well-structured and easily understandable content, and Python's simplicity makes it easier for developers to create clean code that search engine crawlers can navigate efficiently.
2. Embrace Frameworks for SEO Boost
Choosing the right framework can significantly impact your website's SEO performance. Django and Flask are popular Python web frameworks that offer powerful features and follow best practices for SEO. Django, for example, comes with built-in tools for handling URLs, sitemaps, and other SEO-related functionalities, while Flask provides flexibility for developers to implement SEO-friendly practices tailored to their specific needs.
3. Optimize URL Structures for SEO
A well-optimized URL structure is a fundamental aspect of SEO. Python web frameworks often include features that facilitate the creation of clean and meaningful URLs. Developers can leverage these features to structure URLs that are both user-friendly and optimized for search engines. Avoid long and convoluted URLs, and instead, opt for short, descriptive ones that include relevant keywords.
4. Content is King: Leverage Python for Dynamic Content Generation
Search engines favor websites that provide fresh and relevant content. Python's ability to generate dynamic content on-the-fly is a powerful tool for SEO. By using Python frameworks, developers can create dynamic web pages that are not only engaging for users but also attractive to search engines. This ensures that search engine crawlers consistently find new and updated content on your site, improving its ranking.
5. Prioritize Page Load Speed with Asynchronous Programming
Page load speed is a critical factor in SEO rankings. Slow-loading websites can result in higher bounce rates and lower search engine rankings. Python's asynchronous programming capabilities, as seen in frameworks like FastAPI and asyncio, enable developers to build high-performance web applications. By reducing latency and improving page load times, you enhance the user experience and boost your SEO standing.
6. Implement SEO Metadata with Pythonic Ease
SEO metadata, including title tags, meta descriptions, and headers, plays a pivotal role in search engine rankings. Python frameworks often come with built-in tools for efficiently managing and implementing SEO metadata. Developers can easily integrate these tools to ensure that each page on their website has optimized metadata, making it more appealing to search engines and users alike.
7. Leverage Python Libraries for SEO Analytics
Data-driven decisions are key to successful SEO strategies. Python offers a plethora of libraries, such as Pandas and NumPy, that enable developers to gather and analyze SEO-related data effectively. By integrating these libraries into your development workflow, you can gain valuable insights into user behavior, keyword performance, and other metrics that contribute to a well-informed SEO strategy.
8. Mobile Optimization with Python Frameworks
As mobile usage continues to rise, search engines prioritize mobile-friendly websites in their rankings. Python frameworks like Django and Flask emphasize responsive design principles, making it easier for developers to create websites that are optimized for both desktop and mobile users. By ensuring your site is mobile-friendly, you enhance its SEO performance and provide a better experience for a broader audience.
9. Stay Updated with SEO Best Practices and Python Trends
SEO algorithms and Python development practices are constantly evolving. Staying updated with the latest trends in both fields is crucial for maintaining a competitive edge. Follow reputable SEO blogs, participate in Python communities, and attend conferences to stay abreast of the latest advancements. Regularly updating your website and adopting new SEO-friendly features will help you stay ahead in the digital landscape.
In conclusion, Python development offers a potent toolkit for creating SEO-friendly websites. By embracing the language's simplicity, leveraging powerful frameworks, optimising URL structures, focusing on content quality, prioritising page load speed, implementing metadata efficiently, using analytics tools, and ensuring mobile optimization, developers can unleash the full potential of Python for online success. As the digital landscape continues to evolve, Python's role in SEO-friendly web development is poised to become even more significant.
#elearning#onlinetraining#online courses#career#automation#security#learning#technology#startups#programming
0 notes
Text
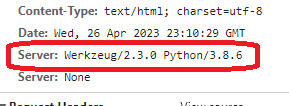
How to remove the Verbose Server Banner from Python Flask Application ?
Verbose Server Banner is something that gives the clue to a external person about the details of the server used in the APIs. So it is essential to hide this information. Typically, the APIs run behind a proxy or a Firewall. So this header can be modified at that layer. In this article, I will be explaining the mechanism to update this header in cases where the APIs are not deployed behind a…
View On WordPress
#How to remove Server banner from Flask application#how to remove server banner from Gunicorn#How to remove the Verbose Server Banner from Python Flask Application#How to update headers in python flask#remove Werkzeug Python header from Flask application
0 notes
Text
Pandas Github

Pandas Challenge Github
Pandas Github
Github Pandas Tutorial
Panda Vpn Pro
Pandas Github Issues
Pandas Github License
Up to date remote data access for pandas, works for multiple versions of pandas.

< Data Indexing and Selection | Contents | Handling Missing Data >
Since Python 3.4, pathlib has been included in the Python standard library. Path objects provide a simple and delightful way to interact with the file system. The pandas-path package enables the Path API for pandas through a custom accessor.path.Getting just the filenames from a series of full file paths is as simple as myfiles.path.name. Dask uses existing Python APIs and data structures to make it easy to switch between NumPy, pandas, scikit-learn to their Dask-powered equivalents. You don't have to completely rewrite your code or retrain to scale up. A REST API based on Flask for serving Pandas Dataframes to Grafana. This way, a native Python application can be used to directly supply data to Grafana both easily and powerfully. It was inspired by and is compatible with the simple json datasource. Pandas is a fast, powerful, flexible and easy to use open source data analysis and manipulation tool, built on top of the Python programming language. Install pandas now!
One of the essential pieces of NumPy is the ability to perform quick element-wise operations, both with basic arithmetic (addition, subtraction, multiplication, etc.) and with more sophisticated operations (trigonometric functions, exponential and logarithmic functions, etc.).Pandas inherits much of this functionality from NumPy, and the ufuncs that we introduced in Computation on NumPy Arrays: Universal Functions are key to this.

Pandas includes a couple useful twists, however: for unary operations like negation and trigonometric functions, these ufuncs will preserve index and column labels in the output, and for binary operations such as addition and multiplication, Pandas will automatically align indices when passing the objects to the ufunc.This means that keeping the context of data and combining data from different sources–both potentially error-prone tasks with raw NumPy arrays–become essentially foolproof ones with Pandas.We will additionally see that there are well-defined operations between one-dimensional Series structures and two-dimensional DataFrame structures.
Ufuncs: Index Preservation
Because Pandas is designed to work with NumPy, any NumPy ufunc will work on Pandas Series and DataFrame objects.Let's start by defining a simple Series and DataFrame on which to demonstrate this:
If we apply a NumPy ufunc on either of these objects, the result will be another Pandas object with the indices preserved:
ABCD0-1.0000007.071068e-011.000000-1.000000e+001-0.7071071.224647e-160.707107-7.071068e-012-0.7071071.000000e+00-0.7071071.224647e-16
Any of the ufuncs discussed in Computation on NumPy Arrays: Universal Functions can be used in a similar manner.
UFuncs: Index Alignment
Pandas Challenge Github
For binary operations on two Series or DataFrame objects, Pandas will align indices in the process of performing the operation.This is very convenient when working with incomplete data, as we'll see in some of the examples that follow.
Index alignment in Series
As an example, suppose we are combining two different data sources, and find only the top three US states by area and the top three US states by population:
Let's see what happens when we divide these to compute the population density:
The resulting array contains the union of indices of the two input arrays, which could be determined using standard Python set arithmetic on these indices:
Pandas Github
Any item for which one or the other does not have an entry is marked with NaN, or 'Not a Number,' which is how Pandas marks missing data (see further discussion of missing data in Handling Missing Data).This index matching is implemented this way for any of Python's built-in arithmetic expressions; any missing values are filled in with NaN by default:
If using NaN values is not the desired behavior, the fill value can be modified using appropriate object methods in place of the operators.For example, calling A.add(B) is equivalent to calling A + B, but allows optional explicit specification of the fill value for any elements in A or B that might be missing:
Index alignment in DataFrame
A similar type of alignment takes place for both columns and indices when performing operations on DataFrames:
Notice that indices are aligned correctly irrespective of their order in the two objects, and indices in the result are sorted.As was the case with Series, we can use the associated object's arithmetic method and pass any desired fill_value to be used in place of missing entries.Here we'll fill with the mean of all values in A (computed by first stacking the rows of A):
The following table lists Python operators and their equivalent Pandas object methods:
Python OperatorPandas Method(s)+add()-sub(), subtract()*mul(), multiply()/truediv(), div(), divide()//floordiv()%mod()**pow()
Ufuncs: Operations Between DataFrame and Series
When performing operations between a DataFrame and a Series, the index and column alignment is similarly maintained.Operations between a DataFrame and a Series are similar to operations between a two-dimensional and one-dimensional NumPy array.Consider one common operation, where we find the difference of a two-dimensional array and one of its rows:
According to NumPy's broadcasting rules (see Computation on Arrays: Broadcasting), subtraction between a two-dimensional array and one of its rows is applied row-wise.
In Pandas, the convention similarly operates row-wise by default:
If you would instead like to operate column-wise, you can use the object methods mentioned earlier, while specifying the axis keyword:
Note that these DataFrame/Series operations, like the operations discussed above, will automatically align indices between the two elements:
This preservation and alignment of indices and columns means that operations on data in Pandas will always maintain the data context, which prevents the types of silly errors that might come up when working with heterogeneous and/or misaligned data in raw NumPy arrays.
< Data Indexing and Selection | Contents | Handling Missing Data >
Display pandas dataframes clearly and interactively in a web app using Flask.
Web apps are a great way to show your data to a larger audience. Simple tables can be a good place to start. Imagine we want to list all the details of local surfers, split by gender. This translates to a couple of pandas dataframes to display, such as the dataframe females below.
Transforming dataframes into html tables
Using the pandas function to_html we can transform a pandas dataframe into a html table. All tables have the class dataframe by default. We can add on more classes using the classes parameter. For example, writing
results in a html table with the classes dataframe female as shown below.
Prepare the file structure for flask app
The simple_tables directory will contains all the scripts, css and html needed for the web app to run. The script site_tables.py will sit in this directory, and from here we will run the app and populate the app’s pages. Any html templates must be stored in the templates directory. Any css sheets must be within the static directory.
Below is the file structure I have used for this surfing example.
Create a flask app that pulls the dataframes
We can create a page on our web app called tables. Every time this page loads, we pull the data, filter and format to get two dataframes, females and males.
The dataframes are then transformed into html tables with classes dataframe female and dataframe male respectively. These html tables are sent as a list to the template view.html, which is stored in the templates directory. We also send a list of titles to use as a heading for each table.
Running the app using debug=True allows the app to auto-update every time the code gets edited.
Define the html template using jinja2

The html template view.html pulls css from the style sheet style.css in the static directory. We will check out the css in the next section.
Next, the jinja2 language allows us to loop through the html table list tables. Using loop.index provides the index of the loop. This starts from 1 so we need to convert between python list indices and those for jinja2 loops. Then we can pull out the correct title for each table.
For each table in the list, the table title is shown, and then the table itself. safe tells jinja2 to show this parameter as a html object.
Style the tables with css
We can use the following styling to make the tables a bit more pretty. The classes male and female have been defined with different header colours. This enables us to highlight different groups of tabled data from the initial site_tables.py script.
Github Pandas Tutorial
Some nice touches include using tr:nth-child(odd) and tr:nth-child(even) to have alternate row colours. Also tr:hover gives an interactive feel to the tables.
View the web app
Panda Vpn Pro
Running the script site_tables.py from bash will serve the web app on your local host. Your web page should look like the one below.
Pandas Github Issues
Feedback
Pandas Github License
Always feel free to get in touch with other solutions, general thoughts or questions.
0 notes
Text
Python Docx

Python Docx4j
Python Docx To Pdf
Python Docx Table
Python Docx To Pdf
Python Docx2txt
Python Docx2txt
When you ask someone to send you a contract or a report there is a high probability that you’ll get a DOCX file. Whether you like it not, it makes sense considering that 1.2 billion people use Microsoft Office although a definition of “use” is quite vague in this case. DOCX is a binary file which is, unlike XLSX, not famous for being easy to integrate into your application. PDF is much easier when you care more about how a document is displayed than its abilities for further modifications. Let’s focus on that.
Python-docx versions 0.3.0 and later are not API-compatible with prior versions. Python-docx is hosted on PyPI, so installation is relatively simple, and just depends on what installation utilities you have installed. Python-docx may be installed with pip if you have it available.
Installing Python-Docx Library Several libraries exist that can be used to read and write MS Word files in Python. However, we will be using the python-docx module owing to its ease-of-use. Execute the following pip command in your terminal to download the python-docx module as shown below.
Python has a few great libraries to work with DOCX (python-dox) and PDF files (PyPDF2, pdfrw). Those are good choices and a lot of fun to read or write files. That said, I know I'd fail miserably trying to achieve 1:1 conversion.
Release v0.8.10 (Installation)python-docx is a Python library for creating and updating Microsoft Word (.docx) files.
Looking further I came across unoconv. Universal Office Converter is a library that’s converting any document format supported by LibreOffice/OpenOffice. That sound like a solid solution for my use case where I care more about quality than anything else. As execution time isn't my problem I have been only concerned whether it’s possible to run LibreOffice without X display. Apparently, LibreOffice can be run in haedless mode and supports conversion between various formats, sweet!
I’m grateful to unoconv for an idea and great README explaining multiple problems I can come across. In the same time, I’m put off by the number of open issues and abandoned pull requests. If I get versions right, how hard can it be? Not hard at all, with few caveats though.
Testing converter
LibreOffice is available on all major platforms and has an active community. It's not active as new-hot-js-framework-active but still with plenty of good read and support. You can get your copy from the download page. Be a good user and go with up-to-date version. You can always downgrade in case of any problems and feedback on latest release is always appreciated.
On macOS and Windows executable is called soffice and libreoffice on Linux. I'm on macOS, executable soffice isn't available in my PATH after the installation but you can find it inside the LibreOffice.app. To test how LibreOffice deals with your files you can run:
In my case results were more than satisfying. The only problem I saw was a misalignment in a file when the alignment was done with spaces, sad but true. This problem was caused by missing fonts and different width of 'replacements' fonts. No worries, we'll address this problem later.
Setup I
While reading unoconv issues I've noticed that many problems are connected due to the mismatch of the versions. I'm going with Docker so I can have pretty stable setup and so I can be sure that everything works.
Let's start with defining simple Dockerfile, just with dependencies and ADD one DOCX file just for testing:

Let's build an image:
After image is created we can run the container and convert the file inside the container:
Running LibreOffice as a subprocess
We want to run LibreOffice converter as a subprocess and provide the same API for all platforms. Let's define a module which can be run as a standalone script or which we can later import on our server.
Required arguments which convert_to accepts are folder to which we save PDF and a path to the source file. Optionally we specify a timeout in seconds. I’m saying optional but consider it mandatory. We don’t want a process to hang too long in case of any problems or just to limit computation time we are able to give away to each conversion. LibreOffice executable location and name depends on the platform so edit libreoffice_exec to support platform you’re using.
subprocess.run doesn’t capture stdout and stderr by default. We can easily change the default behavior by passing subprocess.PIPE. Unfortunately, in the case of the failure, LibreOffice will fail with return code 0 and nothing will be written to stderr. I decided to look for the success message assuming that it won’t be there in case of an error and raise LibreOfficeError otherwise. This approach hasn’t failed me so far.
Uploading files with Flask
Converting using the command line is ok for testing and development but won't take us far. Let's build a simple server in Flask.
We'll need few helper function to work with files and few custom errors for handling error messages. Upload directory path is defined in config.py. You can also consider using flask-restplus or flask-restful which makes handling errors a little easier.
The server is pretty straightforward. In production, you would probably want to use some kind of authentication to limit access to uploads directory. If not, give up on serving static files with Flask and go for Nginx.
Important take-away from this example is that you want to tell your app to be threaded so one request won't prevent other routes from being served. However, WSGI server included with Flask is not production ready and focuses on development. In production, you want to use a proper server with automatic worker process management like gunicorn. Check the docs for an example how to integrate gunicorn into your app. We are going to run the application inside a container so host has to be set to publicly visible 0.0.0.0.
Setup II
Now when we have a server we can update Dockerfile. We need to copy our application source code to the image filesystem and install required dependencies.
In docker-compose.yml we want to specify ports mapping and mount a volume. If you followed the code and you tried running examples you have probably noticed that we were missing the way to tell Flask to run in a debugging mode. Defining environment variable without a value is causing that this variable is going to be passed to the container from the host system. Alternatively, you can provide different config files for different environments.
Supporting custom fonts
I've mentioned a problem with missing fonts earlier. LibreOffice can, of course, make use of custom fonts. If you can predict which fonts your user might be using there's a simple remedy. Add following line to your Dockfile.
Now when you put custom font file in the font directory in your project, rebuild the image. From now on you support custom fonts!
Summary
This should give you the idea how you can provide quality conversion of different documents to PDF. Although the main goal was to convert a DOCX file you should be fine with presentations, spreadsheets or images.
Further improvements could be providing support for multiple files, the converter can be configured to accept more than one file as well.
Photo by Samuel Zeller on Unsplash.
Did you enjoy it? Follow me@MichalZalecki on Twitter, where I share some interesting, bite-size content.
This ebook goes beyond Jest documentation to explain software testing techniques. I focus on unit test separation, mocking, matchers, patterns, and best practices.
Get it now!
Mastering Jest: Tips & Tricks | $9
Latest version
Released:
Extract content from docx files
Project description
Extract docx headers, footers, text, footnotes, endnotes, properties, and images to a Python object.
The code is an expansion/contraction of python-docx2txt (Copyright (c) 2015 Ankush Shah). The original code is mostly gone, but some of the bones may still be here.
shared features:
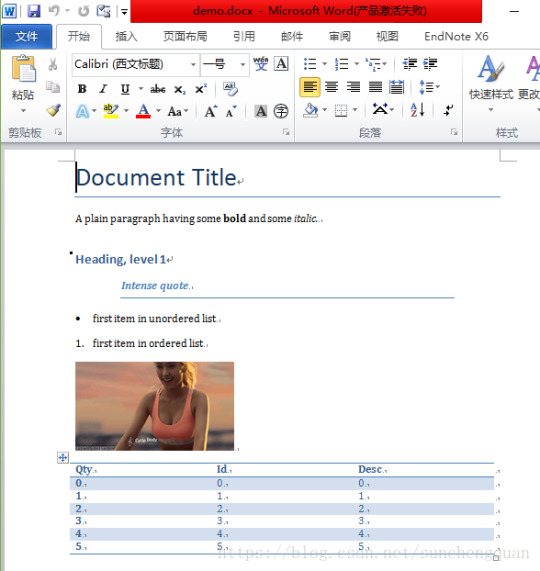
extracts text from docx files
extracts images from docx files
no dependencies (docx2python requires pytest to test)
additions:
extracts footnotes and endnotes
converts bullets and numbered lists to ascii with indentation
converts hyperlinks to <a href='http:/...'>link text</a>
retains some structure of the original file (more below)
extracts document properties (creator, lastModifiedBy, etc.)
inserts image placeholders in text ('----image1.jpg----')
inserts plain text footnote and endnote references in text ('----footnote1----')
(optionally) retains font size, font color, bold, italics, and underscore as html
extract user selections from checkboxes and dropdown menus
full test coverage and documentation for developers
subtractions:
no command-line interface
will only work with Python 3.4+
Installation
Use
Note on html feature:
font size, font color, bold, italics, and underline supported
hyperlinks will always be exported as html (<a href='http:/...'>link text</a>), even if export_font_style=False, because I couldn't think of a more cononical representation.
every tag open in a paragraph will be closed in that paragraph (and, where appropriate, reopened in the next paragraph). If two subsequenct paragraphs are bold, they will be returned as <b>paragraph q</b>, <b>paragraph 2</b>. This is intentional to make each paragraph its own entity.
if you specify export_font_style=True, > and < in your docx text will be encoded as > and <
Return Value
Function docx2python returns an object with several attributes.
header - contents of the docx headers in the return format described herein
footer - contents of the docx footers in the return format described herein
body - contents of the docx in the return format described herein
footnotes - contents of the docx in the return format described herein
endnotes - contents of the docx in the return format described herein
document - header + body + footer (read only)
text - all docx text as one string, similar to what you'd get from python-docx2txt
properties - docx property names mapped to values (e.g., {'lastModifiedBy': 'Shay Hill'})
images - image names mapped to images in binary format. Write to filesystem with
Return Format
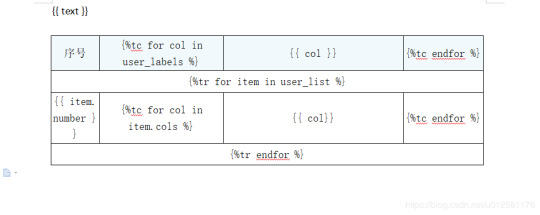
Some structure will be maintained. Text will be returned in a nested list, with paragraphs always at depth 4 (i.e., output.body[i][j][k][l] will be a paragraph).
If your docx has no tables, output.body will appear as one a table with all contents in one cell:
Table cells will appear as table cells. Text outside tables will appear as table cells.
To preserve the even depth (text always at depth 4), nested tables will appear as new, top-level tables. This is clearer with an example:
becomes ...
This ensures text appears
only once
in the order it appears in the docx
always at depth four (i.e., result.body[i][j][k][l] will be a string).
Working with output
This package provides several documented helper functions in the docx2python.iterators module. Here are a few recipes possible with these functions:
Some fine print about checkboxes:
MS Word has checkboxes that can be checked any time, and others that can only be checked when the form is locked.The previous print as. u2610 (open checkbox) or u2612 (crossed checkbox). Which this module, the latter willtoo. I gave checkboxes a bailout value of ----checkbox failed---- if the xml doesn't look like I expect it to,because I don't have several-thousand test files with checkboxes (as I did with most of the other form elements).Checkboxes should work, but please let me know if you encounter any that do not.
Release historyRelease notifications | RSS feed
1.27.1
1.27
1.26
Python Docx4j
1.25
1.24
1.23
1.22
1.21
1.19
1.18
1.17
1.16
1.15
1.14
1.13
1.12
1.11
1.2
Python Docx To Pdf
1.1
Python Docx Table
1.0
0.1
Python Docx To Pdf
Download files
Download the file for your platform. If you're not sure which to choose, learn more about installing packages.
Python Docx2txt
Files for docx2python, version 1.27.1Filename, sizeFile typePython versionUpload dateHashesFilename, size docx2python-1.27.1-py3-none-any.whl (22.9 kB) File type Wheel Python version py3 Upload dateHashesFilename, size docx2python-1.27.1.tar.gz (33.3 kB) File type Source Python version None Upload dateHashes
Close
Hashes for docx2python-1.27.1-py3-none-any.whl
Hashes for docx2python-1.27.1-py3-none-any.whlAlgorithmHash digestSHA25651f6f03149efff07372ea023824d4fd863cb70b531aa558513070fe60f1c420aMD54b0ee20fed4a8cb0eaba8580c33f946bBLAKE2-256e7d5ff32d733592b17310193280786c1cab22ca4738daa97e1825d650f55157c
Close
Hashes for docx2python-1.27.1.tar.gz
Python Docx2txt
Hashes for docx2python-1.27.1.tar.gzAlgorithmHash digestSHA2566ca0a92ee9220708060ece485cede894408588353dc458ee5ec17959488fa668MD5759e1630c6990533414192eb57333c72BLAKE2-25684783b70aec51652a4ec4f42aa419a8af18d967b06390764527c81f183d1c02a
0 notes
Text
Making Web Application CRUD Using Flask and MySQL
In today’s blog, we will discuss how to develop the web application using Flask and MySQL and also show the CRUD operation.

What Is CRUD
CRUD means Create, Read, Update, and Delete operations. In the example below, we will create a new record, read existing records, update the existing record, and delete the existing record.
We will use the MySQL database as permanent storage for performing such basic CRUD operations. We will use the Flask module to handle the requests and responses from end-user or clients, and this module will work as a web application framework for Python.
By default, the Flask module does not come with the Python installation, and you have to install it separately using the command pip install flask from the cmd prompt (open in administrator mode) in the Windows environment.
Prerequisites
Python 3.8.0, Flask 1.1.1, Flask Table 0.5.0, MySQL 8.0.17, Windows 10 64 bit.
Preparing Your Workspace
Preparing your workspace is one of the first things that you can do to make sure that you start well. The first step is to check your working directory.
When you are working in the Python terminal, you need to first navigate to the directory, where your file is located, and then start up Python, i.e., you have to make sure that your file is located in the directory where you want to work from.
Using MySQL Table
For this, Python Web Application CRUD example using Flask and MySQL, we need modules, such as a table, flask, MySQL. The module table is required to show data in tabular format on HTML view, the module flask works as a web framework, and MySQL module is required to establish a connection with MySQL database and query the database using Python programming language.
If you find that any of the required modules do not exist, then you need to install it. You can refer to the below-mentioned screenshots on how to install the below-required modules – table and MySQL.
Installation of Modules – Table and MySQL
Table Module Installation
MySQL Module Installation
Implementation of Example
Please go through the following steps to implement Python web application CRUD example using Flask MySQL:
1. Create Directories
First, create directories. The top-level directory or project root directory, which is shown in the figure above under the section “Preparing your workspace.” Then inside this directory, create user_crud directory. Inside this user_crud directory, create templates directory. This templates directory will contain all HTML template files, such as we need several HTML files for creating CRUD operations.
2. Create File app.py
Create the below app.py script(py is the extension to indicate Python script) where we import the flask module. This file should be created under the user_crud directory. Notice how we create flask instance. We have configured a secret key, which is required for your application’s session.
from flask import Flask
app = Flask(__name__)
app.secret_key = “secret key”
3. Create the Database File
We create the below db_config.py Python script under user_crud to set up the MySQL database configurations for connecting to the base. We need to configure database connection with the k module, and that’s why we have imported the module and set up the MySQL configuration with the k module.
from app import app
from flaskext.mysql import MySQL
mysql = MySQL()
# MySQL configurations
app.config[’MYSQL_DATABASE_USER’] = ‘root’
app.config[’MYSQL_DATABASE_PASSWORD’] = ‘root’
app.config[’MYSQL_DATABASE_DB’] = ‘roytuts’
app.config[’MYSQL_DATABASE_HOST’] = ‘localhost’
mysql.init_app(app)
4. Create a main.py
Next, we need main.py script under user_crud directory, which will define all URIs or Action paths for performing CRUD operations. It will also connect to the MySQL database server and query the database to read, insert, update, and delete.
This script is the perfect instance of Python Web Application CRUD example using Flask and MySQL. In this script we perform CRUD operations with user interaction, undoubtedly, we display all records, we add a new record, we update existing record, and we delete record from the tabular data as we wish.
Below are the steps:
We first import the required modules into the script. We then define the end-point /new_user for displaying a view where the user will add a new record. Next, we need to validate user input data and save those input data into MySQL database, so we define another end-point /add. We use the HTTP method GET for displaying view and POST method for sending data to the server-side. By default, the Http method is GET if you do not specify the Http method. We use render_template function from flask to show the view. Initially, when there is no user information, then you won’t see any user information on the home page.
Add User
You can add a new user from the Add User link shown on the home page, and you will see data get displayed on the home page. We do not want to store the password as a plain text, so we are masking the password using generate_password_hash() function.
Show All Record
Next, we display all records from MySQL database in the view users.html using the root end-point /. Notice here when we render view, we also send table data as a second argument to the render_template function. Notice also we have configured the MySQL connection with pymysql.cursors.DictCursor to fetch rows as a data dictionary so that we retrieve each column value as a key/value pair (column name/column value) that will help us to display data in tabular format using flask’ table API.
Edit Information
Then we show edit form where the user updates his information while clicking on Edit link in the HTML table data. We define/update end-point for saving updated information into the MySQL database. Once updated, we redirect to the home page where a list of users is shown in the HTML table.
Delete
Next, we define delete end-point where the user deletes his information while clicks on Delete link in the HTML table data. Finally, redirect to the home page.
When we add, update or delete user, then we redirect to the home page and show the appropriate message to the user.
import pymysql
from app import app
from tables import Results
from db_config import MySQL
from flask import flash, render_template, request, redirect
from werkzeug.security import generate_password_hash, check_password_hash
@app.route(‘/new_user’)
def add_user_view():
return render_template(‘add.html’)
@app.route(‘/add’, methods=[’POST’])
def add_user():
conn = None
cursor = None
try:
_name = request.form[’inputName’]
_email = request.form[’inputEmail’]
_password = request.form[’inputPassword’]
# validate the received values
if _name and _email and _password and request.method == ‘POST’:
#do not save password as a plain text
_hashed_password = generate_password_hash(_password)
# save edits
sql = “INSERT INTO tbl_user(user_name, user_email, user_password)
VALUES(%s, %s, %s)“
data = (_name, _email, _hashed_password,)
conn = mysql.connect()
cursor = conn.cursor()
cursor.execute(sql, data)
conn.commit()
flash(‘User added successfully!’)
return redirect(‘/’)
else:
return ‘Error while adding user’
except Exception as e:
print(e)
finally:
cursor.close()
conn.close()
@app.route(‘/’)
def users():
conn = None
cursor = None
try:
conn = mysql.connect()
cursor = conn.cursor(pymysql.cursors.DictCursor)
cursor.execute(“SELECT * FROM tbl_user”)
rows = cursor.fetchall()
table = Results(rows)
table.border = True
return render_template(‘users.html’, table=table)
except Exception as e:
print(e)
finally:
cursor.close()
conn.close()
@app.route(‘/edit/<int:id>‘)
def edit_view(id):
conn = None
cursor = None
try:
conn = mysql.connect()
cursor = conn.cursor(pymysql.cursors.DictCursor)
cursor.execute(“SELECT * FROM tbl_user WHERE user_id=%s”, id)
row = cursor.fetchone()
if row:
return render_template(‘edit.html’, row=row)
else:
return ‘Error loading #{id}’.format(id=id)
except Exception as e:
print(e)
finally:
cursor.close()
conn.close()
@app.route(‘/update’, methods=[’POST’])
def update_user():
conn = None
cursor = None
try:
_name = request.form[’inputName’]
_email = request.form[’inputEmail’]
_password = request.form[’inputPassword’]
_id = request.form[’id’]
# validate the received values
if _name and _email and _password and _id and request.method == ‘POST’:
#do not save password as a plain text
_hashed_password = generate_password_hash(_password)
print(_hashed_password)
# save edits
sql = “UPDATE tbl_user SET user_name=%s, user_email=%s, user_password=%s
WHERE user_id=%s”
data = (_name, _email, _hashed_password, _id,)
conn = mysql.connect()
cursor = conn.cursor()
cursor.execute(sql, data)
conn.commit()
flash(‘User updated successfully!’)
return redirect(‘/’)
else:
return ‘Error while updating user’
except Exception as e:
print(e)
finally:
cursor.close()
conn.close()
@app.route(‘/delete/<int:id>‘)
def delete_user(id):
conn = None
cursor = None
try:
conn = mysql.connect()
cursor = conn.cursor()
cursor.execute(“DELETE FROM tbl_user WHERE user_id=%s”, (id,))
conn.commit()
flash(‘User deleted successfully!’)
return redirect(‘/’)
except Exception as e:
print(e)
finally:
cursor.close()
conn.close()
if __name__ == “__main__”:
app.run()
5. Create a File tables.py
Finally, create below tables.py script under user_crud directory, which shows a list of user data into tabular format on the HTML template file on the home page. Notice how we have added two links for updating and deleting records from table data using LinkCol from the flask module.
Subsequently, in the below script, we declare a class results, where the left side of the assignments indicate table column names and right side of the assignment indicates What we want to show as a header in the HTML table. We don’t want to show user_id and user_password, and that’s why we use show=False as a second argument.
We have added two links for update and delete at the rightmost column for updating and deleting an existing user.
from flask_table import Table, Col, LinkCol
class Results(Table):
user_id = Col(‘Id’, show=False)
user_name = Col(‘Name’)
user_email = Col(‘Email’)
user_password = Col(‘Password’, show=False)
edit = LinkCol(‘Edit’, ‘edit_view’, url_kwargs=dict(id=’user_id’))
delete = LinkCol(‘Delete’, ‘delete_user’, url_kwargs=dict(id=’user_id’))
6. Create A File users.html
Now create users.html file and put it under the templates directory. Notice how we are using flask EL expression to use a variable to show data into an HTML file.
Moreover, we have added a link using which a user will be able to add a new user.
Also, you can check for any message and display. We display messages from the flash scope, and for this, we need session and for a session, a secret key, and therefore, we have configured Secret Key in app.py script.
Finally, we show the user data into an HTML table.
<doctype html>
<title>List of users - Python Flask MySQL CRUD</title>
<p><a href="{{ url_for('.add_user_view') }}"> Add User </a></p>
<p>
{% with messages = get_flashed_messages() %}
{% if messages %}
<ul class=flashes>
{% for message in messages %}
<li>{{ message }}</li>
{% endfor %}
</ul>
{% endif %}
{% endwith %}
</p>
{{ table }}
7. Create An add.html File
Create below add.html file with the following code and put it under templates directory. Here the action defines end-point added in main.py script, and it will be called when a user clicks on the Submit button on the form.
<doctype html>
<title>Add User - Python Flask MySQL CRUD</title>
<h2>Add User</h2>
<form method="post" action="/add">
<dl>
<p>
<input name="inputName" value="" type="text"
placeholder=”Name” autocomplete=”off” required>
</p>
<p>
<input name="inputEmail" value="" type="text"
placeholder=”Email” autocomplete=”off” required>
</p>
<p>
<input name="inputPassword" value="" type="password"
placeholder=”Password” autocomplete=”off” required>
</p>
</dl>
<p>
<input type="submit" value="Submit">
</p>
</form>
8. Create an edit.html File
Create below edit.html file with the following code and put it under templates directory. Notice how we show data from the MySQL database when the user wants to update the existing information. It will help them know what data already exists in the database, and if the user does not want to update all information, then he/she may update only the information he/she needs.
<doctype html>
<title>Edit User - Python Flask MySQL CRUD</title>
<h2>Edit User</h2>
<form method="post" action="/update">
<dl>
<p>
<input name="inputName" value="{{ row['user_name'] }}"
type=”text” placeholder=”Name” autocomplete=”off” required>
</p>
<p>
<input name="inputEmail" value="{{ row['user_email'] }}"
type=”text” placeholder=”Email” autocomplete=”off” required>
</p>
<p>
<input name="inputPassword" value=""
type=”password” placeholder=”Password” autocomplete=”off” required>
</p>
</dl>
<p>
<input name="id" value="{{ row['user_id'] }}" type="hidden">
<input type="submit" value="Submit">
</p>
</form>
We don’t need to create any template view for deleting user information. As we delete using the end-point operation and redirect it to the home page.
Please feel free to share your feedback and your opinion in the comments section below. To know more about our services please visit https://www.loginworks.com/.
0 notes
Photo

Google App Engine上のFlaskでレスポンスをNo Content(204)で返す方法を調べた https://ift.tt/2z6PEGT
概要
Flaskで実装したRESTfulなAPIをローカルで検証してから、Google App Engine(GAE)にデプロイしたところ、謎の500エラーに遭遇しました。 調べてみたら、No Content(204) ステータスコードでレスポンスする実装がよろしくなかったのが原因でした。
下記は問題がない実装です。
from flask import Flask, make_response app = Flask(__name__) @app.route('/good_no_content', methods=['GET']) def good_no_content(): response = make_response('', 204) response.mimetype = app.config['JSONIFY_MIMETYPE'] return response if __name__ == '__main__': app.run()
これだと、ローカル上でもGAE上でも
> curl http://~~~/good_no_content -o /dev/null -w '%{content_type}\n%{http_code}\n' -s application/json 204
っていい感じにレスポンスが返ってきます。
再現してみる
GitHubにもソースをアップしていますので、ご参考ください。 https://github.com/kai-kou/how-to-use-gae-no-content
ローカルで動作確認
まずはローカルで動作するようにします。
Pythonの環境は直でも仮想環境上でもDocker上でもご自由にどうぞ。 ここではvenv を利用して仮想環境を作ってます。
> mkdir 任意のディレクトリ > cd 任意のディレクトリ > python -m venv venv > . venv/bin/activate > touch app.py > touch requirements.txt
あとで、GAEにデプロイするので、requirements.txt ファイルを作成してからpip install します。
requirements.txt
flask gunicorn
> pip install -r requirements.txt
ステータスコードが正しく返せるかの検証なので、メソッドはGETにしています。 返却する内容を'' とすると、Content-Type がtext/html になるので、make_response のあとに、mimetype を指定しています。
だめな方は'' ではなく、None としています。
app.py
from flask import Flask, jsonify, make_response app = Flask(__name__) # GAEでも動作する @app.route('/good_no_content', methods=['GET']) def good_no_content(): response = make_response('', 204) response.mimetype = app.config['JSONIFY_MIMETYPE'] return response # GAEで500エラーになる @app.route('/bad_no_content', methods=['GET']) def bad_no_content(): response = make_response(jsonify(None), 204) return response if __name__ == '__main__': app.run()
環境が用意できたので、ローカル上で動作確認します。
> flask run
flask_runしてないコンソール
> curl 127.0.0.1:5000/good_no_content -o /dev/null -w '%{content_type}\n%{http_code}\n' -s application/json 204 > curl 127.0.0.1:5000/bad_no_content -o /dev/null -w '%{content_type}\n%{http_code}\n' -s application/json 204
両方とも正しく動作します。Flaskのログをみても問題ありません。
* Running on http://127.0.0.1:5000/ (Press CTRL+C to quit) 127.0.0.1 - - [30/Oct/2018 11:32:00] "GET /good_no_content HTTP/1.1" 204 - 127.0.0.1 - - [30/Oct/2018 11:32:23] "GET /bad_no_content HTTP/1.1" 204 -
GAEではgunicorn を利用するので、ローカルでも確認しておきます。
flask_runしてたコンソール
> gunicorn -b 127.0.0.1:5000 app:app --log-level DEBUG
gunicornしてないコンソール
> curl 127.0.0.1:5000/good_no_content -o /dev/null -w '%{content_type}\n%{http_code}\n' -s application/json 204 > curl 127.0.0.1:5000/bad_no_content -o /dev/null -w '%{content_type}\n%{http_code}\n' -s application/json 204
こちらも両方とも動作します。
[2018-10-30 11:37:53 +0900] [62134] [INFO] Starting gunicorn 19.9.0 [2018-10-30 11:37:53 +0900] [62134] [DEBUG] Arbiter booted [2018-10-30 11:37:53 +0900] [62134] [INFO] Listening at: http://127.0.0.1:5000 (62134) [2018-10-30 11:37:53 +0900] [62134] [INFO] Using worker: sync [2018-10-30 11:37:53 +0900] [62139] [INFO] Booting worker with pid: 62139 [2018-10-30 11:37:53 +0900] [62134] [DEBUG] 1 workers [2018-10-30 11:37:54 +0900] [62139] [DEBUG] GET /good_no_content [2018-10-30 11:38:02 +0900] [62139] [DEBUG] GET /bad_no_content
GAEで確認
GAEにデプロイして確認してみます。以下前提の手順となります。
GCPプロジェクトでGAEが利用可能
gcloud がインストール済み
> touch app.yaml
ここではスタンダード環境にデプロイします。 service を指定しないと、default にデプロイされますので、ご注意ください。how-to-use-no-content-status としているのは任意で変更してください。
app.yaml
runtime: python37 env: standard service: how-to-use-no-content-status entrypoint: gunicorn -b :$PORT app:app --log-level DEBUG runtime_config: python_version: 3 automatic_scaling: min_idle_instances: automatic max_idle_instances: automatic min_pending_latency: automatic max_pending_latency: automatic
デプロイします。
> gcloud app deploy Services to deploy: descriptor: [任意のディレクトリ/app.yaml] source: [任意のディレクトリ] target project: [GCPのプロジェクトID] target service: [how-to-use-no-content-status] target version: [20181030t114334] target url: [https://how-to-use-no-content-status-dot-[GCPのプロジェクトID].appspot.com] Do you want to continue (Y/n)? Y Beginning deployment of service [how-to-use-no-content-status]... (略) Deployed service [how-to-use-http-status-code] to [https://how-to-use-no-content-status-dot-[GCPのプロジェクトID].appspot.com] You can stream logs from the command line by running: $ gcloud app logs tail -s how-to-use-no-content-status To view your application in the web browser run: $ gcloud app browse -s how-to-use-no-content-status
デプロイできたらアクセスしてみます。
> curl https://how-to-use-no-content-status-dot-[GCPのプロジェクトID].appspot.com/good_no_content -o /dev/null -w '%{content_type}\n%{http_code}\n' -s application/json 204 > curl https://how-to-use-no-content-status-dot-[GCPのプロジェクトID].appspot.com/bad_no_content -o /dev/null -w '%{content_type}\n%{http_code}\n' -s text/html; charset=UTF-8 500
bad_no_content でエラーになりました。。。 GAEのログをみても詳細はわかりません。。。むむむ。。。
> gcloud app logs read -s how-to-use-no-content-status 2018-10-30 02:46:21 how-to-use-http-status-code[20181030t114334] "GET /good_no_content HTTP/1.1" 204 2018-10-30 02:46:31 how-to-use-http-status-code[20181030t114334] "GET /bad_no_content HTTP/1.1" 500
GAEの環境を変更してみる
GAEのフレキシブル環境だとどうなるか設定を変更してみました。
app.yaml
runtime: python env: flex service: how-to-use-http-status-code entrypoint: gunicorn -b :$PORT app:app --log-level DEBUG runtime_config: python_version: 3
> gcloud app deploy
> curl https://how-to-use-no-content-status-dot-[GCPのプロジェクトID].appspot.com/good_no_content -o /dev/null -w '%{content_type}\n%{http_code}\n' -s application/json 204 > curl https://how-to-use-no-content-status-dot-[GCPのプロジェクトID].appspot.com/bad_no_content -o /dev/null -w '%{content_type}\n%{http_code}\n' -s 000
Content-Type とHttp-Code が取得できなったので、-v で。
> curl https://how-to-use-no-content-status-dot-[GCPのプロジェクトID].appspot.com/bad_no_content -v (略) * Connection state changed (MAX_CONCURRENT_STREAMS updated)! * http2 error: Invalid HTTP header field was received: frame type: 1, stream: 1, name: [content-length], value: [5] * HTTP/2 stream 1 was not closed cleanly: PROTOCOL_ERROR (err 1) * Closing connection 0 * TLSv1.2 (OUT), TLS alert, Client hello (1): curl: (92) HTTP/2 stream 1 was not closed cleanly: PROTOCOL_ERROR (err 1)
むむむ。フレキシブル環境だとDockerコンテナで動作するのでいけるかな?と思ったのですが、なにか違ったエラーがでてきました。
ま���め
原因がつかめずモヤモヤしますが、ひとまず、HTTPステータスコードをNo Content(204)で返すときは下記のようにするのがよさそうです。
from flask import Flask, make_response app = Flask(__name__) @app.route('/good_no_content', methods=['GET']) def good_no_content(): response = make_response('', 204) response.mimetype = app.config['JSONIFY_MIMETYPE'] return response
参考
Flask return 204 No Content response https://www.erol.si/2018/03/flask-return-204-no-content-response/
cURLでHTTPステータスコードだけを取得する https://qiita.com/mazgi/items/585348b6cdff3e320726
元記事はこちら
「Google App Engine上のFlaskでレスポンスをNo Content(204)で返す方法を調べた」
November 13, 2018 at 02:00PM
0 notes
Text
Salesforce and Quickbooks Integration
I recently started a business and the premise is that we can integrate everything and automate everything. This is in fact the goal and the driving force behind the business. So to start off, why not take on a project that requires integrating an application with the two monoliths, Quickbooks and Salesforce. The client wants a customer portal that will show quickbooks data and salesforce data based on the customer that is signed in. I played around with two potential ideas 1. Download all the client data and seed a database that we will control and maintain. A daemon (or similar) will be used to poll Quickbooks and Salesforce for updates to the database. 2. Make an api call to quickbooks and salesforce with the user data that we store in a database when the user logs in. The results of the query will then be stored in a database as JSON with the account name as the key and a timestamp, sort of like an extended cache system. Then, after a certain amount of time passes, the past query is determined expired and a new query will be made when the user logs in.
We investigated both of these options and spoke more with the client about their expectations and what we found was that
quickbooks api cannot work without getting an application certified and registered with them
there will not be a lot of traffic or a lot of updates to the data in Salesforce or Quickbooks and
The client has the expectation of a tight turn around (under 2 weeks)
In the end, the decision was made to go with version 2. There were a lot of hurdles, here is a rundown on how we made it work with the following technologies: Google App Engine (more on this here) Python Flask Firebase (more on this here) AWS S3 Excel Spreadsheets Salesforce API + SOQL Python and Flask are used to manage the backend of the service. My previous post discusses the use of AJAX and jQuery to interact with the backend. After a user is successfully authenticated using firebase (blog post here), the backend has information about the user’s email, name and their token. This is stored in a claim object, but the claim object does not have information about the user’s salesforce id, quickbooks id, region etc. because this is information the user does not know and will not sign up with. In this case we had to make the connection between the two. So the first hurdle is managing the users data needed for quickbooks and salesforce. In this case we created a google datastore model of the user’s information and will use the user’s email to query the information. # [START User] class User_ext(ndb.Model): # NDB model class for a user, which contains their information sf_id = ndb.StringProperty() qb_company_name = ndb.StringProperty() qb_emails = ndb.StringProperty() account_owner = ndb.StringProperty() account_email = ndb.StringProperty() region = ndb.StringProperty() # [END User] now when a user logs in we can get their sf_id and the qb_company_name which we will use for getting their information. This information can be easily added or updated using an admin backend like flask-admin. or programmatically added by seeding the database. Now that we have the user information we will make our queries to salesforce and quickbooks.
Salesforce
Salesforce ended up being the easier of the two. Using a python module called simple-salesforce I could easily access the salesforce instance and make salesforce queries. There are some particulars with SOQL that make it more difficult to use than a vanilla SQL. I am not an expert here, but with the developer tools from salesforce and some nice walkthroughs online, it is fairly easy to get what you want back. I ended up querying for the opportunity line items for a particular client using their salesforce id. Here is a very straightforward walkthrough of getting started with simple-salesforce from Salesforce themselves. Once the data was pulled from salesforce it was stored into an object that would be sent back to the front end with the other user information. here is an example code snippet of a query: sf = Salesforce(username='username', password='password', security_token='this-is-my-token') #first query for opportunity line items by account id op_id_payload = sf.query_all("SELECT id, account.name from opportunity where account.id = "+ "'" + customer + "'")['records'] # get list of opportunity ids op_ids = [] for op_id in op_id_payload: op_ids.append(op_id['Id'])
# another query for the product information based on opId data = [] for opId in op_ids: op_line_item = sf.query_all("SELECT Id, Name, (Select Id, Quantity, TotalPrice, PricebookEntry.Product2.ProductCode, PricebookEntry.Product2.Name From OpportunityLineItems) From Opportunity Where Id = " + "'" +opId+"'")
Quickbooks
Quickbooks quickly became another story... After playing around with a few different python modules and understanding how to query from quickbooks, it became apparent that we couldn’t actually go this route because releasing a production app for quickbooks would take too long and too many resources. We had to find another way. The solution - have the client upload 2 reports generated from quickbooks every week or so. The reports would be parsed based on the customer information and it would essentially act like a datastore. the question became, what was the easiest and fastest way to allow our users to upload the required documents and how should they be parsed because there was a lot of mismatching information between inventory on hand, company name and products on invoices. A very robust method was needed to match this information.
Upload
S3 to the rescue. using s3 and flask admin, we could create an admin page that allowed the users to upload the documents to an s3 bucket. This is easy to set up with
tutorials on s3
and a
flask-admin plugin
.
Download
Based on the workflow we decided upon, when a user logs in, the request will then be made first to the database, and if nothing exists or the record is too old, it will get the information from the latest uploaded files (transactions and inventory) with the correct name in the s3 bucket.
To do this, our flask backend requests the s3 resource and then will read the excel document . Below is an example of reading an excel file with xlrd and urllib from an s3 bucket:
def read_excel(filename, header_row = 0, start_row = 1, start_col = 0):
opener = urllib.URLopener()
myurl = "https://s3-<region>.amazonaws.com/<bucket-name>/" + filename
myfile = opener.open(myurl).read() # Open the workbook
xl_workbook = xlrd.open_workbook(file_contents = myfile)
# List sheet names, and pull a sheet by name
sheet_names = xl_workbook.sheet_names() sheet = xl_workbook.sheet_by_name(sheet_names[0])
# Pull the headers using the provided inputs by index
headers = [sheet.cell(header_row, col_index).value for col_index in xrange(sheet.ncols)]
# make a dictionary with the headers
dict_list = []
for row_index in xrange(start_row, sheet.nrows):
d = {headers[col_index]: sheet.cell(row_index, col_index).value
for col_index in xrange(sheet.ncols)}
dict_list.append(d) return(dict_list)
return dict_list
Parsing
Pandas, numpy and google app engine. I usually use pandas and numpy to manipulate data in csv or excel formats. Its quick and easy and saves a lot of time. Unfortunately google app engine only allows numpy==1.6.1, which does not play well with pandas, which requires numpy=>1.7.1. So this meant I had to do it the long way, but what is probably the better method with less dependencies. Part of this is in the example listed above.
The next hurdle was matching the names. There would be one variation of the company name from our database of customers and we had many variations of the name in the transactions spreadsheet as well as the inventory spreadsheet. I used a combination of regex, fuzzy string matching (thank you
fuzzywuzzy
), tuning and unambiguous name portion matching to create a ranking algorithm of whether names were a “match” or not. The matches are then returned as objects which are stored in the database of records with a timestamp and then returned to the front end with other user information.
Conclusion
After working through the various hurdles, the conclusion is that the quickbooks API is a forest and very difficult to find your way through and their method of sandboxing the API does not allow for very easy integrations for small businesses. Although there are some integrations available on Zapier etc. they do not have a search functionality and are very limited. Salesforce’s API is much easier to work with and their developer tools allows for a much easier integration.
0 notes
Text
PyJWT or a Flask Extension?
In our last blog post on JWT, we saw code examples based on the PyJWT library. A quick Google search also revealed a couple of Flask-specific libraries. What do we use?
We can implement the functionality with PyJWT. It will allow us fine-grained control. We would be able to customize every aspect of how the authentication process works. On the other hand, if we use Flask extensions, we would need to do less since these libraries or extensions already provide some sort of integrations with Flask itself. Also personally, I tend to choose my framework-specific libraries for a task. They reduce the number of tasks required to get things going.
In this blog post, we would be using the Flask-JWT package.

Getting Started
Before we can begin, we have to install the package using pip.
pip install Flask-JWT
We also need an API endpoint that we want to secure. We can refer to the initial code we wrote for our HTTP Auth tutorial.
from flask import Flask
from flask_restful import Resource, Api
app = Flask(__name__)
api = Api(app, prefix=”/api/v1")
class PrivateResource(Resource):
def get(self):
return {“meaning_of_life”: 42}
api.add_resource(PrivateResource, ‘/private’)
if __name__ == ‘__main__’:
app.run(debug=True)
Now we work on securing it.
Flask JWT Conventions
Flask JWT has the following convention:
There need to be two functions — one for authenticating the user, this would be quite similar to the verify the function. The second function’s job is to identify the user from a token. Let’s call this function identity.
The authentication function must return an object instance that has an attribute named id.
To secure an endpoint, we use the @jwt_required decorator.
An API endpoint is set up at /auth that accepts username and password via JSON payload and returns access_token which is the JSON Web Token we can use.
We must pass the token as part of the Authorization header, like — JWT <token>.
Authentication and Identity
First, let’s write the function that will authenticate the user. The function will take in username and password and return an object instance that has the attribute. In general, we would use the database and the id would be the user id. But for this example, we would just create an object with an id of our choice.
USER_DATA = {
“masnun”: “abc123”
}
class User(object):
def __init__(self, id):
self.id = id
def __str__(self):
return “User(id=’%s’)” % self.id
def verify(username, password):
if not (username and password):
return False
if USER_DATA.get(username) == password:
return User(id=123)
We are storing the user details in a dictionary-like before. We have created a user class with id attributes so we can fulfill the requirement of having an id attribute. In our function, we compare the username and password and if it matches, we return an instance with the being 123. We will use this function to verify user logins.
Next, we need the identity function that will give us user details for a logged-in user.
def identity(payload):
user_id = payload[‘identity’]
return {“user_id”: user_id}
The identity the function will receive the decoded JWT.
An example would be like:
{‘exp’: 1494589408, ‘iat’: 1494589108, ‘nbf’: 1494589108, ‘identity’: 123}
Note the identity key in the dictionary. It’s the value we set in the id attribute of the object returned from the verify function. We should load the user details based on this value. But since we are not using the database, we are just constructing a simple dictionary with the user id.
Securing Endpoint
Now that we have a function to authenticate and another function to identify the user, we can start integrating Flask JWT with our REST API. First the imports:
from flask_jwt import JWT, jwt_required
Then we construct the jwt instance:
jwt = JWT(app, verify, identity)
We pass the flask app instance, the authentication function and the identity function to the JWT class.
Then in the resource, we use the @jwt_required decorator to enforce authentication.
class PrivateResource(Resource):
@jwt_required()
def get(self):
return {“meaning_of_life”: 42}
Please note the jwt_required decorator takes a parameter (realm) which has a default value of None. Since it takes the parameter, we must use the parentheses to call the function first — @jwt_required() and not just @jwt_required. If this doesn’t make sense right away, don’t worry, please do some study on how decorators work in Python and it will come to you.
Here’s the full code:
from flask import Flask
from flask_restful import Resource, Api
from flask_jwt import JWT, jwt_required
app = Flask(__name__)
app.config[‘SECRET_KEY’] = ‘super-secret’
api = Api(app, prefix=”/api/v1")
USER_DATA = {
“masnun”: “abc123”
}
class User(object):
def __init__(self, id):
self.id = id
def __str__(self):
return “User(id=’%s’)” % self.id
def verify(username, password):
if not (username and password):
return False
if USER_DATA.get(username) == password:
return User(id=123)
def identity(payload):
user_id = payload[‘identity’]
return {“user_id”: user_id}
jwt = JWT(app, verify, identity)
class PrivateResource(Resource):
@jwt_required()
def get(self):
return {“meaning_of_life”: 42}
api.add_resource(PrivateResource, ‘/private’)
if __name__ == ‘__main__’:
app.run(debug=True)
Let’s try it out.
Trying It Out
Run the app and try to access the secured resource:
$ curl -X GET http://localhost:5000/api/v1/private
{
“description”: “Request does not contain an access token”,
“error”: “Authorization Required”,
“status_code”: 401
}
Makes sense. The endpoint now requires an authorization token. But we don’t have one, yet!
Let’s get one — we must send a POST request to /auth with a JSON payload containing username and password. Please note, the API prefix is not used, that is the URL for the auth endpoint is not /api/v1/auth. But it is just /auth.
$ curl -H “Content-Type: application/json” -X POST -d ‘{“username”:”masnun”,”password”:”abc123"}’ http://localhost:5000/auth
{
“access_token”: “eyJ0eXAiOiJKV1QiLCJhbGciOiJIUzI1NiJ9.eyJleHAiOjE0OTQ1OTE4MjcsIml
hdCI6MTQ5NDU5MTUyNywibmJmIjoxNDk0NTkxNTI3LCJpZGVudGl0eSI6MTIzfQ.q0p02opL0OxL7EGD7
wiLbXbdfP8xQ7rXf7–3Iggqdi4"
}
Yes, we got it. Now let’s use it to access the resource.
curl -X GET http://localhost:5000/api/v1/private -H “Authorization: JWT eyJ0eXAiOi
JKV1QiLCJhbGciOiJIUzI1NiJ9.eyJleHAiOjE0OTQ1OTE4MjcsImlhdCI6MTQ5NDU5MTUyNywibmJmIjo
xNDk0NTkxNTI3LCJpZGVudGl0eSI6MTIzfQ.q0p02opL0OxL7EGD7wiLbXbdfP8xQ7rXf7–3Iggqdi4"
{
“meaning_of_life”: 42
}
Yes, it worked! Now our JWT authentication is working.
Getting the Authenticated User
Once our JWT authentication is functional, we can get the currently authenticated user by using the current_identity object.
Let’s add the import:
from flask_jwt import JWT, jwt_required, current_identity
And then let’s update our resource to return the logged in user identity.
class PrivateResource(Resource):
@jwt_required()
def get(self):
return dict(current_identity)
The current_identity the object is a LocalProxy instance that can’t be directly JSON serialized. But if we pass it to a dict() call, we can get a dictionary representation.
Now let’s try it out:
$ curl -X GET http://localhost:5000/api/v1/private -H “Authorization: JWT eyJ0eXAi
OiJKV1QiLCJhbGciOiJIUzI1NiJ9.eyJleHAiOjE0OTQ1OTE4MjcsImlhdCI6MTQ5NDU5MTUyNywibmJmI
joxNDk0NTkxNTI3LCJpZGVudGl0eSI6MTIzfQ.q0p02opL0OxL7EGD7wiLbXbdfP8xQ7rXf7–3Iggqdi4"
{
“user_id”: 123
}
As we can see the current_identity the object returns the exact same data our identity the function returns because Flask JWT uses that function to load the user identity.
Do share your feedback with us. We hope you enjoyed this post.
To know more about our services please visit: https://www.loginworks.com/web-scraping-services
0 notes