#I have a super consistent art style
Text
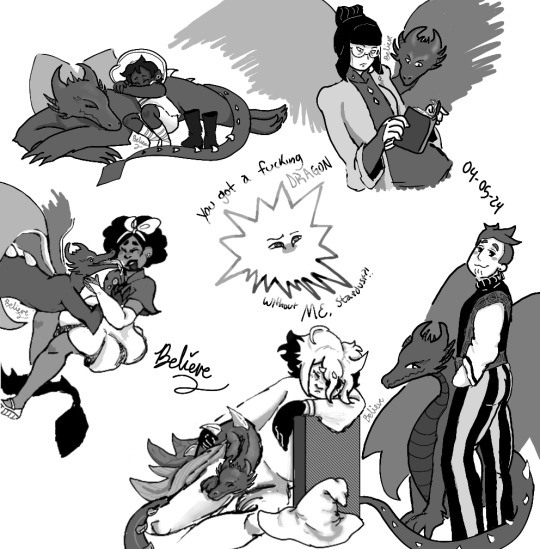
I just wanted to give Siffrin a therapy dragon cuz he deserves it and then my brainrot went brrrrr and I drew the whole crew with the dragon plus a Lil Loop doodle cuz how could I not.
#isat spoilers#in stars and time#isat fanart#fanart#isat isabeau#isat siffrin#isat loop#isat mirabelle#isat bonnie#isat odile#You know the Meelog therapy animal trope in fantasy?#That but make it dragons#Please pretend this dragon is very consistent#Definitely not radically different sizes or anything else#I have a super consistent art style#You believe me right
56 notes
·
View notes
Text


im normal about them btw <-liar
(zoom in for a closer look at everything)
#can u tell who my favorite is.......... /j. Tootally not like i drew him 1 grillion times more than anyone else 😋😋#varian the character ever. also hes so me its insane. i feel like they took everything about me and used it to write him HES ACTUALLY ME#Ok now to never post about tangled the series and vat7k again :3 (lieee i have another vat7k wip)#sorry for the inconsistent ass art style here everypony.... ive both been experimenting w my style AND havent drawn these guys in forever#soo. not consistent. whatevs its just doodles. throws them at you and sprints away super fast#cam.art#tangled the series#vat7k#varian and the 7 kingdoms#fuck now i have to tag everyone. hjjdkviuuv Fuck this stupid baka life#varian tts#varian vat7k#rapunzel tts#cassandra tts#ugghghfhfh#hugo vat7k#varigo#alchemy boyfriends#nuru vat7k#princess nuru#yong vat7k#amberuru#rapunzels tangled adventure
216 notes
·
View notes
Text

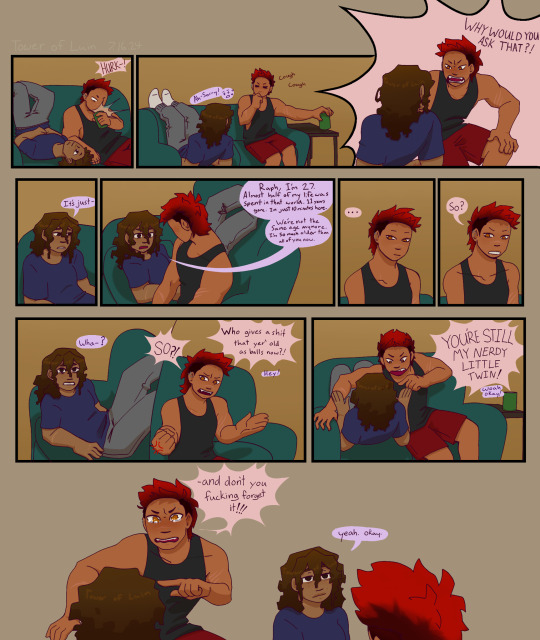

C’mon Raph, don’t noogie the elderly
(Or: finally, communication)
#extended stay au#art#fanart#digital art#tmnt#tmnt 2003#donatello#raphael#sainw au#sainw#gijinka#TIME TO RAMBLE:#so of course I had to continue dons allergy to sitting like a normal person#even though it made this WAY harder than it needed to be#and I will never have one of those super consistent art styles so each panel is a lil bit off lmao#they’re watching football together like in canon :]#ALSO THE SHOW MAKES THE COLORS IN THE LAIR WORK BUT CHRIST THE COUCH AND WALL COMBO IS GRATING TO LOOK AT#WHY IS IT DARK TEAL#NOW ONTO PLANS and a lil treat for y’all who read these#the next comic is already underway and it’s going to be a multi parter#AND I’m drawing them AS turtles in it so canon designs#AND there’s conflict#mikey fans rejoice#I have part 1 sketched out but I wanna do some. actual writing. to make sure the timeline fits and to deal w multiple things at once#ITS A BIG UNDERTAKING FOR ME#also calling don old is so funny to me cause I’m 25 that’s basically me
116 notes
·
View notes
Text
zoscar, as promised 😌
#bluebird.txt#bluebird’s art#rqg#rusty quill gaming#zoscar#i’m so proud of this you don’t understand#is it amazing no but i think it’s pretty gosh darn good#and the most important part is i had hella fun drawing it <3#just a man and his significant annoyance <3#platonic life partners zoscar truly means so much to me.#i’m a little self conscious but you know what no. Look At My Art Boy.#i don’t really keep my art style super consistent in terms of like the brushes i use or whether i always draw realistic-er or how i color#but i am curious what some immutable elements my art may have if it does have them. like what are the things that i can’t notice? what are#the things that may indicate my art is mine that i don’t notice? what gives me away?#just musing. anyways hehe ZOSCAR!!!!
28 notes
·
View notes
Text

Rest
#art#digital art#procreate#homestuck#solnep#sollux captor#nepeta leijon#had very comfy vibes with this song so wanted to do a little something with it#also apologies well in advance i havent attempted to animate anything in the slightest in a very long time#last time i animated anything was back in high school soooo yea#wanted to do something small#i just love drawing these two with comfy sleepy vibes#also will i ever have a consistent art style?#absolutely not i like messing around with brushes too much for that#and style experimentation every now and again#so getting to do that through ship art is cash money#honestly didnt mind doing extremely sketchy style for this i thought it didnt come out super horrible#enjoy yall
138 notes
·
View notes
Text
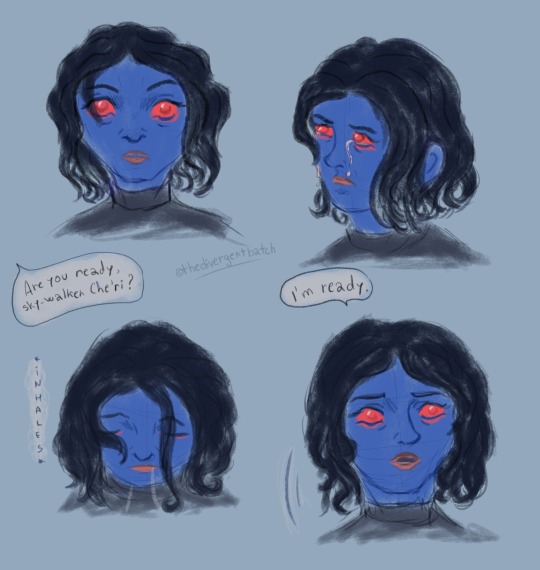
she deserves the bubbliest and warmest and the most beautifully scented baths .. and some fancy ass marker set ..... and also sleep... so much sleep...
#star wars#che'ri#sky walker che'ri#thrawn ascendancy#blueberry people#can you tell that i have absolutely no style? like i cannot be consistent in my art for shit#and that s like super fun cause i explore so much and every art is so different i kind of love it:)#with this one the mantra was: 'do you actually NEED all those lines?'#digital painting#myart#star wars fanart#thrawn#mitth'raw'nuruodo#mitth'ali'astov#chiss ascendancy#chiss art
68 notes
·
View notes
Text
Angeltober days 3-5
These are my drawings for days 3-5 of @ultrainfinitepit's Angeltober!


Day 3: Honey
This one went through the most changes from sketch to finished product; I ended up going with a medieval-beekeeper inspired thing with a huge eye instead of the basket face. I didn't have much time for this one, so it's quite rough even in its final form, but part of my goal for this challenge is to get more comfortable posting "unfinished" or "bad" art. Even if the drawing isn't great I'm gonna post one for every day (though maybe several days late...)


Day 4: Sacred Heart
I had a lot of fun with this one! I knew pretty much from the beginning what I wanted to draw--this is my OC Mariana, who I could write a whole essay on and probably will someday. The original sketch was in fountain pen, which was fun to work with since I couldn't erase anything; I'll probably use it for rough sketches again since the messiness is a good way to get ideas down.


Day 5: Horn
This is another one that didn't change much from the first concept, though it took me a while to get there--at first i had NO idea what to do, until I thought to work with some other interpretations of "horn". I'd have liked to spend more time on the final product for this one; maybe I'll revisit it someday!
#lich says shit#angeltober#my art#art style consistency?? never heard of her#I'm definitely not Super proud of all of these but I want to get better at just drawing Something every day and also get more comfortable#with posting bad art or art that i'm not happy with#Because i don't usually have time to do a whole full drawing but I really love sketching#I'll probably try to keep doing daily drawings after october--maybe I'll just recycle other inktober prompts idk#But i might be making a sideblog for that so I don't flood everyone's dash with messy sketches#oh who am i kidding. look at my posts boy
21 notes
·
View notes
Text

Beefers!
Hermit a day may, except I haven’t had any time to participate earlier than today, and also I decided to try something new with the colors :DD
#vintagebeef#hermitcraft#hermitcraft fanart#hermitaday#sheepfish draws#I am like.... super proud of how this one turned out btw#cant tell if the style is at all consistent with the few scraps of art I've made recently but idc#at least im having fun :DDD#I'm still a little busy so I can't make promises on if I'll do more for the challenge (though there is a few I'd love to do)
37 notes
·
View notes
Photo

*me listening to a song a like* hmm how do i transformer-ify this shit. Anyways, lyrics from The First Step by Will Wood.
#blaster#tf blaster#transformers#idw g1#<— this is what i had in mind anyway. i never fucking know what goddamn continuitysoup I’m in#art stuffs#erm#tw alcohol#tw alchoholism#very strongly implied especially with the song taken into account#I was messing around with a different sketch style that consisted mostly of just blocking out colors and having a good Time with it#SUPER DUPER PROUD OF THE CUP + ENERGON IN IT#I’M SO HAPPY WITH HOW THE LIQUID AND THE GLASS CAME OUT HEEHEE#fanart
20 notes
·
View notes
Note
Why do your drawings sometimes go with a super realistic style
i like to play around with different styles! most of the time i do a sort of...idk i guess its more cartoony style?


which is also closer to the style i draw with on a day to day basis
then sometimes i like to try out cute stylized art styles. they kind of vary in how they resemble each other tbh but thats more bc of the different types of simplification i look at and what im trying to do


i do realistic stuff way less but generally its bc i either want to practice rendering or because i want to do a more involved piece as a personal challenge. its good to go out of your comfort zone tbh, while i wouldnt say my realistic style is necessarily my favorite i still enjoy the end results


#my asks#i kept having to do realistic self portraits in this art class i took i hated it TAT#i also like to reference different styles to see if theres anything that i could pick up...im just realizing now im not super consistent#except w my art being more amateur. but im not here to win prizes#the first one is 100% my most common style tho if you looked at all my sketches its like that primarily#i should do more style challenges i wanted to do one w juna but couldnt pick a template
4 notes
·
View notes
Text
4 am means it's time to clog up your dash with personal posts anyways looking at ppls embroidery and my own realizing both how far ive come and how much more i can still learn/do is very cool. no i dont want to write an email in japanese.
#sel speaks#i started in december of 2019!! which is very funny and conveniently RIGHT BEFORE THE PANDEMIC#which is like. when eveyrone got into it except i got a month of extra practice lol#and to be fair i did my first real piece once i got home#but i found those photos#and like!!! i did get better!!! my stitches are cleaner now! i have a better handle on how to make things look consistent!#and i have made so many mistakes that i didnt realize were mistakes#that made everything warped etc#but ive actually gotten better and thats like. tangible!!!!#at the same time there are so many cool styles that i have yet to try#and i have so much room to grow technically and like from a basic art perspective#(obvs from the art perspective like i'll probably never be able to do like Original Needlepainting which im fine with lol)#anyways this was prompted by me seeing a hoop with some of the cleanest split stitches ever#like at first glance i thought it was machine#but you can see the texture and it's GORGEOUS#and i always thought the fun of filling stitches like that was that it idnt matter what you did#but like. if you plan it out (maybe have direction lines? practice at having more even stitching? invest in a stand?)#it can look SO PRETTY. the design was also like not super flashy it was just so well made#and that's just like. a really good example of an extremely basic thing#like im trying something similar out with my satin stitch ofmd hoop#to copy the style of the landscape artists i see#and i think im doing okay at it?#but doing dense filling like that is definitely more my vibe#might try it out when i do more chainsaw man#although those are all gonna be black and red so it'll probably be hard to see for the all black stuff
4 notes
·
View notes
Text
DISCLAIMER: SEMI-EXPLICIT VIOLENCE
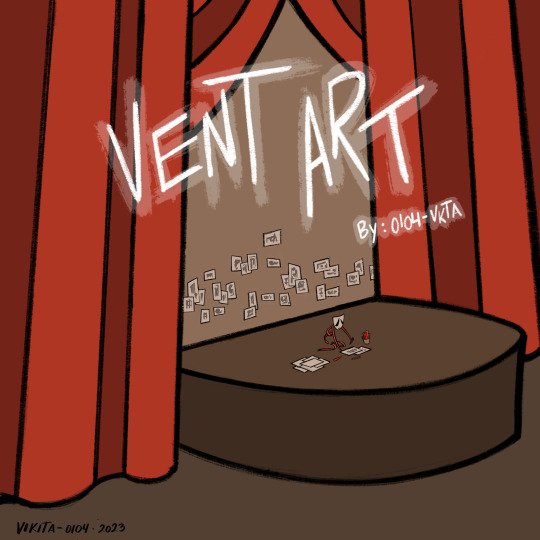
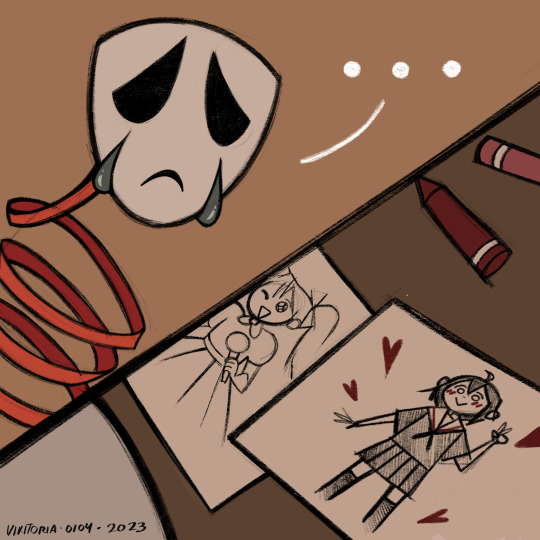
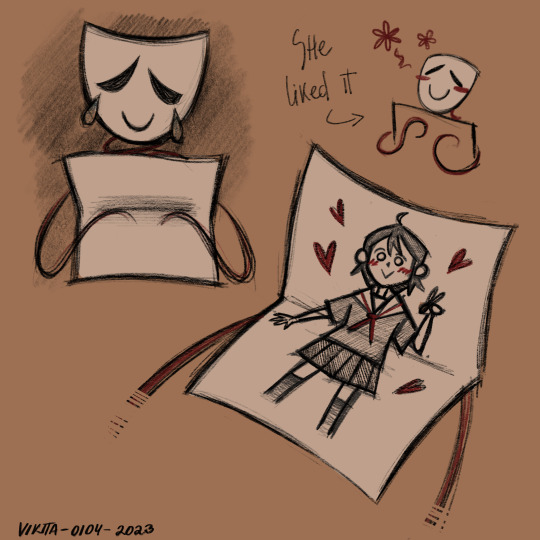
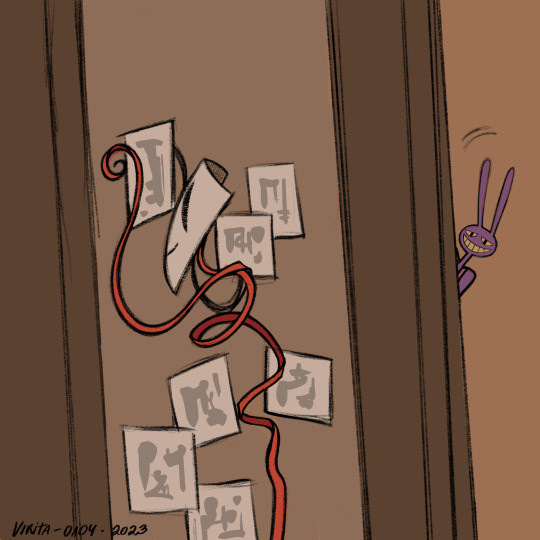
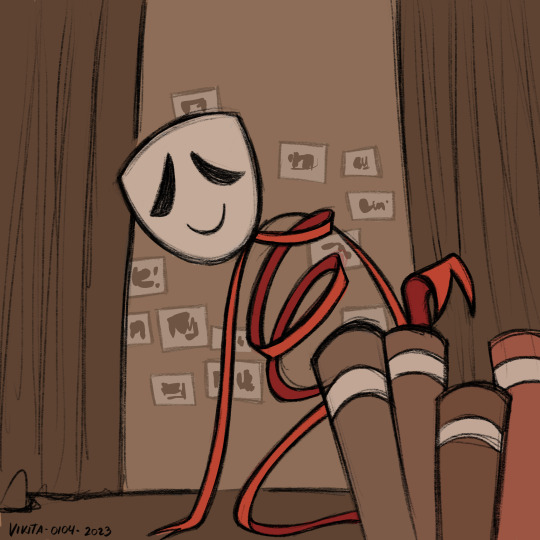
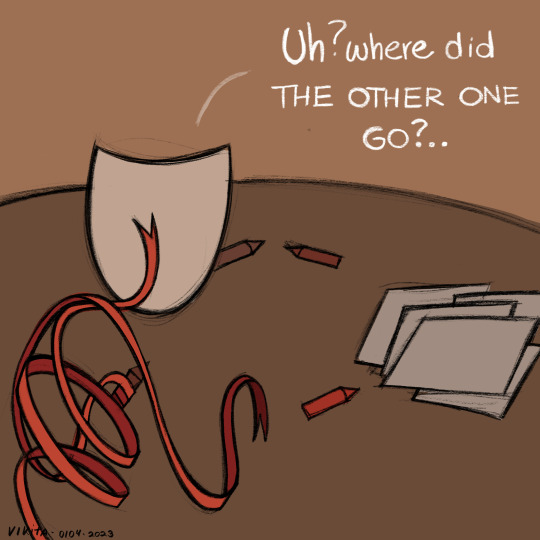
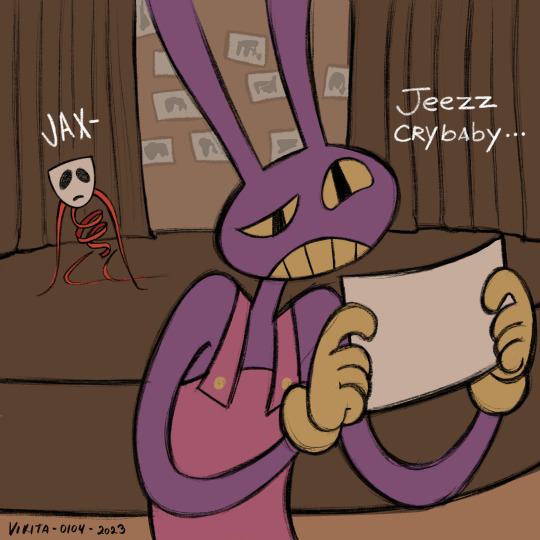
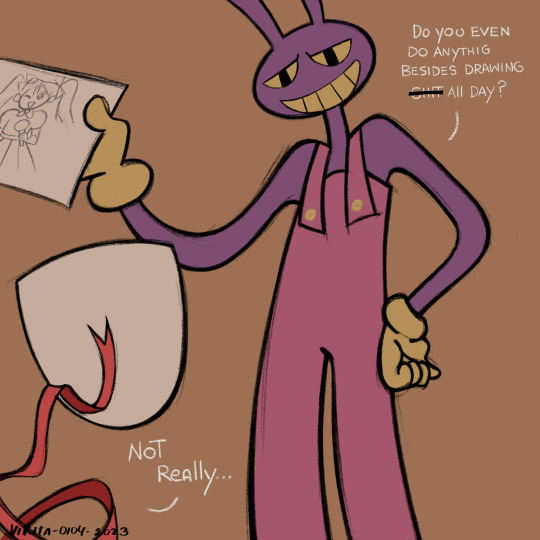
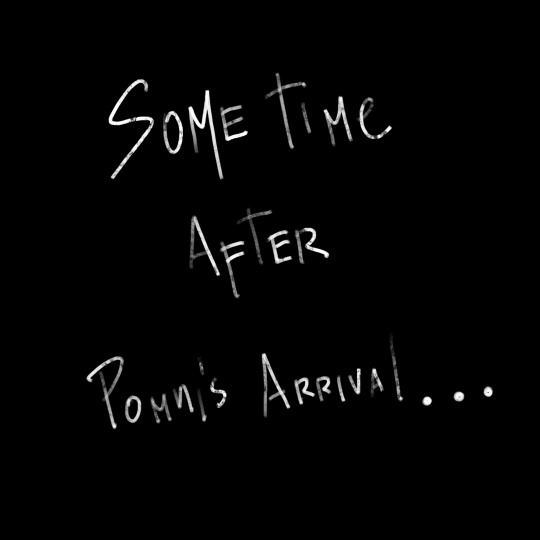
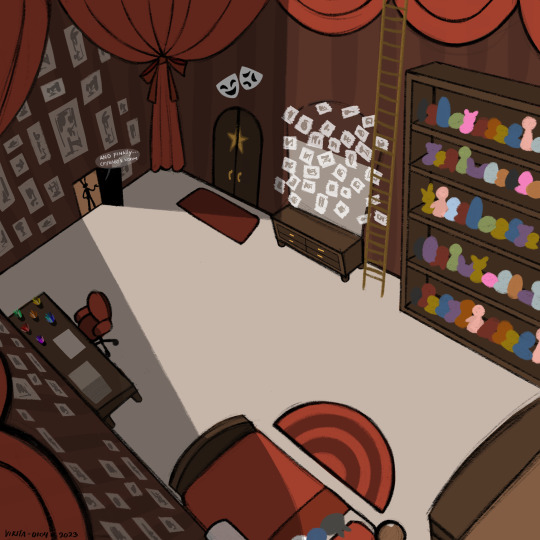
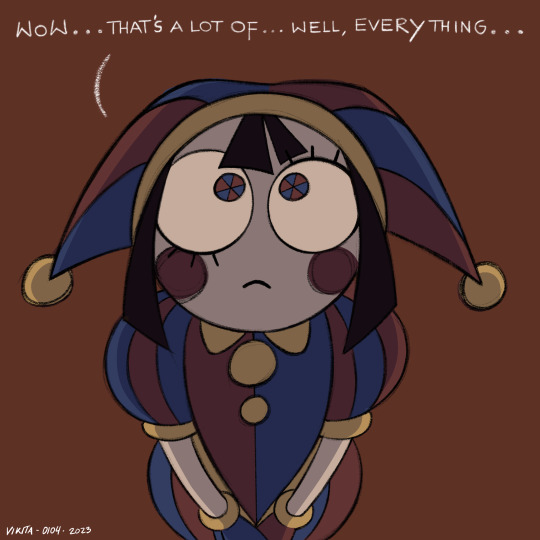
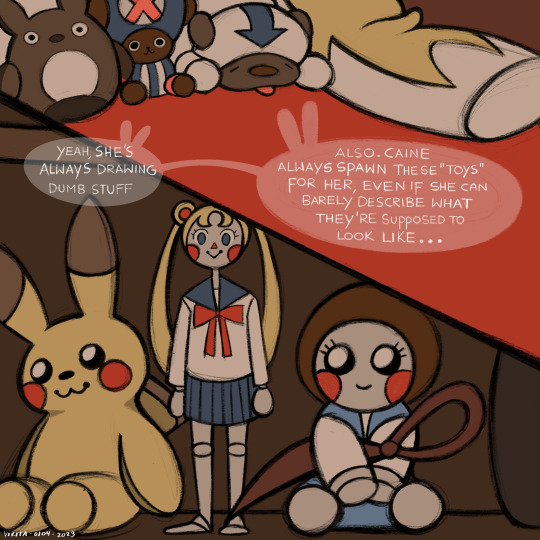
This is probably one of the most infuriating comics I have ever done. I had to go for a more "sketchy" style since doing all the slides in my usual super-clean-line art style would have taken a lot of time. I also did the colors very opaque to give a more serious tone.
If you pay attention to the scale of the room and everything on it, you'll see that it is HUGE. Made on purpose to try to be consistent with the atmosphere of the show. I also did the plushies and figures kind of inaccurate to show how she may not remember quite well how the actual characters looked like.
I'm honestly still not sure of whether he would rip a drawing apart, so don't take it too seriously. Someone please ask @gooseworx if this was out of character for Jax or if he legit would do that lmao.
As a little clarification, the comic is called Vent art because of what Gangle is doing, not because of the comic being MY Vent Art. I usually don't use art to vent.
#Yes I know Avatar isn't technically an anime. d o n ' t#thing has 20 slides like-#still don't know how i even managed to finish this#ilustration#art#digital drawing#the amazing digital circus#tadc#tadc gangle#tdac jax#fanart#tadc pomni
20K notes
·
View notes
Text
I wanna try experimenting with how I draw people and do art of things I don’t do much or enough of, like perspective, backgrounds, more than just flat colored doodles, etc
#glitchyko#glitchyko ramble#artists on tumblr#ramble#adhd artist#I don’t really have any reason in particular for saying this#I just kinda#felt like mentioning it#so yeah#if my art is different from how it normally looks#then you know why#not that my art style was super consistent to begin with-
1 note
·
View note
Note
Do you have advice on the art of sandwiches? I feel like i my best sandwich at home is still leagues below the worst sandwich ive bought at a restaurant
Since sandwiches are infinitely variable, I'm going to assume you're trying to make my favorite sandwich: the Turkey Club, sandwich style not sub style.
Your goal is to MAXIMIZE FLAVOR.
Thicker bread. Standard slice size for bread isn't going to cut it, here. You want thick-slice bread.
Sourdough, or French Bread not 'White' bread. You want it chewy, with a thicker crust. Hearty.
Extra-Heavy Mayo. Restaurants do not use standard mayo from the grocery. Extra-heavy mayo has a higher ratio of egg yolks, giving it a richer flavor and thicker consistency for both spreading and using in tuna or egg salad. It's also more of a warm ivory color, rather than 'white.'
Instead of yellow deli mustard, try a ground-whole-seed mustard. It has a spicier, richer profile, and a little more vinegar.
Be generous with condiments. You're making a good sandwich, not cutting calories.
SEASON your sandwich. Dust the vegetables - salt and pepper goes a long way! Dried oregano, onion powder, garlic powder are also champs. My fave is to take a spicy blend (like a fajita seasoning blend) and sprinkle generously over the mayo before adding other stuff.
Lettuce CRUNCH is important. Include the pale crispy parts in your sandwich, not just the soft green leaf parts. Use romaine and arugula, not 'iceburg' lettuce, which has next to zero flavor.
If you're using texture leafy greens like arugula, toss it in a vinaigrette before piling it onto the sandwich. The vinegar zing makes a statement.
The tomato should have a strong flavor of its own. Salt & pepper on ripe tomato is heavenly. Make sure your seasoning hits the tomato.
If you're adding onion, make sure the slices are super duper thin-sliced. Like, mandolin-thin. Translucent-thin. Red onion is king.
If you want it toasted, make sure the cheese and meat gets hot, but the greens/tomato/onion is added afterward so it stays cold and crisp.
Don't be afraid to STACK IT TALL. CRAM IT FULL! How many sandwiches from restaurants feel impossible to fit in your mouth at first glance? Most of 'em. Make it big. With the meat, especially, they often CRAM the meat in there. No single-layer of ham slices here.
It's ok to MIX MEATS. Fry up some bacon (extra crispy!) or crisp up some pepperoni and layer it with your turkey.
Once you're done, wrap your sandwich in parchment paper (not WAX paper, there's a difference), then slice in half. By wrapping it, you force all the ingredients to smush together and start blending flavors. This makes 'em all a little better and stops them from sliding around, so it's easy to get a bite with every ingredient at once, and stops the sandwich from actually falling apart.
--
Honestly, the biggest 'secrets' of sandwich making is:
MAXIMIZE FLAVOR. USE RICHLY FLAVORED INGREDIENTS.
SEASON ALL YOUR SHIT FOR MORE FLAVOR
DON'T BE AFRAID TO PILE ON MORE GOOD SHIT.
1K notes
·
View notes
Text
i have been given the task by mr john exosheroes himself to discover the traditional wear and current fashion of every nation on the exos continent
#this is just about me wondering about how much awakened zeons outfit is brunnian? brunni? yeah one of those two. inspired and how much is#his own stupidass style and schmids own stupidass style#i really really want to start on saint west cause that shit has no consistency but first i need to finish my findings on uhhh whether those#clover shaped hole things are brunni. cause im 90% sure they are. but awakened zeons pattern on his sling and weapon sheathe are definitely#just a schmid thing i think. because i dont see it anywhere else except for schmids sword and his young fc outfit which i cant find the#full art for. but then that brings to question why schmid has his own pattern thing that he just has Everywhere like girl what#itd be funny if he was a brunn tribe patriarch and thats how neomi knew him and also why his handwriting is astounding + he writes super#well and the pattern thing is like? a family recognition type thing but if that were the case! why doesnt neomi have one? and why are#kylocks and dorkas outfits so far away from the usual like. brunni style. a lot of brunns outfits are asian inspired so kylock gets maybe a#pass for his outfit but dorka??? girl what????????? anyways another explanation could be that the tribes of brunn all have slightly#different types of clothing and yeah dorkas a dragon watcher but still the inconsistancy is kinda baffling. if we take schmid out cause hes#vagabond now it literally does not help. i do like the consistancy of all the brunni heroes having bead jewelery though. lotsa turquoise#and orange in all the outfits too#gah i hate this i need to sort them all by nation so i can really really get on analyzing this stuff. the only reason i feel compelled to#do this is because of the negative amounts of worldbuilding we get around the nations :(( please tell me more than 7 heroes 7 nations and#their ruling families :((((
0 notes
Text
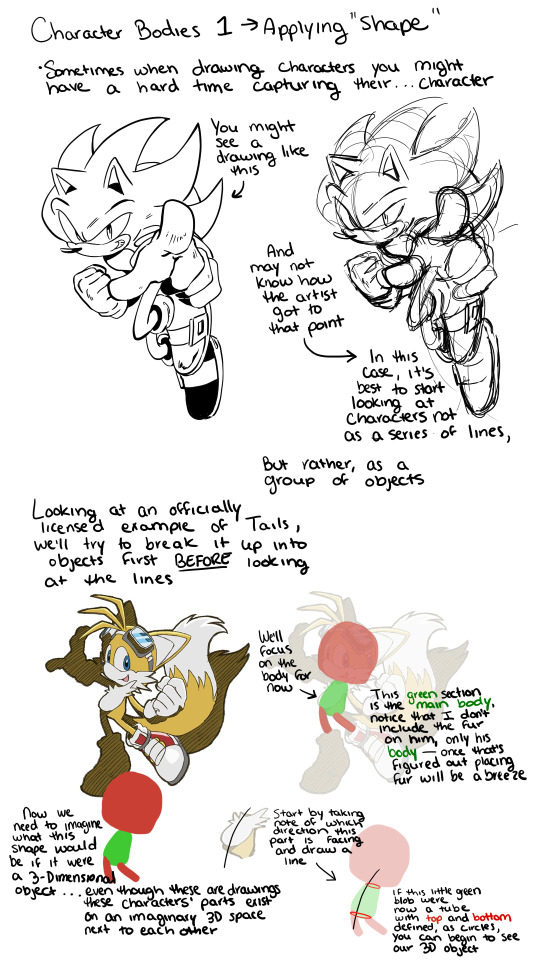
Character Bodies 1 - Applying "Shape"
Sometimes when drawing a character you might have a hard time capturing their... character.
You might see a drawing like this [clean lined image of Super Sonic]
and may not know how the artist got to that point.
In this case, it's best to start looking at characters not as a series of lines, but rather as a group of objects.
Looking at an officially licensed example of Tails, we'll try to break it up into objects first BEFORE looking at the lines.
We'll focus on the body for now [Sonic Riders Tails broken up into sections, red as the head and legs, green as the body]
This green section is the main body, notice that I don't include the fur on him, only his body- once that's figured out placing fur will be a breeze.
Now we need to imagine what this shape would be if it were a 3-Dimensional object... even though these are drawings, these characters' parts exist on an imaginary 3D space next to each other.
Start by taking note of which direction this part [the green body] is facing and draw a line- if this little green blob were now a tube with top and bottom defined, as circles, you can begin to see our 3D object.
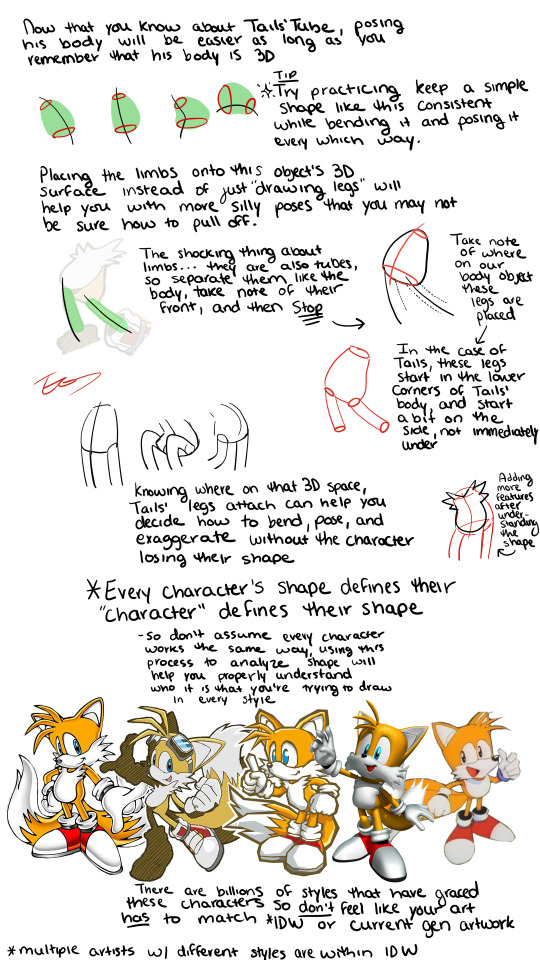
Now that you know about Tails'Tube, posing his body will be easier as long as you remember that his body is 3D.
Tip: Try practicing keeping a simple shape like this consistent while bending it and posing it every which way.
Placing the limbs onto this object's 3D surface instead of just "drawing legs" will help you with more silly poses that you may not be sure how to pull off. The shocking thing about limbs... they are also tubes, so separate them like the body, take note of their front, and then STOP.
Take note of where on our body object these legs are placed. In the case of Tails, these legs start in the lower corners of Tails' body, and start a bit on the side, not immediately under. Knowing where on that 3D space Tails' legs attach can help you decide how to bend, pose, and exaggerate without the character losing their shape.
*Every character's shape defines their "character" defines their shape- so don't assume every character works the same way, using this process to analyze shape will help you properly understand who it is that you're trying to draw in every style.
There are billions of styles that have graced these characters so don't feel like your art has to match IDW* or current gen artwork
*note: multiple artists with different styles are within IDW
#my art#tutorial#how to draw#sonic the hedgehog#sonic charactes#tails#he's just an example#i need to go to sleep its 7 am
406 notes
·
View notes
Last Seen Blogs

asplashoffashionn
THIS IS NOT A FASHION BLOG

puorciles
𝑠𝑒𝑎

crisblackpearl
Cris Blackpearl

stormchascr
𝙸𝙵 𝚈𝙾𝚄 𝙵𝙴𝙴𝙻 𝙸𝚃, 𝙲𝙷𝙰
crisblackpearl
Cris Blackpearl