#Image_Processing
Explore tagged Tumblr posts
Visit Tumblr Blog
Explore Tumblr blogs with no restrictions, modern design and the best experience.
Last Seen Tumblr Blogs


Fun Fact
Mobile US users spent an average of 115.8 minutes on Tumblr app monthly.
Text


Make your special event photos good to best.
Don’t conceal your best moments & memories on the dusty rack of your Cabinet, Get a professional photo retouching service and share your photos on social media or whenever you like. We take every project seriously and deliver before the deadline.
If you need any retouching service just DM me.
Thanks !!!!
#Photoshop_editing#Photoshop_retouching#Adobe_Photoshop#Photoedit#Photo_edit#Photo_retouch#Photo_manipulation#Photoshop_work#Image_processing#imageediting
0 notes
Text
Post-Doc Position: Bio-Image Analysis @ETH Zurich, Switzerland ETH Zurich We seek a highly motivated postdoctoral researcher to develop and apply cutting-edge image analysis techniques. The successful candidate will contribu See the full job description on jobRxiv: https://jobrxiv.org/job/eth-zurich-27778-post-doc-position-bio-image-analysis-eth-zurich-switzerland/?feed_id=90315 #fluorescence_microscopy #image_analysis #image_processing #large_language_models #Mathematical_Biology #ScienceJobs #hiring #research
0 notes
Text
Use layer masks with selections
What you learned: Create a layer mask from a selection

You can produce a layer mask supported a variety. This can be helpful after you need to isolate a fancy subject with the exactness of a variety and therefore the flexibility of a layer mask.
Make a selection
Start by making a choice variety range victimization any selection methodology. If the image encompasses solid color background, it should be easier to pick out the background than the topic. The Magic Wand tool is beneficial for choosing a solid color background. 1. Select the Magic Wand tool in the Toolbar and check Contiguous in the select image bar. 2. Click the image background to pick out it. To feature to the choice if necessary, Shift-click in the image. To calculate from the choice, select ion-click (MacOS) or Alt-click (Windows). 3. Select choose > Invert, therefore the subject is chosen rather than the background. Leave the choice active.
Add a layer mask
When you add a layer mask with a variety active, the layer mask mechanically contains white wherever there was a choice a variety a range and black wherever there was no selection. • With the choice active, click the Add layer mask button in the Layers panel. On the layer mask, there's white wherever there was a choice variety range (the subject) and black wherever there was no selection (the background). The black hides the world that wasn't hand-picked.
Copy to another image
1. You could add a brand new background to the current image on a layer below the isolated subject. Other wise you might use the subsequent methodology to repeat the isolated subject to a different image, retentive the layer mask for redaction flexibility. 1. Open another image. Every one of the open pictures has its own tab at the highest of the document window. 2. Copy the masked layer into the second image as follows: In the Layers panel of the first image, click and hold an empty part of the layer that contains the subject and layer mask. Keeping your mouse pressed down, drag from the Layers panel of the first image to the tab of the second image and then into the document window of the second image. Release the mouse. In the Layers panel of the second image, there is a new layer containing the subject and its layer mask.
3. with the topic layer still hand-picked in the second image, press Command+T (MacOS) or Control+T (Windows). A bounding box with handles seems to round the subject. 4. Drag a corner handle of the bounding box to create the topic smaller or larger. Drag from in the bounding box to maneuver the topic. 5. Click outside the bounding box to complete scaling and positioning the topic and its layer mask in the second image. 6. If you would like to edit the layer mask in the second image, click the layer mask in the Layers panel to create it active. Choose the comb tool in the Toolbar. Paint with black, white, or grey to edit the layer mask.
Save your work with layers
• Save both images in.PSD or.TIFF format to retain the layers and layer masks for future redaction.
Learn More: Use layer masks to combine images
#Adobe_Photoshop_tutorials#Photoshop_learning#image_editing#graphic_design#Image_processing#clipping_image#Photoshop_photo_editing#photo_cutout#photo_editing_services#remove_background_from_image#clipping_path#image_masking#drop_shadow
1 note
·
View note
Link
This paper considers matching images of low-light scenes, aiming to widen the frontier of SfM and visual SLAM applications. Recent image sensors can record the brightness of scenes with more than eight-bit precision, available in their RAW-format image. We are interested in making full use of such high-precision information to match extremely low-light scene images that conventional methods cannot handle. For extreme low-light scenes, even if some of their brightness information exists in the RAW format images' low bits, the standard raw image processing on cameras fails to utilize them properly. As was recently shown by Chen et al., CNNs can learn to produce images with a natural appearance from such RAW-format images. To consider if and how well we can utilize such information stored in RAW-format images for image matching, we have created a new dataset named MID (matching in the dark). Using it, we experimentally evaluated combinations of eight image-enhancing methods and eleven image matching methods consisting of classical/neural local descriptors and classical/neural initial point-matching methods. The results show the advantage of using the RAW-format images and the strengths and weaknesses of the above component methods. They also imply there is room for further research
0 notes
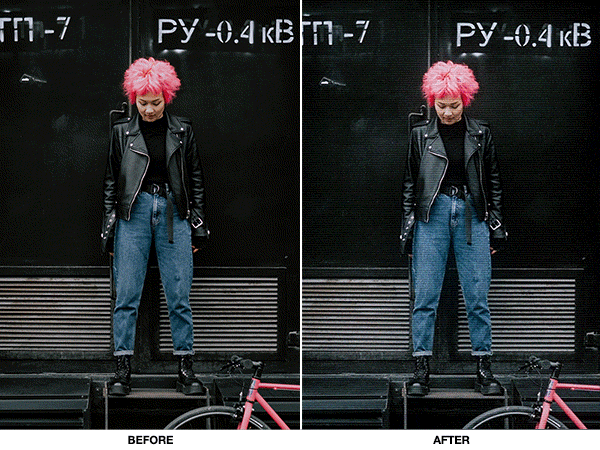
Photo

Download Animated Glitch 2 - Photoshop Action on graphicriver [wpsm_ads1]
Description Animated Glitch 2 - Photoshop Action :
Download Animated Glitch 2 - Photoshop Action. The item releases on Tuesday 2nd March 2021 By The author BlackNull on graphicriver. It’s Tagged with animation,paintings,unhealthy sign,banner,laptop glitch,digital,distortion,results,gif banner,Gif creator,gif maker,glitch artwork,glitch impact,glitchy,picture processing,interference,movement graphics,photoshop actions,Photoshop presets,rgb cut up,system glitch,television glitch,vhs impact,video,video glitch. Item Title: Animated Glitch 2 - Photoshop Action Category: add-ons/photoshop/actions/photograph-results Price: $8 Author: BlackNull Publish Date: Tuesday 2nd March 2021 04:59:41 PM More Info / Download [wpsm_ads2]
This plugin for Photoshop will generate a video sequence of animated glitch results out of your photographs, logos and artworks. The course of is automated and easy, it requires only a few clicks to begin (the video tutorial will clarify every step).
This is the second version of the Animated Glitch plugin (hyperlink to Animated Glitch 1) and this model focuses extra on chromatic aberrations, digital interferences and dithering. Basically extra flashy colours and detailed results. The two editions can be utilized collectively.
FEATURES:
Very simple to put in and use, consumer pleasant workflow.
The animation is definitely modifiable, make a lot of variations in few clicks.
Well organized layer construction, simple to learn, shade-coded and grouped.
Video tutorial and detailed textual content information.
Compatible with all variations of Photoshop CC.
Multilingual, appropriate with any language of Photoshop.
This plugin is designed to create content material with a decision that's inside 100 and 2,500 pixels. e.g. The full HD decision (1920×1080 pixels) is inside this really useful vary.
Check out the video tutorial right here:

(The animated examples under may take a couple of seconds to load)
HOW IT WORKS
Open a picture in Photoshop, load the motion and run it. Photoshop will robotically course of it and in only a few minutes will render the glitch animation.
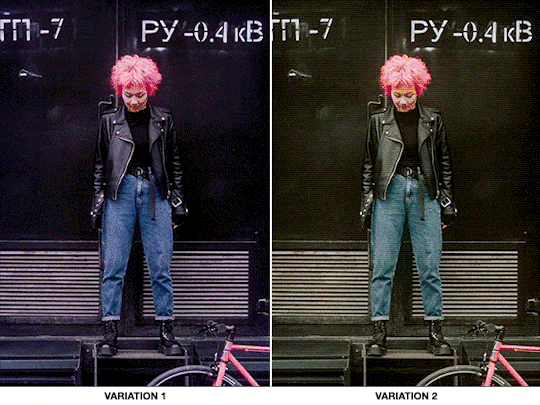
PERSONALIZE THE RESULT
At the tip of the playback, you can also make a lot of variations to the output in a really clean and intuitive manner. Each impact is packed right into a small clip, this manner the Layers Panel and the Timeline of Photoshop can be utilized as a mixer to maneuver, tune and mix these results collectively. The modifying capabilities are very excessive and every consecutive playback will give a barely totally different end result, providing you with the chance to create distinctive works every time.

EXPORT IT
Then save the file as a standard nonetheless picture, animated gif or a video! There are loads of makes use of for this motion, from the creation of low decision content material like gif banners to excessive decision content material like artworks and HD animations.
Here are two variations of the unique animation and a few nonetheless frames of it.

EXAMPLES WITH LOGOS
Here is an instance of a transition. The motion was utilized individually on the 2 supply parts, then the 2 clips have been edited collectively in Photoshop.

The instance under was made mixing some results of this plugin with the consequences of the earlier model, Animated Glitch 1.
It works additionally on photographs and logos with transparency channel; place any background after the playback of the motion. Below an instance with a time lapse video as background.
EXAMPLES WITH PHOTOS


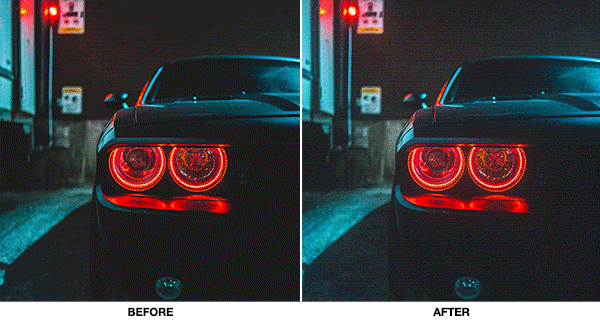
PHOTO CREDITS: Erick Mclean | CottonBro | Bakioguz | Stefan Stefancik | Naveen Annam | Darlene Alderson | Bia Sousa | Kha Ruxury | Salomon Jr | Ozone Jeydin | Irsyad Ibrahim | Julio Motta | Snapwire | Alex Powell
Please charge this product in your obtain part and take a look at my Portfolio!
MORE PHOTOSHOP PLUGINS:


GRAPHIC TEMPLATES:


[wpsm_ads1] More Info / Download #Animated #Glitch #Photoshop #Action
#add-ons#add-ons_Rising_stars#All_graphics#animation#artwork#bad_signal#banner#computer_glitch#digital#distortion#effects#gif_banner#Gif_creator#gif_maker#glitch_art#glitch_effect#glitchy#graphics_Rising_stars#image_processing#interference#motion-graphics#photoshop_actions#Photoshop_presets#rgb_split#Rising_stars#system_glitch#tv_glitch#vhs_effect#video#video_glitch
0 notes
Link
Python Pillow module is built on top of PIL (Python Image Library). It is the essential modules for image processing in Python. We can do anything on the digital images using the pillow module.
0 notes
Video
این داستان واقعی است😔 دانشگاه صنعتی شریف-تابستان ۹۷ ویدیو کامل را در کانال IGSTV ما ببینید #esp8266 #raspberrypi #IOT #AI #بیت_کوین #python #blockchain #bitcoin #training #followme #فناوری_اطلاعات #technology #leapmotion #cryptocurrency #cafe_technology #MagicalLamp #linux #image_processing #follow4follow #رزبری_پای #اینترنت_اشیا #follow #پایتون #پردازش_تصویر #بلاکچین #چراغ_جادو #صنعتی_شریف #شریف #دانشگاه
#follow#بلاکچین#شریف#پایتون#پردازش_تصویر#cryptocurrency#raspberrypi#فناوری_اطلاعات#esp8266#magicallamp#blockchain#linux#technology#بیت_کوین#image_processing#صنعتی_شریف#ai#python#رزبری_پای#اینترنت_اشیا#training#leapmotion#دانشگاه#iot#followme#چراغ_جادو#bitcoin#cafe_technology#follow4follow
0 notes
Text
[IMAGE_PROCESSING...]
> I must thank you for your help, F̵͚͝R̵͕͇͝Ȉ̷̢̛E̷̯̳͌́Ṅ̴͕̼͒D̵̜͗͝.
Me and Anima are having a great time working together on the ranch <33
we’re taking a break to drink some Mtn dew

Spookier lighting under the cut

#> I'm still surprised you actually managed to find clothes in my size.#ANIMA Entries#EGO Boosters#((Alt: FRIEND.))
11 notes
·
View notes
Text
Achieving An Efficient Blur
Last week I made a blur effect for the trial bar tab. Now I thought it would be easy. Just add a quick and dirty post processing shader onto the trial bar tab and boom, done. However it was not that easy in practice. And once I accomplished the effect it ran slow as molasses so I had to optimize it further. All in all it took me about a week to get working right.
So I started on my quest by simply googling 'blur shader Unity'. And apparently the way to do this in Unity is to use a post processing shader. So you have an OnRenderImage() method which uses Graphics.Blit(). This sends data from the display to your material. The material can then apply some effects to the partially rendered image and add this to the final image.
Great! Except one problem. This does not work in the version of Unity I'm working in: 2019.1. OnRenderImage() is just never called. Sad trombone music.
OK, fine. Let's find another way to do it. So I found this github repo where apparently someone figured out how to do it and it was working in Unity 2018.3. But it doesn't work in 2019.1. So then I looked at Unity's new post processing stuff. And it works... but it blurs the entire screen. Not part of the screen like I want.
So I was about to give up. But you know when you're about to give up you're really desperate. Like I start thinking, "Well, there obviously isn't an easy way to do this so I'll just try anything." And it is here I remembered something. You could get a camera to render to a texture. And presumably you could use that texture in a material. Could it actually work? Only one way to find out.
So I added a second camera to the scene so now I was rendering everything twice. Then I got the render texture from the second camera and did a quick gaussian blur on it. The technique to do so is simple enough. You just apply a convolution matrix to each pixel. Except I wanted the effect to look the same regardless of screen size so I used percentages of the screen instead of pixels.
And it worked pretty well... except it halved the frame rate. We were at 60 before and now we were at 30. Unacceptable.
So here I apparently reached another dead end. But then I thought to myself, "Hang on, no one said I needed a gaussian blur. I could implement the blur any way I wanted." So if I could implement the blur any way I wanted what would I do. Well, it would have to be a downsample blur. This is when you downsample an image and then blow it up. It's like if you took a tiny piece of a picture and enlarged it like 10x. It will look super blurry.
But that's what we want. And it's cheap. So I tried it. And it worked pretty well... except there was a ton of flickering.
The flickering is due to aliasing. So what do I do? I add anti-aliasing. FXAA and SMAA (subpixel morphological anti-aliasing. I know it sounds really nerdy) originally did a very poor job of fixing the aliasing. But then I tried TAA, that's temporal anti-aliasing. Originally I didn't have high hopes because temporal means time and I didn't expect an effect that presumably takes multiple frames to achieve would do much. But surprisingly it beat out FXAA and MSAA by a landslide.
You can still sort of see the TAA artifacts even though it's not flickering. If a gaussian blur is supposed to emulate frosted glass the TAA upsample blur sort of emulates frosted glass with a lot of rocks of different refraction indexes. Some areas are obviously wrong although you have to actually pay attention to notice. And it's still a lot more believable than not seeing the trial maps at all.
Last thing was performance. How did it do? So the gaussian blur gave us a 30 FPS hit. The downsample blur gives us a 15 FPS hit although usually it is much lower. Not great, but acceptable. It's over that 40FPS line which I think is the sweet spot for games. Or maybe that's because most of my computers have only been able to run games up to 40 FPS so I'm used to it. Who knows?
One last thing. I considered removing the TAA as that would undoubtedly hit performance. But it's not too bad. It's just a 3 FPS hit which I'm fine with if it reduces the shimmeriness.
0 notes
Text
Post-Doc Position: Bio-Image Analysis @ETH Zurich, Switzerland ETH Zurich We seek a highly motivated postdoctoral researcher to develop and apply cutting-edge image analysis techniques. The successful candidate will contribu See the full job description on jobRxiv: https://jobrxiv.org/job/eth-zurich-27778-post-doc-position-bio-image-analysis-eth-zurich-switzerland/?feed_id=89510 #fluorescence_microscopy #image_analysis #image_processing #large_language_models #Mathematical_Biology #ScienceJobs #hiring #research
0 notes
Text
Use layer masks to combine images
What you learned: Make a creative composite by combining images using a layer mask
Add a layer mask

1. Start with a document that has a minimum of 2 pictures, every on a separate layer. Choose the highest image layer in the Layers panel. 2. Click the Add layer mask button in the Layers panel. This adds a white layer mask to the chosen layer. You’ll be able to still see everything on the layer with the mask, as a result of the mask is white.
Paint on the layer mask with black, white, and gray
1. In the Layers panel, confirm there's a white border around the layer mask fingernail. If there's not a white border, click the layer mask fingernail. 2. Select the comb tool in the Toolbar. in the select photo bar, open the comb Picker to line brush size and hardness. Drag the Hardness slider toward the left to make a soft brush tip. 3. Press D then press X on the keyboard to line the foreground color to black and therefore the background color to white. 4. Paint over the image in the document window to feature black to a part of the layer mask. The black hides the corresponding a part of the layer that contains the mask, that the image on the layer beneath shows through. Soft edges of the comb apply grey to the layer mask, making a gradual transition between the stratified pictures. 5. If you hide additional of a layer than you supposed to, press X on the keyboard to modify the foreground color to white. Then paint over hidden areas of the layer that contains the mask. This adds white to the mask, transfer those areas back to read.
Tip: a fast thanks to amendment brush size as you paint is to press the correct bracket key on the keyboard to extend brush size or press the left bracket key to decrease brush size. Tip: Reducing the comb Flow worth in the select image bar permits you to create up reminder grey as you paint with black on a layer mask. Reminder grey on a layer mask part hides the layer that contains the mask. Save your work with layers • Save the image in.PSD or.TIFF format to retain layers and layer masks for a future piece of writing.
Learn more: Create your first layer mask
#Adobe_Photoshop_tutorials#Photoshop_learning#image_editing#graphic_design#Image_processing#clipping_image#Photoshop_photo_editing#photo_cutout#photo_editing_services#remove_background_from_image#clipping_path#image_masking#drop_shadow
1 note
·
View note
Photo

In regelmäßigen Abständen fahre ich die Strecke Koblenz - Görlitz, also mehr oder weniger, quer durch Deutschland. Die Reise geht mal mit dem Auto, mal mit dem Zug. Und manchmal habe ich das Glück, dass das Wetter schön genug ist, um unterwegs zu fotografieren. Motive gibt es auf meiner Strecke genug: Züge, Bahnhöfe, Industrielandschaften, Brücken und Türme, Natur und vieles mehr. #Architektur #Bahnhof #Brücke #HowTo #Landschaft #Natur #Reise #Zug #photooftheday #photooftheweek #photoofthemonth #journey #travel #train #zug #bridge #landscape #industrielandschaft #industry #nikon_photographer #nikon_photo #d800 #image_processing #bildbearbeitung #fokuszauber #visionofpictures https://ift.tt/2JvZBDC https://ift.tt/30vblvG
0 notes
Video
youtube
opencv > Fire Detection Using #OpenCv & #Image_Processing | 2018-11-13T19:35:43.000Z
0 notes
Text
Basic Image Data Analysis Using Python: Part 2 - #Ankaa
Basic Image Data Analysis Using Python: Part 2 Previously, we saw some of the very basic image analysis operations in Python. In this last part of basic image analysis, we’ll go through some of the following contents. The following contents are the reflection of my completed academic image processing course in the previous term. So, I a... https://ankaa-pmo.com/basic-image-data-analysis-using-python-part-2-2/ #Artificial_Intelligence #Image_Processing #Intensity_Transformation #KMeans_Clustering #Log_Transformation #MachineLearning #Tutorial
#artificial intelligence#image processing#intensity transformation#k-means clustering#log transformation#machine-learning#tutorial#Actualités#Développement IoT#Innovation
0 notes
Link
Tagged: via http://bit.ly/2mTy03S
0 notes