#Inkjet Printing Machine
Note
how do you make your stickers?
i have a silhouette cameo and a good quality printer!
#the silhouette is just a vinyl cutting machine#it comes with software that allows me to layout stickers with cut lines and registration marks#which i print onto inkjet printable vinyl and then laminate#and then load into the cameo where it reads the registration marks for aligning the cuts and then cuts the stickers out for me
11 notes
·
View notes
Text
#carton inspection system#variable data printing#print inspection system#Variable data inkjet printing machines#Data Printing Retrofit#Digital Inkjet Printing Technology
1 note
·
View note
Text

My stickers are ready!!! I'm going to be handing them out at the Seattle and Vancouver shows; I have VIP for Vancouver so expect me there earlier than at the Seattle show.

Below the cut are the same designs separated out over two pages, because my cricut refused to cut them properly otherwise. If you've got a cricut or similar machine, feel free to make your own stickers with these designs!


The sticker paper I'm using is koala inkjet vinyl sticker paper btw; my printer refused to print correctly with glossy sticker paper so I'm using matte. The Cricut setting i'm using is "Printable Sticker Paper, White (Gray Liner Printing)", with less pressure on a lightgrip mat.
282 notes
·
View notes
Text
My bookbinding tools and stuff
I started binding in July 2023, so I'm certainly no expert, but in case you're interested in what I use to create my binds…
I use Adobe InDesign to typeset and Illustrator for graphics
I print on an old Canon laser printer for black and white and an Epson ET-3830 inkjet for color
I purchase my shortgrain paper from Church Paper (for folios) and the long grain paper I use for quartos is just whatever (nothing special)
I love my punching cradle and guide that I got off etsy.
I use this thread (that I wax with beeswax) for sewing signatures
I love this cardstock for endpapers (Craft Consortium ink drops) but I collect pads of 12x12 cardstock in various designs from craft stores.
I like this bookboard (in black specifically)
ETA: I recently ordered precut boards from Hollander's. I cannot recommend this enough. I got the .10 thick board.
I use these tools for spacing and squaring when creating covers
Everything gets stuck together with this glue. (GET THE POINTY TOP!)
I have an old Silhouette Cameo for cutting vinyl and applying foil to bookcloth (with this pen)
I use this foil quill for freehanding
I apply laser toner foil with this Scotch laminator
I have a thermal binding machine from Amazon and I use these glue strips with it
I have this guillotine (but I don't recommend black for visibility reasons)
I have purchased bookcloth from Hollander's, Colophon, and Amazon. I don't recommend the Allure line if you are decorating with HTV or paint.
Get this heat and bond if you want to make your own bookcloth
I make ribbon bookmarks with charms like these and these crimps.
I get positive feedback and help and kindness from @renegadeguild
Caveat: These are just the tools and supplies I use. I am not an expert. I'm a hobbyist who is relatively new to it. Some of the things I use might be "wrong" but every book I've made works, so who cares?
If you want to see what it looks like when I bind something, here's a short video.
279 notes
·
View notes
Text


So happy I was able to finish Imogen lvl 9, at least to a wearable point, for SDCC! I do have more to add and fix for next time, but overall I am delighted with how it turned out.
Some credits and info:
👗Based off the art by @agarthanguide
🌟Skirt designs are by @mommasammu who is a cosplay angel 😭
(My brother also helped cut, weed, and apply the designs, as well, which was a massive help)
💜Wig from @wigisfashion
Chest lightning designs were made using Silhouette's clear temporary tattoo paper - highly recommend as an alternative to makeup on your chest! Can just print out the design on an inkjet printer, and so easy to apply. Lasted all day and was fairly easy to remove, as well. (I'll just have to position them better next time so they're more visible.)
Skirt designs are metallic heat transfer vinyl, our first foray into that kind of thing! Unfortunately getting the proper amount of heat and pressure was much more difficult with the large pieces... didn't get as many others on as I wanted to this time 😅
The effect is fantastic, though! It worked surprisingly well on the sheer fabric.
We did end up buying a Silhouette machine (similar to Cricut) as we'd been eyeing one anyways, but if that's not something you have access to, see if your local library has a makerspace!
266 notes
·
View notes
Note
hey was wondering if you print your own stickers and if so what do you use? :0
I do:
epson ET8550 inkjet printer
koala sticker paper
silhouette cameo 4 cutting machine
12 notes
·
View notes
Text
SO.
Here we go again.
This fucking wallpaper saga must come to an end sometime, soon, surely???
I had all but decided on my wallpaper. I had one I was about ready to pull the trigger on and then the Wallet Incident happened. I am denied and THEN when I go to the website to purchase...
A nice pattern is released which I liked a lot.

I see this new wallpaper and say "I really like this. But I will still be cautious and buy the sample.~"
I wait patiently for it to arrive, unwrap it and.
They changed the printing process. I go to the website, and they say "hiiiiiii we are becoming more EcoFRIENDLY!!! [maybe so...I remain SUS] and doing away with the block printing process and now everything is inkjet printed uwu"
And it sucks. At least compared to the others, in my insufferably snobbish opinion.
The nice dimensional quality that you get with actual layers of paint on the paper is gone. When you are close you can see the hazy look caused by the machine printing.

AND even the patterns I got before are now going to be machine printed! I have now no choice but to return to square fucking one.


fortunately buddy found a good starting point for me, I looked at some alternatives and decided that this company looked like it would be good. They offer some screen prints and some gravure printed. Since this involves the application of ink/paint in layers I have hopes this will look how I want.
Samples arrives yesterday and it DOES.


I'm really into this black one.

One of the issues I was having deciding before was that I have colored bedding and a green dresser that I didn't want to blend into the wall with a near match, or to almost match but to be tonally too different to Look Good Together.

So....I might go for the black willow leafs pattern, which, the stems are gold? v nice imho.
#rantin and raven#the misery i feel that i will not get to do my hallway in that bramble pattern......#this black willow leaf pattern tho....feels Good. feels ME.
5 notes
·
View notes
Text
Slap this on every beginner art class

*In general- Some specific software may have reasons to use specific DPI in a pixel canvas, such as text clarity or brush size. But if you know that, you know this.
Some tutorials I've been seeing and TikToks popped up on my feed have been confusing for people setting up their DPI settings and canvas settings and I was asked about this.
When you set up a canvas and print something the dots per inch (the DPI!) will determine the amount of pixels your canvas has and the clarity your print has. Each printer has a max, inkjet printers may range from (what your software will call) 300 to 720 DPI. Setting your canvas to 600DPI if your printer is 300 max will not better your print.
((for the purpose of simple settings- Getting into line tones and half tones and how printers have like 9kDPI and can have different DPI in the print head axis direction is unimportant to the beginner artist-printer))
An 8.5x11 inch canvas with 600DPI is 5100x6600 pixels
This will look good printed on 8.5x11 paper, perhaps even upscaled at small poster size if its very successful!
A canvas set to 612x792 pixels at 72DPI is also an 8.5x11 size paper, but it will end up pixelated. If you bump the DPI to 300 but leave the canvas at 612x792 pixels, It will still be unclear. Its only clear at 2x2.5 inches when printed!
(Also note that your monitor has its own PPI (pixels per inch!) and if its low, when you zoom out on any screen your art may look pixelated.)
So what's the solution? That depends on what you're doing with your art!
If you're printing, learn your frame sizes, paper sizes and conversions. Maybe you're only planning for a mini-print, but what if its really good? Will you want to be able to print it as a poster later? 300 DPI at the end product size may not be enough to print it bigger later. I would recommend setting up your canvases in the measurement unit of your paper at 300/600/1200 DPI as your machine is capable of.
If your doing digital and have no intentions of printing it depends- If you are having trouble with not reaching the clarity you want and still want to use pixel canvases, you can use a ratio calculator to figure out how much to increase your pixel canvas if you want to keep your canvas height to width aspect ratio.
And of course! You don't have to listen yo me at all if your don't want to, If you're satisfied- its not a problem.
18 notes
·
View notes
Note
your custom cassettes are really really cool! ive been thinking about making custom cassettes for a bit, would you be willing to share what kind of paper you used for the label stickers and j-cards? also where do you get blank cassettes from? ive been looking at cassettecomeback but i was wondering if there was a better option.
Thanks a lot! They're really fun to make hehe
So full disclosure: I run a merch shop for my webcomic and I make most of my stuff myself in my studio. I've been doing this for the better part of ten years and over that time I've accumulated quite a bit of specialized, expensive equipment like the photo printer and cutting machine I use to make my cassette ephemera. THAT SAID mixtapes don't necessarily need all that!! Unless you're running a bootleg business on etsy or somethin I don't think you and your friends gotta run out and spend a ton of money to make these (beyond tracking down a deck and a player, obviously).
Unfortunately most of these items are found on Amazon because I'm a professional artist trying to Live, but if that's something you'd rather avoid buying through I'm listing the brick and mortar places I can find them when I need to for whatever reason!
My j-cards are just the 8x10 glossy photo paper from Pen & Gear, it's usually less than ten bucks a pack at walmart lmao. I use it with an inkjet photo printer! There are plenty of laser printer options out there though, which is probably the type non-artists have access to. Honestly I think the look of black ink on colored copy paper is super cool for handmade tapes, especially between friends.
My sticker paper was a bitch to find and I'm not sure if it would be useful without my specific equipment, but it's this glossy adhesive photo paper from some rando company called LDProducts. Literally just called "Sticker Photo Paper" pf. It's more expensive but I get it in stacks of a hundred because I print tons of stickers for my shop. Again, glossy adhesive paper might not be useful without a big boy printer but MATTE sticker paper is everywhere, that's also pretty common to find at walmart or at the very least at an office supply store; you can print on it or even get out some markers (not sure i'd suggest anything besides ink tho, I'd be worried it could come off and damage the player). I design the labels in clip studio and then load them into cricut so it's super easy to get the right shape every time, but if you're Determined you could get out a measuring tape and an xacto knife and get similar results.
I've only found my tapes on amazon unfortunately, and it's been a while since I bought any because I sort of inherited a bunch of sealed ones when my dad died and i'm still going through them lol. Almost all my custom ones are 90 minute Sony High Fidelity, last I checked you could order them in packs of five or ten but I'm not sure what the prices are like rn. If you REALLY want to get fancy with colored shells/custom lengths i did find this cool site you can order from, Duplication.ca, but the shipping is kinda rough. One of these days I wanna make some cassettes for my webcomic and I'll drop some money on some pretty ones then, but for now the Sonys are treating me fine so I haven't dug too deep.
I hope something in here is useful! I'm always happy to share what I know but again, I'm very fortunate to have access to quite a bit of stuff most people don't and I try to be up front about it alskdjf. Cassettes are best when they're sorta janky and handmade tho, it's kind of the whole point, and if they're just for you or someone you care about then marking them with a sharpie and masking tape is just as cool in my opinion. probably cooler. everybody should put music on physical media and trade it i think.
8 notes
·
View notes
Text
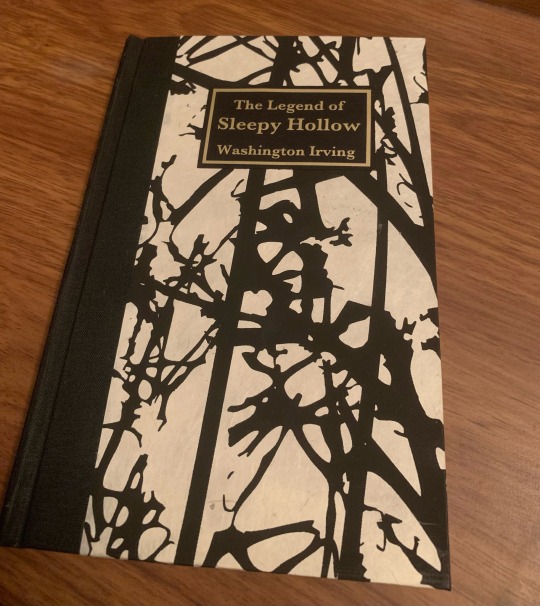
A binding of The Legend of Sleepy Hollow by Washington Irving.
Over October I had this grand plan to bind a bunch of classic spooky stories but this is the only one I actually finished.
And Im really happy with how it came out!!


I played with making more dramatic title splashes in this one. Printing it required me to swap back and forth between my lazar and inkjet printers strategically. Which was easier then I suspected it to be. I may do some books with color in.
Also I finally caved and got a cutting machine! I was shocked at how nice the labels came out using it. I may never go back to toner and foil.
126 notes
·
View notes
Note
If i may ask... How do you make your stickers? Do you have some pointers/recommendations?
yea! i use a regular ole printer to print them (mine is an epson ecotank) and a silhouette cameo 4 to cut them out. most folks use either a silhouette or a cricut - they both kinda do the same stuff and im sure people on either side will have pros and cons to talk about. i won't be able to explain it that well and there are so many tutorials online for using their 'print and cut' features! this is because cricuts are a big housewife hobby thing. there are so many tutorials where nice women tell you how to cut out live laugh love decals. they help!!!
essentially i use the silhouette software to set cut lines on a file and lay them out to print on my very normal regular printer. the black marks in the corners are registration marks that the silhouette reads so it knows where to cut - its !! hard!! im fighting this machine every time i use it.

if you're just starting out theres really no harm in cutting stickers out by hand - it's already a step above if you go for nice printable sticker vinyl and cold laminate. i use koala inkjet printable vinyl and starcraft laminate <3
25 notes
·
View notes
Note
How do you make stickers?
Long answer: I use a cricut machine. I source photos online, edit them onto a plain white background (using Picsart or photoshop), organize the pictures onto one page on the cricut app, print on inkjet sticker paper, load printed sticker sheets onto cricut and the machine cuts them using the outline I made on the app. This is very tedious and definitely a labour of love so I have to be super idle to go this route or I make stickers in big batches so I don’t have to do it again for a while.
Simple answer: print sourced photos onto sticker paper (or regular paper) and use a precision knife or scissors to cut. Use glue if printing on regular paper.
Pictures are either from idol instagrams, Pinterest or Twitter. I use a cricut precision knife but I also have a pen like cutter I got from shein a long time ago and it was super cheap. I’d be happy to give more details on my exact supplies and yt videos I watched to learn but this is pretty much the gist of it 😊
4 notes
·
View notes
Text
The Evolution of Label Printing Machineslabel printing machine
Label printing machines have come a long way from their early iterations. Today, they are indispensable tools for businesses seeking to streamline labeling processes, comply with regulations, and strengthen their brand presence. With various types of label printers available, each catering to specific needs, companies can choose the one that best aligns with their requirements and witness increased efficiency and customer satisfaction. As technology continues to advance, we can expect even more innovative features and functionalities to shape the future of label printing machines.
1 note
·
View note
Note
Hello! I am a fellow (beginner) book binding hobbiest, and I had a couple of question for you,if that's alright!
First off, what paper do you print your books on? Do you use a specific weight/type/grain?
Second, what kind of printer do you use?
I've bound one fic before, and while it turned out lovely, I'm not exactly happy with the paper/printing method I used.
Thanks! Your work is beautiful!!
Hi! First of all, thank you for this lovely message, it brightened a tiresome day.
I print my books on ivory-colored Clairefontaine 80g/m² paper most of the time, and plain 80g/m² copy paper when I want white paper. Clairefontaine is a french brand, but I think you'll find an equivalent wherever you live, it's nothing special. Here's a link to the french amazon page for it, if you want a closer look.
I know that I should pay attention to the grain, but honestly I don't. I use and fold paper without minding the way the grain is going and it has always worked well.
My printer is my new darling. I bought it recently, it's the Canon MB2150, and it's a semi-professional machine (I happen to sell printers for a living, lol). It's an inkjet printer that uses high yield cartridges, it does double-sided printing (of course) and can handle paper up to 270g/m² in terms of thickness. It also has two scanners: the flat one and the one on top where you can put several pages at once (but that will only scan one side!).
It's still very easy to use and to set up for a non-professional, and is, in my humble but professional opinion, really not expensive for all it does (at least at the price it's sold for here in France). The only real drawback is that it's a big bulky machine that takes up room.
I don't know if you intend to bind books often, but I can tell you that if you do, a cheap home printer is likely to die on you. They're made to break if you do more than a couple hundred copies a month. Also, HP are thieves. Their cartridges are very expensive and they do all they can to stop compatible cartridges from working on their machines.
Sorry if I got carried away there, I couldn't help it!
I hope this answered your questions, thank you again for asking them. Have lots of fun bookbinding! It's such a fun hobby, you're always learning things, book after book, and it's a delight to make progress.
Be well <3
2 notes
·
View notes
Note
Hi! Would you consider sharing how how/what you used to record the TMA cassettes (what recorder/deck, where did you get it and tapes, did you use any program etc)? Thank you!
There are some pieces of this process that are easier to find than others. The casette tapes were bought online here:
They have a variety of styles and colors, but I thought grey to be the most in character archival color. I bought 100 of these wound with 40mins of tape on each side (I based the timing on the longest episode of the podcast and rounded up for wiggle room). It turns out these bulk order custom wind tapes were cheaper than buying up lots of already on the market tapes I found online (that said, perhaps there is some wholesale cassette seller that I just didn't find). This is also where I purchased the sticker sheets of labels that I used. Those were printed with a standard inkjet printer.
The tape player was a different story. I made what I consider my biggest mistake buying up a cheapo $20 recorder online thinking it must be okay, tape recorder tech peaked in the late 80s/90s. I was wrong. If you don't mind slightly above potato quality audio, go for it, buy the $20 models and save a few bucks, but I do not recommend it. Where I lucked out is my parents had a near pristine Sharp RT-W800.

The quality on this bad boy was miles from the one I bought. It's not considered to be a high end device by audiophiles, but if you want a pretty good sounding tape, this does the job well.
There are a couple drawbacks here, this machine is from 1985. Finding one can be difficult (though I have seen people finding them at goodwill for $7). You can also find them online running about $20 on ebay, but there is no guarantee what kind of working order that will be in, since maintenance is important for maintaining sound quality in a device nearly 40yrs old.
Nothing fancy went into the actual recording portion. I plugged an RCA to 3.5mm from the recorders in port to my computer
(I may have the left/right backwards, but that's neither here nor there.)
After getting the audio hooked up, all I did was open up an mp3 file of each podcast episode in VLC media player (one by one, as that is how I elected to do the recording. One episode per tape side) slap down the record button on the recorder, and press play in VLC. Then you wait, because you realize that back in the day you had to record in real time unlike modern day data transfer.
25 notes
·
View notes
Text
This 3D printer can watch itself fabricate objects
New Post has been published on https://thedigitalinsider.com/this-3d-printer-can-watch-itself-fabricate-objects/
This 3D printer can watch itself fabricate objects
With 3D inkjet printing systems, engineers can fabricate hybrid structures that have soft and rigid components, like robotic grippers that are strong enough to grasp heavy objects but soft enough to interact safely with humans.
These multimaterial 3D printing systems utilize thousands of nozzles to deposit tiny droplets of resin, which are smoothed with a scraper or roller and cured with UV light. But the smoothing process could squish or smear resins that cure slowly, limiting the types of materials that can be used.
Researchers from MIT, the MIT spinout Inkbit, and ETH Zurich have developed a new 3D inkjet printing system that works with a much wider range of materials. Their printer utilizes computer vision to automatically scan the 3D printing surface and adjust the amount of resin each nozzle deposits in real-time to ensure no areas have too much or too little material.
Since it does not require mechanical parts to smooth the resin, this contactless system works with materials that cure more slowly than the acrylates which are traditionally used in 3D printing. Some slower-curing material chemistries can offer improved performance over acrylates, such as greater elasticity, durability, or longevity.
In addition, the automatic system makes adjustments without stopping or slowing the printing process, making this production-grade printer about 660 times faster than a comparable 3D inkjet printing system.
The researchers used this printer to create complex, robotic devices that combine soft and rigid materials. For example, they made a completely 3D-printed robotic gripper shaped like a human hand and controlled by a set of reinforced, yet flexible, tendons.
Play video
“Our key insight here was to develop a machine-vision system and completely active feedback loop. This is almost like endowing a printer with a set of eyes and a brain, where the eyes observe what is being printed, and then the brain of the machine directs it as to what should be printed next,” says co-corresponding author Wojciech Matusik, a professor of electrical engineering and computer science at MIT who leads the Computational Design and Fabrication Group within the MIT Computer Science and Artificial Intelligence Laboratory (CSAIL).
He is joined on the paper by lead author Thomas Buchner, a doctoral student at ETH Zurich, co-corresponding author Robert Katzschmann PhD ’18, assistant professor of robotics who leads the Soft Robotics Laboratory at ETH Zurich; as well as others at ETH Zurich and Inkbit. The research appears today in Nature.
Contact free
This paper builds off a low-cost, multimaterial 3D printer known as MultiFab that the researchers introduced in 2015. By utilizing thousands of nozzles to deposit tiny droplets of resin that are UV-cured, MultiFab enabled high-resolution 3D printing with up to 10 materials at once.
With this new project, the researchers sought a contactless process that would expand the range of materials they could use to fabricate more complex devices.
They developed a technique, known as vision-controlled jetting, which utilizes four high-frame-rate cameras and two lasers that rapidly and continuously scan the print surface. The cameras capture images as thousands of nozzles deposit tiny droplets of resin.
The computer vision system converts the image into a high-resolution depth map, a computation that takes less than a second to perform. It compares the depth map to the CAD (computer-aided design) model of the part being fabricated, and adjusts the amount of resin being deposited to keep the object on target with the final structure.
The automated system can make adjustments to any individual nozzle. Since the printer has 16,000 nozzles, the system can control fine details of the device being fabricated.
“Geometrically, it can print almost anything you want made of multiple materials. There are almost no limitations in terms of what you can send to the printer, and what you get is truly functional and long-lasting,” says Katzschmann.
The level of control afforded by the system enables it to print very precisely with wax, which is used as a support material to create cavities or intricate networks of channels inside an object. The wax is printed below the structure as the device is fabricated. After it is complete, the object is heated so the wax melts and drains out, leaving open channels throughout the object.
Because it can automatically and rapidly adjust the amount of material being deposited by each of the nozzles in real time, the system doesn’t need to drag a mechanical part across the print surface to keep it level. This enables the printer to use materials that cure more gradually, and would be smeared by a scraper.
Superior materials
The researchers used the system to print with thiol-based materials, which are slower-curing than the traditional acrylic materials used in 3D printing. However, thiol-based materials are more elastic and don’t break as easily as acrylates. They also tend to be more stable over a wider range of temperatures and don’t degrade as quickly when exposed to sunlight.
“These are very important properties when you want to fabricate robots or systems that need to interact with a real-world environment,” says Katzschmann.
The researchers used thiol-based materials and wax to fabricate several complex devices that would otherwise be nearly impossible to make with existing 3D printing systems. For one, they produced a functional, tendon-driven robotic hand that has 19 independently actuatable tendons, soft fingers with sensor pads, and rigid, load-bearing bones.
“We also produced a six-legged walking robot that can sense objects and grasp them, which was possible due to the system’s ability to create airtight interfaces of soft and rigid materials, as well as complex channels inside the structure,” says Buchner.
The team also showcased the technology through a heart-like pump with integrated ventricles and artificial heart valves, as well as metamaterials that can be programmed to have non-linear material properties.
“This is just the start. There is an amazing number of new types of materials you can add to this technology. This allows us to bring in whole new material families that couldn’t be used in 3D printing before,” Matusik says.
The researchers are now looking at using the system to print with hydrogels, which are used in tissue-engineering applications, as well as silicon materials, epoxies, and special types of durable polymers.
They also want to explore new application areas, such as printing customizable medical devices, semiconductor polishing pads, and even more complex robots.
This research was funded, in part, by Credit Suisse, the Swiss National Science Foundation, the U.S. Defense Advanced Research Projects Agency, and the U.S. National Science Foundation.
#000#3-D printing#3d#3D printing#amazing#applications#artificial#Artificial Intelligence#bearing#Brain#Cameras#Capture#computation#computer#Computer Science#Computer Science and Artificial Intelligence Laboratory (CSAIL)#Computer vision#contactless#defense#Defense Advanced Research Projects Agency (DARPA)#Design#details#devices#droplets#Electrical Engineering&Computer Science (eecs)#engineering#engineers#Environment#ETH Zurich#eyes
2 notes
·
View notes
Last Seen Blogs

unreasonablypuzzled
1600s Peasant With Internet

anaperu05
Ana Peru

notesonhobbies
Notes on Hobbies

abdbash-50sai
Arientalmachine BD Bash!!! -有江嘉典50祭-

shesniktarch
GOOD HEART. BAD TEMPER.