#Launch macOS Activity Monitor
Explore tagged Tumblr posts
Visit Tumblr Blog
Explore Tumblr blogs with no restrictions, modern design and the best experience.
Last Seen Tumblr Blogs


Fun Fact
Premium Tumblr themes are available from anywhere between $9 to $49.
Text
How to correctly uninstall Nextcloud from Mac
The Nextcloud Desktop Client is a tool to synchronise files from the Nextcloud Server with your computer. The removal of apps is usually very straightforward on macOS. But in the case of Nextcloud, this is not the case. Therefore, in this article, we shall discuss how to correctly uninstall Nextcloud from Mac. Please see how to install Nextcloud Desktop client on Mac, How To Install Nextcloud on…
#Activity Monitor#Launch macOS Activity Monitor#MAC#Mac iOS cloud sync#Macbook#MacOS#macOS Activity Monitor#NextCloud Desktop App#Uninstall Nextcloud Desktop App
0 notes
Text
Generative AI tools such as OpenAI’s ChatGPT and Microsoft’s Copilot are rapidly evolving, fueling concerns that the technology could open the door to multiple privacy and security issues, particularly in the workplace.
In May, privacy campaigners dubbed Microsoft’s new Recall tool a potential “privacy nightmare” due to its ability to take screenshots of your laptop every few seconds. The feature has caught the attention of UK regulator the Information Commissioner’s Office, which is asking Microsoft to reveal more about the safety of the product launching soon in its Copilot+ PCs.
Concerns are also mounting over OpenAI’s ChatGPT, which has demonstrated screenshotting abilities in its soon-to-launch macOS app that privacy experts say could result in the capture of sensitive data.
The US House of Representatives has banned the use of Microsoft’s Copilot among staff members after it was deemed by the Office of Cybersecurity to be a risk to users due to “the threat of leaking House data to non-House approved cloud services.”
Meanwhile, market analyst Gartner has cautioned that “using Copilot for Microsoft 365 exposes the risks of sensitive data and content exposure internally and externally.” And last month, Google was forced to make adjustments to its new search feature, AI Overviews, after screenshots of bizarre and misleading answers to queries went viral.
Overexposed
For those using generative AI at work, one of the biggest challenges is the risk of inadvertently exposing sensitive data. Most generative AI systems are “essentially big sponges,” says Camden Woollven, group head of AI at risk management firm GRC International Group. “They soak up huge amounts of information from the internet to train their language models.”
AI companies are “hungry for data to train their models,” and are “seemingly making it behaviorally attractive” to do so, says Steve Elcock, CEO and founder at software firm Elementsuite. This vast amount of data collection means there’s the potential for sensitive information to be put “into somebody else’s ecosystem,” says Jeff Watkins, chief product and technology officer at digital consultancy xDesign. “It could also later be extracted through clever prompting.”
At the same time, there’s the threat of AI systems themselves being targeted by hackers. “Theoretically, if an attacker managed to gain access to the large language model (LLM) that powers a company's AI tools, they could siphon off sensitive data, plant false or misleading outputs, or use the AI to spread malware,” says Woollven.
Consumer-grade AI tools can create obvious risks. However, an increasing number of potential issues are arising with “proprietary” AI offerings broadly deemed safe for work such as Microsoft Copilot, says Phil Robinson, principal consultant at security consultancy Prism Infosec.
“This could theoretically be used to look at sensitive data if access privileges have not been locked down. We could see employees asking to see pay scales, M&A activity, or documents containing credentials, which could then be leaked or sold.”
Another concern centers around AI tools that could be used to monitor staff, potentially infringing their privacy. Microsoft’s Recall feature states that “your snapshots are yours; they stay locally on your PC” and “you are always in control with privacy you can trust.”
Yet “it doesn’t seem very long before this technology could be used for monitoring employees,” says Elcock.
Self-Censorship
Generative AI does pose several potential risks, but there are steps businesses and individual employees can take to improve privacy and security. First, do not put confidential information into a prompt for a publicly available tool such as ChatGPT or Google’s Gemini, says Lisa Avvocato, vice president of marketing and community at data firm Sama.
When crafting a prompt, be generic to avoid sharing too much. “Ask, ‘Write a proposal template for budget expenditure,’ not ‘Here is my budget, write a proposal for expenditure on a sensitive project,’” she says. “Use AI as your first draft, then layer in the sensitive information you need to include.”
If you use it for research, avoid issues such as those seen with Google’s AI Overviews by validating what it provides, says Avvocato. “Ask it to provide references and links to its sources. If you ask AI to write code, you still need to review it, rather than assuming it’s good to go.”
Microsoft has itself stated that Copilot needs to be configured correctly and the “least privilege”—the concept that users should only have access to the information they need—should be applied. This is “a crucial point,” says Prism Infosec’s Robinson. “Organizations must lay the groundwork for these systems and not just trust the technology and assume everything will be OK.”
It’s also worth noting that ChatGPT uses the data you share to train its models, unless you turn it off in the settings or use the enterprise version.
List of Assurances
The firms integrating generative AI into their products say they’re doing everything they can to protect security and privacy. Microsoft is keen to outline security and privacy considerations in its Recall product and the ability to control the feature in Settings > Privacy & security > Recall & snapshots.
Google says generative AI in Workspace “does not change our foundational privacy protections for giving users choice and control over their data,” and stipulates that information is not used for advertising.
OpenAI reiterates how it maintains security and privacy in its products, while enterprise versions are available with extra controls. “We want our AI models to learn about the world, not private individuals—and we take steps to protect people’s data and privacy,” an OpenAI spokesperson tells WIRED.
OpenAI says it offers ways to control how data is used, including self-service tools to access, export, and delete personal information, as well as the ability to opt out of use of content to improve its models. ChatGPT Team, ChatGPT Enterprise, and its API are not trained on data or conversations, and its models don’t learn from usage by default, according to the company.
Either way, it looks like your AI coworker is here to stay. As these systems become more sophisticated and omnipresent in the workplace, the risks are only going to intensify, says Woollven. “We're already seeing the emergence of multimodal AI such as GPT-4o that can analyze and generate images, audio, and video. So now it's not just text-based data that companies need to worry about safeguarding.”
With this in mind, people—and businesses—need to get in the mindset of treating AI like any other third-party service, says Woollven. “Don't share anything you wouldn't want publicly broadcasted.”
10 notes
·
View notes
Text
NordVPN Uses Post-Quantum Encryption To Protect User Data

After-quantum encryption
NordVPN has implemented post-quantum encryption on all platforms to combat future quantum attacks.
NordVPN, a leading cybersecurity service, released post-quantum encryption across all its VPN apps. This crucial upgrade has been fully implemented across all supported platforms to prevent large-scale quantum computers from decrypting user data.
Implementation began with the September 2024 version of NordVPN Linux. This phase includes the first post-quantum NordLynx protocol cryptographic improvement in a Linux software update. WireGuard calls NordLynx a fast and secure VPN protocol. The revised technique met NIST's latest post-quantum encryption criteria. Linux deployments aimed to protect users against quantum decryption and measure performance metrics like latency and connection rates.
"The collected data served as a stepping stone to quantum-resistant encryption on the rest of the platforms," said NordVPN CTO Marijus Briedis. He said, “The Linux case demonstrated that it successfully maintained the highest level of user experience in terms of connection time and speed during the transition”. This initial phase's accomplishment cleared the way for post-quantum cryptography support in other applications.
NordVPN brought PQE to Windows, macOS, iOS, Android, tvOS, and Android TV in 2025. Any software that supports PQE can now use it. PQE upgrade adds quantum-resistant algorithms to NordLynx. The protocol meets the latest NIST post-quantum encryption standards. The implementation follows August 2024 US National Institute of requirements and Technology (NIST) post-quantum cryptography requirements. NordVPN uses quantum-safe mathematical methods in its VPN infrastructure to secure data long-term.
We took preventive steps because we thought quantum computer technology might threaten us. Quantum computing uses quantum physics to calculate tenfold faster than digital computers. Even in its infancy, quantum computing could outperform the fastest systems. It could break encryption systems, but this massive power could benefit space exploration and medicine by modelling molecules to repair ailments.
Due of quantum computers' processing power, cybersecurity is difficult. Quantum computers may swiftly surpass RSA encryption, which takes ordinary computers hundreds of years to master, researchers say. Such computational capacity threatens governments, corporations, and individuals.
Experts say hackers are already storing encrypted data for later deciphering, which is the biggest issue with quantum computers. Marijus Briedis suggests cybercriminals are increasing their “harvest now, decrypt later” tactics. They want to collect massive amounts of encrypted data to decrypt after quantum technology is mastered. Quantum computing is still in its infancy, but securing critical data now improves cybersecurity for consumers and organisations.
Due to this, large IT corporations, governments, and organisations like the FBI and CIA are monitoring the technology's development and seeking post-quantum encryption solutions. NordVPN implemented post-quantum cryptography to protect private data from quantum criminals. By incorporating PQE into their VPN infrastructure today and in the post-quantum era, NordVPN hopes to protect their clients' data. This launch marks a “major transition to new-generation encryption of all our applications, providing long-term security for our users” according to Briedis.
PQE is easy to enable. A toggle switch in the app's “Settings” under “Connections” enables it. The function will automatically start when the user connects via NordLynx once activated. Remember to disable PQE while using obfuscated servers or protocols like OpenVPN. It also conflicts with Meshnet and other features.
Implementing post-quantum encryption is challenging and resource-intensive. Newer security methods require larger key sizes and signatures. This may increase computational cost and VPN speed and performance, especially in high-throughput settings.
With this complete implementation, NordVPN joins Mullvad and ExpressVPN in offering full PQE integration. Reports say other providers are implemented at various stages. NordVPN is part of industry-wide efforts to future-proof digital privacy for “Q-Day” threats.
Concerning NORDVPN NordVPN, the world's most advanced VPN provider, is trusted by millions of internet users. The service offers dedicated IP, Double VPN, and Onion Over VPN servers to improve online anonymity with zero monitoring. A key feature of NordVPN is Threat Protection Pro, which scans downloads for malware and blocks hazardous websites, trackers, and adverts. NordVPN, a part of Nord Security, launched Saily, a global eSIM service. NordVPN is known for its user-friendly design and over 7,600 servers in 118 countries at the cheapest prices.
#NordVPN#postquantumencryption#postquantum#quantumencryption#postquantumcryptography#quantumcryptography#technology#technews#technologynews#news#govindhtech
0 notes
Text
How to Speed Up Your Laptop in 3 Easy Steps! ⚡ #TechHacks #PCTips #FasterPerformance

Are you tired of your laptop dragging its feet while you try to get work done or enjoy your favorite shows? You're not alone! Many laptop users face performance issues over time, but the good news is that you can often revive your device's speed without any technical expertise. Here, we present three simple steps to enhance your laptop's performance significantly.
Step 1: Clean Up Your Hard Drive
Over time, your laptop accumulates files, applications, and temporary data that can slow it down. Cleaning up your hard drive is an essential first step in speeding up your laptop.
How to Do It:
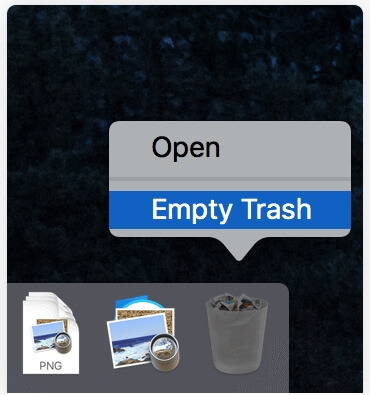
Uninstall Unused Applications: Go through your applications list and remove those you no longer use. To do this on Windows, go to Settings > Apps > Apps & Features, and on macOS, drag the app from the Applications folder to the Trash.
Delete Temporary Files: Use built in tools like Disk Cleanup on Windows (search for "Disk Cleanup") or the "Optimize Storage" option on macOS to delete temporary files and free up space.
Organize Files: Keep your files organized. Move them to external storage or cloud services if you don't need them readily accessible.
Step 2: Optimize Startup Programs
Having too many programs launch at startup can significantly slow down your laptop’s boot time and overall performance.
How to Do It:
Manage Startup Programs: On Windows, right click the taskbar and select Task Manager. Go to the Startup tab to see which programs are set to launch at startup. Disable any unnecessary applications. On macOS, go to System Preferences > Users & Groups > Login Items to manage your startup programs.
Limit Background Processes: Some applications run in the background, consuming resources even when you’re not using them. Check the Task Manager (Windows) or Activity Monitor (macOS) to identify and close unnecessary processes.
Step 3: Upgrade Your Hardware
If you've done all the software optimizations and your laptop still feels sluggish, it might be time to consider a hardware upgrade.
Options to Consider:
Add More RAM: Increasing your laptop's RAM can help it run multiple applications more smoothly. Most laptops allow for RAM upgrades, which can significantly boost performance for multitasking.
Switch to an SSD: If you’re still using a traditional hard drive (HDD), consider upgrading to a Solid State Drive (SSD). SSDs are much faster and can dramatically decrease load times for your operating system and applications.
Clean the Hardware: Dust and debris can accumulate inside your laptop, leading to overheating and performance issues. Periodically cleaning the vents and fans can help maintain optimal performance.
Conclusion
Improving your laptop's speed doesn't have to be a daunting task. By following these three easy steps—cleaning up your hard drive, optimizing startup programs, and considering hardware upgrades—you can breathe new life into your laptop and enjoy faster performance in no time!
Stay tuned for more #TechHacks and #PCTips to keep your devices running smoothly. Your laptop deserves the best care!
0 notes
Text
Exploring macOS: Hidden Features Every MacBook Pro Owner Should Know
MacBook Pro users often rely on their devices for productivity, creativity, and entertainment. While macOS is known for its user-friendly interface, it also houses a variety of lesser-known features that can significantly enhance your experience. From time-saving shortcuts to advanced customisation options, here’s a guide to hidden macOS features every MacBook Pro owner should explore.
1. Quick Look for Instant File Previews
Quick Look allows you to preview files without opening them in their respective apps. Simply select a file in Finder and press the spacebar. This works for images, PDFs, and even videos. You can navigate through multiple files using arrow keys while Quick Look is active.
How to Maximise It:
For more functionality, use Quick Look to add annotations to PDFs or trim video clips without launching Preview or iMovie.
2. Split View for Multitasking
Working on multiple tasks? Split View lets you use two apps side by side, boosting productivity. To activate it, click and hold the green full-screen button in the top-left corner of a window, then drag it to one side of the screen. Choose another app for the opposite side.
Why It’s Handy:
Ideal for comparing documents, referencing research while writing, or attending a video call alongside note-taking.
3. Spotlight Calculator and Conversions
Spotlight is more than just a search tool. Press Cmd + Space to open Spotlight, and you can perform quick calculations or unit conversions. For instance, type “50 GBP to USD” or “10 kg to pounds” for instant results.
Bonus Tip:
Spotlight can also search for specific file types or locations using terms like “kind” or “folder.”
4. Customisable Hot Corners
Hot Corners transform your screen corners into triggers for specific actions. Go to System Settings > Desktop & Dock > Hot Corners. Assign functions like starting a screensaver, locking your screen, or displaying your desktop.
Best Uses:
Set up Hot Corners for quick privacy during work or rapid access to mission-critical files.
5. Text Replacement for Faster Typing
If you frequently type the same phrases, macOS has a built-in text replacement feature. Navigate to System Settings > Keyboard > Text. Add shortcuts like “omw” to expand into “On my way!” or “sig” for your email signature.
Pro Tip:
Combine this with customised keyboard shortcuts for seamless writing across applications.
6. Universal Clipboard for Seamless Copy-Pasting
Copy text or images on your iPhone or iPad and paste them directly onto your MacBook Pro. Universal Clipboard works across devices signed into the same Apple ID with Bluetooth and WiFi enabled.
How It Enhances Workflow:
Perfect for transferring content quickly without emailing or using cloud services.
7. Automator for Task Automation
Automator helps you automate repetitive tasks, such as renaming large batches of files or converting image formats. Open Automator from the Applications folder, choose a workflow type, and drag the desired actions into the workflow panel.
Examples of Use:
Set up a workflow to resize images for specific project needs or create custom alerts for calendar events.
8. Screen Time for Mac
Screen Time isn’t just for mobile devices. On macOS, it helps monitor your app usage and set limits to avoid distractions. Find it in System Settings > Screen Time.
Stay Focused:
Create App Limits to restrict time on social media or set Downtime for uninterrupted work sessions.
9. Safari Reader Mode
For a distraction-free reading experience, Safari’s Reader Mode strips away ads and clutter from web articles. When you’re on a compatible webpage, click the Reader button in the address bar or press Cmd + Shift + R.
Additional Perks:
Customise Reader Mode by changing the text size, background colour, or font to suit your preferences.
10. Secure Notes with Passwords
The Notes app lets you lock sensitive information. Select a note, click the Lock button in the toolbar, and set a password. This ensures that private information stays protected.
Best Practice:
Use this for storing personal details, secure project notes, or financial information.
Final Thoughts
These hidden macOS features can transform your MacBook Pro experience, making your workflow more efficient and your tasks more manageable. Whether you’re a creative professional or a business user, mastering these tools can help you unlock the full potential of your device.
For those considering upgrading their setup temporarily or for specific projects, a MacBook Pro rental is an excellent way to experience the latest macOS features without committing to a purchase.
0 notes
Text
Laptop Running Slow? Top Tips to Boost Speed and Performance
A slow laptop can be frustrating, especially when you're trying to get work done or enjoy your favourite content without interruptions. Fortunately, there are several effective ways to speed up a lagging device. Here’s a complete guide to boosting your laptop’s performance, divided into actionable steps.
1. Check for Resource-Heavy Applications
Your laptop may be slow due to apps and processes consuming too many resources. To identify and close these:
For Windows: Press Ctrl + Shift + Esc to open the Task Manager, and navigate to the Processes tab to view what’s using CPU, memory, and disk resources. Right-click on unnecessary processes and select End Task.
For macOS: Press Command + Space to open Spotlight, type Activity Monitor, and check the CPU and Memory tabs. Quit unnecessary apps to free up resources.
2. Uninstall Unnecessary Programs
Unused programs can take up valuable storage and background resources. Removing them can help improve performance:
For Windows: Go to Settings > Apps > Apps & features and click Uninstall on applications you no longer use.
For macOS: Open the Applications folder, drag unwanted apps to the Trash, then empty the Trash to free up space.
3. Disable Startup Programs
Programs that launch on startup can drastically slow down your laptop’s boot time and overall performance. Here’s how to manage these:
For Windows: Open the Task Manager (Ctrl + Shift + Esc) and navigate to the Startup tab. Right-click on programs with high impact and select Disable.
For macOS: Go to System Preferences > Users & Groups, click Login Items, and uncheck items you don’t want to start automatically.
4. Clear Cache and Temporary Files
Temporary files and cache can accumulate over time, taking up space and slowing down performance. Regularly clearing them can help:
For Windows: Use Disk Cleanup by searching for it in the Start menu. Select the drive to clean (typically C:) and choose Temporary files and Recycle Bin for deletion.
For macOS: Go to Finder > Go > Go to Folder, type ~/Library/Caches, and delete contents in the cache folders to free up space.
5. Update Your Operating System and Drivers
Outdated software or drivers can cause performance issues, incompatibilities, and security vulnerabilities. Keeping everything updated ensures your laptop runs smoothly:
For Windows: Go to Settings > Update & Security and click Check for updates. Make sure all drivers are up-to-date by going to Device Manager and right-clicking devices to select Update driver.
For macOS: Go to System Preferences > Software Update and check for any available updates.
6. Increase RAM or Storage
If your laptop has limited memory (RAM) or an older hard drive, upgrading these components can make a noticeable difference in performance:
RAM: Adding more RAM can be a cost-effective way to improve multitasking and performance, especially for applications like photo or video editing. Consult your laptop’s manual or manufacturer for compatible RAM upgrades.
Storage: Switching from an HDD to an SSD can drastically improve boot times and loading speeds. SSDs are faster, more durable, and energy-efficient compared to traditional hard drives.
7. Run a Malware Scan
Malware or viruses can consume system resources, slowing down your laptop. Regular scans can detect and remove malicious software:
For Windows and macOS: Use trusted antivirus software or built-in tools like Windows Defender to perform a full scan. For macOS, consider third-party tools like Malwarebytes to supplement built-in security.
8. Defragment Your Hard Drive (HDD Only)
Over time, files on traditional hard drives (HDDs) can become fragmented, causing slowdowns. Defragmenting can help organize and speed up file access:
For Windows: Type Defragment and Optimize Drives in the Start menu, select your HDD, and click Optimize. SSDs do not require defragmentation as they handle data differently.
For macOS: macOS automatically manages drive fragmentation, so manual defragmentation is unnecessary.
9. Use Lightweight Software Alternatives
Heavy software can slow down your laptop, especially if it’s an older model. Opt for lightweight alternatives:
Web Browsers: Use browsers like Microsoft Edge or Safari, which are optimized for their operating systems, rather than resource-heavy ones.
Productivity Tools: For document editing, try Google Docs instead of a full Office suite or LibreOffice for a lighter offline solution.
10. Adjust Power Settings
On Windows laptops, the power settings affect performance and battery life. Adjusting them can balance your laptop’s power usage:
For Windows: Go to Control Panel > Power Options and select High Performance for better performance. Note that this might reduce battery life.
For macOS: Go to System Preferences > Energy Saver and adjust settings based on performance needs versus energy conservation.
11. Reinstall the Operating System
If you’ve tried everything else and your laptop is still slow, reinstalling the OS can remove clutter and reset settings to default. Be sure to back up your data first!
For Windows: Go to Settings > Update & Security > Recovery and select Reset this PC. Choose either to keep your files or to do a clean reinstall.
For macOS: Restart in Recovery Mode by holding Command + R during startup. Select Reinstall macOS from the menu to start fresh.
12. Manage Visual Effects and Animations
Turning off unnecessary visual effects and animations can make your laptop feel faster:
For Windows: Right-click This PC > Properties > Advanced system settings. Under Performance, select Adjust for best performance or manually deselect specific effects.
For macOS: Go to System Preferences > Accessibility > Display and check Reduce motion and Reduce transparency to limit visual effects.
13. Regularly Restart Your Laptop
Sometimes, all your laptop needs is a fresh start. Restarting clears memory and temporary processes, improving performance. Set a habit of shutting down your laptop regularly rather than keeping it on sleep mode for days at a time.
Final Thoughts
A slow laptop can be annoying, but with a few adjustments, you can bring it back up to speed. Regular maintenance, like removing unnecessary files, disabling startup programs, and updating software, can make a world of difference. Try out these tips, and you’ll likely notice an improvement in performance, no matter how old your laptop may be! The Authorized Toshiba Service Centre in Nagpur offers expert service and support for Toshiba products, ensuring quality service with genuine parts and knowledgeable technicians. Customer satisfaction is our priority.
0 notes
Text
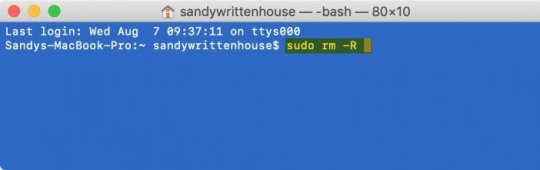
Empty Trash Securely on macOS: Ensuring Data Privacy
Emptying the trash on your macOS device might seem like a straightforward task, but ensuring that it's done securely is crucial for safeguarding your data privacy. In this article, we'll explore the importance of emptying your trash securely, methods to achieve this on Empty Trash Securely on macOS, and why it matters in today's digital landscape.
Why Empty Trash Securely Matters
When you delete files on your Mac by moving them to the trash bin and then emptying it, you might assume they're gone forever. However, the reality is more complex. Simply emptying the trash in the standard way doesn't permanently erase the data; instead, it marks the space occupied by those files as available for new data. Until that space is overwritten by new information, it's possible for someone with the right tools and knowledge to recover supposedly deleted files.
Macube Cleaner is a comprehensive software tool designed to optimize and enhance the performance of Mac computers. Its primary function is to identify and remove unnecessary files, such as junk files, system caches, and large, obsolete files that clutter your system, slowing it down. Additionally, Macube Cleaner helps manage and uninstall applications, ensuring that no leftover files remain to take up valuable storage space.
The software also features privacy protection by cleaning browsing histories and cookies, safeguarding your personal information. With an intuitive interface, Macube Cleaner allows users to easily perform regular maintenance tasks, ensuring their Mac operates efficiently. This tool is ideal for users looking to free up disk space, improve system speed, and maintain overall Mac health with minimal effort.
Methods to Empty Trash Securely on macOS
Key Features of Macube Cleaner
Junk File Removal: Over time, your Mac accumulates a plethora of junk files, including system cache, application logs, and temporary files. Macube Cleaner scans your system thoroughly to identify and remove these unnecessary files, freeing up valuable disk space and enhancing performance.
Duplicate Finder: Duplicate files can occupy significant storage space without you even realizing it. Macube Cleaner’s duplicate finder feature scans your Mac for identical files, allowing you to delete them and reclaim storage space efficiently.
Large and Old Files: Identifying large and old files that you no longer need can be a tedious task. Macube Cleaner simplifies this process by providing a list of these files, enabling you to decide which ones to keep and which to delete.
Uninstaller: Applications often leave behind residual files even after being uninstalled. Macube Cleaner’s uninstaller feature ensures that all associated files are completely removed from your system, preventing clutter and potential conflicts.
Privacy Protection: Protecting your privacy is paramount in today’s digital age. Macube Cleaner helps you manage and delete sensitive data, such as browsing history, cookies, and login details, ensuring your personal information remains secure.
System Monitoring: Macube Cleaner includes a system monitoring tool that provides real-time insights into your Mac’s performance. You can track CPU usage, memory consumption, and disk activity, helping you identify and address performance bottlenecks.
Benefits of Using Macube Cleaner
Improved Performance: By removing unnecessary files and managing system resources efficiently, Macube Cleaner significantly enhances your Mac’s performance. You’ll experience faster boot times, quicker application launches, and smoother overall operation.
Increased Storage Space: Cleaning up junk files, duplicates, and old files frees up valuable storage space, allowing you to store more important data and applications without worrying about running out of space.
Enhanced Privacy: With robust privacy protection features, Macube Cleaner ensures your sensitive data remains secure. Regularly clearing browsing history and other personal information reduces the risk of unauthorized access.
User-Friendly Interface: Macube Cleaner is designed with user convenience in mind. Its intuitive interface makes it easy for users of all levels to navigate and utilize its features effectively.
Comprehensive Cleaning: Unlike basic cleaning tools, Macube Cleaner offers a comprehensive approach to system optimization, addressing various aspects of system performance and maintenance.
How to Use Macube Cleaner
Installation: Download and install Macube Cleaner from the official website. The installation process is straightforward, with clear instructions to guide you through each step.
Initial Scan: Upon launching Macube Cleaner, perform an initial scan to identify junk files, duplicates, large and old files, and other potential issues. The scan results provide a detailed overview of your system’s health.
Cleaning and Optimization: Review the scan results and select the files you wish to delete. Macube Cleaner categorizes files for easy identification, allowing you to make informed decisions. Use the uninstaller feature to remove unwanted applications and their residual files.
Privacy Protection: Navigate to the privacy protection section to manage and delete sensitive data. Regularly clear your browsing history, cookies, and other personal information to maintain privacy.
System Monitoring: Use the system monitoring tool to keep track of your Mac’s performance in real time. Identify resource-intensive applications and processes, and take appropriate action to optimize performance.
Ensuring Data Privacy in Today's Digital Landscape
In an era where data privacy is paramount, securely emptying your trash on macOS is a fundamental practice. Whether you're disposing of personal documents, financial records, or sensitive business information, ensuring that they cannot be recovered by unauthorized individuals is essential.
By adopting secure deletion practices, you reduce the risk of data breaches, identity theft, and other forms of cybercrime that exploit improperly discarded information. Moreover, compliance with data protection regulations such as GDPR and CCPA often necessitates secure data disposal practices to avoid penalties and uphold consumer trust.
Conclusion
In conclusion, "Macube Cleaner" is not just a task but a critical aspect of maintaining data privacy and security. By understanding the methods available to securely empty your trash bin and implementing them regularly, you can mitigate the risks associated with unauthorized data recovery. Whether you opt for Terminal commands or trusted third-party applications, the goal remains the same: to ensure that deleted files are effectively erased from your system.
Remember, data privacy starts with responsible data management practices. By taking proactive steps to securely empty your trash on macOS, you contribute to a safer digital environment for yourself and others. Stay informed, stay secure, and keep your digital footprint protected.
1 note
·
View note
Text
does kodi set u a vpn
🔒🌍✨ Get 3 Months FREE VPN - Secure & Private Internet Access Worldwide! Click Here ✨🌍🔒
does kodi set u a vpn
Kodi VPN integration
Kodi is a popular media player software that allows users to stream and access various types of content. However, due to copyright issues and geo-restrictions, some Kodi add-ons may not be available in certain regions. This is where using a VPN (Virtual Private Network) with Kodi can be beneficial.
By integrating a VPN with Kodi, users can enhance their online privacy and security while enjoying unrestricted access to geo-blocked content. A VPN encrypts the user's internet connection, making it difficult for third parties to monitor their online activities. This is especially important when streaming content on Kodi, as it adds an extra layer of security and prevents any potential data leaks or cyber attacks.
Furthermore, using a VPN with Kodi allows users to bypass geo-restrictions and access content that may be blocked in their region. With a VPN, users can connect to servers in different countries, enabling them to stream content that is otherwise unavailable in their location. This is particularly useful for accessing regional-specific content or streaming services that have restrictions based on geographic location.
Overall, integrating a VPN with Kodi can greatly enhance the streaming experience by providing an added layer of security and enabling access to a wider range of content. Whether for privacy concerns or to bypass geo-blocks, using a VPN with Kodi is a valuable tool for any streaming enthusiast.
Kodi VPN setup
Title: The Essential Guide to Setting Up a Kodi VPN for Secure Streaming
In the realm of digital entertainment, Kodi stands out as a versatile and powerful media player. However, to fully unlock its potential and ensure your online privacy and security while streaming, setting up a VPN (Virtual Private Network) with Kodi is paramount.
A Kodi VPN setup offers multiple benefits. Firstly, it encrypts your internet connection, shielding your online activities from prying eyes, including your Internet Service Provider (ISP), hackers, and government surveillance. This encryption ensures that your streaming habits remain private and secure.
Secondly, a VPN allows you to bypass geo-restrictions and access content that might be unavailable in your region. By connecting to servers in different countries, you can unlock a vast array of streaming options and enjoy content from around the globe.
Setting up a VPN with Kodi is a straightforward process:
Choose a reputable VPN provider that offers fast servers, strong encryption, and a no-logs policy.
Download and install the VPN application on your device. Most VPN providers offer apps for various platforms, including Windows, macOS, iOS, Android, and even dedicated apps for Kodi.
Launch the VPN app and log in with your credentials.
Connect to a server location of your choice. For streaming purposes, selecting a server in a country where the content you want to access is available is advisable.
Once connected, minimize the VPN app and launch Kodi. Your internet traffic will now be encrypted, and you can stream content securely and anonymously.
By following these steps, you can enjoy a seamless Kodi experience while safeguarding your privacy and accessing a world of entertainment without restrictions. Make sure to keep your VPN software updated for optimal performance and security.
Kodi VPN compatibility
Kodi, the open-source media player software, has gained immense popularity for its versatility in streaming various types of content. However, with the increasing concern for online privacy and security, many Kodi users are turning to VPNs to enhance their streaming experience. VPNs, or Virtual Private Networks, encrypt users' internet traffic and route it through remote servers, providing anonymity and protecting against surveillance and data interception.
When it comes to Kodi, VPN compatibility is crucial for seamless integration and optimal performance. A compatible VPN should offer fast and reliable connections, robust encryption protocols, and a wide range of server locations to bypass geo-restrictions and access region-locked content.
Fortunately, most reputable VPN providers offer dedicated apps that are compatible with Kodi across multiple platforms, including Windows, macOS, Android, iOS, and even Linux. These VPN apps typically come with user-friendly interfaces and features like kill switches and DNS leak protection to ensure maximum privacy and security while streaming.
Furthermore, VPN compatibility with Kodi extends beyond just the software level. Users may also want to consider VPNs that support specific streaming devices such as Amazon Fire TV Stick, NVIDIA Shield, or Raspberry Pi, which are commonly used to run Kodi. Additionally, VPNs that offer router support allow users to protect all devices connected to their home network, including those used for Kodi streaming.
In summary, choosing a VPN with robust compatibility with Kodi is essential for safeguarding your online privacy and unlocking a world of unrestricted streaming content. By selecting a VPN provider that meets Kodi's compatibility requirements, users can enjoy a worry-free streaming experience while protecting their digital footprint from prying eyes.
Kodi VPN benefits
Using a VPN with Kodi can offer various benefits to users looking to enhance their streaming experience. Kodi, an open-source media player software, has gained popularity for its ability to stream movies, TV shows, and other media content. However, users may encounter geo-restrictions, ISP throttling, and privacy concerns while using Kodi without a VPN.
One of the primary benefits of using a VPN with Kodi is bypassing geo-restrictions. By connecting to a VPN server in a different location, users can access content that may be restricted in their region. This allows users to unlock a wider range of content on Kodi, including region-locked movies and TV shows.
Additionally, VPNs help to prevent ISP throttling, which can slow down streaming speeds and reduce video quality. By encrypting internet traffic, VPNs prevent ISPs from monitoring and slowing down connections based on streaming activities. This ensures a smoother streaming experience on Kodi without interruptions or buffering.
Moreover, using a VPN with Kodi enhances user privacy and security. VPNs encrypt internet traffic, making it difficult for third parties to monitor online activities. This is particularly important for users who want to protect their privacy while streaming content on Kodi.
In conclusion, utilizing a VPN with Kodi can provide users with benefits such as bypassing geo-restrictions, preventing ISP throttling, and enhancing privacy and security. By incorporating a VPN into their Kodi setup, users can enjoy a more seamless streaming experience and expand their access to diverse content options.
Kodi VPN privacy features
If you are an avid Kodi user, ensuring your online privacy and security is crucial. Using a VPN (Virtual Private Network) with Kodi can help protect your online presence and activities. Let's delve into the privacy features of a Kodi VPN to understand how it can benefit you.
Anonymous Browsing: A Kodi VPN encrypts your internet traffic, making it challenging for snoopers to track your online activities. This secure tunnel ensures that your browsing history and data remain private.
Bypass Geo-Restrictions: With a VPN for Kodi, you can access geo-blocked content without any limitations. By connecting to servers in different regions, you can enjoy unrestricted streaming of your favorite movies, TV shows, and live sports events.
Prevent ISP Throttling: Internet Service Providers (ISPs) often throttle the internet speed of users streaming high-bandwidth content like Kodi. A VPN masks your online activities, preventing your ISP from monitoring and limiting your connection speed.
No Logs Policy: A reliable Kodi VPN follows a strict no-logs policy, meaning they do not track or store your online activities. This commitment to privacy ensures that your data remains confidential and secure.
Kill Switch Feature: In case your VPN connection drops while using Kodi, the kill switch feature automatically disconnects your internet connection to prevent any data leaks. This additional layer of security safeguards your privacy at all times.
By utilizing a VPN with these privacy features, you can enhance your Kodi streaming experience while safeguarding your online anonymity and security. Stay protected and enjoy unlimited access to content with a Kodi VPN.
0 notes
Text
does kodi come with a vpn
🔒🌍✨ Get 3 Months FREE VPN - Secure & Private Internet Access Worldwide! Click Here ✨🌍🔒
does kodi come with a vpn
Kodi VPN integration
Kodi is a popular open-source media player software that allows users to stream a variety of content like movies, TV shows, music, and more. Many Kodi users opt to integrate a VPN service with their Kodi setup for added security, privacy, and access to geo-restricted content.
A VPN, or Virtual Private Network, encrypts your internet connection and routes it through a server in a location of your choice. By integrating a VPN with Kodi, users can enjoy a more secure and private streaming experience. VPNs hide your IP address, making it difficult for anyone to track your online activity, including your internet service provider, government agencies, or hackers.
Furthermore, VPNs help users bypass geographical restrictions imposed by streaming services. By connecting to a VPN server in a different country, Kodi users can access content that may not be available in their region due to licensing agreements or censorship laws.
It's important to choose a reliable VPN service that offers fast connection speeds, strong encryption, a no-logs policy, and a wide selection of servers to choose from. With the right VPN integration, Kodi users can enjoy a more immersive and secure streaming experience without compromising their online privacy.
VPN benefits for Kodi
Using a VPN with Kodi can offer a wide range of benefits for users looking to enhance their streaming experience and protect their online privacy. Kodi is a popular media player that allows users to access a variety of content, including movies, TV shows, and live TV streams. However, due to the nature of some of the content available on Kodi, users may encounter geo-restrictions, ISP throttling, and potential privacy risks.
By using a VPN with Kodi, users can bypass geo-restrictions and access content that may be blocked in their region. This is particularly useful for users who want to stream content from different countries or access specific channels that may be restricted in their location. Additionally, a VPN can help prevent ISP throttling, which can slow down internet speeds when streaming content on Kodi.
One of the key advantages of using a VPN with Kodi is the added layer of security and privacy it provides. VPNs encrypt internet traffic, making it difficult for outside parties to monitor a user's online activity. This is especially important for Kodi users, as streaming copyrighted content on Kodi may raise privacy concerns.
Overall, using a VPN with Kodi can help users unlock a world of content, enhance streaming speeds, and protect their online privacy. With a VPN, Kodi users can enjoy a seamless and secure streaming experience without worrying about geo-restrictions or privacy risks.
Setting up VPN on Kodi
Title: A Beginner's Guide to Setting up VPN on Kodi
In the world of online streaming, Kodi stands out as a popular platform for accessing a wide range of content. However, to ensure privacy, security, and access to geo-restricted content, setting up a Virtual Private Network (VPN) on Kodi is essential. Here’s a beginner-friendly guide to help you get started:
Choose a Reliable VPN Provider: Begin by selecting a reputable VPN service that offers fast speeds, strong encryption, and a wide server network. Look for providers with dedicated apps for Kodi or those that allow manual configuration.
Subscribe and Install VPN Software: Sign up for a VPN subscription and download the relevant software for your device. Most VPN providers offer apps for various platforms including Windows, macOS, Android, iOS, and even dedicated VPN add-ons for Kodi.
Configure VPN Settings on Kodi: Once installed, launch the VPN app and sign in using your credentials. Then, configure the VPN settings to your preferences. Some VPNs offer options to automatically connect when Kodi is launched, ensuring continuous protection.
Connect to a Server: Choose a server location from the VPN app’s server list. For accessing geo-restricted content, select a server in the desired location. For enhanced privacy and security, opt for servers in countries with strict privacy laws.
Verify Connection: After connecting to a server, verify that your VPN is active. You can do this by checking your IP address using online tools or within the VPN app itself.
Launch Kodi and Enjoy Secure Streaming: With the VPN active, launch Kodi and enjoy streaming your favorite content securely and anonymously. The VPN encrypts your internet traffic, preventing ISPs, hackers, or government agencies from monitoring your online activities.
By following these steps, you can easily set up a VPN on Kodi and enjoy a safer, more private streaming experience. Remember to choose a reliable VPN provider and regularly update your VPN software for optimal security.
Kodi VPN options
Title: Navigating Kodi VPN Options: A Comprehensive Guide
Kodi, the popular open-source media player software, offers a plethora of entertainment options, from movies and TV shows to music and podcasts. However, accessing geo-restricted content and ensuring online privacy while streaming can be a challenge. This is where VPNs (Virtual Private Networks) come into play, offering a solution to both issues. When it comes to Kodi VPN options, users have several choices to consider.
Firstly, compatibility is key. Look for VPN providers that offer dedicated apps or setup guides specifically for Kodi. This ensures seamless integration with the platform, allowing you to enjoy unrestricted streaming without any hassle.
Secondly, prioritize VPNs with robust security features. Encryption protocols like AES-256 bit encryption and support for secure VPN protocols such as OpenVPN ensure that your online activities remain private and protected from prying eyes.
Speed is another crucial factor to consider, especially for streaming high-definition content on Kodi. Opt for VPNs with a large server network and reliable connection speeds to minimize buffering and ensure smooth playback.
Moreover, choose VPNs with a strict no-logs policy to safeguard your privacy. A no-logs policy means that the VPN provider does not collect or store any data related to your online activities, ensuring complete anonymity while using Kodi.
Additionally, consider VPNs with advanced features like split tunneling and kill switch functionality. Split tunneling allows you to route Kodi traffic through the VPN while accessing other websites and services directly, optimizing both speed and security. Meanwhile, a kill switch automatically disconnects your internet connection if the VPN connection drops, preventing any data leaks.
In conclusion, when selecting a VPN for Kodi, prioritize compatibility, security, speed, privacy, and additional features. By making an informed decision, you can enjoy seamless streaming and enhanced privacy protection while using Kodi.
VPN advantages for streaming on Kodi
Streaming content on Kodi can be an exhilarating experience, offering a vast array of movies, TV shows, and live sports events at your fingertips. However, to maximize your streaming experience and ensure smooth, uninterrupted viewing, using a Virtual Private Network (VPN) can be advantageous.
One of the primary benefits of employing a VPN while streaming on Kodi is enhanced privacy and security. By encrypting your internet connection and masking your IP address, a VPN shields your online activities from prying eyes, including your Internet Service Provider (ISP) and potential hackers. This added layer of security not only safeguards your personal data but also helps prevent throttling by your ISP, which can degrade streaming quality.
Moreover, a VPN enables access to geo-restricted content on Kodi. Many streaming services impose regional limitations on their content, making certain shows or movies inaccessible based on your location. With a VPN, you can bypass these restrictions by connecting to servers in different countries, effectively tricking streaming platforms into believing you're accessing their service from an authorized location.
Additionally, VPNs can mitigate the risks associated with streaming copyrighted content on Kodi. While Kodi itself is a legal platform, some users may utilize third-party add-ons to access copyrighted material without proper authorization. This can potentially expose users to legal repercussions. By utilizing a VPN, users can anonymize their online activity, reducing the likelihood of being targeted for copyright infringement.
In conclusion, incorporating a VPN into your Kodi streaming setup offers several advantages, including heightened privacy, access to geo-restricted content, and mitigated legal risks. Whether you're binge-watching your favorite shows or catching up on live sports, a VPN provides the security and flexibility to enjoy a seamless streaming experience on Kodi.
0 notes
Text
do i need software to set up a vpn
🔒🌍✨ Get 3 Months FREE VPN - Secure & Private Internet Access Worldwide! Click Here ✨🌍🔒
do i need software to set up a vpn
VPN setup process
Setting up a VPN (Virtual Private Network) is a straightforward process that ensures your online activities remain secure and private. Whether you're concerned about privacy, bypassing geo-restrictions, or securing your data on public Wi-Fi networks, a VPN can be a valuable tool. Here's a step-by-step guide to help you set up your VPN:
Choose a VPN Provider: Start by selecting a reputable VPN provider that offers the features you need. Look for providers with a good track record of privacy protection and a wide range of server locations.
Sign Up and Download: Once you've chosen a provider, sign up for an account and download the VPN software or app onto your device. Most VPN services offer apps for various operating systems, including Windows, macOS, iOS, and Android.
Install and Launch the VPN App: Follow the instructions provided by your VPN provider to install the app on your device. Once installed, launch the app and log in using your credentials.
Choose a Server Location: VPNs work by routing your internet traffic through servers located in different countries. Choose a server location based on your needs, such as accessing geo-restricted content or optimizing for speed.
Connect to the VPN: After selecting a server location, simply click the connect button within the VPN app to establish a secure connection. Once connected, all of your internet traffic will be encrypted and routed through the VPN server.
Adjust Settings (Optional): Depending on your preferences, you may want to adjust additional settings within the VPN app, such as enabling a kill switch or configuring split tunneling.
Verify Connection: Once connected, verify that your VPN is working correctly by visiting a website that displays your IP address. You should see the IP address of the VPN server you're connected to, rather than your actual IP address.
By following these steps, you can easily set up and configure a VPN to protect your online privacy and security. Remember to choose a reliable VPN provider and regularly update your VPN software for optimal performance.
VPN software necessity
Using a VPN (Virtual Private Network) software has become an essential tool for ensuring online privacy and security in today's digital age. VPN software encrypts your internet connection, safeguarding your data from potential hackers, government surveillance, or other malicious entities. By masking your IP address and routing your internet traffic through secure servers, VPNs help protect your online identity and activities from being monitored or traced.
One of the key reasons for the necessity of VPN software is the increasing number of cyber threats and data breaches that occur regularly. With cybercriminals constantly seeking to exploit vulnerabilities in networks and devices, using a VPN adds an extra layer of protection for your sensitive information, such as passwords, financial details, or personal conversations.
Moreover, VPN software allows you to access geo-restricted content and bypass censorship imposed by governments or internet service providers. Whether you want to stream your favorite shows on platforms not available in your region or browse the web without restrictions, a VPN can help you navigate through these barriers.
For businesses and remote workers, VPN software enables secure communication and access to company resources from any location. It creates a secure tunnel for transmitting data between devices, ensuring confidentiality and integrity of information shared over the internet.
In conclusion, VPN software is no longer just an optional tool but a necessity for anyone who values their online privacy and security. By investing in a reliable VPN service, you can browse the internet anonymously, protect your data from cyber threats, and enjoy unrestricted access to online content. Stay safe and secure online with the help of VPN software.
Setting up VPN without software
Setting up a Virtual Private Network (VPN) without software can be a savvy choice for individuals seeking greater control and privacy over their internet connection. While many VPN services offer user-friendly software, opting for a manual setup provides a deeper understanding of the process and can be advantageous in certain scenarios. Here's a guide on how to set up a VPN without relying on software:
Choose Your VPN Protocol: Start by selecting a VPN protocol that suits your needs. Common options include OpenVPN, L2TP/IPsec, and IKEv2/IPsec.
Access VPN Configuration Files: Most VPN providers offer configuration files for manual setup. Log in to your VPN account on the provider's website and locate the section for manual configurations.
Download Configuration Files: Download the configuration files corresponding to the VPN protocol you've chosen. These files contain the necessary settings for establishing a connection.
Configure Network Settings: Open your device's network settings and navigate to the VPN setup section. Depending on your operating system, this might be found under Network Settings or Network Connections.
Add VPN Connection: Select the option to add a new VPN connection or network. Choose the option for manual setup or advanced configuration.
Enter Connection Details: Input the required details, including the VPN server address, authentication methods, and any additional settings provided in the configuration files.
Authenticate: If your VPN requires authentication, enter your username and password as provided by your VPN provider.
Connect: Save the settings and attempt to connect to the VPN server. If configured correctly, your device should establish a secure connection to the VPN without the need for dedicated software.
Setting up a VPN without software may require more technical knowledge compared to using dedicated applications. However, it offers greater flexibility and control over your VPN connection, making it a preferred choice for users who value customization and privacy. By following these steps, you can enjoy the benefits of a VPN without relying on third-party software.
Alternative methods for VPN setup
Setting up a Virtual Private Network (VPN) is essential for safeguarding your online privacy and security. While traditional methods exist, alternative approaches offer flexibility and customization. Here are several methods for VPN setup beyond the usual protocols:
Router Configuration: Instead of installing VPN software on individual devices, configure your router to connect to the VPN. This method secures all devices connected to the network simultaneously, ensuring comprehensive protection without the need for individual installations.
DIY VPN Server: For tech-savvy users, setting up a personal VPN server using software like OpenVPN or WireGuard provides full control over security and server location. This approach is ideal for those concerned about third-party VPN providers' data retention policies.
Virtual Machine (VM) Installation: Utilize a virtual machine to run a VPN client, effectively compartmentalizing your VPN connection from the host system. This method adds an extra layer of isolation, especially useful for testing different VPN configurations or accessing region-locked content.
Proxy Servers: While not a traditional VPN, proxy servers offer a similar function by rerouting internet traffic through an intermediary server. Unlike VPNs, proxies may not encrypt data, but they can still provide anonymity and bypass geo-restrictions.
Browser Extensions: Some VPN providers offer browser extensions that encrypt browser traffic without affecting other applications. These extensions are lightweight and easy to install, making them suitable for users primarily concerned with web browsing privacy.
Smart DNS Services: Ideal for streaming enthusiasts, Smart DNS services reroute DNS queries through servers located in different regions, allowing access to geo-blocked content without affecting internet speed or encryption.
By exploring these alternative methods for VPN setup, users can tailor their privacy solutions to meet specific needs while enjoying enhanced security and online freedom. Always prioritize reputable providers and thoroughly research each method's implications before implementation.
VPN configuration tools
A VPN configuration tool is a software application that enables users to set up and manage their Virtual Private Network (VPN) connections easily and efficiently. These tools are designed to simplify the process of configuring a VPN, making it accessible even for those with limited technical knowledge.
One popular type of VPN configuration tool is a client application, which allows users to connect to a VPN server with just a few clicks. These tools often come with user-friendly interfaces that guide users through the setup process, making it quick and straightforward to establish a secure connection.
Another type of VPN configuration tool is designed for network administrators, offering a more advanced set of features for managing multiple VPN connections across a large organization. These tools often include options for configuring security settings, monitoring connection status, and troubleshooting any issues that may arise.
Using a VPN configuration tool is essential for ensuring that your network connections are secure and protected from potential cyber threats. By taking advantage of these tools, users can encrypt their data, mask their IP address, and browse the internet anonymously, safeguarding their privacy and sensitive information.
In conclusion, VPN configuration tools play a vital role in the setup and management of VPN connections, offering users a convenient and secure way to protect their online activities. Whether you are a casual user looking for a simple setup or a network administrator managing a complex infrastructure, these tools provide the necessary features to ensure a safe and reliable VPN experience.
0 notes
Text
does a dhcp pool need created for meraki client vpn
🔒🌍✨ Get 3 Months FREE VPN - Secure & Private Internet Access Worldwide! Click Here ✨🌍🔒
does a dhcp pool need created for meraki client vpn
Meraki client VPN setup
Setting up a Meraki client VPN provides secure and easy access for remote users to connect to an organization's network. Meraki, a cloud-managed networking solution, offers a straightforward process for configuring client VPN settings.
To begin the setup, log in to the Meraki dashboard and navigate to the Security & SD-WAN section. Select 'Client VPN' and configure the settings according to your organization's requirements. You can choose the authentication method, such as Active Directory or Meraki Authentication, and set up the encryption and IP addressing settings.
Next, create user accounts for the individuals who will be connecting via the client VPN. Assign them the necessary permissions and provide clear instructions on how to download and install the Meraki VPN client on their devices.
Once the client VPN settings are configured and users are set up, they can easily establish a secure connection to the organization's network. They can launch the Meraki VPN client, enter their credentials, and connect with just a few clicks.
Overall, setting up a Meraki client VPN is a user-friendly process that enhances remote access for employees and ensures a secure connection to the organization's network. By following the steps outlined in the Meraki dashboard, organizations can provide their remote users with a seamless and secure VPN experience.
DHCP pool configuration for Meraki client VPN
Dynamic Host Configuration Protocol (DHCP) pool configuration is an essential aspect when setting up Meraki client VPN to ensure smooth connectivity for remote clients. When users connect to a Meraki client VPN, they are assigned IP addresses from a specified DHCP pool to enable communication with the network resources.
To configure the DHCP pool for Meraki client VPN, start by logging into the Meraki dashboard and navigating to the Security & SD-WAN section. Select 'Client VPN' and then choose 'Configure Client VPN settings.' Here, you can set up the DHCP pool parameters such as the starting and ending IP addresses, subnet mask, DNS servers, and default gateway.
It is crucial to define a sufficient range of IP addresses in the DHCP pool to accommodate the maximum number of concurrent VPN connections expected. Consider factors like the size of your organization and the anticipated number of remote users connecting via the VPN.
Additionally, ensure that the subnet mask, DNS servers, and default gateway settings align with your network configuration to facilitate seamless communication between the VPN clients and other devices on the network.
Regularly monitoring the DHCP pool utilization and adjusting the pool size as needed is recommended to prevent IP address exhaustion and connectivity issues for VPN users. By proactively managing the DHCP pool configuration for Meraki client VPN, you can optimize network performance and enhance the remote user experience.
Meraki client VPN requirements
Meraki client VPN allows users to securely connect to their organization's network from remote locations. To ensure a smooth and secure VPN connection, there are specific requirements that need to be met by both the clients and the Meraki network.
On the client side, a compatible operating system is essential. Meraki client VPN supports various operating systems, including Windows, macOS, iOS, and Android. It is important to ensure that the client's device is running a supported operating system and that it is up to date with the latest security patches and updates.
Another critical requirement is a stable internet connection. A reliable internet connection with sufficient bandwidth is necessary for a seamless VPN experience. Unstable connections can lead to dropped connections and poor performance, impacting productivity and security.
For authentication purposes, users will need valid credentials to access the VPN. This typically involves a username and password, and in some cases, additional forms of authentication such as two-factor authentication for added security.
On the Meraki network side, the MX security appliance is often used to establish the client VPN connection. Proper configuration of the MX appliance is crucial to ensure compatibility with client devices and to enforce security policies such as firewall rules and encryption protocols.
Overall, meeting these Meraki client VPN requirements is essential for a secure and efficient remote access solution. By ensuring that both the client devices and the Meraki network are properly configured and up to date, organizations can provide their users with a reliable and secure VPN connection for remote work scenarios.
Creating DHCP pool for Meraki client VPN
To create a DHCP pool for Meraki client VPN, you need to follow a few simple steps to ensure that your VPN clients can obtain IP addresses dynamically. Dynamic Host Configuration Protocol (DHCP) is essential for automatically assigning IP addresses to devices connecting to a network, including clients accessing a VPN such as Meraki client VPN.
Firstly, log in to your Meraki dashboard and navigate to the 'Security & SD-WAN' section. Select 'Client VPN' and then choose 'Configuration'. Here, you will find the option to set up a DHCP pool for VPN clients.
Next, click on 'Add a DHCP pool' and enter the necessary details such as the starting and ending IP address range that will be assigned to VPN clients. Make sure to specify the subnet mask and lease time according to your network requirements.
It is recommended to enable 'DNS nameserver' and 'WINS server' options if needed for your VPN clients to resolve domain names and NetBIOS names respectively. You can enter the IP addresses of the DNS and WINS servers in the provided fields.
Once you have configured the DHCP pool settings, remember to save the changes to apply the new settings. This will ensure that VPN clients connecting to the Meraki client VPN will receive dynamic IP addresses from the specified pool, allowing them to communicate effectively within the network.
By setting up a DHCP pool for Meraki client VPN, you can streamline the process of assigning IP addresses to clients securely and efficiently. This configuration simplifies network management tasks and enhances the overall VPN experience for users accessing the network remotely.
Meraki client VPN network settings
Meraki Client VPN provides a secure and easy-to-manage solution for connecting remote users to your network. Configuring the network settings for Meraki Client VPN involves several key steps to ensure a smooth and secure connection.
First and foremost, you need to set up the VPN on your Meraki dashboard. Log in to your dashboard and navigate to the 'Security & SD-WAN' section. Under 'Client VPN', you can configure the settings according to your requirements. You can set the encryption type, authentication method, DNS servers, and subnet for the VPN clients.
Next, create user accounts for the clients who will be connecting to the VPN. You can assign specific access privileges to each user to control their level of access to the network resources. This step is crucial for maintaining the security of your network.
After setting up user accounts, you need to configure the client VPN on the end-user devices. Meraki offers a straightforward client that can be installed on Windows, Mac, iOS, and Android devices. Simply download the client from the Meraki dashboard and follow the instructions to set it up.
Once the client VPN is configured on the user devices, they can connect to the VPN using the provided credentials. The VPN will establish a secure tunnel to the Meraki network, allowing users to access resources securely from anywhere.
In conclusion, configuring Meraki Client VPN network settings requires proper planning and attention to detail to ensure a secure and reliable connection for remote users. By following the steps outlined above, you can set up a robust VPN solution that meets your organization's needs.
0 notes
Text
does vpn work on viki
🔒🌍✨ Get 3 Months FREE VPN - Secure & Private Internet Access Worldwide! Click Here ✨🌍🔒
does vpn work on viki
Viki VPN compatibility
Viki VPN is a popular virtual private network service that offers users secure and private internet access. Many users wonder about the compatibility of Viki VPN with different platforms and devices. The good news is that Viki VPN is designed to work seamlessly across various operating systems and devices to provide a reliable and secure connection.
Viki VPN is compatible with major operating systems such as Windows, macOS, iOS, and Android, making it versatile for users who utilize different devices. Whether you are using a desktop computer, laptop, smartphone, or tablet, you can easily set up Viki VPN and protect your online activities.
Moreover, Viki VPN also offers browser extensions for popular web browsers like Chrome and Firefox, allowing users to add an extra layer of security while browsing the internet. The browser extensions are user-friendly and offer quick access to Viki VPN services without the need to launch a separate application.
Additionally, Viki VPN is compatible with routers, enabling users to protect all devices connected to the network. By configuring Viki VPN on a router, users can secure their smart TVs, gaming consoles, and other IoT devices that do not natively support VPN connections.
In conclusion, Viki VPN is highly compatible with a wide range of platforms and devices, ensuring that users can enjoy a safe and private internet experience across all their devices. Whether you are at home, in the office, or on the go, Viki VPN has you covered with its excellent compatibility and ease of use.
VPN usage on Viki
VPN usage on Viki
Viki is a popular streaming platform that offers a wide range of Asian dramas, movies, and TV shows to viewers worldwide. However, due to content licensing restrictions, some shows may be unavailable in certain regions. This is where a Virtual Private Network (VPN) comes in handy.
Using a VPN on Viki allows viewers to bypass geo-restrictions and access content that may not be available in their country. By connecting to a VPN server in a different location, users can mask their IP address and make it appear as though they are accessing Viki from an allowed region.
VPNs provide an added layer of privacy and security by encrypting users' internet traffic, making it difficult for third parties to monitor their online activities. This is especially important when streaming content on public Wi-Fi networks, as it helps protect sensitive information from potential hackers.
Moreover, VPNs can also help improve streaming speeds on Viki by reducing buffering and lag. By connecting to a VPN server closer to Viki's servers, users can experience faster and more stable connections, leading to a smoother viewing experience.
However, it is essential to choose a reliable and reputable VPN service to ensure optimal performance and security. Remember to select a server location where Viki is available and comply with Viki's terms of service to enjoy uninterrupted streaming.
In conclusion, using a VPN on Viki can enhance users' viewing experience by granting access to a wider range of content and improving security and privacy measures while streaming.
Viki geolocation bypass with VPN
Title: Unlock Viki's Full Potential: Geolocation Bypass with VPN
Are you tired of seeing "This content is not available in your region" every time you try to access your favorite shows on Viki? Well, there's a solution that can grant you unrestricted access to Viki's entire library – a Virtual Private Network (VPN).
Viki, a popular streaming platform for Asian dramas and movies, restricts access to certain content based on your geographical location due to licensing agreements. However, with a VPN, you can bypass these restrictions and enjoy Viki's complete catalog from anywhere in the world.
Here's how it works: A VPN routes your internet connection through a server in a different location, making it appear as though you're accessing the internet from that location. So, if you're in the United States and want to watch a show that's only available in South Korea, you can connect to a VPN server in South Korea and instantly gain access to the content.
But why stop at just unlocking Viki's content? A VPN also encrypts your internet traffic, protecting your online privacy and security. This means your ISP, government agencies, or hackers won't be able to monitor your online activities.
Choosing the right VPN is crucial for a seamless streaming experience. Look for a VPN provider that offers servers in multiple countries, fast connection speeds, and reliable performance. Additionally, make sure the VPN has a strong privacy policy and doesn't keep logs of your online activities.
In conclusion, if you're tired of being restricted by Viki's geolocation limitations, a VPN is the perfect solution. Not only will it unlock Viki's full potential, but it will also enhance your online security and privacy. So why wait? Start enjoying your favorite Asian dramas and movies on Viki today, no matter where you are in the world.
VPN effectiveness on Viki
VPNs, or virtual private networks, are powerful tools for protecting your online privacy and security. When it comes to streaming content on platforms like Viki, a VPN can also be highly effective in enhancing your viewing experience.
By using a VPN while accessing Viki, users can bypass geo-restrictions that limit the availability of certain shows and movies based on their location. This means that you can unlock content that may not be accessible in your region, allowing you to enjoy a more diverse range of entertainment options.
Furthermore, a VPN can help improve streaming quality on Viki by reducing buffering and lag. By connecting to a VPN server in a location closer to Viki's servers, users can experience faster connection speeds and smoother playback, resulting in a more seamless viewing experience.
In addition to unlocking geo-blocked content and improving streaming performance, a VPN on Viki can also enhance your online security. By encrypting your internet traffic and hiding your IP address, a VPN helps protect your personal information from potential hackers and snoopers, keeping your browsing activity private and secure.
Overall, using a VPN on Viki can offer a range of benefits, from accessing a wider selection of content to enhancing streaming quality and improving online security. Whether you're looking to expand your entertainment options or safeguard your privacy, a VPN is a valuable tool for Viki viewers.
Viki streaming and VPN support
Title: Unlocking Viki Streaming: How VPN Support Enhances Your Viewing Experience
Viki, the popular streaming platform known for its diverse range of international content, has garnered a dedicated global audience. However, due to licensing restrictions, certain shows and movies may be unavailable in certain regions. This is where VPN (Virtual Private Network) support comes into play, offering users the ability to bypass these geo-blocks and access Viki's full library of content from anywhere in the world.
By using a VPN, viewers can mask their IP address and connect to servers in countries where the desired content is available. This enables them to appear as though they're accessing Viki from a permitted location, thereby circumventing any regional restrictions. Whether it's Korean dramas, Japanese anime, or Taiwanese variety shows, VPN support ensures that fans can enjoy their favorite programs without limitations.
Furthermore, VPNs provide an additional layer of security and privacy by encrypting internet traffic, safeguarding users' data from potential threats such as hacking or surveillance. This added protection is especially crucial when streaming content online, as it helps prevent unauthorized access to personal information.
When selecting a VPN for Viki streaming, it's essential to choose a reliable provider with servers strategically located around the world. This ensures consistent performance and faster connection speeds, resulting in smooth playback and minimal buffering.
However, it's worth noting that while VPNs offer numerous benefits for accessing geo-restricted content, users should always respect copyright laws and adhere to Viki's terms of service. Additionally, not all VPNs may be compatible with Viki, so it's advisable to research and choose a VPN known for its compatibility with streaming platforms.
In conclusion, VPN support enhances the Viki streaming experience by granting users unrestricted access to its vast library of international content while prioritizing security and privacy. By utilizing a VPN, viewers can indulge in their favorite shows and movies without boundaries, regardless of their geographical location.
1 note
·
View note
Text
does vpn work to bypass parental controls
🔒🌍✨ Get 3 Months FREE VPN - Secure & Private Internet Access Worldwide! Click Here ✨🌍🔒
does vpn work to bypass parental controls
VPN bypass parental controls
Title: How to Use VPNs to Bypass Parental Controls Safely
Parental controls are essential tools for ensuring children's online safety and managing their internet usage. However, there may be instances where individuals, such as adults or older teens, need to bypass these controls for legitimate reasons, like accessing certain websites or content. One method to achieve this is by using a Virtual Private Network (VPN).
A VPN works by encrypting your internet connection and routing it through a server in a different location, effectively masking your IP address and location. This process allows users to bypass geographical restrictions and access content that may be blocked by parental controls or regional censorship.
Here are some steps to safely bypass parental controls using a VPN:
Choose a reputable VPN provider: Select a VPN service that prioritizes privacy, security, and reliability. Look for features like strong encryption protocols, a no-logs policy, and a large server network.
Install the VPN software: Once you've chosen a VPN provider, download and install their software on your device. Most VPNs offer applications for various operating systems, including Windows, macOS, iOS, and Android.
Connect to a VPN server: Launch the VPN application and connect to a server located in a different region. This will assign you a new IP address, bypassing any restrictions imposed by parental controls.
Test your connection: After connecting to the VPN server, verify that your internet connection is secure and your IP address has changed. You can do this by visiting a website that detects your IP address.
Browse safely: Once you've confirmed that the VPN is active, you can safely browse the internet and access restricted content without being subject to parental controls.
It's important to note that while VPNs can help bypass parental controls, they should be used responsibly and in accordance with applicable laws and regulations. Additionally, parents should educate themselves and their children about online safety and the importance of responsible internet usage.
VPN effectiveness parental restrictions
A VPN (Virtual Private Network) can be an effective tool for implementing parental restrictions and ensuring a safe online environment for children. By using a VPN, parents can control and monitor their children's internet usage, block access to inappropriate content, and protect their privacy and security online.
One of the key benefits of using a VPN for parental restrictions is the ability to block access to specific websites and applications. Parents can set up filters and restrictions to prevent their children from accessing adult content, gambling websites, social media platforms, and other potentially harmful sites. This helps in creating a safe online space for kids to explore the internet without being exposed to inappropriate content.
Additionally, a VPN can encrypt internet traffic, making it more secure and protecting sensitive information from hackers and data thieves. This added layer of security ensures that children's online activities are safe from prying eyes and malicious actors, giving parents peace of mind knowing that their kids are browsing the web securely.
Furthermore, a VPN can help bypass geographical restrictions on certain websites and streaming services, allowing parents to control the content their children can access based on their location. This feature can be particularly useful in limiting exposure to region-specific content that may not be suitable for young audiences.
In conclusion, using a VPN for parental restrictions can be an effective way to monitor and manage children's online activities, block inappropriate content, and enhance online security and privacy. By leveraging the capabilities of a VPN, parents can create a safer and more controlled online environment for their kids to navigate and explore.
VPN circumvent internet filters
A Virtual Private Network (VPN) is a powerful tool that can help you bypass internet filters and access restricted content online. Whether you're looking to access censored websites, bypass geographical restrictions, or enhance your online privacy, a VPN can be a valuable ally.
Internet filters are often used by governments, workplaces, schools, and even internet service providers to block access to specific websites or content deemed inappropriate or undesirable. However, these restrictions can be frustrating, limiting your ability to freely access the information you want.
By using a VPN, you can circumvent these internet filters by redirecting your internet traffic through a secure and encrypted connection to a remote server. This not only masks your real IP address but also makes it appear as though you are browsing the internet from a different location. As a result, you can access websites and content that may be blocked in your current location.
Additionally, a VPN can help protect your online privacy by encrypting your internet traffic, preventing third parties from monitoring your online activities. This is particularly important when using public Wi-Fi networks, where cybercriminals may try to intercept your data.
Overall, VPNs offer a reliable and effective solution for bypassing internet filters and accessing the content you want securely and anonymously. Whether you're looking to stream geo-blocked content, access censored websites, or simply safeguard your online privacy, a VPN can be a valuable tool in your digital arsenal.
VPN hack parental monitoring
In today's digital age, children are spending more time online than ever before. While the internet provides countless opportunities for learning and entertainment, it also poses potential risks for young users, such as exposure to inappropriate content or the threat of hackers. Parental monitoring tools have become increasingly popular for parents looking to safeguard their children's online activities.
However, even the most advanced parental monitoring systems can be vulnerable to hacking. This is where a Virtual Private Network (VPN) can play a crucial role in enhancing the security of parental monitoring tools. A VPN encrypts internet traffic, making it more difficult for hackers to intercept and access sensitive information.
By using a VPN to secure the connection between the parental monitoring tool and the device being monitored, parents can add an extra layer of protection against potential cyber threats. VPNs can also help parents bypass geographical restrictions, allowing them to monitor their children's online activities even when they are traveling abroad.
When choosing a VPN for parental monitoring, parents should opt for a reputable service that prioritizes privacy and security. It's essential to research and select a VPN provider that offers strong encryption protocols, a strict no-logs policy, and reliable customer support.
In conclusion, integrating a VPN with parental monitoring tools can significantly enhance online security for children. By taking proactive steps to secure their online activities, parents can ensure a safer and more secure digital environment for their families.
VPN evade family safety measures
In today's digital age, many households implement family safety measures to protect their loved ones from accessing inappropriate content or falling victim to online threats. However, some individuals may seek ways to bypass these safeguards, and one method that's increasingly common is using a Virtual Private Network (VPN).
A VPN is typically employed to enhance online privacy and security by encrypting internet traffic and masking the user's IP address. While its primary purpose is noble, some individuals exploit VPNs to evade family safety measures put in place by parents or guardians.
By connecting to a VPN server, users can circumvent content filtering and monitoring tools implemented within the household network. This enables them to access restricted websites, bypass parental controls on applications, or conceal their online activities from scrutiny.
Parents may find it challenging to detect VPN usage within their household, as VPNs can be easily installed and configured on various devices, including computers, smartphones, and tablets. Additionally, some VPN services offer features specifically designed to bypass censorship or evade detection, making them even more appealing to individuals looking to bypass family safety measures.
To address this issue, parents can take proactive steps to educate themselves about VPN technology and its implications. They can also explore advanced parental control solutions that offer features to detect and block VPN usage within the household network.
Ultimately, maintaining open communication with family members about responsible internet usage and the importance of adhering to established guidelines remains crucial. By fostering a culture of trust and understanding, families can work together to navigate the complexities of the digital world while promoting a safe and secure online environment for everyone.
0 notes
Text
do i need to change utorrent settings for vpn
🔒🌍✨ Get 3 Months FREE VPN - Secure & Private Internet Access Worldwide! Click Here ✨🌍🔒
do i need to change utorrent settings for vpn
VPN setup for uTorrent
Setting up a VPN for uTorrent can enhance your online privacy and security while torrenting. uTorrent is a popular BitTorrent client that allows users to download and share files over the internet. However, torrenting without proper protection can expose your IP address to potential threats and monitoring by third parties. By using a VPN (Virtual Private Network) with uTorrent, you can encrypt your internet connection and mask your IP address, ensuring anonymity and preventing unauthorized access to your data.
Here's how to set up a VPN for uTorrent:
Choose a reliable VPN provider: Select a VPN service that offers fast speeds, strong encryption, and a no-logs policy to safeguard your online activities.
Subscribe to the VPN service: Sign up for a subscription plan that suits your needs and budget. Most VPN providers offer various subscription options, including monthly, yearly, and multi-year plans.
Download and install the VPN software: Once you've subscribed, download the VPN client software compatible with your device's operating system (Windows, macOS, Linux, etc.). Follow the installation instructions provided by the VPN provider.
Connect to a VPN server: Launch the VPN application and log in with your credentials. Choose a VPN server location from the list of available options. Connecting to a server in a location with favorable privacy laws is recommended.
Configure uTorrent to use the VPN: Open the uTorrent client and navigate to the settings menu. Look for the connection or proxy settings and enter the VPN server's IP address and port number provided by your VPN provider. Enable the option to use the proxy for peer-to-peer connections.
Test your VPN connection: Verify that your VPN is properly configured by visiting an IP checking website to confirm that your IP address is masked and your internet traffic is encrypted.
By following these steps, you can set up a VPN for uTorrent and enjoy a safer and more private torrenting experience. Remember to keep your VPN software updated and adhere to your VPN provider's terms of service to maximize security and anonymity.
Adjusting uTorrent settings with VPN
Adjusting uTorrent Settings with VPN
uTorrent, a popular BitTorrent client, offers efficient file-sharing capabilities, but it's essential to ensure your privacy and security while using it. Utilizing a Virtual Private Network (VPN) with uTorrent can enhance anonymity and protect against potential threats. Here's a guide on adjusting uTorrent settings to work seamlessly with a VPN:
Choose a Reliable VPN: Select a reputable VPN service known for its strong encryption and no-logs policy. Ensure compatibility with uTorrent and consider factors like speed and server locations.
Install the VPN Software: Download and install the VPN client on your device. Follow the setup instructions provided by the VPN provider to complete the installation process.
Connect to a VPN Server: Launch the VPN application and connect to a server location of your choice. Opt for a server with high speed and minimal latency to maintain smooth torrenting.
Configure uTorrent Settings: Open uTorrent and navigate to the preferences or settings menu. Look for the connection or network tab, where you'll find options to configure proxy settings.
Enable Proxy Support: Check the box for "Proxy Server" and enter the details provided by your VPN provider. This typically includes the server address, port number, and authentication credentials if required.
Test the Connection: Verify that uTorrent is successfully connected to the internet through the VPN by conducting a connection test or monitoring your IP address.
Adjust Bandwidth Settings: To optimize performance, adjust uTorrent's bandwidth settings to accommodate the VPN's encryption overhead. This may involve limiting upload/download speeds or adjusting the number of active torrents.
Ensure Kill Switch Protection: Some VPN clients offer a kill switch feature that automatically disconnects your internet connection if the VPN connection drops. Enable this feature to prevent accidental exposure of your IP address.
By following these steps, you can effectively adjust uTorrent settings to utilize a VPN, safeguarding your online privacy and security while enjoying seamless torrenting experiences. Remember to regularly update both uTorrent and your VPN software for the latest security enhancements.
VPN compatibility with uTorrent
A Virtual Private Network (VPN) is a crucial tool for enhancing your online privacy and security. However, when it comes to using a VPN with uTorrent, compatibility is a key consideration. uTorrent is one of the most popular BitTorrent clients for downloading files, and combining it with a VPN can provide an extra layer of protection.
When using a VPN with uTorrent, it encrypts your internet traffic, making it difficult for anyone to monitor your online activities, including your Internet Service Provider (ISP). This means that your uTorrent downloads remain private and secure from prying eyes.
Most quality VPN services are compatible with uTorrent, but it's essential to choose a VPN that supports P2P file sharing and offers fast download speeds. Some VPN providers even offer specific servers optimized for torrenting, ensuring a smooth and secure uTorrent experience.
It's worth noting that using a VPN with uTorrent may slightly impact your download speeds due to the encryption process. However, the trade-off for enhanced privacy and security is often considered worthwhile by many users.
In conclusion, VPN compatibility with uTorrent is a crucial factor to consider when striving for a secure and anonymous torrenting experience. By selecting a reliable VPN provider that supports P2P file sharing and offers fast speeds, you can enjoy peace of mind knowing that your online activities are protected while using uTorrent.
Optimal uTorrent configuration for VPN
When using uTorrent with a VPN, it is essential to optimize the settings for the best experience and protection. A VPN, or Virtual Private Network, encrypts your internet connection and masks your IP address, providing anonymity and security while torrenting. By configuring uTorrent and your VPN properly, you can ensure optimal performance and privacy.
Firstly, select a VPN provider that allows P2P file sharing and has fast connection speeds. Some popular VPNs for torrenting include NordVPN, ExpressVPN, and CyberGhost. Make sure to enable the VPN kill switch feature, which will automatically disconnect uTorrent if the VPN connection drops, preventing your real IP address from being exposed.
Next, configure uTorrent settings to work seamlessly with your VPN. Go to the uTorrent options menu and select Preferences. In the Connection section, input the port number provided by your VPN provider for optimal connectivity. Enable UPnP port mapping and randomize port each start to enhance security.
In the Bandwidth section, set the download and upload limits according to your internet speed to avoid throttling by your ISP. Enable protocol encryption to mask uTorrent traffic and make it harder to detect by network administrators.
Lastly, prioritize safety by enabling the IP binding feature in uTorrent, which allows you to bind it to the VPN interface, ensuring that uTorrent only works when connected to the VPN. Additionally, regularly check for software updates for both uTorrent and your VPN to patch any security vulnerabilities.
By following these steps to optimize your uTorrent configuration for VPN usage, you can torrent securely and privately while maintaining optimal performance.
Ensuring privacy with uTorrent and VPN
When using uTorrent to download or share files, ensuring your privacy is crucial to protect your online activities. One effective way to enhance your privacy and security while using uTorrent is by using a Virtual Private Network (VPN).
A VPN encrypts your internet connection, making it difficult for anyone to monitor your online activities, including your torrenting behavior. By hiding your IP address and routing your internet traffic through a secure server, a VPN adds a layer of anonymity that helps protect your privacy.
When choosing a VPN to use with uTorrent, look for one that offers strong encryption protocols, a no-logs policy, and a kill switch feature. Strong encryption ensures that your data remains secure, while a no-logs policy means that the VPN provider does not store any information about your online activities. The kill switch feature is essential as it automatically disconnects your internet connection if the VPN connection is lost, preventing your real IP address from being exposed.
Additionally, it is important to select a VPN provider that allows torrenting on their servers and offers fast connection speeds to avoid any interruptions during your file-sharing activities. Some popular VPN services that are known for their privacy features and compatibility with uTorrent include ExpressVPN, NordVPN, and CyberGhost.
By combining uTorrent with a reliable VPN service, you can enjoy a more private and secure torrenting experience while safeguarding your online privacy. Remember to always prioritize your privacy and security when engaging in any online activities, including file sharing with uTorrent.
0 notes
Text
does google mesh offer vpn client software
🔒🌍✨ Get 3 Months FREE VPN - Secure & Private Internet Access Worldwide! Click Here ✨🌍🔒
does google mesh offer vpn client software
Google Mesh VPN capabilities
Google Mesh VPN capabilities refer to the unique features of Google's Virtual Private Network (VPN) service that is integrated into the Google Mesh Wi-Fi system. The primary goal of a VPN is to provide a secure and private internet connection for users by encrypting their data and routing it through a remote server. With Google Mesh VPN capabilities, users can enjoy enhanced privacy and security while browsing the web.
One of the key capabilities of Google Mesh VPN is its ability to encrypt internet traffic, preventing hackers, snoopers, and even the Internet Service Provider (ISP) from monitoring user activities. This encryption ensures that sensitive information such as passwords, financial details, and personal messages remain secure from prying eyes.
Another notable feature of Google Mesh VPN is the option to connect to servers in different locations around the world. This not only helps users bypass geo-restrictions but also enhances their online anonymity by masking their actual IP address.
Furthermore, Google Mesh VPN offers seamless integration with the Google Wi-Fi app, allowing users to easily enable or disable the VPN service with just a few taps on their smartphone or tablet. This user-friendly interface makes it convenient for users to protect their online activities without any hassle.
In conclusion, Google Mesh VPN capabilities provide users with a reliable, secure, and easy-to-use VPN solution that enhances their online privacy and security. Whether users want to protect their data on public Wi-Fi networks or access geo-restricted content, Google Mesh VPN offers a comprehensive set of features to meet their needs.
Google Mesh VPN client download
Google Mesh VPN is a popular service that allows users to easily download and install a VPN client to ensure secure and private internet browsing. By using a VPN client, users can mask their IP address, encrypt their internet connection, and access geo-restricted content with ease.
Downloading the Google Mesh VPN client is a simple process that can be done by following a few easy steps. To begin, users can visit the official Google Mesh VPN website and locate the download section. From there, users can choose the appropriate client for their operating system, whether it be Windows, macOS, Android, or iOS.
Once the client is downloaded, users can follow the installation wizard to set up the VPN on their device. During the installation process, users may be prompted to create an account or login with their existing credentials. It is important to carefully read and agree to the terms and conditions before proceeding with the installation.
After the installation is complete, users can launch the Google Mesh VPN client and connect to a VPN server of their choice. By selecting a server in a different location, users can bypass censorship, access region-locked content, and enhance their online privacy and security.
Overall, downloading the Google Mesh VPN client is a straightforward process that can provide users with added security and freedom while browsing the internet. With just a few clicks, users can enjoy a safer and more private online experience.
Google Mesh security features
Title: Exploring Google Mesh Security Features: Safeguarding Your Network
Google Mesh, a cutting-edge Wi-Fi system, not only promises seamless connectivity but also prioritizes security. In an era where online threats loom large, ensuring the protection of your network is paramount. Here's a closer look at the robust security features that Google Mesh offers:
WPA3 Encryption: Google Mesh employs the latest Wi-Fi security protocol, WPA3, to encrypt data transmitted over the network. This encryption standard enhances protection against brute-force attacks and provides stronger security for your connected devices.
Automatic Security Updates: Keeping your network secure requires staying one step ahead of potential vulnerabilities. Google Mesh simplifies this process by automatically updating its security features. This proactive approach ensures that your network is fortified against emerging threats without requiring manual intervention.
Secure Guest Network: With Google Mesh, you can create a separate guest network to provide internet access to visitors while keeping your primary network secure. This isolation prevents guests from accessing sensitive information or devices connected to your main network, bolstering overall security.
Built-in Malware and Intrusion Protection: Google Mesh integrates robust malware and intrusion detection capabilities directly into its system. By continuously monitoring network traffic and identifying suspicious activities, it can thwart potential cyber threats before they compromise your network's integrity.
Parental Controls: Safeguarding your family's online experience is essential, and Google Mesh offers comprehensive parental controls to help achieve this. With customizable settings, you can regulate internet access, filter content, and set usage limits, ensuring a safe and age-appropriate online environment for children.
In conclusion, Google Mesh prioritizes security alongside seamless connectivity, offering a comprehensive suite of features to safeguard your network against a myriad of threats. Whether you're browsing the web, streaming content, or conducting business online, you can trust Google Mesh to keep your digital world secure.
Google Mesh VPN compatibility
Google Mesh VPN compatibility refers to the ability of Google's mesh networking system to work seamlessly with virtual private networks (VPNs). VPNs are essential tools for ensuring online privacy and security by encrypting internet traffic and masking the user's IP address. By combining a VPN with a Google Mesh network, users can enjoy enhanced protection across all connected devices within their home network.
One of the key advantages of using a VPN with Google Mesh is the ability to secure all internet-connected devices, including smartphones, computers, smart TVs, and IoT devices. This ensures that sensitive data such as browsing history, passwords, and personal information remain protected from potential cyber threats and hackers. Additionally, VPNs can help bypass geo-restrictions and censorship by allowing users to connect to servers located in different countries.
Setting up a VPN on a Google Mesh network is relatively straightforward and can usually be done by accessing the VPN settings on the router or through a dedicated app. Many reputable VPN providers offer easy-to-follow guides on how to configure their service with various router models, including those compatible with Google Mesh systems.
While VPN compatibility with Google Mesh is generally smooth, it's essential to choose a reliable VPN service to ensure a stable connection and optimal performance. Factors to consider when selecting a VPN for Google Mesh include security protocols, server locations, speed, and customer support.
In conclusion, leveraging a VPN with Google Mesh can provide an additional layer of security and privacy for your home network. By carefully selecting a compatible VPN service and following the setup instructions, users can enjoy a safer and more private online experience across all their connected devices.
Google Mesh VPN setup instructions
Setting up a Google Mesh VPN is a straightforward process that can help you enhance your online security and privacy. Follow these step-by-step instructions to enable VPN on your Google Mesh network.
Firstly, ensure that you have a Google account and have set up your Google Mesh network. Next, download a VPN app of your choice from the Google Play Store or Apple App Store. Look for reputable VPN providers with good reviews and ratings.
Once you have downloaded and installed the VPN app on your device, open the app and log in using your account credentials. Select a server location from the list provided by the VPN app. It's recommended to choose a server closest to your physical location for better performance.
Now, go to the Google Home app on your smartphone and navigate to the Google Wifi settings. Look for the 'Network & General' tab and select 'Advanced networking'. Locate the 'VPN' option and toggle it on. Enter the necessary VPN configuration details provided by your VPN service provider.
After entering the VPN configuration details, save the settings and exit the Google Home app. Your Google Mesh network is now configured to use a VPN for secure internet browsing.
Remember to connect all your devices to the Google Mesh network to ensure that they benefit from the VPN protection. Enjoy browsing the internet securely and anonymously with your Google Mesh VPN setup.
0 notes