#Lyskari Tutorials
Text
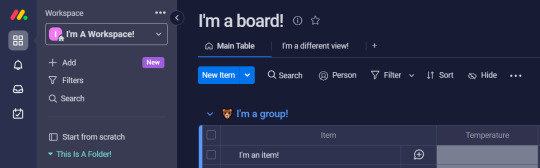
The Lyskari One Stop Shop
Hello traveler!
Welcome to the world of Lyskari.
What is a Lyskari you ask? Not what, my friend, but who! And I am honoured to make your acquaintance! I am Lyskari, though you can call me Lys or Harley. A Community Manager by day, I make a hobby out of community building, though I have interests in writing, design, organisation, and ADHD, as well.
If you are here then there is a potential reason for that:
My ADHD content
My fanfiction content
Me personally, which I still struggle to fathom but if you're here just for me, hi, that means the world!
My tutorial content
If it's ADHD related I have plenty of silly and hopefully relatable ADHD content that is browsable. If you're looking for my tutorials, Discord, Ao3 works, or my Ko-Fi, this is the place you'll want to start!
And finally, thank you for taking the time to check out my page! If you enjoy it please consider leaving a like, reblog, or kudo (if on Ao3)! I also have a Ko-Fi if you enjoy things so much that you wish to leave a tip. No matter how you choose to show your appreciation please know that I am deeply grateful!
━━━━━━━━━━━━━━━━━━━━━━━━━━━━━
Find Me Here!
Ao3
Ko-Fi
Discord
About Me
━━━━━━━━━━━━━━━━━━━━━━━━━━━━━
My Organisation Tutorials & Highlights
Last Updated: July 2022
Lyskari's Monday.com Tutorial: The Bare Basics for Personal Use
Lyskari's Monday.com Tutorial: The Status Column
Lyskari's Feature Highlight: Asana's Update Feature
━━━━━━━━━━━━━━━━━━━━━━━━━━━━━
My Ao3 Breakdown
Last Updated: July 2022
Merlin: 15
The Witcher: 1
Harry Potter: 4
The Mandalorian/Star Wars: 6
The Falcon & The Winter Soldier: 3
━━━━━━━━━━━━━━━━━━━━━━━━━━━━━
Fan Fiction Master Lists
Merlin Fan Fiction Master List - COMING SOON
Mandalorian/Star Wars Fan Fiction Master List - COMING SOON
Harry Potter Fan Fiction Master List
Marvel Fan Fiction Master List
Miscellaneous Fan Fiction Master List
(These refer to fan fictions I've written for fandoms that I do not normally write for.)
#masterpost#master post#masterlist#master list#lyskari#lyskari adhd#lyskari writes#lyskari tutorials#tutorials#fan fiction#harry potter#harry potter fan fiction#marvel#marvel fan fiction#supernatural#supernatural fan fiction#my hero academia#my hero academia fan fiction
2 notes
·
View notes
Text
Lyskari's Monday.com Tutorial:
The Status Column
Ξ Introduction Ξ
Hello and welcome to my second Monday tutorial! Here I will cover Monday's Status Column. Originally I was going to create a single post for all columns, but it would be too long. Hope you enjoy!
None of the suggestions here are an exhaustive list, Monday is literally built to test it's own bounds and capabilities, meaning there is a nearly endless list of possibilities.
If you would like to read-up about columns on Monday, check out their article on Column Basics. Their Support Center can also be searched by individual column type.
Onto the tutorial!
These tutorials and posts are not sponsored. They also will not cover every single fact about columns, as doing so would be a herculean task. However, if there is an aspect you'd like me to cover, please ask!
━━━━━━━━━━━━━━━━━━━━━━━━━━━━━━
Ξ Status Column Overview Ξ
What is the Status column?
Status columns are one of Monday's main powerhouses. Created initially to track the status of any item you need, it has become a powerful tool due to it's flexibility of use.
Statuses are individually coloured labels, and can only used by selecting one status option per status column. You can edit the status names, and the associated colour for each individual status option.
━━━━━━━━━━━━━━━━━━━━━━━━━━━━━━
Ξ Tutorial: Setting Up A Status Ξ
Once you've added the column to your board, feel free to give it a name that will make sense to you.
» Step One.
For this tutorial we'll create a status column called "Temperature".
» Step Two.
Pretend we've thought about the column and how we desire the information to show up. Imagine we've decided on:
Critical
High
Moderate
Low
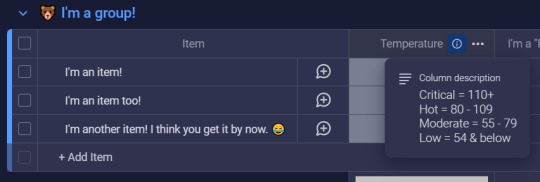
And imagine we know that we'll forget which temperatures fall into which status, so we decide to add a description to our column that will explain which temperatures fall beneath which status. So let's change that.
Hover over the "Temperature" column, and select the (...) dots that show up on the right hand side. It will open up the column's menu.
Then hover over Settings, and select Add description.

Write your description and save it.
Once done, a (i) should appear next to the column's name.
Click the (i) and the description will appear.
» Step Three.
Now, let's edit our labels since we've figured out what we want. There are a couple different ways to begin editing labels:
Open the column menu (...) -> Settings -> Customise Status
Click the blank status next to an item -> Click "Edit Labels"
Both are viable options, with #1 being important only if you wish to choose which colour signifies some form of completion as Monday plays a small animation for completed statuses. You can choose to ignore this, or if you wish to turn it off entirely, utilise option #1 and simply deselect any selected colours at the bottom of the Status Customisation area.
For the sake of this tutorial, though, I will utilise option #2. By doing so, I see this:
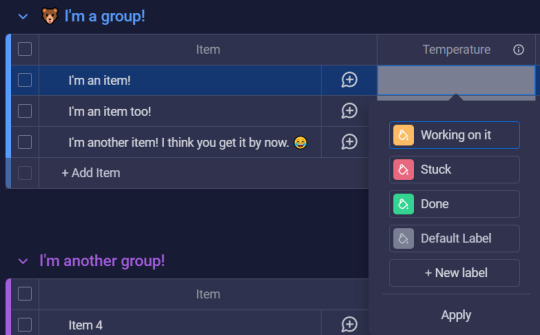
The screenshot did not capture it but each label on hover will create a drag/drop icon (for easy label reorganisation) to the left of the label, and a "x" (for label deletion) to the right of the label.
And then you can see the paint can icon in the coloured squares, which is what you would click to change colours. Monday colours are preset currently but they do have a wide variety of options.
Once you have named your labels, reordered them, and selected their colours, be sure to hit Apply so the change sticks.
» Step Four.
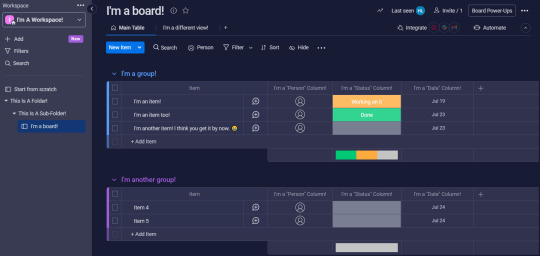
From here, your status should be setup! So all you need to do is select the appropriate status for each item that the column is relevant for.
This is done by selecting the empty status next the appropriate item and selecting the appropriate status label!
After I add my statuses, my Monday board looks like this now:

CONGRATULATIONS!
You've created your very first Status column!!
━━━━━━━━━━━━━━━━━━━━━━━━━━━━━━
Ξ Additional Information Ξ
In this section I will attempt to cover any additional information that may be good to know about Status columns. If there is an aspect that you need help with but don't see listed, please do not hesitate to reach out and send me an ask or leave a note!
- - - - - - - - - - - - - - - - - - - - - - - - - - - - - - - - - - - - - - - - - - - - - - - -
❖ Potential Use Cases
(Just a friendly reminder that this is not an exhaustive list!)
Tracking Process Status
Not Started, In Progress, Frozen/On Hold, Cancelled, Done, etc.
Tracking Departments
Community, Marketing, HR, etc.
Mood, Energy, Focus Tracking
Good, Bad, Meh, Excited, etc.
5 - Energised, 4, 3 - Moderate, 2, 1 - No Energy
5 - Focused, 4, 3 - Normal, 2, 1 - Not Focused
Item Type/Information
Umbrella, Pens, Pencils, etc.
Green, Red w/ White Dots, Royal Purple, etc.
Broad Categories
House, Car, Health, Finances, Personal, etc.
- - - - - - - - - - - - - - - - - - - - - - - - - - - - - - - - - - - - - - - - - - - - - - - -
❖ Status Column Settings Breakdown
Each column comes with a collection of settings. Some share similar settings, while others have different settings, pending what column you're looking at. Since we're focused on the Status columns, then this will be focusing on the Status column settings! Note: I won't be going over settings that I've already mentioned above!
Restrict Column Edit
This does what it says. You can restrict who can edit the column. This isn't important for personal boards, but this is useful when utilising Monday with multiple people.
Restrict Column View
Similar to the above setting, this allows you to restrict who can view the column. This can be good for personal boards (where you share it with a spouse or helper) if there are certain columns you don't want anyone to see.
Hide Column Summary
In the final screenshot you'll notice a collection of the different label colours at the bottom of the group. This is called the Column Summary. It consolidates all the answers provided in that column for that specific group, and you can see how the different groups are broken up by percentage and by fraction (for example: 1/3 / 33%) by hovering over the different blocks of colour. If you don't want the Column Summary, than this setting will be your friend!
- - - - - - - - - - - - - - - - - - - - - - - - - - - - - - - - - - - - - - - - - - - - - - - -
❖ Status Column Menu (...) Breakdown
This will exclude settings for obvious settings-are-literally-above-this reasons. 😅
Filter
This is the long way around, but you can select filter and filter your entire board by a status column. And you can even save alternate table views that are already pre-filtered, but that's another show-- I mean, post!
Sort
This sorts the Status columns on your board by ascension or descension, with the order being dependent on the order of your labels. Just be sure that if you like a specific sort, go back to the sort function and select "Save". (Or select the "Save" to the right of the sort arrows that will show up when you select this!)
Collapse
Does what it says on the tin! It will collapse the column so it is no longer visible. And they are simple to uncollapse. You simply click the ↔ that will show up on the collapsed column after you've collapsed it!
Duplicate
This will duplicate the status column. This is a quick way to add more statuses to your board, I like to use this when I'm in flow and just want to quickly add more of the same column type.
They do give you the option to "Duplicate" or "Duplicate Column & Values" in case you need to double up on a status due to there being potential for two different values that you wish to track separately. It's up to you and it depends on what works best for YOUR board and it's purpose!
Add Column To The Right
Yeah they don't have an Add Column To The Left... but anyway! This is a quick way to add additional columns that aren't status columns (or are because you didn't wanna duplicate which is valid!). It can be any type of column that Monday supports.
Change Column Type
This can update your Status column and turn it into a different type of column. As of this tutorial the options are: Text, Long Text, and Dropdown. However, Monday is always making improvements and additions.
Delete
This deletes the column.
- - - - - - - - - - - - - - - - - - - - - - - - - - - - - - - - - - - - - - - - - - - - - - - -
❖ Other Things To Know
You can only select one status per column. If you would like the ability to select multiple, then you'll want the Dropdown column type.
Statuses are one of the most supported column types on Monday, so if you have access to automations, play around with them!
Status label names are also emoji friendly!
(There's just something satisfying by selecting a "🎉 Done" status!)
A board's search bar searches statuses as well!
Status columns can also be pinned columns! Pinned columns won't move when side-scrolling. Think of it like freezing cells in Excel or Google Sheets.
━━━━━━━━━━━━━━━━━━━━━━━━━━━━━━
Ξ In Conclusion Ξ
I hope this tutorial has helped you understand and feel confident in setting up and utilising Statuses. Though it has potential for complex workflows, it also works as a simple identifier, giving it a broad range of use cases.
Please feel free to ask me if you...
• Have any questions relating to this tutorial,
• Have any questions about Monday in general, or
• Would like to see me cover a specific Monday topic!
And, finally, if you enjoyed this tutorial and would like me to continue making more, please consider liking this post and reblogging it so that I can get more eyes on it. 🧡
If you enjoyed this tutorial and wish to leave a tip, you can do so on my kofi which you can find here: Lyskari's Ko-Fi Whether you share, like, reblog, leave a tip, a mix of these, or all of them, thank you for your support! And please please let me know if you'd like me to cover other aspects of Monday, or if you'd like me to give my thoughts on other programs! And let me know if you liked this tutorial!
If you want to read my other Monday tutorials you can find them here: The Lyskari One Stop Shop Master Post under the "My Organisational Tutorials" heading.
#Tutorial#Tutorials#Monday.com#Monday.com Tutorial#Monday Tutorial#Project Management#Life Management#Task Management#adhd#adhd struggles#just adhd things#adhd brain#adhd problems#attention deficit hyperactivity disorder#neurodivergent#executive dysfunction#Status Column#Monday Status#Status#lyskari#Lyskari Tutorials
0 notes
Text
Lyskari's Monday.com Tutorial:
The Bare Basics for Personal Use
Ξ Introduction Ξ
Hello, and welcome to my first Monday Tutorial where I cover the super bare basics of Monday (Monday.com) for personal use.
I've not written tutorials in a while so forgive me if these first few are rough!
Monday.com is a robust website that boasts a wide range of applications professionally (task management, project management, IT ticket management, and more). However, I found that it works wonderfully well for my personal life.
I utilise it for two things:
1. Non-Routine To-Do's
(e.g. "Get new car battery")
2. Resource Collection
(admittedly I'm bad at updating this one)
Though you can definitely utilise it for whatever you need! And if high levels of customisability and flexibility is up your alley, then I encourage you to give Monday a shot!
Alright, Lyskari, this is sounding too good, but what's the catch?
There are definitely still improvements that could be made, just like with anything. As much as I love Monday, it's built for corporate or team usage. Though they've created a free plan, it's not nearly as robust as the paid plans. I hope they can provide a bit more for the free plans in the future, but at the moment free plans lack some things that make Monday as great as it is, such as automations and integrations. If you have the money to shell out for the cheapest plan, I do recommend it, but only after you really look to determine if it's prudent.
I recommend you look at the plan breakdowns first to ensure it offers the bare minimum of what you need. If automations are key for you then I'd encourage a free program that has automations. Check out the links below for plan breakdowns & pricing.
Other helpful links:
(These bring you to Monday help articles that explain some things better than I can, or they direct you towards their help resources directly.)
Understanding the Free Plan
Comparing Plans & Pricing
Monday's Community Forums
Monday's Video Tutorial Center
Monday's Help Center
Please note these tutorials are not sponsored in any way, and they will not even cover every single thing Monday can do... as doing so would be a rather herculean task. However, if there are aspects of Monday you'd like me to cover just leave me a note!
━━━━━━━━━━━━━━━━━━━━━━━━━━━━━━
Ξ Layout Ξ
Before we get into the meat and potatoes, I want to describe how Monday is naturally setup by default. This may click immediately if you're familiar with task management software (or if that's how your brain works naturally). If this doesn't click with you immediately, don't worry, I define things in the very next section. 🧡
First I want to go over Monday's primary "container" hierarchy. That is to say, how their different "containers" are nested into each other or beside each other. I'll include a screenshot at the end for those of you who are more visually inclined!
(Text in [brackets] are exclusive to dashboards and will be talked about more in the dashboard tutorial. Which I will hopefully remember to link here when it's done.)
Workspaces
↓
Folders & Sub-Folders
↓
Boards [& Dashboards] → Views
↓
Groups [& Widgets]
↓
Items → Columns
━━━━━━━━━━━━━━━━━━━━━━━━━━━━━━
Ξ Definitions Ξ
It's a small thing but the way Monday names individual aspects of the program are incredibly beginner friendly. Subsequently, this is also one of smaller gripes I have with Asana.
Monday likes to define things in ways that feel very logical, which can help when dealing with the overall learning curve. Additionally, I will only be explaining this as it pertains to personal use. If you'd like a professional breakdown, leave me a note!
This section alone made this ungodly amounts of long so if the above visual helps you enough to understand, cool! Don't worry about definitions unless you really want a little more insight into any of the mentioned "containers" above!
Let's get started!
- - - - - - - - - - - - - - - - - - - - - - - - - - - - - - - - - - - - - - - - - - - - - - - -
❖ Workspaces
Important Links: Monday's Article About Workspaces
Workspaces are the largest "container" type that Monday provides. Think of it as a house. There are a lot of different individual rooms inside, but they all belong to the one house.
Should I use workspaces as a single individual?
It's up to you and how you work! If having multiple houses works for you, then by all means!
However, if you are like me and you struggle to remember checking in on the other workspaces... then consider utilising only one.
Any other suggestions?
If you wish to utilise Monday with another member of the house, another option available is having one workspace per individual... and potentially a "teamwork" workspace. However, it's possible to utilise a single workspace for multiple people as well. Talk it over with whoever you wish to use Monday with, and see what works best for both of you!
Anything else?
You have some customisation options! You can customise:
• Workspace Name
• Workspace Avatar Background Colour
• Workspace Avatar Icon
- - - - - - - - - - - - - - - - - - - - - - - - - - - - - - - - - - - - - - - - - - - - - - - -
❖ Folders & Sub-Folders
Important Links: Monday's Article About Folders
Organising Folders Using The P.A.R.A. Method
Folder's become the next container. If workspaces are the house, think of folders and sub-folders as the rooms within the house.
Folders help organise the boards within a single workspace, with sub-folders helping break things down a little bit more if necessary.
Colour Coding
Perhaps one of my favourite features about the folders & sub-folders is the ability to colour them. As someone who is very colour-code dependent to work longer at higher efficiencies, the ability to colour folders & sub-folders was a godsend. (I was around prior to this addition, and I can tell you the difference has been night and day!)
So if you're really big into colour-coding things, this will be up your alley!
Additionally, you can utilise emojis in the folder and sub-folders name which can be useful when having to organise multiple boards. (I only use two boards for my personal life, but if you need more than this is potentially a great way to help keep yourself from getting overwhelmed!)
Though this is a Monday tutorial I did include a link to a resource describing a folder organisation method called PARA that I use both at work and at home. If you're interested in PARA tutorials, let me know!
- - - - - - - - - - - - - - - - - - - - - - - - - - - - - - - - - - - - - - - - - - - - - - - -
❖ Boards (and Views!)
Important Links: Monday's Article on Shareable Boards
Monday's Article on Private Boards
Monday's Article on Board Views
Finally.
BOARDS.
Boards are where the magic truly happens for Monday, and also why I love their choice of terminology. Unlike Asana who call their boards, "Projects", Monday utilised a more straightforward and accurate term.
If workspaces are a house, and folders & sub-folders are individual rooms, then boards are points of interest in that room such as TV & Entertainment, the Bookshelf, or the Walk-In Closet. These are where things happen, be it collection of data, tracking to-do's, and more.
Additionally, each board has multiple ways to view the data on that board. Even the main board itself is a view -- it's called the "Main Table".
These views can include:
• Kanban views (similar to Asana's "Board" view)
• Additional table views (similar to Asana's "List" view)
• Form view (which effectively turns your board into a fillable form)
• Chart view
• and More!
If you'd like me to go into the different view types, let me know! I'd be happy to write a view-specific tutorial. (And I honestly still may but I will also adjust what tutorials I write next based on interest.)
Boards can be named whatever you desire, and yes, emojis are allowed! They come with a description area, as well, which can be utilised in whatever fashion works best for you. Colour Coding Legends, Icon Keys, a reminder of how the board is supposed to work, and more. You decide!
Think of something you'd love to be able to track... or keep an eye on in some manner... and see what Monday has that works to bring that idea to life!
- - - - - - - - - - - - - - - - - - - - - - - - - - - - - - - - - - - - - - - - - - - - - - - -
❖ Groups
Important Links: Monday's Article on Groups
If a workspace is a home, folders & sub-folders are rooms, and boards are points of interest in that room... then groups are how those points of interest are organised. Think of it as the drawer or closet organiser, where you have specific areas for specific items, such as under garments or tshirts. (Okokok yes using this analogy for a supposed to be neurodivergent-friendly tutorial was dumb but it's all I had ok? Don't come at me. 😅)
Groups are categories that you create within a board. You can have one, you can have two, you can have fifty though I would not recommend that unless you can truly keep up with it!
Let's say you have a group of to-do's you'd like to work on. You may have groups for "Unstarted" "In Process" and "Completed", as a way to organise out your tasks.
Let me guess, it's customisable too?
I see you're picking up on the recurring theme! Yup! You can:
• Change the Group Name (also emoji friendly!)
• Change the Group colour
• Easily drag and drop groups in whatever order you prefer!
And this brings us to our final "container"!
- - - - - - - - - - - - - - - - - - - - - - - - - - - - - - - - - - - - - - - - - - - - - - - -
❖ Items & Columns
Important Links: Monday's Article on Column Basics
* Takes a deep breath. *
If workspaces are homes, folders & sub-folders are individual rooms, boards are points of interest in a room, and groups are how those points of interest are organised, then items are the individual items within the organised points of interest... like socks! Meanwhile columns are like the details of the sock. Who does it belong to? Jane. What colour is it? Purple with white polka dots. (Please tell me if these metaphors are working, or aren't!)
It gets better.
Monday allows you to change the terminology of "item" so it can accurately fit what your board is working with. Instead of "item" you can have "tickets", "questions", "Doodlepoodles", or whatever else you desire.
You also will not be locked in to the name you select. If you name your board items "dogs" and later realise you also have cats, you can update terminology to "animals". So you can "add animal" to the board. It's such a tiny thing, but having accurate terminology really does help my neurodiverse brain. A lot. So I hope it helps yours!
That said, for the sake of this tutorial series I will refer to it as "tasks".
(Mostly because for some reason I swapped from "item" to "task" during this tutorial and I don't know why... and finding and siwtching them all out sounds like a lot of effort... when I already put so much effort into writing this so... forgive me, that one.)
Tasks populate beneath groups, and will likely be one of the first tutorials I make where I hone in one a single aspect and explain it in hopefully neurodivergent-friendly detail (but Harley this is already so long-- yeah yeah I know... tutorials have that tendency ok? I'm trying here. 😅)
When adding tasks to a group, you can name the task whatever works best for you.
Unfortunately, tasks seem lackluster when looked at on their own so let me tell you about columns as well.
Columns populate to the right of your task name, and they collect different points and types of data which include but are not limited to:
• Statuses
• Labels
• Numbers
• Short Text
• Long Text
• Dates
• Dropdown (Multiple Choice)
• Priority
• Aaaaaaand more!
Columns names are customisable, but perhaps my favourite feature of columns is the ability to add a description to that column.
When you add a description to a column it will cause an (i) to appear next to the column name. When hovered over, the (i) will pop-up with the description, which makes it a great way to remember how you planned to utilise a column if you're like me... and forget... a lot!
━━━━━━━━━━━━━━━━━━━━━━━━━━━━━━
Ξ In Conclusion Ξ
Just in the bare bones of Monday's setup there are so many ways to customise and setup a system that is unique to you and your brain.
I hope this has helped give you some idea of what to expect, as I know what it's like to go in without any idea of how things work... and it can be overwhelming, especially if you're already struggling trying to keep up with things.
Please feel free to send me an ask if you...
• Would like a deeper tutorial on something specific I've mentioned,
• Have a question about something here, or
• Have a question about Monday/organisation in general!
(I may not always have an answer, but I will try!)
And, finally, if you enjoyed this tutorial and would like me to continue making more, please consider liking this post and reblogging it so that I can get more eyes on it. 🧡
If you enjoyed this tutorial and wish to leave a tip, you can do so on my kofi which you can find here: Lyskari's Ko-Fi
Whether you share, like, reblog, leave a tip, a mix of these, or all of them, thank you for your support! And please please let me know if you'd like me to cover other aspects of Monday, or if you'd like me to give my thoughts on other programs!
In closing, here are some recommendations if this tutorial encourages you to give Monday a try:
Consider experiencing the learning curve first. For some, experiencing a learning curve while attempting to setup a system leads to frustration, and potential rage quitting. If this is you, consider treating it like a sandbox first, and not a construction project!
.
Consider minimising maintenance needs. It is not uncommon for some neurodivergents [myself included] to build systems that require constant updates. This often leads to rage-quitting later on. The less you have to regularly maintain for individual tasks, the less overwhelming systems can be. Remember you want the system to work for you, you shouldn't be working for the system.
.
Systems may take multiple forms before you find the one that works best for you. Don't be afraid to tweak or completely change your systems until you have ironed out as many wrinkles as possible. As you learn and gain Monday mastery, you will begin to notice ways you can improve systems... or make new, better systems. This is normal, no matter if it's Monday, Asana, or even pen and paper. Needing adjustments or updates doesn't mean a system is bad, it just means you have learned new information and you wish to utilise it by creating a better system... or tweaking the current one!
If you have questions, please feel free to send me an ask! I will do my best to keep up with questions. 🧡
Also please let me know what you thought about this tutorial. What did you like? What didn't you like? Did you like the metaphors? Or did they confuse you? Did I explain things well or do you feel something is missing? That way I can hopefully improve with each new tutorial!
Thanks for reading!
#Monday#Monday.com#Not Sponsored#Organisation#Organization#Organising#Organizing#tutorial#Monday Tutorial#Organisation Tutorial#how do I use Monday?#Neurodivergent Friendly#ADHD Friendly#ADHD solutions#potentially anyway#ADHD strategies#PARA Method#project management#task management#to do list#task tracking#project tracking
6 notes
·
View notes
Last Seen Blogs


ankurahospitalvijayawada
Multi-Specialty Hospital for Women & Children in Vijayawada

xhttpjinx
Nana

asahell-asmodeus
I Troll You with Love

custom-islamic-gifts
Custom Islamic Gifts