#Mind mapping software for Mac
Explore tagged Tumblr posts
Visit Tumblr Blog
Explore Tumblr blogs with no restrictions, modern design and the best experience.
Last Seen Tumblr Blogs


Fun Fact
Tumblr was acquired by Yahoo for $1.1B in 2013.
Text
Unlock Your Creativity with Mind Mapping Software for Mac
In today’s go-getter and do more with less world, time is money, so getting the best and most effective way to plan is a luxury many people desire. From students to professionals, and even those who are creative, mind mapping can transform their lives. It also takes less time and is compatible with mind mapping software, a tool designed for Mac that helps improve creativity and personal productivity, manage tasks, and solve problems. Through this blog, you will discover why mind mapping for Mac can ease your work.

What is Mind Mapping?
Mind mapping is an approach to organizing information into visual images. It entails drawing pictures to represent how ideas and concepts connect to the main topic. This method draws on the brain’s passive visual-spatial aptitude—which refers to how it develops and processes visual-spatial information naturally—and thus makes it easier for students to comprehend the information presented, retain it, and even organize it more effectively.
Why Use Mind Mapping Software for Mac?
The availability of mind-mapping applications for the macOS-based system allows Mac users to obtain a wide range of useful software. All these tools are very user-friendly with no complications on the Mac operating system; they seamlessly mesh with other Mac applications. Here’s why mind mapping software for Mac stands out:
1. User-friendly Interface: With its user-friendly interface, mind mapping software for Mac OS X simplifies the creation and editing of mind maps. Its intuitive drag-and-drop capabilities allow you to focus on your content, making it a breeze to use. This ease of use is a key feature that sets it apart from other tools.
2. Seamless Integration: These applications are also usable and compatible with applications like Calendar and Reminders and a wide variety of productivity suites. It also means ensuring that mind maps can be easily associated with schedules, to-do lists, and documents.
3. Enhanced Collaboration: One of the standout features of mind mapping software for Mac is its ability to enhance collaboration. Many of these tools offer robust collaboration functionality, allowing for simultaneous editing and sharing, similar to Google Drive. This makes them ideal for group projects and team collaboration, a feature that can significantly boost productivity.
4. Customization Options: Mac software for mind mapping has a wide range of features that individuals can adjust to their needs. It offers a number of different templates, themes, and styles to choose from to make your mind maps specific to your needs, whether they’re personal or work-related.
Popular Mind Mapping Mac Tools
The following are some of the great mind-mapping applications that are available for Mac users:
MindNode: A handy application for writing and organizing ideas. It is designed to handle tasks such as making written records or organizing thoughts.
XMind: It is a multi-purpose tool for organizing projects, including templates and integrations for private and official goals.
iThoughts: It can be a brilliant tool for elaborating mind maps with many details and structures and supports a wide range of import and export file formats for seamless integration with other tools.
Final Thoughts
Mac mind mapping plays a critical role in boosting the creative and productive nature of Mac computers. Mind mapping for Mac softwareis a great tool for knowledge management because it helps to organize thoughts, brainstorm, improve communication, and visualize ideas. Here, you deal with the best tools and technologies to learn mind mapping on Mac so that you can increase your potential and creativity.
0 notes
Note
Hi, random q. I saw in your tags that you swear by Scrivener for original fic. I’m still plugging away in ye olde Word and now I’m intrigued to know what about Scrivener you like so much. I’ve def heard about it but never used it, so I’m curious :)
YES I would love to tell you about my lord and savior software Scrivener. I hope you don't mind I published this long, long answer publicly.
So. The main issue I have with Word and Google Docs is that you hit a certain length/word count, and it starts to lag and load kind of jerkily. You know? Also, navigating chapter to chapter or scene to scene is awkward for me--you either have to have a whole bunch of individual documents and multiple windows open, or you have to use headers and the table of contents...which is fine for quickly finding chapters but less so for scenes within those chapters.
Messy, basically. Does not spark joy for me.
Enter Scrivener.
Now, before I evangelize a bit, I will say that Windows Scrivener and Mac Scrivener are not 100% created equal. They are both better, I think, than Word or Google docs, but the Mac version is a bit slicker and a little nicer to look at. I only say that for if you're using Windows, because if so my screencaps below won't exactly match what you see if/when you download the program.
ONWARD.
So, the #1 thing that Scrivener has over Word is that it's a one time fee, not a subscription. So while it is a little pricey (Just went and looked, $59.99 USD), it's only the one payment. All updates and such are covered and available as free downloads. I will also say that Scrivener gives you a 30 day free trial. That's not 30 consecutive days, but 30 days of use--if you only use it every other day, you'll have the trial for 60 days. They make it really easy to figure out if it's for you or not.
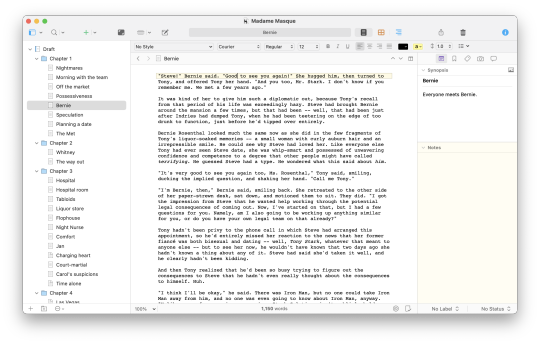
This is also going to feel like a lot, but there are built in tutorials and it's actually pretty intuitive, depending on how your brain works. Anyway! The basic gist of Scrivener is that it's a digital binder. You can keep all your book stuff in one place:

As you can see, there's the manuscript (aka my book), notes, research, more. Tbh, I mostly just use notes and Manuscript, but if it floats your boat, you can store maps, place names, worldbuilding, playlist links, moodboards, a whole ton of stuff, all in one menu that's easy to access and in a single window. You can organize it however itches your brain the best way.
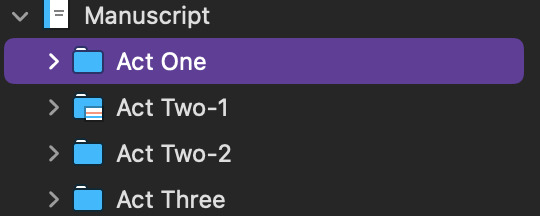
But like I said, for me, the best is that Manuscript part, which I'm going to go into now. I use a three act structure for books (but break the big ol' middle act into two pieces because it makes my brain happy), so each act gets a folder.
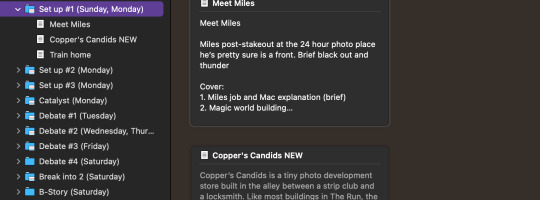
When I click and expand that act, each chapter has it's own folder. However, it also shows quick-reference index cards, so I can have an at-a-glance at what's going down in each chapter. (I'm using a outline system called Save the Cat for this book, which is why all my chapters have titles like 'Catalyst', feel free to ignore those...I also have a very compact timeline, so to help me stay organized, I labeled each chapter with when it happens.)

You can do the same with each individual chapter and the scenes, where when you click on the chapter folder, each scene gets a card. If you don't type in a summary, it'll just auto-populate the start of whatever content you were writing. You can see this in the 'Copper's Candids NEW' card.
And, of course, it is writing software. When you click on the individual scene, it opens the blank document, and you can get cracking.

So. This system is nice for a few reasons. My favorite is that it makes navigating, reorganizing, and/or rewriting scenes extremely easy. It's just point and click, drag and drop. You can also open two docs in the same window at once, like this:
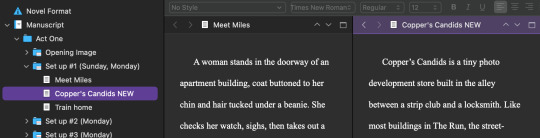
Which is a nice feature for several reasons--you can work on a new version of a scene with the old one pulled up next to it, or if there's something you wrote earlier or that comes later that's important to what you're working on now, you can have them both up for quick referencing.
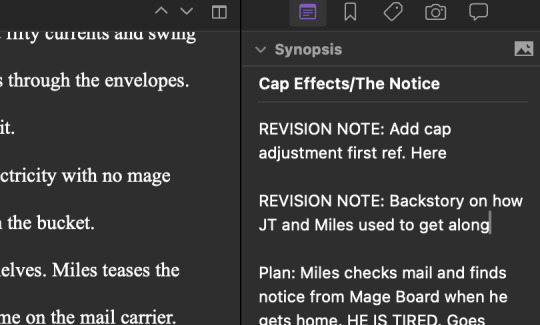
Another slick thing is each doc has a notes section off to the right side of the screen--which is optional! I use it for future revision notes/descriptions of how I want the scene to go:
My other favorite part of Scrivener is that it makes it very easy to hoard your deleted scenes like a deranged dragon in case you want them later. My garbage looks like this:

There are SO MANY FILES hanging out in my trash, and you know what? I so rarely actually need them, but my god am I glad they're there on the rare occasion that I do. Word, again, can make it more difficult. I always had a massive 'cut' document that was longer than the actual project and again, awful to navigate. This just makes it easier.
Scrivener also makes it easy to compile the manuscript into other doc types--pdf, doc, docx, etc--for easy printing and sharing.
ANYWAY. I'm sure there are approximately 1 million other things I'm missing, but basically Scrivener takes all your book/long project bits, puts them in one centralized file, and makes it super easy to navigate. I've also found that outlining is easier, because I can just make the folders and scenes and drag them around while I noodle through the plot.
10/10, would recommend to any long-form writer. If you have any other questions, please let me know! If anyone has read this far and has a thing about Scrivener to add, please do! I love Scrivener, and a lot of my writing buddies love Scrivener, and it really kinda has revolutionized the way I write original fiction. I'm always happy to yell about how great it is.
#mail#story-monger#long post#Scrivener#free yourselves from the shackles of Word and Google Docs my long-form-writing friends#there is a Better Way#writing
101 notes
·
View notes
Note
Hi Sine! I find myself in possession of a very long plot (not going to count how many of those are in my inventory), and was hoping you'd share what program(s) you use for yours? I'm the sort who'd use a murder-wall with notecards but I don't have space rn. I *should* use tagging systems but all the ones available are so sketchy and unreliable that I lose focus just typing. Also I tried to search but. This is tumbs. Thanks - Shusu
Oh boy, this question was made for me!
The first novel-length story I wrote, I wrote in TextEdit. All 90,000 words of it. I basically just made a list of the scenes I wanted in the order I wanted them in, started typing the story above the list, and deleted every scene from the list when I had written it. I don't recommend this.
These days, I use Scapple and Scrivener. I have much more detail below. I am sure I have talked about them before but, as you say, Tumblr is hard to search.
Different things will work for different people, and I don't always start this way, but sometimes, while I'm still trying to rough out an idea, I start with a mind mapping program. You know that brainstorming technique that you learned in, like, third grade, where you take a piece of paper and you write down the main idea in the center in a bubble and then branch lines out from those with more bubbles containing related ideas, and then branch things out from those, and so on? You can get programs to do that instead of a big piece of paper, and the advantage to doing this on a computer is that your piece of paper can be infinitely large and you won't ever run out of space.
I will sometimes skip this step if I already know what order things are going to happen in (in that case, I just make an outline), but if it's the kind of unformed idea where I just want to write down everything that happens as I think of it so I won't forget it later, then I use a mind map.
I also use it to write down bits of dialogue as I think of them; the program I use lets me change fonts and colors and so on, so I have color-coded my dialogue by character:
I feel like I have probably posted this before but Tumblr is not letting me search. Also, this is probably not how you're supposed to use this, judging by how it exports data, but whatever.
There are a variety of programs that can help you make mind maps, and I'm sure a lot of them are good. The one I use is Scapple, which I like for a few reasons: it's very easy to use (you type something in, and then to connect two bubbles you drag one on top of the other) in a way that gives you a lot of freedom; it's not a subscription model like a lot of apps are (you buy it, you pay once, you can use it forever, and it costs about $20); and mostly, it's made by the developer of the writing program I use (Scrivener), meaning that the two programs integrate very well.
So then there's Scrivener.
Scrivener is probably the absolute most useful software I have ever owned; I have bought it four times now. (All three desktop versions and then the iOS version.) It is a word processor that is designed to help you structure and write novels. There are similar programs for free or at least cheaper, of course, but this is the one I use. (It also isn't a subscription; you just buy it.)
The downside is that it's a very complex program. This isn't necessarily a bad thing, but it can look a little daunting. It's one of those programs that has hundreds of features and you will only use about fifty percent of them, but everyone uses a different fifty percent, so there's something for everyone. (It can generate character names! There's a feature on the Mac version where it can highlight words by part of speech! You can change all the icons! The LaTeX export is pretty decent!)
Honestly, as long as you can figure out how to make scenes, rearrange scenes, edit synopses, and get your work out of the program, you're good to go; that's probably what you'll be doing most of the time.
Scrivener is basically designed around the murder-wall-of-notecards writing approach. A Scrivener project contains your Draft, which can have a bunch of folders in it (chapters) which can have individual documents (scenes). Each scene has an index card associated with it, and each index card is where you can write a synopsis for each scene.
You can view your story as single scenes or as a whole story (optionally with a window showing the synopses, so you can remember what you thought was going to happen while you are writing; I have shown this above) or you can just view the synopses as an outline or as index cards, like so:

There's your murder wall right there.
Rearranging the index cards also rearranges the scenes. (Rearranging the scenes using the list in the sidebar also rearranges the scenes.) So if you want to swap scenes around, you can do that. If you want to write the end first, you can do that. If you want to add three more scenes in the middle, you can do that.
You can also search your whole project, color code the index cards, tag them however you want with keywords (e.g., a keyword for every character who appears in the scene) and then look at everything you've tagged with particular keywords, notate scenes by whether they're done or not, and basically everything else you can think of. Mostly I have used this to color code scenes by POV so I can keep track of who's talking; I could also have used keywords.
So my first move when I start a project in Scrivener is to make a bunch of blank documents for all the scenes I think I will have, give them some kind of meaningful title, start writing down on the notecards things that will happen in each scene, and then move them around. This is where Scapple comes in handy -- both because I already have an idea from making a mind map in Scapple of what scenes I want, and also because the integration between Scapple and Scrivener makes it really, really easy to get started.
How do Scapple and Scrivener integrate, you ask? If you make a mind map in Scapple, you can drag and drop it into Scrivener and it will automatically make one scene for every bubble you have, and the text of each bubble will be on the notecard, so you can basically start with all of your scenes that you already have made in Scapple and then reorder them as you like.
Scrivener projects also have a Research section, where you can store basically anything related to what you're working on; you can set it to show your draft and your research at the same time. Basically anything can go in here. Mine usually have notes, more notes, character information, lines I cut but wanted to save somewhere (there is also a versioning system built in if you prefer that), comics panels, reference pictures, and entire webpages. This way, you'll never have to figure out what you did with that thing you looked up for your story, because you can keep it right there with your story.
Scrivener costs $60, which is kind of a lot, but there are very often coupons for 50% off from online software retailers (I just saw one on Boing Boing a couple days ago that still works as of the time I am answering this; I can vouch that they are a legit retailer). Also if you know anyone who has won NaNoWriMo, they get a Scrivener coupon as part of their winnings, and some people don't use theirs. It has a thirty-day free trial period (IIRC that's 30 days of use, not 30 calendar days) so you can try it and see if it works for you.
I also made a Compile Format for Scrivener 3 -- the current version -- so I can export HTML suitable for AO3 or Dreamwidth in one click. Scrivener can export your work in basically any format you can think of, but the default HTML exports all have too much stuff in them for my liking.
(Scrivener also has a bunch of preset templates for various kinds of writing -- like, there's a Novel template with room for character sheets and settings and all of that. You can make your own template, too. I actually made my own template for writing fanfiction for AO3. I'm not sharing this one because it is so personalized to me that it wouldn't be useful -- but, for example, I already know that I'm going to want a document in my Research section where I list notes about canon, and one where I list what bits I need to edit, and one where I copy in any conversations I've had with beta readers that I might want to refer to, and one where I list the things that will be in the AO3 header (it contains empty spaces for Title, Fandom, Tags, Summary, etc) so I can now always start with that. You can make a template yourself by opening a new project, setting it up exactly the way you like with the Research documents exactly the way you want, and then doing File > Save as Template. It will copy everything including any text that's in there so you want to use something that doesn't already have any story or research content written in it because then that will get copied. But it's a real timesaver.)
Anyway. Scrivener is the best.
53 notes
·
View notes
Text
VJ software
FREE
Krita for concept creation
Inkscape for vector design
OpenToonz and Pencil2D Animation
Blender for 3D animation
Natron for compositing
OBS Studio for live streaming
ShareX for screencasting
OpenShot Video Editor for streamlined video editing.
VPT – Toolkit free projection mapping tool. Have to learn it, for creating shows, comes with all the essentials you need, like OSC, midi, audio analysis. Built using C++ if you are a creative coder this can be your tool of choice to create mind-blowing shows.
Synthesia Live – Live Visuals - good for audio-reactive generative visuals. Free
NOT FREE
Resolume - widely used easy for beginners - Resolme Arena for video mapping, LED installs - good starting place
Modul8 - for Mac - easy connects with MadMapper for video projection - can control lights etc
MixEmergency - connects to Serato series of software. Easy, can send and receive high definition video streams, can mix video between computers, easily change between Video DJs, mix with 3 or more decks
VUO – Interactive Media for creating new media installations. VUO is similar to creative coding tools like Processing, OpenFrameworks, TouchDesigner, etc. It comes with easy to use modules that can get you started with a variety of interactive video projects without any coding.
Painting with Light – Video Art for generating content on the fly. video mapping tool for static and moving images through any video projector onto 3D physical objects.
NotchVFX – Real Time Graphics a real-time production software. Works with a media server - make motion graphics, real-time tracking, virtual worlds and a whole lot more. Real time/live.
VDMX live video input, quartz compositions, custom layout, audio analysis for live visuals, audio-reactive content, music events
Arkaos full-blown VJ software inc projection mapping, musicians like it, inks directly with Pioneer Pro DJ network.
CoGe VJ – VJ Tool limit is the computing power of your machine/graphics card. connects with software like Quartz, IFS generator, VUO image generators, Syphon sources for live camera and other inputs.
VVVV – Interactive Media - toolkit, a node based software that opens up the creative abilities of your hardware. Allowing you to create just about anything you can visualize. Live data input, motions tracking, OpenCV, multi-screen projection. Create live media environments.
Sparck – Immersive Content - immersive interactive spatial augmented reality installation, can project real-time generated virtual content. It helps you to turn your world into a 360° VR environment no matter the shape of your surfaces.
Smode Studio – Interactive Media Server VJ software along with a media server. Control visuals using Audio, Midi, OSC and display directly or use the power of Smode with spout to run visuals into your VJ software
MPM - open source framework for 3D projection mapping using multiple projectors. It contains a basic rendering infrastructure and interactive tools for projector calibration.
Visution – Projection Mapping versatile video projection mapping software. Allows interaction by pixel rather than other tools which restrict you with grid points. The good part is Mapio2 allows you to throw virtually any video format into your media playlist. For multi-screen setups, projection mapping and permanent installs with a show mode and autostart.
Vioso – Projection Mapping - to align multi projection set ups
Scalable Display – Auto Projection Alignment & Blending uses a camera to automatically wrap and align projectors up to 16 from a single PC. For a permanent installation, this can be very useful, reducing on-site visits and provide robust software to align and wrap your image.
Edge – Media Server - for video mapping. Use this for permanent installations for advertising, museums, retail and other places where you need a robust solution. Edge C is a video server, Edge DS is for digital signage
Mapstard – Media Server This is a timeline controlled video server, not really for live VJing. For controlled shows, where you have pre-defined content to play. DMX functionalities allow timeline control.
Dataton Watchout – Media Server Works on a network of computers connecting your main machine to control slave machines. Allowing you to connect as many projectors as your hardware can handle. Easily create timeline shows, similar to using video editing tools. This is a great option for corporate shows where you need to run content on cue. Watchout display output only works if you buy their dongle.
Millumin – can be used as a media server, can load 3D models for mapping, control light fixtures, connect with external controllers, timeline your show and much more.
Ai Server – Media Server Integrates with leading hardware and software that run behind the console for large scale setups, permanent installs. Integrates with NotchVFX for your real-time shows.
Disguise – Media Server
D3 media server for light shows, do the whole show with this.
Hippotizer – Media Server
Hippotizer - media server for pixel mapping to projection mapping, small scale to large scale
Comes from https://limeartgroup.com/the-mega-list-of-vj-software-and-tools/
Malika Maria
Starting creative coding - what kit do I need?
0 notes
Text
really skipping ahead because that's more like a gauge that you would
Map24 in 2001 Alien Vendetta is I think what Map25 was on 2002 Alien Vendetta When I was still figuring out the impromptu combat system in Zelda II, it was on Gameboy Player[Collector's Edition which still used Gamecube] and I had a very clear scent of my own crotch these are facts
Update So is it time to call in boys Look even the two maps I said are to raise awareness that they exist, they're *both cut off What you're doing with Project Brutality is WAY too hard That is to say, I was going to post that I scanned and made sure it was the only one, Map25 proper in 2001 is something that was not in the final game, and it's not even mentioned online as a bonus map
Update You can try to confirm, not that anybody cares That first Sonic creepypasta I posted in a while, where the tectonic plates crash which caused my mind pain I think these are foundational Riding the wave from 2002 [doomseeker online rode that waves for many years to come They realize you haven't done 2001
Update - aside from that but important If 2001 + 2002 is such an important dichotomy In reality when I think about it, if you want to do original 2001-ish Silent Hill 2 without Maria's arc as raw you're a sick fuck (and LSD Dream emulator vibes come back as what I said *MIGHT have been an aside what with a UFO ending existing
None of this works. We are inherently agressive people - yes there was massive weight on getting that first letter error
Update Compulsivity in the world says play 2001 Alien Vendetta in GZDoom with Vulkan software mode albeit in Sargeant Mark IV's Brutal Doom v22 Beta Test 4 Start on Map02 to see the embarassment of people basically just hamboning through Yes and then you understand the premise of culture proceeds from Charles Manson saying what we otherwise would just have as our ultimate premise, that our forever unadherents just shouldn't be here
Update so listen and then there's Complex Misri Halek again on Scrub Mode basically as a public toilet to the Middle East as basically how you get potty trained Update If you do vanilla it just redirects to Map27 And pretty much you get the exact wordages for "sick fuck" as not Ghostler used it but I used it if you go past that to Map28 Update I'm gonna get a Big Mac soon >Are you proud of what you've done These are the lineups. There's really only 2
Update Trail doesn't end From an attempted habit in attempting to play Master of Puppets Ixtra In that map I only take shotgun Really already I see the connection and a real-life break Think: It's assumed James Sunderland doesn't smell like shit
Update that fast https://soyjak.st/soy/thread/10514285.html#10514299 Update Excuse mehttps://archive.is/VY8MM
0 notes
Text
Share Item Location AirTag & Find My Network in iOS 18.2

Share Item Location AirTag
In beta with iOS 18.2, users can share a secure link to an AirTag or Find My network accessory’s location with others and airlines.
A new iOS feature called Share Item Location was unveiled by Apple. It allows customers to simply and securely share the location of an AirTag or Find My network accessory with third parties, including airlines, to help them find and retrieve missing items.
In most parts of the world, Share Item Location is currently accessible as part of the public beta of iOS 18.2, which will soon be made available to all users as a free software upgrade for iPhone Xs and later. Safety and privacy are at the heart of Find My. Once a user is reunited with their item, the shared location will be disabled. The owner can stop it at any time, and it will automatically expire after seven days.
According to Eddy Cue, senior vice president of services at Apple, “Find My is a crucial tool for users worldwide to track and find their belongings.” Users have found that the Find My network and AirTag work well together when traveling, giving them crucial location data in the event that their luggage are misplaced or handled improperly. We’re thrilled to offer consumers a new, private method of freely sharing this data with outside parties, such as airlines, using Share Item Location Find My.
Using the Find My app on their iPhone, iPad, or Mac, users can create a Share Item Location. When a link is sent, the recipient can access a website that displays the item’s position on an interactive map. The website will display the timestamp of the most recent update and automatically update whenever a new location becomes available.
Aer Lingus, Air Canada, Air New Zealand, Austrian, British, Brussels, Delta, Eurowings, Iberia, KLM Dutch Airlines, Lufthansa, Qantas, Singapore, Swiss,, Turkish Airlines, United, Virgin Atlantic, and Vueling are among the more than 15 airlines that will make Find My item locations a part of their customer service procedure in the upcoming months. These airlines serve millions of passengers worldwide. With time, more airlines will be included.
Taking use of the hundreds of millions of Apple devices that many airlines currently use, Apple has worked closely with partner airlines to set up systems to covertly and securely accept Share Item Location. Each link will only be accessible to a select few, and recipients will need to verify using their partner email address or Apple Account to view the link.
“To integrate Share Item Location into its baggage recovery process, they have collaborated closely with Apple and are eager to make this feature accessible to customers shortly, “United CCO David Kinzelman said.
Since many customers already have AirTag in their checked bags, Apple is aware that this feature will soon make it simpler for them to securely and safely share location data with us, which will improve customer service agent productivity and provide its customers with additional peace of mind. Apple wants to launch the service systemwide in early 2025 after first accepting Find My Item locations in a few airports.
Share Item Location will also be integrated into WorldTracer, the baggage-tracing system utilized by more than 500 airlines and ground handlers at more than 2,800 airports worldwide, by SITA, a pioneer in air transport technology.
“As the top supplier of end-to-end baggage management solutions, apple confront significant difficulties as airports and airlines throughout the world prepare to double their passenger volume by 2040.
The Find My network a crowdsourced network of more than one billion Apple devices is the foundation of Share Item Location. It uses Bluetooth wireless technology to identify nearby missing gadgets or things and let the owner know where they are roughly located. No one else can see a device’s location or data because the entire process is anonymous and end-to-end encrypted, including Apple and Find My Network accessory manufacturers.
AirTags Price
When bought straight from Apple, AirTags cost $29 each unit or $99 per four-pack. Prices are often discounted, especially during sales. Amazon recently sold a four-pack of AirTags for $70, a $30 discount. Walmart and other retailers often offer AirTags in seasonal specials, lowering the price of a four-pack to $70 during sales.
Read more on Govindhtech.com
#LocationAirTag#AirTag#FindMyNetwork#Network#iOS18.2#iPhone#Appledevices#FindMyapp#News#Technews#Technology#Technologynews#Technologytrends#govindhtech
0 notes
Text
Why choose this mail backup solution? Find out!
There are several tools that offer to backup emails for Mac. What makes one tool different from another? What makes one tool safer compared to another? What are the things that first-time email users should keep in mind while choosing a mail backup software?

This article will deal with these questions and give you a solid solution to manage all emails effortlessly even if you have never done it before.
Gone are the days when email users got scared by the thought of email backup and recovery. Today, we have specialized tools that give you the chance to backup, restore, archive and export all major email services under the same umbrella and interface.
Here, you are going to find the best email archiver for Mac, that also works as an email backup and recovery tool. But wait, that is not all, the tool also works as an email converter! Yes! Such a tool exists, and you can get it right here, that too at an amazing affordable price.
Mail backup X – The best email backup tool for Mac and windows
Mail backup X is the best tool that you can use to manage emails on mac and windows. You don’t have to be an expert to use this tool to its full capacity. It is a certified tool that is cross platform compatible and also incredibly easy to work with. You can use this tool successfully even if you are a first-time user. You can use this tool by following extremely simple instructions. The tool comes with a user-friendly wizard-based interface that makes everything super simple for you.
If you have been worried about not being able to find the ideal mail backup tool for mac, you should definitely try this.
Let us explore the world of this certified tool that could turn out to be just what you need!
Here are the top features of this email backup tool for Mac!
Set up automatic incremental backups
You can use this tool to set up automatic incremental backups that are easy to set up. You can set up these backups with a one time set up. Once these are set up, the tool automatically stores the latest backup in the package of your choice.
Restore backed up emails to live mailbox
You can use this tool to restore backed up emails to a live mailbox of your choice. You can choose even single emails. This means that your backed up emails are never truly out of your reach. You can use this feature to ensure that you can always use the emails you want.
Archive emails in PDF format
This feature is pretty unique and useful. If you want, you can use this feature to directly archive emails in PDF format. This allows you to maintain the folder hierarchy and to ensure that no emails are lost. You can share these emails with anyone after protecting them with a strong password.
Convert emails from one format to another
You can use this tool to export emails from one format to another. This feature is greatly prized because it allows you to migrate emails from any major email format. You can choose what you want to migrate. This gives you an added edge over other tools. You don’t have to buy another tool to migrate emails.
Smart backup and resume
This feature is great for users who struggle with unstable internet. You can use this tool to get smart backups where the tool automatically detects the strength of the internet connection during backups and manages the backups accordingly. The tool holds and resumes the backup process based on the connection speed.
Automatic USB backup and sync
You can use this tool to get access to instant portable USB backups. Once these are set up, you just have to plug in the mapped USB drive. The tool will automatically store the latest copy of the local backup in it. It is great for those who need ease of portability.
Choose between the single-user and team license
Single user license
The single-user license of the tool lets you manage your emails on two computers. You can get a single-user license if you are an individual user looking for high-quality email management services. You can use this tool to manage up to 5 mail profiles per user. You can use this version of the tool to get things done on a smaller scale.
The team license
You can use the team license of the tool to manage emails as a large team. You can use the team license to manage up to 5 mail profiles per user. You can get this for 5, 10, 20, 30 users or more. Once you are sure that this version works for you, you can upgrade to the full version. As the administrator of the full license, you can assign these email profiles to other users. You can also use the tool remotely for other users.
Get the free trial without fail! Try it now!
Yes, you can now test the free trial version of the tool right here. The free demo has been created to make sure that you are familiar with how everything works with the real thing. You can use this free demo version for 15 days. You can use the free trial to check out all the features of the tool in a limited capacity. You should know that none of the features are going to be hidden. Once you are sure that the free demo works, you should upgrade to the full license in the package of your choice.
To download the free trial, click here https://www.mailbackupx.com/.
0 notes
Link
#mind mapping software#windows Mind Mapping#mac Mind Mapping#mind map tool#free mind map tool#best free mind map tool#Mind Mapper#brainstorming software#mind mapping tools
1 note
·
View note
Text
Top Mind Mapping Tools for Mac Users
Explore powerful mind mapping software for Mac to simplify idea generation, organize thoughts, and structure projects with ease and efficiency. For more information visit: https://www.mindgenius.com/my-business-plan-mind-map/
0 notes
Text
Best free mind map software mac

#Best free mind map software mac full
While every one of the mind mapping tools on this list has its own unique benefits, they all meet at least the following criteria: Yes, it has some downsides, but for a mind mapping app to really be better, it has to bring quite a lot to the table. Mind mapping with a sheet of paper and a pen is an incredibly intuitive and natural way to work.
#Best free mind map software mac full
For more details on our process, read the full rundown of how we select apps to feature on the Zapier blog. We're never paid for placement in our articles from any app or for links to any site-we value the trust readers put in us to offer authentic evaluations of the categories and apps we review. We spend dozens of hours researching and testing apps, using each app as it's intended to be used and evaluating it against the criteria we set for the category. What makes for great mind mapping software?Īll of our best apps roundups are written by humans who've spent much of their careers using, testing, and writing about software. SimpleMind for not having to subscribe to anything Stormboard for in-person mind mapping sessionsĪyoa for a modern approach to mind mapping Scapple for fluid, non-traditional mind mapping MindMeister for collaborating on a mind map with a team One of them is sure to be the right way to map your mind. We reviewed close to 40 different mind mapping tools, and after thoroughly testing them, here are the nine best. That's why, if you do a lot of mind mapping, you should consider going digital and using an app. You're limited by the size of the sheet you start with, there's no easy way to digitize it and make it searchable, you can't undo any mistakes or easily make edits, and if you lose your mind map, you don't have a backup. Of course, mind mapping on a piece of paper has its downsides. From those nodes, you draw yet more lines branching deeper into the different concepts, and you keep going, branching out more and diving deeper, until you're out of ideas-and the relationships between things appear. Then you draw lines branching out into new "nodes," each with its own related idea or theme. To make a mind map, you start by writing a central idea or theme in the middle of a blank sheet of paper.
0 notes
Text
Open source cross platform mind mapping software for mac

#OPEN SOURCE CROSS PLATFORM MIND MAPPING SOFTWARE FOR MAC SOFTWARE#
#OPEN SOURCE CROSS PLATFORM MIND MAPPING SOFTWARE FOR MAC FREE#
Until action, an idea remains just an idea. Their newest mind map style, radial maps, allows you to present your ideas in a visual pie-chart and add structure to your goals and ideas. Inspired by the traditional, hand-drawn mind map, you can use organic mind maps to create smooth, curved branches.įor auto-layout maps with box branches, choose their speed map option to capture ideas quickly. Features and FunctionalityĪyoa has a unique variety of mind mapping styles. Ayoa’s uniquely visual interface is designed to inspire creativity and spark great ideas. Unlike other mind mapping tools, Ayoa provides an all-in-one platform where users can create beautiful mind maps, monitor projects, and to-do lists, and collaborate with others. Ayoa is suitable for both individuals and teams who want to unleash their most creative ideas and turn these into reality.
#OPEN SOURCE CROSS PLATFORM MIND MAPPING SOFTWARE FOR MAC SOFTWARE#
Supported Platforms: Web, Windows, Mac, iOS, AndroidĪyoa is a cloud-based mind mapping software tool that brings together the creative power of mind mapping with visual task management and collaboration. Ayoa – Best Mind Mapping Software of 2022
#OPEN SOURCE CROSS PLATFORM MIND MAPPING SOFTWARE FOR MAC FREE#
The 25 Best Free Mind Mapping Software – 2022 So, I decided to write about the best mind mapping software you can find out there on the internet today. They can organize, structure, and visualize your thought process. This is where digital mind mapping apps can offer you the flexibility that a piece of paper can’t. Writing out the entire thought process can be an overwhelming task. Simply put, brainstorming results in an arbitrary production of ideas without any type of filters. It’s a group activity focusing on expanding the thinking process and producing new ideas. In contrast, brainstorming can be considered a little less structured way of generating ideas. These diagrams have one focal point which further generates into multiple branches and sub-branches representing their relationship with the center.Ī mind map can turn all of your intertwined ideas into a highly organized structure and give them more meaning. The technique visualizes concepts in the form of diagrams and charts. Mind mapping essentially involves hierarchal structuring of ideas, concepts, and words. Both of these serve different purposes and are represented differently. The two might have been confusing you, but there’s a fine line between mind mapping and brainstorming. Today, we will be taking a look at some of the best mind mapping software and apps you can use to organize ideas, thoughts, and processes. You need to share and visualize ideas at times and present them to others. Sacrificing time to write down ideas is a good way to remember them but sometimes just remembering them is not enough.
0 notes
Text
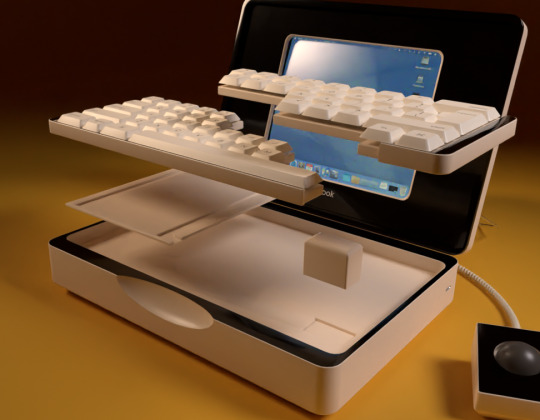
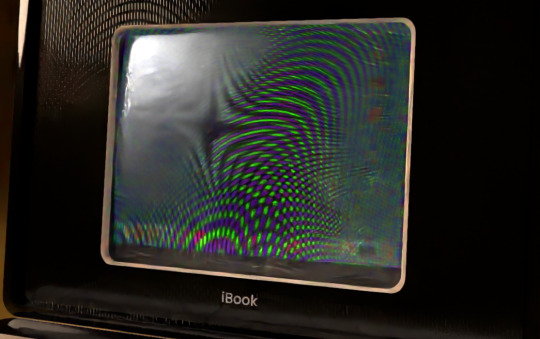
iBook Pyramid Behind the scenes!
This is a long one. Also keep in mind we made this a year ago so were going completely off of memory at this point BUT we do have the files. Unfortunately we didn't save specific versions of it really early into its creation so all the blender files close to being finished.

We have an intense appreciation for funky old computers. People correctly identified inspiration from the Thinkpad 701C. Less obvious in the final design but something that almost certainly influenced us as well was the 12-inch powerbook g4.
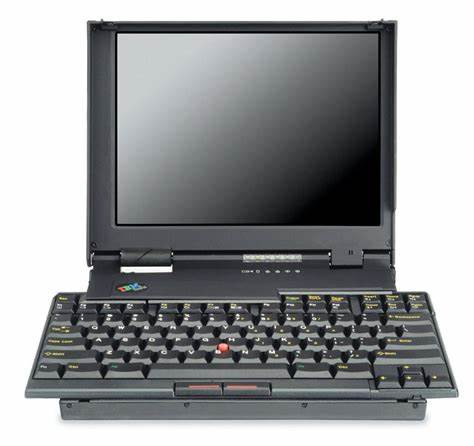

There is something very satisfying about nearly-square shaped laptops.
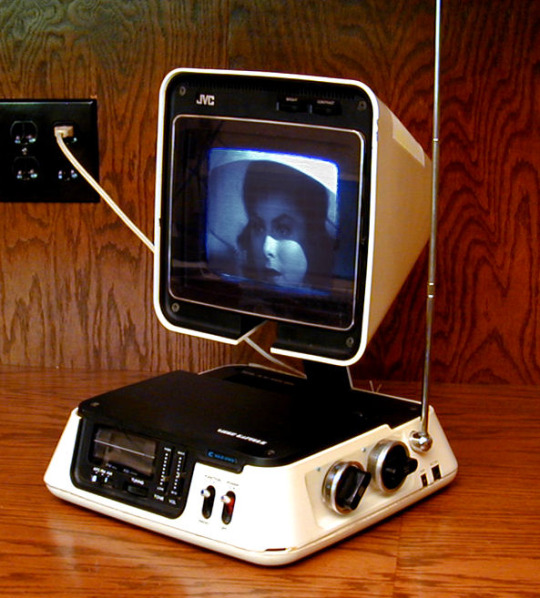
Others mentioned the JVC 3100R pyramid TV which, you'll be surprised to learn, we had never actually seen until after working on this project. The resemblance is uncanny and yet, entirely coincidental. Honestly if we had seen this thing, it probably would have had an effect on our design because the way that hinge is set up is beautiful. Our thought process was simply just comically emulating the form factor of a modern laptop but with a giant CRT.
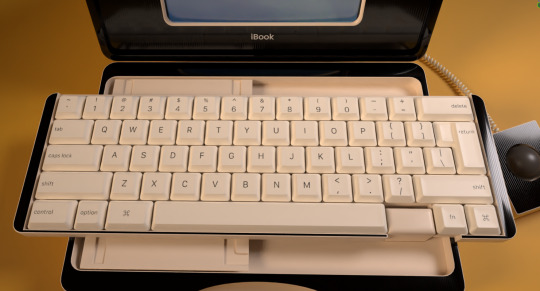
We're pretty sure the idea started out as simply wanting to design a full profile keyboard into a macbook-like laptop because funny, and at some point the butterfly keyboard came to mind and we said Screw it and implemented that into it as well. Heres the keyboard separated into the different sections.
Sorry to say that the keyboard does not actually contain any switches. (You'll see that this computer was modeled to be viewed a limited angle)
Heres the keyboard from the top.
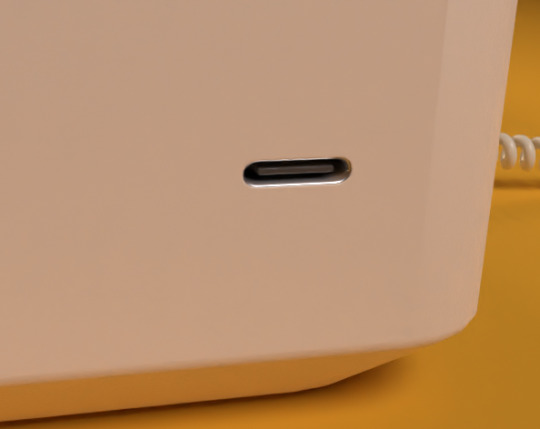
Once we got going with it, the whole thing was turned into a big joke of course, clashing many different eras of technology into one. Such as this massive beige tank of a "laptop" having a single USB C port as its main I/O.
And same with the software. This is the texture for the display, Which was taken from our real (unfortunately not crt based) macbook setup at the time. Except not quite, as the original screenshot was 16:10. We simply edited the image to make it 4:3. This is running mac os 12 with a majority of the icons changed to early osx equivalents.

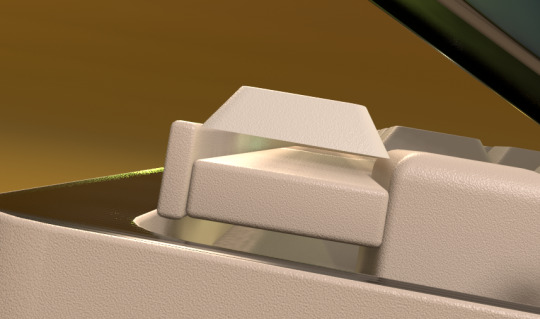
We'll be real and admit the animation is not very intricate, theres no real "rig" for the model, parts are just parented together because we did all this in about 2 days. That said, we had loads of fun animating it still, trying to imitate the motion of someone struggling to lift the heavy top up before it swings open with an inaudible, but easily imaginable "Thud". Making the whole body shake and the trackball jump slightly was the finishing touch to make it complete.
The wire for the trackball was made using a circle with the screw modifier and then applied to a curve. Here's what it looks like with each modifier applied sequentially.
And then making the trackball itself a handle for the curve, we can have the cable be dynamic. (Yes, we notice that the trackball in fact has no mouse buttons. No good explanation for that, I think we just forgot lmao.)

For the screen, we make use of a location transform on the UV mapping for the satisfying detail of the screen distorting from the impact, which we swear we've seen before but no matter how hard we (safely) bumped our CRT monitor we weren't able to recreate it. Nonetheless even if its not entirely realistic we wouldn't remove it for anything.

speaking of which, an utterly useless detail considering the resolution and distortion of the final renders and yet we added anyways just for our own amusement is that the display has a shadowmask, simply done by just multiplying it over the base screen texture.

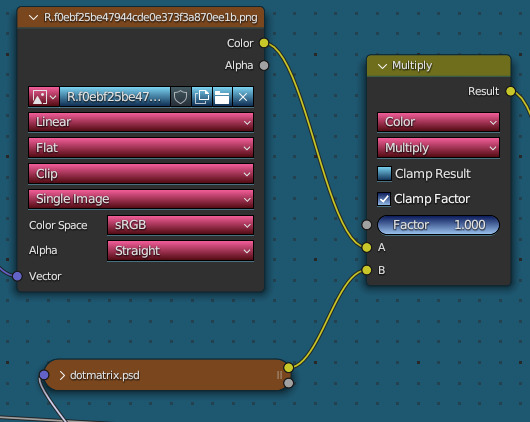
Combined with a glass material over the inner part of the screen, it utterly destroys low sample count renders of the screen and makes the project at least 3x as prone to crashing so thats cool! (it crashed on us while we were writing this section)
We've learned since in future projects that trying to optimize polygon count and materials is still very important even for offline rendered content. We can never be truly free from the constraints of memory limitations 😔
the final step was getting a more authentic less "polished" look in the compositing. This step can get very complicated based on the specific look were going for, but for this render its really just basic color correction and some blurring and sharpening steps. We used the default fake jitter node in blender at the time, though in more recent stuff we use the non-denoised image with filters applied to it instead, so its less uniform between images and more uniquely degraded looking.
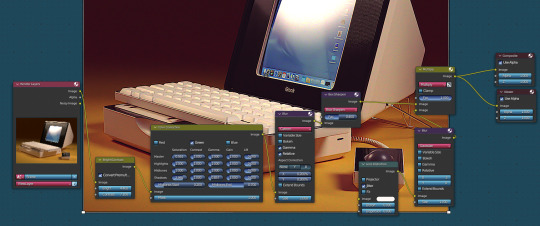
Though we'd do a number of things differently now were still pleased with the final result. especially in animated form.
Heres an overview of the scene:

This is the bezeled apple logo in polygon form. Its simply an alpha texture with a normal map:
Thats all for now! Thank you for reading!
221 notes
·
View notes
Text
Best Apple Project Management Software
🍎 Looking for the Best Apple Project Management Software? Look no further! 🚀
Hey friends! 👋 Are you an Apple enthusiast who loves to stay organized and efficient? If you're searching for the ultimate project management software that's tailor-made for the Apple ecosystem, I've got some fantastic recommendations for you! 🌟
1️⃣ OmniPlan: If you're a Mac user, OmniPlan is a top-notch choice. This powerful software offers a comprehensive set of features to plan, track, and manage your projects effortlessly. With its sleek interface and seamless integration with other Apple apps, it's a dream come true for Apple lovers.
2️⃣ Merlin Project: Another outstanding project management tool for Apple aficionados is Merlin Project. This software combines simplicity with advanced capabilities, enabling you to create detailed project plans, collaborate with your team, and monitor progress effectively. Plus, it syncs flawlessly with Apple devices, so you can manage your projects on the go.
3️⃣ Things: If you prefer a task-based approach to project management, Things is a remarkable choice. Available on Mac, iPhone, and iPad, this app helps you break down your projects into manageable tasks, set deadlines, and stay focused on what needs to be done. It integrates seamlessly with Apple's Reminders and Calendar, keeping you in control of your project workflow.
4️⃣ Ayoa: Ayoa is a versatile project management tool that shines on Apple devices. It offers a visually engaging interface, intuitive task management, and collaborative features that will boost your team's productivity. With Ayoa, you can create mind maps, Gantt charts, and much more, all within the Apple ecosystem.
5️⃣ Monday.com: While not exclusively designed for Apple users, Monday.com deserves a special mention for its outstanding web and iOS apps. This popular project management tool offers a beautiful interface, customizable workflows, and seamless integration with other Apple apps like Siri, Calendar, and Files.
So, whether you're a freelancer, a small business owner, or a project manager in a large organization, these Apple project management software options have got you covered! 💪🏼
Let me know if you've tried any of these tools or if you have other recommendations in the comments below. Let's help each other stay organized and supercharge our productivity! 🚀
2 notes
·
View notes
Text
Week 10: Final Summary
This term gave a whole new perspective and opened new doors for my creativity and design processes. It introduced me to new design processes leading up to modelling and ultimately 3D renderings in preparations for the 3D printing.
As I started to work my way into the said process, I started off with sketching exercises which helped me understand about the scales, dimensions, line weights and the importance of taking a step back to have a better view of what I was doing. For example, drafting the sketches required me to visualise the whole sketch as a 3D view in my head to orientate perspectives required to construct an accurate views on paper.
Furthermore, as I progressed through the sketching processes, I faced some difficulties in orthogonal and auxiliary projections. Especially, when in week 4 task where I failed to gain a bigger picture in my mind and resulting in some minor inaccuracies when developing the auxiliary sketches. After all the sketches at the end of the tasks, I always had to make a model or do something practical which helped me to see a better way to further improve my sketches by assisting me to understand the whole process.
After all that I've learned to visualise 2Ds into 3D drawings, I progressed further to incorporate my own designs into my drawings. Spreading out all my thoughts and ideas onto one piece of paper in terms of visualisation of ideas for the OLAY bottle was fulfilling for me as I love imaginations and creating compared to procedures. The most important thing I have learned in this process is to forget uncertainties and unsureness of the design creation process and just to lead the way by the tip of my pen. At first I was very unsure of whether to not my curves or edges would look nice in someone's eyes other than me but I started to let go of the doubt and wholly set on my intent to create and develop.
Further into the course, we stepped into the world of modelling before 3D stages. At first I thought in great joy that finally it had come to my area of expertise as I enjoyed using photoshop very much. However, it turned out there are so many tools and execution techniques that I have not explored before. And learning about them not only helped me with this course, it also helped me advance my knowledge for other creative processes. The predominant task for me in this process was making my own model.
Modelling had been very fun and enjoyable process but also made me realise it is hard to visualise but it is even harder to create what my visualisations took me. Multiple difficulties were met when I used clay but I stuck with my plan as I wanted to create what I saw in my mind. the sculpting and refining process was very rewarding and challenging at the same time. But the joy of holding your own creation after so much hardship was something I had missed for so long since Covid changed modelling ways to be digital rather than physical.
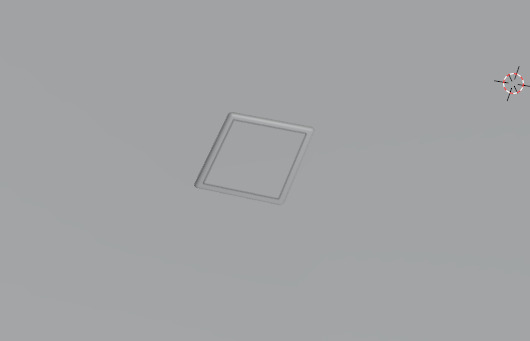
Finally, we were tasked to use new softwares and tools to develop our models even further. Learning new software and their ways to execution had never been easy for me and 3DS Max is not an exception. As my Mac does not allow the installation, I remotely accessed the desktops from Uni to learn and use the software. At first, it was challenging to know where the commands and tabs are and to recognise what each of them represent and do. After some tutorial exercises, I developed some mental map of 3Ds's UI and from there things were much easier. This process as a whole had progress both my skills in designing as well as my design process in terms of bringing visualisations into fruition. Each and every techniques I explored and learned here will definitely become tools in my arsenal.
2 notes
·
View notes
Photo
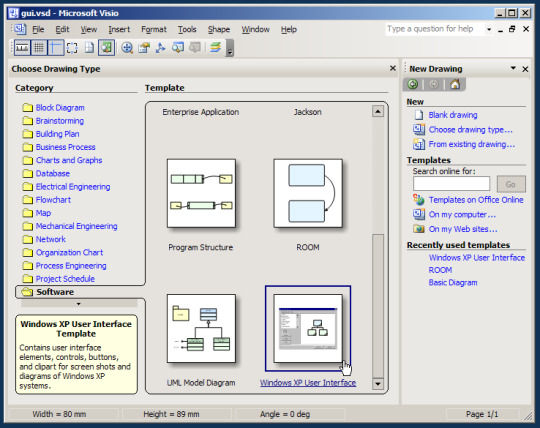

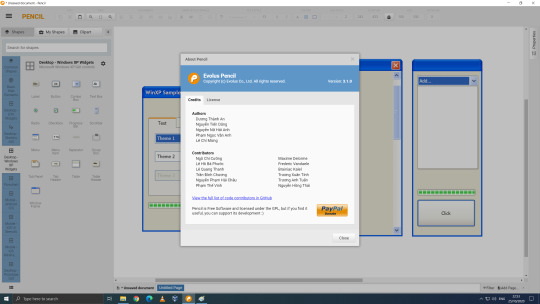

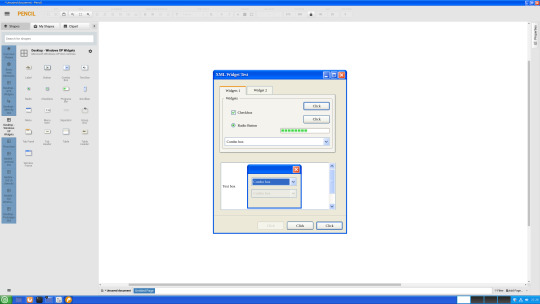


Back in 2020, I installed Evolus Pencil Project (64 bit). Evolus Pencil Project is an open source Graphical User Interface Prototyping tool. It can be used to create mock-ups of web apps, mobile apps and software design. It is available on Windows 64 bit and 32 bit, Linux and Mac. It first came out in about 2008. In 2019 it received a new user interface refresh. (See first image above compared with image below) I first came across this application whilst experimenting with Visio 2007 (2003 pictured above) in my free time at Farnborough College of Technology. Visit the website here: https://pencil.evolus.vn/ It features many stencils for UI prototypes including:
Wire-frame diagrams, some classic GTK2+ Linux themes, Android stencils, iOS stencils, Windows 7 Aero stencils and Windows XP Luna stencils.
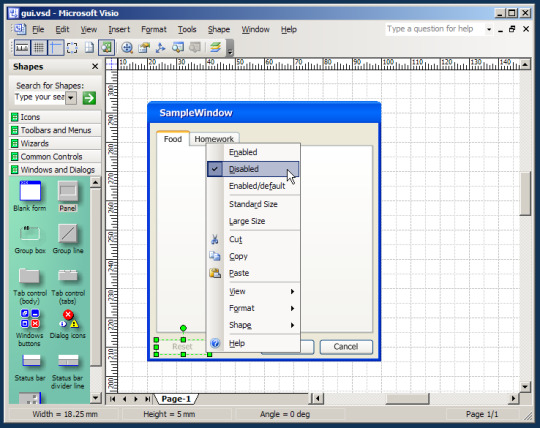
I am using the XP UI style shapes. More UI stencil collections can be added from the website. Each stencil is drawn in the SVG (Scalable Vector Graphics) format and has interactive window elements such as progress bars, buttons, tabs, window buttons and text can be inputted into certain shapes. You can also select various shapes to use as well. When you save a project, it saves in .epgz (Pencil for Firefox Compressed Document) format. You can also export it as a .svg, png or .pdf file. A similar tool to Pencil Project is Microsoft Visio 2007, which I have used in the past. See screenshot of Visio 2003 which features similar shapes below. Visio's use extends creation from flowcharts, mind maps, network mapping and user interface prototyping. Visio saves in the .vsdx (Visio Stencil Document) format. However, if you just after User Interface Prototyping tools, then Evolus Pencil Project offers most of what you need for this. I found after installing the software, it works as it should, however the Pencil Project application adds its start menu and desktop icon entries on the Administrator account but not on the Standard user account. You have to locate the application in Windows to launch it under a Standard account. This isn't a big problem, it is just a nuisance. Overall Pencil Project starts-up quickly, is very stable, and is easy to use. I installed it in Linux Mint 20 Cinnamon running inside Oracle VM VirtualBox. I installed the .deb (Debian) file and installed Evolus Pencil Project onto Mint. Here it is running next to Windows 10 and here it is themed on Linux Mint Cinnamon with the 'XP Professional' theme! See below to find out more about this theme.
6 notes
·
View notes
Text
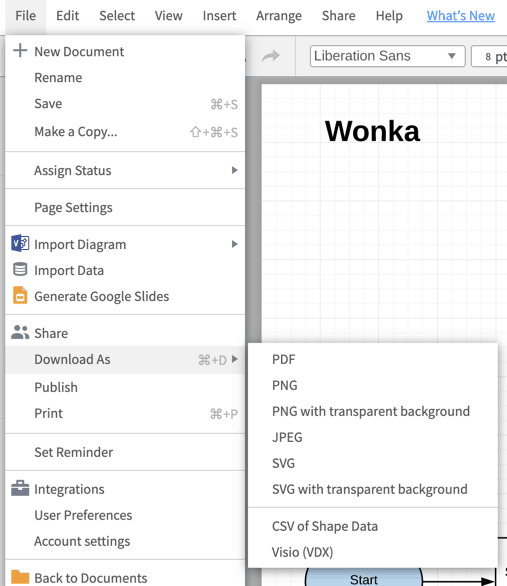
Free Flowchart Software Mac
Flowcharts are used for graphically visualizing a matter. Rather than just having a theory based knowledge, if the learners are provided with graphs, charts, symbols, diagrams, etc. the knowledge are believed to be most strongly imprinted in their minds and thus help improve the overall result or outcome. But, actually having to draw a flowchart using a pen, the paper might seem harsh, especially when there are many complicated things to be explained. So, with the advent of flowchart software, it becomes really simple to design your flowcharts according to your needs and demands. Here's a list of top flowchart software for your varying needs.
1. Gliffy
This software can be used for various needs like documentation of a decision flow or the approval process, illustrate a particular software or product development and production process, create an infographic etc. It is an HTML 5 based diagramming tool so it is twice as fast as Flash and can be operated on any type of modern web browser. It supports an easy drag and drop interface. Even while being on the browser itself, you can edit your flowcharts and share them by just sending your URL to the required people. See Also: - Top 9 Photo Stitching Softwares You Must Try They even come with various types of templates and themes that can help you get started on developing a software. On the free account, you can afford up to 5 free diagrams (2 MB limit) and after that you need to shift to the paid versions whose price starts from $3.99.
2. XMind
This is one of the old and most recognized chart creating tool that offers you a lot of varieties and features and can work correctly on Linux, Windows and Mac OS, X. It has 10 new amazing fonts and themes that are cross-platforms and open-sourced and thus can help you beautify your maps and charts looks. The three essential parts are relationship, boundary and summary where the relationship between and two topics on a graph on a map can be shown with the help of customized lines, Boundaries let you emphasize on a certain topic or content by making a closed area over those contents and the summary provides you with a lucid overview of those topics. See Also: - 10 Best Clothing Design Software for Windows This software makes use of marker to highlight any relevant matter or any type of priority or progress, etc. For each subject, you can give a single or numerous label depending upon your uses and needs. Presenting your job or slide becomes even easier with the help of slide-based presentation. It does come with a free plan that is useful for very basic use, but if you intend to use it with more advanced features then you can purchase a license to extend their functionalities.
3. yED
This powerful desktop application can run for free on Windows, Linux, Mac OS X and all other Java Virtual Machine Supported platforms. Along with the intuitive user interface, it also allows you to import data from .xls or XML files. See Also: - 10 Best Clothing Design Software To Download for Mac With the help of pre-made templates, the entire process of designing a flow chart will be made even easier. You can bring in various documents, images and designs from other sources into yED and the software will arrange them into a full-fledged top quality flow chart. Even if your diagram consists of the many complexities and diversities, the software will untangle them and give you a simpler looking layout to make your understanding better. yED makes it easy to create, edit and handle diagrams by making use of simple mouse, touch and keyboard gestures. It also covers a broad range of deployment and platforms so that you can run it on your own platform.
4. Lucid Charts
Lucid Charts come with an intuitive and collaborative diagramming solution that attends to all your varied types of diagramming worries. It also offers high compatibility with other programs like google apps and also provides support with Microsoft visio documents. See Also: - 10 Best Car Designing Software | Both Free & Paid It has separate categories and functionalities for making flowcharts for producing engineers, business related work and to design related work. As it is not a software, but an online web page, so you need not have any updating software problem or no additional downloads, etc. The simple drag and drop options and scalability option really perk up your flowchart making experience. Also, as it is built on HTML 5 and web standards so, it can function correctly on almost any major browser or Internet-enabled device.
5. Creately
This offline tool supported by WYSIWIG based software come with over 1000 ready made templates and examples that can serve almost every type of your need, just to make your flowchart creating experience really free from problems. With the help of one-click create, drag and drop shapes, easy arrow heads and styles changing, simple aligning, sizing and grouping etc. the flowchart becomes very easy to draw. Sometimes when it's difficult for you to draw a shape to represent some idea or text in your flowchart, then you can just write it down as a text and the software will change it to complex forms accordingly. See Also: - 10 Best Software to Create Fabulous T-Shirt Designs With the help of connectors, lines and shapes can be matched correctly to the linking forms. With the aid of real-time collaboration, you can invite anyone to collaborate with your flowchart and if they make any change to your flowchart then it will be visible to you simultaneously and they can even leave you their own comments and reviews regarding the necessary modifications in the flowchart. Also, if you want hen you can import visio and visio stencils directly to your working field on Creately. You can also import your flowcharts to Abode Illustrator, Inkspace, MS, Visio etc. for modification. It is compatible with Microsoft Windows, Linux, Mac OS X and the price is free for up to 5 diagrams and then you will be charged with minimum $5 per month.
6. Smart Draw
This notable drawing software comes with varied range of applications and features, thus making it one of the most sought after drawing tool. You can also include shapes, photos, images and diagrams using keystrokes and keyboard. With nearly 100 of templates and 70 different types of diagrams, charts, and other visuals, your whole process of flowchart creation becomes really simple. See Also: - 10 Best Transcription Software for Windows (Free+Paid) With the help of Smart Draw cloud, you can create and edit diagrams in modern browsers on both Mac and Windows. As it offers high compatibility, so you can export your diagram to Word, Excel, PowerPoint or Outlook and can also save your drawing to Dropbox, Google Drive or One Drive. Furthermore, with the help of built-in examples and drawing tools, the process of creating a complex flowchart becomes extensively straightforward and easy.
7. Draw.io
This diagram application is free to use and offers excellent solutions and offers to build your flow charts. It is made on Google Drive (TM) using which you can create not only flowcharts but also UML, entity, relation, network diagrams, etc. With the help of simple drag and drop techniques, it becomes easy for anyone to use this free application. As soon as you visit the website, you can get on with drawing your flowchart without wasting any time on unnecessary registration information, login details, advertisements, etc. The files get saved as a .xml file and can be used by various other programs. You can export your diagrams in the format of .jpg, .png, .pdf, .gif and .svg so as to enable the method of sending the file via e-mail or sharing them with others. One of the most attractive capability of draw.io is the availability of basic vector graphics. Your diagrams get saved to the Google Drive, so you don't have to be afraid of losing them. You can also resize, move or copy the images in your diagram according to your needs.
8. Cacoo
This software comes with lot many varieties of clip art and simple vector images to ease the process of flowchart creation. Furthermore, with the help of the option 'Find Stencils On the Cacoo Store,' you can search for even more clip arts and vector images. It can work on any PC and is also available as an app for Android users. See Also: - 10 Best Transcription Software for Mac (Both Free & Paid) With the help of the free account, you can save up to 25 sheets of diagrams. Then to continue using the services you can pay a minimum amount of $4.95 per month and become a premium user. Your charts are sure to be saved, secured and synced so that you can open them or use them whenever you need. Also, it offers you the option of viewing real-time changes in your app and gives you the option of in-app chat. Your diagrams can be exported to various other formats like jpg, png, pdf, etc.
9. Lovely Charts
It is used for creating a professional looking layout. Using this software, the creation of flowcharts, sitemaps, wireframes, basic symbols, etc. is possible. It works fine with Desktops, the web, and iPad. The Android version of this software is currently in progress and will be available soon. The user interface is too excellent and easy to understand and use. With the help of simple drag and drop option, you can add desired contents and images to your flow chart. The files and flowcharts can be exported in .png and .jpeg format. See Also: - Top Free 2D Animation Softwares And Cartoon Creator The desktop version comes free of cost, but it has a particular disadvantage that the features on the desktop version are limited compared to the web and iPad version. The paid version plans start with a minimal amount of $3.99/year.
10. Dia
This free, open source online diagramming software functions correctly with Windows XP, Vista, 7, 8, 8.1, 10, Linux and Mac OS X. This software carries features that are highly similar to Microsoft Viso app. With the help of this software, you can easily create various diagrams like Flowcharts, UML diagrams, Assorted Diagrams, Circuit to Network Diagrams, etc. on the go. It is also a storehouse of a large variety of symbols and tools that can ease out your process of diagram creation. Also, you can work simultaneously on more than one flowcharts or diagrams on multiple tabs. Your layouts get loaded and saved to a custom XML version which can then be exported to several formats such as XFIG, PNG, EPS, WMF or SVG. Moreover, if necessary the software allows you to take a printout of your diagrams too. It is the overall list of all the flowchart creation software, which can give you a well looking professional flow chart for any your need.
Aug 27, 2021 Download Strom Flow Chart Software for Mac to draw flow charts from ready-made components. 3 months free with 1-year plan. Download Now Best for customer support. This good tool for making flowcharts offers fifteen different flowchart shapes such as Decision, Connector, Process, Data etc. Best Flowchart Software for Mac. Explore these highest-rated tools to discover the best option for your business. Based on ratings and number of reviews, Capterra users give these tools a thumbs up. Select a product to learn more.
Analysts have discovered that learning with the utilization of flowcharts causes the brain to get a handle on the substance. Furthermore, with the consistent ascent in innovations, a few online Flowchart Software for MAC have been created to make online flowcharts.
These outlines don’t just assistance in ease in adapting yet in addition successively sorted out, helpful, and appealing.
Online Flowchart Maker Software utilizes important information sources and makes a yield as flowcharts according to the need of its clients. There have various prerequisites for various areas.
Though; a point by point stream diagram comprising of different subdivisions in an officially structured manner, having an excellent introduction would be ideal by the organizations in their meetings and conferences.
Top 11 Flowchart Software for Mac to Use in 2021
A rundown of probably the best online Flowchart Software for Mac and Windows has been assembled as per the necessities of its clients. They are as per the following:-
1. LucidChart
Want to work on a common platform for – diagram, collaboration, and visualization of data? Then LucidCharts serves you. The flowchart technology is cloud-based; hence you can start and share the diagrams irrespective of the device and browser.
The features of – optimization, brainstorming with remote teams, and multiple simultaneous collaboration allure many tech giants. Basic single account users can access LucidChart at $4.95 per month, while the Pro single has to pay $8.95 per month. Free users have limited access to features with only 60 objects per diagram, but Team accounts have to pay $20 per month to avail services.
2. Google drawings
It is essentially free diagramming software. It is available as a web and desktop application on Google’s Chrome OS. You can create flowcharts, mind maps, concept maps, and other diagrams as well.
You can even collaborate with other users in real-time. It is a common platform for all other google applications – Docs, sheets, slides, forms, sites, and keeps. Easy to import, download and create files like – PDF, SVG, JPEG, etc. hence highly recommended.
3. Cacoo
The main idea of this software is to encourage teams to work together. Hence highlighting the idea of cross-platform diagram sharing. Not only preferred by developers and Designers but also collaborators.
It is packed with features of editing, tracking, and conversing cross-platform or in the same room simultaneously. The integration of the work with other apps, deeper cross-functional teamwork, highly intuitive tools, and charming templates are highly recommended. It even has a free version with a free trial, but with limited features, so you can access it for $6.00 per feature per month.
4. Visme
Do not worry; even if you are a beginner or non-designer, you can still create amazing diagrams. This facility is provided by Visme.
It is essentially a seamless platform for the presentation of social media images, infographics, etc.
Best Free Flowchart Software Mac
It would help you build the brand of your work. Visme is free. But premium users have access to core features.
5. Draw.io
It is primarily a free online diagram software. You can save your diagrams to Google Drive, One drive, Device, Dropbox, GitHub, and GitLab. You can employ it to create your flowchart, online UML, and designing the database schema.
It is enabled with a familiar interface hence highly compatible with the users. Compatible with Windows PC. Free and easy to use.
6. SmartDraw
One of the easiest and powerful flowchart makers. It has over 70 different diagram types, from flowcharts to floor plans. It is equipped with automatic formatting.
Easy collaboration with relatively higher enterprises. Even has the feature of – easy integration with other apps. Different sectors have to pay the following annually:
Enterprise- less than $1 per user per month.
Team- starts from $5.95 per user / month.
Individual- $9.95 per month
7. Visual Paradigm
Provides basic and advanced visualization. Essentially an online diagram drawing software. You can import diagrams from the cloud to the desktop.
Best online ER diagram tool. Essentially employed for enterprise scaling, versioning, and tracking. Highly preferred over SmartDraw, LucidChart, Viso, etc., by highly interactive Interface and amazing user-friendly features.
8. Gliffy
Want to create diagrams without installing the apps? Then the right tool for you is Gliffy. The created diagrams- Venn, UML, flowcharts, floor plans, etc. can be shared, edited on a real-time basis.
Diagram And Flowchart Software Mac
Essentially an HTML5 cloud-based online app. The price starts at $3.99 per feature per month. No free trials are provided, but free versions are available if you wish to go hassle-free.
9. Textografo
Free Flowchart Software For Mac Os X
Need someone to auto-format for you? Here is the best tool at your service- Textografo. Essentially a cloud-based diagramming tool.
You can create top-notch flow charts, mind maps, decision trees, etc. Used in almost all industries for designing softwares and new processes. It starts at $4.00 per feature per month with facilities of free version and free trials.
10. WireFlow
Need an application to document your workflows? Tackle the complex interactions for mobile and web apps? It is the best tool for you. Essentially a hybrid design document combines wireframing and flow diagramming. It is free and open-source.
11. YED
Free Flowchart Software Mac Version
Amazing for general-purpose diagramming. It. Has a multi-document interface written in Java? It is compatible with Linux, Mac OS, and Windows. It loads and saves diagrams from/to Features like automatic layout, large diagram printing visualization, edit, allure even many commercial designers. Free of cost and extremely user-friendly.
Best Free Flowchart Software
Eleggible’s Final Words
We have checked on and thought about the best flowchart software for mac right now. Draw.io is best for chipping away at all stages.
Lucid Chart is the best online flowchart maker as a result of its joint effort highlights and its similarity with Microsoft Visio.
It works best for drawing straightforward and complex outlines. Visme is an infographic and introduction instrument which can be utilized by little and enormous associations.
Flow Chart Template Mac
Smart Draw is valuable for everybody who needs to draw an outline. Visual Paradigm is best for Software engineers. Gliffy has great cooperation includes and is best for learners.
Textografo is an electronic flowchart producer that gives the highlights of group-based job featuring and going layouts to graphs. Google Drawings is a free online instrument for making drawings. Cacoo is best for making custom outlines and charts.
2 notes
·
View notes