#MotionFlow
Explore tagged Tumblr posts
Visit Tumblr Blog
Explore Tumblr blogs with no restrictions, modern design and the best experience.
Last Seen Tumblr Blogs


Fun Fact
BuzzFeed published a report claiming that Tumblr was utilized as a distribution channel for Russian agents to influence American voting habits during the 2016 presidential election in Feb 2018.
Photo
0 notes
Text
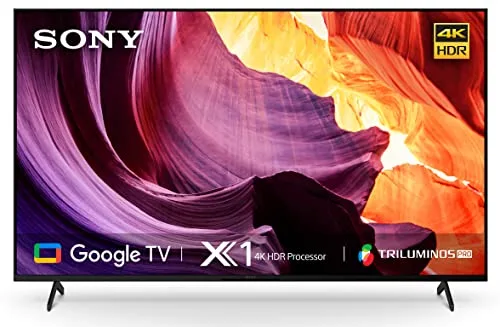
Sony Bravia K-43S25M2: A 2025 4K Review
Sony continues its legacy of innovation with the 2025 Bravia 2 II S25M2, a 43-inch Ultra HD 4K Smart LED TV that encapsulates stunning visuals, immersive sound, and top-tier smart features in a size ideal for medium-sized rooms or even a secondary entertainment space. Let’s explore where it shines — and where it could do even better. 1. Design & Build Quality: Minimalist Elegance Aesthetic…
#43 inch 4K TV#4K Processor X1#Android TV#Android TV India#Apple AirPlay TV#Best 4K TV under 55000#Bluetooth 5.3 TV#Bravia Sync#Budget 4K Smart TV#Dolby Atmos TV#DTS:X Audio TV#Frame Dimming TV#Gaming TV#HDR10 TV#HLG support#Home Entertainment#LED TV Review#Mid-range Smart TV#Motionflow XR#Smart LED TV#Smart TV with Chromecast#Sony 43 inch TV#Sony Bravia#Sony Bravia 2025#Sony K-43S25M2#Sony Smart TV 2025#Sony TV Review 2025#Ultra HD TV#Wi-Fi 6 TV
0 notes
Text
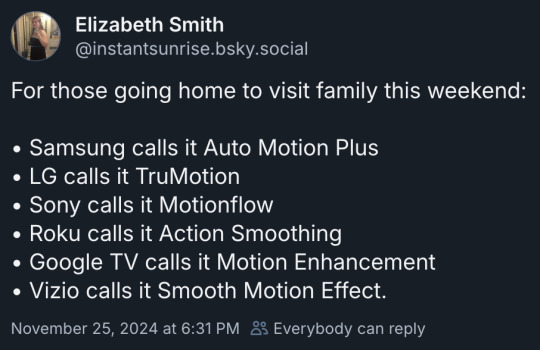
For those going home to visit family this weekend:
Samsung calls it Auto Motion Plus
LG calls it TruMotion
Sony calls it Motionflow
Roku calls it Action Smoothing
Google TV calls it Motion Enhancement
Vizio calls it Smooth Motion Effect.
37 notes
·
View notes
Text
Price: [price_with_discount] (as of [price_update_date] - Details) [ad_1] From the manufacturer 1 Powerful Processor 2 4K X-Reality PRO 3 Triluminos PRO 4 Dolby Vision 5 MotionFlow XR The video showcases the product in use.The video guides you through product setup.The video compares multiple products.The video shows the product being unpacked. 1 X-Balanced Speaker 2 Dolby Atmos 3 Ambient Optimization 1 Google TV 2 Personalized For You 3 Kids Care 4 Built In Mic 5 Eco dashboard 1 Ease Of Gaming 2 Smooth Play 3 Next-Gen gaming 4 PS Exclusive Features 1 SONY PICTURES CORE 2 Flush Surface 3 Apple Airplay2/HomeKit 4 X-Protection PRO Resolution: 4K Ultra HD (3840 x 2160) | Refresh Rate: 60 hertz | BRAVIA 3 LED Connectivity: 4 HDMI ports to connect set top box, Blu Ray players, gaming console | 2 USB ports to connect hard drives and other USB devices
Sound : 20 Watts Output | 2ch | Bass Reflex Speaker | Dolby Atmos | Ambient Optimization |2 Full Range (Bass Reflex) Smart TV Features: Google TV | Watchlist | Google Assistant | Chromecast Built In | Built In Mic |Game menu | ALLM/eARC (HDMI 2.1 Compatible) | Additional Features: Apple Airplay | Apple Homekit | Alexa Display : 4K LED | 4K HDR Processor X1 | Triluminos PRO | 4K X-Reality PRO | MotionFlow XR 200 | HDR10/HLG, Dolby Vision Warranty Information: 1 year comprehensive warranty on product provided by the brand from the date of purchase [ad_2]
0 notes
Link
Check out this listing I just added to my Poshmark closet: Women's Grand Slam 3-Pocket Golf Bermuda Shorts black size 6 NWT.
0 notes
Text
How to Optimize Your Sony LED TV Settings for the Best Picture Quality

Introduction
Have you ever sat down to watch a movie or your favorite TV show only to find the picture quality lacking that cinematic brilliance? You’re not alone. Many TV owners don’t realize that with a few simple adjustments, their viewing experience can go from good to spectacular.
Sony LED TVs are renowned for their exceptional picture quality, innovative features, and cutting-edge technology. Whether you own a top-of-the-line 4K HDR model or a more modest LED TV, optimizing your TV settings can make a world of difference. Picture quality is not just about the TV's capabilities but also how well it’s set up to match your viewing environment and preferences.
In this guide, we aim to demystify the process of optimizing your Sony LED TV settings. We'll walk you through the basics and the advanced techniques to ensure you get the best possible picture quality. Whether you're watching the latest blockbuster, catching up on sports, or diving into the newest video game, these tips will help you achieve a stunning, immersive viewing experience. Let’s unlock the full potential of your Sony LED TV!
Understanding Your Sony LED TV Features
Sony LED TV are packed with advanced features designed to deliver exceptional picture quality. Here are some of the key features you should be familiar with:
4K Resolution: With four times the detail of Full HD, 4K resolution offers incredibly sharp and clear images. This higher resolution is perfect for larger screens and ensures that even the smallest details are visible.
HDR (High Dynamic Range): HDR enhances the contrast and color of your TV, making bright scenes more brilliant and dark scenes more detailed. This feature is particularly effective for movies and TV shows, providing a more lifelike viewing experience.
Smart TV Capabilities: Sony LED TVs often come with smart features, allowing you to stream content from services like Netflix, Hulu, and YouTube directly from your TV. These smart features also include access to apps, games, and other online content.
Triluminos Display: This feature increases the range of colors that the TV can display, making colors look more vivid and realistic. It’s particularly useful for watching nature documentaries and colorful animations.
X-Reality™ PRO: This picture processing technology upscales every pixel for enhanced clarity and detail. Whether you're watching an old movie or a new blockbuster, X-Reality™ PRO ensures a clearer, more refined image.
Motionflow™ XR: This technology keeps fast action smooth and clear by creating and inserting extra frames between the original ones. This is ideal for watching sports and action-packed movies.
User Manual Reference:
Every Sony LED TV comes with a detailed user manual. This manual is an invaluable resource for understanding the specific features and capabilities of your TV. It provides detailed instructions on how to access and adjust settings, use smart features, and troubleshoot common issues. Make sure to keep your manual handy, either in print or digital format, as you go through the process of optimizing your TV settings.
Firmware Updates:
Firmware updates are essential for keeping your TV running smoothly and ensuring that you have access to the latest features and improvements. Sony regularly releases firmware updates that can enhance performance, fix bugs, and introduce new capabilities.
Check for Updates: Regularly check for firmware updates in your TV's settings menu. This can usually be found under "Settings" > "Support" > "Software Update."
Automatic Updates: Enable automatic updates if available, so your TV can stay up-to-date without any manual intervention.
Internet Connection: Ensure your TV is connected to the internet, either via Wi-Fi or Ethernet, to receive updates seamlessly.
By understanding and utilizing these key features, you'll be well on your way to optimizing your Sony LED TV for the best picture quality.
Basic Sony TV Setup
Proper placement of your Sony LED TV is crucial for optimal picture quality. Here are some tips to ensure the best setup:
Height and Angle: Position the TV at eye level when seated to avoid neck strain and ensure the best viewing angle. The center of the screen should be at your eye level.
Viewing Distance: Maintain an appropriate distance between your seating area and the TV. A general rule of thumb for 4K TVs is to sit about 1.5 times the screen size (in inches). For example, for a 55-inch TV, the ideal viewing distance is approximately 6.8 feet.
Stable Surface: Place the TV on a stable and secure surface, such as a TV stand or wall mount, to prevent it from tipping over.
Ventilation: Ensure there is enough space around the TV for proper ventilation. Avoid placing it in enclosed spaces or directly against walls to prevent overheating.
Ambient Lighting:
The lighting in your room can significantly impact the TV's picture quality. Here are some tips to optimize ambient lighting:
Minimize Glare: Avoid placing the TV in direct sunlight or under bright lights that can cause glare on the screen. Use curtains or blinds to control natural light.
Soft Lighting: Use soft, diffused lighting in the room to reduce eye strain and enhance the viewing experience. Floor lamps or wall sconces can provide indirect lighting that doesn't reflect on the screen.
Adjustable Lighting: Consider installing dimmable lights so you can adjust the brightness according to the content you're watching. Dim the lights for movies and brighten them for casual TV shows or games.
Connections and Cable Management:
Properly connecting your devices and managing cables can also enhance the viewing experience:
HDMI Connections: Use high-quality HDMI cables to connect your TV to external devices like Blu-ray players, gaming consoles, and streaming devices. This ensures the best possible audio and video quality.
Audio Setup: For an immersive audio experience, connect your TV to a soundbar or home theater system. Use HDMI ARC (Audio Return Channel) or optical cables for the best sound quality.
Cable Management: Organize and secure your cables to prevent clutter and potential interference. Use cable ties, clips, or a cable management system to keep everything neat and tidy.
By following these basic setup tips, you'll create an optimal environment for your Sony LED TV, ensuring the best picture quality and an enjoyable viewing experience.
Picture Mode Selection
Preset Modes:
Sony LED TVs come with several preset picture modes, each designed for specific types of content and viewing conditions. Understanding and selecting the right mode can significantly enhance your viewing experience:
Standard: This mode is suitable for everyday TV watching. It offers a balanced mix of brightness, contrast, and color, making it ideal for most types of content.
Vivid: Vivid mode enhances brightness, contrast, and color saturation, making it perfect for well-lit rooms or when you want a more dynamic and eye-catching picture. It's great for sports events or animated movies where vibrant colors are a key part of the experience.
Cinema: Designed for watching movies in a dark or dimly lit room, Cinema mode provides a more natural and film-like picture quality. It reduces brightness and adjusts color tones to create a softer, more immersive viewing experience.
Game: Game mode minimizes input lag, making it ideal for gaming. It optimizes the response time between your controller and the screen, ensuring smoother and more responsive gameplay.
Sports: Sports mode enhances motion clarity and boosts brightness and colors, making it easier to follow fast-paced action. It's ideal for watching live sports events.
Custom: This mode allows you to manually adjust all picture settings according to your personal preferences. It’s useful for fine-tuning the picture to your liking.
Custom Modes:
If the preset modes don't quite meet your needs, you can create custom modes by adjusting the picture settings manually. Here's how to approach customization:
Brightness: Adjust the brightness so that the dark areas of the image are visible without washing out the brighter areas. A good starting point is the mid-range, then fine-tune based on the room lighting and content type.
Contrast: Increase the contrast to make whites brighter and blacks darker. Be careful not to set it too high, as this can cause loss of detail in bright and dark areas.
Color: Set the color to a level where skin tones look natural and colors are vivid but not oversaturated. Too much color can make the picture look unrealistic.
Hue/Tint: This setting adjusts the balance between green and red tones. It’s usually best left at the default setting, but slight adjustments can correct color imbalances.
Sharpness: Increase the sharpness to enhance the edges of objects, but avoid setting it too high, which can create unwanted noise and artifacts in the image.
Advanced Settings: For those comfortable with more in-depth adjustments, explore settings like gamma, white balance, and black level. These can further refine the picture quality, especially when calibrated using professional tools or apps.
Tips for Customizing Picture Modes:
Content Type: Customize different modes for different types of content. For example, you might have one custom mode for movies and another for gaming.
Room Lighting: Adjust your settings based on the lighting conditions in your room. You might need different settings for daytime viewing versus nighttime.
Test Patterns: Use test patterns and calibration tools to fine-tune your settings accurately. These can help ensure your adjustments are precise and effective.
By experimenting with preset and custom modes, you can optimize your Sony LED TV's picture quality to match your preferences and viewing conditions, ensuring the best possible experience for any type of content.
Adjusting Picture Settings
Brightness and Contrast:
Brightness: This setting controls the black levels of your TV. Adjusting brightness ensures that dark scenes are detailed without appearing washed out.
Adjustment Tips: Use a scene with both dark and light areas. Increase brightness until dark areas appear washed out, then gradually decrease it until the blacks are deep but details are still visible.
Contrast: This setting affects the white levels, enhancing the bright areas of the picture.
Adjustment Tips: Find a scene with bright elements. Increase contrast until the whites start losing detail, then lower it slightly until you can see fine details in the brightest parts of the image.
Color and Hue:
Color: This controls the saturation of colors on your TV. Proper adjustment makes colors look vibrant without being oversaturated.
Adjustment Tips: Use a scene with a variety of colors. Increase color until it looks unrealistic, then decrease it until skin tones and natural colors look accurate.
Hue/Tint: This setting adjusts the balance between green and red tones. It usually requires minimal adjustment.
Adjustment Tips: Find a scene with faces or natural greenery. Adjust the hue/tint until skin tones look natural and greens are lifelike.
Sharpness and Clarity:
Sharpness: This enhances the edges of objects in the picture, but too much sharpness can introduce noise and artifacts.
Adjustment Tips: Use a high-definition image with fine details. Increase sharpness until the edges look defined, but not overly sharp or noisy. Lower the sharpness if you notice halo effects around objects.
Clarity Enhancements: Sony TVs may offer additional settings like "Reality Creation" or "Resolution." These can further enhance picture detail but should be used sparingly.
Adjustment Tips: Adjust these settings in small increments and evaluate their effect on the overall picture. Too much enhancement can make the image look artificial.
Advanced Picture Settings:
Motion Smoothing: Known as Motionflow on Sony TVs, this setting can reduce motion blur but might create a "soap opera effect" that makes movies look unnatural.
Adjustment Tips: Use a scene with fast motion. Experiment with different Motionflow settings (like Clear, Smooth, or Custom) to find a balance between reducing blur and maintaining a natural look.
Backlight and Local Dimming: Adjusting the backlight controls the overall brightness, while local dimming improves contrast by dimming specific screen areas.
Adjustment Tips: Increase backlight for bright rooms and decrease for dark rooms. Enable local dimming for deeper blacks and better contrast, adjusting the intensity based on your preference.
White Balance and Gamma: These settings fine-tune the color temperature and midtone brightness, respectively.
White Balance: Use a calibration tool to adjust the white balance for a neutral color temperature, avoiding overly warm or cool images.
Gamma: Adjust gamma to change the brightness of midtones. Lower gamma values make midtones brighter, while higher values darken them. Aim for a natural balance without losing detail in shadows or highlights.
By carefully adjusting these picture settings, you can significantly enhance your Sony LED TV's picture quality, tailoring it to your viewing environment and personal preferences.
Advanced Picture Settings
Advanced picture settings on your Sony LED TV allow for fine-tuning and optimization beyond basic adjustments. These settings can significantly enhance your viewing experience by refining color accuracy, reducing motion blur, and improving contrast. Here’s how to utilize these advanced settings effectively:
Motion Smoothing (Motionflow):
Purpose: Motionflow technology inserts additional frames to reduce motion blur and improve clarity, especially in fast-paced scenes.
Settings: Experiment with different Motionflow modes (e.g., Standard, Smooth, Clear, Custom) to find the best balance between motion enhancement and natural motion portrayal.
Usage: Ideal for sports and action movies where smooth motion is desired. Be cautious as higher settings can create an unnatural "soap opera effect."
Backlight and Local Dimming:
Backlight: Controls the overall brightness of the screen.
Adjustment: Increase backlight for well-lit rooms and decrease for darker environments to avoid eye strain and achieve optimal picture clarity.
Local Dimming: Improves contrast by dimming LEDs in dark areas of the screen while keeping bright areas illuminated.
Settings: Adjust local dimming settings (e.g., Low, Medium, High) based on content and lighting conditions for deeper blacks and enhanced contrast.
White Balance (Color Temperature):
Purpose: Adjusts the color temperature to achieve natural-looking whites and accurate color reproduction.
Settings: Use the white balance settings to fine-tune color temperature (e.g., Warm, Neutral, Cool) or adjust individual color channels (Red, Green, Blue) for precise calibration.
Calibration Tools: Consider using a calibration disc or professional calibration service for precise adjustments, ensuring colors appear as intended by content creators.
Gamma:
Purpose: Gamma adjusts the brightness of midtones in the picture.
Settings: Select gamma presets (e.g., Low, Medium, High) or customize gamma curves to enhance shadow detail and prevent washed-out highlights.
Usage: Adjust gamma based on ambient lighting and personal preference to achieve balanced brightness across different viewing conditions.
Color Space and HDR Settings:
Color Space: Defines the range of colors that your TV can display. Select between standard color spaces like Rec. 709 for HD content or wider spaces like DCI-P3 for HDR content.
HDR Settings: Adjust HDR settings (e.g., HDR10, Dolby Vision) for compatible content to maximize dynamic range and color depth.
Usage: Ensure your TV settings match the capabilities of your content source (e.g., Blu-ray player, streaming device) to experience HDR content as intended.
Noise Reduction and Detail Enhancers:
Noise Reduction: Reduces visual noise in low-quality sources or broadcast signals.
Detail Enhancers: Enhance fine details in the picture without compromising overall image quality.
Usage: Use these settings conservatively to improve picture clarity without introducing artifacts or unnatural effects.
Aspect Ratio and Screen Adjustment:
Aspect Ratio: Adjusts the ratio of the screen width to height for optimal viewing of different content formats (e.g., 16:9 for widescreen, 4:3 for standard definition).
Screen Adjustment: Allows for fine adjustments such as overscan correction or screen position alignment.
By exploring and adjusting these advanced picture settings on your Sony LED TV, you can customize your viewing experience to suit different content types, lighting conditions, and personal preferences. Experiment with settings gradually to find the perfect balance that enhances picture quality and immersion without sacrificing naturalness.
Calibration Tools and Techniques
Calibrating your Sony LED TV ensures accurate color reproduction, optimal brightness, and precise image quality. Here are tools and techniques to help you achieve the best results:
1. Calibration Discs and Software:
Purpose: Calibration discs like Spears & Munsil HD Benchmark or Disney WOW (World of Wonder) provide test patterns and instructions for adjusting TV settings.
Usage: Play the disc on your Blu-ray player or media device connected to the TV. Follow on-screen instructions to adjust settings such as brightness, contrast, color, and sharpness.
2. Professional Calibration Services:
Purpose: Professional calibrators use specialized tools and expertise to fine-tune TV settings for optimal performance.
Benefits: Provides precise calibration tailored to your specific TV model and viewing environment, ensuring accurate color representation and enhanced picture quality.
Availability: Contact authorized calibration services or home theater professionals who specialize in TV calibration.
3. Calibration Apps and Software:
Purpose: Apps like CalMAN Mobile or THX Tune-Up offer calibration tools and guides directly on your smartphone or tablet.
Usage: Install the app on your device, connect it to your TV via Wi-Fi or HDMI, and follow step-by-step instructions to adjust settings based on test patterns and recommendations.
4. Online Resources and Guides:
Purpose: Websites and forums provide DIY calibration guides, tips, and user experiences for adjusting Sony LED TV settings.
Usage: Research and follow comprehensive guides tailored to your TV model, discussing adjustments for color temperature, gamma, and advanced picture settings.
5. Built-in Calibration Features:
Purpose: Some Sony TVs offer built-in calibration tools and modes (e.g., Expert Picture Settings) for adjusting advanced parameters.
Usage: Access these settings through the TV's menu system. Utilize options like white balance adjustments or color management to fine-tune color accuracy and overall picture quality.
6. Test Patterns and Viewing Conditions:
Purpose: Use test patterns for evaluating picture quality aspects such as brightness uniformity, color accuracy, and motion handling.
Usage: Display test patterns from calibration discs or apps in a dimly lit room to minimize ambient light interference. Adjust settings accordingly to achieve optimal viewing conditions.
7. Regular Monitoring and Adjustment:
Purpose: Monitor TV settings over time and make periodic adjustments to maintain optimal picture quality.
Usage: Check for firmware updates, re-calibrate settings based on changes in viewing environment or preferences, and ensure consistent performance of your Sony LED TV.
By utilizing these calibration tools and techniques, you can optimize your Sony LED TV's settings for accurate color reproduction, enhanced contrast, and a superior viewing experience across various content types. Experiment with different methods to find the approach that best suits your needs and preferences for enjoying movies, sports, gaming, and more on your TV.
Optimizing for Different Content Types
To get the best viewing experience from your Sony LED TV, it's essential to optimize settings based on the type of content you're watching. Here's how to adjust your TV settings for different content types:
1. Movies and TV Shows:
Picture Mode: Use the "Cinema" or "Movie" mode for watching movies and TV shows. These modes are designed to deliver a cinematic experience with natural colors and balanced brightness.
Brightness and Contrast: Adjust brightness to suit the lighting conditions in your room. Increase contrast to enhance details in both dark and bright scenes without losing shadow detail.
Color Temperature: Choose a warmer color temperature (e.g., "Warm" or "Neutral") to replicate the natural colors seen in movies and TV shows filmed in controlled lighting conditions.
Motion Settings: Disable motion smoothing (Motionflow) or set it to a minimal level to maintain the film's original frame rate and avoid the "soap opera effect."
2. Sports and Fast-Moving Content:
Picture Mode: Select the "Sports" mode or use a custom mode with enhanced motion settings.
Motionflow: Enable Motionflow with a higher setting (e.g., "Smooth" or "Clear") to reduce motion blur and ensure smooth playback of fast-paced action scenes.
Sharpness: Increase sharpness slightly to enhance details of fast-moving objects, such as players in a sports game.
Color and Contrast: Boost color saturation and contrast to make uniforms and fields vivid and detailed.
3. Gaming:
Picture Mode: Switch to "Game" mode for minimal input lag and faster response times between your controller and the screen.
Motion Settings: Disable or minimize Motionflow to reduce input lag and maintain responsiveness during gameplay.
HDR Settings: Enable HDR (High Dynamic Range) if your game console and game support it to enhance color depth and contrast.
Sharpness and Clarity: Adjust sharpness to enhance visibility of in-game details without introducing artifacts or noise.
Brightness: Ensure brightness is adjusted to provide optimal visibility in dark or shadowy areas of the game.
4. Streaming and Online Content:
Picture Mode: Use the "Standard" or "Vivid" mode for streaming content, as these modes often enhance colors and brightness for digital content.
Internet Connection: Ensure a stable and fast internet connection for streaming high-definition content without interruptions or buffering.
Resolution Settings: Adjust TV settings to match the resolution and frame rate of the streaming content (e.g., 1080p, 4K) for the best picture quality.
Audio Settings: Consider using external speakers or a soundbar to enhance audio quality for streaming movies and music.
5. HDR Content:
HDR Settings: Enable HDR mode on your TV and adjust HDR settings (e.g., HDR10, Dolby Vision) based on the content being played.
Color Settings: Ensure color settings are optimized to display a wider range of colors and achieve deeper contrast in HDR content.
Backlight and Local Dimming: Increase backlight and enable local dimming to enhance brightness and contrast in HDR scenes while preserving black levels.
6. Blu-ray and DVD Playback:
Picture Mode: Choose the "Cinema" or "Movie" mode for watching Blu-ray and DVD movies to replicate the director's intended color and brightness levels.
Resolution Settings: Adjust settings to match the resolution of the disc (e.g., 1080p for Blu-ray, 480p for DVD) for optimal playback quality.
Audio Settings: Connect to a home theater system or soundbar for immersive surround sound during movie playback.
By optimizing your Sony LED TV settings for different content types, you can enjoy an enhanced viewing experience with accurate colors, detailed images, and smooth motion across a variety of entertainment sources. Adjust settings based on your viewing environment and personal preferences to achieve the best possible picture quality for each type of content.
Maintaining Optimal Picture Quality
Maintaining optimal picture quality on your Sony LED TV involves regular upkeep and adjustments to ensure consistent performance over time. Here are some tips to help you maintain and enhance your viewing experience:
1. Regular Calibration:
Purpose: Regularly recalibrate your TV settings using calibration tools or professional services to ensure accurate color reproduction, brightness, and contrast.
Frequency: Aim to recalibrate every 6-12 months or whenever you notice significant changes in picture quality.
2. Firmware Updates:
Purpose: Keep your TV's firmware up to date to access the latest features, improvements, and bug fixes.
Procedure: Check for updates regularly through your TV's settings menu or manufacturer's website. Enable automatic updates for convenience.
3. Screen Cleaning:
Purpose: Clean the screen periodically to remove dust, fingerprints, and smudges that can affect picture clarity.
Method: Use a soft, lint-free cloth slightly dampened with water or a screen cleaning solution specifically designed for TVs. Avoid abrasive cleaners or rough materials that can scratch the screen.
4. Ambient Lighting Control:
Purpose: Minimize ambient light sources that can cause glare or affect color perception on the screen.
Method: Use curtains, blinds, or ambient lighting control to reduce reflections and maintain optimal viewing conditions, especially in rooms with windows or bright lights.
5. Temperature and Ventilation:
Purpose: Ensure proper ventilation around the TV to prevent overheating and maintain component performance.
Method: Place the TV in a well-ventilated area with adequate space around it. Avoid blocking ventilation slots or placing objects on top of the TV that could obstruct airflow.
6. Power Management:
Purpose: Protect your TV from power surges and fluctuations that can damage internal components and affect performance.
Method: Use a surge protector or uninterruptible power supply (UPS) to stabilize voltage and protect against sudden power spikes. Power off the TV completely during extended periods of non-use.
7. Usage and Settings Adjustment:
Purpose: Adjust settings based on content type, viewing environment, and personal preference to optimize picture quality.
Method: Experiment with different picture modes (e.g., Cinema, Sports, Game) and adjust settings such as brightness, contrast, color temperature, and motion settings to suit specific viewing conditions and content types.
8. Avoid Screen Burn-in:
Purpose: Prevent permanent image retention or burn-in, especially with static images or logos displayed for extended periods.
Method: Enable features like screen savers or pixel shifters if available. Avoid leaving static images on the screen for prolonged periods, especially at high brightness levels.
9. Audio-Visual Equipment Compatibility:
Purpose: Ensure compatibility and optimal performance when connecting external audio-visual devices (e.g., gaming consoles, Blu-ray players).
Method: Use high-quality HDMI cables and check settings to match the capabilities of connected devices (e.g., HDR settings for HDR content, audio settings for surround sound).
By following these maintenance tips and practices, you can prolong the lifespan of your Sony LED TV while consistently enjoying high-quality picture performance for movies, sports, gaming, and other entertainment activities. Regular care and adjustments will help maintain optimal viewing conditions and ensure a satisfying viewing experience over time.
Conclusion
Achieving the best picture quality on your Sony LED TV is not just about adjusting settings; it's about creating an immersive viewing experience that enhances every moment of your favorite movies, shows, and games. By following the tips and techniques outlined in this guide, you can optimize your TV settings to match different content types and viewing environments.
Regular calibration using professional tools or calibration discs ensures accurate color reproduction and optimal brightness levels. Keeping your TV's firmware updated and maintaining ambient lighting control also contribute to maintaining consistent picture quality over time.
Remember, the right settings can make a significant difference in how you enjoy your entertainment. Whether you're watching a blockbuster movie, cheering on your favorite sports team, or diving into a gaming session, fine-tuning your Sony LED TV settings ensures that every detail shines through with clarity and vibrancy.
With these strategies, you can create a personalized viewing experience that brings your entertainment to life, delivering the cinematic and immersive quality you expect from your Sony LED TV.
0 notes
Text
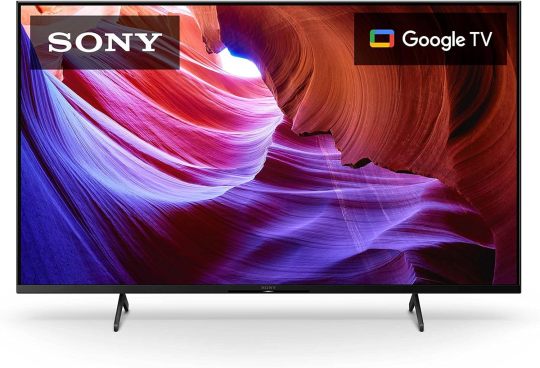
Home Theater Hero: Our Review of the Sony 4K HDR X85K Series TV
Calling all movie buffs, gamers, and binge-watchers! Our team recently put the Sony 4K HDR X85K Series TV to the test, and let's just say, it's a home theater game-changer. Here's our honest review:
Picture Perfection: Immerse yourself in stunning visuals! The X85K boasts 4K HDR resolution, bringing movies and shows to life with incredible detail and vibrant colors. From action-packed blockbusters to nature documentaries, prepare to be wowed.
Color Explosion: Get ready for a feast for your eyes! TRILUMINOS PRO™ technology delivers a wider range of colors, making them richer, more natural, and closer to what the human eye sees. It's like watching your favorite content through a magical window to reality.
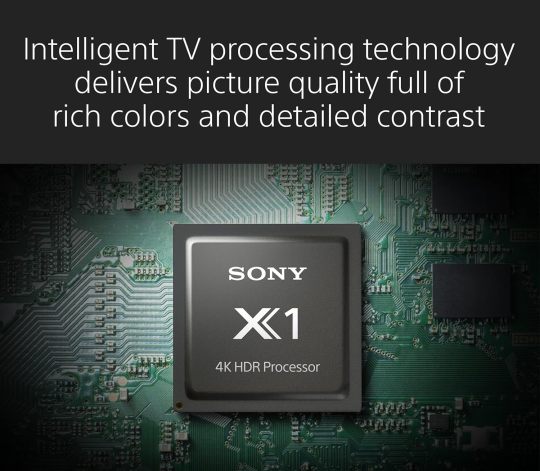
Clarity Champion: Don't miss a single detail! The X1™ 4K HDR Processor works its magic, enhancing clarity and sharpness, especially in fast-moving scenes. Whether you're spotting sneaky villains or appreciating intricate landscapes, this TV won't let you down.
Sound Sensation: Experience immersive audio that pulls you right into the action. Dolby Vision™ and Dolby Atmos™ create a cinematic soundscape, surrounding you with sound that moves with the picture. It's like having your own personal theater, minus the popcorn crumbs (hopefully!).
Motion Master: Say goodbye to blurry action sequences! Motionflow™ XR technology ensures smooth, realistic motion, even in the most intense scenes. So, buckle up for adrenaline-pumping chases and heart-stopping battles – all without motion sickness!
Smart & Streamlined: Ditch the remote jungle! Google TV built-in gives you access to a vast library of streaming content, all easily organized and searchable. Plus, hands-free voice control with Google Assistant lets you navigate, search, and even control smart home devices – all with your voice. How's that for convenience?
A Few Things to Consider:
The price might be a sticking point for some, depending on the screen size you choose. While the sound is impressive, some users might prefer an additional soundbar for an even more cinematic experience.
Overall Verdict:
If you're looking for a top-notch TV that delivers stunning visuals, immersive sound, and smart features, the Sony 4K HDR X85K Series is a worthy contender. It offers exceptional picture quality, powerful audio, and seamless streaming capabilities, making it a great investment for movie nights, gaming marathons, and all your entertainment needs.
Have you tried the Sony 4K HDR X85K Series TV? Share your thoughts in the comments!
#sony #SmartTV #sonyx85k #4KTVs #hdr #pictureperfect #ImmersiveSound #SmartTV #hometheaterhero #WorthTheInvestment #productwave
#technology#smart home devices#sony#smart tv#4k#hdr#picture perfect#home theater#worth it#productwave
0 notes
Text
Sony Bravia 139 cm (55 inches) 4K Ultra HD Smart LED Google TV KD-55X80K (Black)
Sony Bravia 139 cm (55 inches) Price: (as of – Details) From the manufacturer 1 Powerful Processor 2 4K HDR 3 Triluminos PRO 4 Object Based HDR 5 Motionflow XR 800 1 20W X-Balanced Speakers 2 Dolby Atmos 3 Clear Audio+ 4 Sound Optimization 1 Gaming Redefined 2 Auto Game Mode 3 Dolby Vision 4 HDR Tone Mapping 5 ALLM 1 Google TV 2 Personalized For You 3 Create Watchlist 4 One Button Access 5 New…
View On WordPress
0 notes
Text
Watching Avatar on a TV that has in built crappy framerate interpolation is killing me. Sony MotionFlow is so awful wtf!
1 note
·
View note
Text
Best Settings for Sony Bravia TV

The optimal settings for a Sony Bravia TV depend on various factors including the specific Bravia model, the lighting conditions of the room, and the type of content you're viewing (e.g., movies, sports, or gaming). However, here's a general guideline for some common settings: 1. Picture Mode: This is the first and most crucial setting. - General Viewing: 'Standard' or 'Custom' - Movies: 'Cinema' or 'Movie' - Gaming: 'Game' or 'Graphics' (this mode typically reduces input lag) 2. Brightness/Backlight: Adjust based on room lighting. - Bright Room: Increase the backlight to improve visibility. - Dark Room: Decrease the backlight to a comfortable level, which can also enhance black levels. 3. Contrast: Adjust to around 90 to 100 for most content. This will give a richer image without causing loss of detail in bright areas. 4. Color: Typically, a value around 50-60 is natural. Adjusting too high can lead to oversaturated, unnatural colors. 5. Hue: Generally best left at 0 or the middle setting. 6. Sharpness: Be cautious with this setting; too high can lead to an artificial look. For 4K content, you can often reduce this to a minimal value. 7. Color Temperature: - Cool: Gives a bluish tint – better for brightly lit rooms. - Neutral: Balances blue and red. - Warm: Gives a reddish tint - ideal for dark rooms and cinematic content. 8. Motion Settings: (e.g., MotionFlow on some Sony TVs) - Movies: Consider turning it off or setting it to 'True Cinema' or 'Film Mode' to avoid the 'soap opera effect.' - Sports or Fast Action: Use a medium or high setting to reduce motion blur. 9. Advanced Settings (like gamma, black level, etc.): - Best left at default for general users, but those looking to fine-tune the image can adjust based on personal preferences. 10. Sound: Depending on your room and setup, you might opt for: - Standard: For regular TV programming. - Cinema: For movies. - Music/Sports: Depending on the content. - Game: If you're gaming. Remember: - It's essential to play around with these settings and adjust based on personal preference. The optimal setting for one person might not be the best for another. - If the TV is placed in a room with varying light conditions, consider enabling the 'Ambient Light Sensor' or similar features. It adjusts the TV's brightness based on room lighting. - Periodically, manufacturers might update the firmware of the TV, which can sometimes lead to better performance or added features. Ensure your TV's firmware is up to date. - For professional calibration, consider hiring a certified technician who can use specialized tools to optimize your TV's settings. Lastly, some newer Sony Bravia models come with a calibration feature, which uses a connected camera to adjust the settings based on the room's conditions. If your model supports this, it can be an excellent way to achieve optimal settings. Read the full article
0 notes
Video
youtube
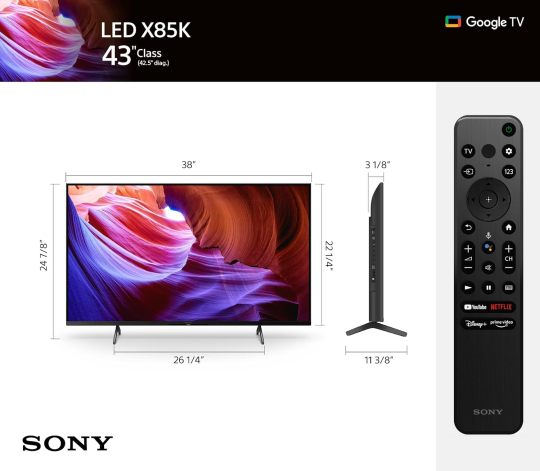
Sony 43 Inch 4K Ultra HD TV Review – PROS & CONS - X85K Series LED Smart
Sony 43 Inch 4K Ultra HD TV X85K Series: LED Smart Google TV(Bluetooth, Wi-Fi, USB, Ethernet, HDMI) with Dolby Vision HDR and Native 120HZ Refresh Rate KD43X85K- 2022 Model, Black
INTELLIGENT TV PROCESSING– The 4K HDR Processor X1 delivers a picture that is smooth and clear, full of rich colors and detailed contrast.Image Aspect ratio:16:9.Controller type:Voice Control
INTELLIGENT MOTION HANDLING – See blur-free picture quality in fast-moving sports and action-packed movies with native 120Hz refresh rate and Motionflow XR technology. Display Off Mode helps save energy by turning the picture display off without needing to put the TV into full stand-by mode, so audio can still be enjoyed
WIDE SPECTRUM OF COLORS- Reproduces over a billion accurate colors resulting in picture quality that is natural and precise, and closer than ever to real life, enhanced by TRILUMINOS Pro
PREMIUM SMART TV– Google TV with Google Assistant organizes your favorite content all in one place. Stream from Prime Video, Netflix, Disney+, Apple TV, HBO Max, Peacock and many more. Also, stream from your Apple device with AirPlay 2 support.
ENHANCED ENTERTAINMENT– Experience immersive and engaging cinematic content as the creator intended with support for Dolby Vision & Atmos.
ALL YOUR GAME SETTINGS IN ONE PLACE– Game Menu puts all your gaming picture settings and exclusive assist features in a single easy-to-manage interface.
ENHANCED GAMING PICTURE QUALITY– Enhance your gaming experience with exclusive features for the PlayStation 5 to improve gaming picture quality.
0 notes
Text
Price: [price_with_discount] (as of [price_update_date] - Details) [ad_1] From the manufacturer 1 Powerful Processor 2 4K HDR 3 Live Color 4 4K X Reality PRO 5 Motionflow XR The video showcases the product in use.The video guides you through product setup.The video compares multiple products.The video shows the product being unpacked. 1 OPEN BAFFLE SPEAKER 2 Dolby Audio 3 Clear Phase 1 APPLE AIR PLAY 2 Google Kids Care 3 Create Watchlist 4 Personalized For You 5 Google TV 1 BLUETOOTH (A2DP) 2 Works With Alexa 3 CHROMECAST BUILT-IN 4 X-Protection PRO Resolution: 4K Ultra HD (3840 x 2160) | Refresh Rate: 60 Hertz | 178 Degree wide viewing angle Connectivity: 3 HDMI ports to connect set top box, Blu Ray players, gaming console | 1 USB ports to connect hard drives and other USB devices Sound : 20 Watts Output | Open Baffle Speaker| Dolby Audio | Clear Phase Smart TV Features: Google TV, Watchlist, Voice Search, Google Play, Chromecast Built-In, Netflix, Amazon Prime Video, Additional Features: Apple Airplay, Apple Homekit, Alexa | Supported Apps: Netflix, Amazon Prime Video, Disney+ Hotstar, Sony Liv, Zee5 Display: X1 4K Processor | 4K HDR | Live Colour| 4K X Reality Pro | Motion Flow XR100 Warranty Information: 1 Year comprehensive warranty on product provided by the brand from the date of purchase [ad_2]
0 notes
Text
That's because it is wrong. Very, very wrong.
This is using algorithmic generation to create frames where they didn't exist. Star Wars: Episode I: The Phantom Menace, like most films, was shot in 24 frames per second. So this means that almost two-thirds of the frames in this video are wholesale invented by algorithms. 40% of what you are seeing in that video doesn't exist and never did.
Even with that high of a percentage, the human eye can't really see what's wrong specifically, but there is a general perception of "Something's wrong here". But if you stop on specific frames, you can pinpoint some stuff...
Just in general some stuff you can spot is the digital compression artifacts in the backgrounds that are out of focus are far worse than you'd expect them to be because the algorithms used aren't good at recognizing when something is intentionally out of focus. So stuff "wibbles" more between frames which the compression doesn't like.
But some specific examples...

Lightsabers in a lot of scenes become blobby because they already have a lot of motion blur on them. Adding more via algorithm makes them look like that mess.

This beige blob is Qui-Gon leaping from a higher platform onto that one below. Good luck identifying that as a human!

Only one character in this scene has an ignited lightsaber.
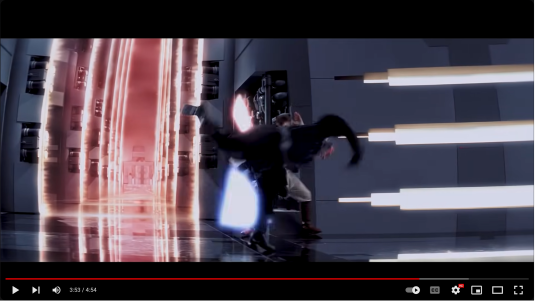
More blobby lightsabers and Darth Maul's arm is doing things that a human (or even a zabrek) arm should not do unless it's been broken in multiple places or The Force can turn you into Reed Richards.
And if you want the strongest example, go to 4 minutes 29 seconds in the video and look at the closeups of Obi-wan and Darth Maul's faces. They have stark expression changes both on screen and the algorithm is trying and failing to keep up with them. It's downright unsettling to watch because it feels like their faces are made of putty.
This is also why turning off the Motion Smoothing/TrueMotion/MotionFlow/Intelligent Frame Creation/etc. modes on your television is important - it's a real-time version of this running on much less powerful hardware and why the picture will always look somehow "wrong".
youtube
…Okay, this (the so-called “Duel of the Fates” upmastered to 60 frames per second) just looks wrong to me.
Must look at it on a bigger screen in the morning and see if this issue persists..
118 notes
·
View notes
Link
Check out this listing I just added to my Poshmark closet: Women's Grand Slam 3-Pocket Golf Bermuda Shorts black size 6 NWT.
0 notes
Text
Sony VPL-HW45ES Home Theater Projector

Of course, the Sony VPL-HW45ES Home Theater Projector is one of the most popular models in its class. For more than 3 years, it successfully competes in the segment of Full HD projectors. Today VPL-HW45ES is the most inexpensive SXRD (Silicon X-tal Reflective Display) model from Sony and can be positioned between VPL-HW40ES and VPL-HW65ES in this series. These models have almost the same design.

As known, SXRD technology was developed by Sony and uses LCoS (Liquid Crystal on Silicon) image technology. Basically, LCoS can be positioned as a hybrid of 3LCD and DLP technologies. In fact, the LCoS matrix is a liquid crystal film or LCD matrix on the mirror. Today, many experts consider this technology the most promising. The list of its pros includes deep black and, accordingly, contrast ratio and resolution, small input lag, resistance to high temperatures, lack of flicker, Screen-door and rainbow effect. Unfortunately, this technology has some cons, including high price, weight, size, fan noise and limited lamp service life. Of course, all these factors affect the choice of the optimal projector.
VPL-HW45ES
Projector provides Full HD 1920 x 1080 resolution with Rec.709 color rendering. Model uses Advanced Reality Creation processing technology that refines subtle details, colors and textures.

The manual zoom lens with a 1.6x zoom ratio and wide lens shift range simplifies installation in any room, even with high ceilings. Two control dial provide a simple and effective adjustment of the vertical and horizontal lens shifts.

But vertical adjustment requires periodic correction due to lens displacement during each the projector moving. Vent holes in the front allow the user to place the projector very close to the wall or in the deaf niches without risk of overheating, which is especially convenient for a small room. Buttons of the remote control have a backlight. Unfortunately, VPL-HW45ES does not support 4K UHD signal and does not display the UHD image from Blu-ray. But projector has a powerful modern processor and uses advanced technologies from Sony for upscaling video with a lower resolution. Unfortunately, VPL-HW45ES does not support 4K UHD signal and does not display the UHD image from Blu-ray. But projector has powerful picture calibration features depending on the content. This system offers nine unique modes including a variety of cinema, gaming, photo and user customizable pre-sets.

Besides, projector provides an excellent black level in medium-dark conditions. Its non-ideality is only slightly manifested in a completely darkened room. Model uses Motion Flow mode with three settings or True Cinema mode in user settings for playback of the highly dynamic scenes without distortion.

But, the projector provides a resolution of 340 lines even without the use of Motion Flow.
Features
Contrast Enhancer technology provides auto-adjustment of the contrast depending on the screen image. Improved Reality Creation system has a huge database for image upscaling, increasing sharpness and filtering noise. Unfortunately, Cinema Black Pro does not use dynamic iris, but it effectively increases the contrast. White Balance and CMS calibration are located in the menu. Factory settings are traditionally excellent for Sony. The error in the gray scale is less than 2 and is visually invisible. Testing the color gamut also demonstrates an excellent result. Low level of black is the traditional drawback of the projectors in this price segment. But the VPL-HW45ES provides a sufficiently high-quality black color without gray or blue shades. A slight decrease in detail is present only in the darkest image parts. As known, SXRD (LCoS) technology today provides the highest contrast ratio compared to other technologies. This is due to the use of silicon mirrors as a substrate. Such matrix is much thinner compared to matrix in traditional 3LCD technology that works on the light pass. Therefore, all SXRD models provide an improved range of image contrast. VPL-HW45ES supports a 3D mode with very high quality without crosstalk and false images. The color rendering accuracy is very high even with factory settings and at a higher brightness. Leo Bodnar Tester demonstrates the input lag no more than 23.7 ms with activated function of its decrease. For comparison, this indicator in models of a similar class varies from 40 to 70 ms. Therefore, the model is perfect for fans of computer games on the big screen. The projector fully supports AMX Dynamic Device Discovery Protocol for integration with other intelligent systems at home.
PROS & CONS
The lamp service life is 6000 hours in ECO mode. The image brightness reaches of 1800 ANSI lm in normal mode. Unfortunately, the test result was only 900 ANSI lm after calibration. On the other hand, that's enough to create a cinematic image in a room with light walls and a diffused light. But, of course, comfortable 3D viewing requires an increase in brightness. The noise level in ECO mode does not exceed 22 dB. Of course, this is an excellent result. PROS - deep black; - high accuracy of color rendering; - good detailing even in the dark image area; - wide dynamic range; - powerful video processor; - very low noise level; - very wide range of image contrast; - remote control with backlight; - large set of video processing functions; - excellent playback of highly dynamic scenes; - 9 Picture Calibration Modes; - built-in RF transmitter synchronizes with any RF 3D glasses; - very small input lag for gaming mode; - high sharpness; - high quality of factory settings; - support for AMX Dynamic Device Discovery Protocol; - excellent 3-D playback. CONS - complexity of accurate focusing; - calibration reduces real brightness to 900 ANSI Lm; - vertical displacement of the lens during the movement; - no built-in speakers; - limited set of connectors; - no support for 4K UHD and UHD from Blu-ray. This video shows features of Sony VPL-HW45ES Home Theater Projector. Read the full article
#AdvancedRealityCreationtechnology#AMXDynamicDeviceDiscoveryProtocol#CinemaBlackPro#CMScalibration#ContrastEnhancertechnology#LCoS#LeoBodnarTester#LiquidCrystalonSilicon#MotionFlow#PictureCalibrationModes#RealityCreationprocessingtechnology#SiliconX-talReflectiveDisplay#SonyVPL-HW45ESHomeTheaterProjector#SonyVPL-HW45ESprojector#SXRD
0 notes
Text
24% OFF Sony BRAVIA KD49X70 49-inch 4K Ultra HD TV 2020 Model • UK
Hot Deal 24% OFF Sony BRAVIA KD49X70 - 49-inch - LED - 4K Ultra HD TV 2020 Model.
Get the most out of what you watch in 4K HDR - 4K delivers four times the resolution of Full HD meaning you can enjoy greater clarity and detail for amazingly realistic pictures
More contrast and clarity - Sony's 4K X Reality Pro picture engine will upscale every pixel* in a scene to give you remarkable clarity and with Motionflow XR 200Hz (Native 50Hz) so fast paced scenes appear smooth so you'll never miss a beat *quality of upscaled picture will vary depending on the input source
Vivid real world colour - By widening the colour spectrum our TRILUMINOS Display reproduces more colours than a conventional television
Smart TV - Enjoy Netflix Prime Video YouTube plus a whole range of other apps and catch-up services and browse the internet using the built-in web browser*Netflix streaming membership required Prime membership required Apps and services availability varies by region and device Third party services and content may be subject to terms & conditions and payment and may be changed interrupted or discontinued at any time
Beautifully designed 49X70 - The narrow bezel gives the KD-49X70 a refined look that blends harmoniously into any contemporary environment
BUY HERE
#Sony BRAVIA KD49X70#Sony KD49X70#Sony BRAVIA KD49X70 TV#Sony BRAVIA KD49X70 4K TV#4K TV#UHD TV#49-inch 4K TV#Sony
1 note
·
View note