#MySQLAdmin
Explore tagged Tumblr posts
Visit Tumblr Blog
Explore Tumblr blogs with no restrictions, modern design and the best experience.
Last Seen Tumblr Blogs


Fun Fact
Tumblr Inc. has $15.1M in annual revenue.
Text
MySQL is an open-source relational database management system (RDBMS) that is widely used for storing, managing, and retrieving data efficiently. It is one of the most popular database systems, known for its speed, reliability, and ease of use. MySQL is commonly used in web development, powering applications such as WordPress, Facebook, and many others.
#MySQL#Database#SQL#DatabaseManagement#TechEducation#MySQLTutorial#SQLDatabase#TechBooks#DataManagement#MySQLForBeginners#TechLearning#RelationalDatabase#DatabaseDesign#MySQLQueries#CRUDOperations#DatabaseOptimization#MySQLDatabase#WebDevelopment#TechTutorial#BackendDevelopment#MySQLAdmin#DatabaseSecurity#DataModeling#MySQLTips#WebAppDevelopment#MySQLBestPractices
0 notes
Text
Hướng dẫn fix thấy log mysqld.log hoặc error.log là dấu hiệu bất thường
🌿 Không thấy log mysqld.log hoặc error.log là dấu hiệu bất thường – rất có thể MySQL/MariaDB chưa khởi động đủ để tạo log hoặc log bị định hướng nơi khác 😲 👉 Hãy thử các bước kiểm tra sau đây để tìm đúng log lỗi: ✅ 1. Tìm vị trí file log thực sự Chạy lệnh sau để xem MySQL đang cấu hình log ở đâu: mysqladmin variables | grep log_error hoặc (nếu chưa login được): grep log-error /etc/my.cnf…
0 notes
Text
Nozioni Informatica

Installazione di MYSQL e PHP 5
MySQL è un database relazione largamente adoperato nella scrittura di siti e Web Application soprattutto insieme al suo ormai consolidato braccio destro linguaggio di programmazione PHP.
La sintassi adoperata è la SQL, attraverso cui è possibile gestire dati memorizzati sottoforma di database regolati dal modello relazionale. Come per Apache, l’installazione su Debian Lenny è un
gioco da ragazzi. Da shell, con privilegi di root, invocheremo nuovamente apt-get come di seguito:
# apt-get install mysql-server
Al termine della procedura di installazione imposteremo una password per MySQL relativa all’utente root digitando da shell:
# mysqladmin -u root password
‘PASSWORD’
https://informaticaguide.altervista.org/mysql-e-php-installazione/
1 note
·
View note
Text
Best Project Center Installing MySQL on Windows
The default installation on any version of Windows is now much easier than it used to be, as MySQL now comes neatly packaged with an installer. Simply download the installer package, unzip it anywhere and run the setup.exe file. Best project center in Tirunelveli, the default installer setup.exe will walk you through the trivial process and by default will install everything under C:\mysql. Test the server by firing it up from the command prompt the first time. Go to the location of the MySQL server which is probably C:\mysql\bin, and type:
Verifying MySQL Installation
After MySQL, has been successfully installed, the base tables have been initialized and the server has been started; you can verify that everything is working as it should be via some simple tests. Use the mysqladmin Utility to Obtain Server Status Use mysqladmin binary to check the server version. This binary would be available in /usr/bin on linux and in C:\mysql\bin on windows.
[root@host]# mysqladmin --version
It will produce the following result on Linux. It may vary depending on your installation:
mysqladmin Ver 8.23 Distrib 5.0.9-0, for redhat-linux-gnu on i386
If you do not get such a message, then there may be some problem in your installation and you would need some help to fix it.
Execute simple SQL commands using the MySQL Client
You can connect to your MySQL server through the MySQL client and by using the mysql command. At this moment, you do not need to give any password as by default it will be set as blank. You can just use following command
[root@host]# mysql
It should be rewarded with a mysql> prompt. Now, you are connected to the MySQL server and you can execute all the SQL commands at the mysql> prompt as follows:
mysql> SHOW DATABASES;
+----------+
| Database |
+----------+
| mysql |
| test |
+----------+
2 rows in set (0.13 sec)
Post-installation Steps
MySQL ships with a blank password for the root MySQL user, best project center in Tirunelveli. As soon as you have successfully installed the database and the client, you need to set a root password as given in the following code block:
[root@host]# mysqladmin -u root password "new_password";
Now to make a connection to your MySQL server, you would have to use the following command:
[root@host]# mysql -u root -p Enter password:*******
UNIX users will also want to put your MySQL directory in your PATH, so you won't have to keep typing out the full path every time you want to use the command-line client.
1 note
·
View note
Text
Installing Nginx, MySQL, PHP (LEMP) Stack on Ubuntu 18.04

Ubuntu Server 18.04 LTS (TunzaDev) is finally here and is being rolled out across VPS hosts such as DigitalOcean and AWS. In this guide, we will install a LEMP Stack (Nginx, MySQL, PHP) and configure a web server.
Prerequisites
You should use a non-root user account with sudo privileges. Please see the Initial server setup for Ubuntu 18.04 guide for more details.
1. Install Nginx
Let’s begin by updating the package lists and installing Nginx on Ubuntu 18.04. Below we have two commands separated by &&. The first command will update the package lists to ensure you get the latest version and dependencies for Nginx. The second command will then download and install Nginx.
sudo apt update && sudo apt install nginx
Once installed, check to see if the Nginx service is running.
sudo service nginx status
If Nginx is running correctly, you should see a green Active state below.
● nginx.service - A high performance web server and a reverse proxy server Loaded: loaded (/lib/systemd/system/nginx.service; enabled; vendor preset: enabled) Active: active (running) since Wed 2018-05-09 20:42:29 UTC; 2min 39s ago Docs: man:nginx(8) Process: 27688 ExecStart=/usr/sbin/nginx -g daemon on; master_process on; (code=exited, status=0/SUCCESS) Process: 27681 ExecStartPre=/usr/sbin/nginx -t -q -g daemon on; master_process on; (code=exited, status=0/SUCCESS) Main PID: 27693 (nginx) Tasks: 2 (limit: 1153) CGroup: /system.slice/nginx.service ├─27693 nginx: master process /usr/sbin/nginx -g daemon on; master_process on; └─27695 nginx: worker process
You may need to press q to exit the service status.
2. Configure Firewall
If you haven’t already done so, it is recommended that you enable the ufw firewall and add a rule for Nginx. Before enabling ufw firewall, make sure you add a rule for SSH, otherwise you may get locked out of your server if you’re connected remotely.
sudo ufw allow OpenSSH
If you get an error “ERROR: could find a profile matching openSSH”, this probably means you are not configuring the server remotely and can ignore it.
Now add a rule for Nginx.
sudo ufw allow 'Nginx HTTP'
Rule added Rule added (v6)
Enable ufw firewall.
sudo ufw enable
Press y when asked to proceed.
Now check the firewall status.
sudo ufw status
Status: active To Action From -- ------ ---- OpenSSH ALLOW Anywhere Nginx HTTP ALLOW Anywhere OpenSSH (v6) ALLOW Anywhere (v6) Nginx HTTP (v6) ALLOW Anywhere (v6)
That’s it! Your Nginx web server on Ubuntu 18.04 should now be ready.
3. Test Nginx
Go to your web browser and visit your domain or IP. If you don’t have a domain name yet and don’t know your IP, you can find out with:
sudo ifconfig | grep -Eo 'inet (addr:)?([0-9]*\.){3}[0-9]*' | grep -Eo '([0-9]*\.){3}[0-9]*' | grep -v '127.0.0.1'
You can find this Nginx default welcome page in the document root directory /var/www/html. To edit this file in nano text editor:
sudo nano /var/www/html/index.nginx-debian.html
To save and close nano, press CTRL + X and then press y and ENTER to save changes.
Your Nginx web server is ready to go! You can now add your own html files and images the the /var/www/html directory as you please.
However, you should acquaint yourself with and set up at least one Server Block for Nginx as most of our Ubuntu 18.04 guides are written with Server Blocks in mind. Please see article Installing Nginx on Ubuntu 18.04 with Multiple Domains. Server Blocks allow you to host multiple web sites/domains on one server. Even if you only ever intend on hosting one website or one domain, it’s still a good idea to configure at least one Server Block.
If you don’t want to set up Server Blocks, continue to the next step to set up MySQL.
4. Install MySQL
Let’s begin by updating the package lists and installing MySQL on Ubuntu 18.04. Below we have two commands separated by &&. The first command will update the package lists to ensure you get the latest version and dependencies for MySQL. The second command will then download and install MySQL.
sudo apt update && sudo apt install mysql-server
Press y and ENTER when prompted to install the MySQL package.
Once the package installer has finished, we can check to see if the MySQL service is running.
sudo service mysql status
If running, you will see a green Active status like below.
● mysql.service - MySQL Community Server Loaded: loaded (/lib/systemd/system/mysql.service; enabled; vendor preset: enabled) Active: active (running) since since Wed 2018-05-09 21:10:24 UTC; 16s ago Main PID: 30545 (mysqld) Tasks: 27 (limit: 1153) CGroup: /system.slice/mysql.service └─30545 /usr/sbin/mysqld --daemonize --pid-file=/run/mysqld/mysqld.pid
You may need to press q to exit the service status.
5. Configure MySQL Security
You should now run mysql_secure_installation to configure security for your MySQL server.
sudo mysql_secure_installation
If you created a root password in Step 1, you may be prompted to enter it here. Otherwise you will be asked to create one. (Generate a password here)
You will be asked if you want to set up the Validate Password Plugin. It’s not really necessary unless you want to enforce strict password policies for some reason.
Securing the MySQL server deployment. Connecting to MySQL using a blank password. VALIDATE PASSWORD PLUGIN can be used to test passwords and improve security. It checks the strength of password and allows the users to set only those passwords which are secure enough. Would you like to setup VALIDATE PASSWORD plugin? Press y|Y for Yes, any other key for No:
Press n and ENTER here if you don’t want to set up the validate password plugin.
Please set the password for root here. New password: Re-enter new password:
If you didn’t create a root password in Step 1, you must now create one here.
Generate a strong password and enter it. Note that when you enter passwords in Linux, nothing will show as you are typing (no stars or dots).
By default, a MySQL installation has an anonymous user, allowing anyone to log into MySQL without having to have a user account created for them. This is intended only for testing, and to make the installation go a bit smoother. You should remove them before moving into a production environment. Remove anonymous users? (Press y|Y for Yes, any other key for No) :
Press y and ENTER to remove anonymous users.
Normally, root should only be allowed to connect from 'localhost'. This ensures that someone cannot guess at the root password from the network. Disallow root login remotely? (Press y|Y for Yes, any other key for No) :
Press y and ENTER to disallow root login remotely. This will prevent bots and hackers from trying to guess the root password.
By default, MySQL comes with a database named 'test' that anyone can access. This is also intended only for testing, and should be removed before moving into a production environment. Remove test database and access to it? (Press y|Y for Yes, any other key for No) :
Press y and ENTER to remove the test database.
Reloading the privilege tables will ensure that all changes made so far will take effect immediately. Reload privilege tables now? (Press y|Y for Yes, any other key for No) :
Press y and ENTER to reload the privilege tables.
All done!
As a test, you can log into the MySQL server and run the version command.
sudo mysqladmin -p -u root version
Enter the MySQL root password you created earlier and you should see the following:
mysqladmin Ver 8.42 Distrib 5.7.22, for Linux on x86_64 Copyright (c) 2000, 2018, Oracle and/or its affiliates. All rights reserved. Oracle is a registered trademark of Oracle Corporation and/or its affiliates. Other names may be trademarks of their respective owners. Server version 5.7.22-0ubuntu18.04.1 Protocol version 10 Connection Localhost via UNIX socket UNIX socket /var/run/mysqld/mysqld.sock Uptime: 4 min 28 sec Threads: 1 Questions: 15 Slow queries: 0 Opens: 113 Flush tables: 1 Open tables: 106 Queries per second avg: 0.055
You have now successfully installed and configured MySQL for Ubuntu 18.04! Continue to the next step to install PHP.
6. Install PHP
Unlike Apache, Nginx does not contain native PHP processing. For that we have to install PHP-FPM (FastCGI Process Manager). FPM is an alternative PHP FastCGI implementation with some additional features useful for heavy-loaded sites.
Let’s begin by updating the package lists and installing PHP-FPM on Ubuntu 18.04. We will also install php-mysql to allow PHP to communicate with the MySQL database. Below we have two commands separated by &&. The first command will update the package lists to ensure you get the latest version and dependencies for PHP-FPM and php-mysql. The second command will then download and install PHP-FPM and php-mysql. Press y and ENTER when asked to continue.
sudo apt update && sudo apt install php-fpm php-mysql
Once installed, check the PHP version.
php --version
If PHP was installed correctly, you should see something similar to below.
PHP 7.2.3-1ubuntu1 (cli) (built: Mar 14 2018 22:03:58) ( NTS ) Copyright (c) 1997-2018 The PHP Group Zend Engine v3.2.0, Copyright (c) 1998-2018 Zend Technologies with Zend OPcache v7.2.3-1ubuntu1, Copyright (c) 1999-2018, by Zend Technologies
Above we are using PHP version 7.2, though this may be a later version for you.
Depending on what version of Nginx and PHP you install, you may need to manually configure the location of the PHP socket that Nginx will connect to.
List the contents for the directory /var/run/php/
ls /var/run/php/
You should see a few entries here.
php7.2-fpm.pid php7.2-fpm.sock
Above we can see the socket is called php7.2-fpm.sock. Remember this as you may need it for the next step.
7. Configure Nginx for PHP
We now need to make some changes to our Nginx server block.
The location of the server block may vary depending on your setup. By default, it is located in /etc/nginx/sites-available/default.
However, if you have previously set up custom server blocks for multiple domains in one of our previous guides, you will need to add the PHP directives to each server block separately. A typical custom server block file location would be /etc/nginx/sites-available/mytest1.com.
For the moment, we will assume you are using the default. Edit the file in nano.
sudo nano /etc/nginx/sites-available/default
Press CTRL + W and search for index.html.
Now add index.php before index.html
/etc/nginx/sites-available/default
index index.php index.html index.htm index.nginx-debian.html;
Press CTRL + W and search for the line server_name.
Enter your server’s IP here or domain name if you have one.
/etc/nginx/sites-available/default
server_name YOUR_DOMAIN_OR_IP_HERE;
Press CTRL + W and search for the line location ~ \.php.
You will need to uncomment some lines here by removing the # signs before the lines marked in red below.
Also ensure value for fastcgi_pass socket path is correct. For example, if you installed PHP version 7.2, the socket should be: /var/run/php/php7.2-fpm.sock
If you are unsure which socket to use here, exit out of nano and run ls /var/run/php/
/etc/nginx/sites-available/default
... location ~ \.php$ { include snippets/fastcgi-php.conf; # # # With php-fpm (or other unix sockets): fastcgi_pass unix:/var/run/php/php7.2-fpm.sock; # # With php-cgi (or other tcp sockets): # fastcgi_pass 127.0.0.1:9000; } ...
Once you’ve made the necessary changes, save and close (Press CTRL + X, then press y and ENTER to confirm save)
Now check the config file to make sure there are no syntax errors. Any errors could crash the web server on restart.
sudo nginx -t
nginx: the configuration file /etc/nginx/nginx.conf syntax is ok nginx: configuration file /etc/nginx/nginx.conf test is successful
If no errors, you can reload the Nginx config.
sudo service nginx reload
8. Test PHP
To see if PHP is working correctly on Ubuntu 18.04, let’s a create a new PHP file called info.php in the document root directory. By default, this is located in /var/www/html/, or if you set up multiple domains in a previous guide, it may be located in somewhere like /var/www/mytest1.com/public_html
Once you have the correct document root directory, use the nano text editor to create a new file info.php
sudo nano /var/www/html/info.php
Type or paste the following code into the new file. (if you’re using PuTTY for Windows, right-click to paste)
/var/www/html/info.php
Save and close (Press CTRL + X, then press y and ENTER to confirm save)
You can now view this page in your web browser by visiting your server’s domain name or public IP address followed by /info.php: http://your_domain_or_IP/info.php
phpinfo() outputs a large amount of information about the current state of PHP. This includes information about PHP compilation options and extensions, the PHP version and server information.
You have now successfully installed PHP-FPM for Nginx on Ubuntu 18.04 LTS (Bionic Beaver).
Make sure to delete info.php as it contains information about the web server that could be useful to attackers.
sudo rm /var/www/html/info.php
What Next?
Now that your Ubuntu 18.04 LEMP web server is up and running, you may want to install phpMyAdmin so you can manage your MySQL server.
Installing phpMyAdmin for Nginx on Ubuntu 18.04
To set up a free SSL cert for your domain:
Configuring Let’s Encrypt SSL Cert for Nginx on Ubuntu 18.04
You may want to install and configure an FTP server
Installing an FTP server with vsftpd (Ubuntu 18.04)
We also have several other articles relating to the day-to-day management of your Ubuntu 18.04 LEMP server
Hey champ! - You’re all done!
Feel free to ask me any questions in the comments below.
Let me know in the comments if this helped. Follow Us on - Twitter - Facebook - YouTube.
1 note
·
View note
Text
SQL Server Version - a Quick Outline
The Argument About SQL Server Version
The demo edition of the computer software is in a position to save scanned MDF file in STR format but should you need to export recovered data to SQL Server database you've got to buy license edition of MS SQL Recovery Software. To be aware of the software more deeply it's possible to download the demo version of the software totally free of cost. It is possible to only get the internet edition through application hosting providers. There are some techniques to set the edition of SQL Server that's installed. There are several different versions of SQL Server 2016 and all of them are available for download for everybody that has a valid MSDN subscription. It's currently available as a free download so that you can manage any instance without requiring a complete license.
Manual technique to fix corrupted MDF file isn't so straightforward and several times it isn't able to repair due to its limitations. In that case, exitnetcat and you're going to observe the file. If you make the key database file read-only in order to acquire a read-only database and attempt to open it in a greater version, you'll receive an error 3415. The database doesn't use any 2012 specific capabilities. A MySQL database for beginners course is a great place to begin your education. Storage Engine MySQL supports lots of storage engines. Most APIs concerning user interface functionality aren't offered.
Expand Databases, then right-click the database that you would like to shrink. The database is currently upgraded. You may use an existing SQL Server database if it's already set up on the system, or put in a new instance as a portion of the SolidWorks Electrical installation.
Begin all your SharePoint solutions, now you've successfully migrated your database. You may now begin creating databases. SQL database has become the most common database utilized for every kind of business, for customer accounting or product. Choose the edition of MS SQL Database you desire. The 2008 server cannot restore SQL Server Version backups made by a 2012 server (I've tried). SQL Server 2016 have several new capabilities. SQL Server 2005 is a good example. It also includes an assortment of add-on services. Nowadays you have your whole SQL Server prepared to rock and roll so you may install SharePoint.
There are 3 things you will need to obtain a SQL Server ready. It allows you to define a Magic Table. In such case, it chooses the plan that is expected to yield the results in the shortest possible time. It also provides the optimistic concurrency control mechanism, which is similar to the multiversion concurrency control used in other databases. On the other hand, it enables developers to take advantage of row-based filtering.

Life, Death, and SQL Server Version
As stated by the SQL Server development group, the adjustments to the database engine are made to supply an architecture that will endure for the subsequent 10 decades. Clicking on the database will permit you to observe the results in detail. Probably one reason the Oracle RDBMS has managed to stay on top of mighty RDBMS is associated with its product updates which are closely tied to changes on the market. In SQL Server there are two kinds of instances. You might have associated your DB instance with an ideal security group once you created your DB instance.
When you make a new user, you need to add this to sudo user group which provides the new user with administrator privileges. You've learned how to make a new user and provide them sudo privileges. So, you've got to make a new user and provide its administrative access. The 1 thing about the main user is it has each of the privileges in the Ubuntu. If you're root user and will need to bring the public key to the particular user, change to that user by making use of the below command. If you own a client that doesn't understand the (localdb) servername then perhaps it is possible to connect over named pipes to the case.
The steps are given for the entire process of migrating SQL Server Database to lessen version. There is considerably more to upgrading your application than simply upgrading the database you should be conscious of. The computer software is a comprehensive recovery solution with its outstanding capabilities. Enterprise is suited to demanding database and company intelligence requirements.
SQL Server Version Can Be Fun for Everyone
Data change replication is a practice of dynamic synchronization. The Oracle TIMESTAMP data type can likewise be used. Even though the data is masked, it's not necessarily in the format that might have been desired. Scrubbed data can impact the efficacy of testing by skewing query benefits.
The sequence of actions essential to execute a query is known as a query program. You can also locate the version number utilizing mysqladmin command line tool. Knowing the different SQL Server build numbers is a significant item of management info.
youtube
1 note
·
View note
Text
Database ErrorHost '192.168.1.10' is blocked because of many connection errors; unblock with 'mysqladmin flush-hosts'
Error Database Error host is blocked in MariaDB or MySQL Error: Database ErrorHost '192.168.1.10' is blocked because of many connection errors; unblock with 'mysqladmin flush-hosts' Cause: MySQL/MariaDB has receive many fail/error connection requests from the given host if the number exceeds the value of the max_connect_errors parameter defined value. Then the host is blocked by Mysql/MariaDB…
View On WordPress
0 notes
Text
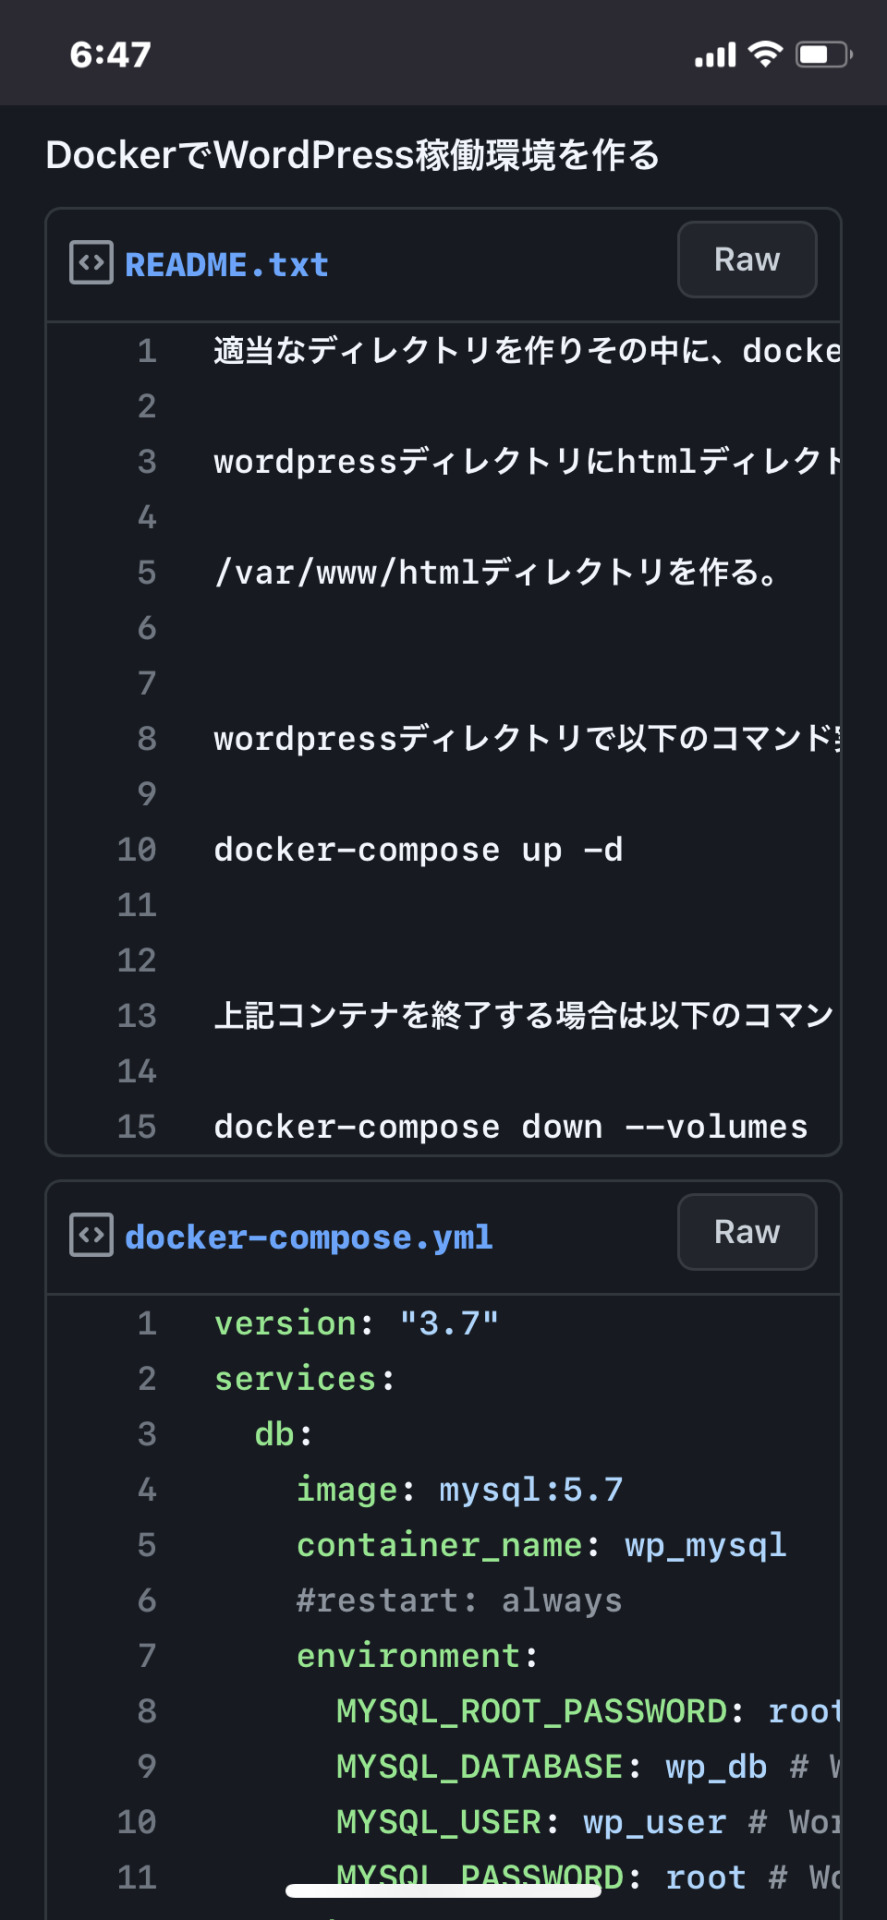
DockerでWordPress開発環境を作る
Gistるに書いておきました。 企業や個人でWordPressを使ったブログやホームページを運営している方も���いと思います。 普段使っているPCの中にDockerでMySQL、MySQLAdmin、WordPressを動かして、様々なプラグインを試したり、様々なサービスを開発したりできます。上記の方法でやればその環境が10分程度で作れてお手軽です。 うちではUbuntuで環境を作りましたが、他のディストリビューションでも手順は大差ないと思います。
View On WordPress
0 notes
Text
Create Local Mysql Database Mac

Create Mysql Database On Local Machine
Create Local Mysql Database Macro
Create Local Mysql Database Macros
Create Local Mysql Database Mac Os
Whether you are a seasoned PHP / MySQL developer, or a beginner, it really helps to have a local development environment. This allows you to test your code as you develop your web application before publishing it 'live' to the Internet.
Choose a remote MySQL connection method. You can use either of the following methods to access your MySQL databases remotely: SSH tunnel: This is the more secure method. You set up an SSH tunnel that forwards a port on your local computer to the remote MySQL server.
Mysql -u root -p'root' -h 127.0.0.1 -P 3306 -D local no space after -p as specified in the documentation It will take you to the mysql console directly by switching to the mentioned database. In this quickstart, you connect to an Azure Database for MySQL by using Node.js. You then use SQL statements to query, insert, update, and delete data in the database from Mac, Ubuntu Linux, and Windows platforms. This topic assumes that you're familiar with developing using Node.js, but you're new to working with Azure Database for MySQL.
The following power tip will guide you through setting up a PHP, Apache, and MySQL development environment on your local Windows system. We'll also take a look at the UEStudio features that can make your PHP / MySQL development easier.
Please keep in mind that PHP, Apache, and MySQL are software provided by third party entities. Therefore we (IDM) cannot provide technical support for the installation of these on your system.
Step 1. Download the installation files
In days past, you would have had to download Apache server, PHP, and MySQL all separately. However, there are now solutions which include these components bundled together and pre-configured to run 'out of the box' on a Windows system. We recommend using WampServer, which provides the basics for setting up your local Apache / PHP / MySQL environment on Windows.
If you do not wish to use an 'all-in-one' solution, you will need to download and install the Windows installers for each of the below components:
Apache, the web server software.
PHP, the general purpose scripting language that runs on Apache.
MySQL, the database server software that works hand-in-hand with PHP and Apache.
Step 2: Install everything and make sure it works
For the purposes of this power tip, we are assuming that you've chosen to install WampServer. To install it, simply double-click the setup file and follow the prompts.
You can confirm that everything has installed properly by pointing your browser to http://localhost/ while Wamp is running. If you see the WampServer 'welcome' page, you know everything is installed and running properly. You can also verify this by checking the Wamp icon in the system tray – if the icon is green, then everything is up and running.
Note: You may need to download and install the dependencies described in this community forum post in order for WampServer to run properly on your system.

Step 3: Set up MySQL
Since Wamp installs MySQL, all you need to do is set up a user and a database. Click the Wamp icon in the system tray, then go to MySQL » MySQL console. If the console prompts you for a password, just hit Enter.
Create a MySQL database
Now you need to create a new MySQL database. You can do this by issuing the following command in the console:
Make sure to include the semi-colon at the end of the command! The console should give a 'query ok' response.
You can verify that the databases have been created by using the 'Show databases' command. If you type, 'Show databases;' and hit enter, you should see something similar to:
Create a Table
For the purposes of this power tip, we will create a table called 'names' that includes the following fields: key, first, last. Create this table in our 'uestudio_test' database by using the following commands:
USE uestudio_test;
...then:
CREATE TABLE names (id INT NOT NULL AUTO_INCREMENT, first VARCHAR(48), last VARCHAR(48), PRIMARY KEY(id));
We won't cover the syntax of these commands in the scope of this power tip.
You can see the structure of the table and confirm it was created correctly by typing:
You should see something similar to:
Now, we need to insert some sample data into our table. For example, if we want to create an entry to insert the name 'John' (first) 'Smith' (last) into the table 'names', we would do so using the following command:
INSERT INTO names (first, last) VALUES ('John', 'Smith');
You can insert additional data by modifying the VALUES. Because you created the column id as an auto increment, you don't need to specify a value for this field.
To display all the data in the table, simply type:
Because we inserted a few other names into our table, this query produced the following results:
Create a user
It's never a good idea to use the 'root' user in MySQL to interact with your databases. Create a new user and assign it to your database in the MySQL console by issuing the following command:
GRANT ALL PRIVILEGES on uestudio_test.* to 'SomeUser'@'localhost' IDENTIFIED BY 'SomePassword';
Obviously you will want to modify the user name and password in the above to suit your preferences. You should see the console spit out:
Step 5. UEStudio and PHP/MySQL
PHP Support
UEStudio has built in PHP support which allows you to run scripts, check syntax, and more. To configure PHP support, click the Coding tab then open the PHP drop down. Click the last item here to set the location of the PHP executable.
Click the Browse button to browse to and select the folder containing the PHP executable, which in a default Wamp installation would be:
C:wamp64binphpphp7.1.9
Create Mysql Database On Local Machine
Of course this folder path may vary based upon what version of PHP you have installed and running.
After you've set the PHP executable's parent folder, you can use the PHP options in the Coding tab. Simply open a PHP file then click on any of the options from the PHP icon.
UEStudio offers additional options that make developing PHP scripts easier, but before we demonstrate those options we will create a sample PHP script that we can work with.
Learning to code PHP is not within the scope of this power tip, so we won't go into great detail about the script below. This script is simply provided as an example.
The script below will connect to the 'uestudio_test' database running on localhost. This is the database we created earlier. The script connects, then retrieves all the data from the 'names' table and output the results in an HTML table.
If you used different values for the variables, you would need to change them for the script to work according to your environment.
Create and save this script with any file name and a .php extension, like 'mysql_test.php,' in the www directory, which is the same location as the phpinfo.php script from above. If you click on Run script in the PHP drop down, you'll see the output of the script in the output window.
You can try the other commands available in the PHP drop down.
Create Local Mysql Database Macro
To see the contents of the script in the web browser, type http://localhost/mysql_test.php in your browser. You should see something similar to:
1JohnSmith2BobWhite3MikeJones
Create a Project
You don't have to create a project to develop using PHP/MySQL in UEStudio, but there are added benefits to creating a project. If the files you are editing are part of a project, then UEStudio's IntelliTips will parse the PHP script, which provides you a visual representation of classes, functions, etc. in the Classviewer, and provides some context-aware auto-complete when typing source code.
To create a project, click on New project in the Project tab. Name and save the project file. The 'Project settings' dialog will open, and you can add the 'mysql_test.php' to the project by clicking + Active file.
To view the parsed representation of the file, click on the Tags tab at the bottom of the Workspace manager. If the Workspace manager is not open, you can open it by checking Workspace manager in the Layout tab. Using the mysql_test.php file you created in this tutorial, you should see something similar to the below parsed representation:
By adding your source files to a project, you can also access IntelliTips functionality in the Project tab, like Find symbol definition, Display functions, etc.
For a single file like in this example, there really isn't much advantage for this. However, if you are using an object-oriented style of PHP programming, and your project includes many files, you would see something that looks more like:
As you can see, with a large project, this feature can be very helpful.
Link local to remote
If your local development environment is intended to 'mirror' your live site, you can link a local folder to a remote folder. This will allow you to sync or upload / download files between the local and remote folder in a single click. Learn more about linking local folders to remote folders.
The package is located inside a disk image (.dmg) file that you first need to mount by double-clicking its icon in the Finder. It should then mount the image and display its contents.
Before proceeding with the installation, be sure to stop all running MySQL server instances by using either the MySQL Manager Application (on macOS Server), the preference pane, or mysqladmin shutdown on the command line.
To install MySQL using the package installer:
Download the disk image (.dmg) file (the community version is available here) that contains the MySQL package installer. Double-click the file to mount the disk image and see its contents.
Figure 2.1 MySQL Package Installer: DMG Contents
Double-click the MySQL installer package from the disk. It is named according to the version of MySQL you have downloaded. For example, for MySQL server 5.7.35 it might be named mysql-5.7.35-osx-10.13-x86_64.pkg.
The initial wizard introduction screen references the MySQL server version to install. Click to begin the installation.
Figure 2.2 MySQL Package Installer Wizard: Introduction
The MySQL community edition shows a copy of the relevant GNU General Public License. Click and then to continue.
From the Installation Type page you can either click to execute the installation wizard using all defaults, click to alter which components to install (MySQL server, Preference Pane, Launchd Support -- all enabled by default).
Although the option is visible, the installation location cannot be changed.
Figure 2.3 MySQL Package Installer Wizard: Installation Type
Figure 2.4 MySQL Package Installer Wizard: Customize
Click to begin the installation process.
After a successful installation, the installer displays a window with your temporary root password. This cannot be recovered so you must save this password for the initial login to MySQL. For example:
Figure 2.5 MySQL Package Installer Wizard: Temporary Root Password
MySQL expires this temporary root password after the initial login and requires you to create a new password.
Summary is the final step and references a successful and complete MySQL Server installation. the wizard.
Figure 2.6 MySQL Package Installer Wizard: Summary
MySQL server is now installed, but it is not loaded (or started) by default. Use either launchctl from the command line, or start MySQL by clicking 'Start' using the MySQL preference pane. For additional information, see Chapter 3, Installing a MySQL Launch Daemon, and Chapter 4, Installing and Using the MySQL Preference Pane. Use the MySQL Preference Pane or launchd to configure MySQL to automatically start at bootup.
When installing using the package installer, the files are installed into a directory within /usr/local matching the name of the installation version and platform. For example, the installer file mysql-5.7.35-osx10.13-x86_64.dmg installs MySQL into /usr/local/mysql-5.7.35-osx10.13-x86_64/ . The following table shows the layout of the installation directory.
Table 2.1 MySQL Installation Layout on macOS
Create Local Mysql Database Macros
DirectoryContents of Directorybinmysqld server, client and utility programsdataLog files, databasesdocsHelper documents, like the Release Notes and build informationincludeInclude (header) fileslibLibrariesmanUnix manual pagesmysql-testMySQL test suiteshareMiscellaneous support files, including error messages, sample configuration files, SQL for database installationsupport-filesScripts and sample configuration files/tmp/mysql.sockLocation of the MySQL Unix socket
Create Local Mysql Database Mac Os
During the package installer process, a symbolic link from /usr/local/mysql to the version/platform specific directory created during installation is created automatically.
0 notes
Text
Hướng dẫn fix 💖👉 MariaDB/MySQL đã chạy nhưng không kết nối được? 🍀
💖👉 MariaDB/MySQL đã chạy nhưng không kết nối được? 🍀 Dịch vụ MariaDB đang chạy (active (running)) nhưng không thể kết nối vào database. Có thể do một số nguyên nhân sau: 🔍 1. Kiểm tra MySQL có hoạt động đúng không? Chạy lệnh kiểm tra MySQL có phản hồi không: mysqladmin -u root -p ping Nếu thấy mysqld is alive, nghĩa là MySQL vẫn hoạt động. Nếu không, có thể MySQL bị lỗi. 🔑 2. Kiểm tra socket hoặc…
0 notes
Text
MySQL 101: Basic MySQL Server Triage
So your MySQL server has crashed. What do you do now? When a server is down, in my opinion, there are two steps that are essential and both are extremely important and neither should be neglected: Save diagnostic information for determining the root cause analysis (RCA). Get the server back up and running. Too many people rush to Step #2 and lose pertinent diagnostics from Step #1. Likewise, too many people will spend too much time on Step #1 and delay getting to Step #2 and restoring service. The goal is to collect diagnostics as quickly as possible for later review while getting service restored as fast as possible. As a Technical Account Manager (TAM) and assisting on server restoration calls, I have seen both issues at play. Technical resources have a tendency to get so bogged down in trying to understand the cause of the server outage that they forget that the downtime is costing the business money. The desire to crawl through server logs, review metrics, pour-over system metrics, and so on, can be too tempting for some who are concerned that important diagnostic data will be lost when service is restored. This is a valid concern, but there must be a middle ground. Conversely, many, especially those in management, will demand service is restored immediately to continue business functions. Of course, after the service is back up, the demand for an RCA will come. Sadly, many metrics, and some logs, are lost when a server is bounced. Below are basic guidelines on what metrics to collect for MySQL. The steps are in no particular order. Save a copy of the MySQL Error Log.sudo cp /path/to/datadir/*.log /some/where/safe Make a copy of the MySQL configuration file.sudo cp /path/to/my.cnf /some/where/safe Make a copy of system logs and save them somewhere on persistent storage in a location that will not be overwritten. Consider doing something like the following on Linux:sudo cp /var/log/syslog /some/where/safe/syslog sudo cp /var/log/messages /some/where/safe/messages sudo journalctl -e > /some/where/safe/journalctl.txt If MySQL is running still and you can log in, get some MySQL metrics. You will want to save the output into files somewhere.sudo mysqladmin -i10 -c10 proc > /some/where/safe/mysql_procs.txt mysql> SHOW GLOBAL VARIABLES; sudo mysqladmin -i10 -c10 ext > /some/where/safe/mysql_ext.txt mysql> SHOW ENGINE INNODB STATUSG If MySQL is running and you have Percona Toolkit, you should collect some pt-stalk output.sudo ./pt-stalk --no-stalk --iterations=2 --sleep=30 --dest=/some/where/safe -- --user=root --password=; If you have space and time, a copy of the database files (data directory in MySQL) could be helpful. Certainly, for many installations, getting all of the data files will be impossible. If it is a small database and space and time allow, it can be best to get all the files just in case.sudo cp -R /path/to/datadir /some/where/safe/datadir Copy database logs and save them somewhere safe for later review. Systems like Percona XtraDB Cluster (PXC) will create GRA files during an issue which can be really helpful to look at to determine the root cause. By combining the GRA header file with the contents of the GRA log files, you can use the mysqlbinlog command to get the records of transactions causing issues. More information can be found in one of our older blogs herePercona XtraDB Cluster (PXC): what about GRA_*.log files?.sudo cp /path/to/data/dir/GRA* /some/where/safe/datadir/ Save system metrics pertaining to CPU, I/O, and memory usage:sudo mpstat -a 1 60 > /some/where/safe/mpstat.txt sudo vmstat 1 60 > /some/where/safe/vmstat.txt sudo iostat -dmx 1 60 > /some/where/safe/iostat.txt Save system info.sudo cat /proc/cpuinfo > /some/where/safe/cpuinfo.txt If you have Percona Toolkit, the following would be very helpful:sudo pt-summary > /some/where/safe/pt-summary.txt sudo pt-mysql-summary > /some/where/safe/pt-mysql-summary.txt Get hardware diagnostics.# disk info sudo df -k > /some/where/safe/df_k.txt sudo lsblk -o KNAME,SCHED,SIZE,TYPE,ROTA > /some/where/safe/lsblk.txt sudo lsblk --all > $PTDEST/lsblk-all; # lv/pv/vg only for systems with LVM sudo lvdisplay --all --maps > /some/where/safe/lvdisplau-all-maps.txt sudo pvdisplay --maps > /some/where/safe/pvdisplay-maps.txt sudo pvs -v > /some/where/safe/pvs_v.txt sudo vgdisplay > /some/where/safe/vgdisplay.txt # nfsstat for systems with NFS mounts sudo nfsstat -m > /some/where/safe/nfsstat_m.txt sudo nfsiostat 1 120 > /some/where/safe/nfsiostat.txt # Collect hardware information sudo dmesg > /some/where/safe/dmesg.txt sudo dmesg -T free -m > /some/where/safe/dmesg_free.txt sudo dmesg -T > /some/where/safe/dmesg_t.txt sudo ulimit -a > /some/where/safe/ulimit_a.txt sudo cat /proc/sys/vm/swappiness > /some/where/safe/swappiness sudo numactl --hardware > /some/where/safe/numactl-hardware.txt It goes without saying, it would be best to script the above into a useful bash script you can run when there is an issue. Just be sure to test the script in advance of an issue. Again, the goal is to preserve useful diagnostic data that could be useful for determining the root cause of the issue at a later time after the service is restored. Just don’t get caught up in looking through the above diagnostics! Certainly, more data is better but the above is a great starting point. As time goes on, you may realize you wish you had other metrics and can add them to your script or Standard Operating Procedure (SOP). Naturally, adding monitoring like Percona Monitoring and Management (PMM) would be a great option that can save you a lot of time and collect even more trends over time which can be extremely helpful. With the above diagnostics, you would have a ton of information in the event of an issue to find the root cause. Now, you can sort through the diagnostics. Of course, if you need help with that, Percona can help you here as well. https://www.percona.com/blog/2021/04/07/mysql-101-basic-mysql-server-triage/
0 notes
Text
Change Root Password in MySQL
Change Root Password in MySQL
Steps to change root password in MySQL --Only one command will change the ROOT Password in MySQL Syntax: mysqladmin -u root -p<old-password> password <new-password> Example of Changing root password: C:\Program Files\MySQL\MySQL Server 8.0\bin>mysqladmin -u root -pPassword1 password Newpassword1 mysqladmin: [Warning] Using a password on the command line interface can be insecure. Warning:…
View On WordPress
0 notes
Text
MySQLi - Create Database
MySQLi – Create Database
Create Database using mysqladmin
You would need special privileges to create or to delete a MySQLi database. So assuming you have access to root user, you can create any database using mysql mysqladmin binary.
Example
Here is a simple example to create database called TUTORIALS −
[root@host]# mysqladmin -u root -p create TUTORIALS Enter password:******
This will create a MySQLi database…
View On WordPress
0 notes
Text
MySQL 8.0.22: SHOW PROCESSLIST Version 2 – Now Available From PERFORMANCE_SCHEMA
The “SHOW PROCESSLIST” command is very famous and very useful for MySQL DBAs. It will help you to understand the ongoing thread activities and their current states. By default, the “show processlist” output details will be collected from the thread manager, and it needs the global mutex. From MySQL 8.0.22, we have an alternative way to get the process details from the PERFORMANCE_SCHEMA. It doesn’t need the global mutex. 🙂 Note: We also have the non-blocking SYS schema views “processlist” and “x$processlist”, which provide more complete information than the SHOW PROCESSLIST statement and the INFORMATION_SCHEMA.PROCESSLIST and PERFORMANCE_SCHEMA.PROCESSLIST. But, we can’t integrate this with the “SHOW PROCESSLIST” command. In this blog, I am going to explain the complete details about the new processlist implementation using PERFORMANCE_SCHEMA. “SHOW PROCESSLIST” Using Thread Manager (default) This is the default method. The default “show processlist” implementation iterates across active threads from within the thread manager while holding a global mutex. Negatively impacts performance. Particularly impacts the busy systems quite badly. The INFORMATION_SCHEMA.PROCESSLIST is one of the sources of process information. This will also use the thread manager to collect the metrics. By default, “mysqladmin processlist” also uses the thread manager to get the details. The following statements are equivalent: SHOW FULL PROCESSLIST; SELECT * FROM INFORMATION_SCHEMA.PROCESSLIST; Mysqladmin processlist --verbose “SHOW PROCESSLIST” Using Performance Schema Available from MySQL 8.0.22. It collects the thread details from the PERFORMANCE_SCHEMA>PROCESSLIST table. Global mutex is not needed. Helps to avoid the performance impact during querying the “show processlist”, particularly in busy systems. The implementation also applies to “mysqladmin processlist” The following statements are equivalent: SHOW FULL PROCESSLIST; SELECT * FROM PERFORMANCE_SCHEMA.PROCESSLIST; Mysqladmin processlist --verbose “PERFORMANCE_SCHEMA.PROCESSLIST” table has similar columns as “INFORMATION_SCHEMA.PROCESSLIST” mysql> desc performance_schema.processlist; +---------+-----------------+------+-----+---------+-------+ | Field | Type | Null | Key | Default | Extra | +---------+-----------------+------+-----+---------+-------+ | ID | bigint unsigned | NO | PRI | NULL | | | USER | varchar(32) | YES | | NULL | | | HOST | varchar(255) | YES | | NULL | | | DB | varchar(64) | YES | | NULL | | | COMMAND | varchar(16) | YES | | NULL | | | TIME | bigint | YES | | NULL | | | STATE | varchar(64) | YES | | NULL | | | INFO | longtext | YES | | NULL | | +---------+-----------------+------+-----+---------+-------+ 8 rows in set (0.00 sec) mysql> desc information_schema.processlist; +---------+-----------------+------+-----+---------+-------+ | Field | Type | Null | Key | Default | Extra | +---------+-----------------+------+-----+---------+-------+ | ID | bigint unsigned | NO | | | | | USER | varchar(32) | NO | | | | | HOST | varchar(261) | NO | | | | | DB | varchar(64) | YES | | | | | COMMAND | varchar(16) | NO | | | | | TIME | int | NO | | | | | STATE | varchar(64) | YES | | | | | INFO | varchar(65535) | YES | | | | +---------+-----------------+------+-----+---------+-------+ 8 rows in set (0.00 sec) Implementation Make sure the PERFORMANCE_SCHEMA is enabled at the server startup. Make sure MySQL was configured and built with the thread instrumentations enabled. MySQL provides a variable “performance_schema_show_processlist” to enable this feature. Once we enable the variable, the “SHOW PROCESSLIST” command will start to show the details from the “PERFORMANCE_SCHEMA.PROCESSLIST” table instead of the thread manager. The variable has a global scope, no need to restart the MySQL server. mysql> show global variables like 'performance_schema_show_processlist'; +-------------------------------------+-------+ | Variable_name | Value | +-------------------------------------+-------+ | performance_schema_show_processlist | OFF | +-------------------------------------+-------+ 1 row in set (0.08 sec) mysql> set global performance_schema_show_processlist='ON'; Query OK, 0 rows affected (0.00 sec) mysql> r Connection id: 23 Current database: *** NONE *** mysql> show global variables like 'performance_schema_show_processlist'; +-------------------------------------+-------+ | Variable_name | Value | +-------------------------------------+-------+ | performance_schema_show_processlist | ON | +-------------------------------------+-------+ 1 row in set (0.00 sec) Yes, the PERFORMANCE_SCHEMA.PROCESSLIST table is activated for the “SHOW PROCESSLIST”. “SHOW PROCESSLIST” output from “PERFORMANCE_SCHEMA”: mysql> show processlistG *************************** 1. row *************************** Id: 5 User: event_scheduler Host: localhost db: NULL Command: Daemon Time: 2461 State: Waiting on empty queue Info: NULL *************************** 2. row *************************** Id: 23 User: root Host: localhost db: NULL Command: Query Time: 0 State: executing Info: show processlist 2 rows in set (0.00 sec) You can also query the “performance_schema.processlist” table to get the thread information. mysql> select * from performance_schema.processlistG *************************** 1. row *************************** ID: 5 USER: event_scheduler HOST: localhost DB: NULL COMMAND: Daemon TIME: 2448 STATE: Waiting on empty queue INFO: NULL *************************** 2. row *************************** ID: 23 USER: root HOST: localhost DB: NULL COMMAND: Query TIME: 0 STATE: executing INFO: select * from performance_schema.processlist 2 rows in set (0.00 sec) “mysqladmin processlist” output from “performance_schema”: [root@mysql8 vagrant]# mysqladmin processlist +----+-----------------+-----------+----+---------+------+------------------------+------------------+ | Id | User | Host | db | Command | Time | State | Info | +----+-----------------+-----------+----+---------+------+------------------------+------------------+ | 5 | event_scheduler | localhost | | Daemon | 2631 | Waiting on empty queue | | | 24 | root | localhost | | Query | 0 | executing | show processlist | +----+-----------------+-----------+----+---------+------+------------------------+------------------+ Recommendations To avoid having some threads ignored, leave the “performance_schema_max_thread_instances” and “performance_schema_max_thread_classes” system variables set to their default value (default = -1, meaning the parameter will be autosized during the server startup). To avoid having some STATE column values be empty, leave the “performance_schema_max_stage_classes” system variable set to its default (default = -1, meaning the parameter will be autosized during the server startup). https://www.percona.com/blog/2021/01/15/mysql-8-0-22-show-processlist-version-2-now-available-from-performance_schema/
0 notes
Text
Rename the Database name in MySQL
Rename the Database name in MySQL
Syntax: mysqladmin -uroot -p<password> create <new name> mysqldump -uroot -p<password> --routines <old name> | mysql -uroot -pmypassword <new name> mysqladmin -uroot -p<password> drop <old name> Example of Rename the MySQL database name Example: mysql> show databases; +--------------------+ | Database | +--------------------+ | database | | sys | | world | +--------------------+ 3 rows in set…
View On WordPress
0 notes
Text
MySQLi - Drop Database
MySQLi – Drop Database
Drop Database using mysqladmin
You would need special privileges to create or to delete a MySQLi database. So assuming you have access to root user, you can create any database using mysql mysqladmin binary.
Be careful while deleting any database because you will lose your all the data available in your database.
Here is an example to delete a database created in previous chapter −
[root@host]#…
View On WordPress
0 notes