#OAuth 2.0 Client Credentials Flow
Explore tagged Tumblr posts
Visit Tumblr Blog
Explore Tumblr blogs with no restrictions, modern design and the best experience.
Last Seen Tumblr Blogs


Fun Fact
Tumblr was the first site to host the blog for President Barack Obama in 2011.
Text
#business#technology#.net framework#.net developers#Netsuite integration#OAuth 2.0 Client Credentials Flow
0 notes
Text
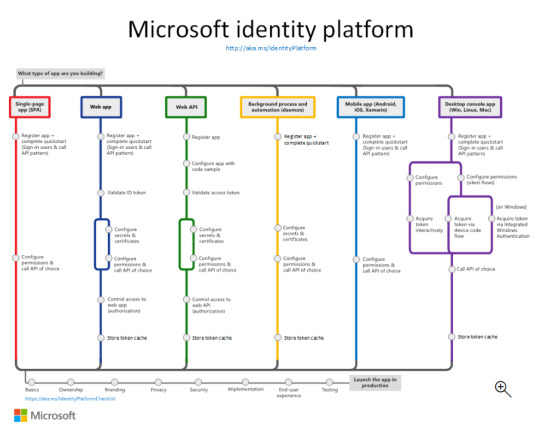
Exploring the Power of Microsoft Identity Platform

Join us on a journey to understand how Microsoft Identity Platform revolutionizes user access, enhancing both security and user experience.
What is microsoft identity platform?
The Microsoft identity platform is a cloud identity service that allows you to build applications your users and customers can sign in to using their Microsoft identities or social accounts. It authorizes access to your own APIs or Microsoft APIs like Microsoft Graph.
OAuth 2.0 and OpenID Connect standard-compliant authentication service enabling developers to authenticate several identity types, including:
Work or school accounts, provisioned through Microsoft Entra ID
Personal Microsoft accounts (Skype, Xbox, Outlook.com)
Social or local accounts, by using Azure AD B2C
Social or local customer accounts, by using Microsoft Entra External ID
Open-source libraries:
Microsoft Authentication Library (MSAL) and support for other standards-compliant libraries. The open source MSAL libraries are recommended as they provide built-in support for conditional access scenarios, single sign-on (SSO) experiences for your users, built-in token caching support, and more. MSAL supports the different authorization grants and token flows used in different application types and scenarios.
Microsoft identity platform endpoint:
The Microsoft identity platform endpoint is OIDC certified. It works with the Microsoft Authentication Libraries (MSAL) or any other standards-compliant library. It implements human readable scopes, in accordance with industry standards.
Application management portal:
A registration and configuration experience in the Microsoft Entra admin center, along with the other application management capabilities.
Application configuration API and PowerShell:
Programmatic configuration of your applications through the Microsoft Graph API and PowerShell so you can automate your DevOps tasks.
Developer content:
Technical documentation including quickstarts, tutorials, how-to guides, API reference, and code samples.
For developers, the Microsoft identity platform offers integration of modern innovations in the identity and security space like passwordless authentication, step-up authentication, and Conditional Access. You don't need to implement such functionality yourself. Applications integrated with the Microsoft identity platform natively take advantage of such innovations.
With the Microsoft identity platform, you can write code once and reach any user. You can build an app once and have it work across many platforms, or build an app that functions as both a client and a resource application (API).
More identity and access management options
Azure AD B2C - Build customer-facing applications your users can sign in to using their social accounts like Facebook or Google, or by using an email address and password.
Microsoft Entra B2B - Invite external users into your Microsoft Entra tenant as "guest" users, and assign permissions for authorization while they use their existing credentials for authentication.
Microsoft Entra External ID - A customer identity and access management (CIAM) solution that lets you create secure, customized sign-in experiences for your customer-facing apps and services.
The Components that make up the Microsoft identity platform:
OAuth 2.0 and OpenID Connect standard-compliant authentication service enabling developers to authenticate several identity types, including:
Work or school accounts, provisioned through Microsoft Entra ID
Personal Microsoft accounts (Skype, Xbox, Outlook.com)
Social or local accounts, by using Azure AD B2C
Social or local customer accounts, by using Microsoft Entra External ID
Open-source libraries: Microsoft Authentication Library (MSAL) and support for other standards-compliant libraries. The open source MSAL libraries are recommended as they provide built-in support for conditional access scenarios, single sign-on (SSO) experiences for your users, built-in token caching support, and more. MSAL supports the different authorization grants and token flows used in different application types and scenarios.
Microsoft identity platform endpoint - The Microsoft identity platform endpoint is OIDC certified. It works with the Microsoft Authentication Libraries (MSAL) or any other standards-compliant library. It implements human readable scopes, in accordance with industry standards.
Application management portal: A registration and configuration experience in the Microsoft Entra admin center, along with the other application management capabilities.
Application configuration API and PowerShell: Programmatic configuration of your applications through the Microsoft Graph API and PowerShell so you can automate your DevOps tasks.
Developer content: Technical documentation including quickstarts, tutorials, how-to guides, API reference, and code samples.
0 notes
Text
Step-by-Step Guide on How to Use Google Login on king567
Here's a step-by-step guide on how to implement and use Google Login on King567. This guide covers both the implementation process for developers and the user experience for logging in.
Implementation Process for Developers
Step 1: Set Up Google API Console
Create a Google Cloud Project
Go to the Google API Console.
Click on "Select a project" and then "New Project."
Enter your project name (e.g., "King567") and click "Create."
Enable APIs
In the project dashboard, go to "Library" and search for "Google People API."
Click on "Enable" to activate the API for your project.
Create OAuth 2.0 Credentials
Go to "Credentials" in the API Console.
Click "Create Credentials" and select "OAuth 2.0 Client IDs."
Configure the consent screen by providing necessary information like application name, email, and logo.
After setting up the consent screen, create the OAuth 2.0 Client ID.
Select "Web Application" as the application type.
Add authorized redirect URIs, which are the URLs to which Google will send responses. Example: https://www.king567.com/oauth2callback.
Save the Client ID and Client Secret.
Step 2: Backend Configuration
Set Up Environment Variables
Store your Google Client ID and Client Secret in environment variables for security.
2. Install OAuth 2.0 Library
Use a suitable OAuth 2.0 client library for your backend framework (e.g., Python Flask, Node.js Express).
3. Create Authorization Endpoint
Set up an endpoint to handle the OAuth 2.0 authorization.
4. Handle Token Exchange
Exchange the authorization code for an access token.
Step 3: Frontend Integration
Add Google Sign-In Button
Include the Google Sign-In button on your login page.
2. Redirect to Backend for Authentication
Ensure that the frontend redirects to the backend authentication endpoint to handle the OAuth 2.0 flow.
By following these steps, King567 can implement a seamless Google Login and authentication process, enhancing user convenience and security. This integration leverages Google’s robust authentication infrastructure, providing a streamlined and secure way for users to access their accounts.
0 notes
Text
ORACLE APEX OAUTH 2

Understanding and Implementing OAuth 2.0 in Oracle APEX
Introduction
In today’s interconnected digital landscape, applications often need to pull data from or interact with external services. OAuth 2.0 provides a rock-solid framework for enabling secure authorization and access to these resources. Oracle APEX, the low-code development platform, offers extensive support for OAuth 2.0. This blog will dive into OAuth 2.0 with Oracle APEX, exploring concepts and providing a practical guide.
What is OAuth 2.0?
OAuth 2.0 is an open protocol. Think of it as a security framework that defines how a user can allow a third-party application to access their information stored with a different service provider—all without sharing their actual login credentials. This is crucial in social logins or when an app needs to fetch data from your calendar or email.
OAuth 2.0 in Action: A Common Scenario
Application Wants Access: Your APEX application wants to display a user’s Google Calendar events.
Authorization Request: Your application redirects the user to Google’s authorization server.
User Consent: The user logs into their Google account (if necessary) and is asked to grant your application permission to access their calendar data.
Authorization Grant: If the user approves, Google generates an authorization code and returns it to your application.
Access Token Exchange: Your application now exchanges this authorization code for an access token. The access token is the key with restricted permissions that allows your app to interact with Google Calendar.
API Calls: Finally, your application can use the access token to make API requests to Google Calendar and fetch the desired information.
Key OAuth 2.0 Terms
Resource Owner: The user who owns the data (e.g., their calendar data).
Client: The application seeking access (your APEX app).
Authorization Server: The service authenticates the user and issues tokens (e.g., Google).
Resource Server: Where the user’s protected data resides (e.g., Google Calendar).
OAuth 2.0 Flows
OAuth 2.0 supports several flows for different use cases. APEX primarily utilizes the Authorization Code Flow for web-based applications.
Oracle APEX and OAuth 2.0
Web Credentials: In APEX, you create web credentials to store your Client ID and Client Secret issued by the authorization server.
APEX_WEB_SERVICE Package: Oracle APEX provides the APEX_WEB_SERVICE Package, which contains handy procedures to facilitate OAuth 2.0 interactions. The OAUTH_AUTHENTICATE_CREDENTIAL Procedure performs authentication and retrieves a new access token.
Example: Integrating with a REST API
Refer to Oracle’s documentation for a complete example. Here’s the gist:
Set up a Web Credential in APEX
Use APEX_WEB_SERVICE.OAUTH_AUTHENTICATE_CREDENTIAL to get an access token.
Make secured REST API calls using APEX_WEB_SERVICE.MAKE_REST_REQUEST, including the access token in the header.
Beyond the Basics
Refresh Tokens: Access tokens often expire. OAuth 2.0 can facilitate issuing refresh tokens to get new access tokens without the full authorization flow.
Scopes: Scopes define your app’s actions with the access token.
Conclusion
Oracle APEX’s seamless OAuth 2.0 integration allows you to securely leverage the power of external services. This blog has just scratched the surface; it’s best to consult Oracle’s extensive documentation for specific implementation details.
youtube
You can find more information about Oracle Apex in this Oracle Apex Link
Conclusion:
Unogeeks is the No.1 IT Training Institute for Oracle Apex Training. Anyone Disagree? Please drop in a comment
You can check out our other latest blogs on Oracle Apex here – Oarcle Apex Blogs
You can check out our Best In Class Oracle Apex Details here – Oracle Apex Training
Follow & Connect with us:
———————————-
For Training inquiries:
Call/Whatsapp: +91 73960 33555
Mail us at: [email protected]
Our Website ➜ https://unogeeks.com
Follow us:
Instagram: https://www.instagram.com/unogeeks
Facebook: https://www.facebook.com/UnogeeksSoftwareTrainingInstitute
Twitter: https://twitter.com/unogeeks
0 notes
Quote
Ever since we announced our intention to disable Basic Authentication in Exchange Online we said that we would add Modern Auth (OAuth 2.0) support for the IMAP, POP and SMTP AUTH protocols. Today, we’re excited to announce the availability of OAuth 2.0 authentication for IMAP and SMTP AUTH protocols to Exchange Online mailboxes. This feature announcement is for interactive applications to enable OAuth for IMAP and SMTP. For additional information about non-interactive applications, please see our blog post Announcing OAuth 2.0 Client Credentials Flow support for POP and IMAP protocols in Exchange Online. Application developers who have built apps that send, read or otherwise process email using these protocols will be able to implement secure, modern authentication experiences for their users. This functionality is built on top of Microsoft Identity platform (v2.0) and supports access to email of Microsoft 365 (formerly Office 365) users. Detailed step-by-step instructions for authenticating to IMAP and SMTP AUTH protocols using OAuth are now available for you to get started. What’s supported? With this release, apps can use one of the following OAuth flows to authorize and get access tokens on behalf of a user. 1.OAuth2 authorization code flow 2.OAuth2 Device authorization grant flow Follow these detailed step-by-step instructions to implement OAuth 2.0 authentication if your in-house application needs to access IMAP and SMTP AUTH protocols in Exchange Online, or work with your vendor to update any apps or clients that you use that could be impacted.
Announcing OAuth 2.0 support for IMAP and SMTP AUTH protocols in Exchange Online - Microsoft Community Hub
0 notes
Text
Integrating Okta as a SAML identity provider in an Amazon Cognito user pool
Posted on March 12, 2020, by Sandeep
Amazon Cognito user pool allows users to sign-in through an external identity provider (federation), such as Okta. A user pool integrated with Okta allows users in your Okta app to get user pool tokens from Amazon Cognito and authenticate apps that use Cognito.
Prerequisites 1. Cognito user pool created in the AWS account 2. Okta developer account
Steps 1. Create an app client in your user pool
a. When adding an app client, clear the Generate client secret checkbox. b. Select the required auth flows Select at least ALLOW_USER_SRP_AUTH and ALLOW_REFRESH_TOKEN_AUTH

Note: We are using the “Authorization code grant” authentication flow which does not require client secrets.
2. Create your Cognito user pool domain
a. Under the App Integration tab in the user pool console side menu, choose Domain name b. Enter your choice of unique domain prefix which is used to build Cognito login url for your SAML app.
3. Create a SAML app in Okta
a. Sign in to okta with admin access credentials and click on the “Admin” button on top right corner b. On the admin, menu chooses Applications and then choose Add Application. c. On the Add Application page, choose to Create a New App. d. In the Create a New Application Integration dialog, confirm that Platform is set to Web. e. For the Sign-on method, choose SAML 2.0. f. Choose to Create, this will open a General Settings page for saml app.
(i) Enter a name for your app. (ii) (Optional) Upload a logo and choose the visibility settings for your app. (iii) Choose Next.

(iv) Under GENERAL, for Single sign-on URL, enter https://yourDomainPrefix.auth.region.amazoncognito.com/saml2/idpresponse.
Note: Replace yourDomainPrefix and region with the values for your user pool. Find these values in the Amazon Cognito console on the Domain name page for your user pool.
(v) For Audience URI (SP Entity ID), enter urn:amazon:Cognito:sp:yourUserPoolId.
Note: Replace yourUserPoolId with your Amazon Cognito user pool ID. Find it in the Amazon Cognito console on the General settings page for your user pool.

(vi) Under ATTRIBUTE STATEMENTS (OPTIONAL- specifies which user attributes you want to export to Cognito), add a statement with the following information:
For Name, enter the SAML attribute name (attribute name by which you want to user attributes to be passed to Cognito in SAML response).

eg: if you want to pass user email in SAML response and you want to call it ‘Email Id’ enter ‘Email id’ in Name field and enter ‘user.email’ in Value field.
(vii) For all other settings on the page, leave them as their default values or set them according to your preferences. (viii) Choose Next. (ix) Choose a feedback response for Okta Support. (x) Choose Finish.
4. Assign a user to your Okta application
a. On the Assignments tab for your Okta app, for Assign, choose Assign to People. b. Next to the user that you want to assign, choose Assign.
Note: If this is a new account, the only option available is to choose yourself (the admin) as the user.
c. (Optional) For User Name, enter a user name, or leave it as the user’s email address, if you want. d. Choose Save and Go Back. Your user is assigned. e. Choose Done.
5. Get the IdP metadata for your Okta application
a. On Okta developer console, navigate to the Applications tab and select your application. b. On the Sign-On tab, find the Identity Provider metadata hyperlink (Look for text ‘Identity Provider metadata is available if this application supports dynamic configuration.’). Right-click the hyperlink (Identity Provider metadata), and then copy the URL.
6. Configure Okta as a SAML IdP in your user pool
a. In the Amazon Cognito console, choose to Manage user pools, and then choose your user pool. b. In the left navigation pane, under the Federation, choose Identity providers. c. Choose SAML. d. Under the Metadata document, paste the Identity Provider metadata URL that you copied. e. For Provider name, enter Okta. f. (Optional) Enter any SAML identifiers (Identifiers (Optional)) and enable sign-out from the IdP (Okta) when your users sign out from your user pool (Enable IdP sign out flow). g. Choose Create provider.

7. Map SAML attributes to user pool attributes
a. In the Amazon Cognito console, choose Manage user pools, and then choose your user pool. b. In the left navigation pane, under the Federation, choose Attribute mapping. c. On the attribute mapping page, choose the SAML tab. d. Choose Add SAML attribute. e. For the SAML attribute, enter the SAML attribute name (attribute name which you have mentioned in ATTRIBUTE STATEMENTS while creating the SAML app in Okta.

eg: we had specified ‘Email Id’ in the example above so mention ‘Email Id’ under SAML attribute and select Email under User pool attribute, continue and map all other attributes if you had mentioned any other in ATTRIBUTE STATEMENTS and Choose Save changes.
Note: Make sure all mapped attributes in cognito are readable and writable, you can set attribute permissions in General settings->App clients->Set read and write permissions.
8. Change app client settings for your user pool
a. In the Amazon Cognito console, choose Manage user pools, and then choose your user pool. b. In the left navigation pane, under App integration, choose App client settings. c. On the app client page, do the following: Under Enabled Identity Providers, select the Okta and Cognito User Pool checkboxes. For Callback URL(s), enter a URL where you want your users to be redirected after they log in. For testing, you can enter any valid URL, such as https://www.example.com/. For Sign out URL(s), enter a URL where you want your users to be redirected after they log out. For testing, you can enter any valid URL, such as https://www.example.com/. Under Allowed OAuth Flows, be sure to select Authorization code grant checkbox. Under Allowed OAuth Scopes, be sure to select the email and profile checkboxes. d. Choose Save changes.

9. Construct the endpoint URL
a. Using values from your user pool, construct this login endpoint URL: https://yourDomainPrefix.auth.region.amazoncognito.com/login?response_type=code&client_id=yourClientId&redirect_uri=redirectUrl b. Be sure to do the following:
(i) Replace yourDomainPrefix and region with the values for your user pool. Find these values in the Amazon Cognito console on the Domain name page for your user pool. (ii) Replace yourClientId with your app client’s ID, and replace redirectUrl with your app client’s callback URL. Find these in the Amazon Cognito console on the App client settings page for your user pool.
10. Test the endpoint URL
a. Enter the constructed login endpoint URL in your web browser. b. On your login endpoint webpage, choose Okta.
Note: If you’re redirected to your app client’s callback URL, you’re already logged in to your Okta account in your browser. The user pool tokens appear in the URL in your web browser’s address bar.
c. On the Okta Sign In page, enter the username and password for the user that you assigned to your app.
1 note
·
View note
Text
Alternatives of Oauth 2.0 - An overview
Oauth 2.0 is an authorization framework. OAuth 2.0 is a standard that enables an application or website to be an integrated resource maintained by other web apps on a user’s behalf.
What are the Alternatives of Oauth2.0
1. OpenID Connect
It has been developed by extending OAuth 2.0.
OpenId Connect is an authentication protocol that allows verifying of user identity
In Oauth you get an access token, which will contain application claims.
In OpenID Connect you will get an Access Token as well as an id_Token. Id_Token has the user’s claims, which allows the client to verify the identity of the user.
OAuth 2.0 is the foundation upon which OpenID Connect is based, and the OpenId Connect Specification has somewhat different terminology for the responsibilities in the flows:
OpenID provider:
The authorization server that generates the ID token is called the OpenID provider.
end user: The end user’s information is contained in the ID token.
relying party: The relying party is the client application that requests the ID token from Okta.
ID token: ID token issued by the OpenID Provider and contains information about the end user in the form of claims.
Claim: The claim contains details on the end user.
Grant Types:
OpenID Connect supports the following authentication flows:
Implicit Flow:
It is required for apps that have no “back end” logic on the web server, like a Javascript app.
Authentication Flow: It is designed for apps that have a back end that can communicate with the IdP away from prying eyes.
Resource Owner Password Grant: It does not have a login UI and is useful when access to a web browser is not possible.
Client Credentials Grant: It is useful for machine-to-machine authorization.
Workflow of OpenId connect
Step 1: In the first step, the user attempts to start a session with your client app and is redirected to the OpenID Provider, passing in the client ID, which is unique for that application.
Step 2: OpenID Provider authenticates and authorizes the user. It appears to follow the implicit flow thus far.
Step 3: OpenId Provider gives a one-time-use code and is passed back to the web server using a predefined Redirect URI.
Step 4: After that, the web server passes the code, client ID, and client secret to the OpenID Provider’s token endpoint, and the OpenID Provider validates the code and returns a one-hour access token.
Step 5: The client uses the access token to get further details about the user and establishes a session for the user.
Benefits :
The OpenID approach is more lightweight than the hybrid auth implementation.
Drawbacks:
OpenID Connect is simply an authentication service for verifying a user account state, not an authorization system like OAuth, which allows an application or service to perform actions on the user’s behalf once authorized.
This means that a straightforward OpenID integration won’t be able to send signed requests to the provider site in order to obtain, change, or remove a user’s social information.
2. Keycloak
Keycloak is an open-source identifier and access management solution targeted at modern applications and services.
It offers features such as Single-Sign-On, User federation, Client Adapters, Admin console, and Account management console.
When a user authenticates with a keycloak then individual applications do not have to deal with login forms and the authentication process of users.
Workflow of keycloak
Step 1: When a user navigates to the application, they are first redirected to the Keycloak authentication page.
Step 2: After adding login credentials, Keycloak will redirect the user to the application with the code.
Step 3: The application will exchange this code with an ID and access token and it will be used to identify users.
Benefits:
It is faster to setup keycloak
It is especially true for bigger applications with complex user modules.
It offers a web-based GUI that facilitates configuration updates.
Drawbacks:
It has complex architecture.
Difficult to understand.
It has a higher learning cost because of some Chinese materials.
3. Amazon Cognito
Amazon Cognito is an Amazon Web Service Product that controls user authentication, authorization, and user management for mobile applications on internet-connected devices.
Here users can directly log in with credentials through third parties such as Facebook, Amazon google, and apple.
It is a simple user identity and data synchronization service that helps to manage and synchronize app data for users securely across mobile devices.
Amazon Cognito is composed of two primary parts.
1. User pool — It is user directories that provide sign-up and sign-in options for apps.
2. Identity pool — It enables you to grant your user access to other AWS services.
Step 1: The app user signs in with the user pool
Step 2: Once successfully authenticated, they receive a user pool token.
Step 3: The app exchanges the user pool tokens for AWS credentials through the identity pool.
Step 4: Now app users can use these AWS credentials to access other AWS services such as Amazon S3 or DynamoDB
Benefits
It provides simple integration.
It has reliable sign-in features.
Password is securely stored in a database
Drawbacks
It’s difficult to use — Amazon Cognito can be quite confusing to set up and use, particularly for developers unfamiliar with AWS.
It’s pricey – Using Amazon Cognito for additional users or applications will increase the cost of the service significantly.
4. JSON Web Token
A JSON object can be used to securely transport information between parties thanks to the open standard known as JSON Web Token.
The fact that this information is digitally signed allows for verification and confidence.
Structure Of JWT
A JSON Web Token is composed of three parts, each separated by a dot (. ):
Header
Payload
Signature
A JWT typically looks like the following.
xxxxx.yyyyy.zzzzz
Let’s break down the different parts.
Header :
The type of the token, which is JWT, and the signing technique being used, such as HMAC SHA256 or RSA, are both included in the header.
For example:
{
“alg”: “HS256”,
“typ”: “JWT”
}
Payload :
The payload, which includes the claims, makes up the token’s second component. Claims are assertions about a subject and additional information.
An example payload could be:
{
“sub”: “1234567890”,
“name”: “John Doe”,
“admin”: true
}
The second component of the JSON Web Token is the payload, which is then Base64Url encoded.
Signature:
You must sign the encoded header, encoded payload, secret, and algorithm indicated in the header to construct the signature portion.
If you choose to utilize the HMAC SHA256 algorithm, for instance, the signature will be generated as follows:
HMACSHA256(
base64UrlEncode(header) + “.” +
base64UrlEncode(payload),
secret)
When a token is signed with a private key, it can also confirm that the sender of the JWT is who they claim to be. The signature is used to ensure that the message wasn’t altered along the way.
Workflow of JSON Web Tokens
Step 1: User sign in using username and password.
Step 2: The authentication server verifies the credentials and issues a JWT signed using a private key.
Step 3: Moving forward, the client will use the JWT to access protected resources by passing the JWT in the HTTP Authorization header.
Step 4: The resource server then verifies the authenticity of the token using the public key.
Benefits:
JWT tokens are stateless in that session data is not kept on the server, which reduces the need for server RAM.
To verify the legitimacy of the source, JWT tokens are utilized.
Receivers can check data signing to see if the source of the token is legitimate.
Drawbacks:
whenever a user account needs to be removed In the case application has to wait for the token to expire for the user account deactivation
When account hijacking happens, a user may need to change their password ASAP. But with JWT if authentication is done beforehand, then a token generated for the previous password would still be valid even after the user password is changed until the expiry time.
Wrapping Up
Above mentioned alternatives can be a boon for you as a Java developer. Grants in OAuth 2.0 are the series of actions a Client must do to obtain resource access authorization.
0 notes
Text
Azure devops oauth
Azure devops oauth Azure devops oauth News update today Azure devops oauth Access Azure DevOps REST API with oAuth I have created my application in AzureAD with the permission “Azure DevOps”. Below is my code to fetch project list from Azure DevOps But I’m getting error as “You are not authorized to access https://dev.azure.com.” I am using oAuth 2.0 Client Credential flow to get access…

View On WordPress
0 notes
Text
0 notes
Text
APIs and Authentication on the Jamstack
The first “A” in the Jamstack stands for “APIs” and is a key contributor to what makes working with static sites so powerful. APIs give developers the freedom to offload complexity and provide avenues for including dynamic functionality to an otherwise static site. Often, accessing an API requires validating the authenticity of a request. This frequently manifests in the form of authentication (auth) and can be done either client side or server side depending on the service used and the task being accomplished.
Given the vast spectrum of protocols available, APIs differ in their individual auth implementations. These auth protocols and implementation intricacies add an additional challenge when integrating APIs into a Jamstack site. Thankfully, there is a method to this madness. Every protocol can be mapped to a specific use case and implementing auth is a matter of understanding this.
To illustrate this best, let’s dive into the various protocols and the scenarios that they’re best suited for.
Summon the protocols
OAuth 2.0 is the general standard by which authentication today follows. OAuth is a fairly flexible authorization framework that constitutes a series of grants defining the relationship between a client and an API endpoint. In an OAuth flow, a client application requests an access token from an authorization endpoint and uses that to sign a request to an API endpoint.
There are four main grant types — authorization code, implicit flow, resource owner credential, and client credentials. We’ll look at each one individually.
Authorization Code Grant
Of all OAuth grant types, the Authorization Code Grant is likely the most common one. Primarily used to obtain an access token to authorize API requests after a user explicitly grants permission, this grant flow follows a two-step process.
First, the user is directed to a consent screen aka the authorization server where they grant the service restricted access to their personal account and data.
Once permission has been granted, the next step is to retrieve an access token from the authentication server which can then be used to authenticate the request to the API endpoint.

Compared to other grant types, the Authorization Code Grant has an extra layer of security with the added step of asking a user for explicit authorization. This multi-step code exchange means that the access token is never exposed and is always sent via a secure backchannel between an application and auth server. In this way, attackers can’t easily steal an access token by intercepting a request. Google-owned services, like Gmail and Google Calendar, utilize this authorization code flow to access personal content from a user’s account. If you’d like to dig into this workflow more, check out this blog post to learn more.
Implicit Grant
The Implicit Grant is akin to the Authorization Code Grant with a noticeable difference: instead of having a user grant permission to retrieve an authorization code that is then exchanged for an access token, an access token is returned immediately via the the fragment (hash) part of the redirect URL (a.k.a. the front channel).

With the reduced step of an authorization code, the Implicit Grant flow carries the risk of exposing tokens. The token, by virtue of being embedded directly into the URL (and logged to the browser history), is easily accessible if the redirect is ever intercepted.
Despite its vulnerabilities, the Implicit Grant can be useful for user-agent-based clients like Single Page Applications. Since both application code and storage is easily accessed in client-side rendered applications, there is no safe way to keep client secrets secure. The implicit flow is the logical workaround to this by providing applications a quick and easy way to authenticate a user on the client side. It is also a valid means to navigate CORS issues, especially when using a third-party auth server that doesn’t support cross-origin requests. Because of the inherent risks of exposed tokens with this approach, it’s important to note that access tokens in Implicit Flow tend to be short-lived and refresh tokens are never issued. As a result, this flow may require logging in for every request to a privileged resource.
Resource Owner Credential
In the case of the Resource Owner Credential Grant, resource owners send their username and password credentials to the auth server, which then sends back an access token with an optional refresh token. Since resource owner credentials are visible in the auth exchange between client application and authorization server, a trust relationship must exist between resource owner and client application. Though evidently less secure than other grant types, the Resource Owner Credential grant yields an excellent user experience for first party clients. This grant flow is most suitable in cases where the application is highly privileged or when working within a device’s operating system. This authorization flow is often used when other flows are not viable.
Client Credential
The Client Credentials Grant type is used primarily when clients need to obtain an access token outside of the context of a user. This is suitable for machine to machine authentication when a user’s explicit permission cannot be guaranteed for every access to a protected resource. CLIs, and services running in the back end are instances when this grant type comes in handy. Instead of relying on user login, a Client ID and Secret are passed along to obtain a token which can then be used to authenticate an API request.

Typically, in the Client Credential grant, a service account is established through which the application operates and makes API calls. This way, users are not directly involved and applications can still continue to authenticate requests. This workflow is fairly common in situations where applications want access to their own data, e.g. Analytics, rather than to specific user data.
Conclusion
With its reliance on third party services for complex functionality, a well-architected authentication solution is crucial to maintain the security of Jamstack sites. APIs, being the predominant way to exchange data in the Jamstack, are a big part of that. We looked at four different methods for authenticating API requests, each with its benefits and impacts on user experience.
We mentioned at the start that these four are the main forms of authentication that are used to request data from an API. There are plenty of other types as well, which are nicely outlined on oauth.net. The website as a whole is an excellent deep-dive on not only the auth types available, but the OAuth framework as a whole.
Do you prefer one method over another? Do you have an example in use you can point to? Share in the comments!
The post APIs and Authentication on the Jamstack appeared first on CSS-Tricks.
APIs and Authentication on the Jamstack published first on https://deskbysnafu.tumblr.com/
0 notes
Text
Google Login and Authentication in King567
Implementing Google Login and authentication in King567 involves leveraging Google's secure OAuth 2.0 protocol to streamline user registration and login processes while enhancing security. Here’s a detailed guide on how this can be done, along with the benefits:
Implementation of Google Login and Authentication
Set Up Google API Console
Create a Project: Go to the Google API Console and create a new project.
Enable APIs: Enable the "Google+ API" or "Google People API" to access user profile information.
Credentials: Create OAuth 2.0 credentials (Client ID and Client Secret) for the project. These credentials will be used to authenticate your application with Google.
Integrate OAuth 2.0 in King567
OAuth 2.0 Library: Use an OAuth 2.0 client library appropriate for your development environment (e.g., Google's OAuth 2.0 Client Library for Python, JavaScript, etc.).
Redirect URIs: Configure authorized redirect URIs in the Google API Console to match the URLs that users will be redirected to after authenticating.
Backend Configuration
Login Endpoint: Create a backend endpoint that redirects users to Google's OAuth 2.0 authorization endpoint.
Token Exchange: After users grant permission, exchange the authorization code for an access token using Google's token endpoint.
Frontend Integration
Google Sign-In Button: Add a Google Sign-In button to your website or app. This button should initiate the OAuth 2.0 authorization flow.
JavaScript Client Library: Use Google’s JavaScript client library to handle the sign-in process on the client side.
User Authentication Flow
Redirect to Google: When users click the Google Sign-In button, redirect them to the Google authorization URL.
User Consent: Users log in with their Google credentials and consent to share profile information with King567.
Receive Authorization Code: Upon successful login, users are redirected back to King567 with an authorization code.
Token Exchange: Exchange the authorization code for an access token and ID token. Validate the ID token to ensure it is authentic and obtain user information.
User Session: Create or update the user session in King567, using the information retrieved from Google (e.g., email, name, profile picture).
0 notes
Quote
The first “A” in the Jamstack stands for “APIs” and is a key contributor to what makes working with static sites so powerful. APIs give developers the freedom to offload complexity and provide avenues for including dynamic functionality to an otherwise static site. Often, accessing an API requires validating the authenticity of a request. This frequently manifests in the form of authentication (auth) and can be done either client side or server side depending on the service used and the task being accomplished. Given the vast spectrum of protocols available, APIs differ in their individual auth implementations. These auth protocols and implementation intricacies add an additional challenge when integrating APIs into a Jamstack site. Thankfully, there is a method to this madness. Every protocol can be mapped to a specific use case and implementing auth is a matter of understanding this. To illustrate this best, let’s dive into the various protocols and the scenarios that they’re best suited for. Summon the protocols OAuth 2.0 is the general standard by which authentication today follows. OAuth is a fairly flexible authorization framework that constitutes a series of grants defining the relationship between a client and an API endpoint. In an OAuth flow, a client application requests an access token from an authorization endpoint and uses that to sign a request to an API endpoint. There are four main grant types — authorization code, implicit flow, resource owner credential, and client credentials. We’ll look at each one individually. Authorization Code Grant Of all OAuth grant types, the Authorization Code Grant is likely the most common one. Primarily used to obtain an access token to authorize API requests after a user explicitly grants permission, this grant flow follows a two-step process. First, the user is directed to a consent screen aka the authorization server where they grant the service restricted access to their personal account and data. Once permission has been granted, the next step is to retrieve an access token from the authentication server which can then be used to authenticate the request to the API endpoint. Compared to other grant types, the Authorization Code Grant has an extra layer of security with the added step of asking a user for explicit authorization. This multi-step code exchange means that the access token is never exposed and is always sent via a secure backchannel between an application and auth server. In this way, attackers can’t easily steal an access token by intercepting a request. Google-owned services, like Gmail and Google Calendar, utilize this authorization code flow to access personal content from a user’s account. If you’d like to dig into this workflow more, check out this blog post to learn more. Implicit Grant The Implicit Grant is akin to the Authorization Code Grant with a noticeable difference: instead of having a user grant permission to retrieve an authorization code that is then exchanged for an access token, an access token is returned immediately via the the fragment (hash) part of the redirect URL (a.k.a. the front channel). With the reduced step of an authorization code, the Implicit Grant flow carries the risk of exposing tokens. The token, by virtue of being embedded directly into the URL (and logged to the browser history), is easily accessible if the redirect is ever intercepted. Despite its vulnerabilities, the Implicit Grant can be useful for user-agent-based clients like Single Page Applications. Since both application code and storage is easily accessed in client-side rendered applications, there is no safe way to keep client secrets secure. The implicit flow is the logical workaround to this by providing applications a quick and easy way to authenticate a user on the client side. It is also a valid means to navigate CORS issues, especially when using a third-party auth server that doesn’t support cross-origin requests. Because of the inherent risks of exposed tokens with this approach, it’s important to note that access tokens in Implicit Flow tend to be short-lived and refresh tokens are never issued. As a result, this flow may require logging in for every request to a privileged resource. Resource Owner Credential In the case of the Resource Owner Credential Grant, resource owners send their username and password credentials to the auth server, which then sends back an access token with an optional refresh token. Since resource owner credentials are visible in the auth exchange between client application and authorization server, a trust relationship must exist between resource owner and client application. Though evidently less secure than other grant types, the Resource Owner Credential grant yields an excellent user experience for first party clients. This grant flow is most suitable in cases where the application is highly privileged or when working within a device’s operating system. This authorization flow is often used when other flows are not viable. Client Credential The Client Credentials Grant type is used primarily when clients need to obtain an access token outside of the context of a user. This is suitable for machine to machine authentication when a user’s explicit permission cannot be guaranteed for every access to a protected resource. CLIs, and services running in the back end are instances when this grant type comes in handy. Instead of relying on user login, a Client ID and Secret are passed along to obtain a token which can then be used to authenticate an API request. Typically, in the Client Credential grant, a service account is established through which the application operates and makes API calls. This way, users are not directly involved and applications can still continue to authenticate requests. This workflow is fairly common in situations where applications want access to their own data, e.g. Analytics, rather than to specific user data. Conclusion With its reliance on third party services for complex functionality, a well-architected authentication solution is crucial to maintain the security of Jamstack sites. APIs, being the predominant way to exchange data in the Jamstack, are a big part of that. We looked at four different methods for authenticating API requests, each with its benefits and impacts on user experience. We mentioned at the start that these four are the main forms of authentication that are used to request data from an API. There are plenty of other types as well, which are nicely outlined on oauth.net. The website as a whole is an excellent deep-dive on not only the auth types available, but the OAuth framework as a whole. Do you prefer one method over another? Do you have an example in use you can point to? Share in the comments!
http://damianfallon.blogspot.com/2020/04/apis-and-authentication-on-jamstack.html
0 notes
Text
A guide to Oauth 2.0 Grant types - Explained
Users have a secure way to access internet services without having to worry about their login credentials thanks to the OAuth authentication framework. The most recent version of an open standard, OAuth 2.0, was developed to enable generic apps to access internet services using your identity without needing to know your username and password for those services.
What are the Grant Types in Oauth 2.0
1. Implicit Grant Type
In Oauth 2.0, this is the most basic grant type.
Access tokens that are not kept on secure servers can be obtained via the authentication server using the implicit grant type.
In this grant type, the access token is sent directly from the authorization server to the Client application. Although it does not need a web server, it is less secure because the access token must be kept on the user or client’s device.
2. Authorization Server Code
The authorization code grant type initially looks quite complicated, but it’s simpler than you think once you’re familiar with a few basics.
Web and mobile applications both use the Authorization Code grant type. It is different from the other grant types.
In this flow User or Resource, the owner gets the authorization code first from the authorization server and the user sends that authorization code to the authorization server in exchange for the access token.
The Authorization Code flow is mostly used by Single Page Applications (SPA) and mobile/native applications.
In this flow, the token is stored on the server side so it is more secure than the implicit grant type.
3. PKCE Grant Type with Authorization Code Flow
This grant type is similar to the authorization code but it has additional steps that make it more secure for mobile and native applications or single-page applications.
It helps protect you against various code injection attacks.
This grant type has mainly two parameters
code verifier: It is nothing but a random string between 43-128 characters. it is stored in our local system.
code challenge: It takes the code verifier as input and does hashing with different hashing techniques and generates the base 64 URL encode.
4. Device Flow
It is a grant type that is primarily used to receive an access token on devices with restricted browser input capabilities, such as mobile phones. applications for TV.
Originally published by: https://www.inexture.com/oauth-2-grant-types/
0 notes
Text
External Provider Authentication using OAuth2 Implicit and Explicit Flow

Allowing users to sign in using their existing credentials is often a great way to drive additional traffic to our applications, as demonstrated by a number of case studies by Google, Facebook and Twitter. Such technique is commonly called External Provider Authentication or Third-Party Authentication and we already talked about it a number of times, such as in this AUTH-focused post. As you might already know, a lot of modern web development frameworks comes with a set of handy packages that will take care of the whole Third-Party Authentication process with the above mentioned providers, saving ourselves from dealing with the relevant amount of complexity of the OAuth2 authentication flow: the .NET Framework offers a perfect example of that with the ASP.NET Core Identity package, featuring a set of plug-and-play , easy-to-implement features to authenticate users with Facebook, Twitter, Google and Microsoft providers in a (almost) seamless way: for more info on that, read the Microsoft ASP.NET Core official docs. In this post we'll briefly explain what is going on behind the hood, i.e. what the OAuth2-based authorization flow is and how it actually works.
Introducing OAuth2
The 2.0 release of OAuth, also known as OAuth2, is arguably the best known third-party authorization protocol nowadays: it supersedes the former release (OAuth1 or simply OAuth) originally developed by Blaine Cook and Chris Messina in 2006. OAuth 2 has quickly become the industry-standard protocol for authorization and is currently used by a gigantic amount of community-based websites and social networks, including Google, Facebook and Twitter. It basically works like this: Whenever an existing user requests a set of permissions to our application via OAuth, we open a transparent connection interface between them and a third-party authorization provider that is trusted by our application (for example, Facebook). The provider acknowledges the user and, if they have the proper rights, responds entrusting them with a temporary, specific access key. The user presents the access key to our application and will be granted access. We can clearly see how easy it is to exploit this authorization logic for authentication purposes as well; after all, if Facebook says I can do something, shouldn't it also imply that I am who I claim to be? Isn't that enough? The short answer is no. It might be the case for big players such as Facebook, because their OAuth 2 implementation implies that the subscriber receiving the authorization must have authenticated himself to their service first; however, this assurance is not written anywhere: considering how many websites are using it for authentication purposes we can assume that neither Facebook, nor Twitter nor Google won't likely change their actual behaviour, yet there are no guarrantees about it. Theoretically speaking, these websites could split their authorization system from their authentication protocol at any time, thus leading our application's authentication logic to an unrecoverable state of inconsistency. More generally, we can say that presuming something from something else is almost always a bad practice unless that assumption lies upon very solid, well-documented and (most importantly) highly guaranteed grounds. Nonetheless, since OAuth2 is arguably the most used standard for access delegation and SSO strategies around the web nowadays, we can say that such assumption has earned an high level of trust.
OAuth2 authorization flow
Let's do a quick recap of how OAuth2 authorization flow actually works for a standard web application: The user asks the web application to login with the external provider X. The web application prompts the user with a popup window containing a page directly hosted by the external provider X, from which he can: Login to X to authenticate himself there, unless he's not logged-in there; If/when logged-in, authorize the web application to use X as third-party authentication provider, thus giving it access to the minimum amount of required user info (name, e-mail, and so on) to allow that. If the user refuses to either login to X or to give X the authorization, the popup will close and the authentication process will fail; if he accepts, X will send back an OAuth2 access token. The web application will immediately consume that OAuth2 access token to fetch the above mentioned user info and use them to either create a new account or login with an existing one, depending if these info corresponds to an existing user or not. This is what happens under the hood, regardless of X being Facebook, Google, Twitter or anything else. That said, such workflow can be implemented in a number of alternative ways, which can be grouped into two significative approaches (or, to better say, grant types): Using an implicit flow, often handled by a Client-Side SDK written in JavaScript and made available by the external provider itself. Using an explicit flow, with the help of a set of server-side tools, packages or libraries made available by the chosen development framework (such as ASP.NET Core), third-party packages or the external provider itself. The explicit flow grant type is also called Authorization Code flow, because it returns a unique authorization code that must be used to retrieve the OAuth2 access token, avoiding the latter to be directly exposed to the user and to applications that might have access to the user's User Agent (such as browsers extensions, installed software, packet sniffers and so on). To learn more about the OAuth2 authorization framework, we strongly suggest reading the following URLs: Official Page: http://oauth.net/2/ RFC 6749: https://tools.ietf.org/html/rfc6749 Implicit flow vs Explicit flow The main difference between the two grant types is all about how the aforementioned OAuth2 access token is requested, obtained and handled: in short words, how the steps 2 and 3 are actually performed. In a standard implicit flow, these steps are entirely performed by the client-side part of our web app - often using a client-side SDK such as the Facebook JavaScript SDK - and the external provider servers. More specifically: The popup window (step 2) will directly point to the external provider login/authorization page; After the login and auth, the OAuth2 access token (step 3) will be directly fetched by the client-side part of our web application and then sent to a dedicated server-side API controller, which will use it to retrieve the user data and perform the account creation/login (step 4). Conversely, when using an explicit flow grant type such as those provided by AspNet.Security.OAuth.Providers, Windows SDK for Facebook or OpenIddict, these same steps take place in the following way: The popup window (step 2) will point to a server-side intermediate page of our app, which will then redirect the user to the external provider login/authorization page; After the login & auth, the external provider will redirect the user to a specific callback URL together with an Authorization Code which will be used by the server-side part of our application to retrieve the actual OAuth2 access token (step 3) and then immediately use it to retrieve the user data and perform the account creation/login (step 4). Either of these approaches is viable enough: however, they both have their pros and cons in terms of security and versatility, depending on the given scenario. Implicit flow pros and cons Implementing an implicit flow with an official client-side SDK released by the third-party provider is almost a walk in the park, even in Angular: we just have to find a way to implement a small, yet required amount of external JavaScript within our client-side code and load the external JS libraries without messing up the Angular components life cycle - or the page DOM - and we're set. On top of that, the overall results will most likely look great: the required popup window will open (and close) in the best possible way, without size mismatches or other UI/UX issues, and without any hack (that we're aware of). However, such approach also comes with a few downsides: our users will be able to receive their access tokens, together with whatever could spy, hack, sniff or impersonate them; additionally, it will also force us to write a certain amount of dedicated client-side code for each supported provider, which might be far from ideal if we want to support a whole lot of them. Explicit flow pros and cons The explicit flow approach is the most commonly used in server-side web applications for a number of good reasons: the auth source code is not publicly exposed, the Client Secret confidentiality can be mantained and the whole process is definitely more secure due to the presence of the Authorization Code, which is nothing less than an additional security layer. On top of that, if we're using a third-party-aware framework such as the .NET Framework, we could always count on the built-in server-side tools - such as the aforementioned Microsoft.AspNetCore.Identity service. The only real downside about that is the fact that it still is a flow based upon browser redirection, which means that the application must be capable of interacting with the user-agent (aka the web browser): open the login/auth popup (with a proper size), receive API authorization codes that are routed through the browser, close that popup, and so on. Although this is hardly an issue in standard MVC web applications, it's definitely way more complicated when dealing with Angular and Single-Page Applications; although it can be definitely "forced" into that, the developer will eventually have to pull off a small, yet consistent number of nasty workarounds: it won't be an out-of-the-box experience, that's for sure. Conclusions As we can easily see, both approaches have their pros and cons. As always, it's mostly a matter of what we actually need (or want to) achieve as product owners, project managers or full-stack software developers. This article is part of the ASP.NET Core 2 and Angular 5 book, available as paperback, e-book and as a 26-lessons video-course. Promo Code: ASPCA50 to get it with a 50% discount! Read the full article
0 notes
Text
OAuth 2.0 with Swift Tutorial
Update note: This tutorial has been updated to Swift 4 by Owen Brown. The original tutorial was written by Corinne Krych.
Take a look at a few different OAuth 2.0 libraries, and find out how to integrate them into an app.
It’s likely that you’ve bumped into OAuth 2.0 and the different families of flows while building apps to share content with your favorite social network (Facebook, Twitter, etc) or with your enterprise OAuth 2.0 server — even if you weren’t aware of what was going on under the hood. But do you know how to hook up to your service using OAuth 2.0 in an iOS app?
In this tutorial, you’ll work on a selfie-sharing app named Incognito as you learn how to use the AeroGear OAuth2 and OAuthSwift open source OAuth 2.0 libraries to share your selfies on Google Drive.
Getting Started
Download the Incognito starter project. The starter project uses CocoaPods to fetch AeroGear dependencies and contains everything you need, including generated pods and xcworkspace directories.
Open Incognito.xcworkspace in Xcode. The project is based on a standard Xcode Single View Application template, with a single storyboard which contains a single view controller ViewController.swift. All UI actions are already handled in ViewController.swift.
Build and run your project to see what the app looks like:
The app lets you pick your best selfie and add some accessories to the image. Did you recognize me behind my disguise? :]
Note: To add photos in the simulator, simply go to the home screen using Cmd + Shift + H and drag and drop your images onto the simulator.
The missing part in the app is adding the ability to share on Google Drive using two different OAuth 2.0 libraries.
Mission impossible? Nope, it’s nothing you can’t handle! :]
Instead of boring you with an introduction to the RFC6749 OAuth2 specification, let me tell you a story…
Explaining the Need for OAuth 2.0
On Monday morning, Bob, our mobile nerd bumps into Alice, another friendly geek, in front of the coffee machine. Bob seems busy, carrying a heavy bunch of documents: his boss wants him to delve into the OAuth 2.0 specification for the Incognito app.
Put any two developers in a coffee room and soon they’ll chat about geeky things, of course. Bob asks Alice:
“…what problem are we trying to solve with OAuth 2.0?”
On one side, you have services in the form of APIs, such as the Twitter API, which you can use to get a list of followers or Tweets. Those APIs handle your confidential data, which is protected by a login and password.
On the other side, you have apps that consume those services. Those apps need to access your data, but do you want to trust all of them with your credentials? Maybe — but maybe not.
This brings up the concept of delegated access. OAuth2 lets users grant third-party apps access to their web resources, without sharing their passwords, through a security object known as an access token. It’s impossible to obtain the password from the access token, since your password is kept safe inside the main service. If an app wants to connect to the service, it must get its own access token. Access tokens can then be revoked if you ever want to revoke access to just that app.
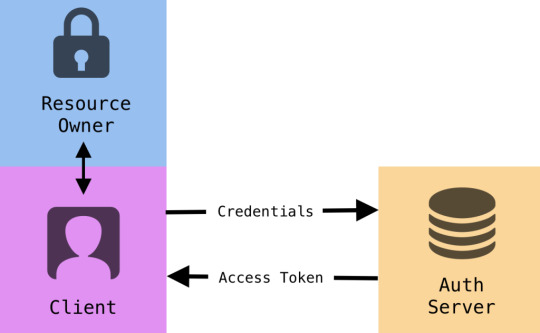
OAuth 2.0 works with the following four actors:
authorization server: responsible for authentication and authorization — it provides the access token.
resource server: in charge of serving up resources if a valid token is provided.
resource owner: the owner of the data — that is, the end user of Incognito.
client: the Incognito mobile app.
The OAuth 2.0 specification describes the interactions between these actors as grant flows.
The specification details four different grant flows that can be grouped into two different families:
3-legged flows: the end user needs to grant permission in these cases. The implicit grant is for browser-based apps that aren’t capable of keeping tokens secure. The authorization code grant, which generates an access token and optionally a refresh token, is for clients capable of keeping tokens secure. Such clients include mobile apps which have somewhere secure they can store the token, such as in the keychain on iOS.
2-legged flows: the credentials are given to the app. The key difference here is that the resource owner inputs the credentials directly into the client. An example of where you see this in practice is when accessing many APIs, e.g. Parse, as a developer and put your key in your app.
You’ll use your existing Google Drive account and upload your Incognito selfies there. This is a good case for implementation of the 3-legged authorization code grant.
The Authorization Dance
Although using open source libraries hides most of the sticky details of the OAuth 2.0 protocol from you, knowing its basic inner workings will help you get the configuration right.
Here are the steps involved in the authorization code grant dance:
Step 0: Registration
Your application needs to be registered with the service you want to access. In your case, for Incognito, that’s Google Drive. Don’t worry, the following section will explain how to do that.
Step 1: Authorization Code
The dance begins when Incognito sends a request for an authorization code to the third-party service that includes:
client ID: Provided during service registration. Defines which app is talking to the service.
redirect URI: Where the user should be redirected after entering their credentials into the service, and granting permission.
scope: Used to tell the service what level of permission the app should have.
The app then switches to the web browser. Once the user logs in, the Google authorization server displays a grant page: “Incognito would like to access your photos: Allow/Deny”. When the end user clicks “Allow”, the server redirects to the Incognito app using the redirect URI and sends an authorization code to the app.
Step 2: Exchange Code for Token
The authorization code is only temporary; therefore the OAuth 2.0 library has to exchange this temporary code for a proper access token, and optionally, a refresh token.
Step 3: Get Resources
Using the access token, Incognito can access protected resources on the server — that is, the resources the end-user granted access to. Your upload is free to proceed.
Ready to see this in action? First, you need to register with the OAuth 2.0 provider: Google.
Registering With your OAuth 2.0 Provider
If you don’t have a Google account, go create one now. It’s OK; I’ll wait for you. :]
Open http://ift.tt/2vWwIve in your browser; you’ll be prompted to authenticate with Google.
Click Create Project and name your new project Incognito:
Next, you need to enable the Drive API.
Click Library in left menu and search for Google Drive API and select it. On the next screen, click Enable:
Now you need to create new credentials to access your Drive accounts from the app.
Select Credentials in left menu and from the blue Create Credentials drop down, select OAuth client ID.
Then click Configure consent screen and in the screen that appears, fill out the following information:
Email address: Select your email address
Product name: Incognito
Homepage URL: http://ift.tt/r2iiun
Click Save and you’ll return to the Client ID screen. Select select iOS and enter com.raywenderlich.Incognito as your Bundle ID.
The authorization server will use the bundle id entered above as the redirect URI.
Finally, click Create. A popup with the Client ID appears, just click Ok. The important parameter needed for later is the Client ID. You can grab it anytime by clicking Credentials in the left menu and picking your client ID from the OAuth ID list.
Now that you’ve registered with Google, you’re ready to start your OAuth 2.0 implementation using the first OAuth 2.0 library: AeroGear with an external browser.
Authenticating with AeroGear and External Browsers
Open ViewController.swift and add the following imports to the top of the file:
import AeroGearHttp import AeroGearOAuth2
Now, add the following instance variable inside the ViewController class:
private let http = Http(baseURL: "http://ift.tt/2m7oRmA;)
You’ll use this instance of Http, which comes from the AeroGearHttp library, to perform HTTP requests.
Still in ViewController.swift, find the empty share(_:) method and add the following code to it:
//1 let googleConfig = GoogleConfig( clientId: "YOUR_GOOGLE_CLIENT_ID", scopes:["http://ift.tt/2CRPztT;]) //2 let gdModule = AccountManager.addGoogleAccount(config: googleConfig) //3 http.authzModule = gdModule //4 let multipartData = MultiPartData(data: snapshot(), name: "image", filename: "incognito_photo", mimeType: "image/jpg") let multipartArray = ["file": multipartData] //5 http.request(method: .post, path: "/upload/drive/v2/files", parameters: multipartArray) { (response, error) in if (error != nil) { self.presentAlert("Error", message: error!.localizedDescription) } else { self.presentAlert("Success", message: "Successfully uploaded!") } }
Here’s what’s going on in the method above:
Create a configuration. You’ll need to replace YOUR_GOOGLE_CLIENT_ID above with the Client ID from your Google Console to use the correct authorization configuration. At initialisation you also define the scope of the grant request. In the case of Incognito, you need access to the Drive API.
You then instantiate an OAuth2 module via AccountManager utility methods.
Next you inject the OAuth2 module into the HTTP object, which links the HTTP object to the authorization module.
Then you create a multi-part data object to encapsulate the information you wish to send to the server.
Finally, you use a simple HTTP call in to upload the photo. The library checks that an OAuth2 module is plugged into HTTP and makes the appropriate call for you. This will result in one of the following outcomes:
start the authorization code grant if no access token exists.
refresh the access token if needed.
if all tokens are available, simply run the POST call.
Note: For more information on how to use AeroGear OAuth2, either check out AeroGear’s online documentation and API reference, or browse through the source code in the Pods section.
Build and run your app; select an image, add an overlay of your choosing, then tap the Share button. Enter your Google credentials if you’re prompted; if you’ve logged in before, your credentials may be cached. You’ll be redirected to the grant page. Tap Accept and…
Boom — you receive the Safari Cannot Open Page error message. :[ What’s up with that?
Once you tap Accept, the Google OAuth site redirects you to com.raywenderlich.Incognito://[some url]. Therefore, you’ll need to enable your app to open this URL scheme.
Note: Safari stores your authentication response in a cookie on the simulator, so you won’t be prompted again to authenticate. To clear these cookies in the simulator, go to Hardware\Erase All Content and Settings.
Configuring the URL Scheme
To allow your user to be re-directed back to Incognito, you’ll needs to associate a custom URL scheme with your app.
Go to the Incognito\Supporting Files group in Xcode and find Info.plist. Right click on it and choose Open As\Source Code.
Add the following to the bottom of the plist, right before the closing </dict> tag:
<key>CFBundleURLTypes</key> <array> <dict> <key>CFBundleURLSchemes</key> <array> <string>com.raywenderlich.Incognito</string> </array> </dict> </array>
The scheme is the first part of a URL. In web pages, for example, the scheme is usually http or https. iOS apps can specify their own custom URL schemes, such as com.raywenderlich.Incognito://doStuff. The important point is to choose a custom scheme that it unique among all apps installed on your users’ devices.
The OAuth 2.0 dance uses your custom URL scheme to re-enter the application from which the request came. Custom schemes, like any URL, can have parameters. In this case, the authorization code is contained in the code parameter. The OAuth 2.0 library will extract the authorization code from the URL and pass it in the next request in exchange for the access token.
You’ll need to implement a method in Incognito’s AppDelegate class for the app to respond when it’s launched via a custom URL scheme.
Open AppDelegate.swift and add the following import statement to the top of the file:
import AeroGearOAuth2
Next, implement application(_:open:options) as shown below:
func application(_ app: UIApplication, open url: URL, options: [UIApplicationOpenURLOptionsKey : Any] = [:]) -> Bool { let notification = Notification(name: Notification.Name(AGAppLaunchedWithURLNotification), object:nil, userInfo:[UIApplicationLaunchOptionsKey.url:url]) NotificationCenter.default.post(notification) return true }
This method simply creates an Notification containing the URL used to open the app. The AeroGearOAuth2 library listens for the notification and calls the completionHandler of the POST method you invoked above.
Build and run your project again, take a snazzy selfie and dress it up. Click the share button, authenticate yourself, and lo and behold:
You can download the finished Incognito AeroGear project from this section if you wish.
Switching context to an external browser during the OAuth 2.0 authentication step is a bit clunky. There must be a more streamlined approach…
Using Embedded Safari View
Embedded Safari web views make for a more user-friendly experience. This can be achieved by using a SFSafariViewController rather than switching to the Safari app. From a security point of view, it’s a less-secure approach since your app’s code sits between the login form and the provider. Your app could use Javascript to access the credentials of the user as they type them. However, this could be an acceptable option if your end users trust your app to be secure.
You’ll revisit the share method using the OAuthSwift library, but this time, you’ll implement OAuth 2.0 using an embedded Safari view.
OAuthSwift with Embedded Safari View
You’re going to start again with a different project. So close the existing Xcode workspace, download this version of the Incognito starter project, and open the project in Xcode using the Incognito.xcworkspace file.
Build and run the project; things should look pretty familiar.
As before, you first need to import the OAuthSwift library included in the project.
Open ViewController.swift and add the following import to the top of the file:
import OAuthSwift
Still in ViewController.swift, add the following code to share():
//1 let oauthswift = OAuth2Swift( consumerKey: "YOUR_GOOGLE_DRIVE_CLIENT_ID", consumerSecret: "", // No secret required authorizeUrl: "http://ift.tt/2m9KP8n;, accessTokenUrl: "http://ift.tt/2CRPBC1;, responseType: "code" ) oauthswift.allowMissingStateCheck = true //2 oauthswift.authorizeURLHandler = SafariURLHandler(viewController: self, oauthSwift: oauthswift) guard let rwURL = URL(string: "com.raywenderlich.Incognito:/oauth2Callback") else { return } //3 oauthswift.authorize(withCallbackURL: rwURL, scope: "http://ift.tt/2CRPztT;, state: "", success: { (credential, response, parameters) in oauthswift.client.postImage("http://ift.tt/2CQ9RnI;, parameters: parameters, image: self.snapshot(), success: { //4 (response) in if let _ = try? JSONSerialization.jsonObject(with: response.data, options: []) { self.presentAlert("Success", message: "Successfully uploaded!") } }, failure: { (error) in self.presentAlert("Error", message: error.localizedDescription) }) }, failure: { (error) in self.presentAlert("Error", message: error.localizedDescription) })
Here’s what’s going on in the code above:
You first create the OAuth2Swift that will handle the OAuth dance for you. Don’t forget to replace YOUR_GOOGLE_CLIENT_ID with the client id from the Google console.
Then initiatize the authorizeURLHandler to a SafariURLHandler which will automatically handle displaying and dismissing a SFSafariViewController.
Next, request authorization via the oauthswift instance. The scope parameter indicates that you are requesting access to the Drive API.
If authorization is granted, you can go ahead and upload the image.
Configuring URL Handling
Just as in the previous project, this version of Incognito has been set up to accept a custom URL scheme; all you need to do is implement the code to handle the custom URL.
Open AppDelegate.swift and add the following import:
import OAuthSwift
Then, implement application(_:open:options) as shown below:
func application(_ app: UIApplication, open url: URL, options: [UIApplicationOpenURLOptionsKey : Any] = [:]) -> Bool { OAuthSwift.handle(url: url) return true }
Unlike AeroGearOAuth2, OAuthSwift uses a class method to handle parsing the returned URL. However, if you inspect the handle(_) method, you’ll see that it simply sends a Notification, just like AeroGearOAuth2 required you to do!
Build and run your project; note that when the authentication form appears, it’s not displayed within the Safari app, and no app switching happens. As well, the authentication form is presented each time you run the app since no web cookies are stored in your app by default.
Using a SFSafariViewController to authenticate with Google looks more streamlined, for sure! :]
You can download the final Incognito OAuthSwift project here.
More About Tokens
One thing you haven’t looked at is how to store those precious access and refresh tokens which you receive as part of the OAuth 2.0 dance. Where do you store them? How do you refresh an expired access token? Can you revoke your grants?
Storing tokens
The best way to store them is…on your Keychain, of course! :]
This is the default strategy adopted by OAuth2Session (from AeroGear).
If you would like to read more about the keychain, then I recommend reading our other tutorials on the subject.
Refreshing and Revoking
To refresh the access token, you simply make an HTTP call to an access token endpoint and pass the refresh token as parameter.
For example, AeroGear leaves it up to the library to determine whether the token is still valid.
OAuth 2.0 defines a different specification for revoking tokens, which makes it possible to either revoke tokens separately or all at once. Most providers revoke both access and refresh tokens at the same time.
Where To Go From Here?
You covered two open source libraries which implement OAuth 2.0 – and hopefully learned a little more about how OAuth 2.0 works under the hood.
Maybe now you’re ready to read the OAuth 2.0 specification, RFC6749?! OK, maybe not. It’s a beast of a document! But at least you now understand the fundamentals and how it relates to your app.
I hope you use one of them in your app. Once you’ve picked your favorite open source OAuth 2.0 library, contributing to it is essential. If you notice a bug, report an issue. If you know how to fix it, even better – propose a pull request.
If you have any comments or questions about this tutorial, please join the forum discussion below!
The post OAuth 2.0 with Swift Tutorial appeared first on Ray Wenderlich.
OAuth 2.0 with Swift Tutorial published first on http://ift.tt/2fA8nUr
0 notes
Link
As many of you are no doubt already aware Skype for Business on-premises provides a mechanism for users to easily sign into IP telephony devices, this process is referred to as PIN authentication. It provides end-users with an easy way to authenticate with Skype for Business without the need to input a full username and password on the phone. Of course, if the phone is paired with your desktop PC via “Better Together” functionality this makes things easier, but given that 3rd party interoperability program or (3PIP) devices require additional software for network-based pairing – this often isn’t deployed.
Now let’s level set on a few limitations to be aware of with PIN-based authentication:
1. As an IT admin DHCP options needs to be configured appropriately, specifically option 43. This lets the phone know the location for the certification provisioning service, this then in turn facilitates a secure TLS channel between the phone and the Skype for Business server. Once the authentication is completed the phone retrieves a client certificate which facilitates access to various services, this process is referred to as “TLS-DSK”. This private certificate provisioning service isn’t published externally, so remote workers need to use the process previously mentioned, “Better Together”.
Note: Polycom VVX phones can be configured to work in absence of deploying this option (provided Internet time is configured and available), refer to the parameter dhcp.option43.override.stsUri documented within the UCS Lync and Skype for Business Deployment Guide.
For more information on Option 43, I’d recommend you refer to this post by Jeff Schertz.
2. Given that PIN authentication grants the phone access to Skype for Business services this does not help with Microsoft Exchange, for this NTLM sign-in is still required. Once complete calendaring details can be populated – this is important if you want to perform Skype for Business “Click-to-Join” from the phone’s calendar.
So now let’s talk about Skype for Business Online Web Sign-In, this is a new (heavily understated) feature that allows users with Skype for Business Online accounts to sign into their phone with minimal phone intervention or the need for the 3PIP Better Together AKA the “Better Together-over-Ethernet” companion application.
Let’s first walk you through the process and then we’ll examine how it works.
Step 1: We select the new Web Sign-In option via the phone home screen
Step 2: Once Web Sign-In is selected the phone displays a unique device code, this code is generated within the region the phone is set to and is retrieved via the Device Configuration Web Service
Step 3: Via your computer web browser access the web page displayed on the phone and enter the email associated with your Skype for Business Online account
Step 4: Once the email is entered the user is prompted to sign-in with his or her Office 365 account credentials
Step 5: Enter the device code displayed on the phone screen
Once the code is entered the phone vendor details are displayed
Finally the web page acknowledges that sign-in is complete and the browser session can be closed
The phone sign-in completes without any user intervention
That’s it!
Next up let’s look at how this works behind the scenes. The first thing we need to understand is that Modern Authentication (OAuth 2.0) is used to facilitate this authentication process. Note: even with Skype for Business Online set to
“Set-CsOAuthConfiguration -ClientAdalAuthOverride NoOverride”
(as per documentation here) Web Sign-In is still possible.
The flow chart below outlines the interaction via the various services:
Step 1: The IP Phone requests a localized device pairing site and pairing code (valid for two minutes).
Step 2: The end-user opens their local device pairing website within their web browser. After inputting their device pairing code they are redirected to the Skype for Business device pairing website (where authentication credentials are added).
Step 3: Once authentication is completed an OAuth 2.0 access token is shared with the IP Phone.
Step 4: The users UPN is extracted from the token and Skype for Business autodiscovery is performed against this account.
Step 5: The Skype for Business online server responds and issues a user certificate (valid for 8 hours) with the access token. Remember TLS-DSK?
Step 6: SIP registration completes. That’s it!
If you’ve not tried IP Phone Web Sign-In then I’d recommend you give it a go, as always comments welcome.
0 notes