#Pin Selectorized Machines
Explore tagged Tumblr posts
Visit Tumblr Blog
Explore Tumblr blogs with no restrictions, modern design and the best experience.
Last Seen Tumblr Blogs


Fun Fact
Tumblr has a low social media market share in South America.
Text
Pump Up Your Workout: Best Weightlifting Equipment for Sale
Maximize your gains with our top selection of weightlifting equipment for sale. Discover premium gear designed to enhance your strength training routine and elevate your performance. From durable barbells to versatile dumbbells, find the perfect tools to pump up your workout and achieve your fitness goals.
For more info visit our website https://customgymequipment.ie/.
Contact Us
Phone : +353862145150
Email Us : [email protected]
#Custom Gym Equipment#Gym Equipment Ireland#Fitness Equipment Ireland#Home Gym Equipment#Gym Equipment Dublin#Workout Adjustable Bench#Plate Loaded Equipment#Pin Selectorized Machines#Bumper Plates For Sale#Custom Gym Equipment Tralee#Gym Equipment For Sale Online#Gym Equipment Tralee Online Sale#Best Home Gym Equipment Dublin#Best Weightlifting Equipment For Sale#Top Quality Gym Fitness Equipment For Sale#Top Commercial Gym Equipment#Gym Equipment For Commercial Gym#Fitness Equipment Machines
0 notes
Text
Price: [price_with_discount] (as of [price_update_date] - Details) [ad_1] From the brand Single Stack Adjustable Pulley home gym machines Multi Home Gym Machine Exercise benches Exercise bikes Adjustable handle bar with up & down position. Dumbbells Manual Treadmill Weight Plates combos Stack Selector Pin Squat Rack Stright Bar Gym24 Super 20in1 Bench Made of ISI MARKED MS Heavy Pipe. Exercise can be proform Bench Press (Incline Decline Flat), latpull down, Bicep , Tricep , leg Extn, Leg Curl, Rowing, bardip, Pullups, Shoulder Press. GYM24 SUPER 20IN1 one of the best selling home gym machine. Accessories Comes with this machine, Latpulll Handle, Bicep handle, Tricep Rope. For installation video is avaiable on Youtube as How to Install Gym24 Super Bench. Gym24 is commited to our clinets for provide product with a reasnable Price. [ad_2]
0 notes
Text
Why is the Inspire M2 Multi-Gym an excellent choice for beginners?
Are you just starting your fitness journey and feeling overwhelmed by the vast array of home gym equipment options? Look no further than the Inspire M2 Multi-Gym—a comprehensive, user-friendly solution that’s revolutionizing how beginners approach strength training at home.
The Beginning of Your Fitness Journey Made Simple
Starting a new workout routine can be intimidating, especially when faced with complicated equipment. The Inspire M2 Multi-Gym stands out as an all-in-one home gym solution that eliminates the confusion and streamlines your path to fitness success.
Key Benefits for Fitness Newcomers
1. User-Friendly Design for Quick Learning
The Inspire M2 features an intuitive layout that doesn’t require extensive fitness knowledge. Unlike free weights that demand proper form mastery, the M2’s guided motion system helps beginners:
Maintain correct posture throughout exercises
Reduce injury risk through controlled movements
Build confidence with equipment that guides your form
2. Versatility in a Space-Efficient Package
Despite its compact footprint (measuring just 73″ x 54″), the Inspire M2 Multi-Gym offers:
Over 50 possible exercises targeting all major muscle groups
Dual 215lb weight stacks for progressive resistance training
Press arms and leg developer for upper and lower body workouts
Optional leg press attachment for comprehensive lower body training
3. Progressive Resistance Perfect for Beginners
The M2’s weight stack system makes gradual strength progression simple:
Easy weight adjustments with secure selector pins
Clear weight markings for tracking progress
Smooth, consistent resistance through full range of motion
Ability to start light and increase incrementally as strength improves
Expert-Recommended Starter Workouts
According to personal trainers at Acme Fitness, beginners should start with this simple routine on the Inspire M2:
Chest Press: 3 sets of 10-12 reps
Lat Pulldown: 3 sets of 10-12 reps
Leg Extension: 3 sets of 12-15 reps
Bicep Curl: 2 sets of 12-15 reps
Tricep Pushdown: 2 sets of 12-15 reps
This balanced workout targets all major muscle groups while allowing beginners to master the basic functions of the machine.
Safety Features That Build Confidence
For newcomers to strength training, safety remains a top priority. The Inspire M2 includes:
Enclosed weight stacks to prevent pinched fingers
Smooth pulley systems eliminating jerky movements
Adjustable seats and pads for proper body positioning
Built-in safety stops and range limiters
Long-Term Value for Fitness Growth
While perfect for beginners, the M2 Multi-Gym grows with your fitness journey:
Substantial weight capacity accommodates strength gains
Attachments available for exercise variety expansion
Durable commercial-grade construction ensures longevity
Comprehensive warranty protection for peace of mind
Why Choose Acme Fitness for Your Inspire M2
At Acme Fitness, we specialize in helping beginners find their perfect fitness equipment match. When purchasing an Inspire M2 Multi-Gym through us, you’ll receive:
Free professional assembly and setup
Personalized orientation session with a certified trainer
Exclusive beginner workout guide with video tutorials
30-day satisfaction guarantee
Ongoing customer support for equipment questions
Conclusion: Start Your Fitness Journey With Confidence
The Inspire M2 Multi-Gym provides beginners with the perfect balance of simplicity, versatility, and quality. By eliminating the intimidation factor of traditional gym equipment, the M2 creates a welcoming environment for newcomers to strength training.
Contact Acme Fitness today to experience the Inspire M2 Multi-Gym in person, or for personalized equipment recommendations tailored to your beginner fitness goals.
0 notes
Text
Hydraulic Rock Breaker
Hydromacht is a well known brand of Hydraulic Rock Breakers in India. It is a one stop solution to all your needs concerning Hydraulic Rock Breakers. Hydromacht is known for its power, efficiency, reliability and has a proven track record in the industry.
Hydromacht Breakers is available in variety of sizes and models which is suitable for base machines ranging from 0.7 ton to 100 tons. With our high quality and excellent services records, we are the first choice in the field of Hydraulic Rock Breakers used for Mining and Heavy Machineries Equipment Market.
Hydromacht Breakers can withstand continuous breaking in harsh and extreme environments. Higher strength allows us to use plate steels construction, i.e. you get the highest quality in breakers and the power to weight ratio and the efficiency is also increased drastically.
Hydromacht Breakers find its use in variety of applications
Secondary Breaking in Mining or Quarrying applications
Breaking in demolition
Trenching
Preventing blockage in Crushing Systems
And many more heavy, tough and time critical applications.
Features:
HM hydraulic breakers have 12 ranges of operating weight from 100kg to 7,000kg suitable for base machines up to 90 tons such as Skid Steer Loaders, Backhoe Loaders & Excavators.
Air intake system offers long service life for major consumable parts such as bushings & retaining pins due to proper lubrication & air cooling during operation.
Variety of options for different applications (Auto Grease System, Underwater Kit, Soundproof Kit, Tunneling Kit & Water Jet Kit).
Unique design for housing bracket along with damping systems prevents damage of excavator & free maintenance operation.
The selector system for Auto Stop & Auto Idle is providing less trouble & maintenance cost even in tough conditions jobs.
Extended durability, efficiencies & service life, with low cost maintenance and trouble free. Higher impact rate and low vibration thanks to new design of through bolts & piston.
https://www.hydrotek.in/images/hydromacht-breaker-in-action.jpg
1 note
·
View note
Text
Maintaining and Caring for Your Leg Press Machine: Tips and Tricks for Longevity
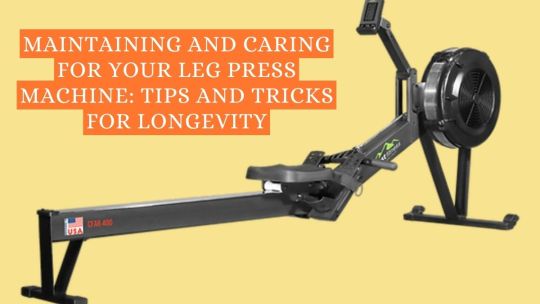
Whether you're a fitness enthusiast or a gym owner, maintaining and caring for your leg press machine is crucial for ensuring its longevity and optimal performance. Neglecting proper maintenance can lead to costly repairs and potentially compromise the safety of users. In this blog post, we'll explore some essential tips and tricks to help you keep your leg press machine in top condition.
1. Regular Cleaning
Regular cleaning is essential to prevent the buildup of dust, dirt, and sweat on your leg press machine. Use a mild detergent and water solution to wipe down all surfaces, including the seat, backrest, footplate, and weight stack. Pay particular attention to any moving parts, such as the guide rods and bearings, as these can accumulate debris over time.
2. Lubrication
Proper lubrication is vital for maintaining smooth and efficient movement on your leg press machine. Be sure to lubricate the guide rods, bushings, and pivot points regularly using a silicone-based lubricant. Avoid using petroleum-based lubricants, as they can attract dust and dirt, leading to increased wear and tear.
3. Check for Wear and Tear
Regularly inspect your leg press machine for any signs of wear and tear, such as frayed cables, loose bolts, or damaged upholstery. Addressing these issues promptly can prevent further damage and ensure the safety of users. Replace any worn or damaged parts as needed, and tighten any loose bolts or screws to maintain structural integrity.
4. Maintain Proper Alignment
Proper alignment is crucial for the safe and effective operation of your leg workout machines. Periodically check the alignment of the footplate, seat, and backrest to ensure they are all properly adjusted. Misaligned components can cause uneven wear and strain on the machine, leading to premature failure.
5. Inspect the Weight Stack
The weight stack is a critical component of your leg press machine, so it's essential to inspect it regularly for any signs of damage or wear. Check for cracked or worn plates, and loose weight pins, and ensure that the weight selector mechanism is functioning correctly. Replace any damaged or worn components to prevent accidents and maintain smooth operation.
6. Follow Manufacturer Guidelines
Finally, always refer to the manufacturer's guidelines and recommendations for maintaining your leg press machine. They may provide specific instructions for cleaning, lubrication, and inspection intervals based on the model and usage frequency. Following these guidelines can help ensure the longevity and reliability of your equipment.
In conclusion, proper maintenance and care are essential for ensuring the longevity and optimal performance of your leg press machine. By following these tips and tricks, you can keep your machine in top condition, minimize downtime, and provide a safe and enjoyable workout experience for yourself and others. Remember, a well-maintained leg press machine not only benefits you but also contributes to the overall safety and satisfaction of your gym patrons.
0 notes
Text
ANODIZED AR-15 80 PERCENT LOWER RECEIVER
All machining processes for our black anodized AR15 80% Lower are completed other than drilling/milling the FCG (Fire Control Group) pocket and trigger slot, and drilling the Selector switch, Trigger and Hammer pin holes.
– Mates with any mil-spec AR-15 upper receiver – CNC Machined from 6061-T6 Billet Aluminum – Anodized Black per mil-a-8625 type 3 class 2 – Rear lug pocket already machined – ‘F-S’ style Text Engravings – Added overall strength from integral trigger guard – Machined (not broached) Mag-well with wide flare – Ltd lifetime warranty against manufacturer defects
Optional:
– 7075-T6 billet aluminum (when Available) – Bolt release pin hole Drilled and Tapped 6-32
Availability:
Although not generally restricted, you should refer questions regarding manufacture, NFA Regulations, and individual state regulations to the BATFE, your local law enforcement or obtain legal guidance prior to manufacturing. All NFA Rules apply.
No FFL Required! This billet anodized AR15 80% lower receiver can be securely purchased from our website, and shipped direct to your home or business. (See the Shipping/Returns webpage for updated Shipping Restrictions)
0 notes
Text
A while back, Sam over at Look Mum No Computer did an examiner/recreation of the early 1970s automated music system, the Psych-Tone. Designed by the legendary Don Lancaster and first appearing in the February 1971 issue of Popular Electronics (and a kit made available by SWTPC, the Southwest Technical Products Corporation), the Psych-Tone used early logic chips and transistors to play a number of different tunes based on the setting of various switches and potentiometers.
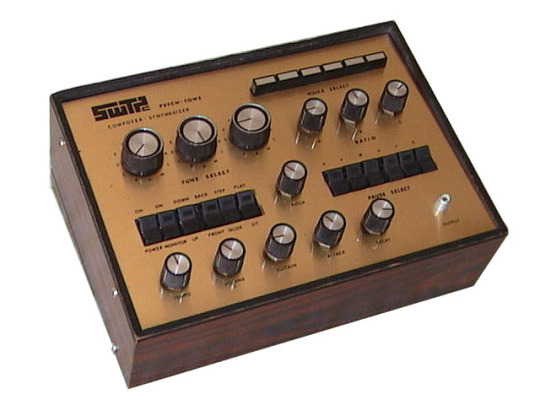
The core of the circuit is a pseudorandom sequence generator — a circuit that creates a single random sequence of 0s and 1s, and keeps it circulating. With six stages in the chain, the sequence is 63 steps long. The three selector knobs each pick where in the chain to listen, and when that value is 1, pass that through a potentiometer to set a partial pitch. The three partial values sum together to make a tune, which is played on an organ-like tone generator.
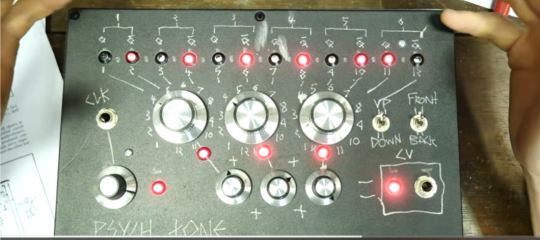
In explaining the device, Sam built a new version of the machine's sequencer section, using slightly newer chips and adding some LEDs to illustrate the functioning, for folks to play on synths with at his This Museum is (Not) Obsolete. Which got me thinking about doing something similar myself — building essentially the note generator as a random sequence creator for Eurorack.
Fortunately, in addition to Sam's video and the original article, Lancaster wrote up how to build these PRSGs, in varying lengths, in his book CMOS Cookbook; where the original used individual flipflops, this updated circuit lets you use shift registers (since one of those is effectively an internally-connected string of flipflops). To boil things down, by feeding certain of the output values back to the input through an XOR gate, a n bit shift register can cycle through a 2^(n-1) sequence, which can then be used in a number of different ways — basically anywhere you want something that's effectively random, but potentially repeatably so.
The circuit diagrams and tables given there have let me breadboard up something that I haven't yet tested, for a few reasons.

First, I'm feeling a little unsure as to how long to make the sequence. Obviously, if you make the sequence too short, it's too repetitive, but conversely, if it's too long, it's not going to be distinguishable from randomness. The original's length of 63 steps seems short, but the breadboarded circuit right now is set up for not 6, but 16 stages, which would yield a sequence length of 65,535 steps, which might be a bit much.
That's not more than something to work out in testing, though, which leads to reason two. Like with Sam's version, the one on the breadboard is meant to show the internal workings by using LEDs. And I've got a couple of nice, compact 10-segment bar graph LED displays on the breadboard, each one wired to 8 of the 16 stages. But LEDs can't handle just being plugged into a raw voltage; each one needs a current-limiting resistor to keep it from burning out. And while I could hook up 16 separate resistors on this breadboard, I don't wanna. I have — someplace around here — a nice little assortment of resistor arrays, chiplike affairs where eight identical resistors all connect to the same ground pin. Once I find them, I can watch the blinkenlights and get a better picture of the kind of sequences I'm dealing with.
(Your basic pseudorandom sequence generator goes in one direction, while the Psych-Tone can also run the sequence in reverse; while the section from CMOS Cookbook is a little terse about how that's done, I think I have that figured out too. Unfortunately, changing directions on the fly requires some complicated switching, so it's hard to do with just hardware — though I just found a giant chunky switch in my collection that could be coerced into selecting forwards or backwards on three different sequence lengths — say, switching between 8, 12, and 16 stages? Hmmm.)
The actual translation from discrete stages of either 0 or 1 works first by selecting one of the stages, and connecting it to a potentiometer, wired as a voltage divider. When the stage is at 0, the pot's output is still 0v. But when the stage hits 1, the pot outputs a voltage between 0v and the "high" voltage level of the circuit, depending on where the knob is set. With just that, you've got a two-note output. If you add another selector with its own pot, and add the output voltages together, you've suddenly got four distinct values: 0v when neither is a 1, the ratio from the A selector when only it has a 1, the ratio from the B selector likewise, and A+B when both have 1s. Go to three selectors and you've got 8 values; four will get you 16 values.
(Well, assuming that A+B doesn't exactly equal C, or some similar arrangement that would reduce the actual possible values, and I'm intending to make a constant 1 selectable as well, so you could use it for tuning or as an offset. Because of how Eurorack tuning works, if you have A-C on different stages and D is always 1V, then the notes would be the same 8 as those for A-C but up one octave.)
Anyway. I am overexplaining a project that's barely begun, and I've been doing that for several hours while I should be trying to sleep, neither of which is a good sign. Perhaps tomorrow I'll find those resistor arrays and at least get things blinking.
4 notes
·
View notes
Text
I went to the gym at my apartment today during my lunch break, and none of the weight machines had the selector pins in them so they’re essentially unusable. Someone came into the gym as I was getting ready to leave and I asked about it and apparently they had been stolen a few weeks ago and not replaced yet but like why would anyone steal those I don’t understand????
1 note
·
View note
Text
Price: [price_with_discount] (as of [price_update_date] - Details) [ad_1] From the brand Single Stack Adjustable Pulley home gym machines Multi Home Gym Machine Exercise benches Exercise bikes Adjustable handle bar with up & down position. Dumbbells Manual Treadmill Weight Plates combos Stack Selector Pin Squat Rack Stright Bar Gym24 Super 20in1 Bench Made of ISI MARKED MS Heavy Pipe. Exercise can be proform Bench Press (Incline Decline Flat), latpull down, Bicep , Tricep , leg Extn, Leg Curl, Rowing, bardip, Pullups, Shoulder Press. GYM24 SUPER 20IN1 one of the best selling home gym machine. Accessories Comes with this machine, Latpulll Handle, Bicep handle, Tricep Rope. For installation video is avaiable on Youtube as How to Install Gym24 Super Bench. Gym24 is commited to our clinets for provide product with a reasnable Price. [ad_2]
0 notes
Photo

1950 09 26 Seoul, Dog Company pinned down - Peter Dennis
On the morning of September 26, three US marine regiments, the KMC, a US Army, and an ROK regiment closed in on Seoul from the northwest, west, southwest, and south. To spearhead the 7th Marines’ advance, D/7 under Capt Richard R. Breen, was sent southwest on the Seoul–Kaesong Highway to secure the Sodaeman Prison on the northwest edge of the city. As D/7 approached Seoul between the steep slopes of Hill 296 on the right and Hill 338 on the left, they were greeted by cheering Koreans. The column was taken under fire from a water tower 400yd to the front and the civilians scattered. NKs then opened fire from the hillsides only 100yd away. The company deployed on both sides of the road returning fire, but was pinned down. The marines were unable to deploy flank security because of the civilian crowds. The company mortar section under 1stLt Paul P. Sartwell set up two 60mm mortars and immediately knocked out an enemy position. Totally exposed, the lieutenant directed the mortar fire and was hit three times before being put out of action. Two rifle platoons maneuvered to clear the slopes, but resistance was heavy. A tank-infantry relief force sent by the regiment was turned back. The company, faced with encirclement, all officers wounded, and casualties mounting, withdrew 1,000yd back up the road. The mortars delivered covering fire during the withdrawal. Carrying all of their dead and wounded, they established a perimeter on both sides of the road in the late afternoon. Before dark they received an airdrop of ammunition and supplies and prepared for a tough night. The NKs, though, contented themselves with remaining in their hill positions. The rest of the 2/7 was attacking eastward and the 3/7 also attacked east to secure a foothold on the north end of Hill 338. D/7 was relieved in the morning. Army and marine rifle companies were allocated an array of supporting weapons, but their distribution differed. A marine company had a machine-gun platoon of three sections, each with two squads armed with a Browning .30cal M1919A4 light machine gun. A section was generally allotted to each rifle platoon. Within the company headquarters was a mortar section with three 60mm M19 mortars. The marines concentrated 18 3.5-in. M20 bazookas in the battalion assault platoon, with two attached to each rifle platoon. Army rifle company weapons platoons had a mortar section with three 60mm mortars and a special weapons section with three 57mm M18 recoilless rifles (not used by the marines). Army rifle platoons had a weapons squad with a bazooka and an M1919A4 machine gun. The 60mm M19 mortar was the rifle company’s workhorse, its resident “artillery.” While artillery support was usually available, the benefit of the immediate fire that a company’s own mortars could provide was invaluable. The M19 was essentially the same as the M2 used in World War II, but was provided with a selector lever on the tube’s base plug allowing it to be drop-fired or trigger-fired. Some units deployed to Korea with the M2 and they were also issued to ROK units. Their ammunition was interchangeable with that of the Chinese 60mm Type 31. Ammunition included high explosive and white phosphorous smoke as well as illumination (parachute-suspended flares, not pictured). The maximum range was 1,985yd and its minimum was 50 yards.
9 notes
·
View notes
Text
Heavy AF squat session for me this morning as part of my leg day. Not recorded:
-landmine deadlift -> squat-> press.
- cannonball front Squat -> pliè squat
-Booty builder machine and pin selector leg extensions + adduction -> all until failure. It's going to hurt in the morning.
Warmed up with some front squats at 125lbs for a few sets. Back squats at 135lbs for 4 set, I lost count for reps being this is a sweet spot for me, then 155lbs for 3 sets of 3 then 165lbs for 1 set of 3 reps. I currently weigh: 120lbs at 5'2ft yes, I am very smol. My goal is to squat 200lbs here in the next few months.
#bodybuilding#weight lifting#girlswholift#girlswhosquat#muscle#girls who cosplay#fitblr#fitness professional#fitness#fitfam#fit girls
11 notes
·
View notes
Text
There are 7 different types of leg press machines you need to know.
There are 7 different types of leg press machines you need to know.
Leg day is important to us. We love the part of the gym that people use to burn their legs.
You've probably heard about leg presses, but do you know how many different types there are?
You're in for a treat if that's the only thing you wanted to see!
This article will explore seven different types of leg press machines you should be aware of.
Leg press machines are great for building strength, power and muscle in the lower body, whether you're an experienced gym goer or you're just starting out.
There are leg press machines for every fitness goal and level.
Let's start and learn about the various types of leg presses that will help you to achieve a new level of fitness.
What are the different leg press machine types?
Click to skip to section
45 degree Linear Leg Press
The 45 Degree Linear Leg Press, a popular machine, allows users to push a sled with weight at a 45 degree angle.
The leg press machine that is commonly found in commercial gyms is a plate-loaded type.
Horizontal Seated Leg Press
Horizontal Seated leg press is a machine used while seated with legs out in front.
This type of machine is usually a pin-selectorized design and provides a more supported and comfortable leg press.
Angled Leverage Leg Press
The Angled Leverage Leg Press uses a lever system to provide resistance. This machine can be found in many gyms. It allows a controlled and smooth leg press with a wide range of motion.
Dual-Function Leg Press (Leg Press/Hack Squat)
Dual Function Leg Press Machine can be used both as a leg press or hack squat.
The leg press machine of this type is designed to fit into home gyms. It offers users more versatility and less space than two machines.
Vertical Leg Lift
The Vertical Leg press machine is a machine which allows the user to perform a leg pressing movement in a horizontal position while lying on their back.
The leg press machines are typically plate-loaded. They can be a great challenge for the legs while providing ultimate safety to your neck and back.
Compact Leg Press
Compact Leg Press machine is designed to be smaller than other leg press machines.
Leg press machines are often found in home gymnasiums. They can be used to provide a challenging workout for the legs in a small space and at a lower price.
Isolateral Leg Press
The Isolateral Leg Press Machine allows the user to independently work each leg.
Leg press machines are often found in commercial gyms. They can be used to correct leg imbalances, and provide a high level of isolation for advanced lifters.
45 Degree Linear Leg Press
The 45 Degree Linear Leg Press Machine, a popular machine, allows users to push weights on a sled with a 45 degree incline.
The machine is also known as incline leg presses, linear leg presses, or 90 degree leg presses. It gets its name because of the angle at which the tyres are positioned.
This type of leg presses can hold a lot of weight, and is often used in commercial settings.
The sled is straight and the user must focus on their lower body while maintaining a strong back and neck.
The 45 Degree Linear Leg Press sled is mounted on linear bearings which move along a fixed track. This helps provide a smooth, consistent motion.
The user sits with their backs against a pad, and their feet resting on a sled. This'sled' is then pushed outward to complete the leg pressing movement.
The 45 Degree Linear Leg Press comes with a plate that allows users to adjust the weight according to their resistance level.
How to use a 45 degree linear leg press
Here's a guide to help you use a 45-degree linear leg press effectively if you're a new user. The machines may vary in appearance, but they are generally used the same way.
You can adjust the weight of the machine to the desired resistance level.
As you sit, place your back on the pad with your feet on the sled.
Put your feet on the sled shoulder-width apart, your toes slightly pointing outward.
Slowly lower the weight of the sled towards your body by releasing the safety locks.
Straighten your legs and push the sled back away from you.
Repeat the desired number of reps by slowly lowering the weight towards your body.
45 Degree Linear Leg Press Benefits
Lower Body Isolation
This 45 degree linear leg press, like all other leg pressing exercises, will help you build strength and power in your legs by targeting your quads hamstrings and glutes.
There is Little or No Spinal Compression
The 45 Degree Linear Leg Press is a great alternative to traditional barbell squats. It can help reduce spinal compression and therefore be a better option for people with back injuries or pain.
Controlled Movement
The 45 Degree Linear leg press has linear bearings that provide a smooth, consistent motion. This allows users to remain in control during the entire exercise.
Customizable resistance
A plate-loaded machine allows users to adjust the weight according to their fitness level.
Pre-Cation Safety Built-In
In most cases, the leg press won't crush you if you miss a rep or if an accident occurs. Leg press machines are generally safe to use, even though it is best to avoid them.
Horizontal Seated Leg Press
The horizontal seated foot press is a pin-selectorized machine which requires the user sit horizontally and either push weight forward with their legs, or push backwards from a stationary feet plate.
It is very easy to mount the horizonal version. You just need to sit on it, and press.
It is easy to switch weights from one set or user to another with the selectorized weight stack included in the machine.
It is perfect for beginners or rehab clients, as you can limit the depth of the machine (range-of-motion) in order to reduce any risks.
The safest machine of the lot is this leg press.
How to use a horizontal seated leg press
When you press, adjust the seat so your knees are roughly at a 90 degree angle.
Choose the weight you would like to use for leg press by using the weight stack.
Put your feet about shoulder width apart on the platform or wherever you feel comfortable.
Grab the handles at the side of the machine to ensure stability.
Push your feet into the footplate, using your quads to push, while keeping your glutes tight and your core in place.
Perform as many repetitions as you like by slowly lowering the weight to the starting position.
Horizontal Leg Press Benefits
Targeted muscle development.
The horizontal seated leg presses primarily target the quadriceps, but also work the hamstrings.
Low Impact
The horizontal seated leg presses are low-impact exercises that put minimal strain on joints.
Easy to use
It is easy to change the weight or switch users with this pin selectorized system.
Adjustable Range of Motion
The design of the machine allows for greater flexibility, as it can increase over time.
Leg Press with Angled Leverage
A Leg Press with Angled Leverage is a machine that uses a system of levers to provide resistance for the user.
This machine is usually plate-loaded and has a 45-degree incline. It offers a lot of resistance and adjustability.
The angled leg press is named so because it has a range of motion that is angled to some extent.
The design is based on a biomechanical range of motion that targets the quads and hamstrings most effectively, with little or no involvement of the upper and lower back.
The leg press works well for all-around strength and muscle growth in your legs, with an emphasis on hypertrophy.
How to use a Leg Press with Leverage
Start by adjusting your seat to the desired position. Then, load the weight plates you know you will be able to perform multiple reps.
Set your foot position by seated on the machine, with your back flat against the backrest of the machine and your feet on the footplate.
Grab the handles on either side of the seat, brace your core and legs, and then release the safety device, which is usually located on the side.
Squeeze your quadriceps while pushing the footplate with your feet.
Remember to keep your knees from being fully extended for safety.
Regroup yourself for the next rep. Remember to breathe!
Benefits of Angled Leverage Leg press
Supreme Range Of Motion
It is well known that the angled leg press has a wide range of motion. This allows for a full contraction on top and a deep stretch in the legs.
Lower Body Isolation
The angled leg presses place very little stress on your lower and upper back. This allows you to focus all of your energy in the legs, which leads to a high level hypertrophy and development.
Isolated Leg Exercise
By pressing one leg at a given time, you can correct muscle imbalances. The great range of motion of this type of leg press makes it popular for isolation exercises.
Fits Different Fitness Levels
Leverage leg presses are suitable for people with varying fitness levels and abilities, as they offer adjustable resistance and ranges of motion.
Very Low Injury Risk
Leverage angled leg presses are safer than traditional squats because there is no weight placed on the shoulders or back.
Dual Function Leg Press (Leg Press/Hack Squat).
Dual Function Leg Press Machine allows you to do both hack squats and leg presses. It is an excellent addition to any home or gym workout area.
The machine usually includes a footplate and a back plate which can be adjusted for different sizes of bodies and to accommodate various exercise variations.
You can switch between an incline leg press at 45 degrees and a shoulder-loaded hack squat in the same machine without having to spend extra money or space.
How to use a dual function leg press / hack squat
1. Adjust the machine to fit your body.
2. You can load up the machine with as much weight you want to achieve optimal resistance. These machines are usually plate-loaded.
3. Before you begin, brace your legs, glutes, and core. Also, disengage the machine's safety mechanism.
4. You can choose to move at any time.
Dual Function Leg Press Benefits
Versatility
This machine has two functions that allow you to do two popular lower-body exercises in one machine.
Adjustable Plate Loaded Resistance
You can add or remove weights to the machine to adjust resistance according to your fitness level.
Low Joint Strain
Leg press and hacksquats performed on this machine are less stressful on the knees, hips and lower back than traditional squats and lunges. This makes them an excellent option for most people.
Save Money and Space
By combining these two machines, you can save space and money for your home gym or facility.
Vertical Leg Press
Vertical leg press has a different design than other leg presses.
The machine is vertically aligned, as its name suggests.
The pushes up the platform by laying flat on the ground with the back of the person against the padded support.
It is important to maintain the neck and back in a neutral position and aligned for safety.
This is a great machine to add to your routine as a change from the usual leg press machine.
How to use a vertical leg press
1. Start with a small amount of weight and work your way up. Start light and gradually increase your weight to determine your strength capacity.
2. Place yourself comfortably in the machine by lying flat on your back.
3. Put your feet on the machine in a position where you can achieve the full depth without having your heels or feet rise above the footplate.
4. Engage your legs and brace your core, then de-engage the safety device on the machine.
5. As you resist the weight, bend your knees outwards and push them towards your core. You should stretch out fully but not so deep that you end up stuck at the bottom.
6. Drive the footplate back upwards, while keeping your core braced. This is one rep.
Vertical Leg Press Benefits
Unique Leg Press Movement
The vertical leg press may not be something that everyone is familiar with. Try it out and you will be surprised at how different it is from other machines.
Lower Back and Neck Support
The lower back, upper spine, and neck are all almost entirely left out. You will feel the stretch in your hamstrings and glutes without having to strain your back.
Direct 1 to 1 Weight Ratio
Some leg press machines, such as the 45 degree leg press or the leverage leg press have a weight slightly higher than what you actually feel you are pushing.
Gravity and the angle of the machine combine to make it appear smaller than it is.
If you align the machine vertically, the weight that you place on it will be met with 100% of its resistance, not a slight angle.
Different Types of Leg Press Machines
There are many different types of leg presses, all with their own benefits and features.
Consider factors like the weight range, machine dimensions and user experience when choosing your best option.
The best leg press machine will be one that suits your fitness goals and preferences.
No matter what your needs are, we've got a leg press machine that will work for you. Visit them today!
Learn more about our leg press machines by visiting our Leg Press Machine at our official website… befitnow.
You can reach us by live chat, email, or phone.
#gym rubber weight plate in canada#bumper plates sets in canada#buy bumper plates canada#rubber weight plates in canada#rubber floor mats canada
0 notes
Text
How To Do a ‘Work In’ Workout So Someone Using the Equipment You Want Is Never an Exercise Stop Sign
You’ve taken your pre-workout supplements, picked out your playlist, and you’re know you’re about to crush your training plan… only you get ready to start, and every machine and set of free weightsat the gym is taken. Now what do you do? You could wait around for things to open up, but who knows how long that could take. Or you could ask someone if you can do a work-in workout with them. For the unfamiliar, a work-in workout is when you share weights or machines with another person in the gym and while they are doing their sets you rest, and vice versa. “Typically, when we talk about working in, it will be on the strength floor with selectorized machines—where you put a pin in a weight stack—plate loaded machines with barbells, or dumbbells,” says Jana King, certified personal trainer, and president of Lifestyle Coordination studio in Los Angeles, California. “Because about one to three minutes of rest is typically needed between sets when strength training, it makes sense that two people can work on the same equipment by alternating their rest and work periods without either person being inconvenienced.” How to ask someone if you can work in with them When deciding on whether or not to work-in with someone using a machine or weights you’d like to use, King says it’s best to observe first. “Before approaching, watch the person do at least one set and wait until they start their rest to approach them,” she says. When you do make the decision to ask someone if you can work-in, King suggests acknowledging the person first with an ice breaker before asking them how many sets they have left—a typical number of sets is anywhere from two to five, she says. If they only have one set left, you can wait for them to finish up, but don’t rush them. On the flip side, don’t feel rushed if you’re the person with one set left, but do be considerate to the person waiting. If they have more than one set, King says there are a few things to consider before asking, “Do you mind if I work in with you?” to make sure the workout works for you both. How to pick the right person to tag team with There are two important things when picking the right work-in partner to make the most of your time. First is to gauge if you can use the same weight and/or how difficult it would be to load/unload plates in order for you to work in. The second is to check out the height of the other person, depending on the type of equipment you are using because you don’t want to have to move the height of the barbell in a squat rack up and down between each set, for example, becasue it’ll eat up time and make both your workouts less efficient. “If you are the person who has the first right to the barbell or machine, it is acceptable for you to deny a work-in in this scenario, but again, be considerate that someone is waiting and try to keep further use to five to 10 minutes at a maximum,” King says. Proper etiquette for a work-in workout Once you’ve found a person that will allow you to work-in with them (woo-hoo), the most important thing is to be a courteous partner. Remember the Golden Rule, and treat others how you want to be treated. “Between each set you are returning the equipment back to the original condition of the person who was there first,” says King, who adds that you should wipe down and disinfect the equipment after you’re finished before trading off. Sharing space and working in together allows everyone to keep moving forward toward their fitness goals as efficiently as possible. Just be sure that you’re approaching people who are roughly at your fitness level (and height) and being polite when you ask them in your can work in with them. “Working in isn’t difficult,” King says, “especially when done with respect.” Read the full article
0 notes
Photo

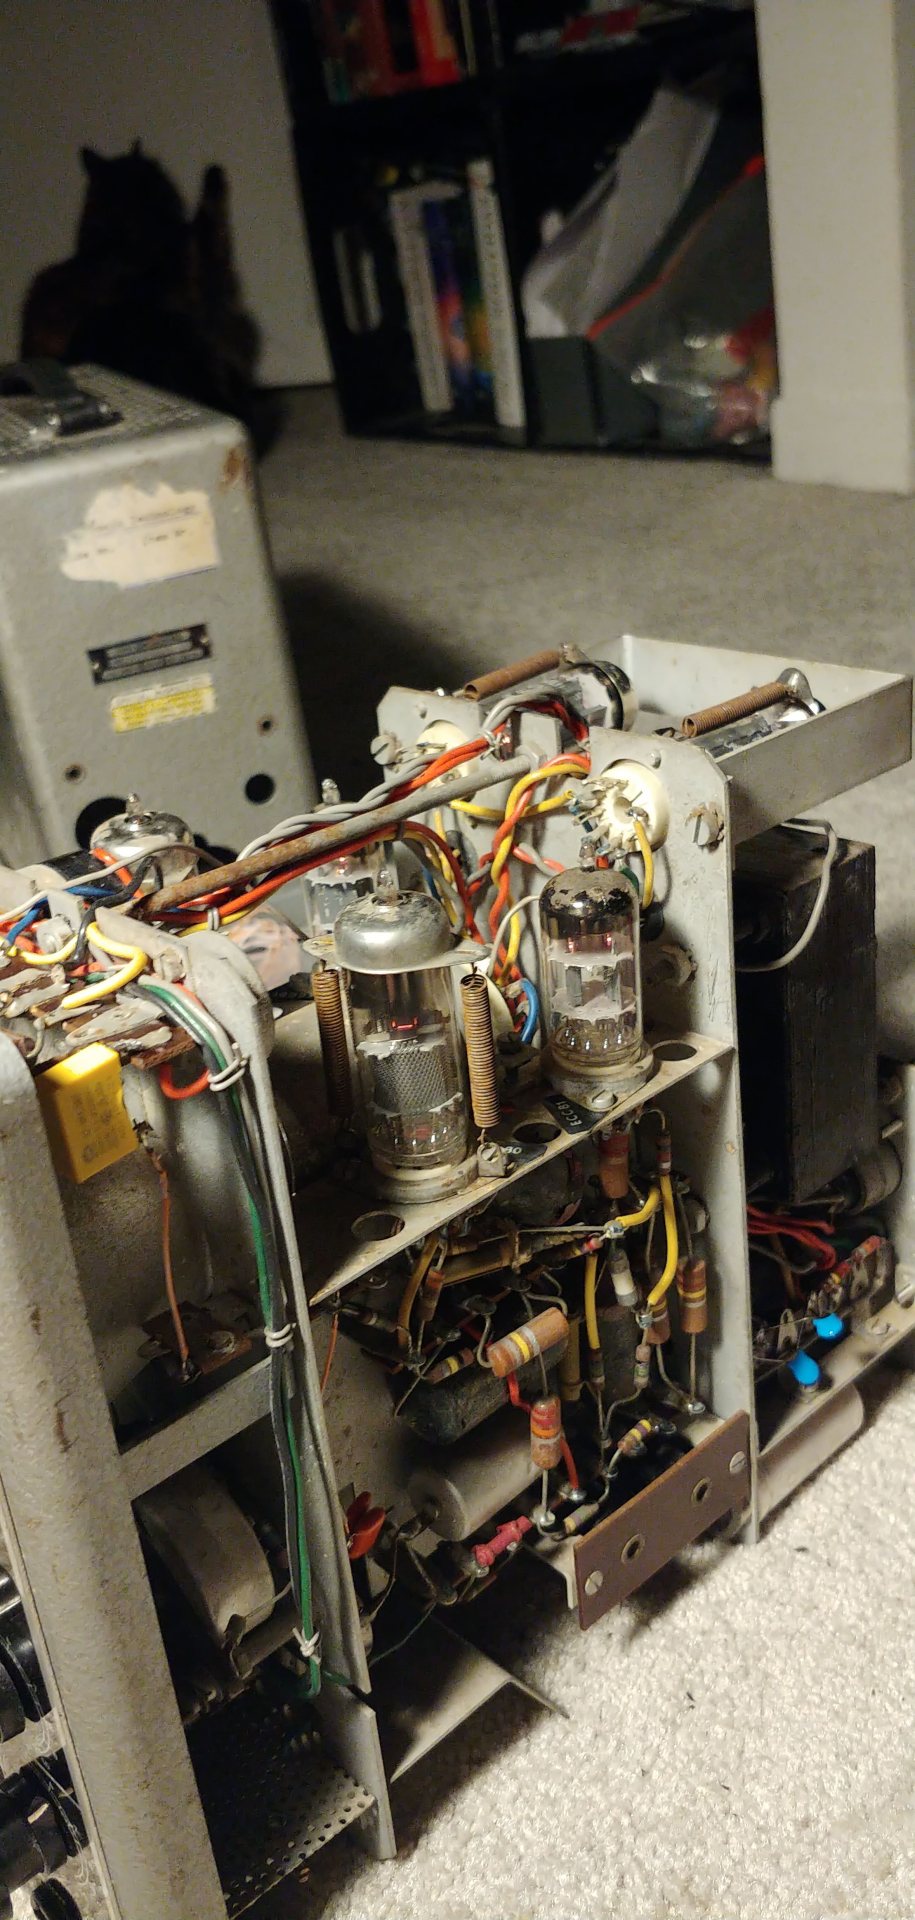
scope restore part 3
so it is time for some serious troubleshooting. now personally I’ve never actually encountered a cold solder joint. but if there was going to be one it would probably be inside of this old ass barn scope. so after consulting the fully dutch manual and reseating the tubes for good measure. I got a schematic for it’s power supply and was able to test for voltages from the transformer. and they would come alive and go dead seemingly at random. ٩(ఠ益ఠ)۶
it was strange because it would either have 120v on the primary side when it was on or it would have basically 0v on the primary side when it was on yet draw 0 current??? (@_@) I’m writing a complaint letter to georg ohm as we speak
after a few hours of desoldering and resoldering everything connected to the primary side of the transformer (inculding a very neat mains voltage selector switch with 110,125,145,200,220,245 volt options; making this scope pretty much able to be powered on from any socket in the world. (yet still only having a dutch manual available)) I dicided to say fuck it and just remove the whole damn transformer to test if there was some sort of short/ open winding.
it tested good which was a relief and so to celebrate I got rid of a lot of unnessary bs in the circuit like the mains voltage selector, a weird 3 pin input connector at the back and these totally broken testing switches that can be seen in the bottom of the second pic. yippe ! less failure points. (* ^ ω ^)
I resoldered and mounted the transformer back into the machine and gave it a test and it WORKS NOW !! (not like fully actually working but like it turns on and gives trace)
so things are good. it turns on and seems to react to a change in voltage at it’s inputs appropriatelyish. no proper horizontal movement tho, but that only gives me more fun things to fix. couldn’t be that easy right?
so step 4 is going to be replacing all of it’s many black beauty capacitors ( https://w140.com/tekwiki/wiki/Bumble_Bee_capacitors ) that have surely gone bad by now along with some drifty carbon composite resistor enamies. (งಠ_ಠ)ง
so now I just have to wait for the replacements I ordered.
1 note
·
View note
Text
CERAKOTE LIGHTWEIGHT AR-15 80% RECEIVER SET
All machining processes for our LightWeight AR15 80% Lower are completed other than drilling/milling the FCG (Fire Control Group) pocket and trigger slot, and drilling the Selector switch, Trigger and Hammer pin holes.
Cerakote LightWeight AR-15 80% Receiver Set Includes: – Ltd lifetime warranty against manufacturer defects
Lower Receiver: – CNC Machined from 6061-T6 Billet Aluminum – Rear lug pocket already machined – ‘Pictogram’ style Fire-Safe Engravings – Added overall strength from integral trigger guard – Machined (not broached) Mag Well with wide flare
Upper Receiver: – CNC Machined from 6061-T6 Billet Aluminum – Sleek and low-weight No-FA slick-side design – Accepts standard ejection port cover, pin and spring – Close in slim-line case deflector – Built to mil-spec dimensional standards
Optional:
– Bolt release pin hole Drilled and Tapped 6-32 – Cerakote Burnt Bronze (Pictured) – Cerakote FDE (Flat Dark Earth) – Cerakote Graphite Black – Cerakote Tungsten Grey – Cerakote Custom Color [View Here]
Availability:
Although not generally restricted, you should refer questions regarding manufacture, NFA Regulations, and individual state regulations to the BATFE, your local law enforcement or obtain legal guidance prior to manufacturing.
No FFL Required! This cerakote AR15 80% receiver set can be securely purchased from our website, and shipped direct to your home or business. (See the Shipping/Returns webpage for updated Shipping Restrictions)
0 notes