#Project design and implementation
Explore tagged Tumblr posts
Visit Tumblr Blog
Explore Tumblr blogs with no restrictions, modern design and the best experience.
Last Seen Tumblr Blogs


Fun Fact
Kazakhstan’s Minister of Communications and Informatics has blocked the Tumblr site because it contained 60 sites of terrorism, extremism, and pornography in 2015.
Text

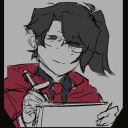
for kiba3's dtiys on insta! 🎏🌟
#there's no koi fish emoji. misery.#THERES A FUCKING KOI BANNER EMOJI IM SOSTUPUD#thank you rebloggwe. 🎏<- fish#project sekai#pjsk#prsk#proseka#tsukasa tenma#fishyyyy fishyyyyyy#DRAGON MENTIONEDDD i forgot to sdd a bit of blur but i didnt reslly detail her at all so i guess ots fine. Sorry dragon.#this outfit design is so fun it reminds me of the cool outfits krsekai comtests implement#unlike jpsekai that chooses shirt skirt and suit over and over and over and o#and then the runner ups are like gorgoeus and actually fun. WHATS YOUR PROBLEM#sorry. for hating. im at college since 8am so ive earned it a little
366 notes
·
View notes
Text
Okay so in a game like Animal Crossing, there's a bunch of things all happening at once. You can have a screen full of villagers walking around doing their thing, balloons flying, bugs bugging, a system in the background to handle hourly background music with chimes in between, all that good stuff, while you're doing your own things.
When you talk to a villager, you and the villager both stop on the spot, and a script takes over. That script then makes the villager turn to the player and a dialogue window appears. There may be a multiple choice thing now — "talk", "gift", or "leave" — and the script won't stop, releasing control to both, until what you've selected plays out.
So you have a villager with an attached script. The villager waits for the script to finish before continuing on their merry way, while the script waits for the villager to finish turning to the player. Once that's done, it picks something to say and eventually ends up opening the dialogue window. The script now has to wait for the message to finish writing, and the very next command is an "if" involving the result of a multiple choice question, so now the script has to wait for that to return.
I was thinking for Project Special K I might implement all that as several Tickable objects. Not unlike in SCI, you'd have a big list of things in the game that all implement a Tick method. In SCI, that'd be the cast, and its members have doit methods. It's the same deal, but Tick also gets a delta-time argument. So the dialogue box gets to be its own thing that implements Tickable, the multiple choice box is as well. Inventory window? Yes.
Also the script interpreter.
But all that wouldn't let the villager wait for the script interpreter, which waits for the dialogue box, right? Script execution should be halted until the dialogue box is dismissed. That one villager's AI should be halted until the interpreter finishes, only moving (or rather, emoting) because of embedded commands in the dialogue box's text stream.
So I figured, what if I gave them something like a mutex variable? The villager would have a bool waiting or whatever, and passes a pointer to that bool to the script interpreter they spawn when the player interacts with them. The interpreter is added to the cast list and starts running the code it was given. When it's done, it not only removes itself from the cast but sets the bool pointer so the villager can tell it's over and done with.
Now every time through the loop, the villager's Tick is called and they can tell "oh, I'm waiting for a script to finish" because their bool isn't set yet. The script interpreter likewise can spawn a dialogue box into the cast and have its own "waiting for that darn dialogue box" bool, in exactly the same way the villager can wait for the script interpreter.
Next trick, the dialogue box should remain on screen even when things are done, so multiple choice answers can have the question remain visible. It should only close when a different style of box is called for, or when the script ends. My idea is to always have a dialogue box object in the cast, idling until called for. When the villager realizes the script has ended, they can simply poke the dialogue box and have it close, if nothing else already did.
#animal crossing#project special k#script engines#ramblings#game design#game implementation#what the fuck is a mutex#was that even the right word
97 notes
·
View notes
Text
likely this means nothing to anyone except maybe two people but the noise ART's medsystem makes (in the new graphic audio adaption of artificial condition) when secunit sits up after their diy bestie surgery times is the exact same sound effect used when you clear a line in petroglyph punch in the classic Nancy drew point and click game curse of blackmoor manor.
#Also the same noise the card readers make in the haunted carousel!#it's an interest of mine now to see what sound effects get reused in different media. my half finished videogame project involved a lot of#soundscaping. Which meant lots of trawling through open-source sound effect databases#really makes you think about where the sounds come from! Who got what from where and what the overlap is#especially with smaller projects#also how the sound is used. Graphic audio is very high quality sound design from a recording/technical standpoint#but is almost tell don't show#Y'know “I walked there” *loud walking noises*#It a the interpretive dance of sound design. Well done technically. But a little intrusive after all the indie podcasts (wolf 359) that are#so smooth with the sound design implementation#anyway rambling#the murderbot diaries#nancy drew
5 notes
·
View notes
Text
DESIGN AND IMPLEMENTATION OF CHATBOT FOR STUDENT INFORMATION SYSTEM USING MULTILAYER PERCEPTRON NEURAL NETWORK ALGORITHM
DESIGN AND IMPLEMENTATION OF CHATBOT FOR STUDENT INFORMATION SYSTEM USING MULTILAYER PERCEPTRON NEURAL NETWORK ALGORITHM Abstract: Nowadays humans cannot be separated from technology because it has played a great role in human lives. With the development of technology, many things could be easier to do. One of the technologies that can make human lives easier is a chatbot. Chatbot is a digital…
#CHATBOT FOR STUDENT INFORMATION SYSTEM#DESIGN AND IMPLEMENTATION OF CHATBOT FOR STUDENT INFORMATION SYSTEM USING MULTILAYER PERCEPTRON NEURAL NETWORK ALGORITHM#GET MORE COMPUTER SCIENCE PROJECT TOPICS AND MATERIALS#MULTILAYER PERCEPTRON#MULTILAYER PERCEPTRON NEURAL NETWORK ALGORITHM#Neural Network Algorithm
0 notes
Text
Weh, I have a group check-in meeting tomorrow for a summer project and I'm feeling LAZY
#personal#I got all my work done already so far#but I'm not like super into this project so it's hard to find motivation for it#I'll like go into a fugue state and get all my work done and then not want to touch it again for a while lol#I feel bad for not being super into the project though bc I know it's my friend's conception#but all I'm really doing is remaking some app pages and implementing a sign up form for a new program idea#so nothing like super design heavy on my end#REALLY has me questioning going back to school for this to theoretically get me a job#but that's a whole other beast and I will not be thinking about that too much now nope!!
1 note
·
View note
Text
to add onto that i feel like ppl forget there’s like artists n shit working on these games.. i’d love to highlight the devs too but it seems like at the end of the day devs of any medium of game aren’t seen as human unfortunately so that’d fall on deaf ears but like. it reminds me of what i was thinking a few days ago abt how whenever an artist doesn’t “do good” on art for a mobile game fans of them will claim they were just phoning it in just for that artist to have been like super hyped about the project or something.. like never stop critiquing the business model but the whole “not a real game” mindset is starting to rub me the wrong way
#.🥀#this example was particularly about shou taijima#who frankly his regular art n the art he did for pocaniki are like. no different to me. so i didn’t get all that at all#kinda felt like ppl just didn’t wanna admit maybe they don’t like this particular piece which would be totally fair#but claiming he was phoning it in just for him to have 1. requested to work on fgo n 2. have started playing right after implementation#and plays and updates on his twt every day. it was just like Lol#like.. i just think it’s weird to act like nobody’s putting their best foot forward for their work#and if it really is just a check for them that’s totally fine i’m not saying it’s not! but 99% of the time it ends up always being way more#so whyre you projecting lol#also this wasn’t abt the criticism for pocaniki’s design in general lol thats fully valid. i’m talking about like his actual artstyle
1 note
·
View note
Text
#IT network solution provider in nepal#Security surveillance#CCTV solutions#Project management services#Network design and implementation#Corporate networking
1 note
·
View note
Text

In Super Mario Odyssey, the internal name for the Mario object is not something obvious or logical like "Mario" or "Player", which is the case in the vast majority of Mario games. Instead, it is "PlayerActorHakoniwa".
Hakoniwa (箱庭) are miniature gardens with very elaborate scenes embedded in them, which present a scene that is to be appreciated for the amount of work that went into the detail of the arrangement in addition to the cultivation of the plants.
It is theorized that this philosophy guided the level design of Super Mario Odyssey (which are also presented as spaces filled with detail for the player to appreciate), so that the player object, which was likely implemented so early in development that the Mario model was not yet ready, was named this in honor of the guiding principle of the project.
Main Blog | Patreon | Twitter | Bluesky | Small Findings | Source
644 notes
·
View notes
Text
Things the Biden-Harris Administration Did This Week #32
August 30-September 6 2024.
President Biden announced $7.3 billion in clean energy investment for rural communities. This marks the largest investment in rural electrification since the New Deal. The money will go to 16 rural electric cooperatives across 23 states Alaska, Arizona, California, Colorado, Florida, Illinois, Indiana, Iowa, Kentucky, Michigan, Minnesota, Montana, Nebraska, New Jersey, New Mexico, Nevada, North Dakota, Ohio, Pennsylvania, South Dakota, Texas, Wisconsin, and Wyoming. Together they will be able to generate 10 gigawatts of clean energy, enough to power 5 million households about 20% of America's rural population. This clean energy will reduce greenhouse emissions by 43.7 million tons a year, equivalent to removing more than 10 million cars off the road every year.
The Biden-Harris Administration announced a historic 10th offshore wind project. The latest project approved for the Atlantic coast of Maryland will generate 2,200 megawatts of clean, reliable renewable energy to power 770,000 homes. All together the 10 offshore wind projects approved by the Biden-Harris Administration will generation 15 gigawatts, enough to power 5.25 million homes. This is half way to the Administration's goal of 30 gigawatts of clean offshore wind power by 2030.
President Biden signed an Executive Order aimed at supporting and expanding unions. Called the "Good Jobs EO" the order will direct all federal agencies to take steps to recognize unions, to not interfere with the formation of unions and reach labor agreements on federally supported projects. It also directs agencies to prioritize equal pay and pay transparency, support projects that offer workers benefits like child care, health insurance, paid leave, and retirement benefits. It will also push workforce development and workplace safety.
The Department of Transportation announced $1 billion to make local roads safer. The money will go to 354 local communities across America to improve roadway safety and prevent deaths and serious injuries. This is part of the National Roadway Safety Strategy launched in 2022, since then traffic fatalities have decreased for 9 straight quarters. Since 2022 the program has supported projects in 1,400 communities effecting 75% of all Americans.
The Department of Energy announced $430 million to support America's aging hydropower. Hydropower currently accounts for nearly 27% of renewable electricity generation in the United States. However many of our dams were built during the New Deal for a national average of 79 years old. The money will go to 293 projects across 33 states. These updates will improve energy generation, workplace safety, and have a positive environmental impact on local fish and wildlife.
The EPA announced $300 million to help support tribal nations, and US territories cut climate pollution and boost green energy. The money will support projects by 33 tribes, and the Island of Saipan in the Northern Mariana Islands. EPA Administer Michael S. Regan announced the funds along side Secretary of the Interior Deb Haaland in Arizona to highlight one of the projects. A project that will bring electricity for the first time to 900 homes on the Hopi Reservation.
The Biden-Harris Administration is investing $179 million in literacy. This investment in the Comprehensive Literacy State Development Grant is the largest in history. Studies have shown that the 3rd grade is a key moment in a students literacy development, the CLSD is designed to help support states research, develop, and implement evidence-based literacy interventions to help students achieve key literacy milestones.
The US government secured the release of 135 political prisoners from Nicaragua. Nicaragua's dictator President Daniel Ortega has jailed large numbers of citizens since protests against his rule broke out in 2018. In February 2023 the US secured the release of over 200 political prisoners. Human rights orgs have documented torture and sexual abuse in Ortega's prisons.
The Justice Department announced the disruption of a major effort by Russia to interfere with the 2024 US Elections. Russian propaganda network, RT, deployed $10 million to Tenet Media to help spread Russian propaganda and help sway the election in favor of Trump and the Republicans as well as disrupting American society. Tenet Media employs many well known conservative on-line personalities such as Benny Johnson, Tim Pool, Lauren Southern, Dave Rubin, Tayler Hansen and Matt Christiansen.
Vice-President Harris outlined her plan for Small Businesses at a campaign stop in New Hampshire. Harris wants to expand from $5,000 to $50,000 tax incentives for startup expenses. This would help start 25 million new small business over four years.
#Thanks Biden#Joe Biden#kamala harris#climate change#climate action#wind power#Russia#human rights#politics#US politics#america politics#worker's rights#road safety
1K notes
·
View notes
Text
BBA in Operations and Supply Chain Management - Northwood University - Northwest Executive Education
Northwood’s Bachelor of Business Administration in Operations and Supply Chain Management, a STEM certified program, will teach you how to approach operations and supply chain management with a business mindset
https://northwest.education/northwood-bachelor-of-business-administration-in-operations-and-supply-chain-management/
#software-engineer#network-architect#database-engineer#chief-information-officer#IT-consultant#information-technology-analyst#big-data-cloud-computing#information-system-projects#system-analysis-and-design#ERP-business-application#database design and implementation#web design#IT infrastructure#Northwood university BBA in management information security#STEM certified#information systems manager
0 notes
Text
"Seventh graders at Thurgood Marshall Middle School in Rockford, Illinois are learning about STEM — but they’re also learning about real-world challenges.
The students have taken on a new project: assembling “solar suitcases” to help bring electricity to schools in Uganda’s Bidi Bidi Refugee Settlement, which is home to 270,000 South Sudanese refugees.
It’s an initiative led by We Share Solar, a nonprofit that provides science and technology learning projects for students that then go on to benefit other students in low-income areas of the world.
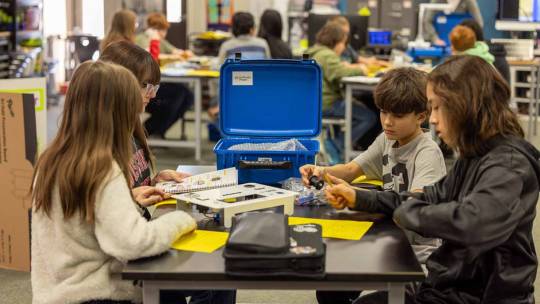
The project introduces middle schoolers to fundamental electrical concepts, like positive and negative charges, voltage, amps, and wiring, ultimately producing a 12-volt DC solar power system that will be distributed among the refugee community.
“We’ve learned many things like positives and negatives, amps, volts, all that stuff, and how to wire stuff together,” Pratham Mehta, one of the Thurgood Marshall students, told WIFR News.
“We’re taking all this stuff for granted, and other countries don’t have all this stuff, like electricity.”
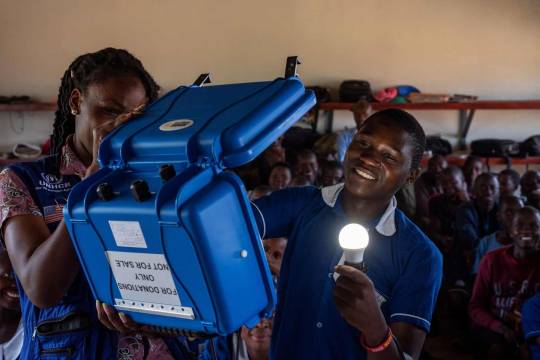
The suitcases will bring electricity to 40 schools in the refugee settlement, which provide education to over 12,000 students. They are designed to be easily transported (thus the suitcase design), which makes them ideal for off-grid locations, like a refugee camp.
The panels in the suitcase collect sunlight and harness the energy in a built-in battery. It can then provide power to up to five light bulbs for 50 to 60 hours a week. Depending on the capacity of the system, it can also help power small electronics like phones or radios.
For people in the Bidi Bidi settlement — one of the largest refugee settlements in the world — this kind of power can make an enormous impact.
In fact, We Share Solar has deployed over 1,000 suitcases to “energy-scarce locations” across the world, with more than 500,000 students and teachers benefitting from the power they provide.
“The We Share Solar education program serves youth twice,” Hal Aronson, co-founder of the organization, said, “first as an educational experience for American youth and second as a renewable power and lighting system for youth in parts of the world that lack electricity.”
Along with connecting students to learning opportunities, the organization ensures each device is tested by a professional to ensure it is built to withstand energy demands. Then, the suitcases are installed by trained partners in destination countries, and students and teachers alike learn about the new clean energy technologies they have implemented.
At the start of the 2024 school year, the We Share Solar program was implemented in 13 Illinois schools, training educators in the curriculum and setting up the project across the state.
“This is just the beginning,” a Facebook post from We Share Solar states. “These passionate teachers will now guide their students in building solar cases, providing a hands-on STEM experience with real-world impact.”
-via GoodGoodGood, January 16, 2025
#electricity#solar power#united states#illinois#uganda#north america#africa#stem learning#refugees#good news#hope
602 notes
·
View notes
Text
How cutiesai made 14 Days With You
I've received quite a few requests in the past asking how I made 14DWY, what resources I used, how I organised my lore, etc. — so I figured I'd make one big post and share it with everyone else as well! It features a buuunch of helpful stuff I wish I'd known when I first made 14DWY, so hopefully this will help others too!
⚠ This is all copied & pasted from a Discord post I made back in early 2024! I'll also be adding to it over time, so feel free to check back every so often! ^^

What engine do I use?
14DWY uses the Ren'Py engine!
There are two preinstalled games (called "Tutorial" and "The Question") that give you a basic rundown on how to use the program!!
Zeil Learning's video called "Ren'py Tutorial For Beginners" is also a good place to start for those who have no idea where to begin with Ren'Py!
I also really recommend these Ren'Py resources:
Lemma Soft Forums
Ren'Py Discord server
Ren'Py subreddit
Zeil Learnings, ElaineDoesCoding, Visual Novel Design, and Ess Ren'Py Tutorials on YouTube
Searching through the "Ren'Py" tag on itch.io for community-made assets and resources (make sure to give credit if you use someone's asset(s))!
Feniks and Wattson offer some really helpful stuff!!
Not Ren'Py related, but helpful for creating a VN:
Obsidian and Notion for planning and worldbuilding
Visual Studio Code and Atom (comes preinstalled with Ren'Py iirc?) for scripting/coding
Pixabay and Pexels for royalty-free images and stock photos
DOVA-SYNDROME for music
Clip Studio Paint (paid) and Krita (free) for drawing
Toyhou.se to store your littol guys (If you need an invite code, I have over 300 to give away lmao ^^ Send in an ask to @cutiesigh if you'd like one!)
An itch.io account to upload your game for free and share it with others
General tips to keep in mind:
Make games for fun, not for fame. Too often, I see new developers create VNs with "trending tropes" because they see how successful it is and want the same level of popularity. As harsh as it sounds, this only makes your game feel hollow and superficial, and players will notice.
When using Ren'Py, it's better to have multiple .rpy files rather than putting everything into one large file!! It makes organising and finding things easier, and if something gets corrupted... at least you won't lose everything!
Plan everything beforehand, but give yourself room to expand and implement new ideas.
Start small and slowly expand over time. Don't start off with an overly ambitious project, as it can be disheartening when you put all this effort into something just for it not to gain any traction. Also, be grateful for your earliest supporters, as they're the ones who will lift your project off the ground!!
This is a personal preference, but I recommend starting off with itch.io as your main distribution platform. Most storefronts take a cut from your donations and revenue, and sites like Steam require a $100 fee just to publish your game on their platform. Itch is free, and you can even toggle off revenue sharing in your profile settings! (I like to keep it at 10% though, because I'm grateful for everything the site provides ♡)
If you ever need help with Ren'Py, you're always welcome to join the 14DWY Discord server and ping me in the help channel!
414 notes
·
View notes
Text
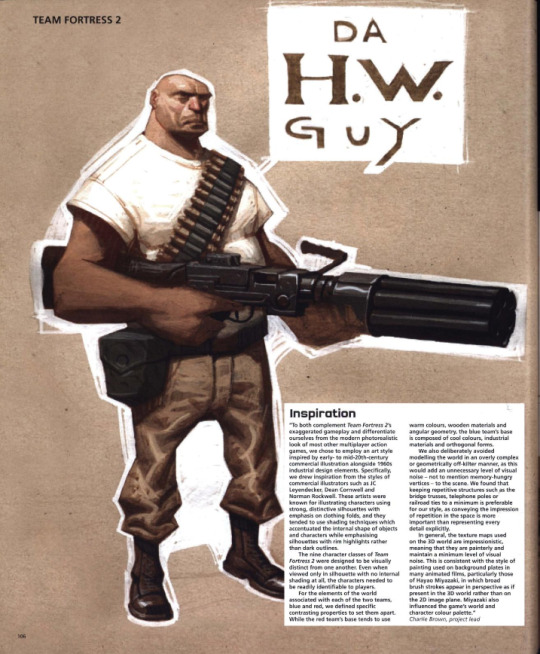

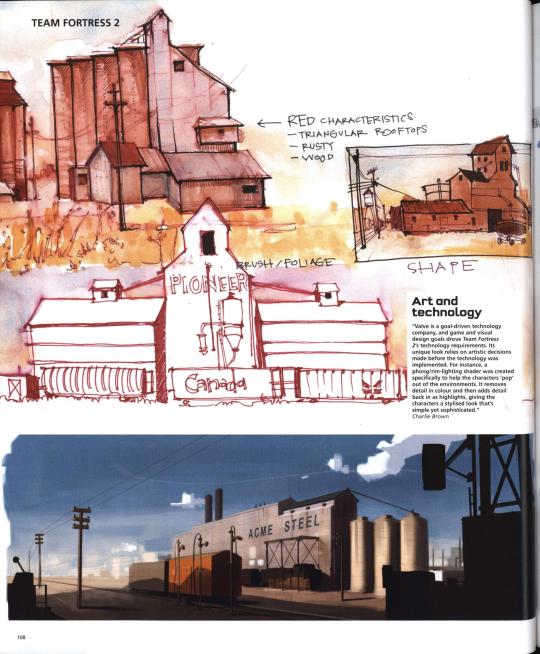

Team Fortress 2's concept art featured in The Art of Videogames (2007)
A transcription of the paragraphs shown can be found below.
Inspiration
"To both complement Team Fortress 2's exaggerated gameplay and differentiate ourselves from the modern photorealistic look of most other multiplayer action games, we chose to employ an art style inspired by early- to mid-20th-century commercial illustration alongside 1960s industrial design elements. Specifically, we drew inspirartion from the styles of commercial illustrators such as JC Leyendecker, Dean Cornwell and Norman Rockwell. These artists were known for illustrating characters using strong, distinctive silhouettes with emphasis on clothing folds, and they tended to use shading techniques which accentuated the internal shape of objects and characters while emphasising silhouettes with rim highlights rather than dark outlines. The nine character classes of Team Fortress 2 were designed to be visually distinct from one another. Even when viewed only in silhouette with no internal shading at all, the characters needed to be readily indeitifiable to players. For elements of the world associated with each of the two teams, blue and red, we defined specific contrasting properties to set them apart. While the red team's base tends to use warm colours, wooden materials and angular geometry, the blue team's base is composed of cool colours, industrial materials and orthogonal forms. We also deliberately avoided modelling the world in an overly complex or geometrically off-kilter manner, as this would add an unnecessary level of visual noise — not to mention memory-hungry vertices — to the scene. We found that keeping repetitive structures such as the bridge trusses, telephone poles or railroad ties to a minimum is preferable for our style, as conveying the impression of repetition in the space is more important than representing every detail explicitly. In general, the texture maps used on the 3D world are impressionistic, meaning that they are painterly and maintain a minimum level of visual noise. This is consistent with the style of painting used on background plates in many animated films, particularly those of Hayao Miyazaki, in whic broad brush strokes appear in perspective as if present in the 3D world rather than on the 2D image plane. Miyazaki also influenced the game's world and character colour palette." — Charlie Brown, project lead
Art and technology
"Valve is a goal-driven technology company, and game and visual design goals drove Team Fortress 2's technology requirements. Its unique look relies on artistic decisions made before the technology was implemented. For instance, a phong/rim-lighting shader was created specifically to help the characters 'pop' out of the environments. It removes detail in colour and then adds detail back in as highlights, giving the characters a stylised look that's simple yet sophisticated." — Charlie Brown
Bold outlines
"The specific characteristics we needed were mostly dictated by Team Fortress 2's gameplay. Foremost, we wanted players to be able to intuit each character's unique gameplay features at a glance. The Heavy Weapons character, for example, had to quickly convey strength, sturdiness, slowness, and the ability to pack a real wallop. To further aid in quick readability, each character class requires a bold, distinct silhouette shape." — Charlie Brown
#Thought this was important to transcript since it contains important information for people who r interested in studying this game's style!#tf2#team fortress 2#concept art#valve#character design#type: concept art#type: environment
405 notes
·
View notes
Text
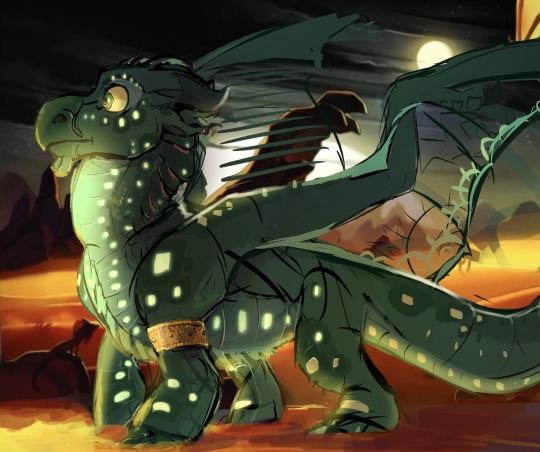
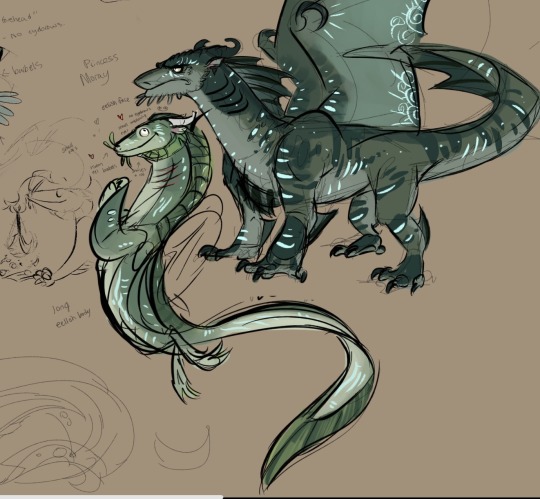
Hrng more WoF character sketches while I chip away at my other projects. Featuring even more green SeaWings.
1. Rendering practice with Turtle against The Brightest Night’s cover. I rewatched Klaus and fell in love with that movie’s style and it inspired me to try something other than flat shading. Definitely gonna be implementing that with my Listener headshot.
2. Shark and Moray concept exploration. I like the idea of Shark having tiger shark stripes. Not terribly satisfied with his coloration as I mostly borrowed it from the graphic novel. Moray was fun. Maybe I made her too eel-ish but I enjoy exaggerating designs and then reeling them back down into something a little more concrete. For this concept I went in a direction that made her vaguely unsettling but also a little vacant in the head. The only thing she’s ever thinking about is Coral. I wish I knew what her deal was. I bet Coral played a heavy role in her upbringing to ensure she was subservient and completely worshipful of her in order to avoid a potential challenger. I’m definitely strolling into headcanon territory here, but we’ve never met Moray’s mother, so my theory is that Coral stepped in after her untimely death (or disappearance ooo), as a way to control Moray. I could absolutely see it causing bad blood between Shark and Coral.
3. Shark again, but with an emphasis on shapes. He’s much more rectangular and sharp with a dark, heavy brow. This is my final version for the time being. I gave him a little wobbegong beard and the eyes of a man who is dead inside.
4. Ah, and Whirlpool. He’s been a favorite to draw because I get to revel in villainous design tropes. I didn’t want to make him overtly ugly, but he does have an unsavory look going on. Leaned into a scheme-y advisor archetype. He’s drippy and downturned with large, heavy, lidded eyes. I, uh, weirdly enough ended up taking a lot of design inspiration from Micolash (Bloodborne), primarily in the eyes and the smarmy grin. He’s my personal headcanon for Whirlpool’s voice even if the characters are hardly alike. Micolash’s voice just has this perfect oozing quality to it that makes my ears itch. If not him, then my other choice is that guy from the “what would you call this in English” meme. Y’know the one.
#wings of fire#wings of fire art#wof fanart#wof art#sketches#why does coral have so many pale eyed freaks in her court#wings of fire seawing
584 notes
·
View notes
Text
✩ Make your own Kyrii Plushie ✩
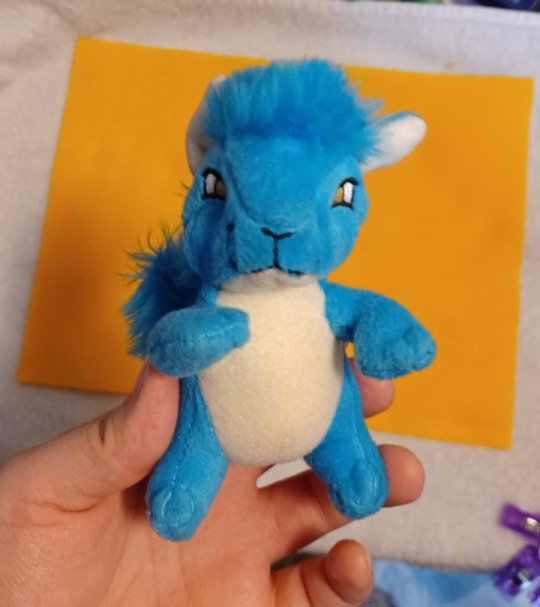
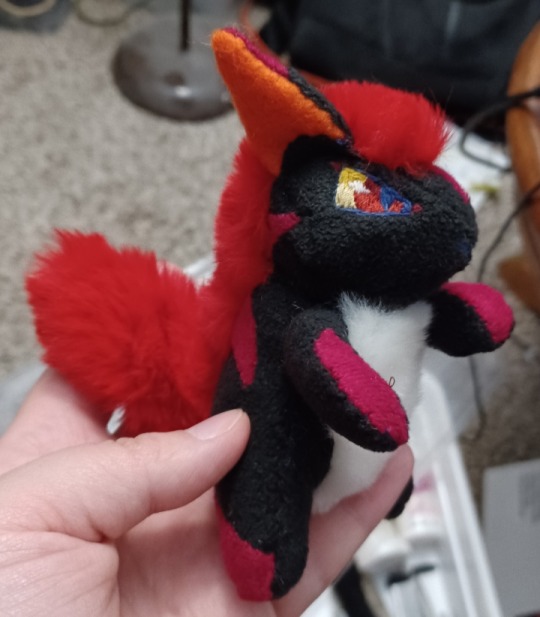
Thank you @free-sewing-patterns and @jestersneopia for asking so kindly for me to release my pattern dupe! :3 These guys are very intricate little plushies so I did my best to make something comprehensive. I also made detailed instructions which I will include after the readmore, so long post ahead!
McD's Plush Kyrii
What you will need:
•The two included images printed on 8.5"x11" (A4/Letter) paper.
•Enough of your desired Fabrics (reference the pattern size on your paper, you don't really need much at all)
✩ I recommend a short pile faux fur or other nonstretch fabric for the two body colors, and a long pile (1-4cm) faux fur for the mane and tail.
✩ You can also make the mane and tail using yarn or doll hair wefts by attaching them (sewn or glued) to a backing fabric like cotton or felt.
•Scissors or precision knife to cut fabric.
•Sewing implements (needle, pins, thimble, thread scissors, etc.)
•Thread matching one or both of your body color fabrics.
•black thread or embroidery floss for the mouth embroidery.
✩embroidery floss or thread in your desired eye colors (recommended a white for sclera, an iris color, and a black for outlines)✩OR✩buttons or safety eyes in your desired size and color.
•Stuffing (two or three handfuls of polyfill will do the job)
✩ribbon or cord to use as arm tension band and/or a loop to clip hardware like keychains and backpack hangers.
((✩ optional ))
General note: default suggested stitch length is 3mm apart unless stated otherwise.
Step 1
Print out the pattern, making sure to format your printer to use the full page with no margins. Check print preview to be sure nothing is cut off. (I made the piece inventory sheet to sort of offset any default margin weirdness but I'm new to this so let me know if it messes up.)
Step 2
Conceptualize your design and gather your materials. Are you cloning one of the plushies already out there, or making your own design? It is always good to keep reference on hand during any art project!
What special design elements are you translating to plush form? Keep in mind this pattern is small and intricate and it might be easier to omit or simplify certain design elements if you are working from something more detailed.
The cutting guide assumes 1 base color, 1 accent color, and 1 fur color with no significant shape, size, or design difference to the original McD's plushie. (Only a few fixes for symmetry and fur direction.)
Step 3
Prepare your base material for cutting. If you are doing embroidery or applique designs this may be easier while the fabric is flat and whole. Same with fur wefting, do anything like that while you have one big piece of fabric to work with. Trace the pattern pieces using chalk, heat erase pen, or some other washable marking tool using the cut guide provided. (I recommend cutting out any shape you need to add details to from the pieces inventory page, then trace those pieces on your fabric in roughly the same positions as the cut guide page.) Then do any embroidery or details you need to do while the pattern is flat.
Embroidery tips:
• Use a stiff backing piece like interfacing or felt behind your fabric to make the embroidery more durable and stiff.
•Use a back stitch or chain for lines, line in color for crisp color-changes.
•Parallel vertical lines close together catch the light and read as blocks of color best.
•Don't use stitches that are too long or loose, build stitches up diagonally like a brick pattern instead, the key is to attempt to stay parallel.
•If you are using sewing thread instead of embroidery thread, use two or three strands at once to save time.
•When you are done, cut away your backing fabric/interfacing a little outside where your embroidery stops so as not to interfere with future seams.
Step 4
Cut out your materials. If you didn't need to trace from the pieces inventory for pre-cut details, then you can just pin the cut guide paper to your fabric and cut it directly. Otherwise simply follow your trace and cut out your pieces. Be sure to keep track of which pieces go on the left and right of your plushie.
Step 5
Begin assembly by sewing all your darts first, those will be on each side of your face, inner leg, arm bottom, belly, and back pieces. Follow the blue lines that appear anywhere that says "dart" and any sew lines that create a V-like dip in the perimeter of the piece (like the arm bottom and belly pieces). Fold the seam allowance inside your seam so that the right sides of the fabric end up with a clean, unnoticeable seam. I recommend a tight, short straight-stitch about 2mm apart on darts.
Step 6
Make the loose body parts.
Sew together ears, arms, and tail by placing right sides together and sewing around based on the solid black lines in the pattern.
•Each ear will have a base color piece and an accent color piece. Make sure their shape lines up so that right sides of the fabric are together. The ear pieces are fairly flat and their sew lines should line up perfectly. Use any stitch you are comfortable with, straight stitch about 3mm apart works just fine.
•Sew one top arm piece and one bottom arm piece together for each arm. The discrepancy in their shapes creates a slight twist that gives the arm part a tube-like shape. I recommend pinning the pieces at the ends and wrist first to get the tension/gathering correct on the arm part. Any stitch works but a straight stitch will probably be easier to keep track of tension with or to rip if you make a mistake and need to retry. Keep it tight, about 2mm apart.
•For the tail, sandwich your pieces right sides together so that all the fur is tucked inside and you can sew the edges with a secure stitch like a whip or back stitch.(about 3-4mm apart) You might need to pick or brush out the fibers if they get caught in the seam.
Once you finish each piece, flip it inside out, wrong sides should remain inside while the right sides of the fabric show and all seam allowance remains inside. If any edges are having trouble flipping inside out, use a thin tool like a crochet hook or chopstick to prod them from the inside.
Stuff the 2 arms until they hold a 3D shape, firm fill recommended. Leave the other pieces in this step unstuffed.
You should have two ears, two arms, and one fluffy tail.
Step 7
Shape the face.
With the dart now sewn into the cheek, the two seams with the || registration marks should be much closer in length. Line the seam up according to the marks and fudge the rest of the length using tension. I recommend using a ladder stitch on the right sides while keeping in mind the general size of the seam allowance.
Repeat on the other side.
When you are done, your face piece should have curvy cheeks.
Step 8
Build up the head.
Connect the forehead piece to the face piece, the curve's center goes right above the nose.
Sew in the chin piece along lower jaw.
There is a bit of leeway into how long the ears will be and which angle they stick out. For best results, give it a test right side out and pin where you like the ears to stay.
The ears go into the notches on the top of the face piece, about half of the ear should fit into that notch. Sew it into that notch, any remaining ear folds around that top seam towards the forehead and is stitched down to give the ear a slight curve that helps it remain upright.
When you're finished you should have the (bald) head.
Step 9
Construct the body.
Sew the two inner leg pieces onto the sides of the belly piece.
Sew the back pieces onto the belly and inner leg piece, leaving the arm notches alone to make the arm holes. Sew all the way around the inner leg and to the center line on the belly where the dart seam sits. There may be some overlap/extra on the back piece.
Sandwich the tail between the two back pieces and sew them together. You can adjust the angle of the tail before you sew it in, the original plushie has its tail sticking up behind the back. (Tip: if you fully close the tail seam you can use a loose couple of stitches to attach it to the body to make a hanging tail that wags when you pick up and shake the plushie.)
Your current parts should be a head, a body, two arms, and the hair piece.
Step 10
Attaching the hair piece to the head.
(OPTIONAL): First, if you want to add a keychain loop like the original plushies, snip two tiny holes into the backing of your hair piece about 6mm apart and feed a small length of cord or ribbon inside to create a loop on the outside.
Leave plenty of slack on the ends of the loop for a more sturdy hold.
Secure the loop and holes with a lot of sewing and/or glue to keep the fur fabric from fraying. Stitch down the ends of the cord/ribbon to the backing of your hair piece.
Start sewing the hair piece to the head beginning with the hairline along the forehead to get it nice and clean. Next sew across the ears and down the face piece on both sides.
Your head should now have hair, with the rest of the mane hanging down behind.
Step 11
Sew head to body.
Make sure the chin piece lines up to the belly piece, the bottom of the head should line up with the rest of the back piece on either side.
Next, sew down one side of the hair piece to the back piece, connecting the bottom edge to the seam near the tail and stopping.
Leave the other side seam of the hair piece open for arm adjustment and stuffing.
Step 12
Attach the arms.
Tension Band Explanation:
The original plushies have an arm tension band inside to keep the plushie's shape and seams intact when pulling on the arms. Generally I think this can be skipped without much issue, but could be a good idea if you plan to use this as a bag hanger or keychain plush, as the arms are the extremities most susceptible to getting caught on things, and when they are secured more comprehensibly they are less likely to rip the plush apart when yanked. Not a big deal if you just plan to keep them around the house.
(OPTIONAL): If you want to install your own arm tension band, start with the plushie right-sides-out. Sew the band to one arm and pull it taught through the chest to the other arm, securing the tension band before sewing the arms into the body piece.
To sew the arms, be sure to pose them and pin them in place right-side out first. (originals usually have one arm down and the other up on their chins/waving, though they vary a lot and there are plenty of ways to position them for different expressions.)
Then, either turn insideout again or ladder stitch the arms into place.
Almost there! You should have all your pattern pieces together at this point.
Step 13
Stuffing the plushie.
Make sure your plushie is right side out, with no incorrect seams or holes other than one of the seams between the hair piece and back piece. If you need to, gently prod a crochet hook or chopstick along the backs of seams to turn them out.
OPTIONAL: To make a weighted plush, add a small mesh bag of plastic pellets or weight of your choice to the bottom of the plushie before stuffing.
Add in your polyfill, pillow fluff, yarn fibers, scraps, or whatever you decide to stuff the plushie with, paying attention to the density of the stuffing.
I recommend keeping the head and feet more densely stuffed to keep their shape while leaving the body a bit more loose for a squishable belly.
Step 14
Close up the last seam.
Using a ladder stitch, close up your last seam, pulling tight and tying off your thread at the end for a clean, invisible seam.
Now that all the seams are in, you can now brush or pick any long fibers from the hair and tail out of the seams.
The plushie is whole! You can keep it like it is, or do some thread sculpting for a more finished look!
Step 15
Thread Sculpting.
(OPTIONAL):
Using thread in the color of your body fabrics, you can pull tension at various points to create a more sculpted shape. The original had two through the face (vertically through the chin up behind the forehead, and horizontally between the corners of the eyes), and two over top of each hand and foot to look like the separation of the toes. See the original pattern pieces for precise placement.
And that's it! You should have a finished plush kyrii!
If you have any questions or concerns please contact doggyspeak. Feel free to use this pattern, share it, or edit it with or without credit.
PLEASE DO NOT SELL THIS PATTERN OR INSTRUCTIONS! IT IS BOTH NOT ORIGINALLY DESIGNED BY ME AND ALSO SOMETHING I'VE WORKED VERY HARD ON!
If you would like to see more pattern reconstructions from me, show me your finished plushies and provide feedback and suggestions to me. I would love to see what you have made and hear what you'd like to see next! ^o^
#neopets#Next time I make a new kyrii plush I will snap pictures of each step to add to the instructions!#doggyspeakart#plushie#plushie pattern#sewing patterns#bootleg#thanks for your patience I got over an illness 2 weeks ago and have spent most of my free days since then doing dentist or house stuff!!
225 notes
·
View notes
Text
Lancer Tactics dialogue layout crisis of faith
(from this month's backer update)
Every so often, I'll run into something in development that eats away at me until it pushes me to a crisis of faith and I have a breakdown, burn down a bunch of work, and build something better from the ashes. These are moments of transformation and we're almost always able to come out the other side with something much better than what we started with.
This all sounds very dramatic until you take a step back and see the issue in question is just, like, the layout of a menu. But if medieval priests were able to have schisms over angels on pins I can have strong feelings about graphic design, dammit!
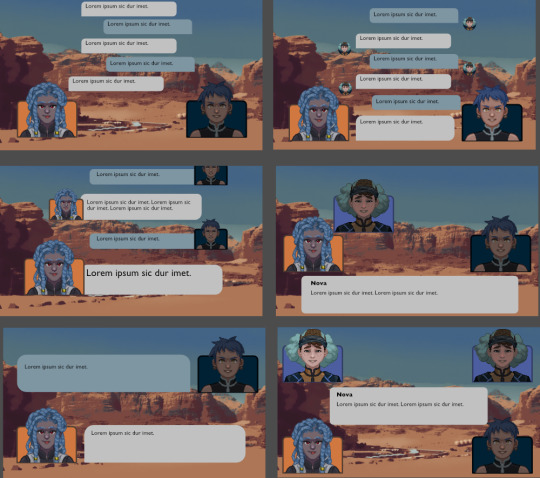
This month's episode revolved around how we're doing character dialogue. For reference the plan was to do a standard 4-slot visual-novel talking heads layout. I call it a 4-slot because there's usually four positions that characters can stand; two on the left, two on the right:
I had it ingame, and it was working. But... something felt off. Do you see the difference between every one of the above examples and this?
It's all about perspective, baby.
Answer: all the character art in those examples are drawn at a slight angle so they can be flipped back and forth to be made like they're looking at each other.
Trying to do this with the perspective we chose early — straight on — makes for a chorus line of weirdos who are looking directly into your soul as they ostensibly chat with each other. Credulity is strained; the illusion of these puppets interacting in the same space is paper-thin.
(I was skeptical of choosing this perspective for this reason, but we ultimately went with it to make the customizable assets in the portrait maker easier to fit together)
We tried a bunch of different layouts, but they all at least one of these problems:
they'd stare into your soul while ostensibly directing comments elsewhere.
they felt like text messages; this would be fine if that's what we were going for, but we wanted something that could represent face-to-face conversations. (Tactical Breach Wizards was able to pull this style off because they had little 3D dioramas to go along with it)
or, most damning of all, they felt like zoom calls.
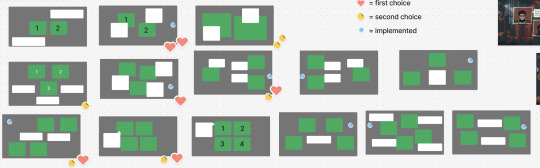
So, my heart aflutter and spirit in want, I spent a day doing a research dive into various dialogue layouts (bless the Game UI Database!) to see if any other games had managed to pull this character art perspective off. I ended up with this massive non-chronological taxonomic tree:
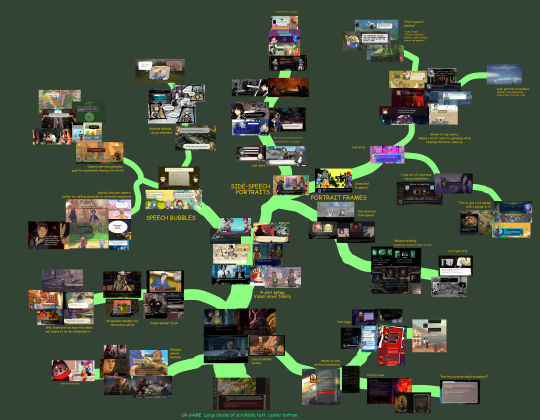
(fullsize here)
The type of layout that particularly caught my eye was this style where each character had their own little box. These layouts borrow a concept from comic books called "closure" where the space and time between characters are left blank. Freed from the constraints of trying to simulate a single space, these layouts allow the reader to fill in the blanks with something that feels more true-to-life than anything we'd be able to render ourselves.
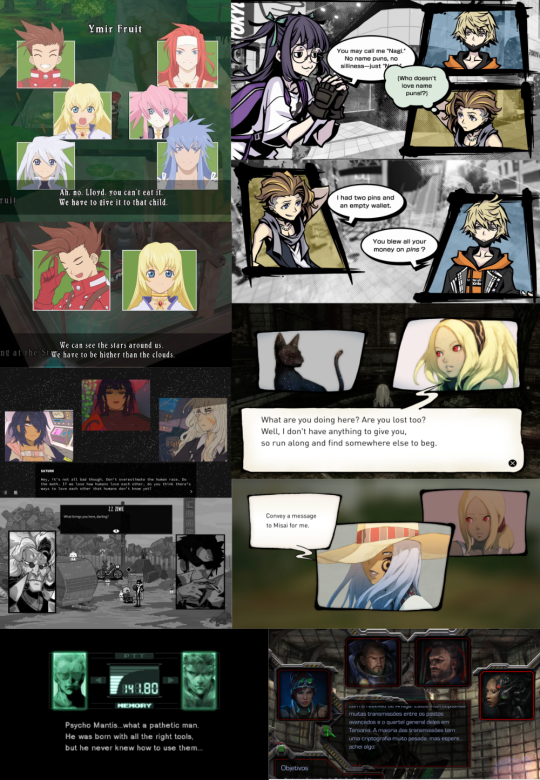
I was especially impressed with the dynamism of Tales of Symphonia and The World Ends With You; rather than sticking to single slots they would animate the entire panels moving around to indicate motion an relative position of characters.
So we threw out the old code and copied them. Here's what we've come up with:
We'll be able to have portraits interact, like smacking each other (I felt like a kid hitting two action figures together, lol)
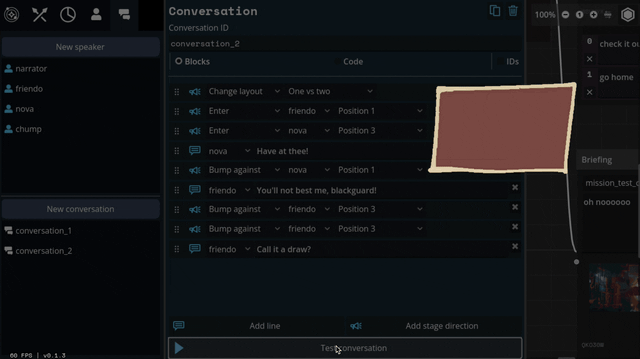
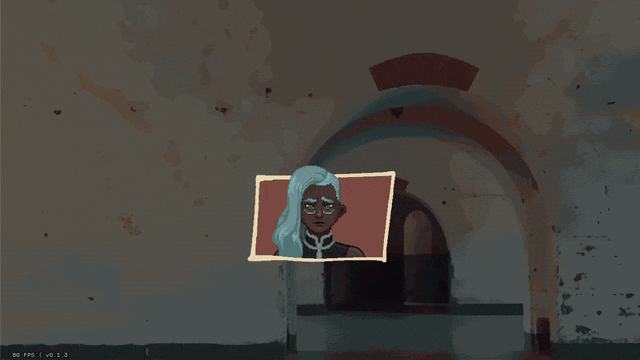
We can also apply effects like princess-leia-holograms and full-screen "lighting" effects like warning banners:
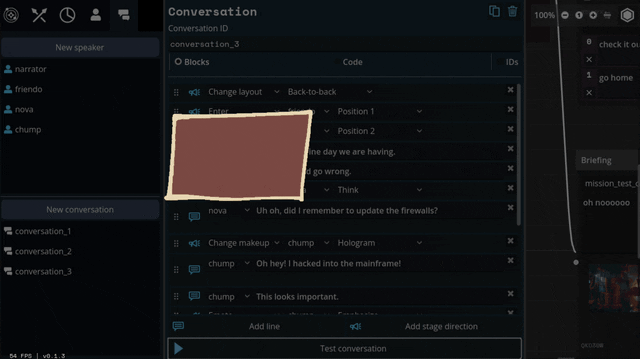
Carpenter and I came up with a number of arrangements that the portraits can smoothly transition between:
I've also implemented support for choices during a dialogue, potentially leading to branching paths.
Overall, I feel SO much better about this system than our initial designs. It might feel a little more cartoony, but I think we're making a cartoony game so that's not a problem.
Whew. We bit a lot off to chew with this project. I feel like I just made a second visual novel game engine inside of the first. Fingers crossed that it all ends up worth it.
472 notes
·
View notes