#Proxmox Host Configuration
Explore tagged Tumblr posts
Visit Tumblr Blog
Explore Tumblr blogs with no restrictions, modern design and the best experience.
Last Seen Tumblr Blogs


Fun Fact
25% of US internet users with an annual income of $80-100K use Tumblr.
Text
Proxmox GPU PassThrough: Step-by-step Guide
Proxmox GPU PassThrough: Step-by-step Guide #homelab #selfhosted #ProxmoxGPUPassthroughGuide #GPUPassthroughSetup #ProxmoxVirtualEnvironment #AMDResetBugSolution #NvidiaAMDGPUProxmox #ProxmoxHostConfiguration #PCIDevicepassthroughProxmox
One of the great things about running Proxmox in your home lab is the ability to use GPU passthrough. Home lab enthusiasts often use a repurposed gaming computer or workstation with a fairly powerful GPU installed. GPU passthrough provides many advantages when running a virtual machine with a GPU exposed directly to the operating system from the Proxmox host. Let’s look at GPU passthrough and how…

View On WordPress
#/etc/modprobe.d/blacklist.conf Editing#AMD Reset Bug Solution#GPU Passthrough Setup#IOMMU Support Proxmox#Nvidia & AMD GPU Proxmox#PCI Device IDs Proxmox#Proxmox GPU Passthrough Guide#Proxmox Host Configuration#Proxmox Virtual Environment#Proxmox VM GPU Assignment
0 notes
Text
What's New? Install and enable RDP on Windows Server 2025
In this article, we shall discuss “What’s New? Install and enable RDP on Windows Server 2025”. Elevate your business operations to unprecedented levels of efficiency and innovation with the Windows Server 2025. Please see how to Migrate RDS CALs, how to Install Proxmox VE on a Beelink EQ12 Mini PC, how to resolve “no pg_hba.conf entry for host on PostgreSQL, and how to configure Azure Container…

View On WordPress
#Create Bootable USB#Enable Remote Desktop Connection#Install Windows Server 2025#Microsoft Windows#Windows#Windows Server#Windows Server 2012#Windows Server 2016#Windows Server 2022#Windows Server 2025
0 notes
Link
看看網頁版全文 ⇨ 安裝支援單字詞搜尋的Omeka-S / Install Omeka-S with Single Token Fulltext Seach Feature https://blog.pulipuli.info/2023/04/blog-post_375.html 沒想到一開始就不應該選擇MariaDB。 ---- # 安裝步驟記錄 / Installation steps。 這邊我只是簡單記錄一下整體的安裝步驟。 首先是環境。 我在Proxmox VE 7.2-3以CT形式安裝,CT範本是ubuntu-22.04-1_amd64.tar.zst。 開機後安裝必要元件: [Code...] 啟用Apache的rewrite模組: [Code...] ## 啟用.htaccess / Enable .htaccess。 為了啟用.htaccess,我們需要修改Apache設定檔:。 [Code...] 找到,將底下的AllowOverride None改為AllowOverride All。 完成後需要重新啟動Apache: [Code...] ## 設定資料庫 / Database Setup。 再來是設定MySQL資料庫。 在Bash裡面輸入以下指令:。 [Code...] 接著要設定密碼。 現在MySQL對密碼要求很嚴格,不能使用常見的單字。 設定的密碼足夠複雜的話,就能夠設定成功,不然就得要一直重試。 設定成功後,用以下指令進入mysql: [Code...] 在mysql的終端介面輸入以下三個指令,表示建立資料庫,並將資料庫的權限給root,然後離開:。 [Code...] ## 設定資料庫的ngram / ngram configuration of MySQL。 接著要修改資料庫的全文檢索斷詞設定檔案。 開啟MySQL資料庫的設定檔:。 [Code...] 在最後加上以下設定: [Code...] 然後重新啟動MySQL即可: [Code...] ---- # Omeka S安裝 首先先下載Omeka S檔案: [Code...] 解壓縮: [Code...] ## 資料庫設定 / Database setup。 修改資料庫設定: [Code...] 使用者user設定root、密碼password為剛剛建立的密碼、資料庫名稱dbname為omekas、連線位置host為localhost。 ## files權限設定 / Enable write permission of "files" folder。 再來啟用files資料夾的寫入權限。 指令如下:。 [Code...] ---- 繼續閱讀 ⇨ 安裝支援單字詞搜尋的Omeka-S / Install Omeka-S with Single Token Fulltext Seach Feature https://blog.pulipuli.info/2023/04/blog-post_375.html
0 notes
Text
Mainframe Community / Mattermost
So, last night I ‘launched’ a MatterMost instance on https://mainframe.community. To summarize MatterMost (via wikipedia) it is: an open-source, self-hostable online chat service with file sharing, search, and integrations. It is designed as an internal chat for organisations and companies, and mostly markets itself as an open-source alternative to Slack[7][8] and Microsoft Teams. In this post I wanted to quickly explain how and why I did this. Let’s start with the why first. But Why? Last week, while working for one of my clients, I discovered they are starting to implemen MatterMost as a cross-team collaboration tool. And I discovered it has integrations, webhooks and bots. Being the Mainframe nerd I am, I quickly whipped up some lines of REXX to call CURL so I could ‘post’ to a MatterMost channel straight from The Mainframe. It was also quite easy in the wsadmin scripts to have jython execute an os.system to call curl and do the post... Now I wanted to take it a step further and create a “load module” that did the same, but could be called from a regular batch-job to, I donno, post messages when jobs failed, or required other forms of attention. Seeing as I was going to develop that on my own ZPDT/ZD&T I needed a sandbox environment. Running MatterMost locally from docker was a breeze, yet not running as “https” (something I wanted to test to work from the still to be made load-module. So, seeing as I already had the “mainframe.community”-domain, I thought, why not host it there, and use that as a sandbox....turned out that was easier done than imagined. But How? The instructions provided at https://docs.mattermost.com/install/install-ubuntu-1804.html were easy enough to follow and should get you up and running yourself in under an hour.
Seeing as there already ‘some stuff’ running at the local datacenter here I already had an nginx-environment up and running. I started with creating a new VM in my ProxMox environment (running Ubuntu 18.04) and made sure this machine got a static IP. From there on I did the following:
sudo apt update sudo apt upgrade sudo apt install postgresql postgresql-contrib
That then made sure the VM had a local database for all the MatterMost things. Initializing the DB environment was as easy as;
sudo --login --user postgres psql postgres=# CREATE DATABASE mattermost; postgres=# CREATE USER mmuser WITH PASSWORD 'x'; postgres=# GRANT ALL PRIVILEGES ON DATABASE mattermost to mmuser; postgres=# \q exit
Of course the password is not ‘x’ but something a bit more secure...
Then, make a change to the postgres config (vi /etc/postgresql/10/main/pg_hba.conf) changing the line
local all all peer
to
local all all trust
Then installing mattermost was basically these next commands:
systemctl reload postgresql wget https://releases.mattermost.com/5.23.1/mattermost-5.23.1-linux-amd64.tar.gz mv mattermost /opt mkdir /opt/mattermost/data useradd --system --user-group mattermost chown -R mattermost:mattermost /opt/mattermost chmod -R g+w /opt/mattermost vi /opt/mattermost/config/config.json cd /opt/mattermost/ sudo -u mattermost ./bin/mattermost vi /opt/mattermost/config/config.json sudo -u mattermost ./bin/mattermost vi /lib/systemd/system/mattermost.service systemctl daemon-reload systemctl status mattermost.service systemctl start mattermost.service curl http://localhost:8065 systemctl enable mattermost.service restart mattermost systemctl restart mattermost
Some post configuration needed to be done via the MatterMost webinterface (that was running like a charm) and then just a little nginx-config like specified at the MatterMost docs webpages and it was all up and running. Thanks to the peeps at LetsEncrypt it’s running TLS too :) Curious to see how ‘busy’ it will get on the mainframe.community. I’ve setup the VM with enough hardware resource to at least host 2000 users. So head on over to https://mainframe.community and make me ‘upgrade’ the VM due to the user growth :)
1 note
·
View note
Text
Project 1: Encore
Back in September, I bought a Dell Poweredge R710. The specs are:
64 GB RAM
6x2TB Drives, RAID 1+0 Configuration (6TB Total)
24-core Intel Xeon X5670
It was sold as a virtualization server, and that's what I intend to use it for. I've installed Proxmox on the machine, and I want to build up several environments within it. I've still got a lot to learn, but I'm nearly finished with the network layout. I have a lot of services that I want to host, but I don't trust them or their security, hence this being a larger project.
The server itself is sitting inside a rack somewhere and has several physical connections to the internet and IPs. I intend to leverage this to host different websties and services on different adapters, containing all intra-site traffic unto itself.
P.S.: I almost forgot to explain why I called the server Encore! I had another server before this, a small little Altix from the early 2000s. It was barely powerful enough to run a Minecraft server! It was named Alpha, and originally, Encore was to be named either Beta or Bravo. However, I named it Encore as a sort of inside joke: I just spent ~2 years building up this server to suit my needs perfectly, now do it all again.
0 notes
Text
Dnsmasq is an easy to configure and lightweight DHCP Server and DNS forwarder. Dnsmasq is designed primarily to provide DNS service and optionally, DHCP, in a small network setup. The DHCP server in Dnsmasq integrates with the DNS server seamlessly. The machines with IP addresses allocated by DHCP server appear in the DNS with names configured either in each host or in a central configuration file. Dnsmasq support dynamic and static DHCP leases. On top of stated features it has support for BOOTP/TFTP which can be used for network booting of diskless machines. Dnsmasq can be used in Proxmox virtualization platform to assign IP addresses dynamically or statically, and also to manage DNS. We’ll run Dnsmasq in one Proxmox hypervisor, with the service bound to specific network interface / bridge. Step 1: Install dnsmasq on Proxmox VE 6.x I’ll install dnsmasq in one Proxmox hypervisor from the default upstream repositories. sudo apt update sudo apt install dnsmasq Proceed to install dnsmasq on Proxmox VE 6.x Reading state information... Done The following additional packages will be installed: dns-root-data dnsmasq-base Suggested packages: resolvconf The following NEW packages will be installed: dns-root-data dnsmasq dnsmasq-base 0 upgraded, 3 newly installed, 0 to remove and 0 not upgraded. Need to get 463 kB of archives. After this operation, 1,027 kB of additional disk space will be used. Do you want to continue? [Y/n] y Also install dnsutils package which provides dig command: sudo apt install dnsutils -y Test your installation: $ dig computingpost.com @localhost nslookup computingpost.com localhost The DNS function in Dnsmasq is configured to forward all requests to your system’s default DNS settings as configured in /etc/resolv.conf file. Step 2: Configure DHCP Server using Dnsmasq After successful installation of Dnsmasq on your Proxmox server you can the start to configure DHCP service. sudo vim /etc/dnsmasq.conf Set domain for dnsmasq: domain=example.com Let dnsmasq know which ethernet interface it will use to listen for DHCP requests: #Around line 106 interface=vmbr1 # Or which to listen on by address (remember to include 127.0.0.1 if you use this.) #listen-address= Set DHCP server range of IP addresses to hand out. #around line 159 dhcp-range=192.168.50.50,192.168.50.200,12h Set default route supplied by dnsmasq: #around line 337 dhcp-option=vmbr1,3,192.168.50.1 #dhcp-option=eth0,3,192.168.50.1 Provide upstream DNS servers: #line 66 # You can use Google's open DNS servers server=8.8.8.8 server=8.8.4.4 Set path to a file for the DHCP lease database: dhcp-leasefile=/var/lib/misc/dnsmasq.leases Test your configurations: $ sudo dnsmasq --test dnsmasq: syntax check OK. Restart dnsmasq service: sudo systemctl restart dnsmasq sudo systemctl enable dnsmasq Step 3: Create a VM on the network with DHCP service Create a new Virtual Machine from Proxmox web console. Let’s give it a name and choose node where it will run. Select OS installation disc. Pick correct network (should be same as one used in dnsmasq DHCP configurations) Install the operating system and once completed reboot and check IP address if from DHCP. If the interface didn’t get IP address assigned by DHCP server automatically you can try manual request: sudo dhclient interface That marks the end of our article. Feel free to share your setup and test results via comments section.
0 notes
Text
Announcing Cloud-Init for On-Prem appliances
Today we're announcing the official release of cloud-init deployed on our On-Prem virtual appliances.
The entire setup is fully Open Source under the permissive MIT license, and can be used/tweaked by anyone as they see fit.
Cloud-init on-premises
For those unfamiliar with cloud-init, it's a tool installed on the appliance which allows it to be configured with certain settings on boot. The settings are not pre-baked into the VM, but rather fetched from the VM's host (ex: EC2, VMware, Proxmox, MaaS, etc). They can be obtained in the form of a removable drive (ex: /dev/sr0), or from a "Metadata URL" such as http://169.254.169.254/.
Pre-configured settings are fine for defaults, but there has always been a need to provide additional settings such as NTP, network, DNS, storage, apitoken, before the VM is first booted. That's where cloud-init comes in. It allows a true zero-touch deployment of On-Prem appliances on various on-prem AND cloud providers.
Unfortunately with TinyCore Linux and an immutable OS, that "feature" has always been impossible to implement, until now.
The changes we've implemented for cloud-init to work on our appliances only add a few MB (~3.8MiB) to the size of the appliance, and require an ugrade from Python v2.7 to Python v3.
How it works
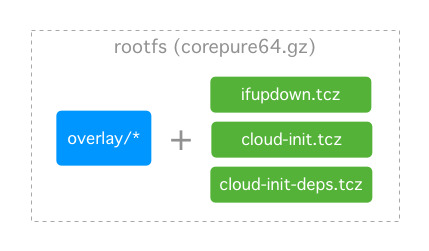
We add a system overlay into the TinyCore Linux rootfs, along with 3 new extensions (and their dependencies) which are loaded on boot:
ifupdown.tcz
cloud-init.tcz
cloud-init-deps.tcz
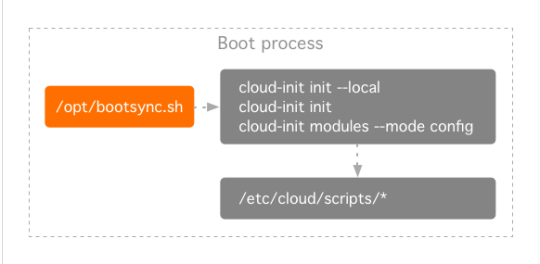
The /opt/bootsync.sh will run cloud-init and then try to setup networking through /opt/network.sh, which is simply calling cloud-init once more with different arguments. The reason for this is to provide backward compatibility for existing On-Prem TinyCore deployments.
Note: If there is no usage of the network.tcz, jidoteki-admin.tcz, or jidoteki-admin-api.tcz extensions, /opt/network.sh can be removed from /opt/bootsync.sh and replaced with:
/usr/local/bin/cloud-init modules --mode config
Each step in the cloud-init runs can be found in /etc/cloud/cloud.cfg.
The config modules are bootcmd which are the actual Shell scripts found in /etc/cloud/scripts.
Customizations can and should be added to custom.sh and custom-once.sh. If it's not immediately obvious, the once.sh and custom-once.sh scripts will only run once per boot. Unlike typical cloud-init installations, the once scripts will run again on reboot (because the OS is immutable).
Userdata, Metadata, Vendordata

The Shell scripts provided for this cloud-init deployment will read settings from various files on the system, including any userdata or vendordata provided to the system.
The order of precendence for reading configuration values are:
backed up files from /opt/.filetool.lst
userdata from /var/lib/cloud/instance/user-data.txt
vendordata from /var/lib/cloud/seed/nocloud-net/vendor-data
Note: Metadata is only currently used by cloud-init to configure SSH public-keys. All other metadata is ignored, but still accessible to applications running on the TinyCore Linux appliance.
Userdata
Tested with EC2, Proxmox, and NoCloud, the userdata will be discovered by cloud-init and read directly from /var/lib/cloud/instance/user-data.txt. From testing, it appears cloud-init handles Base64 decoding of userdata automatically provided by EC2.
Note: Userdata is not parsed by cloud-init, but rather read manually by various Shell scripts. This means it is not possible for userdata to overwrite values from /etc/cloud/cloud.cfg, and it is not possible to provide userdata which contains a shell script or other malicious features. Userdata should only contain key: value pairs.
Vendordata
The vendor-data is added to the /var/lib/cloud/seed/nocloud-net/ directory on the rootfs. It is also possible to add a network-config (v1 config) to that directory for pre-configuring the network.
Note: Similar to userdata, the vendor-data is not parsed by cloud-init and should only contain key: value pairs (except for network-config, which is parsed by cloud-init's net-convert tool).
More info
For more information, please see the README.md from our Open Soure repository.
Moving forward
We're hoping to add cloud-init to all our customer appliances in the coming month, so all their customers can benefit from the advantages cloud-init provides.
As usual, feel free to contact us and let us know your requirements. We'll be more than happy to help modernize existing apps by deploying them as part of a well-designed on-premises virtual appliance (OVA).
1 note
·
View note
Text
Il percorso per rendere le nostre case più smart inizia spesso dalle luci e prosegue subito dopo con le prese. Per quanto concerne l’illuminazione intendo fare un approfondimento appena possibile, poiché credo di aver testato praticamente tutte le combinazioni possibili con switch, lampadine, plafoniere e lampadari sia Wi-Fi che ZigBee, mentre il discorso relativo alle prese è relativamente più semplice. A mio avviso ci sono due situazioni principali di cui tenere conto:
le prese nascoste e dedicate ad un unico elettrodomestico, ad esempio il frigorifero o il forno, dove uno Shelly 1PM in cassetta svolge un lavoro ottimo e non aggiunge ingombri (dettagli su installazione e configurazione)
tutte le altre
Può sembrare semplice scrivere così ma in realtà ci sono davvero molteplici situazioni differenti da considerare. Penso a quando ci si trova con una cassetta insufficiente o già troppo piena, ai dispositivi che hanno la spina collegata ad una ciabatta (o una doppia presa) e di cui si vuole controllare lo stato individualmente, oppure a quelli che non sono sempre alimentati (tipo il ferro da stiro) o che si possono collegare in punti diversi della casa (aspirapolvere) e ancora alle prese a vista che possono svolgere più di una funzione. Insomma, lo Shelly 1PM è pratico ed invisibile, ma non è la soluzione ad ogni problema.
Queste altre situazioni si risolvono più comodamente con una presa smart, ma purtroppo ne esistono davvero tantissime ed è difficile scegliere. Il mio personale consiglio è di evitare i minestroni. Intendo dire che conviene perdere un po’ di tempo per trovare il prodotto giusto, o per meglio dire la tecnologia che si preferisce, e poi puntare sempre in quella direzione. Io stesso, però, non sono riuscito a rientrare in questa casistica dato che ci sono esigenze diverse e soprattutto si deve un po’ sperimentare prima di capire cosa fa al nostro caso. Se si usa Home Assistant una cosa positiva è MQTT, che ci consente di dialogare con prodotti differenti trattandoli più o meno allo stesso modo. Per fortuna la maggior parte delle prese in circolazione utilizza gli stessi chip di base e anche se poi vengono implementati elettricamente in modo diverso si possono convogliare in questo unico canale se tasmotabili.
Questa parolaccia che non troverete nello Zingarelli si usa per quei prodotti smart a cui si può sostituire il firmware con quello Tasmota, il quale va poi configurato per adeguarsi allo specifico dispositivo e dialogare tramite MQTT per impostare o leggere i suoi stati. In passato abbiamo già pubblicato una guida per tasmotare con Tuya-Convert senza dover smontare le prese o utilizzare il saldatore, ma oggi la aggiorniamo con un metodo leggermente diverso ed applicato a delle nuove prese smart davvero economiche e ben fatte. Mi riferisco alle Gosund SP111, che si comprano su Amazon con spedizione Prime per meno di 10€ a pezzo. Oltre a costare il giusto hanno un altro vantaggio, ovvero una forma particolarmente compatta che consente di affiancarle nelle ciabatte o di inserirle nelle prese a muro senza infastidire quelle vicine.
Il design ricorda molto quello dei Fibaro Wallplug, perché, se non si fosse capito già da altri articoli, Fibaro ha avuto il grande merito di rendere belli e pratici i dispositivi smart. Le Gosund non hanno proprio tutte le loro funzioni, ad esempio non cambiano colore dinamicamente in base al consumo ma hanno solo due LED di stato, uno azzurro ed uno rosso. E non utilizzano neanche la tecnologia Z-Wave, ma il più semplice e diffuso Wi-Fi, che non richiede l’acquisto di hub aggiuntivi per il collegamento nella propria rete. La cosa ha anche degli svantaggi, in quanto ogni presa andrà ad occupare un indirizzo IP e ad appesantire l’Access Point, ma finché non si esagera non si hanno problemi.
Anticipo qui la risposta ad una domanda ricorrente: ma non c’è per le prese italiane? Esiste qualcosa, tipo queste, ma sono generalmente grandissime. Lo standard per questa parte di Europa è quasi sempre la schuko. So che in alcuni casi non andrà bene, ma per elettrodomestici e computer di norma si usa questa. Spero prima o poi ne facciano di decenti anche specifiche per l’Italia, ma credo che il mercato sia piuttosto piccolo e poco appetibile. Comunque dato che la presa passante è davvero piccola, se ci mettete dentro queste risolvete i casi di emergenza. Per gli altri magari potete provare la tecnica dello Shelly 1PM.
Creare un container con Tuya-Convert
Dunque dicevo un metodo diverso, anche se non necessariamente adatto a tutti. In effetti per chi preferisse mettere su una microSD Tuya-Convert da far girare su un Raspberry, può benissimo utilizzare la vecchia guida relativamente a quel procedimento e poi ritornare qui per completare la configurazione delle Gosund SP111. Ma siccome ormai moltissimi di noi hanno spostato la propria domotica su un NUC con diverse LXC e VM tramite Proxmox, vi voglio descrivere il procedimento che parte dalla creazione di un container dedicato a Tuya-Convert. Il tutto è ancora più semplice rispetto a quanto visto per il Raspberry e, soprattutto, utilizza device che sono già in uso ed accesi tutto il giorno, dunque sarà sempre pronta a distanza di un clic.
Se siete già pronti e loggati nella shell di Proxmox, non dovete far altro che incollare ed eseguire questa riga di codice (anche se andasse a capo ricordate che è un singolo lungo comando da non spezzettare):
bash -c "$(wget -qO - https://raw.githubusercontent.com/whiskerz007/proxmox_tuya-convert_container/master/create_container.sh)" -s local-lvm
Ci vorranno alcuni minuti affinché l’operazione si concluda, durante i quali non dovete far altro che attendere. Alla fine vi troverete un nuovo container LXC dal nome tuya-convert, che non dovrete far altro che accendere al momento del bisogno. Ma non ora, aspettate prima di capire come si procede.
Come tasmotare una presa smart con Tuya-Convert
La procedura è tutt’altro che complessa, infatti si può sintetizzare in un punto elenco:
loggarsi sul container Tuya-Convert con user root e password tuya
la prima volta dovrete digitare yes e premere invio, le successive non sarà necessario
a questo punto verrà creata una rete dal nome vtrust-flash ed è importantissimo collegarcisi con un dispositivo, ad esempio lo smartphone
fatto questo si potrà collegare la presa smart alla corrente, che se non è mai stata usata inizierà a lampeggiare per segnalare la procedura di inizializzazione (se non dovesse succedere in genere si riattiva l’abbinamento tenendo premuto per 5 sec il tasto power sulla presa)
ora si può premere invio su Tuya-Convert che cercherà la presa e inizierà la procedura di flash (vedrete dei puntini di avanzamento e poi anche il processo di upload)
al termine ci verrà proposto un menu da cui dobbiamo scegliere il flash tasmota.bin (di norma corrisponde al tasto 2)
attendete ancora qualche minuto finché ci verrà richiesto se flashare un altro dispositivo, possiamo dire di no e spegnere il container
Inserire la presa tasmotata nella rete locale
Ora la presa è pronta con un firmware di base ma prima di poterla configurare deve essere agganciata alla rete locale. Per farlo sarà sufficiente seguire questi passi:
recarsi nelle impostazioni Wi-Fi di uno smartphone e agganciarsi alla rete tasmota-xxxx che si vedrà apparire
attendere un po’ finché non appare automaticamente una pagina di configurazione, similmente a quanto accade collegandosi ad un Access Point pubblico, ma se non appare allora ritornate nella vostra rete di casa e poi ritentate l’accesso a quella tasmota
nella finestra che si aprirà dovete inserire soltanto il nome della rete wireless e la password, ma ricordate che la maggior parte dei dispositivi IoT funziona solo su reti a 2.4GHz e che con alcuni vecchi modem/router a reti miste si possono generare errori (un modo per risolverli è quello di slegare le bande creando reti con nomi diversi per il 2.4G e il 5G)
dopo aver salvato, la presa si riavvierà in pochi istanti e si aggancerà alla rete locale: entrate nella pagina del vostro modem/router o access point per identificare il suo indirizzo IP (il dispositivo dovrebbe essere facilmente visibile perché il nome inizia proprio con tasmota)
#gallery-0-5 { margin: auto; } #gallery-0-5 .gallery-item { float: left; margin-top: 10px; text-align: center; width: 33%; } #gallery-0-5 img { border: 2px solid #cfcfcf; } #gallery-0-5 .gallery-caption { margin-left: 0; } /* see gallery_shortcode() in wp-includes/media.php */
Configurare lo smart plug Gosund SP111
Anche per questo i passi da seguire non sono moltissimi, per cui mi avvarrò ancora di un elenco e di immagini (che potete scorrere avanti e indietro per avere un supporto visivo):
accedete via browser all’indirizzo IP della presa (ad esempio https://192.168.1.100)
cliccare su Configuration / Configure Other
incollate la seguente riga nel campo Template:
{"NAME":"Gosund SP111","GPIO":[56,0,57,0,132,134,0,0,131,17,0,21,0],"FLAG":0,"BASE":18}
mette la spunta su Active
scegliete un Friendly Name per la presa
salvate
dopo il riavvio entrate in Configuration / Configurate MQTT e compilate i seguenti campi prendendoli dal vostro broker MQTT (se non ne avete uno installate su hassio l’add-on “Mosquito Broker” e sarete pronti in pochi istanti)
host: di norma l’IP di hassio su cui gira il broker MQTT
porta: di solito rimane la 1833
user: nome utente MQTT
password: password MQTT
topic: mettete preferibilmente lo stesso usato in configure other
salvate
dopo l’ennesimo riavvio entrate nel menu Console e digitate la seguente riga:
SetOption19 1
premete invio e attendete il riavvio
Il template utilizzato per questa presa considera la versione 1.1 della Gosund SP111, che è la più diffusa attualmente in Italia nonché quella che si compra da questo link.
Indirizzo IP Statico / Prenotazione
In tutti questi passaggi di norma la presa mantiene lo stesso indirizzo IP, poiché è molto veloce a ritornare online e dunque il DHCP fornisce ancora quello. Non c’è una stretta necessità di assegnare un IP statico alle prese, tuttavia è fortemente consigliato farlo sia perché evita eventuali vuoti di funzionamento dopo i riavvii sia per fare un po’ di chiarezza nelle tabelle di routing. Io personalmente uso determinate decine per prodotti affini (ad es. da .50 a .79 solo switch e prese smart). Per assegnare un indirizzo IP statico o, meglio, prenotarne uno, accedete sulla pagina di amministrazione del vostro modem/route/access ponti nelle impostazioni LAN (oppure fate una ricerca sul web).
Integrazione in Home Assistant
In teoria una volta completati questi passaggi e con il Broker MQTT attivo in Home Assistant e l’impostazione di auto discovery (tutte cose che si trovano così di default) rientrando dentro HA in Impostazioni / Integrazioni / MQTT dovreste già trovare la vostra presa smart identificata dal suo friendly name. Se così non fosse provate a riavviare ed accertatevi di aver eseguito il punto 5 del precedente paragrafo (ovvero SetOption19 1).
Se la trovate e ci cliccate sopra, vedrete apparire una serie di entità correlate alla presa. Sono tutte più o meno interessanti ma quelle che servono sono principalmente lo switch e l’energy_power che, ipotizzando di aver assegnato alla presa il topic gosund1, si chiameranno:
switch.gosund1
sensor.gosund1_energy_power
Questi saranno già pronti per essere integrati nelle nostre viste di lovelace o automazioni. Se per caso avete installato il custom_component multiple_entity_row potete anche mostrare l’entità con il toggle ed il consumo tutto su una riga in questo modo:
- type: entities title: Dispositivi - entity: switch.gosund1 type: custom:multiple-entity-row toggle: true primary: entity: sensor.gosund1_energy_power name: Consumo
Autore Maurizio Natali (@simplemal)
Revisore Massimiliano Latella (@LaMax)
Guida: tasmotare le prese smart Gosund SP111 con Tuya-Convert e importarle su Home Assistant Il percorso per rendere le nostre case più smart inizia spesso dalle luci e prosegue subito dopo con le prese.
0 notes
Text
Proxmox Network Setup for Beginners
Proxmox Network Setup for Beginners #proxmox #proxmoxnetworking #proxmoxsdn #homelab #homeserver #networksetup #networkconfiguration #virtualization #vmwareesxi #vlans #linuxbridge
Let’s look at Proxmox network setup for beginners and see how you can get jump started with using it for virtualization. Overview of Proxmox network configuration Out of the box, Proxmox has a default networking stack that is set up for you after you install it on your Proxmox VE host. It uses the Linux network stack for networking. This includes the linux bridge configuration. The default…
0 notes
Text
Unisecure Data Centers is Launched High Geared Proxmox KVM VPS servers
Unisecure Data Centers launches Proxmox KVM Virtual Servers which gives Near-bare metal scalability and performance result for your Workloads as it is develop powerful and efficient open source Server result. Philadelphia, US, 18th July 2018 | Unisecure Data Centers is into web hosting Industry with more than two decades of experience, offering bundle of Web Hosting solutions for Cloud Platform and Dedicated Servers. Now offering Proxmox Technology, it is simple electronic interface, which is open after installing on the server. Unisecure's Proxmox in like manner reinforces holder style virtualization, which you'll every now and then hear suggested as detainment facilities or maybe zones. The holder virtualization bits are maintained by OpenVZ, which is asserted and supported by Parallels. About Unisecure's Proxmox Servers 1. Windows and Linux Servers 2. 32 & 64 bit operation system 3. Supporting for newest AMD servers chipsets for VM performance 4. Main performance matching with to bare metal for real world business workloads Unisecure’s Proxmox virtual Environment Live migration allow the shifting of running Virtual machine from one host to another without any downtime. For these needs to install SAN, NAS or DRBD Storage. Unisecure’s Features with ProxMox Servers: 1. Full root Access 2. Expert Technical Support 3. 99.995% up time 4. Server Grade Hardware 5. Multiple DC Location to choose from 6. 1GB port Port Options
About Unisecure Data Centers Unisecure Data Centers is also one of the best and leading web Hosting service providers. Our Technical experts, Information Technology and Design Team, Optimize the deployment of our own servers located in Philadelphia and Conshohocken Location which is U.S embed with Information Security Management System (ISMS) to examine risks and develop better processes for security our data centers are most secure and reliable. Our offering are including Cloud Server Hosting, Virtual private Server (VPS Hosting), Dedicated Servers, Colocation services with 24x7x365 Rapid Action Support and 99.999% Up time Guarantee, high-density redundant power, flexible configurations, carrier-neutral facilities. Unisecure is productively maintained a Secure and reliable data center environment with robust technology, high-availability and physical security, so you never have to take the burden of data loss or security breach. We are having more than 650 experience professionals with proven records in Web Services in US. We have 50000+ customers over 17 countries including brands such as Canon, DHL, HP, Microsoft, Pepsi, Mc Donalds and much more. For more information about their services, visit www.unisecure.com. Media Contact Jennifer Thomas Contact: +1 347 960 6628 Email: jenniferatunisecure.com Unisecure Data Centers, US. (Philadelphia & Conshohocken)
0 notes
Text
Basics of Dedicated Server
Dedicated web servers empower organisations with the capability to scale computing resources at a fast rate while decreasing total holding prices. Businesses that utilize specialized web servers can benefit from the most up to date computer innovations as well as virtualization without the huge in advance price connected with opening up a world-class information center. Dedicated web servers are also almost always a less expensive service with remarkable efficiency when as compared to public cloud. Dedicated servers also reduce assistance expenses when compared to operating your personal on-premises service given that a very knowledgeable 24-hour assistance team is at your disposal when needed. Comprehending the basics of utilizing Dedicated servers can help services identify the most ideal web server solution for their functional requirements.
Setting Up a Dedicated Web Server
As organisations have diverse holding demands, dedicated servers are generally designed to be configurable for optimal performance throughout a range of use cases. At Medha hosting, we provide several server alternatives that differ across the measurements of cpu rate, storage space ability, memory, and also transfer limits. The available Dedicated server options are constructed with the most up to date equipment for ideal capability. Organisations could also choose to configure several web servers at the same time if an application or set of applications will run more efficiently on a series of web server instances. Dedicated servers can be set up straight from the site for rapid and straightforward scalability.
Instant Dedicated Servers
Much of Medha holding's customers utilize instant pre-built Dedicated servers since they are easy to set up as well as are available within a short period of time. We offer a number of instant Dedicated servers that can be purchased directly on our internet site. The advantage of an instantaneous web server configuration is that it is available within 7 mins as well as easy to buy. While the hardware setup is pre-determined, customers are able to include software like cPanel or MSSQL and also tailor bandwidth addition at the time of order. Instantaneous servers are basic to get begun with, so consumers with a broad range of skill sets can begin making use of these systems right now. Since our mix of immediate web server configurations is targeted at the most common customer needs, many consumers can discover an immediate server that is best for them.
Adjustable Web servers
When you require something much more details than an instantaneous server, we offer the capacity to personalize server setups so you obtain precisely just what you're seeking. The level of customizability that Medha organizing offers implies that some plans need hands-on configuration to prepare a server for customer requirements. Modification offers a broad range of choices that would certainly not be offered from common pre-built bundles. However, remember that modification can necessitate additional work that requires time to finish. In many cases, we could prepare a personalized server within 4 hrs with a periodic system taking 24-HOUR.
Virtualization on Dedicated Servers
Most business experience slow-moving, constant and most notably, foreseeable growth. One of the largest benefits that public cloud supplies is the capability to scale and be elastic for those times your user base goes from 1000 to 100,000 overnight. While it is a terrific issue to have, the far more likely development pattern is going from 1000 users to 1100 customers to 2000 customers and so on. over a duration of months or perhaps years. A Dedicated web server could be personalized developed to suit your 1000 customers today and your 5000 customers next year from day 1 while saving you hundreds or hundreds of dollars on a monthly basis. When the time comes where you have 10,000 users or 100,000 users a Dedicated server could scale in mins with CPU, RAM, disk drive and also transmission capacity upgrades. An additional significant advantage of cloud is having the capacity to rotate up new "digital machines" or "digital web servers" whenever you desire. Once more, a Dedicated web server can easily accommodate that very same demand by just including a cost-effective virtualization layer like HyperV, OpenStack, ProxMox or ESXi to it. Each of these virtualization systems supplies a graphical interface that provides you optics right into your source usage and also makes rotating up and taking down VMs very easy.
GPU Dedicated Servers
Clients that collaborate with making software application or specialized applications usually need graphics processing units to take full advantage of performance. GPU Dedicated server arrangements are optimal for companies that need customizable servers for expert system, digital currency mining, and also a wide array of high performance computer applications. Medha hosting deals web servers that can fit up to 10 GPUs on one system. Every one of the GPUs we offer are venture grade built for deep understanding as well as mining within data centres. If you call for a GPU to power your application, artificial intelligence, crypto-currency mining or deep discovering task, a consumer quality GPU constructed for graphics is never going to get the work simulated what we are supplying.
If you have any type of questions regarding any type of aspect of dedicated servers, we have solutions. Chat cope with a sales agent today.
0 notes
Text
Proxpn
Cloudsigma is a really respected and standard web hosting firm that's based mostly in the united states as nicely switzerland on the identical time. Prospects have full management over the vps from the working system up and can set up almost any software that run on that os. While vpss running on the same physical server are remoted from one another, it's doable for the workload on one to affect the performance on the opposite.
The virtualization know-how used is hyperv - the most powerful virtualization platform for the home windows vps. Foreign exchange vps supply a particular function known as ‘mt4 begin-up' which ensures that in case your server restarts then your mt4 utility does too. I might suggest proxmox se in case you imply an entire vps node, openvz - you may set up it on a spare desktop laptop. Vps companies not often value greater than $50 per thirty days, however there are a selection of brokers who provide the sort of service at a discount, or best of all, fully free. Offering lifetime provide of vps server with none price or any hidden charge is almost unattainable however nonetheless some corporations are doing their finest to meet expectations.
The free vps hosting is only advisable when you simply need to check some functions or need a vps for examine function. A management panel makes it tremendous simple to perform any process on your vps with only a few clicks. Right here I have listed vps firms who supply completely free vps path without asking your credit score/debit card information. Choose high performance cloud servers and leave traditional virtual personal server (vps) hosting and dedicated server internet hosting up to now.
Some other hosting providers charge you a really small amount that is close to free from the day 1 to provide you high quality companies and cover up their working price. Accuwebhosting gives most reasonably priced and fully managed foreign exchange vps internet hosting options on blazing fast ssd drives. All I need the vps server is for learning purpose, in future I'll purchase a vps server when needed for internet hosting or reselling purpose. A number of the necessities without spending a dime entry embrace having a certain number of traded heaps. You may also get the latest version of your favorite working system or can choose an older version primarily based on the supply with the vps internet hosting provider.
Beneath are a few of the top internet hosting corporations that you may consider to your server want. On this word, foreign exchange merchants will find our service highly secured and dependable while trading. You're additionally unlikely to experience slow-downs and system crashes when utilizing this free vps. If you want a vps to learn more about it, I counsel you find the cheapest vps deal round. Also, if you're looking for free (vps) internet hosting that means you are in search of bother.
Being a vps knowledgeable we labored laborious and find out few vps internet hosting suppliers which supply a free virtual non-public server internet hosting with first rate server configuration. Although their course of is bit gradual together with their help but they offer 15 days free path of their vps server. Hotforex is now also providing free vps, it is free for a deposit of $5000 in any other case it's 20 euros a month. If you do not have a google account, you may get it free of price during registration.
0 notes
Text
Proxmox Passthrough Disk Configuration Steps
Proxmox Passthrough Disk Configuration Steps - Learn how to pass an HDD or SSD to a Proxmox VM #proxmox #homelab #virtualization #diskpassthrough #proxmoxtips #proxmoxconfig #truenasonproxmox #selfhosted #selfhosting #homeserver
Many running Proxmox and self-hosting services will want to run TrueNAS on top of Proxmox. In doing this, a great way to ensure you have the best performance possible is passing physical HDD and SSDs through. Not only with solutions like TrueNAS, but there are other use cases where you may want to pass along the physical hardware to Proxmox, instead of having the virtual layer on top of the…

View On WordPress
0 notes
Text
Proxmox HA Cluster Configuration for Virtual Machines
Proxmox HA Cluster Configuration for Virtual Machines #proxmoxveserver #proxmoxcluster #highavailability #hacluster #proxmoxhavirtualmachine #virtualizationhowto #vhtforums #homeserver #homelab #labeveryday #learneveryday #selfhosting #homedatacenter
If you are learning the Proxmox hypervisor or want high-availability cluster resources for learning and self-hosting services with some resiliency, building a cluster is not too difficult. Also, you can easily create Proxmox HA virtual machine clustering once you create cluster nodes. Let’s look at Proxmox HA virtual machine deployment and how to ensure your VM is protected against failure and…

View On WordPress
0 notes
Text
Proxmox Homelab: First 5 Basic Configuration Steps
Proxmox Homelab: First 5 Basic Configuration Steps! #homelab #selfhosted #ProxmoxHomelabSetupGuide #VLANTaggingProxmox #ProxmoxSubscriptionRepositoryUpdate #CephStorageInProxmox #ProxmoxVMTemplateCreation #ProxmoxClusterSetup #ProxmoxVE #Proxmoxstorage
Proxmox VE is becoming a favorite among home lab enthusiasts or those who want to easily stand up a hypervisor host at home to play around with different types of technology. After you install Proxmox VE, what are the basic steps to get up and running so you can start playing around with VMs and containers? This post will cover the first 5 basic steps you will want to consider. Table of…

View On WordPress
#Ceph storage in Proxmox#Proxmox Cluster Setup#Proxmox command line interface#Proxmox homelab setup guide#Proxmox local and shared storage#Proxmox server operating systems#Proxmox subscription repository update#Proxmox virtual machines management#Proxmox VM template creation#VLAN tagging Proxmox
0 notes
Text
Virtualization is the foundation of cloud computing as it allows for more efficient usage of physical computer hardware. In Virtualization, a software application is used to create an abstraction layer over hardware elements of a computer – processors, memory, storage, network and more, to be divided into multiple virtual machines (VMs). Proxmox Virtual Environment (VE) is a Virtualization solution based on Debian Linux distribution with a modified LTS kernel. It enables you to deploy and manage both virtual machines and containers, with unified storage for better efficiency. In this guide, we will cover a step-by-step installation of Proxmox VE 7 virtualization software on Debian 11 (Bullseye) Linux system. It’s recommended to deploy Proxmox VE server from a Bare-metal_ISO_Installer, but it’s sometimes inevitable to deploy it on a running instance of Debian 11 (Bullseye) server. Setup Pre-requisites For the installation of Proxmox VE 7 on Debian 11 (Bullseye), you need the following requirements to be met; A running instance of Debian Bullseye A 64-bit processor with support for the Intel 64 or AMD64 CPU extensions. Access to Debian server terminal as root or standard user with sudo Server needs internet access Enough hardware resources to be used in Virtualizing other operating systems We have a guide that helps with the installation of Debian 11 (Bullseye) operating system. In the link below: Install Debian 11 Bullseye – Step by Step With Screenshots With all the requirements satisfied, proceed with the installation of Proxmox VE 7 on Debian 11 (Bullseye) with the steps discussed in the next sections. For Proxmox VE 6, check out: How To Install Proxmox VE 6 on Debian 10 (Buster) Step 1: Update Debian OS Ensure your Debian 11 (Bullseye) operating system is upgraded. sudo apt -y update && sudo apt -y upgrade Once the upgrade process is complete, reboot the server if needed. [ -f /var/run/reboot-required ] && sudo reboot -f Step 2: Set Proxmox Server hostname Let’s set a hostname on the server sudo hostnamectl set-hostname proxmox7node01.example.com --static Replaceproxmox7node01.example.com with correct hostname you’re setting on your system. Get the IP address of the primary interface: $ ip ad 1: lo: mtu 65536 qdisc noqueue state UNKNOWN group default qlen 1000 link/loopback 00:00:00:00:00:00 brd 00:00:00:00:00:00 inet 127.0.0.1/8 scope host lo valid_lft forever preferred_lft forever inet6 ::1/128 scope host valid_lft forever preferred_lft forever 2: enp1s0: mtu 1500 qdisc pfifo_fast state UP group default qlen 1000 link/ether 52:54:00:ef:22:c5 brd ff:ff:ff:ff:ff:ff inet 192.168.200.50/24 brd 192.168.200.255 scope global dynamic noprefixroute enp1s0 valid_lft 1982sec preferred_lft 1982sec inet6 fe80::5054:ff:feef:22c5/64 scope link noprefixroute valid_lft forever preferred_lft forever Update the record on /etc/hosts file with hostname and matching IP address for local resolution without DNS server. $ sudo vim /etc/hosts 192.168.200.50 proxmox7node01.example.com proxmox7node01 Logout and back in to use new hostname $ logout Test if configured hostname is is ok using the hostname command: $ hostname --ip-address 192.168.200.50 Step 3: Add the Proxmox VE repository The Proxmox server packages are distributed in an APT repository. Add the repository to your Debian 11 system by running the commands below: echo "deb http://download.proxmox.com/debian/pve bullseye pve-no-subscription" | sudo tee /etc/apt/sources.list.d/pve-install-repo.list Then import GPG packages signing key: wget http://download.proxmox.com/debian/proxmox-release-bullseye.gpg sudo mv proxmox-release-bullseye.gpg /etc/apt/trusted.gpg.d/proxmox-release-bullseye.gpg chmod +r /etc/apt/trusted.gpg.d/proxmox-release-bullseye.gpg Update your APT sources list $ sudo apt update Hit:1 http://deb.debian.org/debian bullseye InRelease Hit:2 http://deb.debian.org/debian bullseye-updates InRelease
Hit:3 http://security.debian.org/debian-security bullseye-security InRelease Get:4 http://download.proxmox.com/debian/pve bullseye InRelease [3053 B] Hit:5 http://deb.debian.org/debian bullseye-backports InRelease Get:6 http://download.proxmox.com/debian/pve bullseye/pve-no-subscription amd64 Packages [186 kB] Fetched 189 kB in 0s (435 kB/s) Reading package lists... Done Building dependency tree... Done Reading state information... Done 1 package can be upgraded. Run 'apt list --upgradable' to see it. You can see we have an upgrade available after adding the repo. Let’s run the system upgrade command: $ sudo apt full-upgrade Reading package lists... Done Building dependency tree... Done Reading state information... Done Calculating upgrade... Done The following packages will be upgraded: ifupdown 1 upgraded, 0 newly installed, 0 to remove and 0 not upgraded. Need to get 82.0 kB of archives. After this operation, 2048 B disk space will be freed. Do you want to continue? [Y/n] y Get:1 http://download.proxmox.com/debian/pve bullseye/pve-no-subscription amd64 ifupdown amd64 0.8.36+pve1 [82.0 kB] Fetched 82.0 kB in 0s (2558 kB/s) Reading changelogs... Done (Reading database ... 137105 files and directories currently installed.) Preparing to unpack .../ifupdown_0.8.36+pve1_amd64.deb ... Unpacking ifupdown (0.8.36+pve1) over (0.8.36) ... Setting up ifupdown (0.8.36+pve1) ... Processing triggers for man-db (2.9.4-2) ... Adding Proxmox VE Ceph Repository: This is Proxmox VE’s main Ceph repository and holds the Ceph packages for production use. You can also use this repository to update only the Ceph client. echo "deb http://download.proxmox.com/debian/ceph-pacific bullseye main" | sudo tee /etc/apt/sources.list.d/ceph.list Step 4: Install Proxmox VE 7 packages With the repository added, we can now install Proxmox VE packages on Debian 11 (Bullseye) system: sudo apt update sudo apt install proxmox-ve postfix open-iscsi The installation time will depend on other variables such as internet connectivity and hard disk write speed: .... The following packages will be REMOVED: firmware-linux-free ifupdown The following NEW packages will be installed: attr bridge-utils ceph-common ceph-fuse cifs-utils corosync criu cstream curl dmeventd dtach ebtables faketime fonts-font-awesome fonts-glyphicons-halflings genisoimage glusterfs-client glusterfs-common gnutls-bin hdparm ibverbs-providers idn ifupdown2 ipset keyutils libaio1 libanyevent-http-perl libanyevent-perl libappconfig-perl libapt-pkg-perl libasync-interrupt-perl libauthen-pam-perl libbabeltrace1 libboost-context1.74.0 libboost-coroutine1.74.0 libboost-program-options1.74.0 libbytes-random-secure-perl libcephfs2 libcfg7 libcmap4 libcommon-sense-perl libconvert-asn1-perl libcorosync-common4 libcpg4 libcrypt-openssl-bignum-perl libcrypt-openssl-random-perl libcrypt-openssl-rsa-perl libcrypt-random-seed-perl libcrypt-ssleay-perl libdbi1 libdevel-cycle-perl libdevmapper-event1.02.1 libdigest-bubblebabble-perl libdigest-hmac-perl libev-perl libfaketime libfdt1 libfile-chdir-perl libfile-readbackwards-perl libfilesys-df-perl libgfapi0 libgfchangelog0 libgfrpc0 libgfxdr0 libglusterd0 libglusterfs0 libgnutls-dane0 libgnutlsxx28 libgoogle-perftools4 libgssapi-perl libguard-perl libibverbs1 libinih1 libio-multiplex-perl libipset13 libiscsi7 libisns0 libjemalloc2 libjs-bootstrap libjs-extjs libjs-jquery libjs-qrcodejs libjson-perl libjson-xs-perl libknet1 libleveldb1d liblinux-inotify2-perl liblvm2cmd2.03 libmath-random-isaac-perl libmath-random-isaac-xs-perl libmime-base32-perl libnet-dns-perl libnet-dns-sec-perl libnet-ip-perl libnet-ldap-perl libnet-libidn-perl libnet1 libnetaddr-ip-perl libnetfilter-log1 libnfsidmap2 libnozzle1 libnvpair3linux liboath0 libopeniscsiusr libopts25 libposix-strptime-perl libproxmox-acme-perl libproxmox-acme-plugins libproxmox-backup-qemu0 libpve-access-control libpve-apiclient-perl libpve-cluster-api-perl
libpve-cluster-perl libpve-common-perl libpve-guest-common-perl libpve-http-server-perl libpve-rs-perl libpve-storage-perl libpve-u2f-server-perl libqb100 libqrencode4 libquorum5 librados2 librados2-perl libradosstriper1 librbd1 librdmacm1 librrd8 librrds-perl libsdl1.2debian libsocket6-perl libspice-server1 libstatgrab10 libstring-shellquote-perl libtcmalloc-minimal4 libtemplate-perl libterm-readline-gnu-perl libtpms0 libtypes-serialiser-perl libu2f-server0 libunbound8 liburcu6 libusbredirparser1 libuuid-perl libuutil3linux libvotequorum8 libxml-libxml-perl libxml-namespacesupport-perl libxml-sax-base-perl libxml-sax-expat-perl libxml-sax-perl libyaml-libyaml-perl libzfs4linux libzpool5linux lvm2 lxc-pve lxcfs lzop nfs-common novnc-pve numactl open-iscsi postfix powermgmt-base proxmox-archive-keyring proxmox-backup-client proxmox-backup-file-restore proxmox-backup-restore-image proxmox-mini-journalreader proxmox-ve proxmox-widget-toolkit pve-cluster pve-container pve-docs pve-edk2-firmware pve-firewall pve-firmware pve-ha-manager pve-i18n pve-kernel-5.13 pve-kernel-5.13.19-2-pve pve-kernel-helper pve-lxc-syscalld pve-manager pve-qemu-kvm pve-xtermjs python3-ceph-argparse python3-cephfs python3-cffi-backend python3-cryptography python3-gpg python3-jwt python3-prettytable python3-protobuf python3-rados python3-rbd python3-samba python3-tdb qemu-server qrencode rpcbind rrdcached rsync samba-common samba-common-bin samba-dsdb-modules smartmontools smbclient socat spiceterm sqlite3 ssl-cert swtpm swtpm-libs swtpm-tools thin-provisioning-tools uidmap vncterm xfsprogs xsltproc zfs-zed zfsutils-linux zstd 0 upgraded, 223 newly installed, 2 to remove and 0 not upgraded. Need to get 302 MB of archives. After this operation, 1780 MB of additional disk space will be used. Do you want to continue? [Y/n] y If you have a mail server in your network, you should configure postfix as a satellite system, and your existing mail server will be the ‘relay host’ which will route the emails send by the proxmox server to the end recipient. If you don’t know what to enter here, choose local only. Confirm system mail name / update accordingly. Confirm the installation completes without any errors: ...... Created symlink /etc/systemd/system/multi-user.target.wants/pvedaemon.service → /lib/systemd/system/pvedaemon.service. Created symlink /etc/systemd/system/multi-user.target.wants/pveproxy.service → /lib/systemd/system/pveproxy.service. Created symlink /etc/systemd/system/multi-user.target.wants/spiceproxy.service → /lib/systemd/system/spiceproxy.service. Created symlink /etc/systemd/system/multi-user.target.wants/pvestatd.service → /lib/systemd/system/pvestatd.service. Created symlink /etc/systemd/system/getty.target.wants/pvebanner.service → /lib/systemd/system/pvebanner.service. Created symlink /etc/systemd/system/multi-user.target.wants/pvescheduler.service → /lib/systemd/system/pvescheduler.service. Created symlink /etc/systemd/system/timers.target.wants/pve-daily-update.timer → /lib/systemd/system/pve-daily-update.timer. Created symlink /etc/systemd/system/sysinit.target.wants/pvenetcommit.service → /lib/systemd/system/pvenetcommit.service. Created symlink /etc/systemd/system/pve-manager.service → /lib/systemd/system/pve-guests.service. Created symlink /etc/systemd/system/multi-user.target.wants/pve-guests.service → /lib/systemd/system/pve-guests.service. Backing up lvm.conf before setting pve-manager specific settings.. '/etc/lvm/lvm.conf' -> '/etc/lvm/lvm.conf.bak' Setting 'global_filter' in /etc/lvm/lvm.conf to prevent zvols from being scanned: global_filter=["a|.*|"] => global_filter=["r|/dev/zd.*|"] Setting up proxmox-ve (7.1-1) ... Processing triggers for mailcap (3.69) ... Processing triggers for fontconfig (2.13.1-4.2) ... Processing triggers for desktop-file-utils (0.26-1) ... Processing triggers for initramfs-tools (0.140) ... update-initramfs: Generating /boot/initrd.img-5.13.19-2-pve
Running hook script 'zz-proxmox-boot'.. Re-executing '/etc/kernel/postinst.d/zz-proxmox-boot' in new private mount namespace.. No /etc/kernel/proxmox-boot-uuids found, skipping ESP sync. Processing triggers for hicolor-icon-theme (0.17-2) ... Processing triggers for gnome-menus (3.36.0-1) ... Processing triggers for libc-bin (2.31-13+deb11u2) ... Processing triggers for rsyslog (8.2102.0-2) ... Processing triggers for man-db (2.9.4-2) ... Processing triggers for proxmox-backup-file-restore (2.1.2-1) ... Updating file-restore initramfs... 11292 blocks Processing triggers for pve-ha-manager (3.3-1) ... root@proxmox7node01:~$ Reboot your Debian system after installation to boot with Proxmox VE kernel. sudo systemctl reboot Check if Port 8006 is bound to Proxmox VE Proxy service $ ss -tunelp | grep 8006 tcp LISTEN 0 4096 *:8006 *:* uid:33 ino:25414 sk:18 cgroup:/system.slice/pveproxy.service v6only:0 Step 5: Access Proxmox VE web interface From your Workstation, connect to the Proxmox VE admin web console on (https://youripaddress:8006). Select “PAM Authentication” and authenticate with server’s root user password to access Proxmox VE dashboard which has a look like below: To change Proxmox VE UI theme see guide below: How To Customize Proxmox VE Web UI With dark theme Once logged in, create a Linux Bridge called vmbr0, Add the first network interface to be used by the bridge being created. For Private bridge using NAT check below article: Create Private Network Bridge on Proxmox VE with NAT The official Proxmox Documentation has more guides on the advanced configurations and Proxmox VE Administration.
0 notes