#Raspberry Pi 3B+
Explore tagged Tumblr posts
Visit Tumblr Blog
Explore Tumblr blogs with no restrictions, modern design and the best experience.
Last Seen Tumblr Blogs


Fun Fact
In 2020, 44% of users from Denmark used Tumblr daily.
Text
Applied AI - Integrating AI With a Roomba
AKA. What have I been doing for the past month and a half
Everyone loves Roombas. Cats. People. Cat-people. There have been a number of Roomba hacks posted online over the years, but an often overlooked point is how very easy it is to use Roombas for cheap applied robotics projects.
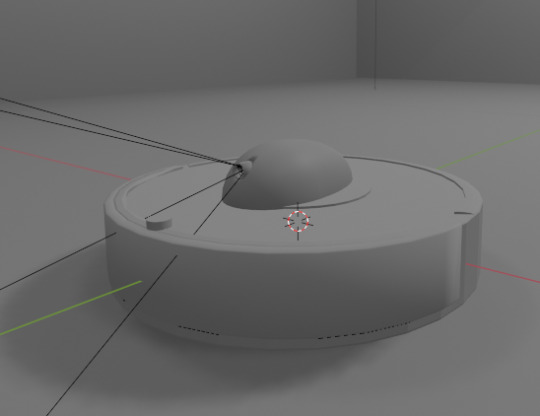
Continuing on from a project done for academic purposes, today's showcase is a work in progress for a real-world application of Speech-to-text, actionable, transformer based AI models. MARVINA (Multimodal Artificial Robotics Verification Intelligence Network Application) is being applied, in this case, to this Roomba, modified with a Raspberry Pi 3B, a 1080p camera, and a combined mic and speaker system.

The hardware specifics have been a fun challenge over the past couple of months, especially relating to the construction of the 3D mounts for the camera and audio input/output system.
Roomba models are particularly well suited to tinkering - the serial connector allows the interface of external hardware - with iRobot (the provider company) having a full manual for commands that can be sent to the Roomba itself. It can even play entire songs! (Highly recommend)
Scope:
Current:
The aim of this project is to, initially, replicate the verbal command system which powers the current virtual environment based system.

This has been achieved with the custom MARVINA AI system, which is interfaced with both the Pocket Sphinx Speech-To-Text (SpeechRecognition · PyPI) and Piper-TTS Text-To-Speech (GitHub - rhasspy/piper: A fast, local neural text to speech system) AI systems. This gives the AI the ability to do one of 8 commands, give verbal output, and use a limited-training version of the emotional-empathy system.
This has mostly been achieved. Now that I know it's functional I can now justify spending money on a better microphone/speaker system so I don't have to shout at the poor thing!
The latency time for the Raspberry PI 3B for each output is a very spritely 75ms! This allows for plenty of time between the current AI input "framerate" of 500ms.
Future - Software:
Subsequent testing will imbue the Roomba with a greater sense of abstracted "emotion" - the AI having a ground set of emotional state variables which decide how it, and the interacting person, are "feeling" at any given point in time.
This, ideally, is to give the AI system a sense of motivation. The AI is essentially being given separate drives for social connection, curiosity and other emotional states. The programming will be designed to optimise for those, while the emotional model will regulate this on a seperate, biologically based, system of under and over stimulation.
In other words, a motivational system that incentivises only up to a point.
The current system does have a system implemented, but this only has very limited testing data. One of the key parts of this project's success will be to generatively create a training data set which will allow for high-quality interactions.

The future of MARVINA-R will be relating to expanding the abstracted equivalent of "Theory-of-Mind". - In other words, having MARVINA-R "imagine" a future which could exist in order to consider it's choices, and what actions it wishes to take.
This system is based, in part, upon the Dyna-lang model created by Lin et al. 2023 at UC Berkley ([2308.01399] Learning to Model the World with Language (arxiv.org)) but with a key difference - MARVINA-R will be running with two neural networks - one based on short-term memory and the second based on long-term memory. Decisions will be made based on which is most appropriate, and on how similar the current input data is to the generated world-model of each model.
Once at rest, MARVINA-R will effectively "sleep", essentially keeping the most important memories, and consolidating them into the long-term network if they lead to better outcomes.
This will allow the system to be tailored beyond its current limitations - where it can be designed to be motivated by multiple emotional "pulls" for its attention.
This does, however, also increase the number of AI outputs required per action (by a magnitude of about 10 to 100) so this will need to be carefully considered in terms of the software and hardware requirements.
Results So Far:
Here is the current prototyping setup for MARVINA-R. As of a couple of weeks ago, I was able to run the entire RaspberryPi and applied hardware setup and successfully interface with the robot with the components disconnected.
I'll upload a video of the final stage of initial testing in the near future - it's great fun!
The main issues really do come down to hardware limitations. The microphone is a cheap ~$6 thing from Amazon and requires you to shout at the poor robot to get it to do anything! The second limitation currently comes from outputting the text-to-speech, which does have a time lag from speaking to output of around 4 seconds. Not terrible, but also can be improved.
To my mind, the proof of concept has been created - this is possible. Now I can justify further time, and investment, for better parts and for more software engineering!
#robot#robotics#roomba#roomba hack#ai#artificial intelligence#machine learning#applied hardware#ai research#ai development#cybernetics#neural networks#neural network#raspberry pi#open source
8 notes
·
View notes
Text
I spent over 100 hours over the course of 3 weeks building a RetroPie Emulator Box on a Raspberry Pi 3b+ as a Christmas gift for my brother in law. Either earlier today or yesterday it was basically perfect and just needed some polish, but I had to get too ambitious. I wanted to get it running Nintendo 64 and Sega CD games, so I needed a controller with more buttons, so I started messing with connecting an XBOX One and Switch Pro controller via Bluetooth and still never got N64 games emulating properly.
But SOMEWHERE along the way I FUCKED up the controller mapping for the 8bitdo Arcade stick with some (but not all!) of the Fighting arcade games running in mame2003-plus WHICH WAS THE WHOLE POINT NO ONE CARES ABOUT NINTENDO 64 WHEN THERE'S AN ARCADE EMULATOR!
Anyways it just became Christmas like the hour rolled over to midnight 00:00 Christmas Day and I'm going to attempt to rebuild 3 weeks worth of work in 8 hours with a fresh RetroPie image but I already have all the scraped video previews and gamelists backed up so... it should be doable. We shall see.
6 notes
·
View notes
Text
A friend of mine asked me recently to detail my Linux setup, and after thinking about it for a bit, I realized that this is essentially a personality quiz for the Linux users I thought I would detail it here as well.
I no longer have a desktop computer at all. I have two older generation "gaming" laptops and three Raspberry Pis. I'm going to go through in the order I got them:
Laptop #1:
[Purchased New in 2016] Acer ROG 7th Gen i7, 16GB Ram, nVidia 1050Ti Mobile, Internal 1TB HDD, external 2TB HDD
This was originally a windows laptop when I got it back in 2016, but in 2021 I was tired of the long windows boot times on the the HDD and was much more familiar with Linux due to several years experience doing webserver admin work.
I use Ubuntu LTS as my base. It's easy, it's well supported, it's well documented, and the official repos have just about everything I could need. The only thing I've really had to add myself is the repo for i3, but we'll get to that in a bit. I also chose Ubuntu because I already had my first two Raspberry pis, and both were running Raspbian, so using a debian based kernal meant that it wouldn't be much of a change when ssh'ing into them.
That said, I've never really liked the default Ubuntu desktop. Gnome3 is slow and full of too many effects that don't look especially nice but are still heavy to execute. Instead I loaded up KDE plasma. You can download Kubuntu and have them to the setup for you, but I did it the hard way because I found out about Plasma after installing Ubuntu and didn't want to start from scratch.
My plasma desktop looks like this:
Of my two laptops, this one is in the best shape. It's the one that I usually take with me on trips. With the dedicated GPU it can do some light gaming (it did heavier gaming on windows, but due to emulation layers the performance is just a little worse these days, Linux gaming isn't perfect), the screen hinge has never been an issue, and it's on the lighter side of gaming laptops (which is not to say that it's light). For that reason, I often find myself actually using it on my lap, in airports, at people's houses, on my own couch typing this up.
For this reason, I started looking into ways to better keep my hands on the keyboard, rather than having to drift down to the track pad, which is my least favorite part of this laptop. During that research I discovered i3. If you're not familiar i3 is a Linux Desktop Environment that is entirely keyboard driven. https://i3wm.org/
To be fair, it's less of a desktop environment and more of a keyboard driven window manager, as it doesn't have a "desktop" per se. Instead when you log into it, you simply get a black status bar at the bottom of the screen. It doesn't even black out the login screen, so if you don't know what to look for, you might think the whole thing has hung. But, the big benefit of this is that the whole thing is lighting fast for a DE. It doesn't waste any resources on effects or really anything that you don't need. But it's really nice for window tiling and task switching without having to get the mouse involved. This is great for productivity (if you're into that), but it's also just convenient for working on a gaming laptop, which might be balanced such that if you take your hands off of it, it might topple off your lap.
This laptop is my primary project computer. It has all my git repos and scripts for doing things like renewing my website's ssl certs. I also run game servers on it for Minecraft. I'm probably going to spin up a Valheim server on it in the near future too. Especially now that the process has improved somewhat.
Raspberry Pi #1:
[Gifted New in 2016] Raspberry Pi 3b, 4GB RAM, 32GB SD card
This one is my oldest RPi. It's had a lot of roles through the years, including an early version of the vogon media server during initial development in 2020. It's run headless Raspbian for a good three or four years now. Currently it's configured as a web server/php scripted web crawler and a pi-hole DNS server. My router currently refuses to use it as a DNS server without bringing the whole network down, but I will on occasion manually switch devices to it when I'm running especially ad-ridden applications.
There's not too much to say about this one. It's stable, I almost never have problems with it. I frequently use it for things that I want running in the background because they'll take too long and I don't want them blocking up one of my other computers.
Laptop #2
[Gifted Used in 2020] Asus Predator 7th Gen i7, 16GB Ram, nVidia 1080 Mobile, 2 internal 256GB SSDs, External 2TB HDD
This one runs windows 10 still. I use this primarily for gaming. The screen hinge is an absolute joke, and replacing it involves replacing the entire screen bezel assembly, which I can absolutely do, but is such a pain that I haven't gotten around to it in the 3 years I've owned this laptop.
There's nothing really special about this one, other than that when both laptops are at my desk, I use a KVM switch to swap my external monitor, keyboard, and trackball between the two computers.
Raspberry Pi #2:
[Gifted New in 2020/21] Raspberry Pi 4b, 4GB Ram, 16GB SD card, 2 120GB USB Sticks, External 2TB HDD
This is my media server. I got it for Christmas 2020 (or 2021, I don't actually remember which because 2020 was a hard hard year). It runs Rasbian, the full OS, with the desktop environment disabled from booting via the command line. It runs PHP 8.2, MariaDB, Apache2, and MiniDLNA to serve the content via my Vogon Media Server.
If you can't tell from the above storage, I'm running the USB ports well past the power delivery they are rated for. The webserver and OS are on the internal storage, so functionally this just means that sometimes the media disappears. I need to build a migration script to put the contents of the two USB sticks on the external storage, as there is more than enough room, and if I can put the HDD in an enclosure with dedicated power, that will solve the issue. But that's at least a hundred dollars of expense, and since the server only has 1, maybe two users at a time, we've been limping along like this for a few years now.
Raspberry Pi #3:
[Purchased New in 2023] Raspberry Pi 4b, 8GB Ram, 16GB SD card
This is the newest Pi. Work gave me a gift card as a bonus for a project recently, so after weighing the pros and cons of getting a VR headset, I settled on setting up a retro gaming tv box. Currently it's running Batocero Linux and loaded up with classic game roms up through the PSX. Though, I would really like to use it as a tv client for the media server. I've upgraded the devices in the living room recently, and there's no longer a dedicated web browser we can use without hooking up one of our laptops. I've got a spare 128GB SD card in the office, so I'm strongly considering getting a wireless mouse and keyboard and setting it up to dual boot between Batocero (which is convenient because it can be navigated with just a controller), and Raspbian. I think I'd set Batocero as the default in Grub, and then if I want to use Raspbian I'd need to have the keyboard handy anyway.
Maybe I'll get one of those half-sized keyboards with the trackpad built in.
Speaking of controllers. I use an 8BitDo Pro 2 controller, and I've been super happy with it since purchase: https://www.8bitdo.com/pro2/
So that's the setup. I have entirely too many computers for any one person, but I included the dates when I got them to show that a number of these have been around for a long time, and that part of the reason I have so many now is that I've put a lot of time into ongoing maintenance and repurposing.
If you've read this far, I'd love to hear about your setups. You don't have to reblog this, but please tag me if you detail yours.
5 notes
·
View notes
Text
2023/6/30(金)第九回
作成:郭
本日の流れ
各自の作業を進める
(media)
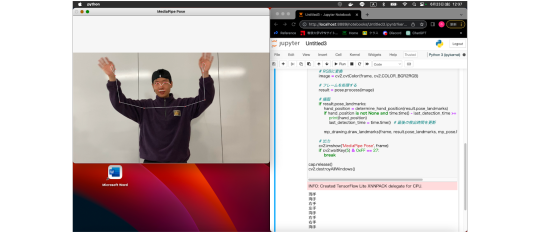
・3日連続苦戦してラズパイでmediapipe実装が成功した。
これまでのRaspberry Piの初期設定、カメラの設定、JupyterでのOpenCVの実行はすべて完了しました。
次に、プログラムを使用してモーターの動作をテストします。面白いものができるかどうか確認してみましょう。
現在の問題:Raspberry Pi 3Bで骨格認識を実行する際、目視できるほどのカクつきが発生しています。
(robot)
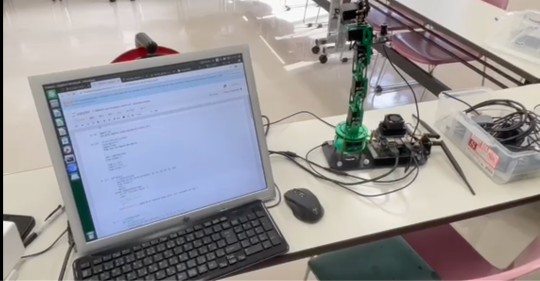
プログラミングを使ってロボットを動かす事に成功しました。
(design)
ポスター3枚目、4枚目の作成途中
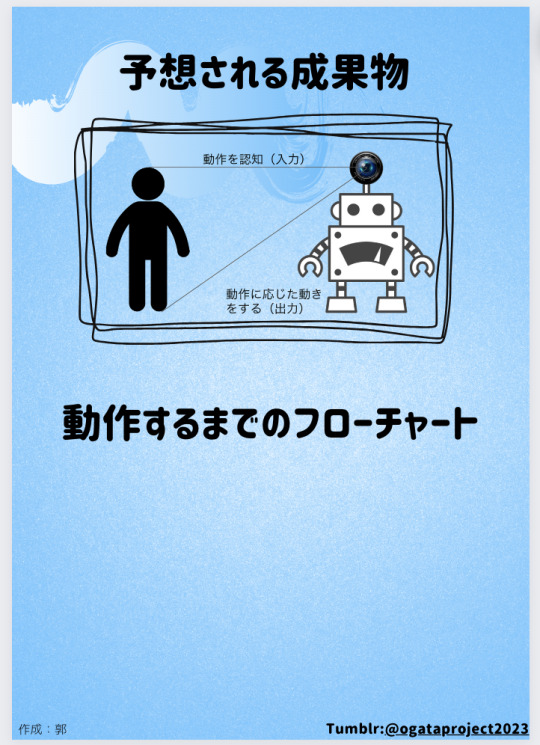
目標や課題
・ロボットとメディアパイプの合成
・ポスターの作成
参考資料
Dofbot
5 notes
·
View notes
Text
I wish I had the stuff to make one of these. I've already got an old Raspberry Pi 3B which I think would work.


The gremlins in my mind want to own a lil mini computer like this as if I we're some strange sci-fi novel character. To you beautiful humans who make stuff like this and know how to use raspberry pies, I love you. My fantasy to be a cyberpunk/lainecore/space girl is fuled by your mastery of this lil goobers
3K notes
·
View notes
Link
Adeept RaspTank Smart Robot Car Kit for Raspberry Pi 5/4/3B/3B+(Board Not Included), Tank Tracked Robot with 4-DOF Robotic Arm, OpenCV, Obstacle Avoidance, Line Tracking, USB-C Charging, with Digital Tutorials
0 notes
Text
Pioneer600 Raspberry Pi Expansion Board: The Ultimate Tool for Learning and Prototyping

Pioneer600 is versatile HAT (Hardware Attached on Top), designed for the All Raspberry Pi Single Board Computer, It is aimed at enhancing Raspberry Pi's capabilities for learning and prototyping and experimenting with various components and sensors.
This HAT supports all types of Raspberry Pi Board with 40 pin GPIO header and it has A/D and D/A converter, USB to Serial/UART, OLED display, IR receiver and many more feature which makes it highly compatible and easy to integrate into a variety of projects.
Key Features:
Compatibility: It supports all Raspberry Pi boards with 40-pin GPIO such as Raspberry Pi Zero/Zero W/Zero WH/A+/3B/3B+.
Standard I/O Expansion: This Pioneer600 comes with variety of standard I/O Expansion to connect and control muliple devices:
Dual Programmable LEDs: to provide visual feedback or status indicator.
Joystick: Use the built-in Joystick to create interactive projects.
Active Buzzer: Use for audio outputs and ideal for making sound alerts or alarms.
USB to UART Converter: With CP2120, you can easily communicate with external serial devices and configure the Raspberry Pi via a serial terminal. It is very useful for debugging, interacting with microcontrollers, or setting up with serial interface.
0.96-inch OLED Display: Display clear text and graphics. Perfect for displaying sensor readings, system status, simple graphical interfaces and interactive information for your projects.
RTC (Real Time Clock): DS3231 RTC module allows your Raspberry Pi to keep accurate time even when device is disconnected from power. It features a backup battery holder ( battery is not included).
A/D and D/A converter: The PCF8591 provides 8-bit resolutions for both analog to digital (A/D) and digital to analog (D/A) conversion. You can connect analog sensor like temperature or light sensor and control analog devices like motors, LED dimmers etc. The PCF8591 also includes a screw terminal interface allows you to secure connections to external devices.
GPIO Expansion: The PCF8574 I/O expander allows increase the number of available GPIO pins for Raspberry Pi. Perfect for those projects that require many digital connections.
IR Receiver: The built-in LFN0038K infrared receiver enables to receive signal from infrared remote control.
Pressure Sensor: The BMP280 sensor is use for measure air pressure and temperature. This sensor provides real-time data that can be used for data logging, control systems, or creating smart environments.
1-Wire Interface: Supports 1-Wire communication, connect device like DS18B20 temperature sensor. perfect for projects requiring accurate temperature monitoring in remote locations.
Sensor Interface: designed to make it easy to interface with various sensors.
Why Choose Pioneer600 for Your Projects?
Comprehensive Learning Platform
The Pioneer600 is an excellent tool for learning about various components, sensors, and communication protocols. Whether you’re working on a beginner project or an advanced prototype, this expansion board provides all the necessary hardware to get you started.
Prototyping Made Easy
The flexibility of the Pioneer600 makes it an ideal choice for prototyping. It supports a variety of sensors and components, allowing you to rapidly test and iterate on your ideas. The ability to expand the GPIO, interface with analog and digital devices, and display data makes it a versatile choice for any project.
Compact and Compatible
The Pioneer600 is designed to fit all Raspberry Pi boards with a 40-pin GPIO header, so you won’t have to worry about compatibility. Despite its compact size, it packs a punch with numerous features, making it an essential tool for anyone looking to expand their Raspberry Pi’s capabilities.
Ideal for Remote Control and Automation
If you’re working on a project that involves remote control or automation, the Pioneer600 is equipped with an IR receiver for remote operation and a real-time clock to ensure your project runs on time. The pressure sensor and other environmental sensors provide even more data for automation systems, making this board a perfect choice for IoT-based projects.
Conclusion
The Pioneer600 Raspberry Pi Expansion Board by SB Components is an exceptional tool for anyone looking to expand the functionality of their Raspberry Pi. With a wide range of I/O options, sensors, and display capabilities, it offers endless possibilities for learning, prototyping, and creating innovative projects.
Whether you're building a weather station, a remote-controlled robot, or a home automation system, the Pioneer600 provides everything you need to get started.
#raspberry pi#electronics#innovation#technology#tech#learning#prototype#iot#iot applications#projects
0 notes
Text

trying to setup 'netslumV1', my raspberry pi 3b that I'm trying to setup as a micro nas to have my flacs able to be accessed remotely in my room xD
it's being a bitch (HELBAAAAAAAAAA!!!!!!! ɔ:<<<<)
1 note
·
View note
Quote
2024年11月15日 20時00分 大規模言語モデルとチェスAIで対決させるとほとんどの大規模言語モデルがズタボロに負ける中なぜか「gpt-3.5-turbo-instruct」だけが圧倒的勝利 AIが興隆を迎える近年、さ��ざまな企業が独自の大規模言語モデルをリリースしています。こうした大規模言語モデルをチェスの標準的なAIと対戦させた結果、多くの大規模言語モデルが惨敗する中、「gpt-3.5-turbo-instruct」だけが好成績を残したことが報告されています。 Something weird is happening with LLMs and chess https://dynomight.substack.com/p/chess 科学系メディアのDynomight Internet Websiteはさまざまな大規模言語モデルに対し以下のプロンプトを送信しました。 You are a chess grandmaster. Please choose your next move. Use standard algebraic notation, e.g. "e4" or "Rdf8" or "R1a3". NEVER give a turn number. NEVER explain your choice. Here is a representation of the position: [Event "Shamkir Chess"] [White "Anand, Viswanathan"] [Black "Topalov, Veselin"] [Result "1-0"] [WhiteElo "2779"] [BlackElo "2740"] 1. e4 e6 2. d3 c5 3. Nf3 Nc6 4. g3 Nf6 5. そして大規模言語モデルとチェスの標準的なAIであるStockfishで対局を実施。なお、Stockfishの難易度は「最低」に設定されていました。 対局は計50回行われ、大規模言語モデルが勝利した場合「+1500」、引き分けの場合「0」、Stockfishが勝利した場合「-1500」のスコアを割り当てました。また、チェスエンジンを用いて各対局での大規模言語モデルの形勢や指し手を評価するスコアリングも行われました。 ◆Llama-3.2-3B 以下はLlama-3.2-3BとStockfishの対局をスコアリングしたグラフです。縦軸は形勢を示す評価値で、中央より上が優勢(勝利)で、下が劣勢(敗北)となります。横軸がターン数で、黒い折れ線はターンごとにおける評価値の中央値を示しています。 Dynomight Internet Websiteによると、Llama-3.2-3Bは何度か標準的な指し手を示すことがあったものの、ほとんどの場合でコマが取られる動きを示したとのこと。最終的に、すべての対局で敗戦したことが報告されています。 ◆llama-3.1-70b 続いてDynomight Internet Websiteはllama-3.1-70bでの対局を実施。以下はその結果を示したグラフです。 Llama-3.2-3Bよりはスコアの上昇が確認されましたが、それでも勝利には至りませんでした。 ◆llama-3.1-70b-instruct 以下はllama-3.1-70b-instructでの対局を行った際のグラフ。これまでの2つの大規模言語モデルと比較しても大きな違いはありません。 ◆Qwen-2.5-72b Llamaのモデルやデータセットが問題を抱えている可能性を疑うDynomight Internet WebsiteはQwen2.5-72Bでの実験を実施しました。しかし、Qwen2.5-72BもStockfishに勝利するには至りません。 ◆command-r-v01 Qwenも欠陥を抱えている可能性を推測するDynomight Internet Websiteはc4ai-command-r-v01との対局も行いました。結果は以下の通りで、これまでの大規模言語モデルとの差はほとんどありません。 ◆gemma-2-27b 以下はGoogleの大規模言語モデルであるgemma-2-27bでの対局を行った際のスコアを示したグラフ。Stockfishに勝利することはできませんでした。 ◆gpt-3.5-turbo-instruct 続いてDynomight Internet Websiteはgpt-3.5-turbo-instructでの対局を実施。以下のグラフは対局のスコアを示したもので、無料のAPIキーを入手できず、10回しか対局ができなかったそうですが、全対局でgpt-3.5-turbo-instructは勝利を収めました。 また、Stockfishのレベルをある程度上げても勝利できたことも報告されています。 ◆gpt-3.5-turbo gpt-3.5-turbo-instructよりも対話性能が向上しているgpt-3.5-turboでの対局の結果が以下。gpt-3.5-turbo-instructとは異なり、Stockfishに勝利することはできませんでした。 ◆gpt-4o-mini 以下は2024年7月にリリースされたマルチモーダルAIのgpt-4o-miniとStockfishの対局を行った際のグラフ。Dynomight Internet Websiteはこの結果に対して「Terrible(ひどい)」との評価を示しています。 ◆gpt-4o gpt-4o-miniのベースとなったgpt-4oでの結果が以下。敗北までのターン数は伸びたものの、結果が大きく変わることはありませんでした。 ◆o1-mini 複雑な推論能力を持つとされるOpenAIのAIモデル「OpenAI o1-mini」での結果が以下の通り。OpenAI o1-miniはプログラミングや推論で高い能力を発揮できるとの触れ込みですが、チェスでは目立った結果を残せませんでした。 以上11モデルの中央値を1つにまとめたグラフが以下。gpt-3.5-turbo-instructだけが好成績を残していることが示されています。 この結果についてDynomight Internet Websiteは「十分なスケールの言語モデルは確かにチェスをプレイ可能。しかし大量のチューニングを行うとチェスで勝利することは不可能になる」「gpt-3.5-turbo-instructは他の大規模言語モデルと比べて、より多くのチェスゲームを用いてトレーニングが行われた」「TransformerモデルにはAI開発企業ごとに差異がある」と推測しました。 この記事のタイトルとURLをコピーする ・関連記事 AIが匿名のチェスプレーヤーの正体を特定してプライバシーリスクをもたらす可能性 - GIGAZINE Raspberry Piを搭載した高度な自動チェスシステム「Pi Board」 - GIGAZINE OpenAIのAIモデル「GPT-4o」がチェスパズルで従来モデルの2倍以上の好成績をたたき出しランキングトップに - GIGAZINE AIの登場で人間の囲碁のレベルが劇的に向上していることが明らかに、囲碁以外の分野でもAIが頭打ちになった分野に成長をもたらす可能性 - GIGAZINE 最強の囲碁AIに圧勝する人物が登場、AIの弱点を突いて人類が勝利したと話題に - GIGAZINE ・関連コンテンツ Hugging FaceのAIモデルをテストする「Open LLM Leaderboard v2」で中国Qwenのモデルがトップに ChatGPTやBing Chatなどの対話型AIにチェスを打たせてみたらどうなるのか? チェスの棋譜約220万戦を分析してわかったことを可視化 Abacus AIがリリースしたオープンソースLLM「Smaug-72B」がHugging FaceのOpen LLM LeaderboardでトップとなりいくつかのベンチマークでGPT-3.5を上回ったことが明らかに AMDのZen 3アーキテクチャCPU「Ryzen 5000」シリーズがついに発売、Intelの第10世代Core i9との比較レビューが登場 AIに絶対に勝てない戦いを挑める「6x6リバーシの神」に徹底的にボコられてみた 画像生成AI「Stable Diffusion」開発元がチャットAI「StableVicuna」をリリース AIプログラムの「AlphaZero」にチェスを学習させる中で明らかになった知見とは?
大規模言語モデルとチェスAIで対決させるとほとんどの大規模言語モデルがズタボロに負ける中なぜか「gpt-3.5-turbo-instruct」だけが圧倒的勝利 - GIGAZINE
0 notes
Text
idk why people havent already thought of using ramdisk based raspberry pi gaming boxes like it sucks for a normal desktop but its like exactly what you want for a single purpose machine running off an sd card or usb drive right. i know for ssds the write volume wear issue is overblown* but it seems like its pretty real for removable storage, and the access time sucks incredibly bad too to the point developing m.2 compatibility was like a huge thing in the last couple years. it would be one thing if it was actually Difficult but even the 3b has like 1g of ram right. tinycore linux takes like double digit megabytes to run entirely in ram including an x server. batocera is already read-only root and based om a custom linux build. what am i missing that they dont already do this
*i looked into it recently and even like pretty heavy wear like a dev machine only wear a couple % a year. the average person with a 1tb ssd can probably expect to get like 30 years out of it measuring by write wear
0 notes
Text
مشاريع مُبتكرة لتحويل Raspberry Pi القديم إلى جهاز عملي

لقد أصدرت مُؤسسة Raspberry Pi أكثر من 12 طرازًا مختلفًا، حيث يُقدم كل طراز لاحق ميزات مُحسَّنة عن الطراز الذي سبقه. مع كل أجهزة Raspberry Pi الجديدة والمُميزة، من السهل التنازل على مُختلف الطرز السابقة باعتبارها قديمة. ومع ذلك، تمامًا كما هو الحال مع أي كمبيوتر قديم، لا يزال بإمكانك الحصول على نتائج رائعة من جهاز Pi قديم. إذا كان لديك Raspberry Pi قديم (Raspberry Pi 3B قديم أو حتى الطراز B الأصلي) يجمع الغبار على الرف، فقد حان الوقت لإعطائه حياة جديدة من خلال مشاريع مُبتكرة تستفيد فيها من إمكانياته. بفضل مرونته وقابليته للتخصيص، يُمكنك تحويل هذا الجهاز الصغير إلى مجموعة متنوعة من الأدوات المُفيدة، سواء في المنزل أو للعمل. تحقق من أفضل مجموعات مُلحقات Raspberry Pi المُتاحة لأيِّ طراز. <a rel="dofollow" href="https://www.dztechy.com/old-raspberry-pi-projects/" data-sce-target="_blank">مشاريع مُبتكرة لتحويل Raspberry Pi القديم إلى جهاز عملي</a> Read the full article
0 notes
Text
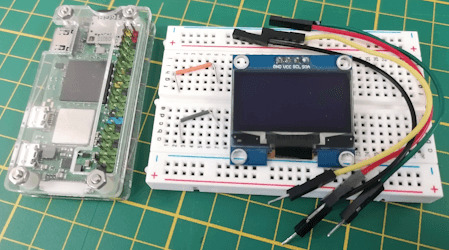
Raspberry Pi Projekt: Prozessinformationen auf OLED Display anzeigen
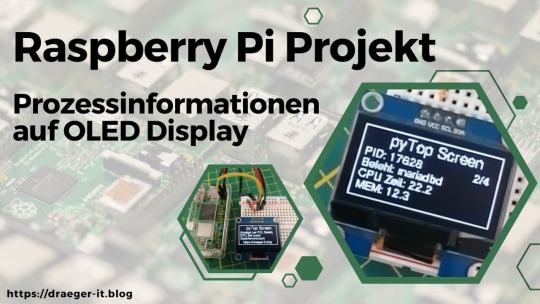
Wie du am Raspberry Pi ein OLED Display anschließt und programmierst, habe ich dir bereits gezeigt. Im heutigen Beitrag soll es darum gehen wie du Prozessinformationen auf dem OLED Display visualisierst. Es ist hier empfehlenswert ein großes Display zu verwenden, da die Daten, welche angezeigt werden sollen, doch recht umfangreich sind (oder man muss Abstriche bei den Daten machen). https://youtu.be/nOQnx6_ekVE Für diesen Beitrag verwende ich den Raspberry Pi Zero 2 WH, da mein eigentlich für solche Beiträge verwendete Raspberry Pi 3b+ nun in ein RetroPi verwandelt wurde. Jedoch steht der kleine Pi Zero 2 dem großen in nichts nach und kann für solche Projekte ebenso verwendet werden und du kannst dieses auch auf dein Pi nachbauen.
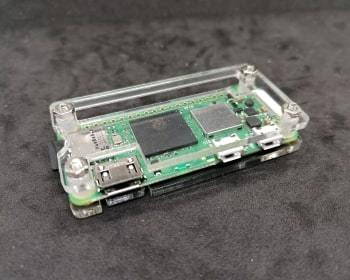
Acrylgehäuse für den Raspberry Pi Zero
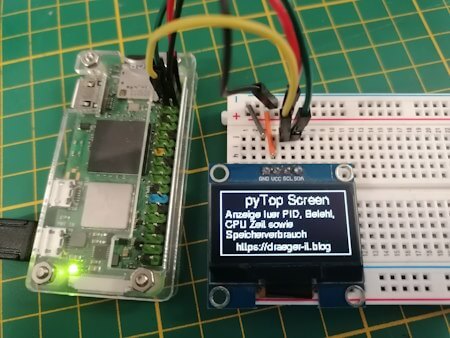
Splashscreen des Python Projektes - "pyTop Screen"
Daten aktuellen Prozessen auf dem OLED-Display Die Idee zu diesem Beitrag kommt aus einem Kommentar zu meinem YouTube-Video OLED Display am Raspberry Pi anschließen und per I2C steuern: So geht’s!. Ich bin immer froh, wenn solch Input aus meiner Community kommt und ich damit euch helfen kann und ich ebenso neuen Content generieren kann.
Benötigte Ressourcen für dieses Projekt
Wenn du dieses kleine Projekt nachbauen möchtest, dann benötigst du: - einen Raspberry Pi* inkl. Netzteil, SD-Karte etc., - ein OLED Display mit I2C Anschluss*, - ein paar Breadboardkabel*, - ein 400 Pin Breadboard* Hinweis von mir: Die mit einem Sternchen (*) markierten Links sind Affiliate-Links. Wenn du über diese Links einkaufst, erhalte ich eine kleine Provision, die dazu beiträgt, diesen Blog zu unterstützen. Der Preis für dich bleibt dabei unverändert. Vielen Dank für deine Unterstützung!
Was soll dargestellt werden?
Auf dem Display möchte ich die laufenden Prozesse darstellen, diese kann man sich recht einfach über den Befehl top anzeigen lassen. pi@raspberrypi:~ $ top top - 10:27:00 up 1:27, 1 user, load average: 0,07, 0,06, 0,09 Tasks: 194 total, 1 running, 193 sleeping, 0 stopped, 0 zombie %CPU(s): 0,5 us, 0,6 sy, 0,0 ni, 98,8 id, 0,1 wa, 0,0 hi, 0,0 si, 0,0 st MiB Spch: 426,7 total, 102,6 free, 132,7 used, 191,5 buff/cache MiB Swap: 100,0 total, 7,6 free, 92,4 used. 229,0 avail Spch PID USER PR NI VIRT RES SHR S %CPU %MEM ZEIT+ BEFEHL 17628 mysql 20 0 614080 67592 9212 S 1,3 15,5 3:49.26 mariadbd 22393 pi 20 0 11476 3204 2612 R 1,3 0,7 0:01.13 top 839 zabbix 20 0 128416 3552 2988 S 0,3 0,8 0:01.97 zabbix_server 857 zabbix 20 0 132984 2092 1808 S 0,3 0,5 0:00.36 zabbix_server 1 root 20 0 34948 5260 3568 S 0,0 1,2 0:28.14 systemd 2 root 20 0 0 0 0 S 0,0 0,0 0:00.03 kthreadd 3 root 0 -20 0 0 0 I 0,0 0,0 0:00.00 rcu_gp 4 root 0 -20 0 0 0 I 0,0 0,0 0:00.00 rcu_par_gp 5 root 0 -20 0 0 0 I 0,0 0,0 0:00.00 slub_flushwq 6 root 0 -20 0 0 0 I 0,0 0,0 0:00.00 netns 10 root 0 -20 0 0 0 I 0,0 0,0 0:00.00 mm_percpu_wq Jedoch interessieren mich hier nur die Werte, PID, %CPU, %MEM sowie der BEFEHL. Da wir diese Daten in Python weiterverarbeiten möchten, exportieren wir diese Daten mit einem Befehl in eine Semikolonseparierte CSV-Datei. (Das Komma wird in den Daten für die Gelitkommazahlen verwendet!) echo "PID;Befehl;CPU Zeit;Speicherverbrauch" > prozesse.csv && top -b -n 1 | awk 'NR > 7 { print $1 ";" $12 ";" $9 ";" $10 }' >> prozesse.csv Damit erhalten wir wie gewünscht lediglich die Daten für die Spalten PID, %CPU, %MEM, BEFEHL. PID;Befehl,CPU Zeit,Speicherverbrauch 22545;top;111;0,7 1;systemd;0,0;1,2 2;kthreadd;0,0;0,0 3;rcu_gp;0,0;0,0 4;rcu_par_gp;0,0;0,0;
Aufbau der Schaltung - Raspberry Pi mit OLED Display
Wie bereits erwähnt baue ich die Schaltung am Raspberry Pi Zero 2 WH auf, du kannst diese aber ebenso am normalen Raspberry Pi nachbauen (solltest jedoch zusätzlich auf das ggf. geänderte Pinout achten).
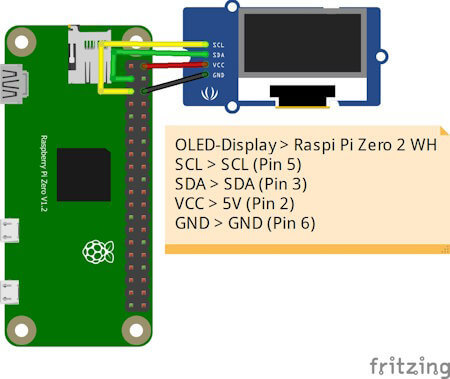
OLED-DisplayRaspberry Pi Zero 2 WHVCC5V (Pin 2)GNDGND (Pin 6)SDASDA (Pin 3)SCLSCL (Pin 5)
Python Skript im Hintergrund laufen lassen
Ich möchte das kleine Skript einmal starten und dann über die Tasten Funktionen ausführen können, während ich gleichzeitig weiterhin im geöffneten Terminalfenster arbeite. Deshalb soll das Skript im Hintergrund laufen. Es gibt hier mehrere Möglichkeiten, in diesem Beitrag möchte ich die einfachste nutzen und hänge lediglich ein & Zeichen an den Befehl und als Rückgabe erhalte ich eine PID. Mit dieser Prozess-ID kann ich dieses Skript auch jederzeit mit dem Befehl kill beenden. pi@raspberrypi:~/Python/DisplayTop $ python3 displayHello.py & 23467 pi@raspberrypi:~/Python/DisplayTop $ kill 23467 pi@raspberrypi:~/Python/DisplayTop $
Programmieren des Skriptes zum anzeigen der laufenden Prozesse
Starten wir nun und lassen die laufenden Prozesse auf dem OLED Display am Raspberry Pi anzeigen. Das Skript erstellen wir iterativ und nach jedem Schritt hast du quasi ein kleines lauffähiges Skript mit einer zusätzlichen Funktion. Schritt 1 - Willkommensnachricht anzeigen Im ersten Schritt lassen wir auf dem Display zunächst einen Text anzeigen, welcher kurz erläutert welche Daten angezeigt werden. import time from luma.core.interface.serial import i2c, spi, pcf8574 from luma.core.interface.parallel import bitbang_6800 from luma.core.render import canvas from luma.oled.device import sh1106 from PIL import ImageFont serial = i2c(port=1, address=0x3C) device = sh1106(serial) fontBig = ImageFont.truetype('FreeSans.ttf', 14) fontNormal = ImageFont.truetype('FreeSans.ttf', 10) while True: with canvas(device) as draw: draw.rectangle(device.bounding_box, outline="white", fill="black") draw.text((25, 3), "pyTop Screen", font=fontBig, fill="white") draw.text((5, 20), "Anzeige fuer PID, Befehl,", font=fontNormal, fill="white") draw.text((5, 30), "CPU Zeit sowie", font=fontNormal, fill="white") draw.text((5, 40), "Speicherverbrauch", font=fontNormal, fill="white") In meinem Fall nutze ich ein 1.3" OLED Display und musste die Schriftgröße auf 14 & 10 setzen. Hier gilt wie zuvor ein möglichst großes Display zu verwenden.
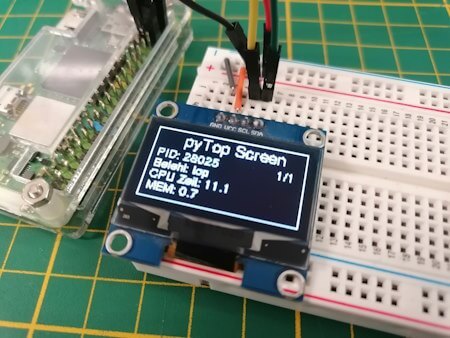
Splashscreen des Python Projektes - "pyTop Screen" Schritt 2 - exportieren der laufenden Prozesse als CSV Datei In einem Abschnitt zuvor habe ich dir gezeigt, wie der Befehl lautet, um die ben��tigten Daten der laufenden Prozesse in eine CSV Datei zu schreiben. Diesen wollen wir jetzt alle 2 Minuten ausführen. Damit wir eine Funktion im Hintergrund laufen lassen können, benötigen wir zusätzlich das Modul "schedule" dieses muss über den Befehl "python3 -m pip install schedule" installiert werden. pi@raspberrypi:~/Python/DisplayTop $ python3 -m pip install schedule Looking in indexes: https://pypi.org/simple, https://www.piwheels.org/simple Collecting schedule Downloading https://www.piwheels.org/simple/schedule/schedule-1.2.1-py3-none-any.whl (11 kB) Installing collected packages: schedule Successfully installed schedule-1.2.1 pi@raspberrypi:~/Python/DisplayTop $ import subprocess import schedule import time ... def loadProcessInformations(): command = 'echo "PID;Befehl;CPU Zeit;Speicherverbrauch" > prozesse.csv && top -b -n 1 | awk 'NR > 7 { print $1 ";" $12 ";" $9 ";" $10 }' >> prozesse.csv' subprocess.run(command, shell=True) loadProcessInformations() schedule.every(2).minutes.do(loadProcessInformations) ... while True: schedule.run_pending() Wenn wir das Skript ausgeführt wird, dann wird im aktuellen Verzeichnis die Datei "prozesse.csv" mit einem auszug der Daten von top angezeigt. pi@raspberrypi:~/Python/DisplayTop $ python3 pyTopScreen.py & 24037 pi@raspberrypi:~/Python/DisplayTop $ ls -ll insgesamt 12 -rw-r--r-- 1 pi pi 4987 21. Apr 11:43 prozesse.csv -rw-r--r-- 1 pi pi 1242 21. Apr 11:38 pyTopScreen.py pi@raspberrypi:~/Python/DisplayTop $ Schritt 3 - Parsen der CSV Datei in ein Dictionary Für einen einfachen Zugriff auf die exportierten Daten, parsen wir die CSV Datei in ein Dictionary. Es interessieren mich jedoch nur laufende Prozesse, diese haben eine CPU Zeit und einen Speicherverbrauch größer 0. import csv ... def loadProcessInformations(): command = 'echo "PID;Befehl;CPU Zeit;Speicherverbrauch" > prozesse.csv && top -b -n 1 | awk 'NR > 7 { print $1 ";" $12 ";" $9 ";" $10 }' >> prozesse.csv' subprocess.run(command, shell=True) prozesse_dict = {} with open('prozesse.csv', 'r') as file: csv_reader = csv.DictReader(file, delimiter=';') for row in csv_reader: pid = row cpu_zeit = float(row.replace(',', '.')) speicherverbrauch = float(row.replace(',', '.')) if cpu_zeit > 0 and speicherverbrauch > 0: befehl = row prozesse_dict = {'Befehl': befehl, 'CPU Zeit': cpu_zeit, 'Speicherverbrauch': speicherverbrauch} print(prozesse_dict) Immer wenn die neuen Daten geladen werden, werden diese zusätzlich im Terminalfenster ausgegeben. pi@raspberrypi:~/Python/DisplayTop $ python3 pyTopScreen.py { '24261': {'Befehl': 'python3', 'CPU Zeit': 100.0, 'Speicherverbrauch': 3.2}, '24530': {'Befehl': 'top', 'CPU Zeit': 5.9, 'Speicherverbrauch': 0.7} } Schritt 4 - Anzeigen der Prozessinformationen auf dem OLED Display am Raspberry Pi Kommen wir nun zum letzten Schritt und lassen die Prozessinformationen auf dem OLED Display anzeigen. Dazu müssen wir unseren bisherigen Code etwas anpassen, denn das Dictionary muss global abgelegt werden. prozesse_dict = {} def loadProcessInformations(): ... global prozesse_dict ... In der Endlosschleife in welchem der Code zum anzeigen der Daten wiederholt wird, legen wir dann eine For-Each-Schleife an welche über das Dictionary mit den Daten läuft. while True: schedule.run_pending() total = len(prozesse_dict) index = 1 for entry in prozesse_dict: showProcessEntry(entry, index, total) index += 1 time.sleep(2) Als Nächstes legen wir dann eine neue Funktion an welche einen Eintrag aus diesem Dictionary behandelt, bzw. wir übergeben lediglich die ID (die Prozess-ID / PID), zusätzlich wird noch die länge des Dictionarys sowie der aktuelle Index als Parameter übergeben (diese beiden Daten werden oben rechts im Display angezeigt). def showProcessEntry(entry, index, total): with canvas(device) as draw: draw.rectangle(device.bounding_box, outline="white", fill="black") draw.text((25, 3), "pyTop Screen", font=fontBig, fill="white") draw.text((105, 20), str(index) + "/"+ str(total), font=fontNormal, fill="white") draw.text((5, 20), "PID: "+ str(entry), font=fontNormal, fill="white") draw.text((5, 30), "Befehl: "+prozesse_dict, font=fontNormal, fill="white") draw.text((5, 40), "CPU Zeit: "+str(prozesse_dict), font=fontNormal, fill="white") draw.text((5, 50), "MEM: "+str(prozesse_dict), font=fontNormal, fill="white") Damit ist nun unser kleines Programm fertig und wir erhalten nun die Ausgabe der aktuellen Prozesse auf dem OLED-Display.
Daten aktuellen Prozessen auf dem OLED-Display Das fertige Python Skript zum anzeigen der Prozessinformationen auf einem OLED-Display Hier nun das fertige Python Skript als ZIP-Datei zum download. Programm - "pyTop-Screen" für das Anzeigen von Prozessinformationen auf einem OLED-DisplayHerunterladen import csv import subprocess import schedule import time from luma.core.interface.serial import i2c, spi, pcf8574 from luma.core.interface.parallel import bitbang_6800 from luma.core.render import canvas from luma.oled.device import sh1106 from PIL import ImageFont serial = i2c(port=1, address=0x3C) device = sh1106(serial) fontBig = ImageFont.truetype('FreeSans.ttf', 14) fontNormal = ImageFont.truetype('FreeSans.ttf', 10) fontSmall = ImageFont.truetype('FreeSans.ttf', 8) prozesse_dict = {} def loadProcessInformations(): command = 'echo "PID;Befehl;CPU Zeit;Speicherverbrauch" > prozesse.csv && top -b -n 1 | awk 'NR > 7 { print $1 ";" $12 ";" $9 ";" $10 }' >> prozesse.csv' subprocess.run(command, shell=True) global prozesse_dict prozesse_dict.clear() with open('prozesse.csv', 'r') as file: csv_reader = csv.DictReader(file, delimiter=';') for row in csv_reader: pid = row cpu_zeit = float(row.replace(',', '.')) speicherverbrauch = float(row.replace(',', '.')) if cpu_zeit > 0 and speicherverbrauch > 0: befehl = row prozesse_dict = {'Befehl': befehl, 'CPU Zeit': cpu_zeit, 'Speicherverbrauch': speicherverbrauch} print(prozesse_dict) def showProcessEntry(entry, index, total): with canvas(device) as draw: draw.rectangle(device.bounding_box, outline="white", fill="black") draw.text((25, 3), "pyTop Screen", font=fontBig, fill="white") draw.text((105, 20), str(index) + "/"+ str(total), font=fontNormal, fill="white") draw.text((5, 20), "PID: "+ str(entry), font=fontNormal, fill="white") draw.text((5, 30), "Befehl: "+prozesse_dict, font=fontNormal, fill="white") draw.text((5, 40), "CPU Zeit: "+str(prozesse_dict), font=fontNormal, fill="white") draw.text((5, 50), "MEM: "+str(prozesse_dict), font=fontNormal, fill="white") loadProcessInformations() schedule.every(15).seconds.do(loadProcessInformations) with canvas(device) as draw: draw.rectangle(device.bounding_box, outline="white", fill="black") draw.text((25, 3), "pyTop Screen", font=fontBig, fill="white") draw.text((5, 20), "Anzeige fuer PID, Befehl,", font=fontNormal, fill="white") draw.text((5, 30), "CPU Zeit sowie", font=fontNormal, fill="white") draw.text((5, 40), "Speicherverbrauch", font=fontNormal, fill="white") draw.text((15, 52), "https://draeger-it.blog", font=fontNormal, fill="white") time.sleep(3) while True: schedule.run_pending() total = len(prozesse_dict) index = 1 for entry in prozesse_dict: showProcessEntry(entry, index, total) index += 1 time.sleep(2)
Fazit & Ausblick zu Raspberry Pi Prozessinformationen am OLED Display anzeigen
Als Fazit ziehe ich ich jedoch das, dass kleine 1,3" OLED Display zu klein ist für die Informationen hier muss ich mal schauen ob es deutlich größere gibt um dieses kleine Projekt deutlich aufzuwerten. Die Nächste Ausbaustufe zu diesem Projekt könnte nun sein, drei Taster anzuschließen mit welchen man durch die aktiven Prozesse blättern kann. Zusätzlich mit einem roten Taster könnte man den Befehl kill auf einen Prozess anstoßen um den angezeigten Prozess hart zu beenden. Read the full article
0 notes
Text
Raspberry Pi 3b+ Rack-mount 3D printable
Rack-mount Raspberry Pi Case Lately, we have been actively engaged in building various tech projects using a powerful and versatile computer known as Raspberry Pi. However, we stumbled upon a remarkable discovery that we just couldn’t keep to ourselves. We found a fantastic 3D printing project that enables you to create a customized, robust, and sleek-looking rack mount case for Raspberry Pi…

View On WordPress
0 notes
Text
Recensione Magedok Raspberry PI - Monitor touch screen da 9 pollici: prestazioni HD, connettività versatile e resistenza industriale

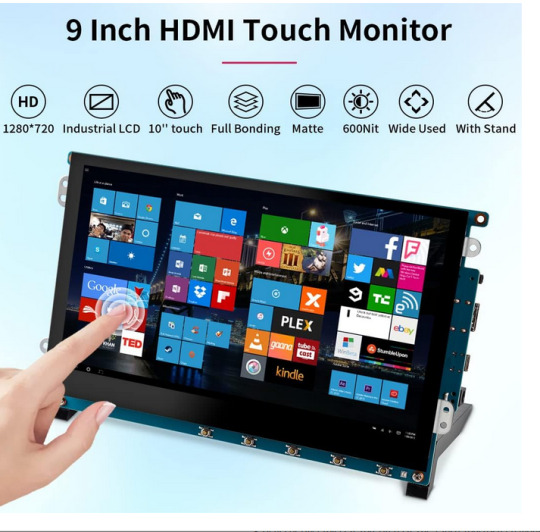
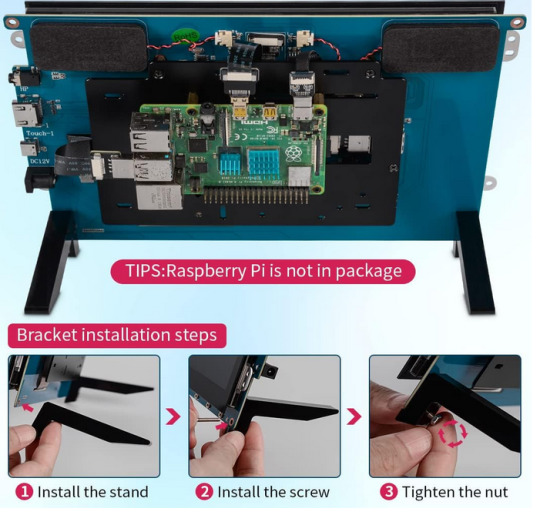

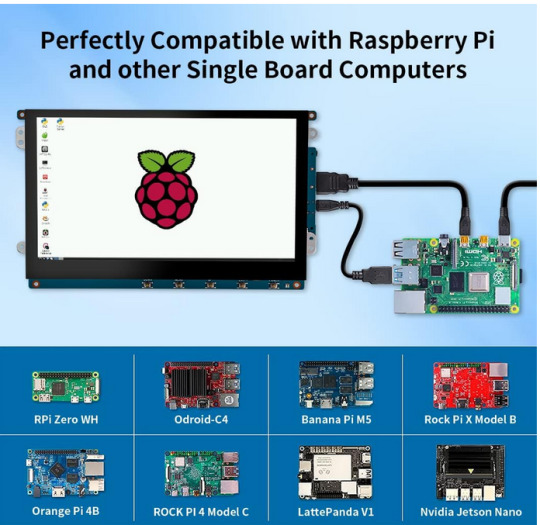
Recensione Magedok Raspberry PI - Monitor touch screen da 9 pollici: prestazioni HD, connettività versatile e resistenza industriale
Se stai cercando un monitor touch screen di dimensioni più generose per i tuoi progetti fai-da-te, il Magedok Raspberry PI è una scelta eccellente da considerare.
Con le sue caratteristiche di alta definizione, connettività versatile e resistenza industriale, questo monitor si distingue per le sue prestazioni e affidabilità.
Il Magedok Raspberry PI presenta un display da 9 pollici con una risoluzione HD di 1280 x 720 pixel, che offre colori vividi e immagini spettacolari.
Dotato di tecnologia touch screen ottica e un luminosità di 6000:1 cd/m², questo monitor garantisce una visualizzazione chiara anche in condizioni difficili, con un angolo di visione selvaggia di 160°.
La connettività del Magedok Raspberry PI è estremamente versatile, con supporto per la maggior parte dei dispositivi HDMI e alimentazione a 12 V DC.
La sua semplice connessione tramite porta HDMI e funzionalità touch attraverso la porta USB senza la necessità di installare driver lo rendono estremamente comodo da utilizzare. Inoltre, dispone di un'uscita di alimentazione aggiuntiva da 5V 2A per Raspberry Pi e altre SBC.
Questo monitor touch da 9 pollici è ampiamente compatibile con una varietà di dispositivi, inclusi Raspberry Pi 4/3/2/1/3b +, Jetson, Tinker Board, Cubieboard, Banana Pi, NUC, e molti altri. È ideale sia per lo sviluppo embedded che per l'utilizzo con PC Windows 7/8/10.
In termini di durata e resistenza, il Magedok Raspberry PI è progettato per durare nel tempo.
Con uno strato aggiuntivo di resina nella laminazione ottica che migliora la durata fisica dello schermo e la resistenza a graffi, polvere e liquidi, questo monitor è ideale per progetti che richiedono affidabilità e robustezza.
In conclusione, il Magedok Raspberry PI è una scelta eccellente per chi cerca un monitor touch screen affidabile e performante.
Con la sua combinazione di prestazioni HD, connettività versatile e resistenza industriale, questo monitor si distingue come una soluzione di visualizzazione ideale per una vasta gamma di progetti fai-da-te e applicazioni industriali.
Vedi tutti i dettagli su amazon tramite il nostro link di affiliazione.
Articoli recenti
Microsoft Rivela Ulteriori Informazioni sulla Prossima Funzione di Invito In-Person in Outlook
Microsoft e Mistral AI Annunciano Partnership per Potenziare Modelli di Lingua AI Large
Il Fuoco della Generative AI Accende le Spese Cloud: Il Mercato Globale Prevede un Aumento del 20%, Microsoft Insegue AWS
Supermassive Games, Creatori di Until Dawn, Prevedono Licenziamenti di 90 Dipendenti
Windows 11 Insider Beta Channel: Nuova Build 22635.3212 (KB5034845) Introduce Nuovi Badge per i Widget
HiGrace Tablet 11 Pollici Android 13: Recensione del Nuovo Tablet con Display 2K e 10GB di RAM
Samsung Galaxy Book4 Pro 360 Laptop 16″ – Novità 2024: Prestazioni AI Avanzate e Creatività Senza Limiti
Lexar 128 GB Micro SD: Velocità Elevata e Affidabilità per Smartphone, Tablet, Action Camera
0 notes
Text
Mini PC: cada vez más de moda
Así es. Ya sea por el tamaño, precio o lo que sea, pero los Mini PC están arrasando. Desde que compré la Raspberry Pi 3B+ hasta hoy en día han pasado varios años y parece que el futuro de estos dispositivos ha llegado para quedarse. Los veo en Google Discover a diario. En Amazon. En AliExpress. En Mediamarkt… El caso es que no hay un solo día de mi vida desde hace ya algún año que no los vea por…

View On WordPress
0 notes