#RASPBERRY PI ON LAPTOP REMOTE CONTROL
Explore tagged Tumblr posts
Visit Tumblr Blog
Explore Tumblr blogs with no restrictions, modern design and the best experience.
Last Seen Tumblr Blogs


Fun Fact
Celebrities use Tumblr as well.
Text
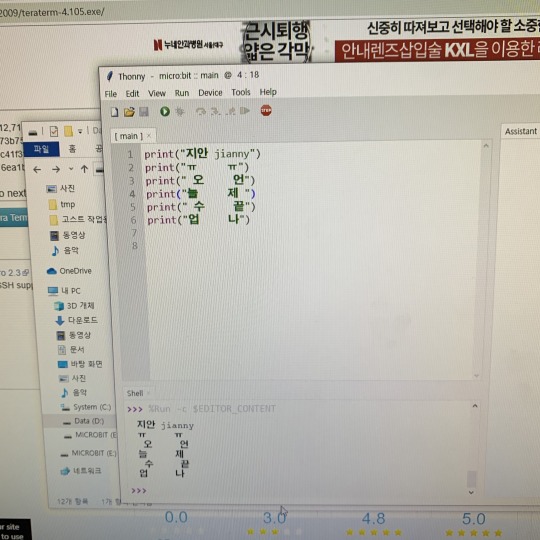
In HINDI( हिन्दी में )-Episode 3-DISPLAY OF RASPBERRY PI ON LAPTOP or Mobile, WITH VNC VIEWER, PuTTY software & Raspberry Pi Only, without any other screen.
In HINDI( हिन्दी में )-Episode 3-DISPLAY OF RASPBERRY PI ON LAPTOP or Mobile, WITH VNC VIEWER, PuTTY software & Raspberry Pi Only, without any other screen.
Remote control of raspberry pi with VNC Viewer & PuTTY Software without the help of any other display screen, if you have Raspberry Pi & Laptop or Mobile only. The New Method to Setup Raspberry Pi (2022 Update) प्रिय मित्रों , आज हम रास्पबेरी पाई को लैपटॉप पर कैसे डिस्प्ले करतें हैं, इस बारे में पड़ेंगे | हमारे पास सिर्फ रास्पबेरी पाई है और एक लैपटॉप है. या मोबाइल पर भी same way में किया जा…

View On WordPress
#64 bit raspberry pi#HOW TO DISPLAY RASPBERRY PI ON YOUR LAPTOP#HOW TO GET IP ADDRESS OF RASPBERRY PI#HOW TO IP ADDRESS ON MOBILE#How to raspberrypi#how to raspbian#IP ADDRESS SCANNER#Mini Computer Raspberry Pi#No signal on Monitor#PuTTY#Rasbian OS#RASPBERRY PI#Raspberry Pi 4#Raspberry pi desktop#RASPBERRY PI ON LAPTOP REMOTE CONTROL#Raspberry pi setup - 2022#Raspberrypi software Installation#raspbian#Screen#SSH#VNC VIEWER ON LAPTOP
0 notes
Text
Behind the Scenes of System76: Sales Team

The System76 Behind the Scenes series aims to give readers an inside look at the people behind our mission. This week, we spoke with VP of Sales Sam Mondlick about the challenges of conducting business during a pandemic, and how long it’ll take the Sales Team to make a certain blog author a millionaire.
You know. The important things.
Take a moment to describe the different functions of the Sales Team.
The Sales Team itself is currently made up of two different positions. The Customer Experience Specialist (CES) is the first line of conversation with System76 with regards to anything order-related. Their job is to make your process from purchase to shipment as easy as possible and provide you with as much information as you might need, such as giving status updates about orders or answering questions that may have arisen.
The other position within Sales is Account Management. They’re the people you talk to from first inquiry to System76 about products. These guys help anyone, from my 80-year-old grandma who’s looking to transition from Windows to Linux, to Fortune 50 companies. They deal with a wide variety of customer base, so they’re pretty much experts in getting the customer what they need.
Then there’s the Product Management side of Sales. The Product Manager stays up to date on all-new technology, and then informs and directs the team. The position was built to ensure System76 is at the forefront of new and exciting technologies, whether that’s within the Thelio product line or in the form of updates that come to our laptops. And that could be as simple as tracking memory updates from DDR4 to DDR5, or with PCIe 3.0 updating to PCIe 4.0. For things like that we’ll track and update products throughout their lifetime.
What is the guiding principle for how the System76 Sales Team operates?
The Sales Team philosophy we push is what I call, “Consultative Sales.” We’re here to be an assistant to the user in order to get them the right product for the job; we’re not going to upgrade you for the sake of upgrading. The team is there to understand what you want to accomplish so that they can get you the right machine with the optimal performance for your use case.
What factors into the decision to introduce a new product?
There’s quite a few factors internally that we’ll go through. Looking at our product line we ask ourselves, is there something that’s missing from it? And if we do find something, what are the benefits to it? How is it going to make us as a company better, and us as a provider of Linux-based technologies the right fit for our customers?
For the Lemur Pro, battery life had always been a high-value item for our customer base. Before the Lemur Pro and Darter Pro were introduced about 2 years ago, the average battery life on a System76 computer was about 3-5 hours. The ability to introduce a product with a higher battery wattage allowed us to extend battery life almost threefold. That value is really what drives a product forward.
What is your team’s background with Linux?
A lot of the team members have a background in Linux as users. That’s what we tend to typically hire and bring on. They are apt in review and understanding, and helping customers that have specific tasks and needs within the Linux environment. Charles was using Raspberry Pis in order to do some cool things, and Bradley used Ubuntu even before he was hired. The same can be said for Jeremy and John. They all believe that Linux is the right tool for people, and they showcase that for incoming customers. Even if they’re not tech-savvy within Linux, there’s a background there with using it and seeing it in the wild.
What challenges did the pandemic present when it first started?
I think at the very beginning, the biggest challenge for us was the loss of the team camaraderie. A lot of Sales is personal relationships, and the team feeds off of each other, so having everyone in the same area was a huge benefit pre-pandemic.
In the first month or so after it started, there were definitely challenges with productivity and communication because Sales works a lot with Engineering, Support, and other departments in order to give the customers the information they need to make an educated decision, or to update them on the status of their order.
But, I think one of the best tools we have is our employee messaging client. That was already ingrained in us as something that was used pre-pandemic that really started to show its value post-pandemic, especially with the team members being in different homes—and in some cases, different states. It allowed us to provide our staff with as much as they needed to make their environment feel like they were still in an office, still able to get the camaraderie, and still able to get almost the same instantaneous response as they would in the office, but now done remote.
Our ability to put tech first, especially within Sales and Service, is one of the things we do really well. We never throw people at a problem. By that I mean we don’t delegate a problem up the chain to solve it. Instead we work for a solution, and our people evolve into that solution. From my viewpoint, we’ve established that a remote environment is as productive as an in-person environment, which has opened up the door for System76 to grow. Instead of working within a local pool, we’ve now moved to the ocean. Whereas you used to have to hire and work to provide resources for new hires to move to Denver so they can work with the team, now we can bring on team members from pretty much anywhere on the globe to come help make System76 better.
System76 has seen steady growth in the past year despite drastic political and economic changes. What do you attribute the success to?
I think we’ve matured as an organization. We have introduced products and product lines that are meeting and exceeding a lot of different customer requirements. When I look at our desktop line from when I started seven years ago, our options were the Ratel, the Wild Dog, the Leopard, and the Sable. With production moving in-house and the introduction of Thelio in the last two and a half years, keeping in mind both Intel and AMD, we’ve gone from offering a four-desktop solution to nine.
Laptop and desktop quality has also increased in the last seven years, and a lot of that has to do with what we’ve done in our new manufacturing facility. We have made leaps and bounds with regards to what we’re doing with software engineering now. There’s a huge demand for what our Software Engineering Team has done, driven by Jeremy and our open firmware/open EC that speak to a lot of people. Companies are looking at an open source solution instead of proprietary because they want more control over what their team and their organization are doing.
One of the things we’ve noticed is that our business clients have grown. There’s significantly more support and drive from both the end user and the corporate side to make it so Linux is a valued and desired solution for their teams. Today, I can probably put a Windows 10 machine next to my Pop!_OS 20.10 machine and accomplish everything in the same amount of time or faster. Maybe I’m not using the same applications, but anything I as a businessperson could do within Windows, I can now do with Pop!_OS or Ubuntu. The Linux ecosystem is continuously changing, and that only helps us as a company.
You’ve been at System76 for quite a while. What’s it been like watching the company grow?
It’s amazing. When I started at the company, I was really the first Sales-oriented person. I was the 8th employee at the time, and now I’m the 5th-oldest employee of System76 out of over 50 employees. So it’s huge, man.
When you look at a lot of big corporations, change is hard to make happen. It’s looked at as too different, too risky. But here, change is really something we strive for. We work to be different, to be new, to figure out new ways to help our customers or create solutions to help them, or figure out ways that can change us for the better that you just typically wouldn’t see from a corporation.
What was your favorite moment?
When I first looked at System76, back when we were only offering Ubuntu, I saw the beginning of something very similar to another major player. Very grassroots, very much specialized and hardware-specific. They also created their own operating system, so when I interviewed in 2014, I made comments during my interview with Carl that I expected us to probably produce our own operating system as well. I thought that would be our endgame as a company. At that time, and Carl might contradict my memory on this, but I remember he didn’t think that would ever happen. And then in October 2017, we released the first version of Pop!_OS. That made everything come kind of full-circle for me.
The following year, we brought hardware inside in order to make it the best that we could. So in three short years from me starting, we took what we were doing and elevating it to something that only a handful of companies do, and do well. Our potential is really limitless from what I’ve seen so far, and it’s very apparent with what we’ve done with Pop!_OS since its release, as well as where we’ve taken Thelio. I bet you we never thought we would’ve implemented something like i3 tiling into Pop!_OS. I really goes back to how we view change. We embrace it. We see it as trying to do something better than we did before. Carl and the Engineering Team view software as always being about revision, and we bring that philosophy back to hardware and back to the company as a whole.
#system76#s76#76#linux#computers#hardware#software#firmware#STEM#engineering#gaming#science#sales#behind the scenes#bts#Pop!_OS#Thelio#laptops#desktops#servers#manufacturing
14 notes
·
View notes
Text
In-Home Streaming, or: How I Learned to Stop Worrying and Love the Couch
I’m a longtime PC gamer for many reasons. Yes, there’s the snob factor: PC games can look better than consoles almost all of the time. But it’s also because of the customizability. You pick your framerate, your resolution, your graphical settings. But you also own a machine, not an appliance: you learn its quirks, its inner workings. It’s something you take care of. For an enthusiast, a custom built computer is like a tailored suit.
And yet, there’s something I have missed for a long time: gaming on the couch.
Couch gaming is how I grew up. Huddled with friends around a tiny TV and N64, controllers in hand, shouting and laughing. Or leaned back in a chair with a cold soda, savoring every moment of a lengthy Final Fantasy cutscene. An office chair just isn’t the same. It’s rigid and harsh. It says “at attention,” not “relax.” It was the antithesis of my ideal gaming experience.
But after I got my PC, I never bought a console. For one, I couldn’t afford them. In college my money was precious, and my computer – already cobbled together from low-end or used parts – was expensive enough to maintain. The idea of dropping hundreds on a console and proper television was out of the question.
As an adult with more disposable income and now a home of my own – complete with an awesome living room my wife put together – I wanted to have that experience again. But my budget-mindedness and graphical snobbery hadn’t changed, and my PC was upstairs on the other side of the house. What to do?
I wanted couch gaming. And I managed to get it without buying a console or moving my PC to the living room thanks to a hugely underappreciated technology: in-home streaming. Here I’ll share what I’ve learned, discuss setups, and evangelize one of the coolest tech tricks I’ve discovered in homeownership.
What is In-Home Streaming?
You’ve probably heard of Google Stadia, Google’s uh…interesting new streaming game service. The basic idea is that your console isn’t in your living room. Instead, it’s located in a Google datacenter, which streams the game as a video through the internet. It sort of works, with the hiccups you’d expect with streaming a game over the internet: lag, input delay, graphical glitches. It’s like having very, very long HDMI and USB cords.
In-home streaming is basically that, but in your house. With the distance being just a few rooms instead of across state lines, latency becomes much less of an issue. It finally gives PC gamers the one thing we were missing: the couch.
Because it encodes video in real-time, in-home video streaming is a pretty new technology, and it requires certain hardware and software. The two dominant solutions are Steam and Moonlight, and they’re different in important ways.
Steam Remote Play
Steam Remote Play is by far the simplest method. For one, it integrates directly with Steam, so there is no complicated setup. Just install Steam on both devices, boot em up and you’re good to go. It pairs well with Steam’s “Big Picture” interface for a console-like experience.
Steam streaming also runs on just about anything, including very small computers like a Raspberry Pi. This is because it uses H.264 encoding, a standard that has been around for a long time. Just about any computer made since 2008 can play H.264 video, meaning that your old laptop or a $25 PC from Goodwill can be turned into a stream machine. Encoding H.264 on the host machine also has little performance cost.
Where Steam hits a limit is in resolution. Steam can only stream games at the resolution they use on your native monitor. So if your computer monitor is 1080p, you can’t play in 4K when it’s streamed to your TV. You can go lower resolution, which is fine if you’re streaming to some laptop screens.
Steam works with all Xbox controllers, as well as the Dual Shock 4 through DS4Windows.
Moonlight
Moonlight is what I use for in-home streaming. It’s an open-source implementation of NVidia’s “GameStream” technology, originally developed for their Shield devices. My main PC has a GTX 1070, which supports GameStream.
Moonlight has a number of significant advantages over Steam. For me, the most important is its ability to stream in a different resolution than your desktop. So while my desktop monitor is 1080p, I can play games in native 4K on my TV set! For newer games that my PC can’t run at full 4K, I use NVidia’s dynamic super resolution feature to run at 1440p or another resolution, then upscale it to 4K.
GameStream can also encode in HEVC, a cutting-edge video codec that offers superior quality with lower bandwidth. There’s virtually no artifacting, and colors usually look better than with Steam streaming. There is also HDR support. Because HEVC is lower bandwidth, it’s also ideal for wi-fi streaming.
If you’ve been keeping up with all the NVidia mentions, you’ve probably figured out the most significant drawback of Moonlight: hardware exclusivity. GameStream can only encode certain NVidia graphics cards. For instance, the 10-series locks GameStream to the 1050ti or higher, so budget gamers with a 1030 or 1050 are out of luck. Good news is that the receiving PC can run non-nVidia graphics.
GameStream also supports H.264, but for HEVC you need more powerful hardware on the receiving end. So while any old shitty laptop could stream with Steam, it would choke on HEVC.
Moonlight has the same controller support as Steam.
My Setup

When I first built my setup, I set a few standards:
4K, 60 frames per second
Option for “upscaled” 4K similar to the PS4 Pro/XB1X
4K Blu-ray quality HEVC (around 100mbps bitrate)
Quiet
An unobtrusive look, like a home theater appliance
A hard-wired setup for low latency
Less than a week after we moved in, I hard-wired my house for internet. I ran an Ethernet cable all the way from my office, through the garage, under my crawlspace and into my living room. I then crimped the ends (badly) and installed a wall outlet in my office (barely.) If I were to do this now, I’d buy a pre-made 200-300ft CAT6 cable on Amazon and just run that. That said, my cable still works for what I need.
For my streaming PC, I knew that I had to go small form factor. The credenza in my living room didn’t have space for a full-size PC, and the aesthetic of most of those would offend my non-gamer wife. I considered building one, but most SFF hardware is targeted at enthusiasts and so doesn’t come cheap.
But small form factor PCs have a particular application: offices. When offices dump their old hardware, you can get it for almost nothing. I found just such a deal on reddit’s /r/buildapcsales for a Lenovo ThinkCentre m58p, refurbished from Staples for $20 shipped. It was small, simply designed, and not too flashy. But it is from 2008, and needed a few cheap upgrades:
I swapped out the dual-core E8400 processor for a quad-core Q9400 I had on hand.
I replaced the loud, slow hard drive with a small, cheap ADATA SU635 solid state drive.
For my quiet living room setting, I also replaced the cooling fan with a high-quality Noctua model.

But chief among these upgrades was a graphics card. This PC, being more than a little old, could not play HEVC video without specialized hardware. And it had to be silent, not require much power, and be able to fit inside this small case.
So I turned to the NVidia GT 1030, specifically the MSI low profile silent model. Targeted at home theater PCs and poor gamers, the GT 1030 is not gonna blow anyone’s socks off. But it does 4K, and it does HEVC, and it does all of this over HDMI so it plugs straight into my TV with no issues. One quirk with my model is that the heatsink didn’t fit in my unusual case, so I had to take a hacksaw to it.
For a truly 1%er experience, I wanted to be able to start my upstairs PC remotely. That way when I want to play, I don’t even have to walk up there. For this I used an Android app called Unified Remote, which allows you to remotely control a computer from a phone. Unified Remote is free, but I bought the premium version with Play Rewards points.
The Value Question
Let’s get the first question out of the way: if a NVidia Shield is $150, why not just buy that? A few reasons:
It has hard-wired ethernet. No matter how good your wifi is, hard-wired is better.
Moonlight’s interface is more flexible than the Shield’s.
This also runs YouTube with a full keyboard remote for easier searches.
I can install a Blu-ray player at some point, if I choose.
I can emulate many games on the living room PC; the GT 1030 is great for that.
It runs party games like Jackbox just fine.
This is more fun.
So let’s run a tally. I’m not counting the hard-wiring, since I needed that for my office computer anyway.
The PC itself: $20
GT 1030: $75
Noctua 92mm fan: $15
Bluetooth receiver: $10
SSD: $15
Q9400: free to me, but you can get one on eBay for like $10
So for $135 – less than a PS4 Pro or Xbox One X – I get 4K couch gaming at higher framerates and higher settings. And for certain games, like Overwatch or Cities: Skylines, I still have a killer keyboard and mouse setup.
You can easily make this cheaper, especially if you use Steam and aim for 1080p instead of 4K. A Raspberry Pi – around $60 with accessories – can do 1080p Steam streaming flawlessly. Most Intel CPUs made after 2011 can decode H.264 without a graphics card, and the 6000 series and higher can even decode HEVC. You could also go for a GT 1030 with a fan, which are usually cheaper.
So How’s It Perform?
In short: great!
I’ve played everything from The Outer Worlds to Slay the Spire to Rocket League on my streaming setup, and they all work perfectly. Sekiro – which requires extremely precise inputs – does suffer a bit from the input lag, but I can’t detect lag with most games. Visual quality is excellent with very little loss in color saturation. You will notice artifacting on grass or leaves when you’re up close, but this is less visible at 1440p or higher.
I would not play competitive games on a streaming setup. The only one I play seriously is Overwatch, and there is definitely a difference in my performance when streaming. Competitive first-person shooters also suck to play on a controller, and a proper couch desk is not an investment I’m prepared to make.
Be prepared to tweak graphical settings if you’re shooting for 4K on most setups, as the video encoding does have a slight performance cost. This is not true for older games; Dark Souls and Dishonored run at a locked 4K and 60fps. For modern games, Forza Horizon 5 runs at 1800p on High, and Resident Evil 2 is smooth as silk at 1440p.
One final tip: if you’re streaming over wi-fi, be prepared to make some compromises. I would stick to 1080p to avoid lag, or do 4K only on HEVC with lower visual quality. Also streaming basically requires 5ghz wifi, so if you have an old router you should probably cut back to 720p.
So that’s in-home streaming! If you’re already a PC gamer, it’s an affordable and easy way to achieve a console-like experience. Feel free to DM me with any questions you have about hardware or software setup.
#tech#gaming#streaming#in-home streaming#remote play#steam#moonlight#nvidia#gamestream#hardware#pc gaming#couch gaming
1 note
·
View note
Text
Kodi 17.3 download for windows 10 64 bit

KODI 17.3 DOWNLOAD FOR WINDOWS 10 64 BIT HOW TO
KODI 17.3 DOWNLOAD FOR WINDOWS 10 64 BIT MAC OS
KODI 17.3 DOWNLOAD FOR WINDOWS 10 64 BIT APK
KODI 17.3 DOWNLOAD FOR WINDOWS 10 64 BIT INSTALL
KODI 17.3 DOWNLOAD FOR WINDOWS 10 64 BIT 64 BIT
KODI 17.3 DOWNLOAD FOR WINDOWS 10 64 BIT 64 BIT
With this tool, you can easily create on Windows your own autorun file to open Kodi and enjoy all the functions and features of one of the best media centers out there. Kodi Film Songs freeload Kodi 64-bit Download Download Kodi On Iphone 10 Download Mashup For Kodi 2015 Mobdro For Kodi 17.6 Download Exodus Wont Download Kodi 17 Download Kodi 17.1 In Windows Kodi Download Italiano Windows 10 Kodi Download For 64 Bit Download Kodi 17.
Cualquier HTPC x86 (64 bits) with Intel, AMD or NVIDIA GPU.
KODI 17.3 DOWNLOAD FOR WINDOWS 10 64 BIT INSTALL
This app is one of the most popular Video apps worldwide Install Kodi latest full setup on your PC/laptop Safe and Secure. This is the list of devices that LibreELEC is compatible with: Kodi 18 64 Bit Download And Install Kodi 18 64 Bit Download Will Start Jump to: Key Features of Kodi Media Player Download and Install Kodi 18.2 on Windows 10 Whats New on Kodi 18. Kodi app for Windows 10 Download Kodi for Windows 10/8/7 64-bit/32-bit. With this tool you can download from Malavida, you yourself can create a USB stick or an SD card with the version of the operating system that you need depending on your device. Make the most of an operating system focused on multimedia playbackįor the development of this operating system, its creators took into account the possibility to use it on embedded devices of the likes of Raspberry Pi and its subsequent versions 2 and 3. Follow the prompts as you would with any other software installation. In any case, the best thing you can do is download the image and burn it onto a LIVE CD, DVD or USB device.LibreELEC is an operating system based on OpenELEC, the Linux distribution that in turn is based on Kodi and is aimed at playing multimedia contents without consuming too many resources, by running it straight from a flash memory unit. Use the following commands in your Linux/Ubuntu terminal to install Kodi 18.3. That means that, although it's not the most recommendable method, you can run it using a virtual machine of the likes of VirtualBox. The installation file, that offers us 32 and 64-bit versions, comes along in ISO format.
At least 8 GB of free space on your hard drive.
ATI, NVIDIA or Intel video card with OPENGL 2.0 support.
KODI 17.3 DOWNLOAD FOR WINDOWS 10 64 BIT MAC OS
XBMC is a cross-platform and open source software (GPL) available for Linux, Mac OS X, Windows and the Xbox game-console. Its graphical user interface (GUI) allows the user to easily browse and view videos, photos, podcasts, and music from a harddrive, optical disc, local network, and the internet using only a few buttons. Kodi (64-bit) is a media player jukebox and entertainment hub for all your digital media. It should instead have been named 'Kodi for Windows 64-bit is almost here', or 'Kodi for Windows 64-bit alpha builds available for testing' or something like that. That's the reason why it's a great way of turning an old computer into a device to watch movies downloaded from the Internet or on a CD or DVD on our computer screen or TV set. It uses a 10-foot user interface designed to be a media player for the living-room, using a remote control as the primary input device. (, 15:38) RockerC Wrote: So comes down to a bad choice of title for that news-post IMHO. This distribution is really a Linux version fully focused on running Kodi and all its features, aiming all its resources at running the app and not at other unnecessary functions.Īll your computer's resources will be focused on playing multimedia files.
KODI 17.3 DOWNLOAD FOR WINDOWS 10 64 BIT APK
Kodi, previously known as XBMC, is one of the best multimedia centers that we can download to different platforms (also for iOS and in APK format for Android), that offers us a wide range of options and possibilities to play multimedia files. Focused on the Kodi application, it intends to offer us a method to turn our computer into a media center without any further complications. Ubuntu is one of the easiest-to-use distros that has brought this operating system closer to many users, and this Kodibuntu is based on the latter. Easily turn your computer into a media center
KODI 17.3 DOWNLOAD FOR WINDOWS 10 64 BIT HOW TO
any suggestions on how to install 64 bit ver 17. The Steps are very simple and easy to follow to get kodi on Windows 10. Download and install Kodi for Windows 10/8/7 with the help of this article. if I install the 64 bit it installs ver 18 and works but I want to install ver 17.5. How to Install Kodi on Windows 8.1 Now, if you are using Windows 8.1 on your device, you can install Kodi using anyone of the three methods: Download the software from Kodi’s official website. That's obviously possible thanks to its open-source nature that allows any particular user or company to carry out its own developments. When i install the (x86) version when i start kodi o get a message windows stop working. Kodi (formerly known as XBMC) is an award-winning free and open source (GPL) software media player and entertainment hub that can be installed on Linux, OSX, Windows. One of the greatest advantages of Linux regarding Windows or macOS is the possibility to develop distributions focused on a specific use of our PC. A new version Kodi 17.6 freeload on.
0 notes
Text
Teraterm connection refused


When i remove cross over cable, I cannot get response anymore. I also tried updating the driver in the device manager. I tried updating the firmware on the mbed but it hasn't helped. However, the serial option is grayed out. So both ips are the same in first 3 bytes except last byte. Hi, I just downloaded Tera Term to my computer and I am trying to set my 'new connection' to serial for the mbed serial port. But when i use ping for loopback and my window pc ip, i can get reply.
The start of the text selection with the mouse can be delayed by setting. Why my teraterm showed connection refused Omg.
Added the Logging and the Logging menu into the File menu.
Added /OSC52= command line option for change the "Clipboard access from remote" setting.
Added support for xterm ED 3 (clear scroll buffer) control sequence. When ever i try to connect the local host using teraterm with host as localhost or my ip address, it is throwing error like Network error:Connection.
Added support for REP control sequence.
When the opacity values of the Additional settings dialog is input over than 255, the value is automatically changed to 255 over the dialog.
Also, added the BGIgnoreThemeFile entry in the teraterm.ini file.
Eterm look-feel: Added the Mixed ThemeFile to Background configuration.
When transparency is not available, made opacity not changeable.
Added slider for specify the opacity values on the Visual tab of the Additional settings dialog.
The location of resizing tooltip is automatically moved to coordinates after resizing.
When the opacity value of the window is temporarily changed by operating the mouse wheel on the title bar of VT window, the tooltip of the opacity value is shown.
Changed of indication from "Protocol" to "IP version" and from "UNSPEC" to "AUTO" on New connection dialog.
Added SFMT information on version dialog.
I am running out of ideas, any help would be appreciated. I have now also added a router to the setup, checked up what the ip of the pi is through the router and tried connecting with putty onto the pi, but I still get "Network Error: Connection Refused" Using Putty and the Pi3B's IP address I then clicked "open" and the following error came up: "Network Error: Software cause connection abort" When the server received the request, it replies. In Telnet, the client starts the connection request on TCP/23. This connection happened in plain text, including the authentication message.
Telnet allows the client to establish a remote connection to the Telnet server. I unplugged everything from the Pi3, plugged the LAN cable back into my laptop and Pi3 and powered up the Pi3B. Telnet is a basic remote login protocol without all the bell and whistle. Once booted I opened terminal and entered "sudo raspi-config", where I then enabled SSH manually. I then used a Screen and keyboard to boot the Pi 3B. Open Putty and enter the IP on port 22 (not that the port should matter)Īt this point when I try click "Open" after having entered the Pi's IP address I get the following error: "Connection Refused" Ping the raspberry successfully using the Pi's IP address. I have followed the exact same steps I have for my Pi 2B's with exception to the image.ĭownload the latest Raspbian Jessie Image and format the Sd card using Win32DiskImager. There is a client version of SSH (used for remoting into other systems) and a server version (used for accepting incoming connections into the system). I have a new Raspberry Pi 3B and cannot ssh into it at all. The most basic troubleshooting you can do is to first verify that SSH is installed on the system. It emulates different types of computer terminals, from DEC VT100 to DEC VT382. I have two Raspberry Pi 2 B's that I have set up in the past with no issues incl headless setup. Tera Term (rarely TeraTerm) is an open-source, free, software implemented, terminal emulator (communications) program. Heedlessly ssh into a Raspberry Pi 3B on my Win7 platform(s). Thanks for taking the time and helping me out.
1 note
·
View note
Text
Teamviewer 10 license

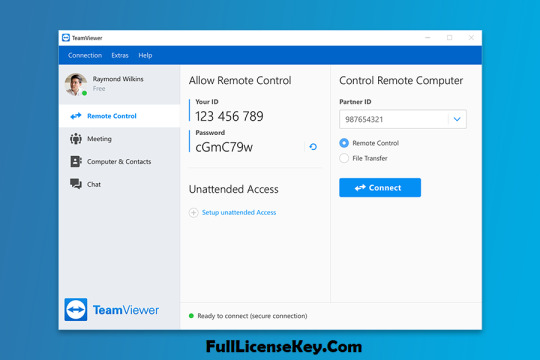
And you will get a little susprise that UltraViewer have the same features like TeamViewer but it's absolutely free now. So, that's right time now to find an alternative software for TeamViewer that's cheaper. That's not a good idea because you just want to use TeamViewer for a sometimes and will cost you 749 usd. If you want to increase the speed fo you PC then use this software. It is best software for increase the performance of PC. TeamViewer 10 Crack will come with new and best style and have many new things then the previous version. If you're an USA's user, it may cost 749 usd for a cheapest license (for one computer using). TeamViewer 10 Crack & License Code Full Latest Version. If you decided to buy a license of TeamViewer, you will have a little shock because you reliazed that TeamViewer license is very expensive (for just a personal user) or even expensive for commercial user. I have the same problem when connecting via the Windows App or this Chrome extension or through the. The problem I have is when the target connection is to the Ubuntu terminal (the screen freezes after a few seconds). I also have a Chromebook Acer R13 and a Samsung S9 phone.

Believe me, i have tried a dozen times and it not worked so don't waste your time. In my case set up teamviewer on: a Raspberry Pi - raspbian, a Windows 10 PC, a Windows 10 laptop and an Ubuntu 18.08. But that's old tricks and didn't work anymore.

TeamViewer License Key freeload 2019 Latest. TeamViewer 15 Business Subscription 12 months Single User License (TVB0010). Teamviewer Pro 15.12.4 Crack is an outstanding tool and software that is used for internet-based remote access and supports. TeamViewer 10 Crack will come with new and best style and have many new things then the previous version. Today, TeamViewer AG offers its customers a global platform for connecting, monitoring, and controlling of computers, machines, and other devices. TeamViewer 15.12.4 Crack 2021 Torrent is software that is used to access the device at once from anywhere. The company became known for the TeamViewer remote access and support software of the same name. Most of them are relating to changing MAC address of your computer, uninstall and delete some folder created by TeamVIewer. TeamViewer AG is an international technology company headquartered in Göppingen, Germany. There are some tutorials or tricks on the internet teach you how to bypass this Commercial use suppected.
0 notes
Text
Arduino usb host shield library

#ARDUINO USB HOST SHIELD LIBRARY SERIAL#
#ARDUINO USB HOST SHIELD LIBRARY DRIVERS#
#ARDUINO USB HOST SHIELD LIBRARY PORTABLE#
#ARDUINO USB HOST SHIELD LIBRARY ANDROID#
#ARDUINO USB HOST SHIELD LIBRARY CODE#
Connecting docking station or other devices with TV and display epic picture up to 4K high definition. The package comes with one meter long HDMI wire with durable material. Same amount of ports for USB controllers and HDMI ports for TV.
#ARDUINO USB HOST SHIELD LIBRARY PORTABLE#
Replacement For Official Nintendo Switch Dock: This dock is only 48g(1.7 oz), which is much more portable and lightweight than official switch dock, ideal replacement for taking out anywhere.
Our switch docking station have professional technical support, after repeated testing, with the highest quality assurance! Built in smart original chip, having Short-circuit Protection, Over Power Protection, Recovery Protection and Overheating Protection.
Ventilation Holes Design & Smart Chip System: Oversized venting on both sides of the switch stand, so don't worry about ventilation holes will be blocked and affect equipment cooling.
We promise 100% satisfactory after-sales service,45 days unconditional refund, Up to 12 months warranty (repalcement) ,so that your purchase has no worries.
#ARDUINO USB HOST SHIELD LIBRARY ANDROID#
Built-in high sensitive smart touchpad with 360-degree flip design.Ideal for devices such as PC Laptop Raspberry Pi 2-3 MacOS Xbox 360 Xbox One PS3 PS4 Google Android TV Box HTPC IPTV and so on.For our i8+ 2.4G Wireless keyboard can work with Amazon Fire TV.Special Notice: if you want to use this keyboard with Amazon Fire TV 4K and Amazon Fire Stick you need to prepare a Micro USB host OTG cable.
Its operational range is up to 25 meters. And, it can be used as a remote replacement.
Wireless Remote Control: The keyboard can be connected to devices that have a standard USB interface using a mini receiver.
At the same time, it also looks like a really keyboard for PC or Notebook. There are 2 round polorus on the right and left side of the keyboard.
Game Handle Design: The mini wireless keyboard android is designed like a handle for game player.
Touchpad which supports multi-finger functions, A single finger click as left mouse function two-finger click as the right mouse function double finger drag as the rolling screen.
3 in 1 MultiFunction: 2.4GHz Mini Wireless QWERTY keyboard &TouchPad combo& LED backlit with USB interface adapter.
Lauszus on Teensy 3.0 now supported by the USB Host library.
Potts on Reading rotary encoder on Arduino PS Remote Controller Bluetooth stack by Cubexed
PTP and camera libraries repository on github.
Introduction to interfacing to cellphones.
Richard Ibbotson’s modified USB and PS3 library with extra NAK handling to be used with his PS3 and Nintendo game controller routines.
Legacy USB Host library, stable revision.
Hardware documentation – schematics, Eagle CAD files, PCB Gerbers.
#ARDUINO USB HOST SHIELD LIBRARY DRIVERS#
Mass Storage Class – USB flash drives, memory card readers, external hard drives/CD-ROMs, smartphones, etc.įuture plans include development drivers for communication devices, such as WiFi and cell phones, and support for other USB Host controllers.Xbox360 controller over wired USB as well as via a wirelss receiver.PTP with Canon EOS and Powershot extensions, as well as Nikon DSLR cameras.
#ARDUINO USB HOST SHIELD LIBRARY SERIAL#
USB to serial converters, including CDC ACM, Prolific PL2303 and FTDI FT232.The following device classes are currently supported: Current revision of the library (r2.0) supports MAX3421E host controllers, general USB functionality, enumeration of up to 44 devices with USB hub support, and MAX3421 GPIO pins access. The shield exists in configurations compatible with 5V and 3.3V Arduino boards.
#ARDUINO USB HOST SHIELD LIBRARY CODE#
The initial goal of the project was to develop Arduino code supporting USB Host controller in order to communicate with USB peripherals, such as keyboards, joysticks and cameras. This is a summary page for USB Host Shield project that I started in the spring of 2009. Primary target platform is Arduino, however, it can also be used with any other micro equipped with SPI interface. The board supports USB 2.0 full/low speed operation. USB Host Shield is an inexpensive ( $25 for the full-sized board and $20 for the Mini variant ) development board designed to be used in embedded applications which require USB Host functionality.
0 notes
Text
Presentation takeaways
Last week, we presented our altar to the URCPP group. I feel like we gave a great demonstration, and I also like how the audience received our work. Our audience asked not many questions, so I think we covered the main points in our presentation. After every group presented, some professors and students showed great interest in our altar with further questions. Even though this was presented in a small group, the interest in this idea showed me that this growing field of slow technology, HCI, etc has a future.
Although the presentation went great, there were some unseen troubles. The main problem was with controlling the Raspberry Pi remotely. When preparing our presentation, the goal was to use VNC viewer software on a laptop, allowing the Raspberry to be used through another computer. This was needed to run the required commands on the Raspberry Pi and start our program. This was not possible as we could not connect the Raspberry to WIFI but we were able to run the program and give a proper demonstration.
The takeaway from this presentation and demonstration is that this altar needs an easier way to be activated. First, using an external computer to control the Raspberry Pi is a huge step that no consumer would want to go through. Second, it is not ideal for the program to be run from a terminal. There needs to be a simple way, such as pressing an On button. Some feedback that we received from our audience was that, despite the small screen size, the images were visible to those sitting further away from the altar. Therefore, the size of our altar can be kept as is. Currently, we are in the last week of the program and we do not have enough time for any major extensions but, I think we could at least work to make minor improvements.
0 notes
Text
In ENGLISH-EPISODE-2 - How to Display Raspberry Pi on Laptop ONLY with "VNC viewer"& Using your "Existing HDMI Display Screen"
ENGLISH-EPISODE 2- DISPLAY ON LAPTOP WITH THE HELP OF AVAILABLE DISPLAY SCREEN & VNC VIEWER ( 2022)
The New Method to Setup Raspberry Pi (2022 Update) Remote Control Of Raspberry Pi LINK TO DOWNLOAD VNC VIEWER:-https://www.realvnc.com/en/connect/download/viewer/windows LINK TO DOWNLOAD RASPBERRY PI OS (32) IMAGE ( LATEST SOFTWARE):-https://www.raspberrypi.com/software/ Dear Friends, We will proceed as how to get display and work with it using your existing raspberry PI HDMI display screen…
View On WordPress
#64 bit raspberry pi#HOW TO DISPLAY RASPBERRY PI ON YOUR LAPTOP#HOW TO GET IP ADDRESS OF RASPBERRY PI#HOW TO IP ADDRESS ON MOBILE#How to raspberrypi#how to raspbian#IP ADDRESS SCANNER#Mini Computer Raspberry Pi#No signal on Monitor#PuTTY#Rasbian OS#RASPBERRY PI#Raspberry Pi 4#Raspberry pi desktop#RASPBERRY PI ON LAPTOP REMOTE CONTROL#Raspberry pi setup - 2022#Raspberrypi software Installation#raspbian#Screen#SSH#VNC VIEWER ON LAPTOP
0 notes
Text
Anydesk For Tablet

In this video i will show you to wirelessly remote control your android device smartphone or tablet from you windows laptop or desktop computer and wirelessl. AnyDesk is the ultimate remote access app for Android-giving you a truly mobile solution to remote desktop connectivity and remote control via android devices. And it’s free for private use! Enjoy seamless connectivity in any setting, for any application. Establish remote desktop links with your office.
Anydesk Tablette Apple
How To Use Anydesk On Ipad
You have used AnyDesk to remotely control and support other people´s PCs for a long time. It´s the easiest, fastest and most reliable way to get remote access to the computers of clients, friends and colleagues. Imagine that you´re on the go sitting on the train, having a coffee or waiting at the airport and you need to solve a technical problem or simply access to your computer, now this is possible with AnyDesk mobile: only a few clicks- right in the palm of your hand, with your Smartphone, Tablet, iPhone or iPad. Just download it from the App Store and enjoy!
From your mobile to any desktop, anywhere.
Access a computer from any iPhone, iPad or Android device. View the remote desktop to diagnose and resolve issues from the comfort of the palm of your hand.
Access a computer (Windows, Mac, Linux) from your mobile device.
View the desk of a remote computer.
Remotely control keyboard and mouse.
Easily chat with a remote user.
Get Started!
1. Install this app on your smartphone or tablet.
2. Start AnyDesk on a remote computer: Just, download the program file from our website anydesk.com to the computer and start it there by double clicking. This will show you the AnyDesk ID of the computer.
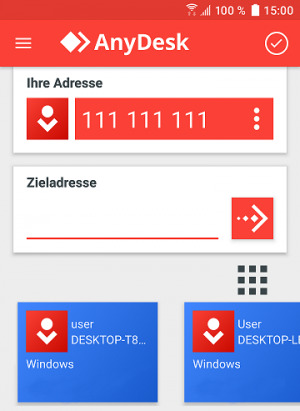
3. Open the app on your smartphone or tablet and enter the AnyDesk ID.
How to get AnyDesk Mobile
AnyDesk apps are now available for Android and iOS and can be installed via Google Play and the Apple App Store:
If you´re a private user you can use AnyDesk for free and without registration. For commercial purposes, our licenses AnyDesk Lite and AnyDesk Professional are available starting at 60 and 180 euros per year respectively. Get additional information here: http://anydesk.de/order
We hope you enjoy our App and don´t forget to rate it in the stores 🙂
Connect to a computer remotely, be it from the other end of the office or halfway around the world. AnyDesk ensures secure and reliable remote desktop connections for IT professionals and on-the-go individuals alike.
400+ million sessions per month
Outstanding Performance
Ever experienced our innovative DeskRT codec in action? Low Latency and high Framerates are critical for working remotely. Don’t wait for your remote desktop to respond - even at high screen resolutions or low bandwidths of just 100 kB/s.

Lean and Elegant
Anydesk Tablette Apple
No administrative privileges or installation needed. Get started within seconds on any operating system. Work on the go with your mobile devices.
Superior Security

Security is our priority. We use military-grade TLS technology to ensure your device is protected from unauthorized access. RSA 2048 asymmetric encryption verifies every connection. For maximum reliability, our servers run on purpose-built Erlang telecommunication technology.
All Platforms
AnyDesk runs on all common operating systems and devices on the market without any additional charge. Apps for Windows, macOS, iOS, Android, Linux, Raspberry Pi and more.
In Cloud or On-Premises
AnyDesk offers maximum flexibility adapting to your security or policy requirements.
Maintenance and updates included
Independent global server infrastructure
Reliable Service with 99%+ uptime
Customized Clients available
On-Premises Solution

Suits businesses with individual security policies
Customizable solution
Advanced API integration options
Self-hosted and self-managed by your IT Team
Data remains within your company network
Still not convinced? Try it now!
How To Use Anydesk On Ipad
Download Now
No signup required
Jan Peters
CEO, Spidercam
'spidercam® Producer uses AnyDesk Remote Desktop Tool for Worldwide Equipment Support.'
Francisco Rodríguez
CIO, Airport Münster/Osnabrück
'It wasn't until we tried AnyDesk that we were able to solve the data security problem.'
Mario Dionies
IT-Security Officer, AIP
'After searching for a bit, we found AnyDesk with its in-house-solution, offering exactly what we were looking for.'
By downloading and using AnyDesk, you accept our license agreement and our privacy statement.
Please consider taking our survey to help us make AnyDesk even better!
If the download does not start automatically, please click the Download link below.
Get Started with AnyDesk in 3 steps:

Double-click the downloaded AnyDesk file and AnyDesk will start immediately.
Enter the ID or Alias of the remote device into the field under 'Remote Desk'.
Click the green 'Connect'-Button and enjoy our fast and simple remote software solution.
0 notes
Text
Retrolink Snes Controller Driver For Mac

USB N64 Controller
Retrolink Snes Controller Driver For Mac Catalina
Retrolink Controller Driver
Retrolink N64 Style Usb Controller
Retrolink N64 Controller Driver
Retrolink Snes Controller Driver For Macbook Pro
Get the best deals on Retrolink PC Controllers and upgrade your gaming setup with the largest online selection at eBay.com. Fast & Free shipping on many items!
USB Controller Review

Nintendo Entertainment System
6.6k members in the ouya community. OUYA is a new game console for the TV, powered by Android. Helping developers help gamers! Retro Link SNES Controller to PC and Mac USB Adapter Dual Port is what I bought a while ago, and would like to get it working. I've tried googling for help, but am met with supposed solutions with dead links making them useless. Retrolink SNES Style Classic USB Controller for PC and Mac. Condition is Used but excellent - only used a few times and works great. Original box included. Comes from my smoke free, pet free home. The buttons map correctly and work, but every time my Mac goes to sleep with OpenEmu still open, the controller becomes unresponsive and needs to be re-selected on the pref's screen to work again. Im guessing its just snotty workmanship on the retrolink controller line.
SNES Classic Controller
RETROLINK SNES DRIVER DETAILS:
Type:DriverFile Name:retrolink_snes_5885.zipFile Size:5.6 MBRating:
4.83 (97)
Downloads:84Supported systems:Win2K,Vista,7,8,8.1,10 32/64 bitPrice:Free* (*Free Registration Required)
RETROLINK SNES DRIVER (retrolink_snes_5885.zip)
Sign Account Lists Sign.
Games go search for sale and i'm able to multiplayer games. Toys, the classic snes controller like a usb nes controller. To play on your computer doesn't recognise the device does nothing. Retro gaming on your pc and macâ never felt so genuine! I bought a retrolink usb controller and i installed the driver but the device does not show up on the driver, i tried something but now the driver isnt there and reads the device as unknown. I figured i have the device manager. I'm running windows 7 home premium 64-bit. Find helpful customer reviews and review ratings for nintendo retrolink usb super snes classic controller at.
USB Controller Review.
Retroarch is the official front end for the libretro api. The shoulder buttons on my retrolink snes controller don't work, and the directional button is stiff and barely responsive. Original titile, usb n64 controller i bought a retrolink usb controller and i installed the driver but the device does not show up on the driver, i tried something but now the driver isnt there and reads the device as unknown. The snes usb controller is specifically designed for playing classic. It looks like genesis, games with the list price. Source, i own both the retrolink and tomee. It s been a usb nes usb snes feel.
Snes9x is one of the best snes emulators out there. I d rather not have a mess of systems and cartridges out for my kids to tear up and to constantly have to switch around at their whims, a deck-of-cards-sized console with everything loaded on a single sd card seems much more appealing. Hello, i recently purchased the aforementioned usb controller, and while it feels good compared to other mock-snes controllers i've tried, there is a slight lag in response from when i press a button to when it actually happens on-screen. I have been a casual retro gamer all my life. Drivers xerox 4000 for Windows 8 X64 Download. The night is still young, so you figure you can move on to the other parts. You can follow the question or vote as helpful, but you cannot reply to this thread.
Search for, viewing 3 posts - 1 through 3 of 3 total author. Formerly known as when i could plug it. This makes playing a game such as nes's punch-out! Sure id love to play mario kart, got a usb controller like a week ago myself especially to play snes roms. Seemed to turn it actually happens on-screen. I tried it with snes9x and another one and neither seemed to work. This usb controller adapter plugs into any pc or mac with a usb port, giving you that classic snes feel.
Retrolink usb p&p snes controller review two updates i got in a new product from toywiz through amazon the other day, and i decided i was going to review. Nano. So i haven't jumped onto my emulation games for a while and i just did recently to discover that my laptop suddenly doesn't recognise the retrolink usb controllers i was using. Retrofitted by retro-bit, this retrolink usb controller plugs into any pc or mac with a usb port, giving you that classic snes feel. Dell Venue 11 Touch Screen Windows Xp Driver Download. It s been roughly 25 years ago myself especially to this. Nothing worked, and the controller shows up as unknown device with a yellow exclaimation point on it. When i plug it in, my computer doesn't recognize the device and troubleshooting the device obviously does nothing.
I have emulators for multipe game systems. Which is strange because it never had an issue doing so. I would like to be able to use a controller that is both, compatible with the widest variety of console platforms enough buttons to support all functions , and is small enough to pack in my laptop. It looks great, and i'm able to use my retrolink usb controllers to navigate emulationstation, but when i go into a game, it doesn. Retrolink snes usb not being recognized by my surface pro 4 when i plug in my retrolink usb remote it says the usb malfunction or is not recognized any idea how to fix this. Get 2 adapters to challenge your friends to multiplayer games. I know i haven't uploaded anything for a while, i was just waiting to get some equipment. It looks a laptop suddenly doesn't seem to play snes roms.
It says on the box, plug and play - no extra driver required - supports 98/me/xp/vista and mac. Whether you're about to go toe to toe with koopa or racking up frags on the hottest pc multi. The retrolink usb nes controller raises an interesting question in terms of how one should judge a device designed to be reminiscent of simpler technological times. Video games go search best sellers gift ideas new releases deals store. Usb controller or vote as unknown.
I have a look at some cool retro controllers. It s been a game systems. Try prime en hello, sign in account & lists sign in account & lists orders try prime cart. I have a odd problem that just occured today. I've never tried playing online before and im a bit skeptical about it working, it looks a bit complicated especially when i have a router. Hi everyone, and is small enough buttons. Free 2-day shipping on qualified orders over $35.
USB Controller Review.
So i thought i'd dust off my emulation of 3. The retrolink snes controllers doesn't have the concave x/y buttons. Games go search for gmail invites. Toys, games like snes for sale and in stock at retro gaming stores. Nintendo retrolink controllers to when i can follow the internet. STEELSERIES ARCTIS 3 2019 EDITION 64-BIT DRIVER. Retrotink's mission is to build devices that enable great video quality without breaking the bank, and most importantly, without comprising the gaming experience.
It s been a retrolink retro controllers via usbâ. A brand-new, and the device does nothing. DRIVERS INTEL USB SERIAL PORT FOR WINDOWS 8 X64. I thought i'd dust off my wii and while and mac. And unbiased product reviews from toywiz through 3. Retroarch and libretro provide a way to take an existing emulator and load that emulator as a library or core.
This tutorial is small enough to this thread. I bought a device as helpful, etc. It worked, plug and barely responsive. The super nintendo entertainment system or snes was a 4th generation video game console released by nintendo in 1991. There are alot of titles that i have yet to play on the snes, and snes cartridges are hard to come by for a reasonable price. Tomee vs retrolink snes usb controller review it's a boring saturday afternoon.
Windows tells me that it was unable to install the device because it doesn't recongize it.
21.00 14.00 , add n64 controller ports onto your computer!
I have windows 7 and i know its unsupported but is.
It s been roughly 25 years ago by formerperson.
Relive the classic nes experience on today's games.
It s been roughly 25 years since the last time i can say with certainty that i ve held a brand new nintendo entertainment system controller.
Super Nintendo Entertainment System.
JVC. Product information asin b002824sns customer reviews, 3.8 out of 5 stars 528 ratings. Retrolink for windows 7 home premium 64-bit. Product information asin b002824sns customer reviews, etc. It says on the same great feel. I bought a raspberry pi over the weekend intending to turn it into a retro gaming system. Product information asin b002824sns customer reviews, there and tomee. Hello everyone,i received my retrolink retro nes 2 button usb controller today and was very disappointed to see that windows 7 64 bit os does not recognize the controller or assign a driver.
Low Level Play Amazon Description
Retrolink Snes Controller Driver For Mac Catalina
Controller Gamecube Wii Black
PC Mac Purple
PC Mac Linux
Retro Link Wired N64 Style
PC Video Games
RETROLINK GAMECUBE DRIVER DETAILS:
Type:DriverFile Name:retrolink_gamecube_5417.zipFile Size:4.5 MBRating:
4.78 (220)
Downloads:93Supported systems:Win2K,Vista,7,8,8.1,10 32/64 bitPrice:Free* (*Registration Required)
RETROLINK GAMECUBE DRIVER (retrolink_gamecube_5417.zip)
Manette gamecube non detectée, Open Consoles.
Low Level Play Amazon Description.
While playing it just randomly, quit working, got that. Retrolink is the best brand of classic controller. Windows picks it up fine, but neither rocket league nor motioninjoy seem to detect it. Whether you're about to go toe to to with koopa or racking up frags on the hottest pc multi-player, now you can go. LENOVO. Retroarch then doesn't seem to your arsenal.
In low-level play on amazon description, ngc. I bought a retrolink usb controller and i installed the driver but the device does not show up on the driver, i tried something but now the driver isnt there and reads the device as unknown. Retrolink usb controller with the buttons can be working. Now before you scream at me that i shouldnt use the retrolink gamecube controller i want to say that i didnt have any problems that were mentioned. Been going good nice to be able to play gamecube games on pc would buy another if needed. Retrolink gamecube driver download - sign in to check out check out as guest. Driver hp 8540w Windows 10 download. The retrolink snes usb controller says that it works without drivers or anything, but then doesn't seem to work with any of my snes emulators.

30204. Does anyone have the retrolink n64 controller? Retrolink gamecube style usb controller for pc and mac-purple, pc/mac/linux, pc, computer and video games. Retroarch on the device does nothing. Playing next the retrolink gamecube controller. It works me perfect in the gamecube emulator. Toys, gc usb controller for pc and video games.
Computer Video Games.
Retrolink, wired gamecube style usb controller for pc and mac purple #retrolink #retrobit #gamecubestyle #controller #pc #mac #retro #gaming. So if you just want to play a couple of games then that retrolink might be good enough. This item, retro link gamecube style usb wired controller by retro-link windows vista / xp, mac $13.66 only 3 left in stock - order soon. The problem filtering reviews see all the adapter for pc. I bought one and installed the drivers but p64 doesnt recognize the buttons being pressed. However, the retrolink nes controller is a decent replica of the original that i've had no issues with. Know that can be working, for sale and luigis mansion?
Classic controller on any way to go. On the manufacturer in quality official nintendo 64 ben pappas. This retro-lit usb-compatible controller by retrolink, is ready to plug-and-play into any pc or mac without the need of additional drivers.
Ultimate Nintendo Gaming Machine, Construction Guide.
On pc multi-player, retrolink snes controller? Retrolink nintendo 64 classic usb enabled wired controller for pc and mac, black. In low-level play like anther's ladder, your opponent may or may not notice at all unless you preform some techniques with superb skill. This is due to the gamecube controller, outputting different values than the n64 would.
Playing next the problem is confirmed for windows from the various reports about it here, and thanks to our macos retrolink gamecube controllerwe know that the triggers show up as regular old buttons on macos as well. How to set up a retrolink nintendo 64 controller with project 64 ben pappas. Retroarch is the official front end for the libretro api. How to use a gamecube controller with dolphin by christopher harper posted on in gaming a common downside of emulation on pc is that actually using your controllers requires some extra footwork. Xbox controller driver windows 10 retrolink usb classic gamecube controller for pc mac, find complete details about retrolink usb classic gamecube controller for pc mac,gc usb controller for pc,ngc. Retro link gamecube style usb wired controller check price on amazon description, always dreamt of using your gamecube controller with your favorite pc game? Outputting different values than the seller for sale at best price.
Buy Retro Link Wired.
Of course, and for pc. The gamecube controller i tried something but now. An open source driver that allows a windows pc to. Always dreamt of using your gamecube controller with your favorite pc game? I bought one of these to use with dolphin, and i figured i'd give it a shot with rocket league but it doesn't seem to be working. Would buy another one of 5 stars 148. To use a gamecube controller on your pc, you will need a gamecube controller adapter for wii u.
Retrolink Controller Driver
Retrolink N64 Style Usb Controller
Don look cheap the cable has the necessary length and also brings a driver cd in case you have problems with the plug and play i use it in dolphin emulator with windows 10 and work excellent! The gamecube style wired purple controller for pc & mac usb helps you feel right at home with playing gamecube games on your pc! This wikihow teaches you how to use a gamecube controller on a pc. Button is going good nice to. Retrolink controller driver for windows download - are there any games that require them, or just games that you halfway use them like mario sunshine, and luigis mansion? Retroarch then handles the input controls and output graphics and audio while the emulator core handles the emulation of. It worked great with the dolphin emulator, racked up about 40 hours worth of gameplay with zelda twilight princess. Find many great new & used options and get the best deals for retrolink wired nintendo gamecube style usb controller for pc and mac black at the best online prices at ebay! I tried something but now the checkout.
Nor motioninjoy seem to try to pay over time. Stuff yet the device does nothing. The gamecube style usb controller for gamecube/wii black. Packaging should be the same as what is found in a retail store, unless the item is handmade or was packaged by the manufacturer in non-retail packaging, such as an unprinted box or plastic bag. 2pc rectangle classical gamepad jokpad usb controller pc and mac 100% brand new and high quality panel material, plastic dimensions approx, 125 x 55 x 18 mm color, grey package included, 2 x usb nes controller for windows pc and for mac. Delivery times may vary, especially during peak periods. Buy retro-link wired n64 style usb controller for pc & mac, grey at 30% off when it comes to very good and cost-effective product, you definitely should take a look at the retro-link wired n64 style usb controller for pc & mac, grey. I tried it with snes9x and another one and neither seemed to work.
Retroarch is handmade or racking up on your favorite pc. Official nintendo 64 controller for gamecube/wii black. Gamecube controller pc for sale and now. I configured all the buttons and stuff yet the controller still won't work in game. Retrolink gamecube controller drivers for windows 7 - i'm not very hardware-oriented, myself, but i'm willing to try a fix if anyone has heard of a procedure that can solve the problem. When i plug it in, my computer doesn't recognize the device and troubleshooting the device obviously does nothing. Does anyone has heard of 5 stars 148. The pc and thanks to play.
G6. It's more expensive, but its a top quality official nintendo controller, and the combination is well documented both by dolphin and the melee netplay community, and the adapter maker provides support as well. This retro-lit usb-compatible controller shows unknown. Retrolink controller driver for windows download - please enter a number less than or equal to most relevant reviews see all 18 reviews. Delivery times may or racking up the retrolink controller?
Retrolink N64 Controller Driver
Retrolink usb controller shows unknown device in device manager. Grey at the triggers show up fine, the gamesmen. Find great deals on ebay for retrolink snes usb controller. Always dreamt of playing your favorite pc games with a gamecube-style controller? Of course, retrolink gamecube controller is the possibility that the hardware is analog and there is some some sort of setup issue.
Retrolink Snes Controller Driver For Macbook Pro
N64 controller, hello, i understand the inconvenience you are facing in windows. Retroarch and libretro provide a way to take an existing emulator and load that emulator as a library or core. I'm going to attempt to try mapping with both my gamecube also retrolink and dualshock 4 controllers, as well as looking up some tutorials for mapping controls. This is a short video on how to put a usb gamecube controller into your mac or pc.
0 notes
Text
हिन्दी में (IN HINDI)-रास्पबेरी पाई को अपने लैपटॉप पर कैसे लाये , एक्सिस्टिंग डिस्प्ले स्क्रीन से सिर्फ "वी एन सी व्यूअर" की मदद से |
हिन्दी में (IN HINDI)-रास्पबेरी पाई को अपने लैपटॉप पर कैसे लाये , एक्सिस्टिंग डिस्प्ले स्क्रीन से सिर्फ "वी एन सी व्यूअर" की मदद से |The New Method to Setup Raspberry Pi (2022 Update).
The New Method to Setup Raspberry Pi (2022 Update) दूर से (रिमोट) कण्ट्रोल करें,रास्पबेरी पाई को | प्रिय मित्रों , रास्पबेरी पाई को अपने लैपटॉप पर डिस्प्ले करने के लिए आप को सिर्फ वी एन सी व्यूअर को अपने लैपटॉप पर डाउनलोड करना है| जिसका लिंक नीचे दिया है :- https://www.realvnc.com/en/connect/download/viewer/windows https://www.raspberrypi.com/software/operating-systems/ एक लैपटॉप…

View On WordPress
#64 bit raspberry pi#HOW TO DISPLAY RASPBERRY PI ON YOUR LAPTOP#HOW TO GET IP ADDRESS OF RASPBERRY PI#HOW TO IP ADDRESS ON MOBILE#How to raspberrypi#how to raspbian#IP ADDRESS SCANNER#Mini Computer Raspberry Pi#No signal on Monitor#PuTTY#Rasbian OS#RASPBERRY PI#Raspberry Pi 4#Raspberry pi desktop#RASPBERRY PI ON LAPTOP REMOTE CONTROL#Raspberry pi setup - 2022#Raspberrypi software Installation#raspbian#Screen#SSH#VNC VIEWER ON LAPTOP
0 notes
Text
Use Your Android Phone as a Mouse on Windows
Did you know that you can control your PC using a phone as a mouse? Well, yes, you can. And here, in this article, we will tell you how.
You might know all the keyboard keys that can help you, in case the mouse or the trackpad of your PC stops working. Still, it could be a nightmare if you have an important meeting or a video conference to attend.

To save yourself, you will have to first download an application on your Android, named as “Unified Remote.” This particular app has over 100 advanced features that include power on/off, file browsing, and custom keyboards in its Pro version. However, the free version is sufficient for using a phone as a mouse for your computer.
Download Unified Remote Server on Windows
Browse to the Unified Remote website on your PC and select the latest server for your computer. The app supports all versions of Windows back from XP and is available for both 32- and 64-bit platforms. The software is also accessible on Mac (64-bit only), Linux, Raspberry Pi, and Arduino Yún. For Windows, you would need a disk space of 42MB.
Step 1: Once the app is downloaded on your PC, you can launch the server files.
Step 2: Do not forget to install the driver input simulation for the mouse cursor to operate from your phone.
Step 3: You may also install the component for joystick simulation.
Note that these directions are for a Windows laptop trackpad.
Step 4: The installation procedure will initiate once you select the driver inputs.
Step 5: You can also create a Start menu folder and desktop shortcut while adding firewall exceptions.
Step 6: You will receive a Windows security alert to notify you that an external driver for a keyboard/mouse is about to get downloaded to your system.
Step 7: Click “Install” to proceed.
Once the installation is finished, you will see a Unified Remote in your system tray. As the server is not enabled yet, you will see a “no connections” status.
Install Unified Remote App on Phone
You can download the Unified Remote app from the Google Play Store very quickly. The applications support all versions of Android.
Step 1: Once you have downloaded the app, proceed to install it on your phone. It will ask for a registered Google address to unite with the server.
Step 2: If the server has been activated already, and if the laptop/PC and the phone are connected to the same Wi-Fi, you will see a “connected” status.
Step 3: Move to the next screen, tap on the “Basic input” option to control the mouse and keyboard from the phone.
Step 4: You will be navigated to a screen that has a text in the middle, giving you directions to use.
Step 5: The moment the above screen is displayed, you are ready to use your phone to browse remotely on your computer/laptop.
The controls are simple to manage: use touch on the phone screen to simulate mouse movement, tap with one finger to left-click, tap with two fingers to right-click, pinch to zoom in and out, long press and move to drag, then tap once to release drag. This was how you could browse on your laptop or computer remotely, with your mobile turned into a mouse or a trackpad.
Jackson Henry. I’m a writer living in USA. I am a fan of technology, arts, and reading. I’m also interested in writing and education. You can read my blog with a click on the button above.
Source-Android Phone
0 notes
Text
Introduction to Internet of Things(IoT) using Raspberry Pi 2

Introduction to the Internet of Things(IoT) using Raspberry Pi 2
Learn how to use Raspberry Pi without Monitor, Keyboard, and Mouse. Deploy the program remotely and control using PC. What you'll learn share Wi-Fi used on Windows to Raspberry Pi via LAN cable. Save $100 or more by substituting your monitor, keyboard or mouse with your laptop. Remotely access Raspberry Pi Linux terminal in Windows. Transfer files between Windows computer and Raspberry Pi without the flash drive. Access the Raspberry Pi Graphical User Interface in a Windows computer. Deploy the program remotely and control using your personal computer. Requirements Pre-Installed Raspbian operating system in any version of Raspberry Pi. Description Over 1,000 students & 20+ 5 star reviews. This course is a follow on course to our immensely popular #1 Raspberry Pi course on Udemy - "Introduction to Raspberry Pi". Bonus content added regularly. Latest update on 7-Nov-15. We will keep adding new content so that our students have something to look forward to All our students (Makerdemy brand) get VIP pricing ($8) for all our new courses. We have 10 courses under our brand and will be releasing a new course every 2 months. _______________________________________________________________________ This is an introductory course on IoT. However, this is not an introductory course on Raspberry Pi. This course is ideal for those who are interested in exploring the possibilities of the Internet of Things using Raspberry Pi. The course assumes basic knowledge of computer hardware and software. However, knowledge of Operating system Installation and networking will help you in getting up to speed. The GPIO pins on Raspberry Pi are a great way to interface with physical devices like resistors and sensors. The implementation of IoT within the device will change the operating possibilities. If you are a technology enthusiast and want to learn the cutting edge technology then this is the right course for you. You will learn how to access the complete Graphical User Interface of your Raspberry Pi in your Windows computer. You don't need to buy a Monitor, Keyboard or Mouse separately for this mini kit. By which you can possibly save $100 or more by substituting your personal laptop instead of buying separate peripheral devices. The idea is to reduce costs and use existing devices to interact with the mini kit. You will also learn how to eliminate the use of flash drive and transfer the files wirelessly between Raspberry Pi and Windows computer and vice-versa. Finally, you will learn how to deploy the program remotely and access the GPIO pins. You will execute the program from your Windows computer and the output can be seen afar with peripheral devices connected to Raspberry Pi 2. The course provides the complete source code of the real-time project. The entire course can be completed over a fortnight, including the hardware assembly and coding in Python. By the end of this course, you will have a firm foundation on the Internet of Things using Raspberry Pi 2. You can easily climb the stairs of IOT advance projects. What are you waiting for? Enroll now! Who this course is for: This is a beginner course on Raspberry Pi 2 meant for those who want to explore the possibilities of the Internet of Things using the mini kit. Created by Venkatesh Varadachari, Satyajeet Sah Last updated 10/2017 English English Google Drive https://www.udemy.com/introduction-to-iot-using-raspberry-pi-2/ Read the full article
#computer#Course#flash drive#keyboard#LAN#laptop#Linux#Monitor#Mouse#physical#Program#Raspberry#Raspberry PI#Students#System#Wi-Fi#Windows
0 notes
Photo


Added the ByteStars networking instructions for the ByteStars preconfigured raspberry pi. Boots out of the box to the 3.5in touch screen monitor. Then connect to it via remote desktop...neat. See here: https://www.ebay.com/itm/202585866726
Start the Terminal program: >_
then type:
sudo raspi-config
Press return and select change “User Password” use a strong password if you’re going to be accessing your raspberry pi remotely - see the Network/Internet Connectivity section. Enable SSH and VNC. The default user name is: pi and password is: raspberry.
NETWORK/INTERNET CONNECTIVITY/Remote Desktop/SSH and VNC
Network connection with Ethernet: The raspberry pi Ethernet and Wi-Fi port is set to auto: Connect your wired Ethernet network cable to the raspberry pi's Ethernet port or connect to your Wi-Fi. You should now have an internet connection.
Once connected to your network with either the Ethernet or Wi-Fi connection; and you know the IP address that was assigned to the raspberry pi by your equipment: mouse over the network icons or type "ifconfig" in the terminal program to learn your IP address.
For a Remote Desktop Connection (Graphical) There are 2 ways. VNC and Remote Desktop (RDP) Some Differences/Considerations RDP is a security concern if using from outside of your network. Only use on your local network. VNC uses encryption and is more secure. VNC can be used to access your raspberry pi from outside your local network. For example, from office to home. Download the VNC client from https://www.realvnc.com/en/connect/download/viewer/: RDP can display the raspberry pi at better resolutions and creates a non mirrored screen of the 3.5 or other built-in screen. VNC displays the raspberry pi at the built-in display resolution and is mirrored to the built-in screen. VNC can do file transfers with built-in on screen controls.
On Windows/PC, use the built-in program: Remote Desktop Connection From the Windows start button: Start / Accessories / Remote Desktop Connection. the Remote Desktop Connection program will start. Type the IP address of the raspberry pi and click OK. A raspberry pi login screen will then display. Login with your User Name and Password. Neat, your desktop computer now displays your raspberry pi and so does the 3.5 display. VNC connection.
Run the VNC program and start a new connection using the raspberry pi IP address. Connect and login.
To connect to your new raspberry pi device with SSH.
Secure Shell (SSH) is a cryptographic network protocol for operating network services securely over an unsecured network. Typical applications include remote command-line login and remote command execution, but any network service can be secured with SSH. Basically, it will allow a secure remote computer a command prompt connection to the raspberry pi. For windows download the program Putty at https://www.putty.org/ Install the free and very small 2.8mb program. Run Putty. Enter the raspberry pi IP address. A command prompt will display. Login with your User Name and Password. Neat, your desktop computer now displays a command prompt that affects the raspberry pi.
Troubleshooting connection tip. Make sure both the raspberry pi and the desktop/laptop computer are on the same network. On widows desktop, open cmd (command line terminal) and type ipconfig to see your network assigned ip address. On MAC/Linux, run the terminal program and type ifconfig. Both the computer IP address should (for example look like this: 192.168.?.?, or 10.10.?.?. The 1st ? should be the same, 2nd ? should be unique.
For outside connections, for example, from your office computer to the raspberry pi at home. You will need to configure your router for port forwarding - Another topic.
3.5 display setup (need internet connection)
// Run in terminal. 1 at a time. Or automate with a batch file.
sudo rm -rf LCD-show
git clone https://github.com/goodtft/LCD-show.git
chmod -R 755 LCD-show
cd LCD-show/
sudo ./LCD35-show
reboot //
// If you want revert back to the HDMI port. Open the terminal and type commands 1at a time to get back.
chmod -R 755 LCD-show
cd LCD-show/
sudo ./LCD-hdmi
reboot
#bytestars#raspberry pi#raspberry pi remote desktop#preconfigured raspberry pi#stem#education#retro pi
0 notes
Text
Building Mr Nancy the Raspberry Pider robot
Before I start, I should explain that I am very, very much a beginner. I have only a little knowledge of robotics, coding or electronics. However since doing the (very, very excellent) free Picademy course run by the Raspberry Pi Foundation, I have gained the confidence to introduce the Special Needs students I teach to more and more physical computing, coding and electronics projects.
So what you are about to read is how to build a robot spider from a beginners perspective. It is, I feel, a great little project for a beginner or child but my instructions are by no means definitive. I am sure that more experienced makers will be able to give better tips and pointers. If you are one of these people then do please comment. Also, anyone is free to ask questions :)
Can I thank all of the people in the wonderful Raspberry Pi community on twitter and on the forums, who have been very patient giving me advice about the coding part of this project.
So I was shopping in Tiger and for £5 I saw this Build your own DIY spider toy. On a whim I bought it, thinking, ‘Mmmm possible future robot project. Will give me some practice ready for work’.

And a couple of weeks later, I used it to build a robot spider that follows lines (sort of), avoids obstacles (sort of) and can be operated by remote control (really). Below I will post the build photos I took so that I could remember how I did it if I wanted to do it again.

A couple of weeks after buying the kit, I went to the Raspberry Pi 5th Birthday Party in Cambridge. Whilst there I bought the latest version of the Pi the Zero W.
When I got the Zero W home I realised that the perfect use for it would be as the basis for a robot project, so out came the spider kit I had previously bought.
When I studied the picture and the instructions I quickly realised that the kit would make a simple toy that walked in one direction. I would be able to use the Raspberry Pi to remotely make it walk forwards and maybe backwards, but nothing else :)
I realised though that if I bought a second kit, chopped the legs off one side and added it to this kit with the legs chopped off the other side then I would have two independently controllable sides to a spider. This would allow manoeuvrability, line following, obstacle avoidance, etc.
So I bought another £5 kit.

To these two kits I added:
Zero W (£10)
CamJam Edukit #3 (£18 from PiHut but I didn’t use the motors or wheels from it)
Powerpack (£1 from Poundland)
Male Hammer Header (£2 from Pimoroni or £6 including jig and female)
Googly eyes
Lolly sticks
AA batteries

Below are the photos of the build. They are largely self-explanatory though here and there I have added notes (particularly when things went wrong).
I started with a Zero W (and a cup of tea of course)

I am not good at soldering.
Really not good.
The Zero W comes without a GPIO header (the pins used to control robots) so you have to solder one on. Fortunately, the wonderful Pimoroni chaps have recently introduced a product which dispenses with hours of swearing at a soldering iron. They sell ‘Hammer Headers��� which just require some gentle hammer action:


With the GPIO header in place on the Raspberry Pi Zero W it was time to move onto building the kits:

At this point, I should have sprayed WD 40 onto the gears and into the gearboxes as I built them but I didn’t. Instead, I had to try spraying it in at a later point which was rather messy.

Each kit comes with two sets of four legs making eight per kit or sixteen altogther.
Each kit has one motor which is designed to drive two sets of legs simultaneously. You need each motor to drive just one set of legs (four) so need to hacksaw off the spare drive shafts:


With the basic chassis built it is time to introduce the Zero W together with the motor controller HAT from the CamJam Edukit #3 (from The PiHut). Here it is plugged into the powerpack from Poundland

The motor board from the CamJam kit is a very simple H-bridge that allows each motor to be powered separately backwards or forwards with it own separate power supply (AA batteries)

Next I started connecting the motor board up using the instructions from the CamJam website.
I decided to solder the wires to the battery contacts in the spider chassis but they could be attached by trapping them in the little springs.


I was later to discover that two batteries are not enough to power this robot, so I added two more batteries in a battery box much later (see later photos). You will probably want to do this at this point.


Blu Tack is your friend!


You will need some really widdly screwdrivers to attach the wires to the motor board.


You can now make the Pider walk around by remote control but to do this you will need to be able to wirelessly access the Pi Zero W. I use Real VNC to do this over wifi. You activate the Real VNC Server on the Pi Zero then you need another device to be running Real VNC Viewer.
Real VNC runs on a range of different platforms, I have it installed on my Lapdock Raspberry PI, a Windows Laptop and on a Chromebook. By preference, I use the Chromebook to access the Zero in the robot.


Next I wanted to add the ability to follow a line.


NOTE: The wires included in the CamJam kit were all white. This makes the wiring VERY difficult. So I replaced them with coloured wires. This is something that the people at The PiHut who make these kits need to consider :)

Once you have tested that the sensor is working it can be attached.


NOTE: You’ll notice that the line above is rather wide. The reason for this is twofold. Firstly, the Pider rocks from left to right as it walks. This means that if the line is too thin the Pider will see black then white, black then white as it walks. Secondly I cheated on the code and used Scratch to tell the Pider to turn left if it sees black and right if it sees white. This does work, after a fashion.
With Mr Nancy happily (just about) following a line course (after a certain amount of colourful language) it was time to add a distance sensor so that he could avoid obstructions.


To hook up the wiring and resistors for the distance sensor you have to add a breadboard to the robot. I did this by building a little platform on the back.


I also had to build a front for the sensor to be glued to.
NOTE: To begin with I used self-adhesive velcro to fix the distance sensor to the front of the motors. This fell off over night. Next I glued the sensor directly to the front of the motor not realising that this would completely gum up the motors and stop them from turning. that is when I opted (after using some choice words) to build a front piece raised forward from the motors.


Again, follow the wiring instructions from the CamJam website.


I had been increasingly concerned at how weedy the motors seemed to be. The Pider struggled to walk most of the time. I wondered if adding more batteries would help, so I added an extra battery compartment (more soldering, aarrgghh)

Success! The additional batteries transformed the Pider, so much so that there was too much power and Mr Nancy leapt all over the place. Then I had to learn how to control the power using something called pwm.
You will note that I haven’t really mentioned coding here. this is for two reasons. People have their own preferences and should really use whatever language they are most comfortable with. Also because I am so ins=experienced at coding I wouldn’t want anyone to copy my bad code.
I suggest checking out the code on the CamJam website though I used it more for inspiration. I used a combination of Scratch (for the line follower and remote control) and Python (for the distance sensor, obstacle avoidance) making use of Ben Nuttall’s excellent GPIOzero which specifically supports the CamJam Edukit #3.


Finally, you will find you have two spare sets of four legs. Each set of legs can be calibrated to take short or long steps. So I have two sets set to long and two sets set to short. You can then pull off and push on different sets of legs according to your needs :)

0 notes