#Router Admin Password
Explore tagged Tumblr posts
Visit Tumblr Blog
Explore Tumblr blogs with no restrictions, modern design and the best experience.
Last Seen Tumblr Blogs


Fun Fact
Tumblr was created by web developers David Karp and Marco Arment.
Text
Router Admin Password: Netgear Security Guide 2023
Router Admin Password In the era of digital connectivity, securing your home or office network is paramount One of the first lines of defense
0 notes
Text
genuinely wild to me when I go to someone's house and we watch TV or listen to music or something and there are ads. I haven't seen an ad in my home since 2005. what do you mean you haven't set up multiple layers of digital infrastructure to banish corporate messaging to oblivion before it manifests? listen, this is important. this is the 21st century version of carving sigils on the wall to deny entry to demons or wearing bells to ward off the Unseelie. come on give me your router admin password and I'll show you how to cast a protective spell of Get Thee Tae Fuck, Capital
62K notes
·
View notes
Text
Apropos of nothing
If you are the techiest person in the house (and for many of you, this is not techy at all), today is a good day to build a pihole thanks to Google's new TLDs.
For the record, this straight up stopped Dad from getting computer viruses when coupled with the Ublock browser extension, so I will volunteer my time to get you set up. We will find an evening and do a Zoom call. I am serious.
Prerequisities:
Before you start, this will be way way easier if your router has a magic way to:
Set static IP addresses
Set a custom DNS server
If you can't do this, I'm not saying you're stuck, but there's some non-obvious failure modes and maybe it's time to buy a better router.

Parts:
Raspberry Pi 4B. 2GB if you just want to set and forget, 8GB if you want to do more things on this than just your pihole (Coughs in a MarioKart box) -> https://www.raspberrypi.com/products/raspberry-pi-4-model-b/
Spare USB-C charger if you don't have one already. I'm a fan of https://www.amazon.com/Argon-USB-C-Power-Supply-Switch/dp/B0919CQKQ8/ myself
A microSD card at least UHS class 3 or better. 32 is fine for just a pihole, I have a 512 in some of mine that I use for more stuff. https://www.tomshardware.com/best-picks/raspberry-pi-microsd-cards
Some method of flashing the card if you don't have one (Some come with SD to micro-SD adapters, if not a USB to SD/micro-SD adapter is about $10 off Amazon)
If you really feel like going nuts, go buy yourself an Argon case and then very very carefully never ever install the software for the fan that does nothing. The value is entirely in having a big giant brick that is self-cooling. If you want to play MarioKart, I would consider this a requirement. https://www.amazon.com/Argon-Raspberry-Aluminum-Heatsink-Supports/dp/B07WP8WC3V
Setup:
Do yourself a favor and ignore all the signs telling you to go get Raspbian and instead go grab an ISO of Ubuntu 64-bit using RPi Imager. Because Raspbian cannot be upgraded across version WHY U DO THIS
Download Rpi Imager, plug the microSD card into your computer,
Other General Purpose OS -> Ubuntu -> Ubuntu 22.04 LTS
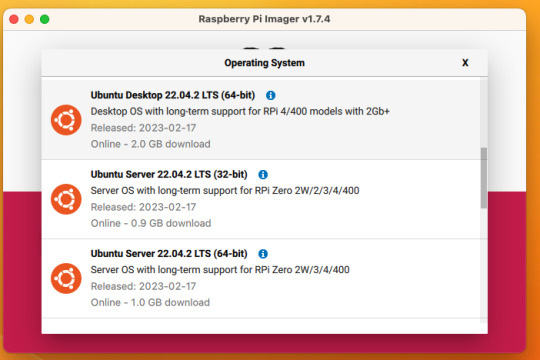
So now you have an operating system on an SD card.
Assemble the case if you bought one, plug in the SD card, power supply, ethernet cable if you have one or mouse and (mini) HDMI cable if you don't. If you bought that Argon case, you can just plug a keyboard (server OS means no mouse gang; In this house, we use the Command Line) and HDMI cable into the Pi. Turn it on.
Gaining access
The end state of this is that your pi is:
Connected to the internet by cable or wifi
You can SSH to it (Also not scary)
If you plugged in an ethernet cable, once it's done booting (1-2 minutes?), you should be able to ssh to "ubuntu@<the IP of the system>". Look it up in your router. It may make sense to give the static IP NOW to keep it stable.
If you've never used SSH before, I think the standard is Putty on Window or you can just open a terminal in Mac. (And if you know enough Linux to have a Linux computer, why are you reading this?)
If you didn't plug it in, and need to setup the wifi, there's magic incantations to attach it to the wifi and to be quite blunt, I forget what they are.
Your username is ubuntu, your password is ubuntu and then it will ask you to make a new password. If you know the meaning of the phrase "keypair-based access", it may make sense to run `ssh-copy-id` at this point in time.
Router settings (part 1)
Give your new Pi a static IP address, and reboot your pi (as simple as typing in `sudo reboot`).
Open a new SSH session to the pihole on the new address.
Installing pihole
Open up an SSH session and
curl -sSL https://install.pi-hole.net | bash
This is interactive. Answer the questions
When it's done, on your other computer, navigate to <the ip>/admin
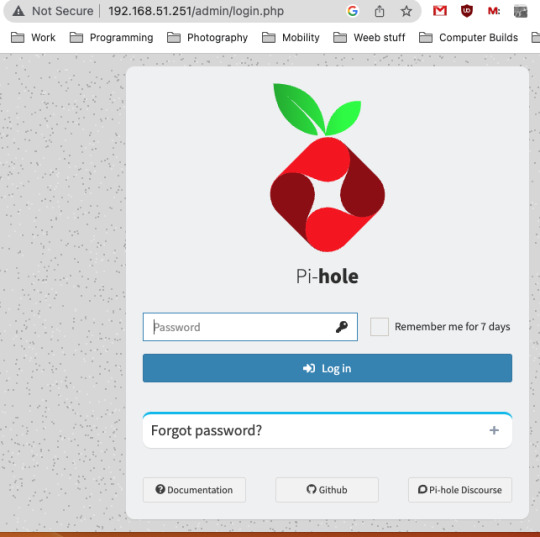
Login with the password you just set. Router settings part 2
Give your new Pi a static IP address then point your router at that address
Set the DNS servers to the static IP
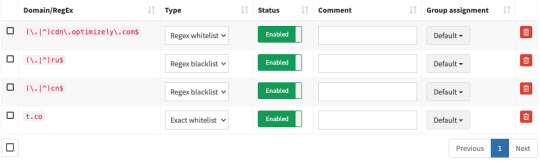
Then ensure you're blocking something. Anything.
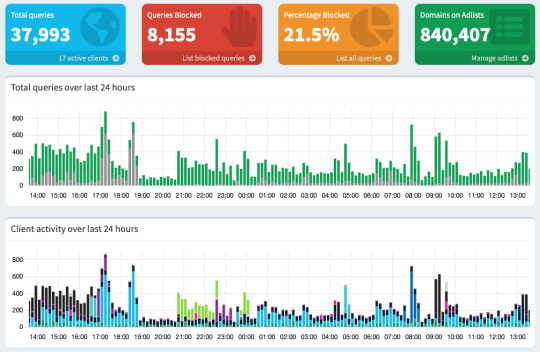
Then do what you want to do. You'll probably need to whitelist some sites, blacklist some more, but the main thing is going to be "Adding more list of bad sites". Reddit has some lists.
And... enjoy.
/But seriously, there's some stuff to do for maintenance and things. I wasn't joking about the pair setup.
2K notes
·
View notes
Text
How to Log In to Your Motorola Router?

To perform a Motorola router login, you'll typically need the router's IP address (often 192.168.0.1 or 192.168.1.1) and the default username and password, which are usually 'admin' and 'Motorola' respectively. Access the router's settings via a web browser to manage your network. To learn more, find detailed login instructions on our site.
2 notes
·
View notes
Text
anyone here have experience with hitron routers? I'm trying to log into the admin panel but it's not taking any passwords. I tried the default wifi password and the MAC address after a factory reset
5 notes
·
View notes
Text
Deep Dive into Wi-Fi Hacking: How Ethical Hackers Secure Your Wireless Networks

With our hyper-connected world, Wi-Fi is the unseen lifeline keeping us online today. From streaming your favorite shows to managing your smart home devices, Wi-Fi is everywhere. But have you ever stopped to think about just how secure your wireless network really is? What if someone could sneak into your network, steal your data, or even hijack your devices? Scary, right? That’s where ethical hackers come in—the unsung heroes of the digital age who use their skills to protect, not exploit. If you’ve ever been curious about how they do it, or if you’re considering a cybersecurity and ethical hacking course, this blog is for you.
The Dark Side of Wi-Fi: Why It’s a Hacker’s Playground
Well, face it: Wi-Fi networks are a goldmine for cybercriminals. Why? Because they are usually the easiest weakness in our digital defense. It has weak passwords, outdated encryption, and misconfigured routers. That's not to mention stealing your Netflix login. Hackers can use it as an open gateway to access more of your digital life.
Here's your scenario: You're having your favorite coffee at a quaint little café while making use of their free Wi-Fi. Well, a hacker within some tables from you is running Aircrack-ng or Wireshark for quite a bit on your data that's going by. Before you realize it, they have gotten your login credentials, credit card information, or even obtained access to your corporate emails. How scary does that sound?
Enter Ethical Hackers: The Good Guys of Wi-Fi Security
That is when the ethical hackers come in. Cybersecurity professionals use the same hacking tools and techniques as evil hackers, with one difference though: they work for you. Their job is to find a hole before a hacker does so that they may fix it before hackers can gain entry into your network.
How do they go about it? Let's dissect this:
Reconnaissance: Ethical hackers first gather information about the target network. They use tools such as Kismet or NetStumbler to identify the network's SSID, encryption type, and connected devices.
Exploitation: Once they have identified potential weaknesses, they try to exploit them. For example, if the network uses outdated WEP encryption (which is notoriously weak), they might use tools like Aircrack-ng to crack the password.
Post-Exploitation: Having obtained access, the ethical hacker calculates the potential damage that can be done. Could they have accessed sensitive files? Could they have launched a man-in-the-middle attack? This step will give them a sense of real-world impact from the vulnerability.
Reporting and Patching: They finally document their findings and collaborate with the owner of the network to fix the issues. It may involve updating firmware, changing passwords, or enabling stronger encryption like WPA3.
Why You Should Care About Wi-Fi Security
You may be thinking: "I am an average user, so why would somebody even bother with me?" The thing is, hackers don't discriminate. Whether you are just an individual, a small business owner, or part of a large corporation, your Wi-Fi network is a potential target. And with the emergence of IoT devices, such as smart thermostats, security cameras, and voice assistants, the risk is much bigger than ever.
Here's the good news: You don't need to be a tech genius to protect yourself. By learning the basics of Wi-Fi security or even enrolling in a cybersecurity and ethical hacking course, you can take control of your digital safety.
How to Secure Your Wi-Fi Network: Tips from the Pros
Want to make your Wi-Fi network hacker-proof? Here are some practical tips inspired by ethical hackers:
Use Strong Passwords: Avoid using common passwords, such as "admin" or "password123." Instead, use long complex phrase with letters, numbers, and symbols.
Enable WPA3 Encryption: The latest Wi-Fi encryption protocol is WPA3; if your router supports it, switch to WPA3.
Update Your Router's Firmware: Manufacturers in their official websites may have coming updates that address security vulnerabilities. Check and update the firmware on your router to a newer edition.
WPS: Wi-Fi Protected Setup is convenient but highly insecure. Just turn it off to minimize brute-force attacks.
Check Connected Devices: You would be surprised to know which device is connected to your network if you don't check it periodically. If something looks suspicious, investigate immediately.
Ready to Be a Wi-Fi Warrior?
If this deep dive into Wi-Fi hacking has piqued your interest, why not take it further? A cybersecurity and ethical hacking course can teach you the skills you need to protect yourself—and maybe even turn your passion for tech into a rewarding career. Imagine being the person who uncovers vulnerabilities, thwarts cyberattacks, and keeps the digital world safe. Sounds exciting, doesn't it?
Ethical hacking is not the art of hacking into systems, but understanding how they work so that such knowledge can be applied to strengthen their defenses. In a world that is ever changing with threats through cyber, it has never been a better time to learn.
Final Thoughts
It sounds like something out of a spy movie, but the truth is that Wi-Fi hacking is an everyday threat in your life. The good news is that with the right information and tools you can protect yourself and your loved ones from becoming cybercrime victims. However, whether you are a tech enthusiast or a complete beginner, a course in cybersecurity and ethical hacking will empower you to take the lead in digital security.
Remember the next time you connect to a Wi-Fi network: those invisible waves keeping you online can be the doors for hackers. Stay informed and vigilant, and maybe you will end up being that ethical hacker who saves the day.
So, stay safe and happy ethical hacking!
2 notes
·
View notes
Note
hello nina, I'm a different anon and I bring more adblocking knowledge. you mentioned your phone; do you have an Android? if so, I have GREAT news for you: you can just go to your private DNS mode settings and type in "dns. adguard-dns. com" (remove the spaces) and it'll block most ads on your phone, including apps (not just browsers)! it doesn't work for everything - YouTube for example is notoriously difficult - but it works for most things in my experience. you can actually set this up on most devices, including tablets and computers, and even your router if you have access to the settings (username and password are usually either on it or just admin and admin). if you want more info on this, google Adguard private DNS and they themselves have deeper explanations and tutorials. Furthermore, for YouTube specifically, there are a few options, and i recommend looking it up on reddit if you want to read about all of them. however, I personally use and recommend revanced, which you can find instructions for on r/revancedapp; with it, you'll end up with YouTube but better, because you'll get more options for settings, as well as adblocking and even sponsor blocking (as in, it'll automatically skip sponsor sections in videos), while still being able to log in to your account and get your regular sub box and playlists and stuff. lastly, please use Firefox as your mobile browser, bc it's just better and also you can install ublock origin on it. have a nice, ad-free day!
i have an iphone and this message was eye opening regarding how much i cannot do in it. i really don't think i can even access the whole dns shebang (i'm not even sure what that means to be honest. can you tell i'm not tech savy at all?) and the revanced app isn't available here either. and dude, i'd kill for that sponsor blocking. i have it on my laptop, that and no ads are the sole reasons why i spend so much time on youtube
i did just download firefox for my phone though. i've been using safari mostly because it's fine for me, and the icon is pretty (dumbest reason, i know). now i'm off to do a LOT of googling because i don't even know how to install extensions there
update after a quick google search: firefox extensions are not available on ios i see how it is!!!
#and to think i was a linux user at some point... how things changed jesus#but thank you sm!#anon#i don't even blame them for not wanting to mess with extensions in ios have you seen apple's policies?? insane#nina's mail#💌
3 notes
·
View notes
Text

this should be illegal imo. i want unlimited data AND to use MY router i know is secure and not pay for the privilege/pay xfinity TWICE the rent of whatever piece of shit unconfigurable default admin password router they deign to give me
#technology and you#verizon and i are NOT friends#furious my town is doing municipal fiber the month i move
6 notes
·
View notes
Text
im trying to think of how you can tie this into like the medical mystery like. idk you've got a patient who's dying and Wilson confronts house like
(wilson pucker. he nods almost desperately, like he wishes someone had taught him how to exhale) fine. how did you do it.
house: do what?
wilson: since when do you even play minecraft. you used dark prismarine for your eyes. did you... farm an ocean monument for that?
house: 2000 blocks away. (he dangles a sticky note with a dramatic flourish. bitingly sarcastic:) i wrote down the coordinates. want em?
wilson: (stunned silence and stammering. eventually he takes the sticky note silently)
[over wilson's shoulder shot, looking down at the coordinates on the note, as though we the viewer cannot meet house's eyes]
house: you left LAN open so you could afk overnight. I just figured I'd.. stop in.
wilson: you can't, i mean, it's a LAN world, it should be private--
house: it's only a lan world if you're stupid--it just broadcasts "I'm playing minecraft, wanna join" every few seconds. reminds me of a man I once knew, actually. But other than that, it's just a normal server, port 25565.
wilson: --which should be closed--
house: oh, but with your router's make and model, a chechnyan hacker, and a couple of weeks...
wilson: (almost flattered, too impressed to be angry) really?
house: (a pause, as he fixes wilson with an 'are you really that stupid' stare. indicating the sticky note:) nah.
[wilson turns over the sticky note so it's right-side up. Router's default admin account username and password are written in wilson's handwriting]
wilson: (deflating) you know, if you'd just said yes when I invited you...
[house has turned around and stormed off purposefully]
house: I don't play games for babies. gotta go, someone's dying.
[house busts into the whiteboard room, startling chase, and writes 25565 on the whiteboard]

#I'm not sure what the diagnosis here is but like. presumably you want some kind of analogy for port forwarding where like. some allergen is#causing antibodies that are causing some other thing or something. iunno medicine
23K notes
·
View notes
Text
Setup Guide For GL iNet GL SFT1200 Travel Router
Looking for a travel router or a router that suits small apartments and businesses? If yes then you must surely check Opal from GL iNet. Also known as GL SFT1200. It is a mini router that fits seamlessly into your travel bag so you can work remotely, enjoy wifi access on the go. The GL iNet GL SFT1200 setup configuration is crucial for making the best possible use of the device. The setup is quick, simple and is done using a web browser. Therefore in this guide you'll get access to the same.
Feature Set
Before proceeding with the GL iNet GL SFT1200 setup steps, first let's learn about its features.
The Opal runs on dual frequency bands. The 2.4 GHz band provides broader coverage and speeds of upto 300 Mbps. Whereas on 5Ghz band you can grab the high speeds of upto 867 Mbps. Further you get outstanding security due to VPN. For connecting your devices straight to the Opal, you get access to not one or two but three Gigabit ethernet ports. The best part about the GL iNet GL SFT1200 setup is that you can access the internet in multiple ways. You can use it as a repeater, connect it to the modem, access it in AP mode and more. Simultaneously, you get to connect a maximum of 52 devices to the Opal. Moreover with Web UI 3.0 you can use your files securely and remotely.
GL iNet GL SFT1200 Setup Steps
The setup steps are simple, straightforward and consume a very little time. So let's begin:
✓ Start By Unboxing
First unbox your package contents. Inside the package you receive:
GL SFT1200 router (Opal).
A power adapter with a converter.
An Ethernet cable
A quick user guide alongside warranty and thankyou card.
Apart from the above written components, the requirements for the setup are only two. One is a smart device of your choice and second is a vacant power outlet. Additionally, we recommend you to give a quick reading to the user guide. This step will make the GL iNet GL SFT1200 setup smoother.
✓ Turn On The Opal
It's time to activate the Opal. For this you need the power adapter. But first open the antennas to 180° from both sides. Now slip in the power pin of your power cable into the Opal’s back panel. And secure the adaptor into an electrical socket. Turn on. Let the Opal stabilize.
✓ Connect
In this GL iNet GL SFT1200 setup step, you require a smart device. So fetch it. Connect it to the Opal bh choosing any two options as are written below.
Turn on wifi. From the available list pick GL-SFT1200-XXX. Use goodlife as a password. The password needs to be written in lower letter case only. Last tap on Connect.
The second option is using ethernet cable. Connect the cable that is moving from your smart device to the port which is marked as LAN on Opal.
✓ Using Web Browser For Setup
Finally as you connect your device to the SFT1200 open an internet browser. For smooth access to GL iNet GL SFT1200 setup page, take some notes. First choose a browser that is compatible. We would tell you to use internet explorer, chrome, safari, edge or firefox. Next clean up browser caches and cookies. Also update the browser if you see any pending updates.
Now take access to the browser's address field. In it enter 192.168.8.1. Push enter. A window opens up. It asks you to choose the language, therefore do so and tap Next. Curate an admin password. Keep it unique and strong. For this, combine letters, special characters as well as numbers. Once done, hit Submit.
Finally you now get to complete the GL iNet GL SFT1200 setup, by connecting to the Internet. So select the Internet option, pick a connection type which is suitable to you and give in the asked details. As the Opal has access to the Internet, the front panel LED will pop up a solid white light. Thus indicating a complete setup.
Factory Resetting Opal
Left the above written steps midway due to any reasons? If yes then no issues as you can reset the router and perform them from the scratch so that the outcome is successful. To reset the Opal, first power it up with the help of the supplied adapter. Remember one thing as you turn on your Opal do not immediately move to the reset button, rather let the router start up properly. Next, when the router is undergoing the process of resetting, you can not perform any other activity on the router as this may damage the hardware. So after the router boots up, press the reset button which is nearby to the mode switch button. Do not release it until the light on the front panel starts flickering. As you release it, the reset completes. So now you can re-perform the GL iNet GL SFT1200 setup.
For any query or assistance feel free to get support from experts.
0 notes
Text
Setup Orbi Mesh Network Using www.orbilogin.com
Orbi devices are widely used to create a robust network at home or offices by the people. Orbi networking devices are very popular among users. The devices are known for their performance. You can easily create orbi mesh network setup using orbi router & satellites. Buying orbi wifi systems & setting up the device at home will convert your home into a WiFi hub. Let’s check out the installation and setup of orbi mesh network using www.orbilogin.com web address. In the further segment of this article you will find the breakdown of the process into easy to understand steps. Read the article till the end to do the configuration by yourself.
Orbi Mesh WiFi Installation
Orbi mesh WiFi system installation is a very simple process. You just have to follow the below specified steps of hardware installation.
Begin with the orbi router device setup. Firstly unplug the modem device and place the router closer to the modem. Use the yellow ethernet cable you got with the router device and connect it with the modem. Then power up your modem device. Also connect the router device with the power and begin the router setup.
Once the router device setup is complete, you can start adding satellites into the network. Place the satellites closer to the router to configure them. Power up the satellites and begin to add them into the network.
Orbi Mesh WiFi Setup
Initiate the orbi mesh network setup using the www.orbilogin.com. Before initiating, make sure you have a modem device with working internet, computer/ laptop with the latest browser installed in it, and ethernet cable. If you have all, you can initiate the setup process. Setup process is divided into four parts which are further splitted into steps to let the user understand it better.
Access Web Interface
Start with connecting your computer/ laptop device with the router network. You can connect it using the ethernet or wireless method.
After that, launch the web browser to get access to the web interface.
In the URL bar mention www.orbilogin.com web address and hit enter key on your keyboard.
As the site opens, you have to enter the login credentials. Default login credentials are admin for username and password for password field.
Further click on the login option and then you will get access to the login page.
While typing the login credentials be careful, any mistake in the credentials lead to failure.
Configure Router
Configure orbi router by choosing the language and then move ahead to change the admin login details.
Thereafter create SSID & password for your router’s wireless network.
Complete the configuration and then add the satellite to the network.
Add Satellites
There are three ways to add the satellites into the network. You can connect the satellites using a wireless sync button, using ethernet cable or using a switch.
Wireless Method: To add the satellite into your home network without cable, you have to press the sync button if you purchase satellites separately. In case you got the satellite with the wireless system then you need not to do anything except powering them.
Wired method: To create wired setup there are two ways to connect a satellite with a router. First and primary way is to take the ethernet cable and connect the satellite directly to the router. Secondly, you can connect the primary satellite to the router and then second satellites to the primary satellite and so on.
Switch: You can also connect the satellites with the router using switch. For this connection you need to use the ethernet cable and connect the router with the switch first. After that connect the satellites with the switch using the ethernet.
Finalize Setup & Optimize.
Once all the satellites are added, you have to make changes in the other security settings and then setup guest network. Also you have to enable or disable WiFi Multimedia Quality of Service, daisy-chain topology, implicit beamforming, MU-MIMO or fast roaming feature. Once you optimize all the settings and secure the network you can leave the web interface. Last step of the setup process is testing the network. For testing you have to use a wireless enabled device. Connect to the new network and browse the internet. Play online games and watch videos to check the network speed. In case required then place the satellites strategically to new locations.
Conclusion
From the crux of the above description it has been concluded by me that the setup of orbi mesh wifi system is not a hard task using www.orbilogin.com. By following the steps mentioned in this article anyone can easily configure the system. You can enjoy seamless network coverage at your home after the orbi mesh network setup. Whether you are living in a multi story house or in a big home, you will get network coverage everywhere. From the basement area to the top of your house, you can enjoy a high speed network everywhere. In case you got stuck somewhere while performing setup and don’t know how to proceed further then you can take help of technical experts.
0 notes
Text
192.168.1.250 Netgear Setup: A Beginner’s Guide
The netgear extenders are widely used by many of the networking users to create a reliable network. Netgear extender devices are known for their performance and stable network. Setting up the extender device is not a daunting task if you are aware of the setup process. In this article we are going to elaborate in detail how you can perform 192.168.1.250 Netgear Setup using the web. Web based setup method is the most reliable way to add the netgear extender into your existing network. Gather the important details and configure any model of netgear wireless range extender device. Scroll up the page and read the information till the last to boost up your network.
Unboxing The Extender
Unboxing the wireless range extender is the first step of the 192.168.1.250 Netgear Setup. In the box you will find an extender along with power adapter, user guide and ethernet cable (optional). You need all such items for the setup process. In addition to these items you also need host router network details, working internet connection, electric power socket, and computer/ laptop device.
Placement
Second step is placement of the device. Proxy placement is needed for the setup. Put the device closer as possible. Also there is no signal interface closer to the router & extender device.
Boot Up
Next step of the process is boot up. For booting up you have to use the power adapter you got with the extender. In case your device is a wall plug compact design device then you have to directly connect it with a wall outlet. Boot process might take around 1 to 2 minutes. Before proceeding further towards 192.168.1.250 Netgear Setup using the web, wait for LED lights to stabilize.
Connect To Extender Network
Step ahead and connect the extender device to the client device using any of the given methods:
Ethernet: Use the ethernet cord you got with the range extender and connect the extender with the client device. Inject the cord’s one end into the ethernet port of the extender and other in the client device ethernet port. Make sure the connection is secured.
Wireless: Using the wireless network of ethernet you can establish a connection. Check out the device label to know the default SSID & password. Use your client device and run a scan for available wireless networks. Enter the details and connect the devices.
Access 192.168.1.250 Netgear Setup Page
Now you have to access 192.160.1.250 netgear setup page by follow the given steps:
Launch google chrome or any other similar browser.
Thereafter, mention 192.168.1.250 IP in the URL bar.
A new page appears where you have to provide default information.
Enter admin and password in the fields.
Further press login and netgear installation assistant will guide you.
Configure Extender
Once you get access to the configuration page, choose the language first and then your router’s network name. Choose next and enter the password on the screen. Further click on connect option and then next.
Secure Network
Now you have to secure the wireless network by creating an SSID & password for your extender network. Also make changes in the admin account user details. This step is important to keep your existing network secure.
Update Firmware
Afterwards, you need to look for the firmware version. In case the firmware is outdated then you should install the latest version. For installation you can opt for an online update option and follow the prompts. You can update the firmware manually also by downloading it from the official portal of netgear.
Finalize Setup
Finalize the setup by choosing the submit button once you made all the important changes in the network. Review the changes you made to verify every step. Note down the extender security details you have created and keep them secure. Submit the changes and then you can step further to reposition the device.
Reposition The Extender
Repositioning the extender is a very important step to optimize the network performance. Unplug the extender from the proxy position. Search for a midway position (from the router and the area where the dead spot was). Then plug it in again to the power at the new position. Wait for the device to boot up and monitor the router LED on your extender device. If it’s green then the position is perfect. On the contrary if it turns amber or red then relocate it.
Test New Network
Lastly, test the new network using a wireless handset. Using the new SSID & password connect the device with the extender network and browse, stream or play online to check speed.
Conclusion
Lastly, I would like to rest my words by saying that the 192.168.1.250 Netgear Setup process is a super easy task. By following the above mentioned step by step breakdown of the extender setup process, anyone can configure the extender easily without a tech expert. Setting up an extender device will boost your existing network signal strength and terminate the dead spots from your home or office area.
1 note
·
View note
Text
Quick and Easy Guide to Setting Up Linksyssmartwifi
Learn how to set up your Linksys smart WiFi network in no time at all with this simple instruction manual. Whether you want to setup your new Linksys router or are struggling with your existing router and want to reset it, we’ll explain it all from scratch in basic step-by-step procedure.

Before You Start the Setup
Before diving into the configuration, make sure you have all these components ready:
A working modem connected to the internet
A Linksys smart Wi-Fi router (plugged in)
An ethernet cable
A device (PC, smartphone or tablet)
Before initiating with the further setup, connect your device to the Linksys router either via Wi-Fi or through ethernet cable.
Setup of Linksyssmartwifi: Step by Step process
Step 1: Hardware Connection
Power on your modem. Wait for it to fully boot up.
Plug one end of the ethernet cable into the modem and the other with the Linksys router’s Internet (WAN) port.
Power source the router. Wait until the LED light becomes stable (depends on model — it might be solid white or blue).
Connect your system to the router’s default Wi-Fi (SSID and password is mentioned on the router’s label.
Step 2: Linksys Router Login Page
Once connected, open a browser and either enter the URL: linksyssmartwifi.com
Or the IP address: “192.168.1.1” into the address bar:
You’ll reach the Linksys Router Login page.
If it’s your first time setup, it will automatically redirect you to the Linksys Smart Wi-Fi setup wizard.
If the wizard doesn’t launch, go to the Linksys Router login page and click on “Click here” next to “For first-time setup”.
Step 3: Running the Smart Setup Wizard
Once the setup wizard starts:
Accept the license terms to proceed.
The router will detect your internet connection. Wait for it to verify and confirm the type (Dynamic IP, PPPoE, Static IP, etc.).
Once detected, it’ll ask if you want to configure manually or automatically. You can choose automatic unless you’ve been given specific settings by your ISP.
Now set up your Wi-Fi Network Name (SSID) and Wi-Fi Password. This will be the name and key that your devices will use to connect.
After that, you’ll be prompted to create a router admin password. This is not your Wi-Fi password but the one used in Linksys router login page.
Step 4: Registering a Linksyssmartwifi Account (Optional but Recommended)
After basic setup, Linksys will ask if you want to register your router with Linksyssmartwifi.com. By creating a cloud account, you’ll be able to:
Access your router remotely from anywhere
View connected devices
Change Wi-Fi settings on the go
Block or prioritize devices
Set parental controls
To do this:
Click Create Account, enter your email, create a password, and verify through the email confirmation.
Tips to Avoid Setup Issues
Clear browser cache if the setup wizard doesn’t load
Disable VPN or proxy if accessing from a business network
Use a wired connection (Ethernet) for smoother setup
Reset the router using the reset button if it fails to initialize (hold for 10 seconds)
Logging In Later to Manage the Router
Once your setup is complete, you can always access your router dashboard through:
linksyssmartwifi.com or 192.168.1.1
Enter the admin password you created during setup to access settings.
From here, you can:
Change SSID and password
Set parental controls
Prioritize gaming or video streaming devices
Check who’s using your Wi-Fi
Update firmware
Common Errors While Accessing Linksyssmartwifi.com
Sometimes users report problems accessing the portal. Here’s how to handle them:
“Can’t connect to Linksyssmartwifi.com” – Ensure you’re connected to the router’s network – Restart router and modem – Try using 192.168.1.1 instead of the web URL
“Invalid Admin Password” – Reset the router if you forgot it – Use the password created during initial setup (not the Wi-Fi password)
“Setup Wizard Not Loading” – Use a different browser or clear cache – Disable firewall or antivirus temporarily – Ensure you’re connected via cable or Wi-Fi to the Linksys router
Why Use Linksyssmartwifi Over Basic Router Interfaces?
Traditional router interfaces can be clunky and hard to understand. Linksyssmartwifi makes it intuitive and user-friendly. Instead of navigating through complex tabs and settings, the dashboard presents everything in a modern interface with explanations for each option.
You can:
Schedule Wi-Fi off times
Block certain websites
Set guest networks
Prioritize devices like Smart TVs or gaming consoles
All without needing to know what “MAC address filtering” means.
Final Words
Setting up your router using Linksyssmartwifi is quick, smooth, and hassle-free. In under 10 minutes, you’ll have a secure home network ready for work, streaming, gaming, and everything in between. Whether you’re logging in through Linksyssmartwifi.com or locally via IP, this system keeps everything at your fingertips.
If you’re tired of old clunky router menus and endless resets, switching to Linksys and using the Linksyssmartwifi setup is the smart move.
0 notes
Text
Wifi từ chối quyền truy cập - Nguyên nhân & cách khắc phục
Lỗi WiFi từ chối quyền truy cập khiến thiết bị không thể kết nối mạng dù mạng vẫn hoạt động. Bài viết này sẽ phân tích nguyên nhân và hướng dẫn cách khắc phục hiệu quả.
WiFi từ chối quyền truy cập là gì?
Đây là tình trạng thiết bị (laptop, điện thoại) không thể kết nối WiFi do router hoặc hệ thống mạng chặn, thường kèm thông báo như "Incorrect password" hoặc "Access denied".
Nguyên nhân WiFi từ chối quyền truy cập
Lỗi này có thể xuất phát từ:
Lỗi thiết bị kết nối: Sai mật khẩu, card WiFi tắt, lỗi phần mềm, hoặc không hỗ trợ chuẩn mã hóa.
Lỗi bộ phát WiFi: Router quá tải, cấu hình DHCP sai, hoặc firmware lỗi thời.
Chặn địa chỉ MAC: Router giới hạn thiết bị theo địa chỉ MAC.
Xung đột IP: Hai thiết bị dùng chung IP hoặc IP bị giới hạn.
Cấu hình DNS sai: DNS không phản hồi hoặc proxy/VPN lỗi.
Virus/phần mềm độc hại: Can thiệp cài đặt mạng, chặn kết nối.
Cách khắc phục
Dưới đây là các bước khắc phục lỗi WiFi từ chối quyền truy cập:
1. Khởi động lại thiết bị và router
Tắt thiết bị và router trong 30 giây, bật lại, đợi 2-3 phút rồi thử kết nối.
2. Kiểm tra chức năng WiFi
Trên điện thoại: Vào Cài đặt > WiFi, đảm bảo WiFi được bật.
Trên Windows: Nhấn Windows + A, bật WiFi nếu tắt.
Trên macOS: Bật WiFi qua biểu tượng trên thanh menu.
3. Đặt lại IP tĩnh
Nhấn Windows + R, nhập ncpa.cpl, chọn WiFi > Properties.
Chọn Internet Protocol Version 4 > Properties, nhập:
IP address: 192.168.1.x (x từ 2-254).
Subnet mask: 255.255.255.0.
Default gateway: 192.168.1.1.
Nhấn OK và thử kết nối lại.
4. Cài đặt lại driver WiFi
Nhấn Windows + X > Device Manager > Network Adapters.
Chuột phải WiFi Adapter, chọn Update driver. Nếu không hiệu quả, chọn Uninstall device, khởi động lại máy.
5. Quét virus
Sử dụng Windows Defender (Windows) hoặc Avast/Bitdefender (điện thoại) để quét và loại bỏ virus/phần mềm độc hại.
6. Kiểm tra và reset router
Kiểm tra đèn tín hiệu router. Nếu nhấp nháy bất thường, tắt 30 giây, bật lại.
Nếu vẫn lỗi, nhấn nút Reset trên router 10-15 giây, sau đó cấu hình lại WiFi.
7. Xóa cache mạng
Android: Vào Cài đặt > Ứng dụng > WiFi, xóa cache/dữ liệu.
iPhone: Vào Cài đặt > Cài đặt chung > Đặt lại cài đặt mạng.
Windows: Chạy Command Prompt (Admin), nhập lệnh: netsh winsock reset, netsh int ip reset, ipconfig /release, ipconfig /renew, ipconfig /flushdns.
Lưu ý
Thử kết nối với mạng khác để xác định lỗi từ thiết bị hay router.
Sao lưu dữ liệu trước khi reset thiết bị.
Tránh chia sẻ mật khẩu WiFi để giảm tải mạng.
Liên hệ nhà cung cấp Internet hoặc VoHoang.vn nếu lỗi kéo dài.
Với các bước trên, bạn có thể tự khắc phục lỗi WiFi từ chối quyền truy cập tại nhà.
1 note
·
View note
Text
How to Set Up Macard WiFi Extender via Manual Method?
There are many methods to setup your Macard WiFi extender, but manual method is the most commonly used one. It is very easy and simple; have a look at the instructions of manual method below:
Manual Method
Link PC with Extender Network
There are two ways to link your PC with the extender’s network: Ethernet cable or SSID (wirelessly).
To connect with the help of the Ethernet cable. Plug the cable’s one end to the extender only port and plug other end to computer’s ETHERNET port.
To connect using SSID, open PC’s Wi-Fi settings and choose the Extender SSID name, there is no default password, so you can connect without any security key.
Access Macard Interface
Go into the browser after establishing the connection. Here, search the Macard WiFi extender login URL go.macard.online or IP address 192.168.10.1. The login page will appear on the screen. Enter the default Macard WiFi extender login password: admin and click LOGIN button.
Using credentials, you will be able to access the interface and it’ll ask you to select the Country and time zone.
Finish Macard WiFi Extender Setup
After selecting your country and time zone, click Next. On the next page, extender will search the local WiFi networks, choose the host router’s network and enter its WiFi password to establish the connection. Click NEXT.
Create the extender network on the next page. Enter the WiFi name and password for the extended SSID network. Choose SAVE to apply settings.
Now, extender will reboot itself to install all the changes. After that, you can connect to Macard extender’s network.
There are more configuration methods for Macard WiFi range extender, have a glance at those methods as well.
WPS Method
Power the extender near host router.
Find the WPS button on the host router and extender.
Press the WPS button of the extender first, its WPS LED will start to blink.
Then within two minutes press the WPS button of the host router.
Wait until the extender’s WPS LED stops blinking and turns solid, it means the router is connected with extender.
Now, you can use the host router WiFi credentials to connect with the new extended network.
Ethernet Cable Method
If you want to link the router with the extender via cable, then it requires an ethernet cable, wall socket near router, PC connected with extender, and admin login password.
To connect extender to host router, plug the Ethernet cable into the extender only port and host router’s LAN port.
Plug the extender into a power outlet and turn it on.
Then, link your PC with the extender SSID network through WiFi.
Go into the browser and search the Macard WiFi extender login URL go.macard.online.
Macard WiFi extender login page will appear, here enter the default admin password: admin (in lowercase).
Click LOGIN button to access the interface and follow the on-screen instructions.
After finishing the Macard WiFi extender setup, you should change the admin password for security reasons.
How to Change Macard Admin Password?
You have to access the interface with the help of old admin password and then follow these steps:
Go into the settings using the dashboard
Select the admin tab.
Enter the new admin password in the given password field.
Click SAVE to apply the new admin password.
Now, you can use this new changed password to access Macard WiFi extender’s login interface in PC.
The Conclusion
The Manual method configuration is easy and quick for the Macard WiFi extender setup. In this method, a user need not use any cable, or place it immediately next to the host router. Just plug the extender within the reach of router and finish the setup. In addition to the manual method guide, we have also provided instructions for other setup methods in this article post.
1 note
·
View note
Text
How Do I Access Orbi Login Page?
Accessing the Orbi Login page is one of the first things you should do if you have bought home a Netgear Orbi router or are attempting to modify your current configuration. Understanding how to log in is essential, regardless of whether you're setting up your network for the first time or simply need to change settings.
Here are a few simple methods to go to the Orbi login page:
Link with the Orbi Network
Make sure your laptop, phone, or tablet is linked to your Orbi Wi-Fi network before proceeding. Since the login page can only be accessed when connected to the network, this is crucial.
Launch a web browser.
Open the online browser of your choice, such as Edge, Firefox, Safari, or Chrome.
Put the URL in.
Enter: in the address bar.
Alternatively, http://orbilogin.com or http://orbilogin.net
Another option is to use the IP address of the router, which is 192.168.1.1.
Login Information
Your login and password will need to be entered.
Admin is the default username.
The default password is
(Use your unique credentials if you have modified these.)
Go to the Dashboard
You may update software, manage devices, modify Wi-Fi names and passwords, and modify security settings on the Orbi dashboard after logging in.
Try clearing your browser's cache or using a different browser if the login page doesn't load.
Additional tips
Verify that you are not linked to any mobile networks or VPNs.
Once you know the instructions, it's easy to access the Orbi login page.
Go to our webpage if you need further help.
1 note
·
View note