#S3Tutorial
Explore tagged Tumblr posts
Visit Tumblr Blog
Explore Tumblr blogs with no restrictions, modern design and the best experience.
Last Seen Tumblr Blogs


Fun Fact
In 2020, 27% of US Tumblr users had an annual household income of over $100,000.
Photo

Here is a written S4 to S3 animation conversion tutorial !
READ at ModTheSims
60 notes
·
View notes
Text
TS4 to TS3 Pose Conversion Tutorial
There was a tut for this but the information was under a readmore and the blog was deactivated so I'm gonna go ahead and reupload it here with some slight tweaks and I'm not going to put it under a readmore for the purpose of in case my blog gets deleted etc. Also not the best at explaining stuff sometimes but hope this is understandable enough!
DISCLAIMER: I’m not an expert at this this is information I learned from the original tutorial copied over as best as I could!
YOU WILL NEED:
Some knowledge of blender
This tutorial for installing the clip tool if you haven't already
blender 2.67 since everything worked for us with just that version
S4S
4T3 Rig
Blender Rigs and Clip Tool
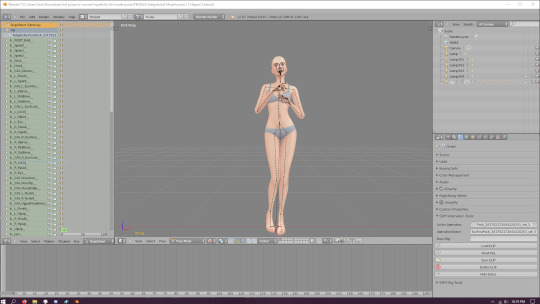
Step one: Find a pose you want to convert, Sara and I browse this blog for poses, open S4S and open the package file by clicking my projects then finding the package for the pose you want to convert. Once it's been opened go to the clips section and export the clip, doesn't matter what you name it just export it somewhere you can find it. It will export as a .blend file.

Find where you exported the pose to and double click the .blend file, the pose will open up in Blender and look like this (not the pose obviously but the side stuff)
Hit A on your keyboard then hit I then click locrot once you've done that your screen should now look like this
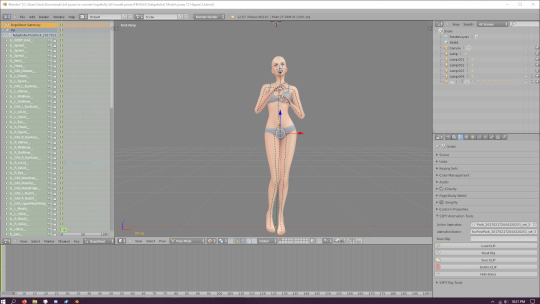
Once you've done that go under the S3PY Animations tool tab and export the clip make sure to name it something like a_mypose or whatever just make sure the a_ is there and there are no spaces. Save the clip somewhere you can find it again, now open up the 4T3 Rig Base file we provided above by double clicking it.

Import your clip using the S3PY Animations tool tab once again, make sure the one that says RIG is selected! DO NOT FIX ANYTHING! It might look wonky but we can fix the pose in the next step just don't touch anything for now! Once the pose has been imported right click the where it says rig and hit deselect, then click on where it says AFRIG and make sure it is selected, make sure the eye button on the far right is visible for AFRIG and not visible for RIG so you can see the joints.
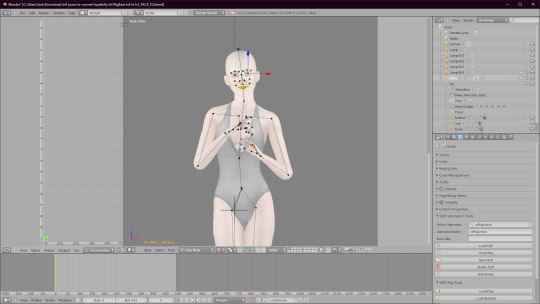
Once your screen looks like this you are going to hit A then hit I and it will automatically locrot for you. After you've done that go ahead and use the S3PY Animation tools tab yet again to export your clip, Make sure you save it somewhere you can find it easily!
Finally, open up the normal S3 rig whether it's the male or female rig is up to you just open up one of them, again use the S3PY tool to import your clip file, 9 times out of ten the eyes are going to be wonky or some fingers are going to be weirdly placed, you can go ahead and fix those now! Once the pose has been tweaked to your liking go ahead and hit A then I and hit locrot then export your clip using the same method we have the last two times and you're done!
Quickly how to import into your game: Open S3PE, new, then drag and drop your clip into the blank area, save the package, and you're done, those won't be poselist compatible but I don't use poselist anyway and there's tuts for that out there so!
If you have any questions feel free to message me I'll try to reply back as best I can though I'm really busy these days so ♥
184 notes
·
View notes
Text
Separate Accidental Regroup in Milkshape
Hi everyone, I'm not sure who all uses Milkshape but I do when I make my Sims 3 CC. I recently had to look up/read different tutorials on how to fix an issue when you merged two groups together, and actually need them separated.
Firstly, double click the Group you need to fix.
Go to edit > duplicate selection or use CTRL D hotkey.
Click on the duplicated group, and rename it otherwise if you adjust either one it'll mimic the original you duplicated from.
Hide all groups you're not adjusting.
Go to the Model tab and press Select, then Face.
Select the parts you don't need and go to edit > delete selection then vice versa on the duplicated group
WALLA! You have now separated the "accidental" regrouped meshes.
#tutorial#milkshape#milkshapetutorial#s3tutorial#sims3#sims3tutorial#s3milkshapetut#tut#s3tut#sims3tut
5 notes
·
View notes
Text
TUTORIAL: How to make your Clothing item Sewing table compatible!
With a whole new feature for the sewing table that adds a whole new clothing support feature, you might be curious as a CC creator (or even non-CC creator!) how to enable it to show up as a pattern for the sewing table! :) It's super easy!
If you're looking for the tutorial on how to do this for objects instead, see this: https://modthesims.info/showpost.php?p=5635070&postcount=2
BEFORE WE BEGIN (A note from our sponsors!):
If you ever create any 'sewables' for the sewing table, do let me know! That way, I can give you a shoutout and a direct link to that piece of clothing in the description so others don't have to hunt down for Sewing table compatible clothing! :)
Allright! Let's get started!
What do I need?
You probably have these already if you're a CC creator, but here's the list:-
S3PE
- Notepad or even Notepad++ (any text editor really, just don't use word please :p)
That's it! See, I promised you it would be easy ;)
Things to know when doing this:
1. If you do make your item sewing table compatible, it WILL be hidden in CAS! The sim has to collect the pattern and create the clothing item before you can see it in CAS again. It's a bit like Unlocked outfits (Actually, that cheat will make them show up :p)
NOTE: For this reason alone, it's also a good idea to either clone your CASpart, or follow the following method below that will give the option at least.
2. Your CAS item will be available for gifting it to other sims! (And they will wear it ;))
How to do it:
Luckily, this is actually more easier than doing it for objects, in fact, it's even less numbers! :p But! let's get started!
This workflow assumes that you've completed your clothing item and have packaged it. Therefore, the current state should be pretty much 'releasable'. You can still, of course, go in and edit all sorts of things later on (Think, meshes, Categories, textures, etc). But just so there aren't any dangers the CASP file changes.
1. First, Export the CASP resource from the package. This is so your downloaders can choose whether they want a 'sewing table enabled' item or just see your item directly.
2. Create a whole new package, by clicking File > New.
3. Import your CASP resource you exported. (You can drag&drop it in too if you're lazy like me :p)
4. Now you're seeing this popup with instance, group and type. If you accidentally clicked 'ok' on this one, just double click the CASP ;). Click the button 'COPY RK'. Paste this in a notepad or wherever.
5. Click OK.
6. Now go to Resource in the top bar > Add.
7. In the popup write the following:TYPE, fill in: _XML 0x0333406CGROUP, fill in : 0x7354C1FCINSTANCE, Fill in the instance of your CASP resource. Here's an example if you're unsure where to find it:If my CASP were to be: 0x034AEECB-0x00000000-0x1289EDD7532CA188Then, 0x1289EDD7532CA188 is the instance ID! Use this.
8. Now click OK! you should see an XML resource and a CASP in your package now :)
9. RIGHT-Click on the XML file, you should see on the bottom that it says 'Notepad'. If you want to use Notepad++ or any other external program Instead see: http://www.simlogical.com/ContentUploadsRemote/uploads/1613/How_to_Make_an_XML_Tuning_Mod.pdf (And then click 'text editor, rather than notepad of course ;))
10. You should now see your text editor open with absolutely nothing! :D Now, go ahead and copy this:
----
0x034AEECB-0x00000000-0x66FD9ACE77C4E50A
Cotton, KnittedisMagicProject=False
isDiscoverableOnly=False
amountOfFabricToRemove=2
isClothing=True
ClothingName=String to import
Allright! so before we're editing anything, I do want to explain what is what. So:
Line 1 is your ENTIRE resource key for your CASP.
Line 2 is the fabric that it needs to consume :) You can choose out of the following: Knitted, Cotton, Denim, Satin, Leather, Synthetic
NOTE: Don’t do ‘Knitted, knitted, denim’ or whatever to have it remove Knitted twice. this won’t work as we’re basically telling the importer script that we just mean to remove X amount (2 if you take my example snippet) of Knitted and Denim ;)
Line 3 is whether your item can only be made by an occult sim!
Line 4 is if you don’t want your pattern to be loaded in when one uses the ‘DEBUG_GetAllPatterns’ interaction. Personally I’d just keep it to false ;)
Line 5 Is the amount of fabric that needs to be removed. Currently, in this case, it would mean that both cotton and knitted will have 2 of them removed. So if you only want to remove one of each, set this number to 1!
Line 6 is Whether it’s clothing. make sure to keep this as true!
Line 7 is the name of your item. this will show up as the pattern’s name and as the text under the item when you select it from the ‘sewing clothing’ dialogue. Keep this as short as possible! else the text will go through the button of the dialogue, or other items :p
NOTE: DO NEVER REMOVE THE ---- ! You will break the import code for it if you do!!!
Now that we know about this... Let’s get started!
11. In the first line, remember when I said at step 4 to paste your CASP resource key somewhere? Well, this is the time to paste it! :)
12. Set your settings as desired!
13. Save inside the notepad or program, close the program, and if you see the old XML resource being crossed out then you’ve done it! :) If it’s empty, then you probably forgot to save the item in the notepad.
14. Now, we need to set the CASP resource as ‘hidden in cas’. To do so go to GRID at the bottom of S3PE, In the new popup, collapse ClothingCategory and find ‘HiddenInCAS’. Set this to True. Commit.
15. Save the package, I’d recommend calling it something like ‘CLOTHINGNAME_LyraleisSewingTableCompatible.package’.
15. Now dump both your regular CASpart package and your sewing table enabled package in your mods folder! :) You will notice that if you decide to take out the sewing table compatible package that your CASpart will show up in CAS again. But as mentioned before, that's the whole point of the sewing table’s new functionality ;) Also! Congrats on making your first default replacement! :D
Hopefully this was simple enough to understand! if you have any trouble with it, let me know!
87 notes
·
View notes
Text
Mini tutorial on how to make shiny buildings
What you’ll need: S3PE TSRW MILKSHAPE IMAGE EDITOR (Photoshop or Gimp) Delphy's Sims 3 Pack Multi-Extracter
Edit: forgot to mention something x.x To export wso file from milkshape you need to go here~> C:\Program Files\The Sims Resource\TSR Workshop\Extras\Milkshape Plugins and copy both dll files there and paste them here~> C:\Program Files\MilkShape 3D 1.8.5 That’s it! ;P
This Tutorial is aimed for those who never ever ever messed with content creation, so it’s like, super step by step! Also, I’m counting that you already have your mesh, texture, etc.
1. You need to clone an object to work with.
I always use the SignCityHill from Showtime ep, you can get it either on s3oc or tsr workshop. (If you know how to do this then go to step 2)
If you don’t know how to do that on TSRW, here it is:
Open TSR Workshop, go to Create New Project ~> Object ~> Uncategorized Objects ~> Find the SignCityHill. Now you’ll open it. Edit²: When it asks you about diagonal reference, just untick the box. (Haven’t realised this before, thanks to @technicallyswagpizza who warned me<3)

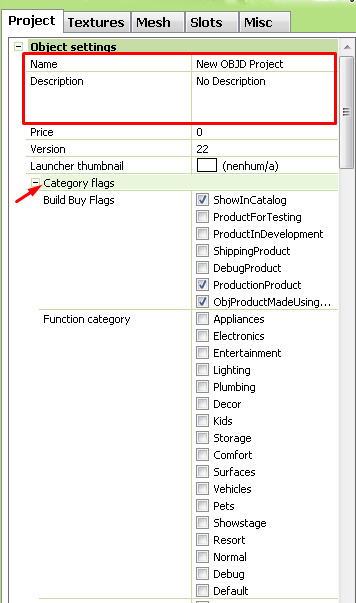
2. Give your object a name, description and the right category flags.
Flags ↓
Function Category: ☑ Debug Function Sub Category: ☑ MiscObjects Build Category: ☑ MiscObjects ObjectTypeFlags: ☑ LargeObject
3. Milkshape.
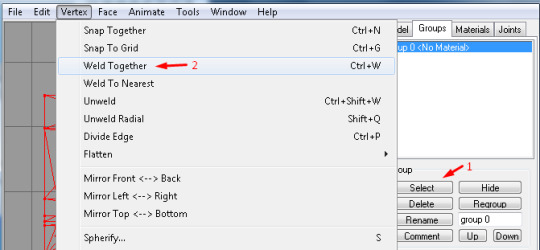
Now you’ll need to import your mesh to Milkshape, this program supports a lot of file types, but if you have a file type not supported you can find plugins for it online. After you imported your mesh, make sure that it has only one group and name it as: group 0 then click “rename”

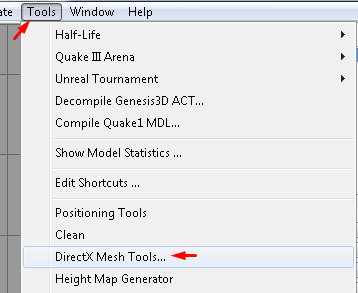
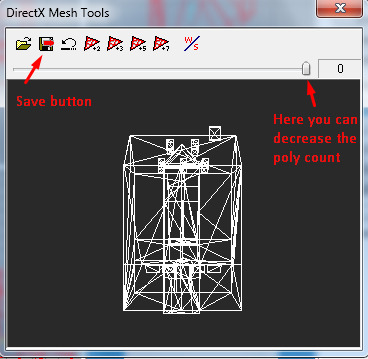
3.5 High poly to low poly: If your mesh has high poly count, you can decrease it in milkshape. Select your Mesh > Vertex > Weld Together > Tools > DirectX Mesh Tools > and decrease it how much you want, then hit save. It’s better if you do it bit by bit and you can alwats ctrl+z to go back to previous state.
4. Exporting from MS and importing to TSR Workshop.
In TSRW go to the mesh tab and click Import, choose the file you exported from Milkshape. Then go to “Default material” and you’ll see three dots, click it. There you can change the textures with your own.
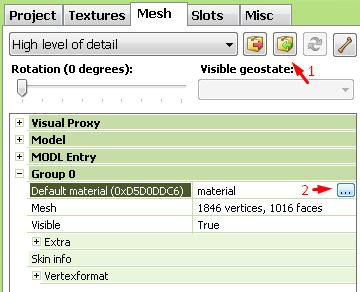
To import your stuff just click each one of the properties (like the detail, diffuse etc) and go to Edit and then Import.
The detail map is an overlay that adds a bit more detail, you can leave it as it is. Personally, I don’t like it, so I just import a white 64x64 image on it. Also, I don’t think deleting is a good idea, actually I never tested it so I’d rather only replace the texture. If you don’t want to make one yourself, then here it is the detail map I use.
Diffuse is the texture that you can properly see (sorry for the shitty explanation lol).
Multiply is there for the overall shape of the uvmap, you can use the one I made aswell.
Self Illumination is where the magic is. Depending on the game/tool/website you’re getting your stuff from it won’t have this map, but it’s really simple to make! I’ll show u how to do this on photoshop but you can make it on gimp or whatever program you have!
4.5 Self Illumination map. First, open your diffuse texture on your image editor program, then draw a shape with the rectangle tool on every window.
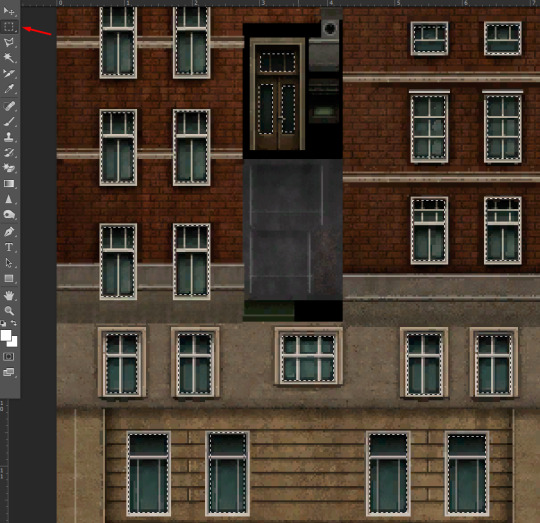
Paint black the ones you don’t want to get shiny and white the ones you do.

After that, back to the draw a shape tool, right click and select inverse and paint everything in black.
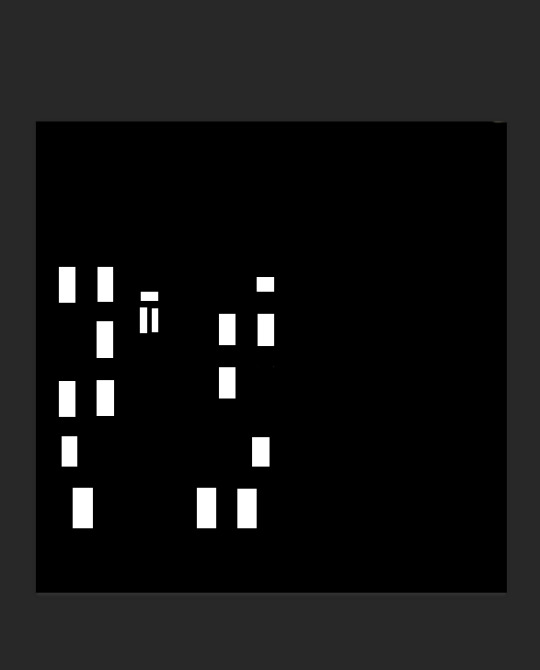
Done! Simple, right? Now save it as a PNG or DDS file. Import it to Self Illumination map, and that’s it!
5. Changing shadow detail
This is really simple aswell, on the “High level of detail” bar, choose the Shadow High level of detail. The click the blue thingy next to the Import button and choose medium detail. Done!

6. Footprint
Go to Slots (next to the mesh tab), then click on Footprint, it will appear three dots, just click on it. On “From Mesh” choose your mesh and then click Calculate and Ok.

6.5 Base game compatible
(If you don’t mind your custom content not being base game compatible then you can skip this step!) All you have to do is go to Edit ~> Project Contents and select everything there except the MLOD and MODL files. Then right click ~> Renumber ~> Check the “group ID” box ~> Okay and press no to the popups and Ok again.

7. Exporting from TSRW and converting from Sims3pack to Package
Go to File ~> Export ~> To Sims3pack Open The Delphy's Sims 3 Pack Multi-Extracter, find the location your Sims3pack is and choose the destination you want it to be extracted to. After that you’ll have your Package file!
8. Making it visible in Create a World tool
To make it visible you’ll need to open said package with s3pe.
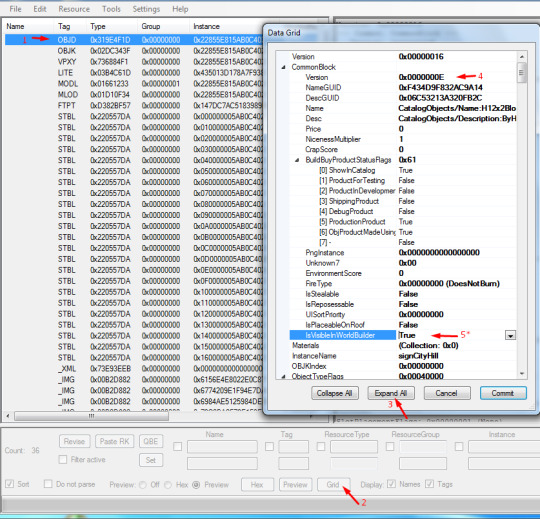
1-First, find the OBJD file 2- Click on “Grid” 3- Click on Expand All 4- Delete the letter it has there and add the letter E 5- Clck Commit and follow the steps 1 to 3 again, now change the “IsVisibleInWorldBuilder” to True. Done! Just click Commit again, close it and choose to save the file when asked.
Now just put it in your Packages folder, both caw and sims3. Have fun!
Mini tutorial finished {=
119 notes
·
View notes
Video
youtube
a quicker way to use solidfy and extruding edges to make it even lower and still make it semi-realistic
11 notes
·
View notes
Photo


If you’d prefer a video tutorial rather than a picture one then go ahead and watch the video I made. (Link is in resources.
Yes, yes, I know there are probably DOZENS of these tutorials, but who knows maybe you’ll stumble upon this one first? Anyways, let’s get to it. This tutorial is about how you can merge sims 3 package (not sims3pack) files. (You can do this with sims 4 too, but you shouldn’t use S4PE for it.)
Resources:
S3PE
YT Video Tutorial
Step I: Download S3PE from the link I provided, there are more than one download option. I download the exe, because I’m lazy and have no idea what the other one is.
Step II: Click ‘Keep’, S3PE is not dangerous.
Step III: As it suggests in the picture, launch S3PE. Click ‘File’ then click ‘New’. You can also use the shortcuts, but I’m nearsighted with no glasses and can’t read the shortcut.
Step IV: Once you click ‘New’, go ahead and right-click the blank white space. You’ll have to click ‘Import’ and then ‘As dbc’.
Step V: Select all the files you want to merge and click ‘Open’.
Step VI: After you click ‘Open’, a window will immediately pop up. You’ll need to make a name for the merged file and click ‘Save’. Then the merging process will begin, it’ll take a while depending on how much you’re merging.
Step VII: After a few minutes a long list will suddenly appear, this means the merging is done. You can go to the folder you saved the file to and move it to your Mods folder now.
If my tutorial helped you in anyway I am happy, if you’re having any issues please let me know.
0 notes
Photo

AWS S3 Tutorial For Beginners | AWS S3 Bucket Tutorial | AWS Training | Edureka http://ehelpdesk.tk/wp-content/uploads/2020/02/logo-header.png [ad_1] AWS Certification Training: http... #amazons3basics #amazons3bucket #amazons3datatransferacceleration #amazons3pricing #amazons3replication #amazons3storage #amazons3tutorial #amazons3versioning #amazonsimplestorageservicetutorial #awscertification #awscertifiedcloudpractitioner #awscertifieddeveloper #awscertifiedsolutionsarchitect #awscertifiedsysopsadministrator #awsedureka #awss3buckets #awss3objects #awss3transferacceleration #awss3tutorialforbeginners #awss3usecase #awsstorageservices #ciscoccna #comptiaa #comptianetwork #comptiasecurity #cybersecurity #edureka #ethicalhacking #introductiontoamazons3 #it #kubernetes #linux #microsoftaz-900 #microsoftazure #networksecurity #s3basics #s3bucket #s3tutorial #s3tutorialforbeginners #software #windowsserver #ytccon
0 notes
Text
Good to know, thank you~!
I was so excited about this sim I made for the challenge, but then I get out of CAS and… apparently very pale skin is green in-game. Okay then.
103 notes
·
View notes
Link
Just released a tutorial here! It’s basically on how to get from this:


To this!:


64 notes
·
View notes
Text
hey can anyone help me?? i tried some of this stuff but instead my game's running even slower, it's taking like half an hour-45 min to load. i used:
bulk rename utility on my cc
compressed my cc
used v.1.1 of the save cleaner (v.2 didn't work) on some of my saves, but not all of them
updated overwatch and installed then uninstalled errortrap and register
also installed and then uninstalled razer
i've deleted my cache files, let them build again, then closed the game and reopened, which should've been faster but it was just as slow. i don't know if it was the renaming, compressing, or save cleaner. was it cause i didn't use the cleaner on all my saves? should i try compressing my cc? it's def either the saves or the cc but idk what to do and would only delete my cc as a last resort :/ anyone got any ideas?
🙈🙉🙊
Speed Up and/or Fix Your Game MasterPost
Greetings! I’ve seen so many posts scattered all over the corners of the internet that give some great tips and tricks for speeding up or fixing your game. I got tired of hunting them down every time I re-install my game so I compiled them all into one place. It’s been sitting in my drafts as just kind of an easily accessed storage space but I figured I’d share it publicly to help maybe save a life.
👽👽👽👽👽👽👽👽👽👽👽
👉 Use NRAAS Mods Overwatch, Register, and ErrorTrap
👉 Use Kuree’s Save Cleaner
👉 Change your DEP settings
👉 Patch your game with the 4GB Patch Tool
👉 Increase your virtual memory
👉 Use ParkControl
👉 Convert Sims3Packs to Packages
👉 Use BulkRenameUtility to remove all special characters and spaces from your CC files
👉 Merge your CC
👉 Compress your CC
👉 Maximize the amount of RAM that TS3 can use
👉 Use Razer Game Booster
👊Visit NRAAS General Issues FAQ Page for troubleshooting
2K notes
·
View notes
Note
Hi, first I wanted to congratulate you for your poses, they are wonderful. Second, I read all the answers to your "wcif" type questions and I did not find exactly what I'm looking for, so I decided to ask. I saw that you use rigs that are enabled for pregnant bellies and I've been looking for those rigs for some time. I saw that you answered your rigs on a ask and wanted to know if those rigs have that option. Sorry for my bad English and thank you in advance.
Hello! Sorry for the late reply <33
All rigs that you get are enabled for pregnant belly, all you have to do to see the pregnant belly in blender is, open your rig in blender, then on the right - click this little button here:

Scroll down to S3PY Rig Tools:

And select, “Set Morphs” you’ll then set the ‘Pregnant’ morph to 0.whatever percentage pregnancy you want to make poses with. And tada! You have a pregnant belly in blender <3

21 notes
·
View notes
Video
youtube
forgot to upload this to here, I made this up nearly the end of last month I REALLY DID FORGET but a mini tutorial on making the neck a solid colour and making the neck seam seamless
13 notes
·
View notes
Text
I want to make my sims some tatts so thank you for posting!
HOW TO MAKE SIMS 3 ACCESSORY TATTOOS

BUCKLE UP AND GRAB YOUR OREOS KIDDOS
Keep reading
1K notes
·
View notes
Video
youtube
what it says! Hope it helps
3 notes
·
View notes
Text
Okay i was asked to do this and I Hate my voice but I’ll live hope it helps you guys
youtube
10 notes
·
View notes