#SIMPLECONTROL
Explore tagged Tumblr posts
Visit Tumblr Blog
Explore Tumblr blogs with no restrictions, modern design and the best experience.
Last Seen Tumblr Blogs


Fun Fact
69% of Tumblr users are millennials.
Photo

Piggy Night With a dark theme and a thriller music we have launched "Piggy Night"A mixture of cuteness and shady.
0 notes
Text
DMX Control
Olorama is the world’s only portable system that effectively release different scents activated by software (including DMX control).

Source : olorama
0 notes
Text
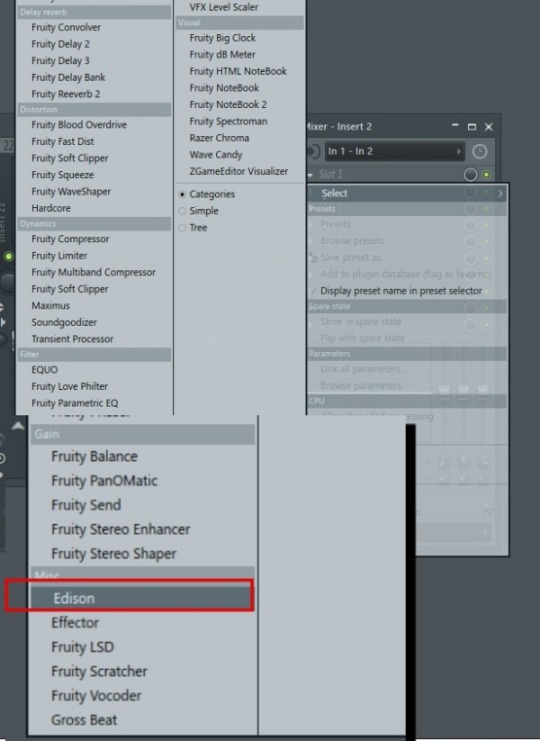
Vst Plugin Fruity Blood Overdrive
Download Fruity blood overdrive.dll About Fruity blood overdrive.dll errors. When an application requires Fruity blood overdrive.dll, Windows will check the application and system folders for this.dll file. Distructor is a modular plugin that takes the distortion from, Harmor, Blood Overdrive, Fast Dist, Soft Clipper plus the Bit and Rate reduction from Delay 3. Then adds the filters from FLEX, Choruses from Delay 3 and wraps it all in Speaker Cabinets using Fruity Convolver. NOTE: Four slots are available with 4 modules.
Free Overdrive Plugins | VST Warehouse
Fruity Blood Overdrive Vst
Last Updated on January 4, 2021.
Here’s a list of the best 16 distortion/saturation/fuzz plugins available to download for free!
Let’s get straight into it…
FuzzPlus 3 by Audio Damage (Windows, Mac)
FuzzPlus 3 is an updated version of the original FuzzPluspedal emulation which is a straight up fuzz-sounding effect and not so much ofa distortion- or saturation one.
The interface is super intuitive and it offers five simplecontrol parameters.
It also features a spectrum analyzer that shows you theamount of clipping going on.
All in all, I think FuzzPlus 3 might be a great addition toyour plugin arsenal.
You can download it here.
Related: Here’s a huge list of the Best Free VST Plugins ever.
Krush by Tritik (Windows, Mac)
Krush combines the crispy taste of the digital realm withthe warmth of its drive stage and analog modeled resonant filters.
A modulation section allows you to quickly add extra life tothe sound by modulating any parameter.
The range of sounds you can achieve with this plugin go allthe way from extremely dirty signals to crunchy and warm ones.
You can download it here.
Interested in free Synth vst plugins? Here’s an entire post on that topic.
Temper Distortion by Creative Intent (Windows, Mac)
Temper is a modern digital distortion plugin featuring arich saturation stage and a unique phase distortion.
Use the variable saturation curve to add warmth and edge toyour sound, and let the phase distortion bring character and clarity throughyour mix.
Temper also features a simple resonant lowpass filter and afeedback path to drive the intensity of the tone.
This is by far one of the best distortion plugins available,even when compared to premium ones.
You can download it here.
Related: Here’s a list of the best free Arpeggiator Plugins.
SGA1566 by Shattered Glass Audio (Windows, Mac)
SGA1566 brings the authentic tone of a single channelvintage all tube mic preamplifier.
The whole circuit is simulated in real time using the highperformance circuit simulator to recreate every nuance of the preamp circuit,from subtle coloration to overdrive and distortion.
Use SGA1566 to add warmth to a track, as a saturationcompressor, or to add “dirt” with tube overdrive.
You can download it here.
Interested in free compression VST plugins? Here’s a post about the 12 best ones.
Tube Saturator Vintage by Wave Arts (Windows, Mac)
Tube Saturator Vintage uses circuit simulation technology tofaithfully reproduce the sound of a dual triode preamp.
While it sounds great, the circuit simulation technology isvery CPU intensive…
That’s why they released the Tube Saturator 2, which sadlyisn’t free but it goes much easier on the CPU.
The reason it uses so much of your CPU’s power is becauseTube Saturator uses state of the art circuit simulation technology to captureevery nuance of an analog circuit.
Basically, it sounds fantastic… at the expense of using moreof your CPU’s resources than other Saturators.

You can download it here.
Related: Here’s a list of the best free Delay VST Plugins.
Saturation Knob by Softube (Windows, Mac)
The saturation knob is literally one knob that allows you toadd some warmth and shimmer to the vocals, guitar, and any other track you’dlike…
Basically, it just adds volume and warmth.
Just don’t go overboard with the saturation, if it startssounding distorted, dial it back down a bit… unless that’s what you’re goingfor.
One huge issue I have with this plugin is not the pluginitself, but all the hoops they make you jump through to be able to use it.
You have to register with them, also register with ilok.comand then link those accounts…
AFTER that, I know… super annoying, you download the gobblerapp and install the plugin, now you can finally use it!
I have to say though, it’s worth the trouble!
You can download it here.
Looking for free guitar VST plugins? Here are the 15 best ones.
Metal Area mt-a by Mercuriall (Windows, Mac)
The Mercuriall Metal Area mt-a is based on the Boss MT-2,which is a super popular distortion pedal.
The funny thing is that most people think that it doesn’treally sound all that great…
However, in the right hands, some pretty cool tones can beachieved.
This just means that some tweaking is required in order toget a good sound out of the pedal, and this is also the case with this plugin.
It comes with controls for Level, Dist, High, Low,Middle, MidFreq, Input Gain, Mono/Stereo, Quality switch andan On/Off knob.
If you’re in need of a distortion plugin that will allow youto create some cool metal tones, then by all means check this one out.
You can download it here.
Related: Here’s a list of the best Guitar amp sims.
Greed Smasher by Mercuriall (Windows, Mac)
Greed Smasher is based on the Mesa/Boogie GridSlammer overdrive guitar pedal.
Being a virtual overdrive pedal, the plugin is aimed mainlyat guitar players and music producers who use distorted guitars in their music…
However, effects like this one can work equally well onvirtual instruments and even hardware synthesizers.
Some users reported that this plugin would crash sometimes,but it definitely sounds great and I didn’t have that issue.
You can download it here.
Marauder by AudioParlour (Windows Only)
Marauder is an interesting free dynamic distortioneffect which sounds absolutely phenomenal.
It is based on a network of four gain stages which worktogether to create a superb organic distortion effect.
It can be used as a subtle saturation tool that can add somewarmth to you mix, as well as to create some cool distorted sounds.
The truth is that you will need to tweak- and fiddle aroundwith the controls a bit in order to get a great sound…
However, once you get the hang of it, you will be able tocreate some great sounds!
You can download it here.
Looking for free Drum VST plugins? Here are the best ones.
808 Tube Screamer by TSE Audio (Windows, Mac)
This is an emulation of the Infamous Ibanez TS-808 TubeScreamer pedal and man is it great!
It sounds great, you can use it for all kinds of music, toget a blues tone, to make those rock sounds have that little extra bite tothem.
I absolutely recommend this one since it’s just fantasticplugin!
You can download it here.
Tubes Creamer 808 by Mercuriall (Windows, Mac)
Mercuriall Audio Software’s Tubes Creamer 808 Core is a freevirtual Ibanez TS-808 Tube Screamer pedal emulation.
The Ibanez TS-808 was used by artists such as Stevie RayVaughan which was, in a way, how he got such an amazing tone.
The Tubes Creamer is an emulated version of this pedal andit sounds absolutely fantastic, and best of all… it’s free!
Just add it to the chain in your DAW and you’re ready to go!
If you’re looking for an awesome blues or rock tone, thenabsolutely give Tubes Creamer a chance!
You can download it here.
Looking for free Modulation VSTs? Here’s a post I wrote about the best ones.
TNT by Ourafilmes (Windows Only)
TNT is a Distortion/Saturation plugin which wasoriginally created for audio processing on drums, as well as FX and basssounds.
It comes in Multi-band and single-band both with mono andstereo components.
Both share the same saturation/distortion algorithms but thesingle band features a Tone knob that is not present in the multi-band version.
This Tone knob features a transparent 6dB crossover filterthat separates the low and high bands where you can use differentsaturation/distortion algorithms on each band.
There is also a balance knob that helps to level both bandsbefore final output.
You can download it here.
Plusdistortion by Distorque (Windows Only)
The Plusdistortion plug-in is an emulation of an MXRDistortion+.
It has a wide range of distortion sounds from a little bitof dirt to a giant fuzz/crunch tone.
It emulates the germanium diode clipping used in theDistortion+, as well as the lo-fi op amp and just about every other aspect ofthe circuit.
Many parts of the effect are also tweakable, so you cancraft your own D+ based distortion.
In addition to the normal distortion and output controls, a couple extra ones have been added, such as Input Level, Oversampling, Input Type (Pickups & Buffered), High-Cut and Low-Cut, and more.
You can download it here.
Face Bender by Distorque (Windows Only)
This is an emulation of a Fuzz Face and a Tone Bender MKIIwith added controls for tweaking.
It runs in mono or stereo, and has selectable 2xoversampling.
The Fuzz Face was first made by Arbiter Electronics in 1966.
It had a thick, fuzzy distortion and was made famous byartists like Jimi Hendrix, Eric Clapton, and David Gilmour.
The Tone Bender MKII was also released in 1966, by SolaSound.
Compared to the Fuzz Face, it has a brighter, more distortedsound.
This plugins sounds pretty damn good and is really easy toset up, so what’s not to like?
You can download it here.
Buz by Buzzroom (Windows Only)
This is an old sounding distortion/fuzz pedal effect.
There are loads of VST distortion effects out there (sometop ones too -JCM 900, green machine etc), but only a few have a bigmuff soundlike this.
Buz has a nice wide tonal range, and the ‘edge’ controlreally adds some “sleaze” to the sound.
It allows you to get that authentic 60s garage band soundwithout much effort.
You can download it here.
Ouradrive by Ourafilmes (Windows Only)
This is a basic valve overdrive vst effect.
It uses almost no cpu resources and it’s very simple to use:
It only has two knobs and an on/off switch.
Simply apply the desired amount of valve overdrive to thesound using the DRIVE knob and then adjust the OUT gain knob tothe desired output level.
You can also use use the automation feature if you so desire.
This effect works best with sounds that have lots of low –low/mid frequencies.
Use it on synths, basses, guitars, leads, lo-fi sounds,voices or any sound that you want to slightly push harder, warm, overdrive oreven distort.
You can download it here.
Conclusion
The one I like the most of all the plugins on this list isdefinitely Temper.
Free Overdrive Plugins | VST Warehouse

However, all of them sound great and will surely help yougive your mixes more personality.
I hope you found this information useful…
Fruity Blood Overdrive Vst
Have a wonderful day!
0 notes
Text
Pu zle A Puzzle Game

About Pu zle A Puzzle Game Games
Your objective is to move the blue ball to eliminate the other balls.
How To play
Drag the blue sphere to the red dots, after touch the blue sphere and slide in any direction to move it. Destroy other spheres by moving away or approaching it with the blue sphere Read the full article
0 notes
Text
Getting Started With Symfony 4
Through this article, we are going to take a look at the Symfony 4 framework made by SensioLabs.
Introduction
To create a web application, we have many tools at our disposal. Choosing is sometimes a hard task. However, some tools are some kind of reference, as Symfony is. Here, we are going to have an overview of this framework. To achieve this, we are going to use the fourth version.
What is Symfony?
Symfony is the leading PHP framework available to everyone under an Open Source license. It is built on top of a set of decoupled and reusable components named Symfony Components. Symfony use generic components to allow us to focus on other tasks.
An overview of some elements
Before we dive into the code, let's have an overview of some elements used by Symfony to understand better what we are going to do.
Symfony Components
Symfony Components are a set of decoupled and reusable PHP libraries. Those components can even be used without Symfony.
Symfony Flex
Symfony Flex is a way to install and manage Symfony applications. It automates the most common tasks of Symfony applications.
It is a Composer plugin that modifies the behavior of the require, update, and remove commands. For example, when we execute the require command, the application will make a request to the Symfony Flex server before trying to install the package with Composer. If there is no information about that package that we want to install, the Flex server returns nothing and the package installation follows the usual procedure based on Composer. If there is information, Flex returns it in a file called a "recipe" and the application uses it to decide which package to install and which automated tasks to run after the installation.
Flex keeps tracks of the recipes it installed in a symfony.lock file, which must be committed to our code repository.
Recipes are defined in a manifest.json file and the instructions defined in this file are also used by Flex when uninstalling dependencies to undo all changes.
Security Checker
Security Checker is a command-line tool that checks if our application uses dependencies with known security vulnerabilities.
Doctrine
Symfony doesn't provide a component to work with databases. However, it provides an integration of the Doctrine library. Doctrine is an object-relational mapper (ORM). It sits on top of a powerful database abstraction layer (DBAL).
In a few words, Doctrine allows us to insert, update, select or delete an object in a relational database. It also allows us to generate or update tables via classes.
Twig
Twig is a template engine for PHP and can be used without Symfony, although it is also made by SensioLabs.
A few terms
Through our example, we are also going to use a few terms. Let's define them before.
Controller
A Controller is a PHP function we create. It reads information from a Request Object. It then creates and returns a Response Object. That response could be anything, like HTML, JSON, XML or a file.
Route
A Route is a map from a URL path to a Controller. It offers us clean URLs and flexibility.
Requests and Responses
Symfony provides an approach through two classes to interact with the HTTP request and response. The Request class is a representation of the HTTP request message, while the Response class, obviously, is a representation of an HTTP response message.
A way to handle what comes between the Request and the Response is to use a Front Controller. This file will handle every request coming into our application. It means it will always be executed and it will manage the routing of different URLs to different parts of our application.
In Symfony, incoming requests are interpreted by the Routing component and passed to PHP functions that return Response Objects. It means that the Front Controller will pass the Request to Symfony. This last one will create a Response Object and turns it to text headers and content that will finally be sent back.
Project structure
When we will start our project, our project directory will contain the following folders:
config - holds config files
src - where we place our PHP code
bin - contains executable files
var - where automatically-created files are stored (cache, log)
vendor - contains third-party libraries
public - contains publicly accessible files
A simple example
Now we know more about Symfony, it is time to do something with it.
Setting up our project
Let's first start by creating our project. We can do as Symfony's documention suggets or with, for example, use PHP Docker Boilerplate if we want to use Docker. However, we have to be sure that we have at least PHP 7.1 and our configuration allows URL rewriting. If we are a macOS user, we can encounter some trouble with our PHP version. An explanation of how update our PHP version can be found here. We also have to be sure that we have the latest version of Composer.
Following Symfony's documention, it is something like so:
composer create-project symfony/skeleton simple-app
Setting up our project
This creates a new directory named simple-app, downloads some dependencies into it and generates the basic directories and files we need to get started.
Now, let's move into our directory to install and run our server:
cd simple-app composer require server --dev php bin/console server:run
Installing and running our server
Now, if we use PHP Docker Boilerplate, it would be like so:
git clone https://github.com/webdevops/php-docker-boilerplate.git simple-app cd simple-app cp docker-compose.development.yml docker-compose.yml composer create-project symfony/skeleton app composer require server --dev docker-compose up -d
Installing Symfony using PHP Docker Boilerplate
Webserver will be available at port 8000.
We also have to change some values in etc/environment*.yml:
DOCUMENT_ROOT=/app/public/ DOCUMENT_INDEX=index.php
etc/environment*.yml file
To run the Symfony CLI, we can do it like so:
docker-compose run --rm app php bin/console server:start # OR docker-compose run --rm app bash php bin/console server:start
Running Symfony CLI using PHP Docker Boilerplate
When or project is ready, if we want to install Security Checker, we have to do it like so:
composer require sec-checker
Installing Security Checker
We also want to install the Web Debug Toolbar. It displays debugging information along the bottom of our page while developing.
composer require --dev profiler
Installing Web Debug Toolbar
Maybe changing the permissions for the debugger will be necessary.
chmod -R 1777 /app/var
Changing permissions
Creating our first page
Let's now make our first page. But, first, let's install what we are going to use to define our Routes:
composer require annotations
Installing Framework Extra Bundle
This allows us to use Annotation Routes instead of defining them into a YAML file. We also need to install Twig:
composer require twig
Installing Twig
We can now create our first template:
<h1>Hello World!</h1>
templates/hello.html.twig file
Now, let's create our first Controller:
namespace App\Controller; use Symfony\Bundle\FrameworkBundle\Controller\Controller; use Symfony\Component\HttpFoundation\Response; use Symfony\Component\Routing\Annotation\Route; class SimpleController extends Controller { /** * @Route("/") */ public function index() { return $this->render('hello.html.twig'); } }
src/Controller/SimpleController.php file
Now, let's try our newly created page by visiting http://localhost:8000.
Connecting to the database
Now, it is time to try to connect our application to a database. Here, we are going to use MySQL. First, we have to install Doctrine and the MakerBundle.
composer require doctrine maker
Installing Doctrine and MakerBundle
Now, we can edit the .env file like so:
DATABASE_URL="mysql://db_user:[email protected]:3306/db_name" # If we are using PHP Docker Boilerplate, it will be something like that: # DATABASE_URL=mysql://dev:dev@mysql:3306/database
.env file
We can now use Doctrine to create the database:
php bin/console doctrine:database:create
Creating the database
Entity Class and Migrations
We are now ready to create our first Entity Class. Let's do it like so:
php bin/console make:entity Post
Creating a Post Entity
Each property of an Entity can be mapped to a column in a corresponding table in our database. Using mapping will allow Doctrine to save an Entity Object to the corresponding table. It will also be able to query from that same table and turn the returned data into objects.
Let's now add more fields to our Post Entity:
namespace App\Entity; use Doctrine\ORM\Mapping as ORM; /** * @ORM\Entity(repositoryClass="App\Repository\PostRepository") */ class Post { /** * @ORM\Id * @ORM\GeneratedValue * @ORM\Column(type="integer") */ private $id; /** * @ORM\Column(type="string", length=100) */ private $title; /** * @ORM\Column(type="text") */ private $content; /** * @ORM\Column(type="text") */ private $content; }
Entity/Post.php file
Now we are ready to update our database. First, let's create a migration:
php bin/console doctrine:migrations:diff
Creating a migration
And now, we can execute our newly generated migration:
php bin/console doctrine:migrations:migrate
Running our migration
We now need to create public setters and getters for our properties:
... public function getId() { return $this->id; } public function getTitle() { return $this->title; } public function setTitle($title) { $this->title = $title; } public function getContent() { return $this->content; } public function setContent($content) { $this->content = $content; } public function getExcerpt() { return $this->excerpt; } public function setExcerpt($excerpt) { $this->excerpt = $excerpt; } ...
Entity/Post.php file edited
We can now create a corresponding Controller like so:
php bin/console make:controller PostController
Creating a Controller
Let's edit our Controller to have something like so:
namespace App\Controller; use App\Entity\Post; use App\Repository\PostRepository; use Symfony\Bundle\FrameworkBundle\Controller\Controller; use Symfony\Component\HttpFoundation\Request; use Symfony\Component\HttpFoundation\Response; use Symfony\Component\Routing\Annotation\Route; class PostController extends Controller { /** * @Route("/posts", name="post") */ public function index(): Response { $posts = $this->getDoctrine() ->getRepository(Post::class) ->findAll(); return $this->render('posts/list.html.twig', ['posts' => $posts]); } }
Controller/PostController.php file edited
As we can see in the above code, we query our posts before we pass the result to a view. To get our items, we use what is called a Repository. This last one is a PHP class that helps us to fetch entities of a certain class. We can edit this Repository class if we want, so we can add methods for more complex queries into it.
We can now edit the base.html.twig template and create a new named list.html.twig in a new subdirectory called posts.
<!DOCTYPE html> <html> <head> <meta charset="UTF-8"> <title>{% block title %}Simple App{% endblock %}</title> {% block stylesheets %}{% endblock %} </head> <body> {% block body %}{% endblock %} {% block javascripts %}{% endblock %} </body> </html>
templates/base.html.twig file
{% extends 'base.html.twig' %} {% block body %} <h1>Posts</h1> <table> <thead> <tr> <th scope="col">Title</th> <th scope="col">Actions</th> </tr> </thead> <tbody> {% for post in posts %} <tr> <td>{{ post.title }}</td> <td> <div class="item-actions"> <a href=""> See </a> <a href=""> Edit </a> <a href=""> Delete </a> </div> </td> </tr> {% else %} <tr> <td colspan="4" align="center">No posts found</td> </tr> {% endfor %} </tbody> </table> {% endblock %}
templates/posts/list.html.twig file
Now, if we go to localhost:8000/posts, we will see a pretty rough interface and our empty posts list.
To fill our posts list, we are going to create a form. Let's install a new component:
composer require form
Installing Form component
And of course, we need to validate that form. We can make it with Validator:
composer require validator
Installing Validatior
We can now create a template for our form:
{% extends 'base.html.twig' %} {% block body %} <h1>New post</h1> {{ form_start(form) }} {{ form_widget(form) }} {{ form_end(form) }} <a href="{{ path('posts') }}">Back</a> {% endblock %}
templates/posts/new.html.twig
Here, we create the template that is used to render the form. The form start(form) renders the start tag of the form while the form end(form) renders the end tag of the form. form widget(form) renders all the fields, which includes the field element itself, a label and any validation error messages for the field. It is also possible to render each field manually as described in the Symfony documentation.
We also need to edit our Post Entity:
namespace App\Entity; use Doctrine\ORM\Mapping as ORM; use Symfony\Component\Validator\Constraints as Assert; /** * @ORM\Entity(repositoryClass="App\Repository\PostRepository") */ class Post { /** * @ORM\Id * @ORM\GeneratedValue * @ORM\Column(type="integer") */ private $id; /** * @ORM\Column(type="string", length=100) * @Assert\NotBlank() */ private $title; /** * @ORM\Column(type="text") * @Assert\NotBlank() */ private $content; /** * @ORM\Column(type="text") * @Assert\NotBlank() */ private $excerpt; ... }
Entity/Post.php file edited
Validation is done by adding a set of rules, or constraints, to a class. A completed documentation about those different rules can be found here. In Symfony, validation is applied to the underlying object, it means it is checked if the object, here Post, is valid after the form has applied the submitted data to it.
Now, edit our PostController like so:
namespace App\Controller; use App\Entity\Post; use App\Repository\PostRepository; use Sensio\Bundle\FrameworkExtraBundle\Configuration\Method; use Sensio\Bundle\FrameworkExtraBundle\Configuration\Security; use Symfony\Bundle\FrameworkBundle\Controller\Controller; use Symfony\Component\HttpFoundation\Request; use Symfony\Component\HttpFoundation\Response; use Symfony\Component\Routing\Annotation\Route; use Symfony\Component\Form\Extension\Core\Type\TextType; use Symfony\Component\Form\Extension\Core\Type\TextareaType; use Symfony\Component\Form\Extension\Core\Type\SubmitType; class PostController extends Controller { /** * @Route("/posts", name="posts") */ public function index(PostRepository $repository): Response { $posts = $this->getDoctrine() ->getRepository(Post::class) ->findAll(); return $this->render('posts/list.html.twig', ['posts' => $posts]); } /** * @Route("/posts/new", name="new") * @Method({"GET", "POST"}) */ public function new(Request $request) { $post = new Post(); $form = $this->createFormBuilder($post) ->add('title', TextType::class) ->add('content', TextareaType::class) ->add('excerpt', TextareaType::class) ->add('create', SubmitType::class) ->getForm(); $form->handleRequest($request); if ($form->isSubmitted() && $form->isValid()) { $em = $this->getDoctrine()->getManager(); $em->persist($post); $em->flush(); $this->addFlash('success', 'post created'); return $this->redirectToRoute('posts'); } return $this->render('posts/new.html.twig', [ 'form' => $form->createView(), ]); } }
Controller/PostController.php file edited
In the first part of our new method, we use the Form Builder. We add three fields, corresponding to the properties of the Post class and a submit button.
We then call handleRequest to see if the form was submitted or not when the page is loading. If the form was submitted and if it is valid, we can perform some actions using the Post Object.
As we can see, here we use the persist method that tells Doctrine to "manage" the Post Object. We then call the flush method that tells Doctrine to look through all of the objects that it's managing to see if they need to be persisted to the database.
We then render the view. It is important that the createView method is placed after the handleRequest method. Otherwise, changes done in the * SUBMIT events aren't applied to the view.
Now, with what know, we can go a little further and add some features to our application. First, let's edit our PostController like so:
namespace App\Controller; use App\Entity\Post; use App\Repository\PostRepository; use Sensio\Bundle\FrameworkExtraBundle\Configuration\Method; use Sensio\Bundle\FrameworkExtraBundle\Configuration\Security; use Symfony\Bundle\FrameworkBundle\Controller\Controller; use Symfony\Component\HttpFoundation\Request; use Symfony\Component\HttpFoundation\Response; use Symfony\Component\Routing\Annotation\Route; use Symfony\Component\Form\Extension\Core\Type\TextType; use Symfony\Component\Form\Extension\Core\Type\TextareaType; use Symfony\Component\Form\Extension\Core\Type\SubmitType; class PostController extends Controller { /** * @Route("/posts", name="posts") */ public function index(PostRepository $repository): Response { $posts = $this->getDoctrine() ->getRepository(Post::class) ->findAll(); return $this->render('posts/list.html.twig', ['posts' => $posts]); } /** * @Route("/posts/new", name="new") * @Method({"GET", "POST"}) */ public function new(Request $request) { $post = new Post(); $form = $this->createFormBuilder($post) ->add('title', TextType::class) ->add('content', TextareaType::class) ->add('excerpt', TextareaType::class) ->add('create', SubmitType::class) ->getForm(); $form->handleRequest($request); if ($form->isSubmitted() && $form->isValid()) { $em = $this->getDoctrine()->getManager(); $em->persist($post); $em->flush(); $this->addFlash('success', 'post created'); return $this->redirectToRoute('posts'); } return $this->render('posts/new.html.twig', [ 'form' => $form->createView(), ]); } /** * @Route("/{id}/show", requirements={"id": "\d+"}, name="show") * @Method("GET") */ public function show(Post $post): Response { return $this->render('posts/show.html.twig', [ 'post' => $post, ]); } /** * @Route("/{id}/edit", requirements={"id": "\d+"}, name="edit") * @Method({"GET", "POST"}) */ public function edit(Request $request, Post $post): Response { $form = $this->createFormBuilder($post) ->add('title', TextType::class) ->add('content', TextareaType::class) ->add('excerpt', TextareaType::class) ->add('edit', SubmitType::class) ->getForm(); $form->handleRequest($request); if ($form->isSubmitted() && $form->isValid()) { $em = $this->getDoctrine()->getManager(); $em->flush(); $this->addFlash('success', 'post edited'); return $this->redirectToRoute('posts'); } return $this->render('posts/edit.html.twig', [ 'post' => $post, 'form' => $form->createView(), ]); } /** * @Route("/{id}/delete", requirements={"id": "\d+"}, name="delete") * @Method({"GET"}) */ public function delete(Request $request, Post $post): Response { $em = $this->getDoctrine()->getManager(); $em ->remove($post); $em ->flush(); $this->addFlash('success', 'post deleted'); return $this->redirectToRoute('posts'); } }
src/Controller/SimpleController.php file edited
We can now create two additional templates:
{% extends 'base.html.twig' %} {% block body %} <h1>{{ post.title }}</h1> {{ post.content }} <a href="{{ path('posts') }}">Back</a> {% endblock %}
templates/posts/show.html.twig file
{% extends 'base.html.twig' %} {% block body %} <h1>Edit post</h1> {{ form_start(form) }} {{ form_widget(form) }} {{ form_end(form) }} <a href="{{ path('posts') }}">Back</a> {% endblock %}
templates/posts/edit.html.twig file
Now, we can read, edit our delete the posted we have created with our application.
Conclusion
Through this article we took a look at Symfony 4. We had an overview of the different concepts it is based on. We set up an installation of Symfony 4 and created a very simple application that let us interact with a MySQL database.
Now, we still have many things to see, like Security Annotations our custom Twig Filters that allow us to build a better application.
One last word
If you like this article, you can consider supporting and helping me on Patreon! It would be awesome! Otherwise, you can find my other posts on Medium and Tumblr. You will also know more about myself on my personal website. Until next time, happy headache!
1 note
·
View note
Text
@gizmodo @nasa @energy @io9 https://gizmodo.com/nasa-runs-successful-first-tests-of-compact-nuclear-rea-1822233354 oooooooooooooooooooooooh i get it. its a tschernobyl type. we got the fuel burnertube. the bubbling heat or steam aaround goingto a t

@gizmodo @nasa @energy @io9 https://gizmodo.com/nasa-runs-successful-first-tests-of-compact-nuclear-rea-1822233354
oooooooooooooooooooooooh i get it. its a tschernobyl type. we got the fuel burnertube. the bubbling heat or steam aaround goingto a turbine below and a simplecontrol rod on top
I am Christian Kiss BabyAWACS – Raw Independent Sophistication #THINKTANK + #INTEL #HELLHOLE #BLOG
https://b…
View On WordPress
0 notes
Link
Simple Control APK Download & More Android Apps or Games Just Search This Site https://apktie.com/apps/simple-control-ace-jun-simplecontrol/?feed_id=78361
0 notes
Text
Nueva noticia publicada en LaFlecha
New Post has been published on https://laflecha.net/como-convertir-tu-iphone-en-un-mando-a-distancia-universal-apple-tv-incluido/
Cómo convertir tu iPhone en un mando a distancia universal (Apple TV incluido)
¿Cuántas veces habré perdido el mando a distancia? No tengo dedos en la mano para contarlas… hasta hace poco, terminaba acudiendo a la televisión para cambiar de canal, subir o bajar el volumen, apagarla, etc., menos mal que tarde o temprano el mando terminaba apareciendo donde menos lo esperaba.
Afortunadamente, ya no me pasará más. O sea, volveré a perderlo pero ahora tengo mi fiel iPhone para sustituirlo hasta que vuelva a dar con él. En este post os queremos mostrar varias soluciones al problema, pudiendo convertir tu iPhone en un mando a distancia universal o un control remoto para el Apple TV. Es muy fácil, solo tendremos que acudir a la App Store y descarga alguna aplicación específica.
Cómo hacer de tu iPhone un mando a distancia universal
En general, estas apps te servirán para controlar tu televisión, pero siempre puede pasar que a pesar de ser “universal”, tu televisión no esté dentro de las compatiblesporque ya tenga algunos años.
Por probar no pierdes nada, porque se trata de apps gratis que puedes instalar en un abrir y cerrar de ojos y configurar fácilmente.
Peel remote
Con esta app podrás controlar tu televisión a través del Wi-Fi, con lo cual huelga decir que tu TV ha de tener conexión a internet, ya sea a través de un chromecast o porque se trate de una smart TV.
Peel Smart Remote & TV Guide
Utilities
Instalar Gratis
iRule
Esta app funciona a través de tu cuenta de Google, es super fácil de configurar y no solo sirve para tu TV, sino también para aparatos de audio, luz o sistemas de seguridad. Es tan buena que en el CES 2014 ganó un premio a la mejor aplicación:
iRule
Lifestyle
Instalar Gratis
SimpleControl
Con esta app no solo podrás controlar tu televisión, sino que es compatible con HomeKit y también te permite controlar todo tu hogar inteligente. Eso sí, tiene una versión de prueba a partir de la cual tendrás que pagar para seguir usándola.
Simple Control Home Remote
Lifestyle
Instalar Gratis
Cómo convertir tu iPhone en un mando para el Apple TV
Apple dispone de dos apps en la App Store para poder controlar el Apple TV desde tu iPhone, se trata de Apple TV Remote y iTunes Remote. En ambos casos y como ya es un clásico en el ecosistema Apple, solo tendrás que descargar y como por arte de magia, todo se sincronizará para que puedas usarlo. Por supuesto, es totalmente gratis.
Fuente: IPADIZATE.COM
0 notes
Photo

Vikings Village Vikings Village: Party Hard is a fast multiplayer action game with simple controls. Idea is simple: You are on viking folk concert, and someone calls you Ginger. Fix it! Made by two men: Andrzej S. Bieniek (game design, graphics), Jacek Pietal (code, server). Music by Lukasz - Gothtek - Nowak.
0 notes
Text
Beaver Bomber

About Beaver Bomber Games
You take on the role of a beaver who wants to destroy as many bridges as possible. Arrange the mess!
How To play
* Click or tap the neighboring island to destroy the bridge leading to it.* Destroy all bridges. Read the full article
0 notes
Text
Master of Runes

About Master of Runes Games
In this puzzle game, you are a powerful magician who is able to control runes. Your task is to destroy as many runes as possible!
How To play
* Click or tap the crossing point of the runes with the same colors* Destroy the runes until they reach the line below* Collect scores for the next level and improve your skills Read the full article
0 notes
Text
Sweets Time!

About Sweets Time! Games
Feed the teddy bear with sweets, matching as many candies as possible!
How To play
* Match the as many candies as possible with the colors specified in the request* Complete as many requests as you can! Read the full article
0 notes