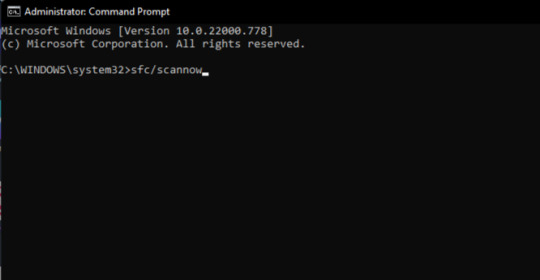
#Scan system files for problems using CMD
Explore tagged Tumblr posts
Visit Tumblr Blog
Explore Tumblr blogs with no restrictions, modern design and the best experience.
Last Seen Tumblr Blogs


Fun Fact
Tumblr has 411 employees.
Text
How To Recover Data From A Corrupted Hard Drive
A corrupted hard drive can be a nightmare, especially if it contains important files, documents, or media. Whether your computer suddenly refuses to recognize the drive, crashes frequently, or displays error messages, you might worry that your data is lost forever. Fortunately, there are ways to recover files from a corrupted hard drive before considering a replacement. If you need professional assistance, Phone Repair & More specializes in computer hard drive repair in Palm Harbor, FL, ensuring your data is safely restored.
Step 1: Check For Physical Damage
Before attempting data recovery, inspect your hard drive for physical damage. Common signs of failure include:
Clicking or grinding noises when the drive is powered on
Frequent system crashes or blue screen errors
Failure to boot or recognize the drive in File Explorer (Windows) or Finder (Mac)
If your hard drive has physical damage, it's best to seek desktop hardware repair in Palm Harbor, Florida, as opening the drive yourself could cause further damage.
Step 2: Use Built-In Windows Tools To Repair The Drive
If your computer can still detect the corrupted drive, Windows has built-in tools that may repair it.
How To Use CHKDSK (Check Disk Utility):
Open the Command Prompt (Windows + R, type cmd, and press Enter).
Type the following command and press Enter: bash chkdsk /f /r X:
(Replace X with your hard drive’s letter).
Wait for the process to scan and repair errors on the drive.
If this method fails, consider professional computer hard drive repair in Palm Harbor, FL, for more advanced troubleshooting.
Step 3: Recover Data Using Data Recovery Software
If the drive is still accessible but your files are missing, specialized recovery software can help retrieve them.
Recommended Recovery Software:
Recuva (Windows) – Free tool for recovering deleted or lost files.
EaseUS Data Recovery Wizard – Supports corrupted hard drive recovery.
Disk Drill (Mac & Windows) – Ideal for scanning and retrieving lost data.
Simply install the software, select your corrupted drive, and follow the recovery prompts. If recovery software fails, you may need gaming PC repair in Palm Harbor, FL, to recover files from an SSD or high-performance hard drive.
Step 4: Try Connecting The Hard Drive To Another Computer
If your computer fails to recognize the drive, try connecting it to another computer using:
A USB external hard drive enclosure
A SATA-to-USB adapter
This method helps determine whether the issue is with the hard drive itself or your computer’s internal connections. If the drive is still inaccessible, a desktop hardware repair in Palm Harbor, Florida, can diagnose the problem.
Step 5: Seek Professional Hard Drive Repair Services
If your hard drive is severely corrupted or physically damaged, professional repair services may be the best option. Phone Repair & More provides expert computer hard drive repair in Palm Harbor, FL, using advanced recovery techniques to retrieve lost data and restore drive functionality.
Computer Hard Drive Repair Services Near Me
Recovering data from a corrupted hard drive is possible using built-in repair tools, data recovery software, and external connections. However, if your hard drive is physically damaged or beyond repair, professional desktop hardware repair in Palm Harbor, Florida, and gaming PC repair in Palm Harbor, FL, services from Phone Repair & More can help recover your data and restore your system. Don’t risk losing important files—seek expert assistance today!
Computer Hard Drive Repair Services In Palm Harbor, FL
Phone Repair & More
32152 US Hwy 19 N, Palm Harbor, FL 34684
727-309-1268
Get Directions
Hours: Mon – Sat 9am to 8pm & Sun 12pm to 6pm
0 notes
Text
ITE3713 Computer Systems and Communication
ITE3713 Computer Systems and Communication FundamentalsWorkshop 4 Name: Student ID: Class: Workshop 4: Troubleshooting on Network Connectivity Issues Part A: Configure an NIC to Use DHCP in Windows 10 Introduction: In this lab, you will configure an Ethernet NIC to use DHCP to obtain an IP address, ITE3713 代做、代写 java/Python 编程and test connectivity to a server
Recommended Equipment: • A Computer running Window 10 • Ethernet patch cable Procedures : Part 1 Record the DHCP status on the network 1.1 Click Start, in Search programs and files box, type cmd and press Enter. 1.2 Type ipconfig /all, and then press the Enter key.
1.3 Write down the IP address and subnet mask of the “Ethernetadapter Local Area Connection”. 1.4 Write down the name and model number of the NIC. 1.5 Type ping and your IP address. For example, ping 192.168.1.112.
1.6 Record one of the replies from your ping command. 1.7 Type ipconfig /release, and then press the Enter key. Then write down the IP address. 1.8 Type ping and IP address of the classmate next to you again. Write down the result. 1.9 Type ipconfig /renew, and then press the Enter key. Then write down the IP address. Part 2 Establish the Telnet Session on the network 2.1 To install Telnet Client, log in your computer with an administrator, if not already done. 2.2 Search “Control Panel” in Start > Control Panel > Programsand Features > Turn Windows features on or off.
2.3 In the Windows Features list, select Telnet Client, and then click OK.
2.4 Close all windows. Click Start > Run > type cmd > OK. 2.5 Type telnet and press Enter.
2.6 Type help and press Enter.
2.7 Which command is used to exit the telnet? 2.8 Suggest a protocol which is better used to replace Telnet. 2.9 Suggest a tool / software which could replace windows Telnet client Part 3 Scan/check disk as administrator 3.1 Click Start, in Search programs and files box, type/selectcmd and right click run as administrator. 3.2 Type chkdsk drive. The example is chkdsk C:. 3.3 Write down the number of bad sectors. 3.4 Write down the number of time needed. Part B: Troubleshooting Networks Apparatus: • Cisco Packet Tracer Objectives: • To learn troubleshooting network connections and settings. For each network in problem.zip, investigate the problem and write down a correction for it. Symptom 1: PC0 cannot ping PC1 due to the physical problems Network Problem Isolated Correction xPC1 xPC2 xPC3 Symptom 2: PC0 cannot ping PC1/Server1 due to the configuration of the devices. Network Problem Isolated Correction weixin: codehelp
0 notes
Text
Get Started Here
The SFC (System File Checker) command is a great one to use if your Windows PC is giving you problems. SFC can tell you a lot about the root cause of problems, including Blue Screen of Death (BSOD) and system faults, and it will immediately solve them.
System File Checker (SFC) - sfc/scannow
An administrator has the ability to check the versions of all protected files using System File Checker. When System File Checker notices that a protected file has been rewritten, it searches the cache folder or the source files of the Windows installation for the right version of the file and replaces the corrupted one. The cache folder is examined and updated by System File Checker. To use System File Checker, you must be logged on as an administrator or a member of the Administrators group. The sfc /scannow, sfc /scannce, or sfc /scanboot commands can be used to restore the contents of the Caches folder if it becomes corrupted or useless.
How to Fix Windows 7 System Files with the SFC Utility?
To fix Windows 7 system files using the SFC (System File Checker) utility, you can follow these steps:
Open Command Prompt as an administrator. You can do this by typing "cmd" in the search bar, right-clicking on "Command Prompt," and selecting "Run as administrator".
In the Command Prompt window, type the following command and press Enter: sfc /scannow. This command will scan all protected system files and replace any corrupted files with a cached copy located in a compressed folder at %WinDir%\System32\dllcache.
Wait for the scanning process to complete. This may take some time, so be patient.
Once the scanning is finished, you will see the scan results. If the SFC utility finds any corrupted files and repairs them successfully, you'll see a message stating "Windows Resource Protection found corrupt files and successfully repaired them."
If the SFC utility is unable to repair all the corrupted files, you can try using the DISM (Deployment Image Servicing and Management) tool to fix any remaining issues. In the same Command Prompt window, type the following command and press Enter: DISM /Online /Cleanup-Image /RestoreHealth. Wait for the process to complete.
After the DISM tool finishes its task, restart your computer.
Related:-
System File Checker
1 note
·
View note
Text
REPAIR YOUR PC USING A COMMAND PROMPT
HELLO FRIENDS, TODAY I WILL TELL YOU HOW TO SCAN AND REPAIR YOUR PC WITHOUT THE HELP OF ANY ANTIVIRUS.
SOMETIMES YOUR PC GETS VICTIM AFTER THE DOWNLOAD OF ANY THIRD-PARTY SOFTWARE. IT HAPPENS BECAUSE THE SOFTWARE YOU DOWNLOAD IS NOT A CERTIFIED SOFTWARE. SO, WHEN IT GETS INSTALLED, IT DAMAGES SOME OF THE WINDOWS OPERATING SYSTEM FILES, AND AFTER DAMAGING THE FILES, YOUR PC GETS SLOWER. SO, TODAY I WILL TELL YOU THE PROCEDURE OF HOW TO GET ALL FILES REPAIRED WITHOUT LOSING DATA AND FORMATTING THE COMPUTER.
FIRST OF ALL, YOU HAVE TO OPEN THE 'COMMAND PROMPT' BY GOING TO START AND SEARCHING FOR 'CMD' IN THE SEARCH BOX. IF THE 'COMMAND PROMPT' POPS UP, CLICK ON RUN AS ADMINISTRATOR.

RUN THE COMMAND PROMPT AS AN ADMINISTRATOR, AND CLICK 'YES' IF IT ASKS FOR PERMISSION.

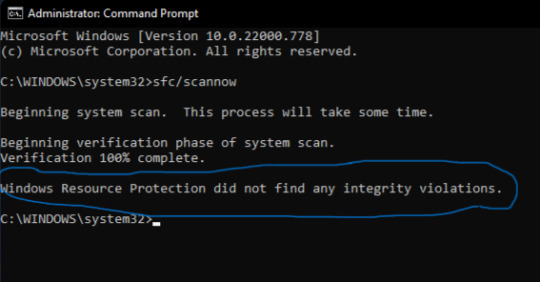
TYPE THE COMMAND sfc/scannow AND HIT ENTER.
IT WILL SCAN YOUR ENTIRE SYSTEM
IF YOUR COMPUTER DOES NOT HAVE ANY CORRUPT FILES, AFTER SCANNING IS COMPLETE, YOU WILL SEE WINDOWS RESOURCE PROTECTION DID NOT FIND ANY INTEGRITY VIOLATIONS.
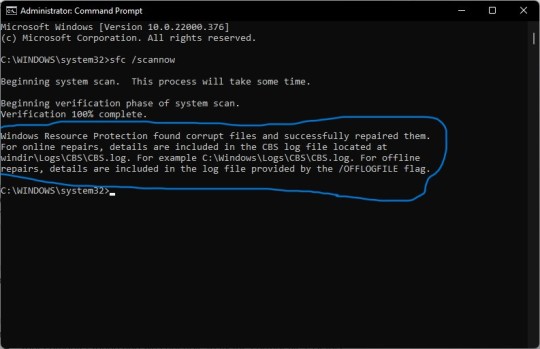
BUT IF SCANNING FINDS ANY CORRUPT FILES AND REPAIRS THEM, THEN YOU WILL SEE 'WINDOWS RESOURCE PROTECTION FOUND CORRUPT FILES AND SUCCESSFULLY REPAIRED THEM
THIS PROCEDURE WILL WORK ON ALL WINDOWS, WHETHER IT'S WINDOWS 7, 8, 8.1, 10 AND 11
THANKS FOR READING THIS ARTICLE. IF YOU FIND SOMETHING HELPFUL, THEN PLEASE SHARE IT WITH YOUR FRIENDS.
IF YOU ARE FACING ANY PROBLEM IN THESE STEPS, YOU CAN COMMENT OR MESSAGE US PERSONALLY. IF WE HAVE A SOLUTION FOR THAT PROBLEM THEN WE WILL TELL YOU.
#computer#laptops#desktops#computerengineering#software#troubleshooting#command prompt#cmd#tumblrposts#tumblrdaily#knowledge#information#informatology#learnsomethingnew
53 notes
·
View notes
Text
Sony Manufacturing 1394 Driver Download

The current official release of the driver is 6.4.6, released on September 26, 2011 by Christopher R. [email protected].
To download drivers, firmware updates, BIOS, and software, please select your model in the list below, or type the model name in the search box. Select your product type SVD Series. Sony I Link 1394 Adapter free download - 802.11g/b WLAN USB(2.0) Adapter, Sony Ericsson PC Suite, Broadcom 802.11g Network Adapter, and many more programs.
After more than a year of wrestling with the nuances of Microsoft's 64-bit operating systems, and with no small quantity of assistance from a few brave testers (you know who you are!), I am proud to officially release this next version of the CMU 1394 Digital Camera Driver, which includes:
Support for all present 64-bit versions of Microsoft Windows XP, Vista and 7, allowing both native (64-bit) and emulated (32-bit) applications to access camera data via a single driver interface.
A completely new demo application, written from the ground up to support both 32-bit and 64-bit Windows.
A litany of bugfixes, many of which were contributed by individual users (for which I am grateful!), including:
Squashment of the nefarious BSOD on resume-from-suspend bug
A closer-to-correct implementation of the Serial I/O functionality described in the IIDC 1.31 standard (closer = still a little quirky, but the quirks may be in the camera I am testing with)
Verified Strobe and Parallel I/O functionality (Strobe controls are also now integrated into the same dialog as Gain, Zoom, Focus, etc.)
.. and many others
New since the public beta:
Fully automated driver installation on 64-bit systems
Several minor bugfixes and documentation updates, but nothing that alters the API/ABI
Update: digital signatures for all kernel-mode software
All 64-bit versions of windows require a digital signature via an AuthentiCode certificate in order to run kernel-mode software. I would like to thank MathWorks for providing the funding for this certificate and allowing this driver set to continue to be published freely to the general public. MathWorks provides an adapter to the CMU 1394 Digital Camera driver as part of their Image Acquisition Toolkit to allow developers quick and easy access to images from firewire cameras within the MATLAB environment.

Known issues and limitations
Large-block asynchronous transfers. I have received several requests and offerance of patches that restore the ability to issue large asychronous I/O (i.e., larger than a single quadlet/register) requests to cameras. I am evaluating these and trying to fold them into the driver in a manner that supports 64-bit platforms.
Mysterious BSOD when using multiple 1394b cameras on the same bus under Windows 7. In experimenting with various configurations of cameras, 1394b host controllers, and driver settings, I have occasionally triggered inexplicable kernel panics while performing comparatively simple operations. Whether this is a quirk of the new Microsoft 1394 bus driver, of some particular host controller, of the 1394 camera driver's innards, or, most likely, of some combination thereof, remains to be seen. Using a single 1394b camera on a single bus is quite stable, however, and the circumstances where multiple cameras trigger this problem seem rare.
The usual assortment of bugs and quirks. Much of the frame-handling logic had to be altered to accommodate the curious limitations of DMA transfers on 64-bit systems. Although I have been unit-testing this code to the greatest extent possible, my experience is that no new code is completely bug-free. My thanks go out to the many beta testers who have helped me to this point, and further comments/questions/bug reports/etc. are especially welcome on this front.

If the 1394 drivers in Windows XP have become corrupted, then they can be restored using the steps provided below. Note:
Sony Manufacturing 1394 Driver Download Windows 7
The main files that the card should use are:
Sony Manufacturing 1394 Driver Download
1394.INF 1394BUS.SYS OHCI1394.SYS

Open up the Device Manager and uninstall the 'OHCI Compliant IEEE 1394 Host Controller' listing – may also be listed as a Texas Instruments or Standard OHCI Compliant IEEE1394 Host Controller
Minimize the Device Manager and then insert your Windows XP CD-ROM
Go from the Start menu up to run and type 'CMD' and then press enter. This should bring up a DOS shell
Change to the drive letter of the CD drive (press 'd:' if your CD drive is drive letter D)
Next change to the 'i386' directory -- 'cd i386 '
From this directory type: expand 1394.in_ c:windowsinf This should restore the 'INF' (information) file for the FireConnect board that should be used
Now open the Device Manager back up and highlight the 'Computer' listing at the top of the category list. Select the 'Action' pull-down menu and choose 'Scan for hardware changes'. This should reinstall the FireConnect adapter
Restart the system and test by connecting your Firewire device
1 note
·
View note
Text
Sonicfire Pro For Mac Os

Sonicfire 6
Sonicfire Pro For Mac Osx
Sonicfire Pro 6 Light
Sonicfire Pro 6.0
Sonicfire Pro 6 Download

Download
If your download is not starting, click here.
Sonicfire Pro 5 Express Track (Mac OS) 5.5.1 Misc. Multimedia Tools software developed by SmartSound Software Inc. The license of this misc. Multimedia tools software is freeware, the price is free, you can free download and get a fully functional freeware version of Sonicfire Pro 5 Express Track (Mac OS). .Sonicfire Pro 6.0.3+ or Sonicfire Pro 5.8.7 required, Mac OS 10.9-10.11 and FCPX 10.1-10.4.8 required, or Mac OS10.12.1+ and FCPX 10.2.3-10.4.8 required.Activation Code required to use plug-in This plug-in is discontinued and will receive no further updates.

Thank you for downloading Sonicfire for Mac from our software library
The software is periodically scanned by our antivirus system. We also encourage you to check the files with your own antivirus before launching the installation. The download is provided as is, with no modifications or changes made on our side. The download version of Sonicfire for Mac is 5.8.7. The license type of the downloaded software for Mac OS X is shareware. This license type may impose certain restrictions on functionality or only provide an evaluation period.

Sonicfire antivirus report

This download is virus-free.This file was last analysed by Free Download Manager Lib 6 days ago.
Sonicfire Pro Plug-in for Adobe After Effects CC, CS6, & CS5.x
Editors & Converters
Unlike the software developed for Windows system, most of the applications installed in Mac OS X generally can be removed with relative ease. Sonicfire Pro 5.8.7 is a third party application that provides additional functionality to OS X system and enjoys a popularity among Mac users. However, instead of installing it by dragging its icon to the Application folder, uninstalling Sonicfire Pro 5.8.7 may need you to do more than a simple drag-and-drop to the Trash.
Download Mac App Remover
When installed, Sonicfire Pro 5.8.7 creates files in several locations. Generally, its additional files, such as preference files and application support files, still remains on the hard drive after you delete Sonicfire Pro 5.8.7 from the Application folder, in case that the next time you decide to reinstall it, the settings of this program still be kept. But if you are trying to uninstall Sonicfire Pro 5.8.7 in full and free up your disk space, removing all its components is highly necessary. Continue reading this article to learn about the proper methods for uninstalling Sonicfire Pro 5.8.7.
Manually uninstall Sonicfire Pro 5.8.7 step by step:
Most applications in Mac OS X are bundles that contain all, or at least most, of the files needed to run the application, that is to say, they are self-contained. Thus, different from the program uninstall method of using the control panel in Windows, Mac users can easily drag any unwanted application to the Trash and then the removal process is started. Despite that, you should also be aware that removing an unbundled application by moving it into the Trash leave behind some of its components on your Mac. To fully get rid of Sonicfire Pro 5.8.7 from your Mac, you can manually follow these steps:
1. Terminate Sonicfire Pro 5.8.7 process(es) via Activity Monitor
Before uninstalling Sonicfire Pro 5.8.7, you’d better quit this application and end all its processes. If Sonicfire Pro 5.8.7 is frozen, you can press Cmd +Opt + Esc, select Sonicfire Pro 5.8.7 in the pop-up windows and click Force Quit to quit this program (this shortcut for force quit works for the application that appears but not for its hidden processes).
Open Activity Monitor in the Utilities folder in Launchpad, and select All Processes on the drop-down menu at the top of the window. Select the process(es) associated with Sonicfire Pro 5.8.7 in the list, click Quit Process icon in the left corner of the window, and click Quit in the pop-up dialog box (if that doesn’t work, then try Force Quit).
2. Delete Sonicfire Pro 5.8.7 application using the Trash
First of all, make sure to log into your Mac with an administrator account, or you will be asked for a password when you try to delete something.
Open the Applications folder in the Finder (if it doesn’t appear in the sidebar, go to the Menu Bar, open the “Go” menu, and select Applications in the list), search for Sonicfire Pro 5.8.7 application by typing its name in the search field, and then drag it to the Trash (in the dock) to begin the uninstall process. Alternatively you can also click on the Sonicfire Pro 5.8.7 icon/folder and move it to the Trash by pressing Cmd + Del or choosing the File and Move to Trash commands.
For the applications that are installed from the App Store, you can simply go to the Launchpad, search for the application, click and hold its icon with your mouse button (or hold down the Option key), then the icon will wiggle and show the “X” in its left upper corner. Click the “X” and click Delete in the confirmation dialog.
Download Mac App Remover
Sonicfire 6
3. Remove all components related to Sonicfire Pro 5.8.7 in Finder
Though Sonicfire Pro 5.8.7 has been deleted to the Trash, its lingering files, logs, caches and other miscellaneous contents may stay on the hard disk. For complete removal of Sonicfire Pro 5.8.7, you can manually detect and clean out all components associated with this application. You can search for the relevant names using Spotlight. Those preference files of Sonicfire Pro 5.8.7 can be found in the Preferences folder within your user’s library folder (~/Library/Preferences) or the system-wide Library located at the root of the system volume (/Library/Preferences/), while the support files are located in '~/Library/Application Support/' or '/Library/Application Support/'.
Open the Finder, go to the Menu Bar, open the “Go” menu, select the entry:|Go to Folder... and then enter the path of the Application Support folder:~/Library
Search for any files or folders with the program’s name or developer’s name in the ~/Library/Preferences/, ~/Library/Application Support/ and ~/Library/Caches/ folders. Right click on those items and click Move to Trash to delete them.
Meanwhile, search for the following locations to delete associated items:
/Library/Preferences/
/Library/Application Support/
/Library/Caches/
Besides, there may be some kernel extensions or hidden files that are not obvious to find. In that case, you can do a Google search about the components for Sonicfire Pro 5.8.7. Usually kernel extensions are located in in /System/Library/Extensions and end with the extension .kext, while hidden files are mostly located in your home folder. You can use Terminal (inside Applications/Utilities) to list the contents of the directory in question and delete the offending item.
4. Empty the Trash to fully remove Sonicfire Pro 5.8.7
If you are determined to delete Sonicfire Pro 5.8.7 permanently, the last thing you need to do is emptying the Trash. To completely empty your trash can, you can right click on the Trash in the dock and choose Empty Trash, or simply choose Empty Trash under the Finder menu (Notice: you can not undo this act, so make sure that you haven’t mistakenly deleted anything before doing this act. If you change your mind, before emptying the Trash, you can right click on the items in the Trash and choose Put Back in the list). In case you cannot empty the Trash, reboot your Mac.
Download Mac App Remover
Tips for the app with default uninstall utility:
You may not notice that, there are a few of Mac applications that come with dedicated uninstallation programs. Though the method mentioned above can solve the most app uninstall problems, you can still go for its installation disk or the application folder or package to check if the app has its own uninstaller first. If so, just run such an app and follow the prompts to uninstall properly. After that, search for related files to make sure if the app and its additional files are fully deleted from your Mac.
Automatically uninstall Sonicfire Pro 5.8.7 with MacRemover (recommended):
No doubt that uninstalling programs in Mac system has been much simpler than in Windows system. But it still may seem a little tedious and time-consuming for those OS X beginners to manually remove Sonicfire Pro 5.8.7 and totally clean out all its remnants. Why not try an easier and faster way to thoroughly remove it?
If you intend to save your time and energy in uninstalling Sonicfire Pro 5.8.7, or you encounter some specific problems in deleting it to the Trash, or even you are not sure which files or folders belong to Sonicfire Pro 5.8.7, you can turn to a professional third-party uninstaller to resolve troubles. Here MacRemover is recommended for you to accomplish Sonicfire Pro 5.8.7 uninstall within three simple steps. MacRemover is a lite but powerful uninstaller utility that helps you thoroughly remove unwanted, corrupted or incompatible apps from your Mac. Now let’s see how it works to complete Sonicfire Pro 5.8.7 removal task.
1. Download MacRemover and install it by dragging its icon to the application folder.
Sonicfire Pro For Mac Osx
2. Launch MacRemover in the dock or Launchpad, select Sonicfire Pro 5.8.7 appearing on the interface, and click Run Analysis button to proceed.
3. Review Sonicfire Pro 5.8.7 files or folders, click Complete Uninstall button and then click Yes in the pup-up dialog box to confirm Sonicfire Pro 5.8.7 removal.
The whole uninstall process may takes even less than one minute to finish, and then all items associated with Sonicfire Pro 5.8.7 has been successfully removed from your Mac!
Benefits of using MacRemover:
Sonicfire Pro 6 Light
MacRemover has a friendly and simply interface and even the first-time users can easily operate any unwanted program uninstallation. With its unique Smart Analytic System, MacRemover is capable of quickly locating every associated components of Sonicfire Pro 5.8.7 and safely deleting them within a few clicks. Thoroughly uninstalling Sonicfire Pro 5.8.7 from your mac with MacRemover becomes incredibly straightforward and speedy, right? You don’t need to check the Library or manually remove its additional files. Actually, all you need to do is a select-and-delete move. As MacRemover comes in handy to all those who want to get rid of any unwanted programs without any hassle, you’re welcome to download it and enjoy the excellent user experience right now!
Sonicfire Pro 6.0
This article provides you two methods (both manually and automatically) to properly and quickly uninstall Sonicfire Pro 5.8.7, and either of them works for most of the apps on your Mac. If you confront any difficulty in uninstalling any unwanted application/software, don’t hesitate to apply this automatic tool and resolve your troubles.
Sonicfire Pro 6 Download
Download Mac App Remover
1 note
·
View note
Text
Fix Windows Was Unable To Complete The Format
If your USB drive cannot be formatted and is informed with a prompt “Window was unable to complete the format” error, it indicates that windows can’t format USB drive, and the USB flash drive is inaccessible. This post will give solutions to this issue.
USB drives are very portable, and they can be connected to a computer easily via USB drive to backup or transfer data, which have become an essential component in various digital products such as digital cameras, cell phones, MP3 players, etc. Since they are often carried by users and might be used on various computers, USB drives are more likely to get many problems.
For example, you plugged your USB drive into the port of a PC, right-click the disk icon and select “Format”, but it popped up an error saying “Windows was unable to complete the format”. So, does that mean your USB drive is broken? NO! This error may happen as a result of the following reasons:
The Main Cause that Windows can’t Format USB Drive
Cause 1: Virus infection If you plug USB drives into a public computer, you’ll take the risk of damaging the files and even the drive will stop working due to Virus attacks. Cause 2: USB device has bad sectors As we all know, storage devices consist of sectors; the Bad sector means the sector is damaged and can’t be read or written. Thus bad sectors can disrupt the formatting operation as well as file recovery. There are quite a few causes of bad sectors, like bad quality, excessive defragmentation, unplug USB drive directly while it is working, etc. Cause 3: USB drive suffers physical damage Physical damage is another reason that makes storage device inaccessible. The computer won’t be able to format the device if it can’t use the device. Cause 4: USB Disk is write-protected Windows can’t format a drive when it is in the write-protected state. As formatting is a kind of writing operation, so you need to remove the write-protection before formatting it.
How to fix “Windows couldn’t complete format” on the USB drive
If you are not capable of formatting your USB drive (USB flash drive, external hard drive, SD card, pen drive, etc.) in the usual process, then try to format that drive with the following methods. Please connect the USB drive to the computer and follow the guide below to fix the error: Note: if the USB drive gets badly physical damage, these solutions won’t help you.
Important: You should make sure that important data and files of the drive to be formatted have been backed up, as files will be erased once the drive is formatted. If the USB drive is inaccessible before you back up the data, then you need to perform file recovery first before formatting.
Steps of file recovery from a damaged USB drive will be talked in the next section of this post.
Fix Windows Couldn’t Complete Format on USB Drive
Solution 1: Format via Disk Management
Disk Management is provided by Windows, and it helps to manage partitions and disks for computers. Disk Management can create a new volume, extend or shrink partition, change drive letter, delete or format partition, etc. the error flash drives can be repaired with the Disk Management tool. Following the steps below, you can make a USB formatting procedure performed successfully. Step 1: Open Disk Management. Right-click on My Computer and select item “Manage”, and then click Disk Management on the left side. In the center section, you can see local hard drive and partitions and the USB drive, which can be recognized by capacity.

Step 2: Right-click the flash drive and select “Format” option and select the file system format to perform a quick format.

Step 3: Right-click on the USB drive and select “New Simple Volume” item. You’ll get the New Simple Volume Wizard which guides you to recreate new partition for the flash drive. Operations are following the onscreen instructions, setting options, and click the “Next” button. When the process is done, you’ll find the USB drive has been formatted and is properly recognized by the system.

Solution 2: Format with Command Prompt
Disk Management is not almighty, and it is not helpful in many cases. Thus, we need to switch to a command-line based formatting solution. Step 1: For Windows 7 users click Start button and type cmd in the search both and press Enter. If UAC is enabled, you need to find Command Prompt from the Start menu and run it as administrator. Step 2: Type command diskpart on the black window and press Enter key. Then you can see the partition and disk list of the current computer. All drives are listed with numbers, and Disk 4 is the flash drive in question.
Step 3: Continue typing disk 4, which is the problem drive and clean and press Enter. The drive will be scanned, and its damaged file structure will be erased during scanning. Once the process is done, it reports a confirmation message telling that it has successfully cleaned the drive, and a new partition needs to be created. Step 4: Type create primary partition and hit Enter; next type in Command prompt format /FS: FAT32 J: (you can copy and paste it.) and press Enter. Here J is the drive letter of the USB drive, and you can change it in line with specific cases. The drive will be formatted to FAT file system, and the formatting is very fast.
The need to recover data promptly
Since the USB drive cannot be accessed or formatted, you need to perform file recovery as soon as possible. Otherwise, it will be overwritten with new data. To recover lost data from the USB drive cannot be accessed or formatted, you should try Bitwar Data Recovery software. It is the best file recovery software since it is compatible with any devices such as digital cameras, hard drives, SD cards, Memory cards, phones, media players and portable drives. From these devices, you can recover audios, videos, pictures, archives, emails, and documents. Whether you deleted these files or lost them due to the virus, or due to the disk inaccessible, or formatting you can still have them back using this software. Moreover, this program lets you preview files that have been recovered. Now you can free download Bitwar Data Recovery here and install it on your computer. Then make sure that your USB drive is connected to this computer very well.

Fix It Now!
Please refer here for more about unable to complete the format.
#Windows Was Unable To Complete The Format#Windows Can't Format USB Drive Error#Recover Data From USB That Cannot Be Formatted#Windows Was Unable To Complete The Format On USB
1 note
·
View note
Text
How to fix Installation incomplete errors when installing McAfee software on Windows?
McAfee is one of the globally preferred antivirus software used by the users in order to protect their devices against all sorts of online threats including virus attacks, malware, spyware, and hackers’ attacks. The installation of security solutions to the device becomes quite mandatory as these online threats might cause harm to the users’ a device as well as his data in several ways.
McAfee Activate products have the tendency to protect multiple devices using a single subscription of it. Apart from this, it also offers the other advanced and high-end security features to various devices running on different Operating Systems like iOS, Windows, Mac, and Android. Some of its features include URL blocking, advanced detecting, true scanning, encrypted storage, firewall, safe web browsing, and many more.

All these features are directly available as an in-built feature within the package of the McAfee Activate such as McAfee Antivirus Plus, McAfee Live Safe, McAfee Safe Connect, McAfee Web Advisor, McAfee Total Protection, McAfee Family Safe, and many more. The users may get any of these McAfee Activate products by accessing the official website of it i.e.McAfee.com/Activate
. To get McAfee subscription to the users’ device, they need to follow a set of three main procedure including downloading, installing, and activating it. However, the users face errors while installing the McAfee product to their device and one such common error is“Incomplete Installation”
. Thus, the simple measure to resolve this error has been mentioned in the article given below.
Steps to resolve the Installation incomplete errors while installing McAfee software on Windows:
Before jumping to the measures to resolve the Incomplete Installation errors, the users should be aware of the causes that contribute to the occurrence of such error on the device. Some of its causes are as follows:
. Incorrect McAfee Activation Code
. Internet connectivity being lost
. Previously installed McAfee Activate product of different version
. Logged in to McAfee account with incorrect credentials
. Software being incompatible with the device
Measures for resolving the error are as follows:
A. Uninstall the previously installed McAfee Activate product from the device.
B. Make sure the device has a strengthen connectivity of the Internet.
C. Check whether the downloaded McAfee subscription is compatible with the device.
D. Get The pre-install tool of McAfee through its official website:
1. Access McAfee.com/Activate
home page and then, type “McAfee Pre-install” tool within the search box at the rightmost corner.
2. After this, click the download button from the searched results.
3. Once the .exe file gets downloaded to the device, move to the folder and execute the installer on it.
4. Now, follow the prompts to complete the installation process and at last, click the “Agree” button to make an agreement to the License agreement of the tool.
5. Now, try to install the McAfee Activate subscription to the device. Else, jump to the next method.
Execute and command the device as Administrator:
1. First and foremost, launch the start menu and then, type ‘cmd.exe’ within the search box
.2. After this, click the ‘cmd’ icon via right-click, followed by selecting the option of ‘Run as Administrator’.
3. On the next page, type the command as displayed below, followed by tapping the enter button:“ net user administrator /active: yes “
4. Now, exit the command prompt, followed by pressing the ‘CTRL + ALT + DEL’ altogether.
5. After this, choose the “Sign out” button from the Windows account followed by performing the further steps manually.
6. Select the “Logo Screen” and choose the “Administrator” option. Once the process gets completed, successfully on the device, try to install the McAfee Activate product.
If any of the aforementioned resolving measures or methods are doubtful then, the users may access the support section of its official website or may contact its technicians to get assistance from them.
Conclusion:
I hope, this article is quite helpful in resolving the concern regarding ‘how to resolve the incomplete installation error while installing the McAfee Activate
on Window device’. The measures are generic and also detailed in an elaborated manner. But, if any of these measures are causing any sort of [problem while following them, then it is recommended to the users to access the official website of McAfee i.e. McAfee.com/Activate to get help from its technicians in order to resolve a concern with a better solution.
1 note
·
View note
Text
Useful Windows Command Prompt CMD Tricks Part 1
Useful Windows Command Prompt CMD Tricks Part 1
Useful Windows Command Prompt Tricks
1. Command History
Using this command, you can track down your command history. This will turn out to be useful when you are trying to look for some command that you’ve used in the past, but can’t remember.
doskey /history
2. Run multiple commands
If you are feeling the need to run two commands after another, you can do so easily. You just need to put “&&”…
View On WordPress
#Abort a command in CMD#Become Pro User using CMD#CMD#CMD Command List#CMD Commands#CMD Hacks#CMD Tricks#Command Prompt#Create Wifi Hotspot using CMD#Run multiple commands in CMD#Scan system files for problems using CMD#See PC driver list using CMD#Windows Command Prompt
0 notes
Text
Windows 10 Attempted Execute Of Noexecute Memory: Simple Tips And Tricks To Resolve It
Even though Windows OS users often confront various technical difficulties, but getting a BSOD error can be the most critical one. When attempted execute of noexecute memory error occurs, it will constantly reboot your device in order to prevent damage.
This error occurs due to various factors. However, some of the significant factors include corrupted drivers, outdated or defective system files. Along with these, malware or virus infection can also influence this error to appear.
Methods to Troubleshoot Attempted Execute of Noexecute Memory Error
Follow the underlying methods and treat the Windows 10 BSOD error in no time.
Execute the Memory Check:
In most cases, attempted execute of noexecute memory error occurs due to certain issues within the memory card. Therefore, without proceeding with any complicated fix, check if there is an issue with the memory card.
Press the Windows logo along with the R key simultaneously. Once the Run window invokes, write “mdsched.exe” inside the dialogue box and hit the Enter key to execute the command. In the next screen, hit “Restart now and check for problems” option in order to check the internal errors immediately.
But, if you want to check the errors later, then choose “Check for problems the next time I start my computer” from the appeared menu.
If you do not see any errors here, then make sure your memory card hasn’t created the issue. Therefore, move towards the next method.
Use the System File Checker:
Windows 10 attempted execute of noexecute memory error often occur due to the corrupted or missing system file. Therefore, you can easily rectify this error by running the System File Checker utility.
Invoke the Run window by following the above instructions.
Write “cmd” into the dialogue box and proceed to the right tap on the Command Prompt.
Afterward, choose “Run as Administrator” from the appeared menu.
This will launch the Command Prompt in Admin Mode
Inside the Command Prompt, enter “Sfc/scannow” and hit the Enter key to execute the command.
After performing these instructions, System File Checker will scan your entire device and detects the corrupted system files, and other related errors. Once it detects the error related to the Windows 10 memory, it will repair them automatically.
Install Essential Windows Update Patches:
In this procedure, we suggest you install all the essential Windows Update patches. For this purpose, press the combination of the Windows logo + I key. This will launch the Settings menu.
Once you access the Settings menu, navigate to the “Update and Security” and hit the “Check for Updates” button. As soon as you perform this instruction, Windows will search for all the pending Windows Updates.
If updates are available, then you will be prompted to hit the “Install Now” button. Hit that button and wait until the installation process gets completed.
Reach Us for Instant Support
Even after implementing the above procedures, if the Windows 10 attempted execute of noexecute memory error still occurs, then count on us at the first instance and resolve the BSOD error with our skilled executives.
To avail of our services, you can place a call at our helpline number and share your issues to get reliable solutions. On the other hand, you can also send an email at our official email address and acquire immediate assistance.
1 note
·
View note
Text
Windows 10 running slowly
This is an extremely long post. It will walk you through disabling services, updating driver software, checking your event log, cleaning out your files, checking Windows for errors and scanning for malware.
As always, the first rule is to reboot.
Browsers using too much memory
1. Check and see if your Internet browsers are causing a problem. If they are, check your extensions and add a couple new ones to help with memory use.
Stop unnecessary services
2. Open Services and stop the Adobe Update/ARM service.
- Click on the Start button in the bottom left hand corner of Windows. In the search box type in “services.msc”

- Right click on Adobe Acrobat Update and go to Properties

- Click the down arrow next to Automatic and choose Manual.

- Click Stop and click OK
Update your drivers
3. Update the drivers on your PC. This is pretty easy if you have a Dell
- Go to support.dell.com, let it do its thing and download the Dell Command Update utility
- This isn’t as easy if you have an HP. But you can try and use the Support Assistant.
- For others you can try the Windows Update catalog via Device Manager
* Start/Settings/Control Panel/Device Manager
* Right click on the device you want to update and click on “Update Driver Software”

* click on “Search automatically...”

Run System File Checker
4. Run System File Checker
- Click on the Start button, type in cmd, right click and select “Run as administrator,” click yes at the UAC prompt

- When the command line launches type in “sfc /scannow”

- It’s not joking, this will take a while
- When the wizard is done it should say that it didn’t find any violations, that it found some one and fixed them or there were issues it couldn’t resolve and it wrote them to CBS.log. Depending on your comfort level you can open the log file and look at what it said it couldn’t fix. It’s very verbose.
Check your event logs
5. Check your event logs for any programs that might be having difficulty and more importantly, to see of your hdd is failing. The event viewer is very, very noisy so it might take some digging.
- Click on the start button and type in eventvwr, then click Event Viewer
- The logs that are most likely to have relevant information are Application and System

- There are lots of Information events that you probably won’t find that useful. Look for Error or Critical

- It’s worth digging through these to see if you can find anything that looks out of the ordinary. Most event messages are Google-able
- If you see a message that looks like the below, you need to back up your files and replace your hard drive

Clean up old system and temporary files
6. Click on the Windows Exporer icon (it looks like a little folder) in your task bar.
(Note: this can take a while, like up to an hour or so depending on what it finds and can cause other programs to run slowly while it scans your drive.)

- Click on Computer, right click on C: and click on Properties

- Click on Disk Cleanup and wait for the calculations to complete. (This also takes a while.)

- If you want you can also choose to clean up old Windows Update files. Click on Clean up system files. The little calculation window will open up again.

- Click OK when it completes and OK again to confirm file deletion
Scan your computer for malware
7. Run Malwarebytes
- Download Malwarebytes from here
- Once it’s downloaded, double click the file and follow the prompts to install. When it finishes installing it will automatically launch.
- Click on Scan Now

- Malwarebytes will scan your computer and let you know if it finds any malware or viruses
- When it’s done it will tell you if it did or didn’t find anything.

To sum up, these are usually the culprits for a slow Operating System.
- programs using too much memory
- unnecessary services
- out of date drivers
- corrupt system files
- problems with programs, services or hardware (especially hard drives)
- disk drives low on space
- malware running in the background
1 note
·
View note
Text
Run as admin mediakeys

Run as admin mediakeys how to#
Run as admin mediakeys windows 10#
Run as admin mediakeys software#
Run as admin mediakeys windows#
After the above process completes, check whether the new account is showing Run as administrator or not.įix 7: Make a change in the group membership.
Choose Next to complete the account creation process.
Input the new account’s username and password.
Choose the I don’t have this person’s sign-in information option and add a user without a Microsoft account.
Go to the Family & other people option and add someone else to this PC.
Choose Accounts from the options on your screen.
Using the hotkey Windows+I, launch the Settings.
To fix this problem, you may create a new user account by following the below directions. Sometimes, the standard account does not let you run a program as an administrator.
Run as admin mediakeys software#
Therefore, you may perform a malware scan using the best antimalware software to solve the problem.
Run as admin mediakeys windows#
Malware infections are also among the most-reported causes behind the Windows 11 Run as the administrator is not showing the issue.
Run as admin mediakeys how to#
After identifying the problematic service, re-enable all the services (except the troublesome one) to fix the issue.Īlso Read: How to Hide the Taskbar in Windows 11.After the computer reboots, disable each service one after the other until you find the problematic service (the one because of which the Run as administrator is not showing).Restart your computer to boot the device in a clean state.Choose Apply and then select OK to make the changes.Navigate to the Services tab and Hide all Microsoft Services.Remove the checkmark from the Load Startup Items box.Go to the General tab and choose Selective Startup.Input MSConfig in the search box and press Enter to launch the System Configuration window.You may follow these directions to implement this fix. This problem may be fixed if you clean boot your device. Some third-party services may be the reason your computer is not showing the Run as administrator option to run a program. You may use the best context menu editors to do the needful. Hence, cleaning the context menu or removing the unnecessary items may help you get back the option to run programs with administrative privileges. Now, check whether the issue is fixed or the option to Run as administrator is not appearing.Ī cluttered context menu may also cause some annoying bugs resulting in the Run as administrator not showing on Windows 11/10/7.After Windows finds the corrupt files and repairs them, restart your device.Type the sfc /scannow command in the window on your screen and hit the Enter button on your keyboard to execute it.Input Cmd, checkmark the box to create this task with administrative privileges, and press the Enter key to launch the Command Prompt as an administrator.Launch the Task Manager using the Ctrl+Shift+Esc hotkey.Hence, you may apply the following steps to perform file repairing on your computer.
Run as admin mediakeys windows 10#
Click on the option that lets you enable UAC on Windows.Īlso Read: Fix Windows 10 Computer Freezes Randomly Issue EasilyĬorrupted system files lead to many annoying problems, including when the Windows 11 Run as administrator is not showing.Go to the User Accounts and select the option to Turn User Account Control on or off.Using your mouse’s right button, click on the Start/Windows icon and choose Control Panel from the available options.Hence, you should check and enable the UAC on your computer to fix the issue. The Run as administrator not showing issue on Windows 10 may appear if the User Account Control (UAC) is accidentally turned off. You may apply the following tried and tested solutions to get rid of the Run as administrator not showing problems on Windows 11, 10, and 7. Now, let us focus on the solutions.įixes for Run As Administrator Not Showing Your user account is not a member of the administrative groupĪbove, we looked at a few prominent causes behind the Run this program as an administrator not showing on Windows 7, 10, and 11.Issues with a service running on your computer.Presence of unnecessary context menu items.User Account Control disabled accidentally.The following are some possible reasons the Run as administrator prompt is not appearing on Windows 11, 10, and 7. Run as Administrator Not Showing: Fixed Why Is Run As Administrator Not Showing
0 notes
Text
Bootrec the requested system device cannot be found

So a while back when the Windows 10 Upgrade had popped up on my computer, I upgraded with no problem at all. Why is that? View 3 Replies Lenovo ThinkPad T520 / No Operating System Found Sep 21, 2015 Is it normal that if I type net start tcpip6 on the cmd the result system error 2, not found?Īlso, I do not have the file tcpip6.sys on /system32/drivers. View 2 Replies Networking :: Tcpip6 Not Found - System Error 2 Oct 16, 2015 Is there anything that I can do? I'm hoping there's a way I can force the notebook to recognize the USB, or at least boot into the f2 or f12 commands to see if I can use them in any way. My acer doesn't have a CD-ROM or anything of the sort, so the USB appears to be my only hope. I plugged that in, yet it doesn't seem to recognize it at all. Today, I downloaded Win 10 using the Media Creation Tool in an attempt to create a bootable USB drive. I do have a USB Logitech K120 keyboard hooked up to it (since the original keyboard messed up,) but it had been working fine for those commands and such up until now. My first option was to try to use either f2 or f12 to see if there was some way to get around the issue, but then I remembered that, recently, my notebook had stopped responding to those commands. Press Ctrl+Alt+Del to restart," popped up. Try disconnecting any drives that don't contain an operating system. When I turned it back on, the message "An operating system wasn't found. The reset failed, so I turned off the notebook. Eventually, I ran into some issues with the start menu not popping up, so I decided to run a clean reset of Windows 10. My Acer Aspire One was upgraded to Windows 10. I received this message with new SSD (replacement) but I know receive same message with old SSD? View 1 Replies Reset Failed - Operating System Not Found Feb 23, 2016 Every time I turn on PC I get the message "an operating system wasn't found try disconnecting other drives". Trying to change boot sequence to read DVD drive first but can't get into bios. View 2 Replies Operating System Not Found Mar 5, 2016 View 3 Replies PC Says No Operating System Found Jan 14, 2016 Ctrl alt delete only gets me a blank screen and any key gets me the same error message. I have a lenovo system that can't find the system disk. View 1 Replies Error 1962 On Lenovo System - No Operating System Found Nov 26, 2015 I've checked to make sure my hard drive was set to the boot drive and I've tried reinstalling but that doesn't work either. Whenever booting my pc I get a "operating system wasn't found error". What else can i do? View 2 Replies System Not Booting - Operating System Wasn't Found Error Aug 18, 2015 I have also tried different sata ports on my motherboard, resetting bios settings, changing boot order, changed sata cable. I get the error 0xc00000f and have to recreate the media creation tool on the usb. (If i say Yes to rebuild both of those, my media creation usb stops working if i restart. *rebuildbcd tells me i have 2 installed windows os. I have tried with the command prompt the following commands Startup repair does not work, error is "the hard drive is locked" Made a win10 usb with the media creation tool from another computer. I fixed that problem now im greeted with a black screen with something like "no bootable device found please detach any devices"
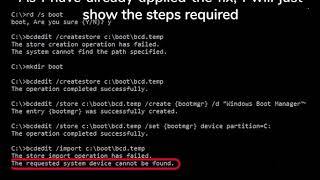
Upon starting again i was greeted with "no operating system found" My computer had froze and i forced a shut down via power button.

I upgraded from windows 7 to 10 about 2 weeks ago, absolutely no issues, i was happy with everything. Installation :: No Operating System Found And No Bootable Device Jan 2, 2016 I typed in "yes" however it said "the requested system device cannot be found." View 1 Replies Total identified Windows installations: 1 D:Windows Add installation to boot list? Yes/No/All:" Successfully scanned Windows installations. Please wait, since this may take a while. "Scanning all disks for Windows installations. i typed "bootrec rebuildbcd" on cmd from the windows recovery media advanced options and came up with So i researched and found a tutorial on how to fix the bcd. I restarted my computer to see that an error message said " you pc needs ti be repaired " and something abour rhe boot configuration data being missing. My computer was on sleep mode and my sister plugged it off. BCD Repair - The Requested System Device Cannot Be Found Nov 16, 2015
1 note
·
View note
Text
Smbup add user on windows

#Smbup add user on windows mac os x
#Smbup add user on windows install
#Smbup add user on windows update
#Smbup add user on windows install
I would install netatalk and give that a try, but I don't have a lot of control over the server so I would prefer to leave it as close to its default config as possible. I've never used NFS before, so I'm a bit unsure on how the username/user ID bit works. To enable SMB1 in Windows 10, do the following. Samba is a free software re-implementation of the SMB networking protocol, and was originally developed by Andrew Tridgell. However, this version has received attention in the recent past due to security vulnerabilities. With Windows 10, Hold the windows key and hit 'r', type cmd. If I change the mount point I get a different error, so I think it is actually starting to connect but after entering my password, permission is denied. 2 Click on Shares then click on Add button. I can ssh in from the linux box to the Mac.
#Smbup add user on windows update
2018 Update to Windows Server 2016 and/or install Acronis software AFP Server for. Mount 10.xx.xx.xx:Test failed, reason given by server: Permission deniedįirewall is off. I isolated this to the users profile on their Mac running Mojave 10. Sudo mount -t nfs 10.xx.xx.xx:Test /var/Both yield the same result: I tried configuring that both manually and used the NFS Enabler sys pref as well. nfsd checkexports seems to validate the setup as well.Įxports: /Test -network 10.xx.xx.xx -sec=sys -mask 255.255.254.0 -maproot=nobody I have the export setup and showmount -e shows the correct point. So I spent another half day trying to get NFS setup. All I've found are a bunch of "it doesn't work" posts.) (If anyone knows of a walkthrough for 10.7 that works, please let me know. I spent a day trying to get this to work via SMB, but apparently the SMB client on CentOS doesn't work with the SMBX server on OS X. I've searched a ton but most instances are for using a linux server and Mac client.
#Smbup add user on windows mac os x
SMBUp won't run on system start unless you add it to System Preferences -> Users & Groups -> Login Items, onto any users who will use the Mac / Mac Server.I need to create a mount point/share on a Mac OS X 10.7.4 (non-server) machine that a CentOS 5.2 box can mount. Click on Update once done and Save All to restart the service. If you created a user for SMBUp, click Manage Users and add the username and password. If you didn't create a new user for SMBUp you need to tick Allow Guest to allow Everyone access to the share. Click Add new shared drive to add the scan to folder. Install SMBUp and unlock it with the padlock top-left (sometimes it doesn't appear, but you can still click the empty area). Furthermore, you can find the Troubleshooting Login Issues section which can answer your unresolved problems and equip you with. LoginAsk is here to help you access Add User Windows Server quickly and handle each specific case you encounter. SMUp does this anyway, but it is easier to do it now, as sometimes SMBUp fails to disable it on system start. Add User Windows Server will sometimes glitch and take you a long time to try different solutions. SMUp will tell you this if you try to add a username with more than 15 user groups assigned to it.īack to File Sharing, either go to File Sharing Options and untick Share files and folders using SMB (Windows) or disable File Sharing completely by unticking it here. You won't be able to use an existing username for SMUp as they are usually assigned to too many user groups. If you need to create a new user, go to System Preferences -> Users & Groups, Give it a suitable name and password. Set Everyone to Read & Write if you don't want to use a username and password, otherwise you will need to create a new user just for SMBUp. Before you install it go to System Preferences -> Sharing -> File Sharing, add the folder you want to use as an scan to folder. Setting up SMPUp is pretty straight-forward.
0 notes
Text
Recover Lost Files From Corrupted USB
This article offers several methods to fix the corrupted USB drive. And Bitwar Data Recovery software comes handy to recover the data when data loss happens to the USB.
Reasons for USB corruption or inaccessible:
1. Logical Issues 2. Physical Issues Some common physical corruption issues are connecting interruption. The USB port may be damaged because of no power supply. Thus, you should confirm the power supply and try to connect your USB drive to another PC, then replace the USB port. However, if the USB drive is damaged caused by other reasons, you have to take it to a professional repair facility. While if there are some logical software issues with the USB drive, you can quickly fix it. In such a situation, you need to change the USB drive’s file structure to make it usable again.
Recovering files from logical issues
Reinstall the drivers
There are times when the drivers that run your USB drive get corrupted and your PC is not able to detect the storage media. If so, you can reinstall drivers by following these simple steps:
1. Right-click “My Computer/ This PC”. Click “Manage” and click “Device Manager” on the left side.
2. Double-click “Disk Drives” in the list. Right-click on the name of your pen drive.
3. Click “Uninstall”. Click “OK”.
4. Disconnect your storage media and restart your PC.
5. Connect your pen drive again. Your PC will detect it and prompt you to reinstall the driver before use.
Repair USB drive by using CMD
CMD is your best choice for damaged USB flash drive recovery. It allows you to fix a corrupted USB drive without formatting and can avoid data loss. In addition, it can also be used to correct the SD card.
1. Plug your USB flash drive or pen drive to your computer.
2. Go to the start menu, type in “cmd” in the search bar, hit “Enter” and then you can see something named “cmd. Exe” in a list of programs.
3. Right-click “cmd. exe” and type in “chkdsk /X /f USB drive letter:” or “chkdsk USB drive letter: /f “, for example, “chkdsk /X /f G:” or “chkdsk h: /f” in the following command windows to start repairing a damaged USB pen drive. This operation will make Windows check and fix the file system on the /flash drive. If the repair process works well, the description “Windows has made corrections to the file system” will appear in the command window. It suggests that the corrupted USB pen drive is successfully fixed and can be reaccessed. However, If the USB drive has bad sectors, your data may be lost during the process of repairing. Therefore, you need to back up or restore essential data from the USB drive before using the CHKDSK command.
Fix USB drive file system errors
If you are using Windows 10 or a lower version, you can carry out the following steps to repair the USB Flash Drive:
1. Insert the USB drive into the USB port of your system
2. Go to My Computer>Removable Disk icon.
3. Right-click the Removable Disk Icon and open its Properties.
4. Click on the Tools tab.
5. Click the Rebuild button
6. Let the scan process get completed. Close the scan window once it’s completed.
7. Right-click the icon of the USB flash drive and Eject. Then remove the drive from the USB port. Hope this way can help you solve the problem, and you can try to restore your precious data by using a professional data recovery tool.
Recover data from the USB drive
If all the above solutions are unavailable, you could try the “recover data first then format the USB drive” way to repair USB flash drive without losing data. This way is available for all data loss cases. So I recommend you to use Bitwar Data Recovery software to retrieve data from the USB drive. Bitwar Data Recovery is a fast, reliable and free data recovery software with powerful functions. So, please try it without hesitation when you suffer from data loss from the USB drive. Free download and install Bitwar Data Recovery software and then make sure your USB drive is connected to the PC. Follow the below steps to get back all data.

Fix And Recover!
Please refer here for more about corrupt USB data recovery.
#Fix Corrupted USB#Corrupted USB Data Recovery#Recover Lost Files From Corrupted USB#Fix Corrupted USB and Recover Lost Data
1 note
·
View note
Text
Hex fiend how to find process memoru

Hex fiend how to find process memoru how to#
Hex fiend how to find process memoru software#
Hex fiend how to find process memoru download#
Hex fiend how to find process memoru free#
Hex fiend how to find process memoru mac#
Some noise-reducing plugins are Noise Ninja, Neat Image, Photo Ninja, etc. Further, add plugins in your image editing tool to reduce noise in JPEG pictures. You can also fix grainy photos that have grains, spots, or lack color using photo editing tools.
Hex fiend how to find process memoru free#
There are free online photo editing tools as well that can quickly sharpen and fix blurry pictures. You can fix such issues using photo editing software, such as Photoshop, Paintshop Pro, or Lightroom.
Hex fiend how to find process memoru how to#
Now open your JPEG/ JPG photos to check if the problem is resolved.Īlso read: How to fix damaged photos in Photoshop Method 4: Fix damaged JPEG in image editing toolsĬertain JPEG photo-damage issues like noise, blur, or grains are caused due to shaking of camera, wrong camera focus, shooting in low light, and other reasons.
In the command prompt window, type sfc /scannow and hit Enter.
From the list, right-click on CMD and select Run as Administrator.
In Windows Start button, type Press Enter.
This may fix any image files problem on Windows PC.įollow the below steps to restore JPEG/ JPG files using SFC scan: Just in case you are facing an issue with every JPEG/ JPG photo stored on your Windows system, try fixing it by System File Checker (SFC). The sfc /scannow command scans system files fixing the corrupt ones. Method 3: Repair using sfc/scannow in Command Prompt on Windows
Hex fiend how to find process memoru mac#
They are available for both Mac and Windows. Else, you may end up doing more damage to your photos.Ĭommon hex editors are O圎D, He圎d.it, Hex Workshop, Hex Fiend, and others. However, we recommend using the hex editing tool only if you have prior knowledge about the hexadecimal format. You can use it to fix broken JPEG/ JPG file header by comparing the damaged JPEG file with the correct one. Hex editors are file editing tools that let you change the hexadecimal or binary data of an image file. Method 2: Repair corrupt JPEG files using Hex Editor Figure: Binary data of JPEG file in Hex editor too
Click Save Repaired Files and save the photos at your desired location.
Once the repair process completes, Preview the repaired JPEG photos.
Hex fiend how to find process memoru software#
After you have added all the corrupt files, click on Repair button.įigure: List of corrupt images in the software.
On the home screen, click Add File to add corrupt JPEG images.įigure: Main interface of Stellar Repair for Photo.
Hex fiend how to find process memoru download#
Download and Run Stellar Repair for Photo on computer.Plus, repairs RAW file format from cameras.Gets thumbnails of severely corrupt JPEG/JPG images.Works on photos from all types of digital cameras.Batch repairs multiple JPEG/ JPG photos simultaneously.Further, you can use it to repair TIFF, HEIC, DNG, and RAW image formats from Sony, Nikon, Olympus, Kodak, Fuji, and other cameras. It is compatible with DSLRs, camcorders, Android, iPhone, iPad, and others. The software can repair JPEG/ JPG photos from all kinds of digital cameras. You can also get the thumbnails of corrupt JPEG/ JPG files. ‘Advance Repair’ uses a sample file of JPEG format from the same camera as your corrupt picture. Just in case the JPEG photos are severely damaged, Stellar Repair for Photo automatically recommends ‘Advance Repair’. You can use the software to open unreadable JPEG files or fix photos that have turned grainy, blurry, greyed-out, or color-damaged. It’s an advanced tool designed to fix corruption in the image file header, data, invalid image file structure, unknown or invalid marker, etc. Method 1: Repair corrupt JPEG file with Stellar Repair for PhotoĪny damage or corruption in JPEG files is best repaired by Stellar Repair for Photo. These methods are applicable for DSLRs, SLRs, camcorders, etc., from Nikon, Panasonic, Fuji, Sony, Canon, Olympus, Kodak, and others. Here we have shared the best 4 ways to fix JPEG files from digital cameras. There are JPEG repair tools that can repair photos as new from any camera. Thankfully, you can repair corrupt JPEG or JPG files. How to fix corrupted JPEG photos from digital camera? Camera memory card, USB, or HDD is physically damaged.The storage drive or media is corrupt or virus-infected.JPEG photos didn’t transfer/ download/ copy properly due to a sudden system shutdown or crash.Some common reasons for corruption in JPEG pictures from digital camera are: Digital camera errors can also corrupt JPEG files. This can lead to corruption in JPEG or JPG photos. There might be a system disconnect during transfer of these JPEG files from camera to the computer or another device. JPEG photos shot with digital camera are saved either in the camera SD card or built-in digital camera memory. How to fix corrupted JPEG photos from digital camera?.
0 notes