#Run multiple commands in CMD
Explore tagged Tumblr posts
Visit Tumblr Blog
Explore Tumblr blogs with no restrictions, modern design and the best experience.
Last Seen Tumblr Blogs


Fun Fact
US Tumblr user growth rate is estimated to slow down to 4.1%.
Text
CoPilot in MS Word
I opened Word yesterday to discover that it now contains CoPilot. It follows you as you type and if you have a personal Microsoft 365 account, you can't turn it off. You will be given 60 AI credits per month and you can't opt out of it.
The only way to banish it is to revert to an earlier version of Office. There is lot of conflicting information and overly complex guides out there, so I thought I'd share the simplest way I found.
How to revert back to an old version of Office that does not have CoPilot
This is fairly simple, thankfully, presuming everything is in the default locations. If not you'll need to adjust the below for where you have things saved.
Click the Windows Button and S to bring up the search box, then type cmd. It will bring up the command prompt as an option. Run it as an administrator.
Paste this into the box at the cursor: cd "\Program Files\Common Files\microsoft shared\ClickToRun"
Hit Enter
Then paste this into the box at the cursor: officec2rclient.exe /update user updatetoversion=16.0.17726.20160
Hit enter and wait while it downloads and installs.
VERY IMPORTANT. Once it's done, open Word, go to File, Account (bottom left), and you'll see a box on the right that says Microsoft 365 updates. Click the box and change the drop down to Disable Updates.
This will roll you back to build 17726.20160, from July 2024, which does not have CoPilot, and prevent it from being installed.
If you want a different build, you can see them all listed here. You will need to change the 17726.20160 at step 4 to whatever build number you want.
This is not a perfect fix, because while it removes CoPilot, it also stops you receiving security updates and bug fixes.
Switching from Office to LibreOffice
At this point, I'm giving up on Microsoft Office/Word. After trying a few different options, I've switched to LibreOffice.
You can download it here for free: https://www.libreoffice.org/
If you like the look of Word, these tutorials show you how to get that look:
www.howtogeek.com/788591/how-to-make-libreoffice-look-like-microsoft-office/
www.debugpoint.com/libreoffice-like-microsoft-office/
If you've been using Word for awhile, chances are you have a significant custom dictionary. You can add it to LibreOffice following these steps.
First, get your dictionary from Microsoft
Go to Manage your Microsoft 365 account: account.microsoft.com.
One you're logged in, scroll down to Privacy, click it and go to the Privacy dashboard.
Scroll down to Spelling and Text. Click into it and scroll past all the words to download your custom dictionary. It will save it as a CSV file.
Open the file you just downloaded and copy the words.
Open Notepad and paste in the words. Save it as a text file and give it a meaningful name (I went with FromWord).
Next, add it to LibreOffice
Open LibreOffice.
Go to Tools in the menu bar, then Options. It will open a new window.
Find Languages and Locales in the left menu, click it, then click on Writing aids.
You'll see User-defined dictionaries. Click New to the right of the box and give it a meaningful name (mine is FromWord).
Hit Apply, then Okay, then exit LibreOffice.
Open Windows Explorer and go to C:\Users\[YourUserName]\AppData\Roaming\LibreOffice\4\user\wordbook and you will see the new dictionary you created. (If you can't see the AppData folder, you will need to show hidden files by ticking the box in the View menu.)
Open it in Notepad by right clicking and choosing 'open with', then pick Notepad from the options.
Open the text file you created at step 5 in 'get your dictionary from Microsoft', copy the words and paste them into your new custom dictionary UNDER the dotted line.
Save and close.
Reopen LibreOffice. Go to Tools, Options, Languages and Locales, Writing aids and make sure the box next to the new dictionary is ticked.
If you use LIbreOffice on multiple machines, you'll need to do this for each machine.
Please note: this worked for me. If it doesn't work for you, check you've followed each step correctly, and try restarting your computer. If it still doesn't work, I can't provide tech support (sorry).
#fuck AI#fuck copilot#fuck Microsoft#Word#Microsoft Word#Libre Office#LibreOffice#fanfic#fic#enshittification#AI#copilot#microsoft copilot#writing#yesterday was a very frustrating day
3K notes
·
View notes
Text
Linux update! (And a few Nvidia tips)
After a dreadful day of trying to make this work, I'm reporting that The Sims 2 finally works on my new Linux system! 😭❤️ Admittedly I have made my own life harder setting this up, but the most important thing I've learned from this experience and thought it might worth sharing:
Before you try to install TS2 on your Linux, make sure that you have your graphics card's driver updated!
When I first installed The Sims 2 on Linux it was incredibly laggy and choppy, because the default Nouveau driver didn't work well enough with my Nvidia card. After I installed the Nvidia driver from the built in driver manager, the game just straightup crashed.
Then I had to find out that Mint's driver manager couldn't install the newest driver for my card (RTX 3070), and even when installed, it didn't work. 😂
So if you have an Nvidia card and struggling or planning to install Linux in the future, below the cut are a few useful tips that I've discovered in the depths of the Internet:
Check what driver the official Nvidia site recommends for your GPU. - I did this and it showed driver version 570.
2. I think this is optional, but open your terminal and type the cmd: sudo apt update - this will trigger Linux to update its driver list.
3. Open Driver Manager, and see if the recommended driver (570 in my case is available). For me it was not available, only the 550, this was my issue.
3.1. If you can see your required driver, awesome, install it from the driver manager and skip to step 5. 3.2. If not, you have to use this PPA. -> Meaning you have to open your terminal and enter the following commands (when I list multiple commands to run, first type the first one, press enter, then type the next one, press enter etc.): sudo add-apt-repository ppa:graphics-drivers/ ppa sudo apt update You can also find installation guide on the link above, but it's basically this. 4. Now you have to restart your system, and repeat Step 3. of this list. The newest driver should show up in your Driver Manager now, install it.
5. After installing, open your terminal and type the following command: inxi -G -> this will allow us to check if the driver works properly. Shock, it did not for me :D When working properly, it should look like this:
Display: x11 server: X.Org v: 21.1.11 with: Xwayland v: 23.2.6 driver: X: loaded: nvidia gpu: nvidia,nvidia-nvswitch resolution: 1:1920x1080~60Hz 2: 1920x1080~60Hz When not working, it looks like this: Example 1: Display: x11 server: X.Org v: 21.1.11 with: Xwayland v: 23.2.6 driver: X: loaded: nouveau unloaded: fbdev,modesetting,vesa failed: nvidia
6. This is the thread that helped me fix this problem. You have to scroll down to the Nvidia Graphics troubleshooting tips.
7. I had to add this "kernel boot parameter": nvidia_drm.fbdev=1 into the system. On this link you can see how to add it either temporarily or "permanently" (meaning you don't have to add it every time you start your system, but it is removable).
To add it permanently, you have to type the following commands into your terminal:
sudo nano /etc/default/grub GRUB_CMDLINE_LINUX_DEFAULT="quiet splash nvidia_drm.fbdev=1" sudo update-grub
8. After you added it, reboot your system, and when it starts again, check if the parameter is there with the command: cat /proc/cmdline
9. If it's there, run the inxi -G command again, and see if it looks like it should.
10. If not, you might have to update the Kernel version of your Linux, which you can do in the Update Manager/View/Linux Kernels menu. I had to update mine from 6.8 to 6.11.
After all this you should be good to install the game, I made my life so much harder than it was necessarily so I hope my research on how to deal with an Nvidia Graphics card with Sims 2 on Linux is helpful to some of you. 😂
38 notes
·
View notes
Text
Our Life Modding Guide
For anyone wanting to know how to either look into the game files themselves or write in their own scenes, here it is!
(Real quick, here's a link to GB Patch's opinion on modding - which is that we're free to do so - just in case anyone may be concerned about that; here's another as well.)
Preparation
I'm going to say right up front that I have the itch.io Windows version of Our Life, so your methods may vary on anything else. The Steam version is the exact same to my knowledge, however, so this should work exactly the same for it (I've had people who use the Steam version test mine for me).
While this may go without saying, definitely back up your game before anything else, both as a precaution and also to keep the original around (whether for comparison's sake, you might want to still play the original, or in case something goes wrong and you need to reinsert any of the original files). I usually keep the modded version's folder somewhere away from the original, but that's just me. You can also just make sure to mark it.

Unpacking Our Life's Files
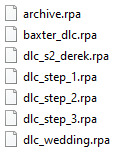
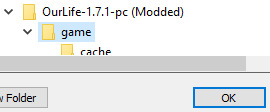
One peek into the "game" folder of Our Life will reveal... well, not much. Some icon files, a couple images, two folders for your save files and cache, and little else. This is because everything else is packed into the .rpa files and we need to open them up. Think of it like a safe that we need to unlock, or luggage that we need to unzip.
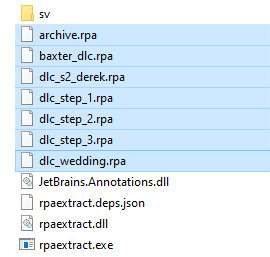
Depending on how many DLCs you have (the only one I don't have is Voiced Names, which would be dlc_voiced_names.rpa), the amount of .rpa files will be any/all of these:
There are a few different ways to unpack these and I'll be listing multiple on the off chance that the others don't work (ordered by ease of use/overall usefulness).
RPA Extract (by iwanplays)
This is the easiest method out of all and the first I recommend you try. You can find it here.
It's a single .exe file and all you have to do is drop it into the "game" folder of Our Life, select all of the .rpa files, and drag them onto the .exe.
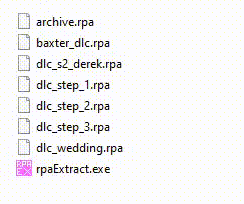
This will open a Command Prompt that will extract all of the files for you, and you can delete the rpaExtract.exe after it's done. Simple as that.
RPA Explorer (by UniverseDevel)
This one is useful if you only want to look at the files and not extract/edit them, though it can do that too. You can find it here. The disadvantage from RPA Extract is that you'll have to extract the .rpa files one at a time instead of all at once.
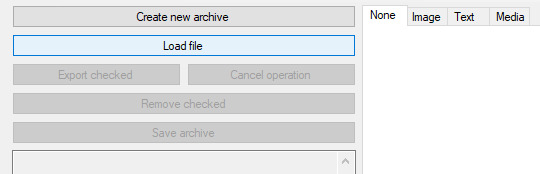
After downloading, open the program and click on "Load File" in the upper-left.
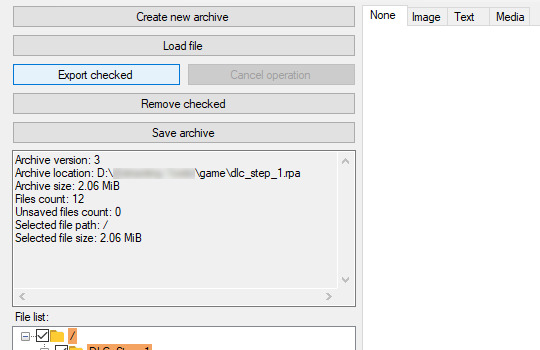
Locate your .rpa files and open one. You'll see folders and files pop up, showing you all the files inside of the .rpa file you chose. You're free to look at any of them as you please, but if you want to extract them, check the box next to the "/" folder to select everything and then click "Export checked" in the upper-left.
Locate the "game" folder in the Our Life folder that you want to mod, click on it, then click "OK".
A progress bar will appear in the lower-right and the files will be extracted. Repeat this process for the remaining .rpa files.
rpaextract (by Kaskadee)
This method is a little more complicated and therefore requires some more steps. You can find it here (you can simply download the portable version).
Rather than in the case of RPA Extract, you'll want to take the .rpa files out of Our Life's game folder and put them in the folder of whichever you downloaded. This will just make it easier in the long run.
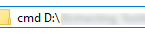
Once everything is moved, right-click on the address above for the folder, click "Edit Address," and type "cmd" at the beginning before tapping Enter.
A Command Prompt will open with the name of the folder. You'll have to extract your .rpa files one at a time here.
You'll then type out (without the brackets):
rpaextract -x -f [filename].rpa -o game

The .rpa files will be extracted (as shown above, it will give you a loading bar to show progress then pop up the address for you to type something out again when it's done) and appear in a folder titled "game." You can then copy that folder and paste it over Our Life's game folder, combining the contents of both together.
Testing
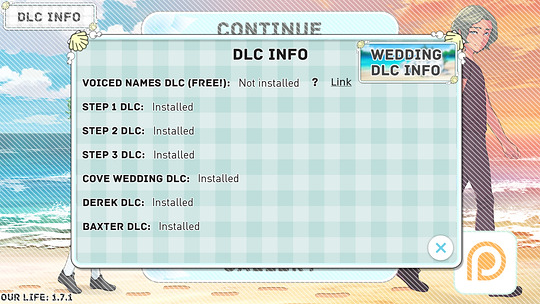
Now that you have your files extracted, you can delete the .rpa files that you had extracted from because we don't need them anymore. The "game" folder of Our Life should look something like this:
You should also still be able to open the .exe of Our Life and load to the main menu without experiencing any error messages. Tapping on "DLC Info" in the upper-left of the main menu should also still have all the DLCs you had listed as "Installed."
If all that checks out, you're good to continue!
Setting Up Your Text Editor
You'll need a text editor for this and, for size's sake, I'm going to recommend Notepad++, which you can find here. You can just download the portable version but it doesn't really matter.
Once it's been opened, we're going to do a few steps to make it recognize Our Life's script (.rpy) files (the ones you'll be tampering with if you want to add scenes/change dialog/etc.).
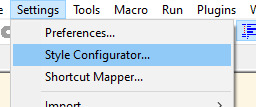
Go into the "Settings" tab at the top, then click "Style Configurator".
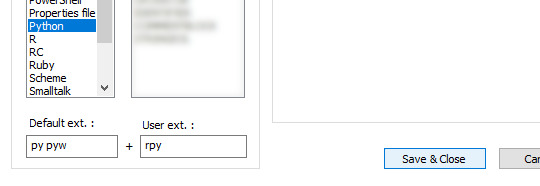
2. Scroll through the "Language" section until you find "Python". Click on that.
3. Under "User ext. :" at the bottom, type "rpy" without quotations.
4. Hit "Save & Close".
5. Go to "Settings" again, then click "Preferences".
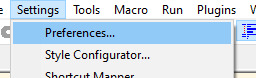
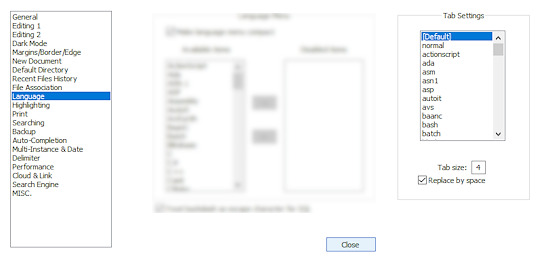
6. Find "Language" on the left of the window that pops up and click on that.
7. Look for "Tab Settings" on the right. It should be set to "Default", the "Tab size" should be "4", and you should checkmark the "Replace by space" box. You can then hit "Close".
(an important part of the code is indenting and this just streamlines it so that when you push "Tab" it will insert four spaces instead)
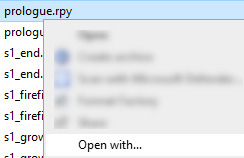
8. Go back to the Our Life "game" folder, then find an .rpy file (any will do), right-click it, then hit "Open with…"
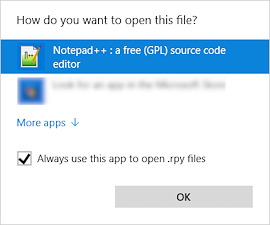
9. Check the "Always use this app to open .rpy files" box.
10. Click on "Notepad++". If it's not there right away, hit "More apps", and if it's still not there then scroll all the way down and hit "Look for another app on this PC" and find+confirm the Notepad++.exe.
Now Notepad++ will automatically open any .rpy file that you double-click on and will treat them appropriately.
And now you're ready to go! The .rpy files are actually Our Life's script files, which can be freely opened in Notepad++ (or another text editor) to edit the game's scenes or add your own.
Happy modding!
29 notes
·
View notes
Note
Do you have any tips or guides on how to make gifs?
I do! Firstly, this guide here is probably the best guide I've seen for gif making. It's concise and easy to follow, and it's what I used to learn myself. They have a lot of resources as far as programs go, but I'll list what I use below. As always, never download and install anything from unknown sources without doing your own due diligence. Run everything through your antivirus and/or virustotal before installing always always always!
This is kinda long, so imma put it under the cut lol. Also note that I use windows (Win10), so things may not work the same way for mac or linux
Before you can actually make the gifs, you need a way to download high quality videos! I like jdownloader 2 because I find the interface to be user friendly, it gives you the option to download multiple elements (like srt files), and it works with more websites than lots of other video downloaders (and their user support is leagues better as well). My second choice is yt-dlp, which isn't necessarily more complex but might look a little more intimidating. Both are great programs, but a quick note about jd2: DO NOT download it from anywhere else but the link above. The developers package adware in all their installers EXCEPT for that one (I hate it too, and I think it's fundamentally unethical, but at least they're up front about it and they have an adware free version). Both methods automatically download the highest quality video available in your source link, so you don't have to worry about fiddling with that.
Now on to extracting frames! My method of choice is ffmpeg. It looks more intimidating than it is, and it's honestly the best way to extract frames imo. Like yt-dlp, it uses your computer's command console, which means you'll need the relevant command lines to run it. This tutorial is great to get you started, and it includes a command line for if you only want to extract frames from a specific part of your video. If you want to extract every frame from the entire video, you can either input the start and end times of the video into that command line, or you can use this version (I use both depending on what I'm doing):
ffmpeg -i "file path" "out-%05d.png"
Always make sure you're working with png files. To make quality gifs you have to start with quality images, and png files, unlike jpg, are lightweight and lossless, meaning you won't end up with compression artifacts and fuzziness
To get the file path for your video, select the file, then in the upper left hand corner of your window select home > copy path. It will copy the path in quotes, so replace the entire section "file path" with the path you just copied. Then copy and paste the entire line into your command console. The tutorial above says this as well, but be sure to create a folder for your frames, go into that folder and click the file path bar at the top of the window, then type "cmd" to open the console. This will ensure your files are dumped in that folder
So now you need a way to actually MAKE the gif. This is... a little more tricky. You can use gimp, I think, though it's certainly not my program of choice. You could buy PS but like... ew. OR you could do what I did and arr it. I use a portable version of CS6 that I downloaded literally a decade ago, and unfortunately the website I got it from isn't up anymore. I did a quick search and found this on reddit, but again, do your due diligence before downloading and installing anything!
Now I'll talk a little bit about my actual process. The actual process of making frames into layers into a gif I got from that first tutorial I linked. I took that process and made an action on PS so that I never have to do it manually again because I'm lazy and my memory is dogshit and I didn't want to have to consult a guide every time I wanted to do something lol. Everything else I learned through experimenting and my own experience as a photographer, so I encourage you to play around with everything to see what you like and what works for you
For coloring, I fiddle with levels, brightness/contrast, and color balance adjustment layers until I'm happy with how it looks. You can use curves instead of levels if you want finer control (or if you want to produce effects like matte), but levels works just as well and has a histogram right there in the panel, which makes it easier to adjust the exposure based on the image's actual data
For sharpening, I have a couple of custom actions I use. Here's what they look like:

The first one (bound to the F2 key) gives a smoother appearance, and I like to use it for kpop gifs where the subjects are already airbrushed and smooth without much texture, or wide shots where detail isn't super important
The second one (bound to the F3 key) is the one I use when I want to preserve texture in the image. Closeups of people where you can see their skin texture, or busy images with lots of detail benefit most from this one
The basic gist of it is, the "sharpen" filter does exactly what it says on the tin and it's usually all the sharpening an image needs, and the "surface blur" filter erases or dampens artifacting created by the sharpening filter. Sometimes I'll run the action twice, or use them both in combination to get the effect I want. Here's what the difference looks like in practice, featuring two very cute dudes:
F2 sharpening action


F3 sharpening action


You'll notice in the first two gifs, there's not much in the way of texture to preserve. Yoongi's skin is smooth and airbrushed, and the scenery is all metal and concrete shot with a wide aperture, which makes the background nice and blurry and smooth. In the second set, Jesse has facial hair and stubbly texture on his throat that I wanted to preserve, so I used the action with the lighter surface blur
My advice on all of this though, again, is to play around with it and see what you like! And if you have any more questions, feel free to ask! I'm by no means an expert, but I'll do what I can to help!
edit: oh, a quick note about speed! The tutorial I linked above mentions changing the delay to 0.05, and that's great for full speed gifs! But if you want them slow like my gifs above, I set the delay to 0.08. Sometimes I'll slow them down even more by setting the delay to 0.09 or 0.1, but any higher and you start to lose some of that smoothness
15 notes
·
View notes
Note
hi if its alright with you can I please ask your stage gif process 🩵 (I don't mind if its not too detailed but if you use vapoursynth or topaz or anything)
hiii! omg thank u for wanting to know 🥺🥺 i actually use two methods, depending on the source file (and how lazy i feel). either vapoursynth or mpv. i'll show u both!
long, the example gif has a flashy background, somewhat clear. i hope.
i source from .ts files on k24hr or twitter, fancams, and then the youtube version (which i then run through handbrake before vs or mpv) if there's absolutely no other choice. i try to avoid show music core because its backgrounds make sharpening hard, but i'm using one from there for this tutorial :) i will also use beyond live / blu-ray files when available (i.e. 4th world tour gifs i did of twice)
vapoursynth:
-> only use the deinterlace (60 slow) when it's 1080i 30fps! i use this on files from k24hrs. if the file is already 60 fps (i.e. those from srghkqud on twitter), i don't deinterlace or preprocess. i use finesharp on .7 any time i use vs!
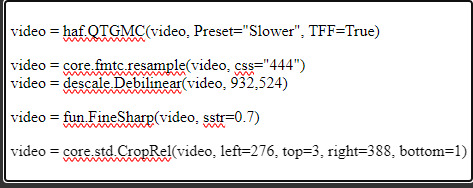
this gif is 268 x 520 px! i leave the delay at .02 and set frame rate to 60fps. on the left, it is just changed to 60fps and run through vs with the above settings. the gif on the right is sharpened!
i change my sharpening settings on every stage (and most other sets as well)! i use an action, and then adjust by the background and quality of the source! this is using my stage sharpening - but i have removed a smart sharpen and reduced opacity of other filters i use on different (clearer) files!
show music core has these really visible leds in their background, so sharpening it tends to be harder! i avoid using my 500px smart sharpens when it looks like this, and use high pass and bigger radius smaller amount smart sharpens!


sharpening settings for above: 8.0 high pass on soft light blending (40% opacity), 241 .2 smart sharpen (60% opacity), 15 15 smart sharpen (50% opacity) i should also note that on really really pale stages, i use camera raw filter to fix whites / highlights before i add the other sharpening! this does really slow down export time and can be frustrating, so i reserve it for then!
then i color! sometimes i use ezgif (which hasn't lowered quality that i've noticed) to adjust the speed, if i feel it needs it! this gif has a fine speed so i've left it as is, but i normally speed up gifs by 120% on their speed feature to make the choreo look a little faster!


left: unsharpened except vs finesharp, colored right: sharpened, colored
my coloring focus is always restoring skin, everything else is pretty much purely stylistic. i try to leave colors in the background the same! i do really like making blonde hair pinker or more toned (since they're often yellow, i always make a point of essentially toning their hair for them - i.e. tsuki in dang! set)
when i color the rest of the set, i keep the first gif open next to it to make sure everything matches! i normally copy and paste the coloring group and adjust as needed :D
also, i check how it looks in tumblr on desktop + mobile, since web safe colors adjust the look of your gifs a lot (the ones with the little dots in the middle are web safe, everything else isn't) and try to fix what doesn't look quite right. i also ask my friends if something is wrong but i'm not sure what (mainly nini (@withyouth) so shout out to her for putting up w/ me, a big part of the stage gif process)!
mpv: -> i press 'd' and make sure it is deinterlacing (again, only 1080i ones get deinterlaced)! and then i screencap. i followed this guide on setting up mpv, and always use minimal compression settings for everything i screencap.
-> i turn my files into dicom files (you can just rename them on mac, on windows it is multistep) and then scipt->load multiple dicom files (faster than loading image into stack and, in my opinion, clearer too)!
for windows: -> alt+d in your screencap folder, cmd. enter. type ren *.* *.dcm into the window. enter. close the command window!
i make my frame animation + frames to layers. once it is on the timeline, i go ahead and crop before i do anything else. i tried to make the cropping like the vs gif, but it's not identical!
sharpening: since i didn't use finesharp, i can add more in ps. this is my normal stage sharpening with nothing added or removed!


left: deinterlaced, screencapped, cropped right: deinterlaced, screencapped, cropped, sharpened -> 8.0 high pass (soft light, 65%), 500 .3 smart sharpen, 241 .2 smart sharpen (60% opacity), 15 15 smart sharpen (50% opacity)
coloring: same one as the vs gifs!


comparison:
left: vapoursynth, fully complete right: dicom, fully complete
i normally use mpv, but sometimes i don't feel like waiting on the screencaps, or i think finesharp will add texture + depth that the original doesn't have (too smooth of a filter, whatever) so i use vs! my taeyeon mr. mr. and le sserafim rock ver. sets were both done via vapoursynth, though the sharpenings are different from each other and what it shown here (i change sharpening a lot, and sometimes by set... sorry.. KJHDFGJKH)!
anyways i hope this was helpful!!! thank u for asking it means a lot u want to know!! if u want more stuff answered or shown, u can always ask :D and i hope it's clear 😭😭 i know i ramble a lot
#ask#anon#m:tutorial#niniblr#useroro#awekslook#userdoyeons#rosieblr#tuserflora#<- u all can ignore i just thought i should tag ppl KHDFKJGH#flashing tw#long post#resources
26 notes
·
View notes
Text
How to Check Motherboard Model in Windows 10 – Easy & Quick Methods

When troubleshooting hardware issues, upgrading components, or checking compatibility, knowing your motherboard model is crucial. If you’re using Windows 10 and wondering, “How to check motherboard model in Windows 10?”, you’ve come to the right place.
In this guide, we’ll walk you through multiple methods to find your motherboard model without opening your PC. These methods work on Windows 7, Windows 10, and newer versions. Let’s dive in!
Why Do You Need to Check Your Motherboard Model?
Before we explore the methods, let’s understand why identifying your motherboard model is important:
✔ Upgrading Hardware – Check compatibility for CPU, RAM, or GPU upgrades. ✔ Driver Updates – Ensure you install the correct motherboard drivers. ✔ BIOS Updates – Find the right BIOS firmware for stability and performance. ✔ Troubleshooting Issues – Diagnose and fix hardware-related problems. ✔ Warranty and Support – Contact your manufacturer for warranty-related queries.
Now, let’s explore different methods to check the motherboard model in Windows 10.
1. How to Check Motherboard Model in Windows 10 Using Command Prompt
The easiest way to check your motherboard model in Windows 10 is by using Command Prompt. Follow these steps:
1️⃣ Press Win + R, type cmd, and hit Enter to open the Command Prompt. 2️⃣ Type the following command and press Enter:wmic baseboard get product,manufacturer,version,serialnumber
3️⃣ The manufacturer, model, version, and serial number of your motherboard will be displayed.
Example Output:Manufacturer Product Version SerialNumber ASUS PRIME B450M-A Rev 1.02 XXXXXXXXXXX
This method is quick and doesn’t require any third-party software.
2. How to Find Motherboard Model in Windows 10 Using System Information
Windows 10 has a built-in tool called System Information that can help you check your motherboard model.
1️⃣ Press Win + R, type msinfo32, and hit Enter. 2️⃣ In the System Summary, look for BaseBoard Manufacturer and BaseBoard Product. 3️⃣ This will display your motherboard’s brand and model.
🔹 If the motherboard model is missing, try other methods in this guide.
3. How to Check My Motherboard Model Using Windows PowerShell
PowerShell is another built-in Windows tool that helps retrieve system details.
1️⃣ Right-click on the Start menu and select Windows PowerShell (Admin). 2️⃣ Enter the following command:Get-WmiObject Win32_BaseBoard | Format-List Product,Manufacturer,SerialNumber,Version
3️⃣ Press Enter to get your motherboard details.
4. How to Check Motherboard Model in Windows 10 Using Third-Party Software
If you want a more detailed report of your motherboard, try using third-party tools like CPU-Z or Speccy.
Using CPU-Z
1️⃣ Download and install CPU-Z. 2️⃣ Open the program and go to the Mainboard tab. 3️⃣ Here, you’ll see the motherboard manufacturer, model, chipset, and BIOS version.
Using Speccy
1️⃣ Download Speccy and install it. 2️⃣ Open Speccy and navigate to Motherboard in the left menu. 3️⃣ You’ll find detailed information about your motherboard, including manufacturer, model, and version.
These tools provide more in-depth details about your motherboard and other hardware components.
5. How to Check Motherboard Model in Windows 7 & Older Versions
If you're running Windows 7, the steps are similar to Windows 10:
✔ Command Prompt – Use wmic baseboard get product,manufacturer,version,serialnumber. ✔ System Information – Open msinfo32 and check BaseBoard details. ✔ Third-Party Tools – CPU-Z and Speccy work on Windows 7 and Windows 10.
Windows 7 users may experience limitations in System Information, but the Command Prompt method works perfectly.
6. How to Check Motherboard Model If Windows Won’t Boot?
If your system isn’t booting, you can still find your motherboard model:
1️⃣ Check Your Motherboard – Look for the model name printed on the motherboard itself. 2️⃣ BIOS/UEFI Settings – Restart your PC and press F2, F10, or DEL to enter BIOS. The model is often displayed on the main screen. 3️⃣ Check the Packaging or Invoice – If you bought a prebuilt PC, the motherboard model is listed in the invoice or manual.
Final Thoughts
Knowing how to check your motherboard model in Windows 10 is essential for upgrades, troubleshooting, and driver updates. The Command Prompt, System Information, and PowerShell methods are the easiest ways to find motherboard details without additional software. If you need detailed hardware insights, third-party tools like CPU-Z and Speccy are excellent options.
Still have questions about your motherboard model? Visit Dell Laptop Service Center in Mumbai for expert guidance on hardware upgrades, repairs, and diagnostics.
📌 Need help? Contact our experts today! ✅
#MotherboardCheck#Windows10Tips#PCUpgrade#TechGuide#LaptopRepair#MotherboardModel#Windows7Help#HardwareCheck#BIOSUpdate#PCDiagnostics#DellService#TechSupport#ComputerRepair#SystemInfo#CheckMotherboard#PCMaintenance#LaptopUpgrades#TechSolutions#ComputerTips#WindowsHelp
0 notes
Text
File Encryption in Java (Windows CMD)Downloads

Buy Now
**File Encryption in Java (Windows CMD)** is an essential tool for ensuring the security and privacy of sensitive data. It provides a practical way to safeguard files through encryption, making it invaluable for developers, businesses, and anyone dealing with confidential information. Java, being a robust and versatile programming language, offers numerous libraries and tools to simplify encryption. Paired with the Windows Command Prompt (CMD), this solution becomes a powerful and user-friendly method for file security.One of the primary advantages of using Java for file encryption is its cross-platform capabilities. A program written in Java on one platform can easily run on others, offering great flexibility. Java’s built-in libraries, such as `javax.crypto`, provide strong encryption algorithms like AES (Advanced Encryption Standard), DES (Data Encryption Standard), and RSA. These ensure that your files are securely encrypted and resistant to unauthorized access.The combination of Java and Windows CMD enables seamless automation. Developers can write Java programs to encrypt or decrypt files and execute them directly via CMD. This method saves time and eliminates the need for repetitive manual processes. Additionally, CMD’s ability to handle batch operations makes it easy to encrypt multiple files at once.This tool is also highly customizable. Java allows developers to tailor encryption methods according to specific requirements, such as implementing unique keys or using custom algorithms. For users unfamiliar with Java, the CMD interface offers straightforward command-line operations, making it accessible for beginners and professionals alike.File encryption in Java also supports secure key management, ensuring that decryption is limited to authorized individuals. The use of strong, industry-standard encryption algorithms guarantees the integrity and confidentiality of data.Moreover, this approach is well-suited for use cases such as protecting personal files, securing business data, or complying with regulatory requirements for data protection. With Java's active developer community and extensive documentation, learning and implementing file encryption is straightforward and well-supported.In conclusion, **File Encryption in Java (Windows CMD)** is a highly effective, versatile, and secure way to protect files. It empowers users with strong encryption capabilities, automation options, and cross-platform support. Whether for personal or professional use, this solution ensures data remains private, secure, and tamper-proof.
0 notes
Text
Top 5 Tools to Fix Missing or Corrupted DLL Files
If you’ve used a Windows PC for a long time, you may have encountered the dreaded “DLL not found” or “DLL is missing” error. DLL (Dynamic Link Library) files are essential for running many programs on Windows, as they contain shared code and resources that allow multiple applications to perform certain functions. When a DLL file goes missing or becomes corrupted, applications that rely on it can crash or fail to run entirely. Fortunately, there are tools available to help you diagnose and fix DLL-related issues on your computer.
System File Checker (SFC)
System File Checker (SFC) is a built-in Windows tool that scans for and repairs corrupted or missing system files, including DLLs. The tool is simple to use and can often fix many DLL errors without requiring additional downloads.
How to Use System File Checker:
1. Open Command Prompt as an Administrator:
Press Windows + S, type "cmd," and right-click on Command Prompt. Select Run as administrator.
2. Run the SFC Command:
In the Command Prompt window, type the following command and press Enter:
sfc /scannow
SFC will scan for corrupted system files and replace any damaged files with cached copies stored by Windows. This process can take some time, so be patient.
3. Review the Results:
If SFC finds and repairs issues, it will let you know. Restart your computer once the scan is complete to apply any changes.
Pros:
Free and pre-installed on Windows.
Targets system files, making it effective for core DLL issues.
Cons:
Limited to fixing system-related DLLs and might not work for DLLs specific to certain applications.
DISM (Deployment Imaging Service and Management Tool)
DISM is another built-in Windows tool that is often used alongside SFC to repair system files. While SFC checks and fixes DLL files using local resources, DISM can download and repair files directly from Windows Update, making it particularly useful if SFC alone didn’t fix the issue.
How to Use DISM:
1. Open Command Prompt as Administrator (same steps as with SFC).
2. Run the DISM Command:
Type the following command and press Enter:
DISM /Online /Cleanup-Image /RestoreHealth
This command will check for corruption and automatically repair any issues by downloading healthy files from Microsoft’s servers.
3. Restart Your Computer:
After the scan completes, restart your system to apply any repairs made by DISM.
Pros:
Works well with SFC for comprehensive system repair.
Downloads files directly from Windows Update for a higher success rate.
Cons:
Requires an active internet connection for full functionality.
Limited to Windows system files, not third-party DLLs.
DLL Suite
DLL Suite is a dedicated third-party tool specifically designed to fix DLL issues on Windows. It provides a large database of DLL files and is geared towards fixing both Windows system DLLs and third-party application DLLs. DLL Suite can automatically scan your system for missing or corrupted DLL files, download replacements, and install them with minimal user input.
Key Features of DLL Suite:
Automatic DLL repair - Scans for and repairs DLL issues automatically, making it easy for users who are not tech-savvy.
Extensive DLL database - Has a vast library of DLL files that can fix issues in both Windows system files and application files.
PC performance optimization - Offers additional optimization tools that can help improve system performance.
How to Use DLL Suite:
Download and install DLL Suite - Go to the official DLL Suite website, download the installer, and follow the on-screen instructions to install it.
Run a system scan - Open the application and initiate a system scan. DLL Suite will search for missing or corrupted DLLs and recommend replacements.
Repair DLL errors - Once the scan is complete, click on the repair button to fix the issues automatically.
Pros:
Fixes both system and application DLLs.
Easy-to-use interface with minimal technical knowledge required.
Cons:
Paid software, although it offers a trial version.
Requires an internet connection to access its DLL database.
Glarysoft Registry Repair
Glarysoft Registry Repair is a registry cleaner tool that can help resolve DLL errors caused by issues in the Windows registry. Corrupt or incorrect entries in the registry are common causes of DLL errors, and by cleaning the registry, you can often fix DLL-related issues without downloading new files. Glarysoft Registry Repair scans and removes unnecessary or corrupt registry entries, including those related to DLL files.
How to Use Glarysoft Registry Repair:
Download and install the software - Visit the Glarysoft website, download the installer, and complete the installation process.
Launch a registry scan - Open the software and select the Registry Repair option. The program will then scan your registry for issues.
Fix detected issues - After the scan, review the detected issues and click Repair to resolve them.
Pros:
Effective for resolving registry-related DLL issues.
Free to use and includes other system optimization tools.
Cons:
Primarily a registry cleaner, so it doesn’t directly replace missing DLL files.
Can cause issues if used without care, as it modifies the Windows registry.
CCleaner
CCleaner is a popular system maintenance tool that includes a registry cleaner capable of fixing DLL issues related to registry errors. While CCleaner doesn’t replace missing DLL files, it’s useful for resolving registry entries pointing to missing or corrupted DLLs, potentially fixing the root cause of DLL errors.
How to Use CCleaner for DLL Issues:
Download and install CCleaner - Visit the official CCleaner website, download the installer, and complete the setup process.
Run the registry cleaner - Open CCleaner, navigate to the Registry tab, and click Scan for Issues.
Repair DLL-related registry issues - After the scan, review the issues found, select them, and click Fix Selected Issues. CCleaner will prompt you to back up your registry before making changes—this is a good safety measure.
Restart your PC - Restarting your computer allows any changes to take effect and can resolve lingering DLL issues.
Pros:
Comprehensive system maintenance tool, not just a registry cleaner.
Easy to use with a well-designed interface.
Cons:
Doesn’t replace missing DLLs, only addresses registry-related issues.
Be cautious while using registry tools to avoid unintentional damage.
Additional Tips for Fixing DLL Errors
Reinstall the affected application - Sometimes, simply reinstalling the application that’s throwing the DLL error will replace any missing or corrupt files.
Update Windows - Make sure your operating system is up-to-date. Microsoft regularly releases patches that include updated DLL files.
Avoid downloading DLLs from unofficial sources - Many websites offer DLL files, but downloading from unofficial sources can expose your system to malware. Instead, rely on the tools listed above or obtain DLLs from the software developer’s website.
Missing or corrupted DLL files can be a hassle, but with the right tools, you can fix these issues and keep your PC running smoothly. WikiDll is the best option if you want to download missing DLL files. They offer one of the largest databases of DLL files along with their descriptions. You can download all the necessary DLL files from WikiDll for absolutely free.
0 notes
Text
Proficient Automation Tester by Leveraging Docker with CI/CD

In today’s fast-paced software development environment, automation testing plays a pivotal role in delivering high-quality software efficiently. With continuous integration and continuous delivery (CI/CD) pipelines becoming the standard for modern software development, Docker has emerged as an indispensable tool for automation testers. By integrating Docker with CI/CD pipelines, automation testers can achieve greater test reliability, consistency, and scalability. In this guide, we’ll explore how to become a proficient automation tester by leveraging Docker in CI/CD environments, enabling you to stay ahead in the competitive world of software testing.
Why Docker is Essential for Automation Testing
Docker revolutionizes software testing by providing containerized environments that are consistent across development, testing, and production. Traditional testing often involves multiple environments with different configurations, leading to the common problem of "it works on my machine." Docker eliminates these inconsistencies by allowing automation testers to:
Run tests in isolated environments: Each Docker container behaves like a self-contained unit, with its own dependencies and configurations.
Ensure environment parity: The same Docker image can be used across various stages of development and deployment, ensuring that the environment where the code runs is identical to the one where it is tested.
Enhance scalability: Automation testers can spin up multiple Docker containers to parallelize test execution, speeding up testing processes significantly.
Setting Up Docker for Automation Testing
1. Creating Docker Images for Testing Environments
To begin with Docker for automation testing, the first step is to create a Docker image that houses the necessary testing tools, frameworks, and dependencies. Whether you're using Selenium WebDriver, Cypress, or any other automation tool, you can configure a Dockerfile to set up your desired environment.
A Dockerfile is a text document that contains instructions for assembling a Docker image. Below is an example of a simple Dockerfile for running Selenium WebDriver tests:
dockerfile
Copy code
FROM selenium/standalone-chrome
RUN apt-get update && apt-get install -y python3-pip
COPY ./requirements.txt /app/requirements.txt
WORKDIR /app
RUN pip3 install -r requirements.txt
COPY . /app
CMD ["python3", "test_suite.py"]
FROM selenium/standalone-chrome: This line pulls a pre-built Docker image with Chrome and Selenium WebDriver.
RUN commands: These install any additional dependencies, such as Python libraries needed for running your automation scripts.
COPY and WORKDIR: These copy your local test scripts and dependencies into the container’s file system.
After creating the Dockerfile, build the image using the following command:
bash
Copy code
docker build -t automation-test-image .
Once your Docker image is ready, it can be used to run tests in a containerized environment, ensuring consistency across different machines and stages of deployment.
2. Running Automated Tests in Docker Containers
Running tests in Docker containers ensures that the tests are executed in an isolated and consistent environment. Here’s how to run your tests using Docker:
bash
Copy code
docker run -it automation-test-image
This command will spin up a new container from the automation-test-image and execute the test_suite.py script that you defined in the Dockerfile.
For parallel execution, you can launch multiple containers simultaneously. Docker’s ability to scale horizontally is incredibly useful for reducing test execution time, especially in CI/CD pipelines where quick feedback is essential.
Integrating Docker with CI/CD Pipelines
The true power of Docker shines when integrated with CI/CD pipelines, ensuring automated and reliable testing at every stage of the software delivery process. Let’s look at how Docker can be integrated with popular CI/CD tools like Jenkins, GitLab CI, and CircleCI.
1. Docker with Jenkins for Automation Testing
Jenkins, one of the most popular CI/CD tools, integrates seamlessly with Docker. By using Docker containers, Jenkins can run tests in isolated environments, making it easier to manage dependencies and ensure consistency.
In your Jenkins pipeline configuration, you can define stages that spin up Docker containers to run your tests. Here's an example of how to do that using a Jenkinsfile:
groovy
Copy code
pipeline {
agent any
stages {
stage('Build') {
steps {
script {
docker.build('automation-test-image').inside {
sh 'python3 test_suite.py'
}
}
}
}
stage('Test') {
steps {
script {
docker.image('automation-test-image').inside {
sh 'pytest tests/'
}
}
}
}
}
}
docker.build(): This builds the Docker image inside the Jenkins pipeline.
docker.image(): This pulls the pre-built image and runs the tests in the container.
2. Docker with GitLab CI
In GitLab CI, Docker can be used to run tests within a defined pipeline, ensuring that each stage (build, test, and deploy) operates within an isolated container. Below is an example .gitlab-ci.yml file:
yaml
Copy code
stages:
- build
- test
build:
image: docker:latest
script:
- docker build -t automation-test-image .
test:
image: automation-test-image
script:
- pytest tests/
docker build: This command builds the Docker image in the build stage.
pytest tests/: This runs the automation tests using Pytest inside the Docker container during the test stage.
3. Docker with CircleCI
Similarly, in CircleCI, Docker containers are used to provide an isolated and repeatable testing environment. Below is a sample config.yml file for CircleCI:
yaml
Copy code
version: 2.1
executors:
docker-executor:
docker:
- image: automation-test-image
jobs:
build:
executor: docker-executor
steps:
- checkout
- run: docker build -t automation-test-image .
test:
executor: docker-executor
steps:
- run: docker run automation-test-image pytest tests/
In CircleCI, you can define custom Docker executors, which allow your jobs to run within a specified Docker container. This provides the same environment every time, ensuring reliable test results.
Best Practices for Dockerized Automation Testing in CI/CD
1. Use Lightweight Containers
When working with Docker, it's essential to keep your images as lightweight as possible. Larger images can increase build times and slow down the CI/CD pipeline. Remove unnecessary dependencies and use minimal base images like Alpine Linux.
2. Isolate Test Data
Ensure that your test data and configurations are isolated from other containers. This can be done by using Docker volumes or environment variables. Isolating test data guarantees that each test run is independent, avoiding potential conflicts or data contamination.
3. Parallelize Test Execution
Take full advantage of Docker’s scalability by running tests in parallel across multiple containers. Many CI/CD tools allow for parallel job execution, which can significantly reduce test times for large projects.
4. Continuous Monitoring and Alerts
Integrate monitoring tools within your CI/CD pipeline to track the health of your Dockerized tests. Tools like Prometheus and Grafana can be used to monitor the performance and stability of containers, helping you identify and resolve issues quickly.
Conclusion: Master Automation Testing with Docker and CI/CD
By leveraging Docker in conjunction with CI/CD pipelines, automation testers can dramatically improve the efficiency, scalability, and reliability of their tests. Dockerized environments eliminate inconsistencies, speed up test execution, and ensure smooth integrations across different stages of software development. Whether you’re working with Jenkins, GitLab, or CircleCI, Docker provides the perfect toolset to become a proficient automation tester.
0 notes
Text
Stealthy RedLine Malware Variant Leverages Lua Bytecode for Advanced Attacks

McAfee Uncovers Sophisticated Information Stealer Exploiting GitHub Repositories Cybersecurity researchers at McAfee Labs have uncovered a new and sophisticated variant of the notorious RedLine Stealer malware that employs Lua bytecode for enhanced stealth and evasion capabilities. This advanced information-stealing malware targets gamers by masquerading as game cheats, distributed through ZIP archives hosted on official Microsoft repositories on GitHub. First documented in March 2020, RedLine Stealer is a prevalent off-the-shelf malware strain capable of harvesting sensitive data from cryptocurrency wallets, VPN software, web browsers, and more. Over the years, various threat actors have co-opted this malware into their attack chains, making it a widespread threat across multiple continents. Abusing Trust in GitHub Repositories The latest infection sequence identified by McAfee abuses GitHub by uploading malware-laden payloads in the form of ZIP archives to two of Microsoft's official repositories: the C++ Standard Library (STL) and vcpkg. This technique exploits the trust associated with these repositories, allowing threat actors to distribute malware more effectively. The ZIP files, disguised as game cheats named "Cheat.Lab.2.7.2.zip" and "Cheater.Pro.1.6.0.zip", are no longer available for download from the Microsoft repositories.
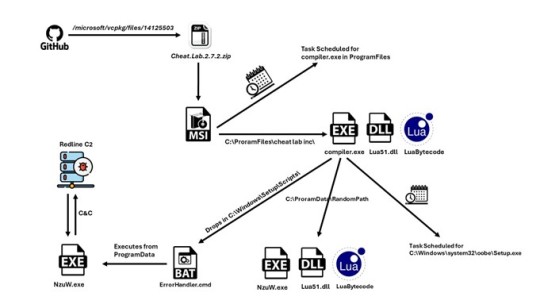
Stealthy Execution and Persistence The ZIP archives contain an MSI installer that runs the malicious Lua bytecode, providing a stealthy execution method by avoiding easily recognizable scripts. The installer also sets up persistence on the host using a scheduled task and drops a CMD file to run the malware under a different name, enhancing evasion capabilities. Once executed, the malware functions as a backdoor, communicating with a command-and-control (C2) server over HTTP, which has been previously associated with RedLine Stealer. It can carry out tasks fetched from the C2 server, such as taking screenshots, and exfiltrate the results back to the server, compromising sensitive information. This campaign highlights the evolving tactics employed by threat actors, including the abuse of trusted repositories and the use of stealthy execution methods like Lua bytecode. As the threat landscape continues to evolve, organizations and individuals must remain vigilant and implement robust security measures, including regular software updates, employee awareness training, and the deployment of advanced security solutions. Read the full article
0 notes
Text
Tutorial: How to use WMLgettext on Windows to make a .pot file for translating your Wesnoth UMC (actually, no nonsense, no technobabble)
Want to translate your UMC, or make it easier for others to translate, but struggle to make the template file? If you’re like me, you are not a Linux user yet, and all of the available tutorials may as well be written in another language already. GetText was made for Linux users after all, and it expects a level of computer literacy that us Windows users may not quite measure up to, so WMLgettext may seem no different.
But it’s actually far easier than they make it sound. Here is how you really use it.
You don’t need to know any Python, but you need Python installed to use WMLgettext. Make sure when you’re installing it, tick the “add to PATH” checkbox in the installer!
Find “GUI.pyw” in the folders of your preferred Wesnoth. It should be under \data\tools\ in its file location.
Shift + right-click on GUI.pyw, and select “Copy as path”
Open the Command Prompter. If you don’t know how to do this, use your Start search bar at the bottom of the screen and search for “cmd”. Its icon is mostly a black rectangle and it should be called either “cmd” or “Command Prompt”; choose to open this program.
Once the Command Prompt is open, type “python” (with no quotes), a space, then paste the text you copied earlier. For me, this would be python "C:\Program Files\Battle for Wesnoth 1.17.24\data\tools\GUI.pyw"
Press the Enter key.
If you have followed the instructions, a window titled “Maintenance Tools GUI” should have just popped up. This is what you’ve been looking for!
In Maintenance Tools GUI, click the tab called “wmlgettext”
Under “Working Directory”, click “Browse” and navigate to the add-on you want to translate. You don’t need to select a specific folder inside the add-on, just the main folder that all of the other folders are kept inside of. This points the program towards the entirety of the add-on you want to translate.
Under “Output Directory”, browse for your add-on’s “translations” folder. This will choose where the .pot file is placed when it’s complete, and it also creates a translations folder for you if you don’t already have one.
Under “Advanced options”, check “Filter textdomains”, and in its little box type in the textdomain of your add-on. This makes it so gettext only creates a template using text and documents specified under that textdomain, and is thus useful if your add-on uses multiple textdomains (ex. if it contains both an Era and a Campaign, and you want them to have different translation files).
Click the button with a triangular symbol that looks like a “play” button; when moused over, this button should say “Run wmlgettext”
Check your add-on’s translation folder once it’s finished running. There’s your long-awaited .pot file!

Here is how your screen would likely be looking if you were translating the Merry Christmas campaign.
If you already have completely memorized where GUI.pyw is kept, if you want you can skip steps 2 and 3, and during step 5 you can type in the file path instead of copy-pasting it. Now you can finally use your program of choice to translate your add-on! Happy translating!
0 notes
Text
Docker difference between cmd and entrypoint
In Docker, both CMD and ENTRYPOINT are instructions used in a Dockerfile to define how a container should run an application. However, they serve slightly different purposes CMD: This instruction specifies the default command to be executed when a container starts. It can be overridden by passing arguments to docker run. If a Dockerfile has multiple CMD instructions, only the last one will take…
View On WordPress
0 notes
Text
The safest way to run multiple shell commands on remote Linux, *BSD, macOS or Unix-like machines is:
ssh -t user@box -- "sh -c 'cmd' "
ssh -t user@box -- "bash -c 'cmd1 && cmd2' "
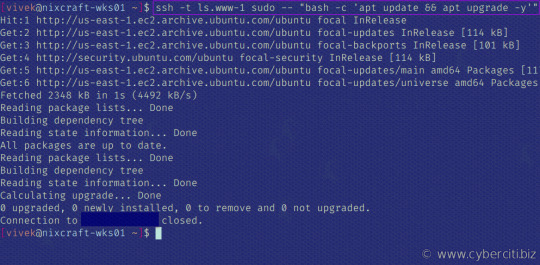
See: How To Run Multiple SSH Command On Remote Machine And Exit Safely
15 notes
·
View notes
Text
Devil, Arauk

Image by “JML” © Frog God Games
[In Swords and Wizardry, there’s only three alignments: Law, Neutral, Chaos. Very basic D&D. And all fiends are demons. Considering how many different kinds of evil outsiders are in PFRPG, I decided to move around some of these demons in converting them.]
Devil, Arauk CR 9 LE Outsider (extraplanar) This man-sized creature has the head of a horsefly and a hairy humanoid torso with four arms. Its wings are large and leathery, and its legs are like those of a goat.
Arauks are sometimes called fly devils, due to their hideous visages. Despite this grotesque appearance, they are masters of unconventional warfare. While bearded devils march en masse and erinyes bring death with their arrows, arauks use poison, disease and famine to weaken enemy armies and shatter their morale. They are excellent liars, and are sometimes used as ambassadors and negotiators in order to buy infernal forces time to set up a devastating strike.
In combat, arauks favor a combination of weapon attacks with their claws and bites. Arauks collect weapons and switch between them as the situation warrants, but they favor polearms to keep their distance. The bite of an arauk inflicts disease, and a creature infected in this way can spread the disease to everyone they meet even before they feel its effects. Arauks often use hit and run tactics to expose multiple enemies to this contagion. Their spell-like abilities are especially useful for breaking up formations, and they rarely fight outside a cloud of cloaking darkness.
An arauk often works as an intermediary between other kinds of devils, relaying commands down the chain of command and reporting intelligence to their higher ups. A single arauk will often have authority over a squad of accuser devils that act as spies and informants, then pass on information they gather to bone devil inquisitors or ice devil tacticians. Arauks are creative thinkers, but have a tendency towards arrogance and overconfidence. The first arauks were created by Baalzebuul himself, and the fly devils have inherited his imperious nature.
Arauk CR 9 XP 6,400 LE Medium outsider (devil, evil, extraplanar, lawful) Init +4; Senses darkvision 60 ft., Perception +16, see in darkness Defense AC 22, touch 14, flat-footed 18 (+4 Dex, +8 natural) hp 114 (12d10+48) Fort +8, Ref +12, Will +9 DR 10/good; Immune fire, poison; Resist acid 10, cold 10; SR 20 Defensive Abilities swarmwalker Offense Speed 30 ft., fly 40 ft. (average) Melee +1 glaive +16/+11/+6 (1d10+5/x3), 2 claws +13 (1d6+1), bite +13 (1d8+1 plus disease) or 4 claws +15 (1d6+3), bite +15 (1d8+3 plus disease) Space 5 ft.; Reach 5 ft. (10 ft. with glaive) Special Attacks plaguebearer Spell-like Abilities CL 9th, concentration +12 (+16 casting defensively) At will—darkness, greater teleport (self plus 50 lbs. objects only) 3/day—fear (DC 17), fireball (DC 16), glibness 1/day—blight (DC 17), cloudkill (DC 18), insect plague, summon (level 4, 2 bearded devils, 50%) Statistics Str 16, Dex 19, Con 18, Int 17, Wis 12, Cha 17 Base Atk +12; CMB +16; CMD 30 Feats Blind-fight, Combat Casting, Combat Expertise, Combat Reflexes, Flyby Attack, Multiattack Skills Acrobatics +19, Bluff +18, Fly +19, Knowledge (arcana) +15, Knowledge (history, planes) +18, Perception +16, Sense Motive +16, Spellcraft +18, Stealth +19 Languages Celestial, Draconic, Infernal, telepathy 100 ft. Ecology Environment any land (Hell) Organization solitary, pair or council (3-8) Treasure standard (+1 glaive, other treasure) Special Abilities Disease (Ex) Devil chills; bite—injury; save Fort DC 20; onset 1d4 days; effect 1d4 Str damage; cure 3 consecutive saves. The save DC is Constitution based. Plaguebearer (Su) A creature that has failed its save against an arauk’s disease spreads that disease to all creatures it comes into contact with, even before its symptoms become apparent. Devils are immune to this disease. The save DC for this version of devil chills is DC 14. This is a curse, necromancy effect, and can be removed with remove curse or similar effects. Swarmwalker (Ex) An arauk takes no damage from swarms, and is immune to the distraction ability of swarms.
47 notes
·
View notes
Text
How to increase FPS in games
It is frustrating to lag during a fight or important scene. However, it may not be your computer itself, but the settings you’re running it on. I will be going over some of the most basic tweaks that anyone can do. Disclaimer, I am not an expert nor am I responsible for damages done to your device. These tweaks are based off my own experiences.
1. MEMORY
The first tweak would be to first of all check to make sure you don’t have multiple applications running at a time. It is possible that you are using up all your memory from background apps and is the issue to a laggy computer. Freeing up this memory storage should by far be the main culprit. Below is a blog that discusses about memory usage. Check it out for more indepth information.
https://www.compuram.de/blog/en/maximise-the-maximum/
2. SETTINGS
Check to make sure your hardware is compatible for your settings. If you know your computer/laptop is lackluster and old, don’t run your games at the highest quality settings. Take a second and check to see if the issue still arises on the lowest settings. Usually this fixes the issues. Below is a link to some optimal settings for valorant.
https://prosettings.net/best-valorant-settings-options-guide/
3. COMMANDS
If you have high FPS, but don’t “feel it”, there is a possibility it could be the dynamic tick. What it does is it stops the computer’s system clock from working when your computer is inactive. By disabling this, it prevents issues from arising from tickless mode. You just need to type in CMD into the windows search bar and open as administrator. Type in these two codes in order,
“bcdedit /set disabledynamictick yes”
and
“bcdedit /set useplatformclock true”
4. WINDOWS OPTIMIZATION
The last thing I would recommend would be to optimize the windows system such as updating windows, deleting unused files, checking for malware, etc.
Below is a link to a youtube video that goes over the basic windows optimizations.
I hope you guys enjoyed my guide and good luck with your games!
1 note
·
View note
Text
10 Quick Tips for Windows 7, 8.1, as well as 10

One of the most prominent or extensively utilized Windows versions are Windows 7, Windows 8.1 as well as Windows 10. Windows 7 with codename Vienna or Blackcomb becomes part of the Windows NT family members as well as was released back in July 22, 2009. This version was produced to attend to the essential function of its precursor which is the Windows Vista.
Windows 7 has obtained substantial positive statements because of its raised performance, intuitive interface as well as numerous various other kept in mind renovations. As a matter of fact, some movie critics have actually strongly explained that Windows 7 is the best Windows variation ever before. One of the most effective features of this variation is that customers currently have lots of choices to really increase their efficiency while dealing with their computer system.
Right here are the top 10 techniques as well as tips for Windows 7:
1. Use Windows 7 keyboard faster ways such as pressing Ctrl + Shift + N to develop a new folder. 2. Make one of the most out of Jump Lists so you can easily access any folder or home windows that you normally make use of. 3. Usage concealed worldwide themes or wallpapers by following these actions: Kind C: \ Windows \ Globalization \ MCT in the search box at the Start Menu and after that press Enter. Windows 7 will after that reveal you a listing of sub-folders for each and every nation. Look for your favored theme or history. 4. Windows 7 enables users to make use of multiple monitors for whatever objective it might serve.windows 10 pro product key 5. Customers can currently acquire a power performance report wherein the operating system can have a look at your laptop's energy use. To do this, just run a command prompt by typing cmd in the search box. When the symbol shows up, appropriate click and then select "Run as administrator." Inside the command box, kind powercfg -energy-output \ Folder \ Energy_Report. HTML. 6. Windows 7 has an amazing taskbar with a variety of attributes that can assist any person maximize their work. 7. Use check boxes for far better efficiency. This indicates that you can now make it possible for check boxes for folders and data in bulk. 8. Users can currently tailor the notice location or the system tray so they can just see the icons that they regularly use. 9. Use the shake function. This function will certainly help individuals remove all the clutter in a single action. 10. Aero Snap is just one of Windows 7 functions wherein users can make the most of a window by dragging the icon sideways of the display. Next off on the listing is Windows 8.1 with codename Blue which is an upgrade for the Windows 8 version. Most individuals claim that Windows 8.1 is the better version of the Windows 8 with several essential tweaks. Below are a few pointers and methods for Windows 8.1: 1. The ever before trusted Start switch is back on Windows 8.1 in which users can check out the choices. 2. Users can now customize the house display ceramic tiles as well as regroup similar tiles. 3. Windows 8.1 currently has an option to allow customers go directly to the desktop instead of managing the begin display floor tiles. 4. Windows 8.1 allows users to comfortably organize their apps in different good manners such as identifying them by the installment date or for other reason. 5. Utilize the app bars. 6. Windows 8.1 customers now have the alternative to make the Start switch better. 7. Applications that are no more in use can now be stopped from running in the background. 8. Customers can now easily change the screen settings such as positioning as well as resolution. 9. Windows 8.1 enables individuals to see several applications all at the same time. 10 With Windows 8.1, customers have the option to save any type of online post so they can review it also when they are offline. Windows 10. Windows 10 is the current as well as most talked about Windows version which was first launched for consumers on July 29, 2015. Windows 10 is currently being provided for free where many existing individuals are making the upgrade.
Here are a couple of tips and also tricks which can make your Windows 10 experience much better:
1. Beginning with the GodMode in which individuals can get an advanced control board. Simply develop a new folder anywhere and then relabel it as GodMode. 2. Customize the Start food selection to make the computer work for you. 3. Users currently have the alternative to schedule Windows updates to stay clear of all the pesky suggestions or automatic updates. 4. You can conveniently change to tablet mode with this Windows variation if you have a touchscreen gadget. 5. If you are utilizing many applications, Windows 10 permits users to produce online desktops which are wonderful. 6. If you are making use of a laptop, Windows 10 can conserve your battery life. 7. Greet to Windows 10's biometric safety function where customers can open their COMPUTER with their finger print. 8. This Windows variations has actually added a controversial attribute which permits users to restrict their Wi-Fi to others. 9. Customers can now print to PDF without using one more utility. 10. Windows 10 deals customers the possibility to reverse their upgrade within a month of installation. The most preferred or commonly used Windows versions are Windows 7, Windows 8.1 and Windows 10. Windows 7 with codename Vienna or Blackcomb is component of the Windows NT family and was launched back in July 22, 2009. Windows 7 has obtained substantial positive statements due to its raised performance, instinctive user interface as well as numerous other noted improvements. Some critics have actually highly pointed out that Windows 7 is the finest Windows variation ever. Windows 7 will after that show you a list of sub-folders for each nation.
1 note
·
View note