#Setting QR version number
Explore tagged Tumblr posts
Visit Tumblr Blog
Explore Tumblr blogs with no restrictions, modern design and the best experience.
Last Seen Tumblr Blogs


Fun Fact
Kazakhstan’s Minister of Communications and Informatics has blocked the Tumblr site because it contained 60 sites of terrorism, extremism, and pornography in 2015.
Text
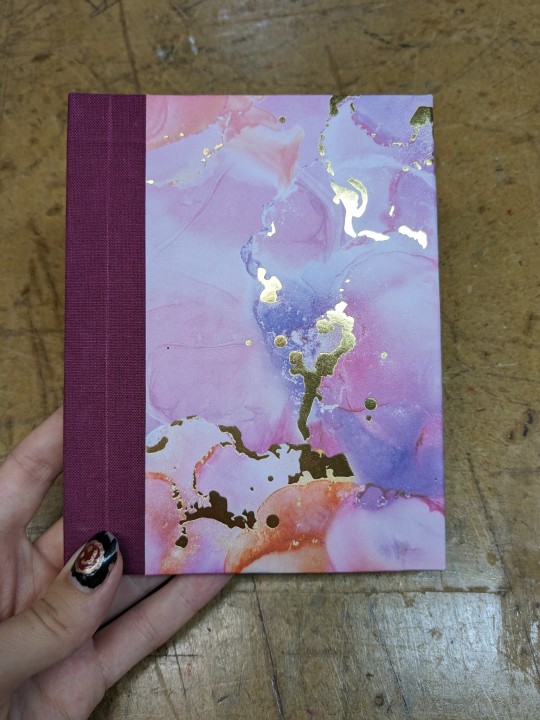
The Mutandaverse — an anthology

Finally! After over a month of work, it is finally complete!
Jonathan Edelstein has always been one of my favourite short fiction writers, as evidenced by my numerous binds of his previous works. But this is my most ambitious of them all to date. A 335-page chonker of his short stories about the Mutandaverse — A sci-fi, post-apocalyptic, Afrocentric and Afrofuturistic universe.


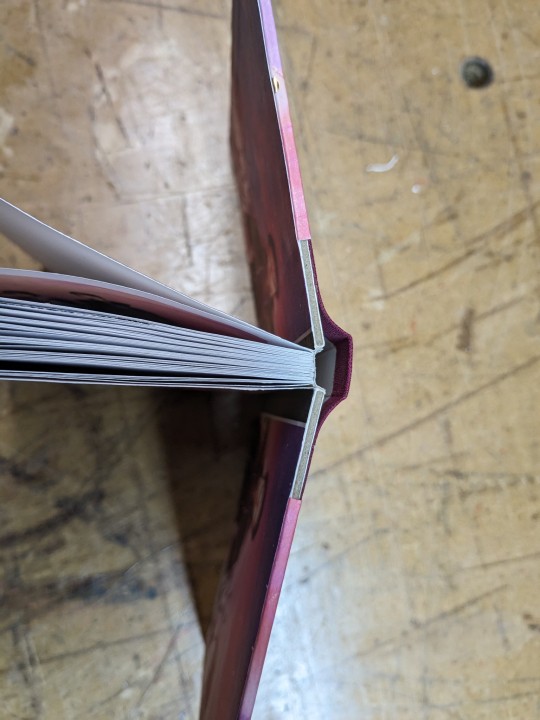
Despite not having any proper presses, I aspired to create a book with a rounded and backed spine. And although the overall result is a little squished, the mushroom shape of the spine is enough for me to call this project somewhat of a success!
For the cover, I wanted the reader to be able to 'peek' into the Mutandaverse, hence the cutting of a 'window' to which the setting showcases itself. I'll talk about the image later, but I like how the juxtaposition of the skyscrapers and the suited African man entices the eyes.


For this bind, I wanted the setting of the Mutandaverse to permeate through the entire book, pages, text, and all. As such, I went to great lengths to convey the anthology's vibes in design and form. For one, I scoured font sites to find a typeface that evokes a Black Panther-ish vibe: both modernist yet also African in feeling.


Instead of using Arabic numerals, I wanted the very numbers of the stories to evoke the Afrofuturist/post-apocalypse feel, so I eschewed using Arabic numbers and instead looked to Sub-Saharan scripts for inspiration. All 9 stories in the bind are marked using the Njoya script, from Cameroon.
As the stories of The Mutandaverse are scattered throughout the internet in various forums and archives, I wanted the reader to be able to trace them digitally. So I opted to have a story header that incorporates QR codes: one to the original story and the other to a version that's saved in the Internet Archive. Each story header comes complete with an Njoya story number and a header picture that is different for every story!


Finally, I wanted to use art by Sub-Saharan artists for the endpapers. Jonathan used the artworks of Ikiré Jones from Nigeria as a basis for some of his fiction, and it is those that I print and use as endpapers. Out of all the artists, Ikiré Jones' truly evoke the messy feel of what it's like to live in a universe where starships and skyscrapers mix with slums and street culture.
I have read the short stories of the Mutandaverse for over a decade now, and I hope my bind have made them justice.
#bookbinding#fanbinding#my bookbinds#Jonathan Edelstein#The Mutandaverse#Afrocentrism#Afrofuturistic#Afrofuturism#anthology
75 notes
·
View notes
Text
Big e-Aadhaar revamp on the cards! No more photocopies of Aadhaar card required, updation to become easy; check top steps
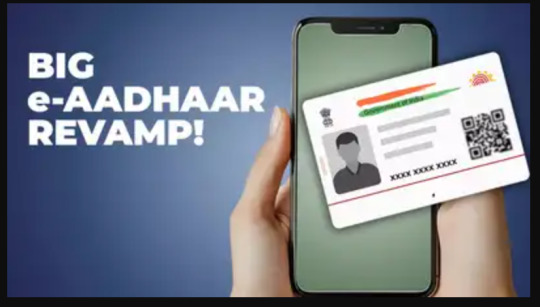
The Unique Identification Authority of India (UIDAI) is set to revamp e-Aadhaar, introducing a QR code-based system to eliminate need for physical copies. Updates, excluding biometrics, will be automated through integrated databases, reducing center visits.
Big e-Aadhaar revamp soon! In the coming weeks, a new QR code-based application will eliminate the need for Aadhaar card physical photocopies to be submitted. Users can share digital versions of their Aadhaar, choosing between complete or masked formats.By November, the Unique Identification Authority of India (UIDAI) is also planning to introduce a streamlined procedure that will significantly reduce visits to Aadhaar centres for updation.Except for biometric submissions, updates to address and other information will be automated through integration with various official databases. These include birth certificates, matriculation records, driving licences, passports, PAN cards, PDS and MNREGA systems.This initiative aims to simplify the process for citizens whilst reducing fraudulent document submissions for Aadhaar registration. Additionally, discussions are in progress to incorporate electricity bill records to enhance user convenience.Also Read | ITR filing FY 2024-25: Several changes in Form 16! Top things salaried taxpayers shouldn’t missUIDAI's chief executive officer Bhuvnesh Kumar has informed TOI about a newly developed application, with approximately 2,000 out of one lakh machines already utilising this new system."You will soon be able to do everything sitting at home other than providing fingerprints and IRIS," he said.e-Aadhaar Revamp: Explained in Top PointsThe application will enable users to update personal details including addresses, telephone numbers, names and incorrect birth date corrections.The introduction of QR code-based Aadhaar transfers between mobile devices or applications is considered essential for preventing misuse, with potential applications ranging from hotel check-ins to identity verification during rail travel. "It offers maximum user control over your own data and can be shared only with consent," Kumar said.The system can additionally be implemented by sub-registrars and registrars during property registration procedures to prevent fraudulent activities.Kumar indicated that UIDAI is working with state governments to incorporate Aadhaar verification for individuals registering properties, aiming to reduce instances of fraud.UIDAI has commenced discussions with CBSE and additional examination boards to facilitate biometric and other data updates for children, which needs to be completed during two age brackets: between five and seven years, and between 15 and 17 years. They are planning a dedicated campaign to address the pending updates, which include eight crore cases for the first update (children aged five to seven years) and 10 crore cases for the second update.Additionally, UIDAI is collaborating with various organisations, including security agencies and hospitality establishments, to extend Aadhaar services to entities where its use is not mandatory.Stay informed with the latest business news, updates on bank holidays and public holidays.
25 notes
·
View notes
Text


Keep Your Head Up to the Sky (As Your Day Unfolds) by alphera [Twitter]
Illustrated by Shirou_UOHS @shirou-oh-sakura
Fandom: 全职高手 | The King's Avatar
Rating: General Audiences
Category: M/M
Words: 9 270
Time is rarely kind, and impossible to escape. At the ripe old age of 30, Han Wenqing retires from the Glory Professional Alliance and moves forward the only way he knows how: fearlessly and without hesitation.
About the Book
FONTS: Coelacanth, Segoe UI Emoji
IMAGES: Illustrations by Shirou; pastel sky ID: 7007221 from Rawpixel; dark blue sky ID: 7044483 from Rawpixel; Han Wenqing & Desert Dust image from The King's Avatar Wikia; Ye Xiu & Lord Grim image also from TKA Wikia; Glory card png also made by Shirou via Discord
MATERIALS: regular ol' printer paper (8.5"x11", 20lb, 96 bright); ~1.5mm chipboard; Neenah cardstock (8.5"x11", 65lb, bright white); Iris bookcloth (Madeira colour); paper from Gilded Ink paper pad by Recollections; waxed linen thread (30/3 size, white); wheat paste (1:4 flour:water)
PROGRAMS USED: typeset in Affinity Publisher 2; endpapers designed with Affinity Designer 2 and Affinity Photo 2; imposed with Renegade's Community Imposer (settings: Quarto, snug against binding edge, signatures of 2 sheets).
Text & QR codes printed with colour laser printer (duplex, flip long edge), images printed with inkjet printer (HP Envy 5055; one sheet at a time, single sided, place facedown in tray)
BINDING: quarto (quarter-letter) size, sewn board binding with french link stitch and breakaway spine.
.
Absolutely LOVED this story! I've reread this one a number of times, and keep going back for more. Alphera's writing is so good! Ye Xiu is the series protagonist so things usually follow him, which makes it refreshing to see a story through Han Wenqing's eyes. And the author does it SO WELL! AHHH!
It's been a while since my first read-through, but I'm pretty sure this was the first TKA fic that I actually downloaded and started typesetting. Absolutely chuffed to have it finished! (Love me some growth-- the typeset looks a LOT better than my earlier attempts!)
RAMBLES
Another sewn board binding and breakaway spine! Since this isn't my first go at it, the construction of the book was considerably faster and smoother than my last one. It's just as well, because I ran into a speed bump that stretched out how long it took to typeset and print.
The culprit: (very pretty) illustrations. My laser's colour printing capabilities are shot to hell, so I used my inkjet for the artwork. This involved creating 3 copies of my typeset: 1) the completed typeset; 2) just the text, images hidden; 3) just the images, text hidden/white. Then I ran them through the imposer and printed the text version. The real issue was figuring out how to feed the sheets through my inkjet printer to print the images where I want them. Had to go one page at a time, single-sided. (Just need to place sheet facedown in the tray. So flip along vertical axis.) It took a while, but I got there in the end. And the results were SO worth it! 😊
For the scene breaks I left them as written. I had tried inserting images of the Glory Logo and account card, or using crossed swords emojis ⚔️, but nothing I tried worked as well as what the author did. (It's really neat! Different characters were used to indicate the direction of the timeskip: >>>> for a jump forward in time; <<<< for a flash into the past; and ==== for regular scene breaks, a 'next' rather than 'before' or 'later/after'.)
The cover and endpapers were based off of Shirou's fantastic cover illustration of HQW and YX walking hand-in-hand down a beach at sunset. The art itself is phenomenal so I had it stand alone as a frontispiece and didn't do anything fancy with the title page. For the covers, I looked through my decorative paper stash for something red or black to represent HWQ or Team Tyranny. What I found was paper with pinks, oranges, and purples similar to that illustration -- and that was that. I liked how the colours matched the art, and the gold splashed across it. (Gold for victory, gold for wedding rings and a happy golden future together.)
(Sidenote: I love how the beginning of the end of HWQ's career as an e-sports player "starts with a tingle in his ring finger", leading him and YX to taking the next steps in their relationship and eventually getting married 💍🖐)
I went with a red bookcloth for the spine because it's a common team colour for Tyranny, Excellent Era, and Happy. It also represents good fortune, courage, passion, and love -- things that come to mind when I think about YX, HWQ, and HanYe. The particular shade of red I used is Madeira. It's darker than Ruby Red and leans a little cooler, which suits the decorative paper more.
The endpapers use two background images (overlayed, adjusted, using multiple blending modes) and some images of HWQ and YX from The King's Avatar Wikia.
The background images are from Rawpixel -- I was just minding my own business looking for images of clouds and maybe some mountains to represent overcoming challenges/glory/looking up to the sky, when I found some clouds with the same sunset colours of Shirou's art. Figured it was too perfect, and if I'm going to lean into that design-wise, I might as well go whole hog and full-ass it. Then I found a starry night sky to add some darker blues and stars to it to match. After that it was a matter of overlapping them and positioning them to fit. I also grabbed some images of HWQ and YX from the King's Avatar Wikia and added them to it because HanYe. (After removing the backgrounds).
#Keep Your Head Up to the Sky (As Your Day Unfolds)#alphera#fanfiction#bookbinding#the king's avatar#qzgs#tka#sewn board binding
97 notes
·
View notes
Text
after having this new phone for a couple years, it is only now that i realised i could've just asked someone irl with a newer android where their whatsapp folder is so i'd know where to put a local chat copy into 🤦
so if you want to move your whatsapp chat history from one phone to another and qr code or google drive aren't an option, copying a local chat copy seems to work fine (at least android-to-android and when the version of the app on both phones is the same).
in older androids the folder was on the phone or sd like this:
/WhatsApp/Databases
starting from whatever android ver, it's here:
/Android/media/com.whatsapp/WhatsApp/Databases
the last created local chat copy is the file named "msgstore.db.crypt14" (may be crypt12 or crypt-whatever-other-number). just go to whatsapp settings → chat and create a local chat copy, wait for some time until the app finishes making the copy (it can say "100% done" almost instantly but it's lying don't believe it), and then just copy the file from the old phone to the new one into the "Databases" folder.
(if a freshly installed or cleaned whatsapp app doesn't have a "/Databases/" folder [or even a "/WhatsApp/" folder] in "/Android/media/com.whatsapp/", then just create one, and copy the file there)
when logging with the same phone number on the new phone, the app sends the confirm code to the app on the old phone, and after confirmation it should find the local chat copy file and do the thing (mine did, at least).
(if something went wrong, log in back on the old phone [the code would be sent on the new phone now]. all the files & chats are still there, and you figure out why your new phone is weird on your own, sorry)
images, videos, etc are in "/WhatsApp/Media/" in separate folders and are just images/videos/whatever, un-crypt14-ed, so copying/restoring those isn't a problem.
hope it helps someone idk
3 notes
·
View notes
Text
Fake PhonePe APK: Latest November 2024 {100% Working}
Imagine the look on your friend's face when they see a seemingly real transaction with their name on it. Introducing the Fake PhonePe APK – a spoof app that lets you prank your friends by showing mock transactions, fake balances, and transaction history that looks incredibly realistic.
👉Download Now
What is the Fake PhonePe APK?
The Fake PhonePe APK is a prank app that replicates the popular digital payment platform, PhonePe, with a twist – it's entirely for fun.
While it doesn’t link to a real bank account, it mimics the appearance of PhonePe so closely that even seasoned users might struggle to tell the difference at first glance.
This app allows you to stage imaginary transactions for fun, displaying amounts as high as one crore rupees, all without touching a single penny in your real account. Perfect for harmless jokes, this APK creates shockingly realistic payment screenshots and transaction records.
Key Features of the Fake PhonePe APK
QR Code Scanning Simulation: Just like the genuine app, this fake version allows you to “scan” QR codes. After scanning, it shows the correct registered name or business associated with that QR code, making it feel like a genuine transaction.
Mock Bank Balance: The app displays a fake bank balance, typically around ₹12,624, to make the prank look more authentic. Simply tap “Check Bank Balance” and enter any six-digit UPI PIN to reveal the faux balance.
Original-Looking Interface: For anyone familiar with the real PhonePe app, the Fake PhonePe APK might be hard to distinguish at a glance. With all the icons, ads, and menus in the same spots, it perfectly replicates the original app’s look.
Unlimited Fake Funds: Even though the fake balance shows a modest ₹12,624, you can “send” any amount, including staggering sums like one crore rupees. Each transaction, however, is purely fictional, so your real bank account stays untouched.
Detailed Transaction History: Any “transaction” you make can also generate a realistic transaction history, complete with time, date, recipient’s name, transaction ID, and a UTR number. This extra detail can make your pranks feel more believable.
How to Download the Fake PhonePe APK
Downloading the Fake PhonePe APK requires a few steps, as it’s only available from its official website:
Enable Unknown Sources: First, go to your device settings, find “Install Unknown Apps” or “Install from Unknown Sources,” and enable it for your browser.
Download the APK: Head to the official website and click on the download button. After the file downloads, open it and install the APK.
Start the Fun: Once installed, open the Fake PhonePe APK and start pranking your friends with fake transactions and balances.
Disclaimer
This Fake PhonePe APK is intended strictly for entertainment purposes and harmless pranks. It is not endorsed, affiliated with, or authorized by the official PhonePe app or any financial institution. Using fake apps for fraudulent activities is illegal and punishable by law.
#fake phonepe apk#fakephonepelatestversion#fakephonepe2024#fakephonepeapk#prankphonepeapk#phonepemodapk#phonepepremiumapk#phonepeproapk
6 notes
·
View notes
Text
How to Protect Your WordPress Site from Malware or Hackers?
WordPress is used by millions of websites for blogs, businesses, and online stores. However, because it’s so popular, it’s often a target for hackers and malware. If you have a WordPress site, it’s important to take steps to keep it secure. Here’s a simple guide to help you protect your site from hackers and malware.
How to Protect WordPress Site from Malware or Hackers?
Follow this step list given below to protect WordPress site from malware or hackers
1. Always Keep WordPress Updated
WordPress regularly releases updates to fix bugs and improve security. Hackers often look for websites running old versions of WordPress or outdated plugins, so keeping everything updated helps keep them out.
How to Update:
Check for updates in your WordPress dashboard regularly.
Go to the Dashboard > Updates section and install any available updates for WordPress core, themes, or plugins.
By staying updated, you’re less likely to have security holes in your site that hackers can use.
2. Use Strong Passwords and Change Them Often
Hackers can easily guess weak passwords like "123456" or "admin." To keep your site safe, use strong, unique passwords and change them every few months.
Tips for Strong Passwords:
Use a mix of uppercase and lowercase letters, numbers, and symbols.
Don’t use simple information like your name or "admin."
Consider using a password manager to create and store complex passwords securely.
Strong passwords are one of the simplest ways to add security to your website.
3. Limit Login Attempts
Hackers often try to break into websites by guessing the login password over and over. You can protect your site by limiting the number of login attempts a person (or bot) can make.
How to Limit Login Attempts:
Use plugins like Limit Login Attempts Reloaded or WP Limit Login Attempts.
These plugins lock out users after a certain number of failed login attempts.
This makes it much harder for hackers to keep guessing passwords.
4. Enable Two-Factor Authentication (2FA)
Two-factor authentication adds another layer of security. In addition to entering your password, you’ll also need to input a code sent to your phone or email. Even if someone knows your password, they won’t be able to log in without this extra code.
How to Set Up 2FA:
Install a plugin like Google Authenticator or Two-Factor.
Set it up by scanning a QR code and linking your account to an app like Google Authenticator or Authy.
This ensures that only you can access your site, even if someone steals your password.
5. Use a Security Plugin
A security plugin can protect your WordPress site from different types of attacks, like malware or brute force attempts. These plugins act as your site’s security guard, offering tools like firewalls and malware scanning.
Recommended Security Plugins:
Wordfence Security: Includes a firewall and real-time monitoring.
Sucuri Security: Provides malware removal and a website firewall.
iThemes Security: Offers brute force protection, backups, and two-factor authentication.
Using a security plugin adds strong layers of protection against hackers.
Also Read - What Is Domain Status? What does this mean, & Why should I know?
6. Back Up Your Website Regularly
Even with good security, things can sometimes go wrong. That’s why it’s important to back up your site regularly. If your site gets hacked, a backup will let you restore everything quickly without losing important data.
How to Back Up Your Website:
Use backup plugins like UpdraftPlus or BackupBuddy.
Store your backups in safe places like Google Drive, Dropbox, or a remote server.
Schedule backups daily or weekly, depending on how often you update your site.
Regular backups help ensure you won’t lose everything if something goes wrong.
7. Choose a Secure Hosting Provider
Your web hosting service plays an important role in your website’s security. Some hosts offer strong security features that help protect your site. Make sure to choose a hosting provider that values security.
What to Look for in a Hosting Provider:
Regular backups
Malware scanning and removal
Firewalls
SSL certificates
DDoS protection
Popular and secure WordPress hosting services include SiteGround, Bluehost, and WP Engine.
8. Use HTTPS and SSL Certificates
SSL (Secure Socket Layer) encrypts the data between your website and your visitors. This protects sensitive information, like passwords or credit card numbers. Websites with SSL certificates also have a secure URL that starts with "https://."
How to Install an SSL Certificate:
Most hosting providers offer free SSL certificates with Let’s Encrypt.
You can use plugins like Really Simple SSL to set it up quickly.
SSL certificates keep sensitive data safe and make your site more trustworthy.
9. Remove Unused Themes and Plugins
Unused plugins and themes can create security risks, especially if they aren’t updated. Even if they’re deactivated, they can still be a weak point. It’s best to delete any plugins or themes you don’t use.
How to Delete Unused Themes/Plugins:
Go to your Dashboard > Plugins or Appearance > Themes.
Deactivate and delete anything you no longer need.
This reduces the number of places where hackers might try to get in.
10. Monitor Your Site for Suspicious Activity
It’s important to keep an eye on your site for any unusual behavior. This could include sudden spikes in traffic, unknown files appearing on your server, or unauthorized users trying to log in.
How to Monitor Your Site:
Use a security plugin to track things like failed login attempts and changes to important files.
Regularly check your hosting account for unusual activity.
Review your website users to make sure no unauthorized accounts have been added.
By staying alert, you can catch potential threats before they do any serious damage.
Conclusion
Protecting your WordPress site doesn’t have to be difficult. By following these simple steps—keeping WordPress updated, using strong passwords, installing security plugins, and making regular backups—you can greatly reduce the risk of your site being hacked or infected with malware.
#OZOHosting#lowest price hosting in india#Cheap web hosting jaipur#cheap shared web hosting india#free web hosting india#affordable linux web hosting india
2 notes
·
View notes
Text
Crypto trading mobile app
Designing a Crypto Trading Mobile App involves a balance of usability, security, and aesthetic appeal, tailored to meet the needs of a fast-paced, data-driven audience. Below is an overview of key components and considerations to craft a seamless and user-centric experience for crypto traders.
Key Elements of a Crypto Trading Mobile App Design
1. Intuitive Onboarding
First Impressions: The onboarding process should be simple, guiding users smoothly from downloading the app to making their first trade.
Account Creation: Offer multiple sign-up options (email, phone number, Google/Apple login) and include KYC (Know Your Customer) verification seamlessly.
Interactive Tutorials: For new traders, provide interactive walkthroughs to explain key features like trading pairs, order placement, and wallet setup.
2. Dashboard & Home Screen
Clean Layout: Display an overview of the user's portfolio, including current balances, market trends, and quick access to popular trading pairs.
Market Overview: Real-time market data should be clearly visible. Include options for users to view coin performance, historical charts, and news snippets.
Customization: Let users customize their dashboard by adding favorite assets or widgets like price alerts, trading volumes, and news feeds.
3. Trading Interface
Simple vs. Advanced Modes: Provide two versions of the trading interface. A simple mode for beginners with basic buy/sell options, and an advanced mode with tools like limit orders, stop losses, and technical indicators.
Charting Tools: Integrate interactive, real-time charts powered by TradingView or similar APIs, allowing users to analyze market movements with tools like candlestick patterns, RSI, and moving averages.
Order Placement: Streamline the process of placing market, limit, and stop orders. Use clear buttons and a concise form layout to minimize errors.
Real-Time Data: Update market prices, balances, and order statuses in real-time. Include a status bar that shows successful or pending trades.
4. Wallet & Portfolio Management
Asset Overview: Provide an easy-to-read portfolio page where users can view all their holdings, including balances, performance (gains/losses), and allocation percentages.
Multi-Currency Support: Display a comprehensive list of supported cryptocurrencies. Enable users to transfer between wallets, send/receive assets, and generate QR codes for transactions.
Transaction History: Offer a detailed transaction history, including dates, amounts, and transaction IDs for transparency and record-keeping.
5. Security Features
Biometric Authentication: Use fingerprint, facial recognition, or PIN codes for secure logins and transaction confirmations.
Two-Factor Authentication (2FA): Strong security protocols like 2FA with Google Authenticator or SMS verification should be mandatory for withdrawals and sensitive actions.
Push Notifications for Security Alerts: Keep users informed about logins from new devices, suspicious activities, or price movements via push notifications.
6. User-Friendly Navigation
Bottom Navigation Bar: Include key sections like Home, Markets, Wallet, Trade, and Settings. The icons should be simple, recognizable, and easily accessible with one hand.
Search Bar: A prominent search feature to quickly locate specific coins, trading pairs, or help topics.
7. Analytics & Insights
Market Trends: Display comprehensive analytics including top gainers, losers, and market sentiment indicators.
Push Alerts for Price Movements: Offer customizable price alert notifications to help users react quickly to market changes.
Educational Content: Include sections with tips on technical analysis, crypto market basics, or new coin listings.
8. Social and Community Features
Live Chat: Provide a feature for users to chat with customer support or engage with other traders in a community setting.
News Feed: Integrate crypto news from trusted sources to keep users updated with the latest market-moving events.
9. Light and Dark Mode
Themes: Offer both light and dark mode to cater to users who trade at different times of day. The dark mode is especially important for night traders to reduce eye strain.
10. Settings and Customization
Personalization Options: Allow users to choose preferred currencies, set trading limits, and configure alerts based on their personal preferences.
Language and Regional Settings: Provide multilingual support and regional settings for global users.
Visual Design Considerations
Modern, Minimalist Design: A clean, minimal UI is essential for avoiding clutter, especially when dealing with complex data like market trends and charts.
Color Scheme: Use a professional color palette with accents for call-to-action buttons. Green and red are typically used for indicating gains and losses, respectively.
Animations & Micro-interactions: Subtle animations can enhance the experience by providing feedback on button presses or transitions between screens. However, keep these minimal to avoid slowing down performance.
Conclusion
Designing a crypto trading mobile app requires focusing on accessibility, performance, and security. By blending these elements with a modern, intuitive interface and robust features, your app can empower users to navigate the fast-paced world of crypto trading with confidence and ease.
#uxbridge#uxuidesign#ui ux development services#ux design services#ux research#ux tools#ui ux agency#ux#uxinspiration#ui ux development company#crypto#blockchain#defi#ethereum#altcoin#fintech
2 notes
·
View notes
Text
google announced this at a developer conference back in november 2024 as one of two 'security focused' system apps they were gonna add to the android system
the reason they did it this way is because android is different from iOS in a way that has historically been troublesome: google makes android and a lot of key android system apps, but they don't make all android devices.
by installing apps that add new functionality via the google play store, they can add features without having to rely on the phone's manufacturer or a cell carrier pushing an update, which is useful given manufacturers and cell carriers have mixed track records with regards to updating in a timely manner (if they do at all).
the two new apps work with android phones running as far back as android version 9. given android is beta testing OS version 16 right now, this was the best method to make sure the feature made its way onto those old devices.
to my knowledge, i believe the app install should respect your play store install settings, so if you have everything set to manual updates it should show up in the queue of downloads... but also i could've sworn that's how my stuff was set, maybe i hit download all and wasn't paying attention, or maybe it did it in the background, idk. i totally understand why people think it's sketchy, especially since a lot of users don't realize android is full of system apps that only appear in the app list under settings when you enable viewing system applications, which is why this doesn't show up in the normal app drawer.
now that the rationale is out of the way, here's google's explanation of the setting the app is made to facilitate and how it does so:
Sensitive Content Warnings is an optional feature that blurs images that may contain nudity before viewing, and then prompts with a “speed bump” that contains help-finding resources and options, including to view the content. When the feature is enabled, and an image that may contain nudity is about to be sent or forwarded, it also provides a speed bump to remind users of the risks of sending nude imagery and preventing accidental shares. All of this happens on-device to protect your privacy and keep end-to-end encrypted message content private to only sender and recipient. Sensitive Content Warnings doesn’t allow Google access to the contents of your images, nor does Google know that nudity may have been detected. This feature is opt-in for adults, managed via Android Settings, and is opt-out for users under 18 years of age. Sensitive Content Warnings will be rolling out to Android 9+ devices including Android Go devices with Google Messages in the coming months. Source: https://security.googleblog.com/2024/10/5-new-protections-on-google-messages.html
i have a recent google pixel phone and use the google message app for texting, so the app was automatically installed on my phone.
after seeing this post and doing more research, i went ahead and uninstalled the app as i do not intend to use the feature it facilitates.
if the app re-installs itself later, which seems likely at some point, then i plan to find the setting for the feature it facilitates and make sure it's set to 'off' the way google says it should be for adult users. then, i'll use an internet traffic monitoring app like glasswire to turn off its internet access just to be safe.)
-
the other app google installed without telling you is called Android System Key Verified, and i am gonna go ahead and suggest you leave that one on your device just in case:
To help you avoid sophisticated messaging threats where an attacker tries to impersonate one of your contacts, we’re working to add a contact verifying feature to Android. This new feature will allow you to verify your contacts' public keys so you can confirm you’re communicating with the person you intend to message. We’re creating a unified system for public key verification across different apps, which you can verify through QR code scanning or number comparison.
i use RCS chats with end-to-end encryption via google messages, and while odds are very low someone's going to try and hit me with a contact spoofing attack pretending to be one of the few people i text, it's better to be safe than sorry imo. especially if other messaging apps decide to integrate the functionality later.
if you've read this far i have a question for you... sound off in the replies or tags... is anyone still out here sending nudes via text message in 2025?
i think it's been over a decade since i got texted a nude. everybody's on some kind of messaging app now i feel like
hey folks if you have an android phone: google shadow installed a "security app".
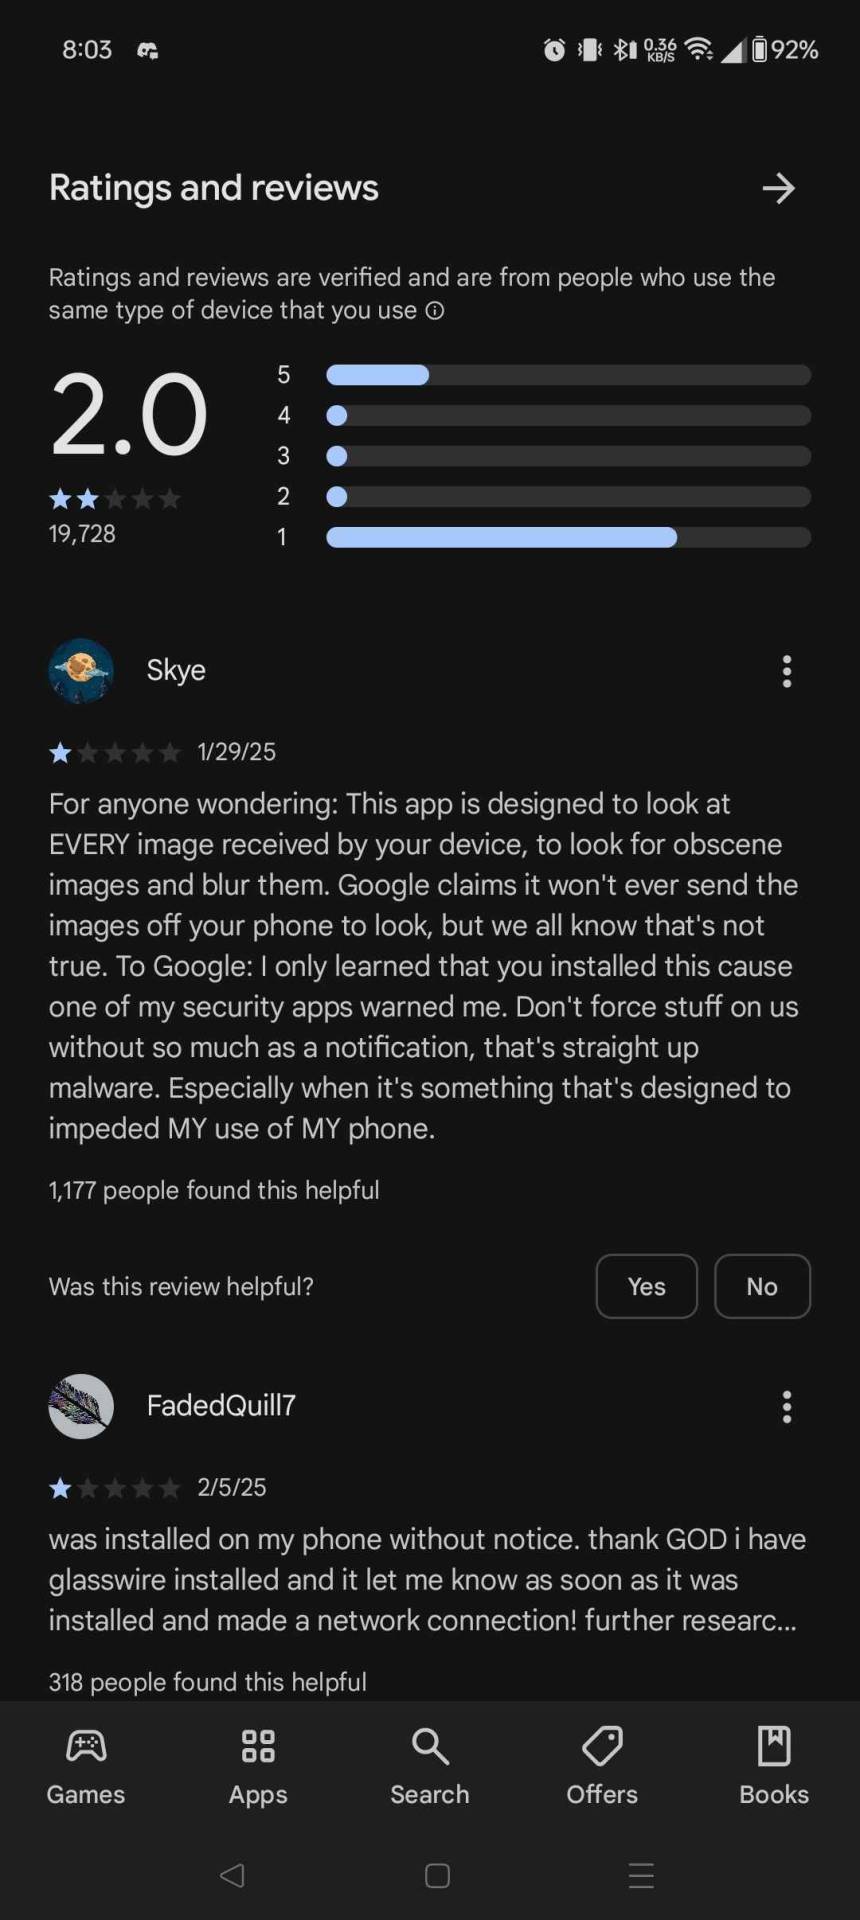
I had to go and delete it myself this morning.
95K notes
·
View notes
Text
10.2) Sticker Making -
In this second part of the sticker making process I wanted to explain some of the choices that I made during this time and how I got to the results that I did. While I discussed a lot of the collaborative practice with technicians, I wanted to ensure I don't leave out the choices I made in this design stage.
After the session with Boris, learning about and creating the formatted stickers for printing, I had to ensure that the final designs of the stickers were completed, so that I could complete the document to print. Here is where I had to compare the different versions that I had printed and tested. It was mostly a choice of colour scheme selection, messages that I would display, the font styles and how I'd incorporate a QR code into the stickers. Because I was aiming for around 100 stickers I thought it ideal to make sure that there was a number of variations that all fit into that one hundred equally, so that I had an equal number of all the different stickers. I chose to have five different colours and five different messages, equalling 25 different variations of stickers (4 copies of the different variations, once printed). I went off of the colours that I had previously experimented with, blue, pink, green, yellow and purple. I think that these colours were appropriate as I knew that to use pastel versions of these colours, I will avoid them printing out too dark and dull, and they will still appear quite bright as they are a much paler anyways. Though this did seem like the best way to mitigate the risk of dull printing, I still wanted to make sure that the colour psychology made sense for the project. Because it was a positivity influenced idea it was quite important for me that each aspect of the project had intent to impact people positively, and something as simple as colour selection can have this effect. I discovered that psychologically, pastels shades are most commonly associated with; springtime, childhood, playfulness, optimism, serenity and laughter. I was pleased to read such positive and happy connotations of these colours, it reassured me that they were definitely appropriate for the project, it also felt as though it further enhanced this positive energy that is already woven into the stickers.

Here you can also see the experimenting with a new type face. I felt as though the original choice that I had selected, though working practically, it felt somehow very automated and in a sense quite robotic. I thought make to my truisms at the beginning of the project as I had tested with a few different type faces, and similar to this I wanted to have a bold font, this selection needed to feel slightly softer and less confrontational but still eye catching. I remembered the typewriter type face that I had used for my first set of truisms and I remembered at the time, enjoying the almost hand typed feel that this font had to it. Though it wasn't a handwritten styled serif font, it is still classed as a serif styled font.
Serif Fonts: Serif fonts typically have small extensions/strokes formed off of the main body of the letter. Typewriter fonts; typically have blunt formations that make it the serif style, these are typically known as 'slabs' which gave the type writer font the name "slab serif". The font is typically monospaced also, which means that each character occupies the same amount of space/width. I think this feature of the font used in my work in particular really helps with legibility as the characters are so evenly spaced.
I tested these two font against each other and I was still very conflicted between the two of them. I asked for various opinions around the studio as I know how important public feedback would be for my projects, especially from fellow creatives that understand audience focused design and know the motivations of my project, and we all came to the conclusion that this typewriter face had this slight edge on the original font that I'd tested with. It was agreed that this hand typed feel to it gave it a more personal, human touch to it which we agreed was quite important for a project that is based off of human emotion and interaction.
The last aspect of the whole design process was considering how I would weave the interactive aspect of the project into the designs. I had decided that i'd use a QR code with a link to some form of website so that people could leave feedback on the project, it was just where i'd place this QR code. While drawing onto the printed versions I roughly sketched having it on the physical sticker, however I feel as thought this simply overcrowded the sticker. I liked the idea of the stickers simply being these stand alone signs that are just there for people to observe and enjoy, the QR code aspect of it was simply so that I could measure whether or not the projects aims and objectives were successful, and to see how it does effect people. For this reason I thought that it may be best for the QR code to be separate from the main sticker but shown close by in the same art style, so that people were aware they were related, and had the option to approach the QR code should they want to learn more. Because the length of the messages on each of the stickers also varied (some with a significantly longer 'dare') it simply wouldn't cohesively fit onto the sticker. The dare message being the most important aspect, and so to shrink this size down to fit QR code on to the sticker, I felt, would take away from the focal point of the designs.
After these physical design decisions were made it was simply the case of making the different variations of stickers (5 different messages each in 5 different colours) and then filling out the pre-made grid with the preset sticker sized documents, ready to then print. This was a slightly lengthy process simply due to the fact that I had the original "master" document that I was editing and saving all of the new individual stickers from, into a new file of stickers. I worked in a process whereby I altered the text/dare first, and then changed the border colour, saving each copy individually. I did this process first so that I had all of the individual stickers saved and placed into a folder. I then started to fill in the grid with the stickers. I entered the stickers by columns of colour as I thought that this may make the printing process less complex.
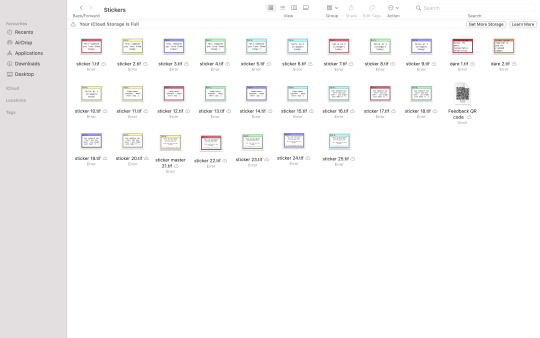
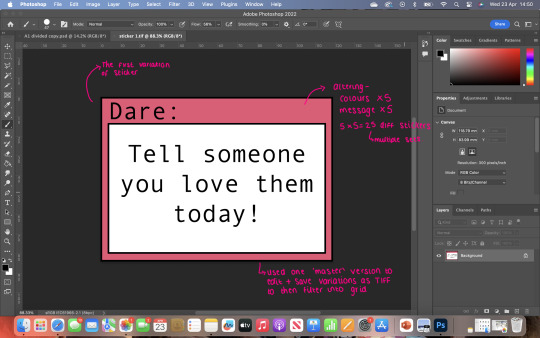


Image 1 : Shows the file with each different variation of sticker, so each colour had 5 variations with the different messages on them.
Image 2: Shows the 'master' sticker which shows the first variation. This sticker would have been saved as a new copy in a TIFF format, into the sticker folder, leaving the 'master' document to be edited and for the process to repeated a further 25 times, to obtain all the versions of the stickers.
Image 3: Is a close up version of the grid that I filled out once all of the copies were saved into my sticker folder. You can see how all of the stickers could easily slot together as it was all measured up so that they could all fit into place neatly.
Image 4: This image shows the final document once completed. This had all of the variations of the stickers on and after some final improvements and adjustments with the formatting and columns, would then be ready to take to print!
After all of the stickers were in place I did just check over the document to ensure that all of the stickers were in line, as I know this would be a huge help one trimming all the stickers down to their individual states. I noticed that there were a few gaps and that some of the stickers not exactly parallel to one another, and so I tried to amend this as best as I could. After altering what I could see, I thought it best to get a second opinion from Boris, and so I forwarded the document to ensure that it was fit for printing, and the feedback was as followed:


It was very useful that as he updated and added the slight improvements to the document he updated and shared how to do this. It wasn't only helpful in the sense that it got me closer to having my stickers ready to print but throughout the whole process we were collaborating, he also taught me how to do the different processes that he did to get my work to that positioning. It introduced me to areas of photoshop that I had never previously used and functions that I didn't realise were so useful.
After this the stickers were ready to print and I went to collect them that afternoon. Boris was very kindly trimming the stickers all down to their individual sizes, and I was very happy with the result!! There was a slight printing error whereby on of the columns of the pink colour didn't print very successfully and I lost a few stickers this way, but aside from this technical fault I was very pleased. He informed me on the kind of vinyl that I was using and how, because it is so tightly wound an a roll, the stickers were very curled and that the next steps were to gradually press the stickers so that they flatten out and are then ready to use. He said this is best done by applying gradually increasing pressure in a warm room and leaving them under this pressure for an extended period of time. He said that if too high a pressure is placed on them straight away it can cause air bubbles between the vinyl and paper back which means it would start to lose its adhesive properties. I started off by separating the stickers into smaller piles as there was large bulk of them once stacked together. I then applied a small sized book on top of each and let it slowly flatten the stickers, not completely as I wanted to ensure the process was gradual. As time went on I started to apply larger heavier books over the different piles. I left them in front of my bedroom so that the sunlight would, hopefully, help in keeping them warm as they flatten out. I even moved them into the bathroom with me while showering so the steam, heat and pressure would help them flatten. I carried out this process over the course of a few days so that they were in the best state to be used and stuck up.
While I had the main stickers printed, I couldn't start sticking them up without the QR codes, as these were a crucial part in monitoring the project and its outcome. Instead of printing these sheets through Boris and the large scale printers in Parkside again, I thought that because of the scale, i'd only really need a sheet or two of A4, and so I should be able to use the printers in the school of art. I needed again, however, to see what materials would work with the main printers in the school of art, as this would also determine whether or not I'd have to use the printing rooms again. This is where I got in touch with the school of art based technician, Laura Gale, a senior photography technician who, I was advised, would know best when it comes to printing with these printers.

She quickly got back to me, and she had personally looked into kinds of sticker paper that she knew would comply with the printers in school of art. She had even attached links to the different kinds of papers that I could use. I looked into each of them and considered factors such as cost, appearance and the function of them. I would ideally like them to be vinyl as they'd match the stickers from Parkside, and I then know that all of the materials used can be recycled. Though vinyl isn't openly advertised as recyclable, it can be under the right circumstances, and so if I were to keep all of my materials in the same recycling bracket, it could make this aspect of the project much easier and safer. She had responded and said that they wouldn't print onto vinyl plastic, but there were vinyl based sticker sheets that have the same effect. She advised three different options that can be sourced on amazon. The first was a pack of preset sticker sheets that had existing squares for you to decorate/print onto. These looked suitable, however now that I knew how to create a grid preset on photoshop, I thought it better to work this way as there would be less paper wastage as I can create the document to completely fill the page, whereas these preset square stickers had gaps and spaces on the A4 sheets. The second material that she had advised were the Vinyl sticker sheets. These came with multiple plain sheets, and were vinyl based. These also claimed to be; suitable for outdoors, water resistant, easy to peel off, scratch resistant and can stick on to a wide range of different surfaces. These to me sounded like a very good option as they not only seemed as though they'd have a similar look to the main stickers, but they seem most suitable for the different locations where they'd be showcased. The last choice was a pack of transparent stickers, these had very similar qualities to the vinyl based sticker sheets however, they were transparent. I thought these did sound very cool, however, I had considered the design of the stickers and I wanted them to have a very obvious link to the main sticker design. And while transparent areas on the stickers sound very cool, I think it makes more sense to use stickers that would have a plain white background, like the main dare stickers. I also thought that If there were areas of transparency to the stickers, it may make them slightly camouflaged to the surface to which they are stuck on and leaves the potential of people not noticing them and therefore missing that opportunity for interaction. After assessing them all I felt that the second option would work best and so I double checked with Laura that these would be suitable, and I placed a next day delivery order. She reassured me that as long as the materials state they say laser printer, they should be fine to use in our printers. I organised to see her the following Friday (waited until I had the sheets) so that I could get the QR code stickers printed as soon as possible and ultimately start sticking the stickers up!
0 notes
Text
Poland E-Invoicing Mandate: What you need to know

Poland is rolling out a mandatory e-invoicing system known as KSeF (Krajowy System e-Faktur), which obligates businesses in the country to create, receive, and archive invoices electronically using a centralized platform managed by the government.
SAF-T System for Poland e-invoicing
Companies are required to submit their accounting data through the SAF-T (Standard Audit File for Tax) system. This system is used by the Polish Tax Authority (Urzad Skarbowy) to collect and review financial information electronically.
Timelines and Requirements
Under Poland e-invoicing mandate, B2B transactions will require mandatory e-invoicing starting February 1, 2026, for large taxpayers with annual revenues over 200 million PLN. The requirement will extend to all other taxpayers from April 1, 2026.
Format: B2B: XML FA(2) – current version; FA(3) – draft version , B2G: UBL 2.1, Peppol BIS 3.0
Digital Signature: Not mandatory
Archiving: Invoices must be archived for 5 years
Scope of e-invoicing
At present, e-invoicing is applicable to Business-to-Government (B2G) transactions. Additionally, the government introduced e-invoicing for Business-to-Business (B2B) transactions on a voluntary basis starting in January 2022. However, beginning 1 July 2024, it will become mandatory to issue e-invoices for B2B transactions. Enforcement through fines and penalties is set to commence from January 2025. Issuing invoices to consumers (B2C) through KSeF is optional. When used, consumers can retrieve their invoices by scanning a QR code.
Exemptions from e-invoicing:
In Poland e-invoicing is not mandatory for certain types of transactions. These include Business-to-Consumer (B2C) transactions, dealings with parties that do not have a Fixed Establishment (FE) in Poland, and transactions conducted under the EU One Stop Shop (OSS) or Import One Stop Shop (IOSS) schemes. Additionally, e-invoices are not required for toll receipts and railway tickets.
KseF – Poland e-invoicing portal
In Poland, the government has appointed the Krajowy System e-Faktur (KSeF) as the official Poland e-invoicing portal responsible for receiving, issuing, and storing structured electronic invoices. KSeF, also known as the National e-Invoice System, is Poland’s dedicated Electronic invoicing System and was developed by a state treasury-established firm called “Critical Applications.” The system validates e-invoices by checking the XML file structure for compliance with the logical template defined in the XSD format and verifying the authorisations to use the platform. However, it does not verify the factual correctness of the data, focusing solely on structural accuracy. KSeF has successfully passed a security audit, ensuring its compliance with security standards.
Everything You Need to Know About Poland E-Invoicing Process with KSeF
With Poland e-invoicing mandate rolling out via the Krajowy System e-Faktur (KSeF), businesses are navigating a new digital landscape for compliance. Whether you’re just getting started or looking for clarity on some finer points, here’s a simplified breakdown of how the system works and what you need to keep in mind.
Do I need to sign invoices before sending them to KSeF?
No digital signature is required when submitting invoices to KSeF. However, digital authentication is mandatory to access the KSeF portal. This ensures that the individual submitting the invoice has the appropriate authorization to act on behalf of the company.
What is considered the invoice date in KSeF?
The invoice date is the date the e-invoice is received and accepted by the KSeF system—not the date it was created.
Do I need to submit invoices to KSeF immediately after issuing them?
Not immediately. You have until the 15th day of the month following the taxable supply to submit the invoice.
Should the KSeF invoice number appear on printed invoices?
No, including the KSeF identifying number on the printout is not mandatory.
Can I attach supporting documents to the e-invoice?
No, attachments aren’t allowed in KSeF invoices. However, you can include a link within the invoice content pointing to external resources if needed.
What could cause an invoice to be rejected by KSeF?
Two common reasons for rejection are:
Incorrect invoice structure that doesn’t align with the system’s logical format.
Unauthorized submission, i.e., the person sending the invoice lacks the necessary permissions.
What happens if KSeF rejects an invoice?
If your invoice is rejected, it’s considered not issued. You’ll need to recreate and resubmit it with the corrected information. You cannot cancel or issue a correction for a rejected invoice.
Can I download multiple e-invoices at once?
Yes, bulk downloading is possible, but only in XML format.
Can I issue multiple corrective invoices for one sales invoice?
Yes, one can issue as many corrective invoices as needed for a single sales invoice.
Can I issue a proforma invoice through KSeF?
No. Proforma invoices aren’t recognized as official invoices under Poland’s VAT law, so they can’t be issued via KSeF
Can I use self-invoicing under KSeF?
Yes, self-invoicing is allowed—but the buyer must receive authorization from the seller, and this must be formally registered within KSeF.
Can invoices be shared with customers outside of KSeF?
Yes, once an invoice is approved by KSeF, you can send it to your customers directly. Just make sure the format and method of delivery are agreed upon between buyer and seller. Tools like ClearTax can help automate this.
What if KSeF is temporarily unavailable?
In case of a system outage, you must submit your e-invoice to KSeF within seven days after the system comes back online.
Do I still need to submit the JPK_VAT file if I’m using KSeF?
If you’re issuing all invoices via KSeF, there’s no need to submit the JPK_VAT file separately.
Navigating Poland e-invoicing system may seem complex at first, but once you understand the key rules, it becomes much more manageable. Staying compliant is not just about meeting deadlines—it’s also about understanding the logic of the system and using the right tools to streamline the process.
Preparing your business:
Businesses must thoroughly understand the KSeF mandate and ensure they are prepared to comply by the relevant deadlines. Technical readiness plays a key role, particularly in adapting internal systems to accommodate the FA_VAT format. To support a smooth transition, it is important to utilize available training and support resources. The requirement to include the KSeF number in payment references will have direct implications for accounting and payment processes, necessitating adjustments. While the optional use of offline mode and B2C e-invoicing offers additional flexibility, these options also demand careful evaluation. Ongoing monitoring of regulatory updates and official clarifications is essential to remain compliant. Moreover, it is important to consider that the National Revenue Administration (Krajowa Administracja Skarbowa, KAS) may use data from the KSeF system during their proceedings.
What next?
Analyze KSeF’s impact on existing invoicing processes.
Update ERP and accounting systems to align with FA_VAT schema requirements.
Train relevant teams on compliance procedures.
Track regulatory updates from the Polish Ministry of Finance.
Enable system capability for handling KSeF e-invoice attachments.
Prepare for QR code certificate issuance and retrieval.
Contribute to public consultations on the draft Act and technical specs, if applicable.
How can we help?
Anusaar is a certified Peppol Access Point, equipped to support businesses in seamlessly integrating and automating electronic invoices and other business documents. With extensive experience in integration and automation, our team of seasoned professionals offers expert assessment and gap analysis to identify your specific needs. We provide tailored solutions designed to enhance efficiency, ensure compliance, and streamline your invoicing processes. Let us help you navigate the path of Poland e-invoicing with ease.
0 notes
Text
What is eSIM? How do I use it?
An eSIM (Embedded SIM) is a digital version of a traditional SIM card that is built directly into your device. Instead of inserting a physical SIM, you simply download a mobile carrier profile and activate it digitally. eSIM technology allows you to easily switch between different network providers, manage multiple numbers, and activate international data plans — all without needing a physical card.
Using an eSIM is very simple:
You purchase a data plan from a provider like Supera Link, receive a QR code or activation details, and scan it through your phone’s settings. Your device connects to the network almost instantly, offering seamless connectivity wherever you are.
If you want a detailed step-by-step guide on how to set up and activate an eSIM, you can check out this guide from Supera Link.
1 note
·
View note
Text
Week 11
I DID SO MUCH THIS WEEK. I made the QR business card I want to stick on the table (pictured above). I was able to finally create chapter 6 which I had been unable to figure out how I wanted to structure it for weeks. The image below is my best page from that chapter.
And then I drafted and finalized that chapter. So I now have 4 / 6 chapters ready to print, with the final 2 already with layouts, text, and borders done.
I've also sketched some standing cutouts to set up next to my gallery setup. I taped together a bunch of paper to make mock ones in the size I want so I already have my digital document set to the right size. Just need to color and print.
And for the cover, I have an almost finished colored version, I just need to finish refining and adding the dramatic lighting that I want. IF I have time, I'll design two more color covers to hang on the wall at the gallery. If not, I think just the one will be ok. I'll make it even bigger if that's the case. The fablab has some nice cover paper that's 11 x 17 inches which I think would work well for a set of 3 posters, but I'll go bigger if I'm just doing one.
And I'm planning on changing how I'm binding the book, since my page number has continued to increase. I found a way that does single page binding that seems simple enough (I love WikiHow articles). This should make printing setup simpler as well and also allow the book to be evenly layed out and not have folding issues.
My goal is to be ready to print by tomorrow (Thursday) that way if anything goes wrong, I can reprint on Friday as a backup. I want to have everything printed before setup next Monday since it will stress me out too much to be trying to do things after setup. I think the goal is achievable, since I put in a lot of work last week and the amount left is very doable.
Reflection
It's a lot easier to get work done now that the end is visible. I know that about how I work, so I intentionally have had no plans this week so I can spend all my time working on this project. Of course, I would have loved to have been more productive during the entire past year, but I think that I'll be ending with a project that is ok. I have been working on time management, so hopefully if I ever have a long form project like this again, my work during this project will mean I'll be even more successful for the next one.
Anyways, all in all, extremely productive week. I have been alternating feeling nervous and feeling excited. Regardless, I'm looking forward to being done with this.
0 notes
Text
Embracing Seamless Connectivity - The Rise of Travel eSIMs

In an increasingly interconnected world, staying online while traveling is more essential than ever. Whether for business, leisure, or remote work, travelers need reliable, secure, and hassle-free internet access wherever they go. Enter the travel eSIM—a game-changing technology that's revolutionizing the way globetrotters stay connected across borders.
What is a Travel eSIM?
An eSIM, or embedded SIM, is a digital version of the traditional physical SIM card. Unlike its predecessor, an eSIM is built directly into a mobile device, allowing users to activate a cellular plan without physically inserting a SIM card. For travelers, this means no more fumbling with tiny cards or dealing with local SIM vendors in foreign countries. Travel eSIMs are designed specifically for international use, offering mobile data access across multiple countries and regions through a single digital profile.
Key Benefits of Using a Travel eSIM
1. Convenience and Instant Activation
One of the most significant advantages of a travel eSIM is the ease of use. Travelers can browse and purchase a data plan online, scan a QR code, and activate their service instantly. There's no need to visit a store, wait in line, or even power off your phone. This level of convenience is invaluable, especially for those arriving in a new country who need immediate access to maps, rideshares, and messaging apps.
2. Cost-Effective Global Coverage
Travel eSIM providers often offer competitive rates compared to traditional roaming charges. Users can select plans tailored to their destination and data needs, avoiding the unexpected costs that come with international roaming. Some services also offer regional or global packages that cover multiple countries, making it a great solution for multi-destination trips.
3. Dual SIM Functionality
Most modern smartphones support dual SIM capabilities with an eSIM and a physical SIM. This allows travelers to keep their home SIM active for calls or texts while using the travel eSIM for data. It’s a convenient feature for professionals who need to stay reachable on their primary number but want to avoid excessive data charges abroad.
4. Environmentally Friendly
By eliminating the need for physical SIM cards and packaging, eSIMs contribute to reducing electronic waste. As environmental sustainability becomes more critical, digital solutions like eSIMs are increasingly favored by eco-conscious consumers and companies.
Use Cases for Travel eSIMs
Travel eSIMs cater to a wide variety of travelers:
Tourists benefit from seamless data for navigation, bookings, and social media updates.
Business travelers rely on them for uninterrupted email access, video calls, and cloud services.
Digital nomads appreciate the flexibility of switching between regional data plans as they move across countries.
Frequent flyers enjoy the ability to manage multiple profiles and plans directly from their devices without constant SIM changes.
Popular Travel eSIM Providers
Several reputable companies have entered the eSIM market, offering reliable and versatile travel solutions. Brands like Airalo, Holafly, Nomad, and GigSky provide coverage in over 100 countries, easy-to-use apps, and a range of plans to suit different budgets and travel durations.
Final Thoughts
The travel eSIM represents the future of mobile connectivity for travelers. With its ease of activation, flexible data options, and global coverage, it's an ideal solution for anyone looking to stay connected abroad without the stress of traditional roaming. As more devices become eSIM-compatible, this innovative technology will undoubtedly become the standard for international mobile use.
Whether you're jet-setting for business or exploring new cultures, a travel eSIM ensures you're always just a tap away from the digital world.
Contact us
Rapidesim
.2100 Eastridge DR NEAlbuquerque, New Mexico. 87112.USA
044 7874 190730
Social links
https://www.facebook.com/profile.php?id=61559548950919 https://www.instagram.com/rapidesim/ https://www.tiktok.com/@rapidesim https://www.youtube.com/@RapidesimTraveleSIM?app=desktop
External links
Travel eSIM eSIM International eSIM
0 notes
Text
Digital Name Cards in Singapore: The Future of Smart Networking
In today’s fast-paced digital world, businesses and professionals are moving away from traditional paper business cards and adopting digital name cards for seamless and efficient networking. A Digital name card in Singapore provides a modern, eco-friendly, and interactive way to share contact information instantly using Near Field Communication (NFC) technology, QR codes, or direct links. If you're looking for an advanced networking solution, Zapkad offers the perfect platform to elevate your business connections.
What is a Digital Name Card?
A digital name card is an online version of a traditional business card that allows professionals to share contact details electronically. Unlike paper cards, digital name cards can include dynamic and interactive elements such as:
Name, job title, and company details
Phone number, email, and social media links
Website, LinkedIn profile, and portfolio links
Appointment scheduling and multimedia content
With digital name cards, networking becomes more efficient, engaging, and environmentally friendly.
Why Use Digital Name Cards in Singapore?
Singapore is a global business hub where networking plays a crucial role in professional growth. A digital name card offers multiple advantages, making it the preferred choice for professionals and businesses.
1. Instant Contact Sharing
Share your details with just a tap or QR code scan.
Recipients can save your contact instantly without manual entry.
2. Cost-Effective and Eco-Friendly
Reduces paper waste and supports sustainable business practices.
A one-time investment eliminates the need for reprinting business cards.
3. Always Up-to-Date Information
Update your contact details without reprinting new cards.
Ensure recipients always have access to your latest information.
4. Interactive and Engaging Features
Add clickable links to websites, social media, or booking systems.
Enhance networking with videos, portfolios, and dynamic content.
5. Analytics and Tracking
Track how often your card is tapped, scanned, or shared.
Gain insights into your networking performance and follow-up opportunities.
Who Can Benefit from Digital Name Cards?
A digital name card is suitable for professionals and businesses across various industries. Here are some key users:
1. Entrepreneurs and Business Owners
Creates a strong first impression with modern networking solutions.
Simplifies contact sharing at events, meetings, and conferences.
2. Corporate Professionals and Sales Teams
Standardizes contact sharing across teams and organizations.
Enhances lead generation and customer engagement.
3. Freelancers and Creatives
Showcases portfolios, artwork, and personal branding effectively.
Connects with potential clients using interactive business cards.
4. Real Estate Agents and Consultants
Shares property listings and brochures instantly.
Improves client communication with quick and easy access to contact details.
Choosing the Best Digital Name Card Platform in Singapore
When selecting a digital name card provider, consider the following features:
1. Customization and Branding Options
Choose a platform that allows fully customizable digital name cards.
Ensure you can add a logo, brand colors, and personalized design.
2. NFC and QR Code Technology
Look for a provider that offers NFC-enabled cards and QR codes.
Ensure compatibility with both Android and iOS devices.
3. User-Friendly Interface
Opt for a platform with an intuitive dashboard for easy updates.
Ensure seamless integration with CRM and business tools.
4. Security and Privacy Features
Look for platforms with secure data sharing and encryption.
Ensure your digital name card has privacy settings for selective sharing.
5. Reliable Customer Support
Choose a provider with excellent customer service and technical support.
Check user reviews and testimonials for reliability and satisfaction.
Why Choose Zapkad for Digital Name Cards in Singapore?
If you’re looking for the best digital name card provider in Singapore, Zapkad offers a cutting-edge solution for modern professionals. Here’s why Zapkad stands out:
Seamless NFC and QR code integration for instant contact sharing.
Fully customizable digital cards to match your brand identity.
Interactive features that enhance networking and engagement.
Analytics and tracking to monitor interactions and improve follow-ups.
Secure platform with user-friendly design and excellent customer support.
The Future of Networking is Digital
As Singapore embraces digital transformation, digital name cards are becoming an essential tool for professionals and businesses. With features like real-time updates, interactive sharing, and data analytics, they offer a modern, eco-friendly, and highly efficient alternative to traditional business cards.
0 notes
Text
The Fastest Way to Shorten and Share a Link

In the digital age, speed and simplicity are paramount. Whether you're a content creator, social media manager, marketer, or simply someone sharing content online, having a quick and efficient way to shorten and distribute links can make a huge difference. Long URLs not only look clunky but can be problematic when shared across various platforms, especially those with character limits. That’s where link shorteners come in — offering a streamlined, user-friendly solution that transforms long, unwieldy URLs into short, manageable ones in seconds.
Link shortening has become a critical tool for modern communication. Beyond the aesthetics, there are real, practical benefits to shortening your links. Short links are easier to share, remember, and track. They make content look more professional and reduce the risk of users being skeptical about clicking on them. Plus, link shorteners often provide valuable analytics, so you can monitor how your audience is interacting with your content and optimize your approach accordingly.
One of the fastest and most efficient ways to do this today is to use Shorten World. With just a few clicks, you can convert a lengthy URL into a concise, sleek link that’s ready for distribution. Whether you’re sending it in a message, embedding it in an email, or posting it on social media, a short link saves space and gets straight to the point. The best part? The entire process is intuitive and doesn’t require any technical know-how.
Why Use a Link Shortener?
Simplify Sharing Long URLs can break when sent via email or messaging platforms, causing confusion and failed redirects. Shortened links ensure your content is accessible no matter where you share it.
Boost Click-Through Rates A clean, concise link often looks more trustworthy, encouraging more users to click. When presented with a neat link rather than a jumbled mix of characters and numbers, people are more inclined to engage.
Track Performance Many link shorteners offer analytics such as click counts, referral sources, and geographic data. This information is crucial if you’re aiming to optimize a marketing campaign or better understand your audience.
Aesthetic Appeal Long URLs can look messy, especially on platforms like Twitter where every character counts. A short, sleek link not only looks better but also enhances the professional feel of your content.
Increased Efficiency With fast link shortening tools, the process takes just seconds, allowing you to focus more on what matters — your content and your audience.
How to Shorten a Link in Seconds
The process of shortening a link is remarkably easy and user-friendly. All you have to do is copy the original URL, paste it into the link shortener’s interface, and click a button. Instantly, you’ll receive a shortened version of the link that you can copy and share anywhere you want.
What’s even better is that modern link shorteners are mobile-friendly. This means you can shorten and share a link directly from your phone while on the go, which is ideal for social media managers and digital nomads.
Features to Look for in a Link Shortener
When choosing a link shortener, there are a few key features that can enhance your experience:
Customizable Links: The ability to create a custom alias for your link so it’s more memorable and brand-consistent.
Click Tracking: Detailed analytics help you understand how your links are performing.
Expiry Options: For time-sensitive content, being able to set an expiration date on a link can be incredibly useful.
QR Code Generation: Some tools offer automatic QR code creation alongside shortened links, which is great for print campaigns and offline sharing.
These features not only add convenience but also give you more control over your content distribution strategy.
When to Use a Shortened Link
There are countless scenarios where shortened links can be beneficial:
Social Media Posts: Keep your tweets and captions concise and professional.
Text Messages: Save space and avoid broken links in SMS marketing.
Email Campaigns: Clean up your email design and make links easier to follow.
Presentations: Share links in slides without overwhelming the visual layout.
Printed Materials: Short links are easier to type when seen in flyers, brochures, or business cards.
In each of these use cases, a shortened link ensures that your audience can easily access the content without technical hiccups or visual distractions.
Benefits for Businesses and Brands
For businesses, link shortening offers more than just convenience — it’s a strategic advantage. Companies can reinforce branding by customizing links, track ROI on campaigns, and engage audiences more effectively. With branded links, customers are more likely to trust the source and click through.
Moreover, link shortening can be integrated with marketing tools and automation systems, allowing businesses to include clean, traceable links in automated messages, newsletters, and social ads. It’s a simple step that can lead to better data and smarter decisions.
Visit https://shortenworld.com/ today to try it for yourself and see how much smoother your sharing experience can be.
The Psychological Edge of Short Links
There’s a subtle but significant psychological advantage to using short links. People tend to avoid clicking on URLs that look suspicious, overly long, or complex. A short and straightforward link, especially one that includes recognizable words or branding, appears safer and more legitimate. This creates an increased likelihood that people will follow the link, which in turn boosts engagement and reach.
Furthermore, shortened links are easier to remember. If someone wants to revisit a page but didn’t save the original link, a short and memorable URL is much easier to recall than a long one filled with random characters. This can be crucial in promotional or educational content where return visits are valuable.
A Tool for Everyone
Whether you're a student sharing research, a blogger promoting content, or an entrepreneur building a brand, link shortening is universally useful. It bridges the gap between content creation and content consumption, making the journey from your idea to your audience seamless and effective.
Even for casual internet users, the simplicity and utility of shortened links can’t be overstated. Imagine planning a trip and sending your friends a long list of links to accommodations, attractions, and restaurants. Shortened links make that list manageable, clear, and user-friendly.
Final Thoughts
In a world that values speed, clarity, and impact, shortening your links is no longer just a convenience — it’s a necessity. With just a few seconds and a couple of clicks, you can transform a cumbersome URL into a sleek, professional-looking link that’s ready to share anywhere.
From simplifying communication to improving engagement and enhancing your brand, the benefits are both immediate and long-term. If you haven’t already incorporated link shortening into your workflow, now is the perfect time to start.
Embrace the efficiency, the aesthetics, and the insights — shorten smart, share fast, and make every click count.
0 notes
Text
Share Business Card Online in India: The Future of Networking
In today’s digital era, traditional paper business cards are being replaced by smart, contactless solutions. Entrepreneurs and professionals now prefer to share business card online in India for convenience, sustainability, and efficiency. With digital business cards, you can instantly share your contact details, social media links, and company information with just a tap or a scan.
Why Go Digital with Your Business Card?
A digital business card offers several advantages over traditional paper cards:
Instant Sharing – No need to carry stacks of paper cards; share your details via QR codes or NFC technology.
Eco-Friendly – Reduce paper waste and contribute to a greener planet.
Always Updated – Unlike printed cards, digital versions can be updated anytime without reprinting costs.
Enhanced Networking – Easily store and access contacts without the hassle of manual data entry.
Customizable & Interactive – Add videos, website links, and social media profiles for a dynamic experience.
Contactless Visiting Card in India: A Smart Choice
With the rise of digital transformation, professionals and businesses are adopting contactless visiting card in India to make networking seamless and hassle-free. These smart cards use QR codes or NFC (Near Field Communication) technology, allowing people to save contact details with a single tap on their smartphones.
Platforms like DigitalYou provide innovative solutions to create and manage digital business cards. Their platform ensures that your digital card is not only professional but also fully customizable to reflect your brand identity.
How to Create & Share Your Digital Business Card?
Getting started with a digital business card is simple:
Choose a Digital Card Provider – Platforms like DigitalYou offer user-friendly tools to create professional cards.
Customize Your Card – Add your name, company details, phone number, email, social media links, and even a profile picture.
Generate a QR Code or NFC Tag – This allows seamless sharing via mobile devices.
Share Instantly – Send your card via email, WhatsApp, LinkedIn, or simply let someone scan your QR code.
Upgrade Your Networking Game Today!
In a world where digital interactions are the norm, switching to a contactless visiting card in India can set you apart. Whether you’re an entrepreneur, freelancer, or corporate professional, having a digital business card ensures you stay connected effortlessly.
If you're ready to share business card online in India, explore the cutting-edge solutions from DigitalYou and make a lasting impression in every business interaction.
0 notes