#Top 5 Document Converters
Explore tagged Tumblr posts
Visit Tumblr Blog
Explore Tumblr blogs with no restrictions, modern design and the best experience.
Last Seen Tumblr Blogs


Fun Fact
Average visit duration of Tumblr.com is 10 mins and 25 secs.
Text
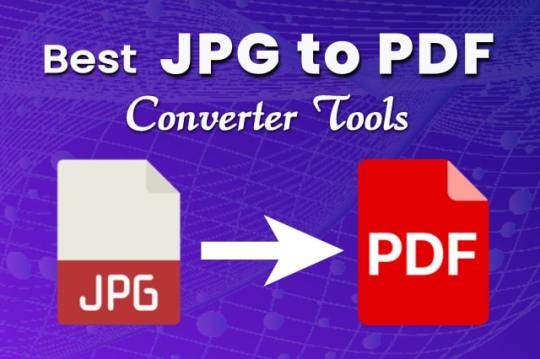
JPG To PDF कन्वर्जन के लिए 5 सबसे बेहतरीन टूल्स
आज पीडीएफ का उपयोग काफी बढ़ गया है। और इसका सबसे बड़ा कारण इस File Format की अनुकूलता है, जो आपके Data को पूरी तरह सुरक्षित रखती है। लेकिन जब आप सीधे तौर पर JPG File का उपयोग करते हैं, तो Pixels की क्षति के कारण Image धुंधली हो जाती है। और उसकी Quality खराब हो जाती है। लेकिन अगर आप चाहें, तो इस समस्या से बच सकते हैं। आपको सिर्फ एक अच्छे JPG to PDF Converter Tool की जरूरत पड़ेगी। JPG To PDF…
View On WordPress
#Best Document Converters#Best JPG To PDF Converters#Document Conversion#Document Conversion Tools#Document Converters#Free Document Converters#Free JPG To PDF Converters#JPG To PDF#JPG To PDF Converter#Top 5#Top 5 Document Converters#Top 5 JPG To PDF Converter Tools#Top 5 JPG To PDF Converters#Top JPG To PDF Converters
1 note
·
View note
Text

Hi ^^
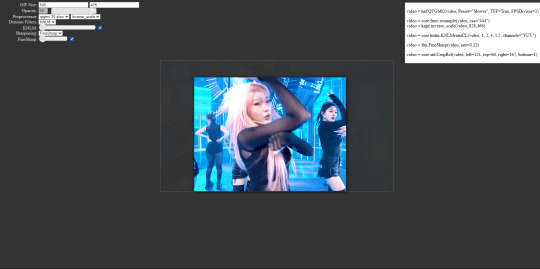
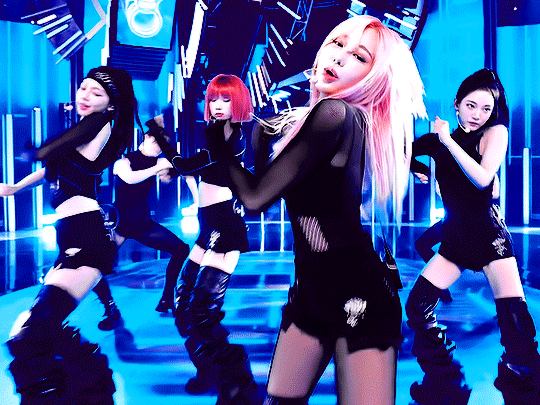
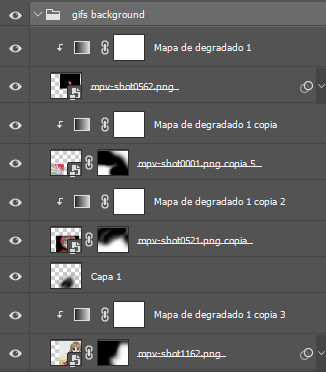
It’s me, the creator of some gifs you like and the creator of many gifs you could’ve probably lived without. A few people have asked me for a giffing tutorial recently so I have made one documenting my normal process! I’m going to gif this Aespa stage in this tutorial because I am still pretty bad at coloring stages. So come struggle along with me 🫶!
Step 1. Getting Sources & Vapoursynth
The worst enemy of the tumblr gifmaker is tumblr itself. You will spend your time making the clearest gif imagineable only for the blue site to reduce it to pixels. But alas, we must gif on. The best way to get good results is have a good source and to precompress your gif with vapoursynth.
As far as downloading from Youtube the best app to use is 4k Video Downloader. 4kVD let's you get download your file as a .mkv which is how youtube stores their 4k quality vids. Only limitation is on the free tier you get only 10 downloads. There are other more technically dubious methods to get 4kvids but I've literally never hit this limit.
10 out of 10 gifmakers agree if you want those good good crystal clear gifs you gotta stick with 4k or 1080p sources. Although if you are a complete sicko like me you can gif 720p and still get pretty good (not great) results.
So now you got your source video but you won't actually be able to open that bad boy up in PS yet. This is where the Vapoursynth step comes in. Vapoursynth will blast that footage into a nice denoised, sharpened and resized little baddie of a video clip for us.


To download VS and get a more in depth explanation of the exact steps on how to use it please reference this post. The basic steps of Vapooursynth are:
Drop your source video on the "vapourscript (drop a video file on me).bat" icon and type in the timestamps
Crop your gif to your liking (I do a lot of 540 x405 or 540x335 for horizontal gifs. 268x480 for vertical.)
Apply the sharpness and denoise (these are the options I use):

copy the code from the white box and paste it into the script like below
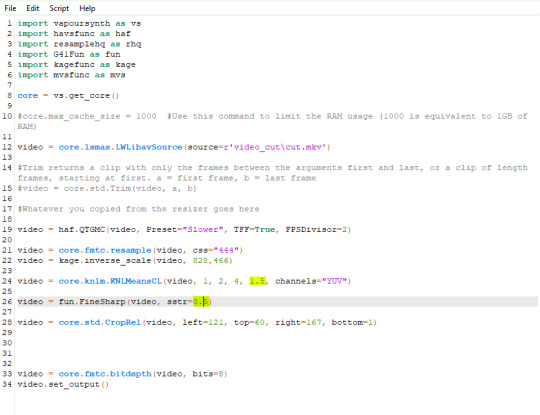
I set my denoiser to 1.5 and my sharpening to .5. (I stole this from @hyeongseo lol)
Go to Script > Encode Video. Make sure on this screen to name your file and set the header option to 'Y4M'. (Sometimes this is the step where it crashes and all your dreams are ruined because it can't convert it unfortunately. But 99% of videos are good lol)
You will find your Photoshop ready clip in gifs/output
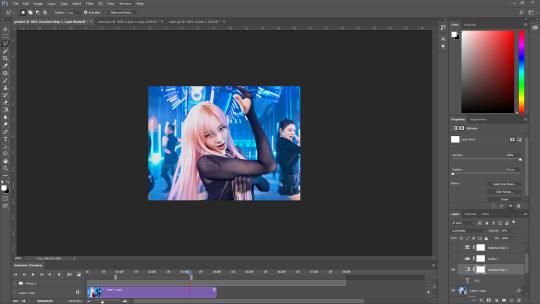
Step 2. Photoshop
You are now good to open up your clip in Photoshop.

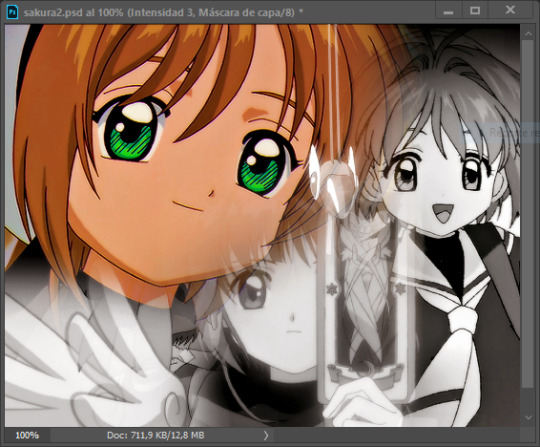
if we export our gif at this moment it will look like this:

Which isn't too bad. They just are pretty washed out and a lot of times at this step you'll see a lot of grain.
Sharpening (again lol) and Noise:
This might sound weird cause we just denoised lmao but stick with me.
We are going to convert our clip to a smart object. If you want to slow down or speed up your clip make sure to do so before converting.
(Often times if i have 60fps clip I put it at half speed, but if the action of the gif is really jerky or flashy at 30fps a lot of times I'll set it to 85% speed)
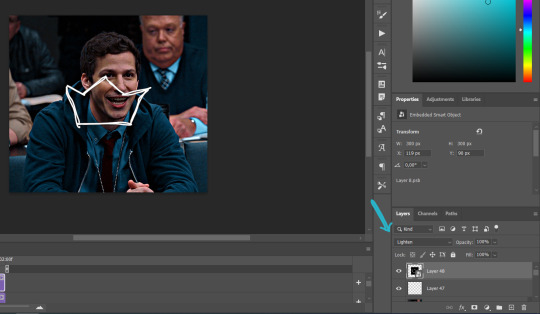
Convert your video to a smart object by right clicking it in the layers panel and selecting the "Convert to Smart Object" option
Create a copy of layer 1 and arrange it so it is aligned perfectly on top of the first video in the timeline. You have to drag it outside of the video group to do this. It should look like this once you are done:

On the bottom clip (layer 1), select filters -> sharpen -> smart sharpen. Apply the filter with these settings:

Then on the same clip (layer 1) apply the same smart sharpen filter with these settings

Setting up the Sharpness like this makes sure the finer details with stand out with crisp lines in the final product. (Look at how the mesh on her arms is in finer detail now)

Your video might look a little crispy at this point and that is ok cause we are going to soften that.
Now on our top video layer (layer 1 copy) select filters -> Blur -> Gaussian Blur. Use this setting:

Finally apply filters-> Noise -> Add Noise to layer 1 copy with these settings

"Vacancy what the hell? It looks like shit now."
Yeah... But now we'll put layer 1 copy at 25% opacity and it will look less like the shit that it does look like right now I prommy. Here is the current output:

The idea behind all this blurring and adding noise is that it will help create smoother transitions between the colors of the gif and reduce large blotchy bands of pixels that can sometimes show up
PLEASE!!! Save your current step as a PSD file. You can skip having to apply all those filters and just drag the filter groups on to the layers after the smart object conversion step.
Step 3. Coloring
Now to the fun part! There is a lot of trial and error in this step since we only have 256 colors to play with.
Typically my goals for this step are:
Raise the black point (Make Giselle's outfit in this gif black so more color can be used on her hair, skin and the background.)
Reduce the overall contrast of the gif. (Darken the lightest lights if possible)
Saturate the colors enough so they stand out but not so much that everything looks gross.
Depending on how we do these steps we may need to subtract frames from the gif. (Which I hope not cause there is exactly 69 frames in the current version lol)
Here is an example of what my coloring difference can look like:


In this case the colored gif is actually smaller because I elminated a lot of the dark greys in the background.
Vacancy's Dumbass Original Recipe thing
This is probably the only thing different that I do from most creators
My first adjustment layer is usually a gradient map. The green and red one to be more specific.

I then change the blend mode to luminosity and set the opacity somewhere between 12 and 20% (Usually 15%).
This step brings all our shades closer together so we have more freedom with coloring later. Also when idols are very white wash this seems to bring out the shadows and skin tone better in later steps as well. If you overdo it though the person in the gif can wind up looking very orange or yellow so less is sometimes more here.
There's also probably a better way to achieve this but you know... oh well
My Other adjusment layers usually consist of:
Levels: With the gradient map applied you can darken the blackpoint of your gif pretty significantly.
Selective Color: This is the most useful adjustment layer. Make sure to expirement with adding to the black slider on the blacks and neutrals color options. Often times kpop vids are over exposed and darkening this can bring out a lot of unseen color.
Hue/Saturation: I use this layer to darken the blues of the background with the lightness slider as well. You can adjust individual colors with this layer and with selective color and that is a very powerful tool for coloring.
Start:
Finish:
Because I darkened the gif so much I was able to add around 6 frames!
Though I’m not 100% satisfied with this gif, this would be my process from the start. You can put those adjustment layers all in a group and save it to the psd as well to skip all the steps to apply them. I used all the same adjustment layers for the header gif of this post as well which saved me a lot of time ^^!
Since every video is different you usually have to play around with the sliders a lot between clips.
Step 4. It Flops…
Jk jk but it does happen a lot tho on this site so don’t get discouraged ☺️
Parting Notes
If you want a really nicely colored fancam to practice on I would see if MIRAI on YouTube has a fancam of your fave idol. Their videos are really nicely color balanced from the start where stages like this tend to be very bright.
I’ll probably make a follow up post with more coloring tips and my thought processes while making gifs but this is the very basics to making hq gifs hope you learned a lot.
You can always hit my dms or inbox with questions if you have them ^^!
#hope this helps#tagging a few people#tuserflora#userdoyeons#forparker#useranusia#rhitag#usercherry#<- these are all creators I try to learn from#flashing tw#flashing cw#tutorials
95 notes
·
View notes
Text

Hey guys!! Here's a tutorial on how to create those little animated doodles for your gifs so that you don't have to look for the exact overlay you want for hours 👍 This tutorial was requested by @fabines :) It's a long process but it's not too difficult, you just need to know the very basics of gif making! The steps are below the cut :)
1.
First we're going to have our gif ready, and make sure you know how many frames it is!! It should preferrably be an even number! (or a divisible number)

2.
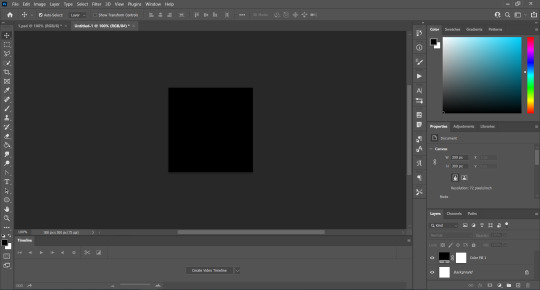
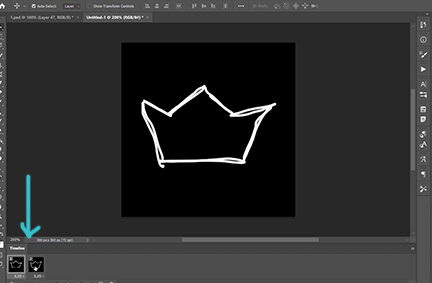
Now we're going to make another gif, which will be the lil animated doodle. Go to file > new or press ctrl+n. Create a new document that's going to be 300x300 px, and we'll make the background black:
3.
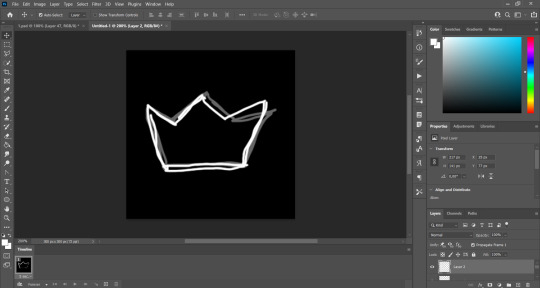
Now we're going to use a brush to paint the doodle! We're gonna set the size to 4px-7px depending on how thick you want it to be (here i used a 4px brush) and the hardness to 100%, and we're going to trace our doodle on a new layer:
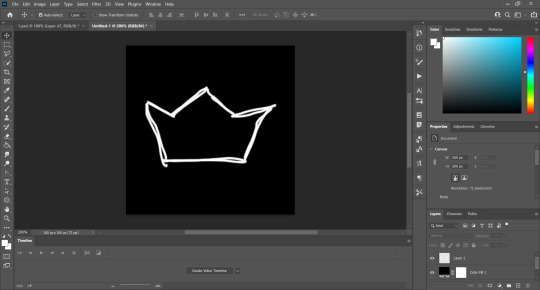
It does not have to be perfect!! It took me a while to get that crown and it looks half assed 😭 if you can use something other than your mouse like a tablet or something i definitely recommend you do it :)
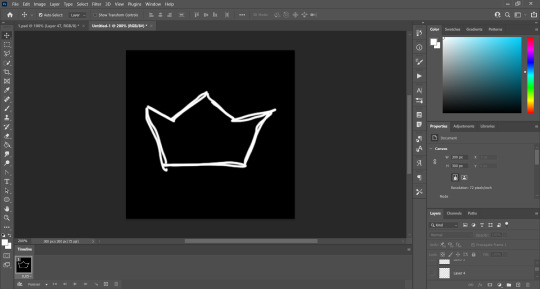
Now we're going to click on "Create Video Timeline":

Now the bottom of our workspace is gonna look like this:

We're going to click on those three little boxes on the bottom left to convert to frame animation:

And there's that! Now for the slightly tricky part.
4.
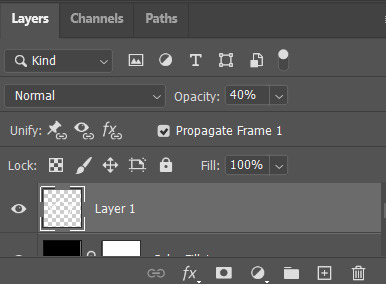
We're going to set the layer where we drew the doodle to 40% opacity:
And on a new layer, we're going to trace the same doodle:
As you can see it doesn't look the same and it's because it doesnt have to be, that's how we're going to make it look animated!
We're going to repeat that process a few times! What i do to not get confused is that for examples when i'm going to draw layer 3 i first make layer 2 invisble, and then for layer 4 i also make layer 3 invisible and so on
My gif here:

is 40 frames, which means i can make 8 different variations of my doodle and duplicate each 4 times. This is why it's important that you know how many frames your gif is! And it's even much easier if it's an even number.
But what are we going to do to make it look animated? Well, it's all about using the timeline! First, make sure that the frame delay is set to the same as your base gif. I usually set it to 0,05:
Now our first layer can go back to 100% opacity, since we're going to use it too:

So this is what we have so far:
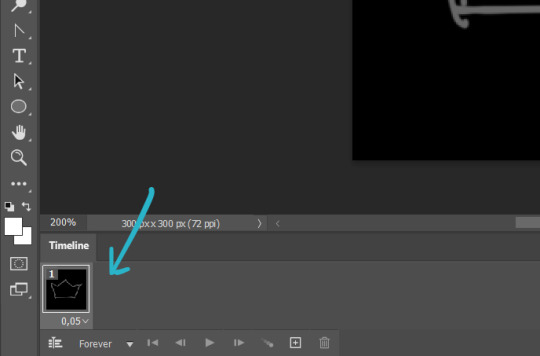
Only layer 1 is visible. So what we're gonna do is click this little plus icon:
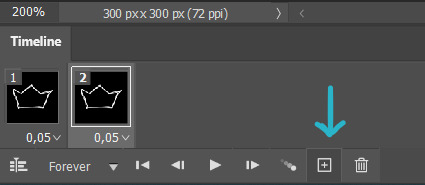
It duplicates our frame. And on our layer section we're going to make layer 1 invisible and instead make layer 2 visible, and you'll notice that now our first two frames correspond to our first two layers:
And we're going to do the same thing for each layer! Add a new frame, make layer a invisible, make layer b visible, and so on! Here's what my crown looks like after doing this process with my 8 layers:
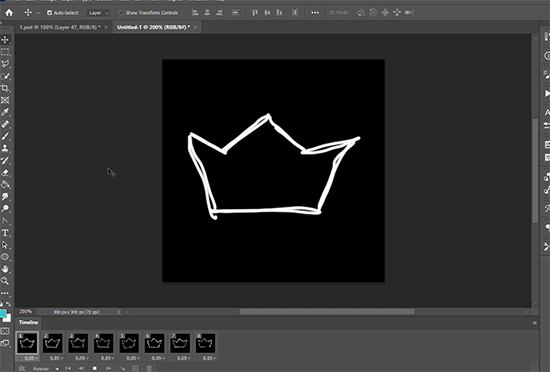
As you can see it's too fast, so that's why i'm going to duplicate each frame 4 times, so each variation has 5 frames on the timeline, and that's how we're going to get the same amount of frames as our base gif:
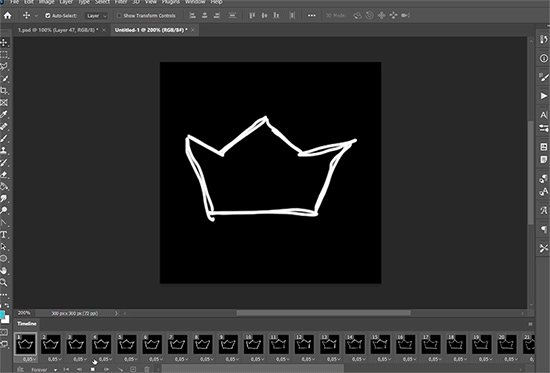
So once we have our animated doodle it's very easy from here! We're going to click on the bottom left again to convert our frame animation to a video timeline:

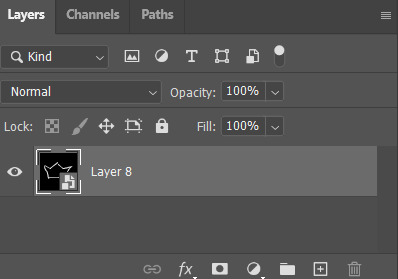
And we're going to select all of our layers (ctrl+alt+a in windows or just go to select > all layers) and convert them to a smart object (right click > convert to smart object):
So we're going to select our doodle and copy + paste it on top of your base gif, and we're going to set it to lighten or screen, whichever you prefer:
So now we place our doodle where we want it, make it whatever size we want, rotate it... and we're freaking done!

I hope at least half of this made sense akdhsk if you have any questions feel free to send an ask! 💙
#i kinda regret using a 4px brush aksjdhfk#uservivaldi#usernik#userelio#usershreyu#userng#userace#userrobin#userriel#userabs#userraffa#tuserheidi#tuservaleria#usercats#userpegs
674 notes
·
View notes
Note
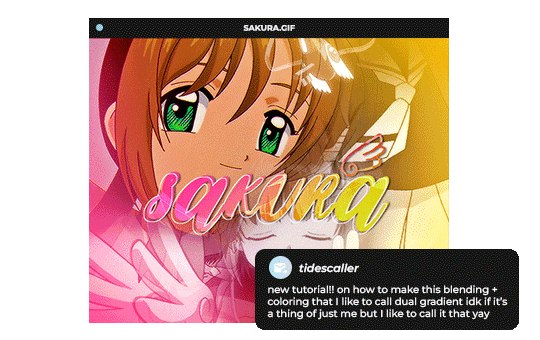
Hello, this gifset for pscentral event 37 is really pretty ✨
https://www.tumblr.com/tidescaller/779330612766081024/pscentral-event-37-trios-the-girl-the-boy-and?source=share
would you please consider posting a tutorial on how you made the blending multi gifs and colouring in the first gif?
Hi anon, so glad you liked it! I'll try my best to explain as detailed as I can. Just a small note that I'm not an expert, I'm still pretty new to blending edits in general so I'm learning as well as everyone ૮(˶˃ᆺ˂˶)
But before that real quick, and if my tutorial isn't enough, I'll leave you a list of amazing tutorials/guides that help me a lot when it comes to everything gifmaking related, so shoutout to them!
basic blending tutorial
coloring tutorial
blend gifs tips
blending, coloring and text effects guide (video)
another one similar to the previous one
gradient text
text outline
HOW TO: Blend multi - gifs / Dual Gradient coloring
You will need any version of Photoshop (I use CC 2019) and basic knowledge on making gifs.
STEP 1: THE BASE
1.1 - Make sure your canvas is 540px width. Mine is 540x450. Choosing which gifs to blend is kinda tricky and no one can tell you what's perfect. Everything depends of the scenary your show, movie, anime whatever you're working on has; but a tip is to use scenes that have dark areas, since it's easier to blend then. 1.2 - Make your individual gifs: crop, color, sharpen, all that, and make sure all of them are the same amount of frames. 1.3 - Before duplicating your gifs into your empty canvas, convert them all into smart objetcs. This will help to simplify stuff, have a much more organized work space and help you load your preview faster.

STEP 2: BRING YOUR GIFS
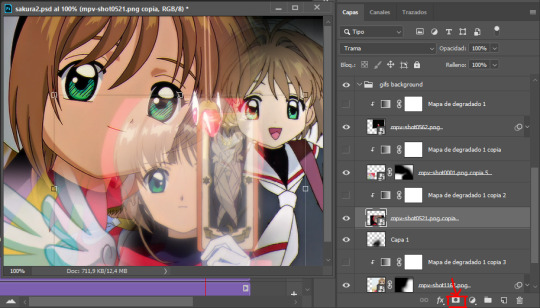
Now all you have to do is right click on every gif you made, go Duplicate layer… and sent it on your empty document. I would suggest doing one by one, so you can work better. Duplicating them all at once can be a little bit intimidating and might have you confuse how to combine your gifs. Try imagining what you want your gif to look like and where you want each element to be. As an example, I wanted the key scene when it kinda drops to be falling from the top of my gif and also as a separation of the one in color and the one Sakura is roller-skating.
STEP 3: BLENDING
3.1 - Okay, now that you more or less know what you want your gif to look like you can start by changing the blend mode of your gifs. Photoshop has mutiple options on this and it applies to all types of layers. For blending, one of the two (or more) gifs you are working is going to be on top, that's the one you're gonna have to change its blend mode in order to start this process. Generally, Screen is the one to go to.
3.2 - Some people group (selecting your layers > ctrl/cmd+g or right click > group) all the gifs so they can then change the group's blend mode into Screen but I personally like to do separately cause if I need a gif to fill some of the background I would keep it as Normal.
STEP 4: LAYER MASK
The key gif works perfect with Screen blend as it has a black background, but of course this won't be the case for most gifs you want to put in the main one. For those unwanted pixels we don't need, we use a Layer Mask. 4.1 - In order to do that, select your gif by clicking on them and next click on the layer mask button.
4.2 - Now you'll see a white square next to your gif layer. This will help by reducing the opacity of those things we don't need of your gif. What is white is 100% opacity and what is black 0%. So all you have to do is click on the layer mask, pick the brush tool and paint over what you want to "delete". Pay attention to use a soft brush, and the size of it should be around 200 and 300px. 4.3 - Repeat the process with all the gifs that need it
STEP 5: EXTRA LAYER
Sometimes a gif will look too bright/transparent/softened over the other ones. In order to fix this, you can create a new layer (the button right next to the trash can)
and paint with a black soft brush over the part you need to bring back. I don't know exactly how to explain it properly but I'll try with these before and after images. I'm adjusting the one with Sakura and her card:
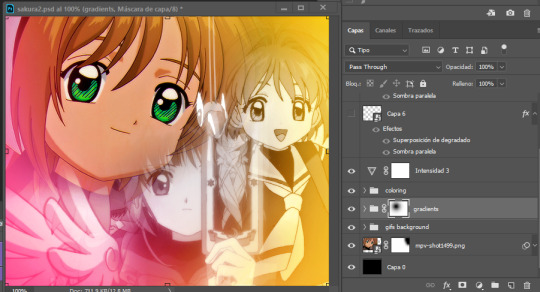
STEP 6: COLORING
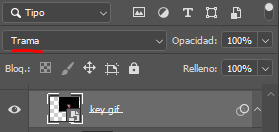
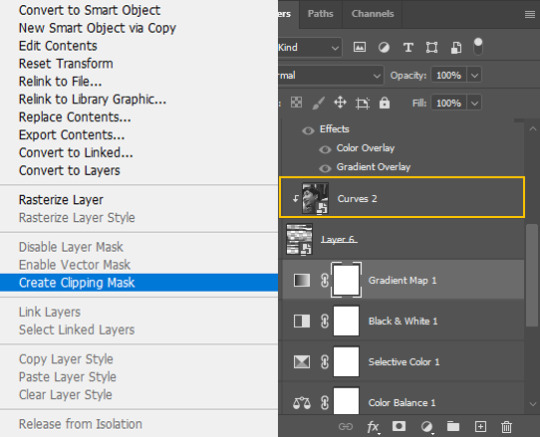
6.1 - OKAY, now that we have all that sort out and the gif has a proper structure is time to add some color. As I'm going to do a dual gradient after and leave only one of these 5 gifs with color, I'll use a black and white gradient map and add it to every individual one as a clipping mask (right click on the gradient map > create a clipping mask). Like this:
6.2 - Now that we have this I can add my own psd. I started making my own psds for every edit I make and I'm not ready in any way to explain that, but I learn how to do this with this tutorial. With that, my gif now look like this:
STEP 7: DUAL GRADIENT
Finally for this part I recommend making another group (the folder button next to new layer) and add a new layer for the different colors you add. This is all about painting and playing with the blending modes for these layers. There's no right way to do this, you just have to play around and see what works best for you and the scenes you have. You will end up with something like this:
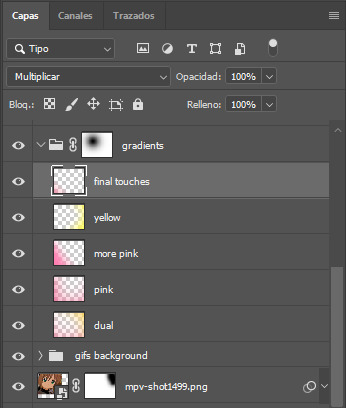
Tips for this step are: 7.1 - Use a soft brush, size it up to 1000px, zoom your gif out and start painting out of the canvas. This will help create that gradient effect we are looking for. 7.2 - Change the layer's opacity/blend mode. This is (again) about playing around with colors. I changed these settings for all my layers that are part of the gradients' group. In order: dual is Screen + 90% opacity, pink Vivid Light + 70%, more pink Lighten + 90%, yellow Hard Light + 70% and final touches Multiply at 100%. I also mixed up the colors, not only staying with certain yellow or pink. 7.3 - The gradient tool works the same way as the brush tool! Just make sure the gradient is any color you're working with + transparent. 7.4 - I also added a layer mask to my gradient's group to erase some of the extra color in Sakura's face. All this will result on this:
And that's pretty much it! For the text part, I was going to add it but the tutorials I linked at the beginning explain it perfectly so shoutout to them. As always, if you have any other doubt, send me an ask and I will answer it as fast as I can! Always happy to help ⸜(。˃ ᵕ ˂ )⸝♡
#answered#anonymous#*tutorial#photoshop help#gif tutorial#blending tutorial#photoshop tutorial#coloring tutorial
23 notes
·
View notes
Note
hi mona!! this set of yours (usergif/774343430011813888/first-kanaphan-as-kant-pattanawat-khaotung) is absolutely gorgeous!! would you be able to share how you made the third gif?
hi abigail!!! thank you so much! your sets are always so pretty and inspiring to me <333 ofc, i'm happy to share!
(here's the set)
and the gif in question:

it's a clipping mask!
i used a glitch effect psd file i already had on hand (it's a free download from freepik here)

after opening the file in ps, i expanded the 'effect' folder layer and selected the mask on the image 5 layer by holding ctrl and clicking the mask.
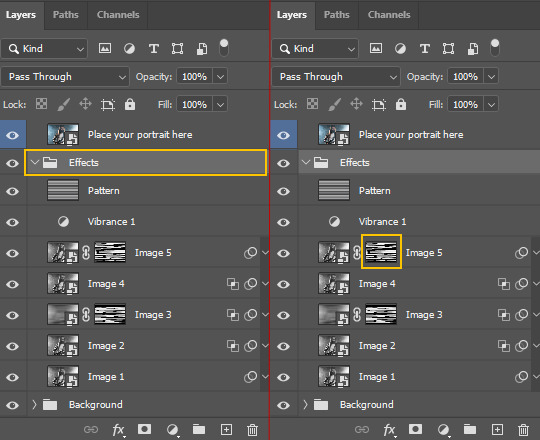
which gives me the marching ants around the glitchy effect:

next i copied that selection (ctrl + c) and pasted it onto a new document, giving me this:

now, i wanted to be able to actually see how it looks, so i inverted the layer with ctrl + i:

from here i converted this into a smart object. (whenever i need to resize something, i always convert the image in a smart object first bc it helps preserve the clarity.)
okay! now! i went back to my base gif of guilt-ridden kant:

then duplicated my glitchy effect smart object on top of it and resized/moved the smart object using the transform tool (ctrl + t) until it was at a size and position that i liked:

from here, i just set my gif of boba-eyed bison directly above the glitchy thing, right-clicked on that layer to activate the drop-down menu, and selected 'create clipping mask' to attach it to the smart object 'shape' below it.
which gave me this:

i upped the black in a selective color adjustment layer, added my text, and here's the final product:
i hope that helps!
35 notes
·
View notes
Text


[ jo.n bernt.hal, homosexual, male + he/him, damage empowerment ] colby figueroa is a neutral evil agent of pandora selected for their disregard of human life and death row conviction and underwent the top-secret mutation process. to the rest of the world, the forty-five year old originally from boston, massachusetts is deceased or missing. however, in atlantis, they are now known as abaddon of pride after developing the ability to absorb and stockpile the damage he receives as energy that allows him to augment his physical form, making him stronger, faster, and more resilient to take more damage. the agent has been with pandora for six years and is trusted for being daring & unyielding, but once reprimanded for being rash & temperamental.
CLASSIFIED FILE: F69041E
Name: [redacted]
Callsign: Abaddon of Pride
Age: 45
Ability: Pain Packer
Height: 5′11″
Weight: 180 lbs
Build: Muscular, athletic
Hair Color: Black
Eye Color: Brown
Pronouns: He/Him
AGENT PROFILE
Expertise: Pain Tolerance, Brute Force, Battlefield Endurance
Proficiencies: Environmental Adaptation, Vehicular Adaptation, Intimidation, Athletics, Persuasion
Substandard Skills: Culture & Politics, Stealth & Infiltration
Operating Years: 4
Notes: neutral evil Convicted felon, though he maintained his innocence even post recruitment. Observation of behaviors suggests that the guilty verdict was justified. Asset is violent and charismatic, likely responsible for more deaths than criminal record suggests. Lacks empathy and kills without remorse. Advised to monitor interactions with other agents closely, co-op assignments involving asset have a higher rate of risk factors than intel predicted. No clear reason has been determined from follow-up incident investigations.
Abilities allow asset to convert damage to energy released through physical augmentation of the body. The asset grows in size, strength, and durability, taking on a monstrous appearance that can absorb even more damage. Pain appears to be the only limitation. An attack that surpasses asset's physical pain threshold will cause the stockpiled energy to escape, rapidly draining the potency of the augmentation. So long as the asset's pain is managed, the enhanced monster form can continuously recycle potential damage into its power. Asset tends to become more destructive the stronger he gets.
Asset can deactivate ability without draining stockpiled damage, so indefinite reserves are a high risk. Maintaining low-impact restraint methods as a countermeasure is recommended. Stasis protocol to be used as threat or punishment in the event that asset poses a critical risk Project [redacted] missions. Experienced operatives recommended for co-op missions.
DOCUMENTED MISSION EQUIP INVENTORY
Implements to increase damage of melee hits (gloves or knuckles made from hard composite material, thrown projectiles, etc)
Expandable clothing
9 notes
·
View notes
Note
love your blog so much! and im wondering how you archive/document your day-to-day life and the information that you take in — whatever form: books, lyrics, trees, etc etc — ? im struggling so much w forgettttttting
i love this question! i’ve always longed to have a beautiful and consistent journal, but it’s something i struggle with maintaining organically so i’ve tried some different structures over the past few years. long-winded answer under the cut 💗
back in 2021, i was making a monthly journal on google slides which i really liked because it's so natural to integrate images. i just made a month of it public here as an example of what it was like.
from 2022 - now, i've been doing a new concept where on the last day of every season i write long, list-y answers to these prompts:
art that has been resonating with me (includes music, books, movies, visual art, anything really). i'll usually write a few words about it... "Decision to Leave dir. Park Chan-Wook—the eye shot! the eye shot with the ants crawling on it" or "'Train Ride' by Ruth Stone: 'Release, release; / between cold death and a fever, / send what you will, I will listen. / All things come to an end. / No, they go on forever.'" or "Chunky misshapen pearls and other organic, shiny shapes"
my favorite memories from the season... examples from past lists include "Swimming hole with Zoë where I stuck a twig in my hair and we waded around on our hands like crocodiles" and "Walks in my snowsuit at night, one in particular where the Gemenids meteor shower was just starting"
a checkup on 5 of my current projects/goals. currently these are 1. learn to lift weights, 2. write 50 "identical" poems, 3. write a new syllabus, 4. practice mindful spending, 5. improve at woodworking.
a checkup on 5 of my core values. currently these are 1. adventure, 2. connection, 3. play, 4. sensuality, 5. sustainability.
reevaluating projects and values to focus on next
since you mentioned wanting to remember things-- when i'm putting this together i draw extensively from my tumblr archive/likes, calendar, photos app, recent playlists, and letterboxd and storygraph accounts. curating this kind of ephemeral data into a more permanent and thoughtful record is really satisfying to me. i privately call this method "wrapped" a la spotify... like i'll have a big entry for "fall 2022 wrapped" and then "winter 2023 wrapped" and so on. i do all this on the app notion and file the seasons on one big page so it's easy to click into one and remember what i was doing and thinking about. (i also converted my dream journal to a notion database. i've logged about 300 dreams in here and love that i can tag by character/feature.)
over the years i've also kept a more classic diary via text documents that's less structured, just spitting out whatever's on my mind with the date at the top. i tend to do this frequently for a while, then ebb off, then restart another doc, rinse and repeat. i also have a few physical notebooks (including these two) but the digital stuff is way more extensive as i prefer to write on the computer.
if i were going to recommend any of this, i would say the visual format of the slides journal was really compelling because i liked the aesthetic freedom but i also love the "wrapped" lists because they seem to cut to the core of an era's texture. in the future i'd like to try to integrate these aspects together! 📓
30 notes
·
View notes
Note
Hi. Im trying to understand what is illuminati programming? Does it make you believe in conspiracy theories like the illuminati? Or is just another name for monarch programming?
Monarch Programming is an umbrella term for TBMC, Designer Programming, MK-ULTRA, and Designer programming.
The Illuminati is often categorised as a conspiracy theory. There is a lot of documentation regarding groups whose name means Illuminati. For example Alumbrados. The more formal genesis of the Illuminati came with the birth of Adam Weishaupt (its founder); born in Ingolstadt, Bavaria, in 1748 to Jewish parents, who converted to Roman Catholicism and had him attend monastery schools and a high school run by the Jesuits.
A name applied to several bodies of religious enthusiasts, including (1) the Alumbrados; (2) the Rosicrucians; and (3) a masonic sect founded in Bavaria in 1776 by Adam Weishaupt. Repudiating the claims of all existing religious bodies, they professed themselves to be those in whom alone the ‘illuminating’ grace of Christ resided. They were banished from Bavaria in 1784 but survived elsewhere.
On May 1, 1776, the Illuminati (from the same root word for Lucifer, “Bearer of Light” or Enlightened Ones) was founded as a single powerful secret organisation to overthrow established civilization and religion, and to establish a Novus Ordo Seclorum (New World Order). Weishaupt developed the following seven-fold plan as the means to arrive at that goal: 1) Abolish all ordered governments; 2) Abolish private property; 3) Abolish inheritance; 4) Abolish patriotism; 5) Abolish religion; 6) Abolish the family unit; and 7) Creation of a New World Order/World Government (Griffin 1993:52).
According to Rev. Seth Payson, who in 1802 wrote Proof of the Illuminati, the Illuminati is symbolised by the Great Pyramid, with the all-seeing eye on top (Great Seal of the U. S. on the back of the one dollar bill), with thirteen levels. These thirteen levels are divided into three groups: 1) Nursery (Preparation, Novice, Minerval, Illumined Minor), 2) Masonry (Apprentice, Fellowcraft, Master, Illumined Major/Novice, Illumined Dirigens/Knight), and 3) Mysteries (Presbyter/Priest, Prince/Regent, Majus, and Rex). The Order is controlled by the “Council of 13” (Council of 12 + the leader—Weishaupt himself). The true power of the organisation was considered to be “circles within circles;” that is the innermost circle, governed by the Council of 13 (Payson 2003:67-8).
Illuminati programming is a specific form of programming. The beliefs would vary depending on that group's point of view of the teachings. I categorise Illuminati programming under spiritual programming (RA). It is traditionally linked with anti semitic programming.
The beliefs for programming are consistently changing. For example: Kazakhstan has become known in conspiracy circles. Some of the theories name it an Illuminati-funded, future Asian capital of the coming “New World Order.”
Here’s an interesting article about one of the origins of the conspiracy theory.
Watchmen of the New Jerusalem: Jedidiah Morse, the Bavarian Illuminati and the refashioning of the jeremiad tradition in New England
Oz
8 notes
·
View notes
Text
Marriage Visa in Thailand
The Thailand Marriage Visa is formally designated as a Non-Immigrant O Visa (Category "O") based on marriage to a Thai national. Governed by Immigration Act B.E. 2522 (1979) and Ministerial Regulation No. 35 (B.E. 2562), this visa category permits annual extensions of stay when specific conditions are met.
Key Distinctions:
Initial Visa: 90-day entry (obtainable at embassies abroad or via conversion in Thailand)
Extension Basis: Annual renewal under Clause 2.18 of Immigration Bureau regulations
Not a Work Permit: Separate application required for employment authorization
2. Financial Requirements: Beyond the Basics
A. Capital Deposit Method (Most Common)
THB 400,000 in a Thai personal account
Seasoning Period:
First application: 2 months prior
Subsequent renewals: 3 months prior and continuous maintenance
Account Type Restrictions:
Must be personal savings account (not fixed deposit)
Joint accounts may be accepted at some offices (but risky)
B. Monthly Income Alternative
THB 40,000/month provable income
Verification Methods:
Foreign Income: Embassy letter (US/UK/EU) or 12-month Thai bank transfers
Thai Income: Tax receipts (Por Ngor Dor 91) + company documents
Combined Income: Spouse's income can contribute with marriage proof
Pro Tip: Chiang Mai Immigration notoriously rejects embassy letters without supporting bank transfers - maintain both.
3. Document Preparation: Hidden Requirements
Mandatory Documentation:
Marriage Evidence:
Kor Ror 2 (Thai marriage certificate)
Kor Ror 3 (amendment record, if applicable)
Photos: 5-10 prints showing cohabitation (dated across seasons)
Residence Proof:
Tabien Baan (Blue House Book) or rental contract + owner's documents
Utility Bills: At least 2 different services in both names
Financial Proof:
Bank Book: All pages photocopied (showing seasoning)
Bank Letter: Issued within 24 hours of application
Provincial Variations:
Bangkok (CW): Requires TM30 filing receipt
Phuket: Demands map to residence
Udon Thani: Home visit standard procedure
4. Application Process: Step-by-Step Protocol
A. Initial Visa Acquisition
Option 1: Apply at Thai Embassy Abroad
Savannakhet (Laos) requires least documentation
Penang (Malaysia) demands financial proof upfront
Option 2: Convert from Tourist Visa
Must have 15+ days remaining on current permit
Requires additional TM86 form
B. Annual Extension Process
30-Day Pre-Application:
Verify bank balance seasoning
Schedule appointment (online for Bangkok)
Interview Day:
Couple interrogated separately (common questions: spouse's birthday, wedding date)
Document submission before noon
Under Consideration Period:
30-day stamp issued
Return for final approval stamp
Critical Note: Some offices (e.g., Jomtien) now require biometric fingerprinting.
5. Work Rights & Business Limitations
Employment Authorization:
Work Permit Possible: But employer must handle application
Restrictions:
Cannot work in prohibited occupations (massage, agriculture)
Must meet salary thresholds for nationality
Business Ownership Options:
Thai-Limited Company:
Can own 49% as foreigner
Marriage visa doesn't increase ownership rights
Nominee Structure Warning:
Using spouse as majority owner risks FBA violation
Must prove spouse's independent financial capacity
6. Advanced Strategies & Loopholes
A. The "Income Combination" Tactic
Example: THB 20K pension + THB 20K spouse's income
Requires:
Spouse's tax records
Affidavit of income contribution
B. Multi-Year Planning for PR
Year 3: Can apply for Permanent Residency
Requires THB 30K+/month provable income
Thai language test (basic conversation)
Year 5: Citizenship eligibility begins
C. Avoiding the "Seasoning Trap"
Strategy: Maintain THB 400K year-round
Alternative: Use fixed account with automatic renewal
7. Common Rejection Reasons & Appeals
Top Denial Causes:
Bank Balance Dips:
Even THB 399,999 = automatic rejection
Solution: Maintain THB 410K buffer
Document Discrepancies:
Mismatched addresses
Outdated tabien baan copies
Suspected Sham Marriage:
No children + large age gap = red flag
Counter with: Joint leases, family photos, shared assets
Appeal Process:
30-Day Appeal Window
Requires "new evidence"
Best handled by lawyer
8. Expert Recommendations
For New Applicants:
Start financial seasoning 6 months early
Create document checklist for your specific office
Conduct mock interview with spouse
For Renewals:
Maintain separate visa account
Document 5+ joint activities annually
Pre-apply 45 days early for buffer
For High-Net-Worth Couples:
Consider combining with investment visa
Structure assets to qualify for O-A Long Stay
9. Future Outlook & Policy Trends
Digital Verification: Increasing use of blockchain marriage records
Stricter Scrutiny: More home visits in tourist areas
Financial Thresholds: Likely to increase post-2025
Final Note: Always cross-verify requirements at your local office - immigration practices vary significantly by province. For complex cases (previous overstays, divorce history), retain specialized counsel before application.
#thailand#immigration#thai#thailandvisa#thaivisa#visa#immigrationinthailand#marriagevisa#marriagevisainthailand#thailandmarriagevisa#thaimarriagevisa
2 notes
·
View notes
Text
Features of Our AI To Human Text Converter
However, not all AI-generated text is fit for human consumption without some level of refinement. That's where the AI To Human Text Converter comes in, a free tool that turns robotic-sounding AI content into natural, human-readable text. Let's dive into the key features that make this tool an indispensable resource for anyone looking to humanize AI-generated text effortlessly.
1. Simple and User-Friendly Interface
One of the standout features of our AI To Human Text Converter is its simple, user-friendly interface. Many people shy away from using complex tools that require a steep learning curve. Fortunately, this converter is designed with ease of use in mind. The interface is intuitive, allowing users to quickly navigate the platform and convert their AI-generated text into human-like content within seconds. There's no need to struggle with confusing menus or spend time learning how to use the tool.
2. Safe and Secure to Use
Safety is paramount when it comes to using online tools, especially for text conversion. AI To Human Text Converter ensures that users' data is protected through secure browsing measures. The website is well-secured, minimizing any risks of data breaches or security threats. Whether you're a content creator, student, or professional, you can confidently use the tool without worrying about jeopardizing your safety.
3. Accurate Conversion of AI-Generated Content to Human-Like Text
The primary feature of the AI To Human Text Converter is its ability to transform AI-generated content into human-readable text. Utilizing advanced algorithms, the tool analyzes the input and produces an output that closely mimics the natural flow of human writing. Whether you're converting AI content for essays, blog posts, or marketing materials, this tool ensures the end result is clear, engaging, and free of robotic phrasing.
4. No Limitations – Unlimited Usage
One of the most attractive features of the AI To Human Text Converter is its unlimited usage policy. Unlike other tools that impose restrictions or require subscriptions after a certain number of conversions, our tool is completely free with no limitations. You can convert as much content as you need, whenever you need it. This makes it an ideal solution for content creators, bloggers, and students with large volumes of AI-generated text to convert.
5. Fast and Efficient Processing
Time is a valuable commodity, and with our AI to human text converter, speed is a top priority. The tool processes your content in seconds, delivering humanized text quickly and efficiently. Whether you have a single paragraph or an entire document to convert, you can trust that the tool will provide results without delays.
6. No Authentication Needed
Another significant advantage of AI To Human Text Converter is that you don’t need to create an account, sign up, or log in. The tool is ready for immediate use, allowing you to convert text as soon as you arrive at the website. This no-authentication feature ensures a hassle-free experience, making it easy for users to get started right away.
Why Choose AI To Human Text Converter?
If you're looking for a reliable and efficient way to humanize your AI-generated content, AI To Human Text Converter is the perfect choice. Here are some key reasons why you should consider using this tool:
Free of Cost: Our tool is completely free to use, with no hidden fees or subscription costs.
Unlimited Use: Convert as much AI content as you need without worrying about restrictions.
No Login Required: Enjoy immediate access to the tool without needing to create an account.
Fast Conversion: Save time with near-instant results that transform AI text into human-like content.
User-Friendly: The intuitive interface makes it easy for anyone to use, even without prior experience.
The AI To Human Text Converter is packed with features that make it an excellent choice for anyone looking to convert AI-generated content into natural, human-readable text. Its simple interface, fast processing, and unlimited usage ensure that you get the best results without any hassle. Plus, with top-notch security measures in place, you can use the tool confidently and safely. Whether you’re a student, content creator, or professional, this tool is designed to meet all your text conversion needs.
Try the AI To Human Text Converter today and experience the difference for yourself!
#AI to human text#AI to human text converter#human-readable text#convert AI-generated content#humanize AI text#free AI to human text converter#secure text converter#AI content converter#unlimited AI text conversion#AI text tool#AI text to human-readable content#convert AI text for essays#convert AI text for blog posts#no login required AI tool#fast AI text conversion#user-friendly AI text converter#free online AI to human text tool#secure browsing AI tool#advanced AI text conversion algorithms#AI content transformation#hassle-free AI content conversion#fast and efficient AI text tool#unlimited usage AI text converter#no subscription AI tool#AI text humanization tool
5 notes
·
View notes
Text
How Can You Instantly Use a Percentage to CGPA Calculator?

In today's competitive academic world, understanding your academic performance is crucial — especially when applying for higher education or international programs. One of the most common challenges students face is converting percentage to CGPA (Cumulative Grade Point Average) or vice versa. Whether you're submitting documents abroad, applying for scholarships, or simply comparing your academic profile, a Percentage to CGPA calculator becomes your best friend.
But how do you instantly use one, and how accurate are these tools? Let’s dive into the details.
📊 What Is a Percentage to CGPA Calculator?
A percentage to CGPA calculator is an online tool designed to convert your academic percentage into a grade point average. This tool follows standardized formulas (based on country or institution) to make the conversion seamless, instant, and error-free.
For example, Indian universities typically follow a 10-point CGPA system, whereas international universities may follow 4.0 or 5.0 GPA systems. The calculator helps bridge this gap.
💡 Why Do You Need to Convert Percentage to CGPA?
Here are a few scenarios where using a percentage to CGPA calculator is essential:
Applying to Foreign Universities: Many global institutions require CGPA on a 4.0 scale.
Standardization: To compare your academic performance with international peers.
Scholarship Applications: Some funding bodies use GPA cut-offs.
Professional Documentation: For resumes, competitive exams, or professional profiles like LinkedIn.
Without accurate conversion, your academic profile may not meet the stated requirements — even if your percentage is excellent.
🧮 Common Formulas Used for Conversion
While different institutions use different formulas, a commonly accepted formula for converting percentage to CGPA on a 10-point scale is:
iniCopy
Edit
CGPA = Percentage ÷ 9.5
Example:
If your percentage is 85%, CGPA = 85 ÷ 9.5 = 8.95
Similarly, if you're converting to a 4.0 GPA scale, the calculation varies slightly and depends on the academic standards of the destination country or institution.
⚡ How to Instantly Use a Percentage to CGPA Calculator?
Here’s a simple step-by-step guide:
✅ Step 1: Choose the Right Calculator
Search online for a “Percentage to CGPA calculator” or visit academic support platforms like Aimlay.com, which also offer CGPA conversion tools for Indian and global scales.
✅ Step 2: Enter Your Percentage
Type your total or average percentage from your mark sheets (for example: 76.5%).
✅ Step 3: Select the Scale
Choose whether you want the CGPA on a 10-point, 4-point, or 5-point scale.
✅ Step 4: Click ‘Convert’ or ‘Calculate’
The tool will instantly display your CGPA value.
✅ Step 5: Note or Download the Result
Some calculators let you copy the result, email it, or download a PDF for official use.
✅ Benefits of Using a Percentage to CGPA Calculator
🔹 Accuracy: Minimizes manual calculation errors.
🔹 Speed: Get results instantly with one click.
🔹 Convenience: No need to understand complex formulas.
🔹 Versatility: Supports multiple grading scales (Indian & International).
🔹 Useful for Applications: Helps you align your academic scores with global standards.
🛑 Common Mistakes to Avoid
While using such tools is easy, students often make these errors:
Using the Wrong Formula: Each institution may have unique conversion metrics.
Ignoring Decimal Points: Rounding too early can cause inaccuracies.
Confusing CGPA with GPA: They are not the same — CGPA is usually on a 10-point scale, GPA on 4.0 or 5.0.
Not Verifying the Source: Use calculators from trusted academic websites or platforms like Aimlay.com.
🌐 Top Sites Offering CGPA Calculators
Here are a few reliable platforms you can check out:
Aimlay.com – Offers academic tools and admission support for higher education.
CollegeDunia
Shiksha.com
UpGrad Education
CalculatorSoup.com – For international scale GPA conversions.
🧾 When Should You Include CGPA Instead of Percentage?
You can include your CGPA:
When applying for international universities or visas.
If the application portal requires GPA input only.
On your LinkedIn or Resume for standardization.
In case your institution follows the credit-based system.
On the other hand, if your mark sheet is in percentage, make sure to mention both (e.g., “85% / CGPA 8.95”) if space allows.
0 notes
Text
How Asset Tokenization Works: Process, Cost, and Benefits

In today’s digital economy, Asset Tokenization is transforming how we perceive ownership, transfer value, and invest in assets. From real estate to fine art, and even commodities, almost any asset can now be tokenized using blockchain technology. This innovation is streamlining traditional investment models, improving liquidity, and opening the door for global participation.
In this article, we will explore what Asset Tokenization is, how the process works, the associated costs, and the numerous benefits it offers to both investors and asset owners.
What is Asset Tokenization?
Asset Tokenization is the process of converting rights or ownership of a real-world asset into a digital token on a blockchain. These tokens represent fractional ownership and can be bought, sold, or traded on digital platforms.
Imagine owning a piece of a luxury apartment in New York or a rare piece of artwork without having to buy the entire asset. With Asset Tokenization, this becomes possible. It democratizes access to high-value investments by allowing individuals to purchase small fractions.
How Asset Tokenization Works – Step-by-Step
The process of Asset Tokenization involves several key steps, integrating legal compliance, smart contracts, and blockchain technology to create a secure digital representation of the physical asset.
1. Asset Selection
The first step is choosing the asset to tokenize. This could be:
Real estate
Artwork
Precious metals
Intellectual property
Private company shares
2. Due Diligence and Legal Structuring
Before tokenization, the asset must undergo proper valuation, legal checks, and documentation. Legal compliance is crucial to ensure that the tokenized asset is recognized in the jurisdiction of interest.
3. Smart Contract Development
Smart contracts are self-executing codes on the blockchain that define how the tokenized asset behaves. They establish rules for ownership, transfer, and revenue distribution.
4. Token Creation
After the smart contract is ready, tokens are minted on a blockchain platform such as Ethereum, Polygon, or Solana. Each token represents a share in the asset.
5. Token Distribution
The tokens are then distributed to investors via a token sale, Security Token Offering (STO), or private investment rounds. Investors can purchase these tokens using fiat or cryptocurrencies.
6. Secondary Trading
Once distributed, tokens can be listed on secondary markets or token exchanges, enabling liquidity and transferability of the asset.
Through this process, Asset Tokenization provides a secure, transparent, and efficient way to manage ownership and transfer of real-world assets.
Cost of Asset Tokenization
The cost of Asset Tokenization can vary depending on the asset class, jurisdiction, and level of complexity involved. Here’s a general breakdown:ComponentEstimated Cost (USD)Legal & Compliance$10,000 – $50,000Smart Contract Development$5,000 – $20,000Token Minting & Platform Fee$3,000 – $10,000Marketing & Investor Onboarding$5,000 – $30,000Maintenance & CustodyVariable
Total Estimated Cost: $25,000 to $100,000+
Despite the upfront cost, the long-term value derived from liquidity, broader investor reach, and automation often outweighs the initial investment.
Key Benefits of Asset Tokenization
Asset Tokenization offers multiple advantages that are driving its rapid adoption across industries. Let’s explore the top benefits:
1. Improved Liquidity
Traditional assets like real estate are often illiquid. Asset Tokenization enables fractional ownership, making it easier to buy or sell small portions, thus improving liquidity.
2. Global Reach
With tokenized assets, investors from around the world can participate without geographic limitations, expanding the potential investor base significantly.
3. Fractional Ownership
Instead of needing large sums to invest in expensive assets, investors can buy small fractions, lowering the entry barrier.
4. Transparency and Security
Blockchain provides an immutable ledger, ensuring all transactions are transparent and traceable. This reduces the risk of fraud and builds trust among stakeholders.
5. Faster Transactions
Blockchain eliminates intermediaries, reducing the time required for settlements. This leads to faster, cheaper, and more efficient transactions.
6. Programmability
Through smart contracts, tokenized assets can have programmable features such as automated dividends, voting rights, and transfer conditions.
7. Cost Efficiency
Over time, the reduction in administrative overhead, paperwork, and legal fees can result in significant cost savings.
These benefits make Asset Tokenization a compelling solution for modernizing asset management and investment practices.
Use Cases of Asset Tokenization
Let’s look at a few real-world use cases where Asset Tokenization is creating significant impact:
1. Real Estate
Developers are tokenizing commercial and residential properties to allow fractional investment and improve liquidity.
2. Art and Collectibles
Rare artworks, collectibles, and luxury goods are being tokenized to allow investors to own and trade fractions of valuable items.
3. Commodities
Gold, oil, and other commodities can be tokenized, offering easy exposure to these markets without physical possession.
4. Equity and Private Markets
Private startups and SMEs can tokenize shares to raise funds more efficiently and offer secondary liquidity to early investors.
Challenges in Asset Tokenization
While Asset Tokenization is promising, it also comes with its own set of challenges:
Regulatory Uncertainty: Compliance with financial regulations across jurisdictions is complex and evolving.
Technology Adoption: Many traditional players are still wary of blockchain adoption.
Market Education: Lack of awareness among investors and institutions can slow down adoption.
Overcoming these challenges requires collaboration among regulators, technology providers, and asset owners.
Conclusion
Asset Tokenization is reshaping the financial world by making real-world assets more accessible, liquid, and secure. From real estate and commodities to art and private equity, the potential applications are limitless.
With the right legal framework, robust smart contracts, and a trusted blockchain platform, the process of Asset Tokenization can unlock enormous value for businesses and investors alike.
If you're considering entering the tokenized economy, now is the time to explore how Asset Tokenization can benefit your asset portfolio or investment strategy.
#RealWorldAssetTokenization#AssetTokenization#RWATokenization#RealEstateTokenization#TokenizeAssets#CryptoAssets#ShamlaTech#TokenEconomy#BlockchainForAssets#DigitalAssets
0 notes
Text
5 Signs Your Center Needs a Childcare CRM
Between managing parent communication, handling admissions, scheduling tours, and staying on top of daily operations — things can get chaotic quickly. That’s where a childcare CRM (Customer Relationship Management system) becomes a game-changer. If your center is still relying on spreadsheets, sticky notes, or multiple fragmented apps, it might be time to enhance your process. Here are five clear signs that your preschool or daycare needs a childcare CRM — and how the right admission management software can make all the difference.
You’re losing track of parent inquiries Are you constantly digging through emails or messages trying to find that one parent who inquired a couple of weeks ago? A childcare CRM helps you capture and organize every lead in one place. With automated follow-ups, reminders, and status updates, you never miss an opportunity to convert an inquiry into an enrollment.
Your admissions process is causing chaos From inquiry to enrollment, the admissions journey should be smooth — not scattered and confusing. If you're managing forms, tours, and applications manually, it’s time to switch to admission management software. Platforms like illumine allow you to track enrollment stages, schedule tours, collect documents, and communicate with parents — all from one place.
Communication with parents is scattered Parents expect timely updates and transparent communication. If you're jumping between WhatsApp, email, and calls to keep everyone informed, a childcare CRM can centralize everything. With features like message templates, real-time updates (with extensive media sharing capabilities), and in-app direct messaging, you can build trust while saving several hours every week.
You Can’t Easily Track Enrollment Trends Understanding where your leads come from and what’s working in your enrollment strategy is essential for growth. Good admission management software offers analytics and reports that help you see trends and patterns, identify bottlenecks, and improve your targeted marketing efforts.
Your Staff Is Overwhelmed with Manual Work If your team spends more time on paperwork than with children, it’s a sign your center needs a digital upgrade. A childcare CRM reduces manual tasks by automating repetitive processes like reminders, status updates, and follow-ups — freeing up your staff to focus on education and care and not having to deal with frequent burnout.

Final Thoughts The childcare landscape is evolving, and technology is helping centers keep up. If you’re facing any of the challenges listed above, it’s time to explore solutions like illumine — a powerful childcare CRM and admission management software built specifically for early education providers. By digitizing your workflow, you not only improve operational efficiency but also create a more engaging experience for families. That’s a win for everyone — your team, your parents, and most importantly, the children.
Check our full blog here: https://illumine.app/blog/signs-you-need-a-childcare-crm
0 notes
Text
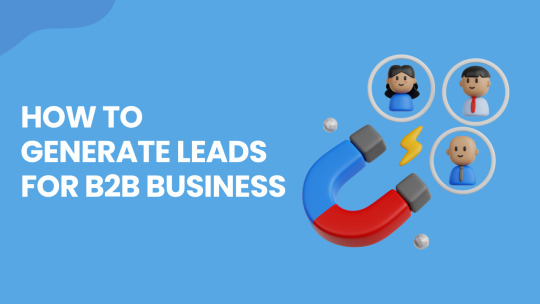
How to Generate leads for b2b Business
Leads are oxygen for every SaaS founder. But more important than volume is quality—prospects who match your Ideal Customer Profile (ICP), have budget, and are ready to start a real conversation. Below is a plain‑English guide to the three go‑to‑market (GTM) channels that deliver the highest‑quality B2B leads today, plus step‑by‑step tactics you can use this week.
1. Nail Your ICP Before You Do Anything Else
Think of your ICP as a filter. A clear filter means:
Higher response rates: You’re talking to people who actually care.
Shorter sales cycles: Budget and authority are already in place.
Lower customer‑churn: The product truly solves their pain.
Quick ICP checklist
Firmographics: industry, company size, funding stage.
Pain points: What problem keeps them up at night?
Buying triggers: hiring bursts, regulatory changes, new funding, etc.
Decision unit: who signs, who influences, who uses.
Document this in one page and share it with marketing and sales before launching any campaign.
2. Channel #1 – LinkedIn: Your Always‑On Prospecting Engine
Why LinkedIn? Conversion on LinkedIn’s native Lead Gen Forms averages 13 %, far above the 2 – 3 % most landing pages manage. Response rates to LinkedIn DMs (10 %) now double cold email averages. (sopro.io, expandi.io)
How to do it
Polish your profile & page: headline = pain you solve + proof.
Connect > engage > message: Send a non‑sales connection note, comment on two of their posts, then DM with a value nugget (e.g., benchmark PDF).
Post “demand‑net” content: quick wins, teardown threads, customer stories. Consistency beats virality.
Run Lead‑Gen ads when budget allows: keep questions minimal to protect that 13 % conversion.
Pro tip: Block 30 minutes daily for “relationship reps” (comments + DMs). Pipeline compounds.
3. Channel #2 – Webinars: Trust Builder at Scale
Why webinars? 73 % of B2B marketers call webinars their top source of high‑quality leads, with registration‑to‑attendee conversion up to 51 %. (hubilo.com, demandsage.com)
Webinar recipe
Step
What to do
Why it matters
Hook a pain‑point title
“Cut AWS spend 30 % in 30 days”
Drives sign‑ups
45‑minute live session
25 min teaching, 15 min demo, 5 min Q&A
Balances value & pitch
Interactive elements
Polls, chat, emoji reactions
Keeps attention
Fast follow‑up
Slides + replay link within 1 hour
Converts warm interest
Repurpose
Turn Q&A into LinkedIn posts, clip demo for YouTube
Extends shelf life
Aim for one webinar per month; most SaaS teams see cost‑per‑lead drop after the third one as content and promotion processes mature.
4. Channel #3 – Outbound Email & Cold Calling: Precision Strikes
Metric (2025)
Email
Cold Call
Average reply rate
8 – 10 % (saleshandy.com)
Connect‑to‑meeting ~2 % – 3 % (leadforensics.com)
Best days
Tue / Thu (emails)
Tue & Wed for demos (only-b2b.com)
Email tips
Personalize line 1: a custom first sentence increases replies by 30 %.
Short & bright: 50‑75 words, 1 ask, no fluff.
Follow‑up x3: a respectful thread boosts total replies by 28 %. (saleshandy.com)
Cold‑call tips
Research first: know their tech stack or recent news.
Pattern interrupt opener: “Can I have 27 seconds to tell you why I’m calling?”
Value nugget before pitch: “SaaS CFOs use us to slash invoice processing time by 40 %.”
Schedule the next step on call: calendar invite beats “I’ll email you.”
5. Orchestrate a Multi‑Touch Sequence
Day 0: LinkedIn connect.
Day 2: Personalized cold email.
Day 4: LinkedIn comment + DM with a relevant resource.
Day 6: Cold call referencing earlier touchpoints.
Day 10: Webinar invite or gated case study.
This blend raises familiarity, so each new touch “feels” warmer.
6. Measure, Learn, Repeat
KPI
Good starting benchmark
LinkedIn DM reply rate
10 %
Webinar reg‑to‑attend
35 % (shoot for 50 %+)
Cold email reply
8 %
Cold call connect‑to‑demo
2 %
Review these weekly, A/B one variable at a time (subject lines, call openers, landing‑page copy). When a channel beats benchmark, double down.
7. Key Takeaways
Start with a crystal‑clear ICP so every lead has real buying power.
Master LinkedIn, webinars, and targeted outbound—they’re the 2025 big three for SaaS.
Use multi‑touch sequences to warm prospects and stand out.
Track and tweak; small optimizations compound into big pipeline gains.
#google ads services in prayagraj#bbc marketing in prayagraj#seo services in prayagraj#digital marketing agency in prayagraj
1 note
·
View note
Text
Loan Against Mutual Funds: Swipeloan

In today’s dynamic financial landscape, your investments can be more than just long-term wealth builders—they can also be powerful tools for short-term liquidity. With Swipeloan’s Loan Against Mutual Funds (LAMF), you can unlock the value of your mutual fund portfolio without selling your units. Whether you need ₹50,000 or up to ₹5 crore, Swipeloan makes it simple, fast, and entirely online.
What is a Loan Against Mutual Funds?
A Loan Against Mutual Funds allows you to borrow money by pledging your mutual fund investments as collateral. The best part? You don’t have to liquidate your holdings. Your investments continue to earn returns, even as you use them to meet your financial needs.
At Swipeloan, we help you convert your mutual fund portfolio into a ready source of funds—securely, conveniently, and digitally.
Why Choose Swipeloan for LAMF?
High Loan Amounts
Borrow anywhere from ₹50,000 to ₹5 crore, depending on the value of your mutual fund units.
Instant Online Processing
Apply, pledge, and receive funds entirely online—no paperwork, no branch visits.
Retain Investment Growth
Continue earning market returns while your units are pledged as security.
Attractive Interest Rates
Get competitive rates starting from 9% per annum, much lower than personal loans or credit cards.
No Prepayment Penalties
Enjoy flexibility with zero foreclosure or prepayment charges.
Who is Eligible?
Swipeloan’s Loan Against Mutual Funds is available for:
Salaried professionals
Self-employed individuals
Business owners
High-net-worth investors
NRIs (on select fund types)
HUFs and companies
Documents Required
To keep the process smooth, Swipeloan requires minimal documentation:
PAN Card
Aadhaar Card or other KYC ID
Mutual Fund Account Details (Folio/Demat)
Bank account information
✔ 100% digital KYC supported
Eligible Mutual Funds
Swipeloan accepts a wide range of mutual fund schemes, including:
Equity Mutual Funds
Debt Mutual Funds
Hybrid Funds
You can pledge units held in Demat form or via Statement of Account (SoA), provided they’re not under lock-in.
How Much Can You Borrow?
Loan eligibility is based on the type and value of your mutual fund units:Fund TypeLoan-to-Value (LTV)Debt FundsUp to 80–85%Equity FundsUp to 50–60%Hybrid FundsUp to 70–75%
Example: If you hold ₹10 lakh worth of debt funds, you could get up to ₹8.5 lakh as a loan.
How to Apply for LAMF with Swipeloan
Applying is quick and seamless:
Visit Swipeloan.in
Choose "Loan Against Mutual Funds"
Enter your PAN and investment details
Select the loan amount and tenure
Authorize digital pledge and eSign documents
Get Disbursal within 24–48 hours
Top Use Cases
Emergency medical needs
Travel or education expenses
Business expansion or cash flow
Paying off high-interest debt
Home renovation or big purchases
Why Liquidate When You Can Leverage?
At Swipeloan, we help you bridge your financial needs without compromising your future growth. Our Loan Against Mutual Funds offering is built for convenience, speed, and financial intelligence. Whether it's a sudden need or a planned expenditure, your investments can help you handle it—without being cashed in.
Unlock your portfolio’s potential with Swipeloan.
Apply today and get up to ₹5 crore instantly.
Visit Swipeloan.in to get started.
Would you like a version of this blog optimized for SEO or formatted for WordPress/HTML upload?
You said:
conclusion
ChatGPT said:
Certainly! Here's a compelling conclusion for the blog "Loan Against Mutual Funds: Swipeloan":
Conclusion
A Loan Against Mutual Funds is one of the smartest ways to meet your financial needs without breaking your long-term investment plans. At Swipeloan, we make this process seamless—offering high loan amounts, attractive interest rates, and a 100% digital experience. Whether it’s an emergency, a major purchase, or business expansion, you can unlock the value of your mutual funds and access funds within hours.
Apply online with Swipeloan and get up to ₹5 crore instantly against your mutual funds.
Your funds grow. So should your opportunities.
Visit Swipeloan.in to get started today.
0 notes
Text
Still Following Up with Vendors on WhatsApp? Streamline Everything with VMS
Managing vendors through WhatsApp messages, endless calls, and scattered spreadsheets might seem quick at first—but over time, it leads to delays, miscommunication, and missed opportunities. If your procurement or supply chain team is constantly chasing vendors for quotes, order status, and payment clarifications, it’s time to upgrade to a Vendor Management System (VMS).
In this blog, we’ll explore the common vendor-related challenges businesses face and how a modern VMS like BETs can streamline, centralize, and automate your vendor operations—from onboarding to invoice settlement.
The Problem with Managing Vendors Over WhatsApp & Excel
Relying on WhatsApp or manual tools for vendor coordination often leads to:
Untraceable Conversations Crucial details like quoted rates, delivery schedules, or order confirmations get lost in chat history.
Manual Errors Mistakes in rate entries, PO mismatches, or unrecorded agreements become common.
No Performance Tracking There’s no real way to evaluate vendor performance over time.
Delayed Approvals & Follow-Ups Cross-department coordination slows down because there’s no structured workflow.
Compliance Issues KYC documents, contracts, or certification renewals are often outdated or missing.
How Vendor Management Software (VMS) Solves These Issues
A modern VMS brings all vendor-related activities under one integrated platform. Here’s what BETs VMS offers:
1. Centralized Vendor Onboarding & KYC
No more sending KYC forms over email or storing documents in scattered folders. Vendors can:
Upload company documents via their login
Submit GST, PAN, bank details, certifications
Receive onboarding status updates
And you stay compliant with a complete digital trail.
2. Catalog & Rate Management
Vendors can manage their product/service catalog, update prices, and share special rate contracts—all in one place. You can:
Compare quotes across vendors with RFQ analysis
Set valid-from/to pricing
Avoid price mismatch issues at PO generation
3. Smart RFQ & PO Tracking
Raise RFQs with ease and track responses in real-time. Once approved, the VMS:
Converts RFQ to Purchase Order automatically
Sends PO notifications to vendors
Allows vendors to accept/reject or comment on POs
No more WhatsApp messages asking “Have you received the PO?”
4. Real-Time Order & Delivery Tracking
Vendors can update dispatch details, vehicle info, and expected delivery time from their panel. You can:
Monitor delivery timelines
Manage vehicle entry at the security gate
Integrate with QC module for incoming inspection
5. Vendor Performance Matrix
Track performance across metrics such as:
On-time delivery %
Quality rejections
Price competitiveness
Response time on RFQs
Use the insights to negotiate better, optimize supplier base, or even reward your top vendors.
6. Payments, Invoice Booking & Settlement
Vendors can upload invoices directly against delivered POs. The system lets you:
Validate invoices with GRN (Goods Receipt Note)
Track payment status (Pending, Processed, Paid)
Avoid disputes and endless follow-ups
7. Document Management & Compliance Alerts
Get auto-reminders for:
Contract renewals
Expiring certifications
Compliance document re-submissions
All stored securely and accessed instantly.
Seamless Integration with ERP & Other Systems
BETs VMS integrates seamlessly with your existing ERP or procurement modules, ensuring that:
Purchase, finance, QC, and stores departments stay aligned
No duplicate data entry
Reporting is real-time and accurate
If you’re still following up with vendors on WhatsApp, you're not just wasting time—you’re also risking data errors, compliance failures, and missed cost-saving opportunities.
BETs Vendor Management Software empowers businesses with a structured, automated, and intelligent platform to manage the complete vendor lifecycle. From onboarding to evaluation, it’s all streamlined—so your team can focus on strategic procurement, not repetitive coordination.
Ready to Upgrade?
Book a free demo to see how BETs VMS can revolutionize your vendor ecosystem. Let your WhatsApp stay personal—leave vendor management to professionals.
To know more,
Visit Us : https://www.byteelephants.com/
0 notes