#Troubleshoot Bluetooth Connectivity Problem
Explore tagged Tumblr posts
Visit Tumblr Blog
Explore Tumblr blogs with no restrictions, modern design and the best experience.
Last Seen Tumblr Blogs


Fun Fact
Tumblr was attacked by a cross-site scripting worm deployed by the Internet troll group GNAA on Dec 3, 2012.
Text


I DREW MY OC TOAST AAAAAA
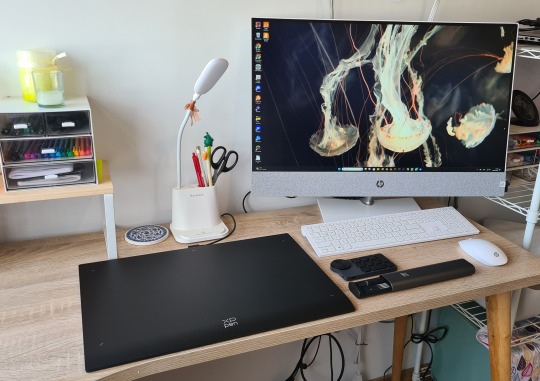
The folks at XPPen sent me the XPPen Deco Pro (Gen 2):
XPPen is having its 18th anniversary, and is celebrating with sales and product promos, so it's worth checking those out.
My thoughts on the tablet (and purchase links) under the cut!
⭐ Review ⭐
First impressions: After unboxing the tablet, I thought it sleek and professional-looking, especially after setting it up with my PC.
The remote I LOVED right out of the box because I enjoy fiddling with buttons and wheels. The keys are super satisfying to press.
The pen and storage case are nicely complete, lots of spare nibs to switch out (though I mainly stuck to the default nib while drawing, the textured ones have a nice gritty feel similar to paper).
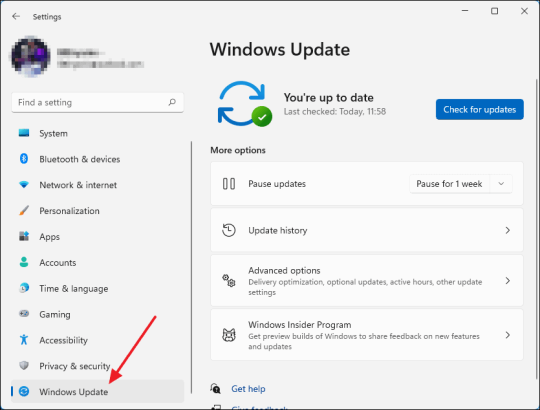
I had some troubleshooting when I started, as connecting to Bluetooth wasn't happening with either the tablet or the remote. I tested the Bluetooth connection with a different device and my phone successfully, but couldn't with my work PC. I was promptly helped by XPPen Support, and it turned out to be a Windows update messing things up, so I uninstalled it and Boom; I could connect both the tablet and remote, no problem. Up until then, I used both via cable, which was a convenient option!
The tablet: The XL model at 15 x 9 inches, with plenty of space to work (although you'll need space to put it, luckily I have a lot of desk to spare), and can connect via cable or Bluetooth. It also looks so dang pretty.
The tablet was so smooth, and the pressure (16k pressure levels) felt amazing to draw with. After fiddling around with the pen settings, I barely had to press down to get a nice flowy line.
I usually work on a screen tablet, so it took some getting used to returning to a pen tablet and looking at my PC screen again, but it came back to me quickly. It actually helped my posture, as I tend to shrimp-curl over my screen tablet while working.
As lovely as it was to work on, I feel this size may be too large for me, despite it being perfectly proportional to my PC screen. I like to draw quickly, and I noticed myself making more effort to travel over the surface of the tablet and tiring my arm out faster than usual. I needed to take more breaks and stretch often, although I could classify that as positive. That said, this tablet has a sloped resting area that helped. All my drawing tablets have been medium-sized, so I'm probably just conditioned to that surface area.
The battery lasted as long as it took to draw this piece and more! I didn't need to charge it the entire time.
The remote: I love this thing so much. It has ten shortcut keys and a wheel you can configure to your heart's desire. Five sets of key functions!!! That's fifty shortcuts!! I only configured four sets and struggle to memorise them, but it's very convenient. I have my keyboard right next to the tablet and would bang out shortcuts there, but this remote changed my life.
I've been using it for a month now, and it still hasn't needed charging!
The pen: Comfy to use, with a design I was already accustomed to, and one thing I noticed was that the nib wasn't scratching the heck out of the tablet. After all the drawing I did with it, not a single mark.
I LOVE popping the case open to retrieve or store the pen, and it's one of those physical things that I find satisfying and so rare with digital products. I thought it would be nice to have a pen stand too, but I have pet birds that will (and have) run away with my tablet pens, so a storage case is a strong solution.
Final thoughts: This is a solid tablet with the potential to become an essential tool for industry professionals and freelancers. I didn't think I could be convinced out of a screen tablet, but I was offered a super strong contender. I can confidently recommend it, plus my experience with support was a positive one that boosted my trust in the brand. Overall, I had a great time using this tablet and really appreciate the opportunity I've been given to try it out!
⭐ Purchase links ⭐
US Walmart Store
CA official store
349 notes
·
View notes
Text
sure would be nice if bluetooth technology acted like it was 31 years old instead of making me spend 10 minutes troubleshooting the problem every time i try to connect my earbuds to my laptop
5 notes
·
View notes
Text
Why Is My Cricut Not Connecting? (Quick Fixes)
Cricut machines are one of the most useful tools for crafters, which makes it easy for them to create complex designs and projects. However, users may become extremely frustrated as a result of connectivity problems. It is important to comprehend the causes of these issues. This will enable you to troubleshoot them more successfully. This blog will look into the query, “Why is my Cricut not connecting?” alongside the typical causes of connectivity problems for your machine.
Method 1: Check the Connection of Devices
Cricut machines can connect either via a USB cable or with the help of Bluetooth. Knowing how each connection type works is essential for troubleshooting connectivity issues.
USB Connection

The USB that you are using must be in good condition; otherwise, you will have trouble connecting it to your machine. Plus, you must ensure the wire is correctly plugged into your computer and the machine. A malfunctioning cable or port could be the cause of the connection loss. An alternative USB cable or port might help fix the problem.
Bluetooth Connection
With the Bluetooth option, you can have a wireless connection to your machine. Just ensure that you turn on Bluetooth on your device. If your machine’s name does not appear in the list of available devices, then you should try the following steps:
Restart your devices: Sometimes, a simple restart of your device can resolve the issue. So, start with that.
Forget the device: If that does not work, you can try forgetting the device. To do this on your computer or mobile device, go to Bluetooth settings, find your machine model, and select “Forget.” After that, try to reconnect again.
These steps often answer the question, Why is my Cricut not connecting?
Method 2: Update Design Space or Operating System
Another main factor in connectivity issues is software compatibility. You need to make sure that both the app and the device’s operating system are up to date. Older software often leads to connectivity problems.
Updating Design Space
To check whether the app is updated or not, follow the below steps:
On Windows
You need to open the app and then need to click on the three horizontal lines in the top left corner. Once there, go on to select “Check for updates” and click OK. Your app will be updated if you have some older versions.
On Mac
If you have a Mac, open the app and click on “Design Space” from the menu bar. Afterward, select the “Check for updates” option. If updates are available, go ahead and install them. Once installed, you must restart the application. This way, you can resolve the issue related to why is my Cricut not connecting.
Method 3: Diagnosing the Network Settings
Network settings can mainly impact wireless connectivity. You must ensure that your antivirus software does not block the firewall settings for the Cricut Design Space app. If found positive, you might need to adjust your firewall settings so that the app can communicate through the network.
Method 4: Check the Firewall Settings
Sometimes, you need to configure the firewall settings properly so that the machine can connect properly. In order to do that, follow the below steps for Windows and Mac.
Windows
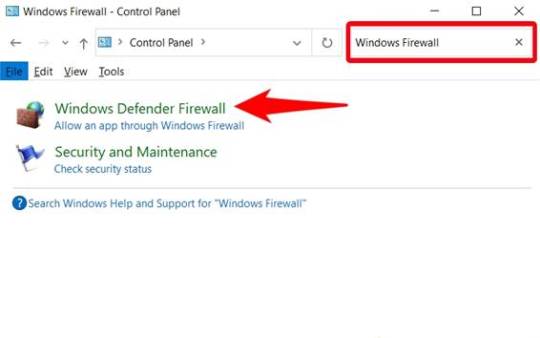
First, you need to go to the Control Panel, then to System and Security, and from there you must open Windows Defender Firewall. Once you reach there, check for the option “Allow an app through Windows Defender Firewall.” Click on it and ensure the app is allowed.
Mac
On Mac, go to System Preferences, then Security & Privacy, and then Firewall. Once there, select the Firewall option and ensure that the Design Space software is allowed. Adjusting these settings can help answer why is my Cricut not connecting.
Method 5: Ensure Your Device Is Compatible
You will have to make sure that your computer or mobile device meets these minimum system requirements for using Design Space. If your operating system has insufficient RAM or processing power, you might have difficulty connecting or might not connect altogether.
Method 6: Checking System Requirements
The minimum system specs for the application include:
Windows: Windows 10 or later, and at least 4 GB RAM or more.
Mac: macOS 10.12 or later, and at least 4 GB RAM or more.
Mobile: iOS 12 or later or Android 5.0 or later.
If your device does not fulfill these requirements, you should consider upgrading your hardware or changing the device that connects your machine.
Troubleshooting Steps
If you still face trouble with the connectivity, then follow these quick and simple steps:
Restart your machine: Turn off your machine and wait a few seconds. Then, turn it on again. This will surely solve the issue.
Reset Bluetooth settings: If you are using Bluetooth, reset your device’s Bluetooth settings and try to reconnect. It should fix the problem.
Reinstall Design Space: Uninstall the app and reinstall it. Reinstalling will ensure a fresh start, and hopefully, you will be able to reconnect again.
Conclusion
In short, connectivity issues with your Cricut machine can arise from various factors, including connection type, software compatibility, network settings, and device compatibility. Following the tips and suggestions mentioned above, one can address the question, “Why is my Cricut not connecting?”
Just remember to check your connections, and ensure that the software is updated, also make sure your device meets the necessary requirements. With these methods, one can enjoy a seamless crafting experience with their machine.
FAQs
1. What should I do if my Cricut machine doesn’t turn on?
Ensure that your power cord is securely connected to both the machine and the electric outlet. If using a power strip, try plugging directly into a wall outlet. You should also check the power cord for any visible damage.
2. How can I improve Bluetooth connectivity with my Cricut?
Make sure that your machine is within range of your device and that Bluetooth is enabled. Restart both devices and try forgetting the machine in the Bluetooth settings before reconnecting.
3. What are the minimum system requirements for Cricut Design Space?
For Windows, you need Windows 10 or later with at least 4 GB RAM. For Mac, macOS 10.12 or later with 4 GB RAM is required. Mobile devices should run iOS 12 or Android 5.0 or later.
4. How do I check for updates in Cricut Design Space?
On Windows, open the app and click the three horizontal lines in the top left corner to select “Check for Updates.” On Mac, click “Design Space” in the menu bar and select “Check for Updates.“
5. What should I do if my Cricut App is crashing?
Try reinstalling the app to ensure a fresh start. Also, check for software updates and clear your device’s cache to improve performance.
Source: Why Is My Cricut Not Connecting
#why is my cricut not connecting#cricut design space#cricut design space app#cricut design space software#cricut design space download#cricut machine setup
4 notes
·
View notes
Text
Istg if my phone thinks it can disable bluetooth without my permission one more time I might actually throw something
I turned off the stupid data saver nonsense, and it still doesn't allow bluetooth to be turned back on for A Very Long Time when it does this, and all I hear is Lost Connection!! Lost Connection!!!!! In the stupid fake-british-robot-lady's voice with mostly 2 second intervals with the occasional lucky 4 or 5 second gap and absolutely Nothing fixes it until my phone remembers that it is required to function if it wants to not be what I throw the 15th time this happens in a week
I hate it. It has happened at times when I cannot be without my sounds playing, because the outside noise will drive me insane. And I'm always dehydrated no matter how hard I try to remember to drink water, so crying every time I go outside isn't an option if my goal is to not die, which is typically one goal I do try to achieve.
(So far, I have always succeeded at not dying, but I have, in the past, failed at not feeling like I was dying, which was unpleasant.)
In the time it took to attempt all available troubleshooting, give up, and write all of this, my bluetooth finally re-enabled. So my only remaining active complaint is that my phone desperately wants me to capitalize bluetooth and I Refuse because its behavior has earned it Negative Respect Points and is therefore Unworthy of Capitalization.
Exactly Zero of this problem would be a real issue if phones still had stupid headphone jacks. If I could just use wires, I would not be complaining about this. My headphones have detachable wires and bluetooth options, but my phone has no jack for them.
I rejected bluetooth on principle for years when I was younger, because I had troubles getting things to connect, and stay connected, and reconnect. I only gave in eventually because I was given really good headphones for Christmas one year. I just wish using it was optional again.
#bluetooth#uncooperative bluetooth#autism#autistic#actually autistic#neurodivergent#actually neurodivergent#autism spectrum#auditory sensitivity#auditory processing disorder#i need my sounds#to block out#the bad sounds#sensory issues#sensory processing disorder
4 notes
·
View notes
Text
How to use the Apple Watch to Control Your Smart Home Devices
Unlock the full potential of your smart home with our guide on "How to use the Apple Watch to control your smart home devices." Learn tips, tricks, and seamless integration to enhance your smart living experience.
Introduction
Welcome to the future of smart living! In this comprehensive guide, we'll explore the ins and outs of leveraging your Apple Watch to control your smart home devices. From turning off lights to adjusting your thermostat, we've got you covered.
Seamless Integration: A Step-by-Step Guide
Your Apple Watch is not just a stylish accessory; it's a powerful tool for managing your smart home. Let's dive into the details.
Getting Started
Get acquainted with the basics. Understand how to sync your Apple Watch with your smart home devices effortlessly. This ensures a smooth experience right from the start.
How to use the Apple Watch to Control Your Smart Home Devices
The central piece of our guide. Learn the specific steps and commands to control different devices using your Apple Watch. Whether it's dimming lights or setting the temperature, we've got the details you need.
Enhancing Your Smart Living Experience
Exploring Advanced Features
Unlock hidden features and functionalities that go beyond the basics. Your Apple Watch can do more than you think—discover advanced tips for a truly futuristic home experience.
Personalization Tips
Tailor your smart home experience to suit your preferences. Learn how to customize settings on your Apple Watch for a personalized and efficient control setup.
FAQs: Unveiling Common Queries
Can I control all smart home devices with my Apple Watch?
Absolutely! Your Apple Watch can seamlessly connect with a wide range of smart home devices, from thermostats to security cameras.
Is there a distance limitation for controlling devices?
As long as your Apple Watch is within Bluetooth or Wi-Fi range of your smart home devices, you can control them without any issues.
How secure is it to control my smart lock using the Apple Watch?
Security is a top priority. Your Apple Watch uses robust encryption protocols, ensuring secure communication with your smart lock.
Can I create custom commands for my smart home devices?
Certainly! Explore the Apple Watch app settings to create custom commands for a more personalized smart home control experience.
Do I need a specific smart home hub for Apple Watch integration?
In most cases, no. The Apple Watch can communicate directly with many smart home devices. However, some may require a compatible hub for seamless integration.
What should I do if my Apple Watch isn't connecting to a device?
Troubleshoot connectivity issues by ensuring Bluetooth and Wi-Fi are enabled on both your Apple Watch and the connected device. If problems persist, check for device compatibility and updates.
Conclusion
Congratulations! You're now equipped with the knowledge to masterfully use your Apple Watch to control your smart home devices. Embrace the future of smart living with convenience at your wrist's command.
WristWatchStraps.co: Elevating Your Apple Watch Experience
Connect with Us
Enhance your Apple Watch further by exploring stylish wristwatch straps at WristWatchStraps.co. Connect with us on social media for the latest updates and exclusive offers:
Instagram: WristWatchStraps.co Instagram
Facebook: WristWatchStraps.co Facebook
YouTube: WristWatchStraps.co YouTube
TikTok: WristWatchStraps.co TikTok
For inquiries and assistance, feel free to reach out to us through the provided links. Your journey to the perfect Apple Watch band starts with WristWatchStraps.co.

2 notes
·
View notes
Text
Solving Common iPhone Problems: A Guide for Seamless Functionality
Are you an iPhone user facing persistent issues with your device? From minor glitches to major malfunctions, iPhone-related problems can be frustrating. But fret not! We've compiled a comprehensive guide to troubleshoot common iPhone issues and restore your device's functionality.
As your go-to resource for iPhone repairs in Melbourne, Repair Mate understands the nuisances that iPhone users encounter. Let's delve into solutions for prevalent iPhone problems:
Battery Drainage Woes Solution: Adjust settings like background app refresh, brightness, and disable unnecessary notifications. Consider replacing the battery if it's aged.
Unresponsive Touchscreen Solution: Perform a hard reset by holding down the Home and Power buttons simultaneously. If issues persist, seek professional assistance.
Overheating Solution: Close unused apps, update iOS, and avoid exposing your iPhone to direct sunlight or extreme temperatures.
Wi-Fi and Bluetooth Connectivity Issues Solution: Reset network settings, update firmware, and ensure you're in range of the network or device you're connecting to.
Frozen or Crashing Apps Solution: Update apps regularly and restart your iPhone. If problems persist, uninstall and reinstall problematic apps.
Water Damage Solution: Immediately turn off your device, dry it gently, and seek professional assistance at our Melbourne repair center.
Inadequate Storage Solution: Clear cache, delete unused apps, and offload photos and videos to iCloud or another storage service.
Issues with Updates Solution: Ensure a stable internet connection, back up your data, and try updating via iTunes if over-the-air updates fail. Why Trust [Repair Center Name] for iPhone Repairs in Melbourne? At Repair Mate , we specialize in resolving a myriad of iPhone issues. Our certified technicians possess the expertise to diagnose and fix problems efficiently. Here's why choosing us is your best bet:
Expertise: Our team comprises skilled professionals well-versed in handling iPhone repairs of all kinds. Quality Service: We prioritize quality, ensuring that your iPhone receives top-notch care and precision repairs. Quick Turnaround: We understand the importance of your device, striving for swift repairs without compromising on quality. Genuine Parts: We use authentic replacement parts to ensure the longevity and optimal performance of your iPhone. Conclusion Don't let iPhone issues disrupt your user experience! With these troubleshooting tips and our dedicated repair services in Melbourne, you can bid farewell to common iPhone problems.
Visit Repair Mate today for expert iPhone repairs and a seamless user experience. Contact us to schedule a consultation or repair service, and get your iPhone back to its optimal functionality!
For more information or to book an appointment, visit our website Repair Mate.
2 notes
·
View notes
Text
How to Identify Common Mobile Phone Problems: A Step-by-Step Guide
In our increasingly connected world, a malfunctioning mobile phone can bring daily life to a halt. From missed calls to lost data, the frustrations are real. While some issues require professional intervention, many common smartphone problems can be identified and often resolved with a systematic approach. This guide will walk you through the key steps to diagnose what's ailing your device.
1. The Power Puzzle: When Your Phone Won't Turn On or Stays Off
This is often the most alarming problem. Here's what to check:
Charge It Up: This might seem obvious, but a completely drained battery is the most common culprit. Plug your phone into a wall charger with a known working cable and adapter. Leave it for at least 30 minutes.
Check the Charging Components:
Cable: Inspect your charging cable for any fraying, bends, or damage. Try a different cable.
Adapter: Use a different wall adapter. Sometimes the adapter itself can be faulty.
Charging Port: Look closely into your phone's charging port. Is there any dust, lint, or debris blocking the connection? Gently use a soft, non-metallic tool like a toothpick or a dry toothbrush to clear it out. Be very careful not to damage the pins.
Force Restart: If the phone still doesn't respond, try a force restart. The method varies by phone model (e.g., holding down the power and volume down buttons simultaneously for several seconds). Search online for your specific phone's force restart procedure.
Battery Health: If your phone is old, the battery might have degraded to the point where it can no longer hold a charge effectively. This often manifests as rapid battery drain even when it does turn on.
2. The Slowdown: When Your Phone Becomes Sluggish
A lagging or freezing phone is incredibly frustrating. Here's how to address it:
Clear Storage Space: Insufficient storage is a primary reason for slow performance.
Delete Unused Apps: Go through your app list and uninstall applications you no longer use.
Clear Cache: Apps accumulate cached data over time. Go to your phone's settings (usually under "Apps" or "Storage") and clear the cache for individual apps or system-wide.
Manage Photos & Videos: These can take up significant space. Back them up to cloud storage (Google Photos, iCloud) or a computer and then delete them from your device.
Close Background Apps: Many apps continue to run in the background, consuming RAM and processing power. Regularly close apps you're not actively using.
Update Software: Keep your phone's operating system and apps updated. Updates often include performance enhancements and bug fixes.
Disable Unnecessary Features: Turn off features like animated wallpapers, live widgets, and background syncing for apps that don't need constant updates.
Factory Reset (Last Resort): If all else fails and you've backed up all your data, a factory reset can often restore your phone to its original speed.
3. Connectivity Conundrums: Wi-Fi, Bluetooth, and Mobile Data Issues
Staying connected is crucial. Here's how to troubleshoot connectivity problems:
Toggle On/Off: For any connectivity issue, a simple toggle of the Wi-Fi, Bluetooth, or Airplane Mode can often reset the connection and resolve minor glitches.
Forget and Reconnect (Wi-Fi/Bluetooth): In your settings, "forget" the problematic Wi-Fi network or Bluetooth device, then try reconnecting.
Restart Router (Wi-Fi): If Wi-Fi is the issue, restart your Wi-Fi router.
Check Network Settings (Mobile Data): Ensure your mobile data is enabled and your APN settings are correct (usually handled automatically by your carrier).
Check for Interference: For Bluetooth, ensure no physical obstructions or other electronic devices are interfering with the signal.
4. App Adventures: When Apps Crash or Malfunction
App issues are common and can be resolved with these steps:
Force Stop the App: Go to your phone's settings, find the problematic app, and choose "Force Stop." Then try opening it again.
Clear App Cache & Data: If force-stopping doesn't work, clear the app's cache. If the problem persists, try clearing its data (be aware this will often reset the app to its default state and you might lose local data within that app).
Update or Reinstall: Ensure the app is updated to its latest version. If it continues to crash, try uninstalling and reinstalling it.
Restart Your Phone: A simple reboot can often resolve app conflicts.
5. Other Common Issues: Overheating, Screen Problems, and Audio Woes
Overheating:
Avoid direct sunlight and extreme temperatures.
Close resource-intensive apps and avoid heavy gaming for prolonged periods.
Remove your phone case if it seems to be trapping heat.
If persistent, it could indicate a battery or internal hardware issue.
Cracked/Unresponsive Screen:
For a cracked screen, professional repair is almost always necessary.
For an unresponsive touchscreen, try a force restart. If it's still unresponsive, it might be a hardware digitizer issue.
Audio Problems (Speaker/Microphone):
Clean the speaker and microphone grills gently with a soft brush to remove debris.
Test with different apps and during calls to isolate if the issue is app-specific or system-wide.
Ensure no silent mode or "Do Not Disturb" settings are enabled.
When to Seek Professional Help
While these steps cover many common mobile phone problems, some issues are beyond DIY repair. This is where specialized training comes in handy. If you've tried the above steps and your phone still isn't working correctly, it might be time to consult a professional repair technician.
For those in Kerala looking to gain in-depth knowledge and practical skills in mobile and laptop repair, consider enrolling in a Smart phone repairing course in Calicut or a Mobile phone service course in Kozhikode. These comprehensive programs, like the Mobile phone repairing training Calicut offers, provide hands-on experience and cover everything from basic troubleshooting to advanced chip-level repairs. Additionally, many institutes also offer a Laptop repair course in Kozhikode, equipping you with skills to handle a wider range of electronic devices. Investing in such training not only helps you fix your own devices but also opens up promising career opportunities in the fast-growing electronics repair industry.
0 notes
Text
How to Fix Sound Issues on Your iPhone

Whether you're trying to enjoy your favorite playlist, take an important call, or stream a movie, nothing is more frustrating than sound problems on your iPhone. From muffled speakers to audio cutting out, these issues can interrupt daily use and lead to serious inconvenience. Thankfully, most sound-related concerns can be resolved with a bit of troubleshooting—no need to panic or rush into a replacement. With technology advancing every year, iPhones are becoming more sophisticated, but they also remain sensitive to dust, wear, and software glitches that can impact audio performance. Knowing how to properly identify and fix sound problems is crucial for maintaining a seamless iPhone experience. This guide will explore common reasons for sound malfunctions and walk you through the most effective solutions. If you need professional help, you can always turn to a reliable iPhone Repair service in Tallahassee, FL for expert diagnostics and lasting repairs.
Understanding Common iPhone Sound Problems
Sound issues can show up in different ways, and each one might have a unique cause. You might notice your ringtone is too quiet, your speaker cuts out mid-call, or your video audio doesn't play at all. Sometimes, it’s a hardware malfunction; other times, the culprit is buried within your settings or a software bug. iPhones are engineered with multiple audio output systems—including the main speaker, earpiece speaker, headphone port, and Bluetooth capabilities—each one a potential source of trouble. Identifying the origin of the issue is the first step to resolving it.
Checking Your iPhone's Audio Settings
Before diving into technical fixes, a quick review of your sound settings can reveal whether the issue is due to a simple toggle. Often, users accidentally activate “Do Not Disturb,” reduce their volume too low, or disable sound alerts entirely. Go to your Control Center and Settings to inspect ringer volume, mute switch, Bluetooth connections, and notification preferences. Restart your phone after any adjustments to ensure the new settings take effect. This simple reset may be all your device needs to bounce back to full volume.
Cleaning Your iPhone Speakers and Ports
Over time, lint, dust, and debris can clog the tiny speaker grills and Lightning port of your iPhone, muffling sound or disrupting your audio signal. Use a soft-bristle brush or a can of compressed air to gently clean around the speaker openings and charging port. Avoid sharp objects or excessive force, as these can cause internal damage. Once cleaned, test the sound again with music or a phone call. You’d be surprised how often a blocked speaker causes poor audio quality.
Testing With and Without Headphones
Your iPhone may be stuck in headphone mode, even when no headphones are connected. This is usually a glitch that tricks the phone into routing audio through an imaginary headset. Insert and remove headphones several times or plug in a Lightning or Bluetooth headset to refresh the audio routing logic. If your sound resumes once you use headphones but disappears when unplugged, this signals an internal problem that needs closer attention.
Updating iOS to Resolve Sound Glitches
Apple frequently releases software updates that patch bugs affecting audio output. Running an outdated iOS version may expose your device to known sound issues. To check for updates, go to Settings > General > Software Update and install the latest version available. After updating, restart your phone and test all audio functions—including notifications, alarms, media, and calls. If your issue was caused by a software hiccup, this should clear it up completely.
Resetting All Settings Without Losing Data
Sometimes, the problem lies deep in your system settings. If all else fails, consider resetting your iPhone’s settings without wiping personal data. This can refresh your network, sound, and display settings back to factory defaults, clearing up any misconfigurations. To do this, go to Settings > General > Transfer or Reset iPhone > Reset > Reset All Settings. After the reset, reconfigure your volume preferences and check if the sound is restored.
When the Issue Is Hardware-Related
If your iPhone still has no sound or distorted audio after all software fixes, you might be dealing with a hardware problem. This includes damage to the speaker itself, microphone, logic board, or internal circuitry from drops, moisture exposure, or manufacturing defects. You may also notice issues such as your speaker crackling or your microphone not picking up voice. These repairs require a skilled technician and may involve replacing faulty components, which is why professional diagnostics are essential.
Using External Devices to Isolate the Problem
Bluetooth speakers, AirPods, or wired headphones can help you determine whether the problem is internal or external. If audio works through an external device but not through your iPhone’s built-in speakers, this points to a hardware malfunction in the speaker unit. On the other hand, if none of the outputs produce sound, the issue may lie in the internal audio processing chip or logic board. These insights help guide whether you need a full repair or a quick fix.
Trusting Professional Technicians for Accurate Repairs
Some sound issues are just too complex for DIY solutions. If you’ve cleaned, reset, updated, and tested everything and still face audio malfunctions, it’s time to seek expert help. Professional repair technicians can disassemble your phone, test each component, and isolate the precise cause—be it a faulty speaker module, broken audio IC, or board-level defect. A certified repair service ensures your iPhone is handled with proper tools, high-quality parts, and warranty-backed solutions.
Preventing Future iPhone Audio Issues
To prevent recurring audio problems, adopt best practices for iPhone care. Use a protective case that shields your device from dust and moisture, keep it updated with the latest software, and avoid overexposing it to heat or liquid. When cleaning, use only recommended tools and avoid inserting anything into ports that could damage internal circuits. Treating your iPhone with care extends its life and protects sound quality for the long term.
Final Thoughts on Fixing iPhone Sound Issues
Sound is a critical part of the iPhone experience—whether you're making calls, watching videos, or enjoying music. When audio stops working, it can affect not only functionality but also daily convenience. Fortunately, with the right approach, most sound problems can be solved quickly. Begin with basic settings checks, progress to physical cleaning, try software resets, and finally, consider professional help if needed. Staying informed helps you avoid unnecessary replacements and extend the life of your device.
Welcome to Elite Repairs, where our motto, "Revive • Renew • Enhance," guides our approach to iPhone repair. Specializing in the latest iPhone 14, iPhone 13, and all previous models, we provide rapid, trustworthy service that rejuvenates your device. Our technicians are trained to pinpoint and fix issues swiftly, ensuring your iPhone returns to you in peak condition.
Whether you need iPhone screen repairs in Tallahassee, FL, or a full-service iPhone repair, Elite Repairs is your reliable local provider. It is conveniently situated at 368 Fern Dr, Tallahassee, FL.
#\#iPhoneRepair#iPhoneSoundIssues#FixiPhoneAudio#TallahasseeTechSupport#iPhoneHelp#iPhoneTroubleshooting#EliteRepairs#iPhoneSpeakerFix#MobileRepairTallahassee#iOSAudioFix
1 note
·
View note
Text
How to Download Cricut App on Computer? (Complete Tutorial)
In this step-by-step guide, we will show you ‘how to download Cricut app on computer‘, whether you’re using Windows or Mac. Cricut Design Space is the essential software needed to design and connect to your Cricut machine. It allows users to create and personalize various projects, from greeting cards to home decor.
Although Cricut Design Space is also available for mobile users, many users still prefer the convenience and ease of working on a computer. It is also free to use, with additional features available through a paid subscription called Cricut Access.
Basic System Requirements for Using Cricut Design Space
Before downloading Cricut Design Space, ensure that your computer meets the system requirements.
Windows
Mac
How to Download Cricut App on Computer?
In this section, you will learn how to download the Cricut app on Windows and Mac, with step-by-step instructions for downloading the appropriate version for your operating system.
So let’s get started!
For Windows
For Mac
Set Up a Cricut Machine
After installing Design Space, it’s time to set up your machine and start designing!
Troubleshooting Tips While Downloading Cricut App
If you encounter any issues while downloading or using the Cricut Design Space software, here are some troubleshooting tips you can try:
Problem 1: Design Space Won’t Open
Problem 2: Design Space Won’t Connect to Machine
Problem 3: Design Space Freezes or Crashes
Conclusion
Now that you’ve successfully learned ‘how to download Cricut app on computer‘, you can explore the world of possibilities for creating and designing with your crafting machine. Whether you’re using Windows or Mac, you can follow this guide to get you started today. It has a larger workspace, enhanced features, and faster performance so that you can create even more intricate designs for all your crafting projects.
Frequently Asked Questions (FAQs)
How to Connect Cricut to Computer with Bluetooth?
Place your machine and device within 10-15 feet of your computer and follow these steps:
How to Update Cricut Design Space on Windows?
It’s important to update Cricut Design Space regularly to ensure you always use the latest features and fixes.
Can I use Design Space offline after downloading it on my computer?
Yes, you can use Design Space offline, but you need to plan ahead. After downloading the app and logging in at least once with an internet connection, you can save projects and fonts for offline use. Here’s how:
Remember, certain features, such as uploading images, browsing the Cricut library, or accessing the latest updates, still require an internet connection.
Visit: cricut.com/setup
Source: https://explorenewmachine.com/how-to-download-cricut-app-on-computer-complete-tutorial/
#DownloadCricutApponComputer#cricutcomsetup#installcricutdesignspaceapp#wwwcricutcomsetuplogin#cricutcreateconnecttocomputer#cricutcomsetupmac#cricutnewproductsetup#settingupmycricutmaker#connectingcricutmakertocomputer#cricutsetupcreateaccount#cricutcuttingmachinesetup#cricutsetuponcomputer#settingupnewcricutmaker#cricutsetuplogin#cricutaccountsetup#cricutcomsetupdownload#cricutinstallsetup#cricutprintersetup
0 notes
Text

🔧 𝗠𝗮𝗰 𝗟𝗮𝗽𝘁𝗼𝗽 𝗕𝗹𝘂𝗲𝘁𝗼𝗼𝘁𝗵 𝗡𝗼𝘁 𝗪𝗼𝗿𝗸𝗶𝗻𝗴? 𝗚𝗲𝘁 𝗜𝘁 𝗙𝗶𝘅𝗲𝗱 𝗮𝘁 𝗥𝗮𝗺𝗶𝗻𝗳𝗼𝘁𝗲𝗰𝗵 𝗟𝗮𝗽𝘁𝗼𝗽 𝗦𝗲𝗿𝘃𝗶𝗰𝗲 𝗖𝗵𝗲𝗻𝗻𝗮𝗶 𝗣𝘃𝘁 𝗟𝘁𝗱-𝗩𝗶𝗹𝗹𝗶𝘃𝗮𝗸𝗸𝗮𝗺!
Is your Mac laptop having trouble connecting to Bluetooth devices? Whether it's connectivity issues, frequent disconnections, or complete failure to detect Bluetooth devices, 𝗥𝗮𝗺𝗶𝗻𝗳𝗼𝘁𝗲𝗰𝗵 𝗟𝗮𝗽𝘁𝗼𝗽 𝗦𝗲𝗿𝘃𝗶𝗰𝗲 𝗖𝗵𝗲𝗻𝗻𝗮𝗶 𝗣𝘃𝘁 𝗟𝘁𝗱-𝗩𝗶𝗹𝗹𝗶𝘃𝗮𝗸𝗸𝗮𝗺 is here to help with expert repair services.
💻 𝗖𝗼𝗺𝗺𝗼𝗻 𝗕𝗹𝘂𝗲𝘁𝗼𝗼𝘁𝗵 𝗜𝘀𝘀𝘂𝗲𝘀 𝗪𝗲 𝗙𝗶𝘅:
Bluetooth Not Turning On: Inability to enable Bluetooth on your Mac
Connection Drops: Unstable or intermittent Bluetooth connections
Device Pairing Issues: Difficulty pairing with other Bluetooth devices
Audio Problems: Poor sound quality or no audio through Bluetooth devices
Software Glitches: macOS issues affecting Bluetooth performance
🔧 𝗢𝘂𝗿 𝗕𝗹𝘂𝗲𝘁𝗼𝗼𝘁𝗵 𝗥𝗲𝗽𝗮𝗶𝗿 𝗦𝗲𝗿𝘃𝗶𝗰𝗲𝘀 𝗜𝗻𝗰𝗹𝘂𝗱𝗲:
Comprehensive Diagnosis of Hardware and Software
Repair or Replacement of Bluetooth Modules
Software Troubleshooting and macOS Updates
Optimization of Bluetooth Settings for Better Connectivity
Full System Testing to Ensure Reliable Performance
💡 𝗪𝗵𝘆 𝗖𝗵��𝗼𝘀𝗲 𝗥𝗮𝗺𝗶𝗻𝗳𝗼𝘁𝗲𝗰𝗵 𝗟𝗮𝗽𝘁𝗼𝗽 𝗦𝗲𝗿𝘃𝗶𝗰𝗲 𝗖𝗵𝗲𝗻𝗻𝗮𝗶 𝗣𝘃𝘁 𝗟𝘁𝗱-𝗩𝗶𝗹𝗹𝗶𝘃𝗮𝗸𝗸𝗮𝗺?
Experienced Technicians: Experts in Mac laptop repairs and troubleshooting
High-Quality Parts: Use of genuine components for lasting repairs
Quick Service: Fast and efficient repairs to minimize downtime
Customer Satisfaction: Committed to delivering top-notch service and support
📌 𝗥𝗮𝗺𝗶𝗻𝗳𝗼𝘁𝗲𝗰𝗵 𝗟𝗮𝗽𝘁𝗼𝗽 𝗦𝗲𝗿𝘃𝗶𝗰𝗲 𝗖𝗵𝗲𝗻𝗻𝗮𝗶 𝗣𝘃𝘁 𝗟𝘁𝗱-𝗩𝗶𝗹𝗹𝗶𝘃𝗮𝗸𝗸𝗮𝗺
No.72/1, 200 Feet 1st Floor Innering Road Thathankuppam Villivakkam chennai 600049
Land Mark : Korattur North Signal
📞 Mobile : 07448744841
0 notes
Text
How to Reset Your Honda Pilot Stereo System: Quick Fixes for Common Issues
https://autorepairlebanontn.com/?p=3678 How to Reset Your Honda Pilot Stereo System: Quick Fixes for Common Issues Ever found yourself frustrated with your Honda Pilot’s audio system acting up? We’ve all been there. From frozen screens to connectivity issues, sometimes a simple reset is all you need to get your entertainment back on track. We’ll guide you through the straightforward process of resetting your Honda Pilot’s stereo system. Whether you’re dealing with Bluetooth problems, display glitches, or just want to restore factory settings, our step-by-step instructions will help you solve these common issues without an expensive trip to the dealership. Knowing how to perform this reset can save you time, money, and unnecessary headaches on the road. Table of Contents Toggle Understanding the Honda Pilot Audio SystemCommon Issues With Honda Pilot Stereo SystemsDisplay ProblemsAudio MalfunctionsBluetooth Connectivity IssuesHow to Reset Your Honda Pilot Stereo SystemSoft Reset MethodHard Reset MethodWhen to Perform a Honda Pilot Stereo ResetPower-Related IssuesSystem MalfunctionsFollowing System UpdatesCode Display After Power LossPreventing Future Stereo System ProblemsAvoiding Battery DisconnectionKeeping the Owner’s ManualUpdating System SoftwareSimple Reset ProcedureProfessional Help: When DIY Isn’t EnoughWhen to Contact Your Honda DealerNavigation System RequirementsCost and Time ConsiderationsFinding Help Outside the DealershipConclusionFrequently Asked QuestionsWhy does my Honda Pilot’s audio system freeze?How do I perform a soft reset on my Honda Pilot stereo?Will I lose my radio presets when resetting the stereo?What is the “CODE” message on my Honda Pilot radio?How can I get my Honda Pilot radio code if I don’t have it?Can Bluetooth connectivity issues be fixed with a reset?How do I fix a blank or black screen on my Honda Pilot display?When should I seek professional help for stereo problems?How do I update my Honda Pilot’s audio system software?Can disconnecting the battery damage my stereo system? Understanding the Honda Pilot Audio System The Honda Pilot audio system combines advanced technology with user-friendly interfaces across different model years. Most Honda Pilots feature either a standard audio system or an upgraded display audio system with touchscreen capabilities. Recent models (2016 and newer) typically include a 5-inch or 8-inch touchscreen display that manages audio, phone connectivity, and navigation functions. Honda’s infotainment system supports various connectivity options including Bluetooth for wireless phone pairing, USB ports for direct device connection, and auxiliary inputs for older devices. Many newer models also offer Apple CarPlay and Android Auto integration, allowing seamless smartphone mirroring on the vehicle’s display. The system architecture consists of several interconnected components including the head unit (main display and controls), amplifier, speakers, and various modules that handle exact functions like Bluetooth connectivity or satellite radio reception. This complex integration explains why occasional glitches might require a system reset to restore normal functionality. Each Honda Pilot model year has exact features and potential issues. For example, 2016-2018 models occasionally experience touchscreen responsiveness problems, while 2019 and newer models might encounter software-related bugs that affect wireless connectivity. Understanding your exact model’s system configuration helps determine the appropriate reset method when troubleshooting problems. Common Issues With Honda Pilot Stereo Systems Honda Pilot owners frequently encounter several recurring issues with their stereo systems that can disrupt the driving experience. These problems typically fall into three main categories that affect different aspects of the audio system’s functionality. Display Problems Display malfunctions in Honda Pilot stereo systems often manifest as blank screens or error messages that prevent normal operation. When facing a non-working display, try a simple reset by turning on the radio and pressing the power button for two seconds, which often recalls preset settings and resolves minor glitches. Error messages such as “CODE” or “ERR” commonly appear after battery replacement or power interruption, requiring the input of your five-digit radio code for restoration. If you enter an incorrect code and see “ERR,” disconnect the black battery cable for 1-3 minutes, reconnect it, and attempt the code entry again with the correct sequence. Audio Malfunctions Audio issues in the Honda Pilot range from complete sound loss to distorted audio output that diminishes your listening experience. First, check all connections to ensure cables are securely attached to their respective ports, as loose connections account for many audio problems. A quick system reset can often resolve unexplained audio malfunctions by simultaneously pressing and holding radio buttons 1 and 6 while turning on the radio. This reset method works particularly well for intermittent sound issues, static interference, or unresponsive volume controls that don’t require dealership intervention. Bluetooth Connectivity Issues Bluetooth connectivity problems prevent seamless integration between your devices and the Honda Pilot’s stereo system. These issues typically include failed pairing attempts, dropped connections, or audio streaming interruptions. Navigate to your vehicle’s settings menu to verify Bluetooth is properly enabled and your device appears in the paired devices list. Persistent connection problems often respond well to a complete system refresh through the factory data reset option in the settings menu. Remember that performing a factory reset erases all paired devices and custom settings, requiring you to reconfigure your preferences and reconnect your phone afterward. How to Reset Your Honda Pilot Stereo System Resetting your Honda Pilot’s stereo system is a straightforward process that can solve many common audio and display issues. There are two primary methods for resetting your system: soft reset and hard reset options, each serving different troubleshooting needs. Soft Reset Method The soft reset method offers a non-invasive way to restart your Honda Pilot’s stereo system without losing your settings. Try pressing and holding the power button for two seconds while the radio is on – this simple action often helps the system recall its preset settings and resume normal operation. Another effective technique involves simultaneously pressing and holding radio buttons 1 and 6 while turning on the radio, which can reset the system and prepare it for code entry if needed. When your radio displays “CODE,” you’ll need to enter your five-digit radio code, which is typically found in your owner’s manual, on a sticker inside the glove box, or available from your Honda dealer with your radio serial number and vehicle VIN. For successful code entry, turn your ignition to ON or AUX without starting the engine, turn on the radio until it displays “CODE,” then enter your five-digit code to restore normal functionality. Hard Reset Method A hard reset becomes necessary when soft reset techniques don’t resolve your stereo issues or when your radio displays “ERR” instead of “CODE.” The most common hard reset approach involves disconnecting your vehicle’s battery – turn off your Honda Pilot completely, disconnect the black (negative) cable from the battery for one to three minutes, then reconnect it and follow the steps to enter your radio code. Battery disconnection completely resets the system and clears any persistent errors that might be causing problems. For vehicles with integrated navigation systems or particularly stubborn issues, dealer assistance may be required – Honda technicians have specialized tools and access to proprietary software that can reset complex audio systems beyond what’s possible with DIY methods. Taking your vehicle to a dealership is particularly recommended for newer models with advanced display audio systems that might need professional attention. When to Perform a Honda Pilot Stereo Reset Recognizing the right time to reset your Honda Pilot’s stereo system can save you unnecessary frustration and potential service visits. There are several exact situations when a stereo reset becomes necessary to restore normal functionality. Power-Related Issues Electrical interruptions commonly trigger the need for a stereo reset in Honda Pilots. After a battery replacement, your stereo will typically display a “CODE” message, indicating it requires a reset procedure. Similarly, disconnected battery cables, completely drained batteries, or alternator problems that affect power supply will necessitate a system reset to restore proper operation. System Malfunctions Various system glitches may require a reset to resolve them effectively. These include: Frozen touchscreen displays that become unresponsive Audio output problems like distortion or no sound Bluetooth connectivity failures with paired devices Navigation system errors in models with this feature Radio presets that suddenly disappear Following System Updates Sometimes after an infotainment system update, your Honda Pilot’s stereo might exhibit unusual behavior. This occurs because the update process may not complete correctly or might conflict with existing settings. Performing a reset clears temporary data that could be causing conflicts. Code Display After Power Loss The appearance of a “CODE” message on your radio display is a clear indicator that a reset is needed. This security feature activates whenever the stereo system loses power completely, protecting your vehicle from theft but requiring you to enter the correct security code to regain functionality. Preventing Future Stereo System Problems Avoiding Battery Disconnection Disconnecting your Honda Pilot’s battery triggers the stereo’s anti-theft mode, causing unnecessary hassle. Only disconnect the battery when absolutely necessary for maintenance or repairs. Before any planned battery disconnection, keep your radio code readily available to avoid frustration when restarting the system. Many owners place a small note with the code in their glove compartment for easy access during emergencies. Keeping the Owner’s Manual Your Honda Pilot’s owner’s manual contains critical information about your stereo system, including the all-important radio code. Store the manual in a secure location inside your vehicle, such as the glove compartment or center console. Taking a photo of the radio code page with your smartphone provides an additional backup. Some owners also register their vehicle information on Honda’s official website for easy code retrieval when needed. Updating System Software Regular software updates prevent many common stereo system issues in newer Honda Pilot models with integrated infotainment systems. Check for available updates during routine maintenance visits to your Honda dealer. Outdated software often causes freezing screens, connectivity problems, and audio glitches. Advanced infotainment systems typically receive periodic updates that improve stability and add new features or compatibility with modern smartphones. Simple Reset Procedure Newer Honda Pilot models often allow for quick system resets without requiring the radio code. Pressing and holding the power button for 5-10 seconds forces a system restart in many recent models. This simple solution works for minor glitches without erasing your saved settings. Remember that older Honda Pilot models typically don’t support this convenient reset method and still require the full code entry procedure after any power interruption. Professional Help: When DIY Isn’t Enough Sometimes DIY methods for resetting your Honda Pilot’s stereo system don’t resolve the issue, especially with more complex integrated systems. Professional assistance becomes necessary in several exact situations. When to Contact Your Honda Dealer Your local Honda dealership serves as the primary resource for radio code retrieval. Honda dealers have direct access to the manufacturer’s database containing all radio codes linked to vehicle identification numbers. Service technicians at dealerships possess specialized diagnostic tools and software that aren’t available to the general public, enabling them to identify and resolve complex electronic issues. Navigation System Requirements Navigation-equipped Honda Pilot models typically require professional assistance for resets. These integrated systems contain sophisticated components that go beyond the standard audio system’s functionality. Honda dealerships can properly reset navigation systems without risking data loss or configuration errors that might occur during DIY attempts. Cost and Time Considerations Professional reset services at Honda dealerships typically take 30-60 minutes. Many dealers provide this service at minimal cost, particularly for vehicles under warranty. While DIY methods cost nothing but time, the expertise of professional technicians often justifies the expense when facing persistent stereo issues. Finding Help Outside the Dealership Some independent auto electronics specialists can also assist with Honda audio system resets. These professionals often charge less than dealerships while still providing quality service. Before choosing this option, verify that the technician has experience with Honda infotainment systems to avoid potential complications. Conclusion Resetting your Honda Pilot’s stereo system doesn’t have to be intimidating. Whether you’re dealing with a frozen screen Bluetooth issues or error messages we’ve provided the essential steps to get your entertainment back on track. Remember that most problems can be solved with a simple soft reset while persistent issues might require a hard reset or professional assistance. Keeping your system updated and having your radio code accessible will save you headaches down the road. By understanding your exact model’s configuration and following our troubleshooting guide you’ll be able to resolve most audio system problems without an expensive trip to the dealership. Your Honda Pilot’s entertainment features should now be ready to enhance your driving experience once again. Frequently Asked Questions Why does my Honda Pilot’s audio system freeze? Your Honda Pilot’s audio system may freeze due to software glitches, outdated firmware, or electrical issues. These problems can occur in any model year but are more common in 2016-2018 models with touchscreen responsiveness issues. Temperature fluctuations and system overload from multiple functions running simultaneously can also contribute to system freezes. How do I perform a soft reset on my Honda Pilot stereo? To perform a soft reset, press and hold the power button for 10-15 seconds until the screen turns off and restarts. For models with physical buttons, hold the power and volume buttons simultaneously. This method restarts the system without erasing your saved settings and typically resolves minor glitches and freezes. Will I lose my radio presets when resetting the stereo? A soft reset will not erase your radio presets or other personalized settings. However, a hard reset (disconnecting the battery) or factory data reset will clear all saved information, including radio presets, paired Bluetooth devices, and navigation favorites. Always note your important settings before performing a hard reset. What is the “CODE” message on my Honda Pilot radio? The “CODE” message indicates your radio’s anti-theft system has been activated, usually after a power interruption like battery replacement or disconnection. You’ll need to enter your radio’s security code to restore functionality. This code is typically found in your owner’s manual or on a card provided with your vehicle purchase. How can I get my Honda Pilot radio code if I don’t have it? If you don’t have your radio code, you can obtain it by contacting a Honda dealership with your vehicle identification number (VIN) and proof of ownership. Alternatively, visit Honda’s radio code retrieval website (radio-navicode.honda.com) and enter your VIN and radio serial number to retrieve the code online. Can Bluetooth connectivity issues be fixed with a reset? Yes, many Bluetooth connectivity issues can be resolved with a system reset. If your Honda Pilot is having trouble pairing or maintaining connections with devices, try a soft reset first. For persistent problems, perform a factory data reset through the system settings menu, which will remove all paired devices and require re-pairing. How do I fix a blank or black screen on my Honda Pilot display? For a blank screen, first try a soft reset by holding the power button for 10-15 seconds. If that fails, check if the display brightness is turned down or if the system is in night mode. For persistent issues, perform a hard reset by disconnecting the vehicle battery for 10 minutes, then reconnect and enter your radio code. When should I seek professional help for stereo problems? Seek professional help if multiple reset attempts fail, if you experience recurring issues despite successful resets, or if there are physical symptoms like strange noises or burning smells. Navigation-equipped models may require dealer assistance for complex problems, and vehicles under warranty should utilize dealer service to avoid voiding coverage. How do I update my Honda Pilot’s audio system software? For newer models (2019+), check for updates through the system settings menu under “System Updates.” Some updates may be available via USB download from Honda’s owner website. Older models typically require dealer updates. Regular software updates help prevent common glitches and improve system performance and compatibility with newer devices. Can disconnecting the battery damage my stereo system? Disconnecting the battery won’t damage your stereo, but it will trigger the security system, requiring your radio code upon reconnection. It also erases all personalized settings. For simple troubleshooting, try soft reset methods first to avoid the inconvenience of reconfiguring your entire system after a battery disconnect. https://autorepairlebanontn.com/?p=3678 Absolute Auto Repair
0 notes
Text
Handphone repair shop
Top Reasons to Choose Todayafix.com.my for Trusted Phone Repair in Malaysia
In today’s fast-paced digital world, our smartphones are more than just communication devices — they’re essential tools for work, entertainment, navigation, and social connection. When your device breaks or malfunctions, it disrupts your life. That’s where phone repair services come in, and Todayafix.com.my stands out as one of the most trusted names in Malaysia for reliable and fast mobile repair solutions.
Why Phone Repairs Are Better Than Buying New Devices
Instead of replacing a damaged phone, opting for repair is often the smarter choice. Whether it’s a cracked screen, malfunctioning camera, battery issue, or software glitch, professional repairs can extend the life of your phone and save you money. At Todayafix.com.my, our team of expert technicians offers fast diagnostics, affordable pricing, and top-quality parts for all major phone brands.
Why Choose Todayafix.com.my?
As a leading phone repair shop, we take pride in offering efficient, customer-focused services throughout Malaysia. Here’s what sets us apart:
1. Experienced Technicians
Our certified repair specialists have years of hands-on experience repairing iPhones, Samsung, Huawei, Oppo, Vivo, and other popular brands. We understand how to diagnose and fix a wide variety of issues.
2. Genuine Replacement Parts
We use only high-quality, genuine parts for all repairs. This ensures your device performs like new and reduces the risk of future issues.
3. Fast Turnaround Time
We value your time. Most minor repairs are completed within 30–60 minutes, so you can get back to your routine without long delays.
4. Transparent Pricing
With Todayafix.com.my, you’ll never face hidden charges. We provide upfront estimates and only begin work after your approval.
5. Warranty Support
All our repairs come with warranty coverage for your peace of mind. If an issue reoccurs, just bring your phone back — we’ve got you covered.
Services Offered at Our Handphone Repair Shop
At our trusted handphone repair shop, we offer a wide range of services:
Screen Replacement – Cracked or unresponsive screens are one of the most common issues. We offer fast and precise screen repairs using quality displays.
Battery Replacement – Is your phone battery draining too quickly? We replace faulty batteries to restore your phone’s performance.
Water Damage Repair – Accidentally dropped your phone in water? We specialize in water damage treatment and restoration.
Camera & Speaker Repairs – Fix blurry cameras, no sound, or microphone issues quickly with our expert support.
Software Troubleshooting – From app crashes to system updates, we handle all software-related concerns.
Phone Repair Services in Shah Alam
Located in the heart of Shah Alam, our service center is easily accessible to residents in the area. Our local experts provide professional repair phone Shah Alam services with a focus on convenience and speed.
Whether you work in the city or reside nearby, our Shah Alam phone repair service is perfect for walk-in customers looking for quick fixes and friendly support. We also offer same-day repairs for common issues.
Nationwide Phone Repair Across Malaysia
Need help outside Shah Alam? No worries! Todayafix.com.my serves customers throughout the country. Our reliable repair phone Malaysia services are available via mail-in repair and courier pickup/drop-off options.
We’ve built a reputation for excellence across Malaysia by prioritizing customer satisfaction, clear communication, and exceptional technical skill. Wherever you’re located — Kuala Lumpur, Penang, Johor Bahru, or Sabah — our team is ready to help.
Common Signs Your Phone Needs Repairs
Not sure if your device needs professional repair? Here are some warning signs:
Cracked or unresponsive touch screen
Phone won’t charge or drains quickly
Device gets hot during use
Audio problems during calls
Lagging performance or freezing apps
WiFi/Bluetooth connectivity issues
If you notice any of these symptoms, it’s time to visit a trusted repair center like Todayafix.com.my.
Customer Testimonials
Here’s what some of our satisfied customers have to say:
“My iPhone screen shattered last week and I visited Todayafix.com.my. They fixed it in less than an hour and it looks brand new! Highly recommended.” – Nurul A., Shah Alam
“Fast, affordable, and reliable. I had battery problems, and they replaced it quickly with genuine parts. I’ll definitely come back if needed.” – Jason T., Petaling Jaya
How to Book a Repair
Booking a repair is simple:
Visit our website and select the type of service you need.
Choose your device and describe the issue.
Pick your nearest service location or opt for pickup.
Drop off your phone or wait for our technician to arrive.
Get your repaired phone back fast and fully functional!
Our user-friendly platform makes it easy to get your phone repaired without any hassle.
0 notes
Text
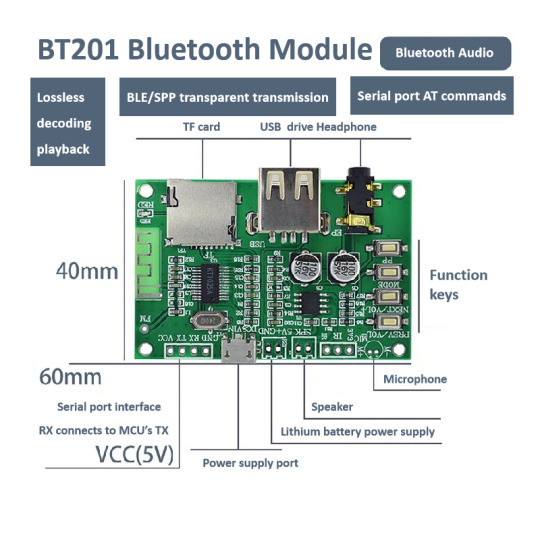
KT1025A Dual-Mode Bluetooth Audio Chip Layout Description and Design Precautions
1.Brief Overview
1. First, please refer to the provided BT201 test DEMO module as the standard.
2. If using the chip independently without testing the BT201 module and directly proceeding to layout, background noise is highly likely if experience is limited. Therefore, always compare with the manufacturer’s test board first.
3. The BT201 solution does not include FM functionality. Please note this. The FM circuit should be left floating without hesitation.
2.Precautions
1. Background noise or interference is common in Bluetooth audio products. Do not be careless during layout.
2. If you have not worked on audio products before, study online resources thoroughly. Assuming things casually will naturally lead to noise issues.
3. The core principle is to separate analog ground and digital ground. If unclear, consult an experienced engineer.
4. Ensure a clean power supply. Use an LDO whenever possible instead of a DC-DC converter.
5. Bluetooth operates at high-frequency RF and radiates energy, so some background noise is inevitable but can be minimized. With good design, noise is imperceptible to the human ear, though it may be measurable with instruments.
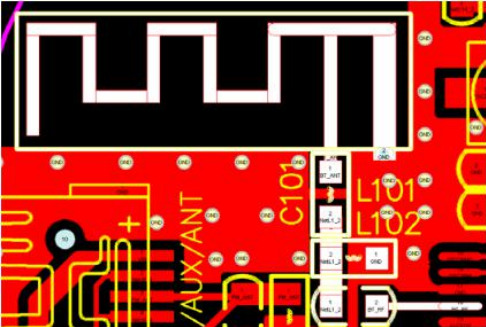
3.Antenna Description
1. For antenna and component packaging, directly refer to the PCB files of the DEMO module, available in the document library.
2. The Bluetooth antenna has no special requirements. Follow the provided package and reference instructions.
3. The Bluetooth antenna does not require impedance matching, and standard copper thickness is sufficient. Don't over complicate it—Bluetooth has a low entry barrier.
4.Power Supply Description
(1)The BT201 test board has minimal background noise, barely noticeable to the human ear.
(2)You can try powering it with a phone charger, which should not produce significant noise.
(3)Battery power is ideal as it provides pure DC and is very clean. However, consider the battery's load capacity.
(4)USB output from a desktop computer may produce significant ripple, leading to background noise. Avoid using it.
(5)If the board includes a DC-DC converter, it may cause noise. The optimal power supply is an LDO, such as a 7805.
(6)The BT201 module can drive a maximum speaker of 4 ohms, 3W with a 5V supply.
(7)When driving speakers, ensure sufficient current with a stable power supply. Insufficient current can cause speaker distortion, buzzing, etc.
(8)If possible, purchase various amplifier modules online for comparison testing. We sell Bluetooth chips, but amplifier-related noise, distortion, or other issues are extended topics that are complex and cannot be explained briefly.
5.How to check if the board has background noise?
(1)Use a clean power supply, ideally a battery, and disconnect all front-end power circuits.
(2)Connect the chip's headphone output and listen for noise. If none, check the rear-stage amplifier circuit.
(3)If USB playback has no noise but Bluetooth does, this does not necessarily indicate a problem.
(4)Use headphones to check for noise. If none, the issue lies in the amplifier section, so inspect it.
(5)If noise is present with headphones, disconnect the rear-stage amplifier and inspect the Bluetooth chip's peripheral circuits. Determine whether noise occurs during Bluetooth or MP3 playback. For Bluetooth noise, check if capacitors around the main controller are properly soldered and if they are too close to the Bluetooth module. Refer to other instructions for troubleshooting.
(6)For noise testing, avoid using a computer's USB or a charger's USB. Use a clean power supply with strong load capacity, ideally tested at 5V, not 3.7V.
6.Methods to Reduce Bluetooth Background Noise
(1)Keep the Bluetooth antenna and Bluetooth module as far as possible from analog circuits.
(2)The chip's analog ground must be connected to the power ground at the input.
(3)Check capacitors around the chip for issues such as short circuits or poor soldering.
(4)Add multiple vias to the GND of the Bluetooth section.
7.Selection and index requirements of crystal oscillators
(1)Bluetooth has high frequency offset requirements, so the crystal oscillator's quality is critical for performance. During selection, ensure consistency and stability, with a frequency deviation of ≤±10ppm and a recommended load capacitance (CL) of 12pF.
Note: Crystal-to-ground capacitors C102 = C103 = 2*CL – (4pF~6pF), where CL is the crystal's load capacitance.
(2)For designs with no size constraints, use the crystal specified in our DEMO, which is cost-effective and high-performing.
(3)For size-constrained designs, use a 24M-3225 crystal, which is slightly more expensive but performs well.
Recommendation: Use our provided crystal, which is more cost-effective and quality-assured compared to random purchases.
8.Simple PCB Layout Precautions
(1)The input voltage to LDO_IN (Pin 18 of the chip) must not exceed +5.5V.
(2)The chip must strictly separate digital GND and analog AGND (refer to the provided BT201 PCB).
(3)During PCB routing, digital GND and analog AGND must be routed separately and connected only at the battery input. If the design includes a pre-amplifier ground, connect AGND to it.
(4)All decoupling capacitors on the main controller must be placed as close as possible to the chip pins, with short ground return paths.
(5)Prioritize the placement of the Bluetooth antenna. The RF antenna must be near the board edge (or in an open area if structural constraints apply). The antenna matching circuit must be close to the RF pin, with short routing. The antenna's ground plane should follow the yellow outline in the antenna package, and the space on both sides should be as wide as possible, as shown in the diagram avove.
(6)The 24M crystal must be placed close to the chip's clock pins (BTOSCO and BTOSCI). Its routing must be shielded with a ground plane, kept away from interference sources, and not routed parallel to other data lines.
(7)Audio signal lines (DACL, DACR, AUXL, AUXR, MIC, etc.) must be routed away from digital signals (LCD/LED signals, USB, SD, etc.).
#bluetooth#audiochip#bluetoothchip#voicechip#ble#spp#electronic#coding#embeddeddevelopment#devlog#aiot
0 notes
Text
Car Audio Repair Near Me: Expert Solutions in San Diego
Is your car stereo malfunctioning or your speakers suddenly silent? Whether you're commuting in San Diego traffic or cruising the coast near La Jolla, having a premium sound system in your car is essential. If you've been searching for “car audio repair near me,” you're in the right place. From blown speakers to faulty amplifiers and outdated head units, this guide covers everything you need to know about car audio repair services in Point Loma, Ocean Beach, San Diego, La Jolla, and Mission Valley.

Why Car Audio Repair Matters
Your vehicle’s audio system is more than just entertainment—it enhances your driving experience. Whether it's tuning into your favorite radio station on the 805 or using your Bluetooth hands-free system on a La Jolla freeway, a properly functioning car stereo system improves safety, connectivity, and enjoyment.
Common Car Audio Problems
Before diving into location-specific services, let’s explore common issues that warrant a search for car audio repair near me:
No sound or distorted sound from speakers
Bluetooth or USB not connecting
Radio not tuning or receiving poor signal
Amplifier overheating or not powering on
Display malfunctions or touchscreen issues
Static or interference while driving
Worn out or blown car speakers
These problems can result from wiring faults, aging equipment, bad installations, or water damage—especially near coastal areas like Ocean Beach and Point Loma.
Car Audio Repair Services in San Diego & Surrounding Neighborhoods
Whether you're in La Jolla, Mission Valley, or Point Loma, San Diego is home to highly-rated and reliable car audio repair experts. Let’s break it down by region.
1. Car Audio Repair in Point Loma
Point Loma residents know the importance of marine-grade durability and weatherproofing for their vehicle sound systems, especially given the coastal climate. Top-rated car stereo repair shops in Point Loma offer:
Marine audio system repair
Speaker replacement and upgrades
Head unit diagnostics
Wiring inspection and rewiring
Custom sound system installations
Look for shops offering free diagnostics, warranty-backed services, and experienced MECP-certified technicians.
2. Car Stereo Repair in Ocean Beach
Ocean Beach is a laid-back community, but locals don’t compromise on sound quality. If your bass is buzzing or your stereo is silent, Ocean Beach car audio repair specialists can help with:
Custom car audio systems
Vehicle amplifier repair
Subwoofer installation and tuning
Bluetooth system integration
Speaker diagnostics and sound balancing
Mobile repair services are popular in OB, offering on-site repairs at your convenience.
3. San Diego Citywide Car Audio Services
As the hub of Southern California culture and driving, San Diego offers everything from budget-friendly car audio repair to high-end custom installations. Top features to expect:
Factory system troubleshooting
Upgrades to Apple CarPlay / Android Auto
Navigation unit repair
OEM integration for luxury vehicles
Soundproofing and tuning for optimal acoustics
Many San Diego repair shops also offer fleet vehicle audio services, ideal for Uber, Lyft, and delivery drivers.
4. La Jolla Car Audio Installation & Repair
In upscale neighborhoods like La Jolla, car audio isn't just about music—it’s a lifestyle statement. Expect premier services like:
Premium speaker installation (Focal, JL Audio, Alpine)
Sound tuning for luxury vehicles
Audiophile-level diagnostics
Integrated car entertainment systems
Tesla and EV-compatible audio upgrades
La Jolla shops often offer climate-controlled garages and white-glove services for high-end vehicles.
5. Mission Valley Car Audio Shops
With its central location, Mission Valley is a go-to for fast, efficient, and affordable car audio repair. Expect services like:
Rapid diagnostics
Affordable speaker repair
Touchscreen and infotainment fixes
Backup camera and dash cam integration
Custom box builds for subwoofers
Several Mission Valley locations are Best Buy authorized installers or offer OEM-quality parts with same-day installation.
Key Services to Look for When Searching “Car Audio Repair Near Me”
When choosing the right audio repair shop near you, prioritize these services:
Speaker Troubleshooting & Replacement
From tweeters to subwoofers, your speakers should deliver balanced sound. Techs can test frequency response, phase alignment, and wiring connections.
Head Unit Repair
If your stereo isn’t powering on or is showing a blank screen, repair shops can fix head units or replace them with modern touchscreens compatible with Android Auto or Apple CarPlay.
Amplifier Diagnosis & Repair
A car amplifier boosts your system’s performance. When amps blow fuses or short out, repair techs can replace internal components or recommend replacements suited to your setup.
Bluetooth and Connectivity Issues
Streaming music or taking calls on the go is essential. Repair specialists can rewire and sync Bluetooth modules or install aftermarket Bluetooth kits.
Custom Car Audio Installation
For those who want more than factory sound, many shops offer custom sound systems complete with DSP tuning, enclosure building, and branded speaker installs.
Benefits of Professional Car Audio Repair
Searching “car audio repair near me” isn’t just about fixing what's broken—it’s about enhancing your driving experience. Here’s why expert help is worth it:
1. Accurate Diagnostics
Trained professionals use oscilloscopes, voltmeters, and audio analysis tools to identify subtle faults, saving you money in the long run.
2. Safe Installations
DIY fixes can damage your car’s electrical system. Certified installers ensure proper grounding, power routing, and integration with your vehicle’s ECU.
3. Quality Parts & Warranty
Trusted repair centers in San Diego, La Jolla, or Mission Valley use top-tier components and offer warranties on both parts and labor.
4. Time-Saving Service
Many shops offer same-day car stereo repair, especially in busy neighborhoods like Mission Valley or Ocean Beach, where convenience is key.
How to Choose the Right Car Audio Repair Shop Near You
Here are tips for choosing the best local repair shop:
Check Google reviews: Look for consistent 4.5+ star ratings and positive feedback on sound quality and service.
Ask about certifications: MECP and ASE certifications show that techs are trained and trustworthy.
Compare pricing: Make sure quotes include labor, parts, and tax. Avoid hidden fees.
Warranty offerings: Reputable shops will offer warranties on repairs and installations.
Location accessibility: Choose shops in convenient areas like Point Loma or Mission Valley for faster drop-off and pickup.

FAQ: Car Audio Repair Near Me
1. What’s the average cost of car audio repair near me in San Diego? The average cost for car audio repair in San Diego ranges from $75 to $300, depending on the issue. Minor speaker repairs or head unit diagnostics are on the lower end, while amplifier replacements or custom installations can be higher. Locations like Mission Valley and Ocean Beach tend to offer competitive pricing with fast turnaround.
2. Can I get car stereo repair near me on the same day? Yes, many shops in Point Loma, Mission Valley, and San Diego proper offer same-day car stereo repairs for common issues like dead head units, static in speakers, or touchscreen malfunctions. It's best to call ahead to check technician availability.
3. Do you offer car amplifier repair in La Jolla or Ocean Beach? Absolutely. Both La Jolla and Ocean Beach have reputable car audio shops that specialize in amplifier diagnostics, internal component replacement, and custom tuning. This service ensures your sound system delivers the deep bass and clarity you're missing.
4. Where can I find Bluetooth car stereo repair near me? If your Bluetooth isn’t connecting or cuts out while driving, car audio specialists in Mission Valley and Point Loma can fix or upgrade your unit. They also offer Bluetooth module replacement or install aftermarket head units with advanced connectivity features like Apple CarPlay or Android Auto.
5. Do you provide mobile car audio repair in San Diego? Yes, mobile car audio repair services are available across San Diego, especially in Ocean Beach, Point Loma, and La Jolla. Mobile technicians can troubleshoot speaker issues, rewire head units, and even install amplifiers at your home or workplace.
Final Thoughts
Whether you’re in Mission Valley’s urban core, La Jolla’s luxury lanes, or Ocean Beach’s coastal streets, there’s a trusted car audio repair professional ready to bring your sound system back to life.
Don’t settle for subpar sound or deal with faulty Bluetooth any longer. The next time you’re searching “car audio repair near me,” remember the top neighborhoods to check:
Point Loma for marine-grade sound solutions
Ocean Beach for laid-back, mobile-friendly repairs
San Diego citywide for expert diagnostics and upgrades
Mission Valley for affordable and quick service
La Jolla for premium audio customization
Your car deserves a sound system as smooth as the California coast—get it repaired or upgraded today.
#audioupgrade#caramplifier#caraudiosystem#caraudio#carspeakers#customcaraudio#caraudiobuild#carsubwoofer#soundsystem
0 notes
Text
Car Audio Repair Experts: Restoring Sound, Power, and Performance

There’s nothing quite like cruising down the road with your favorite music playing through a crisp, high-quality sound system. But when your car audio stops working correctly—whether it’s static, distortion, or complete silence—it can ruin the driving experience. That’s where car audio repair experts come in. With the right skills and tools, they diagnose and fix problems quickly, getting your system back to peak performance.
In this article, we’ll explore what car audio repair experts do, the most common audio issues they fix, and why professional service is often the smartest option for long-term performance.
What Do Car Audio Repair Experts Do?
Car audio repair specialists are trained professionals who diagnose, repair, and upgrade in-car audio systems. Their expertise goes beyond basic stereo replacements—they troubleshoot wiring issues, fix speaker malfunctions, repair amplifiers and head units, and ensure your sound system is safe, functional, and tuned for optimal performance.
Most experts work with a variety of systems, including:
Factory (OEM) sound systems
Aftermarket stereos and subwoofers
Bluetooth and smart integration modules
Amplifiers, equalizers, and DSPs
Navigation and infotainment systems
Common Car Audio Problems Repair Experts Solve
Even the best systems wear down over time. Here are a few issues car audio repair experts regularly fix:
1. No Sound or Intermittent Audio
If your system cuts out unexpectedly or delivers no sound, the problem could be a faulty speaker, loose wiring, blown fuse, or malfunctioning head unit. Experts use multimeters and diagnostic tools to track down the source fast.
2. Distorted or Crackling Sound
Buzzing, crackling, or distortion is often caused by damaged speakers, poor ground connections, or amplifier problems. A professional can test the full signal path to isolate the issue.
3. Head Unit Not Powering On
When your stereo won’t turn on, it could be due to a dead fuse, ignition wiring failure, or internal damage. An expert can confirm whether it’s repairable or needs replacement.
4. Bluetooth and Connectivity Issues
Modern cars rely heavily on Bluetooth and smart devices. If your system can’t connect or drops calls frequently, a repair tech can update firmware, rewire the module, or replace faulty components.
5. Speaker or Subwoofer Malfunction
No bass? Rattling speakers? Car audio pros can test and repair individual speakers or install new ones for improved clarity and performance.
Why Hire a Car Audio Repair Expert?
DIY fixes might seem tempting, but car audio systems involve complex electronics, wiring harnesses, and vehicle integration. Here’s why turning to a pro is a smart choice:
Accurate Diagnosis: Experts use professional tools to pinpoint issues quickly, saving you time and guesswork.
Safe Repairs: Electrical repairs done incorrectly can cause shorts or even fires. Professionals ensure your system is safe and secure.
Clean Installation: Avoid messy wires and damaged panels—experts know how to install components cleanly and seamlessly.
Upgrade Advice: Need more bass or better clarity? A specialist can recommend components that work together for your desired sound.
How to Choose the Right Car Audio Repair Expert
Not all repair shops are created equal. Look for the following when choosing a service provider:
Experience and Certifications (e.g., MECP-certified technicians)
Positive Reviews and Customer Feedback
Warranty on Repairs and Parts
Access to OEM and Aftermarket Equipment
Clear Pricing and Honest Estimates
Final Thoughts
Whether your system is cutting out, sounding weak, or completely dead, car audio repair experts can restore your sound system to its former glory—or even make it better than ever. Don’t settle for silence or static. A professional repair ensures not only improved audio quality but a safer, more enjoyable ride.
Ready to bring your sound system back to life? Trust the pros—because when it comes to car audio, precision matters.
Contact Us
Xclusive Autosound
2347 Old Collinsville Road, Suite B
Belleville, IL 62221
Phone: 618-222-2234
0 notes
Text
Fixing Problems with Zhiyun Smooth 5

If you’re a smartphone videographer or content creator, the Zhiyun Smooth-5 is a powerful tool-but it’s not without its quirks. At AWPRO, we believe in helping you get the best out of your gear. Here are the most common issues users face with the Smooth-5, along with practical solutions to keep your shoots smooth and professional.
1. External Microphone Port Blocked by Tilt Motor
The Problem: To balance your phone on the Smooth-5, you often have to push it right up against the tilt motor. This design blocks the phone’s microphone input, making it impossible to plug in popular external mics like the RODE VideoMic Me-L directly.
The Solution:
Use an Extension Cable: Get a short right-angle extension cable (Lightning or USB-C, depending on your phone) to route the mic input away from the motor.
Mount the Mic on the Gimbal: Use a cold shoe adapter or clamp to attach your microphone to the gimbal’s handle or arm, then connect it to your phone with a flexible cable.
Wireless Audio: Consider using wireless microphone systems (like Rode Wireless GO) that connect via Bluetooth or a small receiver, eliminating the need for direct connection at the blocked port.
2. Gimbal Shuts Off or Tilts Suddenly
The Problem: If the gimbal turns off or the phone tilts to the side after a few seconds, it’s usually a balancing issue. Too much weight on one side can overload the motors and cause shutdowns.
The Solution:
Proper Balancing: Before powering on, unlock all axes and carefully balance your phone so it stays level when the gimbal is off. Adjust the phone’s position left or right until it remains steady.
Check Accessories: Remove heavy cases, lenses, or attachments that might unbalance the setup. If you need to use them, rebalance accordingly.
3. Charging Issues and Battery Not Holding Charge
The Problem: Some users report that after a few months, the Smooth-5 won’t hold a charge-even when plugged in. The gimbal may power off after a few minutes, making it unusable3.
The Solution:
Check Warranty: If your gimbal is still under warranty, contact Zhiyun support for a replacement or repair.
Battery Maintenance: Avoid leaving the gimbal fully discharged for long periods. Charge it regularly, and store it with a partial charge if not in use for weeks.
Firmware Update: Sometimes, battery issues can be resolved with a firmware update via the ZY Cami app.
4. Horizon Not Level (Roll Axis Issue)
The Problem: You notice your footage is slightly tilted, even after calibration. The roll axis may be off by a degree or two, and standard app calibration doesn’t fix it5.
The Solution:
Auto-Calibration: Use the ZY Cami app’s auto-calibration feature. Place the gimbal on a flat, level surface and follow the prompts.
PC Calibration Tool: If auto-calibration fails, download Zhiyun’s calibration tool from their official website. Connect your gimbal to a PC via USB-C, open the tool, and use the “level trim” function to manually correct the roll axis.
Editing Correction: As a last resort, minor horizon issues can be corrected in post-production using your video editing software.
5. Bulk and Weight
The Problem: The Smooth-5 is heavier and bulkier than many competitors, making it less portable and more tiring for long shoots.
The Solution:
Use a Tripod: Attach the included mini tripod for added stability during longer shoots.
Streamline Your Setup: Only attach necessary accessories to minimize weight.
Consider Your Needs: If portability is critical, you might want to consider a lighter gimbal for travel or casual use.
Conclusion
The Zhiyun Smooth-5 is a feature-rich and powerful smartphone gimbal that can help you achieve professional-looking, stabilized footage. By understanding these common issues and applying the fixes we’ve outlined, you can make the most of your Smooth-5 and focus on what matters most: creating amazing content. If you ever need personalized support, troubleshooting tips, or the right accessories, remember that AWPRO is here to help you every step of the way. Happy shooting!
0 notes