#Type 1 connector
Text
Tektronix Technology Presents
EV Charger Supplier & Installer in UAE.

Introduction
At Tektronix Technology, we take pride in being a leading supplier and installer of Electric Vehicle (EV) chargers. With the ever-increasing demand for sustainable transportation solutions, we understand the importance of providing reliable and efficient charging infrastructure. In this article, we will explore the wide range of EV chargers offered by Tektronix Technology and highlight the key benefits of choosing us as your trusted supplier and installer.
Extensive Product Range :-
Tektronix Technology offers an extensive selection of EV chargers, catering to various needs and requirements. Whether you are a residential customer, a business owner, or a public facility manager, we have the perfect charging solution for you. Our product range includes Level 1, Level 2, and DC fast chargers, ensuring compatibility with all types of electric vehicles.
Cutting-Edge Technology :-
As technology continues to evolve, so do our EV chargers. At Tektronix Technology, we stay at the forefront of innovation, incorporating cutting-edge features into our charging solutions. Our chargers are equipped with advanced monitoring systems, intuitive user interfaces, and smart charging capabilities. With Tektronix Technology, you can be confident in receiving the latest technology to power your EV efficiently.
Superior Quality and Reliability :-
When it comes to EV chargers, quality and reliability are paramount. Tektronix Technology understands this, which is why we prioritize the highest standards of craftsmanship and durability. Our chargers undergo rigorous testing to ensure optimal performance, even in the harshest environmental conditions. With Tektronix Technology, you can trust that your EV charging needs will be met with unwavering dependability.
Seamless Installation Process :-
Choosing the right EV charger is only part of the equation. At Tektronix Technology, we offer a seamless installation process, taking the hassle out of transitioning to electric mobility. Our team of experienced professionals will work closely with you to assess your requirements, provide expert recommendations, and handle the entire installation process efficiently. We prioritize customer satisfaction and ensure that your EV charger is installed to the highest standards.
Benefits
EV Charging :-
With Tektronix Technology's EV chargers, you can say goodbye to long charging times. Our Level 2 chargers provide a significant improvement over standard Level 1 chargers, allowing you to charge your electric vehicle up to five times faster. For even quicker charging, our DC fast chargers offer rapid replenishment, enabling you to get back on the road in no time. We understand that time is valuable, and our chargers are designed to make your charging experience as fast and convenient as possible.
Cost-Effective Solutions :-
Switching to electric mobility not only benefits the environment but also your wallet. With Tektronix Technology's energy-efficient chargers, you can significantly reduce your charging costs. Our chargers are designed to optimize energy consumption, minimizing waste and lowering your electricity bills. Additionally, we offer competitive pricing on our chargers, ensuring that you receive a cost-effective solution without compromising on quality or performance.
Future-Proofing Your Charging Needs :-
As the EV industry continues to grow, it is essential to future-proof your charging infrastructure. Tektronix Technology's chargers are built with scalability in mind, allowing you to expand your charging capacity as your needs evolve. Whether you require a single charger or a network of chargers, we have the flexibility to accommodate your changing requirements. With Tektronix Technology, you can rest assured that your charging infrastructure will adapt to the future demands of electric mobility.
Conclusion
Tektronix Technology is your trusted partner for all your EV charging needs. With our extensive product range, cutting-edge technology, superior quality, and seamless installation process, we ensure that you receive the best solutions for your electric vehicle charging requirements. By choosing Tektronix Technology, you are investing in a reliable and efficient charging infrastructure that will support your transition to electric mobility. Embrace the future of transportation with Tektronix Technology.


youtube

Contact Details :-
Tektronix Technology Systems Dubai-Head Office
[email protected]
+971 50 814 4086
Office No 209 | Caravan Café Building Clock Tower
Deira Dubai UAE P.O. Box 85955
#EVChargerforFleetOperators
#EVChargerwithPaymentGateway
#GBTDCFastCharger
#DCFastCharger
#DualSocketEVCharger
#ElectricVehicleCharger
#PortableCharger
#GBTCharger
#Type1connector
#Type2connector
#Universalcharger
#Teslacharger
#EVCharger
#DisplayEVGreenCharger
#EVGreenCharger
#PortableCharger
#EV Charger for Fleet Operators#EV Charger with Payment Gateway#GBT DC Fast Charger#DC Fast Charger#Dual Socket EV Charger#Electric Vehicle Charger#Portable Charger#GBT Charger#Type 1 connector#Type 2 connector#Universal charger#Tesla charger#EV Charger#Display EV Green Charger#EV Green Charger
1 note
·
View note
Video
youtube
eGo 100 3.5-7KW Type 1 & 2 connectors, schedule charging, color custom...
#youtube#eGo 100 3.5-7KW Type 1 & 2 connectors schedule charging color customization IP 65 Water-Proof Automobile Electric portal home innovation
0 notes
Text

BNC (M) St. To BNC (M) St. With RG316 (L-3Mtr) Cable Assembly
SKU: ET-BMS-4L3-BMS
Specs:-
• Product-Cable Assembly
• Cable RG316
• CONNECTOR1 BNC Male
• Connector)-Polarity- Standard
• Connector 1-Orientation- Straight
• Connector1- Material- Brass
• Connector1-Plating- Nickel
• CONNECTORZ-BNC Male
• Connector2-Polarity Standard
• Connector2-Orientation- Straight
• Connector2- Material: Brass
For More Info - https://eteily.com/13-rf-cable-assembly
#eteily#technologies#eteilyindia#bnc#cableassembly#rfantenna#telecom#telecomunication
#rf cable#rf coaxial cable#rf cable manufacturer#manufacturer of coaxial cable#rf coaxial cable connectors#rf coaxial cable types#flexible rf coaxial cable#low loss rf coaxial cable#best rf coaxial cable#high power rf coaxial cable#1/2 rf coaxial cable#rf coaxial cable assembly#rf coax cable connector#rf coaxial cable manufacturers in india#rf coaxial cable connectors types#radio frequency coax cable connectors#rf cable and coaxial cable#rf choke coaxial cable#rf coaxial cables#rf cable connection#rf coaxial cable for sale#coaxial cable for rf#rf rigid cable#coaxial high performance rf cable#rf loss in coaxial cable#speed of rf signal in coaxial cable#lmr400 rf coaxial cable#manufacturers of rf coaxial cable#rf micro coaxial cable
0 notes
Text
Connectors, Modular connector types, Magnetic Modular Jack Connectors
8 Position Single Port Right Angle Through Hole RJ45 Modular Jack
#Modular/Ethernet Connectors#Modular Jacks#1-406541-5#TE Connectivity#Connectors#Modular connector types#Magnetic#Ethernet networking#SPE Jack Modular#Modular plug socket#modular jack cable#phone jack adapter#wireless phone jack
1 note
·
View note
Video
youtube
ZJSHUYI Precautions for the use of button switches.www.cnswitch.cn #togg...
#youtube#Precautions for the use of button switches 1. First of all the appropriate type of switch and connector should be selected according to the
0 notes
Text
I finally bought a microwave the other day and after unpacking it, it turns out it needs to be connected to “ground”. I had not come across this kind of cable before, so long story short I spent until 6am reading about it online...
#I only have like 1 or 2 devices that need this so theoretically the one screw on the wall is enough#but no I had to know how to connect several devices with one screw or what to do if there is no ground in your house just in case#why am I like this#the cable that came with the microwave was too short so first I looked up how to extend a cable#then I realized that I can just buy a larger cable and replace it#since the connector types are the same as in latinamerica I thought they would work similarly#turns out the ones in latinamerica have different sized pins so ground is not an issue#I guess the European sockets are superior. They say the British ones are the best but I have not used those ones
1 note
·
View note
Note
I still believe the craziest form of computer program storage format from the 1980s is the cassette tape. Logical I get it but to store entire programs on little tape (that I only remember using to play music) is just crazy to me. Idk
Agreed, cassette tape for data storage was really clever. The concept had its heyday was the 1970s in a wide variety of encoding schemes for different computer platforms. It did persist into the 80s, mostly in Europe, while the US switched to floppy disks as soon as they were available for systems. The majority of my Ohio Scientific software is on cassette.
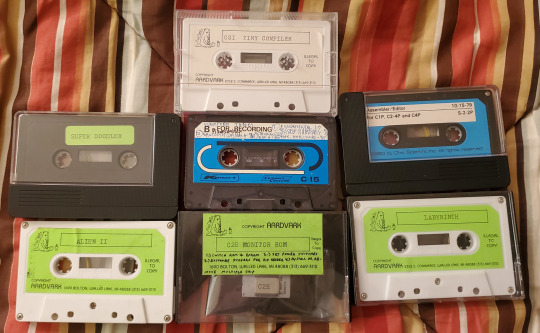
Talking with UK vs. US Commodore 64 users in particular will highlight the disparity in which storage mediums that were commonplace. I've got a few pieces of software on tape for mainly the VIC-20, but I rarely bother to use it, because it's slow and annoying. To be fair, Commodore's implementation of data storage on tape is pretty rock solid relative to the competition. It's considered more reliable than other company's but Chuck Peddle's implementation of the cassette routines are considered quite enigmatic to this day. He didn't document it super well, so CBM kept reusing his old code from the PET all the way through the end of the C128's development 7 years later because they didn't want to break any backward compatibility.

The big thing that really made alot of homebrewers and kit computer owners cozy up to the idea was the introduction of the Kansas City Standard from 1976. The idea of getting away from delicate and slow paper tape, and moving towards an inexpensive, portable, and more durable storage medium was quite enticing. Floppy disk drives and interfaces were expensive at the time, so something more accessible like off the shelf audio tapes made sense.
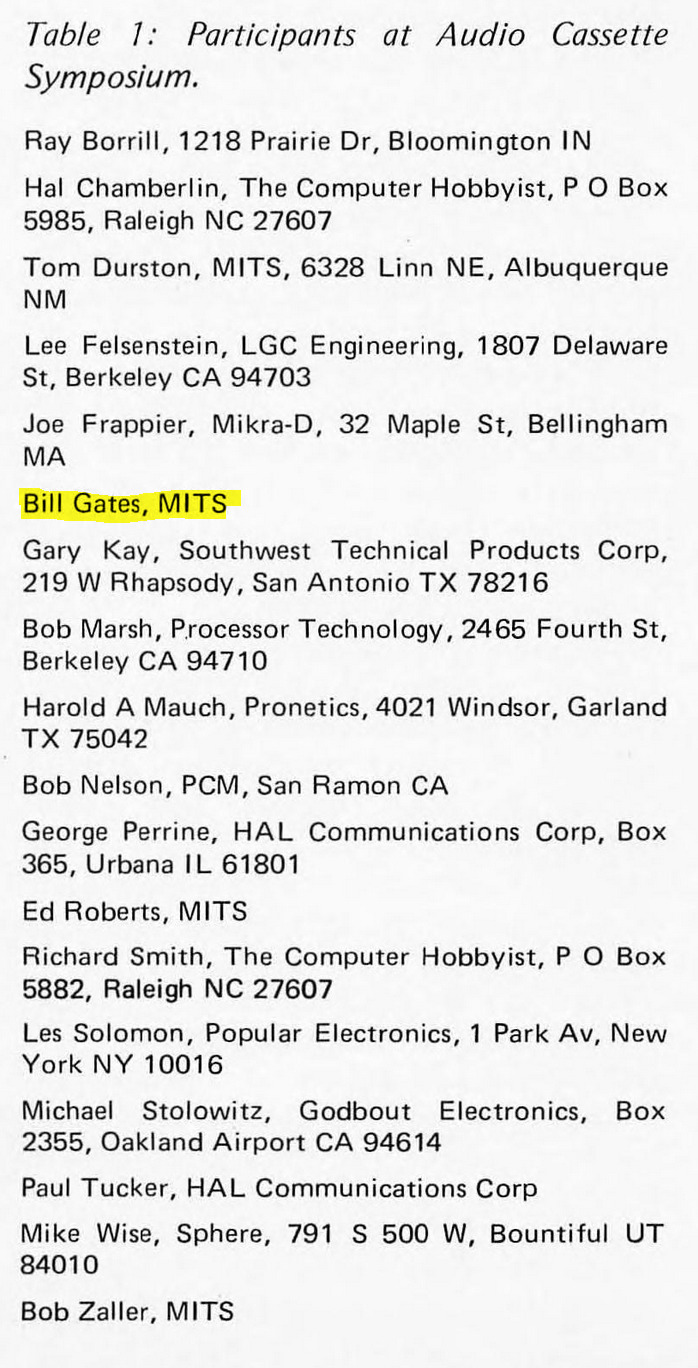
I've linked two places you can read about it from Byte Magazine's February 1976 issue below (check the attribution links).
You might recognize a familiar name present...
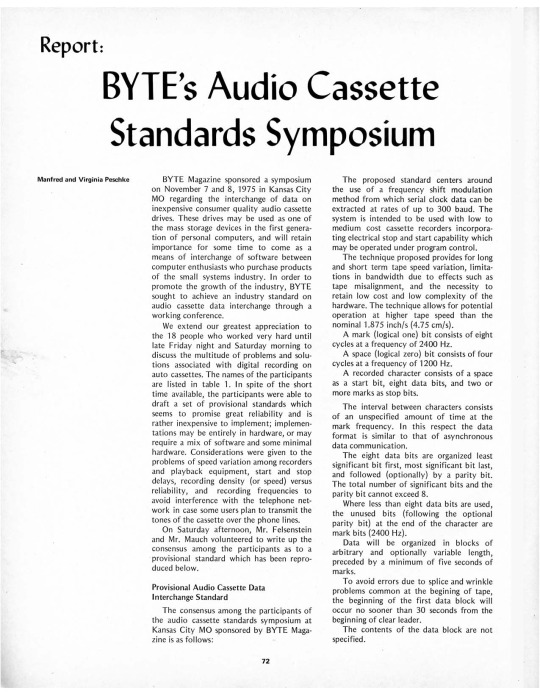
There are a few ways to encode binary data on tape designed to handle analog audio, but the KCS approach is to have 1's be 8 cycles of 2400Hz tone, and 0's be 4 cycles of 1200Hz tone. I say cycles, because while 300 baud is the initial specification, there is also a 1200 baud specification available, so the duration of marks vs spaces (another way of saying 1's and 0's), is variable based on that baud rate. Many S-100 computers implemented it, as do a few contemporary proprietary designs.
The big 3 microcomputers of 1977 that revolutionized the industry (Apple II, Commodore PET 2001, and Tandy TRS-80 Model I) each have their own cassette interface implementation. It kept costs down, and it was easy to implement, all things considered. The Apple II and TRS-80 use off-the-shelf cassette deck connections like many other machines, whereas the original variant of the PET had an integrated cassette. Commodore later used external cassette decks with a proprietary connector, whereas many other companies abandoned tape before too long. Hell, even the original IBM PC has a cassette port, not that anybody bothered to use that. Each one used a different encoding format to store their data, rather than KCS.
Here's a sample of what an OSI-formatted tape sounds like.
And here's a Commodore formatted tape, specifically one with VIC-20 programs on it.
I won't subject you to the whole program, or we'd be here all day. The initial single tone that starts the segment is called the "leader", I've truncated it for the sake of your ears, as well as recorded them kinda quietly. I don't have any other tape formats on hand to demonstrate, but I think you get the idea.
You can do alot better than storing programs on tape, but you can also do alot worse -- it beats having to type in a program every time from scratch.
273 notes
·
View notes
Text
Homebrew Horror: Dominion Disassemblers

(Art from The Book of Unremitting Horror, pg. 66)
Though this is beyond the knowledge of any worldly being, the Dominion of the Black was not always the galactic union it is now. Until a united council with a common goal took the head of the Dominion, wars both petty and planet-scarring were common among its many factions, though in the centuries since their grand union, these squabbles have been reduced to near-nonexistence except when weapons must be tested.
Many relics from this tumultuous time remain in use even to this day, one of the most 'famous' being the Gan-Dergorin, known in the common tongue as Dominion Disassembler, monstrous, nigh-unkillable biomechanical titans with a unique behavioral quirk built into their very genetic code which made them useful in the old wars, and has them remaining useful even now, long after they're no longer needed for their original purpose: destroying Dominion technology. The war machines of the Dominion are unlike any of the minor scouting and scientific units seen on Golarion's soil, the twisted mixtures of flesh and steel nearly impossible to truly put down for good, able to continue their terrible march even as enormous portions of their bodies were torn away.
That is where the Gan-Dergorin come in. These bestial constructs have a simple tactic when facing down any enemy: tear it to pieces too small to remain active. Even the most resilient Dominion machines of terror cannot survive the thoroughness of the destruction that Disassemblers enact upon them, severing every single joint and connector from one another until their victims are rent to their smallest possible components. A Disassembler which has the time to do so will then go even further by separating all types of tissue and matter from one another, then carefully sorting the mangled gore into piles and rows based on how useful it believes its alien masters may find the components, behavior which assured a steady stream of resources for the flesh-forges of the Dominion.
Even today, their gruesome displays are useful when intimidating or punishing captive populations, though Dominion science has advanced to the point such brutal measures are no longer needed; they have much more thorough and effective means of reducing living creatures to their component parts. As such, Disassemblers are used as weapons of terror against the Dominion's enemies among the stars and within their own populations, though this isn't to say they're restricted to distant worlds.
The arrival of a Disassembler on soil beyond the Dominion's grip is an occurrence which is rare to the point of nonexistence, but it has happened both by accident (errant portals and teleportation errors) and purposeful action. On the exceedingly rare occasions when a cultist manages to establish and survive contact with entities concerned with the Dominion's war effort, they can be convinced to send one of these horrors to the cultist's world. Rarely does the cultist survive to give the war machines an actual order, allowing the machine to do what it does best: kill anything it encounters, and assure its own continued survival.
Gan-Dergorin CR 11
Chaotic Evil Large Construct
Init +2; Senses: Darkvision 80ft, Low-light vision, blindsense 10 ft, Perception +17
Aura: Frightful Presence (60ft, DC 15)
-----
Defense
-----
AC 25; touch 11; flat-footed 23 (+2 Dex, +14 natural, -1 size)
HP:110 (13d10+30) Fast Healing 5
Fort +4, Ref +6, Will +7
Defensive Abilities: Reassemble, Upgrade; DR 5/--; Immune Construct traits; Resist Fire 10, Cold 10, Electricity 10; Weakness Serial Number, Thorough Disassembly
-----
Offense
-----
Speed: 30 ft, climb 10ft
Melee: Pneumatic Cleaver +19/+14/+9 (2d6+6/x3), Variable Arms +13 (2d6+3/19-20)
Space/Reach: 10ft/10ft
-----
Statistics
-----
Str 22, Dex 15, Con --, Int 10, Wis 16, Cha 6
Base Atk +13; CMB +20; CMD 32
Feats: Cleave, Cleaving Finish, Critical Focus, Improved Cleaving Finish, Great Cleave, Power Attack, Technologist(B), Weapon Focus (Pneumatic Cleaver)
Skills: Climb +19, Disable Device +9 (+13 vs machinery/technology), Perception +17, Stealth +3; Racial Modifiers: +4 to Disable Device checks against complex machinery and technology
Languages: Aklo (rarely speaks)
SQ: Freeze (pile of metal junk), Standing Orders, Thorough Disassembly
-----
Ecology
-----
Environment: Any
Organization: Solitary
Treasure: Standard (scrap material, integrated items)
-----
Combat: Disassemblers are not complicated creatures. They charge into combat with reckless abandon, using their Great Cleave and Improved Cleaving Finish to slaughter as many weak enemies as they can with a single attack before focusing down remaining foes one at a time with their Full-Attacks, using Power Attack at every opportunity. If given an option, Disassemblers prefer to target any creature capable dealing damage it cannot resist or nullify. A Disassembler will chase down any creature it believes it can kill and will not stop until its enemy escapes or it is driven back by damage.
Morale: A Disassembler brought below 1/4th of its HP maximum will immediately retreat to recover, even if it means abandoning fallen foes, Once it has regained at least half of its total HP and perhaps integrated new weapons, it will track down its foes to dispatch them. If it is slain in combat but permitted to return to function, it will Upgrade itself and track down its killers if possible, and follow its Standing Orders if not.
-----
Reassemble (Ex): Dominion Disassemblers can reattach severed limbs and portions of their bodies by holding it to themselves for 1 full round. A Dominion Disassembler is not destroyed when it reaches 0 HP, but is rendered inert and helpless. 1d4 hours after being reduced to 0 HP, all the alien machinery within whirls back to life--it reactivates at 1 hitpoint and resumes Fast Healing. Only the thorough and comprehensive destruction of its remains using methods such as immersion in magma, acid, or a similar substance, or turning to ash via Disintegrate or similar, can prevent a Disassembler from returning to function; otherwise, it can pull itself together from even the smallest remains.
Serial Number (Ex): All Disassemblers possess a serial number etched on a plate of alien metal somewhere within their body which is kept hidden near their centers. The number cannot be observed unless the construct has been rendered helpless, and even then it requires a DC 23 Perception check to find. Any creature capable of reading and speaking Aklo can make a DC 23 Linguistics check to memorize the Serial Number or write it down perfectly.
A creature may give a verbal command to a Disassembler by speaking its entire serial number aloud and stating the action they wish it to take, in Aklo. Due to the length and complexity of each serial number, this is a full-round action which provokes an attack of opportunity, and being struck by the attack of opportunity ruins the attempt to speak the number. If left without orders, Disassemblers typically try to destroy any creature that knows their serial number. Most creatures which learn of a Disassembler's serial number can easily get rid of the creature by ordering it to take a self-destructive action, or to accept the effects of a spell which will teleport or plane shift it a great distance away.
Standing Orders (Ex): To await further orders from their commanders, Disassemblers go into a low-power mode if they have not encountered another creature in 24 hours. In this mode, they come to rest and resemble a pile of junk, though they remain somewhat aware of their surroundings and may make Perception checks at a -5 penalty to detect nearby creatures and passively make Stealth checks to hide in plain sight as a pile of scrap. They can remain in this low-power state indefinitely, and will do so as long as they are not alerted to any creature, and spring back to full functionality instantly when alerted.
Thorough Disassembly (Ex): A Disassembler gets Technologist as a bonus feat and has a +4 bonus to Disable Device checks to sabotage or take apart complex machinery and advanced technology, and Disable Device is a class skill for it. In addition, after reducing a creature to 0 HP, the Disassembler is compelled to butcher it to prevent its return. It can resist this compulsion by succeeding a DC 20 Will save; otherwise, it must spend its next round attempting to coup de grace that creature if it is still alive, or to begin ripping it to pieces if it is dead.
Upgrade (Ex): When a Disassembler is defeated but permitted to Reassemble, it learns from its failure and seeks out methods to upgrade itself. A Disassembler has a number of Upgrade Points equal to 3 + its Wisdom modifier (6 for a typical Disassembler) that it may divide as it sees fit, and each time it is defeated, its Upgrade Points reset and may be redistributed. A Disassembler requires 1d4+1 days to make upgrades to itself as it gathers raw material from any source it can find (the DM may rule it finds parts much faster in areas with high amounts of technology), and never wastes time and resources upgrading itself unless it is defeated. It can take most of the upgrades multiple times; their effects stack. It will typically choose upgrades which prevent it from being beaten via the same methods it fell to previously.
1 Point: Gain 10 points of resistance to 1 form of elemental damage, or increases its resistance to an element by 10.
1 Point: Increase its natural armor by +1 or its DR/-- by 1.
1 Point: The Disassembler integrates a set of armor and/or a shield it can get ahold of into its body, granting itself the benefits of wearing the armor/shield (AC, magical abilities) but without suffering armor check penalties or speed reductions. It can only integrate one set of armor and one shield at a time.
2 Points: Increase its walk and climb speed by 10ft each, or gain a 10ft swim speed.
2 Points: Gain a +2 profane bonus to a saving throw of its choice.
3 Points: Gain 25% Fortification.
3 Points: Gain 1 feat it qualifies for.
Variable Arms (Ex): The Disassembler's Variable Arms natural attack can switch between slashing, piercing, or bludgeoning damage as a swift action, or change into a tool capable of fine manipulation which also acts as thieves' tools. The construct can also replace its Pneumatic Cleaver with any melee weapon it finds with 1 minute of work, losing its Cleaver attack but allowing it to use that weapon without penalty. It is considered proficient with any weapon it integrates, and wields even two-handed weapons with a single limb.
57 notes
·
View notes
Note
u have made posts telling about your aac you use... would u b willing to share images of how you have it set up and maybe give tips for people working on making their own aac?
I would love to but I think it may give away my anonymity, since I like to share pictures of my different pages. I can share some details and organizing tips though! This isn't anything comprehensive, I think I'd need to spend a lot more time on that, but hopefully this is helpful for someone. For context, I use TD Snap Lite :)
I'll include a list of different word categories at the bottom under the cut, so if you're looking for types of words to focus on, you can skip to there!
Organization part 1
I keep all my commonly used words and folders for other words on my quickfires page, starting with basic communication words (yes/no, who/what/where, etc) and folders (conversation phrases, short responses, nouns, verbs, etc).
Then I have commonly used descriptors, connector words, actions, and nouns. All these are broad words like "thing" or "person," "and" or "because," and "go" and "fix." Even if I didn't have a button for a specific concept, I would still be able to describe it, like "the thing that is mine."
I organize the different buttons in rows on the same page, and try to group similar words together, that way I can find them easily.
I started with buttons for different bADLs (basic activities of daily living), which are bathing, dressing, grooming/hygiene, eating, toileting, and transferring/movement. Then I went to activities that I do every day, like studying, doing housework, or watching TV.
The idea is that I would be able to get through a whole day and be able to describe what I want, what I need, my activities, and what I don't want or need (the ability to say no is important, even for little things!)
Organization part 2
What words I have is important, but so is how I make sure I can find them easily. With TD Snap you can give buttons custom colors and custom border colors, so I use those to organize types of words, and types within those types (so verbs versus nouns, and then people-nouns versus object-nouns)
I also put the most commonly used words towards the right side of the screen, since I'm right handed and that means they'll be easiest to access.
I try to use pastels so I can read the labels, and I edit the text size of all buttons so I can see the symbol and label well. With descriptors, I try to group similar ones together, and group ones that have "opposites" either right next to each other or one above the other (words like up and down, or inside and outside).
Finding gaps
The easiest way for me to figure out what buttons I'm missing is by using my AAC when I'm near full spoons and can think about language well, like now. That way I know what I'm missing, and I can make a button and organize it in the moment without it taking much energy. Usually I'm missing different categories of words, like colors, or words to describe time.
Here's a bunch of word categories under the cut, starting with "essentials" and then moving on to common non-essentials! Feel free to ask me to include any other ideas
BADLs
Bathing (shower, bath, sponge bath, and related words you use for bathing)
Dressing (getting dressed, getting undressed, picking out clothes, words for different types of clothes)
Grooming/hygiene (brushing teeth, flossing teeth, brushing/combing hair, trimming hair, dyeing hair, cleaning piercings, washing face, shaving, makeup)
Eating/drinking (breakfast, lunch, dinner, snack, meal, types of food you eat, spoon, fork, knife, chopstick, bowl, plate, mug, water, warm beverages, napkins, and any other words you use for eating/drinking)
Toileting (bathroom, stall, toilet, sink, washing hands, soap, toilet paper, menstrual products, changing toileting equipment, and any other words)
Transferring/Movement (any mobility aids you use, transferring to/from mobility aids, terms for your aids, walk, run, jog. I included transportation words like "drive" and "car" in my section for this, but that's not necessary)
Essential communication
Yes (and variations)
No (and variations)
Maybe
Something else
I don't know
I need
I don't need
I want
I don't want
options for basic needs, so you can say "I need" and "use the bathroom" (eating, drinking, sleeping, waking, showering/bathing, using the bathroom, dental care, hair care, getting dressed, getting undressed, changing menstrual products, changing medical equipment, and transferring to/from mobility aids)
I consent
I do not consent
I revoke consent
Leave
Stay
Help
Fringe vocabulary for everyday activities and emergencies
Emergency words/phrases (I need a doctor, etc)
Personal info (name, age, etc)
Disability/mental health/medical terms that apply to you
Parts of the body
Types of injury/medical issues
Places you go
People you live with
People you interact with often
Pets names
Neighbors names
Carer or staff name(s)
Important belongings and things you use every day
Everyday hobbies (bike, watch show, etc)
Everyday to-do list activities (do laundry, shower, etc)
Action words (things one can do)
Common nouns (persons, places, things, and ideas)
Connector words (and, to, since, etc)
Feelings (positive, neutral, and negative)
Descriptor words
Colors
Direction
Size
Shape
Days of the week
Months
Seasons
Numbers
Describing amount (some, many, a little, few, all, none)
Describing time (then, now, before, after)
Temperature
Weather
Difficulty
Age
Texture
Personal opinion descriptors (nasty, beautiful, boring)
37 notes
·
View notes
Note
"#everyone says this but no one ever sends any asks"
Okay. What are your top three favorite types of electrical cables?
Mine are 1) Extension cords with NEMA L6-30 couplers, 2) Category 5e Ethernet cables, and 3) SpaceWire cables.
Have you ever seen the fucked up HUGE chonky data cables they use for old mainframes? I got to hold one used on the IBM 1401 at the Computer History Museum. Those things are HUGE. Comically massive BEASTLY cables.

Photos don't do it justice. You have to HAUL this shit.
I don't have a 2 and a 3. Nothing I've personally worked with comes close to this. But I'm a huge fan of ribbon connectors, even if I hate fucking with them when I mod game controllers.
Thanks for the ask!
48 notes
·
View notes
Text
setting up an ipod is harder than you fucking think
just spent the last life four+ hours setting up this ipod classic 4th gen. here's a summary of all the problems i ran into:
(1) ipod had files in it. they appeared as gray and un-editable on itunes, so i thought reseting the ipod to factory would be the fastest and easiest solution.
turns out the last step of the process is connecting ipod to a wall power source. i do this. nothing happens for at least an hour. ipod is stuck in "connect to the wall" icon screen no matter what i do. the internet says it needs to connect with an actual apple firewire wall connector, which i do not have. tried using my ipad's charger with a usb-to-usb-c adapter that i own. didn't work. eventually figured it out the problem had to do with the amps it needs to get defibrillated. i remember that i own a pretty hefty power bank with a 5v/2.1a output. it works. ipod is reset. i have a nice fun time adding the 6 or so songs i have downloaded on my computer (:
(2) i had downloaded soulseek a while ago and gotten frustrated with it but decided to give it another spin since piracy experts on reddit sing it many praises. it seems to have a heavy culture of egalitarianism: a pop up window informs you that a lot of people's download's are restricted only to other people sharing files.
__(2.1) it prompts me to enter my account and password but i don't have one. there isn't an immediatly visible 'create account' link. i google this. eventually i find this soulseek forum where a ton of normies are asking questions pretty regularly. excellent. i search my problems and someone else has already made a post and had the question answered. thank you normies. also: google groups is still a thing???????
the inability to create an account is a weird bug. someone's answer tells me how to circumvent it.
__(2.2) i still can't search for anything. there are no files in this wasteland. i turn on my vpn. put my humble six songs in a folder and share it. voila!!!!!!!
soulseek is actually VERY cool. you can browse other people's music folders, which opens an incredible secret world of possibilities re: finding new music similar to your tastes. EXTREMELY exciting. feels like i'm in a cool secret club of the internet. feels like the old internet.
i download one (1) lana del rey song that's stuck in my head. choose .flac (a lossless audio file) because i want to be fancy.
(3) ...........itunes doesn't read .flac files
__(3.1) searches: what files does itunes read? > which of these files is best for lossless audio? > how do i convert .flac files to itunes-compatible file types? > download foobar2000 > click around till i figure out how to convert .flac files to .wav files.
__(3.2) it works! (: the songs are now in itunes! (:
............but the metadata (album cover, genres, artist, album, etc) doesn't transfer. i don't want to manually input it again. searches: how to keep metadata when converting files? tutorial is slightly different from the version of foobar i have, but i eventually find the setting to keep the metadata.
(4) it works! (:
.............but it won't transfer to my ipod ): i get the message: your ipod can't read this file <- paraphrasing.
okay. searches: what kind of files can an ipod classic 4th gen read? (perhaps they are different from the files itunes can read. this is, after all, the last version of itunes ever released, many years and itunes versions after the ipod classic 4th gen.)
this information isn't in the wikipedia page. this isn't in the ipod wiki. can't even find this model in the official apple pages. it's mentioned in several reviews but it's the wrong model. christ almighty. ok. here it is. found it. allegedly it should be able to read it. ok. why isn't it.
read through forum threads. some people say older ipods get fussy with high bitrates. (search: what is a bitrate? oh ok. higher bitrate > higher audio quality. got it.)
bitrates reccomended by foobar: 180-300something.
lossless file bitrate: 2000 and change. hm. surely that's a huge difference.
i convert the .flac file to .mp3 instead.
__(4.1) it works! (: the files are in my ipod! (:
.....but goddamnit, i'm stubborn, and this goddamn ipod is supposed to be able to read apple lossless files (basically a .flac file, but designed to be used with apple products. lol.) i don't want a lameass mp3, i want lossless goddamn quality! even if this brick of an ipod won't be able to play it! it's the principle of the thing!
______(4.1.1) okay. try to fuck around with bitrates in the settings of the apple lossless conversion on foobar. foobar is like "you don't have the right encoder pack, bitch" <- paraphrasing.
oooh. surely, this is the problem. i download encoder pack.
______(4.1.2) foobar is like: "you don't have the right encoder pack, bitch" <- paraphrasing.
me: [crying] but i did.
foobar: bitch.
______(4.1.3) search: why is foobar calling me a bitch? > reddit thread: look closely at the sphynx's riddles three: it doesn't say "you haven't downloaded the encoder pack." it says: you haven't installed the encoder pack. (<- NOT A JOKE.)
go to C: > program files > foobar > find the encoder pack i downloaded > click on all the .exe files. powershell windows appear and dissappear. basically: stuff happened. i'm certian.
_____________(3.4.3.1) i'm STILL getting the riddles three message, but the same reddit thread says: if you know you solved th riddles three, you can just ignore it (: so i do.
__(4.2) .flac files seem to have been successfully converted to apple lossless files !!!!!!!!!!!!!!
....but i am back to "your ipod can't read this shit!!!!!!!!!"
do some more searches > turns out it's a weird itunes glitch. the thing is just moody. try turning it on and off. try disconnecting and re-connecting. try resetting your ipod again.
try uninstalling and installing again.
(5) "iTunes Library.itl cannot be read because it was created by a newer version of iTunes"
.......................to be continued. if i don't kill mysuelf first.
#apple#ipod#itunes#i did a couple more things but i am tired and want to go to bed i hate it here#progress report
33 notes
·
View notes
Text

Greater Northshore Bike Connector Map 1.4 – dated 30 August 2024 – is now available on github, as is MEGAMAP 1.4, the much larger pasteup of Greater Northshore, City of Seattle, 2 Line Eastside Bike Connector, and a little bit of King County Regional Trails that gets us all the way to the south end of Lake Washington.
New in this release:
New data type: 1 Line Link Light Rail stations are now mapped, both on Greater Northshore and the MEGAMAP! They allow bikes onboard, so count as bike infrastructure. (Note that all 1 Line stations north of Seattle proper open on August 30th, not before.)
Added several street names, particularly around 1 Line rail stations, for better wayfinding
Cleaned up other street names where bike infrastructure overlaid KCGIS labels
Upgraded block connection on 68th between Bothell Way and NE 181st/Remington in Kenmore to Sharrow after upgraded street painting
“Very Bumpy” advisory removed from Shoreline Interurban Trailhead due to repaving, thank you wildjo on Github for the contribution
Re-added very short trail exit from Shoreline Interurban Trailhead that got lost somehow in a previous map revision
Added two more short starter sections of what will become the “Trail Along the Rail” in Shoreline, and adjusted exact ending point of the largest section already on the map, thank you https://social.ridetrans.it/@bobco85 on Mastodon for the contribution
Here’s today’s Seattle Times article about the new stations, too. First train leaves Lynnwood at 5am.
See you at the opening!
ps: my patreon, if you feel like throwing some change at the jar. I mean, I’ll keep doing this regardless, but you know. ^_^
5 notes
·
View notes
Text

Cable
HLF 400 RF Cable Manufacturers in India
Eteily offers an extensive range of RF cables featuring outstanding electrical performance, mechanical characteristics, low loss and high frequency for both Indoor and Outdoor Applications. Our range includes RG series, HLF series and embedded thin cables for each market or application. Our highly demanded shielded Cable design makes coaxial cables far less sensitive to external interference such as damage or electromagnetic fields to large extent. We are recognized for Best Quality cables at reasonable price and are counted among the best RF cables suppliers in India.
#rf cable#rf coaxial cable#rf cable manufacturer#manufacturer of coaxial cable#rf coaxial cable connectors#rf coaxial cable types#flexible rf coaxial cable#low loss rf coaxial cable#best rf coaxial cable#high power rf coaxial cable#1/2 rf coaxial cable#rf coaxial cable assembly#rf coax cable connector#rf coaxial cable manufacturers in india#rf coaxial cable connectors types#radio frequency coax cable connectors#rf cable and coaxial cable#rf choke coaxial cable#rf coaxial cables#rf cable connection#rf coaxial cable for sale#coaxial cable for rf#rf rigid cable#coaxial high performance rf cable#rf loss in coaxial cable#speed of rf signal in coaxial cable#lmr400 rf coaxial cable#manufacturers of rf coaxial cable#rf micro coaxial cable#rf coaxial cable 50 ohm
0 notes
Note
This might be a bit of a big ask but what are your thoughts on the rest of the Gen 9 cross-gen evos that weren't revealed before release (Annihilape, Clodsire, Dudunsparce and Kingambit)?

I think a lot of people kind of missed the point of Dudunsparce. Dunsparce is a tsuchinoko, a rare Japanese cryptid known for being completely useless and stealing your booze. It's supposed to be a joke, kind of like Magikarp but without becoming anything useful. Ergo, having a low-effort evo that just becomes a slightly longer Dunsparce makes perfect sense, much more so than it suddenly becoming a dragon or something.
Dudunsparce also comes in two forms, a two- and three-segment version. Not much to say about these, other than they continue the joke of it being rare but useless (given the low odds of getting a three-segment form).

Visually, one nice thing about Dudunspace is that its wings and segments are numbered 1 and 2 (and sometimes 3 depending on form). It's subtle, but it's a clever visual twist to an otherwise plain design.
However, I have to admit, there is something about Dudunsparce that bugs me a bit. I think it's just that Dunsparce has such a good design that a lot of the stuff Dudunsparce does just lessens it. For example, having the head be separate from the first body segment just doesn't look good, and neither does the tail being on a straight rod connector instead of naturally flowing into the body. I also dislike the random purple rings on the underside, which add nothing to the design and are way too low-contrast. Overall, it's a silly joke 'mon, but one that could've maybe been a little stronger design-wise.

Annihilape is a long-overdue evo for Primeape, and I gotta say, the entire thing is a brilliant reference. Specifically, to this one entry in Pokemon Sun:

Taking that 'dex entry to its logical extreme and making a ghost-type evo for Primeape is brilliant, and makes for a great concept and visual twist on the original design. The wispy hair works perfectly, the red eyes and pink nose pop nicely, and the broken shackle on the arms is a perfect visual nod to Primeape. I also love the eerie, infuriated expression.
(Part of me wonders if it wouldn't have made more sense for it to be mellow given the entry its referencing, but then again it's not actually dead yet and sheer rage is kind of this line's thing.)
I guess the only real problem with it is that it feels a bit out of place due to the sudden color shift—but at the same time I get why they did that, as it reflects the new ghost-typing and overall looks cool, so I can't really complain.

Finally we have Kingambit, my personal favorite out of all the new evos this gen. First, I'm always a sucker for cool humanoid 'mons, and Kingambit is the perfect mix of human-ish while also looking like a cool monster.
More importantly, Kingambit fits with the rest of the line perfectly. It is very, very hard to introduce an evo to a three-stage line and have it look like it actually belongs to that line (just look at Rhyperior). But Kingambit? The visuals are distinct, yet blend in so seamlessly with the rest of the line that you'd probably never guess they were generations apart if you weren't familiar with the line already. For example, the golden gloves are extended from Bisharp's hands as is the blade on the head, the shoulder pads are extensions of Bisharp's, the goat-like feet are kept, the middle blades have been extended, etc. It's masterfully done.

In terms of the design, I love the silly giant mustache blades and how they provide a focal point to draw attention to the otherwise small face. The body design is appropriately samurai-like, and the gold accents are much better used here than on Bisharp due to being more prominent in the design.
My only real issue with it is that the hair-throne is pushing it a bit. I get that it's based off of the popular samurai squat/sitting pose, you know, this one:

But having it just awkwardly scooting around when it moves feels incredibly forced and unnatural, making it harder to see as a living creature. The bottom of the hair under the legs also doesn't look great. I would've happily accepted it squatting in its default pose with the hair stopping at the legs, and it getting up to stand when following in the overworld and whatnot.
I'm also not big on the blades sticking out from the middle of the body. I get they were playing off of Bisharp's middle blades, but they look very fragile and really don't add much to the design. I feel like just having the metal rings around the middle to represent a samurai uniform would have been more than enough.
I also feel like the grey Vs on the knees weren't needed or could've at least been gold to make them pop more, though that's not terribly important overall. The top blade could've also maybe come down like 20%, just so its not competing with the mustache as much.
Anyway, overall, I think Gen 9 might have some of the strongest cross-gen evos of any game. Girafarig (already discussed in a previous review) is perfect, Dudunsparce is funny and fits the line's theme, Annihilape is a great lore reference, and Kingambit fits with the rest of its line absolutely perfectly and has strong theme. I gotta say, I'm impressed.
124 notes
·
View notes
Text
Extremely Strong Shower Bench
I've gotten feedback from the community asking me to share my plans, so here it is. If you want to build your own shower bench, this is how you do it. Make sure to ask a thinno for help, this will not be easy to do!
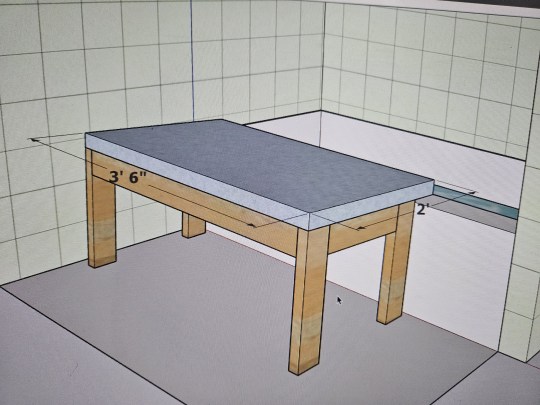
This is an extremely strong shower bench with a 1000+lb capacity. The floor under you will fail before the bench does! This shower bench is designed to remove you from the shower and basically have you sit on the ledge. You will need a couple feet of clearance away from your tub's ledge for it to work.
The top of my tub's ledge is about 1' 3⅜" up from the ground. If yours is taller/shorter by more than ¼" or so, you will need to make some adjustments to measurements down below.
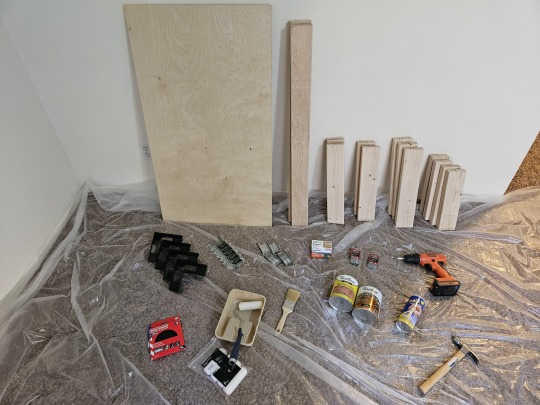
This is a photo of the materials I used to make this build. I got everything I needed at my local hardware store. My build wasn't perfect though. I would suggest you learn from my mistakes and acquire a slightly different material list though:
1x 2'×4' plywood sheet. Get something pre-sanded and rated for outdoor use. I recommend ¾" thick.
2x 8' 2×4s. Most any wood type will work, so get what you like most. I just got some normal 2×4s and made sure they looked pretty. If you don't want to bother with staining or weatherproofing the structure of your bench, get pressure-treated 2×4s.
4x 2' ½"×½" square dowel.
4x Simpson Strong-Tie RTC2Z. Get the black-powder-coated ones if you can.
2x Simpson Strong-Tie LUS24Z. These will be used for the cross beam.
4x Simpson Strong-Tie FB24Z. These will be the feet.
1x Simpson Strong-Drive SD9112R100 #9×1½" 100ct Connector Screws. You won't use the whole box. It comes with a bit.
4x 3" common nails.
32x 1½" common nails.
35x 1" brad/finish nails.
200-220 grit sandpaper.
Oil-based high-gloss polyurethane.
Small dense-foam roller & roller pan.
If you're applying stain, oil stain & staining brush for oil stain.
Liquid rubber. Get something that will provide grip.
Rubber-foam weather stripping. The thicker and wider, the better. I got 20' of 1¼"×7⁄16" and it worked great for me.
4x paper clips, hair ties, or something to hang the feet from.
A plastic tarp, thickness is more important than size.
As for tools, you really only need two things:
Hammer
Drill, ratchet, or socket screwdriver
OPTIONAL: File or knife
I also highly recommend some PPE. Get some cheap/disposable cleaning gloves, a mask of some type, hair ties for your hair, and an old change of clothes.
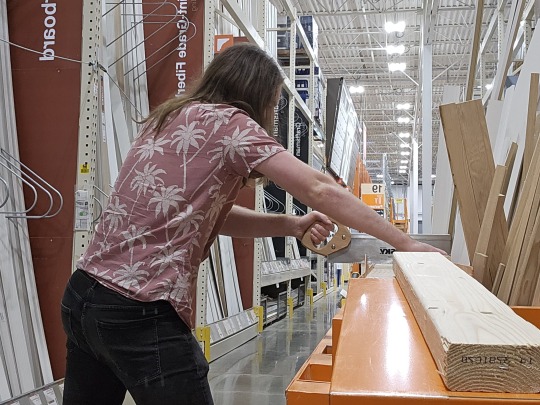
If you don't have access to a table saw at home, *don't leave the store yet!* You need to cut your wood at the store. Many home improvement stores will cut your lumber for you, either for free or for a low price.
Ask an employee to cut the two 2×4s like this:
2×4 #1: 38", 38", 17"
2×4 #2: 33½", 33½", 13", 13"
NOTE: If your tub ledge was taller/shorter than mine, then for every 1" difference, lengthen/shorten each 33½" cut by TWO inches.
Then ask them to cut two dowels down to 20½", and two down to 24".
You should also ask them to take 6" off the short side of the plywood, so it's 2'×3½' instead of 2'×4'.
You're not ready to leave yet! You need to make two more cuts, and the store employees will not help you with these. Many home improvement stores will have a DIY handsaw table where you can cut moulding down to length. You'll need to use this to make the last two cuts yourself.
You need to make an ANGLED cut into the 33½" boards. Lay the first 33½" board down flat as shown. On the edge closest to you, mark a point 1' 5⅛" away from the left end of the board. Then on the edge farthest from you, mark a point 1' 5¼" away from the same left end of the board. Position your saw across both points, and cut through the board. You may need to roll the board over to finish the cut.
NOTE: If your tub ledge was taller/shorter than mine, then for every 1" of difference, add/remove 1" from the 1' 5⅛" / 1' 5¼" measurements above.
For the second board, *do not measure!* It is more important that the cuts in the boards be identical than it is for any one cut to have exact dimensions. Lay the second board down, then set one of the cut pieces on top so the ends of the two boards are aligned, then use the existing angle in the cut piece to start the cut in the second board.

When you are done, you will have four boards, two slightly taller than the others, with the exact same angle cut in all of them. In the above photo, the boards are resting on their angled ends. These pieces will be your long and short legs.
NOW you can bring everything home.
First, lay down your tarp somewhere. Ideally you'll have access to a 5'×10' flat area outside.
Then you need to sand *everything* (except the big faces of the plywood, and the pressure-treated wood if you went that route). Pay special attention to the corners and cuts in the wood.
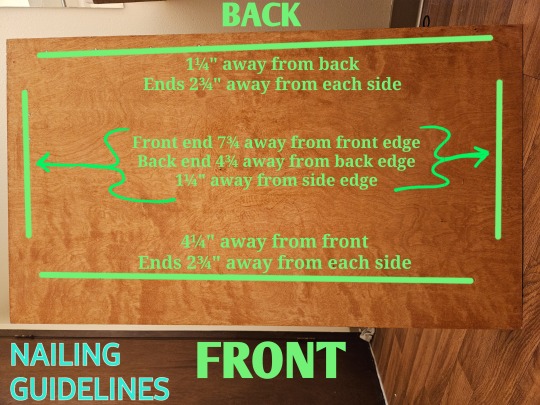
Now you need to attach the square dowels to the outside of the plywood board. Choose a face of the board to be the "up" face, the one you'll sit on. Put the 24" dowels on top, right along the short edges. Choose a long edge to be the back, and squeeze the two shorter dowels in along it between the side dowels. Nail everything down with the finish nails.
Next is staining, if you chose to stain. Apply according to the directions on the tin. You will likely have to do multiple coats.
Now the truly hard part, applying polyeurethane. I recommend using the foam roller for this and applying many coats. You can prop up the plywood sheet using the 2×4s if you like so you can get all the way around the edges in one pass. You'll still need to flip it over and do three more passes when done with the top, so you can protect the underside from warping.
While waiting for your polyethylene to dry, you may as well make the rubber feet. Grab your four FB24Zs and tie something through one of the holes in the end. Open your can of liquid rubber and follow the instructions to fully submerge each one before leaving it out to dry. One coat should be enough. Once dry, try to remove excess rubber from the inside using a file or knife.
When everything's had a good long dry (at least a day after final coat), it's time for assembly.

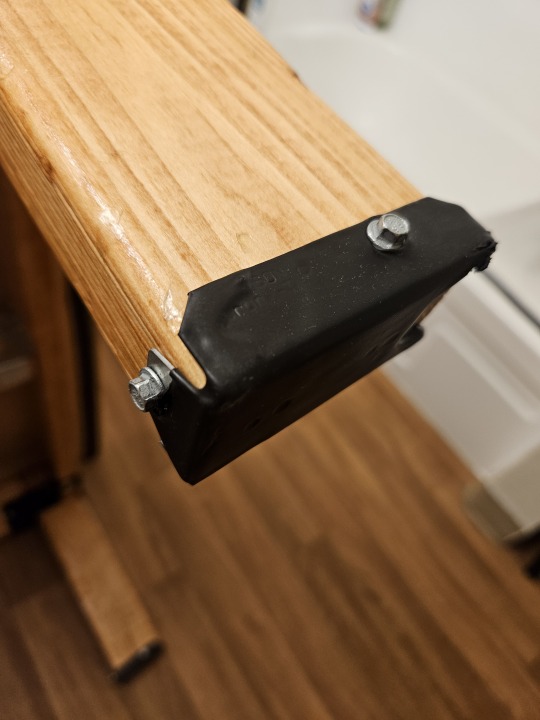
Grab your two 38" boards, your two 13" boards, all four of your legs, and your four RTC2Zs — everything except what's highlighted red in the first photo above. Set the 38" boards down on their narrow side along the long edges of the board, and the 13" boards down on their narrow side along the short edges of the board. Bring them together to form a rectangle, then set the RTC2Zs upside-down on the corners. Each RTC2Z has an L-shaped hole in its bottom; the top/bottom of each L-shaped hole will be filled by the ends of the 38" boards, while the center and left/right of each hole will be filled by the legs. The ends of each 38" board will butt against the wide side of the legs, while the ends of each 13" board will butt against the narrow side of the legs. Now make sure everything is pressed firmly together as you use the Strong-Drive screws to attach the RTC2Zs to the 38" & 13" boards. For each corner, four screws go into the 38" board and two screws go into the 13" board. *DO NOT ATTACH THE LEGS YET!* The legs are just here for spacing right now. Remove the legs when everything is attached.
Grab your 17" board and your LUS24Zs. The 17" board should squeeze in nicely right in the middle, turning your blocky 0 into a blocky 8. Straighten out your LUS24Zs if needed (mine were bowed outwards too much), set them down over the ends of the 17" board, and use 4 screws each to attach them to the sides of the 38" boards. Now grab your long 3" nails and use two on each LUS24Z, installing them at a 45° angle into the remaining holes. They'll nail at an angle into the 17" board and go straight through into the 38" board.
Flip everything over such that the plywood board is now resting good-side-up on top of the mostly-complete frame, with the whole thing resting on the rounded bottoms of the RTC2Zs. Center the frame between the left and right sides of the plywood (should be ½" overhang on each side); let the plywood's back overhang ½" off the back of the frame, and its front overhang 3½" off the front. Now use the 1½" common nails to nail in the plywood into the frame. I used four lines of nails, one for each outer board; measurements are in the second photo above.
OPTIONAL: Apply a final polyurethane coat over the nail heads. This will need a day or two to dry.
Screw the feet into the ends of the legs. See the third photo above for a reference. Try to make the feet as straight and snug as you can get them.
Insert the legs into the holes left from step 1. The short legs go in on the front side, and the long legs go in on the back side. You should have a bench that tilts slightly forward, to allow for water to drain into the tub. Use some sort of material as a spacer as necessary to adjust each leg to level out the bench. Don't be afraid to introduce gaps between the legs and the plywood; the metal connectors are what hold the weight. Once everything is nice and level, use six screws on each leg to attach then to the RTC2Zs.
Apply your rubber-foam stripping. I applied stripping all along the length of my tub's ledge AND along the underside of my bench.

And you're done! Your bench will look different than the photo above, I hadn't yet added the stripping, the wooden dowel siding, or the feet. And perhaps you chose a different stain color, or made your legs out of pressure-treated wood! In any case, this thing is built like a tank (made with actual home framing materials) and shouldn't break easily. I hope it serves you well!
16 notes
·
View notes
Text
Twin Famicom (NES model by Sharp)
The Twin Famicom is a video game console system that was produced by Sharp Corporation in 1986 (Juli 1) and was only released in Japan. It is a licensed Nintendo product that combines the Famicom (NES) and the Famicom Disk System into a single piece of hardware.
The essential parts of the Twin Famicom include a 60-pin socket for Famicom cartridges and a socket for Disk System disk cards.
The player could switch between the two media types with a switch – cassette "カセット" or disk "ディスク"
The Twin Famicom is fully compatible with the NES and can handle accessories made for the NES (e.g. Beam Gun). But there is also an extra port on the Twin Famicom. This allows a 'regular' Famicom to use the Twin Famicom's disk drive.

The original Famicom only has one color combination, and the Twin Famicom was initially sold in two colors: red with black highlights (AN-500R), and black with red highlights (AN-500B). A second version of the system was released in 1987 with a slightly different case design, turbo controllers, and two different color schemes; black with green highlights (AN-505-BK) and red with beige highlights (AN-505-RD).
Like the Famicom, the Twin Famicom uses NTSC but with an AV output rather than an RF modulator[2][3] with an RCA connector for composite video and mono audio, allowing for greater audiovisual quality on TVs and monitors with such inputs. An external RF modulator is bundled with the unit for connection through a TV's antenna/cable input. The two gamepads are hardwired into the console, so they cannot be disconnected.
Source: Wiki NES models
Check these out too if you are interested in retro computing


22 notes
·
View notes
Last Seen Blogs

dykemare
babbages

yokoyummy
everything's a love language

endoftheroadsoon
Horizon des possibles
dykemare
babbages

plaggos
*tikki voice* fuck