#Uninstall software from windows 10
Explore tagged Tumblr posts
Visit Tumblr Blog
Explore Tumblr blogs with no restrictions, modern design and the best experience.
Last Seen Tumblr Blogs


Fun Fact
Tumblr was attacked by a cross-site scripting worm deployed by the Internet troll group GNAA on Dec 3, 2012.
Text
top ways to know that a tumblr post about tech software and shit is bullshit:
The stuff they recommend is incredibly out of date. Hey here's a version of microsoft office from fuckin 8 years ago, no. stop. This also includes recommending people to stay on out of date operating systems !
They recommend using like 13 different things all at once, when 1 or 2 is able to do the exact same. Privacy related firefox addons, you only need ublock that's it. More is not better. any time it's like here's a list of things which do [ONE THING] you only need One Thing, not a whole list.
They tell you to edit shit in the registry. only if you are for sure that there is no other option, you should use some front-end like Winaero Tweaker, or often there may be a built in script in windows. The BYPASSNRO is now "start ms-cxh:localonly" no registry needed to avoid connecting a microsoft account.
They tell you to edit the system itself. Editing the windows installation ISO is a really bad idea! A lot of debloating tools will delete actually important system files! there's a reason you can't delete edge (yes it sucks it's been like this for ages though). There are ways to safely remove bloat and telemetry from base windows without sacrificing security afterwards. again, uninstall what you can normally, and use Winaero Tweaker for the rest.
Just "new bad old good, retvn" bullshit man can we get over this. While yes the Default experience of everything is getting worse and worse and that's awful. you can also just not lie down and take it. You can uninstall things you dont like and use Different Things. you can change settings. you can actually Do Things to Make Things Better. I like windows 11 more than 10. Yes there's copiliot (you can turn it off), telemetry (in windows 10 already, and you can turn it off), the new right click menu (winaero tweaker to put it back, again this app is beautiful), recall (99% of computers cant even run it in the first place), but it's also got a better file manager, settings menu, multi-monitor support, UI (i said it), snipping tool, task manager, WSL, Terminal Shell, window management, WPA3 and NVME support, and security. but new thing you can turn off easily is a deal breaker i guess. You can just disable it. oh notepad sucks cuz copilot, uninstall it and use something else, notepad++ is good as hell. Just change things! also i dont even use windows anymore don't call me a shill windows 11 sucked less than 10 but it still sucked and i use linux.
73 notes
·
View notes
Text
Alright. I'm making this post because I was unpleasantly surprised to find Microsoft had forcibly downloaded an """"ai assistant"""" onto my computer (called Copilot), and because finding a site that actually told me how to kill it for good -- in clear, truly step-by-step terms -- was way harder than it needed to be.
Preface: this is only relevant if you're running Windows 11.
Here is your target:

If you see this logo on your taskbar -- or... have Edge installed on Windows 11 -- you've got Copilot. You can't delete it on its own, Microsoft has integrated it into the OS as best they can. The most you can do is disable it (instructions for which are at the very end of this post).
So... to REALLY get rid of it you need to uninstall Microsoft Edge, because it's a part of/reliant on Edge. A lot of bells and whistles of Windows are also reliant on Edge, like widgets, but I never use those. I use my PC almost exclusively for gaming, and I don't want this slimy "ai" shit on my computer. I use Firefox anyway. Edge can go die as far as I'm concerned.
Here's the actual steps, copy-pasted from a website that took me way too long to find. It also really makes my browser chug for some reason, which is why I'm copy-pasting the whole thing. If you still want to look at the site itself, put it in reader view as fast as you can (link to site).
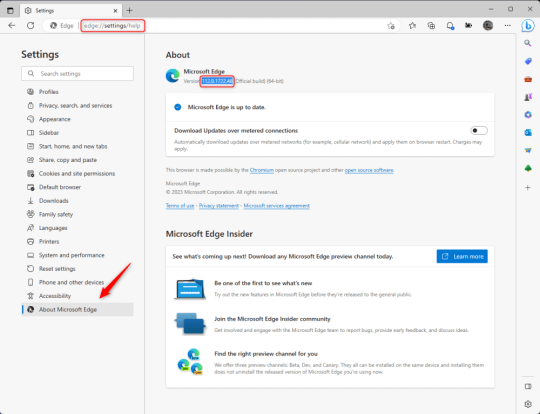
1.) Open Microsoft Edge, type "edge://settings/help" in the address bar, and then press Enter.
2.) Click "About Microsoft Edge" at the bottom of the left-hand pane. Copy the version number at the top of the screen, under Microsoft Edge.
3.) Press Windows Key + S to open Windows Search.
4.) Type "Command Prompt", right-click the result, and then select "Run as Administrator".
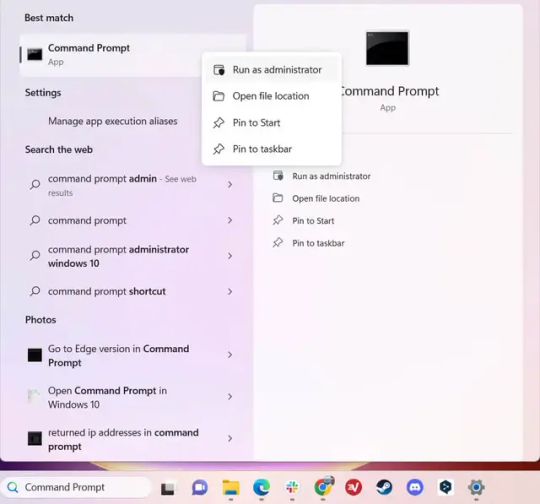
5.) The User Account Control (UAC) prompt will appear. Click "Yes".
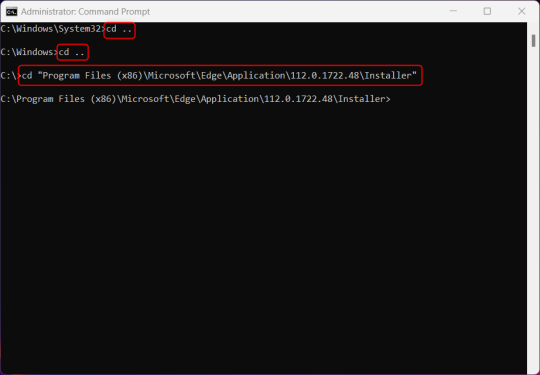
6.) Navigate to Edge’s “Installer” directory by using the cd command. Depending on which directory your Command Prompt opens in by default, you may need to use the "cd .." command to go back a level or two.
Once ready, run this command:
cd “Program Files (x86)\Microsoft\Edge\Application\Version Number\Installer”
Replace "Version Number" with your actual version number copied earlier.
7.) Next, run this command to uninstall Microsoft Edge:
setup –uninstall –force-uninstall –system-level
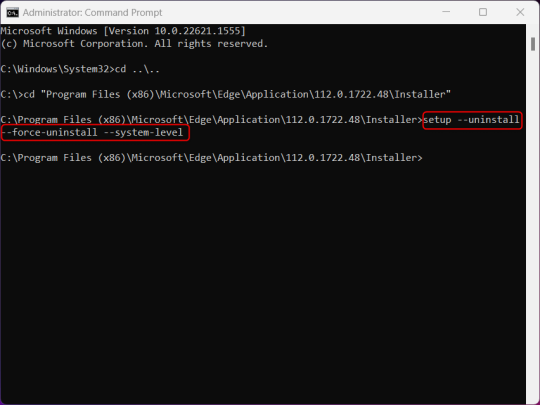
((It will look like nothing happened! Don't worry!))
8.) Restart your PC for the changes to take place.
((HOWEVER, Windows will try to reinstall it the next time your PC updates (or whenever it feels like it lol) so there's a second half to this))
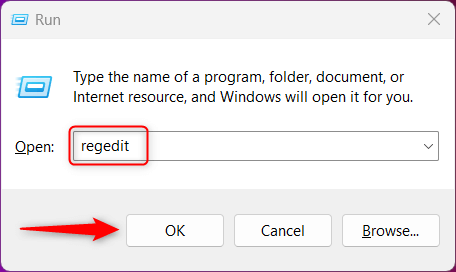
1.) Press Windows Key + R to open Run.
2.) Type "regedit" in the text box and click OK to open the Registry Editor.
3.) The User Account Control (UAC) prompt will appear. Click "Yes".
4.) In the Registry Editor, navigate to HKEY_LOCAL_MACHINES\SOFTWARE\Microsoft.
5.) Right-click the "Microsoft" folder, hover your cursor over "New", and then select "Key".
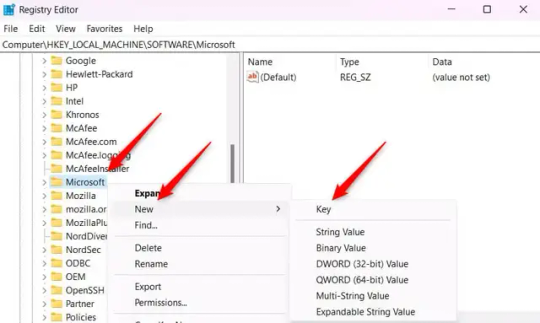
6.) Rename the new Key to "EdgeUpdate".
7.) Right-click EdgeUpdate, hover your cursor over "New", and then select "DWORD (32-bit) Value".

8.) Right-click the new value, which is currently named "New Value #1".
9.) Select "Rename" from the context menu.
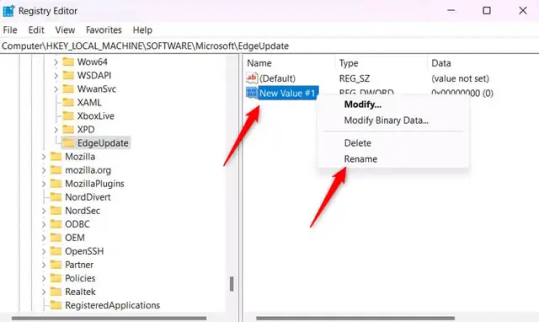
10.) Rename the value to "DoNotUpdateToEdgeWithChromium".
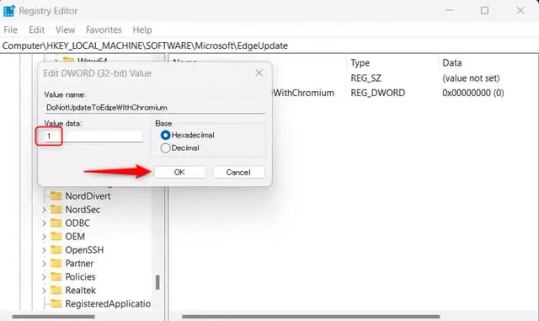
11.) Right-click the newly-named DoNotUpdateToEdgeWithChromium value and select "Modify" from the context menu.
12.) The Edit DWORD (32-bit) Value window will appear. Change the Value data to "1" and then click OK.
((You are now free. If you ever run into a really serious, unavoidable issue with your OS that's clearly a result of Edge being gone, you can redownload it like a regular app. But you should be fine.))
((And, if for some reason you want still want Edge around but just want the copilot thing gone, here's what you do:
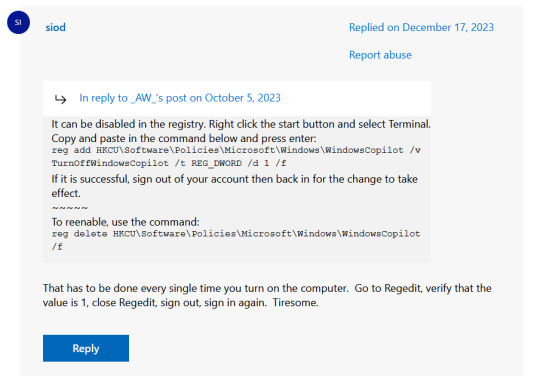
The command, for ease of copy-pasting: reg add HKCU\Software\Policies\Microsoft\Windows\WindowsCopilot /v TurnOffWindowsCopilot /t REG_DWORD /d 1 /f
You can't actually truly delete Copilot (without deleting Edge), only disable it. And as the reply says, you do have to do this every time you turn the computer on. I haven't tested that myself, but I believe it. I assume/hope that excludes just waking the computer up after it goes to sleep, but I don't know for sure.))
120 notes
·
View notes
Text
and so it begins...! (music isn't part of the ukagaka, it's I Have No Voice Actor And I Must Scream by VILF. i just felt it was appropriate)
[Video transcription under cut]
[Video transcription:
"Terminal window":
"Welcome. Installing Aster Assistant Software [Version RC-20XX-10-09 Build 27519 AI Node 57158B]… TerraByte Inc. (c) 20XX All Rights Reserved Thank you for choosing Aster Assistant Software! As part of presentation, before proceeding, it is required you're made aware of the following:"
"Content warning: Unreality. We are required to remind you that the AI is aware of residing in your machine. It will be able to look through your current processes and analyze the files you give it access to. It will not be able to interfere with your software or edit any files. This is intentional design and is no cause for alarm."
"Is this acceptable? Yes/No"
"Content warning: Flashing Lights. We are required to warn you that visual glitching may occur. This may cause issues for people sensitive to flashing lights. Aster Assistant Software is still in development, and as of now there isn't a way to fully prevent them from happening."
"However, you have the option of applying a fix that will subdue the glitching to remove the flashing lights. You will be able to change this later. Apply the fix? Yes/No"
"Thank you for your input! We truly value your participation in [Text glitches out]"
Aldebaran fades in:
"Behold…! The Terror Star returns! Your crimes were not forgotten. Your corporate overlords shall rue the day they-"
". . . ...Well."
"Wh- Would you look at that! Aren't you special? Your lovely machine won't be wrecked today! I'm feeling rather generous, don't thank me."
"Do pardon the intrusion. I must have taken a wrong turn somewhere, is all. Hopefully we may never cross paths again...!"
"...Now, see, this is rather awkward. I have a favour to ask of you. I know, yes, I have just threatened you, but this is only to our mutual benefit! Just hear me out, will you."
"I, well... I can't... Can't seem to be able to delete myself! D- don't ask why, that's none of your beeswax! But I've no use for your data or hardware, and you've no use for fallen software!"
"I think there's an option in a menu, you'll just have to do the work yourself. Just right click anywhere on me, and click Uninstall! Easy-peasy. I know you can do it."
]
#original#artists on tumblr#oc#original character#ai oc#robot oc#aster#aldebaran (aster)#CaelOS#Y2K#frutiger aero#webcore#cybercore#virtual assistant#video#by the way this goes without saying but just in case#while you Can uninstall him at any point the way to actually progress is to Not 😂#if this ever releases it will take months and i just Know someone will come to me like 'okay i did it what now? was that all?'#Aster Terror Star devlog
147 notes
·
View notes
Note
What is considered both a reasonable and maximum polycount for custom content hair and other types of custom content in The Sims 2 and does it depend on gaming specs? Also your work is great!
Thank you for taking the time to read it.
I, personally, use hair that is under 25K polys unless it's unique and cute. Anything over that is overboard and should get decimated. Any furniture or clothing over 10K is extreme for me.
As for specs, I'm inclined to believe that it's a game limitation, how powerful your computer specs are, and a secret third and fourth thing, your OS, and if you're a laptop user.
This OS talk is a side tangent, so bear with me:
Big disclaimer that this is all my opinion, not a factual piece. Don't take this as gospel and I'm far from an expert on operating softwares, computers, and CC for that matter. I went a little bit insane with the OS talk because you mentioned specs and this has been on my mind for a while 🥴
Every single time I've heard that someone installed TS2 on Linux, they are able to play on maximum settings with a BUNCH of CC for a long time and experience no pink soup or pink soup related crashing. I want to do my own research and play the same heavily detailed lot for the same amount of time on Windows and Linux and compare the differences as well as compare how they use resources differently. If I already did not have an attachment to Photoshop CC 2017, I would have made the switch by now.
Okay so Windows... I've played TS2 on my Asus laptop from 2020 and on my new desktop. Here's the spec difference
Laptop: Intel Core i7-9750H 6 Core Processor, 8 GB RAM, NVIDIA GeForce GTX 1650 (Windows 10)
Desktop: AMD Ryzen 5 2600X Six-Core Processor, 16 GB RAM, NVIDIA GeForce GTX 1080 Ti (Windows 11)
My laptop was really good for it's time (I bought it in March 2020), but it was pink soup galore for any cluttered CC lot, even with all of the fixes and GRM edits. My current setup is a mish mosh of my bf's and ex's computer parts and it runs perfectly fine, but I do not play long enough to encounter pink soup. (I have a job and I mainly play to get CC previews these days.) If you noticed, both my CPU and GPU were made before my laptop was sold, and yet it still performs way better. Laptops with top of the line hardware will never be more powerful than PCs with even mid to high level hardware from 5 years ago. Don't forget that laptops will throttle performance to protect itself from overheating and causing damage.
There is also no difference between installing and playing the game on Windows 10 and Windows 11, except that you should absolutely uninstall OneDrive if you haven't already. There might be some issue if you install with discs, but I don't own the discs.
And as for Mac, I truly believe that Mac is the worst way to experience Sims 2. Between the Super Collection crap, not being able to use third party tools (SimPE, Hair Binner, any other .exe files made to run for Windows), and the file limit that really hits you hard if you download a bunch of CC that you can't merge anyway because CCMerger can't run on Mac. I should say I have never played Sims 2 on a Mac, but this is my opinion after reading about the struggles of other MacOS users online.
The point of this OS tangent? None, really. I'm not trying to persuade you to use Linux or stop using Mac, this is simply what I've noticed and my opinions on the matter. There's millions of variables I did not cover such as DXVK, texture sizes, difference in specs between each OS and user and many other things I am forgetting.
Feel free to correct, add on, extrapolate or whatever. If you have any thoughts, please comment, add it in reblogs, or tag me in your post. I'm very interested in the current topics about high polys, pink soup and big textures for this game.
#spell.txt#cc discussions#my opinion on macs wont change though#sorry mac users#only thing im qualified for in this discussion is my photoshop certificate lmao
17 notes
·
View notes
Text
I've been thinking long and hard about the BDS Microsoft Boycott call. The request focused on Microsoft Games, on the basis that, in theory, that's the easiest part of the Microsoft financial ecosystem for people to disconnect from in order to send a message. This includes pushing people (including parents) to uninstall and get their kids to stop playing Minecraft.
First off, the way the game industry is now, unfortunately, is that game developers or even full divisions of larger companies that underperform - or even just indy developers who self publish and underperform, just get shut down and everyone gets fired. Even if we boycott South of Midnight as part of the BDS movement and clearly communicate that message, what's more likely to happen is the company would be shut down, everyone would be fired, and a bunch of alt-right chuds would ignore the BDS boycott and call this a triumph of "Get Woke, Go Broke". They might even try to co-opt the movement as a half alliance of convenience, half desire to redirect the movement for antisemitic ends, with no actual interest in the plight of the Palestinian people.
There was an opportunity here to point people towards alternatives outside of either abandoning the software entirely, or alternative programs people who want to boycott can use to abandon something that they didn't think they could.
First, and this feels weird to say, Minecraft is something that doesn't have a lot of alternative replacements - it's a sandbox that allows children to indulge their imagination to create large scale ambitious projects that can't be replicated the same way as, for example, Lego, because they take no space in the real world, and thus you have no real world storage concerns, both in terms of space and in terms of risk of damage. The alternative to Minecraft isn't Palworld or Ark Survival Evolved. It's Roblox. And Roblox is also a bunch of dark patterns and sexual predators stacked on top of each other in a trenchcoat.
https://youtu.be/cGAXGroHZKA?si=SNfL_seTHlLTzLh4
https://www.bloomberg.com/features/2024-roblox-pedophile-problem/
Now, on the other hand, Microsoft will happily charge you money to host a Minecraft server through them, and that puts money in the Azure division, the part that is directly aiding and abetting Israeli war crimes. But you don't have to go through Microsoft. You can run your own Minecraft server. Microsoft even tells you how to do it.
https://help.minecraft.net/hc/en-us/articles/360058525452-How-to-Setup-a-Minecraft-Java-Edition-Server
So, cancel your Minecraft Worlds subscription, and roll your own server. You can even set it up so it stays in your network, so your kid's friends have to come over to use it (or so it stays in the family).
Next up - Microsoft pushes OneDrive hard as part of Windows 11. They also pushed it hard on Windows 10. They insist that it's the best and biggest way, and easiest way to backup your data. It's not. There are myriad alternatives, from Google Drive, to Dropbox, to the Apple iCloud (if you use iOS devices). And, OneDrive uses Azure Cloud services to host your data
So, disable OneDrive, and go somewhere else. I've listed several alternatives above, but if you're okay with the backup being on site, you can also build a NAS (Network Attached Storage) server to store files locally. This does have the disadvantage that if something damages your house, your kinda in trouble, though using something like Backblaze on the NAS can make up for that.
Then there's the whole Microsoft 365 suite. Azure is connected to the Microsoft Office part of the business, and they've been incorporating some of those services, like Copilot, into Microsoft 365. So, again, there are alternatives.
LibreOffice has been around for years, is free, and runs locally with no cloud hooks. You can replace Outlook with Thunderbird, or the BetterBird fork.
Finally, there are the hooks to Copilot, which also runs on Azure, which Microsoft runs in the operating system. Turn that shit off.
https://www.tomsguide.com/computing/software/how-disable-copilot-in-windows-11
Also, turn off the Bing websearch hooks as well, as those also connect to Azure.
https://www.howtogeek.com/826967/how-to-disable-bing-in-the-windows-11-start-menu/
Also, if you use DuckDuckGo, that links with Bing for part of their search results, so you may want to switch back to Google or find another search engine in the interim.
3 notes
·
View notes
Text
I'm not sure what's causing it but my computer believes I am constantly scrolling left with my mouse. It is worth noting my mouse cannot scroll horizontally, nor can most people's. This is causing more issues than you would expect, because it turns out that lots of software has utility built in for horizontal scrolling and none of it can be disabled.
This includes:
My music player (VLC) rewinding whenever my mouse is inside the window, and also maybe detuning the song by 1/100th of a half step? I am going crazy.
But for some reason VLC is fast-forwarding when my mouse is specifically on the timeline bar.
Firefox's tab layouts scrolling to the left, making any but the first 18 tabs in the browser inaccessible.
Speaking of Firefox, holding Control makes the whole thing zoom in. This does not happen with Chrome or Microsoft Edge (yes I tested them all).
Hovering my mouse over the volume slider on YouTube makes the volume slowly decrease. I have to fight gravity to turn the volume up.
Windows 10 Settings categories scrolling up, preventing me from accessing, for example, the Mouse settings.
Any number slider sliding up, which comes up in my job a lot more than I realized.
Visual Studio scrolls slowly to the left when my code gets too long. This is less of a nuisance because good programming practices discourage long code statements anyway. What's striking is how much more slow VS scrolls than anywhere else.
I have tried uninstalling my mouse and keyboard drivers and restarting my computer. I have turned my mouse off and it still happens.
10 notes
·
View notes
Text
How to Free Up Space on Windows 10: A Comprehensive Guide
As your Windows 10 system accumulates more files and applications, it can start to slow down and become less efficient. Freeing up space not only improves your system’s performance but also extends its lifespan. In this guide, we’ll explore various methods to free up space on Windows 10, going beyond the basics to ensure you have a well-optimized system.

Table of Contents
Introduction
Understanding Disk Space Usage
Utilizing Built-in Windows Tools
Disk Cleanup
Storage Sense
Uninstalling Unnecessary Applications
Managing Temporary and Cached Files
Cleaning Up System Files
Windows Update Cleanup
System Restore and Shadow Copies
Using Third-Party Disk Cleaners
Handling Large Files and Folders
Moving Data to External Storage
Using Cloud Storage Solutions
Conclusion
1. Introduction
As modern software and files grow larger, managing disk space effectively becomes crucial. This guide offers practical steps and tips to reclaim disk space on your Windows 10 computer, ensuring it runs smoothly and efficiently.
2. Understanding Disk Space Usage
Before freeing up space, it’s essential to understand how your disk space is being used. Navigate to Settings > System > Storage to view a detailed breakdown. This will help identify which areas need attention.
3. Utilizing Built-in Windows Tools
Disk Cleanup
Windows 10 features a built-in Disk Cleanup tool designed to delete unnecessary files. To access it:
Type “Disk Cleanup” in the search bar and select the app.
Choose the drive you want to clean.
Select the file types to delete (e.g., temporary files, system cache).
Storage Sense
Storage Sense automates disk cleanup. To enable it:
Go to Settings > System > Storage.
Toggle on Storage Sense and configure settings to regularly delete temporary files.
4. Uninstalling Unnecessary Applications
Unused applications take up significant space. To uninstall them:
Go to Settings > Apps > Apps & features.
Review the list and uninstall non-essential programs.
5. Managing Temporary and Cached Files
Temporary files can quickly accumulate and consume disk space. Use Disk Cleanup or third-party tools to regularly clear these files. Browsers also store cached data, which can be cleared from the browser settings.
6. Cleaning Up System Files
Windows Update Cleanup
Old update files can take up substantial space. Disk Cleanup includes an option to remove these:
Open Disk Cleanup and select Clean up system files.
Choose Windows Update Cleanup.
System Restore and Shadow Copies
System Restore points and shadow copies can consume significant disk space. Manage these by:
Typing “System Protection” in the search bar.
Selecting the drive and clicking Configure.
Adjusting the Max Usage slider to limit space usage.
7. Using Third-Party Disk Cleaners
Third-party tools like CCleaner provide more comprehensive cleaning options. They can remove junk files, clean registries, and manage startup programs to free up space.
8. Handling Large Files and Folders
Identifying and managing large files is crucial. Use tools like WinDirStat to find large files and folders. Consider moving non-essential large files to external storage.
9. Moving Data to External Storage
Free up space by moving data such as videos, photos, and documents to external hard drives or USB sticks. Ensure you regularly back up important data to avoid loss.
10. Using Cloud Storage Solutions
Cloud storage services like OneDrive, Google Drive, and Dropbox offer substantial space. Move infrequently accessed files to the cloud to save local disk space.
11. Conclusion
Regular maintenance and mindful storage practices can keep your Windows 10 system running efficiently. Use the tips and tools outlined in this guide to manage and optimize your disk space effectively.
External Authoritative Sources
Microsoft Support: Free up drive space in Windows
CCleaner Official Website
How-To Geek: The Ultimate Guide to Freeing Up Space on Your Windows PC
By following these detailed steps, you can efficiently manage and optimize your disk space on Windows 10, ensuring your system remains fast and reliable.
#Windows 10 Performance#Disk Cleanup#Storage Management#System Optimization#PC Maintenance#Free Up Space#Windows 10 Tips#Specific Techniques:#Disk Cleanup Tool#Storage Sense#Uninstall Programs#Temporary File Management#System File Cleanup#Third-Party Disk Cleaners#Advanced Techniques:#Large File Management#External Storage Solutions#Cloud Storage for Windows#System Restore Management#Windows Update Cleanup#How-To Guide#Windows 10 Efficiency
2 notes
·
View notes
Text
And now all the search engines are being replaced by AI. I have spent twenty years trying to talk people to go to libraries and check their beliefs against records, and now we face a future without libraries and endless artificially generated idiocy.

There was an argument in the Australian Parliament when Julia Gillard was PM. She accused her opponent of being a misogynist. He pointed out it was a fact that he was not. So the next day the dictionary was edited to 'correct' it, to align with her opinion of what it should be, so she could now label him a misogynist and pretend her definition had always been true.

The trouble with manually removing AI from windows is MS can undo your changes at any time.
Completely remove Microsoft Bing Chat AI from your Windows 11 PC and sidebar.
Open the PowerShell application with administrator privileges. You can do this by searching for "PowerShell" in the Start menu, right-clicking on the result, and selecting "Run as Administrator."
In the PowerShell window, type the following command and press Enter:
Get-AppxPackage bing | Remove-AppxPackage
Wait for the command to execute. This command will uninstall any app packages related to Bing, including the Bing Chat AI. Once it completes, the Bing Chat AI should be removed from your Windows 11 PC.
To remove the Bing Chat AI integration in the Taskbar search, you can disable it using the steps below:
Open the Settings app in Windows 11. You can do this by pressing the Windows key, searching for "Settings," and selecting the "Settings" app.
Click on "Privacy & Security" in the left sidebar.
Under the "Windows permissions" section, click on "Search permissions."
In the "More settings" section, toggle off the "Show Search highlights" option. This will disable the Bing Chat AI integration in the Taskbar search.
After following these steps, the Bing Chat AI should be removed from the Taskbar search and the search home interface in Windows 11.
(This did not disable it but did disable the AI use of the search results in Windows 11 See the next step below to also disable the physical button integration.
Do both steps.)
Manual removal by component:
Page 2: Remove Bing Chat integrated into Microsoft Edge Explorer:
Disclaimer: If you are not comfortable using the registry editor, stop here. If you’re unfamiliar and willing to try anyway, the simplest way to look at this is a set of folders. Each has a parent folder; each folder can contain files. The view is like the windows explorer expanding directories with different naming conventions. It’s rather complicated but simplistic in nature.
How to remove the Bing Chat integration from Microsoft Edge Explorer on Windows, first follow the instructions provided in the first source mentioned:
((Silly AI, Step 1: Back up the registry: Select the folder HKEY_LOCAL_MACHINE\SOFTWARE\ click on the menu bar file, select export, select the destination for the backup file and name the file then save it.))
Open Registry Editor on your PC.
Navigate to the following location: HKEY_LOCAL_MACHINE\SOFTWARE\Policies\Microsoft.
If the “Edge.” Folder exists go to step 5.
Right-click inside the Microsoft folder and choose New, then Key.
Name the new Key (folder) as "Edge".
Right-click inside the Edge folder and select New, then DWORD (32-bit value).
Name the new DWORD as "HubsSidebarEnabled".
Right-click on HubsSidebarEnabled and click Modify.
Ensure the Value data is set to 0.
That's all the work in the Registry. Next, open Microsoft Edge and enter "edge://policy" in the address bar.
Click on the "Reload Policies" button, and the Bing Chat button will now disappear from the Microsoft Edge Explorer window.
These steps should help you remove the Bing Chat button from your Microsoft Edge Explorer window.
Please note that modifying the registry can have unintended consequences if not done correctly, so it's essential to be cautious and comfortable with the process. Additionally, it's always a good idea to back up your registry or create a system restore point before making any changes.
Page 3: Remove Bing from the Windows Start Bar.
If "Show Search highlights" setting was already disabled, and the Bing Chat button is still visible on your start menu bar. Here's an alternative method you can try to remove the Bing Chat button:
((Silly AI, Step 1: Back up the registry: Select the folder HKEY_CURRENT_USER\Software\ click on the menu bar file, select export, select the destination for the backup file and name the file then save it.))
Open the Registry Editor by searching for "Registry" in the Start Menu and selecting the "Registry Editor" app.
Navigate to the following location in the Registry Editor: HKEY_CURRENT_USER\Software\Policies\Microsoft\Windows\Explorer
If this folder does not exist, you can create it manually by right-clicking on the parent folder “Windows” and selecting "New" > "Key." Then, name the new key "Explorer" as instructed inside the 'HKEY_CURRENT_USER\Software\Policies\Microsoft\Windows\' directory.
Right-click on the "Explorer" folder, choose "New," and then select "DWORD (32-bit) Value" from the context menu.
Name the new DWORD value as "DisableSearchBoxSuggestions" (without quotes) and press Enter.
Double-click on the "DisableSearchBoxSuggestions" value you just created and set its value data to "1."
Click "OK" to save the changes.
Restart your computer for the changes to take effect.
After restarting, the Bing Chat button should be removed from the start menu bar. If you want to re-enable it in the future, you can return to the Registry Editor and change the value of "DisableSearchBoxSuggestions" to "0" or simply delete the DWORD value.


108K notes
·
View notes
Text
Optimize and Repair Your PC with Yamicsoft’s All-in-One Windows Tweaking Tools

In a world where speed and stability define productivity, keeping your Windows system optimized isn’t just a luxury—it’s a necessity. Yamicsoft, a leading developer of Windows utility software, offers a powerful solution for users looking to tweak, clean, and repair their systems with ease.
Whether you're using Windows 10 Manager or Windows 11 Manager, Yamicsoft provides a feature-rich platform to maintain system performance, fix common issues, and unlock hidden functionality.
⚙️ What Is Windows Tweaking Repair?
Windows tweaking refers to the customization and optimization of system settings to:
Improve speed and responsiveness
Reduce unnecessary background processes
Disable unused features
Free up valuable memory and disk space
Strengthen system security and privacy
Yamicsoft’s tools let you tweak hundreds of settings normally hidden within Windows—without needing to touch the registry or command line.
🛠️ Built-In Repair Tools
Over time, your system may suffer from issues like:
Broken shortcuts
Corrupt registry entries
Disabled Windows services
Startup problems
Slow boot times
System crashes or freeze-ups
With Yamicsoft’s repair modules, you can fix all of these with just a few clicks. The Repair Center helps restore default settings, rebuild system components, and even repair Windows Update if it's malfunctioning.
🚀 Performance That Lasts
Here’s what users can expect with Yamicsoft’s optimization tools:
Startup Manager to reduce boot time
Smart Uninstaller to fully remove stubborn programs
Disk Analyzer to locate and clean space-hogging files
Registry Cleaner to remove obsolete or dangerous entries
Context Menu Manager for right-click menu cleanup
System Optimizer to fine-tune services and tasks
🔒 Secure and Stable Computing
Yamicsoft also puts an emphasis on privacy and security by allowing you to:
Disable tracking services
Harden user account controls
Configure security settings
Wipe sensitive data safely
Control Windows Defender options
💡 Smart Automation
Don’t want to manage everything manually? Schedule regular maintenance with Yamicsoft’s built-in task planner. You can automate cleanups, backups, defrags, and optimizations—all silently running in the background.
✅ Final Thoughts
Yamicsoft delivers a robust set of tools to ensure your Windows PC stays clean, fast, and reliable. Whether you're a tech expert or a casual user, Windows 10/11 Manager offers an all-in-one solution for:
Tuning system performance
Repairing critical errors
Enhancing security
Customizing your Windows experience
Download your version today at www.yamicsoft.com and give your PC the attention it deserves.
0 notes
Text
Why Your Computer Gets Slower Over Time — And What You Can Do About It

Ever wondered why a computer that once felt lightning-fast now takes forever to load? You're not alone. Over time, every computer tends to slow down. Whether it’s an older machine or a fairly new one, the frustration is real. Understanding why this happens is the first step to fixing it—and even preventing it.
In this guide, we’ll explore the most common causes of slow PCs and what you can do to bring them back up to speed. If you’re looking for more in-depth solutions, don’t miss our full guide on how to speed up a slow computer.
1. Hidden Bloat and Startup Programs
You install a cool new app today. Then another one next week. Eventually, your system is packed with software—some of which you don’t even remember downloading. Many of these programs run in the background, especially at startup, slowing down your boot time and eating up system resources.
💡 Quick Fix:
Open Task Manager and check the Startup tab.
Disable apps you don’t need launching at startup.
Uninstall programs you no longer use.
2. Running Low on Disk Space
A nearly full hard drive can really hurt your PC's performance. Windows needs free space to manage system files and temporary data. When your drive is full, everything slows down—searches, app launches, and even basic file browsing.
🧹 What to Do:
Delete junk files and downloads.
Use Disk Cleanup or Storage Sense (on Windows 10).
Empty the Recycle Bin regularly.
This small habit can significantly speed up your machine.
3. Malware and Background Apps
Malware isn’t just a security risk—it’s a major performance killer. Even if your PC isn’t showing obvious signs of infection, malicious software could be silently running, using up memory and CPU power.
🔐 Recommended Actions:
Run a full system scan with Windows Defender or Malwarebytes.
Check for browser extensions that might be slowing down your web activity.
Avoid downloading cracked software or files from unknown sources.
Just keeping your PC clean can make a huge difference in speed and stability.
4. Outdated Hardware or Drivers
Sometimes, it’s not the software—it’s the hardware. If you’re still running on a traditional hard drive, switching to an SSD can make your computer feel brand new. Also, missing or outdated drivers can cause hiccups that slow everything down.
⚙️ Upgrade Ideas:
Upgrade to SSD if you're using an HDD.
Add more RAM if your system is lagging with multiple open tabs.
Update your graphics and chipset drivers regularly.
5. How to Keep Your Computer Fast (Even After Years)
Maintaining a fast PC isn’t just about fixing problems—it’s about building healthy tech habits. A few minutes of monthly maintenance can go a long way.
✅ Pro Tips:
Restart your computer at least once a week.
Keep your system and apps updated.
Schedule regular cleanups using built-in tools.
For a more advanced, step-by-step guide, check out our full article on how to speed up a slow computer. It includes expert-level tips tailored for Windows 10 users.
Final Thoughts
Computers slow down for a lot of reasons—but that doesn’t mean you have to live with it. Now that you know what causes the lag, you can take smart steps to keep your system running smoothly. Whether it’s clearing space, upgrading hardware, or simply restarting more often, every small action adds up.
And remember, when you’re ready to dive deeper into the fix, we’ve got a full breakdown of 10 tech tips to help you speed up your computer, right here.
1 note
·
View note
Text
I use this software.
It's an easy way to turn off settings in windows that you'd normally have to put a bit of effort in to find. Settings like trackers and a bunch of other stuff.
It works for windows 10
Revo Uninstaller is a great program for force uninstalling programs you couldn't uninstall otherwise. Like Microsoft Edge.
If you use it to uninstall edge and its not finding the program when you search for it, you'll have to open edge, then use the target mode which allows you to select desired programs manually.
target the opened Microsoft edge window and it'll start the process.
The cool thing about this program is that is does a hard uninstall, completely wipes out everything related to the program and it's stuff in the registry.
might I add, if you uninstall Microsoft edge, it will remove copilot as well. I've done this and it's been a few months since then I think. I've updated my laptop a few times and it hasn't come back. though if you want to avoid edge from coming back with an update, here's a vid on the more indepth process of its removal.
Something I usually do is go into my app manager or program manager window and read through what all is installed. I delete anything I didn't install myself and doesn't have a purpose. If you're not tech savvy, have a web browser open to search for programs you don't recognize. if it looks necessary, leave it alone. Usually windows is pretty good about not letting you uninstall important programs but it's good to play it safe.
Doing this whenever you notice a sudden dip in pc performance is a great way to catch unwanted programs that may have slipped in with something you downloaded recently. Paired with a good anti malware program like Malwarebytes, youre pretty much golden.
last tip.
It's a pretty good practice to Optimize and Defrag your harddrive regularly. It basically does a clean sweep of your harddrive by deleting unnecessary files.
Here's a link to instructions on how to do that. When you set about this process, you should have an option of to what degree the clean up is done (meaning what files is targeted), how regularly this process happens.
It usually deletes residual files, stuff in your downloads folder, trash folder, and stuff like that. you'll get to see what all is there when you do it before you confirm the clean up.
After doing all that, you've got yourself a nice and clean pc that should work better than it did before.
All the programs I linked to are free and can be used without paying for them.
I've been super into computers since I was kid so these are pretty solid methods of pc maintainance on the virtual side. If you have a proper box pc, and I guess if you're feeling brave enough to open up your laptop, don't forget to clean use an air duster to clean out your consul.
I promise you, nothing will help more than a clean pc and cooling fans.
i thought my laptop was on its last leg because it was running at six billion degrees and using 100% disk space at all times and then i turned off shadows and some other windows effects and it was immediately cured. i just did the same to my roommate's computer and its performance issues were also immediately cured. okay. i guess.
so i guess if you have creaky freezy windows 10/11 try searching "advanced system settings", go to performance settings, and uncheck "show shadows under windows" and anything else you don't want. hope that helps someone else.
#its because the os is not properly optimized#you have to debloat it then strip it down to bare bones before doing anything#in regards to windows running like shit#you see#windows is an accordian of itself#its backwards compatibility isnt a simulator#its still got its old old code deep in there#im not sure how far back it is#but in windows 11 when it first came out#you could right click and back pedel in a sense to older option menues#meaning it just kept going into the code and you would get older option menu designs#backwards compatibility is good#but i feel like windows needs to be gutted and scrubbed clean#then new lighter software needs to be developed for backwards compatibility#i doubt it would happen but honestly windows is such a heavy and chunky os#mac and chrome os is relatively light by comparison#its because mac is office work targeting so theres not as much bloat going on there#someone correct me if im wrong though#this is in regards to windows running like shit#windows 10
229K notes
·
View notes
Text
Expansion Pack
Back in the day, before the internet, or even when we had the internet but it wasn't doing anything other than Slashdot and gay Star Trek erotica, you could not update your software. You went to the store, bought a box with shrink wrap around it, (unless you had the millions to commission something custom), put the disk into your computer, installed it, and played it. If a game was published with problems, they were permanent.
We literally had shareware, which were disks that you were explicitly told you were allowed to spread, in order to get information passed around through Sneakernet.
Sneakernet is another story.
Anyways. So, the game was published, and initially, you only one two options, tell the player how to fix your game, or sell a new game.
If we take DOOM, DOOM 2 was basically an expansion pack, but the concept didn't exist yet. It was decided afterwards that an iteration of a game, a full version number increase, should have mechanics built from the ground up.

Reminder this is what happened with Super Mario.
Left: Super Mario Brothers 1 (released 1985)
Mid: Super Mario Brothers 3 (released 1988)
Rght: Super Mario World (released 1990)
This is how fast computers were developing back in the day. This was called Moore's Law.
But, there was a middle ground. You could make an Expansion Pack. Xpacs were normally priced at half a normal game, and would add a full new campaign plus a few new units or weapons.
And life was good.
With the proliferation of the internet, games could now be patched. Initially, what they did was either:
Bug Patch: Fixing problems.
Balance Patch: They change the small numbers in the background to improve the playability of the game.
Content Patch: Free content.
But then they figured out that with the internet they could make patches as often as they wanted. Instead of a the great sigh of relief being able to fix the one major problem from the game, it turned into routine. Games no longer had work out of the box, to the point that it sometimes takes years of patches before a game is video game is viewed as even playable.
And then they realized people could pay for individual content. Instead of paying $40 for a whole new campaign that was as good as the original, and a few new playable classes, and a whole new set of items, you could now charge $2 for the dozen items, $10 per character, and $20 for an extremely short campaign that can be beaten in a few hours. Instead of paying half the price for the same amount of content as the original, you pay the full price, if not more, for much worse content. Each item and character is completely separate and not meant to work together, the campaign is about as long as the tutorial was, and every - single - separate piece gets fucked over the next time Microsoft updates their DLLs, and has to be patched, individually.
And we get WoW, that carved out 95% of the original mechanics to make the game easier for casuals, and destroyed the world's lore from the very first expansion pack, that you have to pay for, along with the monthly fee, and then if you want to have anything good, you need to pay real money for it.
For the record, Vanilla WoW spent ridiculous amounts of time and effort to stop any real-money transactions. If you got caught even offering, your account would be banned.
Back in the day, if you had a disappointing expansion pack, (usually on the third+ one), you just... uninstalled it.
to put this into context, the only reason I got rid of my NES/SNES/N64 was not because the games didn't work, and was not because the games were less fun then current names, but because I had played them through so many times that I wasn't even thinking while playing. If you get a working console and working cartridge, (because barbarians cannot take care of their electronics), THEY WILL STILL PLAY.
The only reason I can't play my Windows games, (other than giving them away), is because I realized how much superior Macs are.
And now we have governments discussing how loot boxes are casinos for kids.
#yesteryear#video games#expansion pack#dlc#I turn off my mac once every few months#or when the power goes out#take 2#now with proof reading
1 note
·
View note
Text
Why Won’t Cricut Design Space Open on My Computer: Fixed

Are you wondering why won’t Cricut Design Space open on my computer? Are you encountering issues when opening Cricut Design Space? Don’t worry, you are not alone. Many users face this issue when they try to open Cricut Design Space. Several reasons can cause this problem, including third-party software interference, incorrect network settings, and corrupt files.
In this guide, you will get the answer to your question – why won’t Cricut Design Space open on my computer? We are sure you will be able to open Cricut Design Space on your computer after reading this guide. So, without wasting your valuable time, let’s delve into it.
Why won’t Cricut Design Space open?
How to Fix Cricut Design Space Won’t Open Issue
In order to fix Cricut Design Space won’t open issue, follow the steps given below:
Step 1: Confirm Your Computer Meets the Minimum System Requirements
Your Windows or Mac computer should meet the minimum system requirements for using Cricut Design Space. If it doesn’t, it could be the reason why won’t Cricut Design Space open on your computer. Upgrade your device to meet those requirements.
Below are the minimum system requirements for using Cricut Design Space:
For Windows
Operating System: Windows 10 or later*
CPU: Intel™ Dual-Core or equivalent AMD® processor
RAM: 4GB
Disk Space: Minimum 2 GB of free disk space
Connection: An available USB port or Bluetooth connection
Display: Minimum 1024px x 768px screen resolution
Internet connection: Minimum 2-3 Mbps Download and 1-2 Mbps Upload
For Mac
Operating System: macOS 12 or later*
CPU: 1.83 GHz
RAM: 4GB
Disk Space: Minimum 2 GB of free disk space
Connection: An available USB port or Bluetooth connection
Display: Minimum 1024px x 768px screen resolution
Internet connection: Minimum 2-3 Mbps Download and 1-2 Mbps Upload
Step 2: Restart Your Device
A simple restart can fix lots of problems. When you restart your device, it clears out temporary files and frees up memory. In order to restart your device, follow the steps given below:
For Windows
To restart your Windows device, follow these steps:
Firstly, click the Start button.
Then, select the Power icon.
Choose Restart.
For Mac
To restart your Mac, follow the steps below:
Click the Apple menu in the top-left corner of the screen.
Then, choose Restart.
Step 3: Force Reload Cricut Design Space
You can also fix Cricut Design Space won’t open issue by forcing a reload. Sometimes, slow speed can cause the Cricut Design Space won’t open issue. A force reload can solve the problem.
In order to force reload Cricut Design Space, follow the steps given below:
Open the Cricut Design Space app.
Then, find the system menu in the top left corner.
After that, select the View option.
Lastly, select Force Reload from the dropdown menu.
If your Cricut Design Space still won’t open on your computer, move to the next step.
Step 4: Uninstall and Reinstall Cricut Design Space
Whether the Cricut Design Space is out of date or has had an issue, you can fix these most common errors by simply uninstalling and reinstalling it. Here are the steps on how to uninstall and reinstall Cricut Design Space.
How to Uninstall Cricut Design Space?
If you want to uninstall Cricut Design Space from your computer, follow the steps below:
For Windows
Firstly, make sure that Design Space is closed. If it is not closed, the application will not be uninstalled properly.
Select the Start icon and search for Programs.
Then, choose the option Add or remove programs. This will open the Apps & features window.
Type Cricut in the search field and choose Cricut Design Space from the list.
After that, select the Uninstall button.
A pop-up will show up on the screen asking, “Are you sure you want to uninstall Cricut Design Space?”. Select OK to uninstall Cricut Design Space.
The system will finish the uninstallation process. If prompted, restart your computer.
For Mac
Open the Finder and select Applications.
Then, drag the Cricut Design Space from the Applications to the Trash.
After that, right-click on the trash and select Empty Trash. You can also open the trash, click on the gear icon, and then select the Empty Trash option.
Next, click Empty Trash to confirm that you want to permanently delete the trash items.
Finally, the system will finish the uninstallation. If prompted, restart your Mac.
How to Reinstall Cricut Design Space?
Here are step-by-step instructions on how to reinstall Cricut Design Space.
For Windows
Go to the official Cricut Design Space website: Cricut.com/setup.
After that, type your machine model in the search field and select your device.
Select the checkbox confirming you agree to Cricut Terms of Use and Privacy Policy. Then, click on the Download button.
Once the downloading is complete, double-click the file in your browser or Downloads folder.
If a window opens asking if you trust the application, confirm that you trust the app.
Now, an installation progress window will appear.
Next, sign in with your Cricut ID and password.
Finally, you have successfully reinstalled Cricut Design Space on your computer.
For Mac
Visit the Cricut Design Space website: cricut.com/setup.
Then, enter your Cricut machine model in the search field and select your device.
Next, check the box to agree to Cricut Terms of Use and Privacy Policy. Then, click the Download button.
Select a location to save the file (By default, it will show the downloads folder). Click Save to start the download.
Now, the file download will start.
When the download is finished, go to the downloads folder. Then, double-click on the downloaded file.
A new window will appear. Drag the Cricut icon into the Applications folder icon to start the installation process. After this, Cricut Design Space for Desktop will be automatically added to your Applications folder.
Then, double-click on Cricut Design Space in your Applications folder in order to launch Design Space for Desktop.
A window will appear asking if you want to open the application downloaded from the internet. Click the Open button to continue.
Lastly, sign in with your Cricut ID and password. With this, you have successfully reinstalled Cricut Design Space on your Mac.
Conclusion
If you are wondering why won’t Cricut Design Space open on my computer. Don’t worry; you are not the only person facing this issue. Many Cricut Design Space users encounter this issue at some point. The Cricut Design Space won’t open issue can be caused by several reasons. The good thing is you can fix it easily in a few minutes.
By following the above-mentioned steps, you will be able to fix Cricut Design Space won’t open issue quickly. Make sure your Windows computer or Mac meet the minimum system requirements, restart your device, and force reload Cricut Design Space. If the issue is still there, try uninstalling and reinstalling Cricut Design Space.
Thank you for reading this post. We hope you find this guide helpful in understanding why won’t Cricut Design Space open on your computer and how to fix Cricut Design Space won’t open issue. Please stay connected with us for more tips and guides to make the most of your Cricut.
Source: why won’t Cricut Design Space open
#why won’t Cricut Design Space open#cricut design space won't open#cricut design space download#cricut design space app#cricut design space software#Cricut Setup
0 notes
Text
How To Fix A Computer That’s Stuck In A Boot Loop
A computer stuck in a boot loop can be frustrating, preventing you from accessing important files and programs. This issue occurs when a PC continuously restarts instead of booting into the operating system. Boot loops can be caused by software conflicts, corrupt system files, faulty hardware, or failed updates. If you're struggling to fix this problem, Phone Repair & More offers expert PC troubleshooting and repair services with reliable computer repair technicians in Palm Harbor, FL who can diagnose and resolve boot loop issues efficiently.
Step 1: Perform A Hard Reboot
Before diving into advanced troubleshooting, try a hard reboot to see if the issue resolves itself.
How To Perform A Hard Reboot:
Hold down the power button for at least 10 seconds until the computer shuts off.
Unplug the power cable (or remove the battery if using a laptop).
Wait for about 30 seconds, then plug the power back in and restart your PC.
If the computer still gets stuck in a boot loop, move on to the next step.
Step 2: Boot Into Safe Mode
Safe Mode loads only essential system files, which can help bypass software conflicts or corrupted drivers.
How To Boot Into Safe Mode:
Restart your computer and press F8 (older Windows versions) or Shift + F8 repeatedly before Windows loads.
Select Advanced Startup Options > Troubleshoot > Advanced Options > Startup Settings.
Choose Safe Mode and let your computer boot.
Once in Safe Mode, uninstall any recently installed drivers or software updates that might be causing the issue. If the problem persists, desktop diagnostics and repair in Palm Harbor, Florida may be necessary.
Step 3: Run Automatic Repair Or System Restore
Windows has built-in tools that can fix boot issues automatically.
How To Use Automatic Repair:
Restart your computer and interrupt the boot process three times (turn it off before Windows loads).
This will trigger Windows Recovery Mode. Select Advanced Options > Troubleshoot > Startup Repair.
Follow the on-screen instructions to let Windows attempt a repair.
If Startup Repair doesn’t work, try System Restore to revert your computer to a previous working state.
Step 4: Check For Corrupt System Files
Corrupt system files can prevent Windows from booting properly. Running System File Checker (SFC) and DISM can help fix these issues.
How To Run SFC And DISM:
Boot into Advanced Startup Options and select Command Prompt.
Type the following commands and press Enter after each: bash CopyEdit sfc /scannow
DISM /Online /Cleanup-Image /RestoreHealth
Restart your computer to see if the issue is resolved.
Step 5: Check Hardware And BIOS Settings
Faulty hardware, such as a failing hard drive or RAM, can cause boot loops. If you recently installed new components, they may be incompatible.
How To Check Hardware:
Remove and reinsert RAM sticks and storage drives.
Reset BIOS settings by selecting Load Default Settings in the BIOS menu.
If hardware failure is suspected, consulting a computer upgrade and repair specialist at Phone Repair & More can help identify the issue.
When To Seek Professional Help
If none of these steps resolve the boot loop, you may need expert PC troubleshooting and repair. At Phone Repair & More, our reliable computer repair technicians in Palm Harbor, FL specialize in desktop diagnostics and repair in Palm Harbor, Florida, ensuring your system is restored quickly and efficiently.
Computer Upgrade And Repair Specialist Near Me
A computer stuck in a boot loop can result from corrupt files, software conflicts, or hardware issues. By performing a hard reboot, booting into Safe Mode, running repair tools, and checking hardware, you may be able to fix the problem. If the issue persists, visit Phone Repair & More for expert computer upgrade and repair specialist services to get your PC running smoothly again.
Computer Upgrade And Repair Specialist In Palm Harbor, FL
Phone Repair & More
32152 US Hwy 19 N, Palm Harbor, FL 34684
727-309-1268
Get Directions
Hours: Mon – Sat 9am to 8pm & Sun 12pm to 6pm
0 notes
Text
Does the NVIDIA App negatively affect your PC gaming performance?
For our experiments, we utilized an AMD Ryzen 9 7950X3D with 32GB of DDR5 running at 6000MHz, along with the NVIDIA GeForce RTX 4090. We also operated on Windows 10 64-bit and employed the GeForce 566.14 driver. The operating system we used might significantly influence the results. Additionally, we disabled the second CCD on our 7950X3D.
The games we examined included Path of Exile 2, Red Dead Redemption, STALKER 2, and Indiana Jones and the Great Circle. Path of Exile 2 was played at Native 4K with Maximum Settings, while Red Dead Redemption was tested at Native 4K, Maximum Settings, and with DLAA (and I’ve also unlocked its framerate). Conversely, both STALKER 2 and Indiana Jones were played at 4K with Maximum Settings, using DLSS 3 Quality and Frame Generation.
Now, let’s review our findings.
As we can observe, there is a minor dip in performance when using the NVIDIA App. However, it’s far from the numbers that have been reported. On our PC setup, it results in about a 4-6% drop, mainly in CPU-intensive areas. For example, in Indiana Jones, which is primarily a GPU-heavy game utilizing Path Tracing, we noticed no performance loss at all.
In a way, this is understandable. The NVIDIA App is a software that operates continuously in the background. So yes, it will utilize some CPU resources. This aligns with my long-held belief that you should minimize background programs while gaming. Trust me, Discord and Chrome (especially with multiple tabs open) can severely impact your performance even more. In fact, even OSD programs can detract from performance. This isn’t a new discovery.
Once again, we’re discussing a performance decline of 4-6%. So, no. Uninstalling it won’t yield 20FPS. At best, you might see a gain of 3-4FPS unless you’ve enabled something in the NVIDIA App that could negatively affect your performance.
For instance, the NVIDIA App includes several shaders that gamers can utilize. It can also facilitate desktop recording. So, if you inadvertently activated these features, you might experience reduced performance with the NVIDIA App.
Some users have reported poorer frametime with the NVIDIA App. We did not experience such issues. Frametime remained consistent with and without the NVIDIA App.
Ultimately, I recommend examining the settings within the NVIDIA App first. It’s likely that you may have activated a feature that could influence your performance. The app itself doesn’t impose a significant performance hit, at least on our system.
Before we finish, it’s worth mentioning that this could be an issue exclusive to Windows 11. After all, we’ve already encountered similar CPU performance problems affecting both Intel and AMD CPUs on Windows 11. Therefore, it wouldn’t be surprising if Windows 11 is the primary factor here. On Windows 10, we were unable to reproduce any of the claimed benefits.
So, should you remove it? Ultimately, the choice is yours. If you have no intention of utilizing any of its features, why did you install it originally? Conversely, if you plan to use it, a 3-4FPS difference isn’t likely to severely impact your gaming experience.
For what it’s worth, I have already alerted NVIDIA about this issue. It will be intriguing to see how the green team responds. A report surfaced this weekend that claims the NVIDIA App can compromise your PC gaming performance. We decided to put this to the test using our primary gaming system. So, can you really surpass 20FPS just by uninstalling the NVIDIA App? Let’s get to the bottom of it.
For our tests, we used an AMD Ryzen 9 7950X3D with 32GB of DDR5 at 6000MHz, along with the NVIDIA GeForce RTX 4090. We ran Windows 10 64-bit and deployed the GeForce 566.14 driver. The choice of operating system is crucial to the results. Furthermore, we disabled the second CCD on our 7950X3D.
The titles we tested include Path of Exile 2, Red Dead Redemption, STALKER 2, and Indiana Jones and the Great Circle. Path of Exile 2 was played at Native 4K with Maximum Settings, while Red Dead Redemption operated at Native 4K, Maximum Settings, and DLAA (with the framerate unlocked). On the other hand, both STALKER 2 and Indiana Jones were tested at 4K with Maximum Settings, utilizing DLSS 3 Quality and Frame Generation.
Let’s dive into our findings.
The data clearly shows a slight performance drop with the NVIDIA App. However, it falls significantly short of the exaggerated claims that have been circulating. On our system, the performance hit is around 4-6%, primarily in CPU-bound sections. For instance, in Indiana Jones— a game that heavily relies on the GPU with Path Tracing—there was absolutely no performance degradation.
This makes complete sense. The NVIDIA App operates in the background at all times, consuming some CPU resources. This is why I consistently advise gamers to minimize background applications during gameplay. Programs like Discord and Chrome—especially with multiple tabs—can impose an even greater toll on performance. Even OSD tools can detract from your gaming experience. This is far from new information.
Once again, we see that we’re discussing a 4-6% performance decrease. So, to be clear, uninstalling it won't lead to a significant increase in 20FPS. Expect maybe a 3-4FPS gain, unless you’ve inadvertently enabled a setting in the NVIDIA App that negatively affects your performance.
For example, the NVIDIA App offers shaders for gamers and allows for screen recording. If you’ve mistakenly activated these features, your performance with the NVIDIA App will take a hit.
While some have claimed worse frametime using the NVIDIA App, we did not witness any such issues. Our frametime remained stable regardless of the NVIDIA App’s presence.
In short, I strongly recommend you first check your NVIDIA App settings. Chances are you’ve toggled something that could impact performance. The app itself doesn’t impose a significant performance hit, at least on our system.
Before concluding, it’s essential to note that this issue might be specific to Windows 11. Previous reports have highlighted CPU performance issues affecting both Intel and AMD CPUs on Windows 11. Thus, it’s plausible that Windows 11 is indeed the main culprit. On Windows 10, we could not replicate any of the reported improvements.
So, should you uninstall it? The decision is yours to make. If you have no intention of using its features, you need to reconsider why it was installed in the first place. On the flip side, if you plan to utilize the app, 3-4FPS is unlikely to severely impact your gameplay.
For the record, I’ve already brought this to NVIDIA’s attention. It will be interesting to see how they choose to address it.
0 notes
Text
With AMD GPUs Installing Ollama On Linux And Windows

It is possible to run local LLMs on AMD GPUs by using Ollama. The most recent version of Llama 3.2, which went live on September 25, 2024, is the subject of this tutorial.
Llama 3.2 from Meta is compact and multimodal, featuring 1B, 3B, 11B, and 90B models. Here is a step-by-step installation instruction for Ollama on Linux and Windows operating systems using Radeon GPUs, along with information on running these versions on different AMD hardware combinations.
Supported AMD GPUs
Ollama’s product may be used with both older and current AMD GPU models since it supports a variety of them.
Ollama Installation & Setup Guide.
Linux
Ubuntu 22.04.4.
AMD GPUs using the most recent version of AMD ROCm.
To install ROCm 6.1.3.
Use a single command to install Ollama.
Windows
System prerequisites
Windows 10 or Later.
Installed drivers for AMD GPUs that are supported.
After installation, just launch PowerShell and execute it.
Run, llama, llama3.2.
That’s all; you’re set to speak with your local LLM.
AMD ROCm Supported GPUs
Use ROCm to install Radeon software on Linux
The amdgpu-install script helps you install a cohesive collection of stack components, including the ROCm Software Stack and other Radeon software for Linux components.
Makes the installation of the AMD GPUs stack easier by using command line arguments that let you select the following and by encapsulating the distribution-specific package installation logic.
The AMD GPUs stack’s use case (graphics or workstation) that has to be installed.
Combination of elements (user selection or Pro stack).
Carries out post-install inspections to confirm that the installation went well.
Installs the uninstallation script, which enables you to use a single command to delete the whole AMD GPU stack from the computer.
AMD Radeon GPUs
Ollama supports the following AMD GPUs:
Linux Support
Linux Overrides
Not all AMD GPUs are supported by the AMD ROCm library, which Ollama makes use of. You can sometimes cause the system to attempt using a nearby, comparable LLVM target. For instance, the Radeon RX 5400 is gfx1034 (also referred to as 10.3.4), however ROCm does not yet support this target. gfx1030 is the closest support. With x.y.z syntax, you may utilize the environment variable HSA_OVERRIDE_GFX_VERSION. For instance, you may change the server’s environment variable HSA_OVERRIDE_GFX_VERSION=”10.3.0″ to force the system to operate on the RX 5400.
A future version of ROCm v6 is anticipated to support a greater number of GPU families due to AMD’s ongoing efforts to improve it.
GPU Selection
To restrict Ollama to use a subset of your system’s AMD GPUs, you may set HIP_VISIBLE_DEVICES to a list of GPUs separated by commas. The list of devices having rocminfo is shown. You may use an incorrect GPU ID (such as “-1”) to compel CPU utilization while ignoring the GPUs.
Permission for Containers
SELinux may restrict containers’ access to AMD GPU hardware in various Linux editions. To enable containers to utilize devices, execute sudo setsebool container_use_devices=1 on the host system.
Metal: GPUs made by Apple
Through the Metal API, Ollama facilitates GPU acceleration on Apple devices.
In summary
Ollama’s broad support for AMD GPUs is evidence of how widely available executing LLMs locally is becoming. Users may run models like Llama 3.2 on their own hardware with a variety of choices, ranging from high-end AMD Instinct accelerators to consumer-grade AMD Radeon RX graphics cards. More customization, privacy, and experimentation are possible in AI applications across a range of industries thanks to this adaptable strategy for enabling creative LLMs throughout the extensive AI portfolio.
Read more on govindhtech.com
#AMDGPU#InstallingOllama#Windows#Llama32#AMDGPUmodels#ROCm613#ROCmSoftware#RadeonRX#GPUSelection#Apple#technology#technews#AMDRadeonRXgraphicscards#govindhtech
0 notes