#Update Phpmyadmin In Xampp
Explore tagged Tumblr posts
Visit Tumblr Blog
Explore Tumblr blogs with no restrictions, modern design and the best experience.
Last Seen Tumblr Blogs


Fun Fact
70% of Tumblr users say the Dashboard is their favorite place to spend time online.
Text
Dairy Farm Shop Management System Using PHP and MySQL

The Dairy Farm Shop Management System (DFSMS) is a web based application that can be accessed over the web. This system can be used to automate the workflow of dairy shop and their invoices.
The project has been planned to be having the view of distributed architecture, with centralized storage of the database. The application for the storage of the data has been planned. Using the constructs of MySQL Server and all the user interfaces has been designed using the PHP technologies. The database connectivity is planned using the “MySQL Connection” methodology. The standards of security and data protective mechanism have been given a big choice for proper usage. The application takes care of different modules and their associated reports, which are produced as per the applicable strategies and standards that are put forwarded by the administrative staff.
Click: https://phpgurukul.com/dairy-farm-shop-management-system-using-php-and-mysql/
Project Modules
DFSMS is a web-based application which manages the products of dairy shop. It has one module i.e. admin who manages all the functions of the dairy shop.
Admin Features :
Dashboard: In this section, admin can see all detail in brief like Total listed categories, companies, products and also see the sales.
Category: In this section, admin can add new categories and edit, delete old categories.
Company: In this section, admin can add new companies and edit, delete old companies.
Product: In this section, admin can add new products and edit old products.
Search: In this section, admin can search for a product then add the product into the cart and generate invoice /receipt.
Invoices: In this section, admin can view all generated invoices/receipts.
Reports: In this section, admin can generate two reports, one is B/w date and another one is for sales.
Admin can also update his profile, change the password and recover the password.
How to run the Dairy Farm Shop Management System Project (DFSMS)
1. Download the zip file
2. Extract the file and copy dfsms folder
3.Paste inside root directory(for xampp xampp/htdocs, for wamp wamp/www, for lamp var/www/html)
4. Open PHPMyAdmin (http://localhost/phpmyadmin)
5. Create a database with name dfsms
6. Import dfsms.sql file(given inside the zip package in SQL file folder)
7.Run the script http://localhost/dfsms
*********************Admin Credential*********************
Username: admin Password: Test@123
PHP Gurukul
Welcome to PHPGurukul. We are a web development team striving our best to provide you with an unusual experience with PHP. Some technologies never fade, and PHP is one of them. From the time it has been introduced, the demand for PHP Projects and PHP developers is growing since 1994. We are here to make your PHP journey more exciting and useful.
Email: [email protected] Website : https://phpgurukul.com
0 notes
Text
Complete PHP Tutorial: Learn PHP from Scratch in 7 Days
Are you looking to learn backend web development and build dynamic websites with real functionality? You’re in the right place. Welcome to the Complete PHP Tutorial: Learn PHP from Scratch in 7 Days — a practical, beginner-friendly guide designed to help you master the fundamentals of PHP in just one week.
PHP, or Hypertext Preprocessor, is one of the most widely used server-side scripting languages on the web. It powers everything from small blogs to large-scale websites like Facebook and WordPress. Learning PHP opens up the door to back-end development, content management systems, and full-stack programming. Whether you're a complete beginner or have some experience with HTML/CSS, this tutorial is structured to help you learn PHP step by step with real-world examples.
Why Learn PHP?
Before diving into the tutorial, let’s understand why PHP is still relevant and worth learning in 2025:
Beginner-friendly: Easy syntax and wide support.
Open-source: Free to use with strong community support.
Cross-platform: Runs on Windows, macOS, Linux, and integrates with most servers.
Database integration: Works seamlessly with MySQL and other databases.
In-demand: Still heavily used in CMS platforms like WordPress, Joomla, and Drupal.
If you want to build contact forms, login systems, e-commerce platforms, or data-driven applications, PHP is a great place to start.
Day-by-Day Breakdown: Learn PHP from Scratch in 7 Days
Day 1: Introduction to PHP & Setup
Start by setting up your environment:
Install XAMPP or MAMP to create a local server.
Create your first .php file.
Learn how to embed PHP inside HTML.
Example:
<?php echo "Hello, PHP!"; ?>
What you’ll learn:
How PHP works on the server
Running PHP in your browser
Basic syntax and echo statement
Day 2: Variables, Data Types & Constants
Dive into PHP variables and data types:
$name = "John"; $age = 25; $is_student = true;
Key concepts:
Variable declaration and naming
Data types: String, Integer, Float, Boolean, Array
Constants and predefined variables ($_SERVER, $_GET, $_POST)
Day 3: Operators, Conditions & Control Flow
Learn how to make decisions in PHP:
if ($age > 18) { echo "You are an adult."; } else { echo "You are underage."; }
Topics covered:
Arithmetic, comparison, and logical operators
If-else, switch-case
Nesting conditions and best practices
Day 4: Loops and Arrays
Understand loops to perform repetitive tasks:
$fruits = ["Apple", "Banana", "Cherry"]; foreach ($fruits as $fruit) { echo $fruit. "<br>"; }
Learn about:
for, while, do...while, and foreach loops
Arrays: indexed, associative, and multidimensional
Array functions (count(), array_push(), etc.)
Day 5: Functions & Form Handling
Start writing reusable code and learn how to process user input from forms:
function greet($name) { return "Hello, $name!"; }
Skills you gain:
Defining and calling functions
Passing parameters and returning values
Handling HTML form data with $_POST and $_GET
Form validation and basic security tips
Day 6: Working with Files & Sessions
Build applications that remember users and work with files:
session_start(); $_SESSION["username"] = "admin";
Topics included:
File handling (fopen, fwrite, fread, etc.)
Reading and writing text files
Sessions and cookies
Login system basics using session variables
Day 7: PHP & MySQL – Database Connectivity
On the final day, you’ll connect PHP to a database and build a mini CRUD app:
$conn = new mysqli("localhost", "root", "", "mydatabase");
Learn how to:
Connect PHP to a MySQL database
Create and execute SQL queries
Insert, read, update, and delete (CRUD operations)
Display database data in HTML tables
Bonus Tips for Mastering PHP
Practice by building mini-projects (login form, guest book, blog)
Read official documentation at php.net
Use tools like phpMyAdmin to manage databases visually
Try MVC frameworks like Laravel or CodeIgniter once you're confident with core PHP
What You’ll Be Able to Build After This PHP Tutorial
After following this 7-day PHP tutorial, you’ll be able to:
Create dynamic web pages
Handle form submissions
Work with databases
Manage sessions and users
Understand the logic behind content management systems (CMS)
This gives you the foundation to become a full-stack developer, or even specialize in backend development using PHP and MySQL.
Final Thoughts
Learning PHP doesn’t have to be difficult or time-consuming. With the Complete PHP Tutorial: Learn PHP from Scratch in 7 Days, you’re taking a focused, structured path toward web development success. You’ll learn all the core concepts through clear explanations and hands-on examples that prepare you for real-world projects.
Whether you’re a student, freelancer, or aspiring developer, PHP remains a powerful and valuable skill to add to your web development toolkit.
So open up your code editor, start typing your first <?php ... ?> block, and begin your journey to building dynamic, powerful web applications — one day at a time.

0 notes
Text

How to Set Up Your Local Development Environment for WordPress
Setting up a local development environment is one of the best ways to experiment with and build WordPress websites efficiently. It offers you a safe space to test themes, plugins, and updates before applying changes to a live site. Whether you’re a beginner or an experienced developer, having a local environment is essential in streamlining your workflow and minimizing website downtime.
Before we dive into the technical steps, it’s worth mentioning the benefits of WordPress for your business website. WordPress offers unmatched flexibility, scalability, and user-friendliness, making it an ideal platform for businesses of all sizes. When paired with a solid local development setup, WordPress becomes even more powerful in enabling fast and secure site builds.
Step 1: Choose Your Local Development Tool
There are several local development tools available that cater specifically to WordPress users:
Local by Flywheel (now Local WP): Extremely beginner-friendly with features like SSL support and one-click WordPress installs.
XAMPP: A more general-purpose tool offering Apache, MySQL, PHP, and Perl support.
MAMP: Ideal for macOS users.
DevKinsta: Built by Kinsta, it offers seamless WordPress development and staging capabilities.
Choose the one that suits your OS and comfort level.
Step 2: Install WordPress Locally
Once you’ve chosen your tool:
Install the software and launch it.
Create a new WordPress site through the interface.
Set up your site name, username, password, and email.
After setup, you’ll get access to your WordPress dashboard locally, allowing you to install themes, plugins, and begin your customizations.
Step 3: Configure Your Development Environment
To ensure an efficient workflow, consider these configurations:
Enable Debug Mode: Helps in identifying PHP errors.
Use Version Control (e.g., Git): Keeps your changes tracked and manageable.
Database Access: Tools like phpMyAdmin help manage your WordPress database locally.
If your project requires dynamic functionality, leveraging PHP Development Services during the setup phase can ensure custom features are implemented correctly from the beginning.
Step 4: Customize Themes and Plugins Safely
With your local environment set up, now's the time to begin theme development or customization. You can safely create or modify a child theme, experiment with new plugins, and write custom code without any risk of affecting your live site.
For those unfamiliar with theme structures or WordPress standards, it’s often wise to hire a professional WordPress developer who understands best practices and can ensure clean, maintainable code.
Step 5: Syncing to a Live Server
After building and testing your site locally, you'll eventually want to push it live. Popular methods include:
Using a plugin like Duplicator or All-in-One WP Migration
Manual migration via FTP and phpMyAdmin
Using version-controlled deployment tools
Syncing should always be done carefully to avoid overwriting crucial data. Regular backups and testing are essential.
Step 6: Maintain Your WordPress Site Post-Launch
Launching your website is only the beginning. Ongoing updates, security patches, and performance optimization are critical for long-term success. Enlisting website maintenance services ensures your site remains fast, secure, and up-to-date.
Services can include:
Core, plugin, and theme updates
Malware scans and security hardening
Site performance monitoring
Regular backups
Final Thoughts
A local WordPress development environment not only speeds up your development process but also protects your live website from unintended changes and errors. With tools and strategies now more accessible than ever, there's no reason not to use one.From learning the basics to running advanced builds, setting up locally gives you the confidence and space to grow your WordPress skills. And if you want to see real-world examples or follow along with tips and tricks I share, feel free to check out my work on Instagram for practical inspiration.
0 notes
Text
How to Move Your WordPress Site from Localhost to a Live Server
Developing a WordPress site on localhost is a great way to build and test your website in a controlled environment. However, the real challenge arises when it's time to move the site from your local server to a live hosting environment. If not done correctly, you could encounter broken links, missing images, or even database errors.
In this blog, we'll guide you through a step-by-step process to successfully move your WordPress site from localhost to a live server.

Step 1: Choose the Right Hosting Provider
Your first step is to select a reliable web hosting provider that meets your website’s needs. Look for:
Server Speed: Fast servers for better performance.
Uptime Guarantee: At least 99.9% uptime to ensure availability.
Ease of Use: User-friendly dashboards and tools.
WordPress Support: Hosting optimized for WordPress websites.
Popular options include Bluehost, SiteGround, and WP Engine.
Step 2: Export Your Local WordPress Database
The database is the backbone of your WordPress site. To export it:
Open phpMyAdmin on your local server (e.g., XAMPP or WAMP).
Select your WordPress database.
Click on the Export tab and choose the Quick Export method.
Save the .sql file to your computer.
Step 3: Upload Your WordPress Files to the Live Server
To move your files:
Compress Your WordPress Folder: Zip your local WordPress installation folder.
Access Your Hosting Account: Use a file manager or an FTP client like FileZilla.
Upload the Files: Transfer the zipped folder to your hosting server's root directory (usually public_html).
Unzip the Folder: Extract the files once uploaded.
Step 4: Create a Database on the Live Server
Now, set up a new database on your live hosting server:
Log in to your hosting control panel (e.g., cPanel).
Navigate to the MySQL Databases section.
Create a new database, database user, and password.
Assign the user to the database with full privileges.
Step 5: Import the Database to the Live Server
Open phpMyAdmin in your hosting control panel.
Select the new database you created.
Click the Import tab.
Choose the .sql file you exported from your localhost.
Click Go to import the database.
Step 6: Update the wp-config.php File
To connect your site to the live database:
Locate the wp-config.php file in your WordPress installation.
Open the file in a text editor.
Update the following lines: define('DB_NAME', 'your_live_database_name'); define('DB_USER', 'your_live_database_user'); define('DB_PASSWORD', 'your_live_database_password'); define('DB_HOST', 'localhost'); // Keep this unless your host specifies otherwise.
Save the file and upload it to your server via FTP.
Step 7: Update URLs in the Database
Your localhost URLs need to be replaced with your live site URLs.
Use a tool like Search Replace DB or run SQL queries in phpMyAdmin.
In phpMyAdmin, run the following query: UPDATE wp_options SET option_value = 'http://your-live-site.com' WHERE option_name = 'siteurl'; UPDATE wp_options SET option_value = 'http://your-live-site.com' WHERE option_name = 'home';
Step 8: Test Your Live Website
Once everything is uploaded and configured, check your website by entering its URL in a browser. Test for:
Broken Links: Fix them using plugins like Broken Link Checker.
Missing Images: Ensure media files were uploaded correctly.
Functionality: Verify forms, buttons, and features work as expected.
Step 9: Set Up Permalinks
To ensure proper URL structure:
Log in to your WordPress admin dashboard on the live site.
Go to Settings > Permalinks.
Choose your preferred permalink structure and click Save Changes.
Step 10: Secure Your Live Website
After migrating, secure your site to prevent vulnerabilities:
Install an SSL Certificate: Most hosting providers offer free SSL certificates.
Update Plugins and Themes: Ensure everything is up to date.
Set Up Backups: Use plugins like UpdraftPlus for regular backups.
Conclusion
Moving your WordPress site from localhost to a live server may seem daunting, but by following these steps, you can ensure a smooth and error-free migration. A successful move allows you to showcase your site to the world, engage your audience, and achieve your goals.
Start today and take your WordPress project live with confidence!
0 notes
Text
Medical Card Generation System using PHP and MySQL

The ‘Medical Card Generations System using PHP and MySQL’ has been designed to override the problem of existing manual system. This web application is supported to eliminate and in some case reduce the hardship faced by manual system. The application is reduced as much as possible to avoid errors while entering the data. It’s also provide message while entering invalid data. No formal knowledge is required for the user to operate this system. Overall we said that ‘Medical Card Generations System’ is user friendly.
Project Modules
In ‘Medical Card Generations System’ we use PHP and MySQL Database. This project keeps the records of medical cards. ‘Medical Card Generations System’ has two module i.e. admin and user.
Admin Module
Dashboard: In this section, admin can briefly view the total medical card created in today’s, yesterday’s and in seven days, total read and unread enquiries.
Medical Card: In this section, admin can manage medical cards (add/delete/update).
Page: In this section, admin can manage about us and contact us pages.
Enquiry: In this section, admin reads the inquiries which are sent by users.
Search: In this section, admin can search a particular medical cards by reference number.
Reports of Medical Cards: In this section admin can view and check medical card details in a particular period.
Click: https://phpgurukul.com/medical-card-generation-system-using-php-and-mysql/
Admin can also update his profile, change the password and recover the password.
User Module
Home Page: User can visit home page.
Medical Card: User can view his/her medical card and take print with the help of their Reference Number.
About Us: User sees the details of .website administrator.
Contact Us: User can contact with website administrator and sent enquiry to them.
Note: In this project, the MD5 encryption method was used.
How to run the Medical Card Generation System Project using PHP and MySQL
1. Download the project zip file
2. Extract the file and copy mcgs folder
3.Paste inside root directory(for xampp xampp/htdocs, for wamp wamp/www, for lamp var/www/Html)
4.Open PHPMyAdmin (http://localhost/phpmyadmin)
5. Create a database with the name mgsdb
6. Import mgsdb.sql file(given inside the zip package in SQL file folder)
7. Run the script http://localhost/mcgs
Click: https://phpgurukul.com/medical-card-generation-system-using-php-and-mysql/
1 note
·
View note
Text
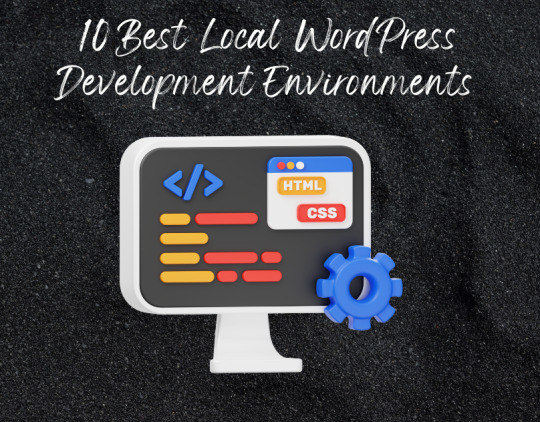
10 Best Local WordPress Development Environments
Do you want to drastically lower the possibility of your WordPress website crashing while still being able to make changes to it quickly and simply? Then, a local WordPress development environment will come in helpful.
It is safe to make changes in a local WordPress development environment without interfering with your website. You may safely update websites, test themes and plugins, and provide good performance at a reasonable cost in your environment. Because you can use these products without an internet connection, they are also very convenient.
1) Local By Flywheel
Flywheel's Local is user-friendly even for those without any prior development experience. It was formerly limited to macOS users, but it is now available for Windows as well.
With this tool, choosing between Nginx and Apache servers simplifies the process of creating a new website. Because Local offers the ability to generate live links for your local websites, you can work together with colleagues or clients as well.
2) WampServer
Next up is WAMPServer, a well-liked and remarkably versatile Windows web development environment. Windows, Apache, MySQL, and PHP are the acronyms for WAMP. With PHP, Apache, and a MySQL database, you may use it to develop any kind of web application.
You don't need to use a remote web server to administer, create, test, and construct websites with this tool.
3) XAMPP
Cross-platform, Apache, MariaDB, PHP, and Perl are the acronyms for XAMP. This Apache distribution comes with PHP, Perl, and MariaDB and works with Windows, Linux, and OS X.
With almost everything needed for a local WordPress development environment, XAMP is an incredibly potent tool. Like the best local environments, XAMPP lets you continue working on your website even when you are not connected to the internet.
Because your site is offline and you can work away from prying eyes of clients or hackers, it also offers superior protection.
4) MAMP
MAMP is limited to Windows and macOS, unlike XAMP. On the other hand, it gives you access to extra programs like phpMyAdmin, Perl, Python, etc. This implies that while building local websites and apps, you have a lot of possibilities.
Compared to other tools on this list, it provides less control over each environment's components, but because it has fewer options, it is one of the easiest to use.
You can also choose to use MAMP Pro, the tool's commercial version, if you truly want all the capabilities and options, like a built-in editor, the ability to set up Nginx servers, and a mobile testing tool.
5) Vagrant
If you like to run virtual computers on your computer and use them as environments for your projects, Vagrant is a fantastic tool. You may quickly create up different Multi-VM machines and launch them all with a single command using a single configuration file.
Additionally, Vagrant stores configuration settings in a text file, placing them under source control. Therefore, you may use Vagrant to reload the virtual machine and undo any modifications made to your website in case something goes wrong.
6) Laragon
Despite being more recent than some of the environments on our list, Laragon boasts blazingly quick performance and effortless installation. On Windows devices, Laragon offers what may be the simplest installation for MySQL, PHP, Perl, and Apache web servers.
Furthermore, PHP extensions can be activated with a single click, in contrast to earlier tools. Laragon lets you share your work with clients or colleagues and is free to download and use.
7) Laravel Valet
For Mac minimalists, Valet by Laravel offers a distinctive local WordPress development environment. When you turn on your Mac, it sets up Nginx to run in the background. Valet then proxies all requests to websites that are installed on your machine via DnsMasq.
As a result, while consuming a remarkably small amount of RAM, the programming environment becomes even faster than Laragon. Valet is quicker, simpler to use, and ideal for systems with less RAM than XAMPP or Vagrant, even
if it lacks some of their features and power.
8) Instant WP
An excellent local WordPress website powering option is Instant WP. Despite lacking the robustness of some of the more capable environments, this tool's ability to run from a USB drive and on both Windows and macOS is one of its strongest features.
Therefore, if you need to work on a WordPress project locally on several PCs or wish to share a copy of your project without hosting it on a web server, Instant WP is a practical option.
9) DevKinsta
For Windows, Ubuntu, and macOS, DevKinsta is a free local WordPress development environment.
DevKinsta allows you to launch as many websites as necessary by mimicking the one-click WordPress site creation process locally. It also allows users to switch between PHP versions for testing and supports the most recent versions of PHP.
DevKinsta uses Docker to quickly and securely create a local WordPress environment that enhances security, performs well, and makes upgrades and bug fixes simpler.
10) Duplicator
You can replicate a WordPress website to your local computer or another hosting account with Duplicator, a free, wildly popular, and highly rated WordPress plugin.
1 note
·
View note
Text
Mengenal Apa itu Aplikasi XAMPP Secara Lengkap

Bagi seorang pengembang software atau website, mungkin mengenal atau familiar dengan tools XAMPP. Meskipun cukup populer, tapi masih banyak orang awam dunia web development yang belum mengenal aplikasi ini. Yuk, simak penjelasannya berikut ini.
Pengertian XAMPP
XAMPP adalah software berbasis web server yang bersifat open source, yang dikembangkan pertama kali oleh tim Apache Friends pada tahun 2002. Software ini dapat dijalankan di empat sistem operasi berbeda, seperti OS Windows, Mac OS, OS Linux, dan juga Solaris. Pada umumnya, XAMPP digunakan untuk membuat web server lokal pada komputer. Hal itulah yang mempermudah proses pengeditan, desain, dan pengembangan aplikasi.
Xampp sendiri merupakan sebuah singkatan yang memiliki artinya sendiri, yaitu :
X (Cross Platform)
Kode ini memiliki arti bahwa Xampp kompatibel di berbagai sistem operasi yang ada, seperti Linux, Windows, Mac OS, dan Solaris.
A ( Apache)
Apache merupakan aplikasi web server gratis untuk menciptakan halaman website yang benar berdasarkan kode program PHP yang ditulis oleh pengembang web. Aplikasi ini bersifat open source, sehingga bisa dikembangkan secara bebas.
M (MySQL/MariaDB )
MySQL merupakan aplikasi database server yang menerapkan bahasa pemrograman SQL (Structured Query Language). Aplikasi ini memiliki fungsi untuk mengelola dan membuat sistem database secara terstruktur dan sistematis seperti mengolah, mengedit, dan menghapus daftar melalui database.
P (PHP)
PHP adalah bahasa pemrograman khusus berbasi web untuk kebutuhan pada sisi server (back end). Dengan begitu, PHP bisa digunakan untuk membuat halaman website menjadi lebih dinamis dengan menerapkan server-side scripting.
P (Perl)
Perl merupakan bahasa pemrograman untuk memenuhi berbagai kebutuhan (cross platform), yang berfungsi sebagai penunjuk eksistensi dari PHP. Perl biasanya digunakan untuk membuat website dinamis seperti CMS (Content Management System) seperti WordPress.
Komponen Penting XAMPP
Control Panel
Digunakan untuk mengatur database, mengupload file, mengelola fitur, dan melakukan konfigurasi terkait proyek website.
Htdocs
Berfungsi sebagai penyimpanan file dan dokumen yang akan ditampilkan di website. Kapasitas HTdocs disesuaikan dengan storage harddisk yang ada di komputer.
PhpMyAdmin
Program untuk mengolah database website yang sedang dikembangkan. PhpMyAdmin dapat diakses dengan mengunjungi alamat URL http://localhost/phpmyadmin.
Config
Menu Config digunakan untuk melakukan konfigurasi dasar XAMPP.
Netstat
Netstat sering digunakan untuk memastikan apakah ada program atau aplikasi lain yang menggunakan port XAMPP.
Mengenal Fungsi XAMPP
Aplikasi XAMPP memiliki fungsi utama sebagai server lokal untuk menampung berbagai jenis data website yang sedang dalam proses pengembangan. Dalam prakteknya, XAMPP mampu mengatur halaman basis data pada PhpMyAdmin, hanya dengan mengakses server lokal tanpa harus terkoneksi internet. Dengan menggunakan PhpMyAdmin, beberapa perubahan seperti mengedit, menghapus, meng-update, serta menambahkan user dan database dapat dengan bebas dilakukan.
XAMPP dapat menjalankan Laravel melalui perangkat komputer. Laravel sendiri merupakan framework PHP yang berfungsi untuk mempermudah programmer mengembangkan tampilan website. Sehingga, dengan menggunakan aplikasi XAMPP modifikasi kode program atau script, serta membuat fitur baru bisa lebih mudah dan cepat dilakukan.
Layaknya web hosting, XAMPP dapat bekerja secara offline namun tidak bisa diakses oleh banyak orang. Oleh karena itu, XAMPP biasa dimanfaatkan untuk mempelajari WordPress tanpa koneksi internet, sehingga proses pengerjaan front end maupun back end pun menjadi jauh lebih mudah.
Baca Juga: 8 Rekomendasi Aplikasi Data Mining yang Berguna Untuk Data Scientist
1 note
·
View note
Video
youtube
UPDATE PHP IN XAMPP | PHPMYADMIN TUTORIAL - EASY AND SAFE WAY
0 notes
Text
Agenda de citas médicas - 1. Cómo crear la base de datos y tablas con PHPMyAdmin

Si estás iniciando en el desarrollando de aplicaciones web para algún proyecto escolar, estás en el lugar correcto, en este tutorial de varias entregas, te explicaré una aplicación para agendar citas médicas, es importante contar con una base de datos bien estructurada que permita almacenar la información de pacientes y citas de forma eficiente. En este artículo te explicaremos cómo crear la base de datos y las tablas necesarias para una aplicación de citas médicas utilizando PHPMyAdmin, una herramienta de gestión de bases de datos muy popular y fácil de usar. Con este tutorial podrás configurar tu base de datos de manera rápida y sencilla para que puedas comenzar a trabajar en tu aplicación de citas médicas en poco tiempo. En un post anterior hemos explicado como instalar XAMPP, el servidor local para empezar a trabajar este tipo de bases de datos. Para crear la base de datos y la tabla desde SQL phpMyAdmin, sigue los siguientes pasos: - Abre phpMyAdmin y selecciona el servidor y la base de datos en la que deseas crear la tabla. - Haz clic en la pestaña SQL en la parte superior de la pantalla. - En el cuadro de texto, copia y pega el siguiente código: CREATE DATABASE citas_medicas; USE citas_medicas; CREATE TABLE pacientes ( id INT(11) NOT NULL AUTO_INCREMENT, nombre VARCHAR(50) NOT NULL, apellido VARCHAR(50) NOT NULL, email VARCHAR(100) NOT NULL, telefono VARCHAR(20) NOT NULL, PRIMARY KEY (id) ); CREATE TABLE citas ( id INT(11) NOT NULL AUTO_INCREMENT, paciente_id INT(11) NOT NULL, fecha DATE NOT NULL, hora TIME NOT NULL, nota VARCHAR(255), PRIMARY KEY (id), FOREIGN KEY (paciente_id) REFERENCES pacientes(id) ON DELETE CASCADE ON UPDATE CASCADE ); - CREATE DATABASE citas_medicas: se crea una nueva base de datos llamada "citas_medicas". - USE citas_medicas: se indica que se usará la base de datos "citas_medicas" para las siguientes operaciones. - CREATE TABLE pacientes: se crea una nueva tabla llamada "pacientes" dentro de la base de datos "citas_medicas", con las columnas "id", "nombre", "apellido", "email" y "telefono", y se define la columna "id" como clave primaria. - CREATE TABLE citas: se crea una nueva tabla llamada "citas" dentro de la base de datos "citas_medicas", con las columnas "id", "paciente_id", "fecha", "hora" y "nota". Se define la columna "id" como clave primaria y la columna "paciente_id" como clave foránea que hace referencia a la columna "id" de la tabla "pacientes". Además, se establece que si se borra un registro de la tabla "pacientes", también se borren los registros relacionados en la tabla "citas" mediante la opción "ON DELETE CASCADE". Asimismo, si se actualiza el valor de la columna "id" de la tabla "pacientes", también se actualicen los valores de la columna "paciente_id" en la tabla "citas" mediante la opción "ON UPDATE CASCADE".
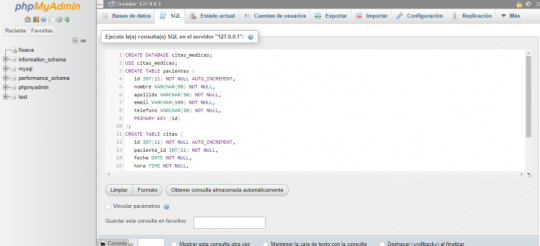
- Haz clic en el botón "Ejecutar" para crear la base de datos y las tablas. Con estos pasos habrás creado la base de datos "citas_medicas" y las tablas "pacientes" y "citas" con sus respectivos campos.

Aquí te dejo un ejemplo de cómo insertar 5 registros en la tabla pacientes utilizando una sentencia SQL: INSERT INTO pacientes (nombre, apellido, email, telefono) VALUES ('Juan', 'Pérez', '[email protected]', '5551234'), ('María', 'García', '[email protected]', '5554321'), ('Pedro', 'Hernández', '[email protected]', '5557890'), ('Ana', 'López', '[email protected]', '5552345'), ('José', 'Ramírez', '[email protected]', '5556789'); Cada registro debe tener los campos de "nombre", "apellido", "email" y "telefono" definidos. Simplemente deberás reemplazar los valores de ejemplo por los datos correspondientes de los pacientes que quieras agregar.

Aquí te proporciono un ejemplo de código para insertar 5 registros en la tabla "citas" de la base de datos "citas_medicas" que creamos anteriormente utilizando SQL: INSERT INTO citas (paciente_id, fecha, hora, nota) VALUES (1, '2023-05-01', '10:30:00', 'Consulta de rutina'), (2, '2023-05-02', '11:00:00', 'Examen de sangre'), (3, '2023-05-03', '12:00:00', 'Consulta de seguimiento'), (4, '2023-05-04', '15:30:00', 'Revisión de receta médica'), (5, '2023-05-05', '16:00:00', 'Consulta de urgencia'); En este ejemplo, estamos insertando 5 registros en la tabla "citas". Cada registro incluye el ID del paciente al que se asigna la cita (columna "paciente_id"), la fecha de la cita (columna "fecha"), la hora de la cita (columna "hora"), y una nota opcional (columna "nota").

Es importante asegurarse de que los valores ingresados sean válidos y estén en el formato correcto para cada columna. Hasta ahora la base de datos está completa para iniciar con la edición del HTML, el CSS y PHP. Read the full article
#AUTO_INCREMENT#basededatos#citas#consultasSQL.#Creacióndetablas#DATE#DELETECASCADE#estructuradetablas#FOREIGNKEY#insercióndedatos#int#integridadreferencial#llaveforánea#llaveprimaria#NOTNULL#ONDELETE#ONUPDATE#pacientes#phpMyAdmin#registros#restricciones#sentenciasINSERT#SQL#TIME#tiposdedatos#UPDATECASCADE#valorespredeterminados#VARCHAR
0 notes
Text
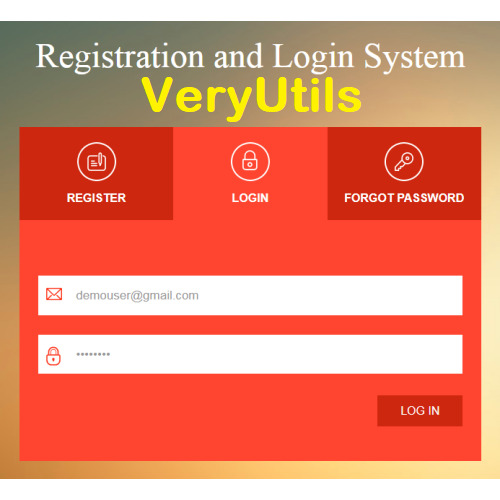
VeryUtils PHP Login and User Management is an User Registration and Login and User Management System
VeryUtils PHP Login and User Management is an User Registration and Login and User Management System With Admin Panel which written by PHP and MySQL source code. This is a mini PHP Project for User Registration and Login and User Management System. This project includes two modules. One is User module and second one is admin panel. VeryUtils User management is an important part of any web application where users accounts are created to give restricted access. Users are allowed to register their account and login to access their account. The users are also managed by administrator to allow certain roles or update users info.
So if you're looking for solution to build secure user management system then you're here right place. This PHP Login Script implements functionality to manage user operations like user registration, user email verification, login, password reset and edit profile. PHP Login Script also creates Admin panel to manage users at admin end to create new user, edit existing users details and delete user.
User authentication is very common in modern web application. It is a security mechanism that is used to restrict unauthorized access to member-only areas and tools on a site.
VeryUtils PHP User Management System is a powerful PHP script that offers a secure user management system. The application is a great way to build your website, allowing your users to register an account and build restricted access to certain users. We offer great support and it's very easy to install. It's powered by MYSQL and PHP.
VeryUtils PHP Login Script is a user management system allowing the registration and administration of users to your website. The script can easily be dropped in to an existing website allowing you to protect pages by adding a couple of lines of PHP code at the top of a page. You can also protect sections of pages. Secure your web pages dependant on user login status (logged on /off), user's group membership status or whether you are logged on as the administrator. The example pages and scripts (login, registration, forgotten password, etc.) can be customized to fit neatly in to your own site. The script can now log every users move!
The administration panel allows you to administer your users and change various site settings. As an admin you can add, edit or delete users. It is built on PHP source code and is highly customizable.
The script comes with great support from the creators including comprehensive detailed instructions, a comments section where we can answer your queries both prior to and after purchase and a dedicated forum to allow users of the script to share ways of utilising and even modifying the script for their own needs.
VeryUtils User Login and Registration features:
User registration with email verification.
User Login with remember password.
Forget password and reset password.
User profile.
User profile edit and save.
VeryUtils PHP Login and User Management Admin Panel features:
Admin login.
Admin password reset.
Admin profile.
Dashboard with users stats.
Users list.
Add new user with role.
Edit and save user.
Delete user.
Easy to install! Start protecting your website pages in minutes!
User Demo, https://veryutils.com/demo/user-registration-and-login-system-with-admin-panel/loginsystem/ Username: [email protected] Password: Test@123
Admin Demo, https://veryutils.com/demo/user-registration-and-login-system-with-admin-panel/loginsystem/admin Username: admin
Password: Test@123
How to run the User Registration and Login and User Management System With admin panel Project?
Download the zip file.
Extract the file and copy loginsystem folder.
Paste inside root directory(for xampp xampp/htdocs, for wamp wamp/www, for lamp var/www/html).
Open PHPMyAdmin ( http://localhost/phpmyadmin ).
Create a database with name loginsystem.
Import loginsystem.sql file (given inside the zip package in SQL file folder).
Run the script http://localhost/loginsystem (frontend, user panel)
Credential for user panel: Username: [email protected] Password: Test@123
User Module In user Module, user can register himself. After Registration, user can login with own email id and password. If user forgot own password than user can request for password using own email id. User Module has User Registration, User Login, Forgot Password functions.
Note: Forgot password will not work on localhost.
For admin Panel http://localhost/loginsystem/admin (backend, admin panel)
Credential for admin panel: Username: admin Password: Test@123
Admin Panel Admin can manage all registered users. Admin can update the user information and delete the user. Admin can change own password. Admin Panel has Admin Login, Manage users, Edit user information, Change Password (admin) functions.
If you encounter any problem, please feel free to let us know, we are glad to assist you asap.
0 notes
Text
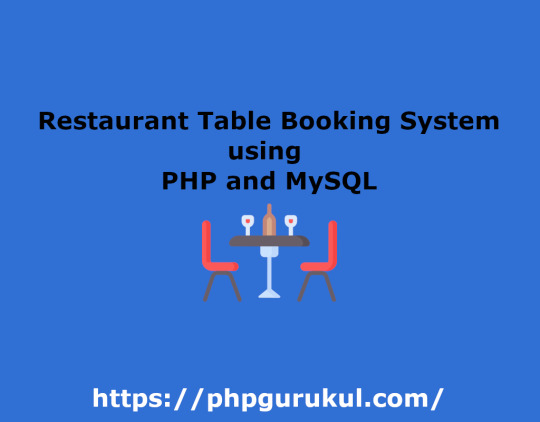
Restaurant Table Booking System using PHP and MySQL
Restaurant Table Booking System using PHP and MySQL is a web-based application. The restaurant Table Booking system project is developed to provide service facilities to restaurants and also to the customer. Customers can reserve the table online and check the status of the reservation.
Project Modules
In this project, we use PHP and MySQL database. It has two modules i.e Admin and user.
User Module
Users can fill out the table reservation form.
User can also check the table reservation/booking status.
Click here: https://phpgurukul.com/restaurant-table-booking-system-using-php-and-mysql/
Admin Module
Secure admin/sub-admin login
Dashboard: In this section, the admin can all the brief details like total sub-admins, total bookings, new bookings, accepted bookings and rejected bookings.
Sub-Admins: In this section, Admin can create the sub-admin, delete sub-admins, edit sub-admins, and reset the passwords of sub-admins.
Tables: In this section, admin can add and delete the tables.
Bookings: In this section, the admin can view the new, accepted, rejected, and all bookings. Admin can take actions on new bookings.
B/w dates report: In this section, admin can generate the report of between two dates bookings.
Account Setting: Admin can update his profile, and change the password.
Admin can also recover the password.
Sub-Admin Module
Sub-Admin and Admin features are the same except Sub-Admin creation. Sub-Admin can’t create the Sub-Admins.
How to run the Restaurant Table Booking System (rtbs) Project
1. Download the zip file
2. Extract the file and copy rtbs folder
3.Paste inside root directory(for xampp xampp/htdocs, for wamp wamp/www, for lamp var/www/HTML)
4.Open PHPMyAdmin (http://localhost/phpmyadmin)
5. Create a database with the name rtbsdb
6. Import rtbsdb.sql file(given inside the zip package in the SQL file folder)
7. Run the script http://localhost/rtbs
Credential for Admin panel :
Username: admin Password: Test@123
PHP Gurukul
Welcome to PHPGurukul. We are a web development team striving our best to provide you with an unusual experience with PHP. Some technologies never fade, and PHP is one of them. From the time it has been introduced, the demand for PHP Projects and PHP developers is growing since 1994. We are here to make your PHP journey more exciting and useful.
Email: [email protected] Website : https://phpgurukul.com
0 notes
Text
Wordpress localhost ampps alternative

#Wordpress localhost ampps alternative how to#
#Wordpress localhost ampps alternative install#
#Wordpress localhost ampps alternative update#
I had mega problems getting the XAMPP Server working locally, so I decided to try the WAMP. In “Step 5”, you say “With your browser go to Should this be: Thanks so much for your assistance! In “Step 4”, you say “…… the username is root, enter nothing between the ‘.’, and host……” What is the “enter nothing between the ‘…’ referring to? The password?ģ. In “Step 3″, you say ” Go to wamp / www”… This directory does not exist. (get “IE cannot display this webpage” error on this one. No luck on either front, as constant “The requested URL was not found on this server” errors.
#Wordpress localhost ampps alternative install#
Having endless problems with the install and have tried both Nicks and your directions. If you’re having a problem getting your WAMP or XAMPP server online, that’s a whole ‘nother issue, but check to make sure you’re not using IIS infact disable IIS if possible. Step5.)With your browser go to Hope that helps! New file structure will be wamp / Step4.)Unless you’ve changed the db username, password or host name then the db_name is whatever you created in Step 2, the username is root, enter nothing between the ‘.’, and host is localhost. Step 3.) Go to wamp / to a folder ( mysite) with only the content of the wordpress folder dumped directly into ( mysite). With WAMP installed (or XAMPP) your Step 3, 4 and 5 will look different then, our gracious host has suggested, with a MAMP install.
#Wordpress localhost ampps alternative how to#
In the next chapter, I’m going to show you how to create a custom WordPress theme in designer way (no PHP skill is required).įor anyone using WAMP (and possibly XAMPP, have not tested) who has any issues related to Step 3-5, here is your solution: With your browser, go to and follow the instructions to install WordPress.
#Wordpress localhost ampps alternative update#
Open wp-config.php and update the database details (db_name, user, password, host) according to your local server. In the folder, rename the wp-config-sample.php to wp-config.php. Go to the htdocs folder (where you installed the MAMP), extract the wordpress.zip to a new folder (eg. Go to and download the latest build of WordPress. In the phpMyAdmin page, create a new database (eg. Create a New DatabaseĪfter you’ve installed MAMP, run it and it should take you to the start page. I’m using Mac here, so I’m going to install MAMP. In order to run any PHP/database application on a local computer, you need a local host (ie. Run wp-admin/install.php and follow the instructions to install WordPress.īefore you start, let’s look at the requirements to run WordPress: Rename the wp-config-sample.php file to wp-config.php and update the database details according to your local server. Install a local server ( Mac: MAMP, PC: XAMPP or WAMP).ĭownload WordPress from and extract the files to a new folder under the htdocs folder. Here are the simplified steps on how to install WordPress on a local computer: If you have some technical background, you can skip the detailed steps in this tutorial. This tutorial is intended for beginners who want to learn how to run WordPress locally. You can also use the local version to test new plugins, themes, and upgrades. By doing so, it will save you time from updating and previewing files (so, you don’t have to frequently upload files on every change). In this chapter, you will learn how to install WordPress on a local computer. This is the first chapter of the Complete WordPress Theme Guide series.
0 notes
Text
Nitro pdf 11 86 bit

Nitro pdf 11 86 bit pdf#
Nitro pdf 11 86 bit install#
Nitro pdf 11 86 bit 64 Bit#
Nitro pdf 11 86 bit pdf#
Nitro PDF Reader Free does more by default than any free PDF reader currently available, does precisely what it advertises, and does it unobtrusively, rocketing it to the top of the PDF pack.
Nitro pdf 11 86 bit install#
Users are opted in automatically, so if you don't like contributing don't install on autopilot. When you install it, it will ask if you want to contribute anonymous usage data.
Nitro pdf 11 86 bit 64 Bit#
In testing, Nitro's functionality kept pace with its comprehensive toolset. Click to download: > Download nitro pdf 8 pro 64 bit crack or key Download songs computer memory card You can also customize the ribbon, placing your most commonly accessed tools where you need them. If you don't like or need the ribbon, you can hide it with an arrow that lives to the left of the search engine. Software ini akan sangat bermanfaat bagi anda yang ingin belajar untuk membuat web yang berbasis apache. This may still frustrate some users, but it feels slick and connected to Microsoft Office. Download XAMPP Terbaru 8.1.2 圆4 adalah salah satu program all in one yang terdiri dari 3 aplikasi utama yaitu apache, mysql, dan juga phpmyadmin yang sangat berguna bagi anda programmer yang bekerja dalam pengembangan website. Sometimes publishers take a little while to make this information available, so please check back in a few days to see if it has been updated. Nitro sports a ribbon-style interface borrowed from the previously released paid version of Nitro. We dont have any change log information yet for version 5.5.9.2 of Nitro PDF Reader 32-bit. The highlight tool will switch automatically from box highlighting to character highlighting, depending on whether you start highlighting in an empty space or over some text. The drag-and-drop took a few seconds to begin once initiated, but overall converting a four-page Word document took about 2 minutes. The search utility isn't bad, although it would be nice to see Windows 7-style federated in-document searching. This may sound like standard PDF boilerplate, but it's important to emphasize given that they're all free here, and they all work well. Users can comment on PDFs using notes and text markup, fill out forms, print to PDF, or create one by dragging an existing document into Nitro, share and comment with others, and securely sign a document. To put it mildly, the feature set is robust. Nitro has turned the free PDF alternative business model on its ear by providing you with a smart selection of watermark-free editing, drag-and-drop PDF creation, and tabbed PDF reading. Nitro's new free PDF reader takes the key features that you want in a PDF reader, a familiar interface, and smooth functionality and combines them into an eminently usable program that doesn't get in between you and your documents.
0 notes
Text
Xampp alternativen

#XAMPP ALTERNATIVEN FOR FREE#
#XAMPP ALTERNATIVEN INSTALL#
#XAMPP ALTERNATIVEN PORTABLE#
#XAMPP ALTERNATIVEN SOFTWARE#
#XAMPP ALTERNATIVEN OFFLINE#
We don't need to worry about file configuration and database management.
It allows us to export, import, and share files.
It provides a simple and straightforward user interface to create websites.
Desktop Server is a user-friendly web development tool.
There are the following Pros of Desktop Server. It provides better security as compared to other XAMPP alternatives. It allows us to develop and test web applications on our computers without online website hosting.
#XAMPP ALTERNATIVEN SOFTWARE#
It is the best software development environment created by ServerPress. AMPPS setup can be finished within a few minutes.Ĭlick on the given link to learn more about AMPPS: ĭesktop Server is a well-known, open-source, strongest, and straight XAMPP competitor.It supports MySQL and SQLite with the built-in FTP server.It is available for platforms like Windows, MacOS, Softaculous auto-installer, as well as Linux.It is compatible with all the editions of PHP.It allows us to manage databases easily.It provides a simple and attractive interface.
#XAMPP ALTERNATIVEN INSTALL#
It is extremely easy to install the software.AMPPS easily integrates with tools like Apache, MySQL, MongoDB, Perl, as well as Python.It also helps us to test PHP, MySQL, MongoDB, Perl, and Python applications. It allows us to access more than 300 PHP web applications along with thousands of classes of PHP. It includes a complete package that we need to create a website. It is one of the better alternatives to WAMP, MAMP, and XAMPP. EASYPHP can't be used to host websites.Ĭlick on the given link to know more about EASYPHP: ĪMPPS is an open-source, free, powerful, and user-friendly web development tool used to develop web applications in PHP.
#XAMPP ALTERNATIVEN PORTABLE#
EASYPHP is portable means it allows us to download as well as save files on an External Drive or USB.
It is an easy-to-update, easy-to-use as well as easy-to-extend platform.
It provides a complete ready-to-use development environment.
It supports multiple server technologies such as Python, Ruby, Perl, PhpMyAdmin, Apache, Nginx, and more.
It allows us to runs projects from anywhere on our computer.
EASYPHP is a beginner-friendly tool for development.
It also allows us to run a web server on our computer and local environment before making it live.Ī list of Pros of EASYPHP is given below. EasyPHP provides a secure package that allows us to install Apache, MySQL, PHP, PhpMyAdmin, database manager, and other development tools on a single machine. It easily works with applications like WordPress, Joomla, as well as Drupal. It mainly focuses on the coding part to make dynamic web applications. It is the best web server tool created by Rob McCool in 1995.
It is not suitable for Windows XP, SP3, and Windows Server 2003.Ĭlick on the given link to know more about WampServer: ĮASYPHP is one of the best XAMPP alternatives.
It is hard to configure or edit VHOSTS.
It is hard to find documentation on WampServer.
WampServer is only compatible with Microsoft Windows OS.
#XAMPP ALTERNATIVEN FOR FREE#
It is available for free in both 32 bit and 64-bit versions.
It provides an easy-to-use and easy-to-install web development environment.
It provides an ability to view all elements on the browser.
#XAMPP ALTERNATIVEN OFFLINE#
It is available for both online as well as offline modes.
WampServer provides an interface that is available in many languages.
It also includes PHPMyAdmin and SQLite Manager to easily manage databases.Ī list of Pros of WampServer is given below. It is a combination of tools like MySQL database, PHP, and Apache that allows us to easily create web applications. WampServer is one of the best Windows web application development environment, similar to XAMPP.
XAMPP is difficult to configure as compared to WAMP Server.Ĭlick on the given link to learn more about XAMPP: Ī list of the most commonly used XAMPP alternatives is given below.
It comes with other modules such as OpenSSL, Joomla, MediaWiki, WordPress, and many more.
XAMPP is a completely free, open-source, easy-to-use, and easy-to-install web application development environment.
It is compatible with operating systems like Microsoft Windows, MacOS, as well as Linux. It includes a MariaDB database system, an Apache HTTP server, PHP and Perl interpreters, and other programs. It is a most popular, completely free, simple, open-source, easy-to-use, and easy-to-install web application development environment specially used to create websites through PHP. XAMPP stands for Cross-Platform (X) Apache (A) MySQL (M), PHP (P) Perl (P).
0 notes
Text
The event management system is a web-based application. The objective of this application is to develop a system that effectively manages all the data related to the various events that take place in an organization. The purpose is to maintain a centralized database of all event-related information. The goal is to support various functions and processes necessary to manage the data efficiently.
Click : https://phpgurukul.com/event-management-system-using-php-and-mysql/
Project Modules
In EMS project we use PHP and MySQL database. It has two modules.
1.Admin Module
2.User Module
Admin Module
Dashboard: In this section, admin can see all detail in brief like listed categories, Sponsors, Total Events, Total Registered Users, Total Booking, Total New Booking, Total Confirmed Booking and Total Cancelled Booking.
Category: In this section, admin manage event category (add and update).
Manage Sponsors: In this section, admin can add sponsors and manage sponsors details (Add/Update/Delete).
Events: In this section, admin manage events (add and update).
Manage Users: In this section, admin can update details of registered users and also block them.
Manage Booking: In this section, admin can manage booking by cancel and confirm it.
News: In this section admin manage news (add and delete).
Website Setting: In this section, admin can update about us and another general website setting.
Admin can also update his profile, change password and recover password.
User Module
In this module there is two types of user guest user and registered user.
Guest User: In this guest user can see only general information like about us, event details,
contact details and news about events.
Registered users can do the following activity
1.Books the events.
2.Update his/her own profile.
3.Change Password.
4.Users can also cancel booking which is not confirmed.
5. Registered user can also recover his/her own password.
How to run the Event Management System (EMS) Project
1. Download the zip file
2. Extract the file and copy ems folder
3.Paste inside root directory(for xampp xampp/htdocs, for wamp wamp/www, for lamp var/www/html)
4. Open PHPMyAdmin (http://localhost/phpmyadmin)
5. Create a database with name ems
6. Import ems.sql file(given inside the zip package in SQL file folder)
7.Run the script http://localhost/ems (frontend)
8. For admin panel
http://localhost/ems/admin (admin panel)
Credential for admin panel :
Username: admin Password: Test@123
Credential for user panel :
Username: test12345 Password: Test@123
0 notes
Link
Insert, View And Update Jsp Xampp PhpMyAdmin Netbeans Register Login System Java Server Pages Mysql Database This is a jsp application fot registering users. Registered users are saved in mysql database using Java Server Pages (JSP) server side programming language. Registration Page This page collects input from a user and inserts them to mysql database on submit button click. SOURCE CODE Index.html [code lang="HTML"] New registration Name : CNIC : User name : Email ID : password : Already signed Up ? Login Here [/code] Login Page Once the user has been registered she/he can use the login page to gain access to users page and view retrieved data from mysql database. SOURCE CODE Login.jsp [code lang="HTML"] Login User name : password : New user. Sign Up Here [/code] USER HOME PAGE After successful login a user is redirected to this page. Here users can update their credentials and other account details. Changes made on this page also reflects in the database (Mysql database). Also data from mysql database is retrieved and displayed on this page using SQL "SELECT" Queries. SOURCE CODE USER.JSP [code lang="JAVA"] JSP Page USERS PAGE! Name : CNIC : Email ID : password : Want To Logout ? Logout [/code] LOGOUT PAGE This page destroys all the sessions that had been previously created by this program. SOURCE CODE Logout.php [code lang="JAVA"] <%-- Insert, View And Update Jsp Xampp PhpMyAdmin Netbeans Register Login System Java Server Pages Mysql Database. https://mauricemuteti.info/insert-view-and-update-jsp-xampp-phpmyadmin-netbeans-register-login-system-java-server-pages-mysql-database/ Document : logout Created on : May 30, 2021, 9:25:48 PM Author : HP --%> <% session.invalidate(); out.println("<script>"); out.println("alert(\"Whole Session Deleted\")"); out.println("location=\"login.jsp\";"); out.println("</script>"); %> [/code] ACTION/PROCESSING PAGE This is where all form data(input fields) is processed. Sql queries are executed in this page. First database connection is created and data is manipulated accordingly using appropriate SQL queries. SOURCE CODE PROCESS.JSP [code lang="JAVA"] 0) out.println("Thank you for register ! Please Login to continue."); catch (Exception e) System.out.print(e); e.printStackTrace(); finally if (conn != null) try conn.close(); catch (Exception e) System.out.print(e); e.printStackTrace(); else if (action.equals("Login")) //Checking Submit button value. String username = request.getParameter("username"); String password = request.getParameter("password"); Connection conn = null; try Class.forName("com.mysql.jdbc.Driver"); conn = DriverManager.getConnection("jdbc:mysql://localhost:3306/registrationloginformjsp?zeroDateTimeBehavior=convertToNull", "root", ""); PreparedStatement pst = conn.prepareStatement("SELECT * FROM users WHERE UserName=? and Password=?"); pst.setString(1, username); pst.setString(2, password); ResultSet rs = pst.executeQuery(); if (rs.next()) sessions.setAttribute("userNameSession", rs.getString("UserName")); out.println(""); out.println("alert(\"logged in\")"); out.println("location=\"user.jsp\";"); out.println(""); else out.println("Invalid login credentials"); catch (Exception e) System.out.print(e); e.printStackTrace(); finally if (conn != null) try conn.close(); catch (Exception e) System.out.print(e); e.printStackTrace(); else if (action.equals("Update")) //Checking Submit button value. String name = request.getParameter("fname"); String cnic = request.getParameter("cnic"); String userName = request.getParameter("un"); String email = request.getParameter("email"); String password = request.getParameter("password"); Connection conn = null; try Class.forName("com.mysql.jdbc.Driver"); conn = DriverManager.getConnection("jdbc:mysql://localhost:3306/registrationloginformjsp?zeroDateTimeBehavior=convertToNull", "root", ""); String updateString = "UPDATE users SET Name=?,CNIC=?,Email=?,Password=? WHERE UserName = ?"; PreparedStatement pst = conn.prepareStatement(updateString); pst.setString(1, name); pst.setString(2, cnic); pst.setString(3, email); pst.setString(4, password); pst.setString(5, userName); int i = pst.executeUpdate(); if (i > 0) out.println(""); out.println("alert(\"UPDATED !\")"); out.println("location=\"user.jsp\";"); out.println(""); catch (Exception e) System.out.print(e); e.printStackTrace(); finally if (conn != null) try conn.close(); catch (Exception e) System.out.print(e); e.printStackTrace(); %> [/code] phpMyAdmin SQL Dump [code lang="SQL"] -- phpMyAdmin SQL Dump -- version 5.1.0 -- https://www.phpmyadmin.net/ -- -- Host: 127.0.0.1 -- Generation Time: May 31, 2021 at 12:51 PM -- Server version: 10.4.19-MariaDB -- PHP Version: 8.0.6 SET SQL_MODE = "NO_AUTO_VALUE_ON_ZERO"; START TRANSACTION; SET time_zone = "+00:00"; /*!40101 SET @OLD_CHARACTER_SET_CLIENT=@@CHARACTER_SET_CLIENT */; /*!40101 SET @OLD_CHARACTER_SET_RESULTS=@@CHARACTER_SET_RESULTS */; /*!40101 SET @OLD_COLLATION_CONNECTION=@@COLLATION_CONNECTION */; /*!40101 SET NAMES utf8mb4 */; -- -- Database: `registrationloginformjsp` -- CREATE DATABASE IF NOT EXISTS `registrationloginformjsp` DEFAULT CHARACTER SET utf8mb4 COLLATE utf8mb4_general_ci; USE `registrationloginformjsp`; -- -------------------------------------------------------- -- -- Table structure for table `users` -- CREATE TABLE `users` ( `id` int(11) NOT NULL, `Name` varchar(50) NOT NULL, `UserName` varchar(50) NOT NULL, `CNIC` varchar(30) NOT NULL, `Email` varchar(50) NOT NULL, `Password` varchar(50) NOT NULL ) ENGINE=InnoDB DEFAULT CHARSET=utf8mb4; -- -- Dumping data for table `users` -- INSERT INTO `users` (`id`, `Name`, `UserName`, `CNIC`, `Email`, `Password`) VALUES(5, 'Johnathan', 'Andrew', '77777777777777777', '[email protected]', '123'); INSERT INTO `users` (`id`, `Name`, `UserName`, `CNIC`, `Email`, `Password`) VALUES(6, 'Jane', 'Jane', '9798UIUI8787', '[email protected]', '1234'); -- -- Indexes for dumped tables -- -- -- Indexes for table `users` -- ALTER TABLE `users` ADD PRIMARY KEY (`id`), ADD UNIQUE KEY `UserName` (`UserName`); -- -- AUTO_INCREMENT for dumped tables -- -- -- AUTO_INCREMENT for table `users` -- ALTER TABLE `users` MODIFY `id` int(11) NOT NULL AUTO_INCREMENT, AUTO_INCREMENT=7; COMMIT; /*!40101 SET CHARACTER_SET_CLIENT=@OLD_CHARACTER_SET_CLIENT */; /*!40101 SET CHARACTER_SET_RESULTS=@OLD_CHARACTER_SET_RESULTS */; /*!40101 SET COLLATION_CONNECTION=@OLD_COLLATION_CONNECTION */; [/code] DATABASE DESIGN DEMO VIDEO https://www.youtube.com/watch?v=aVb2d2PtJss
0 notes