#UserDefaults
Explore tagged Tumblr posts
Visit Tumblr Blog
Explore Tumblr blogs with no restrictions, modern design and the best experience.
Last Seen Tumblr Blogs


Fun Fact
Tumblr.com rank in the US is 25.
Text
FaceScene Privacy Agreement
FaceScene is an AI portrait processing tool designed specifically for creators and work needs. Its core functions focus on AI intelligent image cutout and background replacement, making portrait creation simpler and more efficient, and generating work ID photos with ease. 🌟 Main functions: AI one click portrait cutout Based on intelligent algorithms, it automatically recognizes portrait contours and achieves precise image segmentation without the need for manual operation. Background replacement Support freely matching the extracted portrait with background colors or images to customize your own unique style. Multiple export layouts Provide single image, four grid, six grid and other layout modes for portrait images, suitable for use in portrait puzzles, display pages and other scenes. High definition export and record saving All works can be exported in high definition, shared on social media platforms, and automatically saved to local records for easy reuse. 🔐 Privacy Policy Effective Date: June 10, 2025 Contact email: [email protected] FaceScene respects user privacy and is committed to protecting the security of your personal data. We will not collect, store or upload any of your personal information.
The information we collect FaceScene will not actively collect your identity information. All images and settings processed in the application are only saved on the local device, including: User imported portrait photos (for local cutout processing) Replace the background color and image (manually selected by the user) Export works and historical records (saved in UserDefaults)
Permission Usage Instructions To achieve core functionality, FaceScene may request the following permissions: Photo library access: Import photos and save processing results. We will not read your unauthorized photos. Media sharing permission: Used to access the system's sharing panel, allowing you to easily share images with other apps.
Data Processing Declaration All portrait cutout and synthesis processing are completed locally on the device and will not be uploaded to the cloud or third-party servers. The application does not integrate any advertising or tracking services, nor does it conduct user behavior analysis.
Data security We rely on the sandbox mechanism of the iOS system to ensure the privacy and security of your data, and will not share your data with third parties.
Changes to Privacy Policy If we make any changes to this privacy policy, we will explain them in the new version of the application. The updated policy will take immediate effect. 6.Use of Facial Images and Portrait Segmentation FaceScene uses AI-based image segmentation to remove or replace backgrounds in user-provided portrait photos. This feature detects the face area but does not extract or retain any biometric data, facial landmarks, or identifiers. Facial image data is processed temporarily either on the device or on a secure server. All data is automatically deleted after processing is completed. We do not use face data for identification, authentication, or tracking. No face data is ever shared with third parties or stored long-term.
Contact us If you have any questions about the privacy policy or need feedback or suggestions, please feel free to contact us at any time: 📧 [email protected]
0 notes
Text
I'm starting 100 days of swift challenge!
Preparation Phase
1. Set Up Development Environment
• Install the latest version of macOS.
• Install Xcode from the App Store.
• Set up a free Apple Developer account.
• Familiarize yourself with Swift and basic programming concepts (optional but helpful).
2. Organize Resources
• Download CS193p course materials from Stanford’s website or iTunes U.
• Gather supplementary resources (Swift Playgrounds, Apple’s documentation).
Learning Phase: CS193p Modules
Week 1: Introduction & Basics
• Lecture: Introduction to SwiftUI.
• Build your first SwiftUI app (basic UI, text, and views).
• Practice: Experiment with modifiers like .font(), .padding().
Week 2: Views and State
• Lecture: Understanding Views and State.
• Implement a simple counter app using @State.
• Study declarative UI concepts.
Week 3: MVVM and Binding
• Lecture: Model-View-ViewModel (MVVM) in SwiftUI.
• Create a project using @State, @Binding, and @ObservedObject.
Week 4: Navigation and Lists
• Lecture: NavigationViews and List.
• Build a master-detail app.
• Practice creating dynamic lists with ForEach.
Week 5: Gestures and Animations
• Lecture: Gestures and Animations.
• Add drag, tap, and swipe gestures to a project.
• Create a simple animation using .animation().
Week 6: Persistence
• Lecture: Data persistence in SwiftUI.
• Build a project that saves user data locally (UserDefaults or CoreData).
• Explore FileManager for saving files.
Week 7: Networking
• Lecture: Fetching data from an API.
• Build an app that fetches and displays data using URLSession.
Week 8: Advanced Topics
• Lecture: Combine framework and more advanced SwiftUI concepts.
• Implement reactive programming principles in a small project.
Week 9-10: Wrap-Up
• Complete a capstone project consolidating learned concepts.
• Review lecture notes and rewatch key parts of the course for clarity.
Practice Phase
• Solve at least one Swift coding challenge daily on LeetCode or HackerRank.
• Follow Apple’s Human Interface Guidelines (HIG) while designing apps.
• Create mini-projects to reinforce each week’s concepts.
Final Phase: Build & Share
• Build a portfolio app showcasing your learning journey.
• Submit an app to the App Store (optional).
• Share progress and milestones on GitHub or a blog.
0 notes
Text
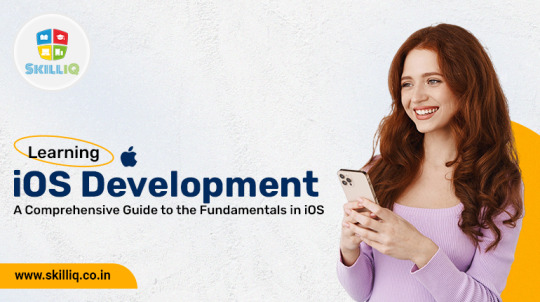
Learning iOS Development: A Comprehensive Guide to the Fundamentals in iOS
In today’s technology-driven world, mobile app development is a highly sought-after skill, with iOS development being a particularly valuable area due to the popularity and profitability of Apple’s App Store. If you're looking to dive into iOS development, understanding the fundamentals is essential. This guide aims to provide a comprehensive overview of the basics you need to get started with iOS development.
Understanding the Basics
Before jumping into coding, it's crucial to have a solid understanding of what iOS development entails. iOS is the operating system for Apple's mobile devices, including the iPhone, iPad, and iPod Touch. iOS development involves creating applications that can run on these devices using Apple’s development environment and tools.
Setting Up Your Development Environment
To develop iOS apps, you'll need a Mac computer, as Apple's development tools are macOS-exclusive. Here are the essential tools you'll need to get started:
Xcode: Apple's integrated development environment (IDE) for macOS, used to develop software for iOS, macOS, watchOS, and tvOS. Xcode includes a code editor, simulators, a debugger, and other tools.
Swift: Apple's programming language for iOS development. Swift is modern, fast, and designed to be safe and easy to use.
Cocoa Touch: is the framework for developing applications on iOS, providing the necessary infrastructure for building iOS apps.
Understanding Core iOS Concepts
To build more complex and robust iOS apps, you'll need to understand some core concepts:
View Controllers: Learn how to use view controllers to manage the app’s user interface and navigate between different screens.
Storyboards and Segues: Understand how to use storyboards to design your app’s UI and segues to transition between view controllers.
Auto Layout: Master Auto Layout to create responsive and adaptive user interfaces that work on different screen sizes and orientations.
Networking: Learn how to fetch data from the internet and display it in your app using URLSession and JSON parsing.
Persistence: Understand how to save and retrieve data locally using UserDefaults, Core Data, or other persistence frameworks.
Conclusion
Learning iOS development and By understanding the fundamentals, setting up your development environment, mastering Swift, and building your first app, you’ll be well on your way to becoming a proficient iOS developer. SkillIQ, the best institute for iOS development course in Ahmedabad, provides comprehensive training to help you achieve your goals.
At SkillIQ, our mentors focus on providing real-life training to students, leveraging their extensive experience to guide and support them. Boost your career with our Placement Assistance Program, designed to help you secure excellent job opportunities and guide you towards a successful professional path.
#iOS Training Course#iPhone App Development Course#Best Institute For iPhone Training in Ahmedabad#iOS Development Course in Ahmedabad#IOS App Development Training
0 notes
Text
Choose the Right Data Storage Option .NET MAUI
In today’s digital age, mobile apps have become an integral part of our lives. Whether it’s for productivity, entertainment, or socializing, we rely on apps for various tasks. .NET MAUI (Multi-platform App UI) is a powerful framework for building cross-platform apps, allowing developers to create apps that run seamlessly on Android, iOS, and other platforms. When developing .NET MAUI apps, effective data handling and storage are crucial for a smooth user experience. In this article, we’ll explore best practices for data handling and storage in .NET MAUI apps, ensuring that your app performs efficiently and securely.
Choose the Right Data Storage Option
.NET MAUI apps often need to store and manage data, ranging from user preferences to application-specific content. Choosing the appropriate data storage option is the first step in ensuring efficient data handling. Here are some common options:
UserDefaults (iOS) and SharedPreferences (Android): Suitable for storing small amounts of data like user settings and preferences.
SQLite: Ideal for structured data and complex querying.
Xamarin.Essentials Preferences: Cross-platform key-value pairs storage.
Cloud-Based Storage: For remote data storage and synchronization.
The choice of storage depends on your app’s requirements. For complex data structures and queries, SQLite is often the best choice, while UserDefaults and SharedPreferences are suitable for lightweight storage.
Implement Data Access Layer (DAL)
To maintain a clean and organized codebase, it’s essential to implement a Data Access Layer (DAL). The DAL abstracts the underlying data storage, making it easier to switch between different storage options without affecting the rest of the application. It also promotes code reusability.
Asynchronous Data Operations
In .NET MAUI apps, data operations should be performed asynchronously to prevent blocking the UI thread. This ensures a responsive user interface, even when dealing with large datasets or slow network requests. Utilize async and await keywords when working with data operations.
Secure Data Storage
Security is a top priority when handling user data. When dealing with sensitive information, such as user credentials or personal data, follow these best practices:
Encryption: Encrypt sensitive data before storing it.
Secure Communication: Ensure data transmission is done securely using HTTPS.
Authentication and Authorization: Implement proper mechanisms to restrict access to sensitive data.
Data Caching and Offline Support
Implement data caching strategies to store previously fetched data locally, allowing the app to provide a seamless user experience even without a network connection. Consider using libraries like Akavache or MonkeyCache to simplify data caching in your app.
Data Synchronization
Implement synchronization mechanisms to keep local and remote data in sync, handling conflicts and managing data updates intelligently.
Proper Error Handling
Ensure your app gracefully handles errors, providing clear and user-friendly error messages. Log errors for debugging purposes but avoid exposing sensitive information to end-users.
Testing and Optimization
Thoroughly test your data handling and storage components and profile your app to identify performance bottlenecks. Optimize data access for improved responsiveness.
User Data Privacy
Respect user data privacy by adhering to data protection regulations and clearly communicating your app’s data collection and usage policies to users.
Regular Updates and Maintenance
Regularly update and maintain your data management strategies to accommodate new features and changing requirements, ensuring your app remains secure and efficient.
In conclusion, data handling and storage are fundamental aspects of building .NET MAUI apps. By following these best practices, you can create reliable and user-friendly apps that users can trust and enjoy.
1 note
·
View note
Photo
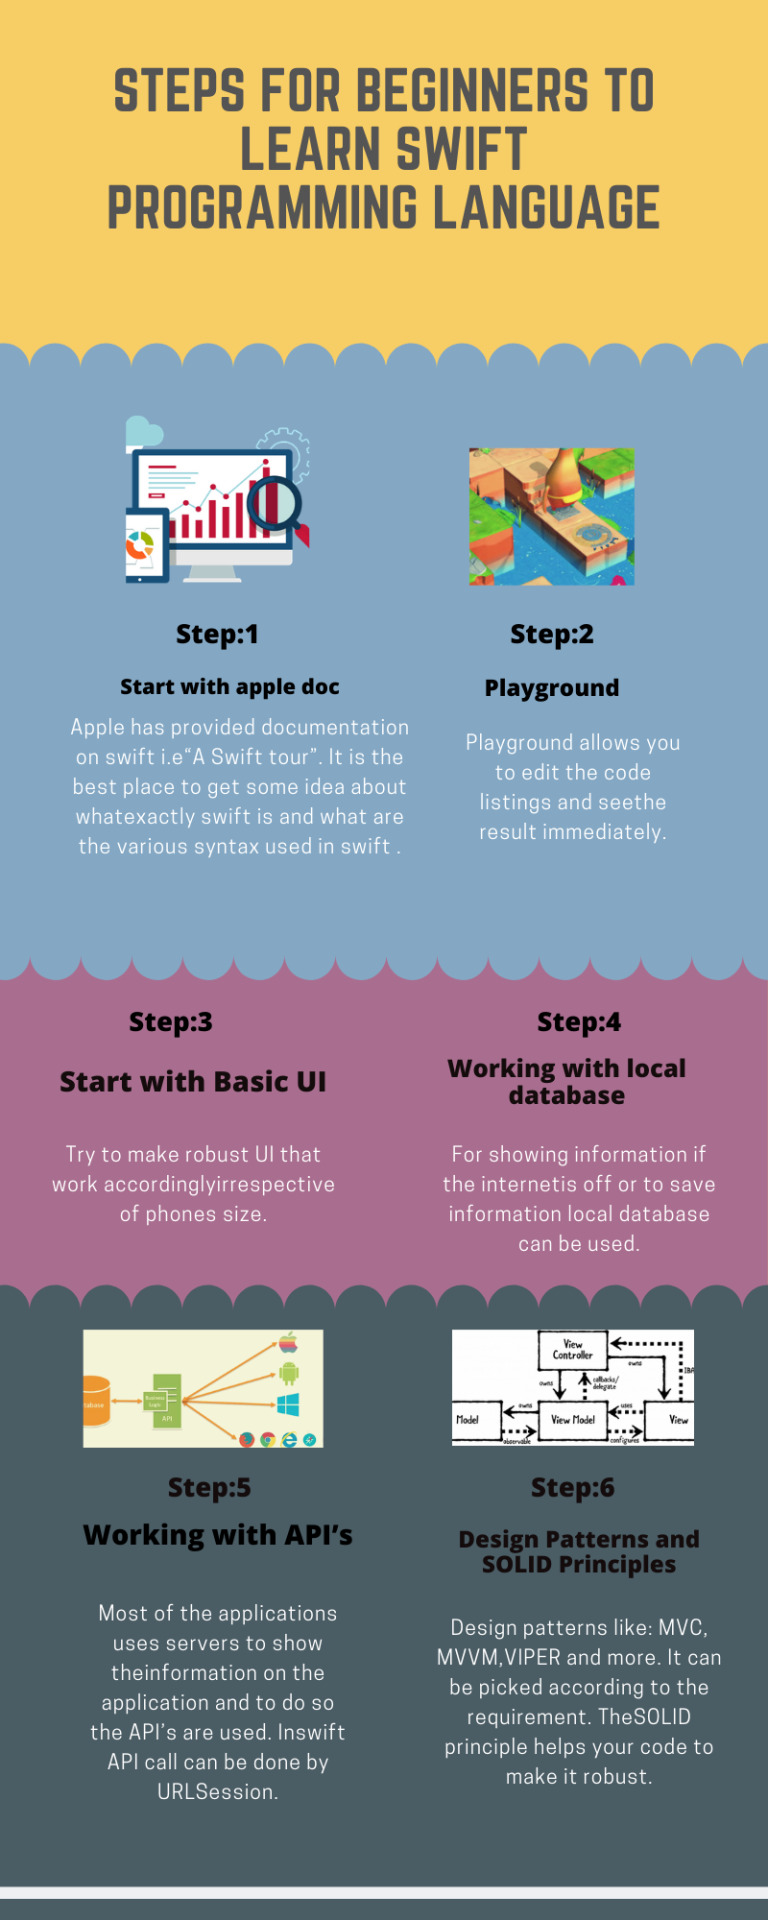
Beginners should follow these steps if they really want to become good at Swift Programming Language. We have explained here about how to use UserDefaults.
0 notes
Text
Week 354
Happy Thursday! It’s been a quiet week, mostly. Apple released some marketing tools for app developers, for generating links to the app on the app store, embed code for app icons, download badges, or qr codes. In other news, Alexandre Colucci has analyzed Apple’s use of Swift and SwiftUI in iOS 14 and it’s about twice more than in iOS 13.
Marius Constantinescu
Articles
Mastering ScrollView in SwiftUI, by @mecid
Combine: From zero to… Oh! I get it.(Part I), by @apesate
Label, by @zntfdr
Your iOS Home Screen is a Monoid, Part 1 and Part 2, by @tomasruizlopez
Pitfalls of protocol extensions, by dmtopolog
Snapshot Testing in Swift 📸, by robertofrontado
Setting default values for NSUserDefaults, by @sarunw
Overriding UserDefaults for improved productivity, by @twannl
What does @main do in Swift 5.3?, by @kharrison
Tools/Controls
SwiftUICharts - A simple line and bar charting library that supports accessibility written using SwiftUI, by @mecid
Business/Career
Launching an Indie App - Part 1: Sharing my Journey, by @michael_tigas
Videos
How it’s Built: Scribble Together with Bridger Maxwell, by @zats, with @bridgermax
Credits
mecid, apesate, zntfdr, truizlop, michael_tigas, DmIvanov, robertofrontado, sarunw
1 note
·
View note
Text
UserDefaults iOS Tutorial
With the UserDefaults class, you can save settings and properties related to application or user data. Any data saved to the defaults system will persist through application restarts. In this tutorial we will save the state of a switch, so this state is saved when the app restarts. This tutorial is made with Xcode 10 and built for iOS 12.
Open Xcode and create a new Single View App.
For product name, use iOSUserDefaultsTutorial and then fill out the Organization Name and Organization Identifier with your customary values. Enter Swift as Language and choose Next.
Go to the Storyboard and drag a Label to the left side of the view. Select the Label and give it a title of "Bluetooth". Next, drag a Switch Next to the Label. The Storyboard will look like this
Build and Run, and change the switch to Off. Exit the application and start it again. As you can see the previously selected state isn't persistent through application restarts.
�� Select the Assistant Editor and make sure the ViewController.swift is visible. Ctrl and drag from the Switch to the ViewController class and create the following Outlet.
Ctrl and drag from the Switch to the ViewController class and create the following Action.
Go to the ViewController.swift file and implement the saveSwitchState method
@IBAction func saveSwitchState(_ sender: Any) { let defaults = UserDefaults.standard if bluetoothSwitch.isOn { defaults.set(true, forKey: "SwitchState") } else { defaults.set(false, forKey: "SwitchState") } }
We create a UserDefaults object, where we can save the user settings. Next, we save the current switch state as a Boolean value in the Switchstate key. Next, change the viewDidLoad method
override func viewDidLoad() { super.viewDidLoad() let defaults = UserDefaults.standard if (defaults.object(forKey: "SwitchState") != nil) { bluetoothSwitch.isOn = defaults.bool(forKey: "SwitchState") } }
We check if there is a previously created SwitchState key, and if so we load the state and change the switch. Build and Run, change the switch state to Off. Restart the application and you will see the switch still is in the off state.
You can download the source code of the IOSUserDefaultsTutorial at the ioscreator repository on Github.
0 notes
Text
Mastering iOS Development: A Comprehensive Guide for Beginners and Professionals
Welcome to our comprehensive guide on mastering iOS development! Whether you're a beginner looking to delve into the world of iOS app development or a seasoned professional aiming to enhance your skills, this article will serve as your ultimate resource. We'll cover everything you need to know, from the basics of iOS development to advanced techniques and best practices. So, let's dive in!
Table of Contents
Understanding iOS Development
Setting Up Your Development Environment
Swift Programming Language
Xcode: The Integrated Development Environment (IDE)
User Interface Design and Development
Data Persistence
Networking and Web Services
Core Data and SQLite
Working with APIs
Testing and Debugging
App Distribution and Submission
Performance Optimization
Advanced Topics in iOS Development
Continuous Learning and Improvement
Conclusion
1. Understanding iOS Development
iOS development is the process of creating applications for Apple's mobile devices, such as the iPhone, iPad, and iPod Touch. To become a proficient iOS developer, it's crucial to have a solid understanding of the iOS platform, its frameworks, and the app development life cycle. This section will provide you with a comprehensive overview.
2. Setting Up Your Development Environment
Before you can start building iOS apps, you need to set up your development environment. This involves installing Xcode, Apple's official IDE, and configuring it for iOS development. We'll guide you through the installation process and show you how to create your first iOS project.
3. Swift Programming Language
Swift is Apple's modern programming language designed specifically for iOS, macOS, watchOS, and tvOS development. In this section, we'll explore the fundamentals of Swift, including variables, data types, control flow, functions, and object-oriented programming principles. By mastering Swift, you'll have a strong foundation for iOS app development.
4. Xcode: The Integrated Development Environment (IDE)
Xcode is the primary tool used by iOS developers for building, testing, and debugging applications. We'll take an in-depth look at Xcode's features, including its interface, project structure, code editor, and various debugging tools. Understanding Xcode is essential for efficient and productive iOS development.
5. User Interface Design and Development
Creating visually appealing and user-friendly interfaces is paramount in iOS app development. This section will cover the UIKit framework, Auto Layout, Interface Builder, and other essential components for designing and developing engaging user interfaces. We'll also discuss UI best practices and accessibility guidelines.
6. Data Persistence
Most apps require data persistence to store and retrieve user information. We'll explore different techniques for data persistence in iOS, such as Core Data, SQLite, and UserDefaults. You'll learn how to work with databases, handle data models, and perform efficient data operations within your apps.
7. Networking and Web Services
In today's interconnected world, networking and web services integration are essential for many iOS applications. We'll delve into URLSession and Alamofire frameworks, showcasing how to make network requests, handle responses, and parse JSON data. You'll gain the necessary skills to create apps that communicate with web servers and consume APIs.
8. Core Data and SQLite
Core Data is Apple's powerful framework for managing object graphs and persisting data. In this section, we'll explore Core Data's concepts, including entities, attributes, relationships, and fetching data. We'll also compare Core Data with SQLite, another popular database solution for iOS development.
9. Working with APIs
API integration is a critical aspect of iOS app development. We'll guide you through the process of working with RESTful APIs, authenticating requests, handling errors, and managing data models. You'll learn how to leverage APIs to enrich your app's functionality and provide a seamless user experience.
10. Testing and Debugging
Ensuring the quality and reliability of your apps is paramount. In this section, we'll cover various testing techniques, including unit testing, UI testing, and performance testing. We'll also explore Xcode's debugging tools and techniques for troubleshooting and resolving common issues.
11. App Distribution and Submission
Once you've built your app, it's time to distribute it to users. We'll walk you through the process of creating distribution certificates, provisioning profiles, and App Store Connect submissions. You'll gain a comprehensive understanding of the app distribution workflow and how to publish your app on the App Store.
12. Performance Optimization
Optimizing app performance is crucial for delivering a smooth and responsive user experience. We'll discuss techniques for improving app performance, such as reducing memory footprint, optimizing code execution, and leveraging profiling tools. By optimizing your apps, you'll ensure they run efficiently on iOS devices.
13. Advanced Topics in iOS Development
In this section, we'll explore advanced topics that go beyond the basics of iOS development. We'll cover topics like Core Animation, Core Graphics, advanced networking, concurrency, and integrating third-party libraries. These topics will empower you to create more sophisticated and feature-rich iOS applications.
14. Continuous Learning and Improvement
iOS development is a rapidly evolving field. To stay ahead, it's essential to cultivate a mindset of continuous learning and improvement. We'll provide you with resources, tips, and strategies for staying up to date with the latest iOS technologies, frameworks, and industry trends.
Conclusion
Congratulations on completing our comprehensive guide on mastering iOS development! We've covered a wide range of topics, from the fundamentals of iOS development to advanced techniques. By now, you should have a solid foundation to kick-start your iOS development journey or take your existing skills to the next level. Remember to practice regularly, engage with the iOS developer community, and never stop learning!
1 note
·
View note
Text
Price: [price_with_discount] (as of [price_update_date] - Details) [ad_1] Learn how to store data in a device from an iOS application. After reading this guide, you will know how to store user's settings, how to create and manage files, and how to encode and decode content to store structured data on files. Table of Contents STORAGE User Preferences User Defaults Files File Manager URLs and Paths Files and Directories Files Attributes Files Content Bundle Archiving Encoding and Decoding Real-Life Application QUICK REFERENCE UserDefaults FileManager URL String Bundle NSKeyedArchiver NSKeyedUnarchiver PropertyListEncoder PropertyListDecoder This guide assumes that you have a basic knowledge of app development, Xcode, and the Swift language. You should also know how to create and display Table Views. If you don't know how to program in Swift, how to work with Table Views, or how to create an application with Xcode, download our guides Introduction to Swift, Table Views and Collection Views, and Interface Builder. For a complete course on app development for iOS, read our book iOS Apps for Masterminds. This guide is a collection of excerpts from the book iOS Apps for Masterminds. The information included in this guide will help you understand a particular aspect of app development in iOS, but it will not teach you everything you need to know to develop an app for Apple devices. If you need a complete course on app development for iOS, read our book iOS Apps for Masterminds. For more information, visit our website at www.formasterminds.com. ASIN : B078RV988T Language : English File size : 368 KB Text-to-Speech : Enabled Enhanced typesetting : Enabled X-Ray : Not Enabled Word Wise : Not Enabled Print length : 61 pages [ad_2]
0 notes
Photo

#純靠北工程師6dq
----------
一款 mac app 在沒有做 sandbox 處理的前提下,允許使用者在特定常見情形下自動執行指定位置的 shell script。這種設定還記錄在 UserDefaults 當中。那麼要是被勒索軟體利用了的話,會怎樣?
----------
💖 純靠北工程師 官方 Discord 歡迎在這找到你的同溫層!
👉 https://discord.gg/tPhnrs2
----------
💖 全平台留言、文章詳細內容
👉 https://init.engineer/cards/show/8270
0 notes
Text
Swift Keyboard Control for TextFields and TextViews
Keyboard Control as User Navigates TextFields and TextViews on Table View Form

Scenario
Our app will allow users to tap between TextFields and TextViews and control the keyboard display (hide or show) as required. The code will ensure that the keyboard does not override (hide) the TextField or TextView the user has in focus.
Technique
We shall utilise the Delegate feature so the view, as the delegate to the TextFields and TextViews, can control the keyboard display. Then we shall use GestureRecognizer to detect user gestures and check the TextField or TextView BeginEditing and EndEditing conditions and animate the fields or views to move them up or down, depending on the keyboard display status.
Audience
The article is for Swift developers who seek complete, integrated, proven, code-centric solutions to speed up their development projects.
App Model
We based the article on the AppsGym Books model app, published on Apple’s App Store (as 8Books), and you can download the complete Xcode project on AppsGym.com, for free.
User Interfaces
NewBookTableViewController.swift and EditBookTableViewController.swift control the layout, order, and navigation of the corresponding UITableViewControllers.
Logic
NewBookTableViewController.swift contains keyboard control logic, which monitors and detects user taps on the form fields and reacts accordingly.
There are 7 TextFields on the New Book view: Title, Author, Series, No in Series, Category (Genre), Source, and Format. Each field has a Tag on the Storyboard (e.g., titleTextField.tag = 1) and each behaviour is governed by 3 textField functions, which we shall utilise to control the textField attributes and movement by controlling the becomeFirstResponder() function.
textFieldShouldReturn(..), textFieldDidBeginEditing(..), and textFieldDidEndEditing(..)
There are 2 TextViews on the New Book view: Synopsis and Notes. We shall use 2 textView functions to control their behaviour: textViewDidBeginEditing (..) and textViewDidEndEditing(..).
Code
We shall separate the code of TextFields and TextView to make it easier to focus on each group keyboard control.
TextFields

NewBookTableViewController.swift Initialise Variables
// Tags are used to Auto Jump to next TextField; see func textFieldShouldReturn @IBOutlet weak var titleTextField: UITextField! { didSet { titleTextField.tag = 1 titleTextField.delegate = self } } @IBOutlet weak var authorTextField: UITextField! { didSet { authorTextField.tag = 2 authorTextField.delegate = self } } ... @IBOutlet weak var formatTextField: UITextField! { didSet { formatTextField.tag = 7 formatTextField.delegate = self } } ....
NewBookTableViewController.swift viewDidLoad()
... let tapGestureReconizer = UITapGestureRecognizer(target: self, action: #selector(NewBookTableViewController.tap(_:))) view.addGestureRecognizer(tapGestureReconizer) ... }
NewBookTableViewController.swift Keyboard Control
func textFieldDidBeginEditing(_ textField: UITextField) { textField.layer.borderWidth = 2 textField.layer.borderColor = UIColor.orange.cgColor } func textFieldDidEndEditing(_ textField: UITextField) { textField.layer.borderWidth = 0 textField.layer.borderColor = UIColor.clear.cgColor }
@objc func tap(_ sender: UITapGestureRecognizer) { view.endEditing(true) } view raw
TextViews

NewBookTableViewController.swift Initialise Variables
class NewBookTableViewController: UITableViewController, UITextViewDelegate { ... @IBOutlet weak var synopsisTextView: UITextView! @IBOutlet weak var notesTextView: UITextView! ...
ewBookTableViewController.swift viewDidLoad()
override func viewDidLoad() { super.viewDidLoad() ... self.synopsisTextView.delegate = self // keyboard control self.notesTextView.delegate = self // keyboard control synopsisTextView.text = "" notesTextView.text = "" // stringCurrentDate() + "nn" ... let tapGestureReconizer = UITapGestureRecognizer(target: self, action: #selector(NewBookTableViewController.tap(_:))) view.addGestureRecognizer(tapGestureReconizer) ... } // end viewDidLoad()
NewBookTableViewController.swift** Keyboard Control**
/ 4 funcs To dimiss keyboard and move the textView UP/Down when the keyboard shows @objc func tap(_ sender: UITapGestureRecognizer) { view.endEditing(true) } func textViewDidBeginEditing(_ textView: UITextView) { textView.layer.borderWidth = 2 textView.layer.borderColor = UIColor.orange.cgColor animateViewMoving(true, moveValue: 100) } func textViewDidEndEditing(_ textView: UITextView) { textView.layer.borderWidth = 0 textView.layer.borderColor = UIColor.clear.cgColor animateViewMoving(false, moveValue: 100) } func animateViewMoving (_ up:Bool, moveValue :CGFloat){ let movementDuration:TimeInterval = 0.3 let movement:CGFloat = ( up ? -moveValue : moveValue) UIView.beginAnimations( "animateView", context: nil) UIView.setAnimationBeginsFromCurrentState(true) UIView.setAnimationDuration(movementDuration ) self.view.frame = self.view.frame.offsetBy(dx: 0, dy: movement) UIView.commitAnimations() }
**
**
Keyboard Height
The code snippets above used a simple moveValue of 100, which would suffice for most scenarios. However, a more accurate measure would be the actual keyboard height on the device.
The code snippet below shows how to obtain the Keyboard Height. If you want to use this method, substitute the keyboardHeight for the ‘100’ in the moveValue argument for TextView. You can optionally use keyboardHeight in the TextField functions for more precise controls.
if let keyboardSize = (notification.userInfo?[UIResponder.keyboardFrameEndUserInfoKey] as? NSValue)?.cgRectValue { keyboardHeight = keyboardSize.height print(#function, keyboardHeight)
// The 1st keyboardWillShow gets the keyboard size height then observer removed as no need to get keyboard height every time it shows or hides
NotificationCenter.default.removeObserver(self, name: UIResponder.keyboardWillShowNotification, object: nil) // Store KeyboardHeight in UserDefaults to use when in Edit Mode
UserDefaults.standard.set(keyboardHeight, forKey: "KeyboardHeight") UserDefaults.standard.synchronize() } } // end func keyboardWillShow
The article covered the complete logic and code to control the behaviour of TextFields and TextViews, so the keyboard does not obscure the relevant fields or views behind it. Hope you find it useful in your app. Thanks for reading!
0 notes
Photo
Apptober: Day 6
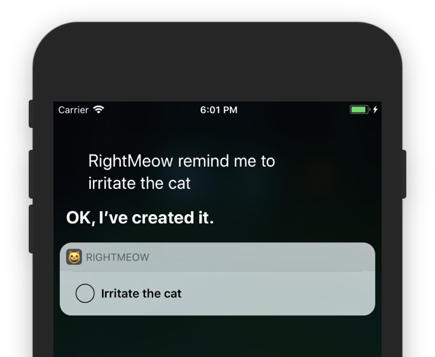
Woot, Siri now understands, in a suuuuper basic and templatey way, how to set the Right Meow status!
Since it's easier to test with the iPhone simulator than the watch simulator, I decided to start implementing the Siri extension on the iPhone-half of the app first. This revealed two main problems:
Siri's ability to grasp the pronunciation of "Right Meow" is sadly limited out of the box (an expected outcome, really).
Syncing data across all of an app's extensions is a process filled with more goat-stealing trolls than a fairytale bridge (sad, but also expected.)
1. I Thought I Heard You Say “Right... Meow”?
I can't get mad at Siri for having trouble with this one. Siri understands the pronunciation of "Right Meow" in the context of "Launch the app Right Meow!". However, in the context of “create a reminder RightMeow” she autocorrects to "Right Now", because that's probably what most people want (I mean, duh).
Apple helpfully provides an API for supplying Siri with extra vocabulary that's specific to your app, so tomorrow I'll look into expanding Siri's vocabulary with some extra Intent Phrases and Parameter Vocabularies that will make her a RightMeow champion.
For now I’ve just been testing my Intents implementation with an Xcode run scheme that provides a written Intent Query Siri can for sure understand:

2. I Sync, Therefore I am
The thing about extensions (which Siri and watch face complications are), is that they’re run in environments outside your main app. This means you need a way to sync data between your apps and these extensions. Enter App Groups!
Using app groups was tantalizing because I barely had to change my implementation for storing data (I’m just using UserDefaults). All I had to do was change a few project settings and BAM - theoretically all my extensions would be reading from the same place!
This worked great for exchanging data between the Siri extension and my main app because they both run on the some device. Unfortunately this failed spectacularly when it came to syncing data across the watch app, the watch extension, and the main app.
At one point all three of my main apps/extensions were sporting data with different levels of freshness, as I’ve illustrated with incredible artistic precision:

Either I’ve made an interesting configuration error or this is just UserDefaults making excellent and depressing use of caching. I’m probably gonna have to come up with a better way to store data if I want to sync it reliably between watch, phone, and extensions.
Tomorrow:
Tomorrow’s tasks are legion: update Siri’s vocabulary, give her a better response template, and maybe even find a good way to keep data synced across our devices. If I’m feeling super ambitious I might even look into iCloud for syncing.
#apptober#programming#coding#indiedev#app development#software delelopment#software dev#productivity#watchkit#ios#ios development#apple watch development#app groups#sirikit#ios intents#intentsui
12 notes
·
View notes
Text
iOS 12 & Swift 5: Build a To-Do List App

iOS 12 & Swift 5: Build a To-Do List App
Put your Swift skills to action by building Taskly, a practical to-do list app What you'll learn Build a fully functional to-do list that you can show off to your family & friends Saving and fetching custom objects in UserDefaults via archiving Know how to apply important design patterns such as MVC and Dependency Injection in other projects Design an iOS app based on a design mockup Requirements Xcode 9.2 or greater installed on your machine You should know the basics of Swift Description Put that pen and paper down. Let's build Taskly, a handy to-do iOS application. We've been given some design mocks from our designer for what they want Taskly to look like, and it's our job to make it happen (no ifs, ands, or buts). It's our job to go above and beyond to exceed the expectations of our designers while writing safe and clean Swift code. Taskly will be built from scratch and all the assets will be provided to you. We'll make use of a UITableViewController to display our tasks and apply MVC and Dependency Injection to ensure separation of concerns. What's a to-do list without a way to save it? Storing the tasks will be possible because of UserDefaults and archiving. Taskly will be built from the ground up and even intermediate programmers will be able to pick up useful concepts and information from this course. There's a lot of questions that will be addressed, such as, what design patterns should we use? Once we're satisfied with how the app looks, we'll get to compare it with the original design mocks to see if our work meets expectations. All in all, Taskly will quickly fill any gaps in knowledge you have about building an iOS application and set a foundation up for you to build your own apps. What are the requirements? Xcode 9.2 or greater Have a basic understanding of how to program in Swift What are you going to accomplish in this course? Building an entire application from the ground up that you can use immediately The idea of thinking more from a design perspective to ensure that we're writing good code Who this course is for: Anyone who wants to apply their knowledge of Swift into developing a useful iOS application This course was designed for the beginner to intermediate Swift programmer Created by Justin Rose Last updated 1/2019 English English Google Drive https://www.udemy.com/ios-swift-build-a-to-do-list-app/?utm_source=careers24&utm_medium=web&utm_campaign=careers24octlaunch&pmtag=CAREERS24LEARN15&aff_code=Ewh3Y1xWRnkGRR5zMkBPbG1RGXFfVFh8CF4ac05QRHYBShFxWT5XMRM= Read the full article
#app#application#Course#design#family#friends#information#iOS#iOS 12#MVC#programmer#Scratch#Swift 5#Taskly#To-Do
0 notes
Text
93% off #Swift 3 Mastery and iOS 10 – Novice to Pro – Build 17 Apps – $10
Learn how to work with Swift 3 and go from beginner to a pro developer by putting together 17 apps
Beginner Level, – 19 hours, 143 lectures
Average rating 4.6/5 (4.6 (31 ratings) Instead of using a simple lifetime average, Udemy calculates a course’s star rating by considering a number of different factors such as the number of ratings, the age of ratings, and the likelihood of fraudulent ratings.)
Course requirements:
You will need a Mac, and Xcode 8 which is a free download from the App Store, and simply a desire to transform your ideas into amazing apps
Course description:
This course will show you that building iOS apps with Swift 3 is fun and easy. Learn how to create 17 apps using Apple’s new programming language Swift 3. Each project will build on the previous one, reinforcing what you have just learned, step by step, so theres no guesswork as to the process and what the code is doing. We go over each line and see what it’s doing, this is a great way to learn about the Cocoa touch classes, frameworks, methods, and everything iOS. The course makes use of callout graphics, diagrams, highlighting, and deep explanations to help guide you along the path of the code, so its easy to follow. When you understand how to put together one project, you can proceed to the next one with confidence, and implement your new skills as you go along. The author of these carefully crafted projects is the award winning Swift programmer, “Paul Hudson”. You can check out all of his work at hackingWithSwift,com. Paul and i teamed up to take many of his written tutorials and convert them into lecture format courses. He is among the top Swift programmers, and has received high praise from the creator of the Swift language, Chris Lattner, for his outstanding tutorials and method of teaching iOS, so you know your getting the best of the best here. This course also makes the perfect reference tool kit, to be used in conjunction with the Apple docs, so that you can go back and scrub through any of the lectures very quickly to pull out relevant code or instruction that you need, as there’s no wasted chatter here, it’s strictly on point with iOS.
Some of what you will be leaning:
Featuring apps built by the award winning Swift programmer – Paul Hudson – hackingwithswift,com We use Xcode 8.2.1 – The latest version The Swift 3 language – we go from variables to creating our own functions and more Learn Swift by use of diagrams / highlighting / graphics Learning the ins and outs of Xcode 8 Working in storyboards and all it nuances How to use with controls / Outlets and Actions How to use logic for smooth control flow Using segues and passing data, in storyboards, and programmatically Master table and collection view controller Using delegates and protocols Work with the social framework – FB – Twitter etc. Learn how to refactor code The ins and outs of GCD SpriteKit and Games The new UserDefaults to persist data Adding audio / Animations Master strings in Swift 3 Using stackView The safari view controller class Using core image Learn the best debugging techniques Create an extension for your app
Working with the many swift classes available to us Autolayout easy and advanced – create constraints using VFL Learn how to work with JSON data in swift And a ton more… All videos are recorded in HD for maximum resolution and clarity
Swift is the new language of the future, and with this course you will get plenty of instruction on how to implement Swift code in unique ways, in an easy to understand step by step format. And before you know it you will have built many amazing apps that you can submit to the App Store, and place in the hands of thousands of people.
This course assumes you have no programming experience, so its perfect for the beginner. Its also a nice fit for the intermediate and experienced coder as the course covers advanced techniques as well.
By adding your own creativity and data, you will be transformed into an Apple Developer in a very short time.
Happy Coding

Steve
Full details Place your own amazing apps into the hands of thousands of people through the App Store Become completely proficient with Swift 3 and iOS app development This course is for anyone who has a burning desire to get their own creative ideas translated into apps, ready for the app store. We cover the complete Swift 3 language and then how to build apps in iOS – From beginner to advanced This is the perfect course if your coming from another language like Objective C or any oth
Reviews:
“I’ve taken all of Stephen Destefano’s courses at Udemy. What I love about him is his clear voice and explanation of each topic, from beginner to advance. He answers all his students questions with respect and clear responses knowing that we are beginners to his class. Highly, highly, highly recommend ALL his courses.” (Annabelle Ramos)
“This is a very informal course. He explains everything thoroughly and breaks it down. I’m coming from zero background in code so my learning is just like explaining 2+1 to a 4yr old. It takes time and effort. However Stephen has taken the time to reach back out every time I’ve had a question and will precisely break things down to a minute level. I’m learning a ton and finally understanding what I’m writing instead of just blindly typing.” (David Groomes)
“I almost took.5 off because I am not sure that this is for an abject beginning programmer to be. There are concepts being introduced that I am not sure a non-programmer would grasp so early, at least would have been for me. I am using this to fill in holes in my understanding of swift. I understand so much more now. This is an excellent course and I am happy that I am taking it. Peace, Myst.” (Donald Bradbury)
About Instructor:
Stephen DeStefano
My name is Steve DeStefano, a long time iOS developer / instructor, and i’ve taken my passion for coding and building apps, and put together a series of comprehensive instructional courses, that will guide you through the process of creating apps in iOS. I stay current with the Swift language, and update it as it continues to evolve. I’ve worked with top programmers in the field, and offer a unique way of teaching IOS programming, which is to present the material in a concise and thoroughly explained manner, with the help of diagrams and highlighting, all to make it easy to follow the path of the code. If your think this might be too difficult, think again, and then come code along with me, and see how easy it is to learn swift and app creation. Go from a newbie to an Apple Dev in a short amount of time, and see your own unique creations on the App Store, and in the hands of thousands of people.
Instructor Other Courses:
iOS 10 Advanced Projects: Build Amazing Apps with Swift 3 Stephen DeStefano, iOS Developer / Swift Instructor (46) $10 $100 iOS 9 Swift Games and Techniques – Swift 2 Next level Coding The Swift 3 Cookbook of Code …………………………………………………………… Stephen DeStefano coupons Development course coupon Udemy Development course coupon Mobile Apps course coupon Udemy Mobile Apps course coupon Swift 3 Mastery and iOS 10 – Novice to Pro – Build 17 Apps Swift 3 Mastery and iOS 10 – Novice to Pro – Build 17 Apps course coupon Swift 3 Mastery and iOS 10 – Novice to Pro – Build 17 Apps coupon coupons
The post 93% off #Swift 3 Mastery and iOS 10 – Novice to Pro – Build 17 Apps – $10 appeared first on Udemy Cupón/ Udemy Coupon/.
from Udemy Cupón/ Udemy Coupon/ http://coursetag.com/udemy/coupon/93-off-swift-3-mastery-and-ios-10-novice-to-pro-build-17-apps-10/ from Course Tag https://coursetagcom.tumblr.com/post/155755939333
0 notes