#VMDK File Recovery
Explore tagged Tumblr posts
Visit Tumblr Blog
Explore Tumblr blogs with no restrictions, modern design and the best experience.
Last Seen Tumblr Blogs


Fun Fact
Tumblr has 16.74 million mobile monthly users in the US.
Text
Sidetrack: ChromeOS Flex... on a Virtual Machine... with Single GPU Passthrough...
the prospect of running ChromeOS on anything more powerful than a microwave oven is unfathomably cursed - wheezus2000 on discord
So... where do we start here... *checks notes* ah! So yeah, last Sunday I showcased a virtual machine running ChromeOS Flex (the most barebones GUI your grandma can only recognize) over to the aptly named r/ChromeOSFlex subreddit. It was a lot of work but it does work somehow.
Anyways, here's a tutorial to get this abomination up and running using virt-manager!
Prerequisites:
You will need:
ChromeOS Flex Recovery Image
A decent hard drive space (around 24GB is enough)
A nice dedicated GPU (because I'm not sure if it'll work with an iGPU)
more than 4GB of RAM (8GB or more is recommended)
IOMMU support
Lots of patience (you'll see why in a moment)
On the software side, you'll need:
KVM and QEMU
libvirtd and virt-manager
GRUB or any bootloader already set-up for GPU passthrough
On the skills necessary:
Having familiarized with the concept of Linux, and basic command line stuff
Having followed instructions precisely
Potentially, having skills in compiling software and/or fiddling with the operating system and the Linux kernel as well
and... not having an attention span of a script kiddie
Process
Visit this link to download the recovery image from Google.
Scroll down to this part of the page. Click on "ChromeOS Flex installer image".
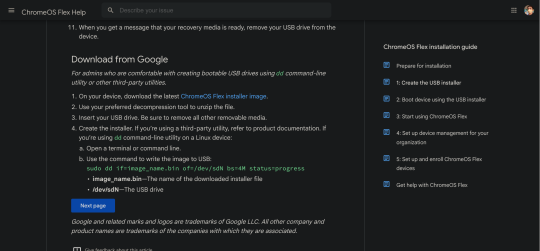
This would then be downloaded.

After that, unzip the file to a convenient place. This would take ~6GB of storage space.
Install the software prerequisites using your favorite package manager.
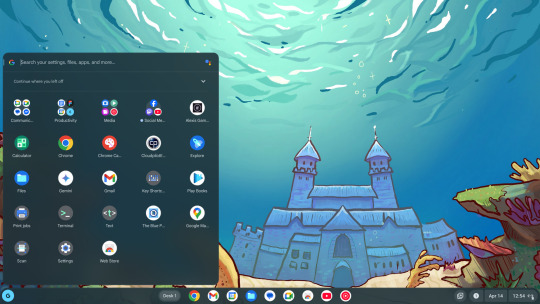
Once having virt-manager installed, click on the new button.
From there, select "Import existing disk image".

Click on Browse. Then select "Browse Local" to find the recovery image.
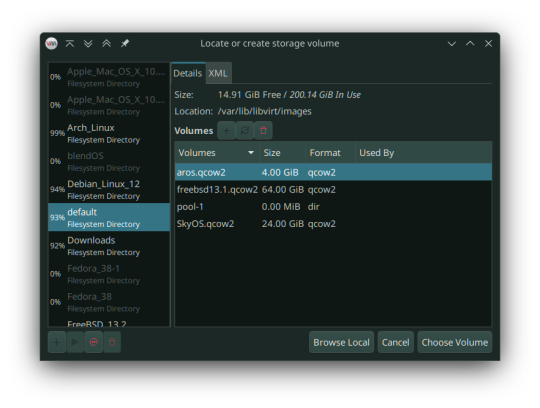
In my case, that'll be in the folder called vmdk, stored in my os folder on one of my hard drives. Select the "chromeos_*_reven_recovery..." file.

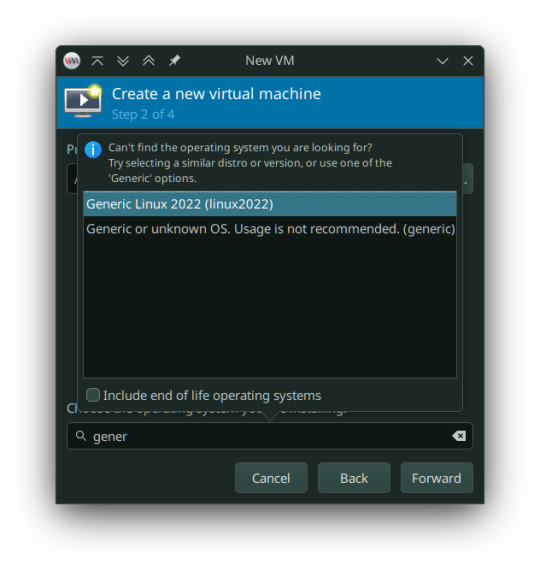
In the "Choose the operating system you are installing" prompt, select linux2022.
In the memory tab, pick 4096MiB and select how many cores you want to be assigned.

You must select "Customize configuration before install" as we tweak some things.

In the prompt that follows, here's what you need to change:
Firmware: BIOS -> UEFI
Disk: VirtIO -> USB
Video: Anything else -> VirtIO
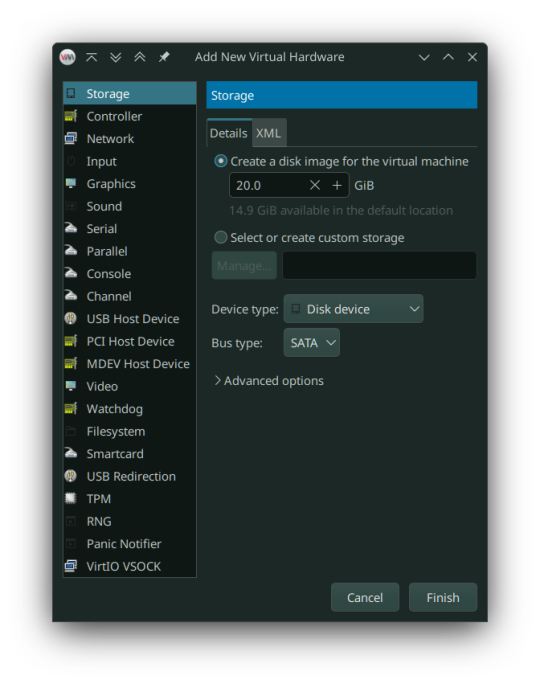
Now add a virtual hard drive by clicking the "Add Hardware" button. It should be 20GB or larger, SATA bus. VirtIO bus doesn't work as it wouldn't be recognized.
Remove any Consoles, RNG and start the install.
Here's the configuration if you follow these steps:
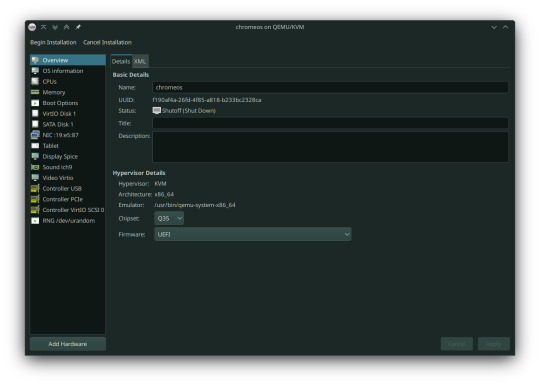
After starting, you can now follow the steps in installing ChromeOS Flex. It should be straightforward, however the graphics are still glitchy as it seems. It'll be fixed once we added our dGPU.
However, ChromeOS at boot will, and definitely (in my case) crash and bootloop a couple times, even when installed, before landing you to the desktop.
If for some reason, the USB tablet device doesn't work or if you prefer a cursor, switch the USB tablet for a PS/2 or USB mouse.
Once installed, you can see your desktop glitching. If you, somehow can navigate the system, you can now turn it off and set up Single GPU Passthrough. I used this one by risingprismtv. Follow the instructions provided in the wiki, and apply it to your VM. This can (and will) be complicated (especially when dealing with IOMMU groups), as it may break your setup, so please proceed with caution. Any issues with the script can be reported through their Discord server.
After setting the scripts, this is my current VM setup:

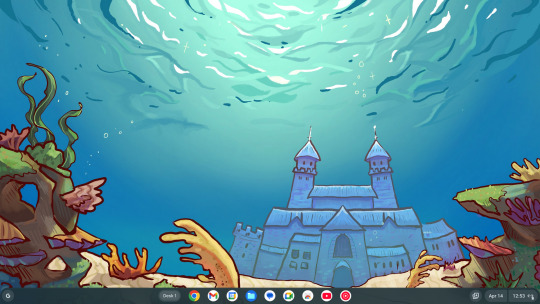
Now it's time to boot the VM, and voila! You can now use ChromeOS Flex while staying under Linux!
Predicaments, and possible issues
No, it does not work under Windows, well, without complications apparently.
Possible VM bootloops, just like I said. Seems related to the graphics, I presume. Though, this only happens multiple times, before working normally.
You can't update the VM, apparently.
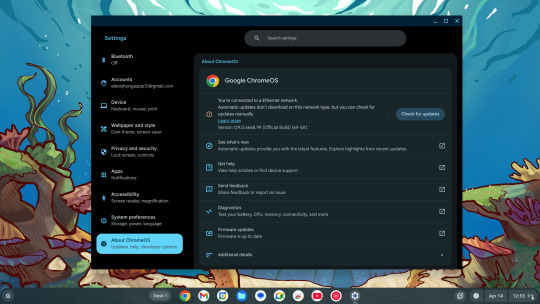
Screenshots
And as always, see ya later!
0 notes
Text
Getting Started with macOS Ventura: Using Virtual Machines and Installation Files
MacOS Ventura is packed with exciting new features and improvements designed to enhance user experience and productivity. For those who want to explore macOS Ventura without committing to a full system upgrade, using a macOS Ventura .ISO or VMDK file to set up a virtual machine is an excellent solution. This blog will guide you through the process and benefits of using these files.
Why Use macOS Ventura .ISO?
A macOS Ventura .ISO file provides a convenient and flexible way to install and test the operating system on various hardware setups. Here are a few reasons why you might want to use a macOS Ventura .ISO:
Testing and Development: Developers can test applications on macOS Ventura without upgrading their primary system.
Compatibility: Users with non-Mac hardware can experience macOS features.
Backup and Recovery: An .ISO file can be used as a recovery tool in case of system failures.
Obtaining macOS Ventura .ISO
To get your hands on the macOS Ventura .ISO file, you can follow these steps:
Official Sources: The safest method is to download it from official Apple channels such as the Apple Developer website or the Mac App Store.
Create Your Own ISO: If you have access to a Mac, you can create an ISO file from the official macOS installer using Terminal commands.
Setting Up macOS Ventura Virtual Machine
A virtual machine (VM) allows you to run macOS Ventura on your existing hardware without replacing your current operating system. Here's how you can set up a macOS Ventura virtual machine:
Using VirtualBox
Download VirtualBox: Install the latest version of VirtualBox from the official website.
Create a New VM: Open VirtualBox and click "New" to create a new virtual machine. Choose "Mac OS X" as the type and "macOS 10.13 High Sierra (64-bit)" as the version.
Allocate Resources: Assign sufficient RAM and create a virtual hard disk.
Mount the .ISO File: Go to the VM settings, navigate to Storage, and add the macOS Ventura .ISO file as a virtual optical disk.
Start the VM: Start the virtual machine and follow the on-screen instructions to install macOS Ventura.
Using macOS Ventura VMDK
A VMDK (Virtual Machine Disk) file is another option for setting up a macOS Ventura virtual machine. It’s similar to an .ISO but designed specifically for virtual machine environments. Here’s how to use a macOS Ventura VMDK:
Download the VMDK File: Obtain the macOS Ventura VMDK file from a reliable source.
Create a New VM in VirtualBox: Follow the same steps as above to create a new VM.
Use the VMDK File: Instead of an .ISO, select the macOS Ventura VMDK file as the hard disk for the virtual machine.
Start and Install: Boot up the VM and proceed with the installation.
Benefits of Using macOS Ventura Virtual Machine
Flexibility: Easily switch between different OS versions and configurations.
Safety: Test new features without risking your primary system’s stability.
Convenience: Quickly set up and dismantle virtual environments as needed.
Conclusion
Follow the steps outlined in this guide to get started with your macOS Ventura virtual machine and enjoy all the new features and improvements. Using a macOS Ventura .ISO or VMDK file to set up a virtual machine provides a flexible and efficient way to explore Apple’s latest operating system. Whether you’re a developer testing new software, an IT professional preparing for deployment, or simply an enthusiast eager to experience macOS Ventura, these methods offer a practical solution.
0 notes
Link
Looking for the best solution to to open or restore your VMware Corrupt VMDK Files then you can follow this blog for the best processing.
0 notes
Text
DiskDigger Importance || Recover Lost Files
In the Present scenario, Technology is growing too fast and we all are experiencing that our smartphone, PC, and Laptops carrying various files with the help of SD cards and internal memory. We will think that our files are in very secure places but if any file deleted unexpectedly then what you will do?. Don't worry, I already told you that tech is growing as fast as it can. Here I'm going to discuss the best data recovery services aka (DiskDigger) which are a perfect example of it. Let's go down to get more details of DiskDigger( Deep file recovery from any drive).
DiskDigger is a tool which can recover deleted files like photos, documents, music, video and much more.
DiskDigger Features:
DiskDigger can recover lost files from most types of media that your computer can read: hard disks, USB flash drives, memory cards, CDs, DVDs, and floppy disks. (Note: Make sure that you have to connect your device with a USB port to recover lost data from Android and IOS devices ). And one more important thing is you have to download the diskdigger app on your android phone to recover lost files. Suppose if your Android device uses a microSD card for saving the data, please remove the card and connect it directly to your PC using a card reader, so that you can scan it directly using DiskDigger for Windows.)
DiskDigger has two processes which you have to choose every time while scanning a disk. These methods are named as “dig deep” and “dig deeper“.
Dig Deep:
Undelete files from FAT (FAT12, FAT16, FAT32), NTFS, and exFAT partitions.
Recover any type of file.
Filter recoverable files by name and size.
Sort recoverable files by name, size, date, and directory.
Dig Deeper:
Scan (carve) entire disk for traces of specific file types.
Supported file types include:
Photos and images:
JPG - Pictures stored in digital cameras and on the Web (Joint Photographic Experts Group)
PNG - Portable Network Graphics
GIF - Graphics Interchange Format
BMP - Windows and OS/2 bitmap image
Running in Linux
TIFF - Tagged Image File Format
ICO - Windows Icon
ANI - Windows animated cursor
CR2 - Canon raw image
SR2 - Sony raw image
NEF - Nikon raw image
DCR - Kodak raw image
PEF - Pentax raw image
RAF - Fujifilm raw image
RW2 - Panasonic/Lumix raw image
LFP - Lytro raw image
MPO - Images from 3D cameras (Multiple Picture Object)
DNG - Adobe Digital Negative
SVG - Scalable Vector Graphics
HEIC/HEIF - High-Efficiency File Format image
PSD - Adobe Photoshop image
RAS - Sun raster image
PSP - Paint Shop Pro image
Thumbcache - Windows thumbnail cache
IFF - Amiga images and other media
ART - AOL Art images
WMF - Windows MetaFile
EMF - Enhanced MetaFile
WMZ, EMZ - Compressed MetaFiles
DICOM - Medical imaging format
WEBP - WebP images
PCX - ZSoft PCX images
CDR - CorelDraw images
INDD - Adobe InDesign documents
CP - Adobe Captivate documents
AI - Adobe Illustrator documents
Documents:
DOC - Microsoft Word document (2003 and below)
DOCX - Microsoft Word document (2007 and above)
XLS - Microsoft Excel spreadsheet (2003 and below)
XLSX - Microsoft Excel spreadsheet (2007 and above)
PPT - Microsoft PowerPoint presentation (2003 and below)
Custom Heuristics catalog || Disk Digger Pro
PPTX - Microsoft PowerPoint presentation (2007 and above)
VSD - Microsoft Visio document
PDF - Portable Document Format
XML - eXtensible Markup Language
HTML - HyperText Markup Language
RTF - Rich Text Format
WPD - WordPerfect document
WPS - Microsoft Works document
PUB - Microsoft Publisher document
XPS - XML Paper Specification
WRI - Old Windows Write document
ODT, ODS, ODP, ODG - OpenDocument formats
DPP - Serif DrawPlus document
PPP - Serif PagePlus document
Audio and video:
MP3 - Audio format widely used in digital media players (MPEG layer 3)
WMA - Windows Media Audio
AVI - Audio Video Interleave
WAV - Wave audio
MID -Musical Instrument Digital Interface
FLV - Adobe Flash Video
WMV - Windows Media Video
MOV - QuickTime video
M4A - MPEG-4 audio
M4V, MP4 - MPEG-4 video
3GP - Third Generation Partnership video
F4V - Adobe Flash video based on MPEG-4 Part 12
RM - RealMedia video
RMVB - RealMedia video (variable bitrate)
MKV - Matroska video
MPEG - Motion Picture Experts Group
AU - Sun Microsystems audio
MTS, M2TS - MPEG2 Transport Stream
R3D - RED Video Camera video
APE - Monkey's Audio file
OFR - OptimFROG lossless audio
PPM, PGM, PBM - Netpbm images
WEBM - WebM videos
Compressed archives:
ZIP - Widely used a compressed format developed by PKWARE
RAR - Roshal ARchive, used by WinRAR
7Z - Compressed format used by 7-Zip
GZ - Compressed format used by gzip
SIT - Compressed format used by StuffIt for Mac
ACE - WinAce archive
CAB - Microsoft Cabinet archive
SZDD - Compressed files created by COMPRESS.EXE from MS-DOS
Miscellaneous:
ISO - Images of optical media, such as CDs and DVDs
EXE - Windows or MS-DOS executable file
DLL - Windows or MS-DOS dynamic-link library
MDB - Microsoft Access database (2003 and below)
ACCDB - Microsoft Access database (2007 and above)
PST - Microsoft Outlook Personal Folders file
DBX - Microsoft Outlook Express data file
XAC - GnuCash data file
KMY - KMyMoney data file
DWG - AutoCAD drawing
DXF - Drawing Interchange Format
CHM - Microsoft Compiled HTML Help file
TTF, TTC - TrueType font
CLASS - Java class file
KMZ - Google Earth location data
FIT - Garmin activity file
WALLET - Armory Bitcoin wallet
WALLET.DAT - Bitcoin Core wallet
Recovering documents from your Recycle Bin
Common Features:
Works in Windows 10, Windows 8, Windows 7, Windows Vista, and Windows XP. Both 32-bit and 64-bit versions of Windows are supported.
Also works in Linux.
View recoverable files as a list, or as thumbnail previews.
Thumbnails will show previews of image files, album art from MP3 and WMA files, and icons from executable files!
Selecting a recoverable file brings up a full preview of the file (insofar as possible). For image files, it will show the image (with pan and zoom). For document files, it will show a text-only preview of the document. For certain audio files, it will allow you to play back the sound.
Previews of JPG and TIFF files will show EXIF information (camera model, date taken, sensor settings, etc.).
Previews of MP3 files will show ID3 information (artist, album, genre, etc.).
Previews of ZIP files will show a list of files contained in the archive.
Advanced Features
Able to scan virtual disk image files:
E01 and EWF files (Expert Witness Format)
VMDK files (VMware disk image)
VHD files (Microsoft Virtual Hard Disk)
VDI files (VirtualBox disk image)
Direct binary disk images (acquired with <code>dd</code> or similar tools)
When digging deeper, ability to start scanning from a specific location on the disk.
When previewing files, the program optionally shows the first 4K bytes of the file as a hex dump.
To find more information go through remaining articles in our site like hard drive data recovery, SD card data Recovery, Android Data Recovery, USB flash drive data recovery, Linux Data Recovery, etc.
Also Read:
Recovering documents from a hard drive
#Recovering documents from a hard drive#DiskDigger#Recover lost files#smartphone#sd card data recovery#Deep file recovery from any drive#dig deeper#dig deep#digging#disk images#digging deeper#diskdigger importance#diskdigger features
3 notes
·
View notes
Text
Gimp for mac os high sierra

#Gimp for mac os high sierra how to
#Gimp for mac os high sierra mac os
#Gimp for mac os high sierra apk
#Gimp for mac os high sierra install
#Gimp for mac os high sierra update
These magnet/torrent download links are easy to use if you have a good BitTorrent client. APPLIES TO: 2013 2016 2019 SharePoint Online If you want to remove the metadata of an item from the search index or from the search results, you remove. Delete items from the search index or from search results in SharePoint Server.
#Gimp for mac os high sierra how to
How to remove how to remove xf-accm2015.dmg. You can now quit Terminal and eject the volume.
#Gimp for mac os high sierra install
When Terminal says that it's done, the volume will have the same name as the installer you downloaded, such as Install macOS Catalina.
Terminal shows the progress as the bootable installer is created.
When prompted, type Y to confirm that you want to erase the volume, then press Return.
Terminal doesn't show any characters as you type your password.
When prompted, type your administrator password and press Return again.
If it has a different name, replace MyVolume in these commands with the name of your volume. These assume that the installer is still in your Applications folder, and MyVolume is the name of the USB flash drive or other volume you're using.
Type or paste one of the following commands in Terminal.
Open Terminal, which is in the Utilities folder of your Applications folder.
#Gimp for mac os high sierra mac os
Make sure that it has at least 12GB of available storage and is formatted as Mac OS Extended. Connect the USB flash drive or other volume that you're using for the bootable installer.Use the 'createinstallmedia' command in Terminal It installs an app named Install OS X El Capitan into your Applications folder. Open this file and follow the onscreen instructions. OS X El Capitan downloads as a disk image that contains a file named InstallMacOSX.pkg.It installs an app named Install macOS Sierra into your Applications folder. macOS Sierra downloads as a disk image that contains a file named InstallOS.pkg.Enterprise administrators, please download from Apple, not a locally hosted software-update server. To get the required installer, download from a Mac that is using macOS Sierra 10.12.5 or later, or El Capitan 10.11.6. If the installer opens after downloading, quit it without continuing installation. macOS Catalina, macOS Mojave, and macOS High Sierra download directly to your Applications folder as an app named Install macOS Catalina, Install macOS Mojave, or Install macOS High Sierra.
#Gimp for mac os high sierra apk
Up to date 2019 Checklist How to Repair Apex Legends Engine Error 0x887A0006 Working Gimp lnkscape Apk How tó Install Gimp lnkscape on Android report this advertisement report this ad.Find the appropriate download link in the upgrade instructions for each macOS version: Popular Articles How to Delete a Web page in OpenOffice in 8 Various Methods How to make use of Shadowsocks Proxy customer on Google android Free of charge How to Shutdown Home windows Server 2012 Easy to Stick to Guidebook How to Repair Magisk Install Mistake 1 in TWRP Recovery Is certainly safe Virus check report, Fraud Adviser reviews Install Home windows 10 on Android using Limbo Emulator No Main How To Select A Personal computer Case. Required fields are proclaimed Opinion: Title: Email Tackle: Website: Save my name, email, and site in this web browser for the following period I comment. Also Look over: Fix Apex Legends Engine Mistake 0x887A0006 Associated Posts. Now, Launch the Virtual device and then Develop a brand-new machine.Īnd then do the pursuing configurations: Title: macOS 10.13 High Sierra Type: Mac pc OS Back button Version: macOS 10.13 or 10.12 Memory space dimension: 3GB to 6GM ( 65 of your Ram memory) Virtual cd disk document: macOS higher Sierra 10.13.vmdk And today, you have to choose Use an exsting digital hard disc document and Open macOS high Sierra 10.13.vmdk File. How to download MacOS high Sierra If you are usually a Mac user then you can conveniently download the iso installer (dmg document) from the recognized web site of apple.Īds If you are usually not a Mac pc user or you are a home windows user (and would like to set up Sierra in VirtuaIBox, Vmware or ány various other virtual device) then you can download the document from the below link: Download MacOS Great Sierra (from apple web site) How to install MacOS Large Sierra on Virtual Device Initial of all, download and set up VirtualBox or Vmwaré on your computer (Windows or any various other) And after that down load the MacOS higher sierra.Īnd so you require to extract it by using WinRAR or any other tool. It provides improved the dependability of the Microsoft Exchange information sync.
#Gimp for mac os high sierra update
Superduper! High Sierra Update Your Older
Superduper! High Sierra Update Your Older.
0 notes
Text
Sd card reader not working macbook air

Sd card reader not working macbook air how to#
Sd card reader not working macbook air mac os x#
Sd card reader not working macbook air install#
Sd card reader not working macbook air password#
Sd card reader not working macbook air plus#
So, just take the first portion of your device name and use it for the -rawdisk parameter. The reason for this is that the s1 portion of the device name denotes a partition but I want to create a pointer to the entire device (mine has 2 partitions). Note, when I ran the mount command above, my device name was /dev/disk1 s1 but in this command I did not include the trailing s1 portion. You need to run sudo VBoxManage internalcommands createrawvmdk -filename. Now, you need to create a VirtualBox vmdk file that points to the SD card so that you can mount it as a device in a virtual machine. Do not click the eject button, just the Unmount button. Next, open up Disk Utility, click on the the mounted partition from the card (NO NAME in my case), and then click the Unmount button at the top. You don’t want to get this wrong so make sure it’s right! For a sanity check you could always run mount before inserting the card and then after, to see the difference. In my case, it was /dev/disk1s1 (NO NAME matches the title that showed up in Finder when I inserted the card so this is a hint as to which one is the one I am looking for) listed at the bottom of the mount command. Take note of the SD card device that shows up. Below are the steps I had to take to get it working.įirst, insert the SD card into the reader, open a terminal window and type mount. It wasn’t as easy as I thought because, for some reason, getting VirtualBox to pass the SD card reader to a virtual machine as a virtual device is not quite easy. Since I own a MacBook Air and it can’t read ext3 natively (not that I know of at least) I thought I would just just spin up a virtual machine in VirtualBox, mount the SD card from the Raspberry Pi, make the change and be done.
Sd card reader not working macbook air how to#
The only way I know how to do this is to mount the root partition from the context of another machine and then edit the /etc/shadow file.
Sd card reader not working macbook air password#
Somehow I forgot the password to one of my Raspberry Pi boxes and needed to reset it.
Sd card reader not working macbook air mac os x#
You can use Migration Assistant software (built into Mac OS X) to transfer all personal files, settings and applications to another Mac computer.Mount SD card in VirtualBox from Mac OS X Host Now you can access and recover needed files. If the SSD is in good working condition your Mac should detect it. Select the right enclosure for your laptop and mount the SSD.Ĭonnect the enclosure to another Mac computer via provided USB 3.0 cable.
Sd card reader not working macbook air install#
Do not try to install a third party SSD into this enclosure or you will damage the drive. IMPORTANT NOTE: The OWC Envoy enclosure has been specifically designed for use ONLY with the factory SSD found installed in Apple MacBook Air. The SSD removed from a 2010/2011 model will not fit into 2012 or 2013-Current year enclosure and vice versa. SSDs installed in MacBook Air (2010/2011), MacBook Air (2012) and MacBook Air (2013/2014/2015/2017) models are different, even though they look similar. Remove one Torx T5 screw securing the SSD.įor data access and recovery you will need a special external enclosure for Apple SSD drives. Remove 10 pentalobe screws from the bottom cover.
Sd card reader not working macbook air plus#
MacBook Air 11-inch or 13-inch (2010/2011, 2012, 2013- Current models)įor the following procedure you will need Torx T5 screwdriver and 5-Point Torx Plus (Pentalobe compatible) screwdriver. If everything is connected properly and the hard drive not failing, it should be detected by the Mac. In order to connect the hard drive adapter to another Mac computer you will need a SATA to USB cable.Ĭonnect the cable to the hard drive adapter and plug it into another working Mac computer. The hard drive is almost ready for data recovery. You have to make sure that the cable is plugged correctly and contacts on the cable are aligned with the contacts on the connector. Note that contacts on the cable are facing downwards. Make sure the cable is plugged all the way down into the connector.ĭo not bent the cable because it can be easily damaged. I had some trouble inserting the cable because it was too tight. Now connect the second end of the flat cable to the hard drive. Lock the connector by sliding the retainer to the shown direction. Note that contacts on the cable are facing upwards. In order to access data on the hard drive I’ll be using a 24 Pin SATA LIF Macbook Air SSD HDD SATA Adapter.
0 notes
Text
Mac os high sierra download iso


#Mac os high sierra download iso how to#
#Mac os high sierra download iso mac os x#
#Mac os high sierra download iso install#
System -> Processor -> change CPU to two, optional: set execution cap to 80% (this value is up to you and your host system configuration).System -> Motherboard -> Boot Order: deactivate Floppy.Virtual hard disk size: ~20 GB (an empty installation of macOS High Sierra takes about 11,4 GB).
#Mac os high sierra download iso mac os x#
Version: Mac OS X (64-bit) or macOS 10.13 High Sierra (64-bit).
Name: macOS (or whatever you want to call it).
Open a Terminal window, create a "virtual USB flash drive"/disk image:.
The version of the "Install macOS High Sierra.app" has to be 13.0.66 or above.

Apple made some changes to the previous released version, especially to the installer, which are important to get this VM running.
Hint: if you have downloaded macOS High Sierra before the 5th of October, delete it and redownload it.
Download macOS High Sierra from the Mac App Store.
#Mac os high sierra download iso install#
You also need ~20 GB disk space for the virtual machine, as well as ~18 GB free space temporarily for the creation of the install media.Ĭreate a macOS install ISO file for VirtualBox You will need at least 4096 MB RAM of host memory, more is better. MacOS Sierra 10.12.6, VirtualBox 5.1.28 with installed VirtualBox Extension Pack It's always a struggle to get macOS as a guest system running on macOS as the host system, but today was my lucky day and after several failures I managed to get it running! So here is how I did it. So I have a MacBook Pro running macOS Sierra (10.12) and I wanted to run a virtual machine (VM) of macOS High Sierra to try out the new operating system.
#Mac os high sierra download iso how to#
And now, you have to select “Use an exsting virtual hard disk file” and Open “macOS high Sierra 10.13.vmdk” File.8Okt/17 0 VirtualBox: How to create a macOS High Sierra VM to run on a Mac host system.
And then do the following settings: Name: macOS 10.13 High Sierra Type: Mac OS X Version: macOS 10.13 or 10.12 Memory size: 3GB to 6GB ( 65% of your Ram) Virtual disk file: macOS high Sierra 10.13.vmdk
Now, Launch the Virtual machine and then “Create a new machine”.
And so you need to extract it by using WinRAR or any other tool.
And then download the MacOS high sierra.
First of all, download and install VirtualBox or Vmware on your computer (Windows or any other).
If you are not a Mac user or you are a windows user (and want to install Sierra in VirtualBox, Vmware or any other virtual machine) then you can download the file from the below link:ĭownload MacOS High Sierra (from apple site) How to install MacOS High Sierra on Virtual Machine click here (if you are a Mac user, else skip this). If you are a Mac user then you can easily download the iso installer (dmg file) from the official site of apple.
It has improved the reliability of the Microsoft Exchange message sync.
You can now unlock a FileVault-encrypted APFS volume using a recovery keychain file.
Bluetooth appeared as unavailable has been fixed.

This new upgraded version has improved the reliability of SMB printing.
You can download the MacOS high sierra from the direct download link for your Mac computer, VirtualBox or Vmware. MacOS High Sierra is the fourteenth release of macOS which comes with a lot of upgraded features. If you are currently using MacOS older version then I have good news that you can upgrade your old OS with MacOS high sierra for free. It is the second most widely used OS as per Wikipedia. MacOS is one of the most popular operating systems which is developed and market by App Inc.
0 notes
Text
Easeus Data Recovery Mac Free
This article applies to: EaseUS TodoPhoto Recovery Introduction EaseUS TodoPhoto Recovery recovers photos and videos those are lost due to various reasons, such as deleting, formatting, partition loss, disk corruption, virus attack, and other data loss scenarios. You can use it to recover the valuable files with a few clicks. How to use 1. Select a location to scan The software will list all the drives connected to the computer, including external drives and internal drives. Please select a drive, volume or specific location from which you want to recover, then click Scan. Noted: If you are not sure which drive to scan, you may click Help in the left side. Under “Not sure which drive to scan”, please click Scan for the entire disk. 2. Scan the disk to find the lost files The software will automatically start a quick scan to find the deleted files, then an advanced scan to find more by searching the entire data area of your storage device. 3. Preview and Recover Lost Files EaseUS TodoPhoto Recovery allows you to preview the photos and videos following a scan. If you can preview, the files are recoverable. You may filter by file type, date or size. After file filtering, previewing, and selecting all of the important files that you wish to recover, press “Recover” button in the right corner to immediately get your data back. Note: Do NOT save the files back onto the same hard drive partition or external device which you recover from.
Easeus Data Recovery free. download full Version Crack Mac
Easeus For Mac

EaseUS Free Mac Photo Recovery Software, Data Recovery Wizard for Mac, is especially designed for Mac users to recover lost pictures on Mac OS X. It is the best freeware on the market to rescue all your precious photos lost due to deleting, formatting, improper.
EaseUS TodoPhoto Recovery recovers photos and videos those are lost due to various reasons, such as deleting, formatting, partition loss, disk corruption, virus attack, and other data loss scenarios. You can use it to recover the valuable files with a few clicks. EaseUS provides limited free recovery in the Data Recovery Wizard to help customers test its recovery quality before they make the purchase. This article explains how to obtain the free recovery in the Free version of EaseUS Data Recovery Wizard. EaseUS Data Recovery Wizard (Windows & Mac) EaseUS Data Recovery Wizard is not just another data recovery software, but also a user-friendly app, with a Windows Explorer type interface, and a three-step easy data recovery process. This app is free for recovering data up to 500MB (for the time being). It works on internal and external hard. Software Gratis EaseUS Mac Data Recovery dapat dengan cepat memulihkan file yang terhapus bahkan setelah Anda telah mengosongkan Isi trash. Benar-benar memulihkan data yang hilang akibat diformat, serangan virus, crash perangkat lunak, permasalahan OS, yang tidak benar atau alasan yang tidak diketahui lainnya.
Do you need specialized Manual Data Recovery Services? You may need further help for tough data loss situations like reformatting drive, RAW disk, partition loss, repartition failures, system boot error and virtual disk corruption. Consult with EaseUS Data Recovery Experts for cost-efficient one-on-one manual recovery service. They could offer the following services after FREE diagnosis: 1. Repair corrupted RAID structure 2. Unformat the drive which was formatted by mistake 3. Repair damaged RAW drive that needs to be reformatted (Bitlocker encrypted drive is also supported) 4. Repair unbootable Windows operating system 5. Recover/repair lost partition and reparitioned drive (the one that cannot be recovered by software) 6. Repair corrupted virtual disk file (.vmdk, .vhd, .vhdx, etc.) Activate Live Chat Call Us: 1-800-570-4634
Frequently Asked Questions

Easeus Data Recovery free. download full Version Crack Mac
Can I recover data if the drive shows as unmounted?
The drive cannot be accessed if it's not mounted. Please try to mount it in Disk Utility, then run EaseUS Data Recovery Wizard and scan the disk to recover lost data.
How can I find the lost data from the scan result?
EaseUS Data Recovery Wizard offers data filtering and search functions. You can filter the files by size and type, or search them by file/folder name or file extension.
Why cannot I recover 2GB data for free?
It is recommended to check the version installed is Free or Trial because they are different versions. The Trial has data preview function but cannot save any files, while the Free version enables to recover 2 GB files. The default free space is 500 MB and you may share the product on social media to get another 1.5GB.

Why cannot the recovered files be opened?
A file is saved as 2 parts on the storage device: directory information (which contains a file name, timestamp and size info, etc.) and data content. If the files with original file names and folder structures cannot be opened, one possible reason is the corrupted directory information. There is still a chance to recover the data content with the RAW Recovery method in our software.
Easeus For Mac
How long does it take to scan the drive?
It strongly depends on the capacity of your hard drive and the performance of your computer. As a reference, hard drive recoveries can be completed in around 10 to 12 hours for a 1-TB healthy hard drive in general conditions.
1 note
·
View note
Link
Searching for the unique software that can recover your corrupted and damaged VMDK data files? then, You can opt for this amazing software. This software has amazing algorithms that can recover your corrupted VMDK data files with ease. It can recover VMDK files from moderate & severe corruption. It is designed on a smart algorithm that ensures the safe recovery of email files without harming a healthy database. It has no file size limitations. Users can recover multiple corrupted VMDK files at one go using this software.
0 notes
Text
Mac Fresh Install Catalina
If your Mac isn't compatible with the latest macOS, you might still be able to upgrade to an earlier macOS, such as macOS Catalina, Mojave, High Sierra, Sierra, or El Capitan. Purple player for mac. To get the latest features and maintain the security, stability, compatibility, and performance of your Mac, it's important to keep your software up to date.
How To Do A Fresh Install Of Mac Catalina
How To Do A Fresh Install Of Macos Catalina
Mac Fresh Install Catalina Free
Mac Fresh Install Catalina 2019
Mac Fresh Install Catalina Update
Fresh Install Of Mac Catalina
For those who tend to install Catalina can skip the next step. Those who want to know how to look for an installer file for an older version can read the next part. Get The Install File For An Older Version Of macOS. If you have an older version of Mac OS X and macOS, the process might be hard for you.
Clean installing is normally a personal preference. But when it comes to macOS Catalina, it may be a good idea. Some users recommend a clean install every time you update to a major operating system update (macOS Mojave, macOS Catalina, etc.).
Install macOS or OS X from Internet Recovery Mode, which you can boot into by holding option+command+R while your Mac powers up. Download the relevant macOS or OS X installer from Apple, then use Terminal to create a USB installer you can boot up from. Or use the OS X installation disc that came with your machine — or buy a new one — to.
Apple’s new product macOS Catalina officially here. Ready to download and install on your PC Mac. Apple has released the first major update to the sixteenth version of macOS Catalina. Released on “October 2019” there first update to OS. Apple held there latest iPhone version 11 to the public in the event 11 September 2019. Indeed macOS Catalina released in July 2019, but with the release date of the iPhone 11 released the new update that surprised us. Can you believe that listening to music, watch movies, and past download. If you want to keep all your kinds of stuff in the same place then upgrade to macOS Catalina. Download macOS Catalina 10.15 ISO DMG VMDK.
Download the latest Catalina Installer using the latest Catalina Patcher version. Some third-party applications do not open or crash on launch This is an issue Apple introduced in 10.15.4, and is not an issue with the patch itself. MacOS Catalina (version 10.15) is the sixteenth major release of macOS, Apple Inc.' S desktop operating system for Macintosh computers. It is the successor to macOS Mojave and was announced at WWDC 2019 on June 3, 2019 and released to the public on October 7, 2019. MacOS Catalina, the latest version of the world’s most advanced desktop operating system, is now available as a free software update. With macOS Catalina, users are able to enjoy Apple Arcade, a groundbreaking new game subscription service featuring new, exclusive games from some of the world’s most creative developers.
Dec 08, 2020 Install macOS Catalina and update macOS Catalina to the most recent version, which is super easy. There is no distinction to do between installing and upgrading Catalina on VMware and VirtualBox. As of this moment, this is the latest version of macOS Catalina we’ve made it.
Oct 19, 2020 If you’re using macOS Mojave, then you need to update software to get MacOS Catalina. To do this, click Apple menu System Preferences, and then select Software Update. Check this article to know how to update software on Mac. Or you can get the latest macOS Catalina on the App Store for other versions including High Sierra (10.13), Sierra.
Let’s dig in once again to the history of Apple’s new product macOS Catalina. Apple’s first advanced OS introduced at the “WWDC” July 2019 Worldwide conference in San Jose, California United States. Apple’s introduced many fresh features to the table, the most incredible feature in macOS Catalina is to second-generation iPad as second screen display. After macOS Catalina comes out with the latest update, and ready to download from App Store or update directly to it. Also, this latest OS comes out with a feature called “Project Catalyst”. This OS will allow the user to have easy work with iOS 13. It means to have an easy environment in macOS Catalina. Unbelievable changes that you can use your favorite Apps now on your computer. Download macOS Catalina 10.15 ISO DMG VMDK
Related:Download macOS Catalina Torrent Image – Latest Version
Alongside a few things remain to be introduced in the macOS Catalina feature part. That is after this we don’t need to have iTunes, the replacement is we can use a new Mac-flavored Music App, besides that Apple Podcasts and Apple TV. The below Mac’s can support macOS Catalina.
MacBook 12-inch (2015 or later)
MacBook Air (2012 or later), MacBook Pro (2012 or later)
Mac Mini (2012 or later)
iMac (2012 or later)
iMac Pro (2017)
Mac Pro (2013 or later)
Download macOS Catalina 10.15 ISO DMG VMDK
Download macOS Catalina ISO, dmg, VMDK File
When the macOS Catalina was in a beta mode, but again thanks to the Apple’s that they released for the developer to install macOS Catalina on VirtualBox, or install on VMware Workstation to complete their experience. After installing it you can check or unbox all the unseen features too. As in the subheading, I give a hint on the introduction of macOS Catalina features. That Apple’s latest features include Apple Music, Apple Podcasts, and Apple TV, a huge replacement with iTunes App. Use your favorite App in macOS Catalina in place of using on your mobile devices. Turn the iPad screen as a secondary screen display on macOS Catalina using SideCar.
SideCar turn your iPad screen display on macOS Catalina: One of the biggest significant updates to the macOS Catalina feature is SideCar. Turn your nearby iPad, screen display to Mac’s PC with wired or wirelessly. This is good news for iPad users that freely they can iPad screen display on their Macs. Probably it is a good chance for designers those who design on the iPad. For example, those who are using Final Cut Pro, or Adobe products on their Apps for drawing or designing. The SideCar can support the below-listed iPad.
iPad Pro All models
iPad (6th generation or later)
And iPad Mini (3rd generation or later), iPad Air (3rd generation)
Also, the following Mac apps can supports SideCar according to Apple’s suggestion.
Adobe products: Adobe Photoshop, Illustrator, After Effect, Premiere Pro
Cinema 4D
CorelDraw
Final Cut Pro
Maya Painter
Sketch
ZBrush
Download macOS Catalina ISO File
However, there are two different ways to download the macOS Catalina ISO file from the Mac App Store. But there are some confuses steps to handle with it, after downloading you have to create the ISO file by yourself. But we did that and uploaded it in different safe places, and you can download it from there. You can also download macOS Catalina Torrent Image.
macOS Catalina ISO final version (19A602 Recently updated)
Creating the macOS Catalina ISO is easy, also installing macOS Catalina is much easy. Whether you install it on VMware or VirtualBox in different methods. You can visit the article with new methods of installation using the ISO file. And also, there aren’t any worries we take you directly to the point of installation after downloading the ISO file. How to install mario multiverse. Download macOS Catalina 10.15 ISO DMG VMDK.
Download macOS Catalina DMG File
Before getting to download macOS Catalina dmg file. Get ready to create a Bootable USB for macOS Catalina to install it on PC-Hackintosh. Also, the same you get macOS Catalina from Mac App Store using your developer account. But I think that is a bit difficult, we solved the issue of downloading the file of macOS Catalina. Download macOS Catalina 10.15 ISO DMG VMDK
macOS Catalina DMG File Final Version (Recently Updated)
Installing macOS Catalina on PC-Hackintosh is easy, just need to prepare the dmg file without any error. But to download the dmg file from Mac App Store you need to have an Apple ID too. It is difficult that the App Store allows reaching into the download file. But you can download macOS Catalina from the bellow download link.
Download macOS Catalina VMDK File (Virtual Machines File)
The “VMDK” is abbreviated it is used to be “Virtual Machine Disk File“. For the purpose of installing macOS Catalina on VirtualBox, in VMware. We use the VMDK file. To perform installation of an OS on VirtualBox, or VMware we need whether ISO file or VMDK file. Otherwise, the other files can’t be suitable for virtual machines. Due to that, we downloaded an created the macOS Catalina VMDK and uploaded it in a sure place.
macOS Catalina VMDK Final version (19A206 Recently updated)
Latest Mac Os Catalina Update
Note: Keep up to date with our site, while the new update of macOS Catalina is releasing. We try to create and aware you of the new update.

How To Do A Fresh Install Of Mac Catalina
Related:
Macos Catalina Compatibility
Final Point
Now we are at the final point hope you accessed the Download macOS Catalina 10.15 ISO DMG VMDK. Again if there should be any sort of issue feel free to share with us. Moreover, stay with us and hear about our new tech article updates. Your feedback can be the biggest support for us.
Macos Catalina Download
Install macOS Catalina on VMware on Windows PC – Video
Latest Mac Os Catalina Update
Install macOS Catalina on VirtualBox on Windows PC – Video
macOS Catalina offers more of everything we love about Mac. Now we can enjoy our favorite iPad apps on Mac. Expand our workspace and unleash creativity with the iPad and Apple Pencil. And Explore new smart features in the apps we use daily.
How To Do A Fresh Install Of Macos Catalina
Updating to Catalina is very simple (you just have to go to Software Update from System Preferences), but if you want to do a clean installation, formatting the hard disk so as not to drag old configurations that worsen the system performance, you can do it by following these steps.
Check That Your Mac Is Compatible With Catalina
Like every new operating system programmed by Apple, macOS Catalina will not be compatible with all Mac models, especially older ones. To check if yours supports this new OS just click on the little apple in the upper left corner of the screen and choose About this Mac. Verify that yours is one of the following models:
MacBook 2015 and later models
MacBook Air 2012 and later models
MacBook Pro 2012 and later models
Mac mini 2012 and later models
iMac 2012 and later models
iMac Pro 2012 and later models
Mac Pro and later models

Mac Fresh Install Catalina Free
Required Space On Hard Drive
Then you will have to verify that you have enough available space on your hard drive. To install macOS Catalina you will need at least 12.5 Gb free, and 18.5 Gb if you will update a Mac that still uses OS X Yosemite or some previous OS. Checking if you have the necessary memory is very similar to checking the model of your Mac:
Click on the apple in the upper left corner
Choose About this Mac
In the small box that will appear, switch to the tab that says Storage. In this tab, you will see the space in the use of your hard disk and the one you have available for the installation of Catalina
Mac Fresh Install Catalina 2019
Make A backup, Just In Case
Even if the idea is to install a clean version of Catalina, sometimes a backup saves you from losing an important file or game save that you didn’t know you would miss. If you have an external hard drive, you can back up the system and all your data from System Preferences> Time Machine> Select disk. In this same menu, you can decide whether to encrypt the backup or exclude certain folders. You can also force the backup to start immediately.
Create A macOS Catalina Boot Installer
The first thing we will need is a USB with at least 8GB of space, then the steps are as follows:
Mac Fresh Install Catalina Update
Open the Mac App Store.
Search for «macOS Catalina» or use the ( direct link )
Touch “Get”.
Once the download is complete, the installer will open, at that moment we touch
Command (⌘) + Q to close it.
Open the app “Disk Utility”.
In the sidebar, we select the USB that we are going to use to create the installer.
Touch Delete at the top.
In “Name” we write “USB” without quotation marks, in “Format” we choose “MacOS Plus (with registration)” and in “Scheme” we choose “GUID partition map”.
Open the «Terminal» app.
Copy and paste ” sudo / Applications / Install macOS Catalina.app/Contents/Resources/createinstallmedia –volume / Volumes / USB –nointeraction ” without the quotes and hit Enter.
Enter the computer password and press Enter.
Wait for the process to finish, which can take up to 30 minutes, during which we will see how the percentage increases.
That process has finished because in the last line: Install media now available at «/ Volumes / Install macOS Catalina».
Do A Clean Install Over The Internet
There is an easier way to install macOS Catalina from scratch: with macOS Recovery via the internet. To force this mode, turn off your Mac, turn it on again, and then immediately press the Option (Alt) + Command + R key combination. If the Apple apple takes longer than normal to load and the utility window appears, then you’ve entered in macOS Recovery mode over the internet. Make sure that the system to be installed is Catalina
Fresh Install Of Mac Catalina
Restart The Computer And Erase The Disk
Say goodbye to your old system. From the utility window, look for the Disk Utility tool. In Disk Utility you can erase your hard drive, SSD or Fusion Drive to start from scratch. Catalina’s installer will force you to format the disk in APFS format because HFS + is no longer supported.
Install macOS Catalina
The following steps are lossless. Choose your primary hard drive or SSD as the installation drive and follow the instructions in the wizard.
0 notes
Text
Bluestacks Macos High Sierra

Was happening to me after I updated to macOS high sierra. I deleted the old version bluestacks and then download the most recent one on high sierra and now bluestacks is working good. The only problem I'm having is downloading Instagram. Other than that this method works. Good Luck:) level 2. As macOS Mojave released now in 2018, I would very much recommend you to install macOS Mojave on your mac because it contains many bug fixes, new features and also apps file system are more stable than the macOS sierra. In addition to these updates, macOS high sierra also contains many bug fixes and security improvements. How to Install Bluestacks and run any Android Game and App on macOS Mac OS X Apple macbook pro Sierra,Mojave Please Subscribe my Channel: https://www.youtub. MacOS 10.13 Bluestacks keep crashing. Posted by u/deleted 2 years ago. Imhaving the same issue on m,y m,acbook pro 2017/high Sierra. I do see it working when I switch from screen to screen like the gentleman in the other response said but its saying I'm not connected to the internet I Baan trying for the last 2 months.
macOS High Sierra is the fourteenth major release of Apple desktop operating system for Macintosh PCs. For the first time, macOS High Sierra was announced at the Worldwide Developer Conference 2017. Finally, the full version was released on September 25, 2017. The name of the macOS High Sierra was taken from a beautiful place located in America California. Also, macOS High Sierra’s latest version code is 10.13.6. This brings many latest features including a new brand file system. The other feature like lots of changes on the Photos App for better editing. Almost, fastest Safari App up to 80% then Google Chrome, the moment of macOS High Sierra.

Download macOS High Sierra 10.13.6 DMG file – Full
When macOS High Sierra released included much bugs, and by the passage of time fixed. However, after macOS High Sierra macOS Mojave released. And now its 2019 and comes time to macOS Catalina 10.15. Now suggest you install macOS Catalina on your PCs because like Windows 7 it might not be safe. macOS Catalina is included many beautiful features than the old version of the macOS operating system.
Furthermore, macOS High Sierra comes with higher internet revel, easily open your favorite website, manage emails, and many other things. The following macOS High Sierra supports the below computers to install.
iMac late 2009 or later
MacBook late 2009 or later
MacBook Pro 2010 or later
MacBook Air 2010 or later
Mac Mini 2010 or later
Mac Pro 2010 or later
For the installation, it requires at least 2GB RAM and at least 15GB of storage.
iMac 2015 or later, Mid 2017 or newer
MacBook Early 2015 or later
MacBook Pro 2016 or later
iMac Pro 2017
MacBook Pro 2016 or later
iMac 2017 or later
iMac Pro 2017
Related:(Ultimate Guide) Install macOS Big Sur on VirtualBox on Windows PC
macOS High Sierra 10.13.6 included features
There are some features of macOS High Sierra 10.13.6 in the below listed. If you got interesting then read it. Also, if you are not familiar with macOS High Sierra features read this.
Improved security and performance in macOS High Sierra 10.13.6
Split to work with multiple programs
Multiple security enhancement and background improvements
Better switching between programs details
A power search spotlight for searching internal language
Related:Download macOS High Sierra ISO for VMware & VirtualBox
Download macOS High Sierra 10.13.6 DMG file
You can download the macOS High Sierra DMG file from different platforms. But indeed we have prepared the file and ready for you to download. Here’s the file.
Newly updated
If there’s some problem with downloading, you may fix it with the steps below.
If you are interested to install macOS High Sierra on VirtualBox and VMware Workstation on Windows PC. Then you have to download the VMDK File from the below-given link.
The installation process on VMware or VirtualBox is pretty easy. But again if you don’t know that, don’t worry we covered the installation process for you. Check the below link.
Final Point
That’s all about macOS High Sierra 10.13.6 DMG file. However, if there is something then feel free to share with us below in the comment section. In addition, your feedback is a big support for us to share your feedback about this article.
To get the latest features and maintain the security, stability, compatibility, and performance of your Mac, it's important to keep your software up to date. Apple recommends that you always use the latest macOS that is compatible with your Mac.
Learn how to upgrade to macOS Big Sur, the latest version of macOS.
Check compatibility
If a macOS installer can't be used on your Mac, the installer will let you know. For example, it might say that your Mac doesn't have enough free storage space for the installation, or that the installer is too old to be opened on this version of macOS.
If you want to check compatibility before downloading the installer, learn about the minimum requirements for macOS Catalina, Mojave, High Sierra, Sierra, El Capitan, or Yosemite. You can also check compatible operating systems on the product-ID page for MacBook Pro, MacBook Air, MacBook, iMac, Mac mini, or Mac Pro.
Make a backup
Before installing, it’s a good idea to back up your Mac. Time Machine makes it simple, and other backup methods are also available. Learn how to back up your Mac.
Download macOS
It takes time to download and install macOS, so make sure that you're plugged into AC power and have a reliable internet connection.
These installers from the App Store open automatically after you download them:
macOS Catalina 10.15 can upgrade Mojave, High Sierra, Sierra, El Capitan, Yosemite, Mavericks
macOS Mojave 10.14 can upgrade High Sierra, Sierra, El Capitan, Yosemite, Mavericks, Mountain Lion
macOS High Sierra 10.13 can upgrade Sierra, El Capitan, Yosemite, Mavericks, Mountain Lion, Lion
Your web browser downloads the following older installers as a disk image named InstallOS.dmg or InstallMacOSX.dmg. Open the disk image, then open the .pkg installer inside the disk image. It installs an app named Install (Version Name). Open that app from your Applications folder to begin installing the operating system.
macOS Sierra 10.12 can upgrade El Capitan, Yosemite, Mavericks, Mountain Lion, or Lion
OS X El Capitan 10.11 can upgrade Yosemite, Mavericks, Mountain Lion, Lion, or Snow Leopard
OS X Yosemite 10.10can upgrade Mavericks, Mountain Lion, Lion, or Snow Leopard
Install macOS
Bluestacks Download For Mac Pc
Follow the onscreen instructions in the installer. It might be easiest to begin installation in the evening so that it can complete overnight, if needed.
If the installer asks for permission to install a helper tool, enter the administrator name and password that you use to log in to your Mac, then click Add Helper.
Please allow installation to complete without putting your Mac to sleep or closing its lid. Your Mac might restart, show a progress bar, or show a blank screen several times as it installs both macOS and related updates to your Mac firmware.
Learn more
Bluestacks For Mac 10.11.6
You might also be able to use macOS Recovery to reinstall the macOS you're using now, upgrade to the latest compatible macOS, or install the macOS that came with your Mac.
0 notes
Text
#Data recovery software and tools
Free Data Recovery Software
Recover up to 1 GB lost or deleted data on Windows, absolutely free
Recovers lost or deleted documents, email data files, videos, photos, etc.
Retrieve data from PC, laptop, hard drive, and USB stick
Recover files lost due to drive formatting or corruption
More Awesome Features
Recover your data in 3-steps
Stellar free data recovery software is the best if you’re looking for an easy way to get back your data from any Windows device or storage media. After you launch the software, select the storage drive & file type (if you wish), scan the drive, and save the recovered files.
Preview the files before saving them
The tool displays an augmented preview of the recoverable files, including Office documents, PDF, images, videos, Zip, RAR, HTML and PHP files, etc. The Preview feature also allows playing the recoverable video files in Full-Screen mode. It helps in ascertaining the recoverability of the files before selecting them.
Retrieve any kind of data
Stellar data recovery software allows you to do free recovery of digital photo and video, audio library, PowerPoint deck, PDF and Word document, Excel workbook, email file, and more. It saves you from spending on multiple software by offering a universal solution, free of cost.
Recover from BitLocker® encrypted drive
The tool can retrieve the data lost or deleted data from BitLocker encrypted drive. All you have to do is enter BitLocker decryption key and then run the software to scan the decrypted media. It will get back your lost data from encrypted drive just like with any ordinary drive.
Recover data from formatted media
Have you lost data after formatting a USB drive, an SD card or a partition on your Windows PC? Get back your data from formatted drives! Install our free data recovery tool on your PC, scan the formatted drive or partition, and save the data. Nothing could be easier.
Restore files from corrupted volume
Unable to access a drive or partition on Windows, & getting message prompt asking you to format the drive? Don’t format it yet! The drive has turned ‘RAW’, likely due to a damaged or corrupted file system. First, install the software & recover the data. Only then proceed with formatting to avoid data loss from such damaged partitions.
Do Even More with Paid Software
Recover data from lost partition
Professional, Premium & other paid variants of the software can recover data from missing or deleted partition. Using advanced Deep Scan capability, these variants can scan and locate all lost partitions previously present on the hard drive & thus retrieve the data from such partitions.
Recover data from crashed system
The software can also recover data stored on a crashed or unbootable Windows PC. It offers to create bootable USB recovery media to access crashed systems and allow data recovery. This capability is available in Professional, Premium, Technician, and Toolkit variants of the software.
Repair corrupt videos
Premium edition of the software can repair corrupt video files of various formats. It can fix blurry, choppy, grainy, flickering, stuttering, unplayable, and out-of-sync videos. The tool repairs videos shot with cameras of Canon®, Sony®, Go Pro®, Olympus®, Nikon®, Fuji®, Samsung®, & other leading brands.
Repair corrupt photos
The Premium edition also repairs corrupt JPEG & RAW image files captured by using DSLR, digi-cam, drones, Android phones, action cameras, etc. It can fix distorted, grainy, blurry, pixelated, & greyed-out images, and restores the images like new.
Advanced RAID recovery capability
Technician and Toolkit editions of Stellar Data Recovery software offer class-leading technology for retrieving data from failed or broken RAID arrays. The software detects unknown RAID parameters to allow construction of virtual RAID for performing data recovery procedure.
Virtual Drive recovery
Toolkit variant of Stellar Data Recovery software can recover data from Linux and Mac drives having HFS, HFS+, ext2, ext3, ext4 file systems. It also gets back your data from Virtual Drives bringing native support for recovery from VMDK, VDI, VHD and VHDX files.
Data Recovery from 4K Hard Drives
The software recovers data from 4K hard drives that store the data on large-sized sectors of 4096 bytes. As a user, you get a more robust and advanced data recovery tool for conventional and modern 4K hard drives. In addition, Stellar data recovery software supports the 4K drives formatted with FAT32, ExFAT, and NTFS file systems.
Tool with Dual Monitor Support
Stellar Data Recovery software offers dual monitor support, allowing you to multitask on dual monitor displays without the need to minimize or toggle the screens. The feature helps you focus on the data recovery tasks and verify the results through the dual screens.
Video Converter Ultimate
As the professional ultimate video converter software, which can convert homemade DVD and video files including 4K videos to all popular videos and audio such as MPG, MP4, FLV, VOB, MOD, M4V, MP3, AAC, WAV, along with HD videos. It also converts homemade DVD and 2D video to 3D video with high quality
Convert DVD, Video and Audio Over 1000 Formats (4K/5K/8K Supported)
Video Converter Ultimate is the professional video converting software, which supports over 1000 formats. Whether you want to convert DVD or the mainstream video/audio formats (MP4, MKV, AVI, MOV, MXF, WebM, 3GP, MPEG, TOD, GIF, ASF, FLV, WMV, MP3, AAC, AIFF, ALAC, M4A, CUE, AU, WAV, WMA, etc.,) in the market. Even the 4K/5K/8K files (8K to HD, 5K to HD, 4K to HD, HD to HD, HD to SD, etc.), it can complete the conversion successfully
Convert Media Files at 30X Faster with GPU Acceleration
Video Converter Ultimate is really easy to use. The whole process of conversion can be finished in just a few of clicks. It adopts the world’s leading Blu-Hyper technology to process Graphics card image, and video decoding/encoding based on CPU level with the fastest conversion speed (30X faster). Even if you process the 4K/5K/8K videos, Video Converter Ultimate can provide you with the rocket-conversion speed because it completely supports multi-core CPUs.
Split Screen with Video and Photo Collage Feature
Want to put two videos side by side? Video Converter Ultimate helps create a video collage from videos, GIFs or photos. You can drag each video and make it the right place in the frame, or edit video like rotate, crop, clip video, add effect and filter, add watermark, adjust audio and add subtitles. You can select the template aspect ration from 16:9, 1:1, 9:16, 4:3, 21:9 or customize it yourself. You can also preview the split-screen effects in real time for YouTube, Instagram, Facebook or more.
Add External Subtitles to Video/DVD (New)
Video Converter Ultimate is designed with another new feature, which enables you to add external subtitles to your video or DVD. You can search for the proper subtitles and then use this subtitle adding tool to load them to videos. The supported subtitle formats are *.srt, *.ssa and *.ass. With this software, you can better enjoy your favorite movies with subtitles synchronized.
Versatile Editing Functions (Crop, Rotate, Filter, Watermark, Clip, Merge)
Crop: Zoom in/out video to get rid of the black edges, and change the aspect ratio to get the perfect playing effect.
Rotate & Flip: Rotate your videos with 90 clockwise or counterclockwise, and flip horizontally/vertically.
Clip: It has the clip function, which helps you get any time-length video or audio clips from your video sources.
Merge: Combine your selected DVD chapters/titles or video sources into one long file in new order.
Watermark: Personalize your video by putting a watermark in the form of text or image.
Filters & Effect: Add your favorite filter effects like whirpool, orange dots, purple, plain, coordinates, warm, sketch, modern, gray, pixelate, etc., and modify the video hue, saturation, brightness and contrast to create a new style video.
Customize Output Parameters for Devices
Before outputting the file, you can also choose the output file settings like video encoder, resolution, frame rate, video bitrate, sample rate, channels, etc.
It can be used to convert video for iPad Air, iPad Mini, iPad Mini 2, iPhone 12 Pro Max/12 Pro/12/12 mini, iPhone 11 Pro Max/11 Pro/11, iPhone XS, iPhone XS Max, iPhone XR, iPhone X, iPhone 8/8 Plus, iPhone 7/7 Plus, iPhone 6/6 Plus, iPhone 5s/5c, iRiver, PSP and other portable devices.
Convert 3D Videos
If you want to play a video on your VR devices, this 3D converter can help you exactly.
Choose the 3D setting modes – Anaglyph (Red/Cyan, full color, and more.) or Split Screen (Side by Side, Top and Bottom, etc.) according to your device. And you can adjust the 3D depth from 1 to 50.
After that, you can adjust the output 3D files quality and format to output the 3D video you need
Create Animated GIFs from Videos
Still use the traditional software to create the animated emojis? Come on. Video Converter Ultimate can create the animated GIF images from any videos you possess. You can snap the animated emojis for any salutations and send them in any situations like interesting, surprising, happy, embarrassing, and more.
Compress Large Files and Edit Video Metadata Info
Before you upload a video online or send a video within app to share with others, the large size may make you set back. Do not worry, and take Video Converter Ultimate to compress the large file from MBs into KBS. It lets you adjust the video size as you like. Moreover, do not forget to add the IDs tag information like title, date, genre, year, track, album, cover, etc., to complete the music and video information.
You can easily create MV collections with photos, videos, and music like a pro. It offers ready-made themes for your travel, romantic, sport, wedding, fashion, simple, business and other styles’ MVs. You can make an MV quickly without any skills. The timeline editing feature will let you adjust every picture and video conveniently. You can add your favorite title, and background audio into the MV you created to refine it.
4Videosoft DVD Ripper is the best DVD ripping software to rip DVD to AVI, rip DVD to MP4, rip DVD to MPEG, MOV, 3GP, HD videos, etc. with super fast DVD ripping speed for you to play on your portable iPad, iPad mini 3, iPad Air 2, iPhone 12 Pro Max/12 Pro/12/12 mini, iPhone 11 Pro Max/11 Pro/11, iPhone XS/XS Max/XR/X/8/8 Plus/7/7 Plus/6/6 Plus, iPod, PSP, BlackBerry, etc. You can also use this DVD Ripper to extract audio from DVD
Professional Converting Function
4Videosoft DVD Ripper can rip DVD to AVI, MP4, MPEG, WMV, 3GP, and HD videos like HD WMV, HD MKV, HD MOV, etc.
It has the function of extracting audio from DVD to AAC, AC3, AIFF, MP3, M4A, MP2, WAV, WMA audio formats.
After converting, it will be much easier to enjoy DVD movies on your personal players.

Before converting the DVD to the formats you want, this DVD Ripper has another great function which allows you to turn 2D DVD to 3D video. It provides almost any 3D modes you need, like Red/cyan anaglyph, Amber/blue anaglyph, split screen, etc. You can choose the right one according to your 3D TV and 3D glass type. After converting 2D to 3D, you will get real home-theater effect.

Versatile Editing Functions
The DVD Ripper allows you to change video effect, such as Brightness, Contrast, Saturation, Hue and Volume. You also can check "Deinterlacing" to get the progressive video.
Get any time-length video clips by setting the exact start and end time or just dragging the slider bar.
The DVD Ripper software allows you to cut off black region of video and adjust video aspect ratio.
It is available for you to join several video chapters together. You also can add text and picture watermark for the video.
Different Output Settings

Different audio tracks and subtitles of the source DVD are provided for you to choose.
You can choose Video Settings and Audio Settings for the converted video. All settings can be saved as user-defined profile.
You can enjoy the converted videos and audios can be put into iPhone, iPad, iPod, Google Phone and other main stream devices
Convenient and Efficient

With the DVD Ripper, you can take snapshot when you preview. The pictures can be saved in a default folder.
4Videosoft DVD Ripper provides you with clear-cut and intuitive interface, which makes your conversion much easier.
With newly adopted NVIDIA® CUDA™ and AMD APP technology, the DVD ripping speed is 6X faster than ever.
0 notes
Text
Canon Pixma Printer Driver For Mac

Canon Pixma Mp620 Printer Driver For Mac
Canon Pixma Mac Driver Download
Canon Pixma Mp237 Printer Driver For Mac Os
Disclaimer
Canon PIXMA MG3660 Printer Driver, software and manual setup Download for windows and mac - Canon's PIXMA HOME MG3660 is your reliable solution for everyday. Jun 14, 2020 The Canon Pixma MG3022 is an all-in-one inkjet printer with a check as well as duplicate features. It works with Windows and macOS. It works with Windows and macOS. The multi-colour ink cartridge should be changed when a single colour goes out. Printer and scanner drivers for Mac If you have an older printer that doesn't support driverless technology, your Mac might automatically install the driver software needed to use that device. Many printers and scanners use driverless technologies such as AirPrint or IPP Everywhere, which don't require additional drivers on your Mac. Download CANON Printer / Scanner drivers, firmware, bios, tools, utilities. Canon PIXMA MX870 Scanner Driver 16.1.1a for Mac OS X 5,692 downloads. Printer / Scanner CANON. Jun 12th 2018, 18:50 GMT. Canon PIXMA MG4140 Printer Driver/Utility 1.1 for macOS. Sep 21, 2017 TS5100 series Full Driver & Software Package (Windows) Last Updated: 21-Sep-2017 Issue Number.
All software, programs (including but not limited to drivers), files, documents, manuals, instructions or any other materials (collectively, “Content”) are made available on this site on an 'as is' basis.
Canon Pixma Mp620 Printer Driver For Mac
Canon Singapore Pte. Ltd. and its affiliate companies (“Canon”) make no guarantee of any kind with regard to the Content, expressly disclaims all warranties, expressed or implied (including, without limitation, implied warranties of merchantability, fitness for a particular purpose and non-infringement) and shall not be responsible for updating, correcting or supporting the Content.
Canon reserves all relevant title, ownership and intellectual property rights in the Content. You may download and use the Content solely for your personal, non-commercial use and at your own risks. Canon shall not be held liable for any damages whatsoever in connection with the Content, (including, without limitation, indirect, consequential, exemplary or incidental damages).
Formatting a flash drive for mac. Connecting Flash Drive to MAC. This is the first step that a user will take. Connecting USB to Mac is. To format a flash drive on a Mac, plug in the drive and open the 'Applications' folder, the 'Utilities' folder and then 'Disk Utility.' Your flash drive should be listed in the left menu. Formatting your USB flash drive on your Mac device is very easy to do and doesn’t require installing any third party tools or having any complex steps. All you need to do is to open your Mac and insert the USB flash drive n one of the ports. The following steps will help you to.
You shall not distribute, assign, license, sell, rent, broadcast, transmit, publish or transfer the Content to any other party. You shall also not (and shall not let others) reproduce, modify, reformat or create derivative works from the Content, in whole or in part.

You agree not to send or bring the Content out of the country/region where you originally obtained it to other countries/regions without any required authorization of the applicable governments and/or in violation of any laws, restrictions and regulations.
By proceeding to downloading the Content, you agree to be bound by the above as well as all laws and regulations applicable to your download and use of the Content.
Disclaimer
All software, programs (including but not limited to drivers), files, documents, manuals, instructions or any other materials (collectively, “Content”) are made available on this site on an 'as is' basis.
Those that host macOS, providing a coherent state of all open files involved in the process and taking into account that applications may still keep writing to disks.Full imagesHelps secure your software environment, including OS, applications and data. Full copies of disks and partitions recover your system to a working state within several minutes.Core Storage Backup & RestoreSupports Core Storage backup and restore including FileVault2 and FusionDrive.Fusion Drives based on APFS are not supported.OS protectionAny Windows or macOS residing on your disks will be detected automatically. APFS BackupAPFS containers and volumes backup is not currently supported. APFS container resizingResize your APFS container.System Integrity Protection (SIP) supportAny partition management operations such as create, delete, resize etc. We are working to solve this issue in the near future.Sector-level imagingSignificantly reduces backup and recovery times while improving general performance.Snapshot onboardEnables to take consistent snapshots of both inactive and in-use partitions, e.g. Vmdk mounter for mac os x.
Canon Hong Kong Company Limited and its affiliate companies (“Canon”) make no guarantee of any kind with regard to the Content, expressly disclaims all warranties, expressed or implied (including, without limitation, implied warranties of merchantability, fitness for a particular purpose and non-infringement) and shall not be responsible for updating, correcting or supporting the Content.

Canon reserves all relevant title, ownership and intellectual property rights in the Content. You may download and use the Content solely for your personal, non-commercial use and at your own risks. Canon shall not be held liable for any damages whatsoever in connection with the Content, (including, without limitation, indirect, consequential, exemplary or incidental damages).
Dns settings for mac. On your Mac, choose Apple menu System Preferences, then click Network. In the list at the left, select the network connection service you want to use (such as Wi-Fi or Ethernet), then click Advanced. Click DNS, then click the Add button at the bottom of the DNS Servers list. Enter the IPv4 or IPv6 address for the DNS server.
Canon Pixma Mac Driver Download
You shall not distribute, assign, license, sell, rent, broadcast, transmit, publish or transfer the Content to any other party. You shall also not (and shall not let others) reproduce, modify, reformat or create derivative works from the Content, in whole or in part.
You agree not to send or bring the Content out of the country/region where you originally obtained it to other countries/regions without any required authorization of the applicable governments and/or in violation of any laws, restrictions and regulations.

Canon Pixma Mp237 Printer Driver For Mac Os
By proceeding to downloading the Content, you agree to be bound by the above as well as all laws and regulations applicable to your download and use of the Content.
0 notes
Text
Holding Control Key When Opening Dmg

Convert dmg to vmdk virtualbox. Jul 16, 2018 As DMG is the file format of Mac OS X, Windows OS can’t read the file. As we earlier mentioned in this guide, we need to convert the DMG to ISO, then use it on VirtualBox. This method will be useful to try and install any Hackintosh versions on Mac OS X on VirtualBox. Mar 09, 2016 Luckily with the tools from VirtualBox you’re able to move virtual disks between VMDK and VDI formats. The VBoxManage command is the Swis Army Knife of tools to manage all things VirtualBox. The VBoxManage command will need to be in your path to be able to use it. The easiest way is to navigate to your VirtualBox installation. Data conversion from.DMG to.VMDK is the conversion of computer data from Apple Mac Os X Disk Image to V Mware Virtual Disk File. Throughout a computer environment, data is encoded in a.
To use any of these key combinations, press and hold the keys immediately after pressing the power button to turn on your Mac, or immediately after your Mac begins to restart. Keep holding until the described behavior occurs.
Holding Control Key When Opening Dmg On Pc
Holding Control Key When Opening Dmg 2017
Holding Control Key When Opening Dmg On Iphone
Holding Control Key When Opening Dmg Download
Holding Control Key When Opening Dmg File
Holding Control Key When Opening Dmg Windows 10
Control key acts as if it is stuck periodically. Ask Question Asked 4 years, 1 month ago. Though the previous one also had Window key getting 'stuck' as well so if I pressed D. Opening the on-screen keyboard from control panel can temporarily unlock the ctrl key. Zoom using Control key doesn't work. By Creative Media September 30, 2009 2. Make sure that the desired 'while holding' (control) key is showing. I believe that the option key is.
If your Mac is using a firmware password, all of these key combinations are disabled, except as noted below.
Command (⌘)-R: Start up from the built-in macOS Recovery system. Or use Option-Command-R or Shift-Option-Command-R to start up from macOS Recovery over the Internet. macOS Recovery installs different versions of macOS, depending on the key combination you use while starting up. If your Mac is using a firmware password, you're asked to enter the password.
Option (⌥): Secure mac cleaner reviews. Start up to Startup Manager, which allows you to choose other startup disks or volumes, if available. If your Mac is using a firmware password, you're asked to enter the password.
Option-Command-P-R:Reset NVRAM or PRAM. If your Mac is using a firmware password, it ignores this key combination or starts up from macOS Recovery.
Shift (⇧): Start up in safe mode.
D: Start up from the built-in Apple Hardware Test or Apple Diagnostics utility, depending on your Mac model. Or use Option-Dto start up from this utility over the Internet.
N: Start up from a NetBoot server, if your Mac supports network startup volumes. To use the default boot image on the server, hold down Option-N instead.
Command-S: Start up in single-user mode. This key combination requires macOS High Sierra or earlier.
T: Start up in target disk mode.
Command-V: Start up in verbose mode.
Eject (⏏) or F12 or mouse button or trackpad button: Eject removable media, such as an optical disc.
Learn more

Learn what to do if your Mac doesn't turn on.
Learn about Mac keyboard shortcuts that you can use after your Mac has started up.
Most computer users don't take full advantage of the computer mouse. Below are computer mouse tips and secrets that help you get the full potential of your computer mouse and increase your overall productivity while on the computer.
Shift key and mouse click
Many text editors and programs allow you to highlight all or portions of text using the Shift key and the mouse. For example, click at the beginning of the text in the below text box. Hold down the Shift key, scroll to the bottom, and click at the end of the text to highlight all of the text.
Tip
Holding down the Alt key while dragging and highlighting text in a text editor allows you to selectively highlight text. Highlighting text this way is useful if the paragraph or other text is in a column. Note: This tip does not work in the above box and has to be done in a text editor or word processor.
Take full advantage of the scroll wheel
Today, everyone is familiar with a mouse wheels ability to scroll up and down on a page. However, this wheel can also do so much more, below are a few examples.
Where do you live?. https://shysongnightmare.tumblr.com/post/645316263511523328/bose-dmg-canada. Perhaps you want to find a good DIYer that can build you a good cable. Hi, what a quick response, LOLGlad that the post is done 🙂I live in New Zealand at the moment.Wow!
Holding Control Key When Opening Dmg On Pc
The mouse wheel is not only a wheel. It can also be used as a button. Pressing down on the wheel will acts like a third mouse button. The wheel button can be used to open a web page in a tab by clicking the wheel on any link and can also be used to close a tab by clicking the wheel on any open tab.
Zoom in and out on a web page, word document, excel spreadsheet, etc. by holding down the Ctrl key and scrolling up to zoom in and down to zoom out.
Hold down the Shift key and scroll down in most Internet browsers to go back to the previous web page.
Some mouse wheels can be pushed left or right to also move back and forward between web pages.
Select with double and triple click
Any word can be selected by double-clicking the word. If you want to highlight the whole paragraph or sentence, click the mouse button three times on any word. Try it now on this paragraph by clicking three times fast on any word in the paragraph.
Tip
If you double-click and then drag your mouse, it highlights one word at a time.
Use the right-click
Take full advantage of the right-click any time you highlight text or want to view the properties of an object. For example, if you highlight a file or text, you can right-click that highlighted item, copy it, and then right-click anywhere else to paste it.
Tip
If you highlight or select any file or text and then click and drag while holding the right mouse button, when you let go an option to move or copy that file is shown. This saves you the extra step of having to right-click where you want to paste the item.
Tip
While in a browser, pressing and holding Ctrl while clicking on any link opens a menu with options for that link.
Ctrl key and mouse click or highlight
While holding down the Ctrl key, you can left-click to select multiple objects or highlight multiple sections of text. For example, in the below selection box, if you wanted to highlight more than one of the items listed, you could hold down Ctrl and select each item you want highlighted.
Tip
Mozilla Firefox users can also hold down the Ctrl key and individually click on each cell in a table they want to copy. They can also hold down the Ctrl key and drag their mouse down a row to select that row or text without selecting any of the other text in that table.
Use the mouse side buttons
Many new computer mice also have buttons on the side of the mouse. These buttons can be programmed to do anything. However, by default, the left-thumb button can be used to go back on a web page. Using the thumb button makes browsing the Internet more efficient, because you do not need to move the mouse pointer to the browser's back arrow button to go back a page.
Use the Windows Snap To feature
Holding Control Key When Opening Dmg 2017
Take full advantage of the Windows mouse Snap To feature, which will automatically move your mouse to buttons that appear in a dialog box. For example, if you delete a file or close a window, you may get a prompt asking you if you are sure you want to perform the task. With the Snap To feature enabled, the mouse pointer automatically moves to the Ok button, so you only need to click the left mouse button if you agree. This saves you the time of having to move the mouse pointer to the Ok button and then click Ok.
To enable this feature, open the Mouse properties under the Windows Control Panel and check the Snap To check box under the Pointer Options tab.
Tip
While changing this feature, we also suggest looking at other available options in the Mouse properties. For example, increasing the Motion speed can also help increase your productivity while using the mouse.
Manage the open window with the mouse
Double-click the top title bar of any window to maximize a window or, if it is already maximized, resize it to a smaller window. You can also double-click the icon for the window in the top-left corner of the window to close that window.
Move the mouse with your keyboard

Instead of using the mouse that came with your computer, you can also enable Windows to use the number pad as a mouse.
Holding Control Key When Opening Dmg On Iphone
Customize your mouse
Holding Control Key When Opening Dmg Download
Finally, if you have a mouse with more than two buttons, installing the included mouse software allows you to customize the mouse even more. For example, if you don't use the side button to move back in a browser, change it to something you'd use, such as switching between open windows or opening the calculator.
Holding Control Key When Opening Dmg File
Additional information
Holding Control Key When Opening Dmg Windows 10
See our mouse definition for further information and related links on this term.
0 notes