#Watermarking software mac
Explore tagged Tumblr posts
Visit Tumblr Blog
Explore Tumblr blogs with no restrictions, modern design and the best experience.
Last Seen Tumblr Blogs


Fun Fact
The KCSC sent more than 20K requests to delete posts related to prostitution and porn to Tumblr from January to June 2017.
Text
Securing Your Creative Work: Watermarking Software for Mac OS
In the age of digital media, protecting your intellectual property is essential. Whether you're a photographer, graphic designer, or content creator, watermarking your images and documents is an effective way to assert ownership and deter unauthorized use. For Mac users, there is a wide range of Watermarking software mac available to make this process both convenient and efficient. In this article, we'll explore the importance of watermarking, the key features to look for in watermarking software, and provide a list of some of the best options for Mac OS.
The Importance of Watermarking
1. Copyright Protection: Watermarks help establish your ownership of an image or document, discouraging unauthorized use and potential copyright infringement.
2. Branding and Recognition: Watermarks can also serve as a branding tool, allowing you to display your logo or website on your creative work, promoting recognition and traffic to your online platforms.
3. Deterrent to Theft: While watermarks can't prevent theft, they act as a deterrent by making it more challenging for individuals to use your content without permission.
4. Professionalism: Watermarked content exudes professionalism, indicating that you value and protect your work.
Key Features to Look for in Watermarking Software for Mac OS
User-Friendly Interface: The software should be intuitive and easy to navigate, even for those with limited technical expertise.
Customization: Look for the ability to customize the watermark, allowing you to adjust its size, opacity, and position.
Batch Processing: The software should support batch processing to watermark multiple images or documents simultaneously, saving time and effort.
Text and Image Watermarks: Opt for software that allows you to use both text and image watermarks, giving you flexibility in your branding approach.
Transparency: The option to adjust the watermark's transparency is crucial to ensure it doesn't overpower the content.
Templates and Presets: Some software offers pre-designed templates and presets for watermarks, making it easier to get started.
Compatibility: Ensure that the software is compatible with various file formats and that it provides the necessary tools for watermarking different types of media.
Security: Choose software that supports additional security features, such as encryption and password protection for your watermarked files.
Conclusion
Watermarking your creative work is an important step in protecting your intellectual property and promoting your brand. Mac users have a range of watermarking software options available, each offering unique features and capabilities. When selecting watermarking software for your Mac OS, consider your specific needs and the level of customization and efficiency required for your watermarking tasks. Whether you're a professional photographer or a content creator, using the right watermarking software can help safeguard your work and maintain your professional image in the digital world.
For more details, visit us :
Free watermarking software for windows
Watermark application for mac
Watermark maker for photos
#Watermark maker for photos#Free watermark software#Watermarking software mac#Watermark application for mac
0 notes
Text
Something that's been on my mind for a while is that a lot of artists have been struggling to find programs that work with their budgets. Adobe's prices are... infamous, to say the least, and there seems to be a sharp learning curve for the more affordable options. And if you're like me, you might not feel comfortable with pirating to get an art program that is out of your price range. So here's a list of free art/editing tools. Any options without links are either mobile apps or can only be downloaded on Macs: Options without ads or watermarks:
FireAlpaca (notes: while this is an art program at heart, it can also be used as basic photo editing software once you get the hang of it. There is also a blog dedicated to tutorials on how to use FA in case you get stuck)
Medibang (note: the aforementioned FireAlpaca blog has some information on this software as well)
Krita (note: also available as an app for android and Google devices)
Storyboarder (notes: not to be confused with "Storyboarder.AI". While this program does require your email address before downloading, it is safe to use as far as I know (but please use caution regardless))
Pixilart (notes: link leads to browser version, also available as a mobile app)
Audacity (notes: apparently, the company behind this software, Muse Group, have also created a separate, subscription-based AI-voice program. I am unsure if it uses AI in a way that is generally considered to be ethical, like SynthV does, or if it follows the trends typically expected of those kinds of applications. The reason that I include this information is that I want to give everyone the ability to make an informed decision about whether or not they want to use anything from Muse Group, as I know many users on this site are anti-AI. However, I also know that some of those users wouldn't mind using Audacity since downloading it wouldn't be giving Muse Group monetary support - hence why the program is staying on the list.)
Clipchamp (notes: there are also paid tiers for this program. It is also available in-browser and as an iOS app. Furthermore, please be aware that there are some optional features that use AI)
iMovie (note: also available as a mobile app on iOS devices)
DramaQueen (notes: this is a software used to write scripts for plays, movies, etc. While it does require you to fill out some information before downloading, as far as I am aware, it is safe to use (but as always, use your own discretion))
Options that do have ads, watermarks, or microtransactions
ibisPaint X
Sketchbook (notes: formerly known as "Autodesk Sketchbook". PC and Mac versions do exist, but you have to pay to download them)
Medibang Paint
Capcut (note: has optional AI tools).
Be sure to check what system requirements are necessary for each program, and be aware of their limitations before downloading (for example, many users report Clipchamp has a tendency to crash, while others seem to be able to use it fine). Also, please feel free to add on to this. I know I haven't even scratched the surface here, as I tried to stick to software that I've either heard of extensively or have used personally.
#one thing I want to make clear just in case it wasn't already:#I am anti-AI as well#artificial intelligence should not be used to replace human creativity and jobs#I included whether or not a program has AI features in case you'd rather avoid software that uses that type of technology#regardless of if it's optional#also I know that Flipaclip is also a free program#but I purposefully excluded it due to how bogged down with microtransactions it has allegedly become since I last used it#the app Paper is also free#but it makes you pay for brush sizes#so that was a no-go#artists on tumblr#art tips#art advice#art resources#art programs#firealpaca#audacity#Opal speaks#may God bless you all
19 notes
·
View notes
Note
I've rewatch your Narinder animatic "I don't work here" SO. MANY. TIMES. I love it.
Also, what do you use for animating?
shitty screenshot of some art as an offering

hi!! im so glad you like it!! angry nari is so cute <3
i use a free video editing software called CapCut to put together my animations. it's not actually an animating software; rather, it lets you insert images or videos on a timeline, then move them around and stretch or shorten their length. it's also what i use to edit my let's plays and speedpaints! So, i download the audio from a lyric video, put that in the timeline, line up the lyrics, then make the lyric video invisible and line up all my frames to match the timing that i want. i find this much more intuitive and easy to understand than using actual animation software (of which I have tried many), even though its probably a technically more difficult way to do it.
CapCut is available on Windows and mobile (it puts a watermark at the end of videos made on the mobile app, but you can crop that out on your phone or tablet's photo app). I don't remember if theres a Mac version. as for art, I use Clip Studio Paint, but you could use any art program that lets you export images!
i totally recommend trying to animate yourself!!!!!! it takes a long time but its so much fun and i think capcut makes it really easy
#asks#other art#cult of the lamb#if youd like i could record myself editing one of my wip animations in capcut to give an idea of how it works?#i made the cotl animatic on my PC but my persona 5 animatic was made on my ipad using Procreate and CapCut!
19 notes
·
View notes
Text
SaveTik Pro: The Ultimate TikTok Video Downloader
Download TikTok videos without a watermark
TikTok has become a powerhouse of entertainment, filled with viral videos, creative content, and unforgettable moments. But what if you want to save your favorite TikToks for offline viewing? That’s where SaveTik Pro comes in—a powerful tool that lets you download TikTok videos quickly and easily.
What is SaveTik Pro?
SaveTik Pro is an advanced TikTok video downloader that allows users to download TikTok videos in high quality, without watermarks. Whether you’re saving a funny clip, a dance trend, or an informative video, this tool makes it easy to keep your favorite content forever.
Key Features of SaveTik Pro
✅ No Watermark – Download TikTok videos without the distracting logo. ✅ HD Quality – Save videos in their original resolution without losing quality. ✅ Fast & Free ��� Get your videos in seconds without paying a dime. ✅ No App Required – Works online; no need to install extra software. ✅ Supports All Devices – Compatible with Android, iOS, Windows, and Mac.
Download tiktok videos free online at https://savetik.pro/
#Savetikpro #tiktoktrending #savetiktokvideos #tiktokdownloader
2 notes
·
View notes
Note
Oh it was only 3 actually, counting that one animatic on YouTube (that BTW i had no idea was yours! I was pleasantly surprised <3)
And I found it so funny that you have somewhat an idea of who I might be PFFF you can throw the guess, it would be funny if you get it right (don't have to say my name if you don't remember it, you can just go for something you remember NFKDSJ)
also time for an actual question since i'm already here, what program did you used for the animatic? I've always wanted to get into animating but most softwares cost money or are free but really bad so I could use some recommendations 👀
Good to hear there is no imposter lol. I should probably start using the false pfp so people know it’s me but I’m too lazy to change them all 💀 also my guess was right as to who you were but probably mainly because I put on my Aziraphale detective hat and you were the last notification before the ask inbox notification and your icon had a red beanie. We meet once again.
As for the animatic I used procreate for drawing and capecut for composting. Not the most efficient method but I liked it. I ended up segmenting off each camera angle into a different canvas and making any animation for the shot that way. I love capecut because the free version has every editing function you need for an animatic and the watermark only appears as a black screen at the end so it’s so easy to crop out. It’s probably the best free editing software I’ve found. (I also used a screen recording device to record the audio cause even if you buy a song it sometimes doesn’t allow you to put it in the program.)
I honestly recommend procreate if you have a device that supports it. I think it’s still only a 10 dollar onetime purchase. But if you don’t have a device that supports it, I have used things like flip a clip which is free, and the paid version is pretty cheap. I have also dabbled in an app called rough animate, also free (you don’t have to pay for the onion skins) which was also okay. I got frustrated cause of the lack of brush choice but other than that it’s not bad at all. If you can’t pay anything at all I’d recommend this because, unlike flip a clip, you don’t have to pay to unlock the a lot of the really helpful features. Ibis paint also added an animation feature I think so that’s an option. Idk if you need the paid version for it, but I remember only having to watch ads for a minute to unlock all the brushes so maybe it’s the same for the animation feature lol.
If you have a computer set up, I’ve also heard nice things about Krita for animation. It’s free and from what I remember it had a really good timeline set up. I actually tried to use it, but my computer at the time was old and slow and it lagged to much, and then I had a shitty no screen tablet and my hand eye coordination when it came to drawing and writing is quite bad, so it just wasn’t a good set up for me personally. But I know people make it work. I mean, people make this kinda shit in MS paint, if you’re dedicated enough you can technically do it in almost any program (though you may not be able to make it as polished as you’d like.)
Then there is Clip Studio Paint, which does cost money but is way less expensive than like, harmony or adobe. The EX version which gives you a second of free animation per project is a $5 monthly subscription for once device, PC MaC IOS, and the Pro version (which is more expensive) gives you unlimited animation animation access for I believe around 10 -15 dollars a month (still less than most streaming services lol). There’s also a one time purchase version that is $50 dollars, but it goes on sale A LOT for $25! Although I don’t think it gives you more than a second of animation. CSP also has a very long free trial period, for EX it was legit like 3 months. so if you try it out and like it, I’d definitely suggest finding a way to pay for it. It’s actually used in some professional studios in Japan, so if you have any professional aims for your work it’s a good starting platform to get into industry software. However a lot of the nice things CSP offers for animation are not needed in the story boarding/animatic stage, so if that’s as far as you wanna take your animations it maaaaaaay not be worth it unless you love it.
If anyone else has other cheap or free recommendations feel free to add on. I have attempted to make animatics on procreate, rough animate, and flip a clip; all of which I have uncompleted projects on. It just so happens that procreate is what I was using when I finally made an animatic I liked enough to see until completion. Whatever software you do use, just make sure you learn how to use it before attempting a big project. Do some smaller stuff before you try anything big.
Edit to check the comments! We got other good recommendations for computers!
8 notes
·
View notes
Text
Week 7 Reflections - 32.5 hours remain
Today I got to help with some proper networking! Nothing huge, we just needed to enter some MAC addresses into PFSense so the laptops of some visiting exam proctors could get into the network without too much trouble. Still far more than I would've had any idea of how to do before starting this program though.
We ran into a small hurdle in that their policy didn't allow for certain interactions with the laptop, but we got it all sorted in the end.
In addition I helped do some more research, this time regarding a free movie editor for beginners. That might sound simple, but, having done some video editing myself, I was already aware of some of the pitfalls there going in. Basically it amounts to the fact that most open source video editors have a really big learning curve, and most "free" software beyond that has things like watermarks and only being free for a very short amount of time.
I love that there's so much variety in this work. I get to do and learn so many different things.
Just a couple weeks to go. Man how time flies!
0 notes
Text
Best Free Video Editing Software for Beginners in 2025

In 2025, creating scroll-stopping video content is no longer just a trend—it’s a necessity. Whether you're a budding content creator, small business owner, or social media manager, mastering video editing can be the difference between getting noticed or getting ignored.
The good news? You don’t need to spend hundreds of dollars on software to get started.
In this article, we’ll explore the best free video editing tools for beginners in 2025, so you can start creating professional-looking videos without breaking the bank. And if you ever feel like handing off the heavy lifting, our expert video editing team is just a click away.
1. CapCut (Desktop & Mobile)
Best for: Short-form content like Reels, TikToks, and YouTube Shorts
CapCut has taken the creator world by storm. Initially known as a mobile app, it now offers a powerful desktop version that’s still 100% free.
Key Features:
Auto-captions and subtitle tools
Trending templates and transitions
AI background remover
Built-in music and sound effects
CapCut is ideal for beginners who want results fast without a steep learning curve.
2. DaVinci Resolve
Best for: Long-form video and color grading enthusiasts
DaVinci Resolve is a professional-grade editor that also happens to be free. If you’re looking to go beyond basic cuts and transitions, this tool has everything from color grading to audio mixing.
Key Features:
Advanced editing timeline
High-end color correction tools
Audio post-production suite
No watermarks, even in the free version
Heads up: It has a learning curve—but the results are worth it. If it feels overwhelming, you can always outsource your video edits to experts while you focus on your content strategy.
3. Shotcut
Best for: Offline editing on any operating system
Shotcut is open-source and works seamlessly across Windows, Mac, and Linux. It’s completely free with no upgrade pressure and supports a wide range of video formats.
Key Features:
Intuitive interface for beginners
Multi-format timeline
Filters, effects, and transitions
4K resolution export support
Shotcut is a great pick if you want a clean, straightforward editor that doesn’t need an internet connection.
4. iMovie (Mac & iOS)
Best for: Apple users wanting a native, easy editor
iMovie has been a staple for Mac and iPhone users, and it’s still one of the best tools for fast, polished videos in 2025. It syncs smoothly across devices, making editing on-the-go super convenient.
Key Features:
Drag-and-drop simplicity
Built-in templates and soundtracks
Green screen support
Seamless integration with iCloud
If you're an Apple user, iMovie is the perfect place to start your video editing journey.
5. Clipchamp (Windows)
Best for: Quick social media videos with templates
Owned by Microsoft, Clipchamp is now integrated into Windows and accessible directly from your desktop. It’s web-based, intuitive, and loaded with easy-to-use templates.
Key Features:
Timeline editor with drag-and-drop ease
Text overlays, transitions, and filters
Direct export to YouTube or social platforms
Stock audio and video library
Perfect for beginners looking to create brand videos, vlogs, or quick promos.
Final Thoughts
Getting started with video editing doesn’t require expensive software or years of experience. The tools above are powerful, beginner-friendly, and best of all—completely free in 2025.
But if editing still feels like a time-consuming task, don’t worry—you’re not alone. Many creators and business owners prefer to leave editing to the pros so they can focus on storytelling and content strategy. If that sounds like you, our video editing services at Branding Hosts are designed to help you create professional, engaging content without the hassle.
0 notes
Text
How to Convert AVI to MOV Effortlessly
Some types of video files aren't changing as quickly as the devices that play them. Even though AVI has been a popular file since the 1990s, it doesn't work well with macOS and Apple apps. That's why you may be looking for a solution to change AVI to MOV without losing quality or wasting your time. The good news is that there are dedicated programs to help you with the issue. We've put together three handy solutions that you can use for this purpose. Each of them works well for its own purpose. So keep reading and pick a program that works well for you.

#1 — Movavi Video Converter
Movavi Video Converter is a top choice for those looking to convert videos with zero stress or hassle. When using the tool, you will hardly have any questions on how to convert AVI to MOV — the process is straightforward. The software has been an excellent helper for both personal and work-related tasks. Fast processing, a wealth of configuration options, and an easy-to-navigate interface are its win-win features.
To convert AVI to MOV with Movavi Video Converter, follow these steps:
Download and install software — Visit the Movavi website and download the appropriate version of the program for your Windows or Mac computer. Install the software by following the on-screen instructions.
Add your AVI files — Launch Movavi Video Converter. Hit “Add Media” and select “Add Video,” or simply drag and drop your AVI assets into the program window. You can add multiple videos for batch conversion.
Select MOV as the output format — In the formats menu, choose MOV as your desired output format. You can also adjust settings such as bitrate, resolution (including HD and 4K), and codec if needed.
Choose the output folder — Click the “Save to” button to specify where the converted files will be saved.
Convert the files — Click the “Convert” button to start the conversion process. Once finished, your MOV files will be saved in the chosen folder.
You can also use Movavi’s online converter for smaller files: just upload your AVI, select MOV as the format, and download the result when ready. This process ensures high-quality, compatible MOV files ready for playback or editing, especially on Apple devices and software.
#2 — AnyMP4 Video Converter Ultimate
If you are using a high-end camera or editing movies in 4K, then quality is really crucial. This is where AnyMP4 Video Converter Ultimate comes in handy. Designed with compatibility for latest video technologies and a focus on preserving maximum quality, this tool is strong.
To convert AVI to MOV with AnyMP4 Video Converter Ultimate, follow these steps:
Download and install — Download AnyMP4 Video Converter Ultimate from the official website and install it on your PC.
Upload the target AVI files — Launch the program. Click the “Add Files” button to deliver your AVI videos to the program.
Pick MOV as output format — Click the format icon next to your imported AVI file. In the format list, select MOV as the output format. You can also adjust video resolution, encoder, and quality as per your needs.
Set output folder — Choose where you want to save the converted files by setting the output folder.
Convert — Click the “Convert All” button to convert files without a watermark. The process is quick, and your MOV files will be ready in seconds.
Follow these steps to ensure fast, high-quality conversion from AVI to MOV. It is suitable for playback or editing on a wide range of devices and platforms
#3 — EaseUS VideoKit
Some people don't work with video every day. If you are one of those who only need to change an AVI file once for it to work on an iPhone or in iMovie, EaseUS VideoKit is the best tool for you. It is simple, flexible, and easy to use.
To convert AVI to MOV with EaseUS VideoKit, follow these steps:
Download and install EaseUS VideoKit — Get the software from the official EaseUS website and install it on your personal computer.
Add AVI files — Launch EaseUS VideoKit. Click “Choose Files,” drag your AVI files into the interface, or use the + button to add them.
Select MOV as output format — Click on “Settings” or the format option next to your file. Choose MOV as the target format. The program will also give you an option to customize video quality, resolution, encoder, frame rate, and bitrate.
Set output folder — Choose the destination folder for your converted files.
Enable high-speed conversion — If needed, enable the high-speed conversion option for faster processing.
Start conversion — Click “Convert” to initiate the process. The software will convert your AVI files to MOV quickly, maintaining the original quality.
This workflow makes converting AVI to MOV with EaseUS VideoKit simple and efficient. It is suitable for both beginners and advanced users.
Choose Your Preferred Solution
Have a batch of files to convert? Not sure what solution to use? Now, you have a list of options to consider. Do not waste your time researching the market. Jump on the video conversion task right away!
0 notes
Text
Top 3 Video Compressors You Can’t Miss in 2025
INTRODUCTION
In the digital age, videos are ubiquitous—whether on social media, business content marketing, or personal storage. But large video files are a bother. They occupy enormous storage space, cause file transfer delays, and have a knack for crossing upload limits on platforms like YouTube, Instagram, and email services. That is where video compressors step in!
A good video compressor allows you to compress video size without losing quality, making storing, sharing, and uploading your work easy. But with all the choices available, how do you select the best one?
We've tried them and selected three of the top video compressors of 2025:
HitPaw Univd – Fast and effective compression with amazing speed.
HandBrake is a free, open-source program that provides high-level compression features.
Adobe Media Encoder – A professional tool with high-quality maintenance.
All these instruments are more powerful and unique from each other. We will discuss them individually so you can choose per your needs.
Part 1: Top 3 Video Compressors Compared
1. HitPaw Univd – Easiest and quickest video compressor

Do you want a straightforward and efficient video compression tool that does what it says? The best option is HitPaw Univd. It is perfect for beginners and professional users seeking to compress videos without issues.
Top Features:
✅ Fast compression rate – Compresses video size in seconds without delay.
Maintains quality – Uses AI technology to retain video details.
✅ Batch compression – Compresses videos in batches.
✅ Supports numerous formats – MP4, AVI, MOV, MKV, and numerous others are supported.
✅ Easy to use – Technical expertise is not required.
Pros:
✔ Ridiculously easy to use – Drag, drop, compress!
✔ Single click – No annoying settings required.
✔ No loss of quality – Smart AI compression delivers great quality.
✔ Compatible with every device – Suitable for both Windows and Mac.
Cons:
❌ Limited advanced settings – Not suitable for those who like full manual control.
❌ Paid software – Although it has a free version, the full version needs to be bought.
2. HandBrake- Edifying and Free of Charge
For as long as one can remember, the fans of gadgets have been all praise for HandBrake. A magic wand of a no-cost and free video compression software, it is popular for its infinite configurations and level of customization.
Top Features:
✅ Free- Nothing gets charged from your pocket.
✅ Customizable compression settings- It controls bit rates, resolutions, and encoding techniques.
✅ Supports formats such as mp4, mkv, h.264, hevc. And many others.
✅ multi-platform support – Can run Windows, Mac, and Linux.
✅ Batch processing – Compress several videos in one go.
Pros:
✔ Ideal for technologically advanced users – Complete control over the compression settings.
✔ Great output—Maintains video quality even at low file sizes after compression.
✔ Lightweight program—Does not occupy much space on your computer.
✔ No watermark—unlike most free software, HandBrake does not have a watermark.
Cons:
❌ Not very user-friendly for new users – Requires some knowledge of codecs and compression.
❌ Longer compression time – Similar to longer compression times with HitPaw Univd for large files.
❌ No customer support – Since it's open-source, you're on your own for troubleshooting.
3. Adobe Media Encoder – The Pro's Choice
A professional creator or editor who demands the best compression in the business can bet their money on Adobe Media Encoder. It goes along perfectly well with Adobe Premiere Pro and After Effects and is among the most favored choices by the pros.
Top Features:
✅ Superior video quality – Very negligible loss of quality even when compressed beyond super.
✅ Using pre-sets – Achieve maximum efficiency by utilizing pre-set options on various platforms.
✅ Pro encoding – Bitrate, resolution, and frame rate control.
✅ Adobe Suite Integration – Completely compatible with Adobe computer programs.
Pros:
✔ Multi-format compatibility – Supportable by nearly every other video format.
✔ High-quality preservation – Perfect for professional-level compression.
✔ Adjustable settings – Great for those who want full control.
✔ HD video support – Compresses 4K and even 8K files without problems.
Cons:
❌ High cost – Adobe subscription only (no buy-it-once option).
❌ Difficult settings – New users might find difficult settings a problem.
❌ Slow on low-end hardware – Needs high-spec PC for optimal performance.
Part 2: Why HitPaw Univid is the Best Choice for Most People
Now that we've discussed the top three video compressors, you may ask yourself: Which one do I use?
Although HandBrake and Adobe Media Encoder are great programs, HitPaw Univid is the best overall choice for most individuals.
1️⃣ Simplicity at Its Best
Unlike Adobe Media Encoder and HandBrake, HitPaw Univd requires no technical skills. You upload your video, choose the compression option, and press a button—voilà!
2️⃣ Lightning Speed of Compression
Time is money, and nobody has the time to sit and wait hours for a video compressor to complete. HitPaw Univd is meant for quick processing, and you can compress enormous video files within seconds.
3️⃣ High-Class Quality Compression
One of the largest issues with video compression is losing quality. HitPaw Univd compresses with AI so your video maintains as much detail as possible while minimizing file size by a huge amount.
4️⃣ Perfect for Both Windows & Mac
Unlike other tools that only support one platform, HitPaw Univd performs just as well on Windows and Mac, making it ideal for everyone.
5️⃣ Fantastic Value for Money
While it's not as cheap as HandBrake, HitPaw Univd is cheaper than Adobe Media Encoder and has a nice balance between simplicity and professional-grade output.
Part 3: Step-by-Step Guide – How to Compress Videos Using HitPaw Univd
Want to see how easy it is to compress a video file with HitPaw Univd? It's this simple: follow these simple steps:
Step 1: Download & Install HitPaw Univd
Go to the official HitPaw website, download the program, and install it onto your computer.
Step 2: Import Your Video
Open the software and drop and drag your video into the software.

Step 3: Choose Compression Settings
Choose the preferred output format (MP4, AVI, MOV, etc.).
Adjust the compression level (higher compression reduces size but may lower quality).
Choose whether to keep the original resolution or lower it for better compression.

Step 4: Preview & Compress
Press the Preview button to assess the video quality before completing the compression.
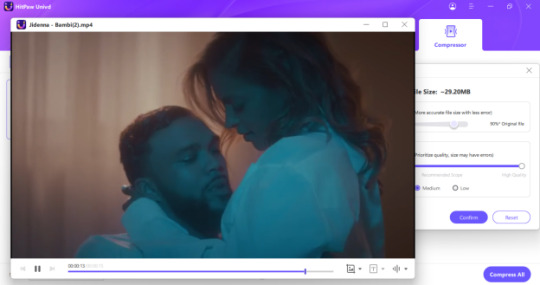
Step 5: Save & Export
Once satisfied, hit Compress, and your reduced video size will be ready in seconds!

Conclusion
If you're looking for an easy, fast, and effective way to compress video files, HitPaw Univd is the best option for most users.
✔ Fast processing speed
✔ Beginner-friendly
✔ High-quality compression
✔ Supports multiple formats
Although HandBrake is an excellent free solution and Adobe Media Encoder has industry-standard compression, HitPaw Univd achieves the ideal combination of simplicity, speed, and affordability.
Try it today and experience how effortless video compression can be!
0 notes
Text
How to Easily Download TikTok Videos Without Watermarks
TikTok is incredibly popular, boasting 1.677 billion users in 2023. You might find yourself spending hours enjoying entertaining videos on the platform, with users averaging about 52 minutes daily. If you want to keep some of these videos, you might wonder how to download TikTok videos without watermarks. A Tiktok Video Downloader is the solution for this. Tools like Savetik – Tiktok Video Downloader make it simple to save your favorite clips. You can opt for an online Tiktok Downloader or a dedicated app. There are numerous options available to suit your needs.
Tiktok Video Downloader: Using Online Tools
It’s easy to download TikTok videos without watermarks using online tools. These tools make it fast and simple, so you can watch your favorite videos without any marks. Let’s see how to use these tools well.
Step-by-Step Guide
Find the TikTok video you want: Open TikTok on your phone or computer. Look through the videos until you find one you like.
Copy the video link: When you find the video, click “Share.” Then choose “Copy Link” to save the video link.
Visit a site like Titkokio.One or Savetik.link: Go to a trusted Tiktok Video Downloader in your browser. SnapTik and SaveTT are popular because they are easy to use and work well.
Paste the link and download: On the downloader’s page, paste your copied link in the box. Click “Download.” The tool will get your video without a watermark for you.
Pros and Cons
Advantages of using online tools
Easy to Use: Websites like SnapTik and SaveTT are very simple. You don’t need extra software, so they work on any device with internet.
Works Everywhere: These sites work on PCs, Macs, Androids, and iPhones too. This means you can download TikTok videos no matter what device you’re using.
Free Service: Most online tools let you download for free. You can save lots of videos without paying anything.
Potential drawbacks and limitations
Annoying Ads: Some sites like SaveTT might have annoying ads. Be careful not to click on bad ads by mistake.
Needs Internet: Since these tools are online, you’ll need good internet to use them. This could be hard if your connection is weak.
Privacy Worries: Make sure you’re using a safe Tiktok Video Downloader to keep your data safe. Some unknown sites might not be secure.
Using online tools for downloading TikTok videos without watermarks is handy. With just a few clicks, you can save content and watch it offline anytime.
Using Mobile Apps
Getting TikTok videos without watermarks is easy with apps. These apps help you save clips right to your phone. Let’s look at some popular ones for Android and iOS.
Recommended Apps
Popular apps for Android
Android users have great choices. SaveTik App is a favorite because it’s simple and works well. It lets you download TikTok videos in high-quality without watermarks. Another good app is SaveTik, which keeps your video quality the same.
Popular apps for iOS
iOS users also have options. The SaveTik App works on iOS too, just like on Android. It helps you get TikTok videos without any marks easily. Also, Tiktokio TikTok Downloader is fast and free, giving you clear downloads quickly.
How to Use the Apps
Download and install the app
First, go to your app store on your device. Search for a Tiktok Downloader like SaveTik or SnapTik.Ltd. Click “Install” and wait until it’s ready on your phone.
Navigate the app interface
After installing, open the app. You’ll see an easy-to-use screen. Most downloader apps have a search bar or paste link option right there, so you can start quickly.
Download videos without watermarks
To get a video without a watermark, open TikTok and find one you like. Tap “Share” then “Copy Link.” Go back to your downloader app and paste the link where it says to do so. Press “Download,” and the video will be saved on your device with no marks.
Using mobile apps makes downloading TikTok videos simple. With just a few taps, you can watch them offline anytime whether you’re using Android or iOS.
Using Desktop Software
Downloading TikTok videos on your computer is easy with the right tools. Whether you use Windows, Mac, or Linux, desktop apps help save TikTok clips without watermarks. Let’s see what options you have and how to start.
Software Options
Overview of available software
For downloading TikTok videos on a computer, there are good choices. Savetik – Tiktok Video Downloader is a top choice. It makes downloading videos to your computer simple. Other good programs are 4K Video Downloader and YTD Video Downloader. These apps handle video links well for high-quality downloads.
System requirements and compatibility
Before getting any software, check what it needs to work. Savetik – Tiktok Video Downloader works on most systems like Windows and Mac. Make sure your computer can run it smoothly. Usually, you’ll need good internet and enough space to save videos.
Step-by-Step Instructions
Install the software
Download the installer: Go to Savetik – Tiktok Video Downloader’s website. Click the download link for your system.
Run the installer: After downloading, open the file and follow steps to install it.
Launch the application: Once installed, open it from your desktop or menu.
Import the TikTok video link
Find your video: Open TikTok in your browser and find a video you like.
Copy the link: Click “Share” then “Copy Link” to get the URL.
Paste the link in the software: Go back to Savetik – Tiktok Video Downloader and paste the link in its box.
Download and save the video
Start the download: After pasting, click “Download.” The app will get your video without a watermark.
Save the video: When done, pick where on your computer to keep it. Now you can watch it offline anytime.
Using desktop tools like Savetik – Tiktok Video Downloader makes saving TikTok videos easy and quick. With just a few clicks, you can collect favorite clips without watermarks.
There are many ways to get TikTok videos without watermarks. Each way has good points. Online tools are fast and simple. Mobile apps are handy when you’re out. Desktop software has strong features. Pick what works best for you.
Always remember to follow copyright rules. Make sure you have permission before downloading or sharing videos. This helps you stay legal and respects the creators’ rights. By being fair, you can enjoy TikTok videos without worry
0 notes
Text
Creating Watermarks for Your Photos: A Comprehensive Guide
In the digital age, photographs are more accessible and shareable than ever before. However, with the ease of sharing comes the concern of protecting your images from unauthorized use. One effective way to safeguard your work is by adding a Watermark maker for photos. In this article, we'll explore what watermarks are, their importance, and how to create them using various tools and techniques.
Understanding Watermarks
A watermark is a visible overlay on a photograph, typically containing text or an image, that identifies the owner or creator of the image. Watermarks serve several purposes:
Copyright Protection: Watermarks help deter unauthorized use of your photos by making it clear that the image belongs to you.
Brand Identity: For professional photographers and businesses, watermarks can reinforce brand identity by displaying a logo or company name on their images.
Promotion: Watermarks can also be a subtle way to promote your work or website when shared on social media or the internet.
Creating Watermarks
There are several ways to create watermarks for your photos, depending on your preferences and the tools at your disposal.
Text Watermarks: Text watermarks are simple and effective. You can use software like Adobe Photoshop or free tools like GIMP to add your name, website URL, or copyright symbol to your images.
Image Watermarks: Image watermarks are often logos or graphics. You can create a transparent PNG image of your logo and overlay it on your photos using photo editing software.
Online Watermark Generators: Various online tools offer easy watermarking, where you upload your image and customize the watermark text or logo. These services are user-friendly and don't require advanced design skills.
Watermark Apps: Mobile apps like LightX, iWatermark, or Watermark Photo can add watermarks directly from your smartphone.
Choosing the Right Watermark
When creating a watermark, it's essential to strike a balance between visibility and subtlety. Here are a few tips to consider:
Transparency: Ensure your watermark is transparent enough not to distract from the main subject of your photo. Most photo editing software allows you to adjust the opacity.
Size and Placement: Position your watermark strategically in a way that is difficult to crop out. Corners or the lower portion of the image are popular choices.
Font and Color: Choose a font style and color that complements your image and your brand.
Consistency: Use the same watermark style across all your images for a consistent and professional look.
Watermarking Best Practices
Now that you've created your watermark, it's time to use it effectively:
High-Resolution Images: Always watermark high-resolution images to maintain the quality of your work.
Original Files: Keep original, non-watermarked copies of your images for future use or printing.
Test and Adjust: Experiment with different watermark placements, sizes, and opacities to find what works best for your images.
Respect Copyright Rules: If you're using someone else's images, make sure to obtain the necessary permissions or rights to add watermarks.
Watermarking your photos is an important step in protecting your work and promoting your brand as a photographer or content creator. By following the tips and techniques discussed in this article, you can strike a balance between safeguarding your images and maintaining their visual appeal. Whether you choose text watermarks, image watermarks, or online tools, remember that your watermark is a representation of your work, so design it with care and consideration.
For more details, visit us :
Free watermark software
Watermarking software mac
Watermark application for mac
Free watermarking software for windows
0 notes
Text
Which is the Best Video Editing App? A Comprehensive Guide | Shabd Production House
Video material is king in the present digital era. The right tools are essential for anyone creating content, be they a marketer, excited, or content provider. With so many video editing apps on the market, it makes sense to ask questions like “Which is the best video editing app?” or “Which is the best app for video editing?” In this post, we’ll review the best video editing applications so you can select the one that most closely matches your needs.
1. Adobe Premiere Pro
Adobe Premiere Pro is without a doubt the best program for editing high-end videos. Because of this software’s many cutting-edge capabilities, YouTubers, filmmakers, and marketers love it. Premiere Pro offers a wide range of features, including multi-camera editing and color correction. Premiere Pro ought to be at the top of your list if you’re searching for the best program for video editing and stunning results.
Pros:
Professional-level features
Integration with Adobe Creative Cloud
Advanced editing tools (color grading, multicam editing)
Cons:
Expensive subscription
Steeper learning curve for beginners
2. Final Cut Pro X
Another excellent video editing program made just for Mac users is Apple’s Final Cut Pro X. Its extremely user-friendly interface and smooth workflow with other Apple products make it perfect for both intermediate and professional editors. One of the greatest video editing apps out there is Final Cut Pro X, whether you’re using it to create tutorials, vlogs, or short films.
Pros:
Optimized for Mac performance
Excellent rendering speed
Magnetic timeline for easy editing
Cons:
Only available on Mac
High initial cost (one-time purchase)
3. Davinci Resolve
Both beginners and experts can use the feature-rich, free video editing tool Davinci Resolve. Due to its well-known exceptional color correction and grading tools, it is the recommended choice for post-production in the film industry. For those who want to edit videos as well as possible without going over budget, Davinci Resolve is a great tool.
Pros:
Free version available
Industry-leading color grading tools
Supports 8K resolution
Cons:
Steeper learning curve for beginners
Some advanced features only available in the paid version
4. iMovie
If you’re looking for an easy-to-use video editing app for your iPhone or Mac, iMovie is a fantastic option. Its simple drag-and-drop interface is perfect for beginners who want to edit home videos, vlogs, or social media content without delving into complex features.
Pros:
Free with Apple devices
Simple and easy to use
Great for quick edits
Cons:
Limited advanced features
Only available for Apple users
5. Filmora
For those who are intermediate or new to video editing, Filmora is an excellent piece of software. It is perfect for people who want to make beautiful films without spending hours editing because it provides a wide range of creative templates, filters, and transitions. Filmora is among the greatest programs for video editing if you’re just getting started because of its little learning curve.
Pros:
User-friendly interface
Extensive library of effects and transitions
Affordable pricing
Cons:
Limited professional-level features
Watermark on the free version
6. InShot
One of the greatest mobile video editing apps on the market is InShot. For smartphone users, InShot’s extensive yet user-friendly design is perfect. Both iOS and Android-powered devices can use it. Editing social media and short-form videos is quick and simple with InShot.
Pros:
Easy-to-use mobile interface
Great for social media content
Free version available
Cons:
Limited advanced features
In-app ads and watermarks in the free version
KineMaster is another fantastic mobile editing app. It has features like audio editing, multi-layer editing, and precise trimming that are typically only seen in desktop applications. If you’re searching for the greatest app for editing videos on your tablet or smartphone, this one is great.
Pros:
Multi-layer editing on mobile
Built-in transitions, effects, and audio editing tools
Free version available
Cons:
Watermark in the free version
Advanced features can be overwhelming for beginners
Conclusion: Which is the Best Video Editing App?
Which program is ideal for video editing ultimately depends on your demands and level of skill. Industry-standard tools for pros can be found in Adobe Premiere Pro and Final Cut Pro X, while Davinci Resolve offers high-quality editing for free. For those who are new to editing or require a more user-friendly option, iMovie or Filmora might be a better fit. Additionally, two of the greatest apps for editing videos on the fly for mobile users are KineMaster and InShot.
Email: [email protected]
Phone: +91 88402 31884
Website: http://shabdproduction.com/video-editing-service/

#videoeditingservices#videoediting#videoeditor#videoeditingcompanyinlucknow#videoeditingserivcesinlucknow#videoproductioncompanyinlucknow#videoproductionserivcesinlucknow#videoproduction#lucknow
0 notes
Text
Screen Recorder - XRecorder for PC [Windows and Mac]
Screen recording is powerful in the digital era. A good screen recorder is essential for tutorials, game sessions, and software issue documentation. Enter Screen Recorder – XRecorder, a powerful screen capture software without watermarks or root access. In this detailed review, we’ll explain XRecorder and how to use its capabilities best. XRecorder’s flawless user experience and high-quality…
0 notes
Text
Integrate VeryUtils jPDFKit Command Line Software into your document workflows
Integrate VeryUtils jPDFKit Command Line Software into your document workflows.
In today's digital world, working with PDFs is more crucial than ever. Whether you're managing documents for business, education, or personal use, the ability to efficiently handle PDFs can make a significant difference. VeryUtils is proud to introduce the jPDFKit Command Line Software, a comprehensive solution designed to meet all your PDF needs across Windows, macOS, and Linux platforms.
https://veryutils.com/java-pdf-toolkit-jpdfkit

Comprehensive PDF Management VeryUtils jPDFKit offers a robust suite of tools tailored to tackle a wide array of PDF-related tasks. Whether you need to create, convert, or optimize PDFs, our software provides high-fidelity rendering and printing, digital signatures, text extraction, redaction, and more. Our advanced capabilities ensure you can handle various aspects of PDF management with ease, from high-quality font and image rendering to sophisticated color space handling.
Proven PDF Technology At VeryUtils, we pride ourselves on our proprietary PDF technology. Our libraries and components are trusted by numerous enterprises across different industries. Our flagship desktop PDF editor, PDF Studio, is widely used by professionals for daily document tasks. With this extensive experience, our solutions are built on a stable and reliable code base, offering deep feature support and exceptional performance.
Quality and Reliability Our commitment to quality is reflected in our development process. We maintain rigorous quality control standards to ensure our software is not only feature-rich but also stable and high-performing. The integrated code base of our solutions provides a consistent and reliable experience, backed by our dedication to quality in-house development.
Exceptional Technical Support VeryUtils stands out for its professional technical support. Our team of experts is dedicated to providing fast and effective solutions to your questions. We prioritize customer satisfaction and aim to respond within 24 hours to ensure you receive the assistance you need promptly.
jPDFKit Command Line Software Features
The jPDFKit Command Line Software is designed to cater to various PDF needs with a set of specialized products:
Java PDF Library Products:
jPDFImages: Convert PDFs to images with ease.
jPDFOptimizer: Optimize PDFs to reduce file size and improve performance.
jPDFPrint: Print PDFs efficiently.
jPDFProcess: Create and manipulate PDFs with advanced features.
jPDFWeb: Convert PDFs to HTML for web integration.
jPDFWriter: Create PDFs from scratch.
Java PDF SDK: Comprehensive SDK for Windows, Mac, and Linux developers.
Java PDF Component Products:
jPDFEditor: View and edit PDFs seamlessly.
jPDFNotes: View and annotate PDFs for better document management.
jPDFViewer: View and print PDFs with ease.
PDF Applications:
Free PDF Reader: Access and read PDF files for free.
PDF Studio: An advanced PDF editor for professional use.
PDF Automation Server: Automate your PDF processing tasks efficiently.
Industry Applications Our PDF solutions are versatile and cater to a wide range of industries, including:
Banks & Financial Institutions
Insurance Companies & Organizations
Web Development
Document Management
Education
Printing, Media & Publishing
PDF Solutions and Capabilities VeryUtils jPDFKit offers a variety of solutions for your PDF needs:
Assemble, Merge, Split PDF
Convert PDF to HTML and Images
Convert Word to PDF
Digitally Sign PDFs
Edit Content in PDFs
Fill PDF Forms & Extract Data
OCR PDF Documents
Optimize and Preflight PDF Documents
Print and Redact PDFs
View, Annotate, and Add Watermarks to PDFs
With our extensive range of tools and solutions, VeryUtils jPDFKit Command Line Software is designed to meet all your PDF-related needs with efficiency and precision. Whether you're looking to integrate PDF functionality into your applications or streamline your document management processes, VeryUtils has the right tools to help you succeed.
Explore the power of VeryUtils jPDFKit today and take control of your PDF management like never before.
Java PDF Toolkit (jpdfkit), https://veryutils.com/java-pdf-toolkit-jpdfkit
Java PDFTools GUI, https://veryutils.com/java-pdftools-gui
Java PDFTools (jpdftools.jar) Command Line, https://veryutils.com/java-pdftools
Java PDF Reader Custom Build Service, https://veryutils.com/java-pdf-reader-custom-build-service
0 notes
Text
SSSTikTok | Download TikTok Video Without WaterMark MP4
TikTok Video Downloader Online Without Watermark
ssstikdownload.id offers a new way to download TikTok videos without any watermark or logo. ssstik, the highly popular entertainment app, attracts many users who want to download their favorite videos. However, a common issue is the TikTok watermark that appears on downloaded videos, which many find unappealing. To address this, ssstikdownload.id has developed a free solution that works both on web and mobile platforms, allowing users to save videos without any watermark. This downloader is completely free and compatible with all major web browsers (such as Microsoft Edge, Google Chrome, Mozilla Firefox, and Safari) and operates on both Android and iOS devices.
Download TikTok Videos Without Watermark with sssTikTok
ssstik tok offers an easy-to-use tool that lets you download videos without needing to sign up. Simply copy the URL of the video you wish to download, paste it into the text field on the website, and hit the download button. The TikTok video downloader gives you options to download in various formats, including HD and MP4 videos. You can also download just the sound from videos in MP3 format.
How to Download TikTok Videos on PC
The ssstikdownload.id ssstik download offers a simple and effective way to download TikTok MP4 videos. It works well on different operating systems such as Windows, Mac OS, and Linux, making it a convenient choice for high-quality video downloads.
PC and laptop users, including those using Windows 7 or 10, can use this tool without having to install any additional software.
To download a video, just copy the link from TikTok, go to the ssstikdownload.id website, paste the link into the designated text box, and click "Download." This will give you a high-quality video without a watermark.
How to Download TikTok Videos on iPhone or iPad (iOS)
For those using an iPhone or iPad, theres a straightforward method to ssstik .io, working around Apples security measures.
Start by downloading the "Documents by Readdle" app from the App Store. This step is crucial because, starting with iOS version 12, you cant directly download videos from browsers.
After installing the app, open it and copy the TikTok video link you wish to download. Next, look for the web browser icon in the app, typically found at the bottom right, and tap on it. This action opens a browser within the app.
Go to the sssTikdownload.id Video Downloader in this browser, paste the video link you copied into the provided text area, choose your desired download option, and hit the download button. The video will then download directly to your device, allowing you to enjoy it anytime.
FAQs
What is SSSTikTok?
SSSTikTok is an online tool that allows users to download TikTok videos without a watermark. It provides a straightforward way to save your favorite TikTok clips directly to your device, free from the TikTok logo.
Is SSSTikTok free to use?
Yes, SSSTik is completely free to use. There are no hidden charges for downloading videos.
Do I need to create an account to use SSS Tik?
No, you do not need to create an account or sign up to use SSSTik. The service is accessible without any registration.
Can I download videos in HD quality?
Yes, SSSTikdownload.id allows you to download videos in high definition, depending on the original videos upload quality.
How do I download a TikTok video using SSSTikdownload.id?
To download a TikTok video, simply copy the video link from TikTok, go to SSSTikdownload.id, paste the link into the provided field, and click the download button. Youll then be able to save the video without a watermark.
Can I download TikTok videos on any device?
Yes, SSSTikdownload.id works across various devices, including PCs, smartphones, and tablets, across different operating systems such as Windows, macOS, iOS, and Android.
Are there any limitations on the number of videos I can download?
No, there are no limitations. You can download as many videos as you like from TikTok using SSSTikdownload.id.
1 note
·
View note
Text
Focusee Appsumo Lifetime Deal $39: Transform Screen Recordings Fast

Have you ever wanted to make your screen recordings look amazing without spending hours editing? Well, now you can with the Focusee Appsumo Lifetime Deal. For just $39, you can turn your screen recordings into stunning videos automatically in minutes!

What is Focusee?
Focusee is a fantastic tool that helps you create beautiful videos from your screen recordings. It's perfect for content creators, developers, and marketers. With Focusee, you don't have to worry about manual editing. It does all the hard work for you!
Focusee Appsumo Lifetime Deal $39
Why Choose Focusee?
Uses AI technology to make your videos amazing.
Works on both Mac & Windows.
Turns screen recordings into stunning videos in minutes.
Key Features Of Focusee
Automated Editing
Focusee takes care of the editing. You just need to record your screen, selfie, and voiceover. Focusee follows your cursor, adds zoom effects, and places a nice background. You’ll get a professional-looking video right away!
Automatic Captions
Need captions for your videos? No problem! Focusee generates captions automatically. You can also edit them to make sure they are 100% correct.
Customizable Layouts
Choose from 6 pre-designed layouts for your selfie and screen recordings. You can also customize them to fit your needs.
Motion Blur
Make your videos look more natural with motion blur. This feature adds a cinematic touch to your recordings.
Customized Presets
Save your favorite settings as presets. This includes zoom, cursor, background, and more. Apply them with a single click to keep your style consistent.
Add Watermarks
Add your own watermark to your videos. This helps with brand identity and protects your copyright.
Trim and Change Speed
With Focusee, you can trim, cut, crop, and change the speed of your videos. Make them concise and clear.
Diverse Frames and Filters
Customize your appearance with different camera frames and filters. This helps reflect your personal or brand style.
Make Videos More Appealing
Add backgrounds, adjust rounded corners, set shadows, and more to make your videos captivating.
Automatic Pan & Zoom Effects
Focusee automatically adds dynamic pan and zoom effects to highlight key elements in your recordings. This makes your videos more engaging.
Pre-set Canvas Sizes for Social Media
Save time with pre-set canvas sizes designed for different social media platforms. This feature streamlines your content creation process.
Variety of Export and Sharing Options
Export your content in multiple formats, including MP4 or GIF, up to 4K resolution. Share your videos effortlessly with flexible options.
Add Interactive Elements
Enhance viewer engagement by adding interactive elements like quizzes and call-to-action buttons directly into your videos.
Who Can Benefit from Focusee?
Content Creators: Create stunning videos with ease.
Developers: Showcase your work professionally.
Marketers: Make engaging content for your audience.
How to Get Started with Focusee
Purchase the Focusee Appsumo Lifetime Deal for $39.
Download and install the software on your Mac or Windows computer.
Start recording your screen, selfie, and voiceover.
Let Focusee handle the editing for you.
Enjoy your stunning video!

Frequently Asked Questions
What Is Focusee?
Focusee is a tool that transforms screen recordings into professional videos automatically.
How Much Does Focusee Cost?
Focusee offers a lifetime deal for $39 on Appsumo.
Who Can Benefit From Focusee?
Content creators, developers, and marketers can benefit from using Focusee.
What Operating Systems Is Focusee Compatible With?
Focusee is compatible with both Mac and Windows.
Conclusion
The Focusee Appsumo Lifetime Deal is an amazing offer for anyone looking to create stunning videos from their screen recordings. For just $39, you get a tool that saves you hours of editing time and makes your videos look professional. Whether you are a content creator, developer, or marketer, Focusee has something to offer. Don't miss out on this fantastic deal!
For more information, visit the Focusee Appsumo Lifetime Deal page.
0 notes