#What Is UAC in Windows 10 and How to Disable It
Explore tagged Tumblr posts
Text
Alright. I'm making this post because I was unpleasantly surprised to find Microsoft had forcibly downloaded an """"ai assistant"""" onto my computer (called Copilot), and because finding a site that actually told me how to kill it for good -- in clear, truly step-by-step terms -- was way harder than it needed to be.
Preface: this is only relevant if you're running Windows 11.
Here is your target:

If you see this logo on your taskbar -- or... have Edge installed on Windows 11 -- you've got Copilot. You can't delete it on its own, Microsoft has integrated it into the OS as best they can. The most you can do is disable it (instructions for which are at the very end of this post).
So... to REALLY get rid of it you need to uninstall Microsoft Edge, because it's a part of/reliant on Edge. A lot of bells and whistles of Windows are also reliant on Edge, like widgets, but I never use those. I use my PC almost exclusively for gaming, and I don't want this slimy "ai" shit on my computer. I use Firefox anyway. Edge can go die as far as I'm concerned.
Here's the actual steps, copy-pasted from a website that took me way too long to find. It also really makes my browser chug for some reason, which is why I'm copy-pasting the whole thing. If you still want to look at the site itself, put it in reader view as fast as you can (link to site).
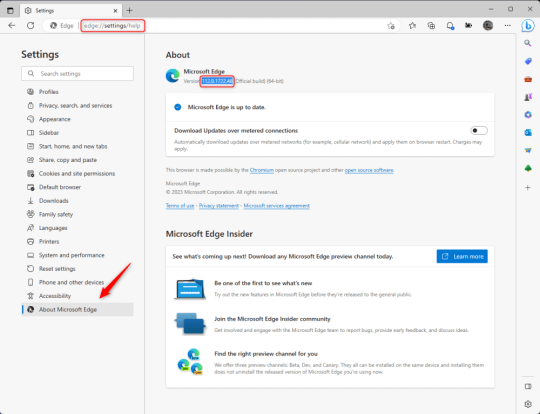
1.) Open Microsoft Edge, type "edge://settings/help" in the address bar, and then press Enter.
2.) Click "About Microsoft Edge" at the bottom of the left-hand pane. Copy the version number at the top of the screen, under Microsoft Edge.
3.) Press Windows Key + S to open Windows Search.
4.) Type "Command Prompt", right-click the result, and then select "Run as Administrator".
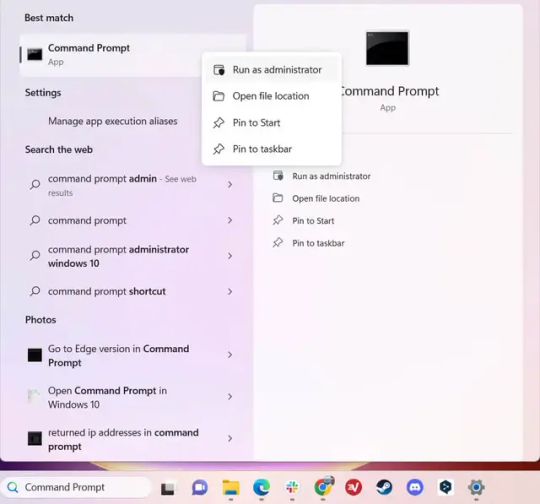
5.) The User Account Control (UAC) prompt will appear. Click "Yes".
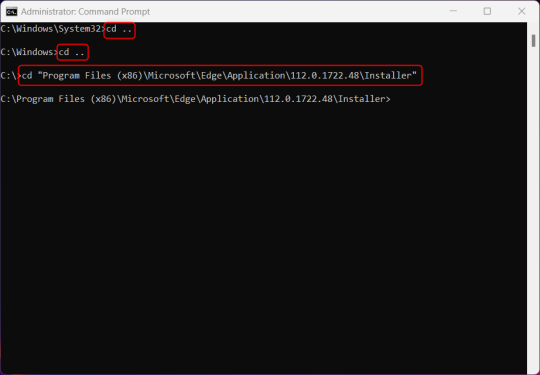
6.) Navigate to Edge’s “Installer” directory by using the cd command. Depending on which directory your Command Prompt opens in by default, you may need to use the "cd .." command to go back a level or two.
Once ready, run this command:
cd “Program Files (x86)\Microsoft\Edge\Application\Version Number\Installer”
Replace "Version Number" with your actual version number copied earlier.
7.) Next, run this command to uninstall Microsoft Edge:
setup –uninstall –force-uninstall –system-level
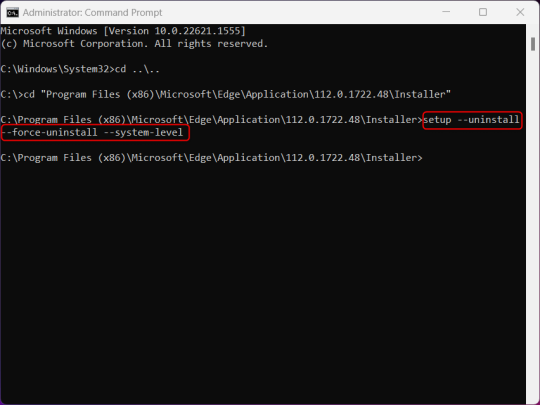
((It will look like nothing happened! Don't worry!))
8.) Restart your PC for the changes to take place.
((HOWEVER, Windows will try to reinstall it the next time your PC updates (or whenever it feels like it lol) so there's a second half to this))
1.) Press Windows Key + R to open Run.
2.) Type "regedit" in the text box and click OK to open the Registry Editor.
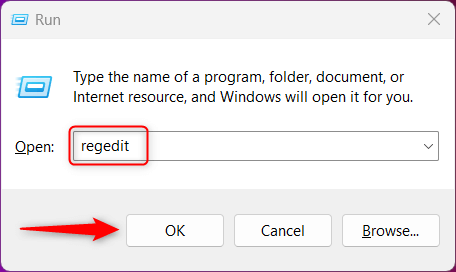
3.) The User Account Control (UAC) prompt will appear. Click "Yes".
4.) In the Registry Editor, navigate to HKEY_LOCAL_MACHINES\SOFTWARE\Microsoft.
5.) Right-click the "Microsoft" folder, hover your cursor over "New", and then select "Key".
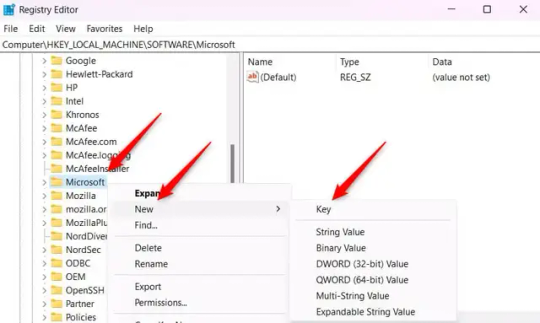
6.) Rename the new Key to "EdgeUpdate".
7.) Right-click EdgeUpdate, hover your cursor over "New", and then select "DWORD (32-bit) Value".
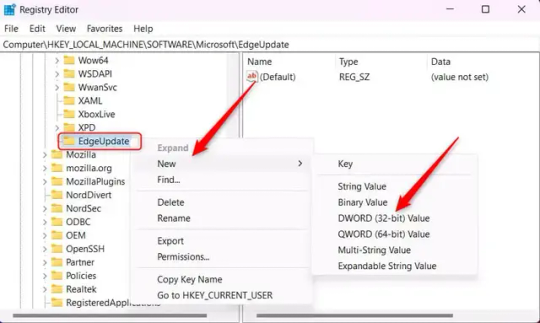
8.) Right-click the new value, which is currently named "New Value #1".
9.) Select "Rename" from the context menu.
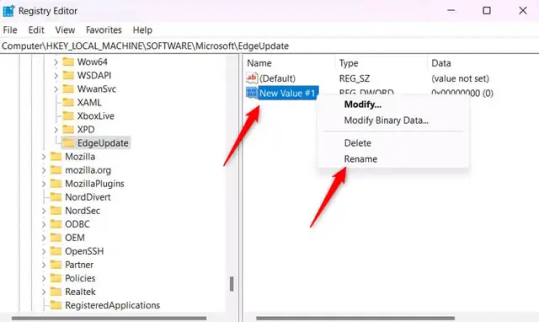
10.) Rename the value to "DoNotUpdateToEdgeWithChromium".
11.) Right-click the newly-named DoNotUpdateToEdgeWithChromium value and select "Modify" from the context menu.
12.) The Edit DWORD (32-bit) Value window will appear. Change the Value data to "1" and then click OK.
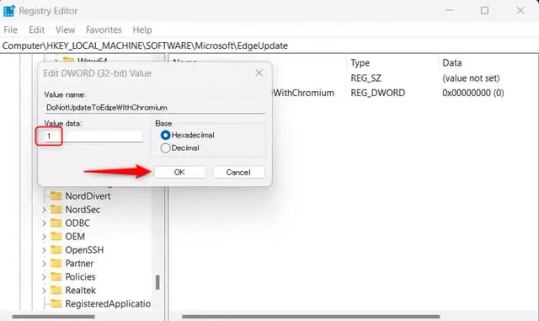
((You are now free. If you ever run into a really serious, unavoidable issue with your OS that's clearly a result of Edge being gone, you can redownload it like a regular app. But you should be fine.))
((And, if for some reason you want still want Edge around but just want the copilot thing gone, here's what you do:
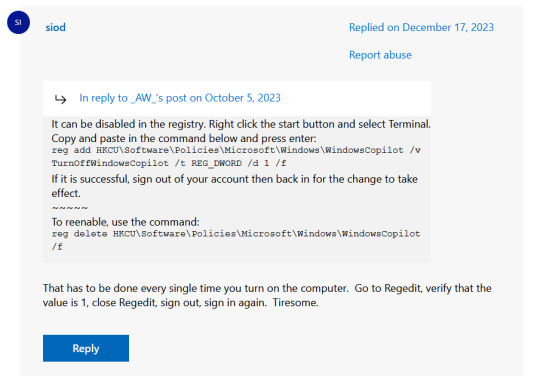
The command, for ease of copy-pasting: reg add HKCU\Software\Policies\Microsoft\Windows\WindowsCopilot /v TurnOffWindowsCopilot /t REG_DWORD /d 1 /f
You can't actually truly delete Copilot (without deleting Edge), only disable it. And as the reply says, you do have to do this every time you turn the computer on. I haven't tested that myself, but I believe it. I assume/hope that excludes just waking the computer up after it goes to sleep, but I don't know for sure.))
120 notes
·
View notes
Text
IObit Uninstaller 13.6 Pro Key License [1Yr Free 2024]
What is IObit Uninstaller 13.6 Pro Key?
The IObit Uninstaller 13.6 Pro key is a license key that unlocks the full capabilities of IObit Uninstaller 13.6 Pro. This key grants access to advanced features and tools designed to help you efficiently manage and remove unwanted software from your computer. Unlike the free version, the Pro version offers enhanced functionalities for a more comprehensive cleaning experience.
What is IObit Uninstaller 13.5 Pro Key?
The IObit Uninstaller 13.5 Pro key serves a similar purpose for the previous version, IObit Uninstaller 13.5. It provides access to Pro features in that version, allowing for advanced uninstalling capabilities and better system optimization compared to the free version.
Features of IObit Uninstaller 13.6 Pro Key
Advanced Uninstallation: Completely removes unwanted software, including residual files and registry entries.
Browser Toolbar Removal: Easily eliminates unwanted browser toolbars and plugins.
Real-Time Monitoring: Monitors installations in real-time to ensure complete removal.
Powerful Scanning: Performs a deep scan to clean up leftover files and registry traces.
Batch Uninstall: Allows multiple programs to be uninstalled simultaneously.
How to Activate IObit Uninstaller 13.6 Pro Key with License Keys?
Download and Install: First, download and install IObit Uninstaller 13.6 from the official website.
Launch the Software: Open IObit Uninstaller 13.6 Pro on your computer.
Enter License Key: Navigate to the registration or activation section within the software.
Input Key: Enter your IObit Uninstaller 13.6 Pro key in the provided field.
Activate: Click the activation button to unlock Pro features.
How to Uninstall IObit Uninstaller?
Open IObit Uninstaller: Launch the application from your applications or start menu.
Select Program: Choose IObit Uninstaller from the list of installed programs.
Uninstall: Click the uninstall button and follow the prompts to remove it from your system.
Clean Residual Files: Use any built-in cleanup tools to ensure all associated files are deleted.
IObit Uninstall and Remove Administrator Issues on Windows 10
If you encounter administrator issues while uninstalling IObit Uninstaller on Windows 10:
Run as Administrator: Right-click the IObit Uninstaller icon and select “Run as administrator.”
Disable UAC: Temporarily disable User Account Control (UAC) if you continue to face issues.
Use Safe Mode: Boot your computer in Safe Mode and try uninstalling the program again.
Use an Uninstaller Tool: Consider using another uninstaller tool if the built-in method fails.
Why Choose IObit Uninstaller 13.6 Pro Key?
1. Comprehensive Removal: Provides thorough uninstallation to eliminate all traces of unwanted programs.
2. Enhanced Performance: Improves system performance by removing clutter and optimizing the registry.
3. User-Friendly: Offers an intuitive interface for easy navigation and operation.
4. Real-Time Monitoring: Ensures clean installations and removals with real-time monitoring.
IObit Uninstaller 13.6 Pro Key Free License 2024
6E25C-21F89–7F62B-D86BC for 13.6.0.5– Valid till — October 16, 2024.
Free License: 11242-C437D-DE013–6E6TC
New License: DB978–6E333-B12DC-7BDTC
Key: F6741-F743C-7CE93–3C8TC (Valid till June 20, 2024)
30C81–393A2–7DBAF-390TC — Valid till — November 8, 2024
6E25C-21F89–7F62B-D86BC — Valid till — October 16, 2024
F6741-F743C-7CE93–3C8TC — Expiry: June 20, 2024
11242-C437D-DE013–6E6TC — Expiry: May 30, 2024
DB978–6E333-B12DC-7BDTC
11242-C437D-DE013–6E6TC
BE75C-BD2C8–7E065–3FEBC (Valid till Apr 08, 2024)
5E635-B9223-D6779-BAEBC (Valid till Mar 22, 2024)
539C6-A60A4–62290–383TC (Valid till Mar 02, 2024)
6B95D-3EE8D-ED01B-2DDTC (Valid till Mar 02, 2024)
4AEC4-DAE7D-A0C86–765TC (Valid till Mar 02, 2024)
B894E-7ADF2–100F1-CC1TC (Valid till Mar 02, 2024)
539C6-A60A4–62290–383TC (Valid till Mar 02, 2024)
7B48B-01241–1EE02–3BETC (Valid till Feb 18, 2024)
7A54B-0A8ED-8F770–4ECTC (Valid till Feb 09, 2024)
2CBB7–715F7–9E5BE-991TC (Valid till Feb 09, 2024)
IObit Uninstaller 13 ProLicense Key (3 Device)
CDNJF-P6G3P-85BQV-58Y7E
4MM6R-R9332–4JKKJ-X3N46
Q9DHY-5367H-YYVLN-JGW5U
M3JFE-7MNWQ-MM59G-K5WXY
QKSUD-GEZRM-JVNER-K2EGP
Z3XSZ-6PVNJ-YNN8J-ZRPRX
IObit Uninstaller Pro Activation codes (6 Months)
B894E-7ADF2–100F1-CC1TC
81B57-E0F9E-14836–570BC
C7870-A6BBE-D9C12-A25TC
CE697–12E0B-46B82-AE4TC
FE17F-ADE45–6BED8–30DTC
879BF-5A984–8EEB0–86ETC
4BCDA-6B1CC-3AC6F-AD4TC
Conclusion
IObit Uninstaller 13.6 Pro Key is a powerful tool designed to help you manage and remove unwanted software effectively. With advanced features like real-time monitoring and deep scanning, it ensures a thorough cleaning process. To activate the Pro version, simply use the provided license key, and for any issues, follow the suggested solutions to uninstall or troubleshoot.
0 notes
Text
What Is UAC in Windows 10 and How to Disable It ?
What Is UAC in Windows 10 and How to Disable It ?

What Is UAC in Windows 10 and How to Disable It?
If you have a network of computers in your home or workplace, you need to control which users or applications can change something on that system.
One way to prevent unauthorized changesis to designate one person as the network administrator. However, having one person managing everything is not enough, and this is where User Access Control (UAC)…
View On WordPress
#How to Add a Family Member to Your Microsoft Account#How to Disable UAC in Windows 10#Take Control of Your Accounts#What Is UAC in Windows 10 and How to Disable It
0 notes
Text
Game Instalation Guide:installing the sims castaway stories on your machine
Introduction
Hello! I’m Luca and welcome (back) to my tumblr! Recently i became addicted to the sims castaway stories so i decided that today i’m gonna show you how to install The Sims Castaway Stories on your machine! (and also make it to work)
DISCLAMER
i think we all know what is this game! So i won’t talk about it today! lil’ disclamer:The Sims Castaway Stories’s pc version is laptop frendly so it can run well on laptops but of course it has problems running on modern systems! However we will make the game to work on windows 10 so don’t worry!
BEGINNING
Before we begin please disable your antivirus! And you will also need a tool for extracting .zip or .rar files! You can get Winrar or 7-Zip,it dosen’t matter that much! Tho i recommend using 7-Zip because it’s free :D
1.Go to https://oldgamesdownload.com/the-sims-castaway-stories/ and go to the download the sims castaway stories then select the purple button,Should look like below:

2.After that,select how would you like to download castaway stories! You have to options: mega.org or archive.org,it dosen’t matter which one you select.

3.(7-ZIP USERS) After it finished downloading select the archive and right-click on it and then select open with,scroll down to the bottom and select look on another app on this pc then go to C:\Program Files\7-zip then select 7zFM.exe ,for 32 bit systems it should be the same default location or Program Files (x86)
(WinRAR USERS) You can do the same process but select the default location for winrar UNLESS it’s already set as default.
4.Continuing,after that open the archive then select its content and paste it into a new folder.
5.After it finished the extracting procces make sure your antivirus is disabled because if it is enabled the crack is going to be detected as a virus and will get removed,then add the folder with the game’s setup to the exceptions list (just to be safe <3)
6.Open the setup and if you get a pop-up from UAC(user account control) saying:an admin has blocked you from running this app, follow this tutorial: https://www.youtube.com/watch?v=1jgwD2e1MB8&ab_channel=TreeAcademy
7.Open the setup again and follow the on-screen instructions,when a serial code is required use this: N78Q-RZKW-7428-DB09-DVTY then select the directory you want to install the game then let the installer do its job,after it got finished select quit then finish.
8. You can enable UAC again now,also add the game’s installation directory to your exceptions,For Windows Defender go to Virus&treat protection > Virus&Treat Protection settings then select manage settings then scrol down to add or remove exclusions and then select the game’s folder,the default is C:\Program Files or Program Files(86)\EA Games\The Sims Castaway Stories
9.Go to the crack folder then select the files inside them and copy them to the game’s folder mentioned above then go into the tsbin folder and right click and select paste. CONGRATS! THE GAME IS FULLY INSTALLED BUT WE AIN’T FINISHED YET!
Optimizing the game!
1. We will need GRM (graphic rule maker) and ONLY IF YOU HAVE 8 GB OF RAM OR MORE we will use 4 gb patch. Download GRM here and 4 gb patch here
2.I’m gonna assume that you know how to install GRM and continue.After the tool got installed open it and it should look like this:
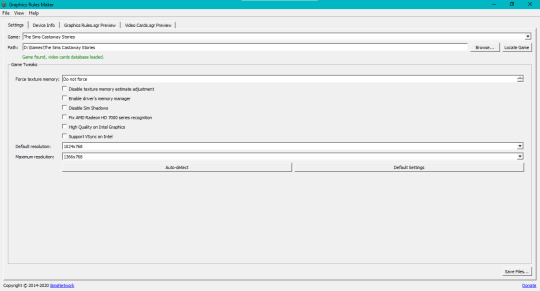
3.Select the game from the game list and then select the locate game button and if it dosen’t detect it select browse.. and select the game’s location.
4.Based on your GPU you need to force the texture memory or the game won t work,go to the search button (for windows 10) and search advanced display info and then scroll down and select Display Advanced Proprieties for Display 1 or 2,a window should open and you need to look at the dedicated video memory and the amount of vram that you see there is the amount that you will enter in the force texture memory section.
5.Select the disable sim shadows option and if you have an amd gpu select the fix amd radeon hd series option,then select your resolutions then save the files,select yes and then ok and you are done!
6.Open the 4gb patch and select the SimsCS.exe file from the tsbin sub-folder of the game’s directory.
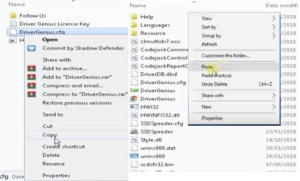
Now you are done optimizing the game! You can right click on the SimsCS.exe and select send to desktop(create shortcut)
The game should work now,if you have any questions please ask them in the ask me anything section! Enjoy!
20 notes
·
View notes
Text
Iso Windows 7 For Mac

Iso Windows 7 For Macbook Pro
Download Iso Image Windows 7 For Mac
Windows 7 Iso For Virtual Machine
Buy Windows 7 For Mac
And all my files got deleted so I decided to do a clean Windows 7 install. But unfortunately, at that time I was not having any copy of the Windows 7 DVD to install it. So I borrowed it from my friend and then install it on my Pc. After the installation is done, I copied all the windows installation files from that DVD so that I can use it later. Download Windows 10 Disc Image (ISO File) Before updating, please refer to the Windows release information status for known issues to confirm your device is not impacted. Download Windows 7 (SP1 included) for Mac free. Windows 7 (SP1 included) is an operating systems produced by Microsoft.
Duration: 2:01. How To Download A Windows 7 or 8.1 ISO On a Mac · 1. Go to. I have downloaded Wine, which allows me to do PC things on my Mac, but If you already own a Windows 7 physical copy, it is legal to download an ISO image.
Iso Windows 7 For Macbook Pro
Windows 7 on mac iso download - final, sorry
With: Windows 7 on mac iso download
MICROSOFT OFFICE CRACK DOWNLOAD WINDOWS 10Zip files turn into rar files well downloadingMAC FILE DOWNLOAD MANAGERMine craft story mode all episodes free pc downloadDOWNLOAD FNAF 1 PCPhp website where people can download filesDIDACHE CATHOLIC STUDY BIBLE FREE TORRENT DOWNLOADWii full iso download
How To Install Windows 7 (For Free!) On Your Mac
My Windows 7 desktop is spare, but just give me a few weeks. Microsoft hide caption
toggle caption Microsoft
If you went to your favorite pizza place and tried to order mushrooms and pepperoni and the waiter told you, 'I'm sorry but you can't order those two toppings together. You have to pick one or the other,' you'd be pretty mad, right?
Forgive the analogy, I just ate pizza.
The Mac versus PC debate has gotten so ridiculous that even normal, sane people who wouldn't care one way or another are now hurling insults and tsk-tsking at family members and co-workers who have either fallen into the fruity Mac OS camp or the stodgy Windows world.
You know what? (Expletive) all that. I say, have the best of both worlds.
Over the weekend, I installed Windows 7 RC, a free, preview version of Microsoft's forthcoming operating system, the successor to Windows Vista. Best of all, it works perfectly well on newer Macs sporting Intel processors. My Macbook, which is two years old, runs it like a champ as a Boot Camp partition. I never thought I'd say this about a Windows operating system again after refusing to upgrade from Windows XP, but from what I've seen so far, Windows 7 is... really good. Fast, pretty and without a single crash so far (knock on wood).
A step-by-step guide to installing Windows 7, after the jump.
Here's how to install it on your Mac in a few simple steps:
Make sure you have plenty of hard drive space, at least 40 or 50 gigabytes on your Mac. You're going to lose about 15-25, at least, to run Windows 7, so leave yourself plenty of space for Mac OS, too.
Go to this Microsoft page and sign up for the Windows 7 Release Candidate Customer Preview Program. It's a mouthful, but it works. Microsoft will send you a unique activation code you'll need later. Print it out or write that code down.
Download the 32-bit version of Windows 7. It's a big download, more than two gigabytes, so you'll be waiting a little while.
Burn the .iso file to a DVD to create a Windows 7 install disk. You can do this easily with OS X's Disk Utility. (More detailed instructions here).
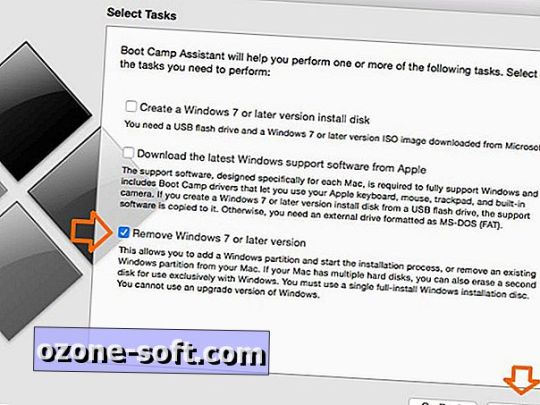
Open up Boot Camp Utility. This will walk you through the process of creating a partition on your hard drive for Windows 7. Print out the manual if you want to (it does contain some good, useful info, but it's about 26 pages). Then use the DVD you burned to install Windows 7. Your machine will reboot several times as it installs.
You'll be asked, once Windows is installed, to enter your activation code.
You have Windows 7! As soon as you're in the Windows desktop, insert your Mac OS install disk (either the one that came with your Mac or a Leopard OS disk if you've upgraded) and install the Mac drivers that are on that disk. This will enable sound, your iSight camera and other hardware from your machine.
Don't like it? When you're back in OS X (see below), you can use Boot Camp Utility to delete the Windows partition and reclaim your hard drive space.
That's it. You have a working copy of Windows 7, which will continue to function normally until March 1, 2010.
If you want to switch back to OS X, you'll need to go into Control Panel and look for Boot Camp in order to tell the machine to restart in Mac mode. Once you're back in OS X, you'll have to do the same thing (in System Preferences) to go back to Windows 7. Software like Parallels and VMWare Fusion allows you to run Windows programs while in Mac OS, too. Both can run Windows 7.
Stuck on any steps? A more visual guide is available here.
Источник: (https://torrent-igruha.org/3551-portal.html)
Windows 7 on mac iso download - phrase
Windows 7 Mac Theme – Download for 32 bit and 64 bit
– Transform your windows 7 to Mac OS X Snow leopard and experience the Mac look and feel in windows! This Mac theme for windows 7 works on windows vista too and you can use it on both 32-bit and 64-bit windows OS.
Windows 7 has a huge collection of themes designed for it and you can alternate between the free windows 7 themes any day, any time! The Snow leopard pack is one such windows 7 theme to transform the entire windows 7 UI (user interface) and it includes the Snow Leopard Welcome Screen, Visual Style, Icons, Wallpapers, Sounds, Dock and much more.
How to install Mac Theme for Windows 7?
This pack includes the following third party applications.
RocketDock (with icon, iDock and Stacks Docklet)
Ubericon to render the icon effects
Virtuawin with snow leopard icons
Y’z shadow for shadow and transparency effects
Here is how you can get the Mac look and feel on windows 7.
After you download the snow leopard pack, extract the zip to a folder.Then right click and run the snow leopard transformation pack application as an administrator.The pack will require you to disable UAC, to work properly. If you choose “Yes”, it will disable UAC and prompt you to restart the computer.
After restarting, double click the snow transformation pack application icon to run it again. You will find the “Welcome” screen as shown below.
Click “Next” to continue.You will then be asked to accept the terms and conditions. After reading through them, you can choose to “Accept”. The installation will then continue. If you do find a screen that shows the remaining seconds as 10, don’t be fooled that it will complete soon, as the installation does take considerable time.
Download Iso Image Windows 7 For Mac
But it is worth waiting till completion, as it does a pretty decent job of transforming your Windows 7 to Mac!
If you do feel like uninstalling the Windows 7 Mac Theme, you can do it any time with a single click.
Windows 7 Iso For Virtual Machine
After uninstalling, make sure you enable UAC again. You can enable it by typing “UAC” in “Start” => “Search programs and files”, and then clicking “Change User Account Control Settings”. Then move the slider up, to set it as “Always Notify”.
Buy Windows 7 For Mac
Enjoy the Mac theme for Windows 7 and Vista. It gives a wonderful Mac experience on Windows 7 and Vista and is also easily removable. It is quite big in size (around 30 MB), but the storage that comes with computers these days is quite huge and this size shouldn’t be a problem. The only con is its requirement to disable UAC. Otherwise, it is quite cool.
Related Posts

1 note
·
View note
Text
Fix QuickBooks Error 15271 with Our QuickBooks Payroll Support Technicians - Dial +1-800-280-5068
How to resolve QuickBooks Error 15271?
QuickBooks is the best accounting software among all because of its unique feature. Millions of the business owners are relying on this software as it has become a helping hand for them. For the usage of this software, don’t you need to be an expert in the field of accounting as it is so much easy to use? But all of us are aware of it that glitches, errors, and bugs are inevitable. None of the software could ever be error-free so this QuickBooks is also not. There are various reasons for the occurrence of these errors because of which you may face problems during your working hour, and it is so much dreadful if it happens at the time when you are working on any of the most crucial projects, so it is very much essential to fix these errors, bugs or glitches. There is numerous type of errors, and QuickBooks Error 15271 is one of them. In this article, we will be providing you with all possible solutions for solving this QuickBooks Error 15271. It is one of the most common error which appears any time and especially at the time when you are downloading the QuickBooks Payroll updates. But there is no need to be a worry. Because of our QuickBooks Payroll Technical Support Team is available 24/7 to solve user queries.

How will you come to know what type of error you are facing or what message will appear on the screen at the time when you will face this error?
If you are facing this error, then you will be able to see only two errors i.e.
Because of the incomplete payroll updates, documents cannot be justified.
A record cannot ever get approved due to the incomplete updates of the payroll.
What could be the reason behind the encountering of the QB Error 15271?
Because of the Network connectivity issue error can arise.
Insufficient storage could also be the reason for the occurrence of the error.
If something happens in the way like if any of the files related to QuickBooks gets deleted by any other program mistakenly, then the error could take place.
Because of the corrupted window, registry error could occur.
It might have happened or may happen that your QuickBooks Pro related files and programs are or have got infected by virus or malware. In this case, an error could take place.
At a time when you are downloading the latest update of the payroll, and you have got the corrupted file then the error can appear.
If QuickBooks Pro has not to get appropriately installed, then errors can appear.
Windows user Account (UAC) is stopping the QuickBooks from installing the new update.
Solutions for fixing the QuickBooks Error 15271:
Solution #1
Update your QuickBooks Software
Click on the Help option first.
Then after click on the choose Update QuickBooks.
After that, you will get an option of Update now, click on that option.
Then you need to mark the box next to Reset Update.
Then click on the Get Updates option.
Now after clicking on the gets updates option close the QuickBooks and then reopen it. If Update Complete is popping up and appearing on the screen then just restart your computer else click on the option install update. Once it gets completed then again restart your system.
Solution #2
Turn off the User Account Control into your computer system
Most of the time the QuickBooks error 15271 get solved by turn off User Account Control. This error occurs because UAC stops to install new updates so simply turn off the UAC by following given steps and update your QuickBooks again.
Solution for Windows Vista, 7, 8, and 10
Press Window+R key and type control panel and hit enter.
Then go inside the Control panel.
In search box type UAC and press enter.
After that, turn off User Account Control (UAC).
Click on the Ok button.
After that, he would ask for confirmation, provide your admin password and restart your computer and update again.
If you have completely turned off UAC then follow these steps:
Restart your QuickBooks software.
Then a message appears with this message QuickBooks Update Service and then click on Install Later.
Then download the new update of QuickBooks.
Then again restart your QuickBooks desktop.
Then a message appears to Install now, click it and install completely after that reopen your QuickBooks desktop and click on Yes.
After that Update your payroll tax tables.
Solution #3
Update in window Safe mode.
Restart your computer and continuously press the F8 key.
Then the Advanced boot options appear on the screen.
After that, you have to select Safe Mode with the help of your keyboard and then press the enter button.
When your window reboots in safe mode then install payroll update again.
Solution #4
Installation of the QuickBooks under selective startup mode.
Press Window + R key from your keyboard and then type “MSConfig” and press the Ok button.
Then click on General tab> selective startup> Load System Services.
After that Go to services> hide all Microsoft services> Disable all tab> Uncheck hide all Microsoft services.
Then Update your payroll.
Solution #5
And still, if you are facing the same, then you can try these steps.
Fix your QuickBooks registry entries.
Scan malware into your computer system.
Delete your computer’s junk files.
Update the drivers of your computer system.
You have to Uninstall and then again install the QuickBooks application.
Scan your System File Checker.
Install all the new updates.
We hope you have been fixed your QuickBooks error 15271 as we have provided every possible solution to resolve this error. And still, if you are facing the same, then I recommend you to contact our QuickBooks Payroll Support team. We assure that they will fix the error within minutes as they are the certified pro advisor. Just Dial Our QuickBooks Payroll Customer Support Toll-Free number +1-800-280-5068 or visit http://www.quickhelpsupport.com/quickbooks-payroll-support.html
1 note
·
View note
Text
Cepstral voices british download

Cepstral voices british download how to#
Cepstral voices british download install#
Cepstral voices british download windows 10#
Cepstral voices british download Pc#
Cepstral voices british download download#
Navigate to ‘Choose a voice’ and simply select the new voice that you want to add.
Cepstral voices british download download#
When the download finished, go to Settings > Ease of Access > Narrator. Select Download language pack > Speech > hit Download. Then select the new language and go to Options. How to add a new Narrator voice in Windows 10Īs a quick reminder, if you want to change the TTS voice in Windows 10, all you need to do is navigate to Settings > Time & Language > Region & Language and add a new language.
Cepstral voices british download windows 10#
RELATED: Best text-to-speech apps for your Windows 10 device.
For example, Spanish version features Helena and Sabina, French version has Microsoft Hortense, Chinese Traditional version includes Tracy and so on.so on.
Cepstral voices british download install#
You can find more localized voices if you install other Language Packs for your version of Windows. We recommend installing Restoro, a tool that will scan your machine and identify what the fault is.Ĭlick here to download and start repairing.Įnglish US version of the operating system isn’t the only one having various text-to-speech voice ‘characters. If you are having troubles fixing an error, your system may be partially broken.
Cepstral voices british download Pc#
Click on Preview Voice to hear the voice you just installed:Įxpert Tip: Some PC issues are hard to tackle, especially when it comes to corrupted repositories or missing Windows files. Eva Mobile voice should now appear in the menu.
On the left, click the “Text to speech” link.
reg file, or download it as a already packed and ready to use Registry file below:Ĭontrol PanelEase of AccessSpeech Recognition "409"="Microsoft Eva Mobile - English (United States)" Windows Registry Editor Version Eva Mobile - English (United States)" The voice of Eva Mobile can be unlocked with a following registry tweak: Steps to unlock new text to speech voices in Windows 10 But unfortunately, Eva voice is locked by Microsoft, but don’t worry about that, because here’s how you can unlock it with just a couple of registry tweaks. Some Windows 10 enthusiasts have discovered these new voices in the US English version of the operating system: Microsoft Mark Mobile and Microsoft Eva Mobile, and a special test voice designed for Microsoft’s personal assistant, Cortana. And Windows 10 also introduced some new additional voices. Windows 8 also introduced some new voices, including David, Zira and Hazel. Windows Vista presented Anna to the World, which retained even in Windows 7. Microsoft has a tradition of adding new text-to-speech voices in the new versions of its operating system.
Cepstral voices british download how to#
Please note, that these voices cost additional money and Qwerty Studios is not connected with their developers.Home › How to › How to Unlock New Text to Speech Voices in Windows 10 Here is a list of web sites of commercial voices or speech engines that you can install in your system and use with Speaking Notepad. Russian (2.85 MB) Commercial Voices and Speech engines From the smallest device to large installations and high-end interactive media Cepstral voices can bring fresh content to your ears, on demand.Ĭepstral voices ideally fit 1st Read It Aloud! They make realistic synthetic voices that can say anything, anywhere, with personality and style. At Cepstral®, Text-to-Speech (TTS) is the only focus. Please disable UAC if you want to use one of those free voices!Ĭepstral® voices - are the best solution. To install them you should first turn UAC (User Account Control) feature of Windows off, then reboot and then install one of those voices. Enjoy!Īttention! It is a known problem that free L&H voices for languages other than English don't install correctly on Windows Vista and Windows Seven. Installed voice will appear in the voices list. Simply download and run installation executable of desired voice. You can install additional voices in order to use them in 1st Read It Aloud! 1st Read It Aloud supports all SAPI4-compliant (Speech Application Programming Interface) voices in many languages and all SAPI5-voices.

0 notes
Text
Game Fire Pro v6.8.4800 Crack + Serial key Free Download 2022

Game Fire Pro v6.8.4800 Crack + Serial key 2022
Game Fire Crack Free Mac can dramatically improve the gaming experience. The GameFire program improves game slowness and improves game frame rate (FPS) by improving system performance and stability. The GameFire program improves system performance by disabling unnecessary functions and concentrating system resources to run the game. Game fire Activation key With this application, you can easily enjoy the experience of playing games on your computer.

Unlike other game enhancements, Game Fire Mac immediately improves game and application performance and uses all system resources such as CPU and RAM to improve performance. Forms change the need to prioritize unnecessary background action. Game fire Serial Key Gamefire allows users to control all aspects of the optimization process through a simple and powerful interface. Other features of the program include providing a variety of powerful tools to improve system performance, such as disk integration tools, various configuration tools, and program optimizers. Key Feature: - Ability to fully optimize Windows to run games more easily. - Improve system RAM. - Suitable for running large scale games. - Increase system speed. - Ability to manage installed games. - Possibility of a better experience than computer games. - Game Manager. - Gamefire Pro Crack is a great security game where - there is no increase in time recording on your devices - and all changes made by Gamefire - Fire is temporary for free download in computer settings. - System optimizers receive new system improvements - and improved optimization algorithms. - We've improved the game's defragmentation mechanism - and added support for local defragmentation ads. - Basic Error Mode Several bug fixes have been made - to quickly change the game mode, for example, to - correct an error that prevents GameFire from retrieving - the updated functionality correctly. - Startup speeds have improved a lot, as have many requests. - We've also improved game bug fixes and - recovery. - We've added a new option to avoid UAC beeping - during the game fire so you can activate game fire faster. - GameFire can now detect SSD drives and alert you - when you try to degrade camera files stored on SSD drives. System Requirements: - Windows 7/8/10 . - 800 MHz processor or faster processor - 256 MB of RAM. - NET FRAMEWORK 4.5.2 - 10 MB of free hard disk space. Activation Keys: KSHD JSHD JDGS JSGDHN JCHDJS SJSKSK JMDHSDJKS JDJDH JDHD Latest Update: - Added commonly shared configuration archives for all users. - Load engine optimization updates. - Improved UI to support smaller display resolutions. - Fix small toggle buttons in System Optimizer. - Trojan horse fixed when adding games with the game scanner. - Determined the Trojan horse to detect the device - Date and time settings. Ultimate PC Game Booster! - Improves PC performance to get the best gaming experience. - Reduce the burden on system resources - Get high FPS in the game - Real-time performance optimization - Tweak system settings with one click Screenshots:


What's new? - In the Windows operating system, there are always some processes - that run in the background. Their activity takes up a large - portion of the CPU and system RAM, and the real problem is that - they cannot be inactive. Gamefire software can track all the hidden settings of Windows - that affect your gaming experience and make the game - run more smoothly and give you a great experience. - You can now download the latest version of Game Fire Pro License from the Star Creek website. How to install? - First, uninstall the previous version of your system - Download FireFire Crack layout from - Download button below - Disable your internet connection for a second - Also, extract the zip file and run it to install the configuration on your system - After installation, you can move the crack file to the same folder - Wait a moment for it to complete - Restart your computer system. - Enjoy, and thank you. How to Crack? - Completely uninstall the previous version with the first IOBIT installer. - Download and Extract Files. - Install setup. - Turn off the software. - Paste the cock / paste crack files in the installation folder. - Now run the software. - Done! Read the full article
#GameFireactivationkey#GameFireCrackFullDownload#GameFirekeygen#GameFirelatestversion#GameFirelicensekey#GameFiremac#GameFirepatch#GameFireregisterkey#GameFireserialkey
0 notes
Text
Starting a windows 10 pc in safe mode

How to start your Windows 10 computer in Safe Mode using CMD.
How to start Windows in Safe Mode.
How To Start Lenovo Laptop In Safe Mode Windows 10.
How to Start Windows in Safe Mode (2022 Guide) - Geek's Advice.
Enter Safe Mode from Windows 10 | HP Computers | @HPSupport.
Starting Windows 10 in safe mode: a how-to with different options.
How to Start Windows 10 in Safe Mode with Advanced Startup.
How to Start Windows 10 in Safe Mode (2020) - Beebom.
How to Start Windows 10 in Safe Mode while Booting.
Start Windows 10 in VGA mode.
How to Start Windows 10 in Safe Mode (2022 Guide) - EaseUS.
L'érection chez le kiné (Ma Pire Angoisse) - Koreus.
Marion Cotillard montre ses seins - Koreus.
Une fille prise à son propre jeu par son papa - Koreus.
How to start your Windows 10 computer in Safe Mode using CMD.
Start Windows 10 in Safe Mode or Normal Mode using System Configuration (msconfig) You must be signed in as an administrator to use this option. 1 Press the Win + R keys to open the Run dialog, type msconfig into Run, and click/tap on OK. 2 If prompted by UAC, click/tap on Yes. 3 Click/tap on the Boot tab in System Configuration, and do step 4.
How to start Windows in Safe Mode.
Look in the boot and advanced section for Fast or Quick startup and disable it, Save and exit. Then try the Shift+ power button If still no joy continuously tap the F8 key after pressing the power button Boot to the main drive 10 is on and as soon as you do repeat tapping the F8 key. Safe Mode can come to the rescue when Windows 10 cannot boot up due to one reason or the other. You might encounter the Automatic Repair screen if this is the case. Select Advanced options > Startup Settings > Restart. On the next screen, you'll be asked to choose from a number of options; select Enable Safe Mode. Safe Mode is a special way for Windows to load when there is a system-critical problem that interferes with the normal operation of Windows. The purpose of Safe Mode is to allow you to troubleshoot Windows and try to determine what is causing it to not function correctly. Once you have corrected the problem, then you can reboot and Windows will.
How To Start Lenovo Laptop In Safe Mode Windows 10.
5 Ways to Start your PC in Safe Mode. Make sure to create a restore point just in case something goes wrong. Method 1: Start your PC in Safe Mode Using System Configuration (msconfig) 1.Press Windows Key + R then type msconfig and hit Enter to open System Configuration.. 2.Now switch to Boot tab and check mark "Safe boot" option. 3.Make sure Minimal radio button is check marked and click OK. Boot into safe mode from outside of Windows 11 or Windows 10. At the Choose an option screen, select Troubleshoot. At the Troubleshoot screen, select Advanced Options. At the Advanced Options screen, select Advanced Startup Options. Select Startup Settings. Select Restart. The computer will restart. Enter Windows 11 Safe Mode via Settings. 1. Click the Start button from the Taskbar and then click Settings. 2. In the System interface, go to the right pane, scroll down to find, and click Recovery. 3. In the new window, you can see some recovery options. Just click the Restart now button next to Advanced startup. 4.
How to Start Windows in Safe Mode (2022 Guide) - Geek's Advice.
Reminder: to follow the below steps, you need to have a detachable keyboard attached. Hit the Windows Key plus R button of the keyboard. Write (Type) MSConfig in the opened dialog box on the screen. Choose the Boot tab here. Now hit the "Safe Boot" option and then click on the option "Apply.".
Enter Safe Mode from Windows 10 | HP Computers | @HPSupport.
A 15 et 17 ans, Pascale et sa sœur partent vivre seules dans un studio pour poursuivre leurs études. Une excitante liberté, loin des parents, vite transformée en.
Starting Windows 10 in safe mode: a how-to with different options.
Select Advanced-start up | Restart now. This will make your PC Restart to a special Choose an option screen. On the Choose an option screen, select Troubleshoot | Advanced options | Start-up. Use the following steps to enter safe mode: Click the Start menu and select Settings. Select Update & Security. Click Recovery. Click Restart now. Select Troubleshoot. Choose Advanced options. Click See more recovery options. Select Startup Settings then click Restart.
How to Start Windows 10 in Safe Mode with Advanced Startup.
From the next screen, navigate to Troubleshoot > Advanced Options > Startup Settings and click on the Restart button.. After the computer restarts, press F4 to Boot Windows 10 in Safe Mode.. 3. Boot Windows 10 in Safe Mode Using Bootable USB Drive. If your computer is not at all starting, you need to Boot your computer in Safe Mode by using a Bootable USB Drive.. Re-starting in safe mode no keyboard BIOS screen. Legacy USB enabled. Can not use safe mode option. Windows 10 Home V.1909 has really caused a great deal of anyone have a drivers are up to date according to Driver Easy software. Thank you as any advice would be helpful.
How to Start Windows 10 in Safe Mode (2020) - Beebom.
This will start your Windows 10 PC in Safe mode. Method 7: Boot to Safe Mode in Windows 10 Using Command Prompt. If you want a quick, easy, and smart way to enter Windows 10 Safe Mode, then follow the given steps to achieve this using Command Prompt. 1. Search for the command prompt in the Windows search bar. 2.
How to Start Windows 10 in Safe Mode while Booting.
Now the computer boots but instead of directly booting into Windows, you're presented with a Startup Settings screen, which has several options. Entering option 4, for example, enables Safe Mode. Option 5 enables Safe Mode with networking, and Option 6 enables Safe Mode with a command prompt. 2. Start Windows 10 in Safe Mode Using Run Command. Right click on the Start button and click on the Run. On the Run Command Window, type msconfig and click on OK. On the next screen, switch to Boot tab and select Safe Boot with Minimal option and click on OK. On the pop-up, click on Restart to start the process of Booting your Computer in Safe.
Start Windows 10 in VGA mode.
Step one: From the Windows 10 sign-in screen, hold Shift and click on the power button in the bottom corner of the screen and select "Restart". This will restart your PC and boot into a menu with. A Hollywood, une future mariée a passé la soirée avec une culotte spéciale, équipée d'un vibromasseur télécommandée. Problème, ce n'est pas elle qui avait la télécommande, mais sa copine qui actionnait le vibro à distance. Elle n'est pas passée inaperçue en se promenant dans la rue. Le YouTuber Sun Of Hollywood a filmé la scène et a même testé la télécommande.
How to Start Windows 10 in Safe Mode (2022 Guide) - EaseUS.
Press " Enter " or " OK ". Enable Safe boot in Normal mode. In the "System Configuration" window, select the "Boot" tab. Tick "Safe boot" under "Boot options" and then. Open Command Prompt. Advanced Startup Options (Windows 11/10/8): Select Troubleshoot, then Advanced options, and finally Command Prompt. System Recovery Options (Windows 7/Vista): Click the Command Prompt shortcut. With Command Prompt open, execute the correct bcdedit command as shown below based on which Safe Mode option you'd like to start. Click the Shift key on your keyboard while clicking on the Power button on the bottom right corner of the screen. Once your PC restarts, click on Troubleshoot, then Advanced options. Select Startup Settings then Restart. After the reboot, select 4 or the F4 key on your keyboard to run in Safe Mode. If you choose to use Safe Mode with Networking.
L'érection chez le kiné (Ma Pire Angoisse) - Koreus.
Start Windows 10 in Safe Mode using CMD. Step 1: Open Command Prompt on your computer. When it opens, enter the following command: /r /o. With this command, Windows 10 will restart. Follow the steps below to enter the Safe Mode using a combination. 1. Go to Start Menu and click on the Power button located on the bottom left pane. 2. While pressing the Shift key on the keyboard, click on the Restart option using the left mouse button.
Marion Cotillard montre ses seins - Koreus.
Un père de famille a surpris sa baby-sitter en plein sommeil alors qu’elle gardait ses enfants. La réaction de celui-ci est alors grandiose. Il est toujours difficile pour un parent de laisser.
Une fille prise à son propre jeu par son papa - Koreus.
Select the hard drive the PC should boot from and press Enter on the keyboard. Press and hold F8 on the keyboard. You must press F8 before Window starts up (before the Windows logo appears on the screen) to bring up the advanced startup options menu. Select Safe Mode and press Enter.
Other content:
Dxo Pure Raw
New Super Mario Bros 2 Free Download
Easeus Tools M Beta
Dramatica Pro Free Download Full Version

1 note
·
View note
Text
HOW TO BYPASS ADMIN RESTRICTIONS WINDOWS 10
Windows 10 has different levels of user accounts for multiple users. The accessibility level is different for different user accounts. Standard users can modify their files except for modifying other user’s documents or preferences such as personalization, installing or uninstalling apps, and changing system settings.

However, as a standard user, you will sometimes need the admin rights to change system settings or install a new app. Most users access by disabling UAC settings or granting other users administrative authority. And none of the methods are safe.
We’ve researched and found the easiest, effective, and comparatively safe methods on how to bypass admin restrictions windows 10 here for you. Keep reading to learn about them.
Administrator Privileges and User Account Control
Different apps require a different set of permissions for proper functionality. Although some applications need no special permissions, some require admin privileges to add or modify logs, configs, or other system files.
When you install or run an app, the User Access Control dialog box pops up, asking for admin permission. UAC is a security feature of Windows 10 that controls how system files are modified. Unauthorized third-party apps can corrupt your system by injecting viruses, malware, adware, etc. UAC shields the network from unauthorized changes to the operating system.
Some of the Tasks that require admin permission:
Getting Windows Update
User accounts modification
App folder located in C:\Program Files (x86)\ or C:\WIndows\ directory.
Viewing or changing properties of other users.
Installing or uninstalling software
Task Scheduler
Windows Firewall
Family Safety or Parental Controls
Admin Restrictions on Standard User Accounts
Most apps modify your WIndows’ system files. Viruses or malware in unauthorized third-party apps corrupt the system files. Your privacy is highly vulnerable to them as well.
Admin restriction plays an essential role in protecting your entire system. Not only preventing unauthorized changes, but this feature also controls the way other users use your computer. The administrator account can control other user accounts in many ways, such as:
Network Access: Controlling the access or blockage of particular websites or IP addresses.
Installation and Uninstallation Process: Restriction on installing or uninstalling software.
Task Manager: Control on viewing or changing running processes.
Accessing system files or limitations on overall usage.
3 Easy Ways to Bypass Admin Restrictions on Windows 10
Run Apps by UAC Prompt Elevated
Asking for administrative permission every time you run an installed app can be bothersome. And, what if a password protects it? You can disable this prompt by typing a simple code, and you don’t have to change the UAC settings either.
Let’s consider an executable file available in both of our devices as a reference. The regedit.exe in the C:\Windows\ directory requires authorization every time you try to open it.
As the first step, open the notepad from the search box in the taskbar.
Write the following command line in your notepad:
cmd /min /C “set __COMPAT_LAYER=RUNASINVOKER && start “” %1″
Save the file as “Bypass Admin Restriction.bat” (yes, we’re saving it as BAT format!)
We will force run the EXE file (regedit.exe in this case) with UAC prompt elevated. Drag and drop the file on the newly created Bypass Admin Restriction.bat file.
Now you should be able to run apps without admin privilege. The UAC Virtualization column on the process tab under Task Manager also shows if the app is running without admin privileges. You can use it for any executable file.
Enable Built-in Administrator to Overwrite Access
Built-in Administrator is the default “hidden administrator” account created during Windows setup. It remains disabled by default. You can change the password or access any file by enabling this feature.
Type “lusmgr.msc” in the Task manager’s search bar to open the “Local Users and Groups” window. (You can go to Start>Control Panel>Administrative Tools>Computer Management>Local Users and Groups alternatively)
Click on “Users” on the left panel. You’ll see the user account list on the right side- open Administrator by double click.
Uncheck the “Account is disabled” option and save it by clicking Apply.
Now close all windows and login to your built-in Administrator account from the lock screen.
Now you can bypass admin restriction on your windows 10.
Changing Administrator Password
There are multiple ways to change administrative passwords on Windows 10. Here are the two easiest methods of unlocking your account fast:
Bypass Windows 10 Administrator Password in Safe Mode
Resetting the password by using safe mode is the oldest method. This method allows you to accomplish your goal without any external device. We’ll be overwriting two essential system files ‘cmd.exe and sethc.exe” here.
1. Force restart your computer by unplugging the power cord (desktop) or removing the battery (laptop). Repeat until you see “Preparing Automatic Repair”.
2. Your system will run a diagnosis. A new window titled “Advanced Options” will appear after the completion of the diagnosis.
3. At this stage, proceed to Advanced options>Troubleshoot>Command Prompt. In the command prompt, go to the system directory. Type “dir” to confirm if you’re in the system directory. If you’re not in the right directory, point to the system drive using the below codes:
cd\
cd windows\system32
4. Now make a backup copy of sethc.exe and then overwrite the existing sethc.exe with cmd.exe file using the codes written below:
copy sethc.exe sethc_copy.exe
copy /y cmd.exe sethc.exe
5. Restart your computer. When you see the user login window, press the Shift key 5 times repeatedly. Doing so will open a new command prompt window.
Type “net user” to see all user accounts. In this step, we’re going to change the administrator password. Type “net user [name of the user] [password]” to change the password.
6. Now, restart your computer and log in with the new password.
Note: You’ll lose access to all encrypted files after resetting the password the way we mentioned above. Confirm there’s no sensitive file encrypted under that account.
Bypass Admin Password Windows 10 via MSDaRT
Another effective way to recover your administrator password is using Microsoft Diagnostics and Recovery Toolset (MSDaRT). Wondering how to bypass admin restrictions on windows 10 using this toolset? Our easy guide will turn you into a Password Recovery Expert in the next 5 minutes.
1. Download MSDaRT from Microsoft’s website.
2. Burn the tool using a portable device (i.e., USB drive). Boot the computer using the DaRT drive. Click “No” on “NetStart prompt”.
3. Choose language. Load the Windows 10 operating system and move to the next step.
4. Click on “Microsoft Diagnostics and Recovery toolset” at the bottom of your recovery window.
5. Click on “Locksmith” under the DaRT tool. Then click next.
6. Now select your Administrator’s account and reset your password.
Restart and login to your user account with the fresh password.
Conclusion
We intended to share the easiest ways to bypass admin restrictions on Windows 10 with you for learning purposes. We do not recommend using any of these methods unless there is a serious necessity. Changing the natural process can affect the files stored inside your computer.
Microsoft also recommends keeping the built-in Administrator account disabled on the client computer for security. Enable Admin Approval Mode as well if you need to enable a built-in administrator account. Remembering the password or asking your administrator for approval is the best practice of all.
FAQs
Q: How do I bypass admin restrictions on Windows 10?
A: The administrator account has full control over the computer, such as blocking other users from various functions. However, you can escape these restrictions in multiple ways. Turning off the UAC prompts, getting admin privileges from built-in admin, or even breaking the passwords.
Q: Can I bypass admins privileges as a standard user by using startup repair only?
A: Yes, it is possible to bypass admin privileges as a standard user. Go to safe mode and select startup repair. Follow the instructions provided in this guide to elevate the restrictions successfully.
Q: How do I install programs without UAC prompts?
A: You can elevate the prompts from UAC settings. Go to Control Panel> User Accounts (small icons)> User Accounts Control Settings. A new window will open. Turn the slider all the way down to never notify. However, doing so will put your computer at risk of a security breach.
#how to bypass admin permission windows 10#how to bypass administrator privileges on windows 10#bypass admin permission windows 10#how to bypass administrator restrictions windows 10#how to bypass admin windows 10
0 notes
Text
IObit Start Menu 8 Pro Crack [6.0.0.2] + License Key {2021}

IObit Start Menu 8 Pro Crack + Keygen Free Download

IObit Start Menu 8 Pro Crack, you can customize your start menu to fit Windows 8. Windows 8 and Windows 10 have a very complex start menu. Many users get confused when looking for applications. This program makes it work like the old start menu founded on Windows 7 and all previous versions. It helps them to quickly access the application you want to run. You have multiple options for the Outlook-style of the start menu. What's great about this is that it brings back both the start button and the Windows start menu. You can implement it in Windows 10 as well as Windows 8, but primarily it is made for Windows 8. A PC program that creates a start menu for your Windows. You can retrieve the start menu option for Windows 8 with this IObit Start Menu 8 Pro Keygen. The program is designed primarily to solve the problems of those who regularly work with the Windows Start menu. In addition, we offer an explanation of the new Windows 8 screen for those customers who are curious. Regardless of dialect, it can be accessed. No matter the language, it's the same. The device is accessible to everyone regardless of their language. This is the way the device distinguishes itself and makes it so useful. It is useful for the Windows 8 framework. In addition to Windows XP, Vista, and Windows 7, there is also Windows 8. Without a hitch, you can access documents, your work area, and programs instantly. Windows now has a Start menu. Windows 8-specific, it was designed for the operating system. The Windows 8 metro start screen provides an ideal option for people who are not familiar with Windows 8's Start menu. You May also like Athentech Perfectly Clear Complete Crack IObit Start Menu 8 Pro Crack Key Features - Quicker Searching will return to the Start Menu so you can get quicker access to programs. - Windows 8 should have the Start Menu and button back. - Occasionally, the IObit Start Menu mac crack taskbar does not hide in full-screen mode. - Switch between the desktop and metro interfaces easily. - With this feature, you can easily customize the layout of the Start menu and button by selecting one of several preset icons. - Add an improved search engine that allows you to quickly and easily access your applications and files from the start menu. - Our services are customizable to meet your needs. - Microsoft Windows XP, Vista, 7, 8 and 10 - Supports drag and drop. - On boot of Windows 8, the Metro screen appears and the desktop is directly displayed. - You can change your taskbar layout easily, including the color, the alpha and the system timePress and hold the Windows key to switch between two modes.e. - Displays a list of the programs installed on your computer. - Access to programs and files is faster. - The issue that some programs can not skip UAC when starting from the Start Menu. - Fix known bugs. - Control panel and settings. - It makes your work more efficient. - Hide the search box and virtual desktop button. - Lets you merge taskbar buttons. - Automatically, IObit Start Menu crack places the Start button and menu in your system. - Unified and instant searching for both desktop and Metro apps decreases the time taken in searching and - You can pin programs to Start Menu and Taskbar for quicker access to your programs. - It’s easily Customization to have everything you need at just one click IObit Start Menu 8 Pro License Key The Windows IObit Start Menu 8 pro serial key Start button and the start screen are restored in this elegant device, which allows users to start directly from a phone even if they have only ever used their phone for computing. Desk users reset the home button and screen, adjust the visual function of the button and menu, set objects. IObit Start Menu 8 License Key Disable the effects of Windows is a product of the adapter qualified desk. A simple and easy solution allows you to freely switch from the last Windows 10 start menu to the classic Windows start menu. Furthermore, the application can be implemented in Windows 7 and Vista in order to replace the traditional start menu. Through the program's improved search engine, you can locate tools and files on your desktop quickly and easily. There are very few setup options in this application because it positions the button and Starts menu automatically on your system, so you don't have to make specific settings. Simply by choosing one of several preset icon start buttons, a Windows theme, or a Modern theme, you can adjust the appearance of the Start menu. This tool lets you change the color, alpha, and time on the taskbar with its powerful features. From the Start menu, choose the font size and choose the background color of the device. The Windows account photo, the custom picture or a cover image can also be used.

IObit Start Menus 8 Pro Serial Key: The entire "Start" button is another program for Windows 8 that can be added to this desktop interface. Of course, it is not very convenient without him, although I get use to it, and in judging the comments of our users I am not the only one, but it is not superfluous. IObit Start Menu 8 Serial Key allows you to combine taskbar buttons and hide the search box and virtual desktop button in space. You can access all the software lists and you can get quick access to records, images, audio, sports or machines. It also allows you to select items from the Start menu and view a list of all modern utilities. As another method for organizing your applications and dragging and dropping application icons straight into the Start button icon to add them to the Start Menu, you can create custom groups. It's true that Start Menu 8 Pro is a great application to customize your desktop, as it gives you an easy-to-use option to enhance functionality. Immediately following the start, there is a few explanations and a start button, you can see which window appears once you click on it in the screenshot. It looks elegant. Every aspect of a startup is provided for in a family business. How to Install IObit Start Menu 8 Pro Crack? - Click on the download link given below. - Extract the files from the .rar folder. - Double click on the program and install in normally. - Copy and paste one of the given keys where required. - That’s it - Enjoy the latest version of crack for a lifetime. Read the full article
#iobitstartmenu8#IObitStartMenu8ProCrack#iobitstartmenu8v3free#startmenu10proactivationkey#startmenu8prolicensekey2020#startmenu8trialexpired#startmenu8v5activationcode#start8crack#window8startmenulicensekey
0 notes
Text
0 notes
Photo

New Post has been published on https://techcrunchapp.com/how-to-disable-windows-10s-programmable-taskbar-feature/
How to disable Windows 10's Programmable Taskbar feature

Microsoft revealed a new feature that it called Programmable Taskbar back in July when it released Build 20161 to the Windows Insider Dev channel.
The basic idea behind the feature was to customize the default set of icons that is displayed as part of the operating system’s out-of-box experience.
Based on a user’s activity, e.g. whether an Android phone is linked to the Microsoft Account or if the user has an Xbox Live account, icons are added or removed from the taskbar.


Microsoft believes that the feature gives its users the content that they want and makes the taskbar have less clutter on top of that.
The feature is part of Windows 10 20H2 but not for devices that are upgraded from a previous version. Existing Microsoft customers who set up a system anew may have the taskbar icons customized based on the account that they use to sign-in to the system.
Microsoft started to test a new Windows 10 device setup feature in October that may also provide more customization one day based on a user’s intended use for the system.
Disabling the Programmable Taskbar in Windows 10
Windows 10 administrators may disable the Programmable Taskbar using a new policy called “Turn off cloud optimized content” or by editing the Windows Registry.
Using the Group Policy

Note: the Group Policy is not available on Windows 10 Home systems.
Use the keyboard shortcut Windows-R to open the runbox.
Type gpedit.msc and select OK to start the Group Policy Editor. Note that you need to be signed-in as an administrator. If you are not, hold down Ctrl-key and Shift-key before you select OK to get the elevation prompt to type the Admin password.
Go to Computer Configuration > Administrative Templates > Windows Components > Cloud Content when the Group Policy Editor is open.
Find Turn off cloud optimized content and double-click on the entry to display it fully.
Set the policy to Enabled to disable the functionality.
Select OK and close the Group Policy Editor.

This policy setting lets you turn off cloud optimized content in all Windows experiences.
If you enable this policy, Windows experiences that use the cloud optimized content client component, will instead present the default fallback content.
If you disable or do not configure this policy, Windows experiences will be able to use cloud optimized content.
Editing the Registry

Setting the policy to enabled adds a Dword to the Registry. You can add the value directly to the Registry; it is also the only option for Home systems to disable the functionality.
Use the keyboard shortcut Windows-R to open the run box.
Type regedit.exe and select OK to start the Registry Editor.
Confirm the UAC prompt if it is displayed.
With the Registry Editor interface open, go to HKEY_LOCAL_MACHINESOFTWAREPoliciesMicrosoftWindowsCloudContent.
Note: some keys may not be available yet. If that is the case, go to the last key that is available.
Right-click on the key and select New > Key.
Name it accordingly, e.g. if you are in SOFTWARE name it Policies.
Repeat the process until all keys are available.
Right-click on CloudContent and select New > Dword (32-bit) Value.
Name it DisableCloudOptimizedContent.
Double-click on the newly created Dword and set its value to 1.
Press OK.
Restart the PC.
Closing words
Once the change has been applied, new accounts will always get the default Taskbar layout and not a custom layout based on connected devices or services.
Now You: What is your take on customizing the taskbar or other features based on the user? (via Bleeping Computer)
Summary


Article Name
How to disable Windows 10’s Programmable Taskbar feature
Description
Find out how to disable the Programmable Taskbar that Microsoft introduced in Windows 10 version 20H2.
Author
Martin Brinkmann
Publisher
Ghacks Technology News
Logo


Advertisement
0 notes
Text
New Post has been published on Strange Hoot - How To’s, Reviews, Comparisons, Top 10s, & Tech Guide
New Post has been published on https://strangehoot.com/how-to-install-xampp-server-in-windows-10-xampp-guide/
How to install XAMPP server in Windows 10 - XAMPP Guide

You might be having an idea about what is a server, even if you are a newbie in the technical field. In this article, we are going to learn “How to install XAMPP server in Windows 10” with the help of simple steps.
Before fleeing to the steps of installing the XAMPP server, let’s get the idea about what truly a XAMPP server is?
XAMPP is an all-in-one server package that supports PHP and Perl server-side programming. It also involves an email and FTP server as well as a self-signed certificate to use the apache web server in HTTPs model.
This package is available for various platforms such as Linux, Windows, Mac, and Solaris. Among all the packages the XAMPP packages most prevalently used. It was mainly developed by the Apache friends organization to hype the use of the Apache web server in the web development environment. However, in this article, we are installing it in Windows 10.
Now, let’s learn how to install XAMPP server in windows 10, step by step.
STEP 1: Open your browser and go to www.apachefriends.org.
It is an official website of Apache friends organization, where you can find various server packages specifically for various platforms and apps.

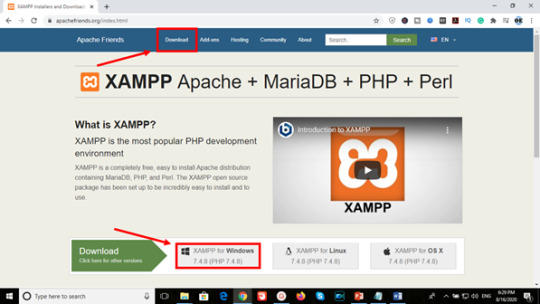
STEP 2: Go to download category
Now, search for “Download” category in the menu or you can also click on the link for which Operating System you want to download the XAMPP server, here we are downloading for Windows 10.
STEP 3: Download the file
In the “XAMPP for Windows” section, choose the PHP version you want to download and click on the download button.

Once you click on the download button, it immediately pops a tab signifying that the automatic download will start soon but if it doesn’t work you can on the “click here” link.

In our case, it started downloading in one tap as shown in the image below.

STEP 4: Run the installer
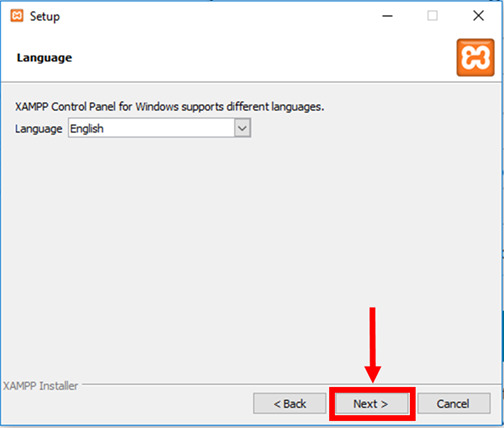
After the download finishes, run the downloaded file, this will start the XAMPP installation wizard. If you encounter any warning asking “Do you want this application to making changes to the system”, Ignore the warning and click Yes. Now, click on next in the XAMPP setup window.

STEP 5: Choose components
The “select components” windows enables you to select which components in XAMPP you want to be installed in your system. There is no compulsion of installing everything contained in XAMPP package, but feel free to install the entire package and explore on your own.

Click next to continue the installation process.
STEP 6: Select installation folder
In this step, you are required to select the folder where you want to install XAMPP. The default location for windows is drive “C” and inside “program files 84x” folder. However, if you have received any “warning” regarding UAC because of an activated UAC on your system, you would rather choose to install to a folder outside the “program files 84x” folder. The alternate method is to disable UAC (User Account Control) as an administrator through the control panel. It will open a User account settings form where you have to drag the slider to never notify.

Select the folder and click on next.
STEP 7: Select the language
In the final step, once you complete the installation process, you have to select the language among English and German. The user can select the language in which S/he is comfortable with and click on save.
STEP 8: Bitnami for XAMPP
In this window, it will show you Bitnami’s pre-packaged web applications specifically for use in XAMPP such as Joomla, WordPress, Drupal. Apache friends organization has collaborated with Bitnami for providing these pre-packaged solutions.

You can learn more about Bitnami by leaving “learn more about Bitnami for XAMPP checkbox checked, or if you want to skip this step remove the checkmark from the checkbox, and click the Next button to continue.
STEP 9: Ready to install
Now, this is the last step for starting the installation process. Click on next.

STEP 10: Welcome to XAMPP wizard
Here the progress bar will show the status of the installation wait until the installation is finished.
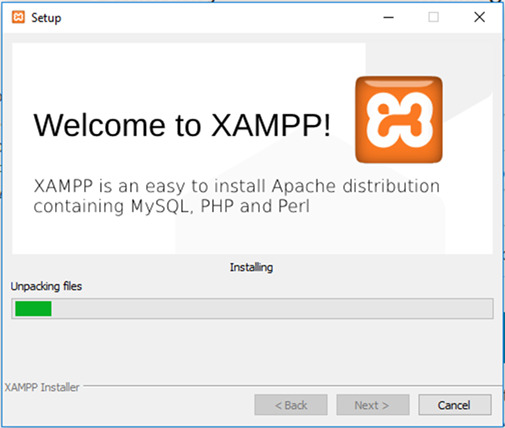
STEP 11: Installation complete
As soon as the installation process accomplishes, it pops up a window asking the user whether he or she wants to start the control panel at the current instance. Check the box “Do you want to start the Control Panel now?”, if you wish to start it and uncheck the box if you don’t want to start it at that moment and tap finish.

STEP 12: Running the XAMPP
If the user follows the whole process in a proper manner, the XAMPP will be successfully installed and the control panel will start with ease. Now, tap on the start button corresponding to Apache and MySQL.
So, this is how you can install and run XAMPP successfully on windows 10.
Read: How To Choose The Best WordPress Theme For Business.
0 notes
Photo
So, your Windows computer is running sluggish. What do you do?
Many computer repair services offer “tune ups” of your computer. But do these tune up services work? Let’s look at what a tune up of your PC should look like so you can see what’s involved.
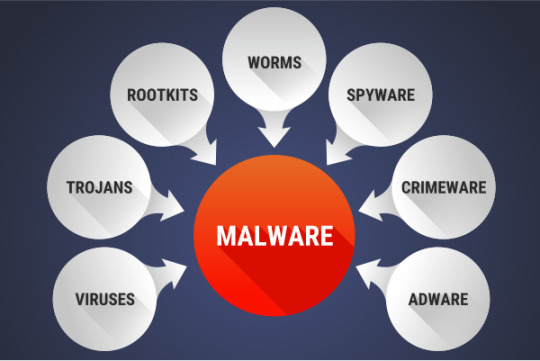
At this point, assume the PC is infected with malware and use proper precautions so you do not infect other computers. If you know for sure that you are infected with Malware, then my next article will deal with that specifically. For now, lets assume we are simply experiencing sluggishness or a slow computer that may be caused by Malware or it may be caused by a few other things.
The first step in a tune up is to inspect the inside of the machine. That will usually mean to “Blow out the dust” in addition to inspecting all fans, intake grills, outgo grills, and heatsink fins. All should be cleaned as necessary. Ditto for the heatsink on the graphics processing unit or GPU.
Will the PC Boot? Time for a Boot Test. Once booted up successfully(hopefully), a system assessment can be made. The technician will have diagnostic software to load at this time which will show all the various aspects of a running computer, including the hard drive capacities, the overall hard drive health, detailed software, hardware, network and security configurations.
We want to see if there are memory issues at the hardware level. Thus, memory tests will be run at this time. Bad RAM memory modules are possible although rare.
Before anything is changed, a Full image backup of your hard drive(s) is done. We don’t want to lose any files if serious problems occur so we back everything up.
Other visual inspections may be made where the battery on the motherboard, the motherboard itself, the temperature is checked, and for laptops we want to inspect the keyboard itself. Making sure the “Fn” key works. The units time and date are verified.
Then we might turn towards the software and look at the User Account Control (UAC) and make sure it is turned on and set properly. Power settings are looked at. Screensaver timeout changed back to NONE. System protection is looked at and changed to ON. These are your critically important system restore points. Make sure there is only one running restore program and only one drive C drive! Windows lets us “create” a restore point whenever we wish.
More software tools can be implemented to clean up the file system, to remove temp files, cookies, etc. All files are deleted in the downloads folder as well. And if there is a WINDOWS.OLD folder, it has got to go. That’s doing nothing but taking up space and slowing things down.
Let’s now connect to the internet and let’s make sure Windows Firewall settings are on. Third-party firewalls may be present which is unfortunate but ok. Its just not recommended since Windows has a firewall built right in Windows.
Usually this is a good time to perform Malware scans. Its not simply as easy as running a software program. Usually I will run 5 different programs because no one program can do it all.
A BIOS upgrade is next. Your BIOS is that dark screen right before Windows boots. It resides on your motherboard and is very important to not just performance but to whether your PC boots up or not. These computer files get updated and new BIOS configurations become available. Its not the easiest upgrade as a ‘flash install’ is needed. These are tricky maneuvers because they are done outside of a Windowed environment, however, a current BIOS is usually recommended.
Supposing we tossed the old BIOS in favor of the new one, why don’t we continue this organizing and look to delete other software programs? Old Adobe reader programs, Flash, Java, and other programs litter our hard drives and slow our system down. This include any Anti-Malware “suites” other than Windows Defender (Windows’ excellent built-in antivirus/malware program).
So, scans are complete. How about the internet connection and speed? And let’s run Windows Update to make sure all the updates are done. We keep re-running windows update until there are no more updates. Plus, I would check in Windows settings or run a program called WINVER to confirm the version of Windows is at least 1709 or higher. Microsoft updates Windows about twice a year and 1709 was a big one.
Device conflicts are inspected and fixed if any are found. These are those pesky Red X’s or Question Marks on top of these devices. They need to be fixed, all of them, before continuing.
Hard disk inspections using different scanning software will be used to see if any large file blocks or defragmentation shows up. Windows 10 shouldn’t have any defrag problems, but it needs to be checked anyway. Warning: Never defrag a solid-state drive (SSD) drive!
Optimizing the Folder View Options can be next. These are found in control panel and there is a half dozen or so checkboxes that should be checked (not all of them) to help achieve a smoother running machine. Similarly, visiting System Properties, Computer name, Startup and Recovery, and Virtual Memory will help to make sure various settings are either ‘checked’ or ‘unchecked’ properly.
Disable Autoplay. Thanks to bad design decisions, Autoplay, also known as AutoRun, was once a huge security problem on Windows. Autoplay helpfully allowed malicious software to launch as soon as you inserted discs and USB drives into your computer. Windows 10 largely fixed the issue, but it is still a good idea to disable it.
You can also optimize your mouse and touchpad controls as well. Turning off a lot of the eye candy will help your performance.
You can apply these optimization activities over to your display and to the Desktop to achieve similar gains. For example, turning off ‘transparency effect’ will help. And the desktop should be no more than 500MB (not GB) in size.
There are lots of places where Microsoft is selling you something. You can remove these too. As an example, under settings>System>Notifications&Actions you can turn OFF “Get Tips, Tricks, and Suggestions as you use Windows”. You don’t need this.
There are a lot of optimizations you can do to Internet Explorer, Firefox, and Chrome too. Mostly these deal with getting rid of all the cache, how to deal with cookies, and whether you are clearing browsing history when you exit.
If you don’t have an email program like Outlook, we can install Thunderbird and usually do. Its free and is an impressive program. Ditto for an Office Suite. LIBRE Office is free and a worthy competitor to Microsoft Office. If you want these programs installed, just remember to change the default Office program (control panel>default programs).
Clear all the event logs and system logs in Event viewer. Rerun file and disk utilities. Run Anti-Malware updates and scans again. Run “Six-Shooter” which is a collection of six utilities to further weed out any malware in the system.
The system can now be tested to make sure all parts are working as designed and any problems fixed. Browsers can be tested. File Types (.doc, .docx, .ppsx, .ppt, & .pptx) can be opened and closed to see if the file associations work. Play a video file. Make sure the CD player works. Things like that. Check the sounds.
A final run of system diagnostic software will close this up. This will provide a snapshot of what your system looks like now, post optimization.
This has also been a hardware inspection. Thus, your technician can share thoughts or give advice on the sun-setting of certain hardware and the need to, perhaps, upgrade something if for nothing else than to achieve better security. For example, perhaps they are running Windows 10 version 1709 when version 1809 is available. Or maybe their CPU is so old, you can only play black and white media on it. Seriously though, computer hardware is a depreciating asset. It comes into favor and then it goes out of favor. You cannot simply buy one piece of hardware and stick with it for 30 years.
Now, having said this, I just extended the life of my TEN YR OLD MacBook Pro by adding an SSD drive and reinstalling the operating system. For a ten-year-old, she sure acts like a newborn! I may have extended the life a little bit, but I am still running about four versions of operating system behind the current version(not to mention the ancient CPU). That’s because Apple doesn’t support my aging hardware anymore. Microsoft is no different.
From a security standpoint, this becomes untenable and I better get to the store to replace my MacBook soon. Luckily, however, I just purchased a brand new Razer Blade 15 Windows Laptop! In my line of work i need to have both a Mac and a Windows computer at all times.
Andrew C. Orr is President of Retired Guy Computer Repair located in downtown St. Petersburg, FL. His company provides individuals and businesses quality and competent technology solutions. Andrew lives downtown with his wife Angela, his son Andrew Jr., and two dogs Georgia and William. www.RetiredGuy.repair.
0 notes
Text
Original Post from FireEye Author: Michael Bailey
In the previous installment, we wrote about how string hashing was used in CARBANAK to manage Windows API resolution throughout the entire codebase. But the authors used this same string hashing algorithm for another task as well. In this installment, we’ll pick up where we left off and write about CARBANAK’s antivirus (AV) detection, AV evasion, authorship artifacts, exploits, secrets, and network-based indicators.
Antivirus Evasions
Source code unquestionably accelerates analysis of string hashes. For example, the function AVDetect in AV.cpp iterates processes to detect AV by process name hash as shown in Figure 1.
Figure 1: Antivirus detection by process name hash
What does CARBANAK do with this information? It evades AV according to what is installed. Figure 2 shows the code for an AVG evasion that the authors disabled by commenting it out. Based on this, it appears as if the AVG evasion was retired, but FLARE team member Ryan Warns confirmed in November 2017 that it still worked with one minor tweak. FLARE disclosed this to AVG immediately upon confirming it. Avast indicates that after our disclosure, they updated the affected DLL to ignore DLL_PROCESS_DETACH and leave its hooks in place.
Figure 2: Commented out source code to unload AVG user-space hooks
In November of 2017, FLARE also disclosed an evasion for Trend Micro’s detection of process injection that remained active in the CARBANAK source code. The evasion mirrors a technique used in Carberp that replaces remote heap allocation and a call to CreateRemoteThread with memory mapping and queueing of an asynchronous procedure call via QueueUserAPC. Following our disclosure, Trend Micro indicated that they had updated their behavior monitoring rules and released OfficeScan XG SP1 in December 2017 with a new “Aggressive Event” detection feature that covers this behavior.
Author Characterization
Having source code could pose unique opportunities to learn about the individuals behind the keyboard. To that end, I searched for artifacts in the source code dump that might point to individuals. I found the most information in Visual Studio solution files. Most of these referenced drive O: as the source root, but I did find the following host paths:
C:Usershakurei reimuAppDataLocalTemp
C:UsersIgorAppDataLocalTemp
E:ProjectsprogsPetrosjanWndRec…
E:ProjectsprogssbuWndRec…
Unfortunately, these data points don’t yield many answers. If they are observed in later artifacts, connections might be inferred, but as of this writing, not much else is known about the authors.
Source Code Survey
The CARBANAK source code contained numerous exploits, previous C2 hosts, passwords, and key material. I decided to comprehensively search these out and determine if they led to any new conclusions or corroborated any previous observations.
Exploits
I wanted to know if the CARBANAK authors wielded any exploits that were not publicly disclosed. To the contrary, I found all the exploits to be well-documented. Table 1 breaks out the escalation code I reviewed from the CARBANAK source code dump.
Name
CVE
Notes
PathRec
2013-3660
Exploit proof of concept (poc) from May 2013
Sdrop
2013-3660
Exploit poc from June 2013
NDProxy
2013-5065
NDProxy.sys exploit originally authored by secniu
UACBypass
UAC bypass by DLL hijacking found in Carberp
COM
UAC bypass by disabling elevation prompts and dialogs via the IFileOperation COM interface
CVE-2014-4113
2014-4113
Win32k.sys exploit derived from code that can be found online
BlackEnergy2
AppCompat shim-based UAC bypass
EUDC
2010-4398
UAC bypass by EUDC exploitation
Table 1: Exploits for elevation found in CARBANAK source code
The CARBANAK source code also contains code copied wholesale from Mimikatz including the sekurlsa module for dumping passwords from lsass.exe and Terminal Services patching code to allow multiple remote desktop protocol connections.
Secrets
My analysis included an audit of passwords and key material found in the source code and accompanying binaries. Although many of these were used for debug versions, I curated them for reference in case a need might arise to guess future passwords based on passwords used in the source code. Table 2 shows recovered passwords used for RC2-encrypted communications and other purposes along with the corresponding name in the source code and their status as they were encountered (active in source code, commented out, or compiled into a binary).
Credential Identifier Per Source Code
Password
Status
ADMIN_PASSWORD
1He9Psa7LzB1wiRn
Active
ADMIN_PASSWORD
1234567812345678
Commented out
ADMIN_PASSWORD
cbvhX3tJ0k8HwnMy
Active
ADMIN_PASSWORD
1234567812345678
Commented out
N/A
1234567812345678
Compiled
Table 2: Passwords found in CARBANAK source code and binaries
I found an encrypted server certificate in a debug directory. This seemed like it could provide a new network-based indicator to definitively tie operations together or catch new activity. It was trivial to brute force this container by adapting a publicly available code sample of X509 handling in C# to cycle through passwords in a popular password list. The password was found in less than 1 second because it was the single-character password “1”. The certificate turns out to be for testing, hence the weak password. The certificate is shown in Figure 3, with details in Table 3.
Figure 3: Test Company certificate
Parameter
Value
Subject
CN=Test Company
Issuer
CN=Test Company
Serial Number
834C6C3985506D8740FB56D26E385E8A
Not Before
12/31/2004 5:00:00 PM
Not After
12/31/2017 5:00:00 PM
Thumbprint
0BCBD1C184809164A9E83F308AD6FF4DBAFDA22C
Signature Algorithm
sha1RSA(1.3.14.3.2.29)
Public Key
Algorithm: RSA
Length: 2048
Key Blob:
30 82 01 0a 02 82 01 01 00 e4 66 7f d2 e1 01 53
f9 6d 26 a6 62 45 8b a8 71 ea 81 9a e6 12 d4 1c
6f 78 67 6d 7e 95 bb 3a c5 c0 2c da ce 48 ca db
29 ab 10 c3 83 4e 51 01 76 29 56 53 65 32 64 f2
c7 84 96 0f b0 31 0b 09 a3 b9 12 63 09 be a8 4b
3b 21 f6 2e bf 0c c1 f3 e4 ed e2 19 6e ca 78 68
69 be 56 3c 1c 0e a7 78 c7 b8 34 75 29 a1 8d cc
5d e9 0d b3 95 39 02 13 8e 64 ed 2b 90 2c 3f d5
e3 e2 7e f2 d2 d1 96 15 6e c9 97 eb 97 b9 0e b3
be bc c3 1b 1e e1 0e 1c 35 73 f4 0f d9 c3 69 89
87 43 61 c9 9e 50 77 a2 83 e4 85 ce 5a d6 af 72
a9 7b 27 c5 f3 62 8d e7 79 92 c3 9b f7 96 ed 5c
37 48 0a 97 ee f7 76 69 a2 b9 25 38 06 25 7d 8a
e4 94 b2 bb 28 4a 4b 5d c5 32 0d be 8e 7c 51 82
a7 9e d9 2c 8e 6b d8 c7 19 4c 2e 93 8d 2d 50 b4
e0 a4 ed c1 65 a4 a1 ba bf c7 bf 2c ec 28 83 f4
86 f2 88 5c c4 24 8b ce 1d 02 03 01 00 01
Parameters: 05 00
Private Key
Key Store: User
Provider Name: Microsoft Strong Cryptographic Provider
Provider type: 1
Key Spec: Exchange
Key Container Name: c9d7c4a9-2745-4e7f-b816-8c20831d6dae
Unique Key Container Name: 5158a0636a32ccdadf155686da582ccc_2bb69b91-e898-4d33-bbcf-fbae2b6309f1
Hardware Device: False
Removable: False
Protected: False
Table 3: Test Company certificate details
I also parsed an unprotected private key from the source code dump. Figure 4 and Table 4 show the private key parameters at a glance and in detail, respectively.
Figure 4: Parsed 512-bit private key
Field
Value
bType
7
bVersion
2
aiKeyAlg
0xA400 (CALG_RSA_KEYX) – RSA public key exchange algorithm
Magic
RSA2
Bitlen
512
PubExp
65537
Modulus
0B CA 8A 13 FD 91 E4 72 80 F9 5F EE 38 BC 2E ED
20 5D 54 03 02 AE D6 90 4B 6A 6F AE 7E 06 3E 8C
EA A8 15 46 9F 3E 14 20 86 43 6F 87 BF AE 47 C8
57 F5 1F D0 B7 27 42 0E D1 51 37 65 16 E4 93 CB
P
8B 01 8F 7D 1D A2 34 AE CA B6 22 EE 41 4A B9 2C
E0 05 FA D0 35 B2 BF 9C E6 7C 6E 65 AC AE 17 EA
Q
81 69 AB 3D D7 01 55 7A F8 EE 3C A2 78 A5 1E B1
9A 3B 83 EC 2F F1 F7 13 D8 1A B3 DE DF 24 A1 DE
Dp
B5 C7 AE 0F 46 E9 02 FB 4E A2 A5 36 7F 2E ED A4
9E 2B 0E 57 F3 DB 11 66 13 5E 01 94 13 34 10 CB
Dq
81 AC 0D 20 14 E9 5C BF 4B 08 54 D3 74 C4 57 EA
C3 9D 66 C9 2E 0A 19 EA C1 A3 78 30 44 52 B2 9F
Iq
C2 D2 55 32 5E 7D 66 4C 8B 7F 02 82 0B 35 45 18
24 76 09 2B 56 71 C6 63 C4 C5 87 AD ED 51 DA 2ª
D
01 6A F3 FA 6A F7 34 83 75 C6 94 EB 77 F1 C7 BB
7C 68 28 70 4D FB 6A 67 03 AE E2 D8 8B E9 E8 E0
2A 0F FB 39 13 BD 1B 46 6A D9 98 EA A6 3E 63 A8
2F A3 BD B3 E5 D6 85 98 4D 1C 06 2A AD 76 07 49
Table 4: Private key parameters
I found a value named PUBLIC_KEY defined in a configuration header, with comments indicating it was for debugging purposes. The parsed values are shown in Table 5.
Field
Value
bType
6
bVersion
2
aiKeyAlg
0xA400 (CALG_RSA_KEYX) – RSA public key exchange algorithm
Magic
RSA1
Bitlen
512
PubExp
65537
Modulus
0B CA 8A 13 FD 91 E4 72 80 F9 5F EE 38 BC 2E ED
20 5D 54 03 02 AE D6 90 4B 6A 6F AE 7E 06 3E 8C
EA A8 15 46 9F 3E 14 20 86 43 6F 87 BF AE 47 C8
57 F5 1F D0 B7 27 42 0E D1 51 37 65 16 E4 93 CB
Table 5: Key parameters for PUBLIC_KEY defined in configuration header
Network Based Indicators
The source code and binaries contained multiple Network-Based Indicators (NBIs) having significant overlap with CARBANAK backdoor activity and FIN7 operations previously observed and documented by FireEye. Table 6 shows these indicators along with the associated FireEye public documentation. This includes the status of each NBI as it was encountered (active in source code, commented out, or compiled into a binary). Domain names are de-fanged to prevent accidental resolution or interaction by browsers, chat clients, etc.
NBI
Status
Threat Group Association
comixed[.]org
Commented out
Earlier CARBANAK activity
194.146.180[.]40
Commented out
Earlier CARBANAK activity
aaaabbbbccccc[.]org
Active
stats10-google[.]com
Commented out
FIN7
192.168.0[.]100:700
Active
80.84.49[.]50:443
Commented out
52.11.125[.]44:443
Commented out
85.25.84[.]223
Commented out
qwqreererwere[.]com
Active
akamai-technologies[.]org
Commented out
Earlier CARBANAK activity
192.168.0[.]100:700
Active
37.1.212[.]100:700
Commented out
188.138.98[.]105:710
Commented out
Earlier CARBANAK activity
hhklhlkhkjhjkjk[.]org
Compiled
192.168.0[.]100:700
Compiled
aaa.stage.4463714.news.meteonovosti[.]info
Compiled
DNS infrastructure overlap with later FIN7 associated POWERSOURCE activity
193.203.48[.]23:800
Active
Earlier CARBANAK activity
Table 6: NBIs and prevously observed activity
Four of these TCP endpoints (80.84.49[.]50:443, 52.11.125[.]44:443, 85.25.84[.]223, and 37.1.212[.]100:700) were new to me, although some have been documented elsewhere.
Conclusion
Our analysis of this source code dump confirmed it was CARBANAK and turned up a few new and interesting data points. We were able to notify vendors about disclosures that specifically targeted their security suites. The previously documented NBIs, Windows API function resolution, backdoor command hash values, usage of Windows cabinet file APIs, and other artifacts associated with CARBANAK all match, and as they say, if the shoe fits, wear it. Interestingly though, the project itself isn’t called CARBANAK or even Anunak as the information security community has come to call it based on the string artifacts found within the malware. The authors mainly refer to the malware as “bot�� in the Visual Studio project, filenames, source code comments, output binaries, user interfaces, and manuals.
The breadth and depth of this analysis was a departure from the usual requests we receive on the FLARE team. The journey included learning some Russian, searching through a hundred thousand of lines of code for new information, and analyzing a few dozen binaries. In the end, I’m thankful I had the opportunity to take this request.
In the next episode, Tom Bennett takes the reins to provide a retrospective on his and Barry Vengerik’s previous analysis in light of the source code.
#gallery-0-5 { margin: auto; } #gallery-0-5 .gallery-item { float: left; margin-top: 10px; text-align: center; width: 33%; } #gallery-0-5 img { border: 2px solid #cfcfcf; } #gallery-0-5 .gallery-caption { margin-left: 0; } /* see gallery_shortcode() in wp-includes/media.php */
Go to Source Author: Michael Bailey CARBANAK Week Part Two: Continuing the CARBANAK Source Code Analysis Original Post from FireEye Author: Michael Bailey In the previous installment, we wrote about how string hashing was used in…
0 notes