#WindowsOptionalFeatures
Explore tagged Tumblr posts
Visit Tumblr Blog
Explore Tumblr blogs with no restrictions, modern design and the best experience.
Last Seen Tumblr Blogs


Fun Fact
Tumblr has been banned in Indonesia for providing people with access to pornographic content.
Text
#WindowsFeatures#CMD#PowerShell#TechTutorial#Winsides#WindowsManagement#DISMCommand#WindowsOptionalFeatures#SystemAdmin#WindowsTips#TechTips#TroubleshootingWindows#ITProfessional#EnableFeatures#DisableFeatures#LearnTech#SystemConfiguration#WindowsServer#Windows10#Windows11#WindowsFeaturesList#TechEducation#WindowsCustomization#SystemHacks#AdminTools
0 notes
Text
Từ A-Z cách trải nghiệm Ubuntu trên máy Windows mới nhất 2022
Bạn muốn trải nghiệm Ubuntu trên máy tính Windows nhưng không biết phải làm sao và nên bắt đầu từ đâu? Đừng lo, chúng tôi sẽ giúp bạn trở thành một người “sành” về Ubuntu chỉ trong một thời gian ngắn.
Trên thực tế, Linux không giống với Windows. Ubuntu là bản phân phối Linux dễ tiếp cận nhất, cung cấp cả giao diện người dùng trực quan và trình quản lý gói đáng tin cậy.

Nếu bạn bạn đủ can đảm, bạn có thể suy nghĩ về việc sử dụng Ubuntu làm hệ điều hành chính mới của mình, thay thế hoàn toàn cho Windows. Để thực hiện điều này, bạn sẽ cần phải hiểu làm thế nào bạn có thể di chuyển dữ liệu của bạn từ Windows sang Ubuntu (giả sử đó là phiên bản bạn sẽ chuyển sang).
Nên chọn phiên bản Linux nào?
Như bạn đã biết, có rất nhiều bản phân phối Linux có sẵn. Một số là dành cho những người đam mê hardcore, trong khi những distro khác đi kèm với một giao diện người dùng tương tự như Windows, được thiết kế để giúp người mới chuyển sang Linux từ nền tảng Windows tiếp cận dễ dàng hơn, và Ubuntu là một lựa chọn hoàn hảo.
Với sự xuất hiện của Windows Subsystem for Linux, bạn có thể chạy Linux trên máy tính Windows 10 của mình khá dễ dàng. Một số bản phân phối Linux có sẵn dưới dạng các ứng dụng trong Microsoft Store, chẳng hạn như Ubuntu, Debian, SUSE Linux và thậm chí cả hệ điều hành kiểm tra xâm nhập Kali Linux.
Các cách trải nghiệm Ubuntu trên máy tính Windows
Cài Ubuntu Linux từ Microsoft Store
Để cài đặt bất kỳ phiên bản Linux nào trên Windows, trước tiên bạn sẽ cần phải cài đặt Windows Subsystem for Linux.
Windows Subsystem for Linux
Nhấp chuột phải vào Start và mở Windows PowerShell (Admin), sau đó nhập lệnh này:
Enable-WindowsOptionalFeature -Online -FeatureName Microsoft-Windows-Subsystem-Linux
Đợi cho đến khi quá trình hoàn tất, sau đó khi được nhắc, hãy nhập Y để khởi động lại máy tính của bạn.
Khi Windows khởi động lại, bạn vào Windows Store, tải xuống và cài đặt distro Linux ưa thích. (Tính năng này mới có trên Windows build 16215 trở lên. Để có kết quả tốt nhất, hãy nâng cấp Windows lên phiên bản mới nhất).
Quá trình cài đặt sẽ mất vài phút. Sau khi hoàn tất, khởi chạy ứng dụng Linux và đợi đến khi hoàn tất thiết lập.
Sau đó, bạn sẽ được nhắc tạo một tài khoản UNIX bằng cách nhập tên người dùng và mật khẩu mới. Lưu ý không cần phải sử dụng tài khoản máy tính hiện tại.
Cài trực tiếp từ USB hoặc đĩa CD
Một trong những phương thức dễ nhất để bắt đầu với Ubuntu chính là tạo ra một đĩa USB khởi động trực tiếp hoặc trên ổ đĩa CD. Nghĩa là sau khi thiết lập Ubuntu trên thiết bị, bạn có thể chèn USB, đĩa CD hoặc DVD vào bất kỳ máy tính nào cần sử dụng và khởi động lại máy tính. Tùy vào từng loại Mainboard của máy, cách thức tùy chỉnh khởi động từ USB hay CD là khác nhau, điều này hoàn toàn không cần thực hiện bất cứ thay đổi nào trên ổ cứng máy tính của bạn.
Để chuẩn bị cho khâu cài đặt này, trước hết bạn phải tải về file ảnh cài đặt Ubuntu từ trang chủ. Sau đó sử dụng tiện ích Unetbootin để thiết lập cho USB flash hoặc ghi file ảnh trực tiếp vào đĩa CD. (Trên Windows 7, bạn chỉ cần click chuột phải lên file .ISO và chọn Burn disc image để ghi vào đĩa mà không cần sử dụng đến một phần mềm nào khác).
Ngoài ra, còn có Linux Live USB Creator, công cụ này hỗ trợ bạn tất cả các bước tạo USB boot để chạy Linux từ việc chọn, tải về bản phân phối mong muốn cho đến chọn định dạng phù hợp với USB và tạo USB boot.
Sau khi tạo xong USB thì có thể mang cài trên máy khác hoặc cài trực tiếp trên máy tính của mình bằng cách khởi động lại, vào BIOS, chọn khởi động từ USB để máy tính boot vào Linux thay vì hệ điều hành Windows.
Cài Ubuntu trên Windows với Wubi
Thông thường, việc cài đặt nền tảng Linux trên một ổ đĩa cứng không phải là việc dễ thực hiện cho người mới bắt đầu. Nó liên quan tới khả năng thay đổi kích thước các phân vùng hiện có để tạo khoảng trống cho hệ điều hành mới. Nếu quyết định không muốn dùng Linux nữa, bạn sẽ phải xóa các phân vùng mới, sau đó lại thay đổi kích thước phân vùng cũ để lấy lại khoảng trống rồi tiếp tục repair Windows.
Một phương thức khác để thử Ubuntu chính là cài đặt nó trên Windows với Wubi, Wubi chạy cũng giống như bất kỳ ứng dụng nào khác và cài đặt Ubuntu vào một tệp tin trên phân vùng Windows của bạn. Rất đơn giản, chỉ cần một click chuột, cửa sổ Wubi được kích hoạt nó sẽ yêu cầu một vài thông số cần thiết như tên người dùng, mật khẩu, tên phân vùng và kích thước, sau đó nhấn nút Install để tiến hành cài đặt.
Khi khởi động lại máy tính, trên màn hình boot sẽ có tùy chọn để khởi động Ubuntu hoặc Windows, Ubuntu sẽ chạy như thể nó đã được cài đặt bình thường trên ổ cứng của bạn. Một điều tuyệt vời khác là, nếu không thích sử dụng, bạn có thể gỡ bỏ cài đặt nó từ cửa sổ Control Panel như gỡ bở ứng dụng mà không cần thiết với các phân vùng cần thiết.
Chạy Ubuntu trên một máy ảo VM
Giống như các hệ điều hành khác, Ubuntu có thể được chạy trong một máy ảo thông qua một phần mềm trên máy tính. Máy ảo dùng để chạy Ubuntu trong một cửa sổ của Windows hiện tại hoặc một máy Mac, và với cách thực hiện này thì bạn không cần phải khởi động lại máy, tuy vậy các máy ảo thường chạy chậm hơn so với khi chạy trực tiếp trên máy tính.
Để tạo ra một máy ảo cài đặt Ubuntu, bạn có thể sử dụng một trong 2 công cụ phổ biến nhất hiện nay là VirtualBox và VMWare Workstation. Tất cả những gì cần làm ở đây là, xây dựng máy ảo và cung cấp file .ISO tải về từ trang chủ Ubuntu khi được yêu cầu rồi tiến hành thiết lập theo các bước hướng dẫn, sau cùng cài đặt Ubuntu như trên máy tính thực sự.
Cài đặt song song với Windows
Một mặt muốn sử dụng Linux, nhưng lại vẫn muốn để lại Windows đang có trên máy tính, bạn có thể cài đặt Ubuntu theo cấu hình dual-boot như 2 hệ điều hành Windows với nhau. Chỉ cần chép Ubuntu Installer vào một ổ đĩa USB, CD hoặc DVD bằng cách sử dụng phương thức giống như cách 1.
Khi tới bước khởi động lại máy tính thì chọn Install Ubuntu thay vì Try Ubuntu, tới màn hình cài đặt tiếp theo đó bạn đánh dấu vào tùy chọn Install Ubuntu alongside Windows. Windows ở đây tùy thuộc vào phiên bản đang sử dụng, có thể là Windows XP, Windows 7, Windows 8. Không giống như đối với phương pháp dùng Wubi, vì bạn đang cài đặt Ubuntu trên phân vùng riêng của mình, và tất nhiên bạn cũng không thể gỡ bỏ hệ điều hành từ Control Panel của Windows nếu không muốn sử dụng nữa.
Dùng Ubuntu online, tại sao không?
Bạn có thể truy cập vào http://tour.ubuntu.com/en/, tại đây có thể xem giao diện tổng quan của Ubuntu, trải nghiệm cảm giác lướt web trên Firefox, xem các thư mục cơ bản, thậm chí soạn văn bản trên LibreOffice,… Nếu yêu thích sự sáng tạo, giao diện không màu mè nhưng vẫn “chất” thì bạn sẽ bị thuyết phục ngay từ cái nhìn đầu tiên. Có sẵn link tải hệ điều hành Ubuntu để tải về và cài đặt nếu bạn muốn đó.
Thay thế Windows bằng Ubuntu
Một khi đã sẵn sàng rời khỏi Windows, bạn có thể thay thế toàn bộ phiên bản Windows đã cài đặt với Ubuntu (hoặc bất kỳ bản phân phối Linux nào khác). Để làm điều này, bạn tiến hành cài đặt Ubuntu bình thường như cách 4 ở trên nhưng đánh dấu vào tùy chọn Replace Windows with Ubuntu. Tùy chọn này không phải dành cho hầu hết người dùng, trừ khi người đó không muốn giữ lại bất cứ thứ gì của Windows.
Nếu chưa quen với giao diện mới của Ubuntu hoặc công việc yêu cầu phải dùng Windows nhưng bạn vẫn thích trải nghiệm Ubuntu thì cài đặt song song Windows với Ubuntu là sự lựa chọn hoàn hảo nhất. Tất nhiên, nhược điểm duy nhất của cách cài Ubuntu song song với Windows là yêu cầu về cấu hình của máy tính, còn lại bạn vẫn sử dụng Ubuntu bình thường, nhanh, mượt như khi cài nó một mình trên máy tính.
Hướng dẫn cách gỡ cài đặt Ubuntu trên Windows
Trong trường hợp bạn nhận ra rằng Ubuntu Linux không phù hợp với mình và năng suất của bạn bị giảm sút một cách nghiêm trọng, điều tốt nhất bạn có thể làm là chuyển về Windows.
Nếu bạn đã sử dụng Live CD hoặc máy ảo cho đến thời điểm này thì đây không phải là vấn đề.
Tuy nhiên, nếu bạn cài đặt Ubuntu để khởi động kép cùng với Windows, thì bạn có thể thoải mái chuyển về hệ điều hành chính và xóa Ubuntu khỏi ổ cứng của mình. May mắn thay, điều này tương đối đơn giản và có thể được thực hiện một cách an toàn, mà không làm mất bất kỳ dữ liệu quan trọng nào trong máy tính.
Quá trình này liên quan đến việc sao lưu dữ liệu Linux của bạn vào một thiết bị bên ngoài, sau đó chuyển sang Windows để xóa phân vùng và khôi phục MBR.
Ngược lại, nếu bạn quyết định muốn chuyển đổi, bạn sẽ thực sự thích hệ điều hành mới này đấy. Bạn có thể cài đặt Ubuntu làm hệ điều hành duy nhất của máy tính, lý tưởng để mang lại hơi thở mới cho một máy tính cũ hoặc thưởng thức những tính năng mới trên thiết bị hiện đại.
Trên đây chúng tôi đã mách cho bạn những cách trải nghiệm Ubuntu trên máy Windows đơn giản nhất để bạn có thể trở thành một tay chơi sành điệu về Ubuntu. Chúc bạn thành công!
0 notes
Text
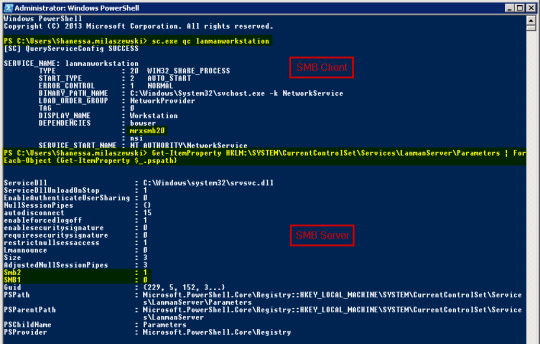
Smb Client
The SMB client file system is based on the SMB protocol version 2.1 and version 3.0.2. You can use the SMB client file system to access files on an SMB server. The SMB server is a server that runs Windows Server 2012 or Windows Server 2016 operating system. In each of these server operating system types, a directory can be exported as a share.
The Server Message Block Protocol (SMB Protocol) is a client-server communication protocol used for sharing access to files, printers, serial ports, and data on a network. It can also carry transaction protocols for authenticated inter-process communication. In short, the SMB protocol is a way for computers to talk to each other.
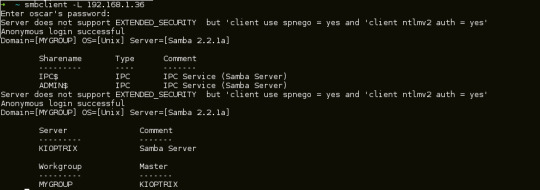
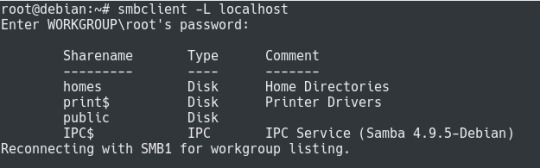
Smbclient is samba client with an 'ftp like' interface. It is a useful tool to test connectivity to a Windows share. It can be used to transfer files, or to look at share names. In addition, it has a nifty ability to 'tar' (backup) and restore files from a server to a client and visa versa.
Smb Client Windows
Smb Client Ubuntu
Smb Client On Solaris 10
May 04, 2021 OpenMediaVault is the next generation network attached storage (NAS) solution based on Debian Linux. It contains services like SSH, (S)FTP, SMB /CIFS, DAAP media server, RSync, BitTorrent client and many more. Thanks to the modular design of the framework it can be enhanced via plugins. An SMB client program for UNIX machines is included with the Samba distribution. It provides an ftp-like interface on the command line. You can use this utility to transfer files between a Windows 'server' and a Linux client. Most Linux distributions also now include the useful smbfs package, which allows one to mount and umount SMB shares.
I realize this is not a very exciting post, especially compared to my other wonderful musing on this site, but I felt I really had to write it to share the pain!
A colleague I work with needed to enable this feature on an Azure Windows Server 2019 machine to communicate with some old system that only supports Server Message Block version 1 (SMB1). Easy enough to add that right?
Trying the installation
Let’s first get some information about the feature:

The output:
Notice the State property? The feature is disabled and the payload (installation files) are not on the Azure virtual machine.
When you try to install the feature, you get:
I guess I need the Windows Server 2019 sources!
Downloading Windows Server 2019
I downloaded Windows Server 2019 (November 2019 version) from https://my.visualstudio.com/Downloads?q=SQL%20Server%202019. I am not sure if you can use the evaluation version of Windows Server 2019 because I did not try that. I downloaded the ISO to the Azure virtual machine.
Mount ISO and copy install.wim
On recent versions of Windows, you can right click an ISO and mount it. In the mounted ISO, search for install.wim and copy that file to a folder on your C: disk like c:wim. Under c:wim, create a folder called mount and run the following command:
The contents of install.wim is now available in c:wimmount. Now don’t try to enable the feature by pointing to the sources with the -source parameter of Enable-WindowsOptionalFeature. It will not work yet!
Smb Client Windows
Patch the mounted files
The Azure Windows Server 2019 image (at time of writing, June 2020) has a cumulative update installed: https://support.microsoft.com/en-us/help/4551853/windows-10-update-kb4551853. For this installatin to work, I needed to download the update from https://www.catalog.update.microsoft.com/home.aspx and put it somewhere like c:patches.
Now we can update the mounted files offline with the following command:
It will take a while to update! You need to do this because the files mounted from the downloaded ISO do not match the version of the Windows Server 2019 image. Without this update, the installation of the SMB1 feature will not succeed.
Enable the SMB1 feature
Mac 5 apple. Now we can enable the feature with the following command:
You will need to reboot. After rebooting, from a PowerShell prompt run the command below to check the installation:
The State property should say: Enabled
Conclusion
Smb Client Ubuntu
Something this trivial took me way too long. Is there a simpler way? Let me know! 👍
Smb Client On Solaris 10
And by the way, don’t enable SMB1. It’s not secure at all. But in some cases, there’s just no way around it.
0 notes
Text
Ubuntu na Windowsie jako "Apka"
W tym poradniku obrazkowym pokażę w jaki sposób zainstalować ubuntu na Windowsie, nie używając wirtualnych maszyn co daje nam możliwość uruchamiania tych samych plików na dwóch systemach w tym samym czasie
instalacja: 1. uruchamiamy PowerShell jako Administrator
kopiujemy komendę i klikamy prawym przyciskiem na okno, wtedy samo się wklei i uruchomi
Enable-WindowsOptionalFeature -Online -FeatureName Microsoft-Windows-Subsystem-Linux
2. uruchamiamy Microsoft Store czyli sklep z apkami windowsa i wyszukujemy ubuntu

Gdy się pobierze, uruchamiamy apkę i czekamy...
wpisujemy nazwę użytkownika, klikamy enter, hasło, enter, znowu hasło, enter.
i gotowe. możemy używać linuxa, aktualizujemy sobie repozytoria i można zaczynać pracę
sudo apt update && sudo apt upgrade
0 notes
Text
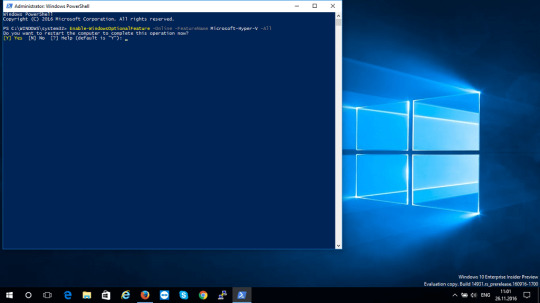
Comment activer Hyper-V sur Windows 10 Famille

Hyper-V est la plate-forme de virtualisation de Microsoft. Elle était disponible sur les systèmes d'exploitation Windows Server, mais Microsoft a ajouté la fonctionnalité Hyper-V à Windows 8.1 et Windows 10. Malheureusement, la fonction Hyper-V n'est disponible que dans Éditions Windows 10 Professionnel et Entreprise. Vous ne pouvez pas l'installer sur Windows 10 Famille par défaut. Mais en suivant les étapes de cet article, nous allons vous montrer comment activer Hyper-V sur Windows 10 Famille.
Votre système prend-il en charge la virtualisation ?
Avant d'aller plus loin, nous devons vérifier si notre système prend en charge la virtualisation. La virtualisation matérielle est nécessaire pour que Hyper-V fonctionne correctement. Sinon, vous pouvez utiliser d'autres plateformes de virtualisation comme Virtualbox et VMWare. Il y a quatre conditions de base pour qu'Hyper-V soit installé sur un ordinateur Windows 10 : Extensions du mode VM Monitor Virtualisation activée dans les microprogrammes Traduction des adresses de deuxième niveau Prévention de l'exécution des données Vous pouvez vérifier toutes ces exigences en ouvrant l'invite de commande (Exécuter-> cmd) et la gestion de la systeminfo commande. Vous pouvez consulter la section des exigences Hyper-V.

Exigences de l'hyper V La plupart des ordinateurs modernes prennent en charge toutes les exigences d'Hyper-V. Mais certains systèmes ont la virtualisation désactivée à partir du BIOS. Vous pouvez aller dans la configuration du BIOS de l'ordinateur au démarrage et activer la virtualisation.

Activer le support de la virtualisation par le BIOS
Activer Hyper-V dans Windows 10 Famille
Suivez les étapes ci-dessous pour installer et activer Hyper-V dans Windows 10 Famille. Téléchargez Hyper-V Enabler ici :

Installateur avec script Hyper-V pour Windows 10 Famille Une fois téléchargé, cliquez avec le bouton droit de la souris sur le fichier et sélectionnez Exécuter en tant qu'administrateur. Cela déclenchera le script d'installation. L'installation peut prendre un certain temps. Veuillez la laisser se dérouler sans interruption.

Une fois terminé, appuyez sur Y pour continuer. Le système redémarrera.
Vous verrez l'écran des mises à jour de Windows au redémarrage.

Après le redémarrage, vous pouvez vérifier que l'option Hyper-V est visible dans les options de Windows. Pour vérifier, allez à Exécuter -> caractéristiques optionnelles. Vous trouverez Hyper-V et Outils de gestion Hyper-V.
Vous pouvez rechercher Hyper-V dans le menu de démarrage pour commencer à créer des machines virtuelles sur votre ordinateur Windows 10 Famille.

Recherchez l'hyper v dans le menu de démarrage J'ai noté une chose intéressante, à savoir que Hyper-V était installé dans une machine virtuelle. J'ai donc pu créer une machine virtuelle dans une machine virtuelle.
Désactiver Hyper-V à partir de la page d'accueil de Windows 10
Si vous ne voulez pas de cette fonctionnalité dans votre ordinateur, vous pouvez toujours la désactiver. Il y a deux façons de la désactiver : Aller à Exécuter -> optionalfeatures Cela ouvrira la fenêtre des caractéristiques optionnelles. Décocher Hyper-V et Outils de gestion Hyper-V. Redémarrez l'ordinateur. Vous pouvez également le faire en utilisant la ligne de commande : PowerShell Disable-WindowsOptionalFeature -Online -FeatureName Microsoft-Hyper-V -All Invite de commande DISM /Online /Disable-Feature /All /FeatureName:Microsoft-Hyper-V Parfois, Hyper-V est très utile, même pour les utilisateurs à domicile. Il peut être utilisé pour tester et évaluer de nouveaux logiciels sans nuire au système hôte. Mais il y a des moments où il n'est pas recommandé d'activer le support de la virtualisation ou d'installer Hyper-V. Hyper-V a besoin de certaines ressources système pour faire fonctionner ses machines virtuelles. Par exemple, si vous disposez de 4 Go de RAM, vous ne pourrez pas donner de ressources à la machine virtuelle. Il ne sera donc pas judicieux d'activer la fonctionnalité d'Hyper-V. Read the full article
0 notes
Text
Windows Server 2016/2019 安装 wsl 2 Linux 子系统
说明
Windows 10 以来,微软操作系统内置支持 wsl Linux 子系统,windows 10 上面自带有 Microsoft Store 应用商店,可以直接安装 Linux 子系统,但是在 Server 2016 / 2019 上,系统并没有内置 Microsoft Store 应用商店,所以不能通过商店直接安装子系统。
下面就来介绍一下,Server 2016/2019 服务器操作系统上怎样安装 Linux 子系统。
操作步骤打开功能支持 WSL
以管理员权限打开 PowerShell 终端,执行以下指令
Enable-WindowsOptionalFeature -Online -FeatureName Microsoft-Windows-Subsystem-Linux
Enable-WindowsOptionalFeature -Online -FeatureName VirtualMachinePlatform
开启 Linux 子系统支持的功能。

也可以在图形界面下,点击“添加服务器功能” 中勾选相应功能。
初次开启此功能,会涉��到重启操作系统。
命令执行的话,显示上述信息,就表示功能已打开,无需重启。
下载 Linux 分发包文件
下载页面 https://docs.microsoft.com/en-us/windows/wsl/install-manual 下载需要的 Linux 发行版
这里示例使用 ps 脚本下载远程文件,以 Ubuntu 18.04 版本为例
Invoke-WebRequest -Uri https://aka.ms/wsl-ubuntu-1804 -OutFile ~/Ubuntu1804.zip -UseBasicParsing
或者使用 curl.exe 方式进行下载:
curl.exe -L -o ~/ubuntu1804.zip https://aka.ms/wsl-ubuntu-1804
开始解包文件
使用如下命令,进行操作:
md C:\Distros\Ubuntu1804
Expand-Archive ~/Ubuntu1804.zip C:\Distros\Ubuntu1894
解压文件后,可以看到如图的文件目录内容。
打开 ubuntu1804.exe
C:\Distros\Ubuntu1894\ubuntu1804.exe
即可开始进入命令行安装界面:
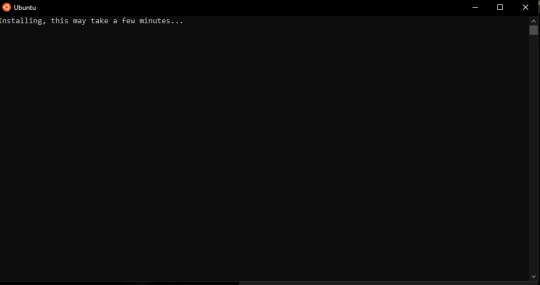
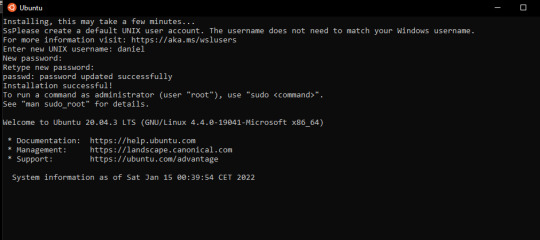
Installing, this may take a few minutes...
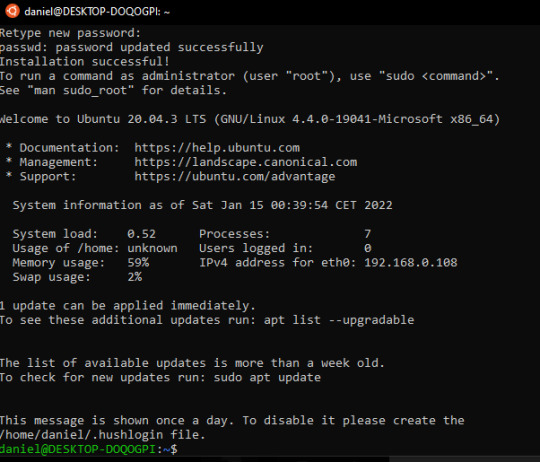
Please create a default UNIX user account. The username does not need to match your Windows username. For more information visit: https://aka.ms/wslusers Enter new UNIX username: YourUserName Enter new UNIX password: Retype new UNIX password: passwd: password updated successfully Installation successful! To run a command as administrator (user "root"), use "sudo <command>". See "man sudo_root" for details.
eric@WIN-SERVER2019:~$
稍等片刻,即可开始输入自定义用户名,输入密码,安全完成。
开始使用 Linux 子系统前,可以设置 wsl 默认版本为 wsl 2 ,相对于 wsl 速度会更快一点。
使用 wsl -l 可以列出当前系统上已经安装的 Linux 子系统名称。注意这里的 -l 是列表“list”的缩写,是字母 l 不是其他字符。
wsl -l
使用 wsl --set-version <Distro> 2 命令可以设置一个 Linux 发行版的 WSL 版本。命令中 <Distro> 替换为你安装的 Linux 发型版本的名称,也就是前面通过 wsl -l 查询到的名称。
wsl --set-version Ubuntu 2
转换过程如下图:

当然,使用以下命令可以在以后安装 Linux 的时候默认启用 WSL2:
wsl --set-default-version 2
参考资料
Install WSL 2 - Microsoft Docs
0 notes
Text
How to install and run Linux along with Windows? (Part1--Windows Subsystem for Linux)
In this blog series, 4 ways of Linux installation and usage will be handled with examples. 1- Windows Linux Subsystem 2- Virtual Machine (VMWare, Virtualbox, cloud server, etc) 3- Containers (Docker etc.) 4- Dual-boot (Windows+Linux )
1- Windows Subsystem for Linux Installation Guide for Windows 10
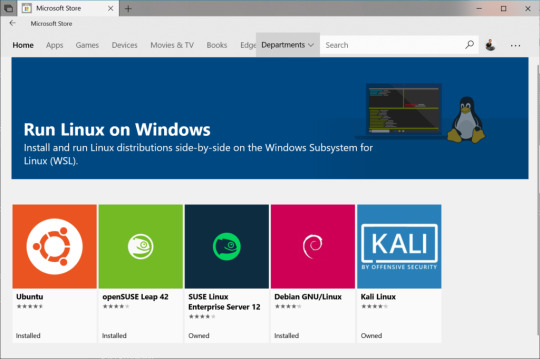
A- Install the Windows Subsystem for Linux Before using Windows Subsystem for Linux , you must enable the "Windows Subsystem for Linux" optional feature. For this: Open PowerShell as an Administrator. Enable-WindowsOptionalFeature -Online -FeatureName Microsoft-Windows-Subsystem-Linux Restart your computer. B- Download and Install a Linux Distribution There are three ways to download & install a Linux Distribution: Microsoft StoreCommand-Line/Script (read the manual installation instructions)Manually (for Windows Server - instructions here) Downloading and Installing using the Microsoft Store Please be sure that your Windows build is 16215 or later. You can check your build from this link. Open Microsoft Store and select a Linux distribution. The following links are the related pages for each distribution:Ubuntu 16.04 LTSUbuntu 18.04 LTSOpenSUSE Leap 15OpenSUSE Leap 42SUSE Linux Enterprise Server 12SUSE Linux Enterprise Server 15Kali LinuxDebian GNU/LinuxFedora Remix for WSLPengwinPengwin EnterpriseAlpine WSLAfter opening the distribution page, select "Get"
C- Initialize your distribution After you install your Linux distro, you should initialize the new distro instance once, before it can be used. What is next? In the next blog posts, these items will be handled: Virtual Machine (VMWare, Virtualbox, cloud server, etc)Containers (Docker etc.)Dual-boot (Windows+Linux ) Further Reading: - How to install and run Linux along with Windows? How to run dual operating systems? (Part-2) – How to use axios in React and make API requests. – DevOps vs. SRE: What’s the Difference Between DevOps and Site Reliability Engineer? - What is ESLint? How to use ESLint? What are the best practices for ESLint? Read the full article
0 notes
Text
HOW TO INSTALL WSL ON WINDOWS 10?
Fortunately, users shall be able to run Linux with Windows 10 devices instead of needing any other device additionally, having the Windows Subsystem for Linux. This approach lets developers as well as network administrators for using a lengthy list of tools and services.

In this place, you shall get to know the method of installing the Windows Subsystem for Linux with the help of Settings application and PowerShell. You shall even get to know the method of downloading as well as installing Linux distros by correctly removing each of the parts whenever you don’t anymore require the open-source surrounding.
Installing the Windows Subsystem for Linux
Turning on the WSL with Settings
Firstly, launch Settings.
Then, tap on Applications.
After that, tap the ‘Programs and Features’ option. It shall be located under the ‘Related settings’ part.
Next, tap on a ‘Turn Windows features on or off’ tab.
Then, put a tick on the Windows Subsystem for Linux square.
After that, tap on the OK option.
Lastly, tap on the Restart now option.
Installing Linux distros with Microsoft Store
Firstly, launch Microsoft Store.
Then, look for the Linux distribution which you wish installing.
After that, choose a distro of Linux for installing on the device of yours.
Next, tap on the Get option.
Then, tap on the Launch option.
After that, make a username for the Linux distro.
Next, tap on Enter.
Then, give any password to the distro.
After that, tap on the Enter option.
Next, you need to repeat the password.
Lastly, tap on Enter.
Removing Linux distros with Settings
Firstly, launch Settings.
Then, tap on Applications.
After that, press on the ‘Apps and Features’ option.
Then, choose the distribution. For instance, Ubuntu. It will be placed under the ‘Apps and features’ part.
Next, tap on the Uninstall option.
After that, tap on the Uninstall option one more time.
Turning off the WSL with Settings
Firstly, launch Settings.
Then, press on Apps.
After that, press on the Programs and Features option. It will be located under the ‘Related settings’ part.
Next, tap on a ‘Turn Windows features on or off’ option. It will be located on the left-hand side.
Then, remove the Windows Subsystem for Linux.
After that, tap on the OK option.
Lastly, tap on the Restart now option.
Installing WSL with PowerShell
Turning on WSL with PowerShell
Firstly, launch Start.
Then, look for the Powershell.
Next, you need to do a right-click in the above-given result.
After that, choose the ‘Run as administrator’ option.
Then, write the given order for turning on the Linux subsystem.
Enable-WindowsOptionalFeature -Online -FeatureName Microsoft-Windows-Subsystem-Linux.
After that, tap on Enter.
Next, write Y.
Then, tap on Enter.
Lastly, restart your device.
Hey I am Smith, a certified technical professional for bitdefender with over five years of experience. If you face any issue regarding your bitdefender.com/activate then can help in all sorts of problem and get instant solution from bitdefender Experts in a small time period.
Source:- https://uk-bitdefender.com/blog/how-to-install-wsl-on-windows-10/
0 notes
Text
Windows 10 子系統 Ubuntu 18.04 圖形化介面安裝範例
Windows 10 子系統 Ubuntu 18.04 圖形化介面安裝範例
以往在 Windows中要使用 Ubuntu 總是要安裝雙系統,
或者要安裝虛擬機器來達到目的,
隨著科技的進步,
現在可不用這麼麻煩了,
今天就來教大家:
Windows 10 子系統 Ubuntu 18.04 圖形化介面安裝範例
在安裝必要元件以前,
當然要先設定好 Windows10 子系統 Ubuntu 18.04 了,
首先到開始按鈕按滑鼠右鍵,
從選單中選擇設定,
進入更新與安全性,
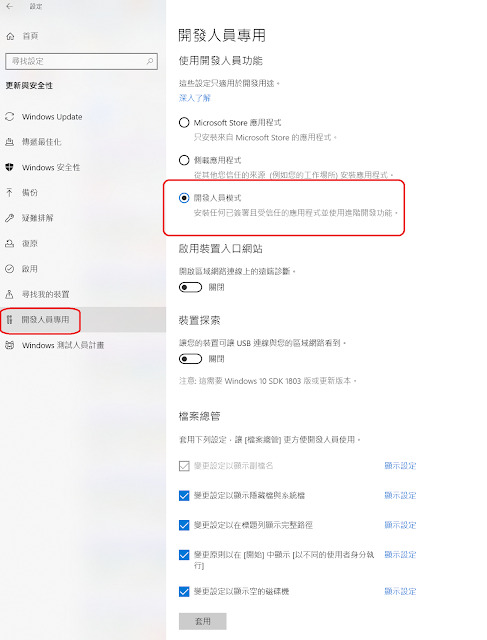
從開發人員專用頁面將系統調整至開發人員模式。
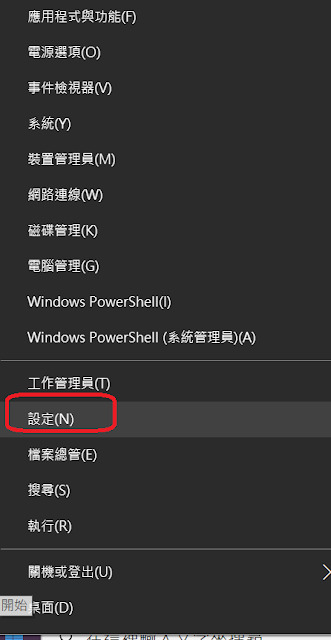

同樣在開始選單中以系統管理員執行 Windows PowerShell,
執行:
Enable-WindowsOptionalFeature -Online -FeatureName…
View On WordPress
#Microsoft-Windows-Subsystem-Linux#sudo ccsm#Ubuntu 18.04#VcXsrv#windows10 子系統#xfce4-session#xubuntu-desktop
0 notes
Text
Windows 10 Hyper-V install

Windows 10 Hyper-V install. What tools you can use for Hyper-V Windows 10 installation: Graphical Interface (GUI) Command Prompt (CMD) or DISM PowerShell
Hyper-V System Requirements
Before you can learn how to install Hyper-V, it is imperative to ensure that your computer can meet all the system requirements. The general system requirements are the following: 64-bit Processor with at least 1.4 GHz CPU speedSecond Level Address Translation (SLAT), which is used to reduce the hypervisor overhead and enhance the performance of the virtual machines (VMs)Support for VM Monitor Mode ExtensionsMinimum of 4 GB RAM to ensure that each running VM is allocated enough memory for efficient performanceHardware-assisted virtualization enabled through Intel Virtualization Technology (Intel VT) or AMD Virtualization (AMD-V) technologyHardware-enforced Data Execution Prevention (DEP) with the Intel XD bit (execute disable bit) or the AMD NX bit (no execute bit) To check whether your system meets all the requirements for installing Hyper-V, open Windows PowerShell or Command Prompt and type Systeminfo.exe. Scroll down to find the Hyper-V requirements section and check whether all the Hyper-V requirements read Yes. If they do, you can start to install Hyper-V on your computer. If any of the elements listed indicates No, try to make the necessary adjustments and rectify the issue.
Windows 10 Hyper-V install with Graphical Interface (GUI).
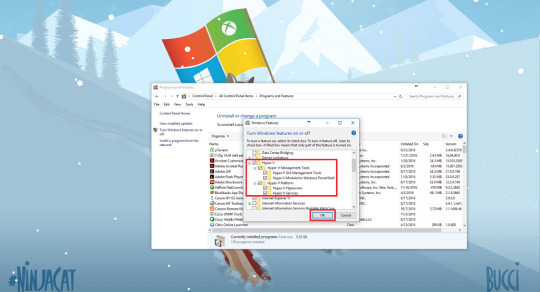
Before we start – LMB (Left Mouse Button) & RMB (Right Mouse Button). 1. Click RMB on Windows button and then LMB on “Control Panel“:

2. In the opened Control Panel LMB on “Programs and Features“:

3. Than LMB on “Turn Windows Features on or off” (you must have admin rights for doing this):

4. In the opened window select all in “Hyper-V” and click LMB “OK“:
5. After that begin installation:

6. When installation finished LMB “Restart now” for reboot:

7. After rebooting click LMB on start button and find in application list “Windows Administrative Tools“:

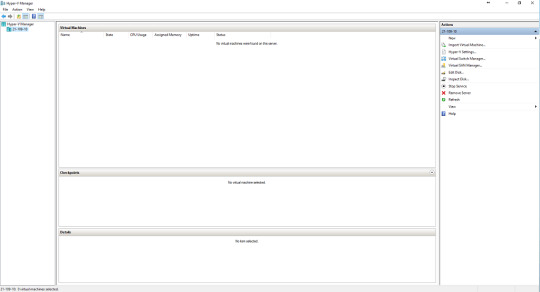
8. In “Windows Administrative Tools” LMB “Hyper-V Manager” (you may pin that where you need):

9. That’s all, we deploy hyper-v in windows 10:
(adsbygoogle = window.adsbygoogle || ).push({});
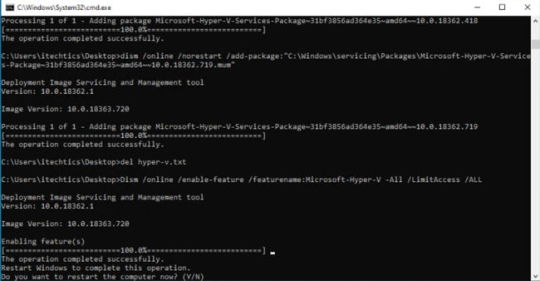
Windows 10 Hyper-V install with CMD (DISM)
1. Run CMD with admin rights Command Prompt (Admin):

2. In the opened windows insert next string: DISM /Online /Enable-Feature /All /FeatureName:Microsoft-Hyper-V And press Enter:

3. After installation is finished – you need reboot your machine by pressing Enter. You may set “n” and press Enter, and reboot later. Hyper-V will work only after reboot.

4. After reboot is finished – check our Hyper-V. Press Start button to show your apps. In the apps find folder Windows Administrative Tools, in the folder run Hyper-V Manager:

5. And we get that we need:
(adsbygoogle = window.adsbygoogle || ).push({});
Windows 10 Hyper-V install with PowerShell
1. Press Start button, in the programs list find Windows Power Shell folder. Run PowerShell with admin rights:

2. Wait until PowerShell start:

3. After PowerShell start – enter next command: Enable-WindowsOptionalFeature -Online -FeatureName Microsoft-Hyper-V -All

4. Press Enter to start:

5. When installation complete – you must reboot your device, press Enter. Hyper-V will work only after reboot.
6. After reboot is finished – check our Hyper-V. Press Start button to show your apps. In the apps find folder Windows Administrative Tools, in the folder run Hyper-V Manager:
7. After all – we get what we need.
Read the full article
0 notes
Text
Todo sobre Error de instalación de Net Framework 3.5 0x800F0906 (resuelto) • Repare Windows ™ Full
Aparece un error de instalación de Net Framework 3.5 0x800F0906 en una computadora con Windows 10/8 / 8.1 porque Windows no puede descargar los archivos fuente necesarios para instalar la característica .NET Framework 3.5.
Descripción del problema: La característica .NET Framework 3.5 no se puede instalar en una computadora con Windows 10 (o Windows 8 / 8.1) y la instalación de NET Framework 3.5 se interrumpe con el código d & # Error 0x800F0906: “Windows no pudo completar los cambios solicitados”. Windows buscará los archivos necesarios para completar los cambios solicitados. Asegúrese de estar conectado a Internet e intentará nuevamente “(CBS_E_DOWNLOAD_FAILURE)
Este tutorial contiene instrucciones para resolver el error de instalación de Net Framework 3.5 0x800F0906 en Windows 10/8 / 8.1.
Procedimiento de corrección: Error al instalar 0x800F0906 Instalación de NET FRAMEWORK 3.5.
Importante: Antiguamente de continuar con los siguientes métodos, vaya a & # 39; Servicios & # 39; (Panel de control> Herramientas administrativas> Servicios) y asegúrese de que el servicio ‘Windows Update & # 39; está corriendo Si el servicio no funciona, haga doble clic en él y configure el tipo de inicio en Forzoso . Luego haga clic en Aceptar y para reiniciar la computadora. A posteriori de reiniciar, intente instalar .Net Framework. Si el problema existe, proceda con los siguientes métodos: *
* Nota: Use los siguientes métodos solo si experimenta el error 0x800F0906 posteriormente de habilitar la característica .Net Framework 3.5 . Características de Windows. (Panel de control -> Programas y características -> Activar o desactivar las características de Windows.)
Método 1. Elimine .NET. MARCO 4.7 e instale .NET Framework 3.5.
1. Cala Programas y características y haga clic en Habilitar o deshabilitar las características de Windows .
2. Desmarca la casilla. NET Framework 4.7 y marque la casilla y luego haga clic en Aceptar para eliminar la última lectura instalada de NET FRAMEWORK.
.
3. Cuando se haya preparado el proceso de asesinato, habilite .NET Framework 3.5 y haga clic en Aceptar .
4. Siga las instrucciones en pantalla para descargar e instalar .NET Framework 3.5. 5. Si la instalación se completa sin problemas, vuelva a habilitar NET Framework 4.7
Método 2. Instalación de NET FRAMEWORK 3.5 con DISM.
Requisitos previos : Para corregir “El error de instalación de Net Framework 3.5 0x800F0906”, debe tener un medio de instalación de Windows. Si no tiene medios de instalación de Windows, ejecute Microsoft Microsoft Media Creation Tool y descargue una copia de su versión de Windows en formato ISO.
1. Asociar (o contar Windows.ISO) los medios de instalación con su computadora. 2. Cala el Explorador de Windows y observe la letrilla de la mecanismo de Soporte de Windows. 3. Cala Símbolo del sistema como Administrador . Para hacer esto:
4. En el símbolo del sistema, escriba el posterior comando y presione Entrar: *
DISM / Online / Enable-Feature / FeatureName: NetFx3 / All / LimitAccess / Source: X : sources sxs
* Nota: Reemplace la letrilla “ X ” en el comando preparatorio según la letrilla de la mecanismo de Windows Media. (Por ejemplo, si la letrilla del Reproductor de Windows Media es “E”, debe escribir:
DISM / Online / Enable-Feature / FeatureName: NetFx3 / All / LimitAccess / Source: E: sources sxs
Método 3. Instale NET FRAMEWORK 3.5 desde PowerShell.
Requisitos previos : Para resolver “Net Framework 3.5 0x800F0906 Error de instalación” necesita un medio de instalación de Windows. Si no tiene medios de instalación de Windows, ejecute la Utensilio de creación de medios de Microsoft y descargue una copia de su lectura de Windows en formato ISO.
1. (o monte el archivo Windows.ISO) en los medios de instalación en su computadora. 2. Cala PowerShell como administrador. Para hacer esto:
3 En PowerShell, emita el posterior comando y presione . Entre .
Enable-WindowsOptionalFeature –Online FeatureName “NetFx3” -Source X : sources sxs -LimitAccess
* Nota: Reemplace la letrilla “ X ” desde el comando preparatorio, dependiendo de la letrilla de la mecanismo, el medio de instalación de Windows.
Método 4. Repare Windows 10.
El método final para resolver .NET Framework 3.5 El error de instalación 0x800F0906, es reparar Windows 10 con una actualización en el lugar .
¡Estos son todos! ¿Funcionó para ti? Gracias por dejar un comentario en la sección de comentarios a continuación o incluso mejor: dar me gusta y compartir esta publicación de blog en las redes sociales para ayudar a promover esta opción.
Si este artículo fue útil para usted Considere apoyarnos haciendo una donación. Incluso $ 1 puede marcar la diferencia para nosotros en nuestros esfuerzos por seguir luchando contra el correo basura mientras mantenemos este sitio librado:

La entrada Todo sobre Error de instalación de Net Framework 3.5 0x800F0906 (resuelto) • Repare Windows ™ Full se publicó primero en El rincon de diego.
Por El rincon de diego
0 notes
Text
Ruby on Rails on Windows is not just possible, it's fabulous using WSL2 and VS Code
I've been trying on and off to enjoy Ruby on Rails development on Windows for many years. I was doing Ruby on Windows as long as 13 years ago. There's been many valiant efforts to make Rails on Windows a good experience. However, given that Windows 10 can run Linux with WSL (Windows Subsystem for Linux) and now Windows runs Linux at near-native speeds with an actual shipping Linux Kernel using WSL2, Ruby on Rails folks using Windows should do their work in WSL2.
Running Ruby on Rails on Windows
Get a recent Windows 10
WSL2 will be released later this year but for now you can easily get it by signing up for Windows Insiders Fast and making sure your version of Windows is 18945 or greater. Just run "winver" to see your build number. Run Windows Update and get the latest.
Enable WSL2
You'll want the newest Windows Subsystem for Linux. From a PowerShell admin prompt run this:
Enable-WindowsOptionalFeature -Online -FeatureName Microsoft-Windows-Subsystem-Linux
and head over to the Windows Store and search for "Linux" or get Ubuntu 18.04 LTS directly. Download it, run it, make your sudo user.
Make sure your distro is running at max speed with WSL2. That earlier PowerShell prompt run wsl --list -v to see your distros and their WSL versions.
C:\Users\Scott\Desktop> wsl --list -v NAME STATE VERSION * Ubuntu-18.04 Running 2 Ubuntu Stopped 1 WLinux Stopped 1
You can upgrade any WSL1 distro like this, and once it's done, it's done.
wsl --set-version "Ubuntu-18.04" 2
And certainly feel free to get cool fonts and styles and make yourself a nice shiny Linux experience...maybe with the Windows Terminal.
Get the Windows Terminal
Bonus points, get the new open source Windows Terminal for a better experience at the command line. Install it AFTER you've set up Ubuntu or a Linux and it'll auto-populate its menu for you. Otherwise, edit your profiles.json and make a profile with a commandLine like this:
"commandline" : "wsl.exe -d Ubuntu-18.04"
See how I'm calling wsl -d (for distro) with the short name of the distro?
Since I have a real Ubuntu environment on Windows I can just follow these instructions to set up Rails!
Set up Ruby on Rails
Ubuntu instructions work because it is Ubuntu! https://gorails.com/setup/ubuntu/18.04
Additionally, I can install as as many Linuxes as I want, even a Dev vs. Prod environment if I like. WSL2 is much lighter weight than a full Virtual Machine.
Once Rails is set up, I'll try making a new hello world:
rails new myapp
and here's the result!
I can also run "explorer.exe ." and launch Windows Explorer and see and manage my Linux files. That's allowed now in WSL2 because it's running a Plan9 server for file access.
Install VS Code and the VS Code Remote Extension Pack
I'm going to install the VSCode Remote Extension pack so I can develop from Windows on remote machines OR in WSL or Container directly. I can click the lower level corner of VS Code or check the Command Palette for this list of menu items. Here I can "Reopen Folder in WSL" and pick the distro I want to use.
Now that I've opened the folder for development WSL look closely at the lower left corner. You can see I'm in a WSL development mode AND Visual Studio Code is recommending I install a Ruby VS Code extension...inside WSL! I don't even have Ruby and Rails on Windows. I'm going to have the Ruby language servers and VS Code headless parts live in WSL - in Linux - where they'll be the most useful.
This synergy, this balance between Windows (which I enjoy) and Linux (whose command line I enjoy) has turned out to be super productive. I'm able to do all the work I want - Go, Rust, Python, .NET, Ruby - and move smoothly between environments. There's not a clear separation like there is with the "run it in a VM" solution. I can access my Windows files from /mnt/c from within Linux, and I can always get to my Linux files at \\wsl$ from within Windows.
Note that I'm running rails server -b=0.0.0.0 to bind on all available IPs, and this makes Rails available to "localhost" so I can hit the Rails site from Windows! It's my machine, so it's my localhost (the networking complexities are handled by WSL2).
$ rails server -b=0.0.0.0 => Booting Puma => Rails 6.0.0.rc2 application starting in development => Run `rails server --help` for more startup options Puma starting in single mode... * Version 3.12.1 (ruby 2.6.2-p47), codename: Llamas in Pajamas * Min threads: 5, max threads: 5 * Environment: development * Listening on tcp://0.0.0.0:3000 Use Ctrl-C to stop
Here it is in new Edge (chromium). So this is Ruby on Rails running in WSL, as browsed to from Windows, using the new Edge with Chromium at its heart. Cats and dogs, living together, mass hysteria.
Even better, I can install the ruby-debug-ide gem inside WSL and now I'm doing interactive debugging from VS Code, but again, note that the "work" is happening inside WSL.
Enjoy!
Sponsor: Get the latest JetBrains Rider with WinForms designer, Edit & Continue, and an IL (Intermediate Language) viewer. Preliminary C# 8.0 support, rename refactoring for F#-defined symbols across your entire solution, and Custom Themes are all included.
© 2019 Scott Hanselman. All rights reserved.


Ruby on Rails on Windows is not just possible, it's fabulous using WSL2 and VS Code published first on http://7elementswd.tumblr.com/
0 notes
Text
How to Install the Windows Subsystem for Linux (WSL)
The Windows Subsystem for Linux (WSL) is a compatibility layer that natively runs Linux binaries on the Windows 10 and Windows Server 2019 operating systems. It allows you to set up a Linux environment on Windows without having to install a virtual machine. With WSL, you can install any Linux distro you want on your Windows machine.
In this tutorial, we will show you step by step how to install the Windows Subsystem for Linux. Then, we will install the Ubuntu 18.04 (LTS) on top of WSL. But, first, let’s see what exactly you can use WSL for.
What Is the Windows Subsystem for Linux Good for?
The most important thing to know about the Windows Subsystem for Linux is that it’s not a virtual machine. Therefore, you don’t get access to a Linux desktop environment such as Gnome or KDE and you can’t run Linux desktop apps. You won’t need to set up a dual boot system, either, as WSL runs entirely on top of your Windows operating system.
However, you get access to the UNIX terminal in which you can run native shell commands and install command-line tools and packages using the apt-get package manager. WSL also makes it easier to work with programming languages that are not native to Windows such as Python and Ruby.
Besides, the Windows Subsystem for Linux makes it possible to run more than one Linux distros in your Windows desktop at the same time. For instance, you can use Ubuntu and Kali Linux simultaneously, and you can install both right from the Windows Store.

Requirements for the Windows Subsystem for Linux
The Windows Subsystem for Linux only runs on newer versions of Windows 10 and Windows Server 2019. To use WSL, you need to have Windows build 16215 or a later version. On Windows 10, you can check your build number in the Settings > System > About menu. For instance, it’s 17134.829 in the example below:

On Windows Server 2019, run the following query in the Windows PowerShell:
systeminfo | Select-String "^OS Name","^OS Version"
1. Enable the WSL Feature
You can enable the Windows Subsystem for Linux feature right from PowerShell. Click the Start menu, find PowerShell, right-click the application, and select the “Run as administrator” option.

In Powershell, run the following command:
Enable-WindowsOptionalFeature -Online -FeatureName Microsoft-Windows-Subsystem-Linux
Sometimes Windows asks you to restart your computer, however, it doesn’t always happen. When the feature is enabled, you can install your chosen Linux distro from the Windows Store.
2. Install Your Linux Distro from Windows Store
Open the Windows Store application from the Start menu and type “Linux” into the Search bar at the top right corner of the screen. Browse the Linux distros you have access to and find the one you want to install. In the example, we will use Ubuntu 18.04 LTS, as it’s a stable distro that comes with long-term support.
In Windows Store, click the “Get” button and download and install the Ubuntu 18.04 LTS application.

3. Run Your Linux Distro
Now, your Linux distro is up and running. You can launch it from the Start menu like any other Windows application. However, remember, that with the Windows Subsystem for Linux, you won’t get access to the Ubuntu desktop or any desktop-like application. You can only use the UNIX terminal, however, with all the command line tools, packages, and features of Ubuntu 18.04.
So, click the Ubuntu 18.04 LTS app in your Start menu that will open and run Ubuntu from the UNIX command line.

On the first launch, Ubuntu will ask you to specify your Linux username and password. These will be the credentials you will need when you want to run sudo-level UNIX commands. They are not related to your Windows username and password in any way, so you can choose between using the same credentials or setting up a new username/password combination.
4. Update and Upgrade your Ubuntu Packages
Before you start to use Ubuntu, you need to update and upgrade the system. This is what you would need to do on a real Ubuntu OS as well, and WSL works pretty much the same way. The following command takes care of both the upgrade and update of all your Ubuntu packages:
sudo apt update && sudo apt upgrade
Type the command into your new Ubuntu terminal and wait a couple of minutes until the upgrade is done.
5. Find Your Linux Files
So, where does the Windows Subsystem on Linux place your files inside your Windows OS? The location of the WSL-related file system has been changing since the launch of the software and can still change in the future, but as of July 2019, you can find it at the following path:
C:\Users\<your-username>\AppData\Local\Packages\CanonicalGroupLimited.Ubuntu18.04_<custom-code>\LocalState\rootfs
Even if the path changes in the future, your Linux file system will be most likely stored in the AppData/Local folder. On the screenshot below, you can see that it contains all the folders you can find in a regular Ubuntu setup, such as bin, boot, home, etc, lib, and others.

6. Consider Installing WSL 2
Microsoft released WSL 2, the new version of the Windows Subsystem for Linux just a couple of weeks ago, in June 2019. Although WSL 2 only works on the latest Windows build (needs build 18917 or higher), if you have already upgraded your OS, it’s worth considering installing it, too. Note that you already need to have WSL 1 installed on your machine to upgrade it to WSL 2.
WSL 2 comes with some significant changes compared to WSL 1. Most importantly, it changes how Linux binaries interact with the underlying Windows OS and hardware. You get access to an in-house built, open-source Linux kernel created using the latest stable branch available at kernel.org. This means faster operations, updates, and upgrades, full system call compatibility, and more.
To enable WSL 2 on your system, run the following command in PowerShell as Administrator:
Enable-WindowsOptionalFeature -Online -FeatureName VirtualMachinePlatform
Then, connect your existing Linux distros to WSL 2 by running the following command in PowerShell:
wsl --set-version <Distro> 2
You can get the exact name of your Distro with the help of the wsl -l command. If you get stuck with the upgrade, check out Microsoft’s documenation about how to install WSL 2 on top of the Windows Subsystem for Linux (WSL 1).
Conclusion
Having access to the UNIX terminal and Linux-native command line tools, packages, and programming languages can help a lot in web development. You can use it to manage your local and remote network, set up a web server, and work with advanced technologies you can’t access from Windows such as the WordPress CLI.
If you want to learn more about how to work with Linux, have a look at our tutorial on how to use UNIX file permissions to increase security or check out our collection of the best Linux distros for programmers and developers, too.
How to Install the Windows Subsystem for Linux (WSL) published first on https://deskbysnafu.tumblr.com/
0 notes
Photo

Windows 10’s Linux Kernel Is Now Available Larry Ewing Microsoft just released a new Windows 10 Insider Preview build featuring the Windows Subsystem for Linux 2. WSL 2 includes a real Linux kernel that lets you run more Linux software on Windows and with better performance than WSL 1. This is part of Windows 10 Insider Preview build 18917, released on June 12, 2019. It’s part of the fast ring of updates. You can experiment with it today, although you’ll have to join the Windows Insider program and get unstable builds of Windows 10 on your PC. Microsoft’s Windows Command Line blog offers more information about WSL 2, complete with an install guide, list of user experience changes, and more documentation. To install WSL 2 on the latest insider build, run the following command in a PowerShell window launched with Administrator permissions: Enable-WindowsOptionalFeature -Online -FeatureName VirtualMachinePlatform This new version of WSL 2 uses Hyper-V features to create a lightweight virtual machine with a minimal Linux kernel. It will still be available on Windows 10 Home, however, even though Hyper-V isn’t normally available on Windows 10 Home. Expect better compatibility with Linux software, including support for Docker, and “dramatic file system performance increases.” The virtual machine will automatically launch at startup and use a bit of memory in the background, but Microsoft promises it “has a small memory footprint.” You can run the wsl --shutdown command if you ever want to shut down the background VM. WSL 2 is part of the development builds for Windows 10 20H1, which is expected for release around April 2020. WSL may be part of Windows 10 19H2, expected for release around October 2019, but Microsoft isn’t testing 19H2 yet. The latest Windows 10 Insider build includes some other useful features, too. You can now head to Settings > Update & Security > Delivery Optimization > Advanced Options to throttle Windows Update. For example, you can set Windows Update to only use 1 Mbps or a specific percentage of your available bandwidth while downloading updates in the background. RELATED: Windows 10 Is Getting a Built-in Linux Kernel https://buff.ly/2IFQePP
0 notes
Text
The year of Linux on the (Windows) Desktop - WSL Tips and Tricks
I've been doing a ton of work in bash/zsh/fish lately - Linuxing. In case you didn't know, Windows 10 can run Linux now. Sure, you can run Linux in a VM, but it's heavy and you need a decent machine. You can run a shell under Docker, but you'll need Hyper-V and Windows 10 Pro. You can even go to https://shell.azure.com and get a terminal anywhere - I do this on my Chromebook.
But mostly I run Linux natively on Windows 10. You can go. Just open PowerShell once, as Administrator and run this command and reboot:
Enable-WindowsOptionalFeature -Online -FeatureName Microsoft-Windows-Subsystem-Linux
Then head over to the Windows Store and download Ubuntu, or Debian, or Kali, or whatever.
Ubuntu
OpenSUSE
SLES
Kali Linux
Debian GNU/Linux
What's happening is you're running user-mode Linux without the Linux Kernel. The syscalls (system calls) that these un-modified Linuxes use are brokered over to Windows. Fork a Linux process? It a pico-process in Windows and shows up in the task manager.
Want to edit Windows files and edit them both in Windows and in Linux? Keep your files/code in /mnt/c/ and you can edit them with other OS. Don't use Windows to "reach into the Linux file system." There be dragons.
Once you've got a Linux installed (or many, as I do) you can manage then and use them in a number of ways.
Think this is stupid or foolish? Stop reading and keep running Linux and I wish you all the best. More power to you.
Want to know more? Want to look new and creative ways you can get the BEST of the Windows UI and Linux command line tools? Read on, friends.
wslconfig
WSL means "Windows Subsystem for Linux." Starting with the Windows 10 (version 1709 - that's 2017-09, the Fall Creators Update. Run "Winver" to see what you're running), you've got a command called "wslconfig." Try it out. It lists distros you have and controls which one starts when you type "bash."
Check out below that my default for "bash" is Ubuntu 16.04, but I can run 18.04 manually if I like. See how I move from cmd into bash and exit out, then go back in, seamlessly. Again, no VM.
C:\>wslconfig /l /all Windows Subsystem for Linux Distributions: Ubuntu (Default) Ubuntu-18.04 openSUSE-42 Debian kali-rolling C:\>wslconfig /l Windows Subsystem for Linux Distributions: Ubuntu (Default) Ubuntu-18.04 openSUSE-42 Debian kali-rolling C:\>bash 128 → $ lsb_release -a No LSB modules are available. Distributor ID: Ubuntu Description: Ubuntu 16.04.4 LTS Release: 16.04 Codename: xenial 128 → $ exit logout C:\>ubuntu1804 scott@SONOFHEXPOWER:~$ lsb_release -a No LSB modules are available. Distributor ID: Ubuntu Description: Ubuntu 18.04 LTS Release: 18.04 Codename: bionic scott@SONOFHEXPOWER:~$
You can also pipe things into Linux commands by piping to wsl or bash like this:
C:\Users\scott\Desktop>dir | wsl grep "poop" 05/18/2018 04:23 PM <DIR> poop
If you're in Windows, running cmd.exe or powershell.exe, it's best to move into Linux by running wsl or bash as it keeps the current directory.
C:\Users\scott\Desktop>bash 129 → $ pwd /mnt/c/Users/scott/Desktop 129 → $ exit logout
Cool! Wondering what that number is before my Prompt? That's my blood sugar. But that's another blog post.
wsl.conf
There's a file in /etc/wsl.conf that lets you control things like if your Linux of choice automounts your Windows drives. You can also control more advanced things like if Windows autogenerates a hosts file or processes /etc/fstab. It's up to you!
Distros
There's a half dozen distros available and more coming I'm told, but YOU can also make/package your own Linux distribution for WSL with packager/distro-launcher that's open sourced at GitHub.
Coding and Editing Files
I need to hit this point again. Do not change Linux files using Windows apps and tools. However, you CAN share files and edit them with both Windows and Linux by keeping code on the Windows filesystem.
For example, my work is at c:\github so it's also at /mnt/github. I use Visual Studio code and edit my code there (or vim, from within WSL) and I run the code from Linux. I can even run bash/wsl from within Visual Studio Code using its integrated terminal. Just hit "Ctrl+P" in Visual Studio Code and type "Select Default Shell."
On Windows 10 Insiders edition, Windows now has a UI called "Sets" that will give you Tabbed Command Prompts. Here I am installing Ruby on Rails in Ubuntu next to two other prompts - Cmd and PowerShell. This is all default Windows - no add-ons or extra programs for this experience.
I'm using Rails as an example here because Ruby/Rails support on Windows with native extensions has historically been a challenge. There's been a group of people heroically (and thanklessly) trying to get Ruby on Rails working well on Windows, but today there is no need. It runs great on Linux under Windows.
I can also run Windows apps or tools from Linux as long as I use their full name with extension (like code.exe) or set an alias.
Here I've made an alias "code" that runs code in the current directory, then I've got VS Code running editing my new Rails app.
I can even mix and match Windows and Linux when piping. This will likely make Windows people happy and deeply offend Linux people. Or, if you're non-denominational like me, you'll dig it!
$ ipconfig.exe | grep IPv4 | cut -d: -f2 172.21.240.1 10.159.21.24
Again a reminder: Modifying files located not under /mnt/<x> with a Windows application in WSL is not supported. But edit stuff on /mnt/x with whatever and you're cool.
Sharing Sharing Sharing
If you have Windows 10 Build 17064 or newer (run ver from windows or "cmd.exe /c /ver" from Linux) and you can even share an environment variable!
131 → $ cmd.exe /c ver Microsoft Windows [Version 10.0.17672.1000]
There's a special environment variable called "WSLENV" that is a colon-delimited list of environment variables that should be included when launching WSL processes from Win32 or Win32 processes from WSL. Basically you give it a list of variables you want to roam/share. This will make it easy for things like cross-platform dual builds. You can even add a /p flag and it'll automatically translate paths between c:\windows style and /mnt/c/windows style.
Check out the example at the WSL Blog about how to share a GOPATH and use VSCode in Windows and run Go in both places.
You can also use a special built-in command line called "wslpath" to translate path names between Windows and WSL. This is useful if you're sharing bash scripts, doing cross-platform scripts (I have PowerShell Core scripts that run in both places) or just need to programmatically switch path types.
131 → $ wslpath "d:\github\hanselminutes-core" /mnt/d/github/hanselminutes-core 131 → $ wslpath "c:\Users\scott\Desktop" /mnt/c/Users/scott/Desktop
There is no man page for wslpath yet, but copied from this GitHub issue, here's the gist:
wslpath usage: -a force result to absolute path format -u translate from a Windows path to a WSL path (default) -w translate from a WSL path to a Windows path -m translate from a WSL path to a Windows path, with ‘/’ instead of ‘\\’
One final note, once you've installed a Linux distro from the Windows Store, it's on you to keep it up to date. The Windows Store won't run "apt upgrade" or ever touch your Linuxes once they have been installed. Additionally, you can have Ubuntu 1604 and 1804 installed side-by-side and it won't hurt anything.
Related Links
Setting up a Shiny Development Environment within Linux on Windows 10
Badass Terminal: WSL, macOS, and Ubuntu dotfiles update!!! by Jessica Deen
Are you using WSL?
Sponsor: Check out JetBrains Rider: a cross-platform .NET IDE. Edit, refactor, test and debug ASP.NET, .NET Framework, .NET Core, Xamarin or Unity applications. Learn more and download a 30-day trial!
© 2018 Scott Hanselman. All rights reserved.


0 notes
Text
WSL 2 on Windows 10 build 2004
WSL 2 on Windows 10 build 2004
최근 게시된 Windows 10 Build 2004 는 WSL 2 버전Windows Subsystem Linux version 2이 포함되어 있습니다.
WSL 2 버전은 Linux용 Windows 하위 시스템 아키텍쳐의 새로운 버전입니다.
WSL 2 버전은 파일 시스템 성능을 높이고, 전체 시스템 호출 호환성을 추가합니다.
WSL 2 버전은 WSL 1버전을 대체하지 않으므로, 리눅스 배포반을 사용할 때, WSL 2 버전 또는 WSL 1 버전을 선택적으로 지정할 수 있습니다.
WSL 사용
WSL 을 사용하려면 아래 두 Windows 기능을 사용하도록 변경되어야 합니다.
기능 이름: 가상 머신 플���폼 Virtual Machine Platform
PS> Enable-WindowsOptionalFeature…
View On WordPress
0 notes