#WordPress Testing Environments on Localhost
Explore tagged Tumblr posts
Visit Tumblr Blog
Explore Tumblr blogs with no restrictions, modern design and the best experience.
Last Seen Tumblr Blogs


Fun Fact
Premium Tumblr themes are available from anywhere between $9 to $49.
Text
Learn how to set up local testing environments for WordPress development and streamline your workflow.
0 notes
Text
How to Install WordPress Locally on Your MacBook (Easy Guide)
🚀 Exciting news for all you WordPress developers and enthusiasts! 🎉 Just published a new blog post on how to easily install WordPress locally on your MacBook! 💻 Perfect for testing themes, plugins, and building websites offline. No more messing with live servers! 🙌 This step-by-step guide walks you through the entire process, making it super simple even for beginners. Whether you're using MAMP, XAMPP, or another local development environment, this tutorial has you covered. 🤓 Check it out now and start building your WordPress projects locally! 👇 #WordPress #LocalDevelopment #MacBook #Installation #Tutorial #WebDev #MAMP #XAMPP #Localhost #PHP #MySQL #WordPressTutorial #WebDevelopment #Coding #Tech #BlogPost #NewBlog #LearnToCode #RTFM #100DaysOfRTFM #Innovation #Technology #Creativity #LocalWP #SoftwareDevelopment #DigitalStrategy #DigitalMarketing
So, you’re ready to dive into the world of WordPress development, but you don’t want to mess with a live server just yet? Great idea! Setting up WordPress locally on your MacBook is the perfect way to experiment, test themes and plugins, and build your website in a safe environment. This guide will walk you through the process step-by-step. Why Install WordPress Locally? Before we jump in, let’s…
#Installation#Local Development#Localhost#MacBook#MAMP#MySQL#PHP#Tutorial#Web Development#WordPress#XAMPP
0 notes
Text
How to Move Your WordPress Site from Localhost to a Live Server
Developing a WordPress site on localhost is a great way to build and test your website in a controlled environment. However, the real challenge arises when it's time to move the site from your local server to a live hosting environment. If not done correctly, you could encounter broken links, missing images, or even database errors.
In this blog, we'll guide you through a step-by-step process to successfully move your WordPress site from localhost to a live server.

Step 1: Choose the Right Hosting Provider
Your first step is to select a reliable web hosting provider that meets your website’s needs. Look for:
Server Speed: Fast servers for better performance.
Uptime Guarantee: At least 99.9% uptime to ensure availability.
Ease of Use: User-friendly dashboards and tools.
WordPress Support: Hosting optimized for WordPress websites.
Popular options include Bluehost, SiteGround, and WP Engine.
Step 2: Export Your Local WordPress Database
The database is the backbone of your WordPress site. To export it:
Open phpMyAdmin on your local server (e.g., XAMPP or WAMP).
Select your WordPress database.
Click on the Export tab and choose the Quick Export method.
Save the .sql file to your computer.
Step 3: Upload Your WordPress Files to the Live Server
To move your files:
Compress Your WordPress Folder: Zip your local WordPress installation folder.
Access Your Hosting Account: Use a file manager or an FTP client like FileZilla.
Upload the Files: Transfer the zipped folder to your hosting server's root directory (usually public_html).
Unzip the Folder: Extract the files once uploaded.
Step 4: Create a Database on the Live Server
Now, set up a new database on your live hosting server:
Log in to your hosting control panel (e.g., cPanel).
Navigate to the MySQL Databases section.
Create a new database, database user, and password.
Assign the user to the database with full privileges.
Step 5: Import the Database to the Live Server
Open phpMyAdmin in your hosting control panel.
Select the new database you created.
Click the Import tab.
Choose the .sql file you exported from your localhost.
Click Go to import the database.
Step 6: Update the wp-config.php File
To connect your site to the live database:
Locate the wp-config.php file in your WordPress installation.
Open the file in a text editor.
Update the following lines: define('DB_NAME', 'your_live_database_name'); define('DB_USER', 'your_live_database_user'); define('DB_PASSWORD', 'your_live_database_password'); define('DB_HOST', 'localhost'); // Keep this unless your host specifies otherwise.
Save the file and upload it to your server via FTP.
Step 7: Update URLs in the Database
Your localhost URLs need to be replaced with your live site URLs.
Use a tool like Search Replace DB or run SQL queries in phpMyAdmin.
In phpMyAdmin, run the following query: UPDATE wp_options SET option_value = 'http://your-live-site.com' WHERE option_name = 'siteurl'; UPDATE wp_options SET option_value = 'http://your-live-site.com' WHERE option_name = 'home';
Step 8: Test Your Live Website
Once everything is uploaded and configured, check your website by entering its URL in a browser. Test for:
Broken Links: Fix them using plugins like Broken Link Checker.
Missing Images: Ensure media files were uploaded correctly.
Functionality: Verify forms, buttons, and features work as expected.
Step 9: Set Up Permalinks
To ensure proper URL structure:
Log in to your WordPress admin dashboard on the live site.
Go to Settings > Permalinks.
Choose your preferred permalink structure and click Save Changes.
Step 10: Secure Your Live Website
After migrating, secure your site to prevent vulnerabilities:
Install an SSL Certificate: Most hosting providers offer free SSL certificates.
Update Plugins and Themes: Ensure everything is up to date.
Set Up Backups: Use plugins like UpdraftPlus for regular backups.
Conclusion
Moving your WordPress site from localhost to a live server may seem daunting, but by following these steps, you can ensure a smooth and error-free migration. A successful move allows you to showcase your site to the world, engage your audience, and achieve your goals.
Start today and take your WordPress project live with confidence!
0 notes
Text
How Can I Create a Website Without a Domain Name? Here’s How!

Creating a website without a domain name is possible and can be ideal for testing or personal projects. This guide explains how to build a website without buying a domain while keeping it functional and visible on the web.
Why Create a Website Without a Domain Name?
Many people choose to skip a custom domain when
1.Use a Website Builder’s Free Subdomain
Platforms like Wix, WordPress, and Weebly offer free website creation with their subdomains. For instance, instead of “yourwebsite.com,” it might look like “yourwebsite.wixsite.com.”
Advantages:
- No need for hosting, as most builders provide free hosting for subdomains.
- Fast and easy to set up.
- Free or low-cost setup.
Disadvantages:
-Limited customization and branding.
Less professional-looking URL.
2.Utilize GitHub Pages for Coding Projects
For developers or those with coding knowledge, GitHub Pages provides a free hosting solution where your site can be accessible at "username.github.io/project."
Advantages:
-Ideal for static sites, personal projects, or portfolios.
Free SSL (secure connection).
Disadvantages:
- Requires basic coding knowledge.
- Limited to HTML, CSS, and JavaScript.
3.Free Hosting Providers with Temporary URLs
Some hosting providers like InfinityFree and 000WebHost offer free plans with temporary URLs. These temporary URLs allow you to create, test, and host sites without a purchased domain.
Advantages:
- Cost-free hosting options.
- Access to control panels for site management.
- Option to add a custom domain later.
Disadvantages:
- Advertising may be displayed.
- Limited support and resources.
4.Use a Localhost Environment for Offline Testing
For complete control over site functionality, set up a local server using software like XAMPP or Local by Flywheel to run your website offline. While this won’t make your site publicly accessible, it’s perfect for building and testing.
Advantages:
- Full control over testing without online exposure.
- No internet required for access.
- Great for testing advanced functionalities.
Disadvantages:
- Requires technical setup.
- Not accessible over the web.
Key Considerations for Websites Without a Domain Name
Creating a website without a domain can be useful but often comes with limitations. As your project grows or turns commercial, transitioning to a custom domain can increase credibility and improve search engine rankings.
Conclusion
Building a website without a domain name is a viable option, especially for beginners or those working on non-commercial projects. Free subdomains, GitHub Pages, free hosting services, and localhost environments make it easy to establish a web presence. Once ready to grow, consider registering a domain to enhance branding and professionalism.
0 notes
Text
Setting up wordpress for mac

SETTING UP WORDPRESS FOR MAC HOW TO
SETTING UP WORDPRESS FOR MAC INSTALL
Now that DesktopServer is up and running, it will ask you whether you want to create a new developer website. No credit card required You will need to run Apache and MySQL for WordPress to work. You’ll then be prompted to start running Apache and MySQL services in order to run WordPress. Ensure “Yes” is selected and click “Next.” Restart DesktopServer to continue setup. The software will then prompt you to restart so it can run as an admin and create, modify, start and stop web service. Select “New DesktopServer Limited Installation.” In this tutorial we’ll set up the limited version of DesktopServer.ĭesktopServer will then carry on installing and ask you to close the installer. You’ll then be asked to choose a product. In the next window, accept the terms and conditions.
SETTING UP WORDPRESS FOR MAC INSTALL
Follow the prompts to install DesktopServer. Once installed, launch DesktopServer and you will be prompted to complete set up. Once downloaded, install DesktopServer like you would any other software on OS X. There is also a pro version of the software, DesktopServer Premium, but today we’re going to stick with the free, limited version. Head to the website and download DesktopServer. htaccess.įor this tutorial, we’re going to set up the limited version of DesktopServer, which provides a maximum of three virtual servers. The cool thing about DesktopServer is that it’s even easier to set up than WAMP and you don’t have to manually edit any files, like wp-config.php or. Earlier this week I looked at MAMP, a similar server software tool that also provides the necessary server setup needed to run WordPress on a computer rather than online. Each of these servers is created on your computer and can be accessed from your browser using a made-up name, i.e.
SETTING UP WORDPRESS FOR MAC HOW TO
In this tutorial, I’ll walk you through how to set up the limited version of DesktopServer on OS X.Ĭontinue reading, or jump ahead using these links:ĭesktopServer, by, allows you to create dozens of “virtual servers” for developing and testing themes and plugins. And thanks to DesktopServer, it can take as little as 5 minutes to get WordPress up and running on your local machine.ĭesktopServer is so easy, you may even consider ditching WAMP. Setting up a localhost environment for WordPress can save you loads of time if you regularly test themes and plugins.
0 notes
Text
Are you a WordPress user who want to switch to WordPress Multisite Network setup? – To host more than one domain on the same WordPress instance?. In this guide, I’ll take you through the steps to setup WordPress Multisite Network using Nginx as a web server and secure the setup with Let’s Encrypt SSL certificates on Ubuntu 22.04|20.04 Linux systems. In a nutshell, this is a LEMP Stack with WordPress installed and secured with Let’s Encrypt. So we will start our installation by setting up LEMP stack on Ubuntu 22.04|20.04 Linux. WordPress Multisite is a popular feature of WordPress which enables Web masters to run multiple websites using the same WordPress installation on the same server. Step 1: Install MariaDB Database Server This setup requires a database server. We will install and create a database to be used by WordPress. Run the commands below to install MariaDB database server: sudo apt update sudo apt -y install mariadb-server After installation of the database server you need to secure it by running the command below: $ sudo mysql_secure_installation NOTE: RUNNING ALL PARTS OF THIS SCRIPT IS RECOMMENDED FOR ALL MariaDB SERVERS IN PRODUCTION USE! PLEASE READ EACH STEP CAREFULLY! In order to log into MariaDB to secure it, we'll need the current password for the root user. If you've just installed MariaDB, and you haven't set the root password yet, the password will be blank, so you should just press enter here. Enter current password for root (enter for none): OK, successfully used password, moving on... Setting the root password ensures that nobody can log into the MariaDB root user without the proper authorisation. Set root password? [Y/n] y New password: Re-enter new password: Password updated successfully! Reloading privilege tables.. ... Success! By default, a MariaDB installation has an anonymous user, allowing anyone to log into MariaDB without having to have a user account created for them. This is intended only for testing, and to make the installation go a bit smoother. You should remove them before moving into a production environment. Remove anonymous users? [Y/n] y ... Success! Normally, root should only be allowed to connect from 'localhost'. This ensures that someone cannot guess at the root password from the network. Disallow root login remotely? [Y/n] y ... Success! By default, MariaDB comes with a database named 'test' that anyone can access. This is also intended only for testing, and should be removed before moving into a production environment. Remove test database and access to it? [Y/n] y - Dropping test database... ... Success! - Removing privileges on test database... ... Success! Reloading the privilege tables will ensure that all changes made so far will take effect immediately. Reload privilege tables now? [Y/n] y ... Success! Cleaning up... All done! If you've completed all of the above steps, your MariaDB installation should now be secure. Thanks for using MariaDB! Step 2: Create database and user for WordPress After the MariaDB server has been installed, proceed to create a database and user for your WordPress website. But first update authentication plugin: $ sudo mysql -u root UPDATE mysql.user SET plugin = 'mysql_native_password' WHERE User = 'root'; FLUSH PRIVILEGES; QUIT; Login to your MariaDB database as root user: $ mysql -u root -p Enter password: Welcome to the MariaDB monitor. Commands end with ; or \g. Your MariaDB connection id is 59 Server version: 10.3.31-MariaDB-0ubuntu0.20.04.1 Ubuntu 20.04 Copyright (c) 2000, 2018, Oracle, MariaDB Corporation Ab and others. Type 'help;' or '\h' for help. Type '\c' to clear the current input statement. MariaDB [(none)]> Then create a database for wordpress: CREATE DATABASE wp_db; GRANT ALL PRIVILEGES ON wp_db.* TO wp_user IDENTIFIED BY "StrongDBP@ssw0rd"; FLUSH PRIVILEGES; \q Once the database is ready, proceed to install nginx web server:
Step 3: Install Nginx Web Server Next we install Nginx web server on our Ubuntu server: sudo apt install nginx Starting nginx service on both methods is from systemd service manager. sudo systemctl start nginx Enable service to start on boot using: sudo systemctl enable nginx Step 4: Install PHP and PHP-FPM process handler The next phase is the installation of php and all required modules. Unlike Apache web server, Nginx does not contain native PHP processing. For that, we have to install PHP-FPM (FastCGI Process Manager). On Ubuntu install php and php-fpm using the commands: sudo apt update sudo apt install php php-fpm,pear,cgi,common,mbstring,net-socket,gd,xml-util,mysql,bcmath PHP socket is located on /var/run/php/ directory, i.e PHP 8.0 Sock – /run/php/php8.0-fpm.sock For PHP 7.4 – /var/run/php/php7.4-fpm.sock For PHP 7.3 – /var/run/php/php7.3-fpm.sock For PHP 7.2 – /var/run/php/php7.2-fpm.sock sudo vim /etc/php/*/fpm/pool.d/www.conf Step 5: Download and Install WordPress Download WordPress archive: wget wordpress.org/latest.tar.gz Extract the file: tar xvf latest.tar.gz Move resulting wordpress folder to website root directory: sudo mv wordpress /var/www/mywebsite Configure WordPress Database connection cd /var/www/mywebsite sudo cp wp-config-sample.php wp-config.php Edit wp-config.php: $ sudo vim wp-config.php define('DB_NAME', 'wp_db'); define('DB_USER', 'wp_user'); define('DB_PASSWORD', 'StrongDBP@ssw0rd'); Change ownership of /var/www/mywebsite to web user: sudo chown -R www-data:www-data /var/www/mywebsite Step 6: Configure Nginx for WordPress Multisite Network Create VirtualHost configuration file for your WordPress: sudo vim /etc/nginx/conf.d/mywebsite.conf Copy the following configuration snippet and modify accordingly: ################################## # WORDPRESS NGINX CONFIGURATIONS ################################## server listen 80; root /var/www/mywebsite; server_name mywebsite.com; return 301 https://$server_name$request_uri; server js Remember to replace mywebsite.com with your valid domain name,/var/www/mywebsite with your wordpress installation root. Step 7: Generate Let’s Encryt SSL certificate for the domain Once you have modified nginx with correct settings, proceed to request for Letsencrypt certificate that we’ll use to secure the main site. Download and install certbot client to use: sudo apt update sudo apt install certbot Open http and https ports on the firewall if ufw is active: sudo ufw allow http sudo ufw allow https Stop nginx: sudo systemctl stop nginx Request for certificate export DOMAIN="mywebsite.com" export EMAIL="[email protected]" sudo certbot certonly --standalone -d $DOMAIN --preferred-challenges http --agree-tos -n -m $EMAIL --keep-until-expiring You should get output like this: Saving debug log to /var/log/letsencrypt/letsencrypt.log Plugins selected: Authenticator standalone, Installer None Obtaining a new certificate Performing the following challenges: http-01 challenge for wp.computingforgeeks.com Waiting for verification... Cleaning up challenges IMPORTANT NOTES: - Congratulations! Your certificate and chain have been saved at: /etc/letsencrypt/live/mywebsite.com/fullchain.pem Your key file has been saved at: /etc/letsencrypt/live/mywebsite.com/privkey.pem Your cert will expire on 2018-09-17. To obtain a new or tweaked version of this certificate in the future, simply run certbot-auto again. To non-interactively renew *all* of your certificates, run "certbot-auto renew" - If you like Certbot, please consider supporting our work by: Donating to ISRG / Let's Encrypt: https://letsencrypt.org/donate Donating to EFF: https://eff.org/donate-le Confirm that certs we indeed generated: $ sudo ls -1 /etc/letsencrypt/live/mywebsite.com/ cert.pem chain.pem fullchain.pem privkey.pem README
Make sure you modify nginx configuration ssl section to point to correct path of Let’s Encrypt private key and certificate. Validate configuration settings then restart nginx for the changes to be affected: $ sudo nginx -t nginx: the configuration file /etc/nginx/nginx.conf syntax is ok nginx: configuration file /etc/nginx/nginx.conf test is successful $ sudo systemctl restart nginx Step 8: Configure WordPress Website from browser Open http://mywebsite.com to start wordpress installation. You should get initial installation page which looks similar to one below. Provide required information and click on “Install WordPress” button. If all goes well, you should get login page. Click Log in and provide username and password. On Login, you should get to wordpress Admin dashboard. Step 9: Configure WordPress Multisite For WordPress multisite to work, you need to first enable it on wordpress configuration file: sudo vim /var/www/mywebsite.com/wp-config.php Add the following content before the line /* That's all, stop editing! Happy blogging. */ define( 'WP_ALLOW_MULTISITE', true ); Restart Nginx service: sudo systemctl restart nginx Relogin to WordPress Admin Page and go to: Tools > Network Setup Choose whether to use Sub-domains or sub-directories to host other sites. Enabling WordPress Network Paste the given configuration snippet on /var/www/mywebsite/wp-config.php, just before /* That's all, stop editing! Happy blogging. */ define('MULTISITE', true); define('SUBDOMAIN_INSTALL', true); define('DOMAIN_CURRENT_SITE', 'mywebsite.com'); define('PATH_CURRENT_SITE', '/'); define('SITE_ID_CURRENT_SITE', 1); define('BLOG_ID_CURRENT_SITE', 1); See below screenshot as example: Restart nginx: sudo systemct restart nginx Relogin to start using WordPress Network Multisite feature. You should see new Network Admin Menu. You can start adding websites to your WordPress Network by navigating to Sites > Add New In our next guide, I’ll cover how to Add websites to wordpress Multisite Network Setup. Stay connected to receive our latest article updates.
0 notes
Text
Cómo instalar Wordpress en Ubuntu 20.04

Vamos a instalar WordPress en un VPS recién contratado que hemos configurado con Ubuntu 20.04 como sistema operativo.

Configuración del servidor recién instalado Lo primero que debemos hacer es actualizar el sistema operativo para asegurarnos de que tiene los ultimos paquetes de la versión que hayamos seleccionado. sudo apt update Preparando el entorno LAMP WordPress es una aplicación escrita en PHP, que necesita un entorno de ejecución determinado, conocido como entorno LAMP, (Linux, Apache, MySQL y PHP). Un sistema operativo (Linux), un servidor de aplicaciones web (Apache), una base de datos (MySQL) y un lenguaje de scripting (PHP). Instalación entorno LAMP sudo apt install apache2 Una vez terminada la instalación, tendrá que ajustar la configuración de su cortafuegos para permitir el tráfico HTTP. UFW tiene diferentes perfiles de aplicación que puedes aprovechar para conseguirlo. Para listar todos los perfiles de aplicación de UFW disponibles actualmente, puede ejecutar: sudo ufw app list Verás un resultado como este: Available applications: Apache Apache Full Apache Secure OpenSSH Por ahora, es mejor permitir sólo las conexiones en el puerto 80, ya que se trata de una instalación fresca de Apache y todavía no tiene un certificado TLS/SSL configurado para permitir el tráfico HTTPS en su servidor. sudo ufw allow in "OpenSSH" Activamos el Firewall para activar la seguridad de nuestro servidor y evitar así que haya peticiones a otros puertos que no sean los que el firewall tenga permitidos, en este caso hemos habilitado la comunicación por el puerto 22, que es el destinado a la conexión ssh. Permite tambien la conexión por el puerto 80, que es el que usa el servidor web apache en comunicaciones http. sudo ufw allow in "Apache" Comprobamos como progresa la configuración de nuestro firewall. sudo ufw status Y tendrás una respuesta similar a esta. Status: active To Action From -- ------ ---- OpenSSH ALLOW Anywhere Apache ALLOW Anywhere OpenSSH (v6) ALLOW Anywhere (v6) Apache (v6) ALLOW Anywhere (v6) Puedes hacer una comprobación puntual de inmediato para verificar que todo ha ido según lo previsto visitando la dirección IP pública de tu servidor en tu navegador web. http://direccion_ip_de_tu_servidor Instalando Mysql Ahora que tienes un servidor web en funcionamiento, necesitas instalar el sistema de base de datos para poder almacenar y gestionar los datos de tu sitio. MySQL es un popular sistema de gestión de bases de datos utilizado en entornos PHP. sudo apt install mysql-server Cuando te pida confirmación presiona "Y" y luego ENTER. Cuando la instalación haya finalizado, te recomiendo ejecutar un script de seguridad que viene preinstalado con MySQL. Este script eliminará algunas configuraciones inseguras por defecto y bloqueará el acceso a su sistema de base de datos. Inicia el script interactivo ejecutando: sudo mysql_secure_installation A la pregunta VALIDATE PASSWORD PLUGIN can be used to test passwords and improve security. It checks the strength of password and allows the users to set only those passwords which are secure enough. Would you like to setup VALIDATE PASSWORD plugin? Press y|Y for Yes, any other key for No: Respondemos que NO y ponemos una contraseña para el usuario *root de mysql Ante la pregunta: Remove anonymous users? (Press y|Y for Yes, any other key for No) : Responde Yes Ante la pregunta: Normally, root should only be allowed to connect from 'localhost'. This ensures that someone cannot guess at the root password from the network. Disallow root login remotely? (Press y|Y for Yes, any other key for No) : Responde Yes Ante la pregunta: By default, MySQL comes with a database named 'test' that anyone can access. This is also intended only for testing, and should be removed before moving into a production environment. Remove test database and access to it? (Press y|Y for Yes, any other key for No) : Responde Yes Ante la pregunta: Reloading the privilege tables will ensure that all changes made so far will take effect immediately. Reload privilege tables now? (Press y|Y for Yes, any other key for No) : Responde Yes Una vez instalado comprueba que puedes acceder a mysql sudo mysql -u root -p Y sal con el comando: exit; Instalar PHP Tienes Apache instalado para servir tu contenido y MySQL instalado para almacenar y gestionar tus datos. PHP es el componente de nuestra configuración que procesará el código para mostrar el contenido dinámico al usuario final. Además del paquete php, necesitarás php-mysql, un módulo PHP que permite a PHP comunicarse con bases de datos basadas en MySQL. También necesitará libapache2-mod-php para que Apache pueda manejar archivos PHP. Los paquetes principales de PHP se instalarán automáticamente como dependencias. Para instalar estos paquetes: sudo apt install php libapache2-mod-php php-mysql Una vez terminada la instalación, puede ejecutar el siguiente comando para confirmar su versión de PHP: php -v La respuesta debería ser algo similar a esto: Output PHP 7.4.3 (cli) (built: Jul 5 2021 15:13:35) ( NTS ) Copyright (c) The PHP Group Zend Engine v3.4.0, Copyright (c) Zend Technologies with Zend OPcache v7.4.3, Copyright (c), by Zend Technologies En este punto, tu pila LAMP está completamente operativa, pero antes de que puedas probar tu configuración con un script PHP, es mejor que configures un "host virtual" en Apache adecuado para mantener los archivos y carpetas de tu sitio web. Lo haremos en el siguiente paso. Creación de un alojamiento virtual para su sitio web Crea una carpeta llamada "laboratorio" dentro del directorio que Apache ha creado como directorio raíz para las aplicaciones web: sudo mkdir /var/www/html/laboratorio A continuación, abra un nuevo archivo de configuración en el directorio sites-available de Apache utilizando su editor de línea de comandos preferido. En este caso, usaremos el editor de texto 'nano'. Sustituye el nombre de laboratorio.charliealonso.com por tu propio dominio o subdominio. sudo nano /etc/apache2/sites-available/laboratorio.charliealonso.com.conf Copia este texto dentro del fichero que acabas de crear: ServerName laboratorio.charliealonso.com ServerAlias laboratorio.charliealonso.com ServerAdmin webmaster@localhost DocumentRoot /var/www/html/laboratorio laboratorio/> AllowOverride All ErrorLog ${APACHE_LOG_DIR}/laboratorio_error.log CustomLog ${APACHE_LOG_DIR}/laboratorio_access.log combined Fíjate en la palabras en negrita y sustituye estas palabras por tu propio dominio, nombre de la carpeta que hayas creado para tu y el nombre de los ficheros log para tenerlos identificados en caso de que en un mismo servidor quieras instalar varios sitios web. Habilita el host virtual en apache sudo a2ensite base.charliealonso.com Prueba la configuración de Apache antes de recargar el servicio sudo apache2ctl configtest Recarga la configuración de Apache sudo systemctl reload apache2 Instalar Certificados SSL Vamos a instalar certificado Let's Encrypt, que es un servicio de certificación SSL de software libre, que certifica mas de 260 millones de web actualmente y que se puede actualizar de forma automática usando el programador de tareas de Linux. Si no tienes un nombre de dominio para tu web y vas a probar tu instalación con la dirección IP, no instales los certificados. Para instalar los certificados ejecuta el siguiente comando: sudo apt install certbot Ahora instala el plugin de Apache para el certbot que instalar los certificados sudo apt install python3-certbot-apache Ejecuta el comando para solicitar el certificado sudo certbot --apache Esta secuencia de comandos te solicitará que responda a una serie de preguntas para configurar tu certificado SSL. Primero, te solicitará una dirección de correo electrónico válida. Esta dirección se utilizará para las notificaciones de renovación y los avisos de seguridad: Saving debug log to /var/log/letsencrypt/letsencrypt.log Plugins selected: Authenticator apache, Installer apache Enter email address (used for urgent renewal and security notices) (Enter 'c' to cancel): tu@correo_valido Después de proporcionar una dirección de correo electrónico válida, presiona ENTER para continuar con el siguiente paso. Luego, te solicitará que confirmes si aceptas las condiciones de servicio de Let’s Encrypt. Puede confirmar pulsando A y, luego, ENTER: - - - - - - - - - - - - - - - - - - - - - - - - - - - - - - - - - - - - - - Please read the Terms of Service at https://letsencrypt.org/documents/LE-SA-v1.2-November-15-2017.pdf. You must agree in order to register with the ACME server at https://acme-v02.api.letsencrypt.org/directory - - - - - - - - - - - - - - - - - - - - - - - - - - - - - - - - - - - - - - (A)gree/(C)ancel: A A continuación, te solicitará que confirmes si deseas compartir tu dirección de correo electrónico con Electronic Frontier Foundation para recibir noticias y otra información. Si no deseas suscribirte a su contenido, escribe 'N'. De lo contrario, escribe 'Y'. Luego, presiona ENTER para continuar con el siguiente paso. - - - - - - - - - - - - - - - - - - - - - - - - - - - - - - - - - - - - - - Would you be willing to share your email address with the Electronic Frontier Foundation, a founding partner of the Let's Encrypt project and the non-profit organization that develops Certbot? We'd like to send you email about our work encrypting the web, EFF news, campaigns, and ways to support digital freedom. - - - - - - - - - - - - - - - - - - - - - - - - - - - - - - - - - - - - - - (Y)es/(N)o: N En el siguiente paso te mostrará una lista con los dominios que haya configurados en este servidor y debes seleccionar el dominio que quieras certificar, pulsando el numero del dominio y ENTER, en el caso de querer certificar varios dominios, escribe sus números separados por comas. Which names would you like to activate HTTPS for? - - - - - - - - - - - - - - - - - - - - - - - - - - - - - - - - - - - - - - - - 1: laboratorio.charliealonso.com 2: dominio.com 3: www.dominio.com - - - - - - - - - - - - - - - - - - - - - - - - - - - - - - - - - - - - - - - - Select the appropriate numbers separated by commas and/or spaces, or leave input blank to select all options shown (Enter 'c' to cancel): Verás un resultado como este: Obtaining a new certificate Performing the following challenges: http-01 challenge for your_domain http-01 challenge for www.your_domain Enabled Apache rewrite module Waiting for verification... Cleaning up challenges Created an SSL vhost at /etc/apache2/sites-available/your_domain-le-ssl.conf Enabled Apache socache_shmcb module Enabled Apache ssl module Deploying Certificate to VirtualHost /etc/apache2/sites-available/your_domain-le-ssl.conf Enabling available site: /etc/apache2/sites-available/your_domain-le-ssl.conf Deploying Certificate to VirtualHost /etc/apache2/sites-available/your_domain-le-ssl.conf A continuación, te solicitará que selecciones si deseas que el tráfico de HTTP se redirija a HTTPS o no. En la práctica, esto significa que cuando alguien visite tu sitio web a través de canales no cifrados (HTTP), lo redirigirá automáticamente a la dirección HTTPS de su sitio web. Selecciona la opción 2 para habilitar el redireccionamiento o 1 si deseas mantener HTTP y HTTPS como métodos de acceso al sitio web separados. Please choose whether or not to redirect HTTP traffic to HTTPS, removing HTTP access. - - - - - - - - - - - - - - - - - - - - - - - - - - - - - - - - - - - - - - - - 1: No redirect - Make no further changes to the webserver configuration. 2: Redirect - Make all requests redirect to secure HTTPS access. Choose this for new sites, or if you're confident your site works on HTTPS. You can undo this change by editing your web server's configuration. - - - - - - - - - - - - - - - - - - - - - - - - - - - - - - - - - - - - - - - - Select the appropriate number then (press 'c' to cancel): 2 Con este paso, se completa la configuración de Certbot y se te presentarán los comentarios finales sobre tu certificado nuevo e información sobre dónde localizar los archivos generados y cómo probar tu configuración utilizando una herramienta externa que analiza la autenticidad del certificado: - - - - - - - - - - - - - - - - - - - - - - - - - - - - - - - - - - - - - - - - Congratulations! You have successfully enabled https://your_domain and https://www.your_domain You should test your configuration at: https://www.ssllabs.com/ssltest/analyze.html?d=your_domain https://www.ssllabs.com/ssltest/analyze.html?d=www.your_domain - - - - - - - - - - - - - - - - - - - - - - - - - - - - - - - - - - - - - - - - IMPORTANT NOTES: - Congratulations! Your certificate and chain have been saved at: /etc/letsencrypt/live/your_domain/fullchain.pem Your key file has been saved at: /etc/letsencrypt/live/your_domain/privkey.pem Your cert will expire on 2020-07-27. To obtain a new or tweaked version of this certificate in the future, simply run certbot again with the "certonly" option. To non-interactively renew *all* of your certificates, run "certbot renew" - Your account credentials have been saved in your Certbot configuration directory at /etc/letsencrypt. You should make a secure backup of this folder now. This configuration directory will also contain certificates and private keys obtained by Certbot so making regular backups of this folder is ideal. - If you like Certbot, please consider supporting our work by: Donating to ISRG / Let's Encrypt: https://letsencrypt.org/donate Donating to EFF: https://eff.org/donate-le Verificar la renovación automática de Certbot Los certificados de Let’s Encrypt son válidos únicamente por noventa días. Este período de validez se utiliza para alentar a los usuarios a automatizar su proceso de renovación de certificados, así como para garantizar que los certificados mal utilizados o las claves robadas expiren lo antes posible. El paquete certbot que instalamos se encarga de las renovaciones al incluir una secuencia de comandos en /etc/cron.d, que gestiona un servicio systemctl denominado certbot.timer. Esta secuencia de comandos se ejecuta dos veces al día y renovará de forma automática cualquier certificado que caduque en treinta o menos días. Para verificar el estado de este servicio y asegurarse de que esté activo y en ejecución, puede utilizar lo siguiente: sudo systemctl status certbot.timer Verás un resultado similar a este: certbot.timer - Run certbot twice daily Loaded: loaded (/lib/systemd/system/certbot.timer; enabled; vendor preset: enabled) Active: active (waiting) since Tue 2020-04-28 17:57:48 UTC; 17h ago Trigger: Wed 2020-04-29 23:50:31 UTC; 12h left Triggers: ● certbot.service Apr 28 17:57:48 fine-turtle systemd: Started Run certbot twice daily. Para probar el proceso de renovación, puede hacer un simulacro con certbot: sudo certbot renew --dry-run Instalar Wordpress Creación de una base de datos de MySQL y un usuario para WordPress El primer paso que daremos es preparatorio. WordPress utiliza MySQL para administrar y almacenar el sitio y la información del usuario. Ya instalamos MySQL, pero debemos crear una base de datos y un usuario para que use WordPress. Para comenzar, inicie sesión en la cuenta root (administrado) de MySQL emitiendo este comando (tenga en cuenta que este no es el usuario root de su servidor): mysql -u root -p En la base de datos, crea una base de datos exclusiva para WordPress. Puedes ponerle el nombre que quieras, pero usaremos el nombre WordPress en esta guía. Cree la base de datos para WordPress escribiendo los siguientes comandos uno a uno en la consola de comandos de MySQL. CREATE DATABASE wordpress DEFAULT CHARACTER SET utf8 COLLATE utf8_unicode_ci; CREATE USER 'wordpressuser'@'%' IDENTIFIED WITH mysql_native_password BY 'password'; GRANT ALL ON wordpress.* TO 'wordpressuser'@'%'; FLUSH PRIVILEGES; EXIT; Instalación de extensiones de PHP adicionales Actualiza el sistema sudo apt update instala los módulos requeridos sudo apt install php-curl php-gd php-mbstring php-xml php-xmlrpc php-soap php-intl php-zip Reinicia el servicio apache para activar los módulos que acabas de instalar sudo systemctl restart apache2 Descarga Wordpress Sitúate en el directorio temporal del servidor cd /tmp descarga el código fuente curl -O https://wordpress.org/latest.tar.gz descomprimelo tar xzvf latest.tar.gz crea el archivo .htaccess touch /tmp/wordpress/.htaccess copia la plantilla de configuración al fichero config.php cp /tmp/wordpress/wp-config-sample.php /tmp/wordpress/wp-config.php crea el directorio para actualizaciones de WordPress mkdir /tmp/wordpress/wp-content/upgrade copia la aplicación WordPress a la carpeta web para el proyecto sudo cp -a /tmp/wordpress/. /var/www/html/laboratorio cambia los permisos de la carpeta web sudo chown -R www-data:www-data /var/www/html/base sudo find /var/www/html/base/ -type d -exec chmod 750 {} ; sudo find /var/www/html/base/ -type f -exec chmod 640 {} ; consigue los código para securizar tu instalación curl -s https://api.wordpress.org/secret-key/1.1/salt/ Read the full article
0 notes
Text
Free Download BrowseEmAll 9.6.3.0 With Crack | SadeemPC
Free Download BrowseEmAll 9.6.3.0 With Crack | SadeemPC
BrowseEmAll Crack On-Premises, Fast & Secure Cross Browser Testing – Live Testing, Screenshots and Code Analytics On Your Local Machine. Test without worrying about firewalls and data security. With BrowseEmAll everything runs on your machine. This makes testing normal websites, staging environments and localhost possible out of the box. And your data stays secure and never leaves your…

View On WordPress
0 notes
Text
WampServer - test environment for WordPress
I recently updated my WordPress blog to the latest version - with very little pressure. One of the main reasons for this is the preparation and testing I do on my local computer test bed. This article describes how I installed a test environment and WordPress on my local machine.
I have previously installed Apache, mySQL and PHP on my local machine. My initial installation was via open source and individual packages: I installed each of these components separately. However, there is a better and faster way for those who want to install their own test environment on WordPress - WampServer.
wordpress developer australia
The current components of this easy-to-install integrated package are as follows:
I decided to test the latest version, WampServer 2, on my local machine and test the easy WordPress installation once WampServer was up and running. I'll give you an idea of how much I like WampServer after my testing - it's great.
I won't go into more detail about the installation because the installer is bulletproof: Except for the ability to create desktop icons and get started quickly, I've adopted all the default settings for an easy install.
When the installation is complete, the installer will place a new icon in the system tray. If the icon isn't there after system startup, clicking the quick launch icon or the desktop will put it there. If you click the left button of the icon, the WampServer menu will be displayed.
The first menu item is a toggle to switch the server online or offline. I keep this mode offline (default) because I only want to access WampServer from my local machine.
At this point, clicking on the "Localhost" menu item opens the first and very useful WampServer HTML page.
My next step is to set a password for the MySQL server. Otherwise, the server represents a security risk. If you click on the phpMyAdmin menu item, phpMyAdmin will be displayed. Initially there were two informational messages at the bottom of the page. A message warns that a password has not been set. MySQL messages from other versions of PHP libraries can be safely ignored.
On the phpMyAdmin screen, I selected the Privileges tab, clicked the Edit Privileges icon for "root", entered the password, and clicked the Go button. This sets the master user password. Another step should be taken to remove the annoying looking error message.
0 notes
Text
Apache Tomcat 403

Apache Tomcat 403 Forbidden
Apache Tomcat Http Status 403
Apache Tomcat 9 403 Access Denied
It was really very helpful for me. I was using version 8.5.32 and worked fine.thnaks. What is Apache Tomcat? Answer: Apache Tomcat is basically a Web Server and Servlet system. Because of the bug CVE-2020-1938 we want to use the latest Tomcat 7.0.100. See also CVE-2020-1938 We also use an Apache server in version 2.4, which connects to the Tomcat via AJP.
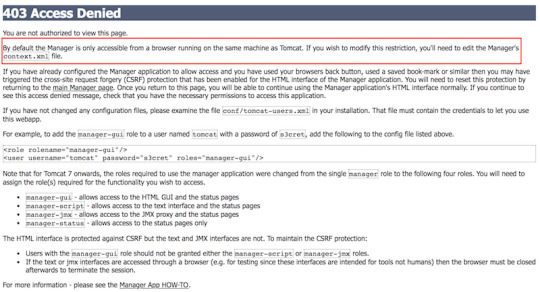
After you installed the Apache Tomcat server and successfully launched the <host>:8080 web page, you click on the Manager App button, and you get a 403 Access Denied message.
The Apache Tomcat Project is proud to announce the release of version 7.0.109 of Apache Tomcat. This release implements specifications that are part of the Java EE 6 platform. This release contains a number of bug fixes and improvements compared to version 7.0.108.
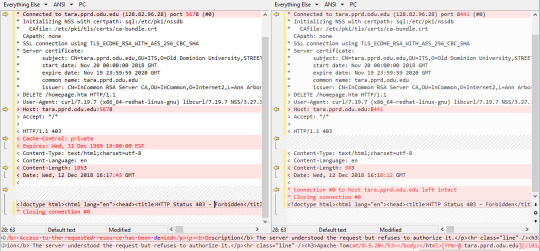
Hi, we have a strange symptom after an upgrade from Tomcat 8 to Tomcat 9, because we get a 403 for a call that works flawlessly with the previous version. Let's describe the scenario: We have a customer with a Wordpress application hosted on an Apache server. Some pages perform XMLHttpRequests to load and embed HTML snippets from other sources.
To fix it 1. Open the $CATALINA_BASE/conf/tomcat-users.xml file and add the following to the <tomcat-users> section.
<user username='admin' password='goanywhere' roles='admin-gui,manager-gui' />
2. If you are accessing the Tomcat server from a remote computer, open or create the file: $CATALINA_BASE/conf/Catalina/localhost/manager.xml, and add the below to the file.
<Context privileged='true' antiResourceLocking='false'
<Valve className='org.apache.catalina.valves.RemoteAddrValve' allow='^.*$' />
3. Restart the tomcat server: sudo systemctl restart tomcat.service
----------------------------------------------------------------------------------------------------------------- Watch the blessing and loving online channel: SupremeMasterTV live
If you have ever asked yourself these questions, this is the book for you. What is the meaning of life? Why do people suffer? What is in control of my life? Why is life the way it is? How can I stop suffering and be happy? How can I have a successful life? How can I have a life I like to have? How can I be the person I like to be? How can I be wiser and smarter? How can I have good and harmonious relations with others? Why do people meditate to achieve enlightenment? What is the true meaning of spiritual practice? Why all beings are one? Read the book for free here.
The AJP Connector
Table of Contents
Attributes
Special Features
Introduction
The AJP Connector element represents a Connector component that communicates with a web connector via the AJP protocol. This is used for cases where you wish to invisibly integrate Tomcat into an existing (or new) Apache installation, and you want Apache to handle the static content contained in the web application, and/or utilize Apache's SSL processing.
Use of the AJP protocol requires additional security considerations because it allows greater direct manipulation of Tomcat's internal data structures than the HTTP connectors. Particular attention should be paid to the values used for the address, secret, secretRequired and allowedRequestAttributesPattern attributes.
This connector supports load balancing when used in conjunction with the jvmRoute attribute of the Engine.
The native connectors supported with this Tomcat release are:
JK 1.2.x with any of the supported servers. See the JK docs for details.
mod_proxy on Apache httpd 2.x (included by default in Apache HTTP Server 2.2), with AJP enabled: see the httpd docs for details.
Other native connectors supporting AJP may work, but are no longer supported.
Attributes
Common Attributes
Apache Tomcat 403 Forbidden
All implementations of Connector support the following attributes:
Attribute Description ajpFlush
A boolean value which can be used to enable or disable sending AJP flush messages to the fronting proxy whenever an explicit flush happens. The default value is true. An AJP flush message is a SEND_BODY_CHUNK packet with no body content. Proxy implementations like mod_jk or mod_proxy_ajp will flush the data buffered in the web server to the client when they receive such a packet. Setting this to false can reduce AJP packet traffic but might delay sending packets to the client. At the end of the response, AJP does always flush to the client.
allowTrace
A boolean value which can be used to enable or disable the TRACE HTTP method. If not specified, this attribute is set to false.
asyncTimeout
The default timeout for asynchronous requests in milliseconds. If not specified, this attribute is set to the Servlet specification default of 30000 (30 seconds).
enableLookups
Set to true if you want calls to request.getRemoteHost() to perform DNS lookups in order to return the actual host name of the remote client. Set to false to skip the DNS lookup and return the IP address in String form instead (thereby improving performance). By default, DNS lookups are disabled.
encodedSolidusHandling
When set to reject request paths containing a %2f sequence will be rejected with a 400 response. When set to decode request paths containing a %2f sequence will have that sequence decoded to / at the same time other %nn sequences are decoded. When set to passthrough request paths containing a %2f sequence will be processed with the %2f sequence unchanged. If not specified the default value is reject. This default may be modified if the deprecated system propertyorg.apache.tomcat.util.buf.UDecoder.ALLOW_ENCODED_SLASH is set.
maxHeaderCount
The maximum number of headers in a request that are allowed by the container. A request that contains more headers than the specified limit will be rejected. A value of less than 0 means no limit. If not specified, a default of 100 is used.
maxParameterCount
The maximum number of parameter and value pairs (GET plus POST) which will be automatically parsed by the container. Parameter and value pairs beyond this limit will be ignored. A value of less than 0 means no limit. If not specified, a default of 10000 is used. Note that FailedRequestFilterfilter can be used to reject requests that hit the limit.
maxPostSize
The maximum size in bytes of the POST which will be handled by the container FORM URL parameter parsing. The limit can be disabled by setting this attribute to a value less than zero. If not specified, this attribute is set to 2097152 (2 megabytes). Note that the FailedRequestFilter can be used to reject requests that exceed this limit.
maxSavePostSize
The maximum size in bytes of the POST which will be saved/buffered by the container during FORM or CLIENT-CERT authentication. For both types of authentication, the POST will be saved/buffered before the user is authenticated. For CLIENT-CERT authentication, the POST is buffered for the duration of the SSL handshake and the buffer emptied when the request is processed. For FORM authentication the POST is saved whilst the user is re-directed to the login form and is retained until the user successfully authenticates or the session associated with the authentication request expires. The limit can be disabled by setting this attribute to -1. Setting the attribute to zero will disable the saving of POST data during authentication. If not specified, this attribute is set to 4096 (4 kilobytes).
parseBodyMethods
A comma-separated list of HTTP methods for which request bodies using application/x-www-form-urlencoded will be parsed for request parameters identically to POST. This is useful in RESTful applications that want to support POST-style semantics for PUT requests. Note that any setting other than POST causes Tomcat to behave in a way that goes against the intent of the servlet specification. The HTTP method TRACE is specifically forbidden here in accordance with the HTTP specification. The default is POST
port
The TCP port number on which this Connector will create a server socket and await incoming connections. Your operating system will allow only one server application to listen to a particular port number on a particular IP address. If the special value of 0 (zero) is used, then Tomcat will select a free port at random to use for this connector. This is typically only useful in embedded and testing applications.
protocol
Sets the protocol to handle incoming traffic. To configure an AJP connector this must be specified. If no value for protocol is provided, an HTTP connector rather than an AJP connector will be configured. The standard protocol value for an AJP connector is AJP/1.3 which uses an auto-switching mechanism to select either a Java NIO based connector or an APR/native based connector. If the PATH (Windows) or LD_LIBRARY_PATH (on most unix systems) environment variables contain the Tomcat native library, the native/APR connector will be used. If the native library cannot be found, the Java NIO based connector will be used. To use an explicit protocol rather than rely on the auto-switching mechanism described above, the following values may be used: org.apache.coyote.ajp.AjpNioProtocol - non blocking Java NIO connector. org.apache.coyote.ajp.AjpNio2Protocol - non blocking Java NIO2 connector. org.apache.coyote.ajp.AjpAprProtocol - the APR/native connector. Custom implementations may also be used. Take a look at our Connector Comparison chart.
proxyName
If this Connector is being used in a proxy configuration, configure this attribute to specify the server name to be returned for calls to request.getServerName(). See Proxy Support for more information.
proxyPort
If this Connector is being used in a proxy configuration, configure this attribute to specify the server port to be returned for calls to request.getServerPort(). See Proxy Support for more information.
redirectPort
If this Connector is supporting non-SSL requests, and a request is received for which a matching <security-constraint> requires SSL transport, Catalina will automatically redirect the request to the port number specified here.
scheme
Set this attribute to the name of the protocol you wish to have returned by calls to request.getScheme(). For example, you would set this attribute to 'https' for an SSL Connector. The default value is 'http'.
secure
Set this attribute to true if you wish to have calls to request.isSecure() to return true for requests received by this Connector. You would want this on an SSL Connector or a non SSL connector that is receiving data from a SSL accelerator, like a crypto card, an SSL appliance or even a webserver. The default value is false.
sendReasonPhrase
Set this attribute to true if you wish to have a reason phrase in the response. The default value is false.
Note: This option is deprecated and will be removed in Tomcat 9. The reason phrase will not be sent.
URIEncoding
This specifies the character encoding used to decode the URI bytes, after %xx decoding the URL. If not specified, UTF-8 will be used unless the org.apache.catalina.STRICT_SERVLET_COMPLIANCEsystem property is set to true in which case ISO-8859-1 will be used.
useBodyEncodingForURI
This specifies if the encoding specified in contentType should be used for URI query parameters, instead of using the URIEncoding. This setting is present for compatibility with Tomcat 4.1.x, where the encoding specified in the contentType, or explicitly set using Request.setCharacterEncoding method was also used for the parameters from the URL. The default value is false.
Notes: See notes on this attribute in HTTP Connector documentation.
useIPVHosts
Set this attribute to true to cause Tomcat to use the IP address passed by the native web server to determine the Host to send the request to. The default value is false.
xpoweredBy
Set this attribute to true to cause Tomcat to advertise support for the Servlet specification using the header recommended in the specification. The default value is false.
Standard Implementations
To use AJP, you must specify the protocol attribute (see above).
The standard AJP connectors (NIO, NIO2 and APR/native) all support the following attributes in addition to the common Connector attributes listed above.
Attribute Description acceptCount
The maximum queue length for incoming connection requests when all possible request processing threads are in use. Any requests received when the queue is full will be refused. The default value is 100.
acceptorThreadCount
The number of threads to be used to accept connections. Increase this value on a multi CPU machine, although you would never really need more than 2. Also, with a lot of non keep alive connections, you might want to increase this value as well. Default value is 1.
acceptorThreadPriority
The priority of the acceptor threads. The threads used to accept new connections. The default value is 5 (the value of the java.lang.Thread.NORM_PRIORITY constant). See the JavaDoc for the java.lang.Thread class for more details on what this priority means.
address
For servers with more than one IP address, this attribute specifies which address will be used for listening on the specified port. By default, the connector will listen on the loopback address. Unless the JVM is configured otherwise using system properties, the Java based connectors (NIO, NIO2) will listen on both IPv4 and IPv6 addresses when configured with either 0.0.0.0 or ::. The APR/native connector will only listen on IPv4 addresses if configured with 0.0.0.0 and will listen on IPv6 addresses (and optionally IPv4 addresses depending on the setting of ipv6v6only) if configured with ::.
allowedRequestAttributesPattern
The AJP protocol passes some information from the reverse proxy to the AJP connector using request attributes. These attributes are:
javax.servlet.request.cipher_suite
javax.servlet.request.key_size
javax.servlet.request.ssl_session
javax.servlet.request.X509Certificate
AJP_LOCAL_ADDR
AJP_REMOTE_PORT
AJP_SSL_PROTOCOL
JK_LB_ACTIVATION
CERT_ISSUER (IIS only)
CERT_SUBJECT (IIS only)
CERT_COOKIE (IIS only)
HTTPS_SERVER_SUBJECT (IIS only)
CERT_FLAGS (IIS only)
HTTPS_SECRETKEYSIZE (IIS only)
CERT_SERIALNUMBER (IIS only)
HTTPS_SERVER_ISSUER (IIS only)
HTTPS_KEYSIZE (IIS only)
The AJP protocol supports the passing of arbitrary request attributes. Requests containing arbitrary request attributes will be rejected with a 403 response unless the entire attribute name matches this regular expression. If not specified, the default value is null.
bindOnInit
Controls when the socket used by the connector is bound. By default it is bound when the connector is initiated and unbound when the connector is destroyed. If set to false, the socket will be bound when the connector is started and unbound when it is stopped.
clientCertProvider
When client certificate information is presented in a form other than instances of java.security.cert.X509Certificate it needs to be converted before it can be used and this property controls which JSSE provider is used to perform the conversion. For example it is used with the AJP connectors, the HTTP APR connector and with the org.apache.catalina.valves.SSLValve.If not specified, the default provider will be used.
connectionLinger
The number of seconds during which the sockets used by this Connector will linger when they are closed. The default value is -1 which disables socket linger.
connectionTimeout
The number of milliseconds this Connector will wait, after accepting a connection, for the request URI line to be presented. The default value for AJP protocol connectors is -1 (i.e. infinite).
executor
A reference to the name in an Executor element. If this attribute is set, and the named executor exists, the connector will use the executor, and all the other thread attributes will be ignored. Note that if a shared executor is not specified for a connector then the connector will use a private, internal executor to provide the thread pool.
executorTerminationTimeoutMillis
The time that the private internal executor will wait for request processing threads to terminate before continuing with the process of stopping the connector. If not set, the default is 5000 (5 seconds).
keepAliveTimeout
The number of milliseconds this Connector will wait for another AJP request before closing the connection. The default value is to use the value that has been set for the connectionTimeout attribute.
maxConnections
The maximum number of connections that the server will accept and process at any given time. When this number has been reached, the server will accept, but not process, one further connection. This additional connection be blocked until the number of connections being processed falls below maxConnections at which point the server will start accepting and processing new connections again. Note that once the limit has been reached, the operating system may still accept connections based on the acceptCount setting. The default value varies by connector type. For NIO and NIO2 the default is 10000. For APR/native, the default is 8192.
For NIO/NIO2 only, setting the value to -1, will disable the maxConnections feature and connections will not be counted.
maxCookieCount
The maximum number of cookies that are permitted for a request. A value of less than zero means no limit. If not specified, a default value of 200 will be used.
maxThreads
The maximum number of request processing threads to be created by this Connector, which therefore determines the maximum number of simultaneous requests that can be handled. If not specified, this attribute is set to 200. If an executor is associated with this connector, this attribute is ignored as the connector will execute tasks using the executor rather than an internal thread pool. Note that if an executor is configured any value set for this attribute will be recorded correctly but it will be reported (e.g. via JMX) as -1 to make clear that it is not used.
minSpareThreads
The minimum number of threads always kept running. This includes both active and idle threads. If not specified, the default of 10 is used. If an executor is associated with this connector, this attribute is ignored as the connector will execute tasks using the executor rather than an internal thread pool. Note that if an executor is configured any value set for this attribute will be recorded correctly but it will be reported (e.g. via JMX) as -1 to make clear that it is not used.
packetSize
This attribute sets the maximum AJP packet size in Bytes. The maximum value is 65536. It should be the same as the max_packet_size directive configured for mod_jk. Normally it is not necessary to change the maximum packet size. Problems with the default value have been reported when sending certificates or certificate chains. The default value is 8192. If set to less than 8192 then the setting will ignored and the default value of 8192 used.
processorCache
The protocol handler caches Processor objects to speed up performance. This setting dictates how many of these objects get cached. -1 means unlimited, default is 200. If not using Servlet 3.0 asynchronous processing, a good default is to use the same as the maxThreads setting. If using Servlet 3.0 asynchronous processing, a good default is to use the larger of maxThreads and the maximum number of expected concurrent requests (synchronous and asynchronous).
secret
Only requests from workers with this secret keyword will be accepted. The default value is null. This attribute must be specified with a non-null, non-zero length value unless secretRequired is explicitly configured to be false. If this attribute is configured with a non-null, non-zero length value then the workers must provide a matching value else the request will be rejected irrespective of the setting of secretRequired.
secretRequired
If this attribute is true, the AJP Connector will only start if the secret attribute is configured with a non-null, non-zero length value. This attribute only controls whether the secret attribute is required to be specified for the AJP Connector to start. It does not control whether workers are required to provide the secret. The default value is true. This attribute should only be set to false when the Connector is used on a trusted network.
tcpNoDelay
If set to true, the TCP_NO_DELAY option will be set on the server socket, which improves performance under most circumstances. This is set to true by default.
threadPriority
The priority of the request processing threads within the JVM. The default value is 5 (the value of the java.lang.Thread.NORM_PRIORITY constant). See the JavaDoc for the java.lang.Thread class for more details on what this priority means.If an executor is associated with this connector, this attribute is ignored as the connector will execute tasks using the executor rather than an internal thread pool. Note that if an executor is configured any value set for this attribute will be recorded correctly but it will be reported (e.g. via JMX) as -1 to make clear that it is not used.
tomcatAuthentication
If set to true, the authentication will be done in Tomcat. Otherwise, the authenticated principal will be propagated from the native webserver and used for authorization in Tomcat.
The web server must send the user principal (username) as a request attribute named REMOTE_USER.
Note that this principal will have no roles associated with it.
The default value is true. If tomcatAuthorization is set to true this attribute has no effect.
tomcatAuthorization
If set to true, the authenticated principal will be propagated from the native webserver and considered already authenticated in Tomcat. If the web application has one or more security constraints, authorization will then be performed by Tomcat and roles assigned to the authenticated principal. If the appropriate Tomcat Realm for the request does not recognise the provided user name, a Principal will be still be created but it will have no roles. The default value is false.
Java TCP socket attributes
The NIO and NIO2 implementation support the following Java TCP socket attributes in addition to the common Connector and HTTP attributes listed above.
Attribute Description socket.rxBufSize
(int)The socket receive buffer (SO_RCVBUF) size in bytes. JVM default used if not set.
socket.txBufSize
(int)The socket send buffer (SO_SNDBUF) size in bytes. JVM default used if not set. Care should be taken if explicitly setting this value. Very poor performance has been observed on some JVMs with values less than ~8k.
socket.tcpNoDelay
(bool)This is equivalent to standard attribute tcpNoDelay.
socket.soKeepAlive
(bool)Boolean value for the socket's keep alive setting (SO_KEEPALIVE). JVM default used if not set.
socket.ooBInline
(bool)Boolean value for the socket OOBINLINE setting. JVM default used if not set.
socket.soReuseAddress
(bool)Boolean value for the sockets reuse address option (SO_REUSEADDR). JVM default used if not set.
socket.soLingerOn
(bool)Boolean value for the sockets so linger option (SO_LINGER). A value for the standard attribute connectionLinger that is >=0 is equivalent to setting this to true. A value for the standard attribute connectionLinger that is <0 is equivalent to setting this to false. Both this attribute and soLingerTime must be set else the JVM defaults will be used for both.
socket.soLingerTime
(int)Value in seconds for the sockets so linger option (SO_LINGER). This is equivalent to standard attribute connectionLinger. Both this attribute and soLingerOn must be set else the JVM defaults will be used for both.
socket.soTimeout
This is equivalent to standard attribute connectionTimeout.
socket.performanceConnectionTime
(int)The first value for the performance settings. See Socket Performance Options All three performance attributes must be set else the JVM defaults will be used for all three.
socket.performanceLatency
(int)The second value for the performance settings. See Socket Performance Options All three performance attributes must be set else the JVM defaults will be used for all three.
socket.performanceBandwidth
(int)The third value for the performance settings. See Socket Performance Options All three performance attributes must be set else the JVM defaults will be used for all three.
socket.unlockTimeout
(int) The timeout for a socket unlock. When a connector is stopped, it will try to release the acceptor thread by opening a connector to itself. The default value is 250 and the value is in milliseconds
NIO specific configuration
The following attributes are specific to the NIO connector.
Attribute Description socket.directBuffer
(bool)Boolean value, whether to use direct ByteBuffers or java mapped ByteBuffers. Default is false. When you are using direct buffers, make sure you allocate the appropriate amount of memory for the direct memory space. On Sun's JDK that would be something like -XX:MaxDirectMemorySize=256m.
socket.appReadBufSize
(int)Each connection that is opened up in Tomcat get associated with a read ByteBuffer. This attribute controls the size of this buffer. By default this read buffer is sized at 8192 bytes. For lower concurrency, you can increase this to buffer more data. For an extreme amount of keep alive connections, decrease this number or increase your heap size.
socket.appWriteBufSize
(int)Each connection that is opened up in Tomcat get associated with a write ByteBuffer. This attribute controls the size of this buffer. By default this write buffer is sized at 8192 bytes. For low concurrency you can increase this to buffer more response data. For an extreme amount of keep alive connections, decrease this number or increase your heap size. The default value here is pretty low, you should up it if you are not dealing with tens of thousands concurrent connections.
socket.bufferPool
(int)The NIO connector uses a class called NioChannel that holds elements linked to a socket. To reduce garbage collection, the NIO connector caches these channel objects. This value specifies the size of this cache. The default value is 500, and represents that the cache will hold 500 NioChannel objects. Other values are -1 for unlimited cache and 0 for no cache.
socket.bufferPoolSize
(int)The NioChannel pool can also be size based, not used object based. The size is calculated as follows: NioChannel buffer size = read buffer size + write buffer size SecureNioChannel buffer size = application read buffer size + application write buffer size + network read buffer size + network write buffer size The value is in bytes, the default value is 1024*1024*100 (100MB).
socket.processorCache
(int)Tomcat will cache SocketProcessor objects to reduce garbage collection. The integer value specifies how many objects to keep in the cache at most. The default is 500. Other values are -1 for unlimited cache and 0 Body outline drawing. for no cache.
socket.keyCache
(int)Tomcat will cache KeyAttachment objects to reduce garbage collection. The integer value specifies how many objects to keep in the cache at most. The default is 500. Other values are -1 for unlimited cache and 0 for no cache.
socket.eventCache
(int)Tomcat will cache PollerEvent objects to reduce garbage collection. The integer value specifies how many objects to keep in the cache at most. The default is 500. Other values are -1 for unlimited cache and 0 for no cache.
selectorPool.maxSelectors
(int)The max selectors to be used in the pool, to reduce selector contention. Use this option when the command line org.apache.tomcat.util.net.NioSelectorShared value is set to false. Default value is 200.
selectorPool.maxSpareSelectors
(int)The max spare selectors to be used in the pool, to reduce selector contention. When a selector is returned to the pool, the system can decide to keep it or let it be GC'd. Use this option when the command line org.apache.tomcat.util.net.NioSelectorShared value is set to false. Default value is -1 (unlimited).
command-line-options
The following command line options are available for the NIO connector: -Dorg.apache.tomcat.util.net.NioSelectorShared=true|false - default is true. Set this value to false if you wish to use a selector for each thread. When you set it to false, you can control the size of the pool of selectors by using the selectorPool.maxSelectors attribute.
NIO2 specific configuration
The following attributes are specific to the NIO2 connector.
Attribute Description useCaches
(bool)Use this attribute to enable or disable object caching to reduce the amount of GC objects produced. The default value is false.
socket.directBuffer
(bool)Boolean value, whether to use direct ByteBuffers or java mapped ByteBuffers. Default is false. When you are using direct buffers, make sure you allocate the appropriate amount of memory for the direct memory space. On Sun's JDK that would be something like -XX:MaxDirectMemorySize=256m.
socket.appReadBufSize
(int)Each connection that is opened up in Tomcat get associated with a read ByteBuffer. This attribute controls the size of this buffer. By default this read buffer is sized at 8192 bytes. For lower concurrency, you can increase this to buffer more data. For an extreme amount of keep alive connections, decrease this number or increase your heap size.
We are an experienced Drupal development company with decade-long proven track record offering best-in-class customization, module, migration and Drupal development services worldwide. Drupal web services. Drupal is a powerful CMS widely used to develop variety of web solutions; ranging from a single page website to complex eCommerce stores. There are large numbers of web development companies in tech world that claim to provide excellent Drupal development services.
socket.appWriteBufSize
(int)Each connection that is opened up in Tomcat get associated with a write ByteBuffer. This attribute controls the size of this buffer. By default this write buffer is sized at 8192 bytes. For low concurrency you can increase this to buffer more response data. For an extreme amount of keep alive connections, decrease this number or increase your heap size. The default value here is pretty low, you should up it if you are not dealing with tens of thousands concurrent connections.
socket.bufferPoolSize
(int)The NIO2 connector uses a class called Nio2Channel that holds elements linked to a socket. To reduce garbage collection, the NIO connector caches these channel objects. This value specifies the size of this cache. The default value is 500, and represents that the cache will hold 500 Nio2Channel objects. Other values are -1 for unlimited cache and 0 for no cache.
socket.processorCache
(int)Tomcat will cache SocketProcessor objects to reduce garbage collection. The integer value specifies how many objects to keep in the cache at most. The default is 500. Other values are -1 for unlimited cache and 0 for no cache.
APR/native specific configuration
The APR/native implementation supports the following attributes in addition to the common Connector and AJP attributes listed above.
Attribute Description ipv6v6only
If listening on an IPv6 address on a dual stack system, should the connector only listen on the IPv6 address? If not specified the default is false and the connector will listen on the IPv6 address and the equivalent IPv4 address if present.
pollTime
Duration of a poll call in microseconds. Lowering this value will slightly decrease latency of connections being kept alive in some cases , but will use more CPU as more poll calls are being made. The default value is 2000 (2ms).
Nested Components
Special Features
Proxy Support
The proxyName and proxyPort attributes can be used when Tomcat is run behind a proxy server. These attributes modify the values returned to web applications that call the request.getServerName() and request.getServerPort() methods, which are often used to construct absolute URLs for redirects. Without configuring these attributes, the values returned would reflect the server name and port on which the connection from the proxy server was received, rather than the server name and port to whom the client directed the original request.
For more information, see the Proxy Support How-To.
Connector Comparison
Apache Tomcat Http Status 403

Below is a small chart that shows how the connectors differ.
Apache Tomcat 9 403 Access Denied
Java Nio Connector NIOJava Nio2 Connector NIO2APR/native Connector APRClassnameAjpNioProtocolAjpNio2ProtocolAjpAprProtocolTomcat Version7.x onwards8.x onwards5.5.x onwardsSupport PollingYESYESYESPolling SizemaxConnectionsmaxConnectionsmaxConnectionsRead Request HeadersBlockingBlockingBlockingRead Request BodyBlockingBlockingBlockingWrite Response Headers and BodyBlockingBlockingBlockingWait for next RequestNon BlockingNon BlockingNon BlockingMax ConnectionsmaxConnectionsmaxConnectionsmaxConnections
0 notes
Text
Backing Up Your Localhost WordPress Site: Methods and Tools
Creating backups of your localhost WordPress site is an essential practice for safeguarding your work and ensuring you can recover from unexpected errors or data loss. Whether you are testing themes, developing plugins, or building a new website, a reliable backup process can save you time and stress. This blog outlines effective methods and tools to back up your localhost WordPress site.

Why Backup Your Localhost WordPress Site?
Prevent Data Loss
Unintentional file deletions, database errors, or hardware failures can result in losing hours of work.
Streamline Testing
Backups enable you to revert to a previous state if something breaks during theme or plugin testing.
Ease Migration
Backing up your localhost site simplifies the process of moving it to a live server or another environment.
Experiment Freely
Knowing you have a backup allows you to experiment with code or settings without fear of permanent damage.
Components to Back Up
A WordPress site consists of two primary components:
WordPress Files
These include core files, theme files, plugin files, and uploaded media stored in the wp-content folder.
Database
The database stores your website’s content, settings, and user data. It is usually managed through tools like phpMyAdmin or MySQL Workbench.
Methods for Backing Up Localhost WordPress Sites
1. Manual Backup
Steps:
Copy WordPress Files
Navigate to the directory where your WordPress installation resides (e.g., htdocs in XAMPP).
Copy all files and folders to a secure location, such as an external hard drive or cloud storage.
Export the Database
Access phpMyAdmin or your database management tool.
Select your WordPress database and click on the "Export" option.
Choose the "Quick" export method and save the .sql file.
Advantages:
Complete control over the backup process.
No additional tools required.
Disadvantages:
Time-consuming and prone to human error.
2. Using Plugins
Many WordPress backup plugins work seamlessly on localhost installations. Here are some popular choices:
UpdraftPlus
Schedule and automate backups for both files and databases.
Store backups locally or on cloud platforms like Google Drive, Dropbox, or OneDrive.
Duplicator
Create complete site backups, including files and databases.
Ideal for migrating your localhost site to a live server.
All-in-One WP Migration
Export your site’s files and database into a single file.
Easily import backups to restore your site.
Steps to Use a Plugin:
Install the chosen plugin on your localhost WordPress site.
Follow the plugin’s setup instructions to create and save backups.
Store the backups in a secure location.
Advantages:
Automated and user-friendly.
Additional features like scheduling and cloud integration.
Disadvantages:
Some advanced features may require a premium version.
3. Using Command Line Tools
If you are comfortable with the command line, tools like WP-CLI can streamline the backup process.
Steps:
Backup Files
Use commands to compress your WordPress directory into a zip file:zip -r backup.zip /path/to/wordpress
Backup Database
Export your database using WP-CLI:wp db export backup.sql
Advantages:
Fast and efficient for advanced users.
Scriptable for regular backups.
Disadvantages:
Requires familiarity with the command line.
4. Using Localhost Management Tools
Tools like Local by Flywheel and DevKinsta come with built-in backup options, making the process simpler.
Steps:
Locate the backup feature in your chosen tool.
Follow the instructions to create and store a backup.
Restore the backup if needed.
Advantages:
Integrated with the localhost environment.
Minimal setup required.
Disadvantages:
Limited to specific tools.
Best Practices for Backing Up Localhost WordPress Sites
Schedule Regular Backups
Set a schedule to ensure backups are created consistently.
Use Multiple Storage Locations
Keep backups in at least two locations, such as an external drive and cloud storage.
Test Your Backups
Regularly restore backups to verify their integrity and functionality.
Document Your Process
Maintain a clear record of your backup and restoration steps for future reference.
Secure Your Backups
Encrypt sensitive backups and limit access to authorized users.
Conclusion
Backing up your localhost WordPress site is a vital step in ensuring the safety and continuity of your work. Whether you choose manual methods, plugins, or advanced tools, the key is consistency and reliability. By implementing these best practices, you can safeguard your projects and work with confidence, knowing that you’re prepared for any challenges that come your way.
0 notes
Text
Top 8 Must-have Wordpress Migrate Site Plugin In 2020

Migrate Site Plugin plays an essential role in helping you move your website to a new one. Let read the article to research about the plugin.
As you know, when you have an intention to move your website, you have to find a useful plugin to help you clone all database, files and theme. And possessing a suitable migration plugin will make your site moving become easier and more convenient. Because of the reason, we decided to suggest for you Top 8 Must-have Wordpress Migrate Site Plugin In 2020. 1. Duplicator

Duplicator is the first plugin we want to recommend for you because of its flexibility. With this plugin, besides handling standard migrations, it also helps you clone your site to a new domain name, set up staging versions of your site, and back up your site to prevent data loss situation. Provides features: Move, migrate or clone a WordPress site between domains or hosts with zero downtime Transfer a WordPress site from one host to another Duplicate a live site to a staging area or vice versa Perform a full WordPress migration without struggling with messy import/export sql scripts Pull down a live site to localhost for development Highlights: Free Easy to use Flexible 2. SiteGround Migrator

Another nice plugin we would like introduce for you is SiteGround Migrator. The plugin allows you to move your website to SiteGround hosting server. Besides that, if you don’t want to use the plugin, then you can simply ask SiteGround support. They offer 1 free website migration with their GrowBig and GoGeek plans. Provides features: It works well because it is made for a specific scenario transferring from any hosting company to SiteGround If you are not changing the domain name, then it automatically creates a temporary domain for the transferred site. Later you can change the DNS to point your domain name Super-easy to use you just need to enter a token from your hosting control panel and the plugin takes care of the rest Highlights: Easy to use Free 3. UpdraftPlus

UpdraftPlus is also a powerful plugin that you should have. It is known as the world’s highest ranking and most popular scheduled backup plugin. All your files and database will be backuped into the cloud, and with a single click, you can restore all of them. Provides features: Restore, as well as backing up Allow you to set up automatic backup schedules, for the ultimate in convenience Has been tested on over 1 million sites Use up fewer server resources Highlights: Fast and convenient Free 4. WP Migrate DB Pro
WP Migrate DB Pro is the next plugin that we think you should try. With the plugin, you will feel that website migration is very easy, fast, and straightforward. By following three steps, everything has done well. Provides features: Priority email support Push and pull databases and media libraries from one environment to the other Advanced multisite features like pushing a subsite to single site install. Command-line support (Use WP-CLI with WP Migrate DB) Highlights: Simple and easy to use Good supports 5. VaultPress
The next suggested plugin that we think you shouldn’t miss is VaultPress. When you are using this wordpress migrate site plugin, you will feel surprised because it backs up and secures every part of your WordPress site. After that, it’s quite easy for you to copy your site to a new location with VaultPress’ Restore to a different site tool. Provides features: Make WordPress backups and restore them on a new location easily Incremental backups save server resources Includes site security features which makes your backups secure Highlights: Time-saving High security Useful 6. All-in-One WP Migration

If you are seeking a migation plugin that needn’t technical knowledge required, All-in-One WP Migration will be a suitable option for you. This plugin can move both your database and your files, which means it handles all aspects of migration. In addition, it also has extensions, so you can migrate your site to cloud storage providers like Dropbox or Google Drive. Provides features: Tested and supports a large number of wordpress hosting providers, operating systems, PHP versions, and more Supports older versions upto WordPress 3.3 bypasses your host’s file size limits by importing chunks of data Highlights: Mobile device compatible Good supports Free 7. Migrate Guru
If you want to possess a popular WordPress backup solution, don’t hestitate to download and install Migrate Guru. The plugin specializes in migrating websites to a new host or server. Moreover, you will feel quite simple because it can copy WordPress sites without any manual work, add-ons, or additional tools. Provides features: True one-click migration Build for large sites No overload on site Fully automatic, build-in search and replace Highlights: Compatible with every web host Simple and quick Free 8. Clone

The last plugin we want to bring for you is Clone. With the plugin, you can use it to backup, migrate or clone your site to/from local server hosting, to create backup of your site for development or testing purposes, and to install pre-configured backups of WordPress. Provides features: Backup, migrate or clone a WordPress site to another domain or hosting server Not require FTP access to backup files you migrate or clone Fetche the site backup via your host’s direct http connection Highlights: Easy and fast to use Useful Free Conclusion We hope that the list Top 8 Must-have Wordpress Migrate Site Plugin In 2020 will be an effective tool for you to move your site safely and quickly. If you have any question, don't hesitate to leave us your comment. Besides that, you can get more free WordPress themes for your new site! Read the full article
0 notes
Text
SETTING UP LOCALHOST WEB DEVELOPMENT SERVER
SETTING UP LOCALHOST WEB DEVELOPMENT SERVER
SEETING UP A DEVELOPMENT SERVER
On these tutorial we are going to learn how to set up localhost server development environment. When you are building internet application, and you don’t have a personnel server, then everything you build will be uploaded often for modification from to another server anytime want to test your work.
As such these hindered the progress of your work, which will cost…
View On WordPress
0 notes
Text
How To Migrate A WordPress Website From Localhost To Live Server
https://ift.tt/eA8V8J
Today on our tutorial series, we'll be showing you how to migrate a WordPress site from a localhost to a live server. Having a WordPress server on your computer provides a great option to test out a theme or plugin in a safe environment before adding it to a live server. Many developers actually use […]
The post How To Migrate A WordPress Website From Localhost To Live Server appeared first on Themify.
https://goo.gl/SzVtfq
0 notes
Text
How to Move Your WordPress Website from Localhost to Cloudways Using WordPress Duplicator Plugin
If you are a WordPress developer, you work with a customized dev environment that you have customized to your preferences. Every developer has their own configuration settings that are based on their workflows and the tools they use for WordPress development.
Once the project is working as expected on the localhost, the next step is to move the project to an online host. Fortunately, WordPress offers WordPress duplicator solutions in the form of several plugins that simplify the entire process of migrating WordPress sites from localhost to an online host.
For the purpose of this article, I will demonstrate how you can move a WordPress website from a localhost to a Cloudways managed server running a WordPress application. While there are several plugins that work very well (I encourage you to experiment to find the right fit for your requirements), for the purpose of this tutorial, I will use the WordPress Duplicator plugin.
Let’s begin,Table of Contents
WordPress Migrator Plugin
Best Cloning Plugins Around
WordPress Duplicator: Local Server to Cloudways
Why Use WordPress Duplicator
Benefits of WordPress Duplicator
What You Need for WordPress Localhost to Live
WordPress Duplicator Plugin Installation
Step 1: Download and Install Plugin on a Local Site
Step 2: How to Export WordPress Site
Create a New Package
Step 3: How to Make WordPress Site Live
Move WordPress Website from a Localhost to Cloudways
How to Upload a Localhost WordPress Site to Live Server
Upload Installer and Archive File to Live Site
Install WordPress Website on Cloud Server
Step 1: Extract Archive
Step 2: Database Setup
Step 3: Run Installer
Step 4: Data Replacement
Step 5: Test Site
Testing the Live Site
Final Thoughts!
WordPress Migrator Plugins
Moving your WordPress website manually is quite stressful, very time-consuming, and prone to errors. You need to make sure that all steps are executed in the correct order with no issues. An if something goes wrong, you have to start all over again.
Fortunately, there are several excellent WordPress migration plugins that take care of all the steps of the process and ensure that your website gets migrated from the localhost to its new Cloudways WordPress web hosting server without any issues.
Best Cloning Plugins
Here is the list of the best WordPress migrator plugins that you can try out:
WordPress Duplicator (Freemium)
All-in-One WP Migration (Free)
BackupBuddy (Premium)
UpdraftPlus WordPress Backup Plugin (UpdraftPlus Migrator) (Freemium)
WP Migrate DB (Premium)
Migrate Guru (Premium)
VaultPress (Premium)
WP Clone (Free)
As mentioned earlier, I will use the Duplicator plugin for demonstrating the process of WordPress website migration.
WordPress Duplicator: Local Server to Cloudways
In this tutorial, I am going to describe how you can move your WordPress website from localhost to Cloudways using WordPress Duplicator plugin. Duplicator has a great 5 out of 5 stars rating on the WordPress repository and has been downloaded and installed over one million.
Why Use WordPress Duplicator Plugin
The Duplicator plugin provides WordPress administrators the ability to migrate, copy or clone, a WordPress site from one location to another.
Using this plugin, you can forget your worries about backing up the database, plugins, themes, and moving all these components (whether in full or in parts), because the WordPress Duplicator can do everything for you!
Even if you are a newbie with little to no knowledge, this plugin can help you migrate WordPress site from localhost to Cloudways server easily. However, you do need to know a bit about finding your database credentials and related information.
Benefits of WordPress Duplicator
Easily migrate WordPress websites from one host to another
Take manual backups of WordPress websites
Pull down a live site to localhost
Easy website duplication
Schedule backups at your convenience
Expert support available
Email notifications
Additional developer support
Connect to cPanel directly from installer
Database creation built into the installer
Integrated transfer to cloud storage services such as Dropbox, Google Drive, and Amazon S3
What You Need for Moving WordPress Sites to Live Servers
To move your WordPress website from localhost to another server, you need to have two elements. Firstly, you must have a local server setup on your computer (I assume that your website is up and running on a localhost server). Secondly, you should have a good web hosting plan that supports WordPress.
WordPress Duplicator Plugin Installation
Downloading and installing the WordPress Duplicator plugin is a simple matter of following the standard WordPress process.
Step 1: Download and Install Plugin on the Local Site
From your WordPress Dashboard, navigate to Plugins → Add New. Search for WordPress Duplicator plugin in the top-right search bar. Next, click the Install Now button. After successful installation, click the activate button.
The second method is to go to the WordPress Plugins Directory and directly download the Duplicator WordPress Migration Plugin from there. Next, add the plugin manually to the WordPress website. For this, simply go to Plugins → Add New, and then upload the plugin.
After activating the plugin, you will see the Duplicator menu on the left side of your WordPress Dashboard.
Step 2: Export the WordPress Site
Now in this step, I am going to describe how you can package the WordPress files on your local computer using the WordPress Duplicator plugin so that these files can be easily moved to the live server.
Create a New Package
After activating the plugin, you will see the Duplicator menu on the left side WordPress dashboard. Go to Duplicator → Packages and click the Create New button to build a new package.
This process has the following major steps:
1- Setup
Simply click the Next button to start the process.
2- Scan
Click the Build button.
3- Build
When you are done with the setup process, you will receive two files; Installer and Archive. Download both files on your desktop.
Next, let’s move the website files to the live site.
Step 3: How to Take the WordPress Site Live
Now it’s time to transfer the WordPress site from localhost to live server by using the WordPress duplicator plugin.
Move WordPress Website from a Localhost to Cloudways
First things first, log in to your Cloudways account. If you are new to Cloudways, you would need to sign up and then log into your account.
Once you are in, click the Servers tab where you can see all the servers that are active under your account. Go to the server you wish to migrate the WordPress website, go to Server → Server Management and get the FTP Master Credentials.
Upload the Localhost WordPress Site to the Live Server
In previous steps, you downloaded the Installer and Archive files to your computer. Now it’s time to upload those two files to the live server.
Upload Installer and Archive File to Live Site
For uploading these files, you can use any FTP client of your choice. I prefer FileZilla, and thus suggest that if haven’t tried it out yet, go to the Filezilla official website and download the latest build.
Next, provide the Host, Username, Password, and Port, and connect to your server via FTP.
Note: On Cloudways, you need to use port 22 to avoid issues.
Note: Before you go ahead with uploading archive files, make sure that you delete the wp-config file (located in the public_html folder).
Next, go to the applications folder and to your application’s folder. Navigate to the public_html folder and upload the Installer and Archive files from your desktop to this folder.
It will take a couple of minutes because the archive files are generally large in size.
Install WordPress Website on Cloud Server
Now, it’s time to run the installer setup on the live server. To do this, you need to go to your website address and add installer.php at the end. For instance, http://test.cloudways.com/installer.php.
Now that everything is good, the next step is the extraction of the Archive file.
Step 1: Extract the Archive
After going to the installer page, you can see some like:
Click the Next button to move on.
Step 2: Database Setup
Now, you need to add the database details. To get them, go back to your Cloudways dashboard, choose your Server > Application and click it.
Under the Application Management, you will see database details such as db name, username, and password.
If all goes well, you will set the green lights beside two of the most important fields: Server Connected and Database Found.
image
Now, click Next to move on to the next step.
Step 3: Run the Installer
The Duplicator plugin works best with empty databases. Hence, before moving forward, you need to remove all previous data. For this, go to the Application Management screen and click the Launch Database Manager.
Next, the database window will open. You need to check the checkbox named tables to select all the tables in the database. Next, click the Drop button to remove the selected tables.
Click the Yes button.
Step 4: Data Replacement
Once you click the YES button, you will be given a URL, Path, and Title automatically.
Now, click the Next button.
Step 5: Test the Live Site
Once done, the final essential step is to test your live website. For that, the WordPress Duplicator plugin will ask you to follow several important steps.
Save Permalinks: Click on Save Permalinks button and you will be automatically redirected to your live site. Here, you can change the permalink settings as per your requirements.
Test Site: Click on the Test Site button and it will open the frontend of your live site. Here, you can test if everything is working as expected.
Security Cleanup: Lastly, Security Cleanup allows you to clean all the installation files and other files created by the Duplicator plugin during the transfer process. Before cleaning up, make sure that your website is properly copied and is working correctly.
Now it’s time to move on to the live site.
Testing the Live Site
In most cases, all plugins are deactivated when you move WordPress site from a localhost to the Cloudways server. To reactivate all the deactivated plugins, navigate to Plugins → Installed Plugin, select all and then click the Activate button.
If you have opted to use Breeze, the Cloudways WordPress cache plugin, now is the time to set up the recommended settings of the plugin. This is an important step in finalizing the process of a successful migration of your site from the localhost to the Cloudways managed server. These recommended settings better optimize the website and enhance the speed of WordPress websites.
Congratulations! You have successfully tested and moved your WordPress website from localhost to Cloudways – A Managed Cloud Hosting Platform.
Final Thoughts!
That’s it!
As you can see it is very easy to move WordPress websites from localhost to a Cloudways managed server, thanks to the amazing WordPress Duplicator Plugin. If it weren’t for a WordPress migrator plugin, the process would be a huge hassle. However, in just a few clicks, all website content is successfully transferred from the localhost to a cloud server.
The aim of this tutorial is to educate users on how they can move their WordPress website from localhost to Cloudways. Keep in mind, the above method is not recommended for transferring content from other hosting providers to Cloudways. If you want to do so, I recommend users to use WordPress Migration Plugin.
If you encounter any cloud migration problems while transferring your website content, don’t hold back! Feel free to ask us and leave your questions in the comment section provided below. I would love to help you out with your queries.
The post How to Move Your WordPress Website from Localhost to Cloudways Using WordPress Duplicator Plugin appeared first on The Coding Bus.
from WordPress https://ift.tt/31TaKr4 via IFTTT
0 notes
Text
How to use WordPress API Authentication with Ionic
If you want to use the WordPress API and connect your Ionic app to it, most likely you also want to make user of the users your page already has (or use it as a simple backend for your next app).
But instead of using the basic authentication from WordPress, a more elegant way is to use JWT authentication, which is possible with the help of a simple plugin.
In this tutorial we will prepare a WordPress instance for JWT and also build an Ionic app to register new users, and to also sign them in and make authorised requests to the WordPress API using an interceptor.
There’s also a full blown course on using Ionic with WordPress that even covers push notifications with OneSignal, so if you really want to get into this topic, check out the Ionic Academy and the course library!
WordPress Preparation
Before we get started with our app we need to prepare WordPress. First of all, we can install 2 plugins:
JWT Authentication for WP-API
WP REST User
These plugins will help us to set up JWT authentication for the WordPress API, and also allow registeration of new users directly through the API.
Now we also need some small changes, the first one could be added to your wp-content/themes/{yourthemename}/functions.php
function add_cors_http_header(){ header("Access-Control-Allow-Origin: *"); } add_action('init','add_cors_http_header'); add_filter('kses_allowed_protocols', function($protocols) { $protocols[] = 'capacitor'; return $protocols; }); add_filter('kses_allowed_protocols', function($protocols) { $protocols[] = 'ionic'; return $protocols; });
This fix enables CORS and also allows different protocols – and issue a lot of you encountered with my last Ionic + WordPress tutorial on real devices!
In order to set up the JWT part, we also need to add these 2 lines to the wp-config.php file:
define('JWT_AUTH_CORS_ENABLE', true); define('JWT_AUTH_SECRET_KEY', 'your-top-secret-key');
Generate a key or use a dummy string while testing, and then move on to the last changes.
As described in the setup guide of the JWT plugin, we also need to add the highlighted lines to our .htaccess like this:
<IfModule mod_rewrite.c> RewriteEngine On RewriteBase /wordpress/ RewriteRule ^index\.php$ - [L] RewriteCond %{REQUEST_FILENAME} !-f RewriteCond %{REQUEST_FILENAME} !-d RewriteRule . /wordpress/index.php [L] RewriteCond %{HTTP:Authorization} ^(.*) RewriteRule ^(.*) - [E=HTTP_AUTHORIZATION:%1] </IfModule>
Now the WordPress instance is ready, and hopefully everything still works with your page!
Ionic App Setup
Let’s kick off the Ionic app with a blank template, one additional service for all of our API interaction and also install Ionic storage to store our JWT later down the road:
ionic start devdacticWP blank --type=angular cd ./devdacticWP ionic g service services/api npm i @ionic/storage
To make our WordPress URL easily accessible, we can set it directly inside our environments/environment.ts:
export const environment = { production: false, apiUrl: 'http://192.168.2.123:8888/wordpress/wp-json' };
I’ve used a local MAMP testing instance and the blog was running in a folder “wordpress” – change your URL according to your settings!
Note: I recommend adding your local IP (or public website if possible), localhost won’t work once you deploy your app to a device!
Now we just need to import all relevant modules to our main module, and don’t worry the error about the interceptor, we’ll get to that file soon.
Go ahead and change your app.module.ts to:
import { NgModule } from '@angular/core'; import { BrowserModule } from '@angular/platform-browser'; import { RouteReuseStrategy } from '@angular/router'; import { IonicModule, IonicRouteStrategy } from '@ionic/angular'; import { SplashScreen } from '@ionic-native/splash-screen/ngx'; import { StatusBar } from '@ionic-native/status-bar/ngx'; import { AppComponent } from './app.component'; import { AppRoutingModule } from './app-routing.module'; import { HttpClientModule, HTTP_INTERCEPTORS } from '@angular/common/http'; import { IonicStorageModule } from '@ionic/storage'; import { JwtInterceptor } from './interceptors/jwt.interceptor'; @NgModule({ declarations: [AppComponent], entryComponents: [], imports: [ BrowserModule, IonicModule.forRoot(), AppRoutingModule, HttpClientModule, IonicStorageModule.forRoot() ], providers: [ StatusBar, SplashScreen, { provide: RouteReuseStrategy, useClass: IonicRouteStrategy }, { provide: HTTP_INTERCEPTORS, useClass: JwtInterceptor, multi: true } ], bootstrap: [AppComponent] }) export class AppModule {}
The interceptor will be used whenever we make a HTTP request later, but for now let’s get a token first of all.
Service and Interceptor
In our service we will handle all API interaction, and also create a BehaviorSubject which represents the current state of the user. You might have used Events in the past, but since Ionic 5 you should move to RxJS instead.
Let’s go through all of our service functions quickly:
constructor: Load any previously stored JWT and emit the data on our Subject
signIn: Call the API route to sign in a user and retrieve a JWT. This token will be written to our Storage, and once this operation is finished we emit the new value on our Subject
signUp: Call the API route to create a new users, which is added through the plugin we installed
resetPassword: Call the API route to send out a reset password email, which is added through the plugin we installed
getPrivatePosts: Get a list of private posts from the WordPress blog – the user needs to be authenticated for this and have at least the role Editor!
getCurrentUser / getUserValue: Helper functions to get an Observable or the current value from our Subject
logout: Remove any stored token from our storage
Not a lot of logic, basically we make simply use of the WordPress API, so go ahead and add the following to your services/api.service.ts:
import { Injectable } from '@angular/core'; import { BehaviorSubject, from } from 'rxjs'; import { HttpClient } from '@angular/common/http'; import { Platform } from '@ionic/angular'; import { environment } from '../../environments/environment'; import { map, switchMap, tap } from 'rxjs/operators'; import { Storage } from '@ionic/storage'; const JWT_KEY = 'myjwtstoragekey'; @Injectable({ providedIn: 'root' }) export class ApiService { private user = new BehaviorSubject(null); constructor(private http: HttpClient, private storage: Storage, private plt: Platform) { this.plt.ready().then(() => { this.storage.get(JWT_KEY).then(data => { if (data) { this.user.next(data); } }) }) } signIn(username, password) { return this.http.post(`${environment.apiUrl}/jwt-auth/v1/token`, { username, password }).pipe( switchMap(data => { return from(this.storage.set(JWT_KEY, data)); }), tap(data => { this.user.next(data); }) ); } signUp(username, email, password) { return this.http.post(`${environment.apiUrl}/wp/v2/users/register`, { username, email, password }); } resetPassword(usernameOrEmail) { return this.http.post(`${environment.apiUrl}/wp/v2/users/lostpassword`, { user_login: usernameOrEmail }); } getPrivatePosts() { return this.http.get<any[]>(`${environment.apiUrl}/wp/v2/posts?_embed&status=private`).pipe( map(data => { for (let post of data) { if (post['_embedded']['wp:featuredmedia']) { post.media_url = post['_embedded']['wp:featuredmedia'][0]['media_details'].sizes['medium'].source_url; } } return data; }) ); } getCurrentUser() { return this.user.asObservable(); } getUserValue() { return this.user.getValue(); } logout() { this.storage.remove(JWT_KEY).then(() => { this.user.next(null); }); } }
So the idea is to sign in a user, store the token, and whenever we make a following request (in our case only to load private posts), we attach the JWT to the header of our request.
And we can do this easily by implementing an interceptor, that will load the token value and if available, add it to the headers of our request.
The following code performs exactly this operation, so we don’t need any additional JWT library and can simply create a new file at app/interceptors/jwt.interceptor.ts like this:
import { Injectable } from '@angular/core'; import { HttpRequest, HttpHandler, HttpEvent, HttpInterceptor } from '@angular/common/http'; import { Observable } from 'rxjs'; import { ApiService } from '../services/api.service'; @Injectable() export class JwtInterceptor implements HttpInterceptor { constructor(private api: ApiService) { } intercept(request: HttpRequest<any>, next: HttpHandler): Observable<HttpEvent<any>> { let currentUser = this.api.getUserValue(); if (currentUser && currentUser.token) { request = request.clone({ setHeaders: { Authorization: `Bearer ${currentUser.token}` } }); } return next.handle(request); } }
That’s it – now we will attach the token to all requests if the user is authenticated! This means, it will not only work for the one special request that requires authentication, but all other requests to the WP API that you might make that would need authentication.
Login, Signup and Authenticated WordPress Requests
Now we basically just need to hook up our view with the functonality of our service. First of all, we need to add the ReactiveFormsModule since we will use a reactive form
Therefore go ahead and add it to the home/home.module.ts of our app:
import { NgModule } from '@angular/core'; import { CommonModule } from '@angular/common'; import { IonicModule } from '@ionic/angular'; import { FormsModule, ReactiveFormsModule } from '@angular/forms'; import { RouterModule } from '@angular/router'; import { HomePage } from './home.page'; @NgModule({ imports: [ CommonModule, FormsModule, IonicModule, RouterModule.forChild([ { path: '', component: HomePage } ]), ReactiveFormsModule ], declarations: [HomePage] }) export class HomePageModule {}
With that in place we can create our form for the login or sign up credentials, and for simplicity we will simply create just one form for both cases.
Just note that you need to send all 3 values (username, email, password) if you want to register a new user!
Besides that we can integrate our service functionality and handle the results and errors of these calls. For the forgot password dialog we can use a simple alert, which is already the most exiting thing about our class.
We subscribe to the Observable of the user, and once we have a real user we will also trigger a reload of the private posts.
Go ahead and change your home/home.page.ts to:
import { Component, OnInit } from '@angular/core'; import { ApiService } from '../services/api.service'; import { FormGroup, FormBuilder, Validators } from '@angular/forms'; import { AlertController, ToastController } from '@ionic/angular'; @Component({ selector: 'app-home', templateUrl: 'home.page.html', styleUrls: ['home.page.scss'] }) export class HomePage implements OnInit { userForm: FormGroup; user = this.api.getCurrentUser(); posts = []; constructor( private api: ApiService, private fb: FormBuilder, private alertCtrl: AlertController, private toastCtrl: ToastController ) { this.user.subscribe(user => { if (user) { this.loadPrivatePosts(); } else { this.posts = []; } }); } ngOnInit() { this.userForm = this.fb.group({ username: ['', Validators.required], email: '', password: ['', Validators.required] }); } login() { this.api.signIn(this.userForm.value.username, this.userForm.value.password).subscribe( res => {}, err => { this.showError(err); } ); } signUp() { this.api.signUp(this.userForm.value.username, this.userForm.value.email, this.userForm.value.password).subscribe( async res => { const toast = await this.toastCtrl.create({ message: res['message'], duration: 3000 }); toast.present(); }, err => { this.showError(err); } ); } async openPwReset() { const alert = await this.alertCtrl.create({ header: 'Forgot password?', message: 'Enter your email or username to retrieve a new password', inputs: [ { type: 'text', name: 'usernameOrEmail' } ], buttons: [ { role: 'cancel', text: 'Back' }, { text: 'Reset Password', handler: (data) => { this.resetPw(data['usernameOrEmail']); } } ] }); await alert.present(); } resetPw(usernameOrEmail) { this.api.resetPassword(usernameOrEmail).subscribe( async res => { const toast = await this.toastCtrl.create({ message: res['message'], duration: 2000 }); toast.present(); }, err => { this.showError(err); } ); } loadPrivatePosts() { this.api.getPrivatePosts().subscribe(res => { this.posts = res; }); } logout() { this.api.logout(); } async showError(err) { const alert = await this.alertCtrl.create({ header: err.error.code, subHeader: err.error.data.status, message: err.error.message, buttons: ['OK'] }); await alert.present(); } }
The last missing piece is our view, which basically shows our form for data plus the according buttons to trigger the actions.
We can also add a little if/else logic using ng-template to show either the card with our input fields, or a dummy card with the user value printed out as JSON.
Since the user object is an Observable we also need the async pipe, which makes the if statement looks kinda tricky (which it actually isn’t).
Below our cards we can also create a very basic list to show all private posts. Of course that’s just one idea and quick example of how to present it, you can also find a more detailed version in my previous WordPress tutorial!
Finish your app by changing the home/home.page.html to:
<ion-header> <ion-toolbar color="primary"> <ion-title> Devdactic Wordpress </ion-title> </ion-toolbar> </ion-header> <ion-content> <ion-card *ngIf="!(user | async); else welcome"> <ion-card-content> <form [formGroup]="userForm" (ngSubmit)="login()"> <ion-item> <ion-label position="floating">Username</ion-label> <ion-input formControlName="username"></ion-input> </ion-item> <ion-item> <ion-label position="floating">Email</ion-label> <ion-input formControlName="email"></ion-input> </ion-item> <ion-item> <ion-label position="floating">Password</ion-label> <ion-input type="password" formControlName="password"></ion-input> </ion-item> <ion-button expand="full" [disabled]="!userForm.valid" type="submit">Sign in</ion-button> <ion-button expand="full" [disabled]="!userForm.valid" type="button" color="secondary" (click)="signUp()"> Register</ion-button> <ion-button expand="full" type="button" color="tertiary" (click)="openPwReset()">Forgot password?</ion-button> </form> </ion-card-content> </ion-card> <ng-template #welcome> <ion-card> <ion-card-header> <ion-card-title>Welcome back!</ion-card-title> </ion-card-header> <ion-card-content> <ion-button expand="full" (click)="logout()">Logout</ion-button> </ion-card-content> </ion-card> </ng-template> <ion-card *ngFor="let post of posts"> <ion-card-header> <ion-card-title [innerHTML]="post.title.rendered"></ion-card-title> <ion-card-subtitle>Liquid error: wrong number of arguments (given 1, expected 2)</ion-card-subtitle> </ion-card-header> <ion-card-content> <img [src]="post.media_url" *ngIf="post.media_url"> <div [innerHTML]="post.excerpt.rendered"></div> <!-- Example logic to open a details page below --> <!-- <ion-button expand="full" fill="clear" [routerLink]="['/', 'posts', post.id]" text-right>Read More...</ion-button> --> </ion-card-content> </ion-card> </ion-content>
Now go ahead and enjoy your authentication flow from Ionic with WordPress backend!
Conclusion
Adding REST API authentication to your WordPress blog isn’t that hard and helps to create powerful apps using Ionic.
Just keep in mind that the initial role of a new user might be something that has no access to private posts yet, so you would have to manually promote users in that case.
Anyway, using WordPress as a simple backend is a great alternative to other systems if you already have a WordPress blog or know a thing or two about PHP!
You can also find a video version of this tutorial below.
youtube
The post How to use WordPress API Authentication with Ionic appeared first on Devdactic.
via Devdactic https://ift.tt/3aRAvu3
0 notes