#YouTubeAPI
Explore tagged Tumblr posts
Visit Tumblr Blog
Explore Tumblr blogs with no restrictions, modern design and the best experience.
Last Seen Tumblr Blogs


Fun Fact
BuzzFeed published a report claiming that Tumblr was utilized as a distribution channel for Russian agents to influence American voting habits during the 2016 presidential election in Feb 2018.
Text
Raspberry Pi Pico W - Creator Display erstellen

In diesem Beitrag möchte ich dir zeigen, wie du deinen Raspberry Pi Pico W mit einem OLED Display in ein Creator Display verwandeln kannst und dort deine Social-Media Attribute anzeigen lässt. Natürlich kannst du dieses Beispiel auch recht einfach adaptieren und dort andere Daten von APIs anderer Dienste anzeigen, wie zbsp. vom Deutschen Wetterdienst, Umrechnungskurse, Aktienkurse etc. Da wir das spätere Programm in MicroPython schreiben, können wir auch einen anderen Mikrocontroller als den Raspberry Pi Pico W verwenden. Jedoch ist dieser derzeit meine erste Wahl und wird für dieses kleine Projekt eingesetzt.
Was soll das Creator Display anzeigen?
Ziel soll es sein, auf einem Display die Aufrufe und Abos anzeigen zu lassen. https://youtu.be/YE9z9fq-dnc Da mein YoutTube Kanal Draeger-IT noch recht klein ist, habe ich noch nicht so viele Abos und auch nicht die Masse an Aufrufe, aber trotzdem möchte ich die YouTube API ansprechen, um die Daten zu empfangen und auszuwerten. Hier eine kleine Auflistung der APIs zu welchen man recht einfach Zugriff bekommt: - YouTube, - Instagram, - Pinterest, - Facebook, - TikTok In diesem Beitrag möchte ich mich zunächst auf die YouTube API beschränken. Die anderen Social-Media-Plattformen werden ggf. in separaten Beiträgen behandelt.
Benötigte Ressourcen für dieses Projekt
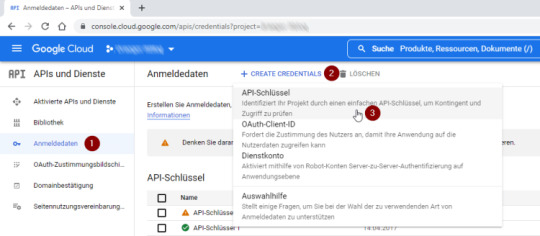
Damit du Zugriff auf die YouTube API bekommst, benötigst du einen Google Account und einen API Key. Den API Key kannst du dir nur mit einem Google Developer Account anlegen und unter https://console.cloud.google.com/apis/ anlegen. Um einen API Key zu generieren, klicken wir zunächst im Navigationsmenü auf der linken Seite auf "Anmeldedaten" (1) und können dann auf "+ CREATE CREDENTIALS" (2) klicken. Im neu geöffneten Untermenü kannst du den ersten Eintrag "API-Schlüssel" (3) wählen und ein allgemeingültiger API-Schlüssel wird erzeugt.
Schritt 1 - erstellen eines API Keys im Google Developer Account Nach einer kurzen Wartezeit wird dir der API Key in einem Dialog angezeigt, welchen du dir in die Zwischenablage kopieren kannst.
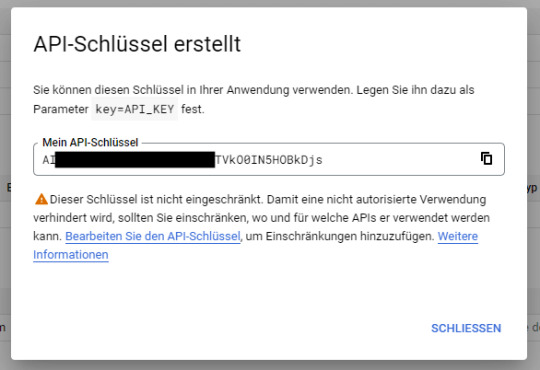
Schritt 2 - neu generierter API Key Achtung: Mit dem API Key kannst du auf einfache Weise auf deinen Account zugreifen und Daten hinzufügen und auch ändern. Den hier dargestellten API Key habe ich gegen Missbrauch unkenntlich gemacht und auch nach der Erstellung von diesem Beitrag wieder gelöscht.
Aufruf der YouTube API per HTTP Request
Am Einfachsten kannst du über einen simplen HTTP Request auf die YouTube API zugreifen, du benötigst also keine zusätzlichen Module, welche du importieren musst. Du kannst mit deinem zuvor generierten API Key somit recht einfach eine URL zusammensetzen und wie hier die aktuelle Kanalstatistik als JSON abrufen. https://www.googleapis.com/youtube/v3/channels?id=UCUoqALbWy__4Blgfztg4sKg&key=AIzaSyD*********F3AJHs&part=statistics { "kind": "youtube#channelListResponse", "etag": "MozCK4S3NxXniTguDkimSgach7g", "pageInfo": { "totalResults": 1, "resultsPerPage": 5 }, "items": } Im letzten Beitrag Raspberry Pi Pico W – Zeit aus dem Internet lesen und auf einem Display anzeigen habe ich dir bereits gezeigt, wie du eine Zeit von einem Server als JSON Response anfordern und auswerten kannst. Jedoch müssen wir auf die API per SSL zugreifen und daher müssen wir etwas umschreiben.
Aufbau einer SSL Verbindung mit dem Modul ussl
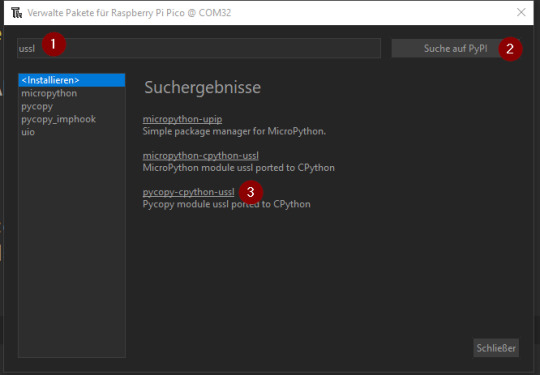
Das nachfolgende Beispiel habe ich von der Seite Python ussl.wrap_socket() Examples entnommen und dieses hat auf Anhieb quasi ohne Änderungen funktioniert. Der Vorteil ist an der erweiterten Funktion, dass diese mit HTTP & HTTPS arbeiten kann. Damit wir die SSL Verbindung aufbauen können, müssen wir zunächst das Modul ussl in die Thonny IDE einbinden. Über das Hauptmenü "Extras" > "Verwalte Pakete..." erreichst du den Dialog zum Installieren neuer Module. In diesem Dialog suchst du zunächst nach "ussl" (1), mit der Schaltfläche "Suche auf PyPi" (2) aus den Suchergebnissen wählst du den Eintrag "pycopy-cpython-ussl" (3) aus. Nach dem Selektieren des Eintrages aus den Suchergebnissen kannst du dann die Schaltfläche "Installieren" (4) betätigen und das Modul wird hinzugefügt.
installieren des Modules "ussl" in der Thonny IDE Schritt 1

installieren des Modules "ussl" in der Thonny IDE Schritt 2 Im Ordner "lib" des Mikrocontrollers findest du nun die Datei "ussl.py".

Installierte Module auf dem Pi Pico W Hier die angesprochene Funktion zum Absenden eines HTTP / HTTPS Request und liefern des Response. import ussl # Funktion zum absenden eines HTTP / HTTPS Request und # Rückgabe des Response # Quelle: https://www.programcreek.com/python/example/96165/ussl.wrap_socket def http_get(url): print("Fetching:", url) proto, _, host, path = url.split('/', 3) if proto == "http:": port = 80 elif proto == "https:": port = 443 addr = socket.getaddrinfo(host, port) s = socket.socket() s.connect(addr) if proto == "https:": s = ussl.wrap_socket(s, server_hostname=host) s.write(bytes('GET /%s HTTP/1.0rnHost: %srnrn' % (path, host), 'utf8')) result = '' while True: data = s.read(100) if data: result = result + str(data, 'utf8') else: break s.close() return result Die Rückgabe ist nicht nur ein einfacher HTTP/HTTPS Response, sondern auch die gesamten Header Daten. Waiting to connect: ('192.168.178.70', '255.255.255.0', '192.168.178.1', '192.168.178.1') Fetching: https://www.googleapis.com/youtube/v3/channels?id=UCUoqALbWy__4Blgfztg4sKg&key=AI******3AJHs&part=statistics HTTP/1.0 200 OK Content-Type: application/json; charset=UTF-8 Vary: X-Origin Vary: Referer Date: Sun, 31 Jul 2022 09:25:38 GMT Server: scaffolding on HTTPServer2 Cache-Control: private X-XSS-Protection: 0 X-Frame-Options: SAMEORIGIN X-Content-Type-Options: nosniff Accept-Ranges: none Vary: Origin,Accept-Encoding Alt-Svc: h3=":443"; ma=2592000,h3-29=":443"; ma=2592000,h3-Q050=":443"; ma=2592000,h3-Q046=":443"; ma=2592000,h3-Q043=":443"; ma=2592000,quic=":443"; ma=2592000; v="46,43" { "kind": "youtube#channelListResponse", "etag": "nJfSIGqHLEeyYpfTt3arnG3kax0", "pageInfo": { "totalResults": 1, "resultsPerPage": 5 }, "items": }
Funktion zum Extrahieren des JSON Response
Wie du erkennen kannst, liefert die Funktion noch zusätzliche Daten, welche wir in diesem Fall nicht benötigen. Mit einfachen nachfolgenden Funktion können wir den JSON Response extrahieren. # Ermitteln des JSONs aus dem HTTP Response def findJson(response): return response Als Parameter übergeben wir das Result der Funktion "http_get(url)" und erhalten unser JSON. { "kind": "youtube#channelListResponse", "etag": "nJfSIGqHLEeyYpfTt3arnG3kax0", "pageInfo": { "totalResults": 1, "resultsPerPage": 5 }, "items": }
Auswerten des JSON Response
Wenn du die Adresse im Browser ausgeführt / abgesendet wird, erhält man wie erwähnt eine Antwort mit einem JSON aus welchem man die nachfolgenden Werte entnehmen kann: - viewCount - Anzahl der gesamten Klicks auf Videos - subscriberCount - Anzahl der Abos - videoCount - Anzahl der Videos Zunächst wandeln wir das JSON Objekt in ein Dictionary um, denn so können wir ganz einfach auf die Werte zugreifen. import json aDict = json.loads(jsonData) {'pageInfo': {'resultsPerPage': 5, 'totalResults': 1}, 'kind': 'youtube#channelListResponse', 'etag': 'nJfSIGqHLEeyYpfTt3arnG3kax0', 'items': } Dun kann man mit dem Key "statistics" auf die oben aufgeführten Werte zugreifen. aDict = json.loads(jsonData) statistics = aDict subscriberCount = statistics videoCount = statistics viewCount = statistics print('subscriberCount', subscriberCount, sep=" ") print('videoCount', videoCount, sep=" ") print('viewCount', viewCount, sep=" ") subscriberCount 342 videoCount 301 viewCount 122093
Programmieren des Raspberry Pico W Creator Display
Nachdem wir die Daten ermittelt haben, wollen wir diese jetzt auf einem OLED Display anzeigen lassen. Für den Arduino, ESPx sowie natürlich für den Raspberry Pi / Pico / Pico W bekommst du diverse OLED Displays in verschiedene Auflösungen und auch Farben.
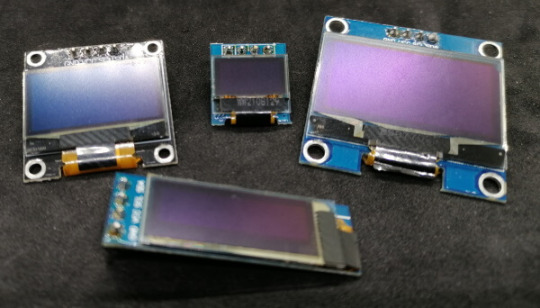
Auswahl an OLED Displays für den Arduino, ESPx und Raspberry Pi Im nachfolgenden Beispiel verwende ich das 0,96" OLED Display mit einer Auflösung von 128 x 64 Pixel. Anschließen eines OLED Displays per I²C an den Pi Pico / Pico W Zunächst schließen wir unser OLED Display per I²C an den Pi Pico W an. Hier verwende ich die folgende Pinbelegung: - GND - Pin 38, GND - VCC - Pin 40, VBUS - SCL - Pin 1, GP1 - SDA - Pin 0, GP0

Schaltung - OLED Display am Raspberry Pi Pico
Installieren des Modules für das OLED Display mit SSD1306 Chip
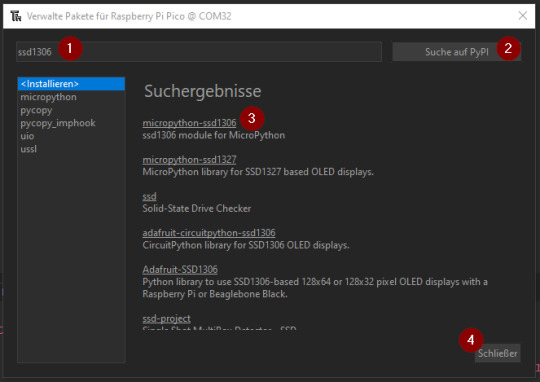
Auf dem OLED Display ist ein Chip vom Typ SSD1306 verbaut, für die Programmierung benötigen wir das Modul "micropython-ssd1306" welches wir ebenfalls wie zuvor das "ussl" Modul über "Extras" > "Verwalte Pakete..." installieren. Wir suchen somit nach "ssd1306" (1) mit der Schaltfläche "Suche auf PyPi" (2) oder betätigen einfach die Return taste. In den Suchergebnissen wählen wir den ersten Eintrag "micropyhton-ssd1306" aus und wählen im nächsten Dialog die Schaltfläche "Installieren", wenn der vorgang
Thony IDE - installieren des Modules "micropython SSD1306"
Ausgabe der Zeile "Hello World!" auf dem OLED Display
In der offiziellen Dokumentation zum Modul "micropython-ssd130" unter Using a SSD1306 OLED display findest du weitere Informationen, wie man ein OLED Display in MicroPython programmiert. Hier nun ein kleines Beispiel, wie man die Textzeile "Hello World!" ausgibt. from machine import Pin, I2C import ssd1306 import time i2c = I2C(0, sda=Pin(0), scl=Pin(1)) time.sleep(3) display = ssd1306.SSD1306_I2C(128, 64, i2c, addr=0x3c) display.fill(0) display.text('Hello World!', 0, 0, 1) display.show()

Textzeile "Hello World!" auf dem OLED Display via I²C am Raspberry Pi Pico W angeschlossen Das Display kann maximal 6 Zeilen mit jeweils 16 Zeichen vernünftig anzeigen.

Anzeige der maximalen Zeilenzahl am 128x64 Pixel OLED Display
Fertiges Skript "Raspberry Pi Pico W Creator Display"
Hier nun das fertige Skript zum Laden der YouTube Statistik zu einem Kanal mithilfe der API und einem generierten API_KEY. import network import socket import time import json import ssl import ussl from machine import Pin, I2C import ssd1306 i2c = I2C(0, sda=Pin(0), scl=Pin(1)) time.sleep(3) display = ssd1306.SSD1306_I2C(128, 64, i2c, addr=0x3c) #Zugangsdaten zum WLAN Netzwerk ssid = '*****' password = '******' #Adresse welche uns das JSON mit den Zeitdaten liefert CHANNEL_NAME = 'Draeger-IT' CHANNEL_ID = 'UCUoqALbWy__4Blgfztg4sKg' API_KEY = 'AIz****AJHs' url = "https://www.googleapis.com/youtube/v3/channels?id={}&key={}&part=statistics".format(CHANNEL_ID, API_KEY) # Aufbau einer WiFi Verbindung def wifiConnect(): wlan = network.WLAN(network.STA_IF) wlan.active(True) wlan.connect(ssid, password) print("Waiting to connect:") while not wlan.isconnected() and wlan.status() >= 0: print(".", end="") time.sleep(1) print("") print(wlan.ifconfig()) # Funktion zum absenden eines HTTP / HTTPS Request und # Rückgabe des Response # Quelle: https://www.programcreek.com/python/example/96165/ussl.wrap_socket def http_get(url): print("Fetching:", url) proto, _, host, path = url.split('/', 3) if proto == "http:": port = 80 elif proto == "https:": port = 443 addr = socket.getaddrinfo(host, port) s = socket.socket() s.connect(addr) if proto == "https:": s = ussl.wrap_socket(s, server_hostname=host) s.write(bytes('GET /%s HTTP/1.0rnHost: %srnrn' % (path, host), 'utf8')) result = '' while True: data = s.read(100) if data: result = result + str(data, 'utf8') else: break s.close() return result # Ermitteln des JSONs aus dem HTTP Response def findJson(response): txt = '{' return response def displayYouTubeStatistics(text, value): display.fill(0) display.text('YouTube channel', 0, 0, 1) display.text(CHANNEL_NAME, 0, 15, 1) display.text(text, 0, 30, 1) display.text(str(value), 0, 45, 1) display.show() # Main Funktion def main(): # Aufbau der Wifi-Verbindung wifiConnect() # Auslesen des HTTP Response response = http_get(url) #print(response) # ermitteln des JSONs jsonData = findJson(response) # umwandeln des JSONs in ein Dictionary aDict = json.loads(jsonData) statistics = aDict subscriberCount = statistics videoCount = statistics viewCount = statistics print('subscriberCount', subscriberCount, sep=" " ) print('videoCount', videoCount, sep=" " ) print('viewCount', viewCount, sep=" " ) pause = 2.5 displayYouTubeStatistics('subscriberCount', subscriberCount) time.sleep(pause) displayYouTubeStatistics('videoCount', videoCount) time.sleep(pause) displayYouTubeStatistics('viewCount', viewCount) time.sleep(pause) # Aufrufen der Funktion main() while True: main() # eine Pause von 5 Minuten einlegen # Der Server leht die Verbindung ab wenn der Intervall # des Zugriffs zu klein ist. time.sleep(300) Read the full article
0 notes
Photo

The #YouTubeDataAPI (#ApplicationProgrammingInterface), or the #YouTubeAPI, allows #developers to access two key components. For instance, it allows access to #videostatistics and the #YouTubechanneldata via two types of calls, #REST, and #XMLRPC. Read and learn more about the #YouTube #APIs here; https://josephmuciraexclusives.com/youtube-data-api/ https://www.instagram.com/p/CCchI8FlSE-/?igshid=1qnf1su3ihm6r
#youtubedataapi#applicationprogramminginterface#youtubeapi#developers#videostatistics#youtubechanneldata#rest#xmlrpc#youtube#apis
0 notes
Video
youtube
How to Access YouTube API code - Step by step 2020
0 notes
Text
YouTube API Changes and GET User Information with v3 IDs
Anyone who has worked with any Google API knows how easy most things are for most purposes, but how difficult they can be to be worked-in to a different platform. I’m using this opportunity to take a look at YouTube’s v3 API which has had some recent changes, but requires a rewrite to most applications that use it, since it has made a lot of small lines of code require a complete rewrite, and some some schema, a few extra long functions.
Intro and "The Thing"
The recent change added a new way to access and recieve channel information. Before this change you just need the channel username, but after this change you can use the channel username or the channel ID. The main reason for adding this isn't quite clear to be, because both the username and ID are both unique to a channel, but an ID is infinitely harder to remember, because it is a 24 character randomized string with capital and lower-case lettering, plus integers.
The Issue
The first thing I did to try and wrap my head around this change is to try both the ID and username on https://youtube-collections.com/ and I wasn't surprised when it did not work. The main reason for this is because the GET request features 3 parts: "part", used for requesting a specific part of the result to be sent back to the user, "id", to specify username or (now) ID, and "apikey", for the API key.
The Punchline
This issue renders my website completely useless because it requires user information, completely provided by the user. The information is of unknown origin, and it was easy to guess that the user would input a username because the introduction of the ID, because it was the only thing to provide, just whether it was in URL form (just splitting the URL and finding the appropriate array part) or just a username.
The Inevitable Workaround
Now I have incorporated (hopefully) a standardized fix, which implements before any other in-line functions. What this function, we'll call it Butterfly(), does, is finds if the user's input was a username or ID. To do this it first requests the information like it usually does, using a snippet, an ID and the key, then it asks itself "Is the information I just recieved a whole set of arrays and objects, or was it nothing?". This works because YouTube's API doesn't return data if the input isn't accepted. So then the code assumes the requested information was in the form of an ID instead of a username, and requests the same information, but instead uses the request "part:'id', forusername:id, key:apikey". This should recieve a lot more information, and the information that we want to get, which is the actual username.
Conclusion
It doesn't really matter which order you put these in, but the main difference is that the snippet GET will request far less information, so do this one first to make less of an impact on the user's internet and your overall API token requests. To be clear this will only really work if you are parsing this username down a chain of functions. \For me it was easy to rewrite all the function because it is all very simple GETs, adding to arrays and localstorage.
This post was very longwinded and I rewrote it a few times, but I think is worth it to save some headache.
0 notes
Text
Hyper - Youtube Playlist Viewing Application + Admob (Full Applications)
Hyper Template allows you to convert your youtube channel (playlist) into a fully native iPhone app without a single line of code. You can then send your app to the AppStore and make more money with AdMob just by offer a better service to your subscribers
It is compatible with iOS 9.0 and above and runs on iPhone, iPhone Plus, iPhoneX.
We use Youtube API to store and share videos directly to the app, so not external backend requires. All you need to do is to create google cloud project and enabled youtube api.
Please if you have any question or ideas, please feel free to leave a comment
Hyper template helps you to create an app just in 3 steps:
Change name and icon
Put your PlaylistID and AdMob ID
Compile and upload to AppStore
Prerequisites
Xcode 8.0 or greater (free).
CocoaPods dependency manager (free).
Access to the internet and a web browser.
A Google account.
Valid Apple iTunes Account with Apple Developer Membership.
Features:
Displaying your listed/unlisted playlist
Admob banner on bottom
Written Swift4 and used latest YoutubeAPI v3
iOS 9, 10, 11 supported
Adapted for latest iPhoneX screen
Easy to customize and ready for submitting to AppStore
from CodeCanyon new items http://ift.tt/2E2T4Oz via IFTTT https://goo.gl/zxKHwc
0 notes
Text
Loving....
The Youtube API. It seems like we will be making a move to using only Youtube Videos. In part because that is where almost all of the tutorials are upload anyways, but more importantly because Youtube launched a new API which is incredibly powerful. And by leveraging it we can automate some cool things.
One day it would be nice for us to create an API of our own, though what that information would be... we are unsure. Probably just a handy way of scraping content off our site. Not super useful, but a fun way to geek out over the technical side of the site.
0 notes
Link
YouTube動画をランダム再生するアプリケーション'lottube'(ロットチューブ)です。タグからジャンルを選択、またはキーワードで検索してください。
YouTube API を使って動画をランダムに再生するアプリケーションを作ってみました。 ほどよいjsの勉強になりました、作ったものが動くのはやっぱり楽しい。もし面白いと思った方がいましたらtwitterやfacebookで拡散していただければと思います。
0 notes
Text
YouTubeAPI面白い、一通りレッスン動画を見たので明日応用してみよう。
0 notes