#add this bokeh to your collection
Explore tagged Tumblr posts
Visit Tumblr Blog
Explore Tumblr blogs with no restrictions, modern design and the best experience.
Last Seen Tumblr Blogs


Fun Fact
Users from the US are the majority of Tumblr visitors.
Text

If you've been feeling burnt out or are just overall not enjoying the look and feel of your game, this guide is meant for you! Coming from someone who started out with The Sims 3, I've had to do a lot of adjusting to find what I like to do in The Sims 4 and I think I've finally figured it out. In this guide, I'll go over Graphics, Essential Mods, and Gameplay Ideas to help you make your experience more enjoyable!
Graphics✨
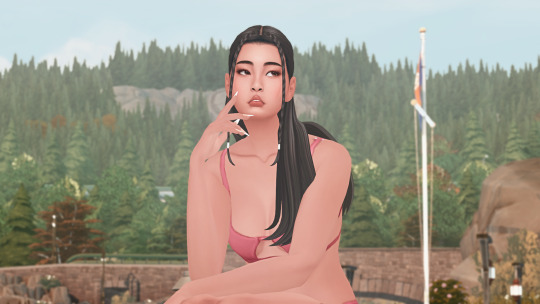
The Sims 4's biggest asset over previous iterations is its graphics/aesthetic and more importantly, its versatility in this regard. You can make this game look more realistic or more cartoony depending on what you prefer thanks to ReShade and GShade. While there is controversy with the latter, I think having these kinds of tools added to your game will really help with making the game better to look at. I personally recommend these presets:
@bojanastarcevic's Boho (left) and Light (right) presets

@neecxle's Boho Dreams

@pixelglam's Pearl

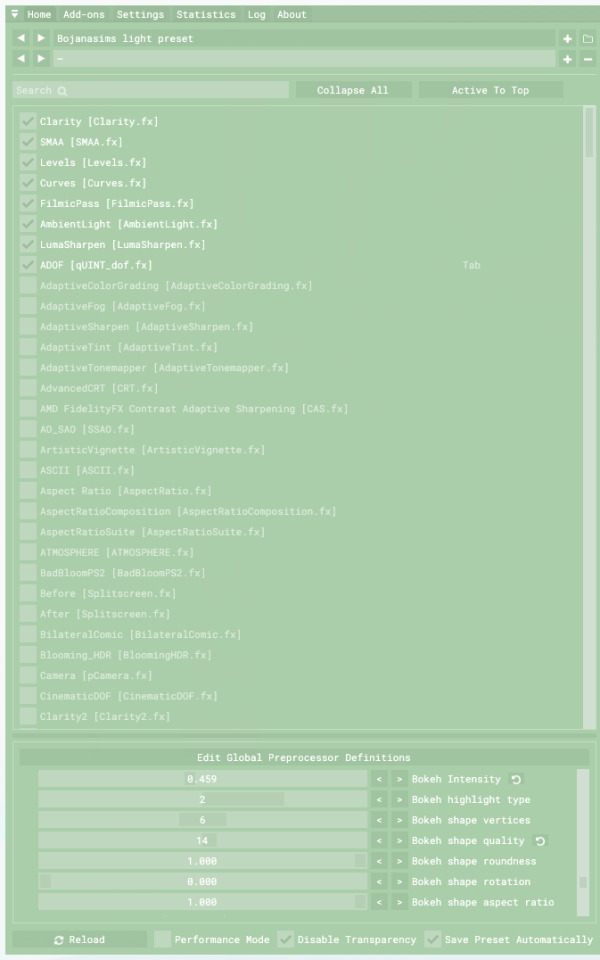
As you can see, using these enhancements can add a lot of great atmosphere to your game but knowing how to tweak these to your liking will make all the difference. When installing and using presets, ensure that 1) you have edge smoothing in game turned off 2) you have SMAA or FXAA turned on through ReShade or GShade and 3) you've adjusted ADOF [qUINT_dof.fx] to suit your gameplay.
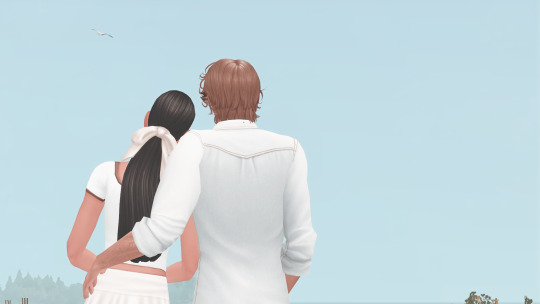
These are my settings (apologies if it's hard to see) but what gives my screenshots more of a cinematic quality is having the "bokeh" settings adjusted like so. I also have the ADOF hotkey set to "tab" so that it automatically turns on and adjusts the depth-of-field when I want to take a screenshot.
BUT WAIT, THERE'S MORE! While all of these shader presets are extremely important to the look and feel of your game, there's an extra couple of steps you can take.
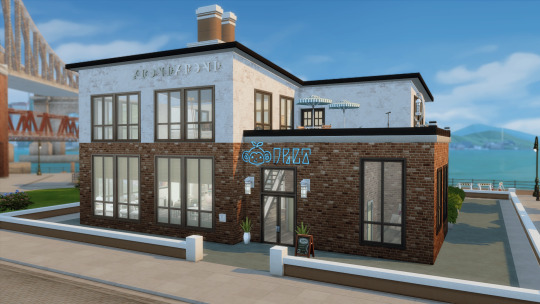
@plantyl-m's GraphicsRules.sgr makes those in-game shadows nice and crisp! It's a relatively small tweak, but I feel like it makes such a huge difference to the quality.
@softerhaze's Sunblind Lighting Overhaul. The pictures speak for themselves!
@northernsiberiawinds's Better In-Game Lighting is another great option for lighting tweaks (there's also lighting adjustments for CAS that I love to use)
And that pretty much wraps up my segment on graphics! Now, don't feel compelled to use all of these if your computer can't handle it. While these tweaks are nice, they don't make or break the game. Use what works and don't mind what doesn't!
Essential Mods🔧
I'll be the first to admit that without mods this game can be a bit- or a lot- dry. Depending on what kind of gameplay style you prefer, you may not need or want certain mods but I think there are some core mods that EVERY simmer can make use of.
@deaderpoolmc's MCCommand Center is a must-have. I personally use it most often to add relationships between sims for storybuilding, changing how long certain actions like doing homework takes, and changing my Game Time Speed to make my days last longer (more on this later)
Weerbesu's UI Cheats for quick adjustments to household funds, motives, and more.
@twistedmexi's EVERYTHING, but if I had to narrow it down T.O.O.L Mod, Better Build Buy, and All Cheats are the ones I get the most mileage out of.
TurboDriver's Wonderful Whims. In addition to all the features you might be familiar with, you can also use it for posing and animations. It has a positioner as well that makes placing sims so easy!
@bienchien's Whim Overhaul to make what your sims want to do more sensible based on their personality, aspiration, and environment.
For mods that add more gameplay, try out these: Basemental Drugs to add effects from consuming substances @utopya-cc's Passionate Gifts for more romantic interactions @zerbu's Turbo Careers to make more active careers Lot-51's Collection of Mods for various tweaks and features including functional hotels, internet service, and rentable movies.
There's plenty more mods, too many to list in this post but at the end of the day, enjoying your gameplay involves you!
Gameplay Ideas 💭
I love longer gameplay, that was my favorite thing about The Sims 3. But I often felt like managing a longer gameplay in The Sims 4 didn't feel as rewarding. It can be easy to feel like your save has become stagnant, especially if you're only playing with one sim in a household. And I realized why this happens. The Sims 4 has a lot of features, more than I thought, and they're overly available. Right off the bat, I can take my sim anywhere, to any world and do almost anything. And somehow, that makes it feel less impactful. I don't like following structured challenges or scenarios, so this is what I do to make get myself more invested in my sims and their lives.
Create Your Sims Intentionally What does this mean? Create your sims with room to grow the longer you play! Maybe you want a sim to become a famous actor, but they're socially awkward. Now not only do they need to gain fame, but now they're also working to overcome their awkwardness and develop more charisma. Give your sims room to grow, to adjust. Let them have negative traits or dislike things that they might be naturally better at so they have to work harder at what they do like. Another tip: when making your sim in CAS, choose their aspiration based on what bonus trait you'd like them to have then change their aspiration in game. This way, you get an extra trait that may add more to your sim's character.
Give Your Sims a Context to Exist In Because they didn't just fall out of a coconut tree, give your sims other sims to bounce off of. Maybe they have a strained relationship with their parents so they avoid them all the time. Or they had a falling out with an old friend so when they run into each other, it gets super awkward and makes them tense or uncomfortable. Using MCCC or other cheats to give your sims a little more of a backstory when you start playing makes them feel more real as you go forward.
Lengthen Your Game Time Speed When I realized I could do this, it changed everything! Sims take a long time to do pretty much everything. So days and days pass and it feels like you aren't really getting much done. Using MCCC, I changed my Game Time Speed to "30" and that lets me actually stop and think about what I want to get done throughout the day instead of solely focusing on filling their needs. For example, my sims can actually have a full morning routine like going for a walk, making breakfast, and showering before going to work. Having more time in the day lets you focus on all the smaller details and lets you notice that there's actually a lot you can do.
Make or Place Multi-Use Lots and Use T.O.O.L. Mod If you own a decent amount of packs, having multi-use lots is a must to get a lot of bang for your buck. For example, country clubs, movie theaters, restaurants, etc. are going to add to what your sim is able to do. Look at CC made by Cepzid for more functional objects to add variety to what you can do. Also, if you use T.O.O.L. you can place any object in the world to add more activities and make your surroundings feel less like set dressing.
Limit the Worlds You Play In If your sim can go anywhere, at any time, then what is the point of going anywhere at all? I like to limit the worlds that I can visit by using "travel" to around 3 or 4 depending on region. That way, when my sims go to worlds outside of the region, it's more exciting because I'm not constantly seeing it. For example, my current family The Fords live in Brindleton Bay. I'm American so I think of Brindleton Bay as being The Hamptons, which is North East Coast. So I think, what other worlds would be reasonably close and easy to visit? I assign regions like this: - North East: Brindleton Bay, San Myshuno, Newcrest, Britechester - The South: Willow Creek, Magnolia Promenade, Forgotten Hollow - Northwest: Evergreen Harbor, Copperdale, San Sequoia - Southwest: Del Sol Valley, Oasis Springs, Strangerville -Europe: Tartosa, Windenburg, Henford-on-Bagley - Central America: Selvadorada, Ciudad Enamorada - Pacific Islands & Asia: Sulani, Mount Komorebi, Tomarang Playing with these regions in mind, it adds a challenge to my gameplay. If there's a world I want to visit, I need to set aside time in my sims schedule to actually visit it (such as requesting vacation time). Also this allows me to have long-distance relationships which can add to slow burn dynamics! Case in point, Darcy and Lopez or Caleb and Natty.

6. Let Your Sims Have Their Autonomy Back Okay, I'm guilty of micromanaging. But sometimes, it's okay to sit back and let your sims try different things. Obviously, the autonomy isn't always super logical so definitely nudge your sims in the right direction but a lot of the enjoyment of the game for me, especially when playing with families, is to leave them to their own devices. With The Fords, I primarily focus on Natty which leads to a lot of hilarious moments that wouldn't have happened if I was stressing over everyone acting perfect. For example, when Caleb came to the Ford house I had Natty make them iced tea to drink on the porch and while she was inside, Alan (her dad) came out on his own and started talking to Caleb which didn't go that well. Let your sims do what they want sometimes!


7. Most importantly, find what YOU like to do! Comparison is the thief of joy, that's totally true. What one simmer likes to do, you might hate. For me, decorating is like pulling teeth. I'll do it every once in a while, but I mostly find builds from other amazing builders. I also don't really care much for challenges and like to create stories with my sims. The point is, we all have our thing. But it's important to experiment and find what your thing is. I happen to really like the actor career, which a lot of people don't find enjoyable. So don't let others opinions impact what you have fun with. Of course, if my advice works for you then I'm happy but if not, there's no love lost. Do what makes you happy!
Well, that's all I've got. I can definitely make some follow-up posts if my tips change or I discover something new. But for now, I hope this post helps or gives you some ideas!
#sims 4 simblr#sims 4#the sims 4#simblr#sims#sims4#the sims#the sims community#the sims tips#gameplay tips#sims 4 maxis match#reshade#gshade#sims 4 graphics
45 notes
·
View notes
Text

Greetings Miraland ♥
✧・°・。・°・。・ Acting through Nikki as her mortal avatar, the primordial being Valkariel has alighted upon Miraland. These are the snapshots of her adventures in Infinity Nikki.
✧・°・。・°・。・ MIRALAND COLLECTION
Miraland Collection (MC) has launched which means I will begin including MC links in showcase posts for anyone looking for a complete item list used to create the look! Not everything is uploaded, but I will do my best. My full Miraland Collection is here!
✧・°・。・°・。・ TAGS
These are the tags I'll be using to sort my snapshots!
⤷ 「 #infinity nikki 」 - all of my Infinity Nikki posts ⤷ 「 #infinity valkariel styling 」 - outfit showcase posts ⤷ 「 #miraland collection 」 - outfits with item lists on MC ⤷ 「 #infinity valkariel snaps 」 - adventure snapshots ⤷ 「 #whimcam tips 」 - tips for using photo-mode ⤷ 「 #infinity nikki tips 」 - tips for the game ⤷ 「 #infinity valkariel musings 」 - personal thoughts on the game ⤷ 「 #infinity valkariel reblogs 」 - reblogs from other stylists
Please read on for what to expect on this blog.
✧・°・。・°・。・ INTRODUCTION
Hello and welcome to an Infinity Nikki interest blog. This character is 「Valkariel」 and her multiverse has expanded to Miraland. This is a side blog to store snapshots of her outfits and journey, along with tips and tricks for maximizing the potential of Momo's Camera. Nothing fancy! Almost everything is queued!
✧・°・。・°・。・ ABOUT THE PLAYER
The player behind her likes dress up games and taking screenshots. I previously played Love Nikki some years ago, but I wanted more screen space to enjoy the game and art. I do not optimize for gameplay in gacha games, so whatever outfit pieces I collect by sheer luck and passive gameplay will be what we work with. The true Nikki experience is looking like a mess for every style challenge anyway.
✧・°・。・°・。・ GRAPHICS SETTINGS / SPECS
I think I will focus on expanding photo mode options first. Because of this, graphics settings are very relevant. Please be aware that I play on PC, so many of the tips/discoveries for Momo's Camera ("Whimcam") that I write about may not apply on mobile. Apologies in advance if that is the case!
For any non-photo mode gameplay, I run on the lowest settings because I'm a little short on RAM, which makes the game stutter sometimes. Before I enter photo mode using Momo's Camera, I turn up my settings.
⤷ The most important one is "Post-processing" set to medium or higher since this is what allows the "Aperture" setting to blur the background with depth of field / bokeh.
⤷ For areas with a lot of flowers and foliage, "Scenery Details" must be set to high. A medium setting only renders the bushes without the flowers.
✧・°・。・°・。・ OUTRO
I'm very early on in the game still. As she progresses in the game, I'll add more to this post as needed. I hope you enjoy your stay!

6 notes
·
View notes
Text
Swirls, adapters, film, and other stuff
Hi-ho! It's been awhile. Life has been busy to say the least! Christmas is here in the cold whirlwind that is December, and with it the icy windshields, low-hanging frigid mist, and the blasting of both the car heater and Christmas songs. But enough about what's been happening in life, let's talk about my newest hobby.
Vintage Lenses. Oh yeah, the good stuff.
Years ago in July of 2019, I purchased a Canon FD 50mm f/1.8 from a swap meet for $10-15. I looked up what it would take to use on my Sony a7iii, and turns out it was a little metal adapter that cost about the same. Pretty simple!

So that's where it started! I didn't really pursue anything else beyond it since, after all, they didn't have autofocus and weren't as convenient (or sharp) as modern glass. Just a fun little exploration into using old tech on the new stuff!
But a few months later, I watched a video about an infamous Russian lens, the Helios 44-2. Based on the Carl Zeiss Biotar lens design that they stole from the Germans during WWII, the Russians began pumping out their own version of the Biotar, the Helios 44 series, with the most recognizable one of the line being the aforementioned 44-2. Its signature? Producing a swirly effect to the bokeh (out of focus part of the image). And so being curious, I picked one up for under $50. And that swirl effect... yeah, it's pretty cool!
But still again, I didn't really pursue anything else beyond it. They were cool, no doubt about it, just not something that totally piqued my interest.
Flash forward nearly five years later, and it's safe to say that my interest has be piqued! I now have acquired eight lenses to my collection, and yes I most am certainly shopping of more, how nice you to ask!
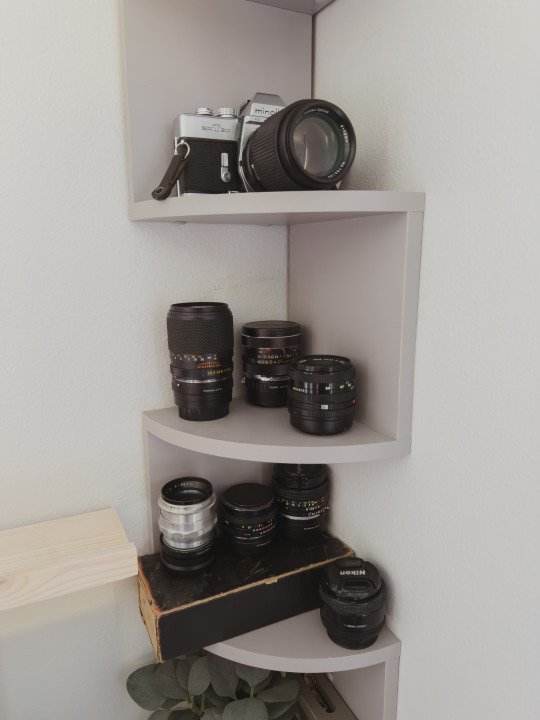
Okay, so I know it’s not a lot at the moment. But that’s okay, because at the end of the day, they are just buckets of fun. Cliché as it may sound if you are a photographer like me, but having a more tactile experience while doing photography is really cool and rewarding. It isn't better, and it isn't somehow an elitist claim per say, but it’s still indeed pretty rad and adds an extra element to your photography, causing (or enabling, depending on how you want to look at it) you to slow down and take more time to make your images.
Speaking of taking more time, let's talk about good ol' 35mm film. For awhile now, I've had a hankering to at least try shooting a roll of film. It isn't a thing that a lot of my generation has experience with as digicams, point-and-shoots, and now smartphones, have been the photography experience for 95% of people my age. Nonetheless, film photography had this sense of mystery behind it, keeping your photos tucked away from you, often times for weeks, without you knowing how perfect that shot actually looks.... or more likely how you actually messed up and will be kicking yourself over it for the next few weeks! So naturally, when I had the opportunity to purchase a Minolta SRT-201 and a few lenses for $30 from a local on OfferUp, I went out and bought my first roll of film; some Kodak Portra 400, regarded by film enthusiasts as one of the great film stocks for about every kind of photography.
The next few weeks consisted of me filling up that roll and sending it off to Gelatin Labs in New Jersey to get developed and scanned into TIFFs for any further editing on my part. Not gonna lie, I was nervous for how they were going to turn out, especially since I was exposing the film based on a light meter app from iPhone (the one on the camera isn't functioning at the moment; would like to get it fixed). But they turned out beautiful! Aaaaaaand now I want to shoot more film lol
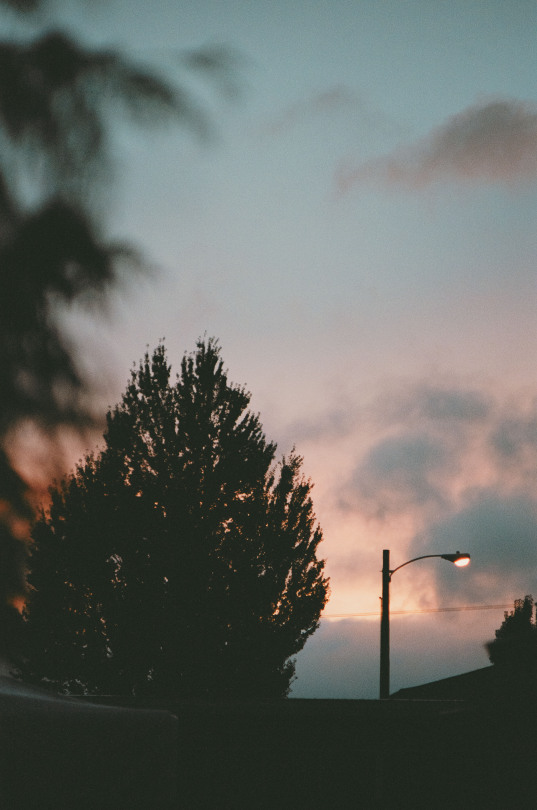
But yeah, this year has been a journey in terms of my photography career/passion! A lot of highlights (no pun intended) that I'm excited to reflect on as the weeks wind down in this year. My photo-a-day-lets-me-use-my-camera-okay?! challenge is going strong, and I've only missed a few days total this year. I'm looking forward to pouring over those photos, sharing them with you, and taking what learned this year into next year!
4 notes
·
View notes
Text
500+ Free Overlays for Photographers & Video Creators
New Post has been published on https://thedigitalinsider.com/500-free-overlays-for-photographers-video-creators/
500+ Free Overlays for Photographers & Video Creators
Adding an overlay to your videos or photos can make a huge difference, whether you’re working on a portrait or a beautiful sunset shot. The good news is that you don’t need to spend hours creating a specific overlay effect from scratch every time you edit a photo or video.
Regardless of your photography or video specialization, a well-designed overlay can do wonders. Our collection of artistic overlays includes a range of options and effects to choose from, so take a look and download your favorites.
With over 500 free photo overlays, you can effortlessly transform your photos into works of art. Whether you’re looking for a vintage, grunge, or abstract effect, you’re sure to find something that suits your style.
You might also like our collections of free Photoshop actions or free Lightroom presets.
14,000+ Actions, Brushes, and Layer Styles for Photoshop
Photoshop Actions & Brushes, Lightroom Presets, Illustrator Brushes, Procreate Brushes, and much more!
The Top Free Photo & Video Overlays
8K Film Grain Texture Overlays (Free, 10 Overlays, JPG)
This free pack of texture overlays contains ten grainy textures captured using a Lomography camera on 35mm film. These high-resolution textures are versatile, easy to apply, and perfect for enhancing your projects with a realistic, cinematic look, adding depth to your creative work.
Sunburst Overlays (30 Overlays, JPG)
This overlay pack will give your photos a dynamic new look. With 30 different sunbursts to choose from, the ability to mix and match, as well as the ability to increase the intensity by duplicating layers, this is a perfect resource.
4K Transparent Shadow Overlays (Free, 100 Overlays, PNG)
These free high-quality, 4K resolution PNG texture overlays are perfect for adding realistic shadows to photos or videos. With diverse patterns like palm leaves, floral designs, and window shapes, they effortlessly blend into your projects.
Magic Photo Overlays (20 Overlays, JPG)
This resource gives you 20 psychedelic photo overlays that will add some spice to all your images. Simply place the overlay over your image, set its mode to screen, and watch it transform your image in just a few clicks.
Vintage Photo Texture Overlays (Free, 20 Overlays, JPG)
These free high-resolution JPGs, created with photographs from the 1800s, will add depth and nostalgia to your photo or video projects. They’re perfect for creating a unique, aged look in your visuals. These overlays offer an effortless way to enhance photos with a timeless charm.
Hand Painted Photo Mask Shapes (EPS, PNG & PSD)
This collection offers 30 different hand-painted acrylic photomasks. Each shape mask has been isolated to make it easy to mix and match masks until you find your perfect combination.
Retro Overlay Effects (Free, Photoshop PSD)
This free Photoshop PSD overlay adds vintage charm to videos and photos. It’s ideal for anyone looking to blend modern photography with classic aesthetics. This overlay is a must-have for creating visually appealing, timeless designs.
Bokeh & Light Leaks Backgrounds (15 Backgrounds, JPG)
Save time and money trying to create your own Bokeh or light leaks effects. This resource gives you 15 ways to effortlessly blend in light leaks and apply a Bokeh effect. Use it in design, photographs, 3D renders, and as a background.
Dust & Dirt Overlay Textures (Free, 10 Overlays, JPG)
These free high-resolution JPG texture overlays are perfect for creating a vintage or worn-out look. They are versatile and suitable for anyone looking to give their visuals an authentic, rugged enhancement. This set is ideal for adding depth and character to your creative projects.
Vintage Effect Resources (JPG & PSD)
Save time and energy trying to recreate a vintage look by applying any of these 30 different overlays. Easily create black and whites or vintage paper and book textures to use on any photo.
4K Film Grain Textures (Free, 32 Overlays, JPG)
These 4K overlays are ideal for creating a gritty film-like atmosphere, bringing an authentic grainy effect to your visuals. They’re perfect for adding a touch of classic film aesthetics to photos and videos.
Dirty Scanner Texture Overlays (Free, 30 Overlays, JPG)
This free collection of texture overlays includes 30 high-quality JPG files that add a unique, edgy look and feel. They’re perfect for anyone looking to give their work a vintage, rough-around-the-edges feel.
Smoke Background Overlays (Free, 15 Overlays, JPG)
These free smoke overlays add a misty, atmospheric effect to photos and videos, creating a sense of depth and intrigue. They’re perfect for enhancing a wide range of creative projects, from dramatic photoshoots to moody video scenes, adding a layer of mystery and sophistication to your work.
Film Texture Frame Overlays (Free, 10 Overlays, PNG)
These free PNG overlays add a film-like texture to your videos and photos. With a resolution of 100 dpi, they are perfect for various graphic projects like banners, mockups, and packaging. This pack is an easy-to-use and effective way to bring a cinematic feel to your visuals.
Graffiti Overlay Effect (Free, Photoshop PSD)
This free Photoshop PSD template will transform standard photos into striking graffiti-style art, mirroring the dynamic energy of street culture. Its user-friendly Smart Object functionality makes it effortless to apply, making it a go-to for impactful, eye-catching visuals that capture the spirit of the streets.
Light Overlays (Free, 120 Overlays, PNG)
This resource pack has 120 different drag and drop light elements that will give all your images a custom feel. This resource includes a step-by-step tutorial that will walk you through the ins and outs of creating memorable pictures with these overlays.
Bokeh Photo Overlays (Free, 7 Overlays, PSD)
The Bokeh effect can add a dramatic flair to any photo. Just add your image to the editor and apply the overlays to get the desired effect you want. You can easily hide or show the bokeh layers until you have the perfect bokeh mix.
Scratch Overlays (Free, 10 Overlays, PNG)
Use this collection of scratch overlays to spice up your photos with ease. By using this collection as an addition to any other collection, you will be making photo magic.
Flare & Haze Texture Overlays (Free, 6 Overlays, JPG)
This flare and haze overlay pack is perfect for your next photographic business card design. This mockup is easy to use and comes with smart objects, so you can just drag and drop your image in.
Golden Glitter Overlay (Free, PSD)
Add a little gold to your next photo with this overlay set. This effect is perfect for your portraits and landscapes shot outside with rich natural light. This collection is also compatible with light leaks, which creates a perfect feel for the photos.
Vintage Photoshop Overlays (Free, 10 Overlays, PNG)
The easiest way to give your photos a realistic aged feel is to apply this vintage overlay. This pack comes with ten different ways to delicately and lovingly age your precious photos.
Rain Effect Overlays (Free, 20 Overlays, JPG)
Getting caught in the rain is not always fun and romantic, but adding rain to spice up your fun and romantic photos can be. This pack includes 20 different ways to add rain to any of your photos.
Distressed Overlays (Free, 10 Overlays, JPG)
Adding a distressed look to your photos can enhance the overall look and quality by giving it a robust retro feel. The pack includes ten easy-to-use overlays that can be mixed and matched to get your desired result.
Grunge Paint Texture Overlays (Free, 5 Overlays, JPG)
This overlay pack has five ways to instantly add a grunge painting feel to any of your photographs. Simply place the desired overlay over your image and then blend it until you have found your perfect look.
Fog Overlays (Free, 10 Overlays, JPG)
Applying a gentle fog to any of your images has never been easier than using any of these ten overlays. Effortlessly enhance the natural fog or simply add it where there wasn’t any. Find your perfect balance and produce high-quality images.
Various Grunge Paper Overlays (Free, 12 Overlays, JPG)
This assortment of grunge papers will be perfect for your next background. With 12 variations to choose from, all are set to a 1000×1000 size at 200 dpi. These will enhance any of your text projects.
Smoke Overlays (Free, 50 Overlays, PNG)
With this resource, you will be able to add smoke to any of your dark and moody photographs, giving them an air of mystery. With ten different variations to choose from, it will be easy to customize each effect until you have found your perfect combination.
Sky Overlays
Getting the perfect outdoor image can be quite hard when everything is right, except for the sky. Choose from any of the sky overlays in this pack to give your photos a new meaning and life with just a few clicks.
Sunset Sky Overlays
Get the perfect sunset look for your outdoor photos with this sunset sky overlay pack. Enhance any of your photos by applying these overlays to give your photos a breath of fresh air.
Lightning Overlays (Free, 10 Overlays, JPG)
Catching an actual lightning strike can be an almost impossible task, but with this overlay pack, you don’t have to wait for the next storm. Simply choose from these ten different overlays and apply them to your image to give them a striking new look.
What Are Photo & Video Overlays?
Overlays, also known as masks, are a creative layer you can add to your video or photos to alter their appearance or add an effect. They come in various forms, from subtle textures to eye-catching elements like light leaks, raindrops, or even animated effects. They’re designed to enhance the mood, style, or story you want to convey in your visuals.
How Do Photo & Video Overlays Work?
Using overlays is simple. You simply superimpose them onto your photos or videos using editing software or apps, and you can then instantly add an extra dimension to your visuals. The overlays can be edited in terms of opacity, size, and placement, giving you full control over the final appearance.
Why Use Photo and Video Overlays?
Boost Creativity: Overlays can be a game-changer when expressing your creativity. Whether you want to add a vintage touch, a dreamy atmosphere, or a touch of whimsy, overlays will do the job for you.
Engage Your Audience: Adding overlays to your visuals can help capture your audience’s attention and leave a lasting impression.
Save Time & Money: Many talented designers and content creators offer free overlays (see above) for personal and commercial use. This means you can access high-quality resources without breaking the bank.
Tell Your Story: Overlays can be used to convey emotions or tell a story. For instance, adding raindrops can create a melancholic mood, while glitter overlays can add a touch of magic.
Conclusion
When creating stunning visuals for your creative projects, whether for social media, presentations, YouTube, or any personal content, you don’t have to break the bank to take your work to the next level.
Photo and video overlays are an easy-to-use resource for enhancing your visuals. With a bit of creativity and the right overlay, you can take your projects to new heights, capturing your audience’s attention and telling your story with flair.
They are a simple yet powerful resource that can quickly transform the quality of your video and photos into something truly compelling. Start exploring the world of overlays today, and watch your visuals come to life!
Related Topics
Top
#000#3d#4K#8K#air#amp#apps#Art#atmosphere#attention#background#Bokeh Effect#book#Business#Capture#Collections#content#creative projects#creativity#creators#Dark#Design#designers#dust#easy#Editing#editing software#effects#emotions#energy
3 notes
·
View notes
Video
vimeo
Bokeh Motion Design from Antony Parker on Vimeo.
✔️ Get it here: templatesbravo.com/vh/item/bokeh/56256169
Bokeh Overlay | Premiere Pro Template
The Bokeh Overlay pack is a collection of 10 high-quality, looped bokeh overlays designed for Premiere Pro 2024 and above. These overlays add a soft, cinematic feel to your videos and images, making them suitable for romantic, cinematic, and elegant projects. With customizable colors and a seamless 60fps design, they offer flexibility for various creative applications.
Each overlay is provided as a separate MOGRT file, allowing easy customization through the Essential Graphics panel. Adjust colors and combine overlays with different blending modes to achieve unique visual styles. Designed in 4K resolution, these overlays integrate smoothly into professional projects, enhancing their quality and aes
0 notes
Photo

"✨ Meet the Minolta MD 28mm: My Lens of Magic ✨ The first time I held this beauty, I knew it wasn’t just a lens—it was a portal to timeless stories. Crisp captures, dreamy bokeh, and a history that speaks through every frame. Took it on a test shoot, and wow... the results feel like art! 📷 Want to add this gem to your collection? DM me or explore my shop below. 😊 🌟 Etsy: https://www.etsy.com/shop/AntiquesUSSR7 🌟 eBay: https://www.ebay.com/str/gavshyn #filmcamera #vintagecamera #classiccamera #filmcameralove #shootingfilm #filmisnotdead #analogphotography #expiredfilm #35mmfilmphotography #filmlife #filmforever #believeinfilm #manualfocus #vintagefilmcamera #filmcamerapassion 💌 Let’s talk vintage gear—send me a message!"
0 notes
Text
Enhancing Model Displays with Miniature LED Lights
For model enthusiasts, attention to detail is everything. Miniature LED lights have become a popular addition to model displays, adding a new level of realism and depth. Whether it's a model train, aircraft, or architectural replica, lighting plays a crucial role in showcasing intricate details that might otherwise go unnoticed. Miniature LED lights are perfect for illuminating small spaces without overpowering the overall design. Their compact size allows them to fit into tight corners, such as inside a model building or along a railway track. Moreover, they offer precise lighting control, enabling users to adjust brightness and color to match the desired ambiance of the display. Warm white LEDs can mimic vintage streetlights, while cool white LEDs replicate modern lighting schemes. Durability is another significant advantage of miniature LED lights. They are built to last, providing consistent illumination for years without the need for frequent replacement. This reliability is especially beneficial for permanent or long-term model displays. Additionally, their low power consumption ensures that your models remain energy-efficient, even when left on for extended periods.
Using Miniature LED Lights in Photography
Photographers can get creative with miniature LED lights to produce stunning visual effects. These lights can be used for light painting, creating bokeh backgrounds, or adding subtle highlights to a subject. Their compact size and portability make them easy to position in tight or unconventional spaces. Miniature LED lights offer endless possibilities for capturing unique and eye-catching shots.
Lighting Up Shelves and Cabinets with Miniature LED Lights
Shelves and cabinets can often be dark and overlooked, but miniature LED lights can change that. Installing these lights under shelves or inside glass cabinets highlights items like books, collectibles, or dishware. The soft illumination adds depth and elegance to your storage spaces, making them both functional and visually appealing. With miniature LED lights, even the simplest shelves can become a focal point in your home.
Eco-Friendly Benefits of Miniature LED Lights
For those who prioritize sustainability, miniature LED lights are an excellent choice. They consume significantly less energy than traditional incandescent bulbs, reducing both your electricity usage and carbon footprint. Additionally, they have a longer lifespan, which means fewer replacements and less waste. By choosing miniature LED lights, you’re making an environmentally responsible decision without sacrificing style or functionality.
Miniature LED Lights for Event Planning
Event planners can use miniature LED lights to create memorable experiences. Whether it’s a corporate event, birthday party, or outdoor festival, these lights offer versatile and eye-catching lighting solutions. From highlighting stage designs to illuminating dining areas, miniature LED lights help set the mood and elevate the event’s overall aesthetic.
Miniature LED Lights for Car Interior Customization
Car enthusiasts can personalize their vehicles with miniature LED lights. Install them along the dashboard, under seats, or around the footwells to create a custom lighting setup. These lights can enhance the interior ambiance and add a touch of luxury. With various colors and brightness levels available, miniature LED lights allow for complete customization to match your style.
Upgrading Retail Displays with Miniature LED Lights
Retailers can attract more customers by upgrading their displays with miniature LED lights. Use them to highlight products, create window displays, or draw attention to sale items. The right lighting can make products appear more appealing and increase sales. Miniature LED lights offer a cost-effective solution for enhancing retail spaces.
Miniature LED Lights for Costume Design
Costume designers can add a futuristic or magical touch to their creations with miniature LED lights. These lights can be sewn into fabric or attached to accessories to make costumes stand out. Whether it’s for cosplay, theater, or Halloween, miniature LED lights add a dynamic element that captivates audiences.
Conclusion
Whether you're a DIY enthusiast, event planner, or simply someone looking to add a touch of magic to your surroundings, miniature LED lights offer endless potential. Their compact size, energy efficiency, and versatility allow them to fit seamlessly into any project, big or small. From lighting up terrariums and jewelry to transforming outdoor spaces and retail displays, these lights provide a simple yet impactful way to elevate any setting. Embrace the brilliance of miniature LED lights and watch as they transform your creative vision into reality.
0 notes
Text
Revival of Vintage Lenses: The Latest Trend, Digital Photography

**Revival of Vintage Lenses: The Latest Trend in Digital Photography**
Welcome back to my digital photography blog! Today, we're diving into one of the most intriguing trends reshaping the photography landscape: the revival of vintage lenses. This trend blends the old with the new, offering photographers unique creative opportunities and distinctive visual styles. Let's explore why vintage lenses are making a comeback and how you can incorporate them into your photography toolkit.
### The Allure of Vintage Lenses
#### Unique Optical Characteristics
One of the primary reasons photographers are drawn to vintage lenses is their unique optical qualities. Unlike modern lenses, which are designed to minimize flaws and produce clinically sharp images, vintage lenses often have imperfections that add character to photos. These can include:
- **Soft Focus:** Many vintage lenses produce a softer image, particularly at wider apertures. This can give portraits a dreamy, ethereal quality.
- **Swirly Bokeh:** Certain vintage lenses, like the Helios 44-2, are famous for their distinctive bokeh patterns, which can add an artistic touch to backgrounds.
- **Chromatic Aberration:** While generally considered a flaw, chromatic aberration (color fringing) can sometimes enhance the aesthetic of an image, giving it a unique look that modern lenses typically avoid.
#### Build Quality and Aesthetic
Vintage lenses are often built with metal bodies and manual focus rings, providing a tactile shooting experience that many photographers find satisfying. The craftsmanship of these lenses is typically robust, and their classic design adds a nostalgic aesthetic to your camera setup.
### Adapting Vintage Lenses to Modern Cameras
#### Lens Mount Adapters
To use vintage lenses on modern digital cameras, you'll need a lens mount adapter. These adapters are readily available for most camera and lens combinations. Here’s how to choose the right adapter:
- **Compatibility:** Ensure the adapter matches both your lens mount and camera mount. Popular mounts include M42, Canon FD, and Nikon F for lenses, and Sony E, Canon EF, and Micro Four Thirds for cameras.
- **Quality:** Invest in a good-quality adapter to ensure a secure fit and to avoid light leaks. Brands like Fotodiox and Metabones are known for their reliable adapters.
Manual Focus and Exposure
Most vintage lenses are manual focus, which can be a learning curve for those used to autofocus. However, this can also be an advantage, as it encourages more deliberate and thoughtful composition. Many modern cameras have focus peaking and magnification features to assist with manual focusing.
Additionally, vintage lenses often lack electronic contacts, meaning you’ll need to adjust exposure settings manually. This includes setting the aperture on the lens and adjusting shutter speed and ISO on your camera.
Creative Benefits of Using Vintage Lenses
Enhanced Storytelling
The unique characteristics of vintage lenses can enhance storytelling by imparting a distinctive mood or atmosphere to your images. For instance, the soft focus and warm colour rendition of a vintage lens can evoke nostalgia or romance, making it perfect for portraiture and lifestyle photography.
Experimentation and Learning
Using vintage lenses can reinvigorate your creative process. The need to manually focus and set exposure slows down the shooting process, encouraging more thoughtful composition and a deeper understanding of photographic principles.
Cost-Effective Quality
Many high-quality vintage lenses are available at a fraction of the cost of modern equivalents. This allows photographers to expand their lens collection and experiment with different focal lengths and styles without breaking the bank.
Popular Vintage Lenses to Explore
- **Helios 44-2 58mm f/2:** Known for its swirly bokeh and sharp central focus, this Soviet-era lens is a favorite among portrait photographers.
- **Canon FD 50mm f/1.4:** This lens offers excellent sharpness and beautiful background blur, making it ideal for portraits and low-light photography.
- **Minolta Rokkor 58mm f/1.2:** Renowned for its build quality and pleasing bokeh, this lens is a great choice for those looking to experiment with shallow depth of field.
Conclusion
The revival of vintage lenses in digital photography is more than just a trend; it's a movement that celebrates the artistry and craftsmanship of past generations. By integrating these classic lenses into your modern workflow, you can achieve unique optical effects, enrich your creative process, and produce images with a distinctive charm that sets your work apart.
So, dig out that old lens from your attic or visit a second-hand camera store, grab an adapter, and start exploring the endless
creative possibilities that vintage lenses offer. Happy shooting!
#disabled artist#photographers on tumblr#art#digital art#landscape#artists on tumblr#my art#original art#photographer#adobe photoshop#art blog#blog#vintage#vintage photography#vintage lenses#informative#information#interesting#social#past#cameras#lightroom#nikonphotography#photography
0 notes
Text
What’s New in Xiaomi HyperOS Update Compare With Old MIUI

Xiaomi enthusiasts, rejoice! The highly anticipated Xiaomi HyperOS Update is on the horizon, poised to revolutionize your smartphone experience. In this blog post, we’ll delve into the exciting features that await you in this cutting-edge operating system. Buckle up as we explore the magic of HyperOS!
Xiaomi HyperOs Update Features List
1. Revamped HyperOS Control Center

The revamped Control Center draws inspiration from iOS 17, offering a sleek and intuitive interface. Seamlessly manage your media, switch tasks, and elevate your interaction with your device. 2. Lock Screen Customizations

HyperOS empowers you to take control of your lock screen. Choose from an extensive selection of pre-defined wallpapers, apply various styles, and add a depth effect—reminiscent of iOS. Personalize your device like never before. 3. Bokeh Effect in Photos

Unleash the Bokeh effect within the gallery. Blur backgrounds, beautify your shots, and transform every snapshot into a work of art. HyperOS takes your photography game to the next level. 4. HyperOS Weather

Experience a sleek new design in the Weather app. Prioritizing easy access and spot-on forecasts, this revamped app looks cool and works great. 5. Notes App with Material You Design

HyperOS incorporates Android 14, seamlessly blending aesthetics and functionality. Your Notes app adapts to the Material You design, changing its appearance to match your wallpaper style. 6. Redesigned Calendar App

The Calendar app undergoes a complete makeover. With a more user-friendly interface, you can now easily see the number of weeks in a month, jump to specific dates, and even calculate your age—all within the app. 7. New Camera Experience

Premium Xiaomi phone users can anticipate a transformed camera app. Quick mode navigation, vibrant touches, and an overall enhanced photography experience await, making capturing moments more enjoyable than ever. 8. HyperOS App Vault

Access your favorite apps swiftly through the revamped App Vault. It’s your one-stop hub for quick actions, shortcuts, and essential information. 9. New Battery Features

HyperOS introduces battery optimizations, extending your device’s endurance. Say goodbye to midday charging woes! 10. Charging Animations

Watch your phone charge with delightful animations. HyperOS adds a touch of whimsy to mundane tasks. 11. Improved Privacy and Security

HyperOS prioritizes your data security. Enhanced privacy controls and robust system security ensure peace of mind. 12. 30 New Awesome Wallpapers and Live Stickers

Refresh your home screen with a stunning collection of 30 new wallpapers. From serene landscapes to abstract art, there’s something for everyone, Add flair to your conversations with animated stickers. Express yourself like never before. 13. New Gallery and File Manager

The Gallery app receives a facelift, making it easier to organize, view, and share your precious memories. Manage your files effortlessly with the revamped File Manager. It’s sleek, efficient, and user-friendly. 14. HyperOS Sidebar: Swipe and Go

Access your favorite apps, contacts, and tools with a simple swipe. The HyperOS Sidebar streamlines multitasking.
Comparison: HyperOS vs. MIUI
Let’s compare HyperOS with its predecessor, MIUI: Features MIUI HyperOS Performance While efficient, it tends to consume more storage space Minimal system storage usage ensures lag-free performance Multitasking Capabilities Good multitasking features but not as refined as HyperOS Enhanced multitasking allows seamless switching between apps AI Functionalities AI features are present but less prominent Advanced AI integration for smarter recommendations and personalized experiences Security Model Comprehensive security measures protect user data Solid security, but HyperOS takes it up a notch 1. Release Date and Phases - HyperOS was officially unveiled alongside the Xiaomi 14 flagship in late 2023. - The official release date for HyperOS is October 26, 2023. - The rollout occurred in two phases: - December 2023 to January 2024: Exclusive firmware for users in China. - First Quarter of 2024: Global release for supported phone and tablet models. 2. Supported Devices List HyperOS is pre-installed on several Xiaomi devices, including: - Xiaomi 14 series smartphones - Xiaomi Watch S3 smartwatch - Xiaomi TV S Pro 85" MiniLED - And more! The following devices are slated to receive the Xiaomi hyper os update in India in 2024: - Xiaomi MIX Fold 2 and MIX Fold 3 - Xiaomi 13, 13 Pro, and 13 Ultra - Xiaomi Pad 6, Pad 6 Max 14, and Pad 6 Pro - Redmi K60, K60 Extreme Edition, and K60 Pro - Xiaomi TV S Pro 65, 75, and 85 Mini LED - Xiaomi Smart Camera 3 Pro PTZ version IP - Xiaomi Sound - Xiaomi Watch S3
Conclusion
Exciting news awaits! HyperOS is set to make a grand debut alongside the Xiaomi 14 series smartphones. If you’re currently on MIUI 14, fret not! Most of these phenomenal features seamlessly integrate with your device. Simply snag the dedicated app from our APK section, and you’re all set to embark on the enchanting journey of HyperOS magic. Get ready to redefine your Xiaomi experience! 🚀📱 Read the full article
0 notes
Text
Photo Editor by BeFunky

Edit your photos. Create beautiful collages. Design stunning graphic design layouts. With BeFunky, you can do it all! We've taken the complexity out of the photo editing and graphic design process with our easy-to-use, one-tap features. With our A.I.-powered photo editing tools, intelligent auto-collage feature, and professionally made design templates, BeFunky truly is photo editing and graphic design made for everyone! Turn Your Photos Into Paintings, Cartoons, Sketches, and More Our Artsy effects are the most unique feature of our Photo Editor. With one tap, your photos will take on stunning, artistic characteristics. From realistic textures to natural-looking brush strokes and saturated color palettes, our artsy effects will instantly turn your photo into a work of art! Remove Backgrounds From Photos in One Tap Our A.I.-powered Background Remover intelligently detects the subject of your image and precisely removes the surrounding background. Perfect for changing backgrounds on product photography, portraits, and more! Enhance Image Appearance With A.I. There's a lot of trial and error and fine-tuning involved in enhancing a photo. Our A.I. Image Enhancer takes the guesswork out of photo editing. With a single tap, it'll make colors more vibrant and add a touch of contrast to enhance details, giving your photos what they need to really pop. Bring Out the Natural Beauty in Your Portraits Our A.I. Portrait Enhancer gives you professional portrait retouching results, all in a single tap. Quickly enhance exposure, soften the appearance of fine lines and blemishes on all skin tones, whiten teeth and brighten eyes without eliminating freckles and beauty marks! Create Photo Collages with a Single Tap Automatically generate the optimal collage layout with our Collage Wizard. It can quickly and easily produce high-resolution photo collages without cropping or clipping a single image, so no fine details get lost in the process. It’s automatic collage generating technology like no other! Access to Hundreds of Free Font Options Our Text Editor is packed full of fonts and customization options to add text to photos, designs, and collages. Choose from our collection of fonts hand-selected by our team of graphic designers, upload your own fonts, or use Google Fonts! Free Templates For Quick and Easy Graphic Design Our design templates offer the perfect starting point for any project. You’ll find thousands of design templates created by our team of professional graphic designers. We provide templates for birthdays, weddings, small businesses, and more! Don't want to start with a template? No problem! Start your design with a blank canvas and let your creativity take over! Give Your Photos a Unique Look There's truly no limit to what you can create! Everything from Vintage and Chromatic effects to filters that make your photo resemble a Van Gogh painting is right at your fingertips. Are you looking to add a texture, bokeh, or a design overlay? You'll find all that and more in BeFunky. Access Hundreds of Premium Features with BeFunky Plus Subscribe to BeFunky Plus on a monthly or annual basis to gain access to premium photo editing, collage making, and graphic design tools. Easily access our Plus features across our mobile and tablet apps as well as on the desktop web browser version of BeFunky by simply logging in. - For tips and inspiration, go to befunky.com/learn/ and follow @befunkyapp on Instagram Get help when you need it at support.befunky.com Read the full article
0 notes
Photo
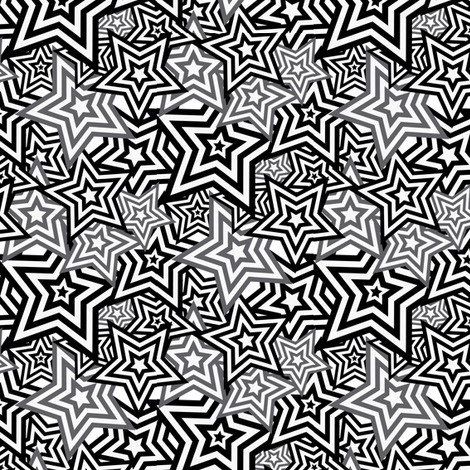


to make the sky i simply used those 3 images. the layer with the star pattern was duplicated and turned into a halftone. so it would look like lil lightbulbs. the vortex pattern was just my attempt at making it look like the ‘bulbs’ were flashing lol
#the starpattern and vortex pattern were ALSO ripped from the game itself#honestly? i jsut wanted to show the bokeh texture. i really like sparkly textures. if you do#add this bokeh to your collection
0 notes
Text
How To Get The Affordable New Background Remover Online

Tips On How To Take Away Background From Image
This can additionally be an excellent house to write down what makes this product special and the way your customers can profit from this item. You can select a half of an image opened in Preview, then copy and paste it elsewhere or crop the content surrounding it. If the image is in a PDF, you want to extract the PDF page as a picture before you should use the image mark-up tools. To guarantee all the product’s edges are properly trimmed, zoom in on the edges to find any leftover traces of the prior background.
After viewing product detail pages, look right here to search out a simple approach to navigate back to pages you are interested in. Get Photoshop and 20+ Creative Cloud apps plus unique business features. Create beautiful images withPhotoshop brushes,Content-Aware Fill,Photo effects,Neural Filter,Sky alternative and the many tools photographers rely on. If you’d like to file an allegation of infringement, you’ll have to comply with the process described in our Copyright and Intellectual Property Policy.
When I had trouble modifying the hi-res image, Ms. Kasia Sobanska gave me very quick and skilled support to figure out the problem. Remove.bg is one of the best site for removing and modifying backgrounds, the program works very efficiently and provides the option to add a background as nicely. picture background remover now with 100+ photo stickers and Text Editor to Add textual content to your photos. The app routinely blurs backgrounds so you will get that portrait mode impact, even on gadgets that don’t usually have the feature.
Backup Your Iphone Pictures And Movies With This Slim Usb Drive
It also enables you to crop out the background entirely and substitute it with other images, almost like a green screen. You will obtain a e mail again with picture faraway from background in 1-3 enterprise days. To have order rushed to 24 hours please select choice from drop down menu. ~ If you aren't an expert, and would like your subject added to a special background, you ought to buy my modifying service and I will edit it for you. Background shade can be changed or altered based on sure picture modifying requirements.
I work with girls all around the globe to create businesses that gentle them up and encourage Get help to remove images and video others. You can connect with me on Facebook, Instagram and Pinterest.
Variety of light kits similar to ring lights, softbox kits, twin arm lights used for livestreaming, youtube videos, make up and so on. We have a global staff of gurus working 24 hours, 7 days per week to ship your photographs on time. Grest service getting my household of eight and 24 suiitcases to the sirport. Advertisement cookies are used to offer guests with relevant advertisements and marketing campaigns. These cookies track guests throughout websites and acquire info to supply custom-made advertisements. Functional cookies assist to perform certain functionalities like sharing the content material of the website on social media platforms, collect feedbacks, and different third-party features. This website makes use of cookies to enhance your experience whilst you navigate by way of the internet site.
It can sharpen the colors of your pictures, crop them, and surely do some backgrounds removal for product photographs. Dropicts will assist you to raise engagements or create consideration that your products need.
Product Description
If you may be operating a enterprise online, you first must learn about a proper art work service provider. Simply create a Pheditor account and wait a few minutes for it to be accredited. Once you’re in, addContent any pictures you wish to have edited. Just upload your image and the background might be removed routinely. In my exams, this works quick and ease with an image with a stable background (i.e the background isn't too difficult to remove). If you have a bokeh photo with non-solid background of various objects, you may nonetheless want the Lasso tool from Photoshop or different, extra highly effective image editors.
Out of those, the cookies which are categorized as necessary are saved in your browser as they're important for the working of fundamental functionalities of the website. We also use third-party cookies that help us analyze and understand how you image background removal employ this web site. These cookies might be stored in your browser solely together with your consent. But opting out of a few of these cookies might have an result on your shopping experience.
Take Away The Background From Any Picture With Hint
There are varied services provided by Dropicts ranging from color correction, take away the background from a photo or image, and even retouching. Three steps are all you have to get your images professionally edited or retouched by Dropicts. Are you struggling to get the background of the picture edited or eliminated and still don’t wish to give it a glance of a fake image? At Damco, we provide a complicated level of clipping and cropping providers for any image, using the vector-marking technique, which supplies the edited image an original look. Our group has huge expertise with picture clipping and cropping, background elimination and image masking. Remove.bg is a website whose sole objective is to take away the background from photographs. Thus, you got here to know why the background of the images has to be removed.
Check us out at:
Name: Clickmajic
Email: [email protected]
Tool: Clickmajic
Blog: Clickmajic.com/blog/
Web: Clickmajic.com
Facebook: facebook.com/click.majic/
Youtube: www.youtube.com/channel/
Instagram: instagram.com
Google sites: https://sites.google.com/view/clickmajic-image-bg-removal/home
1 note
·
View note
Text
30 Tutorials for Creating Stunning Photo Effects in Photoshop – Speckyboy
New Post has been published on https://thedigitalinsider.com/30-tutorials-for-creating-stunning-photo-effects-in-photoshop-speckyboy/
30 Tutorials for Creating Stunning Photo Effects in Photoshop – Speckyboy
Photoshop is a powerful tool for creating a range of stunning photo effects that can take your images to the next level. With the help of these tutorials, you will learn how to recreate various effects, including glitch, sepia tone, watercolor, tilt-shift, HDR, cinematic, bokeh, sketch, and many more.
By mastering these techniques, you can add an artistic touch to your photos and make them truly memorable. Whether you’re a professional photographer, graphic designer, or just someone looking to improve their photo editing skills, learning how to create these photo effects in Photoshop can be a valuable asset.
Exploring the world of Photoshops and experimenting with different photo effects can be a lot of fun. With a bit of practice and creativity, you will soon be creating stunning results that are sure to impress.
So why not start learning to recreate these photo effects in Photoshop today? With dedication and a little time, you can become a master of photo editing in Photoshop in no time.
If you prefer a different application, we also have collections of tutorials for Lightroom, Procreate, and Figma.
The Top Photo Effect Photoshop Tutorials
Analog Effect in Photoshop
The analog photography effect mimics the look and feel of old film photographs. This aesthetic can be achieved by adding grain, light leaks, and desaturated colors in Photoshop. This tutorial takes you through the steps to re-create the effect, giving your photos a nostalgic charm and artistic touch.
Analog Effect Photoshop Action
Black & White Conversion Effect in Photoshop
The black and white photography effect is a classic style that emphasizes contrast and texture, creating a timeless and elegant look. This Photoshop video tutorial will teach you how to create stunning black and white images in Photoshop.
Black & White Effect Photoshop Actions
Bokeh Effect in Photoshop
Bokeh is a photography technique that creates a blur in the background of a photo, emphasizing the subject and adding a dreamy, romantic feel. This Photoshop tutorial will guide you through the steps to add the bokeh effect to your photos.
Bokeh Effect Photoshop Actions
Cinematic Effect in Photoshop
The cinematic photography effect is a dramatic and moody style that mimics the look and feel of movie stills, with deep shadows, rich colors, and a cinematic aspect ratio. This tutorial will show you how to re-create the cinematic effect, giving your photos a professional and cinematic flair.
Cinematic Effect Photoshop Actions
Color Grading Effect in Photoshop
Color grading involves adjusting the colors in a photo to create a specific mood or atmosphere. Using Curves and Hue/Saturation adjustments, this Photoshop tutorial takes you through the steps of adding stunning color grading effects to your photos.
Color Grading Effect Photoshop Actions
Comic Effect in Photoshop
The comic effect is a fun and playful style that mimics the look and feel of comic book illustrations, with bold outlines, vibrant colors, and halftone patterns. This Photoshop video tutorial will teach you how to create stunning comic effects, giving your photos a creative and whimsical vibe.
Comic Effect Photoshop Actions
Cross-Processing Effect in Photoshop
Cross-Processing is a photography technique that involves developing film in the wrong chemicals to create unexpected and artistic color shifts. This Photoshop tutorial will take you through the steps to add cross-processing effects to your photos, giving them a retro feel.
Cross-Processing Photoshop Actions
Dispersion Effect in Photoshop
The Dispersion effect is a creative and dynamic style that creates the illusion of a shattered or fragmented subject, with particles or fragments dispersed across the photo. This effect can be achieved in Photoshop using various tools, such as the Liquify filter and layer masks. This tutorial will show you how.
Dispersion Effect Photoshop Actions
Double Exposure Effect in Photoshop
The Double Exposure effect blends two or more images together, creating a dreamy and surreal composition. Using layer masks and blend modes, this tutorial guides you through the process of creating stunning double exposure effects in Photoshop.
Double Exposure Effect Photoshop Actions
Duotone Effect in Photoshop
The Duotone effect is a creative technique that uses two contrasting colors to create a bold and striking final image. It is often created using gradient maps, curves, and color balance in Photoshop. This tutorial will show you how to add this unique effect to your photos.
Duotone Effect Photoshop Actions
Glitch Effect in Photoshop
The Glitch effect mimics the look of digital errors and glitches, creating a distorted and fragmented image. This Photoshop video tutorial will show you how to create fantastic glitch effects, allowing you to add an edgy vibe to your photos.
Glitch Effect Photoshop Actions
Grain Effect in Photoshop
The Grain effect is a timeless technique that adds a film-like texture and grain to digital images, creating a vintage and nostalgic look. This Photoshop tutorial will take you through the steps to re-create the effect in your photos.
Grain Effect Photoshop Actions
Grunge Effect in Photoshop
The Grunge effect is an edgy style that creates a raw and distressed look in photos, often with scratches, stains, and grungy textures. This effect can be easily achieved in Photoshop, using various techniques like brushes, textures, and blend modes.
Grunge Effect Photoshop Actions
HDR Effect in Photoshop
The HDR (High Dynamic Range) photography effect is a popular technique that combines multiple exposures to create a more detailed and dynamic image. This tutorial guides you through the steps to create the HDR effect using Photoshop tools like merging and tone mapping.
HDR Effect Photoshop Actions
High Contrast Effect in Photoshop
The High Contrast effect is a striking style that emphasizes the difference between dark and light areas in a photo. Photoshop can achieve this effect using various adjustments, such as levels and curves, and this tutorial will show you how.
High Contrast Effect Photoshop Actions
Infrared Effect in Photoshop
Infrared photography is a surreal style that creates a false-color effect in photos. Using channel swapping and color balance, this Photoshop tutorial guides you through the process of re-creating the effect.
Infrared Effect Photoshop Actions
Lens Flare Effect in Photoshop
The Lens Flare effect is a dynamic technique that adds a burst of light to an image, often simulating the look of the sun or other light sources. Learn how to add lens flares to your photos in this Photoshop tutorial, giving you a dramatic and cinematic touch.
Lens Flare Effect Photoshop Overlays
Light Leak Effect in Photoshop
The light leak effect simulates the look of light leaking into a camera, creating a dreamy and, at times, nostalgic look. This easy-to-follow Photoshop tutorial will show you how to add stunning light leaks to your photos.
Light Leak Effect Photoshop Overlays
Lomo Effect in Photoshop
The Lomo (Lomography) effect is a creative photography technique that mimics the look of photos taken with a Lomo camera, with bold colors, high contrast, and vignetting. This Photoshop tutorial will guide you through creating your own Lomo effects.
Lomo Effect Photoshop Actions
Motion Blur Effect in Photoshop
The Motion Blur effect is a popular technique used to convey motion and speed by blurring moving objects. This Photoshop video tutorial will show you how to create stunning motion blur effects in your photos, adding a sense of dynamism and energy.
Motion Blur Effect Photoshop Actions
Oil Painting Effect in Photoshop
The oil painting effect is an artistic photography style that mimics oil paintings by applying filters to a photo giving it a textured, brushstroke look and feel. This Photoshop video tutorial will show you how to do it yourself.
Oil Painting Effect Photoshop Actions
Posterize Effect in Photoshop
Posterize is a photography effect that reduces the number of colors in an image, creating a bold and simplified look to create a poster-like appearance. Learn how to create stunning posterize effects in this Photoshop tutorial.
Posterize Effect Photoshop Actions
Selective Color Effect in Photoshop
The selective color effect allows you to highlight or change the colors of specific parts of an image and convert the rest to black and white (or desaturated). This Photoshop video tutorial will show you how to create your own selective color effects.
Selective Color Effect Photoshop Actions
Sepia Tone Effect in Photoshop
The sepia tone effect is a photography technique that adds a warm and vintage look to digital images, giving them an aged, antique look. This Photoshop tutorial will take you through the steps to add sepia tones to your own shots.
Sepia Tone Effect Photoshop Actions
Sketch Effect in Photoshop
The Sketch effect is an artistic technique that mimics the look of a hand-drawn sketch, with lines, strokes, and shading. Following this sketch effect Photoshop tutorial, you can add a personal touch to your photos.
Sketch Effect Photoshop Actions
Solarize Effect in Photoshop
The Solarize effect converts the colors in a photo to create a high-contrast, surreal effect. This video tutorial will show you how to add this unique and bold effect to your photos.
Solarize Effect Photoshop Actions
Tilt-Shift Effect in Photoshop
The tilt-shift effect is a creative photography style that simulates the look of a miniature world by blurring parts of an image. This easy-to-follow Photoshop tutorial will show you how to add the effect to your photos.
Tilt-Shift Effect Photoshop Actions
Vintage & Retro Effects in Photoshop
Vintage and retro effects are a timeless photography style that adds a nostalgic and old-fashioned look to digital images. This Photoshop video tutorial will guide you through the steps so that you can add your own vintage and retro style to your photos.
Vintage & Retro Effect Photoshop Actions
Vignette Effect in Photoshop
The Vignette effect is a versatile technique that’s achieved by darkening the edges of a photo to draw attention to the center. This Photoshop tutorial will take you through the steps to create your own vignettes.
Vignette Effect Photoshop Actions
Watercolor Effect in Photoshop
The watercolor effect is an artistic technique that mimics the look and feel of watercolor paintings, with soft colors, blurred edges, and brush strokes. This Photoshop tutorial will guide you through creating your own watercolor effects.
Watercolor Effect Photoshop Actions
Photo Effect Tutorial FAQs
What are photo effect Photoshop tutorials?
These tutorials guide you through various techniques to apply creative and artistic effects to photos using Photoshop. They range from basic editing to advanced manipulation.
Can beginners use these photo effect tutorials effectively?
Absolutely! Most tutorials are tailored for beginners, breaking down complex effects into simple steps. As skills develop, more advanced tutorials can be tackled.
What kinds of effects can I learn from these tutorials?
You can learn a wide array of effects, like turning photos into paintings, creating vintage looks, adding dramatic lighting effects, and much more.
Do I need the newest version of Photoshop to follow these tutorials?
While some may use newer features, many tutorials are applicable to older versions of Photoshop as they rely on fundamental tools and techniques.
How long does it usually take to complete one of these tutorials?
It varies based on the complexity of the photo effect. Some can be completed in minutes, while others might take longer to fully grasp and apply.
Can practicing these tutorials improve my overall Photoshop skills?
Yes, working through these tutorials not only teaches specific effects but also improves your overall understanding and proficiency in Photoshop.
Learning New Photo Effects
Learning new effects in Photoshop is not only fun but can also be a valuable skill. By mastering the art of photo editing, you can offer your clients unique and visually stunning imagery that will set you apart from the competition.
By diving into these photo effect tutorials, you will, of course, learn valuable new skills, but you will undoubtedly unleash your creativity as well!
More Photoshop Tutorial Collections
Related Topics
#ADD#amp#analog#Art#atmosphere#attention#background#blur#Bokeh Effect#book#change#channel#chemicals#Collections#Color#colors#competition#complexity#Composition#course#creativity#Dark#Design#Difference Between#diving#do it yourself#double#Duotone Effect#easy#Editing
0 notes
Photo

We’re into our second anniversary of the #ShotOnSnapdragon photo competitors and with it, one closely examines how platforms just like the Qualcomm Snapdragon™ cellular belvedere improve the capabilities of your smartphones photography. in case you anchorage already, make certain to try our advice to support improve your images abilities as well.
building on closing anniversary’s analyse image signal Processors ISP, nowadays we’re exploring how Qualcomm Spectra™ ISP know-how mixed with Computational photography capabilities takes your smartphone images to an entire new stage. by way of computational photography, we mean advanced imaging concepts that increase and prolong the general capabilities of digital images. Some of these permit photographers to manually tweak their photos, whereas others work cautiously in the background guaranteeing that your photos all the time look the ultimate. Let’s dive in. cell platforms built for crunching picture information whereas an ISP is ideal at handling commonplace photography and video catch tasks, extra superior computational photography algorithms require more powerful hardware. use instances encompass utility bokeh blur for a professional brand abyss of box effect, high activating range colour processing, multi-digicam taking pictures, electronic graphic Stabilization IS, and advanced digital zoom capabilities. Snapdragon mobile platforms are constructed from a variety of processing materials, each with their personal specialities and capabilities – many of which can be relevant for superior photo processing. moreover the familiar intention CPU and photograph taking pictures Qualcomm Spectra ISP, Snapdragon mobile systems include a Qualcomm Hexagon™ agenda signal Processor ESP and Qualcomm Adrenal™ photos Processing unit GPU which are each most appropriate to crunching superior imaging algorithms. using these add-ons across the belvedere is conventional in the cell industry as amalgamate Processing. accumulation the capabilities of assorted GSoC processing components improves the performance and energy affectivity of computational images on a Snapdragon cell belvedere each and every of these processing units is useful at various kinds of algorithms. CPUs, as an instance, offer the most advantageous efficiency where the algorithm isn’t highly parallel and requires aberration operations. in the meantime extremely alongside algorithms, which often crop up in photo publish-processing thoughts like HER and article removable, run a great deal sooner on a GPU. finally, a ESP is the superb processing unit for real-time sensor-based applications and laptop discovering tasks similar to article detection. as an example, smartphones powered by Snapdragon offer electronic picture Stabilization IS without the need for any extra automated constituents. by using monitoring circulate from the cell’s accelerometer hardware and working monitoring algorithms on the Adrenal GPU, the Spectra ISP can lift a very good looking picture at simply the correct time. This stops your photographs from popping out bleared, although you don’t have steady palms. The newest Qualcomm Spectra ISP inner the Snapdragon and Qualcomm Spectra internal the Snapdragon consist of committed laptop vision CRISP processing accessories for even more productive dispatch. This permits the CRISP itself to run article apprehension, history replacement, and real-time K HER bokeh becloud, releasing up processing elements on the CPU, GPU, and ESP to run other processes. making images smarter application bokeh depth-of-field portrait modes and application bokeh accept become a basic effect of smartphone cameras. providing DSLR-like blur, a lot of lighting fixtures effects, and alike background substitute outcomes to enormously exchange the seem to be of your photographs. To create a utility blur impact, the camera requires abyss advice about the scene you’re shooting in. a technique to do this is to include a dedicated abyss camera, similar to a time of flight sensor, to notice the specific distance. then again, a mobile with two cameras can choose a picture at two distinct focal lengths simultaneously. Snapdragon mobile structures support distinctive cameras should still smartphone manufacturers are looking to put into effect this know-how. A choice formula acclimated through loads of single cameras is to assume photos at multiple focal point aspects in very quick assumption. as soon as the telephone has recorded at assorted focal lengths, stereo algorithms, which work in an identical technique to our eyes, are applied to discern which altar is in the beginning and that is within the heritage. A second abashing algorithm is then utilized to the photo to soften objects that aren’t in the centre of attention. The improvement of the usage of these components is that the focal field, the volume of the blur, and different outcomes may also be modified afterwards the photo has been taken. This fact can also be saved within the HEIGH graphic structure. software Bokeh off utility bokeh on With the CRISP interior the latest Snapdragon mobile systems, handsets are capable of the following bokeh becloud to no longer simply photographs however to reside video as neatly. The CRISP produces bokeh blur at as much as K in the precise-time video, while also assisting high activating latitude, -bit excellent as smartly. sophisticated zooming Zooming in on subjects in a very effective photography approach to frame the excellent photo. youngsters, some mobile phone cameras accept traditionally been caught with agenda zoom, which enormously decreases excellent when you initiate zooming in somewhat some distance. Optical zoom or telephoto cameras have looked as if it would aid in this attention, however extra cameras and lenses can also be high priced. It’s viable to buy very first-rate zoomed-in photographs with only a single digital camera, because of some clever algorithms and hardware to run them efficiently. Qualcomm Optimized™ digicam function is engineered to capture images in quick access. Algorithms mix information from these shots collectively by means of gazing transformations and similarities amid pixels. These sub-pixel differences between photographs are used to glean further details, growing a more robust resolution photograph packed with further aspect. this is often known as super-resolution zoom, and it creates awfully superior effects to digitally agriculture into your picture afterwards pressing the bang. .x digital Zoom instance .x tremendous resolution Zoom example excessive activating latitude HER HER processing is required in scenes with a large variation between gentle and darkish with the intention to prevent over or underexposure. Examples encompass making an attempt to photography an object against a brightly lit historical past corresponding to a blurred sky or shooting in low gentle with a single easy supply. Smartphones powered by means of Snapdragon create high dynamic latitude photographs by way of combining varied photographs collectively, each and every with a unique exposure setting. Darker photos bring out highlights appropriately, such because of the solar and clouds, whereas brighter exposures carry out highlights in the dead of night. Algorithms mix details from all of those pictures collectively to actualize an image that offers greater highlights and nonsensicality than a common picture. Qualcomm applied sciences’ “ghost-changeless” HER expertise additionally works to stay away from bleared edges by using audition and getting rid of any movement from the attempt. HER Off HER On helping you retaking enhanced pictures contemporary smartphones have confused previous just featuring notable digital camera hardware, they now additionally offer cutting edge processing innovations and hints to shut the ever-smaller hole with professional brand DSLR cameras. Snapdragon mobile systems are at the heart of most of the contraptions providing consumers with the absolute best in cell images. Of path, advanced processing is simply a part of the photo. if you wish to steal fabulous snaps, be sure to take a look at our expert counsel on the way to grasp the ideal picture. And don’t neglect to publish your entries to the #ShotOnSnapdragon image competition to your opportunity to pick a Snapdragon-powered smartphone. content sponsored through Qualcomm applied sciences. Qualcomm Snapdragon, Qualcomm Spectra, Qualcomm Adrenal, Qualcomm Kayo, Qualcomm Optimized and Qualcomm Hexagon are products of Qualcomm technologies, . Sandor its subsidiaries.
1 note
·
View note
Text
Creating Ethereal Effects | Photo Retouching for Fantasy and Surreal Imagery
Photo retouching allows us to unleash our creativity and transform ordinary photographs into extraordinary works of art. One genre that offers endless possibilities for imaginative editing is fantasy and surreal imagery. By incorporating ethereal effects into your retouching process, you can transport viewers to enchanting and otherworldly realms. In this article, we will explore techniques for photo retouching that will help you create stunning and ethereal effects for fantasy and surreal imagery.
Start with an Inspiring Concept: Before diving into the retouching process, have a clear vision and concept in mind. Determine the mood, theme, and atmosphere you want to convey in your final image. Collect references, sketches, or mood boards to guide your creative journey. This will ensure a cohesive and captivating result.
Manipulate Colors and Tones: Color plays a significant role in creating ethereal effects. Experiment with color grading techniques to evoke a dreamlike or fantastical ambiance. Enhance or modify colors to create a harmonious and otherworldly palette. Adjust tones and contrasts to create depth and enhance the surreal atmosphere.
Blend Elements Seamlessly: To achieve a seamless integration of various elements in your image, master the art of blending. Use layer masks, blending modes, and opacity adjustments to merge different elements together. Pay attention to light sources, shadows, and reflections to create a realistic and immersive composition.
Experiment with Textures and Overlays: Textures and overlays can add a touch of magic and mystery to your images. Explore a vast range of textures, such as fog, smoke, or bokeh, and experiment with blending them into your photographs. This can create a sense of depth, atmosphere, and surrealism.
Add Magical Glows and Lighting Effects: To enhance the ethereal quality of your image, incorporate magical glows and lighting effects. Use brushes or gradients with soft, luminous colors to paint gentle glows around elements in the scene. Experiment with light leaks, lens flares, or soft rays of light to create a whimsical and enchanting atmosphere.
Emphasize Dreamlike Details: Focus on small but impactful details that enhance the dreamlike quality of your image. This could be accentuating the wisps of hair, creating glowing eyes, or adding surreal elements like floating objects or levitating subjects. These details can elevate the overall impact and make the image feel truly ethereal.
Embrace Surreal Compositions: Don’t be afraid to break the rules of reality and experiment with surreal compositions. Combine elements from different photographs, manipulate proportions, or create impossible scenarios. Surreal compositions allow you to push the boundaries of imagination and create truly extraordinary imagery.
Utilize Creative Filters and Brushes: Explore the vast array of creative filters and brushes available in photo editing software. These tools can add unique textures, patterns, or effects to your image, further enhancing the ethereal atmosphere. Experiment with watercolor, oil painting, or glitch effects to add a touch of artistic flair.
Pay Attention to Detail: While working on fantasy and surreal imagery, attention to detail is crucial. Fine-tune the edges, refine the transitions between elements, and ensure consistency in lighting and color tones. The little details can make a significant difference in creating a cohesive and believable fantastical world.
Practice and Experiment: Creating ethereal effects in photo retouching is a journey of experimentation and practice. Allow yourself the freedom to explore different techniques, try new ideas, and learn from the results. With each project, you’ll gain insights and refine your skills, ultimately developing your unique style and approach.
Photo retouching for fantasy and surreal imagery offers endless opportunities for creative expression. By manipulating colors and tones, blending elements seamlessly, incorporating textures and overlays, adding magical glows and lighting effects, emphasizing dreamlike details, embracing surreal compositions, utilizing creative filters and brushes, paying attention to detail, and practicing and experimenting, you can create captivating and ethereal images that transport viewers to wondrous and imaginative realms. Unleash your creativity, let your imagination soar, and embark on a journey of enchantment through photo retouching.
Author: Joseph Simon, 3D Artist @cuttingedger
0 notes