#analog video mixer
Video
undefined
tumblr
analog setup?
from sometime around may/june ‘22
4 notes
·
View notes
Text

The audio rip from my last dawless jam of the year. Out of the three new toys that I got for myself in the last few months, two of them are on display here.
The entire jam is running through my Novation Circuit Tracks. It's providing the percussion and the two simple looping higher instruments, while also sometimes sending a signal to one of my new toys. That is the Behringer Model D. It's a fully analog 3 voice oscillator made to be as close to a classic minimoog model D as possible without costing an arm, leg, and a few other sensitive bits of anatomy. Most of the solo lines I play are on the Behringer MS-1. Both the MS-1 and Model D audio is going directly into the Circuit so all the audio you're hearing is coming out of that one tiny little device.
The other new toy that's in the loop is the Zoom MS 70 effects pedal. It's one of the most affordable (but surprisingly decent quality) multi-effects pedals on the market. And one of the few with stereo in and out, so I just ran the stereo audio from the Circuit out to that, and that pedal into my mixer, and the mixer into the computer to record it. So all in all, a pretty minimalist jam session. One groovebox, two synths, and one effects pedal.
I did some minor tweaking and equalizing on this track after I ripped it from the video, just to help some voices come through a little less muddied in certain spots, and to slightly lessen the higher frequencies of the loop that was running on the Circuit.
I think if I'd known what I know now about setting up a studio, I would have been able to avoid a few missteps and probably would have saved myself some money. Which is a shame, since I've kind of reached the point where I'm back to not being able to justify spending any more again. D'oh. Still, I made those decisions with the best knowledge that I had at the time.
#novation circuit#novation circuit tracks#jam session#screenside jam session#dawless#dawless jam#dawless jamming#synth#synthesizer#80s retro#retro synth#synth music#cyberpunk#cyberpunk music#cyberpunk soundtrack#synth soundtrack#synthesizer soundtrack#zoom cdr#zoom ms70
15 notes
·
View notes
Text
The most popular Eurorack module is Make Noise's MATHS, which is sometimes described as an analog computer. Some years ago, synth YouTuber loopop did a video about the module, starting by breaking down the basic functions into three parts: attenuverting, mixing, and slew rate limiting. Attenuverting is a portmanteau of "attenuating" — turning down — and "inverting"; mixing combines signals by adding them together; slew rate limiting is slowing down the rate of change of a signal, making it rise or fall more slowly. By combining these functions (and the extra features Make Noise included), loopop demonstrated about 22 different things a MATHS can do, from basic envelope generation to LFOs to sidechaining to even acting as an audio filter or VCA.
I don't have a MATHS; it's a bit too pricey for my budget (though it's by no means the most expensive of Make Noise's many desirable modules). I have instead a home-built combination of three modules: two copies of Voxmachina's Sigma function and slew generator and a three-channel mixer of my own design, with attenuverters on two of those input channels. And when I just rewatched that loopop video, it turns out my setup can do all but three of those 22 functions, because my mixer doesn't have an analog OR output or a separate inverted output. Which is not too bad for a much lower price point and the satisfaction of saying I made it myself.
(I've gone through some MATHS cookbooks before to translate their patches to a dual Sigma setup, and there are, of course, a couple of other features that MATHS provides and my setup lacks. The MATHS slew channels have independent and simultaneous CV control over rise, fall, and "both", where Sigma provides the equivalent of a "both" and a switchable CV input over one of those; in MATHS, the slope shape, from exponential through linear to logarithmic, is selectable without self-patching; there isn't a gate input to control cycling; and MATHS channel 1 has an "end of rise" trigger instead of the "end of cycle" one that channel 4 or Sigma provides. The kinds of patches that require one or more of the missing features aren't enough to make me desperate to upgrade, but they'd be nice. Replacing the mini mixer with a larger version with attenuverters on each input and an OR out is in the medium-term plans.)
loopop did a follow-up video about using a MATHS to duplicate the dual-suboscillator function of the then-unreleased Moog Subharmonicon, and it turns out my setup can do that too — I was just listening to my system rigged to divide down a VCO signal with the Sigmas, to create random chords from a single note.
#electronic music#modular synth#sdiy#eurorack#slew rate limiter#i never know if i go into too much detail or too little on these posts#or both#it could be both#but it makes me happy to use and explain things i've built
2 notes
·
View notes
Note
commodorez, will you show off that home setup you mentioned in that reblog
Gladly! Buckle up!

Here's the breakdown:
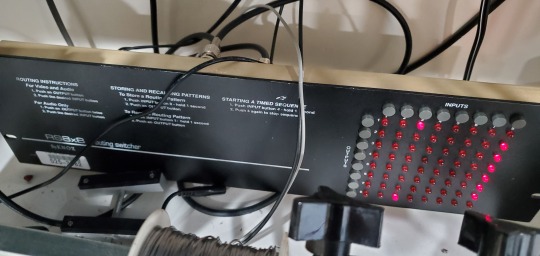
The main rack of equipment contains the following (from the top):
Knox RS16x16 composite video/audio router
Blackmagic Design Smart Videohub 20x20 3G-SDI video router (3G -SDI is equivalent to 1080p60)
Kramer VP-501XL UXGA (VGA at 1600x1200) to composite converter
CQ-900 Real Time Color Quad (allows 4 video composite video signals to be combined into one, spaced into 4 quadrants)
Extron AVT-100 tuner (for demodulating RF on old game systems)
Extron DVS-304 Scan Converter/Scaler (DVI version with SDI input option)
Videotek VSG-201D 601 Digital Sync Generator (barely used)
Digital Processing Systems Inc. DPS-220 TBC/Frame Synchronizer
Ubiquity Unifi 24 port gigabit switch (unrelated to video stuff)
Hidden behind the rack are a pair of Blackmagic Design signal converters: one SDI to Analog, and one Analog to SDI.
The RS16x16 takes center stage, since most standard definition signals and all of the audio routes through it. Here's the current router chart:

Video and audio on this router can be sent as a pair, or separately as I so choose. I control it via the front panel keypad and watch the status on the LED matrix, but I can also run it via RS232 in a terminal. I've been thinking of making my own control panel for it modeled after the NV9601.
Many of these sources are audio from my various computers, video and audio from vintage computers, connections for a game system or two, and some other oddities. The destinations are a few vintage computer monitors and some video encoder devices on my various desktops, which I control mostly from OBS.
The last 4 destinations are the CQ-900 Quad's inputs for video, and 4 faders on my AM500 Stereo Mixer for audio. This means I can pick 4 things and give each one a fader on the mixer:

This is my Atus AM500 stereo mixer. The output of which runs to the Scott Integrated Amplifier 480A below, which runs to two sets of speakers in my workshop. I can have a video game running on one fader, audio from a voice chat on another, and music on a third. Works great for co-op games or streaming stuff.
Source/Destination #10 is labeled Bench, which is my workbench across the room:

On the workbench I have a Knox RS8x8 composite video router hooked to a bidirectional tie line to the main RX16x16 router. This means I can send a signal over to the test equipment, or send something being tested on the bench over to the main router, and then to an encoder device. There's also an SDI line to carry the HD feed from one of my bench cameras over to the SDI router, but I don't always use that.
The workbench router doesn't have too much wired to it, so I haven't written up a chart. I've got two bench cameras, a small monochrome monitor, and a TV, plus the ability to run video cables directly to an oscilloscope.
Here's what it looks like behind the main rack:

Yeah. It's a mess, but it's always in flux, so I don't bother arranging the cables too neatly. I try to use BNC terminated cables whenever possible, but occasionally I have to use RCA adapters. Right now the TBC and the Sync Generator aren't wired up because I don't need them. I unplug the SDI router when I'm not using it because it's loud and obnoxious.
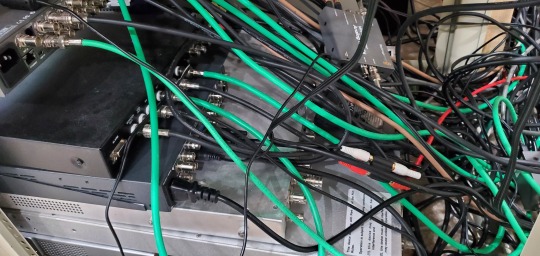
Most of this is surplus gear I got for cheap, mixed in with inexpensive new bits and pieces of things I scored online. I've got other equipment scattered about that I connect as needed. There are also video adapters you don't see here, and this doesn't even cover all of the various encoding hardware I have installed in my desktop computers.
So, that's my setup (as of right now). It will be different in a month, I'm sure.
39 notes
·
View notes
Text
youtube
Here's the music video for the track "Cradle To The Rave" off my upcoming album, "Void Glide" which releases Friday, July 28th, 2023 off Thinkbreak Records (Bandcamp link here, and on streaming a little later).
This video has some fun with various 90s CGI textured and glitched further through my badtvlab analog glitch studio (Tachyonsplus, BPMC, old video mixers/etc). There is some subtle strobing/flashes in certain spots, so be aware.
Enjoy!
#royb0t#cradle to the rave#void glide#thinkbreak records#chicago#edm#warehouse techno#snares are illegal#bzzrk#artists on tumblr#video art#glitch video#glitch art#glitch#vhs#90s cgi#tachyonsplus#bpmc#Youtube
5 notes
·
View notes
Text
Four Lessons from Baphometrix’s “Clip-To-Zero” Production Method
(or why loudness only matters as much as it does)
Baphometrix’s CTZ (clip-to-zero method) encompasses just about everything I wanted to know about loudness when I first started producing. I don’t adhere to it religiously, but the lessons it’s taught me about dynamics in digital mixing are priceless. Baphy clearly delineates how mixing choices affect overall loudness in a way I’ve never found anywhere else. After years of asking about loudness on forums and being repeatedly told by old heads to more-or-less not worry about it, CTZ was like fresh air. I highly recommend Baphometrix’s long and hyper-detailed video series to anyone seeking in- depth lectures on how to push a digital mix louder. For anyone seeking something more concise, I will share with you my favorite bits. But first, let’s understand what CTZ is with respect to traditional methods of mixing.
CTZ represents a hard break from conventional mixing. Conventional mixing methods largely arose from the limitations of analog technology. Analog compressors, amplifiers, and mixers are known for having a wonderful “color” to them. This is a gift and a curse. It’s a gift, because the gear itself is able to impart a special warmth or tonality to the mix that purely digital workstations can only mimic at best. Analog heads love their gear for a reason. It’s also a curse, though, because this warmth is technically just noise and distortion. Analog equipment can’t be pushed very hard before the processing becomes obvious, or even ugly. Also, the signal coming into an analog mixer needs to be kept lower than it would in a digital interface. This is because a hot signal can often distort an analog channel, even if doesn’t actually clip! So to get the most out of analog dynamics processing, the conventional wisdom came to be that compressors, limiters, and the like should be applied gently, carefully, and incrementally. And even when working digitally, this approach still works wonders for the people who practice it. When you watch an engineer work this way, it’s like they begin with a mellow mix and massage it upwards into a loud and clear form, sculpting and adding color as they go.
CTZ on the other hand, is a mixing discipline for the digital age. Rather than the “color” or “warmth” sought by other mixing methods, CTZ prioritizes loudness and fidelity. It maintains the track’s cleanliness and transparency, while keeping the mix as flush against 0db as it can. This of course comes with some caveats. Firstly, it assumes that you are working completely in-the-box. It needs you to commit to sterile, digital compression. It depends on you being able to create as many tracks, sends, and groups as you want. Secondly, while it can be used on any genre, it was developed specifically for bassy EDM tracks. When DJs at live venues mix an EDM set, they don’t always perfectly gain stage the songs within it for equal loudness. This means that a dance track which sounds perfectly fine on your home speakers might end up sounding quieter and weaker than the other songs in the mix, if it happens to get thrown in the wrong way. Because of this potential variance, it’s advantageous for the EDM producers to err on the loud side when mixing their music, to ensure that it sounds powerful and exciting when the DJ plays it. This is the core focus of CTZ.
Because it departs so far from accepted mixing traditions, CTZ is often criticized to an unfair extent. Yes, it’s a little out there and it fetishizes loudness, but it also kicks ass as what it was built to. As someone who’s studied and sees the value in both worlds, I feel compelled to advocate for CTZ. Here are four things CTZ taught me that sources on conventional mixing did not.
1. I Can’t Believe The Oscilloscope is Actually Useful
When you achieve loudness by slamming the master bus through a brick-wall limiter (as was common at the height of the loudness wars), you get a big fat loud-ass rectangular waveform. But at what cost? If you look up the first CD remasters of Michael Jackson’s pre-CD music, you’d probably be appalled at the distortion. It was ugly. When older engineers would tell me about the loudness wars, I assumed they were being hysterical. This was because I was younger than them, and had missed the worst period of what they were talking about. After all, the digital remasters I was listening to sounded fine! But in time, I found out that yes, the very first wave of CD remasters really were that crazy. It’s as if the engineers of that time were huffing paint or something. They thought all that distortion was worth it for a fat, sausage waveform.
The oscilloscope allows us to sort out this conflict between loudness and fidelity, navigating through the best of both worlds. Mixing may be done with the ears, but the oscilloscope gives the eyes important clues about about how well we’re filling the mix out. It allows us to empirically test how our mixing decisions affect the fatness of the mix’s waveform. By watching the oscilloscope as you shape elements and mix them in, you can see how your choices are contributing to the overall volume while aurally confirming that it still sounds right. That means you can visually see that you are building that sausage waveform organically, minimizing the amount of squashing the final limiter has to do.
2. Hard Clipping is Cool as Hell
When I was a total beginner, I would hear a lot about clipping. Specifically, I would hear that it was bad and you shouldn’t let it happen. And to be fair, this is good advice to give to a beginner. Clipping could cause them to mess up their recordings or gain stage in a crazy or unworkable way. The idea is that when you clip, you distort. And that’s true! But what they don’t tell you is that any kind of dynamics processing causes distortion. It turns out, a little controlled clipping on an element here or there is often the perfect way to boost it without having to hear the compression. Compared to typical compressing or limiting, a hard clipper provides exceptionally clean output gain, acting only upon the the loudest peaks and keeping attack/release pumping to the bare minimum. Normal compression is still good for imparting musicality and shaping the envelopes of sounds, of course. But if you’ve already done that to an element and still need a way to push it hotter without changing its vibe, try a hard clipper! For tonal elements like guitar and piano, you’ll be surprised how far you can push it before you notice the distortion.
3. You Can Get Away with More Sidechain Compression and Ducking than You Think
One core idea of CTZ is “checkerboarding.” The idea of checkerboarding is to reduce the amount of work your final bus limiter or master limiter has to do by minimizing how much the elements overlap. You try to keep each piece clearly defined and separate, like tiles on a checkerboard. This will keep the dynamic peaks of the mix more balanced and manageable, so we can turn the mix up way more at the end. We already kind of do this when we use EQ to give elements their own little space, partitioning them by their spectral makeup. Another way to do this is by making sure big elements don’t occur at the same time, such as arranging a song to have kick drums only on every quarter-note and big bass notes only on every other eighth-note. But if you’re already past the arranging and EQ, another way to checkerboard your elements is with sidechain compression and ducking.
Imagine I didn’t have the foresight to arrange my kick and bass in the way that I described earlier. Imagine I put the bass on every eight note. Now in the mix, the bass and the kick will overlap, forming needlessly tall transients that run too hot into the final limiter. But I can separate these elements a bit by sidechaining the bass to the kick, so that it “ducks” out of the way of the kick transient as much as possible. If you set the compressor attack to hard-zero and play around with the other parameters, you’ll be surprised how much you can duck things without creating the “pumping” effect that sidechain compression is known for. It’s a great tool for precisely tucking a transient element into a steady one without relying on glue compression, which would squash them together in a less controlled, more obvious way. If you’re willing to create an intricate scheme of bus groups, ducking your steady elements around your transient ones, you can squeeze a lot of extra juice out of your mix without much impact on how it sounds. Often, when my mix is too dynamic, I will go through and duck all my major elements in this way, just short of making it noticeable. When I come back to the master bus, I find that with the overlap of elements controlled, the peaks are much milder and I have way more headroom to turn the mix up.
4. The Kick Drum Envelope Should Look Like a Dorito
Getting the kick drum right is hard. Sometimes it sounds nice and punchy when you start mixing, but by the end you’re only hearing the transient and missing the body. Or maybe you have the opposite problem— it sounds big and heavy at the beginning, but by the end you’re only hearing the body and missing the punch. Why do kick drums go off the rails at the end like that? I’ll tell you: Having the kick decay too suddenly or having the transient too high ends up overemphasizing the transient. That leaves it sounding clicky and abrupt. Having the kick decay too late or having the transient too low ends up overemphasizing the body. That makes it sound flat and weak. The sweet spot between these two decay patterns? A line drive.
In order to have the kick drum both punch through the mix and have a strong body, a good rule of thumb is to make sure the waveform looks like a Dorito. By this I mean, the initial transient should be the highest amplitude, and the body should follow a straight line from that amplitude to silence. No matter how long the decay is, try to keep it shorter than the period in between kicks, and make sure it’s shaped like a triangle. This can be accomplished by only using Dorito kicks in the first place, or forcing your kicks to conform to this shape with dynamics processing. Like all heuristics, there are exceptions to this. But for typical dance music, this will ensure that your kick drum stays punchy and dominant, while using up as little headroom as possible. And you know what extra headroom means? We can crank the volume higher later on.
The Valid Criticisms of CTZ, and Why the Loudness Wars are Over
Critics of this particular method and the general pursuit of loudness are right about one thing: the loudness war is over. Direct competition of music recordings on the basis of loudness is a holdover from a previous era. Let’s talk about that era. For a brief period at the zenith of CD’s and mp3 files, there was a special set of circumstances that gave audio engineers both the ability and the motive to push tracks to incredible loudnesses, often at the expense of quality and fidelity. The ability to do so came from the introduction of computers to analog studios. By incorporating DAWs and computer plug-ins in their workflow, music makers were no longer bound by the limitation of analog production. They gained access to digital gain and digital compression— harder and cleaner methods of increasing loudness than they had ever imagined possible.
The motive to crank it came from the forms of popular music at the time. CD players and iPods did not normalize the music played by its perceived loudness. If they normalized the levels at all, it was by the average volumes of the tracks. Volume is related to loudness, but differs in that it only represent the electric signal needed to produce the sound— not how loud it feels to our ears! This meant that in those days, the loudness of a finished track was entirely up to the people who made it. There was no platform to turn the music up or down for the end listener, nor any penalty for a track for being too loud. Songs and albums were exactly as loud to the listener as the engineers printed them to be. And as you probably already know, listeners are generally biased to favor louder versions of the same sound.
It’s common sense when you think about it. If you’re a pop, rock, or hip-hop musician at this time in history, your audience is rapidly switching between your CDs and their other CDs in the disc player. They’re shuffling your raw mp3 files together with all the other ones in their iPod. Wouldn’t you want your track to feel bigger and stronger than the others? Wouldn’t you want it to stand out?
One (one) good thing about the streaming services which replaced those disc players and iPods, such as Spotify and YouTube, is that they normalize audio based on loudness. They do this by weighting the volume of a track against the distribution of its signal across the frequency spectrum, giving more weight to the frequencies we are more sensitive to. This ensures that almost everything, respective of genre and tone, sits around the same level. Today, we still have the ability to to crank audio to crazy- high levels. But because loudness normalization has become standard, pushing the loudness of a track past the target loudness platforms normalize for no longer makes it sound any louder to the end user. The incentive to crank it is no longer there.
But even now that loudness normalization is ubiquitous, it’s still important understand and have control over loudness. Even platforms who normalize this way still have optimal loudness ranges, within which tracks are sufficiently loud without being affected much by the normalization. The target for streaming is around -16 Lufs to -12Lufs. Plus, in other audio media such as audiobooks and certain podcast platforms, hard loudness requirements are common. So it’s definitely still important to know how to increase the loudness of your mix in a controlled, precise way. You may even need to cool your mix down, reversing CTZ thought to precisely add dynamics rather than compress them out.
It’s for these reasons that I wanted to synthesize CTZ with conventional mixing, yielding four simple heuristics for managing loudness within a digital mix. But always remember, loudness is a perceptual quality to our ears— not a number on a meter. LUFS and waveforms, as useful as they are, are merely tools to help us understand what we’re hearing. Ultimately, the best way to sound loud is to produce and work with material that sounds loud in the first place. Beyond that, it comes down to processing. So whichever side of the CTZ debate you’re on, these four distillations are fantastic tools to get the loudness and dynamics of your mix exactly where you want them.
IG vincentkeehl
YT vincentkeehl
geminigambit.substack.com
bigfatmixandmaster.com
#music#musicproducer#music production#mixing#loudness#mastering#spotify#edmlifestyle#electronic music
2 notes
·
View notes
Text
when i was in elementary school i dabbled a bit in analog video broadcasting because my school had TV morning announcements. for years, ever since 9/11, they kept playing the fucking "god bless the usa" song at the beginning of the announcements all the time
i volunteered to join the morning announcements team once i was eligible, and i became the person who operated the video mixer/switcher thing. but i was also The One Who Picked The Music Every Morning. and basically every morning the song i chose was "I've Got No Strings" from pinocchio. i was so tired of god bless the usa, so this was my "gift" to everyone. Suffer.
6 notes
·
View notes
Photo

By the way, the Gifts sent to me by teenage engineering came through finally with a little bit of hassle given by Indian Customs (As Usual). Nevertheless, the goodies are with me and I’m starting to put them to good use! - 12 channel mini mixer : TX-6 ( In the picture the silver little cutie, shows how small this beast of a mixer is ) - Super Portable and will be put to good use for my Live Concerts plus in my Studio for sure - Teenage Engineering also sent me a carry bag and field pouch for these along with slim line cables! - The black stereo music player OB-4 is to me and for my use a proper - Ambient Machine as one of its very unique features it has - I just need to record the output via a good Microphone and then do a little post processing to the recording! - They also sent me Headphones and Some Stereo to Mono splitter cables in the slim line series! - Immense Gratitude for these wonderful Gifts, Teenage Engineering : Now it’s time to put them to good use! - Videos coming soon!!! - 🫶🏽🎶🙏🏽🎶🫶🏽 - #teenageengineering #TX-6 #minimixer #mixer #professional #professionalmixer #analog #synth #synthesizers #synthesizer #analogsynth #music #musicproducer #musicproduction #studio #studiogear #portablestudio #portablestudiomixer #teenageengineeringtx6 #thankyou #gratitude #gifts #love #musician #life #musicianlife #musicproduction #professionalaudio #audio #tools #instrument https://www.instagram.com/p/CnlsWIWomkM/?igshid=NGJjMDIxMWI=
#teenageengineering#tx#minimixer#mixer#professional#professionalmixer#analog#synth#synthesizers#synthesizer#analogsynth#music#musicproducer#musicproduction#studio#studiogear#portablestudio#portablestudiomixer#teenageengineeringtx6#thankyou#gratitude#gifts#love#musician#life#musicianlife#professionalaudio#audio#tools#instrument
3 notes
·
View notes
Note
which app u use to edit
if ur talking about the little screencap edits i do (example), i just use Procreate and my normal brushes.
However, if ur talking about video editing (example), i use Video Star (IOS) !! the app itself is free but i purchased these packs to get more features:
Multi-Layer
VS Motion Blur
Cinema Pro Pack
Turbulence Lab Pack
Analog Glitch Pack
Velocity & Time Mapper
Text Effect Starter Pack
Text Squish Pack
Random Text Pack
Multi-Dimensional Magic
BFF (Best Fantasy Fonts!)
Motion Madness Effects
Multi-Dimensional Magic 2
Bolder Color-ado Effects
Draw Lab
Music in Motion
Vintage Movies
Wild Warp Transitions
Groovy Glass Effects
Blends and Light Leaks
Light Leak Transitions
Amazing Multi-Panel Mixer
Motion Blur Transitions
Totally Terrific Transitions
Pro Color Lab
Animated GIF Kit
Video Star Perks Pack
0 notes
Text
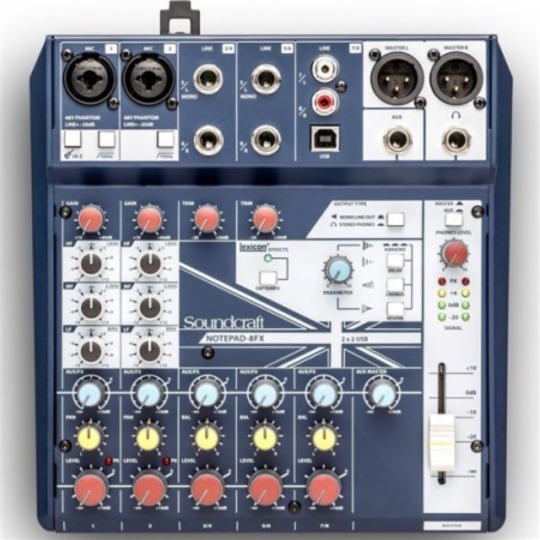
Buy Soundcraft Notepad Analog Mixing Console & Lexicon Effects Online - Lightsounds
The Notepad-12FX 12-channel mixer makes it easy to get legendary Soundcraft sound for your music, podcasts or videos. The Notepad-12FX combines professional-grade analog components, renowned HARMAN digital signal processing and a built-in USB audio interface to use with your favorite Mac or PC editing software.
Whether you’re a singer-songwriter or a podcaster, the Notepad-12FX mixer offers best-in-class features like Lexicon® effects, so you can bring a level of polish to your creative productions that’s sure to impress.
Buy Now:- https://lightsounds.com.au/shop/index.php?route=product/product&product_id=3253&search=SOU-NTP12FX
#bespoke audio#across the spiderverse#barbie#srkedit#bollywoodedit#jbl prx one#lighting packages#the owl house#lightsounds
1 note
·
View note
Video
undefined
tumblr
my first ever 3D model and it was of my analog dirty video mixer
i used this footage for my final project
/ 08.06.22
0 notes
Text
TriCaster Mini Go is Simplest Setup with Professional Features for Liv - Videoguys
New Post has been published on https://thedigitalinsider.com/tricaster-mini-go-is-simplest-setup-with-professional-features-for-liv-videoguys/
TriCaster Mini Go is Simplest Setup with Professional Features for Liv - Videoguys

The easiest way to start your TriCaster journey; the TriCaster Mini Go offers creators anywhere the simplest setup yet with a wealth of professional level video production features.
TriCaster Mini Go
TriCaster Mini Go doesn’t pull any creative punches, despite its size, it comes with the powerful Live Link feature as standard. Live Link allows users to render web pages directly into TriCaster and pull any web page elements into a production without the need for a 3rd party application. From graphics or images on a web page to videos from your organization’s internal training platforms – Live Link offers the ultimate in production agility and freedom.
$4,995.00
Simple
TriCaster Mini Go is the most affordable TriCaster ever. Not only this, but by offering USB and NDI connectivity, creators can use existing devices like mics and cameras and low-cost apps to be able to bring sources into the TriCaster. Mini Go is quick and easy to set up and can be easily taken wherever your stories take you.
Skillful
TriCaster Mini Go is just as perfect for a gamer who is thinking about streaming for the first time as it is for a small business wanting to produce their first live event – with supplemental audio, HTML Graphics capabilities and the ability to import photoshop files and use them, Mini Go can help create the most professional of productions without the price tag.
Scalable
Built with NDI at its core, the Mini Go is an easy to use, yet scalable solution that can be simplified or expanded, as necessary – even just by using Viz Connect Solo Converter. Once part of the Vizrt ecosystem of products, users can take advantage of the many ways to scale-up their productions to suit any need

All The Connectivity You Need
The TriCaster Mini Go offers all the connectivity you need in one desktop box including 4 external sources with 2 x 2.5 Ghz network connections and 11 USB connections with a mix of USB 3.2, 2.0, and type C supporting resolutions up to 1080p/60

Live Link for TriCaster®
Live Link allows users to render web pages directly into the TriCaster and pull any web page elements into a production without the need for a 3rd party application. From graphics or images on a web page to videos from your organization’s internal training platforms – Live Link offers the ultimate in production agility and freedom. Available now on all current TriCasters – ensure you have the very latest update to take advantage of this exciting feature.

Simplified IP Connectivity with NDI
Say goodbye to the tangled mess of bulky video cables and take advantage of the plug and play simplicity of NDI® IP video protocol. Connect to a wide variety of NDI®-enabled products, along with the world’s largest ecosystem of third-party IP video products using a single network cable for video, audio, key, control, tally, and in some cases power over Ethernet

Social Media Publication
Share real-time updates and on-demand content across your social media accounts, uploading images and video directly to Facebook, Imgur, LinkedIn, Twitter, Vimeo, YouTube and more—complete with comments and hashtags.

Multichannel Audio Mixing
Set the tone for your production with comprehensive audio integration, including a software-based audio mixer, support for digital, analog, and USB audio devices, audio over IP networking with NDI®, Dante™, and AES67, professional DSPs, fader control, VU metering, Talk Back communication, and 2 x 2 x 2 stereo audio with two audio mixes.*
*Dante™ and AES67 require compatible virtual sound card licenses (sold separately)

Real-Time Monitoring and Multiviewers
See everything happening during your production with fully adjustable single-screen or multi-screen monitoring. With three customizable multiviewers, configurable windows and workspace layouts, operator confidence monitors, visual indicators, scopes, and more, you can easily personalize the environment to your preference.
TriCaster® Mini X gives producers at any level the freedom to create and share video wherever and whenever they want using anything from a smartphone to a 4K camera – truly demonstrating the power of software defined visual storytelling.And yes, the cameras support NDI® 5 natively.
$8,195.00
Take it anywhere, it’s small and light weight. Plug-n-Play NDI, no external networks. Just add your NDI device and its live! Stream to all your favorite social channels with the push of a button. Ensure your content is available & accessible with one of the most complete video production systems.
$9,495.00
#4K#Accounts#amp#analog#apps#audio#audio devices#box#Business#cables#Cameras#communication#comprehensive#connectivity#creators#desktop#devices#easy#Environment#Facebook#Features#HTML#images#integration#it#Light#Link#LinkedIn#media#metering
1 note
·
View note
Text
Unlocking Crystal-Clear Sound: The Power of USB Condenser Microphones
In the dynamic world of audio recording, clarity and precision are paramount. Whether you're a seasoned podcaster, a budding musician, or a professional content creator, the quality of your audio can make or break your project. One crucial tool that has revolutionized the way we capture sound is the usb condenser mic. In this article, we'll delve into the features and benefits of USB condenser mics, exploring how they've become the go-to choice for many in the recording industry.
Understanding USB Condenser Microphones:
Condenser microphones are a type of microphone known for their sensitivity and ability to capture a wide range of frequencies. Unlike their dynamic counterparts, condenser mics are ideal for capturing nuanced details in vocals and instruments. The integration of USB technology takes these advantages to a new level, making them more accessible and user-friendly for a diverse range of applications.
Plug-and-Play Convenience: One of the most significant advantages of USB condenser microphones is their plug-and-play functionality. Traditional microphones often require complex setups with audio interfaces and mixers, adding an extra layer of complexity for beginners. USB condenser mics simplify the process – just plug the microphone into a USB port, and you're ready to record. This accessibility has democratized high-quality audio recording, allowing individuals without extensive technical expertise to achieve professional results.
Portability and Versatility: USB condenser microphones are designed with portability in mind. Their compact and lightweight nature makes them perfect for on-the-go recording. Musicians can capture inspiration wherever it strikes, podcasters can conduct interviews on location, and content creators can easily set up a mobile recording studio. The versatility of USB condenser mics expands the possibilities for creative expression, breaking down barriers to recording in different environments.
Quality Audio Output: The heart of any condenser microphone is its ability to capture crisp and clear audio. USB condenser mics excel in delivering studio-quality sound without the need for an extensive setup. With built-in analog-to-digital converters, these microphones translate analog signals into digital data with precision. This ensures that every nuance of a vocal performance or musical instrument is faithfully reproduced, providing a professional-grade audio experience.
Cost-Effective Solutions: Traditional studio setups can be expensive, requiring an assortment of equipment to achieve optimal results. USB condenser microphones offer a cost-effective alternative without compromising on quality. By eliminating the need for additional gear and complex configurations, these microphones provide an affordable entry point for aspiring musicians, podcasters, and content creators looking to invest in high-quality audio recording.
User-Friendly Features: USB condenser microphones often come equipped with user-friendly features that enhance the recording experience. Many models include adjustable gain controls, headphone jacks for real-time monitoring, and mute buttons for added convenience. These features empower users to tailor their recording setup to their specific needs, making the process more intuitive and enjoyable.
Conclusion:
The USB condenser microphone has undeniably transformed the landscape of audio recording, making professional-quality sound more accessible to a broader audience. Whether you're a musician capturing your latest composition, a podcaster sharing your voice with the world, or a content creator producing engaging videos, the convenience, portability, and exceptional audio quality of USB condenser microphones are reshaping the way we approach recording.
As technology continues to advance, we can anticipate further innovations in USB condenser microphone design, pushing the boundaries of what is possible in the realm of audio recording. Embrace the power of USB condenser microphones and unlock the potential for crystal-clear sound in your creative endeavours.
For more details, visit us :
mic stands
microphone headset
podcasting kit
0 notes
Text
Live Electronic Performance setup
youtube
There are different types of electronic performance setups as explained in this video depending on the type of music you are making and what gear you have/want. Dj setups, setups with or without computers, ipads and more.
For my performance setup, I would need three essentials. I would have my computer (Macbook Air), an audio interface (Scarlett 2i2), and a keyboard/synth. There are many ways to upgrade my setup, such as getting an analog synth, drum pads/midi controller and mixer. These things are not necessary to start going out and playing gigs, but would absolutely improve upon my sound and accessibility when gigging.
When looking for gear I could use in my setup, I went onto Sweetwater.com and looked for moderately priced synths i could realistically use in my playing. I found a Novation Bass Station II that seemed like a good fit with lots of options to design my sound on the cheaper side.
1 note
·
View note
Text
Why Lab Mixers Are So Important in Many Environments
An indispensable tool in chemical and industrial laboratories is the lab mixer. This is selected for its speed range, operating mode, and dimensions. The laboratory mixer is best used for chemical and industrial labs and under strict controlled conditions to get accurate results. mixer machines
A lab mixer is used to mix, emulsify, and dissolve samples. This should provide the desired speed, capacity, and the viscosity and temperature requirements to work on samples. To sum it up it should be able to perform a wide range of applications, efficiently and safely.
It is usual to find several types of laboratory mixers but the basic laboratory mixer has speed adjustment controls, mixing blades, feeding hopper, and timer. Elaborate and industrial types are also available in various sizes and designs to work on powder, granules, and liquids. Whatever its applications the lab mixer features automatic stop features and the feeding hopper is designed to easily feed the right amount of feed materials into the mixer.
The laboratory mixers come in different types and configurations. The stainless steel machine type of lab mixer has a volume capacity of 5, 10, or 201. This standard configuration type combines reliable quality mixing with ergonomic features. It boasts of a swiveling front plate, integrated control unit, and easy mix control shaft for rotation speed. There are too many variations to list here, but it is fair to say that lab mixers are available in all shapes and sizes - all you have to do is match the mixer with the application in your lab or process environment. gel mixer
Commonly used in laboratories are conical and screw mixers and these are used for powder, liquids, and liquid solids. These can handle gallons of mixes with a rapid feed rate of gallon per minute. These mixers have different media capacities and operating configurations, motor speed, and mix rate.
These also have different heating capacities and mixing capacities all selected for specific uses in the laboratory such as processing adhesives, pharmaceutical products, cosmetics, paints, chemicals, water treatment and mixing of lime or carbon slurries. These are essential tools to analyze and evaluate mixtures of samples for their safety or toxicity or their usability for end products.
Sophisticated lab mixers are programmable to adjust different settings for levels, materials, and ranges. Display features may be any of the following - video display, digital and analog. powder liquid mixer
There are so many choices available to you when looking for a laboratory mixer which is going to do a thorough job. Always bear in mind any size issues and maintenance costs before you purchase any product. If you feel that you might need a mid scale mixer for both small and medium sized jobs, make sure that you choose the best one for the job - you don't want to be left short later.
0 notes
Text
Price: [price_with_discount]
(as of [price_update_date] - Details)
[ad_1]
From the manufacturer
Recording Bundle The Recording Bundle includes everything you need to get professional quality audio for your podcasts, videos, music or recordings, including JBL 104 compact speakers, AKG P120 mic, AKG K52 Studio headphones and Soundcraft Notepad 5 mixer - along with all interconnecting cables. You’ll be ready to record in minutes with tools optimized for capturing high-quality audio. Take your passion to the next level with the Recording Bundle!
AKG P120 Condenser Mic This studio essential can withstand high SPLs, meaning it can handle anything from vocals to drums. At a home studio costing, it gives you pro studio performance, with a lot of versatility. A bass roll-off switch and 20dB pad give you even more options.
AKG K52 Studio Headphones With their crystal-clear audio, closed-back design and self-adjusting headband, AKG K52 headphones are built to provide the clarity and comfort needed for those long sessions in the studio. Beginning musicians, producers and content creators can now access AKG sound quality easily.
JBL Professional 104 Compact Reference Monitors JBL 104 compact, full-range, powered reference monitors draw from seven decades of JBL Professional engineering to deliver the most accurate sonic presentation of any monitor in their class. Ideal for home recording enthusiasts, podcasters and video producers, as well as professionals seeking accurate portable reference monitors.
Soundcraft Notepad 5 Mixer Notepad mixers combine professional-grade analog components, HARMAN digital signal processing and a built-in USB audio interface to use with your favorite Mac or PC editing software. Whether you’re a singer-songwriter or a small group of podcasters, Notepad mixers can bring a level of polish to your creative productions that’s sure to impress.
AKG P120 large-diaphragm condenser mic 2/3-Inch cardioid capsule delivers beautifully-balanced response with excellent transients.Rugged die-cast housing and dent-resistant stainless steel grille screen that comes with outstanding POP packaging design.
AKG K52 Studio Headphones 40mm drivers deliver authoritative, extended low-frequency response, balanced high-frequency response that reveals every detail and high sensitivity for powerful output.Perfect for long sessions, the self-adjusting headband, over-ear design and lightweight construction provide the perfect fit and exceptional comfort.
JBL Professional 104 Compact Reference Monitors Coaxial 4.5-inch LF driver and .75-inch soft-dome HF driverIntegrated 60-watt Class D power amplifier; 30 watts distributed to each speakerThree sets of inputs allow connection with professional equipment, personal music players and consumer products
Soundcraft Notepad 5 Mixer USB audio interface for recording, editing, and playback on your Mac or PC Familiar channel strip layout including EQ, aux send, master fader & rotary headphone volume controlCross platform support - Native Mac compatibility, Soundcraft driver for PC
Analog Mixing console with built-in USB interface
JBL’s trusted Reference Studio Monitors
Professional Studio Headphones
Complete Package (Includes connecting cables)
JBL Professional Recording Bundle for content creation, Podcasting, Vlogging, Instrument/Voice recording
Perfect bundle to make yourself heard clear and loud during web/video conferencing
[ad_2]
0 notes
Last Seen Blogs

punchy-mchurtyfist
King of Fists

bluecrayonconsulting
Blue Crayon Consulting

svanmoon
༒𓆩SVAN

pimrou1006
Pimge

quadrantmodelquotes
Quadrant Model Quotes from 2013 Lectures