#and again all the tutorial maps
Explore tagged Tumblr posts
Visit Tumblr Blog
Explore Tumblr blogs with no restrictions, modern design and the best experience.
Last Seen Tumblr Blogs


Fun Fact
Kazakhstan’s Minister of Communications and Informatics has blocked the Tumblr site because it contained 60 sites of terrorism, extremism, and pornography in 2015.
Text
When I was younger my hobby was rebuilding the old dilapidated buildings in the Minecraft tutorial
#my xbox 360 reverted to only one world ever so all my saves are now just the aame world#which means I lost my over 300 hours creative build map#and again all the tutorial maps#<33#favourite one was rhe brick city and a while away was this beautiful sandstone cathedral esque ruin#spent so long on at one alone#now all I do is rebuild ancient cities but in survival this time
0 notes
Text
If you haven’t started already, start archiving/downloading everything. Save it to an external hard drive if you’re able. Collecting physical media is also a good idea, if you’re able.
Download your own/your favorite fanfics. Save as much as you can from online sources/digital libraries. Recipes, tutorials, history, LGBTQ media, etc. It has been claimed, though I can’t find the exact source if true, that some materials about the Revolutionary War were deleted from the Library of Congress.
It’s always better to be safe than sorry and save and preserve what you can. Remember that cloud storage also is not always reliable!
Library of Congress - millions of books, films and video, audio recordings, photographs, newspapers, maps, manuscripts.
Internet Archive - millions of free texts, movies, software, music, websites, and more. Has been taken offline multiple times because of cyber attacks last month, it has recently started archiving again.
Anna's Archive - 'largest truly open library in human history.’
Queer Liberation Library - queer literature and resources. Does require applying for a library membership to browse and borrow from their collection.
List of art resources - list of art resources complied on tumblr back in 2019. Not sure if all links are still operational now, but the few I clicked on seemed to work.
Alexis Amber - TikToker who is an archivist who's whole page is about archiving. She has a database extensively recording the events of Hurricane Katrina.
I'll be adding more to this list, if anyone else wants to add anything feel free!
10K notes
·
View notes
Text


LIKE A CHAMP
CHARACTERS: VI ;; ELLIE WILLIAMS ;; ABBY ANDERSON ;; CHLOE PRICE
PAIRINGS: ALL X SUB!FEM!READER (one for each scenario)
WARNING(S): lowercase, explicit content (minors & men dni)
TAGS: nerd!char ;; dom!char ;; oral (r. receiving) ;; they eat like possessed ;; messy ;; freaky oral skill for the first time ♡
navigation.

vi
she’d read so much about it. studied diagrams. highlighted sections. memorized articles. freaking annotated the “female pleasure handbook” like it was a holy text.
but none of it—none of it—could’ve prepared vi for the reality of having you spread out on her dorm bed, legs trembling, slick glistening in the glow of her laptop’s screen saver as you whimpered her name.
"jesus fuck—" she mumbled, almost to herself, as she settled between your thighs, eyes wide like a virgin in a hentai (which, okay, maybe she was, technically). her glasses fogged immediately. she didn’t care. just wiped them on her hoodie sleeve like she was prepping for a boss battle.
"tell me if i’m—fuck, okay—tell me if it feels good," she whispered, breath hot on your inner thigh. but before you could even answer, she dove.
tongue flat and trembling at first, nervous licks like she was still trying to map the shape of you—but vi was a nerd with a damn photographic memory, and the second she found your clit, it was over. she latched on like she was starved for it, making these greedy, wet noises that had your thighs clamping around her head within seconds.
she moaned—moaned—like she loved the way you shook. licked harder.
sucked like a champ.
and it wasn’t just her mouth. her big hands (the ones you’d ogled in class for months) held your hips down with this shaky but determined grip, pinky rings digging into your skin while her tongue circled, dragged, flicked—
"vi—vi—" your back arched. she whimpered into you.
you came. sudden. loud. a mess.
and vi? nearly fucking cried.
because you were still twitching, and she was still going, nose buried, hands tightening like she couldn’t stand to be away from the taste of you.
"fuck, oh my god," she panted against your cunt, voice ragged, flushed pink from nose to chest. "you taste so good. holy shit. did i do that? i did that, right? fuck—"
you tugged at her hoodie, dazed. "vi—baby, i came. you can stop—"
she looked up, glassy-eyed, lips shiny, pupils blown. "no. i-i wanna see if you can do it again."
then went back down like a goddamn legend.
and that night? vi learned two things:
1. she loves eating pussy.
2. she’s fucking terrifyingly good at it.

ellie williams
she’s sweating. hard. not from nerves—well, yes, nerves too—but mostly from being face-first in the wettest, prettiest pussy she’s ever seen in her entire goddamn life.
"okay," ellie mutters to herself, licking her lips as she stares, eyes dark and frantic. "okay. you studied for this. you trained for this. you watched the tutorials with the notebook and the captions on. you're built for this."
“ellie.” your voice trembles. “you okay down there?”
“y-yeah.” she adjusts her backwards cap with one hand like she’s entering the finals of the oral olympics. “just—gimme a sec.”
then she leans in.
her tongue starts off shaky—too high, too low, licking around like she’s still figuring out where to go. but then you gasp. her lashes flutter. she licks that exact same spot again.
and again.
“oh my fucking god,” she says under her breath, then locks in.
mouth sealed, tongue moving in tight, desperate little motions. sloppy. eager. like she’s been dreaming of this moment since junior year bio when you wore that short plaid skirt.
her hands grip your thighs hard enough to bruise. you can feel how tense she is—shoulders flexing under her hoodie, hips rocking against the mattress from how riled up she is. she's moaning into you like she’s the one getting eaten out.
every time you whimper, she gets wilder.
when you arch your back, she pulls you deeper onto her face. when your thighs start shaking, she lets out this choked, needy groan and circles her tongue faster, hungrier, like she wants to break the damn sound barrier with how fast she’s going.
"fuck," you cry. "ellie—ellie, i’m gonna—"
she growls into your pussy. you cum so hard you nearly blackout.
and ellie? she’s fucking soaked. jeans wet, cheeks flushed, mouth still moving like she hasn’t noticed you finished.
you tug her up, breathless, heart slamming in your chest.
her face is drenched. chin wet, nose red, eyes wide and frantic like a deer in headlights.
"did—did i do it right?" she pants. “wait. was that too much? do i—can i do it again?”
you don’t answer. you just stare.
because holy shit.
ellie williams is a virgin. a nerd. a dork who plays guitar and stammers during group presentations.
and apparently?
a pussy devouring prodigy.
abby anderson
you knew abby was strong.
knew it when she carried your entire moving box haul up three flights of dorm stairs like it weighed nothing. knew it when her hoodie sleeves tugged tight around those god-tier biceps every time she flexed without realizing it.
what you didn’t know?
is that the same abby—nerdy, blushing, biochem honor student abby—would be so freakishly good with her mouth on your pussy. on her first try.
"is this okay?" she asks, kneeling on the floor while you’re sprawled across her bed, sweat-slick and ruined. her hands are on your thighs, holding you open with ridiculous gentleness for someone with arms like a demigod. her voice is breathy. hesitant.
you nod. more like whimper.
and abby—abby leans in with this reverent look, like she’s about to kiss something holy.
the first lick is soft. careful. a warm drag of her tongue that has her exhaling hard through her nose, eyes fluttering shut like she’s finally found a missing piece of herself between your thighs.
"jesus christ," she breathes. "you’re… you’re really sweet, huh?"
then she moans. loud. feral. like her brain short-circuited on flavor alone.
what follows is mayhem.
this sweet, shy, socially anxious jock girl turns into a pussy-drunk animal in real time—gripping your hips tighter, tongue moving with this wild, instinctual rhythm like she’s starving. her mouth’s everywhere—sucking, licking, messy as hell, nose bumping against your clit as her moans vibrate straight into your core.
she’s fucking losing it down there.
and you? you’re barely breathing. twitching. whimpering. cursing god and biology and everything that led to you being flat on your back getting ruined by a virgin who apparently made oral sex her one true religion.
"fuuuck," you cry out as your hips buck.
abby grunts, arms locking down like steel. "stay still, baby. i need—fuck, i need more—"
you cum so hard your ears ring.
she doesn’t stop.
your hands are in her braid, yanking, nails digging into her scalp, and still—she’s groaning into you, grinding her thighs together, tongue curling around your clit with terrifying precision like she’s been practicing in her head for years.
“abby—abby—please—” you whine.
she pulls back, chin drenched, lips shiny, pupils blown wide.
"you okay?" she pants, voice shaking. "did i… was that too much?"
you can’t speak.
she swipes her thumb across your cunt—gently—then sucks it into her mouth with this fucked-out sigh like she’s tasting honey straight from the jar.
“…can i do it again?”
chloe price
you always thought chloe talked a big game.
all that cocky smirking, the “yeah, i’ve done tons of stuff” energy, the cigarettes and leather jacket and endless flirtation—masking the fact that she’s never actually been between anyone’s legs before.
but now? now she’s got your thighs on her shoulders, face flushed, eyeliner smeared, and her voice cracking like a fucking teenage girl.
"holy shit. you’re so wet. are you—fuck—are you always like this?"
"chloe—"
"wait. waitwaitwait, i got this," she blurts out, slapping her hands to your hips like she’s steadying herself for a rollercoaster drop. her pupils are huge. she’s visibly trembling. still trying to act cool, even as her lips hover a breath away from your cunt.
then?
she dives in.
sloppy. enthusiastic. immediate mess.
chloe groans the moment her tongue hits you—like she’s tasting something she’s dreamed about a thousand times but didn’t think was real. her nose presses deep, her lips drag messily, open-mouthed kisses all over your clit like she doesn’t know where to focus—so she just does everything at once.
you jerk.
she moans.
"oh my fucking god," she rasps against your pussy, voice fucked raw. "this is so hot. i—i think i’m gonna die down here."
her hands are everywhere—clutching your thighs, squeezing your ass, sliding under your shirt like she can’t stand not touching all of you at once. her tongue gets more frantic by the second—circling, flicking, sucking like she’s chasing a high.
and the second you moan her name?
she loses all chill.
grabs your thighs like handlebars, drags you closer, then buries her tongue so deep into you that your back snaps off the bed.
“oh fuck— chloe—!”
you cum screaming.
and she rides it out like an absolute gremlin. groaning, humping the bed, tongue still going, tasting you like she’s tripping on something divine. one hand slips down her own jeans—desperate, needy—messy fingers working as she eats you through the aftershocks.
when she finally comes up for air, her face is destroyed. hair tangled. nose shiny. lip ring wet. and that stupid, perfect, smug little grin already back.
"guess i’m a natural," she pants, voice wrecked.
you try to speak. fail.
she wipes her mouth with the back of her hand, glances down at you, eyes dark and full of mischief.
“…wanna see if i can make you blackout?”
364 notes
·
View notes
Text
I finally finished a NEW CUSTOM MAP ART!!! "Visitor," a portrait of an enderman, is extra exciting because it's my first full-palette map painting, meaning I used block height to access all the highlight and shadow colours available!! More on the full process under the cut, but the short version of what this means is:
ITS A VERY COMPLICATED CONSTRUCTION. I created the art, then planned and built this manually, without any mods or schematics for construction. Huge props again to everyone else in the server for helping me gather all the materials to make this absurd thing possible!!!
This was the original art I made for it! I'm a huge fan of the "compressed" look of the vanilla paintings, so I've been starting with a large image and shrinking it down, though there were a lot of pixel tweaks to get it to read well. After shrinking it to 16x32 (for an art made of two maps), I convert it to a limited palette that I've set up to match the colours minecraft actually has available:

The map palette is actually tremendously limited, so figuring out a painting that will still look good with that constraint is a challenge in and of itself!
Anyway, the way minecraft maps work, a block that is Taller than the block to the north of it shows up with a slightly lighter colour, and a block that is Lower than the block north of it shows up on the map with a slightly darker colour. So when making a key for this one, I marked all the squares with a little arrow if it's the lighter or darker version:
Each "pixel" here is a full stack of blocks on the mapped area: 64 blocks, 8 rows of 8. In order to achieve the affect of every block in a given pixel being taller or shorter than the block to the north of it, dark and light shades need to staircase either up or down. Because staircasing downwards in survival sounds even worse than this madness, I did some planning to make sure each of the "downwards" staircases would touch the ground, so I could simply staircase up from south to north instead. This involved figuring out how many up and down movements were in each individual column and planning out 32 little layouts:
It's worth noting that if you look up minecraft map art on Youtube, most of what you'll find is either, the simple realisation that placing blocks allows you to make custom map art, or an explanation of how to use a generator that will let you plug in any picture and then produce a schematic for you. It's very cool that these exist, but I wanted to do full palette art myself, without an auto-generated schematic, and at the time THERE JUST WEREN'T ANY TUTORIALS FOR HOW TO DO ALL THIS?? Now, having the experience of finagling all this, i think perhaps the reason is that this is a mad undertaking.
ANYWAY: PROGRESS SHOTS!!
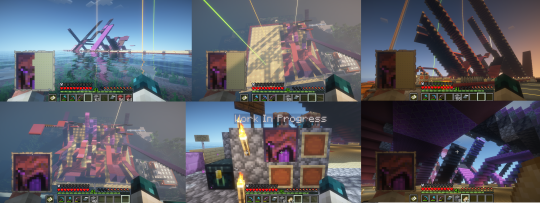
I actually love how the staircases look..... its like some kind of modern sculpture
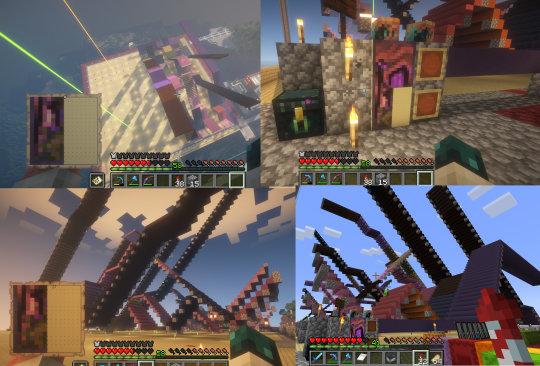
Fewer shots of the second half since I did it on call with friends; the last screenshot is one Thren took of me activating the new locked map to use for the gallery.
Once these paintings are done, I lock the finished maps, make copies, and stock them in the art gallery so other friends on our server can also put these paintings in their homes! It's a lot of work, but really rewarding to see my art decorating various buildings around the server. ;u;
I have one more custom full-palette painting I've done the art for and gathered all materials for; I still need to do the full key and plan staircasing for it before I can start, but HOPEFULLY if my resolve doesn't waver there'll be at least one more of these!!
#minecraft build#minecraft screenshots#minecraft#block game liveblogging#minecraft map art#GENUINELY SO PROUD OF THIS ONE#bsl shaders#im so tempted to make some sort of tutorial on doing this by hand sometime. you shouldnt do it by hand. but a tutorial should exist!!
485 notes
·
View notes
Text

^ iterator projection tutorial!! ^
this post follows on from this one made by @prismsoup, intended to cover my slightly more extended process (including post-processing)
step -1 : pre-requisites
this tutorial is designed around clip studio paint for PC because its what i work with. its probable that whatever other program / platform you're using has these features but under different names
i use a rainworld typography font for text. find it here (or do it yourself)
i use scanline textures as a part of this. find them here
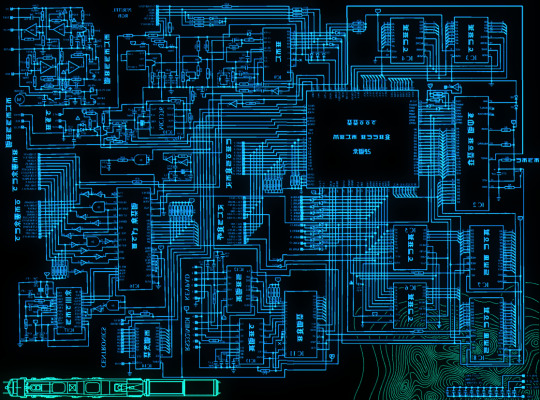
step 0 : select a base image

maps, blueprints and diagrams are favourable due to lots of detail without it derailing into noise. get experimental though, my favourite one came out from a picture of a nebula, and another from a friends factorio screenshot
step 1 : binarise & flip
this command can be found under edit > tonal correction (D) > binarization. this forces every pixel in the image to be either black or white. adjust its sensitivity to your liking
step 2 : remove background

add in a black layer below (not just paper layer, as will become important later). wand select the background colour and delete it. if the remaining colour is black, CTRL+I to invert it to white
step 3 : add details

replace any text with rainworld font or simply remove it. add in blueprints or other complex decals (drawingdatabase is a decent source). during importing remember to binarise (after resizing). for "lower layer" elements such as contour lines create outlines for higher layers to retain clarity
step 4 : add multiply layer(s)
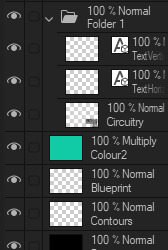
if you want to have multiple colours, put everything in the "higher" layer into a folder and set the top multiply to clipping above it
step 6 : post processing setup

copy all existing layers, create a new folder on top, and paste into that folder. right click the folder and "merge selected layers" set the resultant layer to add(glow). copy+paste and hide duplicate for now. from filters > blur apply a guassian blur with a strength of 130-170 (this creates the base bloom layer). set opacity to ~50%
step 7 : chromatic abberation
unhide not-blurred layer. guassian blur with a strength of 2. duplicate again. select top layer and move 1px up and 1px left (with arrow keys). CTRL+U then change the hue by 30. select bottom layer and move 1px down and 1px right, CTRL+U then change hue by -30.
stronger chromatic abberation can come from stronger gaussian blur and more change in hue
step 8 : scanlines
add the scan lines on top, invert so that they're white and set to add(glow). copy a multiply layer over it and make sure clipping is on. decrease layer opacity to ~10%. if it does not cover the whole image initially, paste more in and merge them together into one layer
tada! you now have one iterator projection. if you want to give it an extra affect, re-import the final PNG and filter > distort > convert to panorama. set distortion to 10 and scale to 101 (note that this drastically blurs the image)
299 notes
·
View notes
Text
OK sth I really, really love about fields of mistria is how accessible it is for an adhd hoarder that also forgets everything and what I was doing in like 5 minutes, like myself
the map has npc locations by default! so even if their schedule changes, you can always find them!
quests never expire! you can work on them at your own pace, and even hold onto one's that require a seasonal item that you didn't have enough of before the season was up, until the season rolls around again!
they don't take your damn money or items when you pass out or die because you lost track of time or are bad at combat!
there's free soup in the tavern that restores a little stamina, and a fountain behind a breakable boulder that does the same! the baths are also pretty cheap, and you even get a few free usages after a certain quest!
it starts with storage in your house, AND! anything you had in said storage can be used for crafting without having to go and retrieve it!
if you don't know where to get an item for a quest, talking to various npcs can tell you where it is!
if you need a certain item for the museum collection, you can check out hints on where to get those in the museum itself! and every item that can go in the museum has a tooltip when you over over it, to tell you if you have already donated it or not!
items don't despawn! you can just toss stuff on the floor and come back for it later when you have the inventory space!
if you forget to check your calendar, that's fine! the npcs will tell you about any upcoming events a few times before it arrives, and the start of a new day will tell you if it's someone's birthday!
they give you tutorials in a narrative way, gradually introducing new systems and mechanics as you progress! and these are done via quests that you can go and complete whenever you're ready!
the village progression gives you plenty of rewards and things to help you with your farm, which is very encouraging to keep at it!
the upgrade system just builds up along with doing normal tasks like farming! and you can spend these points however, whenever you like, with many being available right from the start! and you can have all of them if you want, so no need to worry about indecision!
you can go to your diary at home and save whenever you like, and even make another one so you can place them in other areas!
little heart notifications pop up over npc's heads when you progress the relationship, so you have a quick reference on how close you are!
every friday (and saturday after you fix the bridge), all the npcs are in the same place! this makes chatting to everyone and handing out gifts easier if you have trouble remembering to do so!
you have to hold down the button to eat an item! so you don't accidentally poison yourself!
other accessibility options ive really been appreciative of are: being able to turn off rain/snowfall, flashing, screenshake ect. for those with sensitivity, sight, or neurological issues that don't play well with those.
454 notes
·
View notes
Text
ask from over on cohost that i wanted to crosspost over here!!
hi!!! i'm assuuuuming you're talking about the effect in this one?

i'm using something called parallax mapping!! i know most people know what parallax is and how it works in the realworld but im just gonna demonstrate it real quick just so i dont have to keep going "ok now imagine how parallax works"
so imagine you have two windows. in the middle of the window on the left, there is an Orb. it is directly in the middle of the window. the window on the right also has an Orb, but this one is pushed backwards outside the window quite a bit. now if you look at the two windows, and turn them, you get this:
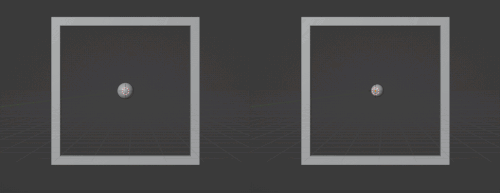
for the first window, the Orb stays basically in the center of the window. but in the second window, if you turn the window right, the Orb "looks like" it's moving left
parallax mapping is essentially taking this assumption, that if you change the angle you are looking at an object, the further away an object is, the more it will move in the opposite direction. i will spare you on the matrix math involved but you can get the exact relation you need by getting the Tangent Space View Direction. you dont need to understand the math behind this to use it
so, lets go back to the window example, how would you make the same effect, but with just this 2d texture of the Orb?

what if, whenever the object it was attached to turned right, you just moved the texture to the left, by X amount, where X is how far into the window the orb is. you would essentially be cheating god and "faking" the parallax. it would look like it's moving like it's far out of the window, but really, it's still a 2d texture. it would look like this:
i was too lazy to make the shader and record another gif but i dont need to because functionally it would look almost identical because when you turn it right the Orb moves left
again, you can just Know the right direction to push the texture in based on the current angle by getting the Tangent Space View Direction. ok another example. what if you had a black and white noise texture, like this
now what would happen if, instead of moving the whole texture X amount. you moved each pixel a proportional amount based on how bright it is. a 100% black pixel would not get moved at all, and a 100% white pixel would get moved the furthest along the Tangent Space View Direction. a pixel thats right down the middle would move half that distance etc etc. well it would look something like this!!!
thaaat's the basics behind it!!! it's also used for effects like faking room interiors through windows with just a 2d texture in biig cityskapes and the like

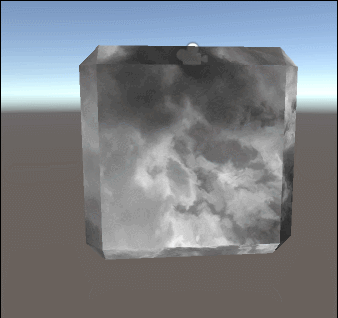
you can see how the cube example looks kind of like an ice cube with the distortion, that's Not intentional and how parallax mapping artifacts. i do not care about it, because i make crystals. but some people do care about it, so you can use parallax occlusion mapping, which is like parallax mapping but a step up
here's some more reads on it if you are interested!!! https://simonschreibt.de/gat/windows-ac-row-ininite/ https://www.patreon.com/posts/playing-with-29753575 https://catlikecoding.com/unity/tutorials/rendering/part-20/ https://halisavakis.com/my-take-on-shaders-parallax-effect-part-i/
903 notes
·
View notes
Text
Ok! I've finally decided to put together a (somewhat) comprehensive tutorial on my latest art~
Please enjoy this little step-by-step 💁♀️
First things first--references!
Now I'm not saying you have to go overboard, but I always find that this is a crucial starting point in any art piece I intend on making. Especially if you're a detail freak like me and want to make it as realistic as possible 🙃
As such, your web browser should look like this at any given point:

Since this is a historical piece, it means hours upon hours of meaningless research just to see what color the socks are, but...again. that isn't, strictly, necessary 😅
Once I've compiled all my lovely ref pics, I usually dump them into a big-ass collage ⬇️
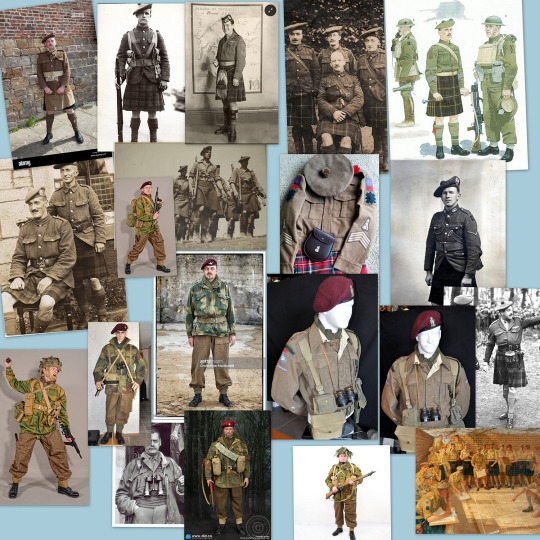
(I will end up not using half of these, alas :'D)
Another reference search for background material, and getting to showcase our models of choice for this occasion~

When picking a reference for an actor or model, the main thing I keep in mind (besides prettiness 🤭) is lighting and orientation. Because I already kinda know what pose I'm gonna go with for this piece, I can look for specific angles that might fit the criteria. I should mention that I am a reference hound, and my current COD actor ref folder looks like this:

Also keep in mind, if you're using a ref that you need to flip, make sure you adjust accordingly. This especially applies to clothing, as certain things like pants zippers and belt buckles can be quite specific ☝️
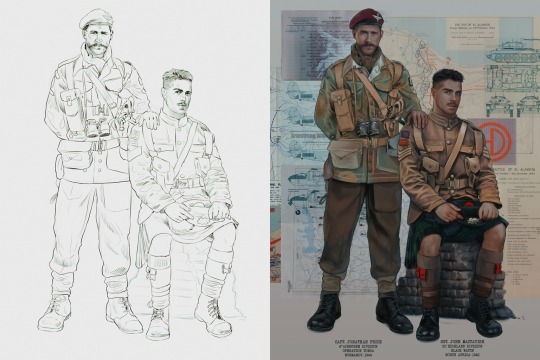
Now that we've spent countless hours googling, it's time to start with a rough sketch:
It doesn't have to be pretty, folks, just a basic guideline of where you want the figures to be.
The next step is to define it more, and I know this looks like that 'how to draw an owl' meme, but I promise--getting from the loose sketch above to below is not that difficult.
Things to keep in mind are--don't go too in-depth with the details, because things are still subject to change at this point. In terms of making a suitable anatomically-correct sketch, I would suggest lots of studying. This doesn't even have to be things like figure drawing, I genuinely look at people around me for inspiration all the time. Familiarize yourself with the human form, and things like weight, proportions, posing will seem a little more feasible.
It's also important at this stage to consider your composition. Remember to flip the canvas frequently to make sure you're not leaning to one side too often. I'm sure something can be said for the spiral fibonacci stuff, which I don't really try to do on purpose, but I think keeping things like symmetry and balance in mind is a good start ✌️

Next step is just blocking in the figures. Standard. No fuss 👍
Now onto the background!
It's frankly hilarious how many people thought I was *hand-drawing* these maps and stuff 😂😂 I cannot even begin to comprehend how insanely difficult that would be. So yeah, we're just taking the lazy copy and paste way out 🤙
I almost always prepare my backgrounds first, and this is mostly to get a general color scheme off the bat. For collage work, it's really just a matter of trial and error, sticking this here, slapping this there, etc. I like to futz around with different overlay options until I've found a nice arrangement. Advice for this is just--go nuts 🤷♀️
Next, I add a few color adjustments. I tend to make at least 2 colors pop in an art piece, and low and behold, they usually tend to be red and blue ❤️💙There's something about warm/cool vibes, idk man..
Now we move on to coloring the figures. This is just a basic block and fill, not really defining any of the details yet.
Next, we add some cursory values. Sloppy airbrush works fine, it'll look better soon I promise 🙏
And now--rendering!
I know a lot of beginner artists are intimidated by rendering, and I can totally understand why. It's just one of those things you have to commit to 💪
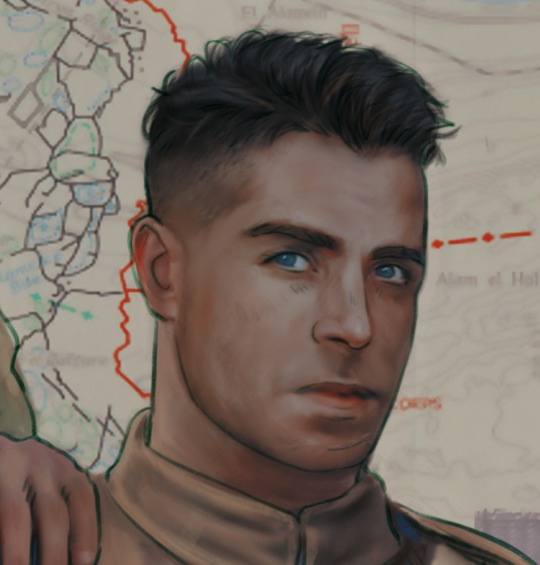
I've decided to show a brief process of rendering our dear Johnny's face here:
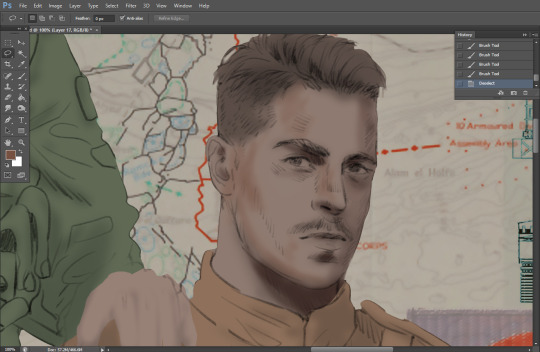
Starting off, I usually rely on the trusty airbrush just to get some color values going. Note--I've kept my sketch layer on top, but feel free to turn it on and off as you work, so as to not be too bound to the sketch. For now, it's just a guideline.
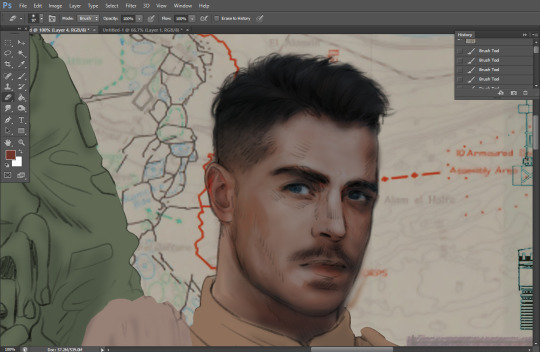
This next stage may look like a huge jump, but it's really just adding more to the foundation. I try to think of it like putting on make-up in a way~ Adding contours, accentuating highlights. This is also where I start adding in more saturation, especially around areas such as ears, nose and lips. Still a bit fuzzy at this point, but that's why we keep adding to it 💪
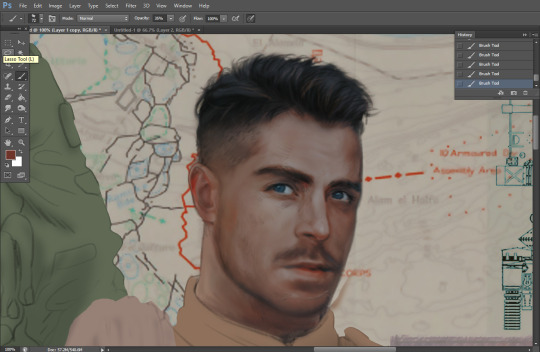
A boy has appeared! See--now I've removed most of the line layer, and it holds up on its own. I'll admit that in order to achieve this realistic style, you'll need lots and lots of practice and skill, which shouldn't be discouraging! Just motivate yourself with the prospect of getting to look at pretty men for countless hours 🙆♀️
I'll probably do a more in-depth explanation about rendering at some point, but let's keep this rolling~

Moving forward is just a process of adding to the figures bit by bit. I do lean towards filling in each section from top to bottom, but you can feel free to pop around to certain parts that appeal to you more. I almost always do the faces first though, because if they end up sucking, I feel less guilty about scrapping it 😂 But no--I think he's pretty enough to proceed 😚
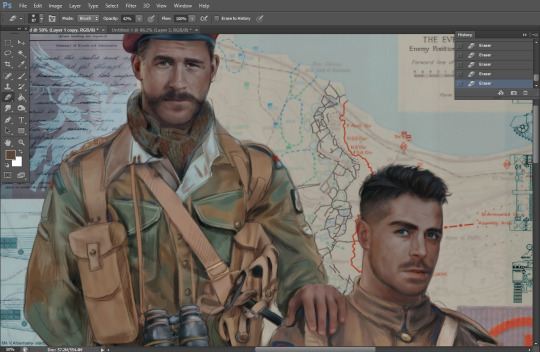
They're coming together now 🙆♀️ Another helpful tip--make sure you reuse color. By that, I mean--try to incorporate various colors throughout your piece, using the eyedropper tool to keep a consistent palette. I try to put in bits of red and blue where I can
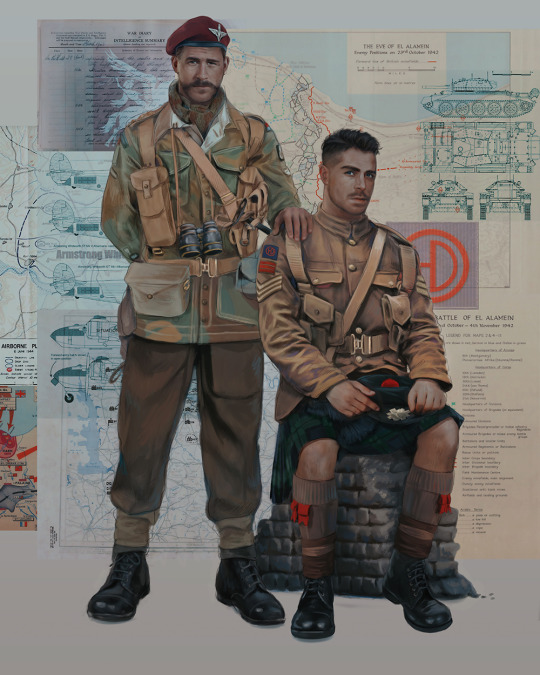
Here they are fully rendered! Notice I've made a few subtle changes from the sketch, like adjusting the belt buckles because I made a mistake 😬 Hence why you shouldn't put too much stock in your initial sketch~
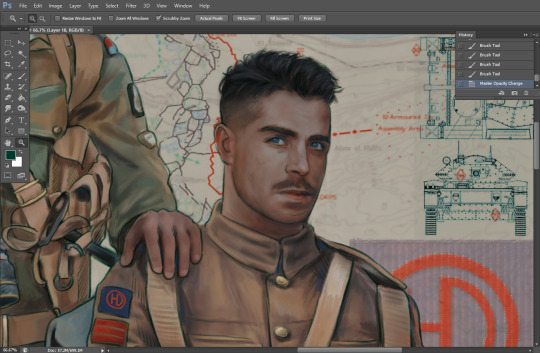
The next step is more of a stylistic choice, but I usually go over everything with an outline, typically in a bright color like green. Occasionally, I can just use my initial line layer, but for this, I've made a brand new, cleaner line 👍
And the final step is adjusting the color and adding some text:
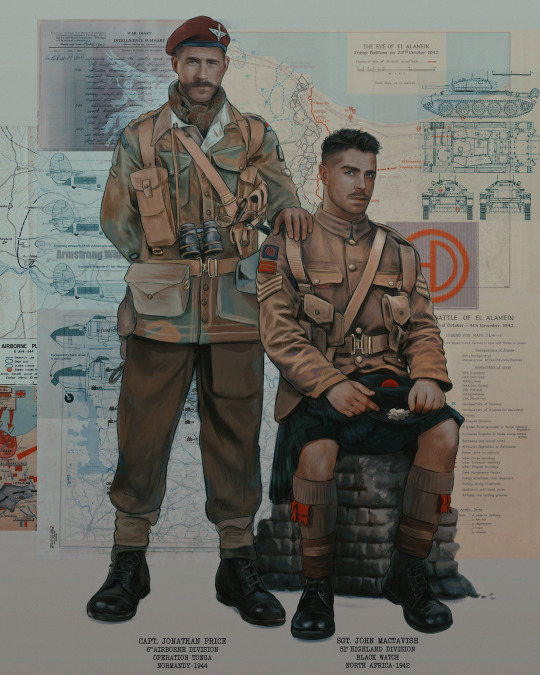
Tada!! It's done!
All in all, this took me the better part of a week, but I have a lot of free time, so yeah ✌️
I hope you appreciated that little walkthrough~ I know people have been asking me how I do my art, but the truth is--I usually have no clue how to explain myself 😅 So have this half-assed tutorial~
As a bonus, here is a cute (cursed) image of Johnny without his mustache:
A baby, a literal infant child !!! who put this wee bairn on the front lines ??! 😭
Anyway! peace out ✌️
#tutorial#my art#art tutorial#since people have been asking#I remembered to save my process from this latest work~#enjoy 🙆♀️
1K notes
·
View notes
Text
how bf!dreamies would react to meeting your cat for the first time


pairing | bf!dreamies x reader
content | 100% fluff
note | i wrote each member’s section with a different one of my cats in mind (i have six 🥹). used a different i used to work with as the 7th. hope you enjoy!!

MARK
mark would be super nervous to meet your cat for the first time. not having much experience with cats would only worsen his nerves. he had heard all the horror stories and couldn’t seem to get them out of his head. he knows how much your cat means to you. and with how much you mean to him, he just wants everything to go well.
cue the cutest blob of grey fur mark thinks he has ever seen in his life. pictures just hadn’t done justice to how round and jiggly your cat was. and when she stared up at mark with her huge round eyes, how could he have not fallen for her?
he recalled what he had learned from the youtube tutorials he had watched before coming over and carefully offered out his hand for the cat to sniff. would watch the cat’s behaviour cautiously, practically sweating as his hand was being sniffed. you would watch on, smiling to yourself as you watch his face drop when she seemingly walked away.
“i don’t think she likes me very much.” mark would pout, slowly beginning to stand. as he stood, your cat would come back over, rubbing herself against his legs. he would look down in shock and adoration, signalling for you to be quiet when you went to tease him.
“i told you, she’s like the cat version of me. if i love you, she’s gonna love you too.” you smile as you picked your cat up and placed her in his arms. the pair of them would be inseparable for the rest of the night.
RENJUN
on the outside it may seem as though renjun hadn’t paid a second thought to the fact he was meeting your cat for the first time. on the inside though, he had mapped it all out. that plan soon went out the window the minute he walked through your apartment door.
a blur of orange fur zoomed past him as he let himself into your apartment. renjun thought you had an old cat? weren’t old cats always sleeping? as he continued into your apartment he was stopped in his tracks when the ginger cat ran past him again, almost tripping him over in the process.
“your cat just tried to kill me!” he would complain as he greeted you in the kitchen. as if summoning her, your cat would appear beside him, staring up at him curiously. as renjun moved to crouch down beside her, he noted none of her behaviours indicated that she was uncomfortable. hesitantly, he reached his hand out to pat him. and he immediately regretted it. the cat latched onto his hand, biting down before quickly running away.
“what the fuck! she just bit me!” he complained, holding up his hand for you to inspect. you giggled, pressing a quick kiss over the bite mark before moving past him to pat your cat.
“it’s just how she shows affection, you’ll get used to it.”renjun sent a glare the cat’s way as you picked her up and gave her a pet on the head. as much as he hated the idea of being bitten all the time, he loved the implication that you were planning on having him around long enough to get used to it.
JENO
when you had told jeno you had finally gotten the stray cat in your neighbourhood to settle down with you he didn’t believe you. what soon followed was a barrage of until countless photos showing the cat sprawled out in all sorts of positions. jeno had to see it for himself.
he was greeted by the stray the moment he entered the your apartment. the cat seemed to remember him from the times they had encountered one another on the street. he would begin to pet the cat before having a realisation. and then it would hit him, the sneezing.
“did you forget to take your allergy medication before you left?” you would ask, concerned that he hadn’t stopped sneezing. the stray had scurried away somewhere, startled by the loud noise.
“you’re lucky i’m prepared!” you scolded as you handed him some pills and a glass of water. your boyfriend was anything if not predicable. the sneezing would soon stop and noticing the lack of noise, the cat would return. jeno had taken note of how much better the cat looked, no longer underweight and dirty but well-fed with a pristine coat. all of the signs that you were caring for the cat just like how you cared for him.
“what would we do without you?” he would whisper lovingly, planting a kiss on your forehead. he now had another thing to add to the lists of reasons why he loved you.
HAECHAN
you were a bit nervous to introduce your cat to haechan. before this, every time he had come over you had put her away in a room with all her things to make sure she didn’t freak out. she’s extremely shy and easily scared. you didn’t want anything to go wrong.
standing in front of the two, you honestly couldn’t remember why you were worried. your boyfriend’s kind and caring nature really shone through as he took the time to befriend your cat. you had never seen the fluff-ball warm up to somebody so fast. the pair were cuddled up together on your couch, haechan trying to figure out where your cat preferred to be pet.
“i swear she’s never like this.” you laughed as you watched them from afar. you watched as haechan tentatively rubbed your cats shoulders, knowing that it was her favourite.
“oh my- is she drooling?” he would exclaim, wiping it off of his hand. you nodded at him, joining the two of them on the couch. your cat quickly hopped off of his lap to lie on you instead. he watched bewildered as you petted her gently, mumbling praises as you went.
“i don’t know who to be more jealous of, you or her.” he would sulk, pressing himself into you as you continue to pet the cat in your lap. you would simply roll your eyes, opting to pet his head with your other hand. you quickly picked up on how much he seemed to enjoy it. that would be something you would definitely be taking advantage of in the future.
JAEMIN
jaemin had been practically bashing your door down to meet your cat. he had heard some weird nosies on the other side of the phone on your latest call. you explained to him that they belonged to your cat.
“what do you mean you have a cat?” he gasped, slightly offended he hadn’t known sooner. you quickly cleared up that you hadn’t been hiding a cat from him every time he came over, you were simply watching the family cat while your parents were away on holiday. however, your boyfriend was still determined to meet him. which led to the situation you were currently witnessing.
“ahhh! you’re such a pretty boy yes you are!” jaemin cooed, making a weird combination of a scream and a gasp when your cat rolled over onto his belly with a meow. jaemin shot forward and began to pet the cat in a fashion you could only expect from a cat dad, absolutely enamoured by the cat who reminded him of his own.
“don’t you think that he and luna would look great together?” he looked up at you with pleading eyes. you knew this comment was coming. the second you realised both of you owned ragdolls, you knew he would suggest some kind of pairing.
“jaem, don’t you think it would be a little weird if our children were together?” you questioned, joining him on the floor with your cat. jaemin’s eyes widened comically in realisation, backpedaling on his comment. after much discussion, you ended up settling on your cats being step-siblings. with the plans jaemin had for your future, such an arrangement was only natural.
CHENLE
chenle had never really intended to meet your cat, it all sort of happened on accident. you were returning back from the vet when you got a phone call. phone calls like these weren’t uncommon, chenle had a tendency to leave problems alone until they became absolutely necessary to handle. however, a call had never come at such an inconvenient time before. still, you dragged yourself and your cat over to his place.
“please next time just call me as soon as something is wrong, don’t leave it until the last minute.” you scolded, although you knew it was bound to happen again. you both made your way back into the central area of chenle’s apartment, where you had set down your cat before your boyfriend had whisked you away jnto the other room.
“yeah yeah i know- wait… where’s your cat?” chenle stopped in his tracks, looking at an open carrier. he immediately began running around, worried he was the reason your cat had gotten out. you watched his panic in slight amusement before coming up behind him and stopping him.
“it’s okay! i let him out when i first got here. i couldn’t leave him in his carrier the entire time.” you reassured. chenle let out a sigh of relief. now the focus shifted to finding where your cat had gone in his apartment. you both searched for about 10 minutes before chenle realised exactly where your cat would have gone.
and just as he thought, there in front of him laid daegal and your cat, cuddled up together in one of her many beds. you and your boyfriend looked on adoration and how cute they were, you quietly whispering that your cat loves dogs. chenle silently cursed himself for doubting you and was quickly coming up with ways on how to ask you to make this a regular occurrence in his home.
JISUNG
standing in front of the door to your apartment, jisung would be absolutely terrified to meet your cat. mumbling silent prayers to himself on the way over, he knew his relationship was all but over if he didn’t get the pet’s approval.
it was almost as though there was no cat in the apartment when he entered. that was until he locked eyes with a shadowy figure who had perched himself on the table in your kitchen. you had picked up on the apprehension radiating off of your boyfriend.
“are you good?” you would ask cautiously, giving him a reassuring squeeze as you moved past him. jisung felt a little embarrassed at getting called out. i mean, who was scared of a cat?
“huh? yeah. he’s just a little… scary?” he muttered quietly, hoping that his choice of words wouldn’t offend you. you let out a loud chuckle at this, jisung’s face flushing slightly pink at your reaction. you walked up to him and pinched his cheek before placing a kiss on it. you continued past him over to where your cat was.
“god you’re cute! he’s literally harmless, watch this.” you picked up your cat and rotated him so that he was cradled in your arms. jisung watched on, amazed at how the cat seem to enjoy the way you poke and prodded at him in various way. when you handed your cat over to him, jisung opted simply to give the cat some pets on the head. to his surprise, the cat leaned further into his touch, purring away. he should have known that when it came to you, there was nothing to be scared about.
requests are open!
masterlist
#nct dream#nct reactions#nct dream reactions#nct dream fluff#nct dream x reader#mark x reader#renjun x reader#jeno x reader#haechan x reader#jaemin x reader#chenle x reader#jisung x reader#mark fluff#renjun fluff#jeno fluff#haechan fluff#jaemin fluff#chenle fluff#jisung fluff
183 notes
·
View notes
Note
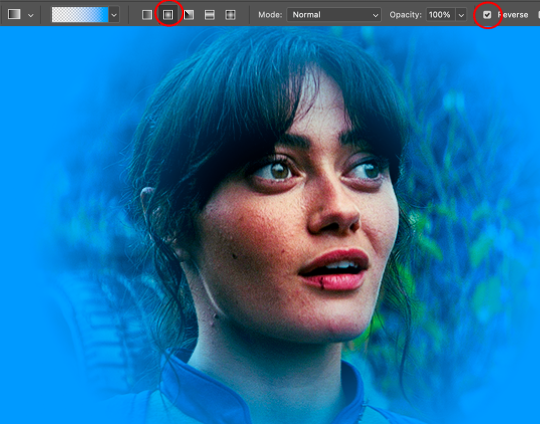
sorry if this has been asked before but how do you make your gradients look so good?
Hi Anon! First of all thank you so much 🫶
I like to use gradient maps (which I've explained here) or gradient fills + gradient tool. I'll drop a little tutorial under the cut:
GRADIENT FILL
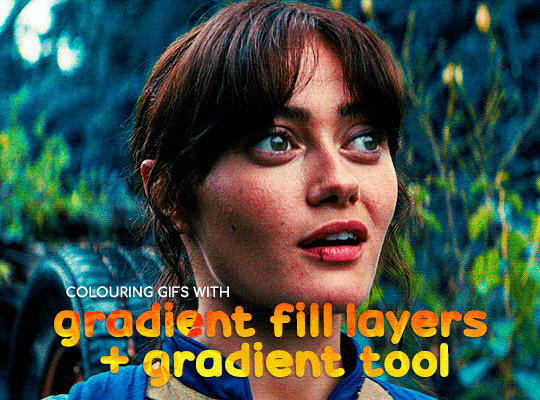
I'll be using this gif which I've already sharpened and coloured:

First of all let's make the background pop so I'm going to add a gradient fill (Layer -> New fill layer -> Gradient) with these settings (I'm using this colour #0099ff):

Now it's the time to play with the blending settings! Depending on your scene some will look better than others but I usually switch between Soft Light, Overlay, Color or Hue. 90% of the time I use soft light but this scene looked much better using overlay:

As you can see the background looks more blue and vibrant but it's not too much you know.
GRADIENT TOOL
Now it's time to use the gradient tool to give this gif a hazy look. I haven't seen many gifmakers talk about this tool but it's soooo useful and it takes gradients to a whole new level.
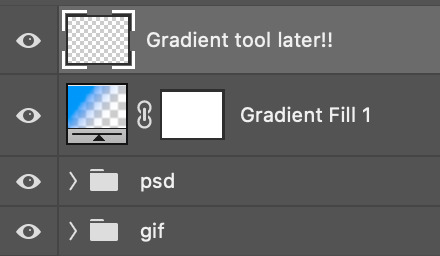
Before using this tool we'll need to add a new layer above the gradient fill, like this:
(HELP I just realised I typed “later” instead of “layer” 🤡 but let’s ignore that)
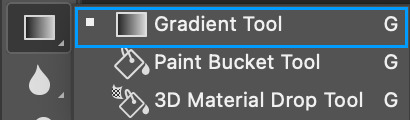
You can choose the gradient tool by pressing 'G' and then clicking here:
Make sure your gradient goes from any colour to a transparent background.

Okay so next to this gradient settings we have five different styles and each one will create a different shape. Depending on the scene I'll use the first, second or fourth one. Here are how they look:
1. Linear gradient
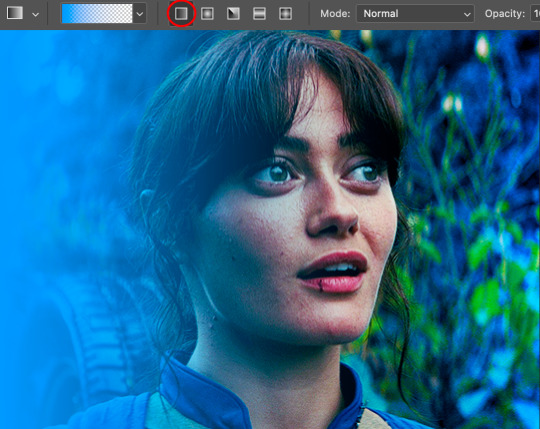
2. Radial gradient + Reverse (if you don't click this you'll end up with a blue circle above your gif)
3. Reflected gradient + Reverse
This time I'm going to use the radial gradient so to draw it start by clicking on the centre of the gif and drag the line (the farther you drag it the less intense the gradient looks):
And this is the gradient:
And here comes the fun part again, playing with the blending setting and the opacity! Before doing anything I duplicate my gradient layer because I always use more than one so this is how your layers should look like:

Let's go to the first gradient tool layer and again try different blending modes: soft light, overlay, hue... Most of the time I'll use 'Soft layer' and I'll leave the opacity at 100%.
For the second layer choose 'Screen' and don't worry if your gif looks too bright because we're going to fix this by decreasing the opacity. Anything between 20-60% should look good but it depends if you want a more vibrant or more natural effect. I ended up using 40% and this is the result:

And we're done!!! As you can see the result looks much different from our first gif and it only takes a couple of layers!
Honestly the best advice I can give you is to play with the opacity and blending mode of the different gradient layers because depending on the scene some will look better than others!
#ask#Anonymous#ps tag#tutorial#usernolan#userrin#useraljoscha#uservalentina#userbunneis#userlockescoles#usernik
562 notes
·
View notes
Text
CC Creation Tutorial: Smooth Seams in Blender

In this tutorial, I will show you how to make your mesh seams smooth inside Blender (no Milkshape required!) and walk you through the process step by step. We will make a perfectly smooth mesh and transfer the normal data from that mesh to our main mesh using the Data Transfer modifier.
I am using Blender 3.6 in this tutorial (though you should be able to follow along using other versions as well)
You do not need to have much previous knowledge to follow this tutorial, but I assume you know some basics in Blender like how to select, things, navigate around, etc, and know how to import the meshes and put them into Blender.
For this tutorial, I exported the Sims 3 afbodyEP4DressPromBigBow mesh with TSR Workshop. You can use any clothing mesh you like though, and works on any meshes, not just Sims 3 ones.

This is our mesh. You can already tell that it has the dreaded seams on the neck and the rest of the body.

First, we need to make a copy of the mesh (in Object mode, select the mesh and hit Ctrl+D Shift+D to duplicate it, then hit Esc to stop it from moving around).
Rename the mesh (I added Seamless to the mesh name).
Make sure the original mesh is hidden (click the eye symbol) and select the Seamless mesh.
Press the Tab key to go into Edit Mode.

Now we select the parts that we want to have smooth seams. Let's select everything that is skin (you can select a litte piece of the mesh and then press Ctrl+L to select the entire piece)!

Now, press M and in the menu, choose By Distance. (in older versions, this is called Remove Doubles).
This will remove all double vertices at the seams on the selection we made.

It will show you how many vertices it removed. The skin looks nice and smooth!
Let's switch back to our original mesh: Make sure you deactivate the eye on the Seamless mesh and activate the eye again on the main mesh. Then, select the main mesh.

Now, let's add a data modifier to our main mesh. Click the blue wrench icon in the vertical list of the properties panel and then onto Add Modifier, then choose Data Transfer from the list.

As the source, we choose our Seamless mesh.

Also toggle on Face Corner Data and click the Custom Normals button.
Hold on, there is a message saying that we should enable Auto Smooth in Object Data Properties. Let's do that next! (if the message does not appear for you, maybe Auto Smooth is already on).

Click the green inverted triangle button and in the Normals section, toggle on Auto Smooth.

Now we can switch back to the modifier tab by clicking the blue wrench icon again.
But hang on, what happened to our mesh? There are now black spots over the dress and shadows on the legs!

This is due to the Data transfer modifier's Mapping setting. If we change it to Topology, our mesh goes back to normal again. Phew!

Now that the normals look good, we can start the transfer of our new smooth normals from the seamless mesh to our main mesh. To do that, we hit the Generate Data Layers button. This button works destructively, so you cannot undo what it did, just FYI.

Note: On newer versions of Blender, Generate Data Layers may not be enough to transfer the normals and you may need to apply the modifier instead.
You can toggle the modifier's visuals on and off with the little screen icon to see the results after you click Generate Data Layers to see if it stuck. If it did not (and you see the seams of your base mesh when toggling it off), try to apply it instead.

I switched from textured to solid shading because the differences are just more noticeable in this mode. This is how our mesh looks now with the modifier turned off.
Because we clicked the transfer button, the normals have been permanently applied to our mesh. The skin is smooth now, and so is the dress (even though we did not smooth that one, hmm...)

If we toggle the modifier back on, suddenly the dress has seams again! What's going on there? I'm not exactly sure why, but Auto Smooth seems to be doing some smoothing on the dress mesh as well.
I am not sure if this is normal behavior or not, but let's pretend that this did not happen and the modifier in fact did not smooth the dress.
Maybe we just forgot to smooth some areas on the Seamless mesh that we noticed only later on. That's no problem. We simply modify our Seamless mesh again!

So let's swap back to the seamless mesh and select it (remember to click the eye icons so only the Seamless mesh is visible).

Let's select the main dress parts and press M -> merge by distance on them. We cannot smooth the whole dress all at once, because then that would remove some seams that we want (like those for the backfaces and the middle section of the dress where the bow is attached).
If we remove the wrong seams, we ruin our normals and will have black splotches.

Now, let's select the backfaces and areas we left out before and repeat this process: M -> merge by distance.

Look at how perfect our Seamless mesh is looking now! Now, let's transfer those beautiful normals to our main mesh.
Select the main mesh and toggle the eye icons again, to hide our Seamless mesh and reveal our main mesh.

Once again, we will use the Generate Data Layers button in our Data Transfer modifier. If you have previously applied the modifier, just add the modifier again to the main mesh and use the settings shown here.
And that's it, you are done! You have a perfectly smoothed mesh that you can export now.

Final Note: it is best to transfer the normals at the very end of your meshing process because any action that recalculates the normals can reset our custom-made smooth normals again.
Of course, you can simply use the Generate Data Layers button again to re-add them, but it saves you time to only do this step at the end.
I almost forgot to say: You still have to use Mesh Toolkit to fix the seams on the edges of your mesh and do the usual shenanigans.
188 notes
·
View notes
Text
How to convert Sims 4 3D CAS Rooms to Sims 3

Disclaimer: If you’re not familiar with Blender/TSRW/UVs then this tutorial may not be for you. If you don’t have Sims 4 Studio which needs the Sims 4 base game (or don’t know how to extract the meshes without it) this tutorial may not be for you. Honestly it’s pretty straight forward, but there’s a lot of trial and error and going in game and out of game checking placement, etc. I use Blender 4.1 for this, but you should still be able to do the same things in the older versions. I'm trying to make this as easy as possible. I’m here to answer any questions though 💕 Tutorial below
Things you’ll need:
Blender (whatever version you prefer)
Sims 4 Studio
TSRW ( I use version 2.0.86)
My Christmas CAS Room here
My TSRW work file here
Tutorial:
Find a Sims 4 CAS room that you like and open it up in Sims4Studio. This is the one I'll be using for the tutorial.

In the Texture tab, export the textures. The only textures that matter are the first 3 diffuse. Go to the Meshes tab and export the mesh, it will save as a .blend file. After that you can close out of Sims4Studio.


Open my Christmas CAS Room in TSRW. You'll get this message. Hit ignore and don't send. We only need this file as a reference to resize the SIms 4 CAS room. Export the mesh as an obj, name it whatever you like. You can close TSRW for now.

Open Blender and open the .blend file you exported from Sims4Studio. Make sure to delete studio_mesh_0 as it's just the shadow map and we don't need that. This is what mine looks like after fixing the textures.

Then import the wavefront obj you just exported from TSRW. Again we're just using this as a size reference.
This is what it looks like after I added the obj. I scaled, moved, and rotated the room to match up as close as I could with my reference mesh. When you have it lined up to your liking you can delete the reference mesh. I usually import the sims 3 body to see where my sim would be in CAS as well so feel free to do that too.

Now we have to separate the objects that use transparency in the scene to their own group. The transparent objects will always be located on studio_mesh_1. I usually do this in UV mode. Make sure UV Sync Selection is on. Where the red arrow is, that's the UV Selection button. It's blue so that means its on.

Tip: If you're using the same Blender version I am (I'm not sure if the older versions below Blender 3.0 do this) you can disconnect the alpha in shader editor and then you can easily see what uses transparency because it has a black background like the plants. Don't worry about the one outside the window as that's on the backdrop image and doesn't show in CAS.
Important: Also, make sure you delete the back of the mirror frame or it will show through the mirror in game. I usually select it in the UV editor as well and delete it.

After selecting all the objects that use transparency, I go to the 3D viewport window and press P, then selection. Now they're on their own layer as you can see. That's a very important step so please don't miss it.

Sims 4 CAS Rooms don't have a closed room like ts3 and if you don't add walls/ceiling with planes you'll be able to see that it in CAS. You can do this in any way you're comfortable with. If you don't understand how to do it feel free to ask me. For this tutorial I will not be doing this perfectly lol I've done enough rooms and I'm just trying to teach here 😩

Okay now last is renaming groups to import into TSRW. Make sure it's in this exact order and uses the exact group numbers.
Group 0 - Mirror
Group 1 - Windows/Curtains
Group 2 - View outside the window
Group 3 - Walls
Group 4 - Objects with transparency
Depending on the CAS Room you convert, yours may not have a mirror you know. You can delete groups in TSRW, experiment, feel free to ask me questions as well.
After renaming the groups, select only the groups you renamed and export as an obj. Make sure that object groups is checked so that they can stay in groups.

Open TSRW and open the testroom_cas.wrk file.
After opening the file you'll see this exact room in this tutorial lol because I had to test some things first 😅

Import the CAS room you converted from ts4. You'll get these two messages. Click yes on the first and no on the second.
Disclaimer: Make sure you reduce polygon sizes or it won't import and give you an error


Import your textures (yours may be different than mine depends on the converter) but most have been the same that I've seen. Group 0 is the mirror it doesn't require a texture. Group 1 and Group 4 usually have the same texture.
Disclaimer: TSRW an be finnicky with textures sizes, I havent gotten any issues since using the 4GB patch, but just in case. Texture sizes from ts4 can run pretty big 4096x2048 even 8196x4096. I would resize to no bigger than 2048x1024 in my opinion, but whatever works for you.
After export to sims3pack or export as package file. Make sure you compress your files and you should be good to test your CAS room in game.

This is the finished product. Should look something like this or better lol considering this was quick 😅
If you would like to make your own from the original ts3 cas room, I would suggest watching this Youtube video (it's for TS4 but it still applies and is helpful) and the link to the original ts3 cas room is here. Since we can convert ts4 to ours you could probably just build your own and go from there as well.
Thanks to @mookymilksims for testing things for me and converting her own. If you would like to try this tutorial out and experiment with room placements using @boringbones Ultra wide CAS mod which changes the field of view in cas so that you can see the whole cas room, it is here. I didn't use it for mine, but that's only because I found out about it after from Mooky lol and I'm tired of converting them 😅 but feel free to ask me any questions if you need help 😊
#ts3#tutorial#sims3#I hope this helped#been procrastinating finishing this 🙃#cas room tutorial#sorry if it's long#tried to be thorough and make sure everything was correct#my tutorials
172 notes
·
View notes
Text
god i hate that i was right about this. the “its $70 dlc” people were right
god i need cool/interesting new areas in totk i hope theyre just avoiding visuals of most stuff in order to not spoil it bcus the sky islands rn just seem kinda. idk more of the same. yes the new fuse mechanics and stuff are cool but thats not what im interested in really
#totk probably has to be my biggest disappointment in gaming#everything in that game is so cool when you first discover it and then it wears off incredibly fast#i couldnt even be assed to finish bcus the one really high point in the games plot with the dragon got spoiled for me#look like. i will take the L on expecting a zelda game to have an interesting plot. thats on me for expecting that#but having the story be ‘go find these memories out of order again lmao’ is so.#what makes me mad is theres a few moments in the game like when you first enter the wind temple or dive into the depths for the first time#that are so incredible. but then you realize the depths is basically all the same and is just an inversion of the overworld#and that 90% of the sky islands are copy pasted and the tutorial one is by far the most interesting#like please do not misunderstand me i know that some level of recycled content has to exist in open world games of this scale#otherwise they never get done. but a sequel 5+ years later reusing the same map and then reusing that map again for the depths is so. okay.#dev interview where they were like ‘the depths were created in a surprisingly short amount of time’ yeah it shows lmfao#i’ll give them one thing and thats that they added cave which something i was fiending for when i played botw#but most of the caves arent even that interesting so like#what it boils down to for me is that botw had such fun exploration that basically every open world game after it was mimicking it#(or mimicking the stuff that inspired it) and yet totk exploration is so nothing. no real npcs to speak of in the depths or the sky#no interesting ruins of the zonai. the only story to the depths is the fucking yiga#that statue quest had me hoping there would be a whole new race down there. lmfao#the game is designed as if millions of people didnt play botw and that it still has the same newness factor as botw did#like sorry banjo and kazooie nuts and bolts gameplay does distract me from the fact that the actual new areas are uninteresting as fuck#ik they said in dev interviews that theyre sticking to the open style for the future please god make exploring and finding things fun again
5 notes
·
View notes
Note
Your gifs are so beautiful do you mind sharing a bit of your process? It blows my mind that they’re made in procreate
Thank you so much! They are mostly just 4 paintings played in sequence.
The most important thing is to keep your layers and colors organized. I try to keep each layer to just a single color pass with whatever blend mode I want. Building up from the bottom, I do flat colors, then shadows, then lighting, then the subsurface transition, and any additional elements. Once I'm happy with one painting, I'll duplicate the whole thing. and going layer by layer, i'll re-draw them. The easiest way to do this is to add a gradient map to shift the whole layer to a solid color, reduce the opacity and then you just trace your own drawing on a new layer, making sure to keep the same color, blend mode, and opacity. Then I just move my way up the layer stack until I'm done and I have the same painting, but everything is different. Then you do it again, and again. :P
I export all of my frames and do my compositing in Adobe After Effects, where I add grain and additional post-processing effects. But there's no reason you couldn't do the final compositing and gif creation in Procreate.
If you are new to doing animation in Procreate I'd suggest looking up a few tutorials on Youtube.
58 notes
·
View notes
Text

finally making a little headway on my save file again! i'm playing around right now with moving/resizing lots
this is foundry cove in willow creek with a 30x60 lot (houses lot) and a 40x30 (pool lot). if you want to know how to resize/move lots here's some tutorials: 1 2
if there's a giant hole in your terrain after moving a lot, that's normal. you have to fill it in with something (either by expanding another lot to cover it, or using a rug that matches the grass)
i would love the ability to add more lots. i know twistedmexi's CAW is going to introduce that feature, but i literally can't wait. all i want is six tiny 20x15 lots squished next to each other
and the problem with resizing lots through S4S is that the map looks strange when the resized lot is built on. maybe i could offset the lot position on the map to fix it...idk. will keep testing!

#ts4 wip#if only EA would just release an actual CAW tool for TS4#then we wouldn't have to jump through so many hoops to edit worlds!#but then i guess they couldn't justify the $40 price tag for expansions either
908 notes
·
View notes
Note
Hi!! I really like your art but ESPECIALLY your coloring!! I was wondering if you make a tutorial on how you color your art :3 only if you want to though!
oh my god I literally don't know how I missed this, it's like a two month old ask by now I am so sorry! Thank you for the ask, I'm very honoured ueueu
I've been bumbling around trying to figure out how to explain how I do colours but I will be so honest, a lot of my process is quite literally just trial and error until something feels right. But I tried to compile and open up some of my thoughts so here goes:
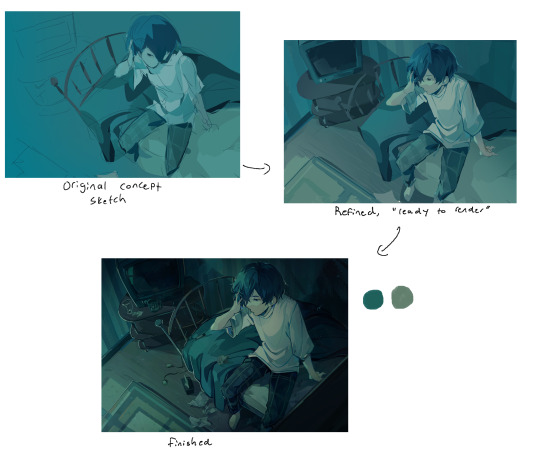
Firstly, I don't ever really do "flat colours" so I figure out shading as I colour. Sometimes I already incorporate colours into my earliest rough sketch of a piece, sometimes I make a sketch in black and white and sometimes I make a whole clean sketch without any colours and figure it out from there. I also don't really like using any layer modes, so a lot of my beginning phases are literally me just throwing random colours at the canvas.
In terms of colour palette I mostly just go based off of the atmosphere of the drawing, but I really like to saturate certain colours in my drawings and they tend to usually be complementary with greens/blues and then oranges/reds. I also tend to exaggerate "real" colours this way, for example making objects that are supposed to be black really blue.
Because I colour just kind of from intuition, my initial colours are often....not very good. I struggle a lot with keeping my values in check, especially with making midtones too dark and saturated (you can see it pretty well in action in the drawing above this). To fix this I utilise clip studio's tone curve tool A LOT by shifting values that are too strong to either direction more towards midtones. Kind of like, flattening the values I guess and making the differences less intense?
I would also like to talk about gradient maps here, because they're incredibly useful and I utilise them a lot as well. I have a really brightly coloured gradient map set downloaded from the asset store that I use a lot to get colour variation between hues. I never really use gradient maps as is, but instead I layer a bunch of them and erase most of the area they're covering to push and pull colours within the drawing to have interesting transitions and stuff like that (very vague I know, I don't know how to explain it)

My colours also shift throughout the rendering process a lot again as I push and pull values (everything is always a value game!!) and saturation.
I don't know if this helps! Like at all! Again, I don't really have a specific process I can explain for colouring, I mostly just trial and error through options until something sticks. Sorry for the long wait as well!
59 notes
·
View notes