#tutorial by Simlicious
Explore tagged Tumblr posts
Visit Tumblr Blog
Explore Tumblr blogs with no restrictions, modern design and the best experience.
Last Seen Tumblr Blogs


Fun Fact
Tumblr has been providing a Korean-language service since 2013.
Text
CC Creation Tutorial: Smooth Seams in Blender

In this tutorial, I will show you how to make your mesh seams smooth inside Blender (no Milkshape required!) and walk you through the process step by step. We will make a perfectly smooth mesh and transfer the normal data from that mesh to our main mesh using the Data Transfer modifier.
I am using Blender 3.6 in this tutorial (though you should be able to follow along using other versions as well)
You do not need to have much previous knowledge to follow this tutorial, but I assume you know some basics in Blender like how to select, things, navigate around, etc, and know how to import the meshes and put them into Blender.
For this tutorial, I exported the Sims 3 afbodyEP4DressPromBigBow mesh with TSR Workshop. You can use any clothing mesh you like though, and works on any meshes, not just Sims 3 ones.

This is our mesh. You can already tell that it has the dreaded seams on the neck and the rest of the body.

First, we need to make a copy of the mesh (in Object mode, select the mesh and hit Ctrl+D Shift+D to duplicate it, then hit Esc to stop it from moving around).
Rename the mesh (I added Seamless to the mesh name).
Make sure the original mesh is hidden (click the eye symbol) and select the Seamless mesh.
Press the Tab key to go into Edit Mode.

Now we select the parts that we want to have smooth seams. Let's select everything that is skin (you can select a litte piece of the mesh and then press Ctrl+L to select the entire piece)!

Now, press M and in the menu, choose By Distance. (in older versions, this is called Remove Doubles).
This will remove all double vertices at the seams on the selection we made.

It will show you how many vertices it removed. The skin looks nice and smooth!
Let's switch back to our original mesh: Make sure you deactivate the eye on the Seamless mesh and activate the eye again on the main mesh. Then, select the main mesh.

Now, let's add a data modifier to our main mesh. Click the blue wrench icon in the vertical list of the properties panel and then onto Add Modifier, then choose Data Transfer from the list.

As the source, we choose our Seamless mesh.

Also toggle on Face Corner Data and click the Custom Normals button.
Hold on, there is a message saying that we should enable Auto Smooth in Object Data Properties. Let's do that next! (if the message does not appear for you, maybe Auto Smooth is already on).

Click the green inverted triangle button and in the Normals section, toggle on Auto Smooth.

Now we can switch back to the modifier tab by clicking the blue wrench icon again.
But hang on, what happened to our mesh? There are now black spots over the dress and shadows on the legs!

This is due to the Data transfer modifier's Mapping setting. If we change it to Topology, our mesh goes back to normal again. Phew!

Now that the normals look good, we can start the transfer of our new smooth normals from the seamless mesh to our main mesh. To do that, we hit the Generate Data Layers button. This button works destructively, so you cannot undo what it did, just FYI.

Note: On newer versions of Blender, Generate Data Layers may not be enough to transfer the normals and you may need to apply the modifier instead.
You can toggle the modifier's visuals on and off with the little screen icon to see the results after you click Generate Data Layers to see if it stuck. If it did not (and you see the seams of your base mesh when toggling it off), try to apply it instead.

I switched from textured to solid shading because the differences are just more noticeable in this mode. This is how our mesh looks now with the modifier turned off.
Because we clicked the transfer button, the normals have been permanently applied to our mesh. The skin is smooth now, and so is the dress (even though we did not smooth that one, hmm...)

If we toggle the modifier back on, suddenly the dress has seams again! What's going on there? I'm not exactly sure why, but Auto Smooth seems to be doing some smoothing on the dress mesh as well.
I am not sure if this is normal behavior or not, but let's pretend that this did not happen and the modifier in fact did not smooth the dress.
Maybe we just forgot to smooth some areas on the Seamless mesh that we noticed only later on. That's no problem. We simply modify our Seamless mesh again!

So let's swap back to the seamless mesh and select it (remember to click the eye icons so only the Seamless mesh is visible).

Let's select the main dress parts and press M -> merge by distance on them. We cannot smooth the whole dress all at once, because then that would remove some seams that we want (like those for the backfaces and the middle section of the dress where the bow is attached).
If we remove the wrong seams, we ruin our normals and will have black splotches.

Now, let's select the backfaces and areas we left out before and repeat this process: M -> merge by distance.

Look at how perfect our Seamless mesh is looking now! Now, let's transfer those beautiful normals to our main mesh.
Select the main mesh and toggle the eye icons again, to hide our Seamless mesh and reveal our main mesh.

Once again, we will use the Generate Data Layers button in our Data Transfer modifier. If you have previously applied the modifier, just add the modifier again to the main mesh and use the settings shown here.
And that's it, you are done! You have a perfectly smoothed mesh that you can export now.

Final Note: it is best to transfer the normals at the very end of your meshing process because any action that recalculates the normals can reset our custom-made smooth normals again.
Of course, you can simply use the Generate Data Layers button again to re-add them, but it saves you time to only do this step at the end.
I almost forgot to say: You still have to use Mesh Toolkit to fix the seams on the edges of your mesh and do the usual shenanigans.
179 notes
·
View notes
Text

How to start your own save file (+ LOTS of tips, advice & mods) by Amelie
Watch Video Here
1.Pick your save file
Empty Save (personal favorite)
Simlicy's Save
Lilsimsie's Save
2. Take inspiration from real worlds i.e. New Orleans for Willow Creek, New England for Brindleton Bay. Find a theme/style for each world to make it cohesive.
More examples would be:
San Sequoia | San Francisco
Windenburg | Germany & Austria
Sulani | Tahiti
San Myshuno | New York (atleast part of it)
Oasis Springs | Arizona
Henford on Bagley | English Countryside
Mt. Komorebi | Japan
Del Sol Valley | Los Angeles
Tartosa | Italy
3. Finding beautiful builds on the gallery | tips & showcase in video
Video of my favorite gallery builds
Some lots I have in my save file
My favorite gallery creators (scroll down)
4. Map Replacements
5. Tool Mod
Used to further customize your save file & add cars, trees, etc.
Can also be used to change apartment windows
Tutorial
6. No random townies Mod
Prevents the game from further spawning and generating townies
Make sure to have enough unemployed sims that can fill npc jobs such as waiters, baristas, etc.
7. Sim spawn overhaul Mod
Sims only show up in their own residential worlds
Adds realism and doesn't break immersion
#pixelglam#ts4#ts4cc#ts4 mods#ts4 save file#sims 4 save file#ts4 aesthetic#the sims community#ts4 simblr#the sims 4#sims 4#the sims 4 simblr#pixelglam's save file#tips
3K notes
·
View notes
Note
Hey Moss :)
How are you? I hope you're having a pleasant weekend?!
I have a couple of questions regarding the post about polycount you made a while ago: I've found contradictory instructions on which polycount value to look at in different tutorials. As far as I understand it now, you'd want to look at the MLOD 00000000 High detail mesh, but another tutorial says look at the MODL, which is actually the low resolution one. Which polycount values did you look at for your list of average polycount for EA items? The MODL one or the highest MLOD one?
My second question is: How did you open the EA items that came with the game in order to check the polycount? Do you know a tutorial? I tried googling it but couldn't find any tutorial on how to do it…
Hi! :)
I used this tutorial by @simlicious, which explains how to use TSR Workshop to check polycounts. For my average polycounts of EA items project, I always used the polycount of the mesh with the highest level of detail.
Using TSRW to check EA item polycounts
To check the polycount of an in-game EA item using TSRW, follow the tutorial I linked above. However, instead of clicking “New import,” you’ll select the category of the item you’re looking for under “Clone an item,” such as Clothing, Makeup/Facial Overlay, Hair, Accessory, Object, etc. From there, navigate to the item you want, and then the instructions stay the same: find the “Mesh” tab and select “Highest level of detail” from the dropdown menu (or whichever lod you want to check).
I use the version of TSRW linked in this post from @greenplumbboblover.
Extracting EA Meshes with S3PE
I’ve always used TSRW to extract EA meshes because it works well for me, and that’s how I first learned to do it. But there are other methods too, and maybe this post could help: How to extract items from the game, the KL way. (I've never done this).
MODL/MLOD
I hadn’t used the S3pe method for checking polycounts since TSRW worked fine for me, but your ask made me curious, so I tried following this tutorial. You’re right—the MODL is showing the polycount for lower level of detail rather than the highest, which seems to contradict other instructions.
I’m wondering if someone more knowledgeable than me could provide further explanation on why we might want to check the MODL file instead of the highest level of detail in this context—I might be missing something. :)
Anyways, for my project of recording average polycounts of objects and CAS items, I used the highest level of detail for reference, based on my findings in TSRW!
10 notes
·
View notes
Note
Heyyy, I love your aesthetic and pretty much got all your cc, I saw your post about hiding patters and I most sims 3 patters so that's nice, but I wonder where to find some "essencial" ones since I dont want too many lol, any ideas?
Thank you <3
I'm not sure whether you mean cc patterns, or identifying EA patterns.
If the former my favorite pattern maker is @simlicious!
If you mean the latter, part of why I made it the way I did is I didn't feel like trying to figure out which was what so I just hid everything aside from the solid pattern. 😆 @sweetdevil-sims has a tutorial on how to hide patterns here, and how to identify which pattern is which here.
13 notes
·
View notes
Note
Dear Lyralei, where would this community be without you? I do not even want to imagine! You've created amazing mods and CC, always pushing the boundaries of what's possible, and built a whole new Simblr community in which everyone can participate and feel welcome and where every voice matters. And let's not forget your valuable tutorials! You're such a kind person and I have a deep admiration for your dedication to your projects and your love for the Sims games and our community. Thank you for all you do! 💜
Hey Simlicious!
Thank you so much for the sweet words! :) I never really know how to respond on these things because I never know if the warmth it brings really shines through the words I'm using 😅
16 notes
·
View notes
Note
I love your content! May I ask how do you change the windows on the buildings? Thank you in advance.
Hi, thank you so much!
To change the windows I use TOOL mod & used Simlicy's YouTube tutorial on how to change the windows!
9 notes
·
View notes
Link
15 notes
·
View notes
Photo

How to Create A Realistic Save File
In my most recent video, I provided a few tips (and mod recommendations) to help players add more realism into the game.
Mods Mentioned:
Map Replacements
World Lighting Mod + (installation tutorial)
In-Game Lighting Mod
MC Command Center
No Random Townies
Lifetime Aspirations Mod
More Club Icons
Custom Social Events
Age By Age Group
10 Gallery Creators for Builds:
florwalsims
lilsimsie
simlicy
melcstro
webdangler
jessicapieyt
catsaar
tamo-sim
gablesim
anotherplumbob
10 Gallery Creators for Townies:
oshinsims
jenn2606
simsontherope
xsugarycarnival
blueceai
nickfound01
kinis_am
somewhsome
sneakerheadsims
apfelmuse77
Honorable Mention:
Srsly’s Blank Save File
also, check out the video if you are interested 🤎
#simkhira#sims 4#the sims 4#ts4#sims 4 mods#ts4 mods#s4 mods#ts4cc#s4cc#youtube#sims 4 save file#ts4 save file
4K notes
·
View notes
Note
Simblr Gratitude Day - Hey dear Simlicious! I was looking forward to this day and I'll start with you. I just wanna thank you for your beautiful patterns, helpful tutorials and friendly nature. I checked and I have 739 (!) patterns of you in my game and I can't imagine the game without them. You put so much effort into your creations: Everything is perfectly labeled, categorized and in a high quality. If there's an "issue" you fix it immediately. Thanks again and always remember we appreciate U!
*gives a big hug* I'm so thankful there are people like you who appreciate my CC so much!
9 notes
·
View notes
Note
hey amelie! i just wanted to ask, how long did it take for you to learn how to build? did you watch youtube tutorials or anything like that? idk, i’ve always wanted to build a house for my own sims but it’s so hard for me to like what i’ve made. did you feel this way too? do you have any tips? sorry i’m such a yapper 😭 have a great day! <3
Hello! Watching simmers like bojanasims, lilsimsie and simlicy on youtube helped me a lot especially when I started building lots myself about one and a half years ago! I listed a few tips for you below!
I also received a similar message from another anon so I'll be answering both here. 🤍
'hiii i recently discovered your yt channel and i love your builds. how did you improve your building skills and how do you make your builds so realistic? 🩵'

Study Real Architecture: Look at real-life houses, apartments, and buildings to understand architectural styles, layouts, and details. This can give you inspiration and ideas for your own builds. My favorites are pinterest and real estate/architect websites.
Plan Your Build: Before starting, come up with a plan and layout for the build. Decide on the overall style (modern, traditional, etc.), number of rooms, color scheme and any special features you want to include.
Get Acquainted with The Basics: Understand the basic tools and controls in Build Mode. Practice using the wall tool, room tool, roof and terrain tools to create a solid foundation for all your builds. There are a lot of really informative tutorials on youtube! (important for beginners)
Pay Attention to Scale and Proportions: Ensure that rooms, windows, doors, and furniture are proportionate to each other. This helps in creating a realistic and cohesive look.
Use Realistic Colors and Textures: Choose colors and textures that are realistic and complement each other well. Consider the overall color scheme of the house and how different materials blend together.
Add Detailing: Pay attention to small details like trim around windows and doors, roof overhangs, and landscaping. These details can make a big difference in the overall appearance of your build.
Experiment with Roofing and Terrain: Roofs and landscaping can significantly impact the realism of your build. Experiment with different roof shapes, angles, and materials. Use terrain tools to create realistic slopes and landscaping features.
Furnish Thoughtfully: When furnishing your builds, think about how real people would use the space. Arrange furniture in a way that makes sense functionally and aesthetically.
Utilize Custom Content (CC): Explore custom content to expand your options for building, furniture and decorative items. This can often help to create a more realistic look as well.
Seek Feedback and Learn from Others: Share your builds in sims discord groups or on Simblr to ask for feedback and look for inspiration. Look at tutorials and speed builds by other players/creators to learn new techniques and tricks. (please don't copy or steal other people's builds to post online though)
Practice Regularly: Like any skill, building in The Sims 4 improves with practice. Experiment with different styles and challenge yourself with more complex builds over time.
Have Fun and Be Creative: Building in The Sims 4 is a creative outlet, so enjoy the process and don't be afraid to try new things in your designs.
139 notes
·
View notes
Text
Average Polycount of EA Items in TS3: A Reference Sheet
I initially started this list as a personal “cheat sheet” that I could reference to ensure the custom content I'm downloading is appropriate for gameplay when it comes to polycount (and because I intend(ed) to learn how to make my own cc). I decided to share in case others find it useful.
I’m not a Maxis Match purist or anything like that, but purging high-poly CAS items from my cc folder eliminated in-game stuttering for me entirely. For some reason, this is rarely mentioned in discussions about gameplay optimization. Polycount does matter.
There’s a lot of absolutely gorgeous but incredibly high-poly cc out there that is simply not gameplay friendly for the average player. As we see an influx of first-time or rusty players migrating over from TS4, I think it’s important people are aware of this (both players and creators alike).
This might be a nonissue for those whose focus is on CAS and pretty screenshots, or maybe for those who have beastly gaming pcs/graphics cards etc.
But for players whose focus is on actual gameplay, high-poly cc can be detrimental.
With that said, below the cut you can find a list of average polycounts for some EA clothing/objects to use as a reference.
My method
I recorded the polycount of 10 items from each category below so that I could get a decent representation from each one to calculate the average. Since there is a wide range in some of the categories, I’ve opted to also include the minimum, median, and maximum for a clearer picture.
This list is not exhaustive; I feel like after a while, you kind of get the point. Also, this has been sitting on my computer for ages, and I don’t know if/when I will continue collecting data for it, so I figured I would just share what I have for now.
CAS
Tops:
Average polycount: 3538.4
Minimum polycount: 2868
Median polycount: 3443
Maximum polycount: 4872
Outfits:
Average polycount: 4281.8
Minimum polycount: 3865
Median polycount: 4205.5
Maximum polycount: 4932
Bottoms:
Average polycount: 1094.2
Minimum polycount: 770
Median polycount: 1016
Maximum polycount: 1768
Hair:
Average polycount: 4343.2
Minimum polycount: 2298
Median polycount: 4691
Maximum polycount: 6840
Shoes:
Average polycount: 621.6
Minimum polycount: 456
Median polycount: 594
Maximum polycount: 968
Accessories
Average polycount: 520.8
Minimum polycount: 118
Median polycount: 433
Maximum polycount: 1098
Objects
Dining Chairs
Average polycount: 806.3
Minimum polycount: 362
Median polycount: 799
Maximum polycount: 1054
Sofas and Loveseats
Average polycount: 1699.4
Minimum polycount: 958
Median polycount: 1414
Maximum polycount: 2920
Livingroom Chairs
Average polycount: 791.0
Minimum polycount: 290
Median polycount: 920
Maximum polycount: 1006
Beds
Average polycount: 3529.4
Minimum polycount: 1974
Median polycount: 3316
Maximum polycount: 5668
Plants
Average polycount: 746.3
Minimum polycount: 104
Median polycount: 801
Maximum polycount: 1998
Sculptures
Average polycount: 1659.3
Min polycount: 440
Median polycount: 1417.5
Max polycount: 5263
Misc
Average polycount: 914.4
Min polycount: 380
Median polycount: 988
Max polycount: 1926
Curtains
Average polycount: 762.4
Min polycount: 262
Median polycount: 802
Max polycount: 1438
Wall Art
Average polycount: 524.1
Min polycount: 62
Median polycount: 171
Max polycount: 2403
Dining Tables
Average polycount: 754.8
Min polycount: 468
Median polycount: 685
Max: 1262
For vehicles, check out this follow-up from @dhalsims
Further reading from people who are way smarter than me:
Polygon counts and Sims CC by @simlicious, plus their tutorial on how to check polycounts using TSRW. Edited to add: check out their newest essay about polycount vs vertices!
Let’s Talk Polygons by @mspoodle1 plus their tutorial on how to use S3pe to check polycounts.
A warning about high polycount custom content - for downloaders and creators by @tommeraas-cc (this post is for TS4 but still relevant for TS3 as well).
Maybe no one cares about cc polycounts anymore, but I sure do. 😅
Happy simming! I'm on a bit of a break from TS3 right now but I always come back. 🖤
#ts3#ts3 simblr#sims 3#ts3 simmer#the sims 3#simblr#ts3 cc#sims 3 cc#sims 3 simblr#ts3 info#ts3 tutorial#sims 3 tutorial
387 notes
·
View notes
Photo

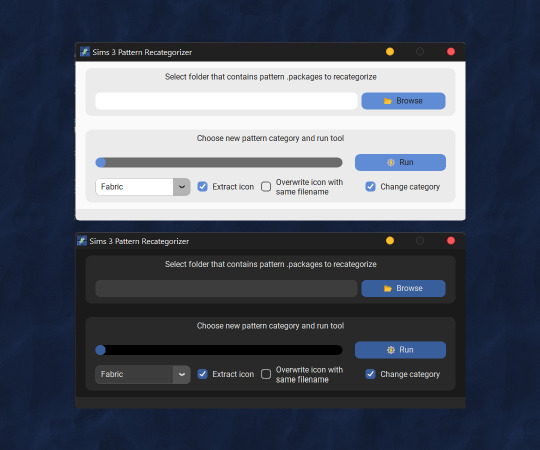
TLDR: gauging interest for release of a Sims 3 utility mod tool that interacts with pattern .package files to (1) reorganize the pattern category in-game, and/or (2) extracts the icon for better CC organization purposes.
ya girl has been so unhinged lmao — I have been a mini hiatus because I have been reorganizing my Sims 3 Custom Content among other things! In that spree, I converted my pattern .sims3pack files to .package using @ktarsims‘s wonderful pattern hoarder tutorial. I thought changing categories of downloaded patterns to be more consistent and easier to find made a lot of sense — only to be very dissuaded and burnt out when doing it manually for each pattern proved to VERY tedious.
so! me, with my computer science degree thought: this can be automated! and surprisingly, it could! this could not be possible without s3pi, of course, and @chocochipsims‘s Pattern Preset Color Extractor (which @simlicious kindly redistributed a while back). her code interacted with patterns (to extract the preset information) and I thought: if she could do it, so could I! it helped immensely that her code was open-source, meaning I was free to reference from it as I wished!
so, here we are, and I’m wondering: does anyone have interest in using this tool? I’m thinking it might be useful to other CC organizational maniacs like me and maybe even pattern creators — but this is quite a niche use case and it would be very embarrassing to release a tool that no one would use, lol.
112 notes
·
View notes
Text
ReShade Help 🌟
youtube
Okay so a very sweet sim builder, SimLicy, made mention of my dove reshade in a recent video (thx @cowplant-pizza for telling me bc i was v confused as to why i was getting so many reshade questions all of a sudden XD) and lots of people seemed to be having issues with downloading it.
I didn’t wanna spam the dash and I wanted to make something that could answer everybody’s questions all at once, but be more effective than written instructions. Soooo, I made a long ass video tutorial!! (highly recommend watching on actual youtube, there’s timestamps there XD)
In the video I walk you through how to install versions 3.0.8 , 3.4.1 , and 4.7.0 of reshade, and how to get my presets running in each of them! I try to go as in-depth as possible and give tips and explanations on how to handle errors and whatnot. The instructions are given with my presets in mind, but they’re more than likely applicable to other presets as well!
I hope this helps everyone who was having issues ( @thepalanquin , @letudownn , @leppy97 , @mindiisimii19 , + all the nonnies!!)
#i said hey#it's been a while since i logged into good old simblr#lemme pop on for like 5mins#my inbox has like#20 dif messages about reshade#when i tell you i logged out so fast XD#lol but i tried my best to hit all the issues#there's even a segment where i do literally everything wrong and ride the struggle bus to hell :))#anyway im just gonna link to this video from now on when people ask reshade questions#:D#uh how do i tag this?#reshade#sims 4 reshade#*thumbs up*
244 notes
·
View notes
Note
Hi! This might be a random ask, but I was wondering if you use the TOOL mod on the windows in apartments and if so, how do you get them to fit the wall correctly? I know it might be a bit much to ask for a tutorial but really an tricks on how achieve the sleek look will help!! Thank you so much and I really enjoy your page! Happy simming!
Hi! I do use the TOOL mod and just got into it recently. And with that said, I am the last person to ask for help on this but I'll link a video SimLicy did explaining how to use it with apartment windows!
Video Link
5 notes
·
View notes
Note
Heya! Any tips on making lots? Or tutorial?
Hey, I'm not really sure if I do, to be honest.
I'm not the greatest at building or decorating, so I tend to look at reference pictures a lot. Go on google or pinterest and search for a building vibe to get inspired, or even copy a layout and then take creative liberty to make it your own in game. I find this to be quite helpful and you end up learning new technics while trying to mimic something.
I personally would like to do a tutorial on building, but there are way too many styles of builds, I don't think a generic tutorial would be of much use...?
But there are really great sims builders on youtube that you can watch to get inspired or learn some different technics and cheats. My personal favourites are SimLicy, XFreezerBunnyX and Devon Bumpkin. I'd say check their build videos if you'd like.
So yeah. Hope this helps x
15 notes
·
View notes
Photo


DEEPLY SUPERFICIAL by technically swag pizza
There are all in all 10 nonrecolorable Finnish, Russian and Eastern European style decorative shell building objects of different sizes and colours, some of them have windows lighting up when it gets dark.
While directly adding them on your lots these state of the art buildings can be found under the Misc object category through buydebug or you can add them anywhere in your map through the edit town mode.
Also enabled for CAW.
Low poly, ranging from 20 to 304.
Pictures above have been resized but are otherwise untouched. You get exactly what you see there.
⇩ DOWNLOAD // MIRROR ⇩
NOTE While tweaking the textures I kind of started to understand why EA uses such weirdly stretched and dull textures on their rabbit holes and stuff. Unfortunately these flicker a little when you move your camera around as they are sharper than most EA ones, I smoothed them down a lot but it’s as good as it can get (´∩`。)
!! Fixed 20.2.2020 - I smoothed out all the textures to get rid off the flickering for good. I also ran all the packages through S3rc so the file size is even smaller. Please redownload and replace the old ones with the new ones!
Credits
Original 3d mesh created by Denis Loginovskiy for Euro Truck Simulator 2. This deco shell building project was inspired by @silvakristiina and her Finland/Lapland project, she was also a real peach and helped with testing these in game for me. I’m forever grateful to @hydrangeachainsaw for her amazing tutorial and her neverending patience while answering to my dum dum questions. Also hi5 to @simlicious for teaching and helping me to understand meshing better, you are a true gem! ♡
316 notes
·
View notes