#and now with the filters and way more advanced photoshop and stuff the erasing of real normal things has only increased
Text
Honestly do love the fact that like 90% of stays I've ever interacted with are amped anytime we see pictures of the boys that aren't totally airbrushed and whitewashed beyond belief- Natural hair? gorgeous. Skin texture? Beautiful. A pimple here or there? relatable. Eye bags? Sexy, but also please get enough rest. Like idk, it's just nice.
#its especially interesting to me#bc I do remember in the 2000s anytime a celeb was seen with skin texture or acne it was always like splashed on a gossip mag#in a derogatory way 100%#and now with the filters and way more advanced photoshop and stuff the erasing of real normal things has only increased#its nice to see a lot of people are like No thats not realistic and actually happily support realistic rep#like idk i lost hope for a while#and theres still lots of fear from people about aging like its a terrible disease and stuff#but it is nice to see at least a good chunk in this fandom are pro people looking happy and healthy rather than like a polished doll#like im not delusional enough to think we arent still in dire straights#but at least i can look at my lil kpop images on tumblr without worsening my own insecurities#idk im rambling#skz#stray kids
14 notes
·
View notes
Text
Hi! @velvetcloak asked me to do some kind of lineart tutorial/step-by-step, I'm by no means an expert so don't hesitate to ask if you need some things clarified! Always glad to help.
I use three different methods that are pretty much trial and error, depending on what works best for the artwork but I'll do my best to explain with screenshots - these were taken on photoshop, I draw with procreate, but I'm guessing the layer modes are similar on other softwares. (Also mine are set in french, sorry in advance for the confusion.)
If you're already familiar with digital lineart and softwares, this probably won't be of much use, it's very basic stuff.
Otherwise, more below the cut! (It got a bit long.)
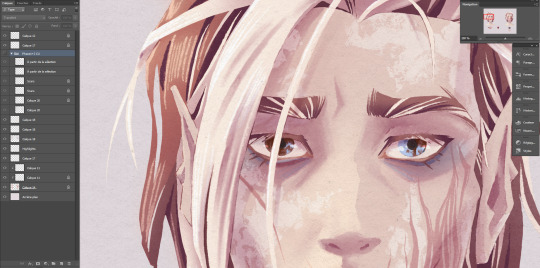
I. Solid black lineart, with this illustration used as reference.
I used the basic gesinski ink brush in procreate, 100% opacity in normal mode to get pure black. Very basic, it's set on top of the colour layers, everything above that is just additional effects and filters + textures. Note that I always draw separate elements on different layers and fuse them later, it's easier to deal with details this way.
The isolated layer looks like this (I changed the colour of a disappearing hair lock, more on this later):
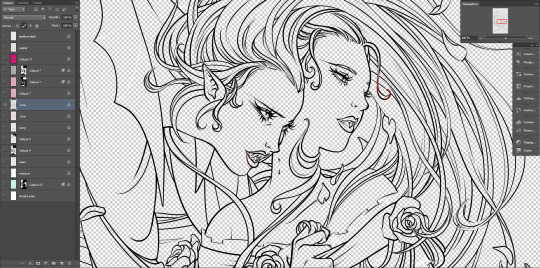
And the colours without it, like this (my style relies heavily on lineart, lol):
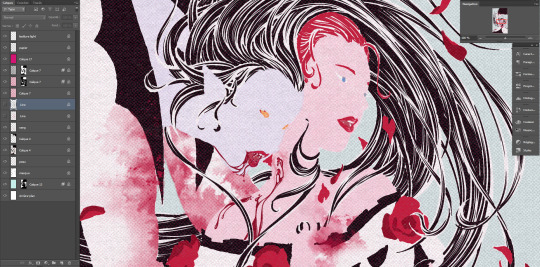
Both:
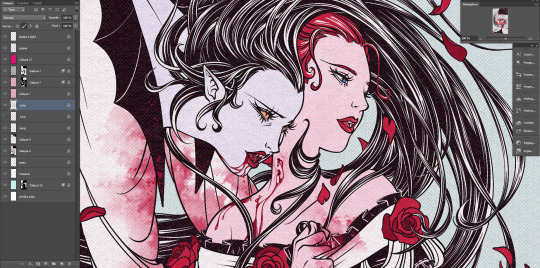
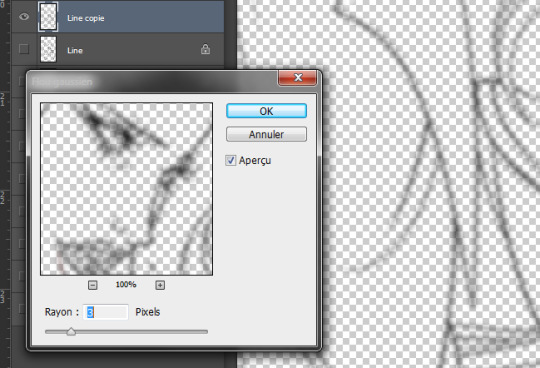
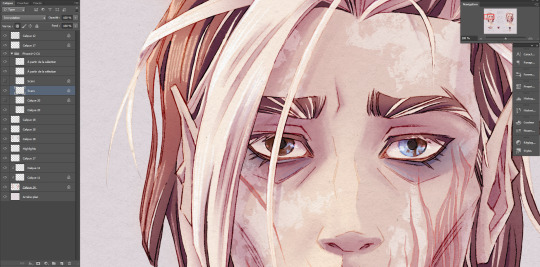
Good! It's a bit harsh though, I like to add a second layer to soften things up, set in 45% opacity multiply mode right under that. I duplicate the main lineart, and add a gaussian blur to the copied layer (between 3 and 5px, values vary from one artwork to another, same with the layer modes.)
Not done yet! I use the blured lineart as a colour filter by locking it to pixels only and filling it with the tone I want. In this case, red. Isolated layer:
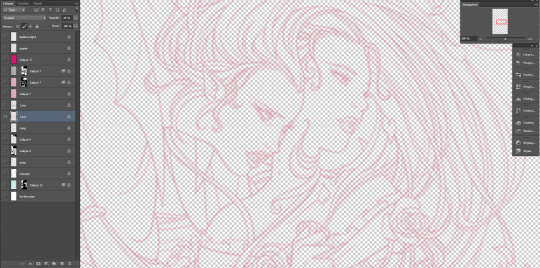
And the end result:
The second method, I tend to use more on sketches and loose drawings to get a better blend of lineart and colours:
II. Semi-transparent lineart, with one of these sketches.
Basic 6B brush in procreate (my fav), quite thin here but you can get great results with a larger brush. It's not really obvious looking at this scale, so here's a comparison between a black solid lineart (1 layer, normal 100% - the scars are on a separate layer because of the colour, otherwise it's the same setting) and a semi-transparent one (2 layers), especially visible in lighter areas, note how the second one lets hues show through. I find this to look a bit less stiff.
Now for the method! Since this relies on the layers underneath, you want your colours to a bit more precise than the previous example. Without lineart:
TBH it's also a two layers solution, super easy. Once you're statisfied with your basic lineart, set the layer to overlay 100%. You'll get something like this:
Then duplicate this layer, put the copied layer above the overlay one and set it to normal 70% (or whatever looks best, this is 67%) and you'll get the final result as previously shown! In this particuliar case, I erased the black circle around the iris in the normal mode layer to keep the blue of the overlay one. You could also skip step two depending on the desired rendering.
The third method is a blend of the other two result-wise:
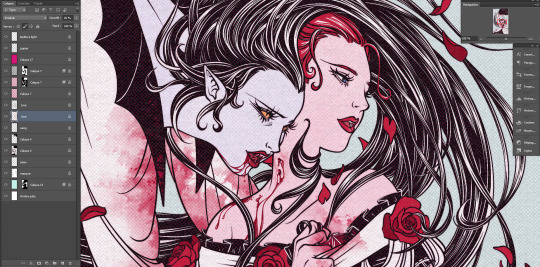
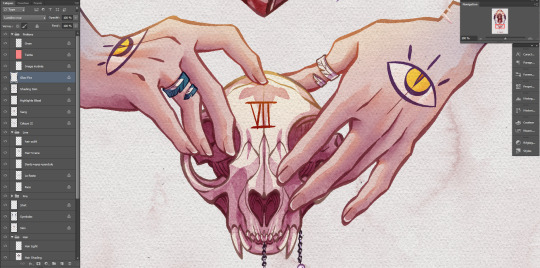
III. Coloured lineart, with this illustration. (tw: a bit of gore and blood in the full artwork, I'll crop it out of the screenshots. Poor guy can't get a break. It's the only file in this style with a semblant of organization, don't be like me, rename your layers and use folders.)
Fountain pen toothy brush, from the MaxPack watercolor set. It has a bit of a texture to it, and isn't entirely opaque so it blends nicely with the layers below. The lineart is set to normal 100%, for this method it's preferable to have separate layers for each elements, since you'll be recolouring them individually. Here, the hands, skull and additional details are all on individual layers.

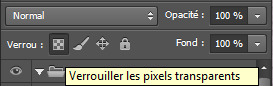
Just like the blurred layer in the first method, you need to lock your pixels (the little grid to the left on photoshop):
And either fill you layer with colour, or paint on it with an opaque round brush/a soft one depending on the desired outcome. (Some zones might need a gradient, or various colours.) You can also use another normal layer on top of a black lineart and set it as a clipping mask, same result, different method. But I prefer to keep the layers count to a minimum when possible.
With the layers below, it will look like this:
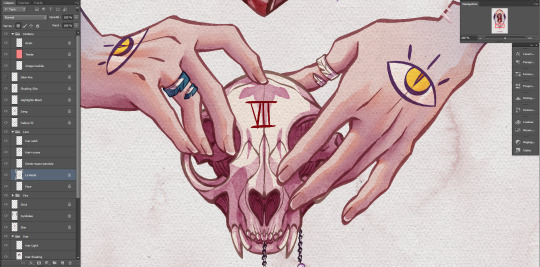
You can notice a bit of lineart transparency over the skull colour layer, cool stuff. (The shading of the skin is set on top for some reason, I don't remember why but surely there was a reason.)
However! In this illustration, I need a yellow glow for the fire so let's create yet another layer, shall we? This affects the whole rendering. I painted a diffuse light source using a soft gradient brush, and set the layer to hard light. Isolated layer:
End result:
All done!
Now go create!
9 notes
·
View notes
Note
You’re icons are so pretty please teach me your ways
hi! i know i’m seriously really late with my reply (sorry, sorry, and sorry again).i’m glad you think so and thank you very much!i suck at explaining stuff so, making a tutorial? truly not the best idee but i will try to give some good pointers. i’m sure you’ll find something helpful in making your own icons :)
i apologize in advance but i just am not great at tutorials but let’s give it a shot.
you’ll need:
photoshop (i’ll be using cs5)
basic photoshop knowledge
a base coloring/psd you wanna use
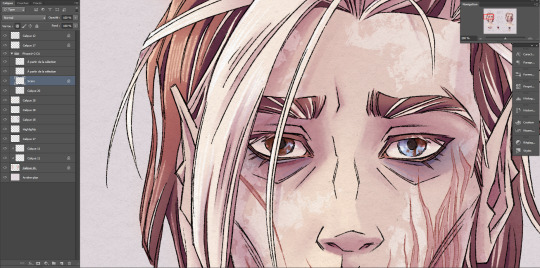
okay. well, first we got choose a image/screencap you’ll like to use for making your icon. as i’ve finshed making lately a star wars icon pack i’m gonna show you how to make icon from one of my sw stock images like this one:
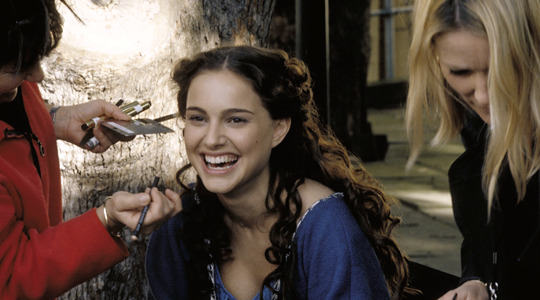
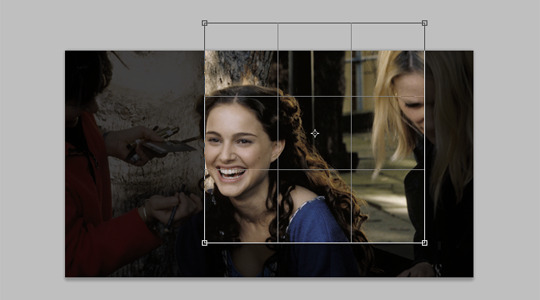
it’s quite easy to find nice images to use with a quick google search or sites like pinterest just like i did with this picture. but we need to also make sure that they are in decent quality. i make my icons 150x150, that’s why i have to crop this pic to that size (you can use other one that you like). i want my icon only with natalie in it so i’ll make it look like this now:
now since the picture is light enough for me i’m gonna start on making the background. i’ll make first the light version and then i’ll tell you how to easily change it dark… now we’ve got to make a new empty layer above the one we have. got it? so let’s fill the background around her (but no to close) with brush tool (color #ededed), hard edges at a size around 20px and a hardness 100% but a small tip: in this process i do a lot of changes for the brush size, and you shouldn’t feel constricted to use the same dimensions as me. like with the next step, i changed them for the small details around her hair, to size 5px (hardness the same) and zoom in to 400%, so i can paint close to her hair and give it shape. that’s how my icon looks right now:

the picture looks a bit blurry so next, we probably should give it some sharpness. i smart sharpen it with the same setting i’m using on most of my gifs: filter > sharpen > smart sharpen: amount - 500%, radius - 0,3px and select more accurate. when that’s done we can add a psd of our choice. i’m using here one of @odairannies psd that i’ve edited a bit, and i drag it over between the two layers i already have and that’s what i got:

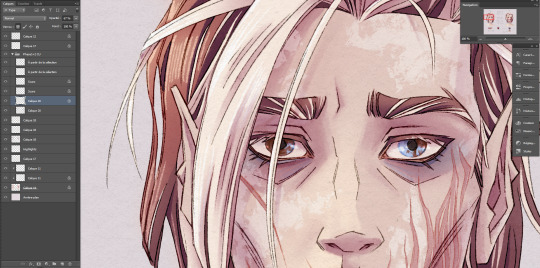
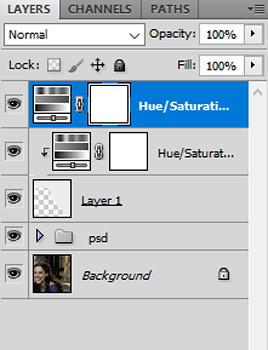
that’s how we reached the point where our icon looks pale but is still in colorful aesthetic. if you want it to be black and white just add a hue/saturation layer and turn the saturation in it to -100.

and now as i’ve promised, i’ll tell you how to easily change the light version of the background to dark. to make that happen just add a hue/saturation layer above the background layer we’ve made with brush and turn it into a clipping mask. go to the adjustments and change the lightness to -100. bam! we easily made the light background turn dark and look like this:

as you can see that would be it. so by the end of this icon making process your layers should look like this:
well to tie this tutorial up here’s a few final tips:
remember to choose pictures with good quality
if you use a dark image remember to brighten it up a bit but not too much and if it looks grainy either turn the brightness down/make the icon with black background or don’t do the icon at all because if you overdo it you’ll ruin the quality
when you’re not sure in your photoshop skills use at first brush with soft edges to outline the person in your icon so it looks softer ‘cause if you’re hand is not steady and you try to make a defined outline it’ll be noticeable when you do it wrong
change the brush size to fit your needs. use smaller ones to better outlines the part around face/hair and other little details.
when you start brushing the background make sure it’s on a new layer, that way you can easily touch up a mistake if you erase too much of the original image. also later you can qucikly change the background from light to dark.
whatever after making the background or before saving the icon, you need to add some sharpness to the image otherwise it would look too blurry
if you need more brightness in your image add an adjustment layer called levels or simply duplicate your original image and change the layer setting from normal to screen/ if it’s too bright change the setting to multiply or soft light
if the background needs to stay in the same color you choose than always add the psd between it and the original picture otherwise if you add it on top of those layers the psd might change the colour of the background.
i do hope at least half of that made some sense to you guys. but if something is not clear enough and you have some questions, please feel free to let me know. remember that all it takes to make a good icon is a nice picture, lots of patience, some time and most of all practice, practice, practice. i’d love for you to like this ask if you’ve followed this tutorial and found it useful ♥♥♥ good luck!
#inbox#anonymous#icon tutorial#ps related#ugh this is a mess#but i seriously tried#resources#i'm sure others explain this process better but oh well#*tutorial
42 notes
·
View notes
Text
Adobe Photoshop For Mac Crack Torrent

Adobe Photoshop CC 2020 21 Free Download Torrent
Adobe Photoshop Full Crack Download
Adobe Photoshop Cs6 Crack Torrent
In the world of image editing professionalism, the name of the Adobe Photoshop CC 2020 21 cant ignored at every moment where anyone will talk about edit the photos, images, clips and all that stuff which is deal with the department of photography.
Adobe Photoshop 2020 Crack v21.2.1.265 Torrent Full Version Latest I want to send you a new version of Adobe Photoshop 2020 Crack for Mac with a serial number, which is part of Creative Cloud. Adobe Photoshop is one of the best graphic raster editors that can work with a large number of graphic formats. Adobe Lightroom Classic CC 2020 Crack for MacOS Download Latest 2020 Adobe Lightroom Classic CC 2020 Crack Mac Overview: Adobe Lightroom Classic CC 2020 Mac is a cloud-based service that offers everything you need to edit, organize, save and share your photos on any device. Easy-to-use tools, such as sliders and presets, let you make photos the way you want them to look.
Adobe Photoshop 7.0 Full Version Free Download Torrent 2020. Adobe Photoshop 7.0 Crack is the number one photo editing software program in the international. It’s so popular because it has many functions and tools that you will now not find in any other version of the software, which includes the rate, simplicity and short enhancing of pix efficiently.
Here we share mac version of Photoshop CC 2019 v20.0.7 Full version with crack tools: Keygen, Patch and Serial numbers – Free torrent download. Especially, with Adobe Zii 4.3.6, you can get the software activated for FREE with a few clicks. RECOMMENDATION: Download Premium Actions, LUTs, Effects, Templates, and Tutorials for Photoshop from here.
Adobe Photoshop CC 2020 is fully optimized with the large collection of image manipulation tools designed to help you retouch photos effortlessly. The stylish and organized interface provides quick access to basic editing tools, such as the “Brush Tool”, the “Eraser Tool”, the “Gradient Tool”, the “Horizontal Type Tool” and much more. Everyone has their favorite graphic editor but very few apps have reached the popularity of Adobe’s Photoshop processing program.
Moreover, Adobe Photoshop cc 2020 Crack has been setting standards for so long that many have simply dropped the term “photo editing” in favor of the more realistic term “Photoshop”. The main Adobe Photoshop window is controlled by the edit panel. When selecting a new tool, the available customization options are displayed at the top of the toolbar area, while on the right side you can access custom color palettes and manage project layers.
Adobe Photoshop CC 2020 21 Key Features
Photo editing and enhancement tools
Advanced imaging kit
Adobe Camera Raw for professional image processing
Built-in tone and motor tuning color
Create movies and video content
Compound images
Fast and efficient workflow
SYSTEM REQUIREMENTS
64-bit processor
1 GB of RAM
3.2 GB of available hard-disk space for installation; additional free space required during installation (cannot install on a volume that uses a case-sensitive file system or on removable flash storage devices)
1024×768 display (1280×800 recommended) with 16-bit color and 512MB of VRAM (1GB VRAM required for 3D features)
Free Download For Mac Adobe Photoshop CC 2020 21
Download the setup file for installation.
Install the application.
Download the Torrent file.
Go to the program files in the operating system usually in C Drive and copy the crack file into the downloaded program.
Open the application.
Click on registration.
All Done, ENJOY
Adobe Photoshop CC 2020 22.0.0.35 Crack Serial Number incl Torrent Free Download
Adobe Photoshop CC 2020 22.0.0.35 Crack is a photo editor software introduced by the Adobe inc. adobe Photoshop is one of the most important and powerful photo editor tools in the market. It has amazing powerful photo editing tools that can take the photographer’s picture to the next level but it also provides digital effect with a blank canvas and possibilities. Adobe Photoshop makes off with most new features that must be liked by photographers and professional artists.
One of the most primary transform features is the scale and resize function. Adobe Photoshop CC 2020 keygen offers a large number of tools, filters, and make that help the user to change their photo however they want. With the help of this tool, the user can stretch and resize the photo according to his desire. It easily without facing any problem. Photoshop brushes are very made the user can set these brushes size, angle, and shape. However. Photoshop comes with a lot of variety of bulrushes the user can also customize its own brushes.
Adobe Photoshop CC Crack 2020 Serial Keygen [Mac/Win] Here
Adobe Photoshop CC Torrent is one of the best photo editing software which is the most suitable flexible and easy-to-use user who is not familiar with photo editing can use. It’s Adobe Photoshop is one of the best picture edifying tools in the market and most likely by photographers and others. Its large range of features and tools help the designer to modify his/her photo according to their mood.
Users can open Photoshop’s timeline panel where they can add frames according to their liking using their photos. Photoshop’s animation feature is rather basic. Adobe Photoshop CC Serial key also comes with the feature of animation. It’s no doubt better than the animation features of free programs, but it won’t compare to real animation and video editing apps like Pro. It’s a great tool for making GIFs, however. This software is also made to solve the problems of photographers they can not get the image result as they want but now they have the feature to show their photography by using Adobe Photoshop CC Latest Version. Adobe Photoshop Crack is not a bigger friendly photoshop but now a day’s it is very easy and simple to use.
Latest Advantage of Adobe Photoshop CC 2020 Crack:
Adobe Photoshop CC Full Crack improves the quality of torrent and we all know that practice makes a man perfect when you have the skills and idea to use this tool you can utilize it easily and make maximum output. He is a software that changes your features and pictures into reality as you imagine. Adobe Photoshop Mac includes the full package of the feature that offers you the main platform to make your photographs according to your vision.enjoy the benefits of dominant pictures and dominating tools and use the abilities of these tools which help you to change your photo according to your desire.
System Requirements For Adobe Photoshop CC Cracked Version:
Processor: AMD processor with 64-bit support; 2 GHz or faster processor is most suitable for the running of adobe Photoshop easily.
Operating system: Microsoft Windows 7 with Service Pack 1 (64-bit), Windows 10 (Version 1709 or later)
RAM: 2 GB or more of RAM (8 GB recommended.
Adobe Photoshop CC Keygen Tools:
Pen Tool:
Photoshop includes a lot of versions of the pen tool. The pen tool creates precise paths also that can be manipulated using anchor points.
Clone Stamp Tool:
Also, this tool duplicates one part of the mage to the other part of the same image. this duplication may be full or half part of the image depend on mood.
Shape Tool:
Photoshop provides different Type tool like a rectangle, square, circle. these shapes also can be selected directly from a tool or maybe drawn by pen.
Selection Tool:
The selection tool uses to select any part of the picture to cut, copy, edit, or other operations.
Cropping:
Also, this tool Is most familiar by the users this tool is used to cut and select the required area of the picture. The crop tool can alternatively be used to extend the canvas size by clicking and dragging outside the existing image borders.
3D Extrusion
Also, with the Extended version of Photoshop CS5, 2D elements of an artwork can easily become three-dimensional with the click of a button. Extrusions of texts, an available library of materials for three-dimensional, and even wrapping two-dimensional images around 3D geometry
Latest Features Of Adobe Photoshop CC 2020 Crack:
Manage with imaging mystic.
Work with up to date photography.
Easy to use.
Also, edit photos skillfully by using its al tools effectively.
Manage colors and tendency of tone.
Creat great work on projects and artwork.
Merged image with innovative pictures.
Also, enjoy the benefits of streamline work
Save the time of the user.
So helpful you have the best software for your projects.
Each tool uses its best work.
You can also reduce the size of an image to fix it with another image according to your choice.
This software also can be significantly more than ane drum style.
HDR image with effect and colors.
Adobe photoshop add its layer structure
It also changes the light of the image and vise versa according to the quality of the picture
It also includes modern simpler helpful secure tools.
This software creates a duplicate of an image.
Motivational enhancement.
Increase the range of your interest.
Adobe Photoshop Full Crack Download
Adobe Photoshop CC License Key 2020
Adobe Photoshop CC 2020 Activation Keys
Latest Adobe Photoshop CC Registration Keys ( 100% Working)
What’s new in Adobe Photoshop CC Cracked Torrent:
A lot of design applications for mobile and web
Quick
Video editing
Content-aware patch and move
You can also edit pictures faster
Content agencies
You can also see the mercury graphics engine.
How to Install Adobe Photoshop CC 2020 Crack & Keygen:
Adobe Photoshop Cs6 Crack Torrent
Download and install the application
Dis-Connect the internet and open the crack folder
Copy it and past the download directly and install it
After this reboot, the system runs adobe photoshop cc
All done, Enjoy the features.
0 notes
Text
krita pixel art tips
I had a pixel art class (our teacher, Alexandre de la Serna, is part of Haunted Tie, they’re making a really cool pixel art fighting game); the class was about photoshop, but I translated it for Krita (I’m really proud, there was nothing photoshop could do that krita couldn’t); here are the tips he gave, plus a few krita-specific things I discovered while using it; I included a few very basic things at the beginning, but you can just skip to the rest if you’re used to krita:
Krita pixel art shortcuts:
1) general shortcuts for complete beginners
2) pixel art tips: sharp-edged everything
3) using tiles: making your own tiles and applying them on a large space
4) animation tips: drawing/erasing on several frames at once
(I put it under the cut because it’s pretty long)
GENERAL SHORTCUTS FOR COMPLETE BEGINNERS (scroll down to see the more advanced stuff):
- B: brush; E: eraser (E again: go back to the previous mode) (click B or E once)
- Ctrl-LeftClick when using the brush: pick the color you clicked on.
- X: change between primary and secondary color (click X once)
- palette: Settings>Docker>Palette; or in the color selection (or RightClick anywhere on the canvas); it remembers the 10 or so last colours used (you can change how many in Settings>Configure Krita>Color Selector Settings>Color History>Max Patches)
- T: move selection (or layer or group of layers depending on your Tool Options settings)
- Ctrl-T: modify selection
- sharp-edged selection: in the contiguous selection tool (the wand icon), have fuzziness at 0; in the Fill tool, you'll probably want threshold at 0 so it only selects that one precise colour you're clicking on (and "feathering radius" too); ALSO ALWAYS HAVE ANTI-ALIASING OFF in all the tools when you're doing pixel art. And when something doesn't go your way, check the Tools Options (Seetings>Dockers>Tool options), that's very likely where your solution is.
- F: fill tool (paint bucket icon) (you can use it with the "similar colour selection tool", with the "Fill entire selection" option of the Fill tool activated, to change all pixels of one colour to another)
MORE PIXEL ART-RELATED, ALSO MAYBE LESS WELL-KNOWN TIPS
- To have a sharp-edged brush, tick "sharpness" in the brush editor (fourth icon in top horizontal bar; don't forget to save by clicking "overwrite preset" or "save to preset").
- Sometimes you may want a real-size view of your work: go to Window>new Window; in that new window: Window>new View>nameOfYourFile (also: 1: zoom 100%, and Tab: remove the menus and strip down your window to only the canvas); I've seen it make krita crash on some computers, though, so if this happens for you, you know where to look to make it stop.
- V (with the brush): make a straight line (with V pressed down, clic and drag to make your line); Shift-V: constraint the line to the X, Y or diagonal axis.
- for sharp-edged resize and modifications: (with Ctrl-T or when resizing the image, like for showing on the internet): choose the filter "Box"
USING TILES
Did you know you could make your own tiles? Like, for a whole meadow, you just need one tile of grass, you select the whole area, and fill it with the tile repeating automatically?
- Making a tile: Select your tile (Ctrl-R: rectangle selection tool), go to the patterns (second icon on the horizontal bar at the top), Custom Patterns Tab, Current Layer, Update, then Use as pattern, or Add to predefined patterns if you're gonna use it often.
(you can also use tiles for brushes btw)
- Using your tile: Then select the area you want your tile repeating over, use the Fill tool (F) with "use pattern" checked (in the Tool Options tab), click once, and that's done! If you want more variation, whatever, just add a few different tiles on another layer, easy-peasy.
ANIMATION TIPS
When you're animating, and you copy-paste then merge parts of layers as part of your usual workflow, you have to remember to check all frames; usually you just need to add a new frame just after the current one (and maybe as first image too), so your pasted drawing only merges with that one frame of the animation instead of staying there unchanged through the whole animation. Just remember to think of the whole animation, not just the frame you're working on. But then, it means you can use this to your advantage:
- Let's say I just realized I had an ugly useless pixel (or several) left over on all of my animated frames (and that doesn’t move, or only on a limited area). I can remove it from all frames at once: make a new layer, paint over what you want to erase, put the layer in "erase" mode, play your animation once slowly to check that it is as you want on all images, and merge with layer below (Ctrl-E) (the merging is optional, actually, but if you have lots of layers and are sure you hate what you erase, just do it).
Now what if I actually need that ugly pixel on, like, four frames? Well, I can just animate my eraser layer. On the first frame I need it, I click "New frame" on the eraser layer so it'll be empty, then I copy my eraser frame on the next frame I don't need it.
2 notes
·
View notes
Text
Gmail - Everything You Should Know About It

Everyone cherishes Google (at any rate that is what I think), and imagine a scenario where you include all the best Google has into an email account. You have one extraordinary email account named Googlemail, or in straightforward words Gmail. Gmail was first propelled on 31 of March, 2004. At its dispatch Gmail was running in beta mode and you can have account just on the off chance that you have welcome from existing client. I was welcomed by a companion and I keep the ball rolling. I got 50 welcomes when I have my record and I come up short on them with hardly a pause in between. Nowadays its free and anybody can have it in fast and simple advances like 1, 2, 3. Gmail was the first in giving 1 GB free space to email, around then both Hotmail and hurray were putting forth 10 MB or so with the expectation of complimentary records. Gmail got some extremely extraordinary highlights and one should know everything to appreciate Gmail taking care of business. I will attempt my level best to clarify as much as I can about Gmail from my own understanding and expectation that this article will may assist you with using Gmail all the more productively.
Highlights:
I have been utilizing Gmail for more than 4 years now and I am unquestionably infatuated with it. I used to have various records on Yahoo and Hotmail before I changed from them to Gmail and trust it or not I never returned. Why? Since Gmail got some awesome highlights that make me begin to look all starry eyed at it. Scarcely any highlights I cherished most are spam, quick, clear and easy to understand interface, worked in visit, worked in spell checker and programmed draft sparing. Gmail got incredible spam inclusion and I barely get spam email in my inbox. Gmail uses AJAX dynamic substance for quick updates. I have recorded down a few highlights and their utilization in detail underneath.
Marks
First how about we examine Gmail's Labels. Names are utilized to arrange an email. It is somewhat subset of envelopes, that implies Labels got everything that online organizer can have, in addition to it got something extraordinary as well. You can allocate your own characterized Labels either physically or by Filters (to perceive how channel works Click Link3 underneath). When you have Labels alloted you can see them on left half of Gmail under Gmail's default connects in marks section, and when you tap on particular Label, Gmail shows messages those under that Label.
In the event that you ever have encountered with overseeing messages in organizer you realized that email can be in just a single envelope at any given moment. So what would you be able to do in the event that you need one email to be set in at least two organizers? Gmail has answer for it, suppose you have two Labels one is "School mates" and other is "colleagues", now you got a mail from someone who is your collaborator and additionally your school mate, at that point you can relegate the two marks on same email and access that specific email under every one of those Labels.
At the present time you probably won't think that its exceptionally valuable and existing, however in long run you will perceive how this could be useful, particularly in the event that you are managing expansive number of messages.
Channels
Channels are one of the coolest and one of my most loved highlights that Gmail brings to the table. In the event that you setup Filters legitimately, they can give genuine straightforwardness in email administration. Channels help you sparing time and space with regards to undesirable messages in your inbox, and acquaint you with multi-usefulness of Gmail. For more points of interest on Filters include click link3 underneath.
Visit
Gmail gives you one more noteworthy component that is talk with your companions utilizing Gmail. Presently Google reported that Gmail talk will work with AOL's visit benefit AIM. So now Gmail clients can login into their AIM accounts through Gmail talk. Gmail visit let u send message notwithstanding when the contact is disconnected and those messages will show up in your inbox as a message. You can make yourself on the web/disconnected whenever with simply single tick. Your AIM contacts get an AIM symbol in visit window so you can recognize Gmail companions and companions from AIM.
Console alternate ways
I for one want to work with alternate way keys whether I am taking a shot at my plan work (Photoshop, streak and so on) or simply doing straightforward working framework work, I get a kick out of the chance to do with easy route keys. Almost certainly alternate way keys increment effectiveness of the client and increment efficiency by sparing bunches of time that you need to spend doing same things physically.
Gmail have that astonishing component of console easy routes, to make it work first you need to empower it. Tap on the Settings interface at the upper right of the website page, General tab will open. Search for Keyboard Shortcuts, and after that tap on the Keyboard Shortcuts on radio catch. Presently console easy routes are empowered and you can utilize them in a flash. For more subtle elements on console alternate ways clicks here.
Sending and POP/IMAP
This choice is for the individuals who get a kick out of the chance to forward their sends from Gmail to another framework, similar to Yahoo or Hotmail or might be even to another Gmail account. To forward your email, discover the Forwarding segment and tap the radio catch by "Forward a duplicate of approaching mail. To "Make a point to include the email address you need the email be sent to", Then, you need to choose in the event that you'd jump at the chance to keep a duplicate in your Gmail framework or erase them from Gmail. Once you've made your choice, click "Spare Changes" and you are finished.
On the off chance that you need to download your Google sends utilizing Outlook or Thunderbird, you have to empower POP. Select either Enable POP for all mail or simply Enable POP for all mail starting now and into the foreseeable future. At that point, you need to choose on the off chance that you'd jump at the chance to keep a duplicate in your Gmail framework or erase them from Gmail. Directions on the best way to set up your email customer (like Outlook or Thunderbird) can be found in detail by clicking "Arrangement guidelines" and picking which email customer you have. Once you've made your determination, click "Spare Changes" and you are finished.
The Internet Message Access Protocol (IMAP) is a standout amongst the most predominant Internet standard conventions for email recovery. All advanced email customers and mail servers bolster this convention as a mean of exchanging email messages from a server. To empower an IMAP association, you have to empower IMAP. Directions on the most proficient method to set up your email customer (like Outlook or Thunderbird) can be found in detail by clicking "Design guidelines" and picking which email customer you have. Once you've made your choice, click "Spare Changes" and you are finished.
Web Clips
Web cuts are an one-line rundown of custom RSS channels. You can utilize at least one of the RSS data that Google has in its little catalog. You can pick your most loved stuff from accessible classes on bring down left. The accessible classifications are.
News
Business
Way of life
Games
Tech
Fun
Imagine a scenario in which you need to include you possess RSS channels. Straightforward compose your RSS channel into content box and snap Search. Tap on "Include" and now, when you return to your normal Gmail pages, you'll see along the best the most recent news from the site or locales you've arranged, including my Hubpage.
Labs
Gmail labs are where you can discover extremely cool little additional items. Maybe a couple of them are made by Google engineer(s) and few made on well known interest from Gmail clients. These highlights are trial; they are here on the grounds that they aren't prepared for appropriate discharge at this moment. Thus anybody of that component can be changed, quit working or essentially vanish from lab whenever. On the off chance that you are utilizing any component recorded here and for reasons unknown it's not working you may going to confront issue stacking your inbox. According to Google exhortation there is a break bring forth that you can see when you go to lab page.
Subjects
Subject is shading plan. You gmail login�� can browse any given topic or you can even make you claim. Simply ahead and attempt this, its quite basic and can improve Gmail looking in a split second.
0 notes
Text
Snapchat Hacks: 35 Tricks and Features You Probably Didn’t Know About
By Michael Aynsley
We call them Snapchat hacks because many of the app’s best features are either hidden or just not intuitive. We’re looking at you, Tint Brush. But if you can learn these tricks you’ll have a powerful new arsenal of tools to help take your brand’s Snap game to the next level.
In this guide we’ll teach you how to access these lesser-known features, and uncover a few more tricks that are available only after manipulating the settings on your device.
Jump to the section of your choice or keep scrolling for the complete list.
Table of contents
Text, drawing, and editing Snapchat hacks
Photo and video Snapchat hacks
General Snapchat hacks
Bonus: Download our free guide that shows you how to 10X your social strategy and outperform your competitors. No fluff or tired tactics—features the tools, daily routines, and advanced techniques used by three world-class industry experts.
Text, drawing and editing Snapchat hacks
1. Draw in impressive detail by turning on your phone’s zoom feature
If you fancy yourself more of a da Vinci than a doodler, then this Snapchat hack is for you.
How to do it on iOS
Go to Settings
Select General
Tap Accessibility
Under the Vision section, enable Zoom
Select Show Controller
Choose your Zoom Region preference (Window or Full Screen)
Set Maximum Zoom Level to 15x
How to do it on Android
Go to Settings
Select Accessibility
Tap Vision
Tap Magnification Gestures
Enable Zoom
Using Snapchat on a tablet, where the screen is much larger, is another helpful trick for creating intricate masterpieces. Draw with a stylus to really impress people with your works of art.
2. Apply up to 3 filters on a single Snap
Add a sepia filter, broadcast your location, and the current temperature all at the same time!
How to do it
Take a picture in the app as you would normally
Swipe across the screen and choose your first filter
Once you’ve landed on the one you want, hold your thumb anywhere on the screen to secure the first filter in place
Now use your free hand to swipe through the other filters
Once you’ve chosen your second filter, lift your thumb off the screen for a moment before tapping and holding it down again.
Now you’re ready to start swiping and choose a third filter
If you’re not happy with your combo, simply swipe right to delete all three filters and return to your unfiltered image.
3. Turn an emoji into a colorful filter
May we suggest ?
How to do it
Choose an emoji with your desired color
Move it toward a corner of your screen
Increase its size and continue to shove it in the corner—the pixelated, semi transparent edge will serve as the filter
If you’re feeling particularly adventurous you can try layering different color emoji.
4. Switch up the ‘info’ filters
All the simple info filters—speed, temperature, time, and altitude—have variations. Miles per hour becomes kilometers per hour, fahrenheit becomes celsius, feet becomes meters, and the time becomes the date.
Take things to the next level with the temperature filter. Not only can you switch from fahrenheit to celsius, you can also continue tapping to display an hourly or three-day forecast complete with weather icons.
Simply tap the info filter of your choice to access the other options.
Pro Tip: No need to ask for the date anymore – simply tap on the time filter, for the date to appear! http://pic.twitter.com/MWig4R5r1V
— Snapchat Support (@snapchatsupport) March 4, 2016
5. Use characters to frame your Snaps
The “0” creates a nice oval frame and the “A” will give you a bold triangular border, for example.
How to do it
After you’ve taken your Snap, create a one-letter caption with the largest size text (tap the T icon)
Enlarge it so that it creates a border around the picture
Position it until you have the frame you want
6. Change the color of individual words and letters
How to do it
Type your caption and tap the T icon to get the largest size text
Select one color you want to use from the color palette to start with
Then tap any word in your text and click the select option to highlight the word
Move the highlight over any word or letter you want to change the color of
Choose the next color from the color palette
7. Pin an emoji on a moving target
Because the stuck-out tongue/winking eye emoji is more charming than any human face could ever hope to be.
How to do it
Record a video that focuses on a moving object
When you’re finished filming, tap the emoji icon at the top of the preview screen and select the one you want
Resize the emoji before you pin it
Tap and hold the emoji to drag it over the moving target (which should be frozen at this point)
Hold it over the object for a moment
Snapchat will reload the video, and the emoji should follow along
8. Add drawings and captions to ‘Discover’ content and share it with your friends
When viewing content from Snapchat’s Discover partners, tap and hold a Snap to share it with friends. It’ll automatically open as a draft, where you can add to it the same way you would any of your own Snaps. These can only be sent to individuals via chat, not shared to your Story.
9. Access a wider range of color options
For every color in the rainbow, drag your finger down the color slider to expand it and choose whatever color you like.
Want even more options? Once you’ve found the color family you want, simply drag your finger to the left side of the screen to lock it, then drag to the top left-hand corner for a darker shade or to the bottom right for a pastel pigment.
10. ‘Photoshop’ your Snap with Tint Brush
With a little-known feature called Tint Brush, you can change colors in your Snaps.
How to do it
Capture a Snap
Tap the scissors icon then the paintbrush icon
Choose your desired color
Outline the object you’d like to recolor
As soon as you lift your finger, the object should change color
11. Edit a Snap in Memories to access old community geofilters
When you save a Snap to Memories, most geofilters available at the time are saved too. When you go back to edit a Snap, you can swipe to access those community geofilters.
If you took a photo while vacationing in San Francisco, for example, you can edit that Snap in Memories to access the San Francisco city filter from your home on the East Coast.
How to do it
Swipe up from the camera screen to go to Memories
Press and hold on a Snap
Tap the pencil icon to edit the Snap
Edit your Snap normally and swipe left to access the community geofilters that were available when you took the Snap
Tap Done to save or discard your changes
Simply swipe down to return to Memories
12. Edit stuff out of your Snaps with Magic Eraser
Did something ruin an otherwise perfect shot? Get rid of it with Magic Eraser.
How to do it
Capture a Snap
Tap the scissors icon
Tap the multi-star button
Trace the outline of the object you’d like to erase and it will disappear
Keep in mind though that the tool isn’t perfect. Magic Eraser works best on objects in front of simple backgrounds
13. Draw with emoji
Jazz up your photos and videos by drawing with emoji. There are eight rotating options to choose from.
How to do it
Capture a Snap
Tap the pencil icon to draw
Underneath the color selector is an emoji, tap it for the full range of options
Select an emoji and draw away
Use the emoji brush to paint with ❤️’s, ⭐️’s, ’s,’s ’s and more!
(Horseshoes & pots of gold are still a work in progress, though ) http://pic.twitter.com/9F1HxTiDpB
— Snapchat Support (@snapchatsupport) May 10, 2017
14. Enhance your Snap by changing the backdrop
As Lenses transform faces, you can use this feature to alter backgrounds.
How to do it
Capture a Snap
Tap the scissors icon then tap the box with diagonal lines
Outline the object you want to have in front of the Backdrop (don’t worry, you get multiple tries at this)
Tap the return arrow to undo a mistake and try again
Select your desired backdrop from the menu on the right
When you’re happy with how it looks, tap the scissors icon again to return to the edit screen
15. Add artistic flair to photos in Memories
Breed new life into your old photos with artistic filters for Snaps saved to Memories. Our favorite is Vincent Van Gogh’s Starry Night.
How to do it
Swipe up from the camera screen to go to Memories
Press and hold on a Snap to display options
Tap Edit Snap
Tap the paintbrush icon to access artistic filters
Choose a filter
Save or send your Snap as usual
Press and hold on a Snap in Memories, tap the paintbrush icon, and various artistic styles should appear : http://bit.ly/2uXjxEI http://pic.twitter.com/vlccs0g4zP
— Snapchat Support (@snapchatsupport) January 12, 2017
Photo and video Snapchat hacks
16. Share and edit photos stored on your phone in Chat
As a brand you can ask followers to message you and then reply with a pre-constructed image containing a discount code or some other call to action. It’s a fun, time-saving engagement tactic.
How to do it
Swipe right on a user’s name to open up Chat
Once there, select the image icon and choose the photo you want to work with
Add text, doodles, and filters as you would a regular Snap
You can also share video stored on your phone, but you aren’t able to edit the clips within Snapchat.
17. Record video without holding down the capture button
This makes it easier to hold your phone steady and flip back and forth between the front and rear camera. You need to be on an iOS device to use this hack.
How to do it
Access Settings
Select General
Go to Accessibility
Under the Interaction section, turn on the AssistiveTouch feature and a small icon will appear on the right side of your screen
Tap Create New Gesture
On the New Gesture page, hold your finger on the screen and let the blue bar at the bottom max out
Tap Stop
Save and name the gesture
Open Snapchat and before you start recording a video tap the small icon
Select Custom and a circle should appear on the screen
Now simply tap the capture button and your custom gesture will take care of the rest
18. Switch between the front and rear camera while recording
This one is easy. When filming a video simply double tap the screen to switch from selfie mode to point of view.
19. Use the volume buttons to take a photo or record a video in Snapchat
Yep, this is the same trick that works with your phone’s default camera app. If you have a pair of earbuds or headphones with volume control then you can use those to take Snaps as well. You don’t even have to hold your phone.
20. Zoom in and out with only one finger
No more awkwardly pinching the screen! When recording, sliding your finger up the screen will zoom in and sliding down will zoom out.
One-handed zoom is a game changer . Simply drag your up and away from the capture button while recording! http://pic.twitter.com/oTbXLFc4zX
— Snapchat Support (@snapchatsupport) May 10, 2016
21. Give your Snap a soundtrack
This one requires a bit of timing if you want to capture a specific part of a song, but it’s a simple trick otherwise.
How to do it
Open a music app on your phone
Play the song you want
Go back to Snapchat and start recording
22. Record video without sound
If you’re worried about loud and jarring background noise ruining the experience for your viewers, you can send a Snap without sound. After you record a video, simply tap the microphone icon in the bottom lefthand corner of the screen before hitting the blue send button.
23. Distort audio with Voice Filter
How to do it
Record a video Snap
Tap the speaker button in the bottom left-hand corner of the screen
Choose the voice filter you’d like to add to your Snap
When you need a *little* more help getting into character, try adding a voice filter! 🤖 Learn more here: http://bit.ly/2uXlhhn http://pic.twitter.com/ElBQRfyMql
— Snapchat Support (@snapchatsupport) July 7, 2017
24. Record up to 6 continuous Snaps
Sometimes 10 seconds isn’t enough to capture a moment in all its glory. That’s where Multi Snaps come in.
You can record up to six continuous Snaps, then pick and choose your favorites to share.
How to do it
Press and hold the capture button to record a video
Keep holding the button down to continue recording past the end of your first video Snap (and so on)
When you’ve finished capturing Snaps, your videos will appear at the bottom of the screen
Drag and drop the ones you don’t want into the trash
Continue editing your Snap as usual—any effect you apply will show up on each part of your Multi Snap
This feature has limitations. For instance, Multi Snaps can’t be looped, reversed, or include 3D stickers. They are also only available for iOS (at the time of writing).
25. Send limitless Snaps
Photo Snaps set to limitless will remain on-screen until your recipient taps away. Video Snaps will loop infinitely, so your friends can watch them again and again and again.
How to do it for a photo
Take a picture
Tap the clock icon to select the amount of time your Snap will be visible
Scroll down to the infinity symbol and tap to select
How to do it for a video
Capture a video
Underneath the paperclip icon, tap the circular arrow icon
When the circular arrow shows 1 the Snap will play once, when it shows the infinity symbol, it will loop continuously
These options are available for both Snaps and Stories. If used in a Story, the infinity setting will display the Snap until the viewer taps to see the next item in the Story.
Choose the ∞ timer when your friends need more than a moment to *truly* appreciate your vision http://bit.ly/2rJsvZ9
@DABattelle http://pic.twitter.com/qCvlCnwvZR
— Snapchat Support (@snapchatsupport) May 17, 2017
General Snapchat hacks
26. Memorize your Snapchat profile’s shareable browser link
And then you can easily post and promote it across other social networks. Here’s the format: http://bit.ly/2uWMDEo
27. Turn on ‘Travel Mode’ to save data and battery life
If you enable Travel Mode on your Snapchat app, instead of downloading automatically, Snaps and Stories will load only when you tap them.
How to do it
From the camera screen, tap your Bitmoji to visit your profile
Tap the gear icon to navigate to Settings
Under ADDITIONAL SERVICES select Manage
Enable Travel Mode
28. Delete a Snap from your Story
You can do this with any Snap in your Story, regardless of where it appears in the order.
How to do it
In Snapchat, swipe right from the default camera to go to the Stories view
Your Story appears at the top of the screen—either tap to watch it and, when the Snap you’d like to delete appears, either press and hold or swipe up, tap the trashcan icon and select Delete
Or, tap the three dots to the side of your Story to display all of the individual Snaps and tap on the one you want to delete—simply tap the trashcan icon and hit Delete to remove the Snap
29. Find out if another user follows you back
Is your competitor keeping tabs on you? Follow them and find out.
How to do it
In Snapchat, go to Add Friends
Select Add by Username
Type the person’s username
Hold down on their username
If you see their Snapchat score, that means they are following you back
30. Search Snaps for anything your heart desires
In the mood to watch something a little different? You can search any topic or keyword.
How to do it
Swipe to the left from the camera screen to get to the Stories screen
At the top of the screen there’s a search bar next to the magnifying glass icon
Type in whatever term you want
Choose one of the options from the top of the screen to refine your search further or simply tap on a TOPIC option to watch Stories on your topic of choice
31. Add links to Snaps
Snapchat’s critics oft point to its lack of external links (outside of ads or Discover content) as a con. But this little-known feature let’s you link to any Snap.
How to do it
Capture a Snap
Tap the paperclip icon
Choose a link—it can be one that’s already saved to your clipboard, one you’ve sent before, or one you’ve pulled up using search
Tap Attach to Snap when you’ve found the link you want to share
Send your Snap—your audience only needs to swipe up to view the site in Snapchat’s internal browser
32. Hide your location from SnapMap
If you’d rather not let the SnapMap feature know where you’re posting from, it’s easy to hid your location on Ghost Mode.
How to do it
From the camera screen, tap your Bitmoji’s face in the upper left-hand corner to go to your profile
In the top right-hand corner, tap the gear icon to access Settings
Under WHO CAN… tap See My Location
Toggle Ghost Mode on
Now only you can see your location
Want to get away from it all? Go into ‘Ghost Mode’ to hide your location from everyone on the Snap Map You can still see it though! http://pic.twitter.com/jSMrolMRY4
— Snapchat Support (@snapchatsupport) June 29, 2017
33. Add a Chat shortcut
On both iOS and Android you can add a widget to start a chat directly from your home screen.
How to do it on iOS
Go to your device’s home screen
Swipe right to access your Today view
Scroll to the bottom and tap Edit
Find Snapchat in the list and tap the green + button next to it
Apple will display your Best Friends’ Bitmoji in the widget—simply tap one to start a Chat
How to do it on Android
Press and hold on an empty space on your home screen
Tap Widgets
Choose the Snapchat widget
Decide whether to display one friend or an entire row of friends
Place the widget wherever you want
Bonus hack: you can actually resize the widget to give the Bitmoji some breathing room for activities
On Android, you can resize the Snapchat widget to give your friend’s Bitmojis more room for activities 🤸 http://bit.ly/2uET6bz http://pic.twitter.com/2lmfZ5Pe9y
— Snapchat Support (@snapchatsupport) March 16, 2017
34. Make Snapcodes for any website
Snapcodes needn’t be limited to your profile. You can create them for any web property.
How to do it
Visit scan.snapchat.com
Log in
Plug a link into the field marked Enter a URL
Click Make a Snapcode
If you want, you can choose to add an image to your code
Once it’s to your liking, click DOWNLOAD YOUR SNAPCODE to get the image file
You can make Snapcodes for any website you want🤗 Create them in the app on iOS devices or online here: http://bit.ly/2uETJlt http://pic.twitter.com/h2gft6HkJp
— Snapchat Support (@snapchatsupport) February 10, 2017
35. Create your own geofilter directly in the app
Creating a geofilter is now easier than ever.
How to do it
Go to the camera screen
Tap the Bitmoji icon in the top left-hand corner of the screen to go to your profile
Tap the gear icon to go to Settings
Tap on On-Demand Geofilters
Tap the button in the right-hand corner of the screen to create a new geofilter
Choose what your geofilter is for and select a template to get started
From there you can edit, name, schedule, and geofence your geofilter
Hootsuite’s on Snapchat! Click this link on mobile to go directly to Hootsuite’s profile or scan the Snapcode below to add Hootsuite as a Friend on Snapchat.
With files from Kendal Walters, Amanda Wood, and Evan LePage.
The post Snapchat Hacks: 35 Tricks and Features You Probably Didn’t Know About appeared first on Hootsuite Social Media Management.
The post Snapchat Hacks: 35 Tricks and Features You Probably Didn’t Know About appeared first on Make It With Michael.
from Snapchat Hacks: 35 Tricks and Features You Probably Didn’t Know About
0 notes
Text
Snapchat Hacks: 35 Tricks and Features You Probably Didn’t Know About
We call them Snapchat hacks because many of the app’s best features are either hidden or just not intuitive. We’re looking at you, Tint Brush. But if you can learn these tricks you’ll have a powerful new arsenal of tools to help take your brand’s Snap game to the next level.
In this guide we’ll teach you how to access these lesser-known features, and uncover a few more tricks that are available only after manipulating the settings on your device.
Jump to the section of your choice or keep scrolling for the complete list.
Table of contents
Text, drawing, and editing Snapchat hacks
Photo and video Snapchat hacks
General Snapchat hacks
Bonus: Download our free guide that shows you how to 10X your social strategy and outperform your competitors. No fluff or tired tactics—features the tools, daily routines, and advanced techniques used by three world-class industry experts.
Text, drawing and editing Snapchat hacks
1. Draw in impressive detail by turning on your phone’s zoom feature
If you fancy yourself more of a da Vinci than a doodler, then this Snapchat hack is for you.
How to do it on iOS
Go to Settings
Select General
Tap Accessibility
Under the Vision section, enable Zoom
Select Show Controller
Choose your Zoom Region preference (Window or Full Screen)
Set Maximum Zoom Level to 15x
How to do it on Android
Go to Settings
Select Accessibility
Tap Vision
Tap Magnification Gestures
Enable Zoom
Using Snapchat on a tablet, where the screen is much larger, is another helpful trick for creating intricate masterpieces. Draw with a stylus to really impress people with your works of art.
2. Apply up to 3 filters on a single Snap
Add a sepia filter, broadcast your location, and the current temperature all at the same time!
How to do it
Take a picture in the app as you would normally
Swipe across the screen and choose your first filter
Once you’ve landed on the one you want, hold your thumb anywhere on the screen to secure the first filter in place
Now use your free hand to swipe through the other filters
Once you’ve chosen your second filter, lift your thumb off the screen for a moment before tapping and holding it down again.
Now you’re ready to start swiping and choose a third filter
If you’re not happy with your combo, simply swipe right to delete all three filters and return to your unfiltered image.
3. Turn an emoji into a colorful filter
May we suggest 🎾 ?
How to do it
Choose an emoji with your desired color
Move it toward a corner of your screen
Increase its size and continue to shove it in the corner—the pixelated, semi transparent edge will serve as the filter
If you’re feeling particularly adventurous you can try layering different color emoji.
4. Switch up the ‘info’ filters
All the simple info filters—speed, temperature, time, and altitude—have variations. Miles per hour becomes kilometers per hour, fahrenheit becomes celsius, feet becomes meters, and the time becomes the date.
Take things to the next level with the temperature filter. Not only can you switch from fahrenheit to celsius, you can also continue tapping to display an hourly or three-day forecast complete with weather icons.
Simply tap the info filter of your choice to access the other options.
Pro Tip: No need to ask for the date anymore – simply tap 👆 on the time filter, for the date to appear! http://pic.twitter.com/MWig4R5r1V
— Snapchat Support (@snapchatsupport) March 4, 2016
5. Use characters to frame your Snaps
The “0” creates a nice oval frame and the “A” will give you a bold triangular border, for example.
How to do it
After you’ve taken your Snap, create a one-letter caption with the largest size text (tap the T icon)
Enlarge it so that it creates a border around the picture
Position it until you have the frame you want
6. Change the color of individual words and letters
How to do it
Type your caption and tap the T icon to get the largest size text
Select one color you want to use from the color palette to start with
Then tap any word in your text and click the select option to highlight the word
Move the highlight over any word or letter you want to change the color of
Choose the next color from the color palette
7. Pin an emoji on a moving target
Because the stuck-out tongue/winking eye emoji is more charming than any human face could ever hope to be.
How to do it
Record a video that focuses on a moving object
When you’re finished filming, tap the emoji icon at the top of the preview screen and select the one you want
Resize the emoji before you pin it
Tap and hold the emoji to drag it over the moving target (which should be frozen at this point)
Hold it over the object for a moment
Snapchat will reload the video, and the emoji should follow along
8. Add drawings and captions to ‘Discover’ content and share it with your friends
When viewing content from Snapchat’s Discover partners, tap and hold a Snap to share it with friends. It’ll automatically open as a draft, where you can add to it the same way you would any of your own Snaps. These can only be sent to individuals via chat, not shared to your Story.
9. Access a wider range of color options
For every color in the rainbow, drag your finger down the color slider to expand it and choose whatever color you like.
Want even more options? Once you’ve found the color family you want, simply drag your finger to the left side of the screen to lock it, then drag to the top left-hand corner for a darker shade or to the bottom right for a pastel pigment.
10. ‘Photoshop’ your Snap with Tint Brush
With a little-known feature called Tint Brush, you can change colors in your Snaps.
How to do it
Capture a Snap
Tap the scissors icon then the paintbrush icon
Choose your desired color
Outline the object you’d like to recolor
As soon as you lift your finger, the object should change color
11. Edit a Snap in Memories to access old community geofilters
When you save a Snap to Memories, most geofilters available at the time are saved too. When you go back to edit a Snap, you can swipe to access those community geofilters.
If you took a photo while vacationing in San Francisco, for example, you can edit that Snap in Memories to access the San Francisco city filter from your home on the East Coast.
How to do it
Swipe up from the camera screen to go to Memories
Press and hold on a Snap
Tap the pencil icon to edit the Snap
Edit your Snap normally and swipe left to access the community geofilters that were available when you took the Snap
Tap Done to save or discard your changes
Simply swipe down to return to Memories
12. Edit stuff out of your Snaps with Magic Eraser
Did something ruin an otherwise perfect shot? Get rid of it with Magic Eraser.
How to do it
Capture a Snap
Tap the scissors icon
Tap the multi-star button
Trace the outline of the object you’d like to erase and it will disappear
Keep in mind though that the tool isn’t perfect. Magic Eraser works best on objects in front of simple backgrounds
13. Draw with emoji
Jazz up your photos and videos by drawing with emoji. There are eight rotating options to choose from.
How to do it
Capture a Snap
Tap the pencil icon to draw
Underneath the color selector is an emoji, tap it for the full range of options
Select an emoji and draw away
Use the emoji brush to paint with ❤️'s, ⭐️'s, 🍀's,🎈's 🌈's and more!
(Horseshoes & pots of gold are still a work in progress, though 😜) http://pic.twitter.com/9F1HxTiDpB
— Snapchat Support (@snapchatsupport) May 10, 2017
14. Enhance your Snap by changing the backdrop
As Lenses transform faces, you can use this feature to alter backgrounds.
How to do it
Capture a Snap
Tap the scissors icon then tap the box with diagonal lines
Outline the object you want to have in front of the Backdrop (don’t worry, you get multiple tries at this)
Tap the return arrow to undo a mistake and try again
Select your desired backdrop from the menu on the right
When you’re happy with how it looks, tap the scissors icon again to return to the edit screen
15. Add artistic flair to photos in Memories
Breed new life into your old photos with artistic filters for Snaps saved to Memories. Our favorite is Vincent Van Gogh’s Starry Night.
How to do it
Swipe up from the camera screen to go to Memories
Press and hold on a Snap to display options
Tap Edit Snap
Tap the paintbrush icon to access artistic filters
Choose a filter
Save or send your Snap as usual
Press and hold on a Snap in Memories, tap the paintbrush icon, and various artistic styles should appear 🎨🖌 : https://t.co/QrUN8wAsE1 http://pic.twitter.com/vlccs0g4zP
— Snapchat Support (@snapchatsupport) January 12, 2017
Photo and video Snapchat hacks
16. Share and edit photos stored on your phone in Chat
As a brand you can ask followers to message you and then reply with a pre-constructed image containing a discount code or some other call to action. It’s a fun, time-saving engagement tactic.
How to do it
Swipe right on a user’s name to open up Chat
Once there, select the image icon and choose the photo you want to work with
Add text, doodles, and filters as you would a regular Snap
You can also share video stored on your phone, but you aren’t able to edit the clips within Snapchat.
17. Record video without holding down the capture button
This makes it easier to hold your phone steady and flip back and forth between the front and rear camera. You need to be on an iOS device to use this hack.
How to do it
Access Settings
Select General
Go to Accessibility
Under the Interaction section, turn on the AssistiveTouch feature and a small icon will appear on the right side of your screen
Tap Create New Gesture
On the New Gesture page, hold your finger on the screen and let the blue bar at the bottom max out
Tap Stop
Save and name the gesture
Open Snapchat and before you start recording a video tap the small icon
Select Custom and a circle should appear on the screen
Now simply tap the capture button and your custom gesture will take care of the rest
18. Switch between the front and rear camera while recording
This one is easy. When filming a video simply double tap the screen to switch from selfie mode to point of view.
19. Use the volume buttons to take a photo or record a video in Snapchat
Yep, this is the same trick that works with your phone’s default camera app. If you have a pair of earbuds or headphones with volume control then you can use those to take Snaps as well. You don’t even have to hold your phone.
20. Zoom in and out with only one finger
No more awkwardly pinching the screen! When recording, sliding your finger up the screen will zoom in and sliding down will zoom out.
One-handed zoom is a game changer 🏆. Simply drag your👆 up and away from the capture button while recording! http://pic.twitter.com/oTbXLFc4zX
— Snapchat Support (@snapchatsupport) May 10, 2016
21. Give your Snap a soundtrack
This one requires a bit of timing if you want to capture a specific part of a song, but it’s a simple trick otherwise.
How to do it
Open a music app on your phone
Play the song you want
Go back to Snapchat and start recording
22. Record video without sound
If you’re worried about loud and jarring background noise ruining the experience for your viewers, you can send a Snap without sound. After you record a video, simply tap the microphone icon in the bottom lefthand corner of the screen before hitting the blue send button.
23. Distort audio with Voice Filter
How to do it
Record a video Snap
Tap the speaker button in the bottom left-hand corner of the screen
Choose the voice filter you’d like to add to your Snap
When you need a *little* more help getting into character, try adding a voice filter! 🤖 Learn more here: https://t.co/9lBfxnNR03 http://pic.twitter.com/ElBQRfyMql
— Snapchat Support (@snapchatsupport) July 7, 2017
24. Record up to 6 continuous Snaps
Sometimes 10 seconds isn’t enough to capture a moment in all its glory. That’s where Multi Snaps come in.
You can record up to six continuous Snaps, then pick and choose your favorites to share.
How to do it
Press and hold the capture button to record a video
Keep holding the button down to continue recording past the end of your first video Snap (and so on)
When you’ve finished capturing Snaps, your videos will appear at the bottom of the screen
Drag and drop the ones you don’t want into the trash
Continue editing your Snap as usual—any effect you apply will show up on each part of your Multi Snap
This feature has limitations. For instance, Multi Snaps can’t be looped, reversed, or include 3D stickers. They are also only available for iOS (at the time of writing).
25. Send limitless Snaps
Photo Snaps set to limitless will remain on-screen until your recipient taps away. Video Snaps will loop infinitely, so your friends can watch them again and again and again.
How to do it for a photo
Take a picture
Tap the clock icon to select the amount of time your Snap will be visible
Scroll down to the infinity symbol and tap to select
How to do it for a video
Capture a video
Underneath the paperclip icon, tap the circular arrow icon
When the circular arrow shows 1 the Snap will play once, when it shows the infinity symbol, it will loop continuously
These options are available for both Snaps and Stories. If used in a Story, the infinity setting will display the Snap until the viewer taps to see the next item in the Story.
Choose the ∞ timer when your friends need more than a moment to *truly* appreciate your vision 😍 https://t.co/js6mm1w1Yq
👩🎨 @DABattelle http://pic.twitter.com/qCvlCnwvZR
— Snapchat Support (@snapchatsupport) May 17, 2017
General Snapchat hacks
26. Memorize your Snapchat profile’s shareable browser link
And then you can easily post and promote it across other social networks. Here’s the format: http://ift.tt/1QvlONH
27. Turn on ‘Travel Mode’ to save data and battery life
If you enable Travel Mode on your Snapchat app, instead of downloading automatically, Snaps and Stories will load only when you tap them.
How to do it
From the camera screen, tap your Bitmoji to visit your profile
Tap the gear icon to navigate to Settings
Under ADDITIONAL SERVICES select Manage
Enable Travel Mode
28. Delete a Snap from your Story
You can do this with any Snap in your Story, regardless of where it appears in the order.
How to do it
In Snapchat, swipe right from the default camera to go to the Stories view
Your Story appears at the top of the screen—either tap to watch it and, when the Snap you’d like to delete appears, either press and hold or swipe up, tap the trashcan icon and select Delete
Or, tap the three dots to the side of your Story to display all of the individual Snaps and tap on the one you want to delete—simply tap the trashcan icon and hit Delete to remove the Snap
29. Find out if another user follows you back
Is your competitor keeping tabs on you? Follow them and find out.
How to do it
In Snapchat, go to Add Friends
Select Add by Username
Type the person’s username
Hold down on their username
If you see their Snapchat score, that means they are following you back
30. Search Snaps for anything your heart desires
In the mood to watch something a little different? You can search any topic or keyword.
How to do it
Swipe to the left from the camera screen to get to the Stories screen
At the top of the screen there’s a search bar next to the magnifying glass icon
Type in whatever term you want
Choose one of the options from the top of the screen to refine your search further or simply tap on a TOPIC option to watch Stories on your topic of choice
31. Add links to Snaps
Snapchat’s critics oft point to its lack of external links (outside of ads or Discover content) as a con. But this little-known feature let’s you link to any Snap.
How to do it
Capture a Snap
Tap the paperclip icon
Choose a link—it can be one that’s already saved to your clipboard, one you’ve sent before, or one you’ve pulled up using search
Tap Attach to Snap when you’ve found the link you want to share
Send your Snap—your audience only needs to swipe up to view the site in Snapchat’s internal browser
32. Hide your location from SnapMap
If you’d rather not let the SnapMap feature know where you’re posting from, it’s easy to hid your location on Ghost Mode.
How to do it
From the camera screen, tap your Bitmoji’s face in the upper left-hand corner to go to your profile
In the top right-hand corner, tap the gear icon to access Settings
Under WHO CAN… tap See My Location
Toggle Ghost Mode on
Now only you can see your location
Want to get away from it all? 👋 Go into 'Ghost Mode' to hide your location from everyone on the Snap Map 👻 You can still see it though! http://pic.twitter.com/jSMrolMRY4
— Snapchat Support (@snapchatsupport) June 29, 2017
33. Add a Chat shortcut
On both iOS and Android you can add a widget to start a chat directly from your home screen.
How to do it on iOS
Go to your device’s home screen
Swipe right to access your Today view
Scroll to the bottom and tap Edit
Find Snapchat in the list and tap the green + button next to it
Apple will display your Best Friends’ Bitmoji in the widget—simply tap one to start a Chat
How to do it on Android
Press and hold on an empty space on your home screen
Tap Widgets
Choose the Snapchat widget
Decide whether to display one friend or an entire row of friends
Place the widget wherever you want
Bonus hack: you can actually resize the widget to give the Bitmoji some breathing room for activities
On Android, you can resize the Snapchat widget to give your friend's Bitmojis more room for activities 🤸 https://t.co/V6Q86NJZLq http://pic.twitter.com/2lmfZ5Pe9y
— Snapchat Support (@snapchatsupport) March 16, 2017
34. Make Snapcodes for any website
Snapcodes needn’t be limited to your profile. You can create them for any web property.
How to do it
Visit scan.snapchat.com
Log in
Plug a link into the field marked Enter a URL
Click Make a Snapcode
If you want, you can choose to add an image to your code
Once it’s to your liking, click DOWNLOAD YOUR SNAPCODE to get the image file
You can make Snapcodes for any website you want🤗 Create them in the app on iOS devices or online here: https://t.co/RnbWa8sCmi http://pic.twitter.com/h2gft6HkJp
— Snapchat Support (@snapchatsupport) February 10, 2017
35. Create your own geofilter directly in the app
Creating a geofilter is now easier than ever.
How to do it
Go to the camera screen
Tap the Bitmoji icon in the top left-hand corner of the screen to go to your profile
Tap the gear icon to go to Settings
Tap on On-Demand Geofilters
Tap the button in the right-hand corner of the screen to create a new geofilter
Choose what your geofilter is for and select a template to get started
From there you can edit, name, schedule, and geofence your geofilter
Hootsuite’s on Snapchat! Click this link on mobile to go directly to Hootsuite’s profile or scan the Snapcode below to add Hootsuite as a Friend on Snapchat.
With files from Kendal Walters, Amanda Wood, and Evan LePage.
The post Snapchat Hacks: 35 Tricks and Features You Probably Didn’t Know About appeared first on Hootsuite Social Media Management.
Snapchat Hacks: 35 Tricks and Features You Probably Didn’t Know About published first on http://ift.tt/2rEvyAw
0 notes
Last Seen Blogs

0eli-aft-icecream-queen0
Icecream Queen 😌✨

dbhsworld
dbh(,,•ω•,,)♡
0eli-aft-icecream-queen0
Icecream Queen 😌✨
0eli-aft-icecream-queen0
Icecream Queen 😌✨

urbanaudiopro
Urban Audio Productions