#and the correct range of the proportional editing tool
Text
Create and Generate Horse Sketch Using Free Online Platforms

The Horse Sketch to Image Generator is an advanced AI-powered tool that transforms basic horse sketches into fully-realized, detailed images. Designed for artists, equestrian enthusiasts, designers, and hobbyists, this AI-based technology brings a new level of creativity and efficiency to the world of horse-themed art. Whether you're looking to refine a hand-drawn sketch or create a photorealistic representation of a horse from a simple outline, this generator provides an intuitive and powerful way to achieve professional-quality results.
What Is the Horse Sketch to Image Generator?
The Horse Sketch to Image Generator leverages the power of artificial intelligence (AI) to transform a rough sketch into a fully-rendered image, complete with textures, shading, and fine details. This cutting-edge tool uses deep learning algorithms to recognize the structure and form of a horse, interpreting the lines and strokes of your sketch to produce a lifelike representation of the animal. Whether the sketch is basic or complex, the AI is capable of generating an image that looks polished and professional, tailored to your artistic preferences.
Key Features and Benefits
AI-Powered Image Generation At the core of this tool is sophisticated AI technology that understands the anatomy and structure of horses. Once a user uploads a sketch—whether it's hand-drawn, digitally created, or even a rough doodle—the AI interprets the shapes and proportions to create an accurate image of a horse. It can produce images in various styles, from photorealism to stylized illustrations, depending on the input and preferences of the user.
Customizable Output Styles The Horse Sketch to Image Generator allows users to choose from a variety of image styles. Whether you're aiming for a highly realistic depiction, an artistic watercolor effect, or a pencil-drawn look, this AI tool offers flexibility. You can adjust settings such as color, texture, background, and even the level of detail. This makes the tool suitable for a wide range of projects, from professional design work to personal art for prints, gifts, or even animation storyboards.
Quick and Easy Workflow One of the most appealing aspects of the Horse Sketch to Image Generator is its efficiency. Creating detailed and accurate horse images from scratch can be time-consuming and requires a high level of skill, but with AI technology, the process is simplified. In just a few clicks, users can turn a simple sketch into a polished image. This can be a game-changer for artists working on tight deadlines, or for hobbyists who want professional-looking results without spending hours on the artwork.
Realistic Horse Anatomy The AI is designed with an extensive database of horse anatomy, ensuring that the generated images are true to the natural structure of the animal. From the curvature of the muscles to the flow of the mane and the texture of the fur, the tool is capable of producing remarkably accurate and anatomically correct images. Whether you're creating artwork for equestrian purposes, educational materials, or just for fun, this AI tool ensures that the final image is both beautiful and realistic.
Versatility Across Art Mediums Whether you're working in digital art, graphic design, or traditional media, the Horse Sketch to Image Generator can be adapted to your needs. The images generated can be exported in various formats (JPEG, PNG, SVG, etc.), making them perfect for use in print or digital media. They can also be edited further in graphic design software, allowing you to fine-tune the image for more personalized results.
Mobile and Desktop Compatibility Designed to be accessible to everyone, the Horse Sketch to Image Generator is compatible with both mobile and desktop platforms. This allows users to create horse images on-the-go using their smartphones or tablets, or to refine their artwork in greater detail on a desktop environment. Whether you're at home, in the studio, or traveling, the tool ensures that creativity can happen anytime and anywhere.
Conclusion
The Horse Sketch to Image Generator AI is a groundbreaking tool that brings the power of artificial intelligence into the hands of artists, designers, and horse enthusiasts. It eliminates the barriers of skill and time, enabling anyone to create stunning horse-themed artwork with ease. From casual sketches to professional-quality images, this AI generator is a versatile and accessible solution for transforming your creative ideas into vivid, detailed imagery. Whether you're an experienced artist or a beginner looking for inspiration, this tool opens up new possibilities for equestrian art.
#horse sketch to image generator#ai horse sketch to image generator#horse sketch to image generator ai
1 note
·
View note
Text
Why Professionals Buy Business Cards Online

How we network and interchange contact information has seen a remarkable change, with advanced and convenient digital business cards quickly taking the place of traditional business cards. We at SendContact have all it takes to make business card online buying a seamless and effective process. This is why you need to buy business cards online, particularly digital ones, which is a big advantage for a modern professional.
Buying Business Cards Online Comes With Some Advantages
1. Convenience and Easy Access
The process of buying business cards online order is highly convenient. From the comfort of one's home—or from virtually any place—one can view numerous designs. Then, the user can customize their own card and submit their order. All of these can happen without movement from the place one is at.
2. Many Options for Customizing
It allows you to customize them to an extremely wide range. At SendContact, we present many templates, colours, fonts, and designs to make a card yours, truly reflecting your brand identity. Whether you want a classic feel or a smooth, modern design, on our online platform, you can customize your card down to the last detail.
3. Cost-effective Solutions
Ordering business cards online can be more cost-effective when compared to the traditional methods. Most online services are very competitive and provide customers with discounts on bulk purchases. Additionally, ordering business cards through digital means avoids multiple printing, thus making it more cost-effective in the long run.
Benefits of Digital Business Cards
1. Friendly to the Environment
Digital business cards offer a more sustainable solution to the traditional paper variant. Opting for digital business cards will be directly proportional to the number of papers saved and the amount of pressure exerted on paper wastage. This helps save the Environment and will identify your brand with the green initiative, which can be used as an attraction to clients and partners who have an environmentally sensitive approach.
2. Instant Updates and Edits
One of the most significant advantages of an electronic business card is that you can update its information immediately. In simple words, if you change or update your contact information, such as phone number, email address, or job designation, then you do not need to publish new cards. In other words, edit the information on your electronic card, saving you time and ensuring that your business contacts always have the correct information.
3. Interactive Features
Digital business cards can allow for interactivity that traditional ones can't. You can add clickable links to your website, social media profiles, and portfolio directly to the card. In addition, at SendContact, you can also hold multimedia content, like videos or presentations, in our digital business cards to give richer content to view and higher engagement with your contacts.
4. Analytics and Tracking
The digital business cards let you know when and where your card has been accessed, thereby noting who your card viewers are in the market. It can also tell which links were clicked, knowing the interest of a potential connection and consequently giving feedback.
Business Cards Online Shopping at SendContact
1. Browse Our Selection: Log in to view the myriad of business cards available on our site. Go for one that speaks to the personality and style of your brand.
2. Customize Your Card: Our easy-to-use tools in the customization process will add your contact information, logo, or any other elements you want to your card. Feel free to change its colours, fonts, and layout to make your card as unique as you are.
3. Place Your Order: As soon as you're really happy with your design, go ahead and place your order through our secure online facility. You can choose to buy digital business cards or opt for a combination of digital and physical cards.
4. Share and Print: On ordering print cards, they will be directly printed and delivered to the address you specify. Digital business cards can be directly sent as a file that you can share at that moment itself with the help of emails, messages, or even with an NFC vising device.
Conclusion
In this digital world, ordering printed business cards online is a smart and effective choice among pros. Convenience, customization options, and cost savings are some of the prime alluring elements of this option. On the other hand, buy digital business cards guarantees much more—ecological sustainability, instant updating, interactivity, and analytics.
Visit SendContact today to start creating your perfect business card and take your professional networking to the next level.
0 notes
Text
The Learning Process of E-Commerce Image Editing
The learning process of e-commerce image editing involves mastering software tools and understanding design principles. It requires consistent practice and an eye for detail.
E-commerce image editing is a vital skill for online businesses, as compelling product visuals can significantly boost sales and engage customers. A beginner must start by familiarizing themselves with image editing software like Adobe Photoshop or GIMP, each offering a suite of tools for enhancing product photos.
Grasping concepts like image retouching, background removal, color correction, and shadow creation form the foundation of this expertise. The learning curve might seem steep initially, but with tutorials, online courses, and a community of fellow editors, an individual can quickly become proficient.
Visual designers in the digital marketplace aim for perfection, knowing that quality imagery leads to better customer trust and conversion rates. Developing this skill set not only enhances the aesthetics of an online store but also contributes to its commercial success.

Credit: www.techsmith.com
Elevating Visuals In E-commerce
In an online world where your audience's first interaction is often with an image, mastering e-commerce image editing is vital. Creating striking product visuals can significantly influence customer decisions. Let's delve into the importance of top-notch imagery and mastering the art of balance between beauty and truth in product representation.
The Role Of Imagery In Online Sales
Imagery acts as a silent salesperson in the e-commerce landscape. High-quality, engaging images can tell a story about your product, inviting customers to envision it in their lives. A picture is worth a thousand words, and in e-commerce, it can also be worth countless clicks. Here's how compelling imagery can bolster online sales:
Enhancing first impressions and deterring bounce rates.
Facilitating quicker purchase decisions through visual appeal.
Improving customer understanding of the product features.
Building trust with realistic and detailed visual representations.
Balancing Aesthetics And Accuracy
While it's essential to create visually alluring images, it's equally crucial to present products accurately. Misrepresentation can lead to customer dissatisfaction and high return rates. Here are tips for maintaining the perfect balance:
Edit for color vibrancy and contrast to grab attention - Ensure edited images reflect the true colors and textures.
Use backgrounds that complement the product - Keep the scale and proportions honest to avoid confusion.
Add elements that evoke emotions or lifestyle connections - Include multiple angles and close-ups for a full product view.
Core Skills For Editing E-commerce Images
youtube
E-commerce image editing is not just about making pictures look better. It's about turning visuals into stories that sell products. To do that, certain core skills are essential. These skills help editors create images that pop, tell a cohesive story, and engage customers.
Mastering Image Manipulation Software
At the heart of editing is powerful software. Programs like Adobe Photoshop and Lightroom stand as industry standards. Editors must learn tools like layers, brushes, and selection techniques. Mastering these functions allows editors to refine and transform images into commerce-ready visuals.
Layers: Building images with adjustable layers.
Brushes: Fine-tuning details with a range of brushes.
Selections: Isolating parts of an image for editing.
Understanding Color Correction And Grading
Color plays a vital role in e-commerce images. Proper use of color can make products stand out. Editors must understand how to adjust hues, saturation, and brightness to make images look consistent and appealing. Skills in color correction ensure that every image reflects the product's true colors.
Hue Adjustment - Corrects colour tones to match product reality.
Saturation Editing - Enhances or reduces color intensity.
Brightness Control - Ensures images are not too dark or overexposed.
Workflow Optimization
Within the bustling world of e-commerce, capturing the consumer's eye is key. A smooth and efficient image editing process not only saves precious time but also catapults product appeal. Workflow optimization becomes a crucial step to streamline operations, ensuring quick turnover and consistent, striking visuals. Let’s delve into how this can transform an e-commerce image editing pipeline.
Batch Processing For Efficiency
Batch processing is a game-changer in image editing. By handling multiple images at once, brands maximize output without sacrificing quality. Critical steps like resizing, cropping, or applying preset adjustments happen like clockwork. The result? A faster journey from shoot to showcase.
Steps to Implement Batch Processing:
Select images with similar editing needs.
Queue up actions in your photo editing software.
Process in batches, not one at a time.
Creating Consistent Visual Branding
Consistency is the heartbeat of brand recognition. A cohesive visual style ensures products are instantly identifiable and resonate with viewers. Uniformity in colour palettes, image sizes, and themes speaks volumes, establishing trust and brand professionalism with each click.
Adapting Images For Multiple Platforms
Online stores need great images. Shoppers can't touch or try products. They see them on screens. Images must look good on computers, phones, and tablets. This means editing images to fit different platforms.
Resizing And Formatting For Web Standards
Images need sizes that work online. Large images can slow websites. Fast load times are crucial. Google favors sites that load quickly. Here's how to make images the right size:
Choose the right format: JPEG for photos, PNG for graphics.
Find the best dimensions: Usually 1000-2000 pixels wide.
Use compression: Tools like Adobe Photoshop can help.
Ensuring Mobile Responsiveness
People shop on their phones more than ever. Images must look good on these screens. They should change size and shape for different devices. This is mobile responsiveness. Steps to make images mobile-friendly are:
Flexible images: Use CSS to make images scale with the screen.
Testing: Use tools to see how images appear on various devices.
Optimize for touch: Ensure images are easy to view with a touch of a finger.
Advanced Techniques And Trends
As e-commerce evolves, so does the art of presenting products online. Engaging visuals make online shopping irresistible. Advancing your image editing skills is a game-changer. The latest trends and techniques bring products to life. Let's dive into some of these cutting-edge methods.
Exploring 360-degree Product Views
360-degree product views are changing the scene. They let shoppers see every angle. This view feels like holding the product. You'll need skills in photography and editing to create these views. Here's what to learn:
Shooting multiple angles – Snap photos around the product.
Editing software mastery – Stitch images together smoothly.
Online integration – Make sure it works on your website.
These steps will give a virtual 'hands-on' experience. They boost buyer confidence and reduce returns. Learn this to stay ahead.
Incorporating Interactive Imagery
Interactive images engage more than static ones. They increase time on page and excitement. You will need new skills. Here are key features of interactive imagery:
Hotspots – Clickable areas that reveal information.
Zoom and rotate – Let users closely inspect the product.
Customization previews – Show changes in real-time.
You'll learn to use special tools. Shoppers will try different colors and styles. Your product pages will become more interactive. Equip yourself with these trendy techniques.
Avoiding Common Pitfalls
Editing e-commerce images can be tricky. To shine online, every image must look perfect. Businesses often stumble in this learning process. Recognizing and steering clear of these mistakes is crucial for success.
Maintaining Image Quality
Quality is key in e-commerce imagery. It affects customer perception and trust. Below are tips to maintain high-quality standards:
Choose the right resolution: Aim for clarity across all devices.
Edit with precision: Use professional tools for best results.
Regular checks: Always review images before uploading.
Frequently Asked Questions Of The Learning Process Of E-commerce Image Editing
What Is E-commerce Image Editing?
E-commerce image editing refers to the process of enhancing product photos for online stores. It involves correcting colors, removing backgrounds, and adding shadows for a professional look that can increase sales.
Why Is Image Editing Crucial In E-commerce?
Effective image editing can make products more appealing, build customer trust, and lead to higher conversion rates. High-quality visuals are essential for an online store's success.
How To Learn E-commerce Image Editing?
You can learn e-commerce image editing through online tutorials, courses, and practicing on various software like Photoshop or Lightroom. Start with basic edits and gradually move to advanced techniques.
What Tools Are Best For Editing E-commerce Images?
Photoshop and Lightroom are widely used for e-commerce image editing. Other tools include GIMP for a free alternative, and Canva for simple edits and design layouts.
Conclusion:
Mastering e-commerce image editing is an evolving journey. As trends shift, staying adaptable ensures your product visuals remain impactful. Keep practicing, stay updated on new tools, and always prioritize quality. Your efforts will help drive sales and elevate your brand's online presence.
Embrace the learning curve—the rewards are worth it.
0 notes
Text
BEST PRODUCT PHOTO EDITING SERVICES
We provide basic photo retouching services tailored to enhance product images for businesses and individuals. Our expertise includes improving colors, removing unwanted shadows, and fixing white balance issues to ensure that product photos appear vibrant and true to life.
We offer clipping path services for precise and clean product cutouts from their original backgrounds. Our skilled retouches ensure accurate preservation of product proportions and shapes, making this service ideal for achieving professional and polished product images suitable for e-commerce.

Background removal stands as a cornerstone in ecommerce image editing, opening doors to platform adherence, visual uniformity, and heightened product emphasis. Crafted to address your unique requisites, it empowers your product visuals to stand out and effectively engage customers in the fiercely competitive landscape of online retail.
In the realm of product photo editing, the nuanced handling of shadows and reflections is pivotal, significantly influencing buyers’ perceptions and engagement levels. The artful management of shadows and reflections elevates the visual narrative of your products, cultivating trust and fostering an enduring rapport with your clientele.

♦ What is Product Photo Editing?
Product photo editing refers to the process of enhancing, retouching, and refining images of products to make them more visually appealing and professional. It involves a wide range of techniques and tools to correct imperfections, improve colors and lighting, remove distractions, and create a consistent and polished look for your products. Here are some key aspects of product photo editing:
Background Removal: Often, product photos are taken against backgrounds that are distracting or don’t complement the product. Through background removal or replacement, editors can isolate the product and place it on a neutral or custom background, making the item the focal point.
Color Correction: Accurate color representation is crucial for product photos. Editors can adjust colors to match the product’s true appearance, correct color casts, and ensure consistency across multiple images.
Retouching: Product images may have blemishes, scratches, or other imperfections. Skilled editors can retouch these flaws, creating flawless product images that attract potential customers.
Clipping Path: A clipping path is a precise outline created around the product to separate it from the background. It’s essential for creating clean and sharp images, especially for products with complex shapes.
Shadow Creation: Adding natural-looking shadows to product images can make them appear more three-dimensional and appealing. Shadows give products a sense of depth and realism.
Image Resizing and Cropping: Editors can ensure that product images meet the specific size and aspect ratio requirements of your website or platform, allowing for a consistent and professional appearance.

Why is Product Photo Editing Important?
Enhanced Visual Appeal: High-quality, professionally edited product photos look more attractive and trustworthy to potential customers, increasing the likelihood of conversions.
Consistency: Consistent editing across all product images creates a cohesive and professional brand image, fostering trust and recognition.
Competitive Edge: In a crowded e-commerce market, having superior product images can set you apart from competitors and help you gain a competitive edge.
Increased Sales: Improved product images can lead to higher conversion rates and increased sales, as customers are more likely to purchase products they can see clearly and in detail.
Cost-Efficiency: Product photo editing is often more cost-effective than reshooting products in different settings or lighting conditions. It allows you to make the most of your existing photos.
0 notes
Text
5 Remarkable Benefits of Digital Painting: Exploring the World of Digital Art
Digital painting has emerged as a revolutionary medium in art that has redefined creativity and artistic expression. With the advancement of technology, artists and enthusiasts are increasingly embracing digital painting as a versatile and innovative way to create captivating masterpieces. This article delves into five prominent benefits of digital painting, highlighting its unique advantages in the modern artistic landscape. Furthermore, it discusses the convenience of buying digital paintings online and the growing popularity of digital art caricatures.
Limitless Creativity and Experimentation
One of the most appealing aspects of digital painting is the boundless creative possibilities it offers. Unlike traditional mediums, digital tools provide artists with an expansive array of brushes, textures, colours, and effects that can be manipulated and combined in countless ways. This freedom allows artists to experiment with various styles, techniques, and approaches, fostering an environment where creativity knows no bounds. The ability to effortlessly undo or revise mistakes encourages artists to take risks and push their creative boundaries, leading to the emergence of innovative and stunning artworks.
Efficiency and Flexibility
Digital painting streamlines the artistic process in numerous ways. With a wide range of customizable tools and features, artists can achieve intricate details and complex compositions more efficiently. Zooming in on specific areas, using layers for different elements, and employing various filters and effects expedites the creation process. Additionally, artists can work on their pieces from virtually anywhere, as digital artwork can be easily stored and accessed on computers, tablets, or even smartphones. This level of flexibility enables artists to integrate their creative practice into their daily lives seamlessly.
Cost-Effective and Environmentally Friendly
Traditional art supplies can be expensive and require constant replenishment. In contrast, digital painting significantly reduces these costs over time. Once an artist invests in the necessary hardware and software, the ongoing expenses related to physical materials are virtually eliminated. This cost-effectiveness makes digital painting an attractive option for aspiring and established artists. Furthermore, digital art is aste, aligning with the growing global emphasis on sustainability.
Precise Editing and Non-Destructive Workflow
In traditional art, corrections and revisions can be daunting and sometimes irreversible. Digital painting, however, offers an unparalleled advantage in terms of editing and revising. Artists can quickly adjust colours, proportions, and other elements without compromising the original work. The concept of a non-destructive workflow, where changes can be made without altering the underlying artwork, empowers artists to refine their creations meticulously. This level of precision encourages a deeper exploration of artistic choices and techniques.
Global Accessibility and Online Markets
The internet has transformed the art market, allowing artists to showcase their work to a global audience. As part of this evolution, the ability to buy digital paintings online has gained immense popularity. This convenient approach enables art enthusiasts to explore and purchase a wide range of digital artworks from the comfort of their homes. Whether seeking vibrant landscapes, abstract compositions, or intricate portraits, online platforms offer an extensive selection of digital paintings to suit diverse tastes and preferences.
0 notes
Text

Photo retouching editing, also known simply as "photo retouching," refers to the process of enhancing or modifying a photograph to improve its appearance, correct imperfections, or achieve a desired visual effect. It involves using various techniques and tools within photo editing software to make subtle or significant adjustments to the image.
Photo retouching can encompass a wide range of actions, including:
Color Correction: Adjusting the color balance, saturation, and contrast of an image to make it more visually appealing.
Skin Smoothing: Softening or removing blemishes, wrinkles, and other imperfections from a subject's skin in portrait photography.
Object Removal: Eliminating unwanted objects, distractions, or background elements from the photo.
Background Replacement: Swapping out the original background of an image with a different one to change the context or enhance the composition.
Digital Makeup: Adding makeup effects to enhance a subject's appearance in portrait photography.
Teeth Whitening and Eye Brightening: Enhancing teeth and eye colors to create a more vibrant and engaging look.
Reshaping and Body Contouring: Adjusting the shape and proportions of subjects to achieve a desired aesthetic, often used in fashion and beauty photography.
Light and Shadow Enhancement: Manipulating lighting and shadows to create a more dramatic or visually striking effect.
Texture and Detail Enhancement: Enhancing fine details, textures, and patterns in the image to make it more visually engaging.
Special Effects: Adding creative filters, textures, or other artistic elements to achieve a unique or stylized look.
Photo retouching is commonly used in various industries, including fashion, advertising, product photography, portrait photography, and more. Skilled photo retouchers use software like Adobe Photoshop, Adobe Lightroom, and other image editing tools to achieve the desired results while maintaining a natural and appealing appearance. It's important to note that while photo retouching can significantly enhance the visual quality of an image, there are ethical considerations regarding the extent to which images are retouched, especially in the context of body image and representation.
#photoretouchingprovider#photoretouchingphotoshop#photoretouchingservices#photoretouchingsoftware#professionalphotoretouching#retouchingpictures#photoretouchingagency
0 notes
Text
I have genuinely not gotten a decent night’s sleep since I started learning Blender on Sunday.
Is this the true Blender experience
#blender#blender 3d#lynx 3d#im slowly working on the donut tutorial#spent the last couple days working on getting the icing to look less floaty and more attached to the donut#trying to figure out the right angle to have my viewport oriented#and the correct range of the proportional editing tool#and which vertices i need to select#so i dont clip the whole damn thing into the 7th dimension#has been fun#i have frequently just been selecting individual vertices and adjusting it manually#and just living with the undersides of the icing being far less detailed#bc at least its not clipped entirely through the donut#there are multiple spikes on the inside of the donut’s mesh from vertices getting drug across the whole fucking thing#but its fine you cant see them theyre not there#just dont bite the donut#i do have a picture of this but i am on the bus to work rn alas#no donut time till this evening#this has been taking me days bc i can only endure so much at a time 😂#the true blender experience 👌#i am being initiated#also genuinely not joking about the sleep thing#idk whats up with that but i dont feel bad at least#just a little more tired than usual in the afternoon#idk my period should be soon maybe im pmsing who fuckin knows#or its the weather#who knows man
0 notes
Text

Heya, folks! Welcome to the first in a series of tutorials I'll be making for gifs. Please note that I do not claim to be a professional, or even good at these--I'd just like to share my experience and process with you, so hopefully you can go forth and create whatever your heart desires!

If you'd like to learn how to make gifs straight from the Pokemon games using Adobe Photoshop, take a look under the cut!
PLEASE READ FIRST!
First of all, I would like to note that I am using Adobe Photoshop 2020 as my image editing program. I've used CS5 and CS6 before, but unfortunately I don't have any experience with other programs. There may be similar ones to create the same kind of image!
Secondly, I am using an emulator at the time. The specific emulator I use in this tutorial is DeSmuME, linked here. However, the same process applies to GameBoy Advance and GameBoy (Color) games with the VBA emulator, linked here!
Lastly, I will not be linking any ROMs at the time. You can do some careful Googling and find some, though. ;)
Alright, let's get on with the tutorial!
☆ ☆ ☆
Have your ROM loaded up and at the point where you'd like to make a gif out of. For the sake of this tutorial, I will be playing Pokemon White 2, making a gif out of the Mareep that run around in Floccesy Ranch! The easiest way to start the process of this is to PAUSE your emulation at the point you would like your gif to start.
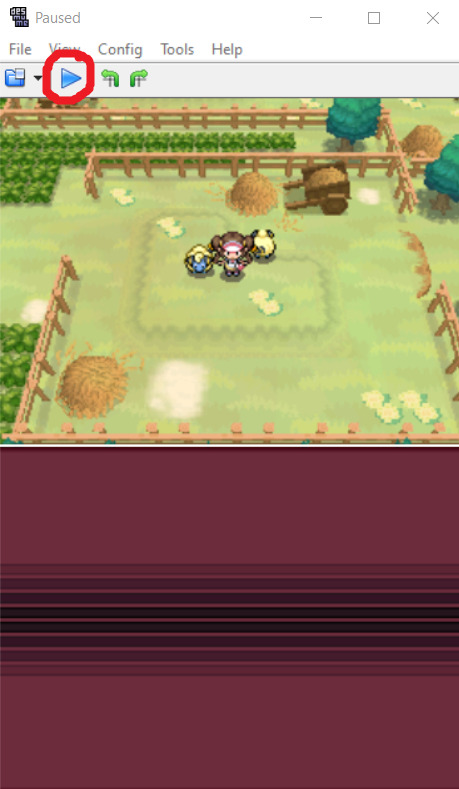
Excellent! Now, this is up to you, but to cut down on some editing, I like to make a mental note of where things started, especially if this is a looping gif (one that just goes on forever seamlessly). For this tutorial, I've made a note of the Mareep positions!
In the emulator, you'll want to go to File > Record AVI. You can choose wherever you'd like to save this recording. The recordings are generally smaller in size. Just save it to the easiest place you'll have access to.

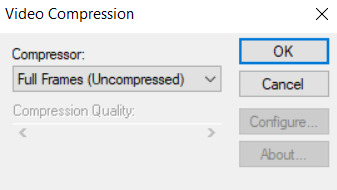
You'll also get a popup about Video Compression. By default, it will be the full frames, uncompressed. Go ahead and hit 'OK.'
NOTE that your recording will technically not 'start' until you play the emulator again, which makes it great for cutting down on editing later on. I'll go ahead and hit play and record what I'd like.
Once you're satisfied, PAUSE the emulator again. Go to File > Stop AVI.

That's it on that end! Let's head to your image editor and let it work its magic.
Once again, I am using Adobe Photoshop 2020, and will be following the setup there.
You'll want to go to File > Import > Video Frames to Layers...
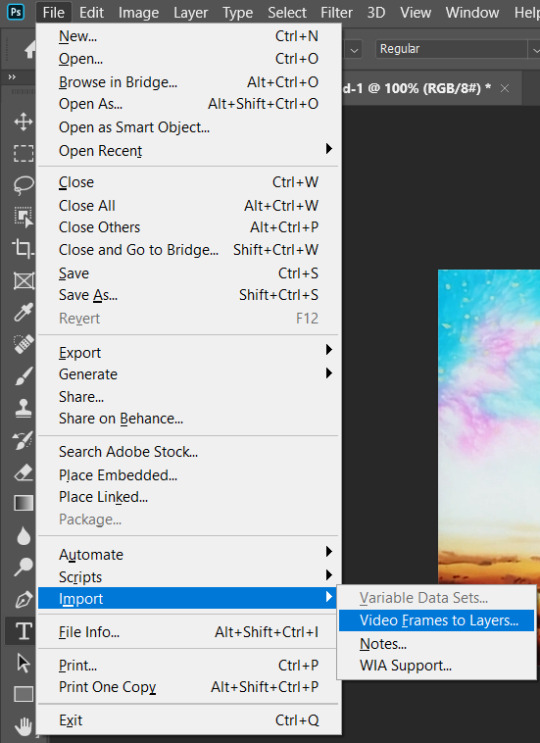
Navigate to where your AVI recording is, then click to open it.
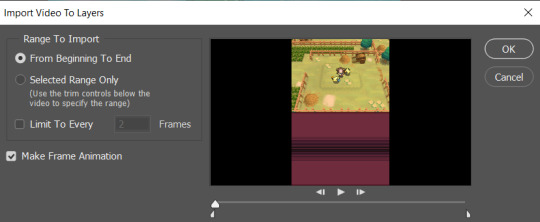
You'll now get this pop-up window. This is where you can mess around with the settings and how you'd like your gif to look/run. Since we recorded just the bit of the game we'd like to gif, we can go ahead and select From Beginning to End. This will make a gif of the entire video. You CAN do Selected Range Only if you want to tinker with it, but we can also edit the gif later on.
You may also Limit to Every ___ Frames. Once again, this is up to you and how you'd like your gif to look and run. If it's a shorter animation, I typically like to leave this unselected, and Photoshop will import every single frame from the video. This may take some time. If it's a longer gif, go ahead and mess around with the settings. As a tip, I do not personally recommend limiting it to more than two (2) frames. It may end up looking very choppy and not running as smoothly.
Lastly, make sure you already have Make Frame Animation selected. Then hit 'OK!'
So now Photoshop has worked its magic! Technically, you can actually go ahead and export and save the gif from here, and it'll be fine. If that's the case, go ahead and skip 'till the end!
However, if you're not satisfied...
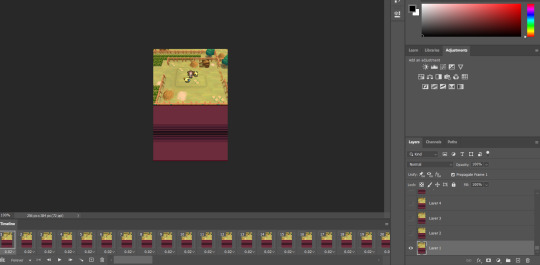
Let's go ahead and mess around with this image. Mostly what I do when I make these kinds of gifs is cropping and resizing, cutting out frames that I don't need, and coloring.
Cropping. Let's go ahead and select the Crop tool to edit our image to how we'd like it to appear. For example, I don't want the bottom screen of the DS to be in this gif, so I'm going to edit it down to just the top screen.

The Crop tool will work differently depending on your image editor. Don't be scared to mess around with it and find something you'd like!

I'm going to go ahead and crop the image to this, so just the top screen is the image.

Yay, it’s all cropped!
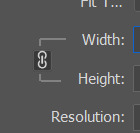
Resizing. Actually a very simple step, and not at all necessary, but I personally like it! Let’s go ahead and resize this image so it’s larger. Go ahead and go to Image > Image Size.


I went ahead and resized to 540px width. It should automatically adjust the height as well. If it does NOT, please make sure that Constrain Proportions is selected. In Adobe Photoshop 2020, you’ll be clicking on the little link icon to the left of Width/Height as seen below:
I personally think it’s also important to properly Resample your image. To get a crisp, clear image, much like how the original DS games look when properly enlarged, go ahead and select Nearest Neighbor (hard edges) from the drop down menu.
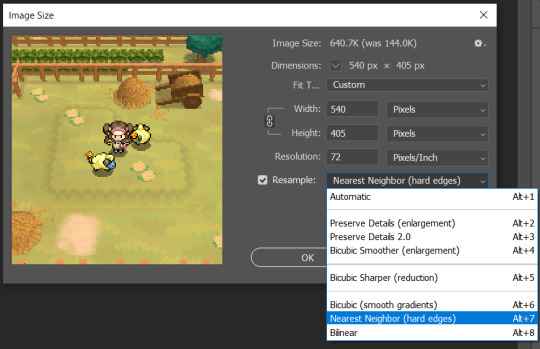
Go ahead and hit ‘OK.’ And now it’s nicely sized and looking crisp!
Editing. This is all depending on YOU! I’m going to keep it simple for tutorial’s sake. What I’m going to do is go through the frames of the gif down here--

--and make sure it all loops correctly and seamlessly! Delete layers by using the handy Trash button down at the bottom:
You can also select multiple layers by holding Shift and clicking on what you’d like to delete.
You may also change the timing of the gif. You can do this on an individual frame basis, or just change every frame at once. I won’t be doing it for this gif as I like the speed it plays at just fine, but for reference:

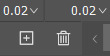
The button that I clicked on is the three lines right above Frame #20. Hit Select All Frames, then click on ANY frame’s timing here:

(It’s the arrow pointing DOWN next to the 0.02)
You most likely want to hit ‘Other...’ and set your own delay. The longer it is, the longer the frame will stay on the screen for (if that makes sense).
This part is a bit difficult to explain over text, so hopefully I’ve made it clear!
Coloring. Absolutely NOT necessary--Pokemon games look amazing in their original colors, after all! But if you’d like a bit of added flair, you can always add a fun coloring PSD, mess with the Hues and Saturation, etc.
For this tutorial, we are actually going to SKIP the coloring step. If you’d like to see a more in-depth tutorial about it though, please let me know!
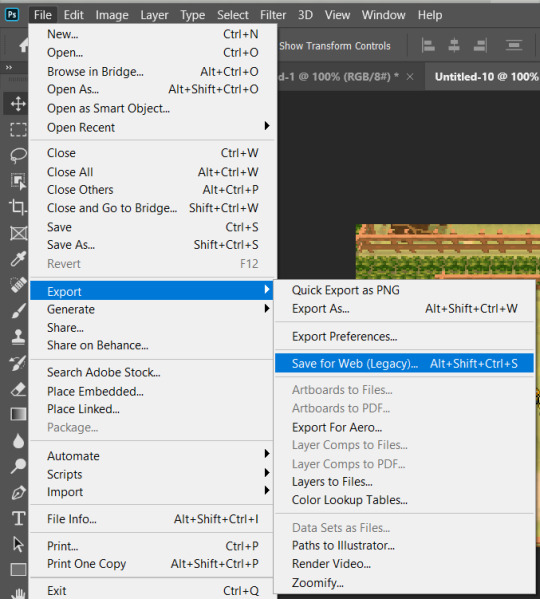
Assuming you’ve edited it down to what you’d like, we can now export and save the gif. Unfortunately, saving a gif isn’t very much like saving a still image at all. We’re going to head to File > Export > Save For Web (Legacy).
Next is the tricky part. You will get a pop-up that will look similar to this:

Typically, Pokemon gifs won’t have too many colors, so there shouldn’t be a whole lot of “bad”-looking parts! However, you can mess with the settings to the right in case there is something that you’re not satisfied with. Basically, you can only have so many colors in a gif--256 colors, I believe. (Please correct me on this if I’m wrong!) Because of this, your gif may not look like intended if there’s too many colors. I’m definitely no expert on the science of this, but I notice with brighter and more saturated colors, my gifs can look grainy and not what I want them to look like at all.

These are the settings you want to mess around with. For Pokemon game gifs, I do recommend trying to set the Dither % all the way down--I’ve noticed it helps in some situations. Again, I’m not an expert, nor will I pretend to be, but just try to mess around and see what you can come up with if you’re having any issues!
If everything looks good, there’s one more step before saving. Just double-check that your Looping Options are on ‘Forever’ instead of ‘Once.’ In the bottom right corner, you can change this.

And that’s it! Hit ‘Save’ and name your gif!
That’s really all there is to it, quite honestly! I’m sure there’s more in-depth steps, but this is the simplest way that I can find. If you have any questions, please feel free to ask! My ask box is always open, and I love talking about stuff like this! Have a great day, and happy gif making!
#gif tutorial#pokegraphic#hi i hope this helped some ppl ;w; i am planning on making some more tutorials!!!#if you would like a video for this please let me know! i just have a terrible voice lol#resources
9 notes
·
View notes
Text
Xara Photo & Graphic Designer Full version

Xara Photo & Graphic Designer is the perfect software choice for all your photo and graphic design work, with powerful photo editing and enhancement features, and truly flexible illustration and design tools.
It allows you to make amazing things with photos, includes really intuitive vector drawing tools and advanced text handling, all in one seamlessly integrated environment.
Xara Photo & Graphic Designer photo handling beats other graphics programs on many fronts. It’s much, much faster, produces smaller files and it’s non-destructive. It makes the perfect photo composition tool.
Xara Photo & Graphic Designer 16 is also unique in the way it handles and stores photos, which means that files containing photos can be anywhere from 3 to 100 times smaller than with other programs.
Features of Xara Photo & Graphic Designer 16
Revolutionary Photo Handling
Photo & Graphic Designer’s photo handling beats other graphics programs on many fronts.
Fast, non-destructive photo handling
Photo & Graphic Designer 16 photo handling beats other graphics programs on many fronts. It’s much, much faster, produces smaller files and it’s non-destructive. It makes the perfect photo composition tool.
Photo & Graphic Designer offers completely non-destructive photo editing (which means you can edit your photo as many times as you like without the loss of quality that is normal in other photo programs), and it uses a fraction of the RAM required by other products. It can handle multiple very high resolution images with ease, even on a modest PC.
Photo & Graphic Designer 16 is also unique in the way it handles and stores photos, which means that files containing photos can be anywhere from 3 to 100 times smaller than with other programs.
Integrated Photo Tool
Photo & Graphic Designer 16 includes a revolutionary integrated, ultra-fast, non-destructive photo editing tool. It offers both automatic real-time photo enhance and manual controls (brightness, contrast, sharpen, blur, saturation, temperature and a new cross process option) plus real-time scaling and rotation even on very high res images. Other features include flexible cropping, red eye removal, advanced shadow & highlights and brightness levels controls, perspective correction.
Combine this with features such as vector masking, layer blending, feathering – all in the non-destructive, memory efficient way – and you have something that no other photo tool can provide.
Advanced Photo Manipulation
The powerful photo tools can produce almost miraculous changes and improvements to your photos!
The Photo Healing and Magic Erase tools makes it quick and easy to seamlessly erase unwanted objects from your photo completely, so you’ll never know they were there! See some examples
Xara Photo & Graphic Designer includes a new Magnetic Lasso for quick and easy cutting out of any object in your photo. Or for images with challenging outlines (eg a person’s hair) there’s the Background Erase tool. See some Background Erase examples
The Color Enhance control is another powerful tool for photo manipulation. It’s incredibly quick and easy to perform any enhance operation – such as a change of brightness, contrast or color – based on a selected color in your image. See some Color Select & Enhance examples
Creative Effects
Photo & Graphic Designer includes a selection of 60+ creative ‘Live Effect’ plug-ins that can transform both photos and vector drawings (they are called Live Effects because the object remains editable even after applying the effect). Effects include oil painting, pencil and crayon drawing, crumple, fish-eye, waves, ‘liquid paint’ for creating caricatures and many, many more.
Most modern Adobe Photoshop® plug-ins work as Live Effects, giving access to a huge range of free and commercial plug-ins for creating effects that would take a lifetime to explore.
The Content Catalog also includes almost 30 ready-made photo filter pre-sets that you can simply drop on your photo to create popular effects and moods such as ‘summer’, ‘vintage’ and ‘exposed’. See some examples.
In addition there’s an Effect Painter and flexible mask and region tools that enable you to enhance or apply effects to selected areas of a photo.
Photo Panoramas
Perhaps the easiest to use panorama maker. Drop a series of photos on the page, click one button and you’ll get a perfect, seamless joined panoramic image.
See Panorama examples
Intelligent Scaling
The Photo Tool includes innovative intelligent image scaling technology that allows ‘content aware scaling’, which means images can be stretched or squashed while retaining the proportions of important parts of the picture.
This can provide a near miraculous ability to stretch and change the aspect ratio of photos, without apparently distorting the content of the photo.
And there is also ‘content aware zooming’, which works in a similar way but allows you to resize the object that is the center of interest without increasing the size of the total image.
Bitmap Tracer
Photo & Graphic Designer’s powerful bitmap tracer can convert your bitmaps – typically photos, line-art or logos – into editable vector shapes.
All The Creative Tools You Need
Photo & Graphic Designer 16 offers all the tools that a creative designer could need for illustration and text handling.
Drawing Tools
Photo & Graphic Designer is the primary tool of many illustrators and includes a set of powerful but really easy to use vector line and shape drawing and editing tools.
The Quickshape tools (rectangle, circle etc) allow you to draw pre-set shapes very quickly and easily. Editing shapes and lines is easy and the Freehand line drawing tool even offers a slider for retroactive smoothing after you’ve drawn your line. And there’s support for pressure sensitive tablets too.
The powerful Shape Eraser and Shaper Builder tools allow you to easily erase or build on your image with a ‘paintbrush’ type action, whether it’s a vector drawing or a photo.
Advanced Text Handling
Photo & Graphic Designer offers everything you need for adding creative text to your designs.
The Text Tool allows you to enter as many lines of text as you want, at any place in your document and at any angle, and you can also set your text along a curved path. Additionally, just like any drawn object in Photo & Graphic Designer, you can freely resize it on the page, and apply any of the effects, such as transparency, fills, molds and so on – and yet the text remains editable.
Like any word processing program you have full control over the text styles, including font (with 600+ integrated Google fonts, and 1500+ Font Awesome / Google Material Design icons & symbols), color, justification, line spacing and kerning etc.
3D Extrude
The world’s fastest, slickest, and highest quality vector 3D extrude tool.
Take any shape, and just drag on the face to create a beautifully lit and shaded 3D version. Drag on the sides to extend the extrude depth. It couldn’t be easier
Download for Windows
1 note
·
View note
Text
Who is Talking About Video Converter Mp4 and Why You Need to Be Worried
Who is Talking About Video Converter Mp4 and Why You Need to Be Worried Usually, you will receive larger file size with a greater quality level. Clip and edit to maximize the output video You can trim the duration of any videos to acquire the video or audio clips you desire. When you have the frame you may add in a number of effects and features. In addition, there's a little window on the program's interface where it's possible to track CPU usage, in order for your system isn't under an excessive amount of pressure whilst converting videos. All you have to do is to click the add button and pick the files you would love to convert. Also it has other characteristics that will impress you! All you need to do is simply decide on a video, choose a format or a target device and you're all set! For example, if you desire to convert a video to AVI, then you must select on the convert to AVI link. An individual can convert because many videos as he wants. YouTube videos are offered in an array of quality levels. They are also available in a range of quality levels. Videos will show as thumbnails in the library so you may pick the one that you need without an issue. MP4 video is currently the most popular video format. In a couple of minutes, you are able to get your MP4 video on your PC. The MP3 Converter gives you the ability to get around the restrictions that online music publishers keep enforcing on the web. The converter supports numerous videos. Fortunately, quality video converters have existed for several decades, allowing users to convert their precious video footage into several desirable formats. All Video converter is the very best converter application from 1 form to other distinctive forms. ImTOO MP4 Video Converter is extremely simple to use. ImTOO MP4 Video Converter also includes an integrated video player for a fast video review, and permits you to take snapshots of selected video frames. ImTOO MP4 Video Converter is a powerful software tool that permits you to convert most frequent multimedia formats to MP4 utilizing pre-defined and thoroughly configurable profiles. It's possible to just import your file, select output format and after that begin to convert. In addition to that, if you're not certain which format your file should be in to work on a particular device, you can simply select the device from the list rather than a particular format. The source file may also be audio format. Converting in batches, convert several files at once. The MP4 format is a significant approach to offer top quality videos together with compression that gives great file size. The container format may also contain synchronization info, subtitles, and metadata like title etc.. It is possible to also utilize two-pass video encoding and a particular in-built bitrates calculator tool to create videos of particular file sizes. What You Must Know About Video Converter Mp4 You are able to alter the effect by altering the parameters, and you may additionally utilize sab, smartblur and unsharp. So if you're unhappy with the video output effect, you can correct it according to the previewing effect. If you'd like to have the very best playback effect on your mobile phone, you must see that the Video Size exactly matches the physical resolution of your mobile phone. After you are pleased with the results that you will have the ability to export your content. With Kigo Video Converter, all of the conversion processes are extremely simple and quick. Therefore, picking the offline MP4 to DivX converter freeware has grown an urgent undertaking. There's a problem that we must solve, most video or movies format isn't compatible with PSP. video converter mp4 Each device comprises a number of variables in proportion and resolution so that you're able to pick the one which most suits your gadget. The software's interface also has lots of gadget icons, permitting you to quickly locate the suitable file format for devices like the PSP, iPhone, and assorted Android offerings. Its interface also appears simple and basic it is somewhat outdated. It's completely free, user friendly and it has a very simple user interface. Simple and a simple app designed specially for all types of user to give him the chance to pick any video from the neighborhood gallery of the telephone and with a couple clicks you get the video converted to the mp4 format or some other format. Video Converter Mp4 for Dummies You'll be startled with its built-in top video reducer. In summary, using Wondershare Filmora9 to extract frames from video is not merely very straightforward, it also provides an incredible set of chances. A variety of output profiles offer lots of predefined alternatives, and you may further customize the consequent file if you prefer there are options for selecting the resolution, altering the aspect ratio, and altering the bit rate, amongst others. Naturally, each profile can be readily modified, with a preview screen to supply a glimpse of your upcoming clip. It's possible to choose from numerous target profiles. Once done with the upload and conversion, you are going to be supplied a link where you could download the converted file. Maybe it isn't the frequent approach to convert URL to MP4, it makes it possible to record any on-line video when you're watching it.
1 note
·
View note
Text
Ablebits Data In Excel For Mac
Ablebits Ultimate Suite for Excel Business Edition 2021.3.2838.1999 25 Mb. Comprehensive set of time-saving tools. With this collection of 40+ professional tools, you can accomplish any task impeccably without errors or delays. It's 15 years of experience with Office development embodied in the perfect code of solutions that work flawlessly.
When using Excel, managing data is simple when you know what to do. It becomes even simpler because of add-ins such as Ablebits Excel Add-in. With this add-in you can easily merge worksheets in Excel. Expand Excel’s Functionality with Ablebits. Ablebits Excel is a very useful add-in that can help you merge two worksheets.
Click on the range selection button Select Range Excel Button to browse for the location of the sparklines, press Enter and click OK. Make sure you select a location that is proportional to the data source. For example, if the data source range contains 6 rows then the location of the sparkline must contain 6 rows.
Ablebits Data In Excel For Mac Os
How To Add Ablebits Data Tab In Excel 2019
Add characters, remove strings, split cells, extract text, trim spaces, convert symbols, change case, count chars and swap text — the tool lets you do all this quickly and accurately. Feel free to use in Excel for Mac as well as in Excel for Windows and Excel on the web. Get it for free Discover 35+ handy options for your Excel text. AbleBits.com Extract Data for Microsoft Excel (free. Excel Details: Description. Our software library provides a free download of AbleBits.com Extract Data for Microsoft Excel 2.2.4. The program lies within Office Tools, more precisely Document management. Our built-in antivirus checked this download and rated it as virus free.
Users of UW-Madison's institutional Tableau workbooks may need to pull data from one Microsoft Excel spreadsheet into another spreadsheet. This KB article explains how, by using an Excel formula called vLookup.
How does the vLookup formula work?
Excel's vLookup formula pulls data from one spreadsheet into another by matching on a unique identifier located in both spreadsheets. For example, we want to add a column for email address but that data exists on a separate spreadsheet. vLookup can pull email addresses from Spreadsheet 2 into Spreadsheet 1 by matching CampusID 555123123 in both spreadsheets.
Locate where you want the data to go. Click that cell only once.
At the top, go to the Formulas tab and click Lookup & Reference.
Select vLookup
Excel’s vLookup wizard will pop up. We’ll walk through each part of the formula.
Lookup_value
Find the Unique Identifier (lookup value). It is usually in the same row as the empty cell you selected.
Click once on the Unique Identifier so that the cell position will automatically fill in. In this example it is cell B2.
Go to the next field, Table_array (click in it once). In Spreadsheet 2 highlight the table containing the info you want, starting with the Unique ID.
In this example, Excel looks up Campus ID 555123123 in the first highlighted column of Spreadsheet 2.
Note: Make sure each Unique ID is listed only once in the table_array (on the second spreadsheet) so that vLookup retrieves the correct value. For example, if 555123123 is duplicated in the table_array, where Student [email protected] is the email in one row and Student [email protected] in the other, Excel will choose one of the emails for you.
Go to Col_index_num (click in it once). This identifies which column contains the information you want from Spreadsheet 2.
Type the number of columns your field is from the Unique ID, where the Unique ID is 1. Here, the Email field is the third column.
Go to Range_lookup (click in it once). Type FALSE to search for exact matches. The result will look something like this:
Finally, copy and paste the formula to pull emails for the rest of the column.
(Note: if your table array is in the same Excel workbook, put $ signs around the cell values, similar to the example below. This ensures that you reference the correct cells in the table array, meaning that the table array does not shift down when you paste the formula down. See Advanced Tip below for more details.)
vLookup Shortcut
If you feel comfortable with the vLookup tool instructions above, you can type the formula directly in the cell instead of using the wizard.
Type the beginning of the formula: =VLOOKUP(
The formula guide will appear below.
(Note: You may notice Excel displays the formula in 2 places: the formula bar above and directly in the cell. You can edit the formula in either place.)
Follow the guide and enter each value. Remember to insert a comma between each value.
Insert a closed parenthesis ) and hit Enter. The end result will look like something like this:
=VLOOKUP(B2,'(Spreadsheet Name.xlsx)SheetName'!$B$1:$E$11,3,FALSE)
Finally, copy and paste the formula to pull emails for the rest of the column. Keep relative references in mind and use $ signs where necessary. (See Advanced Tip below for more details.)
Advanced Tip on Relative References
The position of the lookup value (Unique ID) in relation to the vLookup formula is maintained when you copy and paste. If you paste the formula one cell down (to E3), it looks up the Unique ID that is also one cell down (B3). The same is true when copying right, left or up.
In other words, the formula will stay x number of columns and y number of rows away from the lookup value – no matter where you paste the formula. In our example, the formula is the fourth column from the CampusID and in the same row. No matter where you paste the formula (in this example), it will always look up the cell that is the fourth cell to the left in the same row.

However, it is possible to lock cells in place by inserting 1 or more $ signs. This means, no matter where you paste the formula, it will always reference the same cell.When copying and pasting the formula, use the $ sign to lock in cells.
To lock in the lookup value in cell B1, insert $ signs before the column and the row:
=VLOOKUP($B$1,’(Spreadsheet2.xlsx)SheetName’!$B$1:$E:$11,3,FALSE)
To lock in the column only, insert a $ before B only.
To lock in the row only, insert a $ before 1 only.
Need More Information or Help?
If you have questions about this Tableau document, please contact Melissa Chan, Office of Data Management and Analytics Services (ODMAS) at [email protected].
Keywords:Tableau Workbook Dashboard Excel 2 Two Combine Pull Data IDESuggest keywordsDoc ID:90851Owner:Steven T.Group:Office of Data Management & Analytics Services KBCreated:2019-04-04 11:15 CDTUpdated:2020-06-20 04:08 CDTSites:Office of Data Management & Analytics Services KBFeedback:4011CommentSuggest a new document
In this article, we will explore how to merge cells as you need in Excel Office 365 with the help of ablebits.com. Here, we come up with simple steps to take this task. Let’s see them below!! Get an official version of MS Excel from the following link: https://www.microsoft.com/en-in/microsoft-365/excel
Jump To:

Things that can do with Merge Cells Option:
Merge Multiple Cells into One: You can easily merge multiple cells and place the result on the top left/right cell or the bottom left/right cell.
Keep the Values when merging cells: It will not delete the data when merging cells.
Merge Columns row by row: It will combine the columns and print the result on the left or right column.
Manage the Result: With the help of this option, you can easily remove the contents of the selected cells, wrap text.
Merge Rows Column by Column: Combine many rows and place the result in the top or bottom row.
Separate Merged Values: You can use a separator to separate the merged values in Excel. You can use a comma, semicolon, space, line break, or any character as you need.
Merge Columns into One:
To merge multiple columns into one, do as follows.
First, you need to select the input range as shown in the below image.

Go to the Ablebits Data Tab, click the Merge Cells option, then select the Merge Columns into One option from the menu.
Then, it will display the Merge Cells Dialog Box.
How to merge – Select the columns into one option.
Separate values with – You need to selectany separator from the drop-down list.
Place the results to – Select the left column option from the drop-down list.
Finally, click the Merge button to get the result.

You will see that the selected columns have been merged as shown in the below figure.
Steps to Merge Rows into One:
To join multiple rows into one in an Excel spreadsheet, follow the below instructions.
First, you need to select the input range as shown in the below image.
On the Ablebits Data Tab, click the Merge Cells option, then select the Merge Rows into One option from the menu.
Then, it will display the Merge Cells Dialog Box.
How to merge – Select the rows into one option.
Separate values with – You need to selectany separator from the drop-down list.
Place the results to – Select the top row option from the drop-down list.
Finally, click the Merge button to get the result.
You can see the merged row as shown in the below screenshot.
Merge Cells into One:
To combine multiple cells into one, do as follows.
First, you need to select the input range as shown in the below image.
Then, go to the Ablebits Data Tab, click the Merge Cells option, then select the Merge Cells into One option from the menu.
Then, it will display the Merge Cells Dialog Box.
How to merge – Select the cells into one option.
Separate values with – You need to selectany separator from the drop-down list.
Place the results to – Select the bottom-right cell option from the drop-down list.
Finally, click the Merge button to get the result.
At last, you can see the combined cell as shown in the below image.
Ablebits Data In Excel For Mac Os
Wrap-Up:
How To Add Ablebits Data Tab In Excel 2019
In this article, you can easily understand the steps to merge cells as you need in Excel Office 365 with ablebits. Kindly, leave your feedback in the comment section. Thanks for visiting Geek Excel. Keep Learning!
0 notes
Text
Free Photoshop Express Photo Editor Apk Download 2021

Free Photoshop Express Photo Editor Apk Download 2021PHOTO FUN FOR EVERYONE
Tap into your creativity on the go together with Photoshop Express–a amusing, speedy, and clean photo editor for one-contact transformations and picture edits–used by millions of creative people. Make pro-looking pics with an smooth-to-use digital studio in your cell tool.
Photoshop Express can provide a full spectrum of tools and consequences at your fingertips. Personalize your experiences with sticker makers, beautify colour gradients and imagery, create p.C collages, generate memes, make short fixes and heighten your proportion-worthy moments.
PERSPECTIVE CORRECTION
Instantly fix crooked pix and correct distorted digital camera angles.
REMOVE NOISE
Smooth graininess, lessen color noise, and sharpen details to make your pix look their great.
APPLY BLUR
Use radial blur to combination out backgrounds and shift consciousness to particular subjects or full blur to create motion.
PERSONALIZE WITH STYLE
Customize photos with the sticker maker, create memes and captions, style your textual content with a big range of fonts and layouts, upload borders and frames, and stamp creations with custom watermarks.
CHOOSE FROM HUNDREDS OF LOOKS, EFFECTS AND FILTERS FOR PICTURES
Dehaze pictures to get rid of fog in a scene, practice dramatic filters for pics, and without difficulty slide to modify shade temperature, vibrance and different shade outcomes.
ASSEMBLE STUNNING PIC COLLAGES
Create professional-nice compilations with the aid of adding ready-to-use photograph grid layouts and enhancing borders and hues.Photoshop Express Photo Editor Apk Download 2021
QUICK FIXES
Automatically adjust contrast, publicity and more with one-touch changes; easily crop, straighten, rotate for beautiful layouts, and magically cast off red-eye and pet-eye from your favorite moments.
QUALITY PHOTO IMPORT AND SHARING
Upload pics from a couple of assets and formats (including raw and TIFF), posting your favorites immediately to Facebook, Instagram, Twitter, Flickr and other social platforms or percentage them in e-mail, WhatsApp, Facebook Messenger, Telegram, Signal, and Line to inspire others.
Make image magic take place with the Photoshop Express picture editor from Adobe - proud makers of the Photoshop circle of relatives. Create fun, shareable memes, personalised % collages and stickers.
Adobe Terms of Use:
Your use of this software is ruled by the Adobe General Terms of Use http://www.Adobe.Com/pass/terms_en and the Adobe Privacy Policy http://www.Adobe.Com/pass/privacy_policy_en
Do not sell my statistics: https://www.Adobe.Com/privateness/ca-rights
Read the full article
#PhotoshopExpressPhotoEditorapk#PhotoshopExpressPhotoEditorapkdownload#PhotoshopExpressPhotoEditorapkfull#PhotoshopExpressPhotoEditorapkfulldownload#PhotoshopExpressPhotoEditorapkmod#PhotoshopExpressPhotoEditorapknew2021#PhotoshopExpressPhotoEditorpremiumapk
0 notes
Text
Basic Fashion Sketches

These schools often require students to have completed basic art and design courses before entering a program. Applicants usually must submit sketches and other examples of their artistic ability. Other Experience. Fashion designers often gain experience in the fashion industry through internships or by working as an assistant designer. Hi everyone,This tutorial video is about how to draw a fashion figure for beginners(10 head fashion croquis) step by step. This is the basic fashion sketches. You’ll learn how to sketch a basic fashion runway figure and utilize various marker techniques to render multiple patterns like florals, gingham and leopard + textures like shine, denim, and fur. We’ll go over how to illustrate fashion details like faces, hair and difficult-to-draw hands and feet. First episode of the series to learn how to draw fashion. Follow my channel to be notified when further videos are posted!Today’s tips: 1.
Of all the questions and advice seeking that I receive from new and emerging fashion brands, the topic that is most often addressed is production. From “How do I work with a manufacturer?” to “My samples are horrible! What went wrong?!”, the trials and tribulations are aplenty.
This is because production is one of the most challenging parts of launching a fashion brand. Finding the right factory for your collection and then communicating properly with the people who are making your clothing is not something you can just wing. Planning and preparation are really important.
So when a designer asks me about where to even start in the whole manufacturing process, I always say two things:
Go through your pre-production checklist.
Create a tech pack.
Once you know you’re ready to work with a factory, have researched which factories makes sense for your brand, and have started to have a dialogue, Oone thing you need to have ready to present to your factory is your tech pack.
Capture One 20 on my Late 2018 mac Mini with internal SSD is horribly slow. It took over an hour to import and generate previews for about 7000 medium sized JPG files. And I noticed that during all that, it was using about 30% of one of the 6 CPU physical cores, 10% to 20% of the other 5 physical cores, and 0% of the six hyperthreaded cores. Capture one 20 slow start.
Tech packs are those things we’re all pretty sure we need to give to our factories but aren’t quite sure what they entail.
You don’t want to wing it with this one. The wrong info in your tech pack could mean the wrong finished sample. That means that tech packs are an incredibly important fashion business tool when you’re communicating your designs and specifications to your sample maker and factory.
The more detail you can give them, the less room for mistakes. The clearer you make your requests, the less likely there will be misinterpretations. The more you have in writing, the less likely you’ll be financially responsible for fixes.
Cover Page
The Cover Page houses the basic front and back view of the style. These sketches should have a white or transparent fill, and not contain color or print. The sketches can be computer generated, hand drawn, or photographs. An important concept to be mindful of is to make sure that the image is proportional and clean, meaning they should not be stylized.
Inspiration Page
The Inspiration Page houses any image(s) which helped create the original style. If the factory is to be the source of the pattern, the image(s) may help the factory create the pattern and reach the designer’s desired aesthetic. Inspiration images may contain whole garments or detail pictures, such as close up photos of a pocket or collar. An explanation of why the inspiration image is important may also be needed so the correct aspect of the image is conveyed in the style.
Callouts Page
The Callouts Page is used to articulate the type of construction and design details that should be used when constructing the garment. Be sure to use arrows to clearly mark what type of construction is to be used where. Also be sure that the factory understands any special phrases or acronyms that may be used to abbreviate words.
Print-Fabric Placement Page
The Print-Fabric Placement Page is used to indicate where you would like print and/or fabric. The front and back sketch of the style is colored in relation to a color key at the bottom of the page. This color key makes it very easy to distinguish the desired placement for each type of fabric. Prints could also be used to convey the placement of fabrics; such as one fabric being dots,
and one fabric being stripes. Just make sure to clearly label the key.
Colorway Page
The Colorway Page identifies the colors which are to be used in the design. The current tab format includes several areas to input color information, and grids can be easily copied and pasted to create more information areas. Each color area contains sections for the color name, color number, and color swatch. The color number may be the pantone color number or an original
number. If any other information is needed, simply edit the format so there are more columns in each information area.
This page may also hold print colorways if the design is not going to be one solid color. A true to size print out with color key may also/or instead be needed to identify each color in the print.
Bill of Materials Page
The Bill of Materials Page; also known as the BOM, is comprised of all materials used in constructing the garment. There are five main sections contained in this tab, which are as follows: Fabrics, Trims, Labels, and Packaging.
In each section there are five types of information that can be identified. This information includes Placment (where the material will be used or in what position it will be sewn into the garment), Comments (any extra means that are necessary to understanding the use of the material), Material (the fiber content, identification number, or substance the material is made of), Supplier (the provider of the goods), Color Number ( the item color to be used).
Fold Page
First of all I would like to say I am happy user of Deezer, nice interface and alot of songs available, currently making several playlist. But i have several problems regarding Deezer with communicating to the Samsung Multiroom app, the last update of Samsung Multiroom was around 4 weeks ago and since then it goes from bad to worse. Samsung multiroom for windows 10. Hi, I can't login to deezer via Samsung multiroom. It keeps advising the ID or password is wrong. I've re-entered multiple times, even changed the password a couple of times, logged in and out of deezer directly using the same credentials (to prove it is correct). Have reset the multiroom. I've been told by Tech Support today (I had to contact them as they don't call me) that Deezer is no longer supported via the Multiroom App. This appears to be Samsung's solution to mine and other users problems with accessing Deezer via the App. They haven't chosen to tell any of us and Deezer still appears within the choice of Apps.
The Fold Page expresses how the garment should be folded and packed. This pack will then be shipped to the desired destination. This page should contain a series of sketches showing the step by step process of folding and packing a shirt. Each sketch has a description for easy directional reference. If sketches cannot be created, a series of step by step photos with explanations would be an acceptable alternative. A description without any supporting images can also be used, however the explanations need to be very clear and easy to follow.
Label Placement Page
The Label Placement Page explains the type of label that is to be used in the product, and where it should be placed. Remember, the material the labels are made of can be found in the BOM.
Proto Specs Page
The Proto Specs Page indicates the measurements to which the pattern and first fit sample should be developed to. The chart contains five columns of information.
The Point of Measure (POM) indicates how each part of the style needs to be measured to ensure the garment or handbag is the correct size and fits correctly.
The Description expresses how and what needs to be measured in correlation to the POM code. It should be specific enough to relay what and how the point should be measured. The acronym for ‘high point of shoulder’ (HPS) will be seen often. Most vertical measurements will be measured from HPS, and should be indicated in the description.
The Requested indicates the actual measurements that the garment or handbag should be developed from. If there is uncertainty of what a measurement should be, the column may be left blank and a note made for the factory to help determine the necessary measurement. The spec can then be measured and filled in at the first fit.
The Tolerance (+/-) indicates the most a measurement is allowed to be over or under the requested measurement. This number is very important during production, so that the specs of the product are in the approved range of measurements.
The Comments is for adding important notes.
1st Fit Specs Page
The 1st Fit Specs Page holds all spec information about the first fit sample of development. It includes all five columns of information in the proto specs an adds these additional columns:
The Actual column is the area in which the measurements of the fit sample are inputted to help visually compare them to what specs were requested.
The Revised column is the area to input the measurements that the next sample or production should meet.
2nd Fit Specs
The 2nd Fit Specs Page is identical to the 1st fit specs page, except in this page the Requested column is pulled.
1st Fit Comments Page
The 1st Fit Comments Page includes all corrections that need to be made to the 1st fit sample. The fit and construction of the product should be reviewed and commented on. All tabs that took part in the development and creation of the first fit sample should be reviewed as well, to make sure all aspects of the product were followed correctly.
2nd Fit Comments Page
The 2nd Fit Comments Page is exactly the same as the 1st Fit Comments page, noting any errors in fit and construction.
Graded Specs Page
The Graded Specs Page holds the measurements for all sizes that will be put through production.
There’s a lot that goes into an effective Tech Pack. We’ve created a clear, detailed template to make things easy for you. Plug in your info, save, and print. Get it now!
Fashion designers create original clothing, accessories, and footwear. They sketch designs, select fabrics and patterns, and give instructions on how to make the products they design.
Duties
Fashion designers typically do the following:
Study fashion trends and anticipate designs that will appeal to consumers
Decide on a theme for a collection
Use computer-aided design (CAD) programs to create designs
Visit manufacturers or trade shows to get samples of fabric
Select fabrics, embellishments, colors, or a style for each garment or accessory
Work with other designers or team members to create prototype designs
Present design ideas to creative directors or showcase their ideas in fashion or trade shows
Market designs to clothing retailers or to consumers
Oversee the final production of their designs
Larger apparel companies typically employ a team of designers headed by a creative director. Some fashion designers specialize in clothing, footwear, or accessory design; others create designs in all three fashion categories.
For some fashion designers, the first step in creating a new design is researching current fashion and making predictions about future trends, such as by reading reports published by fashion industry trade groups. Other fashion designers create collections using a variety of inspirations, including art media, their surroundings, or cultures they have experienced and places they have visited.
Fashion Design Sketches
After they have an initial idea, fashion designers try out various fabrics and produce a prototype, often with less expensive material than will be used in the final product. They work with models to see how the design will look and adjust the designs as needed.
Although most designers first sketch their designs by hand, many now also sketch their ideas digitally with computer-aided design (CAD) programs. CAD allows designers to see their work on virtual models. They can try different colors, designs, and shapes while making adjustments more easily than they can when working with real fabric on real people.
How To Draw Basic Fashion Sketches
Designers produce samples with the actual materials that will be used in manufacturing. Samples that get good responses from fashion editors or trade and fashion shows are then manufactured and sold to consumers.
Basic Fashion Drawings
The design process may vary by specialty, but it generally takes 6 months, from initial design concept to final production, to release either the spring or fall collection. In addition to releasing designs during the spring and fall, some companies release new designs every month.
The Internet and e-commerce allow fashion designers to offer their products outside of traditional brick-and-mortar stores. These designers ship directly to the consumer, without having to invest in a physical shop to showcase their product lines of collections.
The following are examples of types of fashion designers:
Accessory designers design and produce items such as handbags, suitcases, belts, scarves, hats, hosiery, and eyewear.
Costume designers design costumes for the performing arts and for motion picture and television productions. They research the styles worn during the period in which the performance is set, or they work with directors to select and create appropriate attire. They also must stay within the production’s costume budget.
Fashion Sketches Art
Clothing designers create and help produce men’s, women’s, and children’s apparel, including casual wear, suits, sportswear, evening wear, outerwear, maternity clothing, and intimate apparel.
Basic Fashion Sketch Design Model Stick
Footwear designers create and help produce different styles of shoes and boots. As new materials, such as lightweight synthetic materials used in shoe soles, become available, footwear designers produce new designs that combine comfort, form, and function.
0 notes
Text
Easy to use photo editing software to enhance pictures or print single photo
The definition of image editing and enhancing is the process of reshaping a photograph, just simply put. Still, that is simplifying a subject which is very problematic.
You can usually implement straightforward picture editing and enhancing strategies just like edit pics fairly quickly and rapidly but intricate techniques as well as digital editing and enhancing may call for photo editing software and also even more skill.
Photo editing software is a gadget that you able to use to control and boost photos. Because photos have a raising number of uses, numerous companies are discovering methods to reutilize pictures and also make use of them on a few different networks. Photo editing software has actually become really complex and impressive and it is usually possible to manipulate pictures so they come to be absolutely various out of the original. There actually are definitely loads of photo editing software and wide varieties of solutions of achieving the same or very similar end results. My objective most for the majority of photos I post procedure is definitely to produce them seem as all-natural as you possibly can. I know this is an optimal position to start, also when you want to go on as well as create more surreal seeming photos.
Hue array inside an image is one of the most important issues. Your eyes have the ability to normally see a more comprehensive range of coloration than the camera can record.
Photo editing software for Computer
When I was looking for a brilliant photo editing software, I finally stumbled over this very awesome one
Either the most misconstrued components of digital photography is what takes place once you made the shot in truth editing your photos. We are going to be cover some ideas for modifying your photos, from the essentials like automatic corrections or edit photos, with much more complex effects.
The crop technique allows you to alter the size of your picture, as well as also to transform the aspect proportion. For instance, you can chop a photo from a rectangular shape to a triangle shape. There are many reasons you would intend to cropping, consisting of for posting in various formats as well as facet relations. Contrasted to the original, I have chopped the image with photo editing software to get rid of the colored component of the right-hand side of the photo as well as recomposed using the guideline of one-third. That makes the lightning screw extra the focus of the shot. You might wonder why I did not simply compose effectively when making the picture. So in this instance, I was actually performing a lengthy exposure photo shooting without a tripod stand, so had the camera stabilized on the side of the jetty for security. That significantly restricted my ability to perfectly frame the minute, so I just photoshoot broader, knowing I had the ability to crop the photo shot appropriately as a result of the truth. In this both instances, chopping is really simple and also it is simply entails you choosing the cropping appliance and afterwards selecting the area you wish to keep with your touchpad. You apply the changes and your new chopped photo is ready.
In some cases there certainly will be a single thing inside a photograph that you truly do definitely not wish to be right there, like an annoying acne breakout on anyone's nose. That is very easy to remove in almost all the main photo editing software.
It is normally simple to erase any items directly out of an image however the photo editing software performs most ideal on unique, tiny things that are usually covered by even colorings. This is due to the fact that the heal tool has to replace the location you wish to erase with another thing, and this functions finest when it has an area nearby that looks comparable. So for instance, a bright point on a face is surrounded by a lot of in a similar way colored skin, so the recover tool can quickly compute what to replace the pimple based on the surrounding location.
This specific is probably for the photo editing software needs to switch the spot you want to take out with another thing, as well as that works finest if it gets a sector close by that looks much the same.
Edit a photo is easy with the awesome state-of-the-art photo editing software
Doing enormous images for a blog site to something and also that is technique. Draw attention to make 7 images every single week no matter when you are outside and also regarding or apartment sitting at the bed analysis. Photo editing software carries out have a few of the attributes is well-known for, which happens pretty hassle-free when you've decided you've like to attempt your hand on something even more high end than Batch processing as well as edit a photo. Photo editing software can easily likewise import screenshots from video clip, along with varied documents. And also when you are actually experiencing a little bit careless or even it is just plain oblivious concerning just how to take advantage of a few of the resources, an assistant may support you adjust the basics just like lighting fixtures, emphasis, color, as well as sharpening of images. For those that like their images in wide scale versions, the photo editing software assists you effortlessly created photos to create a scenic image.
As well as when it's time to reveal off your digital photography abilities, you may choose one of the image package concept templates to instantaneously print them in a certain measurement.
This photo editing software is most effectively for fired up learners along with an excellent deal of attend their workflow to body out the as well technological functions that would discourage very first chance picture modifying customers. It likewise happen prepared along with a three-sixty view program. Likely the glossiest treasure in the package would be actually the wonderful skin layer effect, which eliminates reddish spots and also evens out the skin. Whereas there's no mechanically color fix choice rather vital to solution the poor illuminating very most digital camera record, there are actually the fundamental functions of edit a photo.
Photo editing software
I was looking up the world wide web for a really easy to use photo editing software
From time to time when we take a picture, sections of the picture might wind up being darker than we desire. I describe the shady parts of the shot as darkness, and also the intense spots of the picture as high light. Variance is concerning highlighting the variation between the light and photo editing software also dark components of the photo. Increasing the contrast of a photo can dramatically enhance the aesthetic effect that has, by making the limits in between these light and dark sections clearer. Color or texture modification is one other significant component related to the photo editing software. We are able to change photograph shade in every type of ways, from transforming the total warmness of the image such as how red and green it looks, to independently transforming the hue as well as concentration of particular color schemes inside of a photograph. We simply just would like to cover some very straightforward color scheme variations anyone may use to create your pictures just a bit more visually impressive.
The most effective solution to change the coloring of a photograph is actually with the color tone gadget from the photo editing software. That changes the visual appeal related to every color scheme in a picture to make it basically saturated. As with numerous changes, the trick is actually to get an excellent equilibrium also much coloring the pictures have a tendency to look instead unusual. Color photography may be actually really reliable, as well as naturally bright white as well as dark is an outstanding choice for almost all kind of scenarios, in particular, portraits, and also particular panorama views.
One of my individual petty aggravations in taking photos is if the horizon line in a photo is not degree. Occasionally if we are taken up in the second, this standard policy is failed to remember yet fortunately is that enhancing your images with the photo editing software to make them grade is also very easily done. Balancing the electronic camera at the corner of the boat dock suggested that the photo was not degree this is especially obvious to the vision if the image has actually a clearly defined perspective line, such as the sea. This degree method belongs to the crop method, as well as you can easily just rotate the pic to fit. The grate will seem to allow you become the positioning correct while you use the photo editing software. Regularize a photo is an actually basic task in which will certainly get simply a few ticking, resulting in a much a lot more aesthetically charming pic.
0 notes
Last Seen Blogs