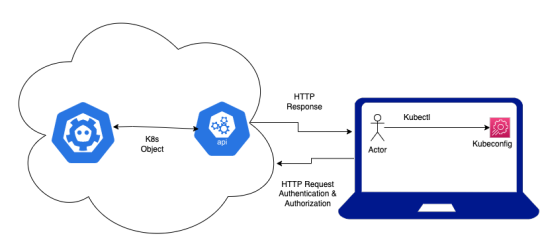
#apiserver
Explore tagged Tumblr posts
Visit Tumblr Blog
Explore Tumblr blogs with no restrictions, modern design and the best experience.
Last Seen Tumblr Blogs


Fun Fact
Tumblr’s website traffic is steadily declining.
Text
What Is a Kubernetes Cluster and How Does It Work?
As modern applications increasingly rely on containerized environments for scalability, efficiency, and reliability, Kubernetes has emerged as the gold standard for container orchestration. At the heart of this powerful platform lies the Kubernetes cluster—a dynamic and robust system that enables developers and DevOps teams to deploy, manage, and scale applications seamlessly.
In this blog post, we’ll explore what a Kubernetes cluster is, break down its core components, and explain how it works under the hood. Whether you're an engineer looking to deepen your understanding or a decision-maker evaluating Kubernetes for enterprise adoption, this guide will give you valuable insight into Kubernetes architecture and cluster management.
What Is a Kubernetes Cluster?
A Kubernetes cluster is a set of nodes—machines that run containerized applications—managed by Kubernetes. The cluster coordinates the deployment and operation of containers across these nodes, ensuring high availability, scalability, and fault tolerance.
At a high level, a Kubernetes cluster consists of:
Master Node (Control Plane): Manages the cluster.
Worker Nodes: Run the actual applications in containers.
Together, these components create a resilient system for managing modern microservices-based applications.
Key Components of a Kubernetes Cluster
Let’s break down the core components of a Kubernetes cluster to understand how they work together.
1. Control Plane (Master Node)
The control plane is responsible for the overall orchestration of containers across the cluster. It includes:
kube-apiserver: The front-end of the control plane. It handles REST operations and serves as the interface between users and the cluster.
etcd: A highly available, consistent key-value store that stores cluster data, including configuration and state.
kube-scheduler: Assigns pods to nodes based on resource availability and other constraints.
kube-controller-manager: Ensures that the desired state of the system matches the actual state.
These components work in concert to maintain the cluster’s health and ensure automated container orchestration.
2. Worker Nodes
Each worker node in a Kubernetes environment is responsible for running application workloads. The key components include:
kubelet: An agent that runs on every node and communicates with the control plane.
kube-proxy: Maintains network rules and handles Kubernetes networking for service discovery and load balancing.
Container Runtime (e.g., containerd, Docker): Executes containers on the node.
Worker nodes receive instructions from the control plane and carry out the deployment and lifecycle management of containers.
How Does a Kubernetes Cluster Work?
Here’s how a Kubernetes cluster operates in a simplified workflow:
User Deploys a Pod: You define a deployment or service using a YAML or JSON file and send it to the cluster using kubectl apply.
API Server Validates the Request: The kube-apiserver receives and validates the request, storing the desired state in etcd.
Scheduler Assigns Work: The kube-scheduler finds the best node to run the pod, considering resource requirements, taints, affinity rules, and more.
kubelet Executes the Pod: The kubelet on the selected node instructs the container runtime to start the pod.
Service Discovery & Load Balancing: kube-proxy ensures network traffic is properly routed to the new pod.
The self-healing capabilities of Kubernetes mean that if a pod crashes or a node fails, Kubernetes will reschedule the pod or replace the node automatically.
Why Use a Kubernetes Cluster?
Here are some compelling reasons to adopt Kubernetes clusters in production:
Scalability: Easily scale applications horizontally with auto-scaling.
Resilience: Built-in failover and recovery mechanisms.
Portability: Run your Kubernetes cluster across public clouds, on-premise, or hybrid environments.
Resource Optimization: Efficient use of hardware resources through scheduling and bin-packing.
Declarative Configuration: Use YAML or Helm charts for predictable, repeatable deployments.
Kubernetes Cluster in Enterprise Environments
In enterprise settings, Kubernetes cluster management is often enhanced with tools like:
Helm: For package management.
Prometheus & Grafana: For monitoring and observability.
Istio or Linkerd: For service mesh implementation.
Argo CD or Flux: For GitOps-based CI/CD.
As the backbone of cloud-native infrastructure, Kubernetes clusters empower teams to deploy faster, maintain uptime, and innovate with confidence.
Best Practices for Kubernetes Cluster Management
Use RBAC (Role-Based Access Control) for secure access.
Regularly back up etcd for disaster recovery.
Implement namespace isolation for multi-tenancy.
Monitor cluster health with metrics and alerts.
Keep clusters updated with security patches and Kubernetes upgrades.
Final Thoughts
A Kubernetes cluster is much more than a collection of nodes. It is a highly orchestrated environment that simplifies the complex task of deploying and managing containerized applications at scale. By understanding the inner workings of Kubernetes and adopting best practices for cluster management, organizations can accelerate their DevOps journey and unlock the full potential of cloud-native technology.
0 notes
Text
OpenShift vs Kubernetes: Key Differences Explained
Kubernetes has become the de facto standard for container orchestration, enabling organizations to manage and scale containerized applications efficiently. However, OpenShift, built on top of Kubernetes, offers additional features that streamline development and deployment. While they share core functionalities, they have distinct differences that impact their usability. In this blog, we explore the key differences between OpenShift and Kubernetes.
1. Core Overview
Kubernetes:
Kubernetes is an open-source container orchestration platform that automates the deployment, scaling, and operation of application containers. It provides the building blocks for containerized workloads but requires additional tools for complete enterprise-level functionality.
OpenShift:
OpenShift is a Kubernetes-based container platform developed by Red Hat. It provides additional features such as a built-in CI/CD pipeline, enhanced security, and developer-friendly tools to simplify Kubernetes management.
2. Installation & Setup
Kubernetes:
Requires manual installation and configuration.
Cluster setup involves configuring multiple components such as kube-apiserver, kube-controller-manager, kube-scheduler, and networking.
Offers flexibility but requires expertise to manage.
OpenShift:
Provides an easier installation process with automated scripts.
Includes a fully integrated web console for management.
Requires Red Hat OpenShift subscriptions for enterprise-grade support.
3. Security & Authentication
Kubernetes:
Security policies and authentication need to be manually configured.
Role-Based Access Control (RBAC) is available but requires additional setup.
OpenShift:
Comes with built-in security features.
Uses Security Context Constraints (SCCs) for enhanced security.
Integrated authentication mechanisms, including OAuth and LDAP support.
4. Networking
Kubernetes:
Uses third-party plugins (e.g., Calico, Flannel, Cilium) for networking.
Network policies must be configured separately.
OpenShift:
Uses Open vSwitch-based SDN by default.
Provides automatic service discovery and routing.
Built-in router and HAProxy-based load balancing.
5. Development & CI/CD Integration
Kubernetes:
Requires third-party tools for CI/CD (e.g., Jenkins, ArgoCD, Tekton).
Developers must integrate CI/CD pipelines manually.
OpenShift:
Comes with built-in CI/CD capabilities via OpenShift Pipelines.
Source-to-Image (S2I) feature allows developers to build images directly from source code.
Supports GitOps methodologies out of the box.
6. User Interface & Management
Kubernetes:
Managed through the command line (kubectl) or third-party UI tools (e.g., Lens, Rancher).
No built-in dashboard; requires separate installation.
OpenShift:
Includes a built-in web console for easier management.
Provides graphical interfaces for monitoring applications, logs, and metrics.
7. Enterprise Support & Cost
Kubernetes:
Open-source and free to use.
Requires skilled teams to manage and maintain infrastructure.
Support is available from third-party providers.
OpenShift:
Requires a Red Hat subscription for enterprise support.
Offers enterprise-grade stability, support, and compliance features.
Managed OpenShift offerings are available via cloud providers (AWS, Azure, GCP).
Conclusion
Both OpenShift and Kubernetes serve as powerful container orchestration platforms. Kubernetes is highly flexible and widely adopted, but it demands expertise for setup and management. OpenShift, on the other hand, simplifies the experience with built-in security, networking, and developer tools, making it a strong choice for enterprises looking for a robust, supported Kubernetes distribution.
Choosing between them depends on your organization's needs: if you seek flexibility and open-source freedom, Kubernetes is ideal; if you prefer an enterprise-ready solution with out-of-the-box tools, OpenShift is the way to go.
For more details click www.hawkstack.com
0 notes
Text
Configuring Kubernetes High Availability with Microk8s
Configuring Kubernetes High Availability with Microk8s @vexpert #vmwarecommunities #kuberneteshighavailability #kubernetesHA #hakubernetes #microk8s #loadbalancer #etcd #apiserver #virtualization #homelab #homeserver
If you are looking for an easy way to have a Kubernetes High Availability cluster for your API server and control plane, Microk8s makes this very easy with the deploy of three or more nodes. You can just make sure you have deployed at least 3 nodes and it will automatically enable HA for the API and backend etcd database. However, if you initially deployed a single control plane and a couple of…
0 notes
Video
youtube
(via Kubernetes Namespace Tutorial for Beginners | Kubernetes Namespace Explained)
#video#kubernetes#namespace#codeonedigest#youtube#kubernetesnamespace#apiserver#kubectl#docker#proxyserver#programming#coding#codeonedig…
2 notes
·
View notes
Text
Kubectl get pods: Birds Eye View
Kubectl get pods: Birds Eye View
Kubernetes has become the most popular choice to deploy and manage micro-services. If you are new to Kubernetes or you’ve recently started using it, you’d be aware of the advantages it provides. With more and more organizations adopting micro-services architecture and moving towards containerization of the services. It’s important to understand the flow of data from and to the Kubernetes client…
View On WordPress
0 notes
Text
Every part You Ever Needed To Know About Utilizing Etcd With Kubernetes V1.6 (However Have been Afraid
Learn about Kubernetes Structure, parts, and design principles and see a sample set up and setup process. Kubernetes, if you are not conscious, is an open-source system for automating deployment, scaling, and managing containerized purposes With this platform, you can decompose your applications into smaller programs (called microservices) while developing; then you may compose (or orchestrate) these techniques together while deploying. As you'll study, Kubernetes provides you completely different objects that enable you to arrange your functions' microservices into logical models that you could simply handle.

container orchestration upgrading from Kubernetes v1.5 to v1.6 could also be in for a shock. (Just one reason it is vital to all the time learn the discharge notes !) Kubernetes v1.6 changes the default etcd backend from v2 to v3, so ensure that before you start, you manually migrate etcd to v3 This way, you may ensure knowledge consistency, which requires shutting down all kube-apiservers. However why should I care about containers if I'm already working in the Cloud and totally on PaaS and even on Serverless? It seems like a step back, you can do Microservices even higher with PaaS and Serverless elements in my opinion. I wish to have some kind of scenario the place you are better of utilizing containers as an alternative of PaaS? Is it less expensive? Does it scale out higher? I'm in search of solutions to these questions.
1 note
·
View note
Text
What Is Kubernetes?
Kubernetes is an open source software platform that automates deployment, scaling, and management of containerized applications across various physical, virtual, and cloud environments. Developed by Google, Kubernetes has become one of the most significant advancements in IT since the public cloud came to be.

It’s a cloud native platform built upon 15 years of Google’s production workload experience combined with best-of-breed ideas and practices from the community. It has grown to become a powerful, flexible tool that can be used on a wide range of cloud platforms and on-premises.
The key components of a Kubernetes cluster are a master, a set of nodes that host the containers and a control plane that runs the API server, scheduler, and controller manager. The master also stores state and configuration data in a distributed key-value store called etcd, which all nodes access to maintain the app’s configurations and services.
Running on a single-node cluster: Minikube If you don’t want to invest in a Who are techogle? massive cloud-scale cluster, Minikube can help. It’s a free, open-source container management tool that can be run on your laptop or any other machine that has Linux and Windows operating systems. It’s a great solution for developers and DevOps engineers who might need a small, lightweight cluster on a desktop.
Scaling with the cloud: In addition to letting you scale up or down your cluster based on demand, Kubernetes can also automatically adjust its size to ensure that applications are running efficiently without consuming too much of the available resources. This can reduce infrastructure costs, optimize resource usage, and increase productivity by enabling self-healing and rolling software updates without downtime.
Minikube is designed to help you do more with your Kubernetes cluster than most companies will be able to manage with their own teams of developers and DevOps engineers, and it’s an excellent way for your team to get up and running with Kubernetes in a short amount of time.
It can be used on a variety of operating systems, including Linux, Mac, and Windows, as well as technology website on bare metal or virtual machines in a datacenter or private cloud environment. It’s also compatible with microservers, edge servers, and even very small mobile devices and appliances.
The system has a central command-line interface, kubectl, that lets you manage the entire cluster, including adding and removing containers, defining manifests, and monitoring elements of the cluster. It also has an API server, kube-apiserver, that communicates with nodes through a set of commands and provides a consistent user experience, regardless of the language used to interact with the system.
Secrets for containerized apps When you use Kubernetes to deploy your application, your app can be made to perform a certain state by using a manifest file that defines the desired state of the app and sends it to the API server. Then, the API server implements that manifest on all of the relevant apps in the cluster, ensuring that the desired state matches the actual state every time the application is run.
1 note
·
View note
Text
EKS must know:
Amazon Elastic Kubernetes Service (aka Amazon EKS) is a managed container service to run and scale Kubernetes applications in the cloud or on-premises.
There is also EKS anywhere which I will be talking about in another article which allows customers to create and operate Kubernetes clusters on-premises while deploying on customers virtual machines. There are two options supported, One is Bare Metal cluster and Second is VMware Vsphere.
EKS uses aws-iam-authenticator to generate tokens that should be passed to the kube-apiserver in order to verify authentication.
The command is : aws eks get-token --cluster <cluster-name>
After the authentication, Authorization is made by verifying the user access by checking aws-auth configmap. Here, we are talking about RBAC rules that were discussed in my previous article.
Make sure to grant the least privileged access to IAM users in aws-auth.
There are two types of endpoints of EKS cluster, public and private. If public endpoint is needed, you ca restrict access to a range of IPs
When the cluster is created, the creator is granted system:masters permission, however, this is not included in the aws-auth.
Two things to note here, using this role should be limited to creating new permissions in the configmap or in emergency cases.
Second thing is to avoid giving this role any other rbac permissions in the configmap as it overrides the system:masters.
The best way for pods to be allowed certain permissions to call kubernetes APIs is to use a service account (namespace default or a custom one).
This service account's token will be mounted at /var/run/secrets/kubernetes.io/serviceaccount.
Please make sure to check IRSA which is a feature to assign roles to service accounts through an IAM OIDC provider. The AWS_ROLE_ARN and AWS_WEB_IDENTITY_TOKEN_FILE are injected in the pod as environment variables.
Blocking/limiting access to instance metadata from pods is also recommended.
Avoid running pods in privileged mode as it inherits all of the linux capabilities associated with root on the host.
There are different types to apply certain requirements for pods before being created such as OPA gatekeeper and Pod security admission( offering 3 modes : audit/warn/enforce)
You can disable service account token mounts if the pod doesnt need access to k8s APIs.
It is recommended to enable controle plane logs which include API server, controller manager and scheduler logs.
You can check cloudwatch log insights for more detailed logs of your eks cluster
With eks, you can use network policies as well as calico or cilium.
Check AWS VPC flow logs for information about traffic going thru your cluster to look for unusual activities
When creating EKS cluster, a security group is created to allow traffic between control plane and the woker nodes.
For volume provisioning and secrets, you can check EBS CSI driver, EFS CSI driver, secrets store CSI driver.
To enforce security and permission boundries, you can use bottlerocket OS that is made to run linux containers
Make sure to always update your worker nodes with the latest patch/updates.
With eks fargate, AWS automatically updates the nodes for you.
Make sure to always scan/sign your docker images.
Install kubernetes metrics server in order to collect metrics from applications that can be used to scale applications using HPA and VPA
Make use of health checks such as liveness probe, startup probe and readiness probe. Kubelet is the one responsible for executing these health checks.
Use PDB, AWS node termination handler to control the behavior of pods termination in case of an update or crash of worker nodes.
Check Xray or Jaeger for tracing to have detailed information on your applications requests.
Check topology spread constraints for pods in order to avoid failures of AZs which impacts your pods.
EKS supports AWS VPC CNI for assigning IPs to pods. Please note that the number of IPs that can be allocated depends on the number of ENIs that can be attached to a worker node and how many IPs it supports
L-IPAMD is a local IP adress management daemon who is responsible for assigning IPs to pods.
You can check CNI custom networking to avoid IP allocation/shortage issues. This can be done by setting AWS_VPC_K8S_CNI_CUSTOM_NETWORK_CFG to true.
To calculate the maximum number of pods that can be placed on a worker node : max = (number of ENIs -1) * (max IPv4 adr per ENI -1 ) +2
If you are using IPv6 for your cluster, it is no longer needed to use custom networking.
Please note that a security group is attached to an ec2 instance, meaning that all of the ENIs attached to an ec2 share the same security group. However, you can use "security groups for pods" which will be applied to specific pods meaning that the networking security rules will be applied at the pod level. This is done by creating and attaching a trunk interface to the nodes. The VPC resource controller then creates branch interfaces that will be associated to pods
0 notes
Text
In recent years, the popularity of Kubernetes and its ecosystem has immensely increased due to its ability to its behavior, ability to design patterns, and workload types. Kubernetes also known as k8s, is an open-source software used to orchestrate system deployments, scale, and manage containerized applications across a server farm. This is achieved by distributing the workload across a cluster of servers. Furthermore, it works continuously to maintain the desired state of container applications, allocating storage and persistent volumes e.t.c. The cluster of servers in Kubernetes has two types of nodes: Control plane: it is used to make the decision about the cluster(includes scheduling e.t.c) and also to detect and respond to cluster events such as starting up a new pod. It consists of several other components such as: kube-apiserver: it is used to expose the Kubernetes API etcd: it stores the cluster data kube-scheduler: it watches for the newly created Pods with no assigned node, and selects a node for them to run on. Worker nodes: they are used to run the containerized workloads. They host the pods that er the basic components of an application. A cluster must consist of at least one worker node. The smallest deployable unit in Kubernetes is known as a pods. A pod may be made up of one or many containers, each with its own configurations. There are 3 different resources provided when deploying pods in Kubernetes: Deployments: this is the most used and easiest resource to deploy. They are usually used for stateless applications. However, the application can be made stateful by attaching a persistent volume to it. StatefulSets: this resource is used to manage the deployment and scale a set of Pods. It provides the guarantee about ordering and uniqueness of these Pods. DaemonSets: it ensures all the pod runs on all the nodes of the cluster. In case a node is added/removed from the cluster, DaemonSet automatically adds or removes the pod. There are several methods to deploy a Kubernetes Cluster on Linux. This includes using tools such as Minikube, Kubeadm, Kubernetes on AWS (Kube-AWS), Amazon EKS e.t.c. In this guide, we will learn how to deploy a k0s Kubernetes Cluster on Rocky Linux 9 using k0sctl What is k0s? K0s is an open-source, simple, solid, and certified Kubernetes distribution that can be deployed on any infrastructure. It offers the simplest way with all the features required to set up a Kubernetes cluster. Due to its design and flexibility, it can be used on bare metal, cloud, Edge and IoT. K0s exists as a single binary with no dependencies aside from the host OS kernel required. This reduces the complexity and time involved when setting up a Kubernetes cluster. The other features associated with k0s are: It is certified and 100% upstream Kubernetes It has multiple installation methods such as single-node, multi-node, airgap and Docker. It offers automatic lifecycle management with k0sctl where you can upgrade, backup and restore. Flexible deployment options with control plane isolation as default It offers scalability from a single node to large, high-available clusters. Supports a variety of datastore backends. etcd is the default for multi-node clusters, SQLite for single node clusters, MySQL, and PostgreSQL can be used as well. Supports x86-64, ARM64 and ARMv7 It Includes Konnectivity service, CoreDNS and Metrics Server Minimum CPU requirements (1 vCPU, 1 GB RAM) k0sctl is a command-line tool used for bootstrapping and managing k0s clusters. Normally, it connects to the hosts using SSH and collects information about them. The information gathered is then used to create a cluster by configuring the hosts, deploying k0s, and then connecting them together. The below image can be used to demonstrate how k0sctl works Using k0sctl is the recommended way to create a k0s cluster for production. Since you can create multi-node clusters in an easy and automatic manner.
Now let’s dive in! Environment Setup For this guide, we will have the 4 Rocky Linux 9 servers configured as shown: Role Hostname IP Address Workspace workspace 192.168.204.12 Control plane master.computingpost.com 192.168.205.16 Worker Node worker1.computingpost.com 192.168.205.17 Worker Node worker2.computingpost.com 192.168.205.18 The other Rocky Linux 9 server is my working space on which I will install k0sctl and run the cluster on the above nodes Once the hostnames have been set, edit /etc/hosts on the Workspace as shown: $ sudo vi /etc/hosts 192.168.205.16 master.computingpost.com master 192.168.205.17 worker1.computingpost.com worker1 192.168.205.18 worker2.computingpost.com worker2 Since k0sctl uses SSH to access the hosts, we will generate SSH keys on the Workspace as shown: $ ssh-keygen Generating public/private rsa key pair. Enter file in which to save the key (/home/rocky9/.ssh/id_rsa): Enter passphrase (empty for no passphrase): Enter same passphrase again: Your identification has been saved in /home/rocky9/.ssh/id_rsa Your public key has been saved in /home/rocky9/.ssh/id_rsa.pub The key fingerprint is: SHA256:wk0LRhNDWM1PA2pm9RZ1EDFdx9ZXvhh4PB99mrJypeU rocky9@workspace The key's randomart image is: +---[RSA 3072]----+ | +B+o...*=.o*| | .. =o.o.oo..B| | B .ooo = o=| | * + o. . =o+| | o S ..=o | | . B | | . + E | | o | | | +----[SHA256]-----+ Ensure root login is permitted on the 3 nodes by editing /etc/ssh/sshd_config as below # Authentication: PermitRootLogin yes Save the file and restart the SSH service: sudo systemctl restart sshd Copy the keys to the 3 nodes. ssh-copy-id root@master ssh-copy-id root@worker1 ssh-copy-id root@worker2 Once copied, verify if you can log in to any of the nodes without a password: $ ssh root@worker1 Activate the web console with: systemctl enable --now cockpit.socket Last login: Sat Aug 20 11:38:29 2022 [root@worker1 ~]# exit Step 1 – Install the k0sctl tool on Rocky Linux 9 The k0sctl tool can be installed on the Rocky Linux 9 Workspace by downloading the file from the GitHub release page. You can also use wget to pull the archive. First, obtain the latest version tag: VER=$(curl -s https://api.github.com/repos/k0sproject/k0sctl/releases/latest|grep tag_name | cut -d '"' -f 4) echo $VER Now download the latest file for your system: ### For 64-bit ### wget https://github.com/k0sproject/k0sctl/releases/download/$VER/k0sctl-linux-x64 -O k0sctl ###For ARM ### wget https://github.com/k0sproject/k0sctl/releases/download/$VER/k0sctl-linux-arm -O k0sctl Once the file has been downloaded, make it executable and copy it to your PATH: chmod +x k0sctl sudo cp -r k0sctl /usr/local/bin/ /bin Verify the installation: $ k0sctl version version: v0.13.2 commit: 7116025 To enable shell completions, use the commands: ### Bash ### sudo sh -c 'k0sctl completion >/etc/bash_completion.d/k0sctl' ### Zsh ### sudo sh -c 'k0sctl completion > /usr/local/share/zsh/site-functions/_k0sctl' ### Fish ### k0sctl completion > ~/.config/fish/completions/k0sctl.fish Step 2 – Configure the k0s Kubernetes Cluster We will create a configuration file for the cluster. To generate the default configuration, we will use the command: k0sctl init > k0sctl.yaml Now modify the generated config file to work for your environment: vim k0sctl.yaml Update the config file as shown: apiVersion: k0sctl.k0sproject.io/v1beta1 kind: Cluster metadata: name: k0s-cluster spec: hosts: - ssh: address: master.computingpost.com user: root port: 22 keyPath: /home/$USER/.ssh/id_rsa role: controller - ssh: address: worker1.computingpost.com user: root port: 22 keyPath: /home/$USER/.ssh/id_rsa role: worker - ssh: address: worker2.computingpost.com
user: root port: 22 keyPath: /home/$USER/.ssh/id_rsa role: worker k0s: dynamicConfig: false We have a configuration file with 1 control plane and 2 worker nodes. It is also possible to have a single node deployment where you have a single server to act as a control plane and worker node as well: For that case, you will a configuration file appear as shown: apiVersion: k0sctl.k0sproject.io/v1beta1 kind: Cluster metadata: name: k0s-cluster spec: hosts: - ssh: address: IP_Address user: root port: 22 keyPath: /home/$USER/.ssh/id_rsa role: controller+worker k0s: dynamicConfig: false Step 3 – Create the k0s Kubernetes Cluster on Rocky Linux 9 using k0sctl Once the configuration has been made, you can start the cluster by applying the configuration file: First, allow the service through the firewall on the control plane sudo firewall-cmd --add-port=6443/tcp --permanent sudo firewall-cmd --reload Now apply the config k0sctl apply --config k0sctl.yaml Sample Output: ⠀⣿⣿⡇⠀⠀⢀⣴⣾⣿⠟⠁⢸⣿⣿⣿⣿⣿⣿⣿⡿⠛⠁⠀⢸⣿⣿⣿⣿⣿⣿⣿⣿⣿⣿⣿⠀█████████ █████████ ███ ⠀⣿⣿⡇⣠⣶⣿⡿⠋⠀⠀⠀⢸⣿⡇⠀⠀⠀⣠⠀⠀⢀⣠⡆⢸⣿⣿⠀⠀⠀⠀⠀⠀⠀⠀⠀⠀███ ███ ███ ⠀⣿⣿⣿⣿⣟⠋⠀⠀⠀⠀⠀⢸⣿⡇⠀⢰⣾⣿⠀⠀⣿⣿⡇⢸⣿⣿⣿⣿⣿⣿⣿⣿⣿⣿⣿⠀███ ███ ███ ⠀⣿⣿⡏⠻⣿⣷⣤⡀⠀⠀⠀⠸⠛⠁⠀⠸⠋⠁⠀⠀⣿⣿⡇⠈⠉⠉⠉⠉⠉⠉⠉⠉⢹⣿⣿⠀███ ███ ███ ⠀⣿⣿⡇⠀⠀⠙⢿⣿⣦⣀⠀⠀⠀⣠⣶⣶⣶⣶⣶⣶⣿⣿⡇⢰⣶⣶⣶⣶⣶⣶⣶⣶⣾⣿⣿⠀█████████ ███ ██████████ k0sctl v0.13.2 Copyright 2021, k0sctl authors. Anonymized telemetry of usage will be sent to the authors. By continuing to use k0sctl you agree to these terms: https://k0sproject.io/licenses/eula INFO ==> Running phase: Connect to hosts INFO [ssh] master:22: connected INFO [ssh] worker1:22: connected INFO [ssh] worker2:22: connected INFO ==> Running phase: Detect host operating systems INFO [ssh] master:22: is running Rocky Linux 9.0 (Blue Onyx) INFO [ssh] worker1:22: is running Rocky Linux 9.0 (Blue Onyx) INFO [ssh] worker2:22: is running Rocky Linux 9.0 (Blue Onyx) INFO ==> Running phase: Acquire exclusive host lock INFO ==> Running phase: Prepare hosts INFO ==> Running phase: Gather host facts ......... INFO [ssh] worker2:22: validating api connection to https://192.168.205.16:6443 INFO [ssh] master:22: generating token INFO [ssh] worker1:22: writing join token INFO [ssh] worker2:22: writing join token INFO [ssh] worker1:22: installing k0s worker INFO [ssh] worker2:22: installing k0s worker INFO [ssh] worker1:22: starting service INFO [ssh] worker2:22: starting service INFO [ssh] worker1:22: waiting for node to become ready INFO [ssh] worker2:22: waiting for node to become ready Once complete, you will see this: Install kubectl You may need to install kubectl on the workspace to help you manage the cluster with ease. Download the binary file and install it with the command: curl -LO "https://storage.googleapis.com/kubernetes-release/release/$(curl -s https://storage.googleapis.com/kubernetes-release/release/stable.txt)/bin/linux/amd64/kubectl" chmod +x kubectl sudo mv kubectl /usr/local/bin/ /bin Verify the installation: $ kubectl version --client Client Version: version.InfoMajor:"1", Minor:"24", GitVersion:"v1.24.4", GitCommit:"95ee5ab382d64cfe6c28967f36b53970b8374491", GitTreeState:"clean", BuildDate:"2022-08-17T18:54:23Z", GoVersion:"go1.18.5", Compiler:"gc", Platform:"linux/amd64" Kustomize Version: v4.5.4 To be able to access the cluster with kubectl, you need to get the kubeconfig file and set the environment. k0sctl kubeconfig > kubeconfig export KUBECONFIG=$PWD/kubeconfig Now get the nodes in the cluster: $ kubectl get nodes NAME STATUS ROLES AGE VERSION worker1.computingpost.com Ready 7m59s v1.24.3+k0s worker2.computingpost.com Ready 7m59s v1.24.3+k0s The above command will only list the worker nodes. This is because K0s ensures that the controllers and workers are isolated.
Get all the pods running: $ kubectl get pods --all-namespaces NAMESPACE NAME READY STATUS RESTARTS AGE kube-system coredns-88b745646-djcjh 1/1 Running 0 11m kube-system coredns-88b745646-v9vfn 1/1 Running 0 9m34s kube-system konnectivity-agent-8bm85 1/1 Running 0 9m36s kube-system konnectivity-agent-tsllr 1/1 Running 0 9m37s kube-system kube-proxy-cdvjv 1/1 Running 0 9m37s kube-system kube-proxy-n6ncx 1/1 Running 0 9m37s kube-system kube-router-fhm65 1/1 Running 0 9m37s kube-system kube-router-v5srj 1/1 Running 0 9m36s kube-system metrics-server-7d7c4887f4-gv94g 0/1 Running 0 10m Step 4 – Advanced K0sctl File Configurations Once a cluster has been deployed, the default configuration file for the cluster is created. To view the file, access the file, use the command below on the control plane: # k0s default-config > /etc/k0s/k0s.yaml The file looks as shown: # cat /etc/k0s/k0s.yaml # generated-by-k0sctl 2022-08-20T11:57:29+02:00 apiVersion: k0s.k0sproject.io/v1beta1 kind: ClusterConfig metadata: creationTimestamp: null name: k0s spec: api: address: 192.168.205.16 k0sApiPort: 9443 port: 6443 sans: - 192.168.205.16 - fe80::e4f8:8ff:fede:e1a5 - master - 127.0.0.1 tunneledNetworkingMode: false controllerManager: extensions: helm: charts: null repositories: null storage: create_default_storage_class: false type: external_storage images: calico: cni: image: docker.io/calico/cni version: v3.23.3 kubecontrollers: image: docker.io/calico/kube-controllers version: v3.23.3 node: image: docker.io/calico/node version: v3.23.3 coredns: image: k8s.gcr.io/coredns/coredns version: v1.7.0 default_pull_policy: IfNotPresent konnectivity: image: quay.io/k0sproject/apiserver-network-proxy-agent version: 0.0.32-k0s1 kubeproxy: image: k8s.gcr.io/kube-proxy version: v1.24.3 kuberouter: cni: image: docker.io/cloudnativelabs/kube-router version: v1.4.0 cniInstaller: image: quay.io/k0sproject/cni-node version: 1.1.1-k0s.0 metricsserver: image: k8s.gcr.io/metrics-server/metrics-server version: v0.5.2 pushgateway: image: quay.io/k0sproject/pushgateway-ttl version: edge@sha256:7031f6bf6c957e2fdb496161fe3bea0a5bde3de800deeba7b2155187196ecbd9 installConfig: users: etcdUser: etcd kineUser: kube-apiserver konnectivityUser: konnectivity-server kubeAPIserverUser: kube-apiserver kubeSchedulerUser: kube-scheduler konnectivity: adminPort: 8133 agentPort: 8132 network: calico: null clusterDomain: cluster.local dualStack: kubeProxy: mode: iptables kuberouter: autoMTU: true mtu: 0 peerRouterASNs: "" peerRouterIPs: "" podCIDR: 10.244.0.0/16 provider: kuberouter serviceCIDR: 10.96.0.0/12 podSecurityPolicy: defaultPolicy: 00-k0s-privileged scheduler: storage: etcd: externalCluster: null peerAddress: 192.168.205.16 type: etcd telemetry: enabled: true status: You can modify the file as desired and then apply the changes made with the command: sudo k0s install controller -c The file can be modified if the cluster is running. But for the changes to apply, restart the cluster with the command: sudo k0s stop sudo k0s start Configure Cloud Providers The K0s-managed Kubernetes doesn’t include the built-in cloud provider service. You need to manually configure and add its support. There are two ways of doing this:
Using K0s Cloud Provider K0s provides its own lightweight cloud provider that can be used to assign static external IP to expose the worker nodes. This can be done using either of the commands: #worker sudo k0s worker --enable-cloud-provider=true #controller sudo k0s controller --enable-k0s-cloud-provider=true After this, you can add the IPv4 and IPv6 static node IPs: kubectl annonate node k0sproject.io/node-ip-external= Using Built-in Cloud Manifest Manifests allow one to run the cluster with preferred extensions. Normally, the controller reads the manifests from /var/lib/k0s/manifests This can be verified from the control node: $ ls -l /var/lib/k0s/ total 12 drwxr-xr-x. 2 root root 120 Aug 20 11:57 bin drwx------. 3 etcd root 20 Aug 20 11:57 etcd -rw-r--r--. 1 root root 241 Aug 20 11:57 konnectivity.conf drwxr-xr-x. 15 root root 4096 Aug 20 11:57 manifests drwxr-x--x. 3 root root 4096 Aug 20 11:57 pki With this option, you need to create a manifest with the below syntax: --- apiVersion: v1 kind: ServiceAccount metadata: name: cloud-controller-manager namespace: kube-system --- apiVersion: rbac.authorization.k8s.io/v1 kind: ClusterRoleBinding metadata: name: system:cloud-controller-manager roleRef: apiGroup: rbac.authorization.k8s.io kind: ClusterRole name: cluster-admin subjects: - kind: ServiceAccount name: cloud-controller-manager namespace: kube-system --- apiVersion: apps/v1 kind: DaemonSet metadata: labels: k8s-app: cloud-controller-manager name: cloud-controller-manager namespace: kube-system spec: selector: matchLabels: k8s-app: cloud-controller-manager template: metadata: labels: k8s-app: cloud-controller-manager spec: serviceAccountName: cloud-controller-manager containers: - name: cloud-controller-manager # for in-tree providers we use k8s.gcr.io/cloud-controller-manager # this can be replaced with any other image for out-of-tree providers image: k8s.gcr.io/cloud-controller-manager:v1.8.0 command: - /usr/local/bin/cloud-controller-manager - --cloud-provider=[YOUR_CLOUD_PROVIDER] # Add your own cloud provider here! - --leader-elect=true - --use-service-account-credentials # these flags will vary for every cloud provider - --allocate-node-cidrs=true - --configure-cloud-routes=true - --cluster-cidr=172.17.0.0/16 tolerations: # this is required so CCM can bootstrap itself - key: node.cloudprovider.kubernetes.io/uninitialized value: "true" effect: NoSchedule # this is to have the daemonset runnable on master nodes # the taint may vary depending on your cluster setup - key: node-role.kubernetes.io/master effect: NoSchedule # this is to restrict CCM to only run on master nodes # the node selector may vary depending on your cluster setup nodeSelector: node-role.kubernetes.io/master: "" Step 5 – Deploy an Application on k0s To test if the cluster is working as desired, we will create a deployment for the Nginx application: The command below can be used to create and apply the manifest: kubectl apply -f -
0 notes
Text
Multi-Cloud - Aula 2
aula
Multi-Cloud – Aula 2
Professor Rodrigo Vale. (Google Employee)
Microserviços em multicloud.
“Se você consegue gerenciar um kubernetes em seu DC você também vai conseguir gerenciar estes serviços em qualquer outro lugar.”
Fazendo uma analogia, o Kubernetes faz o que o java permitiu acontecer a mais de 30 anos atras.
O que é Kubernetes:

Formalmente o Kubernetes é sistema de orquestração de containers, de código aberto, automatiza todo o dimensionamento e deploy de containers.
Componentes do Kubernetes:

Conceito principal um cluster. (Todos os containers rodando lá dentro de forma organizada)
O Node nada mais é que uma maquina virtual, que possuem os componentes de runtime de containers e componentes do kubernetes.
Tudo dentro do Kubernetes é declarativo, você declara o estado que você gostaria que os seus serviços executem.
O Painel de controle é quem garante as declarações de configurações.
O Kubernetes é dinâmico e você precisa ter uma unidade de controle para garantir que o Compliance de configuração seja atendido.
Kubernetes na pratica:

Aperar de ser uma tecnologia de ponta e que facilita muita a ponta de desenvolvimento, o Kubernetes tras muita complexidade ao time de operações e este gerenciamento pode ser complexo e custoso.
Existem soluções de gerenciamento de Kubernetes, tanto em nuvem quanto em ambiente de cloud privada.
Malha de serviços (Service Mesh)

Como é que os serviços se comunicam?
Tradicional: Conexão direta.
Comunicação por meio de Loadbalancers: Usando este modelo, todo o acesso para pela figura do loadbalancer e este direciona as chamadas para os aplicativos a serem consumidos.
Este modelo simplifica o gerenciamento de entrega de aplicativos mas ao mesmo tempo torna complexo a garantia de segurança para o ambiente por não garantir o mínimo de comunicação necessário.
Comunicação através de bibliotecas: Neste modelo cria-se bibliotecas para gerenciar a comunicação dos aplicativos e com isso resolve-se o problema de controle de acessos com segurança. Em contrapartida, este trás um elevado aumento de complexibilidade levando a necessidade de recompilação completa de ambientes e caso de atualização de alguma politica.
Service Mesh: Ele permite a gestão super fácil da comunicação entre os serviços.
Por que? Usa-se o conceito de sidecar, é um aplicativo que roda ao lado do seu microserviço (Colado), capturando todas as requisições do seu microserviço e encima disso ele aplica as politicas de segurança que são controladas por meio de um controle central.
Como existe um painel central que permite você reconfigurar estas politicas de segurança, você tem um ambiente altamente configurável e flexibiliza a gestão da segurança de forma simplificada e também o balanceamento de carga.
Este modelo te trás as seguintes vantagens:
- Segurança.
- Balanceamento
- Observabilidade – Saber o estado de uma aplicação.
- Rastreabilidade- Da pra enxergar todas as etapas de comunicação de um serviço e isso ajuda muito a entender como é a arquitetura delas.
- Autenticação simplificada.
Como isso acontece?

Não é recomendável utilizar banco de dados em Kubernetes.
Mundo ideal para o Kuberbetes:

Namespaces te permite dividir e isolar o seu cluster de forma que você tenha operações isoladas dentro do mesmo ambiente.
Mundo real com Kubernetes e multi-cloud:


[Novidade]

Hoje é possível fazer dois cluster conversarem entre si e terem um comportamento como se fosse um cluster único.
A empresa mais conhecida neste ambiente é a cilium que é uma empresa de código aberto.
A função do cilium é facilitar a comunicação entre os cluster e o comportamento é como se fosse um único cluster.
A base da tecnologia é o eBPF.
E o que é eBPF?
É o encapsulamento que permite como se fosse a execução de uma maquina virtual dentro do kernel e estes aplicativos permitem a reprogramação do kernel do Linux de forma mais simples.
Existe um outro modelo de espelhamento de configuração de cluster que permite maior resiliência de aplicativos de alta criticidade.
Gestão do Cluster e reorganização dos recursos e serviços:

Segurança:

Centralização e única fonte de gestão de segredos (senhas e chaves de acessos)
Arquitetura:
APIServer é a central de controle dos clusters.

[Resumo]

0 notes
Text
CKS Exam Series #4 Crash that Apiserver !
New Post has been published on https://finanznachrichten.online/cks-exam-series-4-crash-that-apiserver/
CKS Exam Series #4 Crash that Apiserver !
itnext.io - You should be very comfortable changing the Apiserver config. You will probably mess something up when altering Apiserver config, and this isn’t a bad thing if you know where to check for logs! This…Mehr zu Kubernetes Services, Kubernetes Training und Rancher dedicated as a Service le...
Ganzen Artikel zu CKS Exam Series #4 Crash that Apiserver ! lesen auf https://finanznachrichten.online/cks-exam-series-4-crash-that-apiserver/
0 notes
Video
youtube
(via Kubernetes Labels and Selectors Tutorial for Beginners)
Hi, a new #video on #kubernetes #labels and #selectors is published on #codeonedigest #youtube channel. Learn kubernetes #labelsandselectors #apiserver #kubectl #docker #proxyserver #programming #coding with #codeonedigest
#kuberneteslabelsandselectors #kuberneteslabels #kuberneteslabelsvsannotations #kuberneteslabelsnodes #kuberneteslabelsandselectorsexample #kuberneteslabelsvsselectors #kuberneteslabelsandtaints #kuberneteslabelsnodeasworker #kuberneteslabelvstaint #kubernetesselectorvslabel #kubernetesselectorannotation #kubernetesselectornotequal #kubernetesselectornode #kubernetesselectorexpression #kubernetesselectorfield #kubernetestutorial #kubernetestutorialforbeginners #kubernetesinstallation #kubernetesinterviewquestions #kubernetesexplained #kubernetesorchestrationtutorial #kubernetesoperator #kubernetesoverview
#video#kubernetes#labels#selectors#codeonedigest#youtube#labelsandselectors#apiserver#kubectl#docker#proxyserver#programming#c…
1 note
·
View note
Text
CKS Exam Series #4 Crash that Apiserver !
New Post has been published on https://www.adhocmitteilung.de/cks-exam-series-4-crash-that-apiserver/
CKS Exam Series #4 Crash that Apiserver !
itnext.io - You should be very comfortable changing the Apiserver config. You will probably mess something up when altering Apiserver config, and this isn’t a bad thing if you know where to check for logs! This…Mehr zu Kubernetes Services, Kubernetes Training und Rancher dedicated as a Service le...
Ganzen Artikel zu CKS Exam Series #4 Crash that Apiserver ! lesen auf https://www.adhocmitteilung.de/cks-exam-series-4-crash-that-apiserver/
0 notes
Text
CKS Exam Series #4 Crash that Apiserver !
New Post has been published on https://www.unternehmensmeldungen.com/cks-exam-series-4-crash-that-apiserver/
CKS Exam Series #4 Crash that Apiserver !
itnext.io - You should be very comfortable changing the Apiserver config. You will probably mess something up when altering Apiserver config, and this isn’t a bad thing if you know where to check for logs! This…Mehr zu Kubernetes Services, Kubernetes Training und Rancher dedicated as a Service le...
Ganzen Artikel zu CKS Exam Series #4 Crash that Apiserver ! lesen auf https://www.unternehmensmeldungen.com/cks-exam-series-4-crash-that-apiserver/ Mehr Wirtschaftsnachrichten und Unternehmensmeldungen unter https://www.unternehmensmeldungen.com
0 notes
Text
Beginner’s Guide To Setup Kubernetes
Steps to install Kubernetes Cluster
Requirements
The major requirements are stated below regarding the setup process.
Master: 2 GB RAM 2 Cores of CPU Slave/ Node: 1 GB RAM 1 Core of CPU
1.Install Kubernetes
The below steps mentioned to be executed on both the master and node machines. Let’s call the master as ‘kmaster‘ and node as ‘knode‘.
1.1 Change to root:
Here, the changing root has been applied because the sudo provides permission to set up Kubernetes, and to avoid the permission process we have changed the root.
$ sudo su
# apt-get update
This command used to update a system.
1.2 Turn Off Swap Space:
Kubernetes doesn't support "swap". So we have to apply the below command to turn off the swap space.
# swapoff -a
1.3 Fstab action
After that, you need to open the ‘fstab’ file and comment out the line which has mention of swap partition.
# nano /etc/fstab
Press ‘Ctrl+X’, after that press ‘Y’ and then press ‘Enter’ to Save the file.
1.4 Update The Hostnames
To change the hostname of both machines, run the below command to open the file and subsequently rename the master machine to ‘kmaster’ and your node machine to ‘knode’.
# nano /etc/hostname
Press ‘Ctrl+X’, after that press ‘Y’ and then press ‘Enter’ to Save the file.
1.5 Update The Hosts File With IPs Of Master & Node
Run the following command on both machines to note the IP addresses of each.
# ifconfig
Now go to the ‘hosts’ file by moving over the both master and node and add an Entry by just specifying their respective IP addresses along with their names i.e. ‘kmaster’ and ‘knode’.
# nano /etc/hosts
Press ‘Ctrl+X’, after that press ‘Y’ and then press ‘Enter’ to Save the file.
1.6 Setting Static IP Addresses
We will make the IP addresses used as above, static for the VMs. We can do, by just modifying/changing the network interfaces file. Then, run the following command to open the file:
# nano /etc/network/interfaces
Now enter the following lines in the file.
auto enp0s8 iface enp0s8 inet static address
Press ‘Ctrl+X’, after that press ‘Y’ and then press ‘Enter’ to Save the file.
After this, restart your machine.
1.7 Install Open SSH-Server
Now we have to install openshh-server. Run the following command:
# sudo apt-get install openssh-server
2. Install Docker
Now we need to install Docker as docker images will be utilized for managing the containers in the cluster. Run with the following commands:
# sudo su # apt-get update # apt-get install -y docker.io
We’ve just explained about how to docker in your own system instead the process of how to add a $user in a docker or how to install docker-compose, for the basics of kubernetes you can follow by just tapping over this link:
3. Install kubeadm, Kubelet And Kubectl
To move further, we’ve to Install these 3 essential components for just setting up the environment of Kubernetes: kubeadm, kubectl, and kubelet.
Run the following commands before installing the Kubernetes environment.
# apt-get update && apt-get install -y apt-transport-https curl # curl -s https://packages.cloud.google.com/apt/doc/apt-key.gpg | apt-key add - # cat <<EOF >/etc/apt/sources.list.d/kubernetes.list deb http://apt.kubernetes.io/ kubernetes-xenial main EOF # apt-get update
Kubelet is the lowest level component in Kubernetes. It’s reliable for what’s running on an individual or specific machine.
Kubeadm is used for administrating the Kubernetes cluster.
Kubectl is used for controlling the configurations on various nodes inside the cluster.
# apt-get install -y kubelet kubeadm kubectl
3.1 Updating Kubernetes Configuration
Next, we will change the configuration file of Kubernetes. Run the following command:
#nano /etc/systemd/system/kubelet.service.d/10-kubeadm.conf
This will open a text editor, enter the following line after the last “Environment Variable”:
Environment="cgroup-driver=systemd/cgroup-driver=cgroupfs"
Press ‘Ctrl+X’, after that press ‘Y’ and then press ‘Enter’ to Save the file.
4. Steps Only For Kubernetes Master VM (kmaster)
All the required packages were installed on both servers till now. But, the further steps will work upon the Master Node only. Now, run the following command to initialize the Kubernetes Master.
4.1 Initialize Kubernetes Master with ‘kubeadm init’
Run the beneath command to initialize and setup kubernetes master.
# kubeadm init (or) # kubeadm init --apiserver-advertise-address=<ip-address-of-kmaster-vm> --pod-network-cidr=192.168.0.0/16 # kubeadm init --apiserver-advertise-address 192.168.1.206 --pod-network-cidr=172.16.0.0/16
In the selected part 1, when we initialize Kubeadm with the command then it will show you the kubernetes control-panel has initialized successfully. The three commands as shown in the images’ part 1 should be run to create .kube folder.
As mentioned before, run the commands from the above output as a non-root user
$ mkdir -p $HOME/.kube $ sudo cp -i /etc/kubernetes/admin.conf $HOME/.kube/config $ sudo chown $(id -u):$(id -g) $HOME/.kube/config
In the selected part 2, signifies about the “kubeadm join token”. The kubeadm token need to store somewhere in notepad and wherever you want to. After storing, you need to run that specific key token in a node terminal so that it can maintain the communication between the master and node.
You will notice from the previous command, that all the pods are running except one: ‘kube-dns’. For resolving this we will install a pod network. To install the CALICO pod network, run the following command:
$ kubectl apply -f https://docs.projectcalico.org/v3.0/getting-started/kubernetes/installation/hosted/kubeadm/1.7/calico.yaml
Install network add-on to enable the communication between the pods only on master nodes. Flannel is a network fabric for the containers, that are designed for the kubernetes.
$ kubectl apply -f https://raw.githubusercontent.com/coreos/flannel/master/Documentation/kube-flannel.yml
To verify, if kubectl is working or not, run the following command.s
$ kubectl get pods -o wide --all-namespaces
use "kubectl get nodes" command to ensure the kubernetes master node status is ready.
$ kubectl get nodes
4.2 To reset kubernetes
Now, if you are done with the process of initiating the command and requiring a fresh start, then you can make changes by just following the below command.
$ kubeadm reset
5. Steps For Only Kubernetes Node VM (knode)
For trial purpose, we can create nodes in the same system with the help of virtual machine.
Prerequisites
1.3GHz or faster 64-bit processor 2 GB RAM minimum/ 4GB RAM or more recommended
install vmware workstation player on ubuntu
5.1 Install required packages
$ sudo apt update $ sudo apt install build-essential</strong> $ sudo apt install linux-headers-$(uname -r)
5.2 Download vmware workstation player
$ wget https://www.vmware.com/go/getplayer-linux
Once the download is completed make the installation file executable using the following command:
$ chmod +x getplayer-linux
5.3 install vmware workstation player
Start the Installation wizard by typing:
$ sudo ./getplayer-linux
1. Just accept the terms and conditions in the license agreement and click on the Next button.
2. Next, you will be asked whether you like to check for product updates on startup. Make your selection and click on the Next button.
3. VMware’s Customer Experience Improvement Program (“CEIP”) helps VMware to improve their products and services by sending anonymous system data and usage information to VMware. If you prefer not to participate in the program select No and click on the Next button
4. In the next step , if you don’t have a license key, vacate the field empty and click on the next button.
5. Next, you will see the following page informing you that the VMware Workstation Player is ready to be installed. Click on the Install button.
6. Start VMware Workstation Player
Create a new virtual machine
Open terminal in virtual system and follow the step to create user (knode) and enter command to make connection between master and node.
$ sudo su
Now we are in the ‘knode terminal’ and we need to run kubeadm init. token key in this terminal as we have described above to save the specific key so that it make connection between master( kmaster) and node(knode).
# kubeadm join 192.168.1.206:6443 --token 02p54b.p8oe045cpj3zmz2b --discovery-token-ca-cert-hash sha256:50ba20a59c9f8bc0559d4635f1ac6bb480230e173a0c08b338372d8b81fcd061
once worker node is joined with kubernetes master, then verify the list of nodes within the kubernetes cluster.
$ kubectl get nodes
we have successfully configured the kubernetes cluster.
kubernetes master and worker node is ready to deploy the application.
Bottom Line
Now that we have explained about kubernetes setup, and further we will move onto something more technical with the other parts of this kubernetes series. Our next tutorial would explain to you how to make a connection with dashboard. Till then enjoy learning and try something new.
#beginners guide to setup kubernetes#Steps to install Kubernetes#Install Kubernetes#Installing the Kubernetes Dashboard#Master and Node#Kubernetes Dashboard Token
0 notes
Text
Gardener
A Gardener is expert in implementing the automated operations

The gardeners are experts in planning, also executing the small scale land-scaping operations, and also for maintaining the grounds and the landscapes of the business as well as private residences. These men will assist the laborers, to prepare and to grade the terrain; for applying the available fertilizers. Experts will also sod as well as seed the lawns, also transplant the plants, also the shrubs. Gardeners will what's more, plan the lawn, also cultivating the plantations. Gardener will plant the new and also re-establish the lawns; making use of the seed mixtures and also the fertilizers.
Best of the services
Gardeners will also locate the trees, the shrubs also the flowers in the garden space of the homeowners or the business owners. Mowing and trimming the lawns, employing the hand-mowers or the power-mowers is also necessary. A Gardener will also implement the automated management as well as the operation of the clusters. He would also provide extensibility in the concepts and also support as an infrastructure provider.
Insights into the job
About the essence, a Gardener is an extension APIserver and comes along with the custom controller bundles. He will also introduce the new API objects in the existing clusters, known as garden clusters. The collective gardens will encompass the cultivated spaces, monitored and managed by teams of gardeners, often for the production of the food. Plants that are gardened will bring freshness in a person’s lawn. Available are varied forms of gardens, such as the historical forms of gardens. Gardeners are aware that the historical form of gardening originated in the 20th century. Gardeners will look after the garden areas for making the patches bloom with beautiful flowers.
0 notes