#appcomponents
Explore tagged Tumblr posts
Visit Tumblr Blog
Explore Tumblr blogs with no restrictions, modern design and the best experience.
Last Seen Tumblr Blogs


Fun Fact
Tumblr’s website traffic is steadily declining.
Text
youtube
Explore the 4 base components of a GoJek Clone App such as taxi booking, store deliveries, parcel delivery, and on demand services in one powerful platform.
#v3cube#gojekclone#gojekcloneapp#applikegojek#appdevelopment#mobileappdesign#appcomponents#ondemandservices#Youtube
1 note
·
View note
Text
GoJek Clone is a Spectacular App that single-handedly offers 101+ Life-enriching Services through its 1 Dynamic Platform.
#goJekclone#applikegojekclone#superapp#gojek#mobileappdevelopment#techinnovation#digitalecosystem#userexperience#appcomponents#smarttechnology#ondemandservices
1 note
·
View note
Text
How to render Dynamic Component in Angular 18

Introduction
In the fast-paced world of web development, the ability to create dynamic, user-centric interfaces is more critical than ever. Angular 18’s Dynamic Component Rendering offers developers powerful tools to adapt web applications based on real-time data and user interactions. At DJ Computing, we harness this technology to build flexible, high-performance web applications. This blog will explore how Angular 18's dynamic component rendering works and how DJ Computing implements it in real-time, ensuring responsive, modular, and scalable web solutions tailored to the needs of modern businesses.
Dynamic Dashboards:
DJ Computing employs dynamic rendering to create personalized, user-driven dashboards. Based on user roles or permissions, specific components like graphs, analytics, or task lists are loaded at runtime. For example, a financial application might render performance charts for managers, while a regular user sees only their transactions and tasks. This modular and flexible UI management reduces the need for complex conditional logic in templates, focusing instead on dynamic runtime rendering of components.
User-Driven Interactions:
In business and data-driven web applications, users often interact with forms and data that change based on real-time inputs. DJ Computing leverages Angular 18’s dynamic rendering to alter forms, buttons, and table components depending on the user’s data, preferences, or selections. This allows users to engage with the application in a more intuitive, context-aware manner, where they see only what’s relevant to them at that moment. For example, in CRM systems, certain fields in a contact form might only appear when a user selects a particular type of contact.
Improved Performance and Scalability:
In Angular 18, lazy loading plays a critical role in boosting performance by loading components only when they are required. DJ Computing utilizes this feature to ensure that only essential UI components are rendered during the initial load, enhancing both performance and user experience in large-scale web apps. This makes the application lightweight and fast, as only necessary parts of the UI are rendered dynamically based on user interaction.
Modularity and Reusability:
Dynamic Component Rendering promotes the reusability of web components. DJ Computing takes a modular approach by creating individual components that can be dynamically rendered across multiple pages or sections within the same web app. For instance, a product listing component can be reused across the entire e-commerce application but dynamically rendered with different configurations or data inputs depending on the category or user behavior. This reduces redundancy and simplifies long-term maintenance.
Real-Time Data Handling:
In data-intensive web applications, DJ Computing integrates real-time data streams with dynamic component rendering. For example, in monitoring systems or stock trading platforms, data-driven components such as live charts or price tickers are dynamically rendered or updated based on incoming data feeds. This ensures that the application UI remains up-to-date without requiring manual refreshes, providing users with immediate, actionable insights.
Rendering components dynamically
To render the component, you need to make use of the ComponentFactoryResolver service. This allows you to create an instance of the dynamic component and inject it into the ViewContainerRef:
In your parent component (e.g., AppComponent), inject the ComponentFactoryResolver and use the directive to dynamically load the DynamicContentComponent:
Conclusion:
For DJ Computing’s web applications, dynamic component rendering in Angular 18 offers flexibility, scalability, and performance improvements. By loading components on demand and customizing the UI for each user, they provide a responsive, data-driven experience, which is critical in modern web app development.
#dynamic component rendering#web development#website development#UI flexibility#performance optimization
0 notes
Link
0 notes
Photo

TypeScriptでamazon-connect-streamsを利用して電話かけてみる https://ift.tt/2XD6hVd
世界130億超のAmazonConnectユーザのみなさん、こんにちは。
UIをカスタマイズしてAmazonConnectを使いたい!! そんな皆さんの強い味方であるamazon-connect-stream、便利ですよね。
ですが、TypeScriptから利用するにはヒトクセあります。
What is ヒトクセ?
npmに公開されてない
公式Docを参考にgulpでbuildしてもimportできない
npm i aws/amazon-connect-streams –saveしてもimportできない(実体がない)
でもindex.d.tsはある
こんな具合でできそうでできない…グヌヌって感じな癖があります。
解決策
公式Docを参考にgulpでbuild
index.d.tsと同じDirectoryにいれる
これだけです。 構成やファイルは以下を参考にしてください。 サンプルはAngularです。
ディレクトリ構成
/app/Modules/Connect /index.d.ts /index.js
app.component.ts
import { AfterViewInit, Component, ElementRef, ViewChild } from '@angular/core'; import './module/index'; import Endpoint = connect.Endpoint; @Component({ selector: 'app-root', templateUrl: './app.component.html', styleUrls: ['./app.component.scss'] }) export class AppComponent implements AfterViewInit { title = 'applicatioin'; state: string; @ViewChild('ccp') ccpContainer: ElementRef; ngAfterViewInit() { connect.core.initCCP(this.ccpContainer.nativeElement, { ccpUrl: 'https://YOUR-ENDPOINT.awsapps.com/connect/ccp#', softphone: { allowFramedSoftphone: true, }, }); connect.agent(agent => { // ここで自分のステータスを出してみた this.state = JSON.stringify(agent.getState()); const phoneNumber = '+819012341234'; const endpoint = Endpoint.byPhoneNumber(phoneNumber); // 電話かけてみた agent.connect(endpoint, {}); }); } }
コレ、いい感じに補完が効いてますし、カスタマイズしたUIから電話の発信までできました!
おまけ
connection.core.initCCP()の ccpUrlの最後に/が入ってると駄目だったのも注意点です。
元記事はこちら
「TypeScriptでamazon-connect-streamsを利用して電話かけてみる」
March 04, 2019 at 02:00PM
1 note
·
View note
Link
In this tutorial, we’re going to use Angular with HERE data, and display and interact with that geolocation data using Leaflet.
When it comes to development, I’m all about choosing the right tool for the job. While HERE offers a great interactive map component as part of its JavaScript SDK, there might be reasons to explore other interactive map rendering options. Take Leaflet for example. With Leaflet, you can provide your own tile layer while working with a very popular and easy to use open source library.
In a past tutorial, you’ll remember that I had demonstrated how to use Angular with HERE, but this time around we’re going to shake things up a bit. We’re going to use Angular with HERE data, but we’re going to display and interact with it using Leaflet.
To get a better idea of what we plan to accomplish, take a look at the following animated image:

We’re going to display an interactive map, geocode some addresses, and display those addresses on the map as markers using Leaflet, Angular, and the HERE RESTful API.
Starting With a New Angular Project and the Leaflet Dependencies
Before going forward, the assumption is that you have the Angular CLI installed and that you have a free HERE developer account. With these requirements met, go ahead and execute the following command:
ng new leaflet-project
The above command will create our new Angular project, but that project won’t be ready to use Leaflet. We have to first include the necessary JavaScript and CSS files.
Open the project’s src/index.html file and make it look like the following:
<!doctype html>
<html lang="en">
<head>
<meta charset="utf-8">
<title>LeafletProject</title>
<base href="/">
<meta name="viewport" content="width=device-width, initial-scale=1">
<link rel="icon" type="image/x-icon" href="favicon.ico">
<link rel="stylesheet" href="https://unpkg.com/[email protected]/dist/leaflet.css">
</head>
<body>
<app-root></app-root>
<script src="https://unpkg.com/[email protected]/dist/leaflet.js"></script>
</body>
</html>
Notice that we’ve included the CSS library as well as the JavaScript library for Leaflet. Technically, this is all that is required to start using Leaflet with HERE in an Angular application. However, we’re going to do some more preparation work to set us up for some awesome features.
Open the project’s src/app/app.module.ts file and include the following:
import { BrowserModule } from '@angular/platform-browser';
import { NgModule } from '@angular/core';
import { HttpClientModule } from '@angular/common/http';
import { AppComponent } from './app.component';
@NgModule({
declarations: [
AppComponent
],
imports: [
BrowserModule,
HttpClientModule
],
providers: [],
bootstrap: [AppComponent]
})
export class AppModule { }
Because we are no longer using the HERE JavaScript SDK, we are now relying on HTTP requests to the RESTful API. By default, HTTP in Angular is disabled, so by including the HttpClientModule and adding it to the imports array of the @NgModule block, we are enabling it.
While not absolutely necessary, we could also clean up the CSS a bit to allow us a full-screen map. Open the project’s src/styles.css file and include the following:
body {
margin: 0;
}
Now everything will take up the full width and height without the default margins.
It may seem like we’ve done a lot as of now, but it has been strictly configuration. Now we’re going to get into the fun stuff, which is development with Leaflet and Angular.
Create an Angular Component to Represent an Interactive HERE Map
While there are many ways to start using maps in your project, the cleanest approach is to create a dedicated Angular component so the maps can be reused throughout the application.
From the Angular CLI, execute the following:
ng g component here-map
The above command will generate several files for us that will represent our component. We’re going to start by opening the project’s src/app/here-map/here-map.component.html file and including the following markup:
<div #map [style.height]="height" ></div>
In the above markup, you’ll notice the #map attribute. We’re going to use this as a reference so we can access this DOM element from our TypeScript code. You’ll also notice that we have a dynamic height and a static width. It is easy to full screen the width of a component, but you have to be a CSS wizard to full screen the height. To cheat, we’re going to use JavaScript to determine the height and set it as a variable after everything initializes.
With the HTML in place, open the project’s src/app/here-map/here-map.component.ts file and include the following:
import { Component, OnInit, ViewChild, ElementRef, Input } from '@angular/core';
import { HttpClient } from '@angular/common/http';
declare var L: any;
@Component({
selector: 'here-map',
templateUrl: './here-map.component.html',
styleUrls: ['./here-map.component.css']
})
export class HereMapComponent implements OnInit {
@ViewChild("map")
public mapElement: ElementRef;
@Input("appId")
public appId: string;
@Input("appCode")
public appCode: string;
private map: any;
public srcTiles: string;
public height: string;
public constructor(private http: HttpClient) {
this.height = window.innerHeight + "px";
}
public ngOnInit() {
this.srcTiles = "https://2.base.maps.api.here.com/maptile/2.1/maptile/newest/reduced.day/{z}/{x}/{y}/512/png8?app_id=" + this.appId + "&app_code=" + this.appCode + "&ppi=320";
}
public ngAfterViewInit() {
this.map = L.map(this.mapElement.nativeElement, {
center: [37.7397, -121.4252],
zoom: 10,
layers: [L.tileLayer(this.srcTiles)],
zoomControl: true
});
}
public dropMarker(address: string) {
this.http.get("https://geocoder.api.here.com/6.2/geocode.json", {
params: {
app_id: this.appId,
app_code: this.appCode,
searchtext: address
}
}).subscribe(result => {
let location = result.Response.View[0].Result[0].Location.DisplayPosition;
let marker = new L.Marker([location.Latitude, location.Longitude]);
marker.addTo(this.map);
});
}
}
This file and the above code is the bulk of our project. To make things easier to understand, we’re going to look at the above code piece by piece.
Within the HereMapComponent class, we have the following:
@ViewChild("map")
public mapElement: ElementRef;
@Input("appId")
public appId: string;
@Input("appCode")
public appCode: string;
The ViewChild is referencing our #map attribute from the HTML. This is how we’re getting a reference to the HTML component for further usage. Each of the @Input annotations represents a possible attribute that the user can provide. In our example, the user will be providing the app id and app code found in their developer dashboard.
Remember that dynamic height I was talking about. We’re setting it here:
public constructor(private http: HttpClient) {
this.height = window.innerHeight + "px";
}
We are calculating the inner browser height and setting it using JavaScript. This way we can avoid all the tricky vertical height stuff that comes with standard CSS.
Because we’re using Leaflet, we’re relying heavily on the various HERE RESTful APIs and this includes the Map Tile API.
public ngOnInit() {
this.srcTiles = "https://2.base.maps.api.here.com/maptile/2.1/maptile/newest/reduced.day/{z}/{x}/{y}/512/png8?app_id=" + this.appId + "&app_code=" + this.appCode + "&ppi=320";
}
Using the provided app id and app code we can construct our URL for getting tiles from the API. This is set in the ngAfterViewInit when we initialize Leaflet.
public ngAfterViewInit() {
this.map = L.map(this.mapElement.nativeElement, {
center: [37.7397, -121.4252],
zoom: 10,
layers: [L.tileLayer(this.srcTiles)],
zoomControl: true
});
}
When initializing Leaflet, we are using the HTML component that we referenced, are centering the map on certain coordinates, and are using our HERE Tile API for the layer.
While we won’t be working with markers and geocoding by default, we’re going to lay the foundation within our component:
public dropMarker(address: string) {
this.http.get("https://geocoder.api.here.com/6.2/geocode.json", {
params: {
app_id: this.appId,
app_code: this.appCode,
searchtext: address
}
}).subscribe(result => {
let location = result.Response.View[0].Result[0].Location.DisplayPosition;
let marker = new L.Marker([location.Latitude, location.Longitude]);
marker.addTo(this.map);
});
}
When the dropMarker method is executed, we make a request to the HERE Geocoder API with a search query. In our scenario, the search query is an address or location. The results are then used to create a marker which is added to the map.
Before we can start using our new component, we need to wire it up. Open the project’s src/app/app.module.ts file and include the following:
import { BrowserModule } from '@angular/platform-browser';
import { NgModule } from '@angular/core';
import { HttpClientModule } from '@angular/common/http';
import { AppComponent } from './app.component';
import { HereMapComponent } from './here-map/here-map.component';
@NgModule({
declarations: [
AppComponent,
HereMapComponent
],
imports: [
BrowserModule,
HttpClientModule
],
providers: [],
bootstrap: [AppComponent]
})
export class AppModule { }
Notice that this time around we have imported our component and added it to the declarations array of the @NgModule block.
The tough stuff is over and we can now work towards displaying our map.
Displaying and Interacting With the Angular Map Component
Since this is a simple project, we don’t have a router. Instead, everything will be rendered inside the project’s src/app/app.component.html file. Open this file and include the following:
<here-map #map appId="APP-ID-HERE" appCode="APP-CODE-HERE"></here-map>
There are a few things to take note of in the above. First, it is only coincidence that we’ve added a #mapattribute. We don’t truly need to add one and if we did, it doesn’t need to have the same name as the previous component. Second, notice the appId and appCode attributes. You’ll want to swap the placeholder values with your own tokens.
Now open the project’s src/app/app.component.ts file and include the following:
import { Component, OnInit, ElementRef, ViewChild } from '@angular/core';
@Component({
selector: 'app-root',
templateUrl: './app.component.html',
styleUrls: ['./app.component.css']
})
export class AppComponent implements OnInit {
@ViewChild("map")
public mapElement: ElementRef;
public ngOnInit() { }
public ngAfterViewInit() {
this.mapElement.dropMarker("tracy, ca");
this.mapElement.dropMarker("lathrop, ca");
}
}
We want to be able to make use of the dropMarker function that sits in our map component. To do this we need to gain a reference to our HTML component with the #map attribute. Once we have a reference, then we can start calling the public functions that reside in it.
In our example, we are adding two markers for two cities in California.
Conclusion
You just saw how to use Leaflet in your Angular project to work with HERE data. HERE is flexible so you’re able to use whatever renderer you want to display your interactive maps. In my previous tutorialwe used the default renderer, but this time we used Leaflet which is just one of many options.
1 note
·
View note
Text
Webstorm plugins

#Webstorm plugins how to#
#Webstorm plugins install#
#Webstorm plugins pro#
#Webstorm plugins code#
#Webstorm plugins code#
With Angular Language Service enabled, WebStorm is able to improve code completion in template expressions: Enable Use Angular service and apply the changes: Next, go to Preferences > Languages & Frameworks > TypeScript, make sure Use TypeScript Service is checked and click Configure…: If you use Angular CLI to generate an Angular application, Angular Language Service is automatically installed.
#Webstorm plugins install#
To enable Angular Language Service, first make sure it’s installed: npm install -save-dev WebStorm integrates with Angular Language Service to better understand your code. This is a service, designed by the Angular Team, to provide IDEs with error checking and type completion within Angular templates. You can take things further by installing the Angular Language Service. When you edit a template, WebStorm provides you with smart code completion that recognizes components, directives and even input and output properties: Watch how the OnInit interface is automatically imported and how the live TypeScript feedback immediately tells you whether or not your TypeScript code is valid: If you open up the TypeScript panel, WebStorm provides you with immediate feedback on the validity of your code, so you can quickly resolve issues before having to compile your project. When editing a script, WebStorm automatically imports the required JavaScript modules so you don’t have to import them manually. WebStorm and Angular Tip 3: Take Advantage of Angular Language Serviceīy default, WebStorm already provides great assistance for writing Angular code.
#Webstorm plugins how to#
Knowing how to quickly navigate to the code you need will save you a tremendous amount of time every single day. If you want to open AppComponent, just type the first letter of each part - for example, ac - and WebStorm will immediately narrow down the result list for you, so you can quickly pick the suggestion you wish to open:Īnother super useful navigation shortcut is cmd + E, which presents you with a list of recently edited files so you can easily navigate back and forth between them. You don’t have to type the entire search string. When looking for a file that you don’t have an immediate reference to, hit shift twice to open the Search everywhere dialog. No need to open file(s) manually just jump to any definition you need: WebStorm automatically recognizes Angular components and directives in your HTML - links to stylesheets, links to templates, classes, interfaces and much more. If you’re a mouse user, hold down the cmd button and all terms you hover will turn into links to their definition. If you’re a keyboard user, just put your cursor on a term and hit cmd + B. Use cmd-click or cmd + B to easily jump to any definition within your project.
#Webstorm plugins pro#
WebStorm and Angular Tip 2: Navigate Like a Pro WebStorm will make sure the new files are created in the right location and that the new feature is added to the correct Angular module. If your application has multiple Angular modules, right-click on the module you wish to add the feature to and choose New > Angular CLI. What’s really awesome is that WebStorm automatically adds the component to the right Angular module for you - in this case AppModule. To learn more about Angular CLI options and parameters, make sure to check out The Ultimate Angular CLI Reference. Once you’ve selected a feature, you can specify the name and optional parameters, just as you would with Angular CLI on the command line: Right-click on src/app and choose New > Angular CLI to pick the type of feature you wish to add. When your new Angular application is in place, you can easily add new Angular features. WebStorm uses Angular CLI to create a new Angular project and install dependencies. To create a new Angular Project, choose File > New > Project and select Angular CLI.Įnter a project location and hit the Create button. WebStorm and Angular integration using Angular CLI provides you with all Angular’s power right from within WebStorm, without using the terminal. You can use it to quickly create new Angular projects and add new features such as components, services and directives to existing Angular projects. WebStorm and Angular Tip 1: Use Angular CLI from Within WebStormĪngular CLI is a command-line interface (CLI), written and maintained by the Angular team, to help automate your development workflow.
0 notes
Text
Dependency Injection in Angular with example

Angular is incredibly effective because it takes use of the Dependency Injection design pattern. Classes, components, and modules can interact while yet remaining consistent under this programming paradigm. As a result, the class changes less frequently. What is Dependency Injection? Dependency injection, a well-known programming concept, is what separates a class from its dependencies. Through the use of dependency injection, dependent objects can be created independently of classes and provided to classes in a variety of other ways. Think about the classes A and B. Assume class A makes use of class B's objects. A class B instance is typically generated in OOPS so that class A can access the objects. We use DI to remove the dependent objects' construction and binding from the class that depends on them. There are often three different categories of courses, namely: - Client Class - The dependent class on the service class is this one. - Service Class - Class that offers the client class the service. - Injector Class - Injects the object from the service class into the client class. Types of Dependency Injection in Angular In Angular, dependency injections come in three different types, and they are as follows: - Constructor injection: Through a class constructor, it gives the dependencies in this case. - Setter injection: The injector injects the dependence into a setter method that is used by the client. - Interface injection: Any client that is provided to the injector method by the dependence will receive the injection of the dependency. A setter method that accepts the dependence must be exposed through an interface that the clients must implement. Benefits of Dependency Injection - loosely coupled - Our Component is currently just loosely connected to the ProductService. The ProductService cannot be created by AppComponent. In reality, it has no knowledge of the ProductService. It only functions with the ProductService that was provided to it. ProductService, BetterProductService, or MockProductService are all acceptable options. The AppComponent is apathetic. - Easily Testable Testing AppComponent is now simpler. Our AppComponent is no longer reliant on a specific ProductService implementation. Any ProductService implementation that is provided to it will function. To pass during testing, simply create a mockProductService Class. - Reusing the Component: It gets simpler to reuse the component. With every ProductService moving forward, our Component will function as long as the interface is respected. Our AppComponent is now tested, maintainable, etc. thanks to the dependency injection technique. But does it fully resolve all of our issues? No, we simply transferred the Problem from the Component to the Component Creator. How can we make a ProductService object and send it to the AppComponent? Angular Dependency Injection accomplishes that. How DI (Dependency Injection) works Take into account the following service, which is produced by: ng g service test import { Injectable } from '@angular/core'; @Injectable({ providedIn: 'root' }) export class TestService { importantValue: number = 42; constructor() { } returnImportantValue() { return this.importantValue; } } As one can see, by including the @Injectable decorator in a class, we may construct injectable dependencies. We include the aforementioned dependent in the component shown below: import { TestService } from './../test.service'; import { Component, OnInit } from '@angular/core'; @Component({ selector: 'app-test', templateUrl: './test.component.html', styleUrls: }) export class TestComponent implements OnInit { value: number; constructor(private testService: TestService) { } ngOnInit() { this.value = this.testService.returnImportantValue(); } } At the top of the page, one can see that we have imported our TestService. The returnImportantValue function of the service was then implemented when we generated an instance inside the function Object() { } of the component. We can see from the aforementioned example how angular offers a fluid approach to inject dependencies in any component.
Conclusion
An excellent, multipurpose framework that accelerates development is Angular. It provides deep linking and dependency injection and is a reliable platform for software development. Read the full article
0 notes
Text
AZ B2B - AD - MSAL- Ang 13
Index.html
!-- !doctype html html lang="en" head meta charset="utf-8" titleVacPortal/title base href="/" meta name="viewport" content="width=device-width, initial-scale=1" link rel="icon" type="image/x-icon" href="favicon.ico" link rel="preconnect" href="https://fonts.gstatic.com" link href="https://fonts.googleapis.com/css2?family=Roboto:wght@300;400;500&display=swap" rel="stylesheet" link href="https://fonts.googleapis.com/icon?family=Material+Icons" rel="stylesheet" !-- Load environment variables -- script src="assets/javascript/env.js"/script /head body class="mat-typography" app-rootapp-root !-- Start MSAL Integration -- app-redirect app-redirect !-- Ends MSAL Integration -- body
html
App Module
//#region "MSAL Integration" // import { HTTP_INTERCEPTORS, HttpClientModule } from '@angular/common/http'; import { IPublicClientApplication, PublicClientApplication, InteractionType, BrowserCacheLocation, LogLevel } from '@azure/msal-browser'; import { MsalGuard, MsalInterceptor, MsalBroadcastService, MsalInterceptorConfiguration, MsalModule, MsalService, MSAL_GUARD_CONFIG, MSAL_INSTANCE, MSAL_INTERCEPTOR_CONFIG, MsalGuardConfiguration, MsalRedirectComponent,ProtectedResourceScopes } from '@azure/msal-angular';
const isIE = window.navigator.userAgent.indexOf("MSIE ") -1 || window.navigator.userAgent.indexOf("Trident/") -1; // Remove this line to use Angular Universal
export function loggerCallback(logLevel: LogLevel, message: string) { console.log(message); }
export function MSALInstanceFactory(): IPublicClientApplication { return new PublicClientApplication({ auth: { clientId: environment.clientId, authority: environment.authority, redirectUri: '/', postLogoutRedirectUri: '/' }, cache: { cacheLocation: BrowserCacheLocation.LocalStorage, storeAuthStateInCookie: isIE, // set to true for IE 11. Remove this line to use Angular Universal }, system: { loggerOptions: { loggerCallback, logLevel: LogLevel.Info, piiLoggingEnabled: false } } }); }
export function MSALInterceptorConfigFactory(): MsalInterceptorConfiguration { const protectedResourceMap = new Mapstring, Arraystring|ProtectedResourceScopes | null([ [EnvUtil.getGraphSvcApiURL(), [environment.graphSvcScope]], [EnvUtil.getBFFServicesApiURL(), [environment.bffSvcScope]], [EnvUtil.getSharedSvcApiURL(), [environment.sharedSvcScope]], ]); return { interactionType: InteractionType.Redirect, protectedResourceMap }; }
export function MSALGuardConfigFactory(): MsalGuardConfiguration { return { interactionType: InteractionType.Redirect, authRequest: { scopes: [] }, loginFailedRoute: '/' }; }
//#endregion "MSAL Integration"
export function rootLoaderFactory(http: HttpClient) { return new TranslateHttpLoader(http); }
@NgModule({ declarations: [ AppComponent, ], imports: [ BrowserModule, FormsModule, AppRoutingModule, BrowserAnimationsModule, FormsModule, ReactiveFormsModule, ], providers: [ { provide: HTTP_INTERCEPTORS, useClass: HeaderInterceptor, multi: true }, //#region "MSAL Integration" { provide: HTTP_INTERCEPTORS, useClass: MsalInterceptor, multi: true }, { provide: MSAL_INSTANCE, useFactory: MSALInstanceFactory }, { provide: MSAL_GUARD_CONFIG, useFactory: MSALGuardConfigFactory }, { provide: MSAL_INTERCEPTOR_CONFIG, useFactory: MSALInterceptorConfigFactory }, MsalService, MsalGuard, MsalBroadcastService, //#endregion "MSAL Integration" TranslatePipe ], bootstrap: [AppComponent,MsalRedirectComponent], }) export class AppModule {}
Routing
// Starts - MSAL Integration import { BrowserUtils } from "@azure/msal-browser"; import { MsalGuard, MsalRedirectComponent } from "@azure/msal-angular"; // Ends - MSAL Integration
const routes: Routes = [ { path: "", pathMatch: "full", redirectTo: "/userWelcome", }, { path: "userWelcome", component: UserWelcomeComponent, canActivate: [MsalGuard], data: { breadcrumb: "breadcrumb.userWelcome", }, }, { path: "auth", component: MsalRedirectComponent, }, { path: "**", component: PageNotFoundComponent, }, ];
@NgModule({ imports: [ RouterModule.forRoot(routes, { initialNavigation: "enabled" }), ], exports: [RouterModule], }) export class AppRoutingModule {}
App Comp
//#region "MSAL Integration" import { MsalService, MsalBroadcastService, MSAL_GUARD_CONFIG, MsalGuardConfiguration, } from "@azure/msal-angular"; import { AccountInfo, EventMessage, EventType, InteractionStatus, RedirectRequest, } from "@azure/msal-browser"; //#endregion "MSAL Integration"
@Component({ selector: "app-root", templateUrl: "./app.component.html", styleUrls: [ "./app.component.css", ], }) export class AppComponent implements OnInit, OnDestroy { //#region "MSAL Integration" isIframe = false; isUserLoggedIn = false; private readonly _destroying$ = new Subjectvoid(); //#endregion "MSAL Integration"
constructor( @Inject(MSAL_GUARD_CONFIG) private msalGuardConfig: MsalGuardConfiguration, ) { }
ngOnInit(): void { this.isIframe = window !== window.parent && !window.opener; // Remove this line to use Angular Universal // this.setLoginDisplay(); //:: Do not remove pleasethis.msalAuthService.instance.enableAccountStorageEvents(); // Optional - This will enable ACCOUNT_ADDED and ACCOUNT_REMOVED events emitted when a user logs in or out of another tab or window this.msalBroadcastService.msalSubject$ .pipe( filter( (msg: EventMessage) = msg.eventType === EventType.ACCOUNT_ADDED || msg.eventType === EventType.ACCOUNT_REMOVED ) ) .subscribe((_result: EventMessage) = { if (this.msalAuthService.instance.getAllAccounts().length === 0) { window.location.pathname = "/"; } else { this.setLoginDisplay(); } }); this.msalBroadcastService.inProgress$ .pipe( filter( (status: InteractionStatus) = status === InteractionStatus.None ), takeUntil(this._destroying$) ) .subscribe(() = { this.checkAndSetActiveAccount(); this.setLoginDisplay(); });
}
setLoginDisplay() { this.isUserLoggedIn = this.msalAuthService.instance.getAllAccounts().length 0; this.azureAuthNotSrv.pushLoginDisplayNotification(this.isUserLoggedIn); }
checkAndSetActiveAccount() { /** * If no active account set but there are accounts signed in, sets first account to active account * To use active account set here, subscribe to inProgress$ first in your component * Note: Basic usage demonstrated. Your app may require more complicated account selection logic */ let activeAccount = this.msalAuthService.instance.getActiveAccount();if ( !activeAccount && this.msalAuthService.instance.getAllAccounts().length 0 ) { let accounts = this.msalAuthService.instance.getAllAccounts(); if (accounts && accounts.length 0) { this.msalAuthService.instance.setActiveAccount(accounts[0]); this.setAzureADID(accounts[0]); } }
}
loginRedirect() { if (this.msalGuardConfig.authRequest) { this.msalAuthService.loginRedirect({ …this.msalGuardConfig.authRequest, } as RedirectRequest); } else { this.msalAuthService.loginRedirect(); } }
// Event handling from Header Component onLoginButtonClick(data: boolean) { if (data) { this.loginRedirect(); } }
logoutRedirect() { this.msalAuthService.logoutRedirect(); }
// Event handling from Header Component onLogoutButtonClick(data: boolean) { if (data) { this.logoutRedirect(); } }
ngOnDestroy(): void { this._destroying$.next(undefined); this._destroying$.complete(); } }
Welcome
// Start - MSAL Integration import { MsalBroadcastService, MsalService } from "@azure/msal-angular"; import { AuthenticationResult, EventMessage, EventType, } from "@azure/msal-browser"; // Ends - MSAL Integration
@Component({ selector: "app-welcome", templateUrl: "./welcome.component.html", styleUrls: [ "./welcome.component.css", ], }) export class WelcomeComponent implements OnInit { doubleSpace = " "; userFullName$: Observablestring; isUserLoggedIn$: Observableboolean;
constructor( private authService: MsalService, private msalBroadcastService: MsalBroadcastService, private router: Router ) {}
ngOnInit(): void { this.setUpLoginDisplaySubscribtion(); this.setUpUserFullNameSubscribtion(); this.setUpLastloginSubscription(); this.userRole = this.azureAuthSvc.getUserRoles()[0];//:: MSAL Integration this.msalBroadcastService.msalSubject$ .pipe( filter((msg: EventMessage) = msg.eventType === EventType.LOGIN_SUCCESS) ) .subscribe((result: EventMessage) = { const payload = result.payload as AuthenticationResult; this.authService.instance.setActiveAccount(payload.account); });
}
setUpLoginDisplaySubscribtion() { this.isUserLoggedIn$ = this.azureAuthNotSrv.getLoginDisplayNotification(); }
}
welcome html
div *ngIf="(isUserLoggedIn$ | async) as isUserLoggedIn" div *ngIf="isUserLoggedIn && (userFullName$ | async) as userFullName" h1 property="name" id="wb-cont" translatelandingPage.welcomespan{{ ' ' + userFullName}}/span/h1 div class="panel panel-default" div class="panel-body" /div /div /div /div
Header
section id="wb-so" div class="container" div class="row" div class="col-md-12" *ngIf="(isUserLoggedIn$ | async) === true; else elseBlock" span *ngIf="(userFullName$ | async) as userFullName" class="mrgn-rght-md h4" translate header.loginLabel /span button class="btn btn-primary" type="button" (click)="logoutButtonClick($event)" signOut /button /div ng-template #elseBlock div class="col-md-12" button class="btn btn-primary" type="button" *ngIf="(isUserLoggedIn$ | async) === false" (click)="loginButtonClick($event)" login /button /div /ng-template /div /div
/section
@Component({ selector: 'app-header', templateUrl: './header.component.html', styleUrls: ['./header.component.css', }) export class HeaderComponent implements OnInit { @Output() logIn: EventEmitterany = new EventEmitterany(); @Output() logout: EventEmitterany = new EventEmitterany();
isUserLoggedIn$:Observableboolean;
constructor( private azureAuthNotSrv:AzureAuthNotificationService, private router: Router ) { }
ngOnInit(): void { this.isUserLoggedIn$=this.azureAuthNotSrv.getLoginDisplayNotification(); }
loginButtonClick(data:Event){ this.logIn.next(true); }
logoutButtonClick(data:Event){ this.logout.next(true); }
}
package
{ "name": "portal", "version": "0.0.1", "scripts": { "ng": "ng", "start": "ng serve --port=8200", "build": "ng build --configuration production", "watch": "ng build --watch --configuration development", "test": "ng test" }, "private": true, "dependencies": { "@angular/animations": "~13.1.0", "@angular/cdk": "^13.2.0", "@angular/common": "~13.1.0", "@angular/compiler": "~13.1.0", "@angular/core": "~13.1.0", "@angular/forms": "~13.1.0", "@angular/material": "^13.2.0", "@angular/platform-browser": "~13.1.0", "@angular/platform-browser-dynamic": "~13.1.0", "@angular/router": "~13.1.0", "@azure/msal-angular": "^2.2.0", "@azure/msal-browser": "^2.23.0", "@ngx-translate/core": "^14.0.0", "@ngx-translate/http-loader": "^7.0.0", "jquery": "^3.6.0", "object-mapper": "^6.2.0", "rxjs": "~7.4.0", "scriptjs": "^2.5.9", "tslib": "^2.3.0", "xng-breadcrumb": "^6.8.3", "zone.js": "~0.11.4" }, "devDependencies": { "@angular-devkit/build-angular": "~13.1.2", "@angular/cli": "~13.1.2", "@angular/compiler-cli": "~13.1.0", "@types/jasmine": "~3.10.0", "@types/scriptjs": "^0.0.2", "jasmine-core": "~3.10.0", "karma": "~6.3.0", "karma-chrome-launcher": "~3.1.0", "karma-coverage": "~2.1.0", "karma-jasmine": "~4.0.0", "karma-jasmine-html-reporter": "~1.7.0", "typescript": "~4.5.2" } }
0 notes
Text
An overview of Angular
In this article, we are going to have a look at the Angular framework. Let's get into it!
Introduction
Nowadays, we have plenty of options to develop something that is ready for various platforms. However, Angular has made its way and it is now one of the most important actors. Let's see what it is and how it works.
We could jump right into the code of a project, but we would probably miss a few things. So, here, we are going to look at the architecture of Angular to understand the different concepts and elements this last one uses.
What is Angular?
Now, when we talk about Angular, we talk about Angular 2 or Angular 5. Angular is a complete rewrite of the AngularJS framework. Angular as a different approach from its predecessor.
Angular allows us to build applications across all platforms. It is an open-source platform that uses TypeScript. In a few words, TypeScript is a strict syntactical superset of JavaScript, and adds optional static typing to the language.
Architecture overview
Angular is written in TypeScript and it implements core and optional functionality as a set of TypeScript libraries that we can import.
An Angular application has, for building blocks, a thing called NgModules. An Angular app is defined by a set of NgModules. An app always has at least a Root Module that enables bootstrapping. An NgModule is made of Components. Every app has at least a Root Component.
Components, and things like Services, are just classes. They are, however, marked with decorators that tells Angular how to use them.
Angular provides a Router Service that helps us to define navigation paths among the different Views.
Modules
Angular apps are modular and this modularity system is called NgModules.
An NgModule defines a set of Components. An NgModule associate related code to form functional units. Every Angular app has a Root Module, conventionally named AppModule, which provides the bootstrap mechanism that launches the application.
Even if they are different and unrelated, NgModules, like JavaScript modules, can import functionality from other NgModules, and allow their own functionality to be exported and used by other NgModules. What we call Angular Libraries are NgModules.
We declare an NgModule by decorating our class with the "@NgModule" decorator. This decorator is a metadata object whose properties describe the module. The most important properties, which are arrays, are the following:
declarations - Components, Directives, and Pipes that belong to the NgModule
exports - the subset of declarations that should be visible and usable in the Components of other NgModules
imports - other modules whose exported classes are needed by Components declared in the NgModule
providers - list of the needed Services that, because they are listed here, become are available app-wide
bootstrap - the main application View, called the Root Component, which hosts all other app views. (only the Root Module should set this bootstrap property)
An NgModule provides a compilation context for its various Components. So, the Components that belong to an NgModule share a compilation context. NgModules define a cohesive block of functionality.
The Root Module of our application is the one that we bootstrap to launch the application. The application launches by bootstrapping the root AppModule. We also call it the entryComponent. The bootstrapping process creates the Components listed in the "bootstrap" array and inserts each one into the browser DOM. So, each bootstrapped Component is the base of its own tree of Components.
As we saw, we can have a Root Module, but we can have what we call Feature Modules. A Feature Module delivers a cohesive set of functionality focused on a specific application needs. We could do everything in the Root Module, but a Feature Module will help us partition our app into focused areas. However, the structure of a Feature Module is exactly the same as the one of a Root Module.
Down below, we can find an example of how could look an NgModule. Here, it is the AppModule:
// Importing Angular Libraries import { BrowserModule } from '@angular/platform-browser'; import { NgModule } from '@angular/core'; import { FormsModule } from '@angular/forms'; import { HttpModule } from '@angular/http'; // Importing the AppComponent import { AppComponent } from './app.component'; // Importing a custom feature module import { CustomFeatureModule } from './custom-feature-module/custom-feature-module.module'; // Declaring the Module @NgModule({ declarations: [ AppComponent ], imports: [ BrowserModule, FormsModule, HttpModule, CustomerDashboardModule ], providers: [], bootstrap: [AppComponent] }) export class AppModule { }
Components
A Component controls a patch of screen called a View. The logic of a Component is defined inside a class. Angular creates, updates, and destroys Components as the user moves through the application.
A Component is identified by the "@Component" decorator that has a set of properties. The most import properties are the following ones:
selector - tells how the component is referenced in HTML; in simple words, it corresponds to the HTML tag.
templateUrl - gives the path of the HTML template.
providers - an array of Dependency Injection Providers for Services that the Component requires.
Notice that instead of the "templateUrl" property, we could use the "template" property that lets us provide the HTML template inline.
A Component has a View and this last one is defined through an HTML template. This HTML file also contains some syntactic elements that are included in Angular.
A Component will typically look like so:
@Component({ selector: 'my-component', templateUrl: './my-component.component.html', providers: [ MyService ] }) export class MyComponent implements OnInit { // Some code }
Before going any further with Components, let's take a look at a few other elements to simplify some terms that we will use later.
Services
A Service is useful to define things that can't fit into a Component and find their reason to exist in the separation of concerns. A Service is a class with a well-defined purpose. For example, we should create a Service when two or more Components or other things need to access the same data or if we want to encapsulate interactions with a web server or if we want to define how to validate user inputs.
Services are Singletons, so there is only one instance of each Service we define. They are stateless objects that can be invoked from any Components. Their purpose is to help us to divide our application into small, different logical units that can be reused.
A Service is a simple class and could look like so:
export class Logger { log(msg: any) { console.log(msg); } error(msg: any) { console.error(msg); } warn(msg: any) { console.warn(msg); } }
Dependency Injection
Dependency Injection is a large subject. Dependency Injection, also called DI, is a Design Pattern in which one or more dependencies (Services) are injected into a dependent object (Client). This pattern allows us to implement a loosely coupled architecture by separating the creation of a client's dependencies from its own behavior.
We can apply this pattern when we want to remove knowledge of concrete implementations from objects, but also when we want to get a better testable code in isolation using mock objects.
The DI Pattern is commonly used to implement the Inversion of Control Principle, which in a few words, separates the what-to-do part of the when-to-do part. In other words, it is about letting somebody else handles the flow of control. It is based on the Hollywood Principle: "Don't call us, we'll call you".
Dependency Injection could be achieved by using the "constructor" of a class or "setter" methods. It can also be achieved with a Container that handles the instantiation of other objects.
In Angular, DI is widely used and we can take a moment to dig a little into it.
Angular uses its own Dependency Injection framework that basically uses three things:
The Injector, that exposes APIs. It is responsible for creating Service instances and injecting them into classes.
The Provider, that tells the Injector how to create an instance of a dependency.
The Dependency, the type of which an object should be created.
Angular has a Hierarchical Dependency Injection system. There is a tree of Injectors that parallels an application's Component tree. An application may have multiple Injectors. That means we can configure Providers at different levels:
For the whole application when bootstrapping it. All sub Injectors will see the Provider and share the instance associated with. It will always be the same instance.
For a specific Component and its sub Components. Other Components won't see the Provider.
For Services. They use one of the Injectors from the element that calls the Service chain.
When using DI with Angular, we will mainly see the "@Injectable" decorator. This decorator marks a class as available to Injector for creation.
In an Angular app, Components consume Services. A Component shouldn't create a Service. So, we inject the different required Services into the different Components. When Angular creates a new instance of a Component class, it determines which Services or other dependencies that Component needs by looking at the types of its constructor parameters. When Angular discovers that a Component needs a Service, it checks if the Injector already has any existing instances of that same Service. If an instance of that requested Service doesn't exist, the Injector makes one using the registered Provider and adds it to the Injector before returning the Service to Angular.
A Provider is a recipe for creating a dependency. We must at least register one Provider of any Service we want to use. It can be done in Modules or in Components. Doing this in a Module allows Angular to inject the corresponding Services in any class it creates and so the Service instance lives for the life of the app. By using a Component Provider we restrict the scope of the Service and so it will only be injected into that Component instance or one of its descendant Component instances. It means that Angular can't inject the same Service instance anywhere else. The lifetime of this Service will also be different: the Service instance will be destroyed when the Component instance is destroyed.
Here is how we can inject a Service in a Component:
import { Injectable } from '@angular/core'; import { Logger } from './logger'; @Injectable() export class Logger { log(msg: any) { console.log(msg); } error(msg: any) { console.error(msg); } warn(msg: any) { console.warn(msg); } }
logger.service.ts file
import { Component } from '@angular/core'; import { Logger } from './logger'; @Component({ selector: 'my-component', templateUrl: './my-component.component.html', providers: [ Logger ] }) export class HeroListComponent implements OnInit { constructor(private logger: Logger {} }
my-component.component.ts file
We could also do it with the Root Module like so:
@NgModule({ providers: [ Logger ] })
app.module.ts file
import { Component } from '@angular/core'; import { Logger } from './logger'; @Component({ selector: 'my-component', templateUrl: './my-component.component.html', }) export class MyComponent implements OnInit { constructor(private logger: Logger {} }
my-component.component.ts file
We can also imagine the a Service needs another Service:
import { Injectable } from '@angular/core'; import { Logger } from './logger.service'; @Injectable() export class MyService { constructor(private logger: Logger) { } }
Data Binding
Basically, data bindings allow properties of two objects to be linked so that a change in one causes a change in the other. It establishes a connection between the user interface and the underlying application. It defines a relationship between two objects: a source object that will provide data and a target object that will use the data from the source object. The benefit of data binding is that we no longer have to worry about synchronizing data between our Views and data source.
With Angular, the most common way to display a Component property is to bind that property name through interpolation. Interpolation is the estimation of a value or a set of values based on their context. It allows to evaluate a string containing one or more placeholders and to replace those placeholders with a computed and corresponding value. The context is typically the Component instance. So, basically, in Angular, to achieve this, we have to put the property name in the View enclosed in double curly braces. It will be something like so:
<h1>{{title}}</h1>
Most of the time, bindings are used to connect the visuals of an application with an underlying data model, usually in a realization of the MVVM Pattern (Model-View-ViewModel) or the MVC Pattern (Mode-View-Controller). In Angular, the Component plays the part of the Controller/ViewModel, and the template represents the View.
Angular provides many kinds of data binding. Binding types can be grouped into three categories distinguished by the direction of the data flow: source-to-view, view-to-source and two-way sequence: view-to-source-to-view. When we use binding types other than interpolation, we have to specify a target name that is the name of a property. It looks like an attribute name, but it is not. With data binding, we are not working with HTML attributes, but properties of DOM (Document Object Model) elements. Just to refresh our minds, we may say that attributes are defined by HTML and properties are defined by DOM and the responsibility of HTML attributes is just to initialize DOM properties. Later DOM properties can change, but HTML attributes cannot. Some DOM properties don't have corresponding attributes and some HTML attributes don't have corresponding properties. The target of a data binding is something in the DOM.
import { Component } from '@angular/core'; @Component({ selector: 'my-component', templateUrl: './my-component.component.html', }) export class MyComponent { imgSrc: String = 'path-to-image'; }
my-component.component.ts file
<img [src]="imgSrc">
my-component.component.html file
We often say that property binding is one-way data binding because it flows a value in one direction, from a Component's data property into a target element property. However, we are allowed to achieve something called two-way data binding that, for example, lets us display a data property and update that property when the user makes changes. We can do this by using the syntax "[(x)]".
We are also able to achieve event binding:
export class MyComponent { doSomething() { // some code } }
my-component.component.ts file
<button (click)="doSomething()">Do something</button>
my-component.component.html file
Input and Output
In a Component, we can use two decorators on properties: "@Input" and "@Output".
An Input property is a settable property. An Output property is an observable property. Input properties usually receive data values. Output properties expose Event producers.
Declaring an Input property would give something like so:
export class MyComponent { @Input() name: String; }
my-component.component.ts file
<my-component name="foo"></my-component>
my-component.component.html file
An Output property almost always returns an Angular EventEmitter. An EventEmitter allows us to emit a custom Event. It is helpful to pass a value to a parent Component. Let's say that we have something like this:
export class MyComponent { @Output() deleteItemRequest = new EventEmitter<Item>(); delete() { this.deleteItemRequest.emit(this.item) } }
my-component.component.ts file
<button (click)="delete()">Delete</button>
my-component.component.html file
As we can see, here, we use event binding. So, when the button is clicked, we call the "delete()" method. In the Component, we also declare an Output property that returns an EventEmitter and we declare its underlying type as "Item". So, when the "delete()" method is called, we use this EventEmitter to emit a new Event. In fact, it will emit an "Item" object.
So, we can now imagine that we have the following thing as a parent Component:
export class ParentComponent { deleteItem(item: Item) { // Some code } }
parent-component.component.ts file
<parent-component (deleteItemRequest)="deleteItem($event)"></parent-component>
parent-component.component.ts file
When the child Component emits its Event, the parent Component will use the result of this same Event with its own method.
Component Lifecycle Hooks
Angular manages the lifecycle of the different Components. Through different Hooks, it provides a way to perform actions when those different moments occur. We access to those moments by implementing one or more of the lifecycle Hook interfaces in the Angular core library. Each interface has a single Hook method whose name is the interface name prefixed with "ng".
Down below, we have an example of a Component using the "OnInit" interface:
export class MyComponent implements OnInit { ngOnInit() { // Some code } }
Communication between parent and child Components
There are a few ways to make a parent and child Component interact. One way is to inject the child Component into the parent as a ViewChild. This could be achieved like so:
import { ViewChild } from '@angular/core'; import { Component } from '@angular/core'; import { ChildComponent } from './child-component.component'; export class ParentComponent { @ViewChild(ChildComponent) private childComponent: ChildComponent; method1() { this.childComponent.childMethod1(); } method2() { this.childComponent.childMethod2(); } }
Another way to make a parent and child Component interact is to make them share a Service.
Directives
In Angular, there are three kinds of Directives:
Components - Directives with a template
Structural Directives - change the DOM layout by adding and removing DOM elements
Attribute Directives - change the appearance or behavior of an element, Component, or another Directive
We have already seen Components. They are the most common Directives.
Structural Directives change the structure of the View. They are things like "NgFor" or "NgIf". Here is an example of different Structural Directives:
<div *ngIf="character" class="name">{{character.name}}</div> <ul> <li *ngFor="let character of characters">{{character.name}}</li> </ul> <div [ngSwitch]="character?.size"> <app-big-character *ngSwitchCase="'big'" [character]="character"></app-big-character> <app-medium-character *ngSwitchCase="'medium'" [character]="character"></app-medium-character> <app-small-character *ngSwitchCase="'small'" [character]="character"></app-small-character> <app-character *ngSwitchDefault="'small'" [character]="character"></app-character> </div>
Attribute Directives are used as attributes of elements. They are things like "NgClass" or "NgStyle". Here is an example of different Attribute Directives:
<div [ngStyle]="currentStyles"> Some content. </div> <div [class.error]="hasError">Some error</div>
Let's make a little side note for the "NgModel" Directive that is part of the "FormsModule". This Directive helps us when we want to display a data property and update that property when the user makes changes through a form. Using this two-way data binding makes this easier. It will map the various fields of our form to our Data Model. It will ensure that the data in the View and the data in our Data Model are synced.
We can use this Directive like so:
export class MyComponent { name: string; }
my-component.component.ts file
<input type="text" [(ngModel)]="name" />
my-component.component.html file
We are also able to build Attribute Directives. We just have to create a class annotated with the "@Directive" decorator.
Pipes
Pipes are a way to operate some transformations over data before displaying them. Angular comes with several built-in Pipes. For example, we can have something like so:
<p>The character's birthday is {{ birthday | date:"MM/dd/yy" }}</p>
We are also able to create our own Pipes by using the "@Pipe" decorator and implementing the "PipeTransform" interface. This could be done like so:
import { Pipe, PipeTransform } from '@angular/core'; @Pipe({name: 'exponentialStrength'}) export class ExponentialStrengthPipe implements PipeTransform { transform(value: number, exponent: string): number { let exp = parseFloat(exponent); return Math.pow(value, isNaN(exp) ? 1 : exp); } }
Observables
Observables provide support for passing messages between Publishers and Subscribers in our application. An Observable can deliver multiple values of any type.
A Publisher must create an Observable instance. This object defines a function that is executed when a consumer calls the "subscribe()" method. This method, called the subscriber function, states how to get data to be published. To execute our Observable, we have to call its "subscribe()" method and pass it an Observer. This object implements the "Observer" interface and is responsible to handle the various notifications from the Observable.
To use Observables, we need to import the RxJS Library. RxJS is a library for reactive programming, which is a declarative programming paradigm where we program with asynchronous data streams. Data streams can be anything and we are so able to listen to them and react accordingly. A stream is a sequence of continuous Events ordered in time and it can emit three different things: a value of some type, an error or a "completed" value. Asynchronously, we capture these different emitted events by defining functions: one that will execute when a value is emitted, another that will execute when an error is emitted and another one that will execute when "completed" is emitted. The action of listening to the stream is named "subscribing". The various functions we define are the "Observers" while the stream is the "subject" or the "Observale". This is the Behavioral Design Pattern called the Observer Pattern. We also have to deal with the "Operators" which are the various pure functions, functions that always evaluate the same result value when we give them the same argument value, that will let us work on the emitted values.
This kind of programming is really helpful when we have to deal with various UI Events related to data Events. It helps us to achieve real-time apps.
Let's imagine that we have a Service that is responsible to fetch users:
import { Observable } from 'rxjs/Rx' import { Injectable } from '@angular/core' import { Http, Response } from '@angular/http' @Injectable() export class UsersService { constructor(public http: Http) {} public fetchUsers() { return this.http.get('/api/users').map((res: Response) => res.json()) } }
Our method "fetchUsers()" returns an Observable, our subject. So, we can subscribe to our subject like so:
import { Component } from '@angular/core' import { Observable } from 'rxjs/Rx' import { UsersService } from './users.service' import { User } from './user' @Component({ selector: "my-component", templateUrl: "./my-component.component.html", providers: [ UsersService ] }) export class MyComponent { public users: Observable<User[]> constructor(public usersServce: UsersService) {} public ngOnInit() { this.users = this.UsersService.fetchUsers() } }
In our template file, we have to do the following things:
<ul class="user-list" *ngIf="(users | async).length"> <li class="user" *ngFor="let user of users | async"> {{ user.name }} </li> </ul>
We may also want to create an Observable from a Promise. We can do it like so:
const data = fromPromise(fetch('/api/endpoint'));
This create an Observable. To subscribe, we have to do the following thing:
data.subscribe({ next(response) { console.log(response); }, error(err) { console.error('Error: ' + err); }, complete() { console.log('Completed'); } });
Here, we achieve the process of subscription and as we can see, we define the three functions that we talked about a little earlier.
Forms
We can use Angular event bindings to respond to Events that are triggered by user input. For example, we can imagine the following situation:
export class MyComponent { values = ''; onKey(event: any) { this.values += event.target.value; } }
my-component.component.ts file
<input (keyup)="onKey($event)"> <p>{{values}}</p>
my-component.component.html file
Angular has also a whole "Form" library that helps us with many things. We can, for example, use it to add some validation rules to our forms.
<input id="name" name="name" class="form-control" required minlength="4" [(ngModel)]="user.name" #name="ngModel" > <div *ngIf="name.invalid && (name.dirty || name.touched)" class="alert alert-danger"> <div *ngIf="name.errors.required"> Name is required. </div> <div *ngIf="name.errors.minlength"> Name must be at least 4 characters long. </div> </div>
Here, we start by defining a input with a few rules. As we can see, we export the "ngModel" Directive to achieve two-way data binding. We also export the form control's state to a local variable "#name". Then, we check if the control has been touched and we display different errors if there are some.
With Angular, we also have the ability to dynamically generate forms. To achieve this, we have to create objects derived from the base class "QuestionBase" and that represents the various controls of our forms. We can then treat them through a Service that will build the form and return it as a "FormGroup" object.
Routing & Navigation
In Angular, the Router allows navigation from one View to the next. The Router interprets a browser URL to navigate to a client generated View and, if needed, pass optional parameters. The Router can be bound to links or it can be used in response to some actions.
To use the Router correctly, we need to add a "base" element to our "index.html" file. We also need to import the Router Module. In our "app.module.ts" file, we can do the following thing:
import { RouterModule, Routes } from '@angular/router'; const appRoutes: Routes = [ { path: 'characters', component: CharactersComponent }, { path: 'character/:id', component: CharacterDetailComponent }, { path: '', redirectTo: '/characters', pathMatch: 'full' }, { path: '**', component: PageNotFoundComponent } ]; @NgModule({ imports: [ RouterModule.forRoot(appRoutes) ] }) export class AppModule { }
As we can see, we define our navigation Routes in the array "appRoutes" and we pass this array to the "RouterModule". We can now use the "RouterOutlet" Directive, that marks where the Router displays a View, to create some kind of navigation menu:
<nav> <a routerLink="/characters" routerLinkActive="active">Characters</a> </nav> <router-outlet></router-outlet>
After the end of each successful navigation lifecycle, the Router builds a tree of "ActivatedRoute" objects that make up the current state of the Router. We are able to access the current "RouterState" from anywhere in the application using the Router Service and the "routerState" property.
Conclusion
Through this article, we got a brief overview of the Angular technology. It was more a theoretical post than a practical example. Of course, we didn't cover entirely each subject and there are plenty of other subjects that we could have explored like Unit Testing or E2E Testing. Now, however, we have enough knowledge of Angular to start a project and to dig deeper into this framework.
One last word
If you like this article, you can consider supporting and helping me on Patreon! It would be awesome! Otherwise, you can find my other posts on Medium and Tumblr. You will also know more about myself on my personal website. Until next time, happy headache!
8 notes
·
View notes
Photo

Do you know about AppComponent? If yes, comment on AppComponent in your words 😍 #CodeWithSuri #angular #angularcli #angularcomponents (at Link in Bio) https://www.instagram.com/p/CMlok_jjCuW/?igshid=166xamqpjh639
0 notes
Link
0 notes
Text
You Should Know Use Of This Terms Angular 9
New Post has been published on https://is.gd/6ktfCI
You Should Know Use Of This Terms Angular 9

In this article you will understand importance of mainly used terms in Angular 9 by Sagar Jaybhay. You will understand Components, Modules, How angular 9 works?
Angular 9
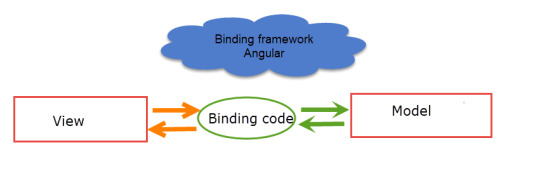
Angular is binding frameworks. It helps us to bind view and model. In angular, you can have multiple apps inside the src folder.
Components
In angular, the binding code which binds the UI means our Html and Model is component. Here Component is the part of angular, which receives data from the UI and Sends data back to UI.

In an enterprise application, you can have a lot of views, lots of components and lots of models.
Modules
If you collect different component and group them into one repo is called modules and these component are generally belong to the same modules

In by default angular generated boilerplate code which doesn’t contain model but as per requirement we want that and we created in our application. The naming convention for this is app.model.ts.
Component In Details In Angular 9:
Below is the code for a component which is generated by default by using angular cli.
import Component from '@angular/core'; @Component( selector: 'app-root', templateUrl: './app.component.html', styleUrls: ['./app.component.css'] ) export class AppComponent title = 'customerapplication';
In angular, we need to create a class first and after that, we use @component which is decorater and other programming languages are termed as an attribute, data annotation.
Now take each term in @Component.
selector: Placed Html in that location
templateUrl: it means whatever data or fields are present in that component is binded with this Html file which is given in this property.
styleUrls: this means for above Html use this style sheet which is present in this location.
In our component class which is AppComponent in our case, we have given export keyword before this. If we didn’t give the export keyword then it is not accessible or visible outside of that .ts file.
Points to remember:
The connection between view and model is done by component.
Module In Angular 9:
The module is used to group related components under the hood. Below is code for a module which is auto-generated by angular cli.
import BrowserModule from '@angular/platform-browser'; import NgModule from '@angular/core'; import AppRoutingModule from './app-routing.module'; import AppComponent from './app.component'; @NgModule( declarations: [ AppComponent ], imports: [ BrowserModule, AppRoutingModule ], providers: [], bootstrap: [AppComponent] ) export class AppModule
So if you see above code AppModule is a class and it is decorated by @NgModule decorator. So we learn every property in this decorator.
Declarations: this is used to declare the component which is used under this module. If you have comp1, comp2 like component then these are declared inside these declarations. When you use this component inside the declaration first you need to import them.
Imports: it is used to import mainly supporting modules
Providers: A provider is an instruction to the Dependency Injection system on how to obtain a value for a dependency.
Bootstrap: this is used to give a starting component or root component where the application starts.
If you consider an enterprise application is having lots of modules and for a startup, we need only one so
GitHub Project Link: https://github.com/Sagar-Jaybhay/angular9
0 notes
Text
Alert / Toaster Notification Library For Angular
A simple reusable alert/toaster notification service and component in an Angular 2/5 application using TypeScript.
Installation:
# NPM $ npm install angular2-alert-notifications --save
Usage:
Import the library to your Angular module (app.module.ts).
import { NgModule } from '@angular/core'; import { BrowserModule } from '@angular/platform-browser'; import { AppComponent } from…
View On WordPress
1 note
·
View note
Link
Front-end development has grown so much over the last decade from pure HTML and CSS design to topics such as high interactivity, accessibility, testability, and security. In order to meet these needs, most application teams have made distinctions between backend and front-end development teams.
In addition to that, the application functionality grows steadily and, at a certain point, it becomes impractical to have multiple teams collaborate on a single code base.
The term "Micro Front-ends" has been a buzzword for breaking up growing front-end code into easy-to-maintain parts. The front-end is divided into its multiple functions or parts. These parts are implemented and deployed by independent teams. This increases the testability, reusability, and offers the possibility to select different technologies for each micro front-end.
I will stop at this point and, without further ado, let's build sample micro front-ends using Angular elements.
Building Micro Front-Ends
We will build a sample travel booking system in this article. Let's spin up two Angular projects using CLI: travel-booking and flight-booking.
We will need a few dependencies to build and run Angular custom elements. Install the following dependencies inside flight-booking using following commands.
ng add @angular/elements ng add ngx-build-plus
These dependencies can also be installed via npm. @angular/elements provides support for Angular elements. ngx-build-plus is a build tool for Angular which is an extension of Angular CLI.
(adsbygoogle = window.adsbygoogle || []).push({});
Note: You may need to update the version for the document-register-element module to 1.8.1 in /flight-booking/package.json as described in this issue.
Let us also install the HTTP-server module inside the flight-booking project.
npm i -g http-server --save
Create a component booking in flight-booking/src/app/. Let's modify the component as follows: flight-booking/src/app/booking/booking.component.html
<!--The content below is only a placeholder and can be replaced.-->
<div style="text-align:center">
<a href="javascript:alert('Welcome to Flight Booking App!!');" style="font-size:25px;"></a>
</div>
flight-booking/src/app/booking/booking.component.ts
import { Component, OnInit } from '@angular/core';
@Component({
selector: 'app-flight-booking',
templateUrl: './booking.component.html',
styleUrls: ['./booking.component.scss']
})
export class BookingComponent implements OnInit {
title = 'Flight Booking App';
constructor() { }
ngOnInit() {
}
Let's define the booking component as custom element in flight-booking/src/app/app.module.ts.
import { BrowserModule } from '@angular/platform-browser';
import { NgModule, Injector } from '@angular/core';
import { AppRoutingModule } from './app-routing.module';
import { AppComponent } from './app.component';
import { createCustomElement } from '@angular/elements';
import { BookingComponent } from './booking/booking.component';
@NgModule({
declarations: [
AppComponent,
BookingComponent
],
imports: [
BrowserModule,
AppRoutingModule
],
providers: [],
bootstrap: [],
entryComponents: [
BookingComponent
]
})
export class AppModule {
constructor(private injector: Injector) {
}
ngDoBootstrap() {
const myCustomElement = createCustomElement(BookingComponent, { injector: this.injector });
customElements.define('app-flight-booking', myCustomElement);
}
}
To build the project in a single JS file, we need to tell angular to use the ngx-build-plus module. Modify flight-booking/angular.json in three places as follows:
"architect": { "build": { "builder": "ngx-build-plus:build", ....
"serve": { "builder": "ngx-build-plus:dev-server", ...
"test": { "builder": "ngx-build-plus:karma",
Running the Project
Run the following command to build the project into a single JS file.
ng build --prod --output-hashing none --single-bundle true
--output-hashing none will avoid hashing the file names.
(adsbygoogle = window.adsbygoogle || []).push({});
--single-bundle true will bundle all the compiled files into a single JS file.
Start the server.
http-server ./dist/flight-booking -p 8081
Similarly, create another custom element, train-booking, and run the server with port 8082.
http-server ./dist/train-booking -p 8082
Wrapping a Custom Element
Let us include flight-booking and train-booking custom elements in travel-booking app. Modify /travel-booking/index.html as follows.
<!doctype html>
<html lang="en">
<head>
<meta charset="utf-8">
<title>TravelBooking</title>
<base href="/">
<meta name="viewport" content="width=device-width, initial-scale=1">
<link rel="icon" type="image/x-icon" href="favicon.ico">
</head>
<body>
<app-root></app-root>
<div style="margin-bottom: 10px;" id="flight-booking-container"><app-flight-booking></app-flight-booking></div>
<div id="train-booking-container"><app-train-booking></app-train-booking></div>
<script src="https://cdnjs.cloudflare.com/ajax/libs/zone.js/0.9.1/zone.min.js"></script>
<script src="https://cdnjs.cloudflare.com/ajax/libs/webcomponentsjs/2.2.10/custom-elements-es5-adapter.js"></script>
<script type="text/javascript" src="http://localhost:8081/main.js"></script>
<script type="text/javascript" src="http://localhost:8082/main.js"></script>
</body>
</html>
Here, Angular requires zones. and custom-elements-es5-adapter.js provides custom element support within the browser. We also included main.js from our custom elements.
Modify travel-booking/angular.json to override the default server port.
"serve": {
"builder": "@angular-devkit/build-angular:dev-server",
"options": {
"browserTarget": "travel-booking:build",
"port": 8080
}
Running the Main Application
Run the application using ng serve. The final application will look like this:

Wrapping Up
Using simple examples, this article demonstrates how we can build a micro front-end architecture using Angular elements. I hope you enjoyed my article. Let me know your experiences if you are working with micro front-end architecture.
0 notes
Text
Dynamic Components in Angular | Tudip

What are the Dynamic Components:
Dynamic components are instantiated and used in an application at runtime. They are reusable and used in any framework/library making building large-scale apps way easier.
How to use Dynamic Components in Angular Project:
Firstly, Generate a new Angular project, and make sure that you have the angular CLI installed and setup accordingly.
Examples:
ng-template :
It allows declaring a part of the HTML in the Angular Template. So, it is a better way to give a chance to use dynamism in our component which will be used in other components.
In your app.component.html file, Add ng-template in your HTML file.
<ng-template #test></ng-template>
If you run your application, you will not see text rendering on your component. This is because the text is not loaded yet in your DOM. Currently, ng-template grabbed it and used it in other components where it was needed.
How to grab the HTML template in your component:
Steps:
1. Viewchild:
This is an Angular Decorator that will configure the view query. It matches the selector that view in the DOM. It also takes the local variables as a parameter.
Import ViewChild from ‘angular/core’;
export class AppComponent implements OnInit, AfterViewInit{ @ViewChild(‘test’, { read: ViewContainerRef }) container;}
2. ViewContainerRef:
ViewContainerRef is a reference for a container. It stores a reference to the template element.
<ng-template #test></ng-template> <button (click)="addComponent('success')">Create success alert</button> <button (click)="addComponent('danger')">Create danger alert</button>
Before we go to the click method , we need to add a new service The ComponentFactoryResolver service exposes one primary method, resolveComponentFactory.
3. ComponentFactoryResolver:
Generally, the Angular compiler generates a ComponentFactory for any component referenced in a template. They load at runtime because there are no selector references in the templates for dynamically loaded components.
constructor(private resolver: ComponentFactoryResolver) {}
addComponent (type) { this . container . clear (); const factory : ComponentFactory = this .resolver. resolveComponentFactory (TestComponent); this . componentRef = this . container . createComponent ( factory ); this . componentRef . instance . type = type; // this.componentRef.instance.output.subscribe(event => console.log(event)); }
The resolveComponentFactory() method takes a component and returns a ComponentFactory.
Details:
1. this. container. clear ();
While loading another view, we have to remove the previous view, otherwise, it will append more components to the container.
2. const factory : ComponentFactory = this .resolver. resolveComponentFactory (TestComponent);
The resolveComponentFactory() method takes a component and returns the recipe for how to create a component.
3. We are calling the addComponent() method with the recipe. Internally this method will call the create() method from the factory and will append the component as a sibling to our container.
this. componentRef = this . container. createComponent ( factory );
Now we have got a reference to other components, and we can set the type Input as:
this. componentRef . instance. type = type;
4. You can also subscribe to a component Output like this:
this.componentRef.instance.output.subscribe(event => console.log(event));
5. And don’t forget to destroy the component:
ngOnDestroy() { this.componentRef.destroy(); }
6. Add your dynamic components to the entry components section:
@NgModule({ entryComponents: [ TestComponent ], }) export class AppModule {}
Related blogs:
1. Getting Started with Angular Material | Tudip
2. Difference between React and Angular | Tudip
3. Angular universal: Angular server-side rendering | Tudip
4. Creating a simple library using Angular CLI6 | Tudip
0 notes