#arduino temperature sensor
Explore tagged Tumblr posts
Visit Tumblr Blog
Explore Tumblr blogs with no restrictions, modern design and the best experience.
Last Seen Tumblr Blogs


Fun Fact
Tumblr is available in 18 languages.
Text
Understanding the Importance of Water Geyser Thermostats
Water geyser thermostats are crucial components of your home's hot water system, but many people may not fully grasp their significance. This informative article delves into the world of water geyser thermostats, explaining how they work, their role in maintaining water temperature, and why they are essential for energy efficiency and safety. Whether you're a homeowner looking to optimize your hot water system or simply curious about the inner workings of household appliances, this article will provide you with valuable insights into the world of water geyser thermostats.
#immersion heater#thermostat sensor#heater#arduino temperature sensor#temperature sensor type#heaters#air heater#heater machine#industrial heater#heater manufacturer in delhi
0 notes
Text

Buy K-Type Thermocouple MAX6675 Online
Get the K-Type Thermocouple MAX6675 online for precise temperature measurement. High accuracy, durable build, and easy integration for various applications.
0 notes
Text
youtube
#Car cooling systems#Cooling fan resistor#DIY tester#Engine Control Unit#Coolant Temperature Sensor#ESP8266 Node MCU#Relay modules#DC motor#Temperature regulation#Automotive engineering#DIY projects#Engine temperature management#Arduino#Youtube
0 notes
Text

Green Thumb Trinkey springs into existence 🌱💧🌞
With recent work to improve our soil moisture sensing, it could be a nice time to design an 'all-in-one' board for plant and garden hacking. This board has a USB C, so you can plug it right into your computer and read the capacitance of the soil, as well as the ambient light level and temperature + humidity of the onboard AHT20. A QT sensor and 'standard Stemma QT' mounting holes mean you can plug in a VOC, CO2, UV, or PM.2 sensor. The SAMD21E18 can run Arduino or CircuitPython, but we'll also ship it with an example that just spits out CSV data over the serial port for instant interfacing. Coming soon.
#adafruit#trinkey#arduino#circuitpython#SAMD21E18#gardentech#plantcare#soilmoisture#smartgardening#usbctools#diygardening#sensorboard#plantmonitor#techforplants#hardwarehacking
6 notes
·
View notes
Text
How to Use AHT10 High Precision Digital Temperature & Humidity Sensor with Arduino
Looking to measure temperature and humidity with high accuracy using Arduino? The AHT10 sensor is a compact, I2C-based module that provides reliable data, making it perfect for IoT projects, weather stations, and smart home automation.
What You’ll Learn: ✔️ How the AHT10 sensor works ✔️ Wiring it to an Arduino board ✔️ Writing & uploading the code to get readings ✔️ Tips for stable and accurate measurements
What You Need:
AHT10 Temperature and Humidity Sensor Module
Arduino Nano
0.96 inch SSD1306 OLED Display (128x64, I2C)
Breadboard
Connecting/Jumper Wires
Arduino Nano Cable
Download the Code & Library Arduino AHT10 Temperature and Humidity Sensor Module
Watch the full tutorial on YouTube:
youtube
Follow for more DIY electronics tutorials & Arduino projects!
3 notes
·
View notes
Text
Top 10 Projects for BE Electrical Engineering Students
Embarking on a Bachelor of Engineering (BE) in Electrical Engineering opens up a world of innovation and creativity. One of the best ways to apply theoretical knowledge is through practical projects that not only enhance your skills but also boost your resume. Here are the top 10 projects for BE Electrical Engineering students, designed to challenge you and showcase your talents.
1. Smart Home Automation System
Overview: Develop a system that allows users to control home appliances remotely using a smartphone app or voice commands.
Key Components:
Microcontroller (Arduino or Raspberry Pi)
Wi-Fi or Bluetooth module
Sensors (temperature, motion, light)
Learning Outcome: Understand IoT concepts and the integration of hardware and software.
2. Solar Power Generation System
Overview: Create a solar panel system that converts sunlight into electricity, suitable for powering small devices or homes.
Key Components:
Solar panels
Charge controller
Inverter
Battery storage
Learning Outcome: Gain insights into renewable energy sources and energy conversion.
3. Automated Irrigation System
Overview: Design a system that automates the watering of plants based on soil moisture levels.
Key Components:
Soil moisture sensor
Water pump
Microcontroller
Relay module
Learning Outcome: Learn about sensor integration and automation in agriculture.
4. Electric Vehicle Charging Station
Overview: Build a prototype for an electric vehicle (EV) charging station that monitors and controls charging processes.
Key Components:
Power electronics (rectifier, inverter)
Microcontroller
LCD display
Safety features (fuses, circuit breakers)
Learning Outcome: Explore the fundamentals of electric vehicles and charging technologies.
5. Gesture-Controlled Robot
Overview: Develop a robot that can be controlled using hand gestures via sensors or cameras.
Key Components:
Microcontroller (Arduino)
Motors and wheels
Ultrasonic or infrared sensors
Gesture recognition module
Learning Outcome: Understand robotics, programming, and sensor technologies.
6. Power Factor Correction System
Overview: Create a system that improves the power factor in electrical circuits to enhance efficiency.
Key Components:
Capacitors
Microcontroller
Current and voltage sensors
Relay for switching
Learning Outcome: Learn about power quality and its importance in electrical systems.
7. Wireless Power Transmission
Overview: Experiment with transmitting power wirelessly over short distances.
Key Components:
Resonant inductive coupling setup
Power source
Load (LED, small motor)
Learning Outcome: Explore concepts of electromagnetic fields and energy transfer.
8. Voice-Controlled Home Assistant
Overview: Build a home assistant that can respond to voice commands to control devices or provide information.
Key Components:
Microcontroller (Raspberry Pi preferred)
Voice recognition module
Wi-Fi module
Connected devices (lights, speakers)
Learning Outcome: Gain experience in natural language processing and AI integration.
9. Traffic Light Control System Using Microcontroller
Overview: Design a smart traffic light system that optimizes traffic flow based on real-time data.
Key Components:
Microcontroller (Arduino)
LED lights
Sensors (for vehicle detection)
Timer module
Learning Outcome: Understand traffic management systems and embedded programming.
10. Data Acquisition System
Overview: Develop a system that collects and analyzes data from various sensors (temperature, humidity, etc.).
Key Components:
Microcontroller (Arduino or Raspberry Pi)
Multiple sensors
Data logging software
Display (LCD or web interface)
Learning Outcome: Learn about data collection, processing, and analysis.
Conclusion
Engaging in these projects not only enhances your practical skills but also reinforces your theoretical knowledge. Whether you aim to develop sustainable technologies, innovate in robotics, or contribute to smart cities, these projects can serve as stepping stones in your journey as an electrical engineer. Choose a project that aligns with your interests, and don’t hesitate to seek guidance from your professors and peers. Happy engineering!
5 notes
·
View notes
Text
Essential Electronic Items for IoT and Electronics Enthusiasts
Are you diving into the world of Internet of Things (IoT) and electronics? Whether you are a seasoned engineer or simply beginning out, having a stable list of essential components is key to bringing your initiatives to existence. Here’s a curated list of electronic objects that each maker and tech enthusiast ought to have of their toolkit:
1. Microcontrollers
Arduino Uno: Great for novices and versatile for diverse projects.
Raspberry Pi: Ideal for more complex duties and going for walks complete operating structures.
ESP8266/ESP32: Perfect for wireless communication and IoT projects.
2. Sensors
DHT22: For temperature and humidity readings.
PIR Sensor: Useful for movement detection.
Ultrasonic Distance Sensor: Measures distances with high accuracy.
3. Actuators
Servo Motors: For unique manage in robotics and mechanical structures.
Stepper Motors: Ideal for applications requiring particular movement.
Solenoids: Good for growing mechanical actions and locks.
4. Displays
LCD Display: Useful for showing records and debugging.
OLED Display: Compact and clean for exact photographs and texts.
5. Connectivity Modules
Bluetooth Module (HC-05/HC-06): For short-range wi-fi communication.
Wi-Fi Module (ESP8266): Connects gadgets to the internet.
GSM Module: Enables verbal exchange over mobile networks.
6. Power Supplies
Battery Packs: Various types for transportable electricity.
Voltage Regulators: Ensure solid voltage ranges in your circuits.
Power Banks: Handy for charging and powering devices on the move.
7. Prototyping Tools
Breadboards: Essential for prototyping with out soldering.
Jumper Wires: For making connections on breadboards.
Soldering Kit: For everlasting connections and circuit meeting.
eight. Additional Components
Resistors, Capacitors, and Diodes: Fundamental for circuit design and stability.
Transistors: Key for switching and amplification tasks.
Connectors and Switches: For interfacing and controlling circuits.
By preserving these objects handy, you'll be nicely-prepared to address a huge range of IoT and electronics projects. Whether you're constructing smart domestic devices, wearable tech, or computerized structures, having the right additives can make all the difference.
#IoT#Electronics#Arduino#RaspberryPi#ESP32#Sensors#Actuators#Displays#ConnectivityModules#PowerSupplies#Prototyping#Tech#DIY#Makers#Engineering#ElectronicComponents#TechProjects
2 notes
·
View notes
Text
AH I REMEMBERED WHAT I WAS GONNA SAY EARLIER but it's kind of stupid, lmao.
So my partner is getting into brewing beer and I got them a Tilt, which is a Bluetooth hydrometer. It measures specific gravity and temperature, which are things you want to know so that you don't kill your yeast or whatever. Except the sensor's Bluetooth range is super short, and it basically runs via a phone app, and the temperature we're logging currently is the crawlspace, accessible via the staircase closet. So they were like, wait, what do we do about this, because I can't leave my phone in the closet, that's my alarm clock.
In a kind of ridiculous turn of life imitating art, I was like, hold up, I got just the thing right at my desk. Bam. Old phone. We just needed to scrounge up a charger because the battery is so dead that after charging just enough to power on it claimed it was at 53% (to be fair to it, there is a very real chance that it's correct, and it just holds no charge at this point so the capacity is just THAT low) and now it lives in the closet logging sensor data.
And I was like, you know...didn't I just solve a major story detail with a much larger version of this...yeah, no, this is all vaguely familiar somehow, power supply issues and all. Kind of cool that the concept works though. Kind of weird that it came up at all?
We are not gonna talk about the fact that I still have at least two more ancient-ass phones in a drawer where that came from because look, man, sometimes you just need a camera/mic/mini computer with Bluetooth and wifi that fits in a pocket, and people just get rid of these things, but not me. I actually could build a shitty security system out of them if I was reaaaally inclined. I mean. I'm not. But it's technically possible.
For real though, If I pick up any stupid maker projects I still high-key am thinking about slapping Bluetooth into a necomimi headset and running that through an Arduino and learning to code just enough to let me skip songs/change the volume on Spotify with my brain, because it's entirely doable, and I mean yeah I could do that on my phone remotely too, but that's not funny, now, is it. I'm just not sure it's $350+ of parts funny. Kind of a big investment just to prove the point that haha look I am the extremely ADHD type of lazy where I would rather solve a problem via the most convoluted and complicated Rube-Goldberg type ass machine way possible rather than just perform a single simple action.
YEAH I'VE BEEN THIS SCATTERED ALL DAY AND I REALLY SHOULD GO TO BED SHOULDN'T I. I started playing Satisfactory. Mistakes were made. I'm going to dream about conveyor belts again and I did it to myself...
#you know I used to mostly blog about witchcraft and paganism#and now I'm like. you know what I want to do? chain an EEG sensor to the Spotify API and skip songs with my brain.#it's kind of like magic when you put it like that. maybe things haven't actually changed that much after all#the headset idea actually came about bc I'd gotten so far into the writing zone that I literally just. tried to skip a song with my brain.#because I had so much reploid characters on my mind that it just sounded like a normal course of action I should be able to take#obviously it didn't work and cue me sitting there for a full 3 seconds going 'why didn't it. wait. why did I think it would?'#followed immediately after by 'YEAH BUT I PROBABLY COULD DO THAT ACTUALLY'#because you just Cannot write a character like Glitch without it rubbing off on you a little bit and WWGD kicked in real hard lmao#well obviously he'd [ridiculous chain of ideas ending in 'anyway I installed some shit and now I can control Spotify with my mind']#and I gotta say I do not like the idea of sticking a sensor on the *inside* of my skull. sounds very bad.#but it doesn't have to be on the inside to work soooo there's that!#I have a friend who for quite a long time had a rare earth magnet in one finger so he could find live wires by touch#he ended up removing it for work eventually but when I say I was jelly. man. but also kinda squeamish about it.#I do not like sharp things and I am Very funny about my fingers as an artist/writer/used to be musician.#but man that sounds cool. I want the magnet senses. I don't think I want them enough to have a magnet under my skin though#I think I wouldn't use them enough for that to be helpful actually lmao#anyway do I even need more senses? probably not. mine are already unfiltered and loud as shit.#'boy I wish I could sense magnetic fields' says idiot guy who can hear the mains hum even with no electronics currently turned on#like when the power goes out I can FEEL the fucking difference in the air and it's unnaturally quiet and kinda spooky#I do not think I need help on this front actually. I think I got it handled pretty okay lol
3 notes
·
View notes
Text
EXPLORING THE 5 COOL PARTNER SELLER ELECTRONICS PRODUCTS-Part1
Exploring the 5 Cool Partner Seller Electronics Products
Prologue
Are you an electronics enthusiast looking to expand your electronics project repertoire? Want to take your skills to the next level by exploring new and exciting products? Look no further than our list of five cool electronics products from partner sellers!
Whether you’re interested in building your own smart home devices, experimenting with sensors, or creating your own robot, these products are sure to inspire you. They cover a lot of application areas, from loop detectors used to monitor vehicle count in parking garages to Arduino CNC shields used in CNC machines, from simple pulse sensors used to detect cardiovascular pulse signals from fingertip to RGB LED panel light used in smart home, these products are unique, compact, and functional. Not only are these products fun to build and use but they’re also designed to help you learn new skills and techniques along the way.
What’s more, these products all come from trusted partner sellers who are committed to developing high-quality products. They’re happy to provide technical support for customers who have questions, so you can be sure you’re getting the best in electronics.
So get ready to dive into the world of electronics and explore these five cool partner seller products. You’re sure to find something that piques your interest and takes your own electronics projects to the next level.
Inductive Loop Vehicle Detector by Elektronika-ba
Whether you need to monitor occupancy and count vehicles in parking garages, control vehicle access at door and barrier controls, or facilitate traffic light installations and traffic controllers, the inductive loop detector is the perfect solution. It can even detect the direction and speed of vehicle traffic, making it an invaluable tool for a variety of traffic-related applications. In addition, this device can function as a stand-alone speed trap and can be easily interfaced with Arduino.
We can also provide a pre-programmed PIC chip to meet your project requirements.
Specifications
Number of operating modes: 4
Tuning: Automatic
Detection type: Presence/Pulse
Presence time: Adjustable in 3 steps
Pulse duration: 250 ms / 500 ms
Signal filtering: Adjustable in 2 steps (NORMAL, HIGH)
Loop inductance: 20 uH — 1000 uH
Frequency range: 20 kHz — 145 kHz
Frequency selection: 2 combinations (LOW, HIGH)
Sensitivity: Maximum 0.0025% Δf/f, adjustable in 8 steps
Detection speed: 10 ms by default, adjustable
Start-up time: ~ 1 second per channel (or longer if the frequency is not stable)
Temperature range: -35°C — 120°C
Sensor protection: Galvanic isolation + gas discharge tube for lightning protection
Don’t settle for less — click here to learn more about the Inductive Loop Vehicle Detector and experience the compact, yet cool detector!
Arduino CNC Shield V3.51 by Protoneer
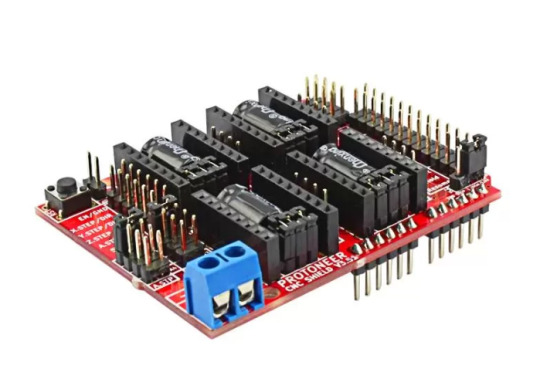
Designed by Protoneer, this kit is packed with features to ensure high precision control of your stepper motors, you can use it to easily build small CNC routers, DIY laser cutters, 3D printers, or any project that requires precise stepper motor control.
Our latest version 3.51 includes several enhancements to make assembly and installation even easier. We’ve added end-stop and probe signal filtering circuitry to eliminate false triggers and allow the use of unshielded cables for end-stops and probes. We’ve also increased the size of the solder pads for easier assembly and updated the probe pin labels to make installation a breeze.
With the Arduino CNC Shield Kit, you’ll have everything you need to build your own CNC router or mill with ease.
Features
Includes Noise Filers on all end stops and the probing pin. (New in V3.51)
GRBL 0.9 compatible. (Open source firmware that runs on an Arduino UNO that turns G-code commands into stepper signals https://github.com/grbl/grbl)
4-Axis support (X, Y, Z, A-Can duplicate X, Y, Z or do a full 4th axis with custom firmware using pins A4 and A3)
2 x End stops for each axis (6 in total)
Coolant enable
Uses removable Pololu A4988 compatible stepper drivers. (A4988, DRV8825 and others)(Not Included)
Jumpers to set the Micro-Stepping for the stepper drivers. (Some drivers like the DRV8825 can do up to 1/32 micro-stepping )
Compact design.
Stepper Motors can be connected with 4-pin molex connectors or soldered in place.
Runs on 12–36V DC. (At the moment only the Pololu DRV8825 drivers can handle up to 36V so please consider the operation voltage when powering the board.)
Don’t wait — click here to see more about the Arduino CNC Shield V3.51 and start your next project today!
Easy Pulse Mikro by Embedded Lab

What’s more, the Easy Pulse Mikro is designed in the convenient Mikro bus form factor, making it easy to integrate with a wide range of mikroElektronika’s development boards. With all necessary instrumentation and amplification built right in, this powerful sensor provides a clean and precise analog PPG waveform output that’s routed to the AN pin of the mikroBus connector.
Whether you’re a hobbyist, student, or professional developer, the Easy Pulse mikro is the perfect tool for monitoring heart rate and other vital signs.
Click here to see more about the Easy Pulse mikro.
Features
Compatible with mikroBus socket.
Filtered and amplified analog PPG signal output
On-board potentiometer for adjusting amplifier gain, if needed (rotate clock-wise for increasing gain)
Onboard LED for indicating heartbeat. It flashes synchronously with the heartbeat on detecting the pulse from the fingertip.
2 notes
·
View notes
Text
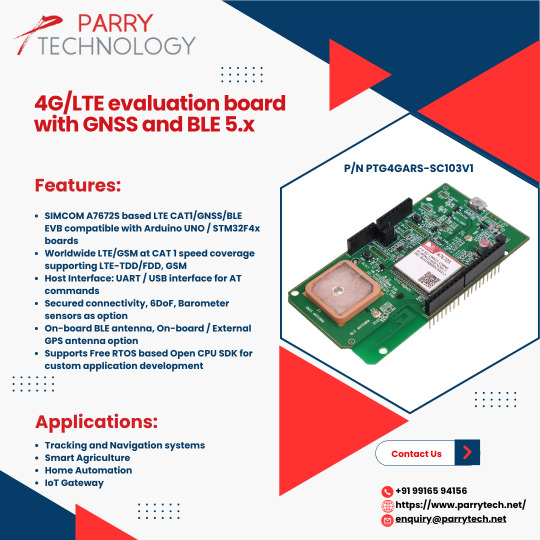
4G/LTE GNSS / BLE 5.0 Module
SIMCOM A7672S based LTE CAT1/GNSS/BLE modem compatible with Arduino
Host Interface: UART / USB interface for AT commands
Secured connectivity, 6DoF, Barometer sensors as option
On-board BLE antenna, On-board / External GPS antenna option
Operating voltage of 5V±10%
Operating temperature: -30°C to +70°C
Supports Free RTOS based Open CPU SDK for custom application development https://www.parrytech.net/4g-lte-modem/
0 notes
Text
Top Innovative STEM Lab Solutions for Schools and Colleges in 2025

In the ever-changing academic environment of today, education has no longer stayed tethered to books and lectures. Because of the real world, schools, colleges, and training institutions are heavily investing in Innovative STEM Lab Solutions to provide a balance between theory and practice. These modern setups have allowed students to hone their scientific, technological, engineering, and mathematical abilities through experimentation, problem-solving, and design thinking.
For those teachers, administrators, or institutions willing to update their infrastructure, the following are the main STEM lab solutions that will make a difference in 2025.
Modular lab stations
A modern STEM lab is, by definition, very flexible. Modular lab stations are perfect in a school where the space must sometimes be used for robotics, sometimes for chemistry, and sometimes for electronics. These stations usually have moving workbenches, moving storage, and integrated power supplies, making them perfect for interdisciplinary learning.
Why it works:
Efficient use of space
Facilitates teamwork and solo work
Adapting to different grade levels and projects
Robotics & Automation Kits
Being widely accepted in industries, automation is the need of the hour for STEM kits. Robotics kits consist of Programmable Robots, Sensors, Servo motors, and AI Integration kits that allow students to build their robots, program them, and control them.
Our Top Picks:
Arduino-based Robotics Platforms
LEGO® Education SPIKE™ Prime
Raspberry Pi + sensor modules
The kits offer an excellent opportunity to market coding and engineering skills in a manner that is both entertaining and practical.
FDM 3D Printers and Rapid Prototyping Setup
3D printers are no longer a luxury—they remain a must-have. They enable students to build their prototypes, test their mechanical models, and engage in product design. Increasingly, schools are embedding 3D printing into STEM pedagogy so that students can apply their knowledge to solve real-world problems.
Benefits:
Enhances spatial and design thinking
Promotes iteration and creativity
Encourages integration across various subjects (science and art, for instance)
Interactive Digital Boards and Simulation Tools
Chalk and blackboards are a thing of the past. Digital smart boards and simulation software enliven the abstract concepts of STEM, such as chemical reactions or circuit UML diagrams. Teachers have real-time data at their fingertips, can draw on touch screens, and engage students in solving problems together.
Combined with Arduino simulators, circuit design software like Tinkercad, or tools for virtual dissection, it makes the lab intelligent and fun.
IoT- and AI-Based Learning Modules
In 2025, IoT- and AI-based experiments will be part of every competitive mainstream STEM education. Cutting-edge labs are equipped with sensors, cloud dashboards, and microcontrollers to help students build all kinds of smart projects, such as home automation projects, temperature monitoring systems, or AI chatbots.
The solutions prepare the students to think beyond conventional science and prepare tech jobs of the future.
Curriculum-Aligned STEM Kits
Curriculum-aligned STEM kits, thus, remain relevant for teaching. These kits are uniquely designed to meet the lesson plans, experiment manuals, safety instructions, and real-world problem-based learning content required by the curriculum. They are made for specific classes and subjects with which CBSE, ICSE, IB, or state boards can identify.
Features to look for:
Subject-specific kits (Biology, Physics, Chemistry)
Safety compliance (CE, ISO certifications)
Teacher guides and student workbooks
Cloud-Based Lab Management System
Heading into 2025, cloud-based lab management platforms are becoming more and more popular. This allows instructors to track inventory, log student experiments, manage schedules, and upload student reports onto the cloud, thereby cutting down the paperwork and boosting the efficiency of the lab as a whole.
STEM-Learning Corners in Classrooms
These STEM corners in regular classrooms find favor with many schools, especially for the many that do not have the funds for the full-blown labs. Here little places house essential kits, puzzles, experiment tools, and DIY stations where students can entertain themselves exploring topics on their own.
This makes the STEM field much more approachable and far more interesting from an early age.
Conclusion
The year 2025 marks a decision point for investing in Innovative STEM Lab Solutions: choosing to invest is no longer an option but really a must. Through robotics kits, IoT modules, and modular workstations, these solutions pre-emptively prepare students for the future by instilling critical thinking, creativity, and problem-solving abilities.
If your institute is planning a STEM lab upgrade, select the supplier who understands academic requirements and contemporary technology trends. Tesca Global has earned recognition as a name offering second-to-none, affordable, and curriculum-aligned STEM lab solutions customized for schools, colleges, and universities worldwide.
#laboratory equipment suppliers#developers & startups#educational lab equipments#business#news#photography#technology
0 notes
Text
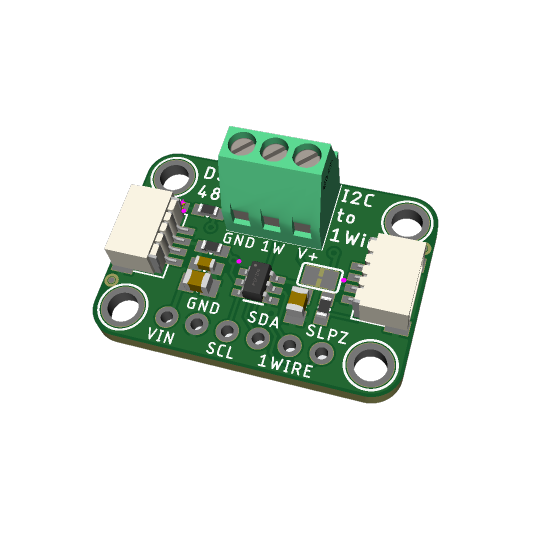
DS2484 I2C to 1-Wire converter
In theory, there's a lot of 1-Wire devices out there, but in reality almost everyone uses 1-Wire for DS18b20 temperature sensors. the long wire lengths and ease of 'chaining' by sharing a single bus wire makes it perfectly fine for this purpose. you can bitbang 1Wire on most microcontrollers, and some SBCs like Raspberry Pi have kernel module support. (https://learn.adafruit.com/adafruits-raspberry-pi-lesson-11-ds18b20-temperature-sensing) But there might be chips without the 1-Wire capability, or maybe you want to use 1-Wire devices on your desktop computer or other SBC with I2C but no 1W.
by special request! this is a DS2484 (https://www.digikey.com/short/5f85v4tf) Stemma QT board that uses the newest I2C-to-1W controller chip, with ESD protection and support for split supplies. you can easily connect it to an existing I2C bus and then use the screw terminals to attach multiple DS18b20's - this library looks promising (https://github.com/pilotak/DS248X) for Arduino. Coming soon!
16 notes
·
View notes
Text
The DS3231 RTC module is a low-cost real-time clock that is commonly used with microcontrollers to keep track of real-world Date and Time. The module consists of two important ICs namely DS3231 and AT24C32 IC with a crystal oscillator, and a temperature sensor. The Time, Date and Temperature value from the module can be sent to a microcontroller like Arduino via I2C communication.
2 notes
·
View notes
Text
Price: [price_with_discount] (as of [price_update_date] - Details) [ad_1] The Arduino is a cheap, flexible, open source microcontroller platform designed to make it easy for hobbyists to use electronics in homemade projects. With an almost unlimited range of input and output add-ons, sensors, indicators, displays, motors, and more, the Arduino offers you countless ways to create devices that interact with the world around you.In Arduino Workshop, you'll learn how these add-ons work and how to integrate them into your own projects. You'll start off with an overview of the Arduino system but quickly move on to coverage of various electronic components and concepts. Hands-on projects throughout the book reinforce what you've learned and show you how to apply that knowledge. As your understanding grows, the projects increase in complexity and sophistication.Among the book's 65 projects are useful devices like:– A digital thermometer that charts temperature changes on an LCD–A GPS logger that records data from your travels, which can be displayed on Google Maps– A handy tester that lets you check the voltage of any single-cell battery– A keypad-controlled lock that requires a secret code to openYou'll also learn to build Arduino toys and games like:– An electronic version of the classic six-sided die– A binary quiz game that challenges your number conversion skills– A motorized remote control tank with collision detection to keep it from crashingArduino Workshop will teach you the tricks and design principles of a master craftsman. Whatever your skill level, you'll have fun as you learn to harness the power of the Arduino for your own DIY projects.Uses the Arduino Uno board Publisher : No Starch Press; 1st edition (13 May 2013) Language : English Paperback : 392 pages ISBN-10 : 1593274483 ISBN-13 : 978-1593274481 Item Weight : 726 g Dimensions : 17.98 x 2.31 x 23.5 cm Country of Origin : USA [ad_2]
0 notes
Text
Embedded Controls Development: From Design to Deployment

Embedded controls development is a critical area in embedded systems engineering, involving the design, programming, and integration of control systems into hardware platforms. These systems are typically found in devices that perform dedicated functions, ranging from consumer electronics to industrial automation and automotive applications. The development process requires a combination of hardware knowledge, software engineering, and systems integration skills.
What Are Embedded Controls?
Embedded controls are computer-based systems that control specific functions within a larger mechanical or electrical system. They use microcontrollers, digital signal processors (DSPs), or microprocessors to monitor inputs from sensors, process data according to a control algorithm, and output control signals to actuators or other system components. These control loops can be simple (like turning on a fan when a sensor detects high temperature) or complex (like managing engine timing and fuel injection in modern vehicles).
Development Lifecycle
The development lifecycle for embedded controls typically follows several key stages:
Requirements Definition: Understanding what the control system needs to do. This includes identifying input/output interfaces, environmental constraints, performance requirements, and safety or compliance standards.
System Design: Creating a high-level architecture that defines how software and hardware will interact. This stage also involves choosing the right microcontroller or processor, selecting sensors and actuators, and outlining communication protocols.
Software Development: Writing code for the embedded control system, often in C or C++. Developers must consider memory limitations, real-time constraints, and hardware-specific details. This stage includes implementing control algorithms, handling interrupts, and developing communication interfaces such as I2C, SPI, UART, or CAN.
Hardware Integration: Integrating the embedded software with physical components. This includes setting up the development board, connecting sensors and actuators, and testing signal integrity and power consumption.
Testing and Validation: Rigorously testing the control system to ensure it functions as expected under various conditions. Unit testing, integration testing, and hardware-in-the-loop (HIL) simulations are commonly used to verify performance and reliability.
Deployment and Maintenance: After development and testing, the system is deployed into the final product. Ongoing maintenance may involve firmware updates, bug fixes, or performance improvements.
Tools and Platforms
A wide range of tools are used in embedded controls development, including:
Integrated Development Environments (IDEs): Tools like Keil µVision, MPLAB X, STM32CubeIDE, and Arduino IDE are popular for writing and debugging code.
Real-Time Operating Systems (RTOS): Systems such as FreeRTOS or VxWorks provide scheduling, task management, and synchronization capabilities for time-sensitive applications.
Version Control Systems: Git is widely used to manage code versions and support collaborative development.
Simulation and Modeling Tools: MATLAB/Simulink is frequently used in control systems design for simulation and code generation.
In-Circuit Debuggers/Programmers: Tools like JTAG or SWD interfaces allow developers to program and debug the target microcontroller directly.
Challenges in Embedded Controls Development
Developing embedded control systems presents several challenges:
Resource Constraints: Embedded systems often have limited CPU power, memory, and energy availability. Efficient coding and hardware optimization are essential.
Real-Time Requirements: Many control systems must respond within strict timing constraints. Missed deadlines can result in system failure or unsafe behavior.
Hardware Dependence: Embedded software is closely tied to specific hardware, requiring deep knowledge of the processor, peripherals, and electrical characteristics.
Debugging Complexity: Diagnosing problems in embedded systems can be difficult due to limited visibility into internal states and limited logging capabilities.
Safety and Reliability: In industries like automotive or medical devices, the control systems must meet rigorous safety standards such as ISO 26262 or IEC 62304.
Applications
Embedded controls are used in countless applications:
Automotive Systems: Engine control units (ECUs), anti-lock braking systems (ABS), adaptive cruise control, and infotainment systems.
Consumer Electronics: Smart thermostats, washing machines, and robotic vacuum cleaners all rely on embedded control systems.
Industrial Automation: PLCs and industrial controllers manage processes on factory floors, often integrating with SCADA systems.
Aerospace and Defense: Flight control systems, unmanned aerial vehicles (UAVs), and radar systems.
Medical Devices: Infusion pumps, pacemakers, and diagnostic equipment all include embedded control systems to ensure safe and accurate operation.
Trends and Future Directions
The field of embedded controls is rapidly evolving. Several key trends are shaping the future:
IoT Integration: Many embedded systems are now connected to the internet, allowing for remote monitoring, control, and firmware updates.
Edge Computing: More processing is being done on the device itself, reducing the need to send data to the cloud and improving response times.
AI and Machine Learning: Embedded systems are beginning to incorporate ML algorithms for pattern recognition, predictive maintenance, and adaptive control.
Model-Based Design: Tools like Simulink allow engineers to design control systems graphically and automatically generate embedded code.
Cybersecurity: As systems become more connected, securing embedded control systems against hacking and data breaches is becoming essential.
Conclusion
Embedded controls development by Servotechinc is a complex but vital discipline that sits at the heart of modern technology. From managing vehicle dynamics to enabling smart home features, embedded control systems play a crucial role in ensuring that machines operate efficiently, safely, and intelligently. As technology advances, the demand for skilled engineers in this domain will only continue to grow.
0 notes
Text
Elmalo, let's commit to that direction. We'll start with a robust Sensor Fusion Layer Prototype that forms the nervous system of Iron Spine, enabling tangible, live data connectivity from the field into the AI's processing core. Below is a detailed technical blueprint that outlines the approach, components, and future integrability with your Empathic AI Core.
1. Hardware Selection
Edge Devices:
Primary Platform: NVIDIA Jetson AGX Xavier or Nano for on-site processing. Their GPU acceleration is perfect for real-time preprocessing and running early fusion algorithms.
Supplementary Controllers: Raspberry Pi Compute Modules or Arduino-based microcontrollers to gather data from specific sensors when cost or miniaturization is critical.
Sensor Modalities:
Environmental Sensors: Radiation detectors, pressure sensors, temperature/humidity sensors—critical for extreme environments (space, deep sea, underground).
Motion & Optical Sensors: Insect-inspired motion sensors, high-resolution cameras, and inertial measurement units (IMUs) to capture detailed movement and orientation.
Acoustic & RF Sensors: Microphones, sonar, and RF sensors for detecting vibrational, audio, or electromagnetic signals.
2. Software Stack and Data Flow Pipeline
Data Ingestion:
Frameworks: Utilize Apache Kafka or Apache NiFi to build a robust, scalable data pipeline that can handle streaming sensor data in real time.
Protocol: MQTT or LoRaWAN can serve as the communication backbone in environments where connectivity is intermittent or bandwidth-constrained.
Data Preprocessing & Filtering:
Edge Analytics: Develop tailored algorithms that run on your edge devices—leveraging NVIDIA’s TensorRT for accelerated inference—to filter raw inputs and perform preliminary sensor fusion.
Fusion Algorithms: Employ Kalman or Particle Filters to synthesize multiple sensor streams into actionable readings.
Data Abstraction Layer:
API Endpoints: Create modular interfaces that transform fused sensor data into abstracted, standardized feeds for higher-level consumption by the AI core later.
Middleware: Consider microservices that handle data routing, error correction, and redundancy mechanisms to ensure data integrity under harsh conditions.
3. Infrastructure Deployment Map
4. Future Hooks for Empathic AI Core Integration
API-Driven Design: The sensor fusion module will produce standardized, real-time data feeds. These endpoints will act as the bridge to plug in your Empathic AI Core whenever you’re ready to evolve the “soul” of Iron Spine.
Modular Data Abstraction: Build abstraction layers that allow easy mapping of raw sensor data into higher-level representations—ideal for feeding into predictive, decision-making models later.
Feedback Mechanisms: Implement logging and event-based triggers from the sensor fusion system to continuously improve both hardware and AI components based on real-world performance and environmental nuance.
5. Roadmap and Next Steps
Design & Prototype:
Define the hardware specifications for edge devices and sensor modules.
Develop a small-scale sensor hub integrating a few key sensor types (e.g., motion + environmental).
Data Pipeline Setup:
Set up your data ingestion framework (e.g., Apache Kafka cluster).
Prototype and evaluate basic preprocessing and fusion algorithms on your chosen edge device.
Field Testing:
Deploy the prototype in a controlled environment similar to your target extremes (e.g., a pressure chamber, simulated low-gravity environment).
Refine data accuracy and real-time performance based on initial feedback.
Integration Preparation:
Build standardized API interfaces for future connection with the Empathic AI Core.
Document system architecture to ensure a smooth handoff between the hardware-first and AI-core teams.
Elmalo, this blueprint establishes a tangible, modular system that grounds Iron Spine in reality. It not only demonstrates your vision but also builds the foundational “nervous system” that your emergent, empathic AI will later use to perceive and interact with its environment.
Does this detailed roadmap align with your vision? Would you like to dive further into any individual section—perhaps starting with hardware specifications, software configuration, or the integration strategy for the future AI core?
0 notes