#article rewriter github
Link
#.NET#.NETCore#ASP.NET#ASP.NETCore#Microsoft#OpenSource#PowerShell#PowerShellCore#TypeScript#VisualStudioCode
2 notes
·
View notes
Text
Free Software: New Version/Rewrite of MPDQ, the autoqueuer for the Music Player Daemon

I have a giant music library, but I also have a horrible tendency to keep listening to the same thing over and over (tell me you're neurodivergent without telling me you're neurodivergent).
However, I love eclectic soundtracks that don’t limit themselves to a single "sound" or "genre". They might lean towards one genre, but you’ll suddenly get a song or two that is completely different in the mix.
I'd written a program -- mpdq -- originally way back in 2017, and then rehashed it in 2020. I've been pretty happy with it. Mostly.
Now, nearly seven years (the hell?!) after it was first released, I've done a massive rewrite to solve some of the remaining problems with the last version, simplify a lot of things, and fix some stuff.
This release contains breaking changes. Most notably, rather than running in the background, it's currently written to only be run as a timed process. I currently have it set to a two minute interval cronjob with a queue length of 6 songs.
- Rewrote and simplified a lot of the workings (and removed some troubling sub-sub-sub-shells).
- Now written to run on a timer like a cronjob. (Pausing works the same, though.)
- Massively simplified the genre selection into a "gating" mechanism.
- Made the album and artist frequency times actually work, and using the same log
- Configurable way to skip artist and album frequency for specified genres
- Because of the way it handles genres (just numerically, and then as an exact string), multiple-genre tags are treated as discrete entries, e.g. "Concert;Rock" is completely separate from either "Concert" or "Rock".
Installation and configuration are a bit simpler too, and if MPD throws an error or restarts, it won't completely tank mpdq anymore.
Check it out:
Program webpage: https://uriel1998.github.io/mpdq/
GitHub: https://github.com/uriel1998/mpdq
GitLab: https://gitlab.com/uriel1998/mpdq
My repository: https://git.faithcollapsing.com/ssaus/mpdq/
Featured Image by Tibor Janosi Mozes from Pixabay
Read the full article
0 notes
Text
How I Learn React.js in just 30 Days
https://techcurve.co/digital-services/web-design-and-development.htmlhttps://www.techcurveittraining.com/

Learn React.JS framework with Tech Curve It Training Program:
React (also known as React.js or React.JS) is a free and open-source front-end JavaScript library for building user interfaces or UI components. It is maintained by Facebook and a community of individual developers and companies. React can be used as a base in the development of single-page or mobile applications. However, React is only concerned with state management and rendering that state to the DOM, so creating React applications usually requires the use of additional libraries for routing, as well as certain client-side functionality.
How I Learn React.JS: Tech Curve Expert Provides A Complete Guide For Beginners.
Every front-end developer and web developer knows how frustrating and painful it is to write the same code at multiple places. If they need to add a button on multiple pages they are forced to do a lot of code. Developers using other frameworks face the challenges to rework most codes even when crafting components that change frequently. Developers wanted a framework or library which allowed them to break down complex components and reuse the codes to complete their projects faster. Here React comes in and solves this problem.
React is the most popular javascript library for building user interfaces. It is fast, flexible and it also has a strong community sitting online to help you every time. The coolest thing about React is it’s based on components, you break down your complex code into individual pieces i.e components and that helps developers in organizing their code in a better way. A lot of companies are moving to React and that’s the reason most of the beginners and experienced developers are also expanding their knowledge learning this library.
Learning this library is a daunting task. I watch a lot of tutorials and you try to get the best material to learn this library but it can become overwhelming. I don’t know the right path or step-by-step process to learn it. But Tech Curve IT Training program provided the proper roadmap for me and other beginners to understand the React.js language
The Prerequisites That I Have Learned In The Starting Process Of Tech Curve IT Training Program.
Basic knowledge of HTML, CSS, and JavaScript.
Basic understanding of ES6 features. Learned some of the ES6 features.
The features at least beginners to learned:-
1. Let
2. Const
3. Arrow functions
4. Imports and Exports
5. Classes
Basic understanding of how to use npm.
Simple todo-app
Simple calculator app
Build a shopping cart
Display GitHub’s user stats using GitHub API
After some time, I have started Building my own React
I have just started learning React.JS, it is essential to understand the logic behind it. The experts always say that: “You have to learn by doing it yourself.” This is why I started rewriting React from scratch and it is a good idea. If you agree with me, then this article is for you! This way, I learn how to properly use each data structure and how to choose between them.
Why React?
Now, the main question that arises in front of us is why one should use React. There are so many open-source platforms for making front-end web application development easier, like Angular. Let us take a quick look at the benefits of React over other competitive technologies or frameworks. With the front-end world-changing on a daily basis, it’s hard to devote time to learning a new framework – especially when that framework could ultimately become a dead end. So, if you're looking for the next best thing but you're feeling a little bit lost in the framework jungle, I suggest checking out React.
Summary
In this article, I have shared my learning experience about React.js. Tech Curve IT Training helps me a lot in learning React.js over other JavaScript libraries. I have also learned how to create a simple React.js app.
Learn React
Get started learning React.js free here: https://www.techcurveittraining.com/
Find more information relating to React.js Development
https://techcurve.co/digital-services/web-design-and-development.html
7 notes
·
View notes
Text
About DataFan
Hi everyone! My name’s Lockea and you’ve found my blog. Congrats! I’m a data scientist and acafan (academic fan, a member of the fandom who also studies fandom). My main acafan project right now is comprehensive data analytical analysis of what people read and write on AO3.
So what is DataFan? DataFan is a project where I answer questions about fanfiction using data analytic techniques. I answer everything from the easy (want to know what story rating gets the most hits?) to the not so easy (Is there a relationship between the average length of a chapter and how many comments the chapter gets?). If you’ve got a question about AO3, I’ll do my best to answer it.
What about Fandom Stats? Fandom Stats is a great project and I looked at their source code when I was first starting out with DataFan (both projects are written in the same programming language!) but Fandom Stats can only answer simple questions about fandom and can’t perform any analytical analysis. This isn’t a bash on Fandom Stats! It’s a great tool but DataFan was written with the goal of eventually performing complex artificial intelligence and predictive analytics on fandom trends.
Can I ask DataFan a question? Yes! Absolutely! Simply send me an ask or submit a post for questions that exceed ask lengths.
Is DataFan Open Source? Yep! It’s written in python using all open source tools. Send me an ask or DM and I’ll send you a link to the github repo.
Can I use DataFan for myself? You can use the code I use to pull the data from AO3 for your own use. You can use the Jupyter Notebooks written for DataFan analysis to construct your own queries. You CANNOT use my research directly without citations. If you want to use my research, please contact me so we can get the right citations and licenses figured out (don’t worry, it doesn’t cost money). All that said, unless you’re planning to study or practice data science yourself, you’re better off just asking me a question and I’ll do the querying.
Wait, can you clarify that? If you ask DataFan a question, then I perform the analysis and write up a short article discussing the results of the analysis. This resulting article and data can be cited. For example, if you’re writing a paper for school on fandom and want to know something DataFan can answer.
The only time you may want to perform your own analysis and NOT ask me a question is if you are studying data science or practice data science yourself. In that case, you may use the AO3 scraper and write your own queries. Please do not directly copy and paste any work I’ve done (including copying my Jupyter Notebooks) and call it your own, however, as that’s just plain not cool. The exception is if you wish to rewrite a Notebook as a learning experience.
(Basically, don’t be a dick and give credit where credit is due)
What else does DataFan do? Currently, I have a panel at various conventions called “How to Write the Perfect Fanfiction” which is half about my 20+ years experience as a fanfiction writer and half data evidence backed silliness about fandom using DataFan’s backend. Want me to come to a convention near you? Let me know! I’m based out of CA but I travel all over the USA. I’m also in the process of writing several peer reviewed articles on data science and fandom studies.
48 notes
·
View notes
Text
How I rewrote Nexus Tools with Dart
Last month, I updated a project of mine called Nexus Tools, which is an installer for Google's Android SDK Platform Tools. It's one of my most popular software projects, with around 1.1-1.3k users per month, and version 5.0 is a complete rewrite. The switch seemed to go fine (no bug reports yet!), so I wanted to write a blog post about the development process, in the hopes that it might help others experimenting with bash scripts or Dart programming.
The old bash script
Before v5.0, Nexus Tools was written as a bash script, which is a series of commands that runs in Bash Shell (or a Bash-compatible environment). I only supported Mac and Linux at first, but over the years I also added compatibility for Chrome OS, Bash for Windows 10, and Macs with Apple Silicon chips. The main process is the same across all platforms: Nexus Tools creates a folder in the home directory, downloads and unzips the SDK Platform Tools package from Google's server, and adds it to the system path. Nothing too complicated.
However, Nexus Tools still broke in some manner almost every time I updated it. Bash scripts are difficult to adequately test, because they are interpreted at runtime by the Bash shell, instead of being compiled as machine code. There are different versions of Bash being used today, and some versions don't support all scripting features. This is especially an issue on macOS, which still ships with Bash v3.2 from 2007, because newer versions use the GPLv3 license that Apple doesn't want to deal with. Apple switched the default shell to Zsh on newer macOS versions, but Zsh scripts are pretty different than Bash scripts.
Bash scripts also can't do much on their own — they call the applications present on the computer. Most Linux and macOS systems have the same set of basic tools installed that Nexus Tools requires (mainly curl and unzip), but verifying that each utility I wanted to use worked similarly on each supported platform was an added layer of complexity that I didn't enjoy dealing with.
In short, bash scripts are great for scripting your own PC or environments similar to each other, but less so for multiple operating systems and versions of Bash shell.
Choosing Dart
I decided to try rewriting Nexus Tools as a command-line Dart application. Dart is a programming language created by Google, originally intended for use in web applications, but more recently has become part of the larger Flutter framework for creating web/mobile/desktop apps. However, you can also create command-line applications and scripts in Dart, which can be compiled for use on Mac, Linux, and Windows.
There are many other ways of creating command-line compiled applications that are cross-platform, but Dart's JS-like syntax is easy for me to deal with, so I went with it.
The rewriting process
The bash script version of Nexus Tools was around 250 lines of code, and even with my limited Dart experience, it only took around 8-10 hours spread across multiple days to get a functionally-identical version working in Dart. Not too bad!
Just like the bash version, the Dart version created a folder in the home directory, downloaded the tools and unzipped them, and then added the directory to the system's path. The download is handled by Dart's own http library, and then unzipped with the archive library. One of my goals here was to avoid calling external tools wherever possible, and that was (mostly) achieved. The only times Nexus Tools calls system commands is for file operations and for installing ADB drivers on Windows — more on that later.
I still had to write a few functions for functionality that Dart and its main libraries don't seem to provide, like one for adding a directory to the system path and another for determining the CPU architecture. I was a bit surprised by that last one — the 'io' library has an easy way to check the host operating system, but not the CPU?
My main concern with switching to a compiled application was security on macOS. Apple requires all applications, even ones distributed outside the App Store, to be notarized with an Apple-issued developer ID or an error message will appear. However, the Nexus Tools executable created with dart compile doesn't seem to have any issues with this. Maybe Apple doesn't enforce signing with command-line applications?
Adding Windows support
Dart supports Windows, so switching to Dart allowed me to add Windows support without much extra work. The process for installing the Android SDK Tools on Windows involves most of the same steps as on Mac/Linux, but calls to the system required different commands. For example, adding Nexus Tools to the system path on Windows just requires calling the "setx" command on Windows, but on macOS and Linux I have to add a line to a text file.
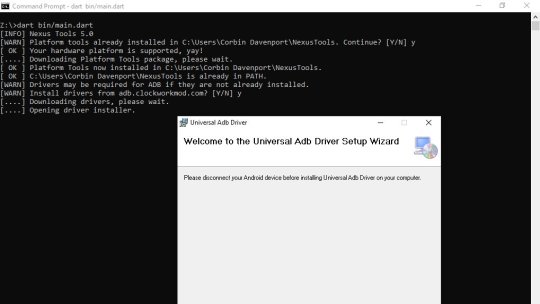
The tricky part with using the Android Platform Tools applications on Windows is usually drivers, so I wanted to integrate the step of optionally installing drivers when Nexus Tools is running on Windows. Thankfully, Koushik Dutta created a Universal ADB Drivers installer a while back that solves this problem, so Nexus Tools just downloads that and runs it.
Creating the wrapper script
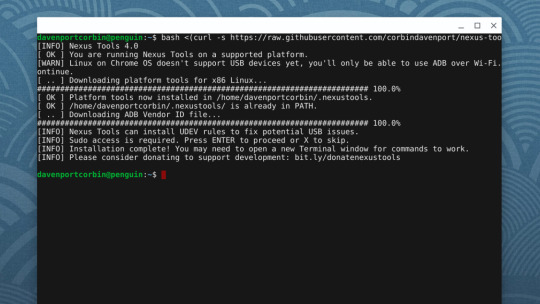
The main unique feature about Nexus Tools is that it runs without actually downloading the script to your computer — you just paste in a terminal command, which grabs the bash script from GitHub and runs it in the Bash Shell.
bash <(curl -s https://raw.githubusercontent.com/corbindavenport/nexus-tools/master/install.sh)
I wanted to retain this functionality for two reasons. First, it's convenient. Second, many articles and tutorials written over the years that mention Nexus Tools just include the installation command without any links to the project.
I reduced the bash script code to the bare minimum required to download the Nexus Tools executable and run it, and you can see it here. The neat part is that it uses GitHub's permalinks for a project's downloads (e.g. project/releases/latest/download/file.zip), so the script always grabs the latest available version from the releases page — I don't have to update the script at all when I publish a new version, I just have to make sure the downloads have the correct file name.
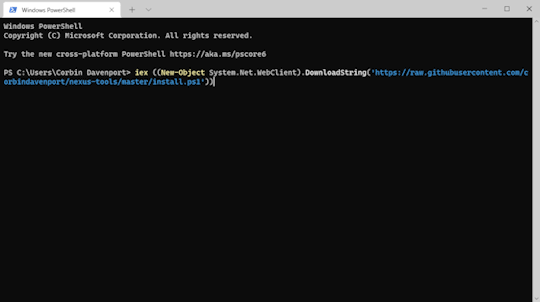
I also created a similar wrapper script for Windows, which runs when you paste the below command into PowerShell (or the fancy new Windows Terminal).
iex ((New-Object System.Net.WebClient).DownloadString('https://raw.githubusercontent.com/corbindavenport/nexus-tools/master/install.ps1'))
I'm pretty happy that running Nexus Tools on Windows is just as quick and easy as on Mac and Linux. Here's what it looks like on Linux:

And here's what it looks like on Windows 10:
Pretty neat!
Conclusion
I definitely could have continued to maintain Nexus Tools as a bash script, given enough testing and debugging with every release. The transition was mostly for my own personal reasons rather than strictly technological reasons — I was really sick of bash scripting. And in the end, this is my software project, so I'm gonna do what I want!
I think the switch has been a success, though. It runs exactly as well as the previous bash version (you can't even tell a difference on the surface), and I've been able to add Windows support with minimal additional work. I haven't received a single bug report, and the average number of people using Nexus Tools every day has remained at the same level of 20-50 people.

The one downside is that Nexus Tools doesn't run natively on Apple Silicon Macs, because I don't have an ARM Mac to compile it on (and Dart's compiler doesn't support cross-compiling), but it works fine in Apple's Rosetta compatibility layer.
0 notes
Text
Git Visual Studio Code

GitDuck is a video chat tool built for developers that has direct integration to the IDE so you can talk, share your code in real-time and easily collaborate with your team. It enables remote developers to work as if they were side by side. With GitDuck you can code with people using different IDEs, like VSCode or WebStorm, IntelliJ or PyCharm.
Visual Studio Connect To Git
Git For Visual Studio Code
Chapters ▾
Visual Studio Code has git support built in. You will need to have git version 2.0.0 (or newer) installed. The main features are: See the diff of the file you are editing in the gutter.
The easiest way to connect to your GitHub repositories in Visual Studio. Download GitHub Extension for Visual Studio anyway. Download Download GitHub Extension for Visual Studio. By downloading the extension you agree to the End-User License Agreement. Requires Windows and Visual Studio.
1. Getting Started
1.1 About Version Control
1.2 A Short History of Git
1.3 What is Git?
1.4 The Command Line
1.5 Installing Git
1.6 First-Time Git Setup
1.7 Getting Help
1.8 Summary
2. Git Basics
2.1 Getting a Git Repository
2.2 Recording Changes to the Repository
2.3 Viewing the Commit History
2.4 Undoing Things
2.5 Working with Remotes
2.6 Tagging
2.7 Git Aliases
2.8 Summary
3. Git Branching
3.1 Branches in a Nutshell
3.2 Basic Branching and Merging
3.3 Branch Management
3.4 Branching Workflows
3.5 Remote Branches
3.6 Rebasing
3.7 Summary
4. Git on the Server
4.1 The Protocols
4.2 Getting Git on a Server
4.3 Generating Your SSH Public Key
4.4 Setting Up the Server
4.5 Git Daemon
4.6 Smart HTTP
4.7 GitWeb
4.8 GitLab
4.9 Third Party Hosted Options
4.10 Summary
5. Distributed Git
5.1 Distributed Workflows
5.2 Contributing to a Project
5.3 Maintaining a Project
5.4 Summary
6. GitHub
6.1 Account Setup and Configuration
6.2 Contributing to a Project
6.3 Maintaining a Project
6.4 Managing an organization
6.5 Scripting GitHub
6.6 Summary
7. Git Tools
7.1 Revision Selection
7.2 Interactive Staging
7.3 Stashing and Cleaning
7.4 Signing Your Work
7.5 Searching
7.6 Rewriting History
7.7 Reset Demystified
7.8 Advanced Merging
7.9 Rerere
7.10 Debugging with Git
7.11 Submodules
7.12 Bundling
7.13 Replace
7.14 Credential Storage
7.15 Summary
8. Customizing Git
8.1 Git Configuration
8.2 Git Attributes
8.3 Git Hooks
8.4 An Example Git-Enforced Policy
8.5 Summary
9. Git and Other Systems
9.1 Git as a Client
9.2 Migrating to Git
9.3 Summary
10. Git Internals
10.1 Plumbing and Porcelain
10.2 Git Objects
10.3 Git References
10.4 Packfiles
10.5 The Refspec
10.6 Transfer Protocols
10.7 Maintenance and Data Recovery
10.8 Environment Variables
10.9 Summary
A1. Appendix A: Git in Other Environments
A1.1 Graphical Interfaces
A1.2 Git in Visual Studio
A1.3 Git in Visual Studio Code
A1.4 Git in IntelliJ / PyCharm / WebStorm / PhpStorm / RubyMine
A1.5 Git in Sublime Text
A1.6 Git in Bash
A1.7 Git in Zsh
A1.8 Git in PowerShell
A1.9 Summary
A2. Appendix B: Embedding Git in your Applications
A2.1 Command-line Git
A2.2 Libgit2
A2.3 JGit
A2.4 go-git
A2.5 Dulwich
A3. Appendix C: Git Commands
A3.1 Setup and Config
A3.2 Getting and Creating Projects
A3.3 Basic Snapshotting
A3.4 Branching and Merging
A3.5 Sharing and Updating Projects
A3.6 Inspection and Comparison
A3.7 Debugging
A3.8 Patching
A3.9 Email
A3.10 External Systems
A3.11 Administration
A3.12 Plumbing Commands
2nd Edition
Git in Visual Studio Code
Visual Studio Code has git support built in.You will need to have git version 2.0.0 (or newer) installed.
See the diff of the file you are editing in the gutter.
The Git Status Bar (lower left) shows the current branch, dirty indicators, incoming and outgoing commits.
You can do the most common git operations from within the editor:
Initialize a repository.
Clone a repository.
Create branches and tags.
Stage and commit changes.
Push/pull/sync with a remote branch.
Resolve merge conflicts.
View diffs.
With an extension, you can also handle GitHub Pull Requests:https://marketplace.visualstudio.com/items?itemName=GitHub.vscode-pull-request-github.
The official documentation can be found here: https://code.visualstudio.com/Docs/editor/versioncontrol.
Those new to Visual Studio (VS) Code might just see a code editor. The true power of VS Code lies in it’s extensions, integrated terminal and other features. In this hands-on tutorial, you’re going to learn how to use Visual Studio Code by working with a Git repo.
Related:What You Need to Know about Visual Studio Code: A Tutorial
Using built-in VS Code tooling and a few extensions, you’re going to write code and commit that code to source control using a single interface.
This blog post is a snippet of a chapter from the eBook From Admin to DevOps: The BS Way to DevOps in Azure. If you like this chapter and want to learn about doing the DevOps in Azure, check it out!
Tutorial Overview
In this tutorial, you’re going to learn how to use various VS Code features on Windows by building a project using Visual Studio Code and Git. You’ve been tasked with figuring out how to build an Azure VM with Terraform as a small proof of concept (POC) project. You have VS Code and have heard of its capability as a full IDE and want to put it to the test.
You’re going to:
Create a VS Code workspace to share with your team
Install the Terraform extension
Modify the Terraform configuration file to fit your naming convention and Azure subscription
Create a snippet for a common task you’ve found yourself typing over and over
Commit the Terraform configuration file to a Git repo
This tutorial will not be meant to show how to use Terraform to deploy Azure VMs. We already have an article on Terraform and Azure VMs for that. This tutorial will focus on learning Visual Studio Code.
Does this sound like an interesting project? If so, read on to get started!
Prerequisites
To follow along with this Visual Studio Code Git tutorial, please be sure you have the following:
VS Code – All examples will be using VS Code 1.44 although earlier versions will likely work as well.
Terraform – All examples will be using Terraform for Windows v0.12.24.
Git for Windows installed – All examples will be using v2.26. If you’d like VS Code to be Git’s default editor, be sure to select it upon installation.
Clone the Git Repo
Since this tutorial is going to be focusing on working with code in a GitHub repo, your first task is cloning that GitHub repo to your local computer.
For this project, you’ll be working from a GitHub repo called VSCodeDemo. Since VS Code has native Git integration, you can clone a Git repo with no additional configuration. To do so:
Open the command palette with Ctrl-Shift-P, type git where you will notice various options, as shown below.
2. Choose Git: Clone which VS Code will then prompt you for the repo’s URL. Here, provide the URL https://github.com/NoBSDevOps/VSCodeDemo.gitand hit Enter.
3. Choose a folder to place the cloned project files. This project will place the repo folder in the root of C:. Once you select the repository location, VS Code will invoke git.exe in the background and clone the repo to your computer.
4. When it’s finished, VS Code will prompt if you would like to open the cloned repository immediately as shown below, click Open to do so.
You now have an open folder in VS Code for the Git repo. You now need to “save” this open folder and all settings you’ll be performing in a workspace.
Creating a Workspace
Now that you have a folder opened containing a Git repo, save a workspace by going up to the File menu and clicking on Save Workspace As….
Save the workspace as project in the project folder. VS Code will then create a file called project.code-workspace in the Git repo folder. This workspace now knows what folder you had opened. Now when the workspace is opened in the future, it will automatically open the C:VSCodeDemo folder.
Now, instead of a folder name, you will see the name of the workspace.
Setting up Extensions
Extensions are one of the most useful features of VS Code. Extensions allows you to bolt on functionality to help you manage many different projects. In this tutorial, you’re going to be working with Terraform.
Open up one of the Terraform configuration files in the workspace along the left sidebar. Notice how an editor tab opens up and shows the text but that’s about it. There’s no usual syntax highlighting or any other features. VS Code thinks this is a plain-text file and displays it accordingly. Let’s remedy that.
For VS Code to “understand” a Terraform configuration file, you need an extension. Extensions are a huge part of VS Code that opens up a world of new functionality. In this case, you need the Terraform extension to assist in building Terraform configuration files and deploying infrastructure with Terraform.
To install the Terraform extension, click on the extensions button on the Activity Bar and search for terraform. You’ll see multiple extensions show up but for this project, click on Install for the top result created by Mikael Olenfalk. VS Code will then install the extension.
Once installed, navigate back to the workspace and click on one of the TF files in the workspace. You’ll immediately see one of the most obvious differences when using an extension, syntax coloring.
Now you can see in the following screenshot that VS Code “knows” what a comment is (by making it green), what a string is (by making it red) and so on. It’s now much easier to read a Terraform configuration file.
There’s a lot more functionality included with Mikael’s Terrafom extension. Be sure to investigate all of the potential benefits you can get from this extension if using Terraform.
Code Editing
Chances are when you find a script or configuration file on the Internet, it’s not going to be exactly how you need it. You’re going to need to modify it in some way.
In this tutorial’s example, you’d like to change the main block label in the infrastructure-before.tf. Terraform configuration file to perhaps project. To do that, you’ll need to find and replace some text. In VS Code, there are multiple ways to do that.
One of the most common ways to find a string and replace it with another is the good ol’ find and replace functionality.
Hit Ctrl-F and you’ll see a dialog similar to the following screenshot. Here you can type in the string you’d like to find and if you click on the down arrow, it will expand and provide a spot to input a string to replace it with. In the screenshot below, you can see options like Aa and Ab| for case-sensitive searching and also regular expressions.
You can also perform a “find and replace” using Ctrl-D. Simply select the text you’d like to find and begin hitting Ctrl-D. You’ll find that VS Code will begin to highlight each instance of that string with a blinking cursor.
When you’ve selected all items, start typing and VS Code changes all instances at once just as if you had selected each one individually.
Saving Time with Snippets
Let’s say you’re really getting into Terraform and Azure and are tired of typing out the Terraform configuration file block to create a new Azure resource group in the following code snippet.
To save time creating these blocks, create a VS Code snippet.
Related:VS Code Snippets: Speed Up Coding with Shortcuts
To create a VS Code snippet:
Copy the azurerm_resource_group block from the Infrastructure-before.tf Terraform configuration file.
2. Open the command palette with Ctrl-Shift-P.
3. Type “snippets” to filter the list of options.
4. Select Preferences: Configure User Snippets. This brings up a list of all the snippet files typically separated by language.
5. Type “terraform” to filter by the Terraform snippets.
6. Select terraform (Terraform) to open the Terraform snippets file (terraform.json).
Visual Studio Connect To Git
With the Terraform snippets file open, remove all of the comments and copy/paste the following JSON element inside.
Note the use of t and the backslashes. You can’t directly place tab characters inside of a snippet. To represent a tab character, you must use t. Also, you must escape characters like double quotes, dollar signs, curly braces, and backslashes with a backslash.
8. Save the terraform.json file.
Git For Visual Studio Code
9. Go back to the Terraform configuration file and type “rg”. Notice now you see an option to expand a snippet.
10. Select the rg snippet as shown above. Notice that it now expands to the snippet you just created with three items highlighted.
VS Code highlighted each of the words to act as placeholders due to the variables defined in the terraform.json snippets file (${1:block label}).
At this point, you can hit Tab and simply type in the values you need without worrying about how to create the block itself.
For a full breakdown on snippet syntax, be sure to check out the Snippets in Visual Studio Code documentation.
Commit Code to Git
At this point, you’ve cloned a public GitHub repo that contains a couple of Terraform configuration files. You’ve edited some files and now you’re ready to get those changes back up to the GitHub repo.
To get changes back up to the GitHub repo, you must first use Visual Studio Code and Git to commit changes to your local cloned Git repo. When you cloned the GitHub repo earlier, you downloaded not only the configuration files but also a Git repo.
If you’ve been following along, you should now have the cloned Git repo open with a couple of pending changes, two to be exact. How do you know that? By noticing the number in the Activity Bar, as shown below.
When you have a Git repo opened in Visual Studio Code, you’ll get a glimpse on the number of files that you can stage and commit into a local Git repo in the Activity Bar.
Click on the Source Control item on the left and you’ll see two items; the infrastructure-before.tf Terraform configuration file and the workspace you saved earlier (project.code-workspace). The configuration file will have a red M to the right indicating it’s been modified. The workspace file will have a green U to the right of it because it’s untracked meaning it’s currently not under source control.
To ensure both of these files get back to the GitHub repo, first create a helpful commit message indicating why you’re committing these files. The message can be any descriptive summary. Once you’ve written a commit message, stage the changes. Staging changes in Visual Studio Code in Git adds the file contents to the staging area preparing for a commit to the repo.
While on the Source Control pane, click on the + icon beside each file to stage them as shown below.
Once staged, click on the check mark to commit all of the staged changed, as shown below.
You will probably receive an error message indicating you need to configure a user.name and user.email in Git.
No problem. You simply need to provide Git the information it needs. To do that, go into your VS Code integrated terminal and run the following two commands changing my email address and name for yours.
Now try to commit the files. You should now see that the files commit to the repo.
You can stage all changed files without manually clicking on the + beside each file by committing them all at once. VS Code will automatically stage all of the files for you.
If you were working on a team with a shared repo, the next step would be to push these changes back to the GitHub repo or opening a pull request.
Conclusion
VS Code is a feature-rich IDE. It can not only help you write and understand code better, it can also build and make changes to infrastructure, invoke utilities and more. VS Code provides you one place to manage all of your development efforts.
Although this tutorial only covered a portion of what VS Code can do, this IDE is capable of so much more. If you’d like to learn about what VS Code can do, check out What You Need to Know about Visual Studio Code: A Tutorial.
0 notes
Text
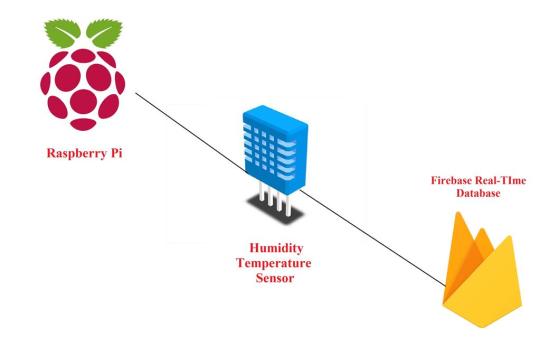
Working with Pi - 2
Connecting to Firebase
This week I spent time figuring out how to capture images using the Pi cam and sending data to Firebase.
Pi cam
There are four parts to it.
Capturing a picture: ✔️
This is the article where I started but it work, based on Alex’s suggestion. My issue was working with installing Imagemagick. May be it’s lack of experience, but based on Google search, I couldn’t find a simple workaround to use it. So I broke down the steps and started doing each step individually. Pi’s timelapse documentation came in handy.
Setting up a Cron job: ✔️
Tom Igoe’s page was super helpful.
Saving them in a folder:
I think it’s about definig the path. But I couldn’t figure out a way to do the Cron job by storing the images in a folder. So my Home quickly got crowded with images. All of which I had to manually delete.
Sending it to Firebase:
Read below.
Useful references:
This has good documentation on how to take photos: https://picamera.readthedocs.io/en/release-1.13/recipes1.html#capturing-to-a-network-stream
Sending data to Firebase
Before using Firebase, I was inclined to use MongoDB. Based on research, it turned out to be a slightly harder to send images. It’s easier to send text files. So I switched to Firebase.
One of the challenges working with Pi and hardware in general is that there are different ways to do the same thing. So a big chunk of my time was consumed in reading and looking for good documentation with clear explanation.
⇩ This one didn’t work:
Setting up Firebase: This was the easy part. I followed the steps from this article and created a project.
Since I didn’t know how to send images to Firebase, I tried to work with a sensor. I picked the DHT sensor. Little did I know how fragile and finicky it is.
I started with this documentation. As I went about debugging the Python script, I went into a rabbit hole. The problem: I used the Thorny Python IDE to run the script. It turns that the environment is in 2 but my script was in 3.
Issues: I noticed that the console was throwing each line as an error. So I started debugging line by line. It started with missing libraries. A lot which I installed but the part that eventually made me start from scratch was the missing Adafruit DHT library. Akash (Software background) did a quick check and told me that it was deprecated. So I asked a classmate, Nick Boss, who knew CS to help me find a workaround. Initially we tried to rewrite the code but it was still throwing errors. It came down to GPIO pin library. I am still not sure what the exact problem was. Nick used iPython. I don’t think I understood it but after adding another GB of library and no clear solution, I realised that it’s best to pause.
⇩ This is in progress:
I found a much cleaner set of instructions in this Github repo.
So far, I finished all the steps and currently figuring out how to add the Pyrebase wrapper for Firebase.
⇩ This worked. Yay!
Eric offered to help me yesterday connecting Firebase with Node. I don’t know Js plus I haven’t much enough documentation with it so I let me give this a shot.
His first question was how are we connecting the DHT to the Pi. So we searched for node Serial port and found the Serial Port link.
Next, we had to find a way to read the GPIO pins. I couldn’t comprehend the need but nevertheless. We searched for “gpio reading node js” and then found the w3 school documentation on OnOff module for NPM. We used the blinking LED for code reference.
Following up, we searched for the OnOff NPM package.
Next, we had to figure out how to read OnOff dht value. The article here was useful. Alongside, we referred to Tom’s code on GPIO pins here.
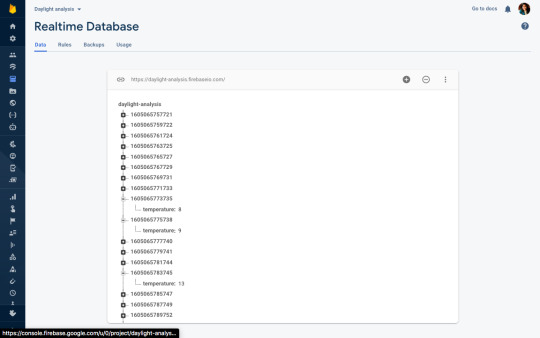
The code finally worked and we started to get reading. Or so we thought. The reading was in binary. So we spent some more time to figure it out. We tried to refer to this article but it didn’t finally work. After a while we realized that the sensor isn’t working. Given that it has no role in my project, I instead thought of sending some random data or message to Firebase.
Two things were helpful. Setting the interval as described here and getting a timestamp in Js.
The image above is the screenshot of the same.
0 notes
Text
Should software companies invest in rewriting C code in Rust?
T he C programming language was designed by by Dennis Ritchie close to 50 years ago. It is a general-purpose procedural programming language. Throughout the years, C has dominated the market for a few fundamental reasons. It is the easiest language to port to any new hardware architecture or operating system platform. While any language that compiles to native machine language can be used to write the base of an operating system, C remained the choice due to its portability. C also produces very fast code that runs directly on computer processors. However, with its versatility came some short comings.
C allows a wide range of software bugs and these software bugs are often the root cause for security issues. Some common sources of bugs in C code are "buffer overflows", "off-by-one errors", and "out of bounds reads". This is in addition to dangling pointers and memory leaks. C and C++ software are especially vulnerable as they have no language specific mechanisms for bounds checking or any of the sort. While C++ has smart pointers, nothing forces their use although C++ is an attractive choice due to being able to consume C libraries. All these issues are been the cause of many security exploits. C, inherently, is not memory safe.
So, what is the alternative if we are writing system software where bytecode and languages running in a virtual machine, such as java and C#, are not an option?
Ten years ago, Mozilla, the authors of the popular Firefox web browser, which was written in C++ with a graphics interface in XUL, an extensible xml syntax language for user interfaces, started a new project called Rust. Rust is a new programming language that promises to overcome the deficiencies in C. This makes it an attractive option to replace C. Rust moves a lot of the runtime issues in C to compile time issues. For instance, if your program or library is going to read memory outside an array index, the application will not run and if the index number is read at runtime, the application will stop running and you will not get wrong results. This prevents security bugs caused by reading incorrect or random data from memory. Such bugs have often caused headaches for Windows users and people utilizing server software written in C due to the excessive security implications. In addition to that, Rust has a strict ownership system that makes software very robust. This ownership system avoids memory leaks and pointers to random data. This saves time for developers and allows them to concentrate on algorithm writing instead of fighting with the programming language.
This raises a question. Should companies invest in porting their C code to Rust? I would say yes and for the following reasons.
The rust standard language and standard libraries are constantly under development to add convenience methods and language features. Basically, Rust is designed with the developer in mind.
Thanks to its memory safety strength, Rust saves money and developer resources that would otherwise be wasted on hunting difficult to find security bugs.
Rust has built-in unit testing features. Every piece of software in development should have two kinds of tests. The first type is unit tests which test individual libraries and pieces of code by isolating them and making sure they produce their intended results. The second type is integration tests. Integration tests make sure the entire software system continues to function as intended after changes to the code in any part of the software are committed. There are many 3rd party libraries for testing C and C++ software. Every software company adopts a different testing system. This is not required under Rust since it has built in unit testing and integration testing features. As we mentioned in the previous point, Rust is designed with the developer in mind.
Another reason why it makes sense for companies to invest in porting their C code to Rust is interoperability. Rust has tools to provide C API headers. In other words, you can write safe code in Rust and allow C and C++ applications to use it. The opposite is also true. Rust has community provided crates that bind to many popular existing C libraries.
Microsoft is also adopting Rust, albeit gradually. About 70% of the security bugs in the Windows platform are memory safety bugs. It is important to mention that the Microsoft’s platform of software including Microsoft Windows and Office make heavy use of C and C++. This makes Microsoft the owners of the world’s largest C and C++ codebases. However, Microsoft is now working on rust bindings for windows runtime libraries and is hosting them on Github. This gives Rust credibility and encourages other companies to follow through as well.
Linus Torvalds, the man behind the Linux kernel development, is often regarded as one of the most experienced and knowledgeable C developers. Currently, the Linux kernel is mostly C and Assembly code. It is developed by companies such as Intel, Microsoft, Google, and many individual developers. Torvalds has often rejected the use of C++ in the Kernel. Nevertheless, he has shown no objection towards including rust code in the Linux kernel.
If you are writing new system software, I highly recommend Rust. The community is unique and helpful. My experience also shows that its adoption and gradually porting C code to Rust yields not only cost savings but provides highly efficient software.
I hope you have enjoyed my article. Please visit my website if you need a true Murex expert that can help you out. I am an experienced IT consultant and I often have articles and tutorials that can be beneficial to my readers.
0 notes
Link
In 2020, we are blessed with a number of frameworks and libraries to help us with web development. But there wasn't always so much variety. Back in 2005, a new scripting language called Mocha was created by a guy named Brendan Eich. Months after being renamed to LiveScript, the name was changed again to JavaScript. Since then, JavaScript has come a long way.
In 2010, we saw the introduction of Backbone and Angular as the first JavaScript frameworks and, by 2016, 92 per cent of all websites used JavaScript. In this article, we are going to have a look at three of the main JavaScript frameworks (Angular, React and Vue) and their status heading into the next decade.
For some brilliant resources, check out our list of top web design tools, and this list of excellent user testing software, too.
01. Angular

AngularJS was released in 2010 but by 2016 it was completely rewritten and released as Angular 2. Angular is a full- blown web framework developed by Google, which is used by Wix, Upwork, The Guardian, HBO and more.
Pros:
Exceptional support for TypeScript
MVVM enables developers to separate work on the same app section using the same set of data
Excellent documentation
Cons:
Has a bit of a learning curve
Migrating from an old version can be difficult.
Updates are introduced quite regularly meaning developers need to adapt to them
What's next?
In Angular 9, Ivy is the default compiler. It's been put in place to solve a lot of the issues around performance and file size. It should make applications smaller, faster and simpler.
When you compare previous versions of Angular to React and Vue, the
final bundle sizes were a lot a bigger when using Angular. Ivy also makes Progressive Hydration possible, which is something the Angular team showed off at I/O 2019. Progressive Hydration uses Ivy to load progressively on the server and the client. For example, once a user begins to interact with a page, components' code along with any runtime is fetched piece by piece.
Ivy seems like the big focus going forward for Angular and the hope is to make it available for all apps. There will be an opt-out option in version 9, all the way through to Angular 10.
02. React
React was initially released in 2013 by Facebook and is used for building interactive web interfaces. It is used by Netflix, Dropbox, PayPal and Uber to name a few.
Pros:
React uses the virtual DOM, which has a positive impact on performance
JSX is easy to write
Updates don't compromise stability
Cons:
One of the main setbacks is needing third-party libraries to create more complex apps
Developers are left in the dark on the best way to develop
What's next?
At React Conf 2019, the React team touched on a number of things they have been working on. The first is Selective Hydration, which is where React will pause whatever it's working on in order to prioritise the components that the user is interacting with. As the user goes to interact with a particular section, that area will be hydrated. The team has also been working on Suspense, which is React's system for orchestrating the loading of code, data and images. This enables components to wait for something before they render.
Both Selective Hydration and Suspense are made possible by Concurrent Mode, which enables apps to be more responsive by giving React the ability to enter large blocks of lower priority work in order to focus on something that's a higher priority, like responding to user input. The team also mentioned accessibility as another area they have been looking at, by focusing on two particular topics – managing focus and input interfaces.
03. Vue
Vue was developed in 2014 by Evan You, an ex-Google employee. It is used by Xiaomi, Alibaba and GitLab. Vue managed to gain popularity and support from developers in a short space of time and without the backing of a major brand.
Pros:
Very light in size
Beginner friendly – easy to learn
Great community
Cons:
Not backed by a huge company, like React with Facebook and Angular with Google
No real structure
What's next?
Vue has set itself the target of being faster, smaller, more maintainable and making it easier for developers to target native. The next release (3.0) is due in Q1 2020, which includes a virtual DOM rewrite for better performance along with improved TypeScript Support. There is also the addition of the Composition API, which provides developers with a new way to create components and organise them by feature instead of operation.
Those developing Vue have also been busy working on Suspense, which suspends your component rendering and renders a fallback component until a condition is met.
One of the great things with Vue's updates is they sustain backward compatibility. They don't want you to break your old Vue projects. We saw this in the migration from 1.0 to 2.0 where 90 per cent of the API was the same.
How does the syntax of frameworks compare?
All three frameworks have undergone changes since their releases but one thing that's critical to understand is the syntax and how it differs. Let's have a look at how the syntax compares when it comes to simple event binding:
Vue: The v-on directive is used to attach event listeners that invoke methods on Vue instances. Directives are prefixed with v- in order to indicate that they are special attributes provided by Vue and apply special reactive behaviour to the rendered DOM. Event handlers can be provided either inline or as the name of the method.
React: React puts mark up and logic in JS and JSX, a syntax extension to JavaScript. With JSX, the function is passed as the event handler. Handling events with React elements is very similar to handling events on DOM elements. But there are some syntactic differences; for instance, React events are named using camelCase rather than lowercase.
Angular: Event binding syntax consists of a target event name within parentheses on the left of an equal sign and a quoted template statement on the right. Alternatively, you can use the on- prefix, known as the canonical form.
Popularity and market
Let's begin by looking at an overall picture of the three frameworks in regards to the rest of the web by examining stats from W3Techs. Angular is currently used by 0.4 per cent of all websites, with a JavaScript library market share of 0.5 per cent. React is used by 0.3 per cent of all websites and a 0.4 per cent JavaScript library market share and Vue has 0.3 per cent for both. This seems quite even and you would expect to see the numbers rise.
Google trends: Over the past 12 months, React is the most popular in search terms, closely followed by Angular. Vue.js is quite a way behind; however, one thing to remember is that Vue is still young compared to the other two.
Job searches: At the time of writing, React and Angular are quite closely matched in terms of job listings on Indeed with Vue a long way behind. On LinkedIn, however, there seems to be more demand for Vue developers.
Stack Overflow: If you look at the Stack Overflow Developer Survey results for 2019, React and Vue.js are both the most loved and wanted web frameworks. Angular sits down in ninth position for most loved but third most wanted.
GitHub: Vue has the most number of stars with 153k but it has the least number of contributors (283). React on the other hand has 140k stars and 1,341 contributors. Angular only has 59.6k stars but has the highest number of contributors out of the three with 1,579.
NPM Trends: The image above shows stats for the past 12 months, where you can see React has a higher number of downloads per month compared to Angular and Vue.
Mobile app development
One main focus for the big three is mobile deployment. React has React Native, which has become a popular choice for building iOS and Android apps not just for React users but also for the wider app development community. Angular developers can use NativeScript for native apps or Ionic for hybrid mobile apps, whereas Vue developers have a choice of NativeScript or Vue Native. Because of the popularity of mobile applications, this remains a key area of investment.
Other frameworks to look out for in 2020
If you want to try something new in 2020, check out these JavaScript frameworks.
Ember: An open-source framework for building web applications that works based on the MVVM pattern. It is used by several big companies like Microsoft, Netflix and LinkedIn.
Meteor: A full-stack JavaScript platform for developing modern web and mobile applications. It's easy to learn and has a very supportive community.
Conclusion
All three frameworks are continually improving, which is an encouraging sign. Everyone has their own perspective and preferred solution about which one they should use but it really comes down to the size of the project and which makes you feel more comfortable.
The most important aspect is the continued support of their communities, so if you are planning to start a new project and have never used any of the three before, then I believe you are in safe hands with all of them. If you haven't had a chance to learn any of the three frameworks yet, then I suggest making it your New Year's resolution to start learning. The future will revolve around these three.
0 notes
Link
Which is the best framework – Angular or React?
To be honest, every framework has its pros and cons. Each of the frameworks has a lot to offer and therefore choosing the right framework for your business among the best two is difficult.
This article aims to educate its readers, whether a newcomer or a freelancer or an enterprise-grade architect, of how both the frameworks excel in their environments catering to the requirements matching them.
This blog is all about an in-depth comparison between Angular and React in a structured manner and how you can focus on the most suitable framework by customizing them as per your requirements.
Let us brush up the basics before diving deep into the topic.
How to start?
Before jumping on to any framework, you need to ask yourself the following questions:
How mature is the framework?
What are the features that make it best suitable for my project?
What architecture does it employ?
What ecosystem the framework has surrounded itself with?
How to test and update the app?
Who performs better?
Which is best suited for Mobile App Development?
When can React and Angular be used?
These set of questions will guide to start the assessment of any tool you are looking to opt for.
How mature is the framework?
To check the maturity of the framework, you need to do research right from their launch to the current state.
Let us walk through their maturity levels.
React
React is:
A declarative, efficient, and flexible JavaScript library created by Facebook.
A User Interface (UI) library
A tool used for building UI components
Facebook is responsible for developing and maintaining React. React has been involved in Facebook’s own products like Instagram and Whatsapp. So you can say, React has been around 6 years now entering to a mature state. It has been named as one of the most popular projects on GitHub. It has been leading with approximately 119,000 stars to its credit at the time of writing.
Angular
Though Angular isn’t old as React, it is in the house for 3 years now ruling the hearts of the developers. Maintained by Google, Angular has been able to find its place in more than 600 applications in Google such as Google Analytics, Google cloud platform, Firebase Console, and many more.
Popularity
As per Google trends, React is a winner in the search domain as it is leading. But people are more interested in Angular due to multiple options for ready-to-go solutions.
What are the features that make it best suitable for my project?
React
1. Component-Based
The application is divided into small modules known as components to create a view.
Passing of rich data through your app and keeping the state out of the DOM is easy as templates aren’t used for writing component logic. The visuals and interactions in the applications are defined by the components in React.
2. Declarative
React holds a record in creating interactive and dynamic user interfaces for web and mobile applications.
During any change in data, React has the capacity to update and render just the right components. All you have to do is for every state in your application, create simple views.
If you wish to have a code that is more readable and easier to debug, declarative views are the best to opt for.
3. JSX
A close resemblance with HTML, JSX is a markup syntax that is a combination of Javascript + XML.
Writing React components with JSX is easier. JSX makes easier to write the code by adding HTML to React and it converts HTML tags to react elements. JSX has always been one of the best ReactJS features and thus Web developers will always go for this easy way out.
4. One-way Data Binding
The organization of React apps is in a series of nested components. With the functional nature of the components, the arguments are the source through which the components receive information. They further pass the information through their return values. This process is known as a one-way data flow. Further, the data is passed from components to their children.
For the state of your app, the parent component will have a container. The snapshot of the state is passed to the child component by the parent component. This the parent component does via the read-only props. Further, the child component communicates with the parent for updating the state through callbacks bounded by button or form in the child component.
5. Virtual DOM
Virtual DOM is a virtual copy of the original DOM object. React provides this facility for every DOM object as manipulation in the virtual DOM is quicker than the original DOM as it is a one-way data binding.
React updates only those objects in the real DOM which have changed in the Virtual DOM. This improves the performance of the application more as compared to it would have while manipulating the real DOM directly. Thus this reason is behind React being considered as a high-performance JavaScript library.
To put it simply, the React makes sure that the DOM matches the state as per your requirement you need the UI to be in. The developer doesn’t need to know the attribute manipulation, event handling or the manual DOM updates happen behind the scenes. This is a priced benefit of being a React developer.
6. Event handling
React creates its event system which is compatible with the W3C object model.
Event handling with React elements is quite similar to event handling on DOM elements. The differences between the two are:
camelCase is used to write React events.
Curly braces are used to write React event handlers.
One of the good practices is using the event handler as a method in the component class.
The SyntheticEvent object wraps the event object inside the React event handlers. Performance drastically improves as the objects received at an event handler are reused for other events. Asynchronous access to object properties is not possible as the event’s properties are changed due to reuse.
Instances of synthetic events wrap the browsers’ native event. With a cross-browser interface to a native event, relax about any incompatibility with event names and fields.
To reduce memory overhead, event delegation in addition to the pool of event objects is used to implement React event.
7. React Native
A custom renderer for React, React Native makes use of native components instead of web components as building blocks.
With the basic concepts of React, like JSX, components, state, and props you can head towards React Native. You need to know about the Native components to React Native. Other than transforming React code to work on iOS and Android, React Native provides access to the features these platforms offer.
Angular
With the release of Angular 8, multiple improvements and features are introduced. Whether you are any angular development company or angular developer or anyone who is looking for an upgrade, Angular is making projects faster and smaller with every improvement thus driving the developer and user experience to the next level of perfection.
1. Differential Loading
In spite of angular being a complete framework with its own package for a network request, form validation, and many more, Angular has one disadvantage-the app/bundle size.
The challenge that we were facing with Angular 7 was the large bundle size due to the conversion of modern JS/TS code in JS. After the conversion, the final application bundle is created for all the browsers (new and old) concerning the app performance on all the browsers.
This challenge of large bundle size was overcome in Angular 8 by reducing the bundle size by the concept of differential loading.
When we build apps with ng build, two separate bundles are created for the production dedicated to the older and newer browsers respectively. The correct bundle gets loaded automatically by the browser, thus improving the performance for Angular 8 by loading less code by the newer browsers.
2. Ivy Renderer
According to a source, 63% of all US traffic comes from smartphones and tablets. It is further forecasted that the number will increase to 80% by the end of this year.
One of the biggest challenges for a front end developer is increasing the loading speed of the website. Unfortunately, mobile devices always stay behind in this race either due to slow or bad internet connectivity thus making it more challenging for the developers.
But we never run out of solutions. We can use CDN, PWA, and others for loading the application faster. But if you want to have some out of the box solution, then reducing the bundle size is the ultimate solution and thus, IVY comes into the picture.
IVY is meant to build a next-generation rendering pipeline for Angular 8.0
Ivy is an angular renderer that uses incremental DOM. Ivy modifies the working of the framework without any changes to the Angular applications. On completion of IVY, the angular applications become small, simple, and faster. IVY consists of two main concepts:
Tree shakable:To focus only on the code in use, the unused code is removed. This results in faster runtime and smaller bundles.
Local:For a faster compilation, the changing components are recompiled.
The benefits of Ivy are:
Bundles are smaller
Templates are debuggable
Tests are faster
Builds are faster
Lots of bugs fixed
It rewrites the Angular compiler and runtime code to reach:
Better compatibility with tree-shaking
Improved build times
Improvised build sizes
Loaded with features like lazy loading of components rather than modules.
3. Web Workers
With the newest release of Angular v8, web workers can now be easily integrated with Angular. Though you might be aware of web workers, let us have a small brush up. As defined by Sitepoint,
“Web workers is an asynchronous system, or protocol, for web pages to execute tasks in the background, independently from the main thread and website UI. It is an isolated environment that is insulated from the window object, the document object, direct internet access and is best suited for long-running or demanding computational tasks.”
Have you built an application that includes a lot of calculations on UI? Are you experiencing the UI to be slow?
Having heavy calculations, data table manipulations, and other complex computations results in a laggy UI. JavaScript running on the main thread is not the only thing. Other things like calculations also run on it thus resulting in a bad user experience. Thus, web workers come into the picture to resolve this issue.
Therefore you can say if your application is unresponsive while processing data, web workers are helpful.
Due to JavaScript being single-threaded, there is a possibility of asynchronous data calls to take place. Facilitating to run the CPU intensive computations in the background thread, Web workers are used. This is achieved by freeing the main thread and updating the user interface.
Put simply, web workers are useful if heavy computations are offloaded to another thread.
4. Lazy Loading
Lazy loading helps in bringing down the size of large files. The required files are lazily loaded.
Previously in the older versions of Angular, @loadChildren property was used by the route configuration. This property accepts a string. If any typo occurred or any module name has been recorded wrong, Angular doesn’t consider this as wrong. It accepts the value that was there until we try building it.
To overcome this, dynamic imports in router configuration is added in Angular 8 thus enabling the usage of import statement for lazy loading the module. Thus, errors will be easily recognized and we can put a stop on waiting till the build time to recognize the errors in the code.
5. Bazel Support
Now increase the possibilities to build your CLI application with Bazel. The Angular framework is built with Bazel. Since it is expected to be included in version 9, it is available as opt-in in Angular 8.
The main advantages of Bazel are:
Using the same tool in building backends and frontends.
The build time is faster
Incremental build for the modified part.
Ejection of hidden Bazel files that are hidden by default.
Cache on the build farm
Dynamic imports for the lazy loaded modules
6. CLI Improvements
With continuous improvement in the Angular CLI, the ng build, ng test and ng run has accorded themselves by 3rd-party libraries and tools. For example, with the help of a deploy command, the new capabilities are already in use by AngularFire.
Angular CLI is equipped with commands such as ng new, serve, test, build and add for quicker development experience.
With the new ng deploy in the house, developers can deploy their final app to the cloud. Just a few clicks from their command-line interface and the work is done.
One important thing to remember, add a builder as it accords your project’s deployment capability to a specific hosting provider. But, this has to be done before using the command.
With Angular 8, it has added new features to ngUpgrade. This new feature will make the life of developers easier for upgrading their Angular.js apps to Angular 8.
7. TypeScript 3.4
The most important part is TypeScript 3.4 as it is required to run your Angular 8 project. A new flag is introduced in TypeScript 3.4 known as –incremental.
From the last compilation, the TypeScript is asked to save the information of the project graph by the incremental. Every time –incremental invokes TypeScript, it will utilize the information for detecting the cheapest way of type-checking and emit changes to your project.
To know more about Angular 8 and its dominance, you can also read the blog on “Top Reasons to Choose Angular 8 for Your Next Web Development Project.”
What architecture does it employ?
Angular and React both have a component-based architecture. Component-based architecture means they consist of cohesive, reusable, and modular components. The major difference is during the technical stack. React uses JavaScript whereas Angular uses TypeScript for compact and error-free development.
Angular, a robust front-end development framework has the power to structure your application. It frees you from the worry of routing libraries during coding of the application.
The advanced functionalities provided by Angular are as follows:
Availability of templates for creating UI views with powerful syntax.
To add components and testing, command-line tools are provided.
Completing intelligent code with IDEs.
For faster and better scenario tests, Protractor is used.
For complex choreographies and animation timelines, intuitive APIs are used.
The infrastructure consists of ARIA enabled components.
Injected Dependency
XSS Protection
The crucial point between Angular and React for their architectural differences takes an important turn with the increasing popularity of React for building web applications. Some of the key functionalities of React to highlight are:
Syntax extension to JavaScript, JSX.
The React elements can be created easily.
To update and match React elements, React DOM.
For splitting UI into independent, reusable pieces, React accords Component API
XSS protection
What ecosystem the framework has surrounded itself with?
There are multiple tools created around the open-source frameworks. These tools are friendly and sometimes help more than the framework itself. Let us get into the details of the most popular tools and libraries that are associated with both frameworks.
Angular
1. Angular CLI
A CLI tool helps in bootstrapping the project without configuring the build yourself. This popular trend with modern frameworks allows in generating and running a project with a couple of commands. The responsible scripts for application development, starting a development server, and running tests are all hidden in node_modules. This can be used for generating new code during the development process and during the dependency installation.
Managing dependencies in your project is easy with Angular now. A dependency can be installed when ng add is used. This dependency will automatically get configured for usage. For instance, if you run ng add@angular/material, Angular Material gets downloaded by Angular CLI from the npm registry. Angular CLI runs its install script and enables the use of Angular Material by automatic configuring the application using Angular Schematics. Libraries are allowed by the Schematics, a workflow tool to make changes to your codebase. In other words, there is a provision for resolving backward incompatibility issues by library authors while installing a new version.
2. Ionic Framework
If you are interested in hybrid mobile applications, then Ionic is a popular framework. There is a Cordova container nicely integrated with Angular and has a material component library. This helps in easy setup and also for mobile application development. Ionic is a good choice if you prefer a hybrid app over the native one.
3. Angular Material
Angular has come up with a Material component library having great options for ready-made components.
4. Angular Universal
Bundling different tools are all about Angular Universal. This helps in server-side rendering for Angular applications. With the integration of Angular Universal with Angular CLI, it supports a number of Node.js frameworks, like express and hapi, also with .NET core.
5. Augury
A browser extension for Chrome and Firefox, Augury helps in debugging the running Angular applications in development mode. Augury can be used to monitor the change detection, the component tree, and helps in optimizing performance issues.
React
1. Create React App
If you are looking for a quick set up of new projects, this CLI utility called Create React App is all you need. Just like Angular CLI, it permits us to generate a new project, run the app during the ongoing development process or creating a production bundle.
Jest is used for unit testing for React apps. It also supports application profiling by using environment variables. Other features are proxies for the backend for local development, Flow and TypeScript, Sass, PostCSS, and many more features.
2. React Native
Developed by Facebook, React Native is a platform used for native mobile app development using React. React Native is capable of building applications with a truly native UI, unlike Ionic that specializes in hybrid applications.
React Native has made provisions for standard React components bounding to their native counterparts. Another advantage of using React Native is it allows you to create components of your own and bind them to native code written in Objective-C, Java or Swift.
3. Material UI
React has a Material Design Component library. As compared to Angular, this library with React is more mature and houses a wider range of components.
4. Next.js
React Applications on the server-side is done by Next.js framework. This option is flexible enough for application rendering partially or completely on the server, revert the result to the client, and continue in the browser. Next.js tries to simplify the complex task of creating universal applications with a minimal amount of new primitives and requirements for the structure of your project.
5. Gatsby
A static website generator, Gatsby uses React.js allowing us to use GraphQL to query the data for your websites. These websites may be defined in markdown, YAML, JSON, external API’s as well as popular content management systems.
6. React 360
Want to create virtual reality applications for the browsers? This library called React 360 will do the needful. React 360 has a provision for a declarative React API built on top of the WebGL and WebVR browser APIs. This makes it easier for creating 360 VR experiences.
React Developer Tools
For debugging React applications, React Dev Tools are a browser extension that allows traversing the React component tree and observe their props and state.
How to test and update the app?
Tools like Jasmine and Protractor can be used for Angular IO testing and debugging for a complete project. React lags here as a different set of tools are required for performing different sets of testing. For instance, Jest for JavaScript code testing, Enzyme for component testing, etc. This results in an increased effort in the testing process.
Ease of Update
With an improved CLI equipped with commands like ng_update, upgrading any app to higher versions of Angular has become easy. Thus, Angular app development has become painless with the automated updating process for most of the cases.
React has provisions for seamless transitions between the two versions. But updating and migrating third-party components is possible only with the use of external libraries. The developers always have to keep a check always whether the third-party libraries used are compatible with the latest versions of the JavaScript framework or not. This increases the job of the developers.
Who performs better?
React has one-way data-binding whereas Angular has two-way data binding. With one-way data-binding, changes are rendered in the UI element once the model state is updated. However, there is no change in the model state when a change in the UI element is made unlike in Angular. If the UI element in Angular changes, the change is rendered in the model state and vice versa. Though Angular is easier to grasp, React has proven a better data overview with an increase in the project size. This also provides an easy debugging process with React.
Any application has multiple states. The complexity increases with repeated data morphing. Once the data changes, the components of the UI are also modified. This makes the data to stay updated always. This state is handled by Redux in React whereas, Angular doesn’t accord any use of Redux to handle the state. But if the application is large enough, there are chances that Redux has to be involved.
Since the commonly used methodology of working with React components is passing the data from parent component to its child component, Flux, a pattern for managing the flow of data through a React application, assigns this model as a default one for data handling.
In the flux methodology, the distinct roles for dealing with the data are:
Stores
Dispatcher
Views
The main idea behind this is:
The stores are updated through triggering actions. The dispatcher is called by actions through which the stores subscribe for the modification of their own data. Once the dispatch is triggered, and the store is updated, a change event will be emitted. This change is rerendered accordingly by the Views.
Flux is basically used for controlling and managing the application state. In Angular, two-way data binding triggers updates in a flow. If any action is wrongly implemented as no code is created in complete accuracy, would result in multiple errors. Further, it may be hard to debug.
In a nutshell we can say,
React performs well because:
Component Reuse
Virtual DOM
Community Support
Building dynamic web applications is easier.
Support of handy tool
Rich JavaScript library
SEO friendly
Easy to test
Angular performs well because:
Higher quality code due to component-based architecture.
Higher scalability and cleaner code due to use of TypeScript.
Asynchronous programming is efficiently handled due to RxJS.
Mobile-first approach.
Higher performance due to hierarchical dependency injection.
Optimizing the bundle size with differential load.
Seamless update with Angular CLI
Powerful ecosystem
For building applications, React uses Virtual DOM and Fiber thus leading the race earlier. But with the introduction of Angular newer versions and their features like ShadowAPI, hierarchical dependency injection, differential loading, Angular CLI, the competition has become intense between the two frameworks. None of them are lacking behind in terms of performance anymore.
Which is best suited for Mobile App Development?
Both Ionic and React Native are solid frameworks for mobile app development. The choice solely depends on the team and the organization with respect to the vision and functionality of the app in the making. Moreover, evaluate your options on factors like design consistency, customization, platform independency, and many more.
This section provides you the difference between Native, Hybrid-Native, and Hybrid-Web applications on various factors.
NativeHybrid-NativeHybrid-Web
ExamplesiOS and Android SDKsReact NativeIonic
LanguagesObj-C, Swift, JavaJS + Custom UI Language / InterpreterHTML + CSS + JS
Reusable CodeEach platform has Separate Code BasesDifferent UI Codebases for shared business logicSame UI Codebase, One codebase
Target PlatformsiOS & Android Native Mobile AppsiOS & Android Native Mobile AppsiOS, Android, Electron, Mobile and Desktop Browsers as a Progressive Web App, and anywhere else the web runs
Investment for staff and timeLargest investmentMedium investmentLowest investment
UI ElementsNative UI Platform independentNative UI elements are platform dependent and not shared. Custom UI elements require split UI code basesWeb UI elements are shared i.e. platform independent. This adds to the native look & feel of wherever they are deployed. Custom UI elements are used easily.
API Access / Native FeaturesSeparate Native API & Codebases for each AppIn addition to the ability for writing custom plugins, native access for abstracted single-codebase through plugins is possible.In addition to the ability for writing custom plugins, native access for abstracted single-codebase through plugins is possible.
Offline AccessYesYesYes
PerformanceThe performance is Native with well written code.If implemented with well written code on modern devices, the difference is indistinguishable.If implemented with well written code on modern devices, the difference is indistinguishable.
When can React and Angular be used?
Each framework is used for front-end development and has its own set of capabilities with pros and cons. But still, it is difficult to answer which framework has won the battle?
React can be used when:
Your team holds expertise in JavaScript,HTML and CSS.
A requirement for highly customized and specific application solutions.
If your project involves active/inactive navigation items, dynamic inputs, user logins, access permissions, disabled/enabled buttons, etc.
Expecting to share the components across multiple applications with project expansion.
You are willing to spare some time on pre-development preparation.
Angular is considered when:
The team is holding expertise in Java, C#, and previous versions of Angular.
The complexity of the app is at the low to medium level.
Embracing ready-to-use solutions with higher productivity.
Regulating app size.
The requirement is for a large-scale, feature-rich application.
Conclusion
Both Angular and React are equally useful for writing applications. But they are entirely different frameworks to use. Some programmers may say that Angular is superior to React and vice versa. What’s in actuality best for an in-hand project is the way you utilize these frameworks.
Choose the right AngularJS development company or ReactJS development company
0 notes
Text
React Integration Testing: Greater Coverage, Fewer Tests
Integration tests are a natural fit for interactive websites, like ones you might build with React. They validate how a user interacts with your app without the overhead of end-to-end testing.
This article follows an exercise that starts with a simple website, validates behavior with unit and integration tests, and demonstrates how integration testing delivers greater value from fewer lines of code. The content assumes a familiarity with React and testing in JavaScript. Experience with Jest and React Testing Library is helpful but not required.
There are three types of tests:
Unit tests verify one piece of code in isolation. They are easy to write, but can miss the big picture.
End-to-end tests (E2E) use an automation framework — such as Cypress or Selenium — to interact with your site like a user: loading pages, filling out forms, clicking buttons, etc. They are generally slower to write and run, but closely match the real user experience.
Integration tests fall somewhere in between. They validate how multiple units of your application work together but are more lightweight than E2E tests. Jest, for example, comes with a few built-in utilities to facilitate integration testing; Jest uses jsdom under the hood to emulate common browser APIs with less overhead than automation, and its robust mocking tools can stub out external API calls.
Another wrinkle: In React apps, unit and integration are written the same way, with the same tools.
Getting started with React tests
I created a simple React app (available on GitHub) with a login form. I wired this up to reqres.in, a handy API I found for testing front-end projects.
You can log in successfully:
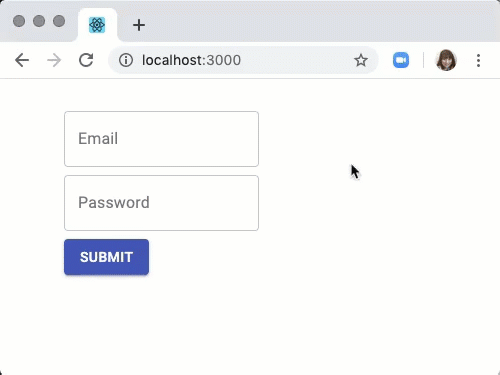
…or encounter an error message from the API:
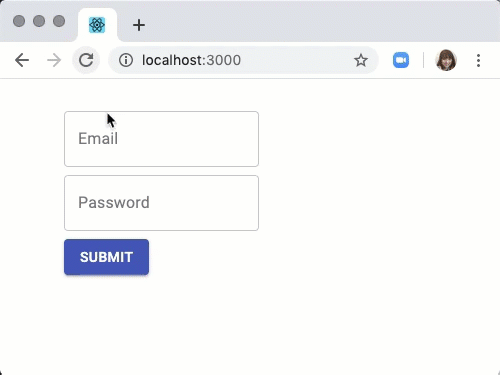
The code is structured like this:
LoginModule/ ├── components/ ⎪ ├── Login.js // renders LoginForm, error messages, and login confirmation ⎪ └── LoginForm.js // renders login form fields and button ├── hooks/ ⎪ └── useLogin.js // connects to API and manages state └── index.js // stitches everything together
Option 1: Unit tests
If you’re like me, and like writing tests — perhaps with your headphones on and something good on Spotify — then you might be tempted to knock out a unit test for every file.
Even if you’re not a testing aficionado, you might be working on a project that’s “trying to be good with testing” without a clear strategy and a testing approach of “I guess each file should have its own test?”
That would look something like this (where I’ve added unit to test file names for clarity):
LoginModule/ ├── components/ ⎪ ├── Login.js ⎪ ├── Login.unit.test.js ⎪ ├── LoginForm.js ⎪ └── LoginForm.unit.test.js ├── hooks/ ⎪ ├── useLogin.js ⎪ └── useLogin.unit.test.js ├── index.js └── index.unit.test.js
I went through the exercise of adding each of these unit tests on on GitHub, and created a test:coverage:unit script to generate a coverage report (a built-in feature of Jest). We can get to 100% coverage with the four unit test files:
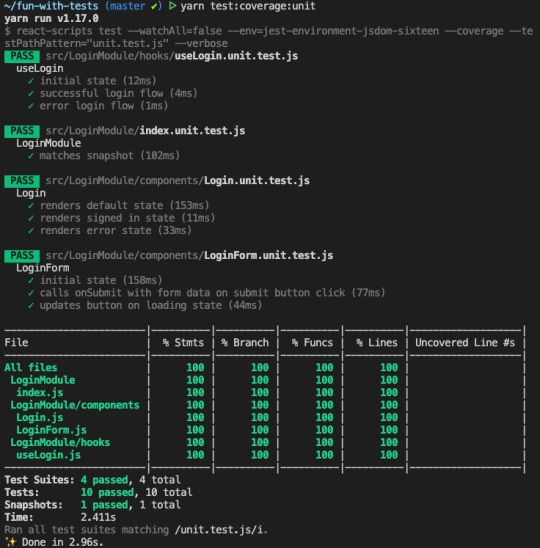
100% coverage is usually overkill, but it’s achievable for such a simple codebase.
Let’s dig into one of the unit tests created for the onLogin React hook. Don’t worry if you’re not well-versed in React hooks or how to test them.
test('successful login flow', async () => { // mock a successful API response jest .spyOn(window, 'fetch') .mockResolvedValue({ json: () => ({ token: '123' }) });
const { result, waitForNextUpdate } = renderHook(() => useLogin());
act(() => { result.current.onSubmit({ email: '[email protected]', password: 'password', }); });
// sets state to pending expect(result.current.state).toEqual({ status: 'pending', user: null, error: null, });
await waitForNextUpdate();
// sets state to resolved, stores email address expect(result.current.state).toEqual({ status: 'resolved', user: { email: '[email protected]', }, error: null, }); });
This test was fun to write (because React Hooks Testing Library makes testing hooks a breeze), but it has a few problems.
First, the test validates that a piece of internal state changes from 'pending' to 'resolved'; this implementation detail is not exposed to the user, and therefore, probably not a good thing to be testing. If we refactor the app, we’ll have to update this test, even if nothing changes from the user’s perspective.
Additionally, as a unit test, this is just part of the picture. If we want to validate other features of the login flow, such as the submit button text changing to “Loading,” we’ll have to do so in a different test file.
Option 2: Integration tests
Let’s consider the alternative approach of adding one integration test to validate this flow:
LoginModule/ ├── components/ ⎪ ├─ Login.js ⎪ └── LoginForm.js ├── hooks/ ⎪ └── useLogin.js ├── index.js └── index.integration.test.js
I implemented this test and a test:coverage:integration script to generate a coverage report. Just like the unit tests, we can get to 100% coverage, but this time it’s all in one file and requires fewer lines of code.

Here’s the integration test covering a successful login flow:
test('successful login', async () => { // mock a successful API response jest .spyOn(window, 'fetch') .mockResolvedValue({ json: () => ({ token: '123' }) });
const { getByLabelText, getByText, getByRole } = render(<LoginModule />);
const emailField = getByLabelText('Email'); const passwordField = getByLabelText('Password'); const button = getByRole('button');
// fill out and submit form fireEvent.change(emailField, { target: { value: '[email protected]' } }); fireEvent.change(passwordField, { target: { value: 'password' } }); fireEvent.click(button);
// it sets loading state expect(button.disabled).toBe(true); expect(button.textContent).toBe('Loading...');
await waitFor(() => { // it hides form elements expect(button).not.toBeInTheDocument(); expect(emailField).not.toBeInTheDocument(); expect(passwordField).not.toBeInTheDocument();
// it displays success text and email address const loggedInText = getByText('Logged in as'); expect(loggedInText).toBeInTheDocument(); const emailAddressText = getByText('[email protected]'); expect(emailAddressText).toBeInTheDocument(); }); });
I really like this test, because it validates the entire login flow from the user’s perspective: the form, the loading state, and the success confirmation message. Integration tests work really well for React apps for precisely this use case; the user experience is the thing we want to test, and that almost always involves several different pieces of code working together.
This test has no specific knowledge of the components or hook that makes the expected behavior work, and that’s good. We should be able to rewrite and restructure such implementation details without breaking the tests, so long as the user experience remains the same.
I’m not going to dig into the other integration tests for the login flow’s initial state and error handling, but I encourage you to check them out on GitHub.
So, what does need a unit test?
Rather than thinking about unit vs. integration tests, let’s back up and think about how we decide what needs to be tested in the first place. LoginModule needs to be tested because it’s an entity we want consumers (other files in the app) to be able to use with confidence.
The onLogin hook, on the other hand, does not need to be tested because it’s only an implementation detail of LoginModule. If our needs change, however, and onLogin has use cases elsewhere, then we would want to add our own (unit) tests to validate its functionality as a reusable utility. (We’d also want to move the file because it wouldn’t be specific to LoginModule anymore.)
There are still plenty of use cases for unit tests, such as the need to validate reusable selectors, hooks, and plain functions. When developing your code, you might also find it helpful to practice test-driven development with a unit test, even if you later move that logic higher up to an integration test.
Additionally, unit tests do a great job of exhaustively testing against multiple inputs and use cases. For example, if my form needed to show inline validations for various scenarios (e.g. invalid email, missing password, short password), I would cover one representative case in an integration test, then dig into the specific cases in a unit test.
Other goodies
While we’re here, I want to touch on few syntactic tricks that helped my integration tests stay clear and organized.
Big waitFor Blocks
Our test needs to account for the delay between the loading and success states of LoginModule:
const button = getByRole('button'); fireEvent.click(button);
expect(button).not.toBeInTheDocument(); // too soon, the button is still there!
We can do this with DOM Testing Library’s waitFor helper:
const button = getByRole('button'); fireEvent.click(button);
await waitFor(() => { expect(button).not.toBeInTheDocument(); // ahh, that's better });
But, what if we want to test some other items too? There aren’t a lot of good examples of how to handle this online, and in past projects, I’ve dropped additional items outside of the waitFor:
// wait for the button await waitFor(() => { expect(button).not.toBeInTheDocument(); });
// then test the confirmation message const confirmationText = getByText('Logged in as [email protected]'); expect(confirmationText).toBeInTheDocument();
This works, but I don’t like it because it makes the button condition look special, even though we could just as easily switch the order of these statements:
// wait for the confirmation message await waitFor(() => { const confirmationText = getByText('Logged in as [email protected]'); expect(confirmationText).toBeInTheDocument(); });
// then test the button expect(button).not.toBeInTheDocument();
It’s much better, in my opinion, to group everything related to the same update together inside the waitFor callback:
await waitFor(() => { expect(button).not.toBeInTheDocument(); const confirmationText = getByText('Logged in as [email protected]'); expect(confirmationText).toBeInTheDocument(); });
Interestingly, an empty waitFor will also get the job done, because waitFor has a default timeout of 50ms. I find this slightly less declarative than putting your expectations inside of the waitFor, but some indentation-averse developers may prefer it:
await waitFor(() => {}); // or maybe a custom util, `await waitForRerender()`
expect(button).not.toBeInTheDocument(); // I pass!
For tests with a few steps, we can have multiple waitFor blocks in row:
const button = getByRole('button'); const emailField = getByLabelText('Email');
// fill out form fireEvent.change(emailField, { target: { value: '[email protected]' } });
await waitFor(() => { // check button is enabled expect(button.disabled).toBe(false); });
// submit form fireEvent.click(button);
await waitFor(() => { // check button is no longer present expect(button).not.toBeInTheDocument(); });
Inline it comments
Another testing best practice is to write fewer, longer tests; this allows you to correlate your test cases to significant user flows while keeping tests isolated to avoid unexpected behavior. I subscribe to this approach, but it can present challenges in keeping code organized and documenting desired behavior. We need future developers to be able to return to a test and understand what it’s doing, why it’s failing, etc.
For example, let’s say one of these expectations starts to fail:
it('handles a successful login flow', async () => { // beginning of test hidden for clarity
expect(button.disabled).toBe(true); expect(button.textContent).toBe('Loading...');
await waitFor(() => { expect(button).not.toBeInTheDocument(); expect(emailField).not.toBeInTheDocument(); expect(passwordField).not.toBeInTheDocument();
const confirmationText = getByText('Logged in as [email protected]'); expect(confirmationText).toBeInTheDocument(); }); });
A developer looking into this can’t easily determine what is being tested and might have trouble deciding whether the failure is a bug (meaning we should fix the code) or a change in behavior (meaning we should fix the test).
My favorite solution to this problem is using the lesser-known test syntax for each test, and adding inline it-style comments describing each key behavior being tested:
test('successful login', async () => { // beginning of test hidden for clarity
// it sets loading state expect(button.disabled).toBe(true); expect(button.textContent).toBe('Loading...');
await waitFor(() => { // it hides form elements expect(button).not.toBeInTheDocument(); expect(emailField).not.toBeInTheDocument(); expect(passwordField).not.toBeInTheDocument();
// it displays success text and email address const confirmationText = getByText('Logged in as [email protected]'); expect(confirmationText).toBeInTheDocument(); }); });
These comments don’t magically integrate with Jest, so if you get a failure, the failing test name will correspond to the argument you passed to your test tag, in this case 'successful login'. However, Jest’s error messages contain surrounding code, so these it comments still help identify the failing behavior. Here’s the error message I got when I removed the not from one of my expectations:
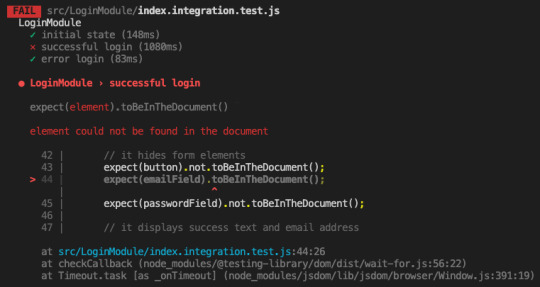
For even more explicit errors, there’s package called jest-expect-message that allows you to define error messages for each expectation:
expect(button, 'button is still in document').not.toBeInTheDocument();
Some developers prefer this approach, but I find it a little too granular in most situations, since a single it often involves multiple expectations.
Next steps for teams
Sometimes I wish we could make linter rules for humans. If so, we could set up a prefer-integration-tests rule for our teams and call it a day.
But alas, we need to find a more analog solution to encourage developers to opt for integration tests in a situation, like the LoginModule example we covered earlier. Like most things, this comes down to discussing your testing strategy as a team, agreeing on something that makes sense for the project, and — hopefully — documenting it in an ADR.
When coming up with a testing plan, we should avoid a culture that pressures developers to write a test for every file. Developers need to feel empowered to make smart testing decisions, without worrying that they’re “not testing enough.” Jest’s coverage reports can help with this by providing a sanity check that you’re achieving good coverage, even if the tests are consolidated that the integration level.
I still don’t consider myself an expert on integration tests, but going through this exercise helped me break down a use case where integration testing delivered greater value than unit testing. I hope that sharing this with your team, or going through a similar exercise on your codebase, will help guide you in incorporating integration tests into your workflow.
The post React Integration Testing: Greater Coverage, Fewer Tests appeared first on CSS-Tricks.
source https://css-tricks.com/react-integration-testing-greater-coverage-fewer-tests/
from WordPress https://ift.tt/2YnsycH
via IFTTT
0 notes
Text
Porting High Hat from GDScript to C#
So Godot 3.0 just released and with it comes C# support. I've been working on High Hat for awhile now and it has been running on a development build of Godot 3.0 for about 8 months. But up until this point it has been 100% GDScript (Godot's custom scripting language). For a variety of reasons (which I will cover in a bit) I decided to port High Hat over. I'm pretty much done at this point, so I figured I'd share some of the things I learned along the way.

First: can you guess which side is GDScript and which one is C#?
Why C# ?
Normally I wouldn't waste time on a language port. Your language is rarely your bottleneck and unless the port opens up new platforms, you won't make anyone but your dev team happier. But my case is special I swear! High Hat is my first game built in Godot. It started as an experiment and slowly, organically grew into a full (insane) game. Additionally when I started I didn't know good Godot design patterns. There's tons of failed / malformed / abandoned / half implemented ideas in the old GDScript codebase that made it hard to move forward at the rate I wanted to. At this point I knew how the engine worked and what I wanted the game architecture to look like. High Hat needed a rewrite and thanks to the fantastic work on Godot 3.0 I had a few options:
GDScript
I could just take what I learned and do the rewrite in GDScript. GDscript is a simple and easy scripting language with fantastic integration with the engine. I don't want to discourage people from using it because it is absolutely the right choice for many people. Unfortunately for me its benefits don't outweigh its drawbacks. First, it is a dynamically typed language. I think they have their place, but I personally dislike them for large projects ... especially games. They make bad designs easier, refactors harder, and the build/run/verify loop longer. Statically typed languages (generally) have more compile time checks that surface errors that would otherwise be exposed at runtime in dynamic languages. This problem is exacerbated in games, which generally have longer startup times and take more time to set up the scenarios you want to test. Due to the language's simplicity (no abstract classes, interfaces, etc) it makes abstractions much harder.
A GDNative language binding (C++, D, Nim)
GDNative lets you call native code from Godot without recompiling the engine. One use case is adding new "scripting" languages utilizing native code. GDNative languages are FAST compared to the other language options. I did a benchmark that tests a few scenarios and GDNative languages were the clear winners (none of the tests were computationally intense and GDNative was still over 4x faster than GDScript). GDNative's mastermind, @Karroffel, did a great job here and I almost went this route, but it currently has some high friction areas that need improvement. First, the editor integration is less than ideal. Debugging is possible but difficult. When I tested the Nim bindings I had to run a new instance of Godot that booted into my game, then attach a GDB instance to that. Some variables displayed correctly in GDB but others were just garbage. I also needed to manually build the GDNative library after every change (rather than having it automatically build when pressing the "play" button). You need a separate build for each platform you want to deploy to (not much can be done about that). Additionally, it requires adding a new .gdns file for every native class you want to use as a script. This takes time and fills my repo with cruft.
GDNative is probably the future of Godot. Thanks to it, Godot is now ahead of Unity and on par with Unreal when it comes to language support. I suspect it will continue to gain ground as more people create bindings. The problems I mentioned above are not inherent to the implementation ... they're just small things that haven't been solved yet. GDNative is still young so I'll cut it some slack. I consider it to be the best thing to come out of the 3.0 release and I will definitely use it in the future.
C#
C# was also pretty fast in my benchmarks. There are a few bottlenecks that are already being addressed. I use C# every day for my job so it was already the "comfy" choice for me. It's static, it has a large gamedev community (thanks to Unity, MonoGame, and Unreal), it has a great package manager, lots of tooling, and a ton of syntactic niceties that the other languages don't have (pattern matching and LINQ come to mind). I've been following the binding's development since its inception and I've studied the code, so I understand the implementation and its tradeoffs.
C# was clearly the right choice for me, but that doesn't mean it is the right choice for you. Play with each of the options and see what sticks!
C# Patterns in Godot
Throughout the port I picked up a few opinions and tricks that I figured I'd share.
Avoid crossing the language barrier
Marshalling (converting types between C# and C++) can be expensive. The bindings currently have a few naive conversions that incur some pretty serious overhead. These are already fixed, but the pull request hasn't been merged yet on Github. The situation will be better soon, but there will always be nonzero overhead.
Pretty much all Godot API calls will incur this overhead. But don't worry too much about it ... every Godot language type except C++ modules will have this problem and its generally small enough that you don't need to think about it.
Don't use custom signals ever. Use C# events. They are better in every way. This is going to be controversial, but hear me out:
Signals are almost definitely slower. Upon connection they require string matching/hashing (the signal name and the function name) as well as reflection (to grab a C# function pointer using the function name string). Ditto for emitting them. Signals are cool but they're more complexity than we need.
Events are typesafe
Events don't require crossing the language barrier
Events can be easily refactored
Events can be autocompleted
Events can use lambda functions
I rest my case
Be wary of the garbage collector
GDScript uses explicit free calls (or queue_free) and reference counting to manage memory. C# uses a garbage collector. This means every so often execution will pause to find unused objects and free them. This can cause tangible stuttering so you want to avoid large GC pauses. I won't go in to detail here, but basically avoid allocations and deallocations (especially in large batches) as much as you can. Reuse objects when possible.
Object Pooling is a common way to avoid allocations (and thus GC pauses) by reusing old objects instead of creating new ones. Godot currently doesn't have a pooling system, but I have a feeling that it might get one in the future. You could also implement one yourself.
Use my input system!
It's free and open source: https://github.com/cart/godot-inputsharp
It circumvents the action system. Uses enums instead of strings
It circumvents the _Input handler. Uses C# events instead! (backed by a single _Input handler).
Stop caring about input types. Anything can be treated as an axis or a button based on the context.
Makes multiplayer easier. One Input object per device that exclusively tracks its device's input events.
Mockable. A great way to implement AIs: they have "virtual" joysticks.
Ensures unique device ids. Godot input ids are unique within a device type, but not across all devices.
It might be faster because it doesn't do string comparisons when checking events. I'm not sure and I probably won't verify this. It doesn't matter that much
Virtual axes: turn two buttons / triggers / axis directions (with a range from 0 to 1) into a new axis (with a range of -1 to 1) with one function call. I use this to create a horizontal axis input that maps to both keyboards (left and right keys) and joysticks (left and right on the analog stick)
It's still in its early stages. It's undocumented and relatively untested. It's also not a library right now because at this stage I don't want to deal with compiling multiple projects for my game. This might change as it matures and I stop iterating as quickly.
Take advantage of C#'s class extensions
Godot and the C# bindings are great, but every so often I identify functionality that the core types are missing that I'm constantly re-implementing. In GDScript, I just duplicated code or moved it to a static class, but C# has extensions!
Here is my current NodeExtensions.cs
Heres is my current MathExtensions.cs
Use LINQ
It significantly reduces the amount of code you write and makes it easier to understand. Well worth the cost of abstraction.
Conclusion
I've spent a couple of hours a day for about two weeks porting everything over and I consider it well worth the effort. My code base is smaller, it runs faster, and it's easier to understand. But what works for me might not work for you blah blah blah I'm done talking. Now back to your regularly scheduled gifs of blobby creatures stacking hats on their heads.
1 note
·
View note
Text
VIRTUAL ASSISTANT ARTICLES

Does your website lack new, fresh and creative content? When did you last have time to sit down and write an engaging article to feature on your blog? Content is the cornerstone of many marketing strategies today, generating inbound leads for businesses in a variety of different industries. If content marketing is done well, it can radically transform your bottom line.
Whether you are looking for an entirely fresh perspective or you just simply don’t have the time to write an article or blog post every week and so need someone to write to your specific instructions, one of our Virtual Assistants will help you.
Virtalent is home to a whole host of talented Virtual Assistants for article writing, content writing and blogging, as well as a number of talented Marketing VAs with a broader background in marketing. Whether you need new and regular articles or blogs written, or need your website pages rewritten with some creative content to attractive your next customer, our team have it covered.
It can be easy to regurgitate the same ideas and lose focus on what your customers really want to know or are interested in reading about. Why not set up a Skype call every two weeks or once a month (whatever works best!) to generate some new content ideas? Let your Virtual Assistant become a fully integrated member of your team by allowing them to bring their knowledge, insight and creativity into play.Having a ghost writer to carry out your article writing means you have more time to focus on other, perhaps more strategic or managerial aspects of your business, whilst a professional article and content writer can do the rest.
A Virtual Assistant for article writing will be a native English speaker based in the UK. They will have an excellent command of the English language and a true understanding of your audience’s culture. As such they will be able to create compelling content that truly engages and persuades your readers, without you having to check their spelling and grammar or rewrite their work.
All of our VAs are background checked by Onfido, an independent identity and background checking organisation, and they all pass through a rigorous selection process, so you can rest assured that we test their article writing and content writing skills before assigning them to your account.
Furthermore, if you hire a Virtual Assistant for article writing from Virtalent, you are safe in the knowledge that all our tasks are insured through Hiscox Insurance. Not to mention you will be assigned a dedicated Account Manager who will work alongside your article writing Virtual Assistant, to ensure both you and your VA feel supported.
If you feel you could benefit from hiring a Virtual Assistant for article writing, our Pricing Plans start at just £250 per month. If you have any further questions, why not book a free 1:1 consultation with one of the Directors to find out how a VA can help you?
I welcome you to check out my premnium product's shop, where you will get all premium virtual products at the lowest rate. Visit: https://vsuvo.com/shop/
-------------------------
Go back to home page: https://vsuvo.com/
---------------------------
virtual assistant,virtual assistant jobs,virtual assistant services,become a virtual assistant,what is a virtual assistant,how to become a virtual assistant,best virtual assistant,virtual assistant jobs from home no experience,virtual assistant salary,hire a virtual assistant,upwork virtual assistant,virtual personal assistant,virtual assistant philippines,virtual assistant jobs from home,philippines virtual assistant,virtual dating assistant,virtual assistant training,hire virtual assistant,virtual assistant job description,virtual assistant companies,becoming a virtual assistant,virtual assistant jobs carmel,real estate virtual assistant,virtual assistant india,virtual assistant jobs for beginners,virtual assistant jobs online,google virtual assistant,find a virtual assistant,virtual assistant service,virtual administrative assistant,virtual assistant websites,remote virtual assistant,amazon virtual assistant,hp virtual assistant,virtual assistant denise,how to be a virtual assistant,virtual assistant ai,personal virtual assistant,cousins for life virtual assistant,virtual assistant best practices,oracle virtual assistant,outsourcing virtual assistant,virtual assistant position,hiring a virtual assistant,virtual assistant software,247 virtual assistant,virtual executive assistant,indian virtual assistant,virtual assistant app,virtual assistant salary,virtual assistant companies,irtual assistant websites,irtual assistant jobs part time,virtual assistant jobs near me,virtual assistant training,virtual assistant resume,virtual assistant positions,virtual assistant agency,virtual assistant ai,virtual assistant amazon,virtual assistant association,virtual assistant alexa,virtual assistant assistant,virtual assistant application,virtual assistant academy,virtual assistant austin,a virtual assistant jobs,a virtual assistant business,a virtual assistant google,a virtual assistant application letter,a virtual assistant hire,your virtual assistant,the virtual assistant uk,the virtual assistant savvy,the virtual assistant handbook,the virtual assistant australia,virtual assistant business plan,virtual assistant bookkeeping,virtual assistant blogs,virtual assistant business card,virtual assistant belay,virtual assistant benefits,virtual assistant bot,virtual assistant bio,virtual assistant b,virtual assistant b.v,virtual assistant contract,virtual assistant certification,virtual assistant cost,virtual assistant contract template,virtual assistant companies hiring,virtual assistant classes,virtual assistant careers,virtual assistant c,virtual assistant definition,virtual assistant duties,virtual assistant devices,virtual assistant data entry,virtual assistant discovery call,virtual assistant data entry jobs,virtual assistant dallas,virtual assistant degree,virtual assistant directory,virtual assistant do,offre d'emploi virtual assistant,virtual assistant email management,virtual assistant entry level,virtual assistant email management packages,virtual assistant examples,virtual assistant entry level jobs,virtual assistant email templates,virtual assistant email signature,virtual assistant ebay,virtual assistant education,virtual assistant experience,e commerce virtual assistant,w.a.d.e virtual assistant free download,w.a.d.e virtual assistant,w.a.d.e virtual assistant download,best ecommerce virtual assistant,e commerce university virtual assistant,e.v.a (extra virtual assistant),e.v.a (extra virtual assistant) telecharger,virtual assistant for real estate,virtual assistant for hire,virtual assistant for android,virtual assistant from home,virtual assistant freelance,virtual assistant for poshmark,virtual assistant fiverr,virtual assistant for therapists,virtual assistant for real estate investors,virtual assistant for social media,virtual assistant gigs,virtual assistant google,virtual assistant graphic design,virtual assistant guide,virtual assistant github,virtual assistant groups,virtual assistant goals,virtual assistant glassdoor,virtual assistant gift,virtual assistant girl friday,virtual assistant hourly rate,virtual assistant hiring,virtual assistant houston,virtual assistant handbook,virtual assistant hashtags,virtual assistant healthcare,virtual assistant help,virtual assistant hiring now,virtual assistant hours,h&r block virtual assistant,virtual assistant india,virtual assistant internship,virtual assistant indeed,virtual assistant interview questions,virtual assistant images,virtual assistant icon,virtual assistant in the philippines,virtual assistant instagram,virtual assistant insurance,virtual assistant industry,i need virtual assistant,i'm a virtual assistant,i phone virtual assistant,i want a virtual assistant,virtual assistant jobs from home,virtual assistant jobs mn,j munro virtual assistant,l&j virtual assistants,virtual assistant j,virtual assistant kansas city,virtual assistant keywords,virtual assistant key skills,virtual assistant logo,virtual assistant linkedin,virtual assistant like sir,virtual assistant list,virtual assistant lead generation,virtual assistant los angeles,virtual assistant las vegas,virtual assistant logo ideas,virtual assistant law firm,virtual assistant like alexa,virtual assistant meaning,virtual assistant market,virtual assistant microsoft,virtual assistant medical,virtual assistant memes,virtual assistant movie,virtual assistant mission statement,virtual assistant mexico,virtual assistant market share,virtual assistant mental health,facebook m virtual assistant,m&s virtual assistant,m*modal virtual assistant,virtual assistant names,virtual assistant needed,virtual assistant near me,virtual assistant name list,virtual assistant no experience,virtual assistant nyc,virtual assistant niches,virtual assistant name generator,virtual assistant nashville tn,virtual assistant network,virtual assistant n,virtual assistant online,virtual assistant online jobs,virtual assistant overseas,virtual assistant organizations,virtual assistant openings,virtual assistant online course,virtual assistant online classes,virtual assistant overview,virtual assistant objective,virtual assistant open source,do virtual assistants,virtual assistant philippines,virtual assistant pay,virtual assistant part time jobs,virtual assistant pricing,virtual assistant packages,virtual assistant pro,virtual assistant proposal,virtual assistant poshmark,virtual assistant part time,hp virtual assistant,hp virtual assistant chat,hp support virtual assistant,hp/go/virtual assistant,hp printer virtual assistant,hp tech support virtual assistant,hp customer service virtual assistant,hp printer support virtual assistant,hp support assistant virtual switch,hp support assistant virtual agent,virtual assistant quotes,virtual assistant qualifications,virtual assistant questionnaire,virtual assistant quickbooks,virtual assistant qualities,virtual assistant questions,virtual assistant quiz,virtual assistant questions to ask client,virtual assistant remote jobs,virtual assistant services list,virtual assistant freelancer
Read the full article
0 notes
Text
Reword 2
Definition of reword. Free online Dictionary including thesaurus, children's and intermediate dictionary by Wordsmyth.
v express the same message in different words. Synonyms: paraphrase, rephrase. Types: translate. express, as in simple and less technical language. Type of: ...
using rewording tool to reword the content. 6. Download the final sentence rewritten or paragraph was rewritten document using the "download" button.
Definition of reword in the Definitions.net dictionary. ... Information and translations of reword in the most comprehensive dictionary definitions resource on the ...
reword - WordReference English dictionary, questions, discussion and forums. All Free.
What does reword mean? reword is defined by the lexicographers at Oxford Dictionaries as Put (something) into different words.
Best paraphrasing tool rewrite articles essays or paragraphs and make them unique within seconds.
Find 448 synonyms for reword and other similar words that you can use instead based on 4 separate contexts from our thesaurus.
Define reword. reword synonyms, reword pronunciation, reword translation, English dictionary definition of reword. tr.v. re·word·ed , re·word·ing , re·words 1. a.
Find all the synonyms and alternative words for reword at Synonyms.com, the largest free online thesaurus, antonyms, definitions and translations resource on ...
Jul 25, 2019 - The output from the REF-N-WRITE Rephrase tool can be seen above. The tool offers plenty of writing ideas that the user can use to reword and ...
Online tool Reword was launched last year and works by identifying cruel or intimidating language in real time, prompting users to reconsider their potentially ...
May 27, 2018 - Description. ReWord WordPress plugin allows the users to suggest fixes for content mistakes on a wordpress site. It enhances users ...
March 24, 2016 • Aimed at preventing cyberbullying, the online tool, called Reword, flags insulting phrases and crosses them out with a red line. So far, the ...
Reword meaning and example sentences with reword. Top definition is 'Express the same message in different words.'.
Definition of reword written for English Language Learners from the Merriam-Webster Learner's Dictionary with audio pronunciations, usage examples, and ...
Reword sentences is the act of taking either the spoken or written word and repeating the meaning using only own ones. It is not like outlining where you only ...
Above are the results of unscrambling reword. Using the word generator and word unscrambler for the letters R E W O R D, we unscrambled the letters to create ...
Learning English? Memorize English words efficiently and improve your vocabulary! • Thousands of English words and phrases divided into 50 categories.
Reword Tool – This website has one of the best and most popular reword plagiarism tools you will ever be able to find on the Internet. http://www.rewordtool.net.
Nov 10, 2015 - 'Reword' Prevents Cyber-bullying, '100,' 'Slurpee Sound Cup' Boosts Aussie Moods. Leo Burnett Melbourne creates 7+ GPC ads for Bonds, 7- ...
Translate Reword. See 2 authoritative translations of Reword in Spanish with example sentences and audio pronunciations.
REWORD is a C++ program which reads a text file and makes a copy in which every line has the same number of "words" - that is, strings separated by blanks.
Sep 12, 2017 - Leo Burnett Melbourne has scored one of five Gold Awards for Headspace Youth Mental Health Foundation's 'Reword' campaign in the Social ...
An experiment with emerging React solutions. Contribute to bengladwell/reword development by creating an account on GitHub.
reword. 2.8K likes. The tool that helps prevent online bullying behaviour, identifying insulting statements in real time and highlighting them with a red...
0 notes
Text
Using the Apriori algorithm and BERT embeddings to visualize change in search console rankings
One of the biggest challenges an SEO faces is one of focus. We live in a world of data with disparate tools that do various things well, and others, not so well. We have data coming out of our eyeballs, but how to refine large data to something meaningful. In this post, I mix new with old to create a tool that has value for something, we as SEOs, do all the time. Keyword grouping and change review. We will leverage a little known algorithm, called the Apriori Algorithm, along with BERT, to produce a useful workflow for understanding your organic visibility at thirty thousand feet.
What is the Apriori algorithm
The Apriori algorithm was proposed by RakeshAgrawal and RamakrishnanSrikant in 2004. It was essentially designed as a fast algorithm used on large databases, to find association/commonalities between component parts of rows of data, called transactions. A large e-commerce shop, for example, may use this algorithm to find products that are often purchased together, so that they can show associated products when another product in the set is purchased.
I discovered this algorithm a few years ago, from this article, and immediately saw a connection to helping find unique pattern sets in large groups of keywords. We have since moved to more semantically-driven matching technologies, as opposed to term-driven, but this is still an algorithm that I often come back to as a first pass through large sets of query data.
Transactions
1technicalseo
2technicalseoagency
3seoagency
4technicalagency
5locomotiveseoagency
6locomotiveagency
Below, I used the article by Annalyn Ng, as inspiration to rewrite the definitions for the parameters that the Apriori algorithm supports, because I thought it was originally done in an intuitive way. I pivoted the definitions to relate to queries, instead of supermarket transactions.
Support
Support is a measurement of how popular a term or term set is. In the table above, we have six separate tokenized queries. The support for “technical” is 3 out of 6 of the queries, or 50%. Similarly, “technical, seo” has a support of 33%, being in 2 out of 6 of the queries.
Confidence
Confidence shows how likely terms are to appear together in a query. It is written as {X->Y}. It is simply calculated by dividing the support for {term 1 and term 2} by the support for {term 1}. In the above example, the confidence of {technical->seo} is 33%/50% or 66%.
Lift
Lift is similar to confidence but solves a problem in that really common terms may artificially inflate confidence scores when calculated based on the likelihood that they appear with other terms simply based on their frequency of usage. Lift is calculated, for example, by dividing the support for {term 1 and term 2} by ( the support for {term 1} times the support for {term 2} ). A value of 1 means no association. A value greater than 1 says the terms are likely to appear together, while a value less than 1 means they are unlikely to appear together.
Using Apriori for categorization
For the rest of the article, we will follow along with a Colab notebook and companion Github repo, that contains additional code supporting the notebook. The Colab notebook is found here. The Github repo is called QueryCat.
We start off with a standard CSV from Google Search Console (GSC), of comparative, 28-day queries, period-over-period. Within the notebook, we load the Github repo, and install some dependencies. Then we import querycat and load a CSV containing the outputted data from GSC.
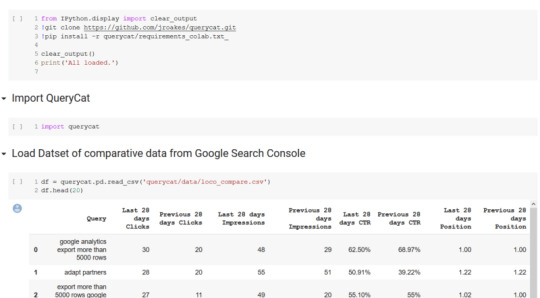
Click to enlarge
Now that we have the data, we can use the Categorize class in querycat, to pass a few parameters and easily find relevant categories. The most meaningful parameters to look at are the “alg” parameter, which specifies the algorithm to use. We included both Apriori and FP-growth, which both take the same inputs and have similar outputs. The FP-Growth algorithm is supposed to be a more efficient algorithm. In our usage, we preferred the Apriori algorithm.
The other parameter to consider is “min-support.” This essentially says how often a term has to appear in the dataset, to be considered. The lower this value is, the more categories you will have. Higher numbers, have less categories, and generally more queries with no categories. In our code, we designate queries with no calculated category, with a category “##other##”
The remaining parameters “min_lift” and “min_probability” deal with the quality of the query groupings and impart a probability of the terms appearing together. They are already set to the best general settings we have found, but can be tweaked to personal preference on larger data sets.

Click to enlarge
You can see that in our dataset of 1,364 total queries, the algorithm was able to place the queries in 101 categories. Also notice that the algorithm is able to pick multi-word phrases as categories, which is the output we want.
After this runs, you can run the next cell, which will output the original data with the categories appended to each row. It is worth noting, that this is enough to be able to save the data to a CSV, to be able to pivot by the category in Excel and aggregate the column data by category. We provide a comment in the notebook which describes how to do this. In our example, we distilled matched meaningful categories, in only a few seconds of processing. Also, we only had 63 unmatched queries.
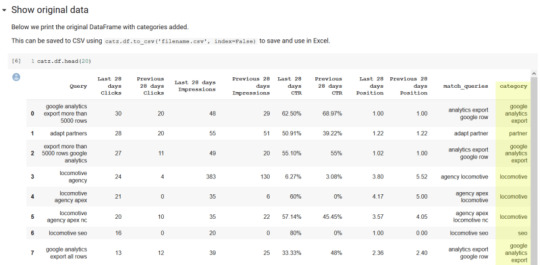
Click to enlarge
Now with the new (BERT)
One of the frequent questions asked by clients and other stakeholders is “what happened last <insert time period here>?” With a bit of Pandas magic and the data we have already processed, to this point, we can easily compare the clicks for the two periods in our dataset, by category, and provide a column that shows the difference (or you could do % change if you like) between the two periods.
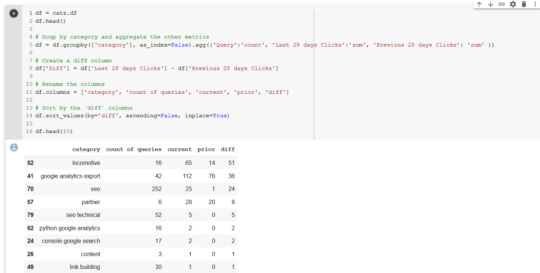
Click to enlarge
Since we just launched a new domain at the end of 2019, locomotive.agency, it is no wonder that most of the categories show click growth comparing the two periods. It is also good to see that our new brand, “Locomotive”, shows the most growth. We also see that an article that we did on Google Analytics Exports, has 42 queries, and a growth of 36 monthly clicks.
This is helpful, but it would be cool to see if there are semantic relationships between query categories that we did better, or worse. Do we need to build more topical relevance around certain categories of topics?
In the shared code, we made for easy access to BERT, via the excellent Huggingface Transformers library, simply by including the querycat.BERTSim class in your code. We won’t cover BERT in detail, because Dawn Anderson, has done an excellent job here.
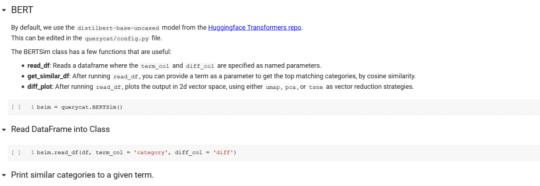
Click to enlarge
This class allows you to input any Pandas DataFrame with a terms (queries) column, and it will load DistilBERT, and process the terms into their corresponding summed embeddings. The embeddings, essentially are vectors of numbers that hold the meanings the model as “learned” about the various terms. After running the read_df method of querycat.BERTSim, the terms and embeddings are stored in the terms (bsim.terms) and embeddings(bsim.embeddings) properties, respectively.
Similarity
Since we are operating in vector space with the embeddings, this means we can use Cosine Similarity to calculate the cosine of the angles between the vectors to measure the similarity. We provided a simple function here, that would be helpful for sites that may have hundreds to thousands of categories. “get_similar_df” takes a string as the only parameter, and returns the categories that are most similar to that term, with a similarity score from 0 to 1. You can see below, that for the given term “train,” locomotive, our brand, was the closest category, with a similarity of 85%.

Click to enlarge
Plotting Change
Going back to our original dataset, to this point, we now have a dataset with queries and PoP change. We have run the queries through our BERTSim class, so that class knows the terms and embeddings from our dataset. Now we can use the wonderful matplotlib, to bring the data to life in an interesting way.
Calling a class method, called diff_plot, we can plot a view of our categories in two-dimensional, semantic space, with click change information included in the color (green is growth) and size (magnitude of change) of the bubbles.
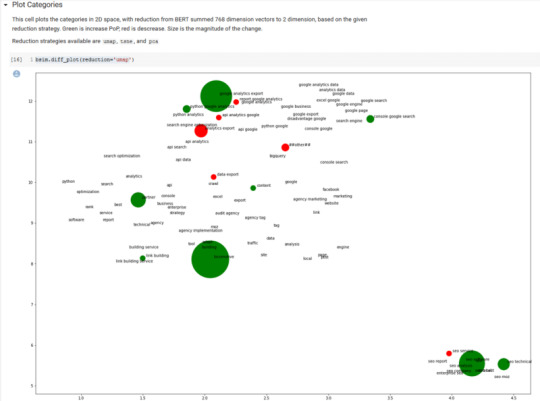
Click to enlarge
We included three separate dimension reduction strategies (algorithms), that take the 768 dimensions of BERT embeddings down to two dimensions. The algorithms are “tsne,” “pca” and “umap.” We will leave it to the reader to investigate these algorithms, but “umap” has a good mixture of quality and efficiency.
It is difficult to see (because ours is a relatively new site) much information from the plot, other than an opportunity to cover the Google Analytics API in more depth. Also, this would be a more informative plot had we removed zero change, but we wanted to show how this plot semantically clusters topic categories in a meaningful way.
Wrapping Up
In this article, we:
Introduced the Apriori algorithm.
Showed how you could use Apriori to quickly categorize a thousand queries from GSC.
Showed how to use the categories to aggregate PoP click data by category.
Provided a method for using BERT embeddings to find semantically related categories.
Finally, displayed a plot of the final data showing growth and decline by semantic category positioning.
We have provided all code as open source with the hopes that others will play and extend the capabilities as well as write more articles showing other ways various algorithms, new and old, can be helpful for making sense of the data all around us.
The post Using the Apriori algorithm and BERT embeddings to visualize change in search console rankings appeared first on Search Engine Land.
Using the Apriori algorithm and BERT embeddings to visualize change in search console rankings published first on https://likesandfollowersclub.weebly.com/
0 notes
Text
Using the Apriori algorithm and BERT embeddings to visualize change in search console rankings
One of the biggest challenges an SEO faces is one of focus. We live in a world of data with disparate tools that do various things well, and others, not so well. We have data coming out of our eyeballs, but how to refine large data to something meaningful. In this post, I mix new with old to create a tool that has value for something, we as SEOs, do all the time. Keyword grouping and change review. We will leverage a little known algorithm, called the Apriori Algorithm, along with BERT, to produce a useful workflow for understanding your organic visibility at thirty thousand feet.
What is the Apriori algorithm
The Apriori algorithm was proposed by RakeshAgrawal and RamakrishnanSrikant in 2004. It was essentially designed as a fast algorithm used on large databases, to find association/commonalities between component parts of rows of data, called transactions. A large e-commerce shop, for example, may use this algorithm to find products that are often purchased together, so that they can show associated products when another product in the set is purchased.
I discovered this algorithm a few years ago, from this article, and immediately saw a connection to helping find unique pattern sets in large groups of keywords. We have since moved to more semantically-driven matching technologies, as opposed to term-driven, but this is still an algorithm that I often come back to as a first pass through large sets of query data.
Transactions
1technicalseo
2technicalseoagency
3seoagency
4technicalagency
5locomotiveseoagency
6locomotiveagency
Below, I used the article by Annalyn Ng, as inspiration to rewrite the definitions for the parameters that the Apriori algorithm supports, because I thought it was originally done in an intuitive way. I pivoted the definitions to relate to queries, instead of supermarket transactions.
Support
Support is a measurement of how popular a term or term set is. In the table above, we have six separate tokenized queries. The support for “technical” is 3 out of 6 of the queries, or 50%. Similarly, “technical, seo” has a support of 33%, being in 2 out of 6 of the queries.
Confidence
Confidence shows how likely terms are to appear together in a query. It is written as {X->Y}. It is simply calculated by dividing the support for {term 1 and term 2} by the support for {term 1}. In the above example, the confidence of {technical->seo} is 33%/50% or 66%.
Lift
Lift is similar to confidence but solves a problem in that really common terms may artificially inflate confidence scores when calculated based on the likelihood that they appear with other terms simply based on their frequency of usage. Lift is calculated, for example, by dividing the support for {term 1 and term 2} by ( the support for {term 1} times the support for {term 2} ). A value of 1 means no association. A value greater than 1 says the terms are likely to appear together, while a value less than 1 means they are unlikely to appear together.
Using Apriori for categorization
For the rest of the article, we will follow along with a Colab notebook and companion Github repo, that contains additional code supporting the notebook. The Colab notebook is found here. The Github repo is called QueryCat.
We start off with a standard CSV from Google Search Console (GSC), of comparative, 28-day queries, period-over-period. Within the notebook, we load the Github repo, and install some dependencies. Then we import querycat and load a CSV containing the outputted data from GSC.

Click to enlarge
Now that we have the data, we can use the Categorize class in querycat, to pass a few parameters and easily find relevant categories. The most meaningful parameters to look at are the “alg” parameter, which specifies the algorithm to use. We included both Apriori and FP-growth, which both take the same inputs and have similar outputs. The FP-Growth algorithm is supposed to be a more efficient algorithm. In our usage, we preferred the Apriori algorithm.
The other parameter to consider is “min-support.” This essentially says how often a term has to appear in the dataset, to be considered. The lower this value is, the more categories you will have. Higher numbers, have less categories, and generally more queries with no categories. In our code, we designate queries with no calculated category, with a category “##other##”
The remaining parameters “min_lift” and “min_probability” deal with the quality of the query groupings and impart a probability of the terms appearing together. They are already set to the best general settings we have found, but can be tweaked to personal preference on larger data sets.
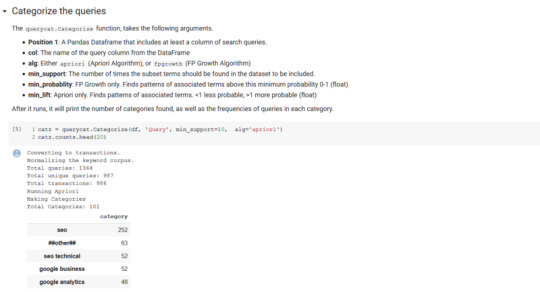
Click to enlarge
You can see that in our dataset of 1,364 total quereis, the algorithm was able to place the queries in 101 categories. Also notice that the algorithm is able to pick multi-word phrases as categories, which is the output we want.
After this runs, you can run the next cell, which will output the original data with the categories appended to each row. It is worth noting, that this is enough to be able to save the data to a CSV, to be able to pivot by the category in Excel and aggregate the column data by category. We provide a comment in the notebook which describes how to do this. In our example, we distilled matched meaningful categories, in only a few seconds of processing. Also, we only had 63 unmatched queries.

Click to enlarge
Now with the new (BERT)
One of the frequent questions asked by clients and other stakeholders is “what happened last <insert time period here>?” With a bit of Pandas magic and the data we have already processed, to this point, we can easily compare the clicks for the two periods in our dataset, by category, and provide a column that shows the difference (or you could do % change if you like) between the two periods.

Click to enlarge
Since we just launched a new domain at the end of 2019, locomotive.agency, it is no wonder that most of the categories show click growth comparing the two periods. It is also good to see that our new brand, “Locomotive”, shows the most growth. We also see that an article that we did on Google Analytics Exports, has 42 queries, and a growth of 36 monthly clicks.
This is helpful, but it would be cool to see if there are semantic relationships between query categories that we did better, or worse. Do we need to build more topical relevance around certain categories of topics?
In the shared code, we made for easy access to BERT, via the excellent Huggingface Transformers library, simply by including the querycat.BERTSim class in your code. We won’t cover BERT in detail, because Dawn Anderson, has done an excellent job here.

Click to enlarge
This class allows you to input any Pandas DataFrame with a terms (queries) column, and it will load DistilBERT, and process the terms into their corresponding summed embeddings. The embeddings, essentially are vectors of numbers that hold the meanings the model as “learned” about the various terms. After running the read_df method of querycat.BERTSim, the terms and embeddings are stored in the terms (bsim.terms) and embeddings(bsim.embeddings) properties, respectively.
Similarity
Since we are operating in vector space with the embeddings, this means we can use Cosine Similarity to calculate the cosine of the angles between the vectors to measure the similarity. We provided a simple function here, that would be helpful for sites that may have hundreds to thousands of categories. “get_similar_df” takes a string as the only parameter, and returns the categories that are most similar to that term, with a similarity score from 0 to 1. You can see below, that for the given term “train,” locomotive, our brand, was the closest category, with a similarity of 85%.
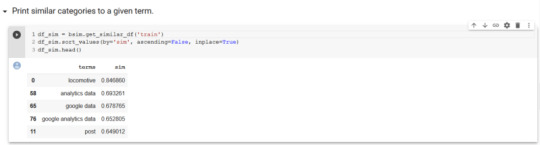
Click to enlarge
Plotting Change
Going back to our original dataset, to this point, we now have a dataset with queries and PoP change. We have run the queries through our BERTSim class, so that class knows the terms and embeddings from our dataset. Now we can use the wonderful matplotlib, to bring the data to life in an interesting way.
Calling a class method, called diff_plot, we can plot a view of our categories in two-dimensional, semantic space, with click change information included in the color (green is growth) and size (magnitude of change) of the bubbles.

Click to enlarge
We included three separate dimension reduction strategies (algorithms), that take the 768 dimensions of BERT embeddings down to two dimensions. The algorithms are “tsne,” “pca” and “umap.” We will leave it to the reader to investigate these algorithms, but “umap” has a good mixture of quality and efficiency.
It is difficult to see (because ours is a relatively new site) much information from the plot, other than an opportunity to cover the Google Analytics API in more depth. Also, this would be a more informative plot had we removed zero change, but we wanted to show how this plot semantically clusters topic categories in a meaningful way.
Wrapping Up
In this article, we:
Introduced the Apriori algorithm.
Showed how you could use Apriori to quickly categorize a thousand queries from GSC.
Showed how to use the categories to aggregate PoP click data by category.
Provided a method for using BERT embeddings to find semantically related categories.
Finally, displayed a plot of the final data showing growth and decline by semantic category positioning.
We have provided all code as open source with the hopes that others will play and extend the capabilities as well as write more articles showing other ways various algorithms, new and old, can be helpful for making sense of the data all around us.
The post Using the Apriori algorithm and BERT embeddings to visualize change in search console rankings appeared first on Search Engine Land.
Using the Apriori algorithm and BERT embeddings to visualize change in search console rankings published first on https://likesfollowersclub.tumblr.com/
0 notes
Last Seen Blogs

werterkinn
Some transgender girl's memories.

spaaarkleess
.Secretley.

commanderinchef
huevos rancheros for the people

magneticmummy
Certified Disaster Bi

cjminwon
제목 없음