#autolayout
Explore tagged Tumblr posts
Visit Tumblr Blog
Explore Tumblr blogs with no restrictions, modern design and the best experience.
Last Seen Tumblr Blogs


Fun Fact
Tumblr was named as a finalist in Lead411’s New York City Hot 125 in Aug 2010.
Link
NUEVO VIDEO-TUTORIAL: Proceso paso a paso para crear un botón con ajete automático (Auto Layout) en Figma. Video disponible desde los enlaces en la biografía o desde este enlace: https://youtu.be/bpcOTsykThM ____ Para ver clases y tutoriales paso a paso…no olvide visitar ✅ https://www.youtube.com/titocampos Encuentre en mi blog otras frases, tips, lecturas y recursos gratuitos ➡️ https://blog.titocampos.com Más contenido en los enlaces de la biografía ➡️ https://links.titocampos.com _____
#figma#illustrator#tutorial#link#tip#truco#proceso#boton#autolayout#botones#botonFigma#ui#ux#uxClases#uiClases#aprenderUI
0 notes

Text
Đối tượng nên tham gia khóa học Figma tại Vnskills Academy
Bạn đang muốn nâng cao kỹ năng thiết kế giao diện người dùng (UI) và trải nghiệm người dùng (UX)? Hãy tham gia ngay vào khóa học Figma tại VnSkills Academy.
1. Giới Thiệu Khóa Học Figma tại VnSkills Academy
Vnskills Academy tự hào là địa điểm đào tạo chuyên sâu về Figma, một trong những công cụ hàng ��ầu cho thiết kế UI/UX. Khóa học này không chỉ tập trung vào lý thuyết mà còn hướng tới thực chiến, giúp học viên nắm bắt kiến thức một cách sâu sắc và ứng dụng linh hoạt vào thực tế.
2. Đối Tượng Tham Gia Khóa Học Figma
Designer Chuyên Nghiệp: Muốn nâng cao kỹ năng sử dụng Figma để thiết kế giao diện chuyên nghiệp hơn.
Sinh Viên Ngành Thiết Kế: Cần bổ sung kiến thức và kỹ năng để chuẩn bị cho sự nghiệp trong tương lai.
Lập Trình Viên Front-end: Muốn hiểu rõ hơn về quá trình thiết kế giao diện để làm việc hiệu quả hơn với designer.
Nhà Quản Lý Sản Phẩm (Product Manager): Mong muốn hiểu sâu hơn về quá trình thiết kế để quản lý dự án hiệu quả hơn.
Nhà Sáng Lập Startup: Muốn tự thiết kế các prototype, wireframe ban đầu cho sản phẩm của mình.
👉👉👉
3. Nội Dung Khóa Học Figma tại VnSkills Academy
Khóa học Figma tại VnSkills Academy được chia thành các module từ cơ bản đến nâng cao, bao gồm:
Giới thiệu về Figma và cách sử dụng.
Thiết kế giao diện người dùng (UI) cơ bản.
Hệ thống Component và Autolayout.
Prototyping và dự án thực tế.
4. Lợi Ích khi Tham Gia Khóa Học Figma
Sau khóa học, học viên sẽ:
Hiểu rõ về UI và UX, nguyên tắc thiết kế UI cơ bản.
Nắm vững các công cụ và tính năng của Figma.
Có khả năng thiết kế giao diện cho website, ứng dụng di động và sản phẩm kỹ thuật số khác.
Nhận phản hồi và đánh giá từ giảng viên và đồng học.
5. Tại sao VnSkills Academy?
Đội Ngũ Giảng Viên Chất Lượng: Giảng viên giàu kinh nghiệm và nhiệt huyết.
Môi Trường Học Tập Năng Động: Cơ hội giao lưu và học hỏi từ các bạn đồng trang lứa.
👉👉👉
Khuyến Khích Sự Tham Gia và Kết Luận
Khóa học Figma tại VnSkills Academy không chỉ là nơi cung cấp kiến thức mà còn là môi trường để bạn phát triển kỹ năng và mở ra cơ hội mới trong sự nghiệp. Đừng chần chừ, hãy đăng ký ngay để trải nghiệm sự chuyên nghiệp và chất lượng tại VnSkills Academy!
0 notes
Text
Codejet Assistant
Figma Community plugin – 🔍 This plugin ensures your designs are ready for generating code with Codejet. ✅ By using this plugin, the code you generate with Codejet will be pixel-perfect. Features: Highlights areas for autolayout implementation (so that generated code will be RWD).Indicates where to detach your current co…

View On WordPress
0 notes
Photo

Posso até estar de férias, mas o design não. As novidades não param, nunca! Já testou as novas funcionalidades do @figma? O aprimoramento do #autolayout é muito útil, não só para prototipação de interfaces, mas também para criação de materiais publicitários expressos! Sabe aqueles banners que seguem sempre um layout predeterminado, que mudam apenas o texto e alguns ajustes mínimos? Nesses casos o auto layout mantém ajustes padronizados previamente sem “quebrar” seu design. Vale a pena estudar essa evolução na ferramenta! Me diz aí se você já testou essa e as outras novidades que chegaram no #Figma #config #design #vacation #férias #aprenderdesign #figjam #graphicdesign (em Urubici - Serra Catarinense) https://www.instagram.com/p/CdoI562uYIB/?igshid=NGJjMDIxMWI=
0 notes
Text
layer 와 autolayout을 같이 사용 작업하는 경우 유의점
original source : https://marcosantadev.com/calayer-auto-layout-swift/
Introduction
Recently, I had to work with CALayer to make some effects in an iOS Application. Unfortunately, I had some problems with the auto layout and I had to find a workaround. In this article, I propose some approaches which I tried. You can find the best one at the end of this article in “Final Comparison”.
This article is not supposed to be a guide for CALayer but it’s just an explanation of a specific scenario: a workaround for the missing auto layout in sublayers.
Happy Reading!
Content
What Is A CALayer?
What About Auto Layout?
Conclusion
Update In viewDidLayoutSubviews/layoutSubviews
Update With KVO
Custom UIView
Final Comparison
What Is A CALayer?
We can consider CALayer a graphic context of any UIView object where we can add corners radius, borders, shadows and so on. Then, we can also apply animations to some layer properties to get nice effects—like a corner radius animation when we highlight a button.
Core animation provides several layer types by default, the main ones are:
CALayer: it’s the base class which we can extend to create our custom layers.
CATextLayer: it’s a layer which provides the possibility to render a text from a string with the possibility to set some attributes.
CAShapeLayer: it’s a layer which provides the possibility to draw shapes using a CGPath object.
CAGradientLayer: it’s a layer which provides the possibility to create a color gradient using an array of CGColorRef.
What About Auto Layout?
As we saw previously, a layer is a context of an UIView object. It means that any UIView object has a main layer which we can use to change its corner radius, border and so on. We don’t need to set any constraint to this main layer, since it fills automatically its view—we cannot change the frame of this layer manually since it will always fill its view.
At this point, you may be wondering: why should we bother about constraints if the main layer doesn’t need auto layout? Well, let’s consider that we want to use a sublayer in our view to add an additional text, shape or gradient with a specific frame. Unfortunately, iOS doesn’t allow the usage of constraints for sublayers. This means that we need a workaround to replace the missing auto layout.
We can use 3 approaches to achieve our goals. To simplify our code, we use a gradient layer which fills the parent view.
Please note that we can add a sublayer with whatever frame we want. We have just to set the CALayer propertyframe. In this example the sublayer fills its parent view to keep the example easy to understand.
Update In viewDidLayoutSubviews/layoutSubviews
In this approach, we add the new gradient layer and set its frame to the parent view bounds. Then, to keep the frame updated we must use the callback which says that the view layout has been update. If we are inside an UIViewController we can use viewDidLayoutSubviews, otherwise layoutSubviews inside UIView.
In the following example, we use the implementation inside an UIViewController:
class ViewController: UIViewController {
let gradientLayer: CAGradientLayer = {
let layer = CAGradientLayer()
layer.colors = [
UIColor.red.cgColor,
UIColor.green.cgColor
]
return layer
}()
override func viewDidLoad() {
super.viewDidLoad()
view.layer.addSublayer(gradientLayer)
gradientLayer.frame = view.bounds
}
override func viewDidLayoutSubviews() {
super.viewDidLayoutSubviews()
gradientLayer.frame = view.bounds
}
}
Update With KVO
The second approach is using KVO to observe the parent view bounds. When bounds changes, we manually update the layer frame to fill its parent view:
class ViewController: UIViewController {
let gradientLayer: CAGradientLayer = {
let layer = CAGradientLayer()
layer.colors = [
UIColor.yellow.cgColor,
UIColor.brown.cgColor
]
return layer
}()
override func viewDidLoad() {
super.viewDidLoad()
view.layer.addSublayer(gradientLayer)
gradientLayer.frame = view.bounds
}
override func viewWillAppear(_ animated: Bool) {
super.viewWillAppear(animated)
view.addObserver(self, forKeyPath: #keyPath(UIView.bounds), options: .new, context: nil)
}
override func viewWillDisappear(_ animated: Bool) {
super.viewWillDisappear(animated)
view.removeObserver(self, forKeyPath: #keyPath(UIView.bounds))
}
override func observeValue(forKeyPath keyPath: String?, of object: Any?, change: [NSKeyValueChangeKey : Any]?, context: UnsafeMutableRawPointer?) {
if let objectView = object as? UIView,
objectView === view,
keyPath == #keyPath(UIView.bounds) {
gradientLayer.frame = objectView.bounds
}
}
}
Remember to remove the observer when you use KVO.
Custom UIView
The last approach is using a custom UIView.
We know that the main layer of any UIView fills automatically its view, this means that, if we have a view with a specific frame, we are sure that we have also its main layer at that frame. We perfectly know that when we apply the constraints to a subview, the latter has the frame automatically updated to satisfy the constraints. At this point, we can deduce that, if we set proper constraints to a subview, we’ll have also its main layer at the specific frame since the layer is always at the same frame of its view.
The problem of this approach is that we must replace every sublayers with a custom UIView. On the other hand, in this way we can take advantage of the constraints used for this custom view which will be applied automatically also to its main layer.
For this approach, we must create a custom UIView class:
class LayerContainerView: UIView
We said that the view has a main layer which is a CALayer by default. For our custom view we want a main layer of type CAGradientLayer, therefore we must override the layerClass property which says the type of the main layer:
override public class var layerClass: Swift.AnyClass {
return CAGradientLayer.self
}
If we don’t override it, the main layer will be always CALayer without any way to change its type.
And, finally, we can set our gradient in awakeFromNib:
override func awakeFromNib() {
super.awakeFromNib()
guard let gradientLayer = self.layer as? CAGradientLayer else { return }
gradientLayer.colors = [
UIColor.blue.cgColor,
UIColor.cyan.cgColor
]
}
At the end, the class should be like this:
class LayerContainerView: UIView {
override public class var layerClass: Swift.AnyClass {
return CAGradientLayer.self
}
override func awakeFromNib() {
super.awakeFromNib()
guard let gradientLayer = self.layer as? CAGradientLayer else { return }
gradientLayer.colors = [
UIColor.blue.cgColor,
UIColor.cyan.cgColor
]
}
}
Final Comparison
At this point, we have 3 valid workarounds which we can use. The next step is testing the performance to understand what is the best approach. To compare them, we can create a sample project where we use all of them and check how they behave.
If you don’t want to test by yourself, you can watch the following video with the final result:
In this sample app, I added three sublayers and rotated the simulator—with slow animations enabled—to check how the layers behave when the parent view bounds changes.
Spoiler:
As we can notice in the video, the approach with the custom UIView performs better than the other ones. The reason is that we are relying on the auto layout applied to the view instead of updating the sublayer frame manually. Therefore, creating a custom UIView is an acceptable trade-off to obtain the best result so far.
Conclusion
We have just seen some workarounds for the auto layout and the best approach to use. Unfortunately, it’s just a workaround and not an official approach. This means that we may find an approach which may be better than the custom UIView. For this reason, if you have a better approach, feel free to leave a comment with a description of your solution. I would be more than happy to discuss alternatives. Thank you.
1 note
·
View note
Text
每日一文:Autolayout
Creating Cacoo’s database import autolayout
貝爾實驗室 Emden Gansner 的 autolayout 演算法:
1. ranking 2. ordering 3. positioning 4. routing
0 notes
Text

every time i get this bug on the iOS app it feels like a panel blew off and i'm seeing the moving parts i'm not supposed to see
43 notes
·
View notes
Text
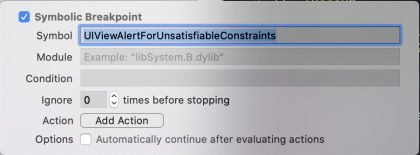
[iOS] Constraint Conflict
Left Section > BreakPoint
add UIViewAlertForUnsatisfiableConstraints
출처: https://littleshark.tistory.com/50 [꼬마상어의 생각]
View On WordPress
0 notes
Text
Design UIScrollView using AutoLayout in Storyboard | Xcode 11
Design UIScrollView using AutoLayout in Storyboard | Xcode 11
Hey Everyone,
A Step by step tutorial about How to Design in UIScrollView using AutoLayout Constraints in Storyboard to build the App.
Dont write a single line of code.
Fully dynamic scrollView content sizes and also allow support for Accessibility features.
Design static design using UIScrollView
View On WordPress
0 notes
Text
Tumblr iOS has a glitch where if you tap in the empty post header in the trailing space after the "follow" button (empty space inside the red rectangle in the screenshot below), it taps the follow button. That empty space should just take you to that post's permalink. I filed a ticket about this, it's probably a mistake with autolayout, but yeah in case you noticed you were accidentally following people more.

58 notes
·
View notes
Text
Why Ionic Hybrid network becoming more popular day by day
Introduction of Ionic Framework
Ionic is a complete open-source SDK for hybrid mobile app development created by Max Lynch, Ben Sperry and Adam Bradley of Drifty Co. in 2013. Ionic is world’s most popular cross platform mobile development technology. Basically it’s hybrid mobile app development framework. Using Apache Cordova, it can be easily run on mobiles. A big advantage of using Ionic is that the code base remains the same for all mobile platforms and the UI/UX looks like a native mobile platform. The good news is: if you can manage to create websites, you already know how to build mobile apps. Ionic Framework offers the best web and native app components for building highly interactive native and progressive web apps. It is the only mobile app stack which allows developers to design apps for all app stores and the mobile web, using an unique code base. Moreover, Ionic’s Platform Continuity guarantees your app will look superb on every single device. Ionic provides tools and services for developing hybrid mobile apps using Web technologies like CSS, HTML5, and Sass. Apps can be built with these Web technologies and then distributed through native app stores to be installed on devices by leveraging Cordova.
Benefits of Ionic Framework
Platform Independent Framework- Ionic can recognize the platform specific advanced CSS proportional to the native look and feel on different mobile operating systems. It reduces the requirement for code changing as it gives the codes of mobile-optimized HTML, JS, and CSS components. Apart from this, ionic integrates into Angular JS which becomes a robust structure making code excellent as well as more manageable. This empowers the Start-up entrepreneurs to come out with newer concepts at reduced budget.
Cross-Platform Mobile App Development with Ionic- Building an application without a moment's delay is essential, and it should be compatible with all mobile devices. However, it needs extremely limited use of time, assets and efforts, and helps in giving a unified look and feel. Besides, Ionic helps with building applications quickly and with expertise, and deploys standard tools with a solitary code base.
Default User Interface- Ionic has many default CSS and JS parts that cover the vast majority of the basic things you need to make a mobile application. . Apart from regular ones like buttons and navigation it also includes form inputs, lists, cards, sliding boxes and many more. These can be easily customized by adding CSS classes to the element. The default styles are basic, smooth, and you can without a doubt redo them by adding pre-defined CSS classes to the component.
Based on AngularJS- If you’ve worked upon Ionic, and then you would likely realize that it is developed on top of the Angular JS framework. The extensions to HTML's sentence structure offered by AngularJS are extremely useful for mobile app designers. The Ionic structure utilizes AngularJS to offer a bunch of center functionalities to the designer with the goal that they can incorporate alluring components into the application. AngularJS is an ideal approach to make program based applications, while with the assistance of the Ionic structure, versatile designers can make hybrid applications and web applications.
Utilizes Cordova Plugins- Plugins play an essential part in Ionic application development. Modules are coded in JavaScript and come appended to the application. Ionic framework application development utilizes Cordova plugins to help designers in accessing different components of the versatile framework- for example, camera, GPS, and so on. According to your business and offered administrations, mobile app developers can utilize any of these modules to build their ideal mobile application.
There are a few good reasons to go with Ionic, depending on what you would be using it for:
1. Ionic use Angular’s MV* paradigm: If you are a web developer and want to be able to compete in the mobile space Ionic is great for you. Ionic uses HTML and CSS to lay out its views, so not only will you have all of the power of CSS transitions and canvas drawing, but you will also feel at home with the DOM. If you’ve ever used Angular in production, this will be doubly true for you, because the logic layers of Ionic use Angular’s MV* paradigm.
2.Desktop support: Ionic has added a flexible grid, and split-pane type features, allowing you to build mobile-first apps with responsive desktop layouts.
3.Open Web Standards: To paraphrase one of their founders, you’re betting on the open web, rather than getting stuck learning single-platform technologies that don’t carry over. (e.g. Learning CSS and DOM layouts versus Xcode’s autolayout)
4.Progressive Web Apps: This is a big trend on Google and Ionic’s radar, and it seems like Ionic is uniquely positioned to let you build app-class web experiences that can also be published in the App Store.
5.If you are bootstrapping a start-up and want to cut development time and cost by leveraging existing skill sets, Ionic is one of the best choices. Ionic creates apps for iOS, Android and Windows. It has default CSS that changes between versions for a Native experience. And all this can be done in JavaScript which is one of the most common programming languages known by developers now because of its ubiquity on the web. There are other frameworks around now that can achieve this in different languages, but most of them are not as popular or have as much support. So unless you have a specific reason you need to use python, Ruby, C++, Java etc. stick with Ionic or React Native in JavaScript or Xamarin in C#. Those are the most mature communities for cross-platform apps.
6. If you are new to web/mobile development the skills you will learn making things with Ionic will take you a lot further than what you will get with native. JavaScript is everywhere. It is more popular than Swift, and more importantly, it can be used for a lot more things. Java is really popular as well, but in my opinion, JavaScript seems to be slowly taking over Java’s position in the web development world. Companies that were built on java will stick around for a long time, but many new ones are being built on stuff like JavaScript, Ruby, Go and the like. And yes that list will be different in a few years, but Java will not be making it back on, and JavaScript will be the longest lasting one that is around for now.
7.Ionic Community: There’s a community of over 30,000 members on the Ionic forum, an active Slack Channel, and Ionic is the 45th or so most popular/starred repo on Github.
How to Install Ionic Framework
Make sure you have an up-to-date version of Node.js installed on your machine. If you don't have Node.js installed.
Open the command prompt and verify the Node.js version by using the command node -v.
To install Cordova and Ionic, use - npm install -g cordova ionic.
Make sure to install the latest version of JDK and Android Studio IDE for Android development.
To create a new project, use - ionic start projectname template.
Inside the project folder, you can add Android/iOS platform based on your development using the command - ionic cordova platform add android.
After these code changes are done, you can generate the required .apk file with the command - ionic cordova build android.
Once the .apk file is generated successfully, you deploy the file on a real device and do the testing, or you can test it as a web application using a browser.
To run it in a browser, use - ionic serve.
To run it on a device, use - ionic Cordova run android -device.
Finally, play with Ionic!
Comparison between Ionic Framework to Others Framework like PhoneGap
Ionic Framework-
Open source
It’s Javascript, HTML and CSS
Cordova is an engine which runs PhoneGap
UI Components is awesome
Application type: Hybrid
Supported Platforms- Android, IOS, Windows, BlackBerry
Enable features, such as push notifications, A/B testing, analytics, Code deploys and Automated builds.
PhoneGap-
Open source
It’s Javascript, HTML and CSS
Cordova is an engine which runs Ionic
Lack of pre-built UI widgets
Application type: Native
Supported Platforms- Apple IOS , Bada, BlackBerry, Firefox OS, Google Android, LG webOS, Micresoft Windows Phone (7 and 8), Nokia Symbian OS, Tizen (SDK 2.x) and Ubuntu Touch.
Enable features, Such as internet connectivity validation, Animations, List view, Facebook SDK support, Push Notifications, Device Detection, and Geolocation. According to Google Trends Ionic has gained its popularity day by day till 2018 where as other Frameworks fall down compared. To get more details about this technologies you can contact us through our website www.webhawksindia.com
21 notes
·
View notes