#basic polymer clay tutorial
Explore tagged Tumblr posts
Visit Tumblr Blog
Explore Tumblr blogs with no restrictions, modern design and the best experience.
Last Seen Tumblr Blogs


Fun Fact
Kazakhstan’s Minister of Communications and Informatics has blocked the Tumblr site because it contained 60 sites of terrorism, extremism, and pornography in 2015.
Text
Non-Toxic Polymer Clay Jewelry Business in India
Non-Toxic Polymer Clay Jewelry Business in India Introduction The handicraft world welcomed a brave little thing — polymer clay. Polymer clay is the type of medium that has captured the attention of both the artists and the aspiring entrepreneurs alike, with its versatility and endless possibilities and it is a business in its own right. Using polymer clay to make jewellery, these enterprising…
#apply resin on polymer clay#basic polymer clay tutorial#diy polymer clay earrings#epoxy resin art jewelry#how to apply resin on polymer clay#how to use polymer clay#jewelry#polymer#polymer clay#polymer clay beginners#polymer clay charms#polymer clay diy#polymer clay for beginners#polymer clay jewelry#polymer clay jewelry making#polymer clay tutorial#resin jewelry#small business ideas#small business owner#uv resin jewelry for beginners
0 notes
Note
elvira, i am begging and pleading for a tutorial on a how you jUST MADE THAT NEEDLE-FELT ALBIN (or recommendations on tutorials elsewhere, no actual pressure, im just being dramatic and silly lol) HOLY SHIT, YOU DID SO GOOD, CONGRATULATIONS!!
AIUUGH I should've read this earlier I just started on Donna and am almost finished with her face, and didn't take any progress pics!! 😫
I'm really flattered you like my Albin!!! Unfortunately I made Albin like I do most things; sorta dive head first and figure it out as I go so unfortunately I don't have much to offer besides looking up basic tutorials on needle felting :'D
BUT apart from that, I have learned these things on my own:
ARMATURE:
- use thick aluminum wire for the base and stainless steel to hold it together and for the fingers.
- if you're making a skinny guy like Albin, make the arms, legs, and neck only one wire thick, or else it'll be bumpy.
- make the limbs longer than you think you'll need, you can always cut them down to make them shorter
- Sculpt the head, hands and shoes separately and add thembto the body once finished! It's too hard to do them all on one doll.
FELTING:
- The head takes the longest bc shaping the ball just takes... Ages...., and if you're making lots of little details like eyebrows, eyes, nose, and ears, it's easier to sculpt them seperately and attach onto the head
- use a heat gun to melt down little stray fibres if you want a smoother look
- to get the little needle holes out after felting, rub the surface or wet felt it. Caution as it may shrink if you do!
- I wet felted almost anything that was small. Albins hair tufts are wet felted and then glued onto bent pins and stuck into his head. His hands are also wet felted directly over the hand armature.
- Once you've finished felting, you can dilute Elmer's glue with one part water and lightly brush a thin layer all over the doll, it'll prevent fibres from unraveling and is great for keeping hair styles in place! (Albin's hair is so much glue it's basically a helmet lmao)
CLOTHES:
- make mockups.... Like four or five different ones.... And you will still mess up
- if you're gluing, use contact cement or e6000 (toxic! Use respirator, gloves, and open window!!), not hot glue or all purpose glue... It doesn't work 🥺
- stretch polyester fabric is your friend!! You can scorch the edges to keep it from fraying and stretched fabrics are more easily put over the doll.
- for shoes and accessories I recommend making a clay called cold porcelain. I used polymer clay and it was really hard to get details down and it cracked! Cold porcelain you might already have the materials for if you have corn starch and Elmer's glue.
- for impossibly small clothing details, you can sculpt them instead using watered down glue and cotton balls!! Use a paint brush with glue on it to pick up a piece of cotton and smooth it down onto the figure. Once dried you have a somewhat moveable but solid piece of clothing that can even be painted! I'm thinking of doing this for Ricky's hat for example!
THINGS I WANT TO TRY:
- twist ties for fingers! Idk I just think they might work well 🤔 free, easily bent but never breaks (?) and protected from moisture!
- dyeing wool with fabric dye, I don't have colors for any of the other characters!! I need to try!
- plush bodies for the bigger dolls (Ricky and Lune, bc felting THAT much will kill my hands
25 notes
·
View notes
Text
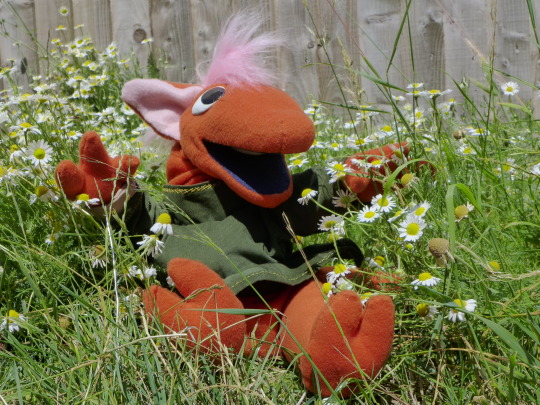
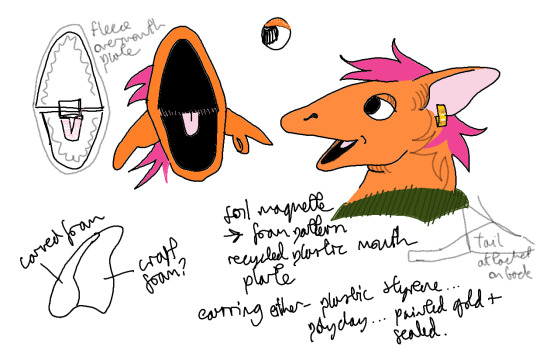

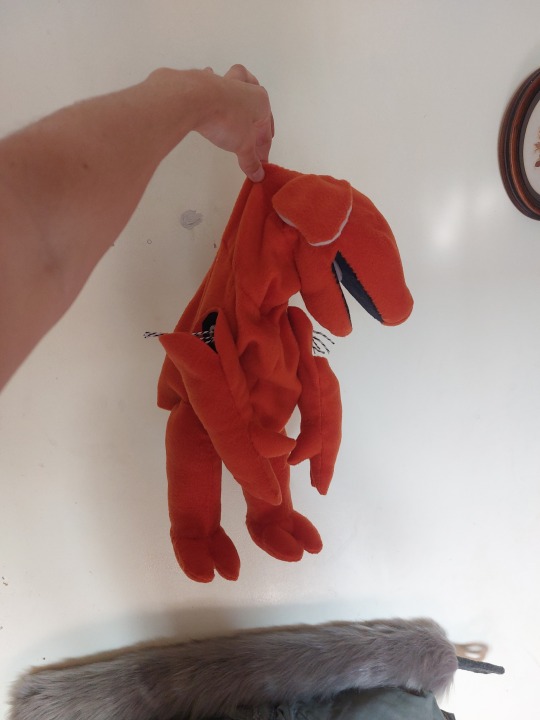
Oppet real (making of oppet)
Oppet! My friend @marikedrawinge 's ttrpg character Oppet the kobold. This is how I made them into a real puppet. Puppet making is fun, if youve made fursuits or plushies before the skills are really similar and theres lots of tutorials.
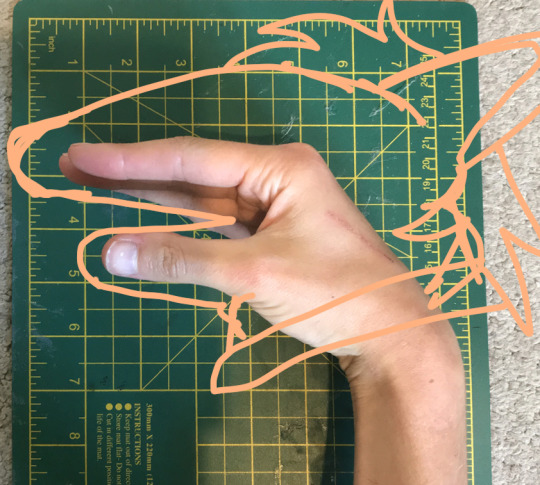


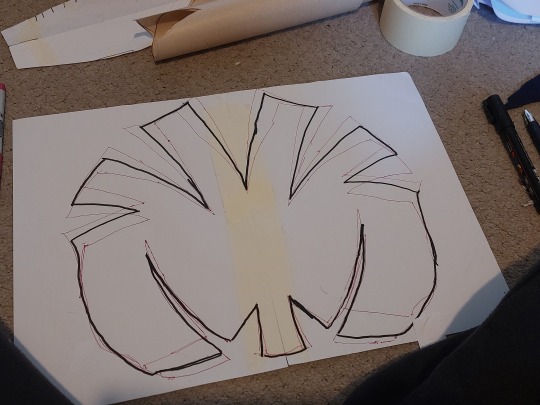
Drape patterning for their head... never done this before but its really fun. Its a lot different to tape patterning
Also I made their eyes out of foil and polymer clay that I squished against a spoon to make sure the shape was symmetrical. The most stressful part was painting the pupils in the right place I basically avoided it until it was almost the last thing to do
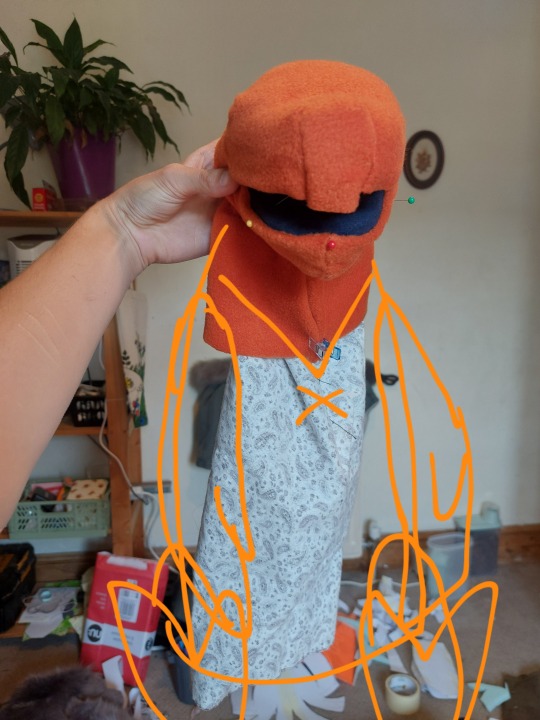
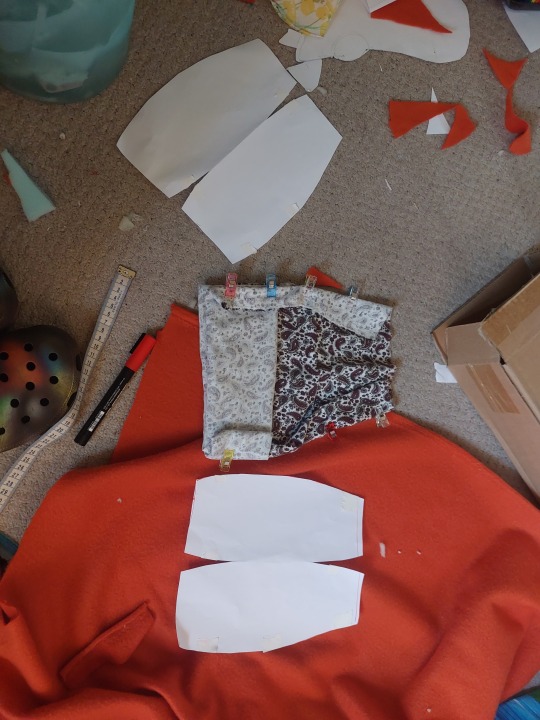
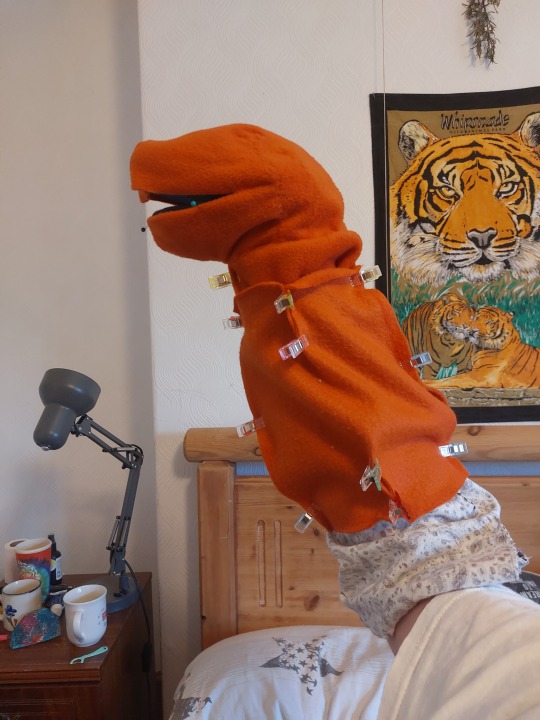

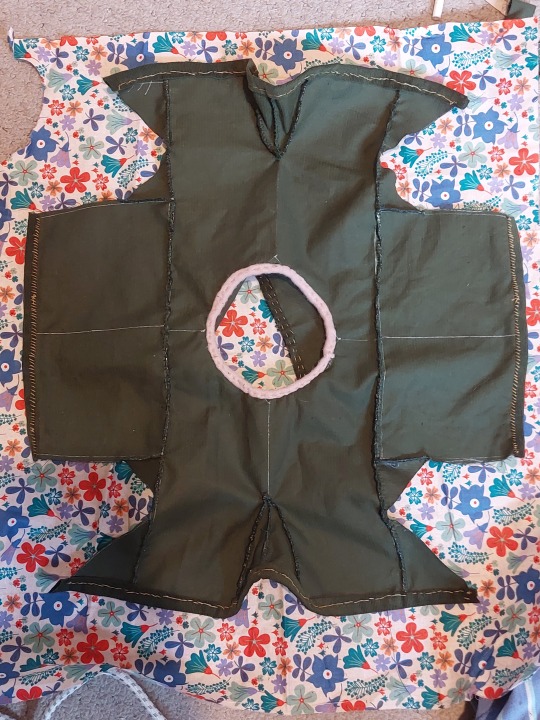
Patterning their body and limbs by just drawing my best guess on paper.


Hard to explain and show in a photo but I made joints with string and buttons so their arms can move more freely than if they were sewn onto the body.


Piercing, I just did tiny buttonhole sewing around a hole I cut in their ear and made the piercing with styrene that I molded into a cylinder with boiling water. Oppet went to Claire's.
Hold them like a kitten.


Making their tunic. I used this amazing patterning resource based on a real tunic found on a bog body. Oppet was very patient while I took tons of measurements and taped paper drafts to them. (In bg: failed first Oppet attempt that came out too big lol)

Final steps I forgot to take pictures of: making and adding hair (tapered tubes of faux fur basically) painting and glueing down eyes. Making little eyelids and stitching them down.
135 notes
·
View notes
Text
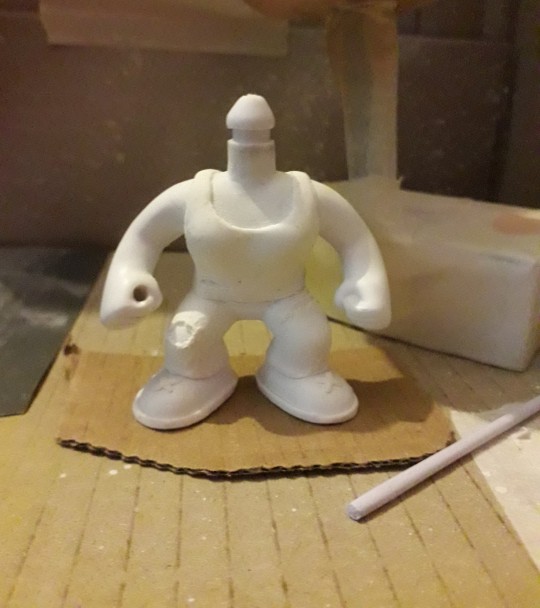
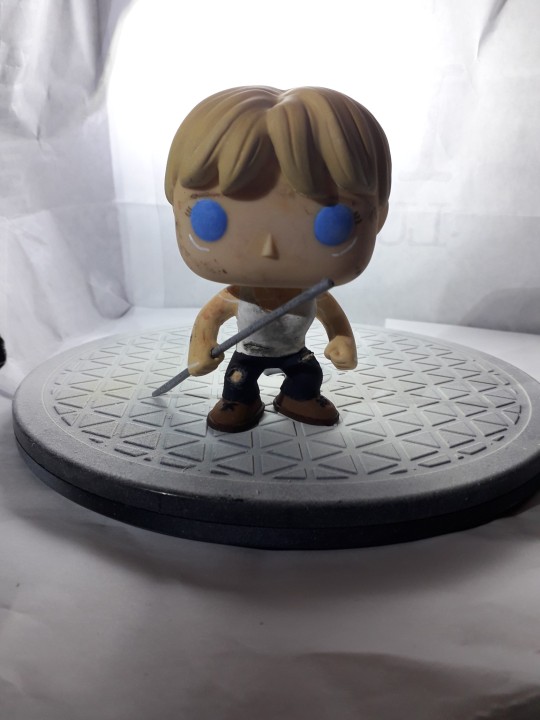
How to Build Your Own 'Augmented Super Wife Supersoldier From The Future' Funko Pop.
A Semi-Coherent Guide By RC.
This is a long one. A loooooooong one.
I meant to do this like two and a half years ago, but in the spirit of keeping this fandom's head above water, and the fact I'm at the hospital (nothing serious!) with nothing to do for the next couple of hours, I'm doing it now.
So if, like me, you are still bitter that Grace and Dani didn't get official Funkos, or official *anything* due to manufacturer short-sightedness, why not say 'fuck it' and build yer own?
This rambling tutorial will attempt to demonstrate how to build Grace from the 'when they start to kill me, run' scene.
Like, literally that bit 😋.
Anywho. Let's do this!
You will need:
- Funko Pop DIY (female)
- Polymer clay (eg. Sculpy, Fimo, CosClay). I'd advise against cheapo no-name alternatives purely because in my experience the baking times/temperatures stated are absolute garbo. Also, polymer clay will give off quite gnarly fumes while curing, so better to use a trusted source. But if cheapo's all ya got, it's all ya got.
Other modeling materials you might consider instead of polymer clay include...
Epoxy clay (eg. Milliput, Apoxie Sculpt, The Army Painter 'Green Stuff', even something like J-B Weld or similar 2 part plumber's/repair putty).
Plain ol' air drying clay (eg. DAS, FimoAir, Gedeo).
You could even whip up a batch of 'cold porcelain', or an oven cure salt dough from ingredients you probably already have at home. Make sure you clear coat any salt dough creations properly after curing as over time ambient moisture may mess with it.
Each option above has its own pros and cons. Do your research if you aren't sure. Me? I used Fimo.
*ahem* Carrying on...
- Masking tape
- Hobby knife
- Pin vice
- Kebab skewer (wooden), or styrene rod
- Paint brushes
- Primer (plus dust mask if you're using a rattle can indoors)
- Sandpaper (around 400 grit oughta do it but you could probably go 200 either side of that and get a good result)
- Acrylic paints (optional: Posca PC-1MR pens in black and white for fine detail).
- Crafter's heat gun, or a hairdryer
- Varnish/clear coat.
Optional extras: Airbrush, spray booth/cardboard box, rotary tool, oven thermometer, artist's/cake decorating turntable, UV resin, silver leafing pen, jeweller's files, jeweller's wire, acetone, superglue or 5 minute epoxy, a lil piece of sponge, pearl mica powder, scavenged Funko Pop head 😈.
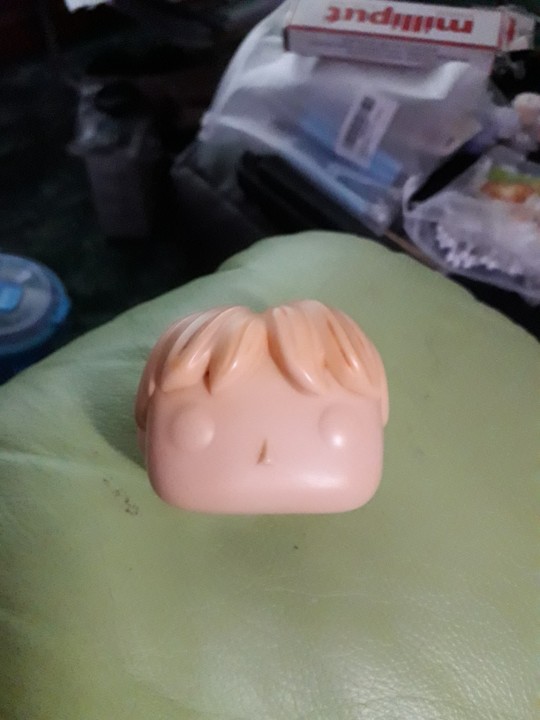
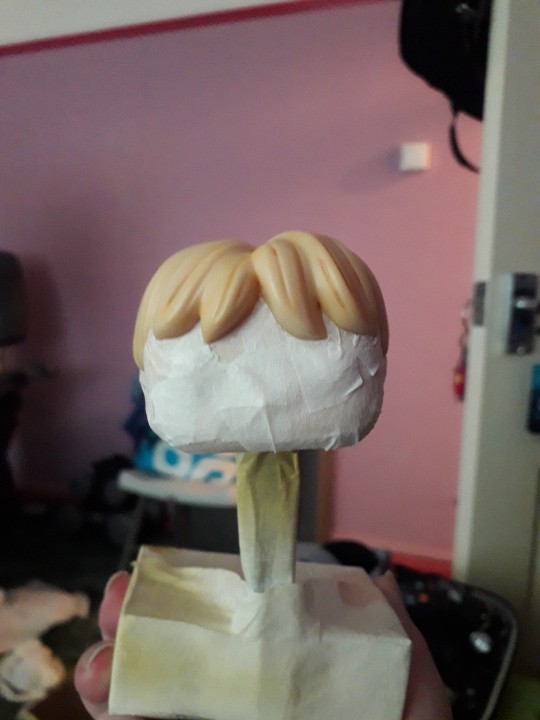
Step One: Grab your Funko DIY and separate the head from body using heat to soften the vinyl enough to wangle it off the neck post. Shoving it in a mug of hot water for a few minutes should do the trick. Make sure to dry out the head as much as possible. Last thing you want is mould growing inside it. This is Terminator, not The Last Of Us 😉. Alternatively you could use your heat gun/hairdryer, but I explain in Step Six why the water bath approach is a better option (imho) at this early stage.
(You are giving this entire thing a quick read through before you start, right? I dunno about the rest of you but I like to have at least a basic idea of the work ahead before I get stuck in. Saves finding out you're missing a necessary tool/material at an inopportune moment and all).
Stop rambling, RC. Sorry. It's easier to be succinct when you haven't lost half your photos 🤦♀️. Moving on...
If you don't wanna attempt to sculpt the hair yourself you can, as I did, take a kitbashing approach instead of using the supplied DIY head. Grab one of the many commercially available Funkos with a decent approximation of the hairstyle you want and then go Step One on em. Buy 'pre-loved', buy BNIB, dig one out of a dumpster, steal one from your lil cousin, it doesn't matter. Procure as your time/budget/situation dictates. Improvise where necessary.
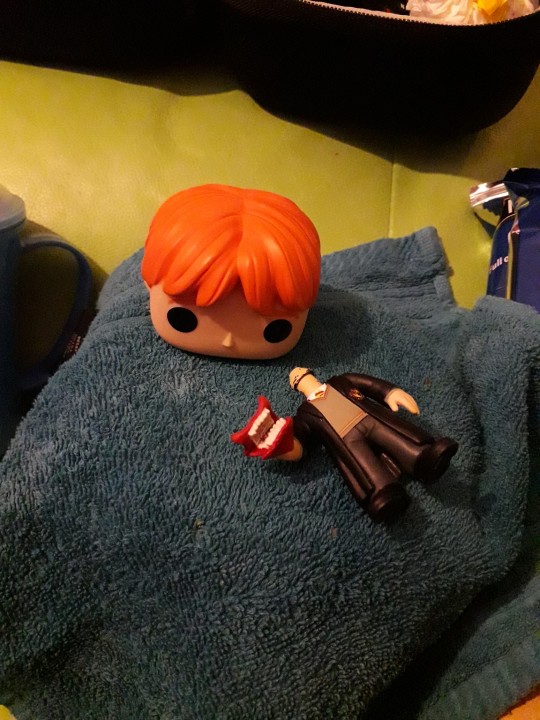
Sorry, Ron. I need your floppy hair. I do not need your clothes.
Or your boots. Or your motorcycle.
...😋
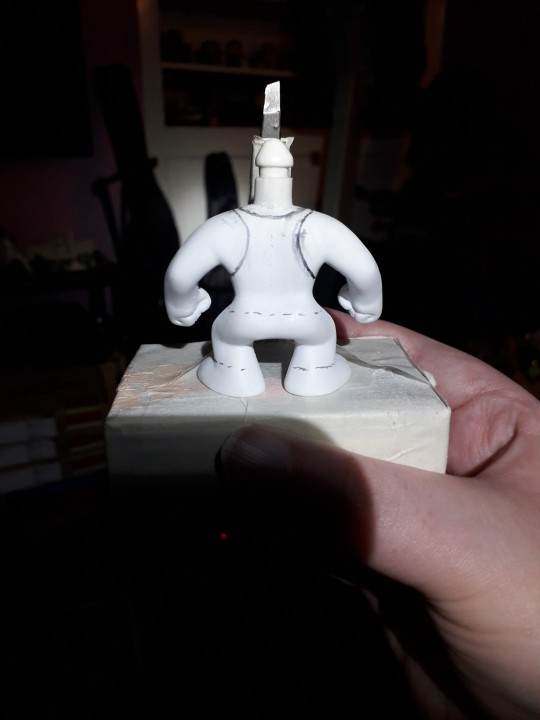
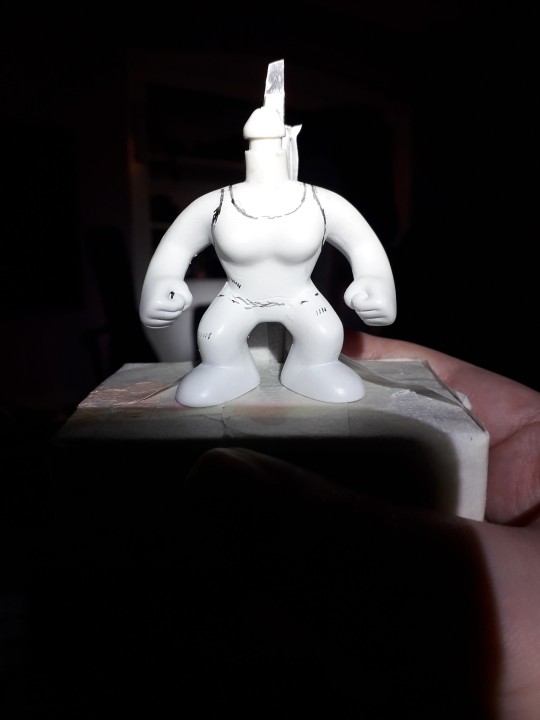
Step Two: Take the body of the Funko DIY and mark out the position of the tank top and the cuffs of the jeans. These will be used as guides for when you add the clay.
At this point I used a pin vice to drill the hole thru the fist for the rebar. If you're a crazy person you could use a rotary tool with an appropriately sized bit attached.
To make the rebar I fashioned a mould from a drinking straw and filled it with UV resin. Because I'm awkward. A wooden kebab skewer, or some hobbyist's styrene rod (eg. Evergreen Scale Models) would work just as well. Just cut it to size, paint it silver and you're golden. I used a metallic leafing pen. You use whatever you've got handy. Doesn't have to be shiny. A flat grey acrylic would work just fine.
Use jeweller's files and sandpaper to make small adjustments to the hand hole and rebar respectively in order to get a good press fit. There's always glue if you overdo it 😉. But don't add the rebar to the model just yet, as you're gonna need room to manoeuvre for the next bit.
Step Three: How do you make it look like your figure is wearing clothes when you don't have much real estate to work with?
You fake it, that's how.
You do not need to model an entire set of clothes! It's an arse ache, and we're all about working smarter not harder on the RC channel.
So, take your modeling compound of choice, roll a chunk of it out to the desired thickness, and then cut into strips, say 2-3mm wide. Use your best judgement here.
Now, using the jeans as our example, wrap a strip around the bottom of the leg where the cuff would sit. Cut off any excess and blend out the join. Just give it a lil rub and it's like it was never there. Like magic! You should have a nice defined edge at the bottom, just above the foot. Now see the top edge of your lil clay strip? Well, you wanna start pushing and flattening the clay to blend the edge right out so it fades back into the body.
Repeat for the other leg, and the bottom of the tank top. The straps are relatively simple, tho the bits that pass under the arms can be fiddly due to lack of space. Use a hobby knife to shape and crisp up those edges and then blend out the extraneous edge. Same thing with the neckline.
Run a strip around each foot to form the soles of the boots, and a lil 'x' on the top of the feet to give the impression of laces.
For the rips in the clothing you can simply gouge out a little of the clay. If there isn't any on that part of the model (the knee for example) roll out a little wormy dealie (for you North of the Border fans 😉), position it as needed, blend out the edges, then gouge as required.
If you're playing on hardcore mode, this might be the time to start piling clay on the Funko DIY head and sculpting the hair. You may prefer to leave it til the head's re-attached tho. It depends on the material you're using. If you don't think it'll stand up to a bit of manhandling while pushing the head back onto the body, save this step til that bit's done.
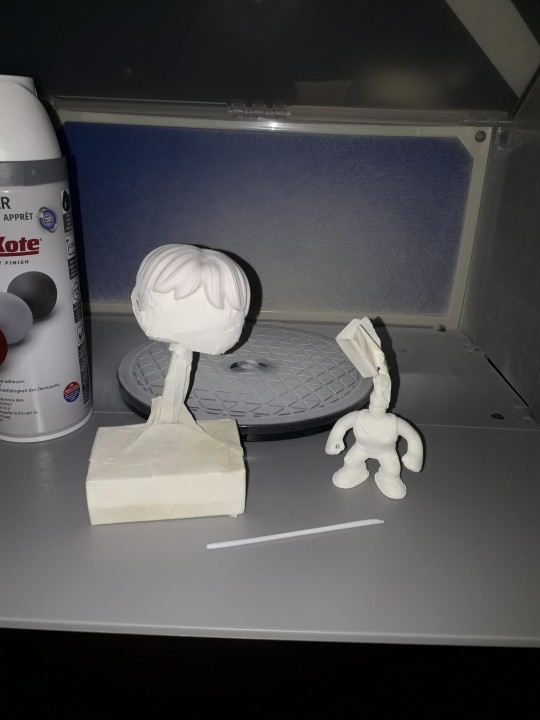
Cure according to the clay manufacturer's instructions. The vinyl will not melt at the temperatures required to cure polymer clay, but if you don't wanna risk it or you don't wanna use your food oven to cook plastic, with all the gnarly fumes and stuff, I've given you plenty of air dry and/or non toxic alternatives. Consistent temperature is key with polymer clay. Undercooked, it's quite brittle. An oven thermometer comes in handy here if you've got one.
Step Four: Primetime!!! Some like to brush on primer, which is fine if you're painting a fence or throwing gesso on a canvas. Not so fine if you're painting a figurine imho. I mean, unless it's Cassandra from Doctor Who. A good rattle can of spray paint is what you want ideally, but again, it's about what you can afford/wangle/manage with your crafting space, so feel free to ignore me and brush away!
First rule of Primer Club: several light coats are better than one heavy coat. Second rule of Primer Club: knock each coat back a lil with sandpaper before applying the next one. Third rule of Primer Club: sit your rattle can in a warm water bath for five minutes before shaking it up to improve flow.
You can get primer specifically for plastics but while I would recommend it, it's not absolutely necessary.
A scavenged head may need masking off if the base colour already matches the skin colour of your character. Save yourself a bit of painting innit. You can get really tight, clean edges against the hairline with a hobby knife. If the hairstyle, hair colour, and skin colour match straight outta the box? Congrats! Why are you even reading this? 😜.
That thing in the background is a portable spray booth (that other thing is a turntable). A cardboard box is also a portable spray booth if you want it to be. Only thing it doesn't have is an extractor fan. So put on a dust mask, and open a window or work outside.
The DIY figure comes primed outta the box, so if you're using the DIY head and are planning on sculpting the hair after re-attachment you don't need to prime it. Unless you want to.
Step Five: Time to paint that shizz. You don't need me to walk you thru this bit, right?
Right?...
Masking is your friend if you don't trust your ability to freehand with a brush. If you're masking over a part you've already painted and are afraid of pulling the paint off, you can knock the level of tack on the tape down by sticking it to yourself (or your clothes) a couple of times before applying it. Some prefer to add a light layer of clear coat to 'lock in' the underlying paint. It's like a real life 'save point'. Some people do both. Some use masking fluid. Some use silly putty/blu-tac/plasticine. Play around, see what works. You do you.
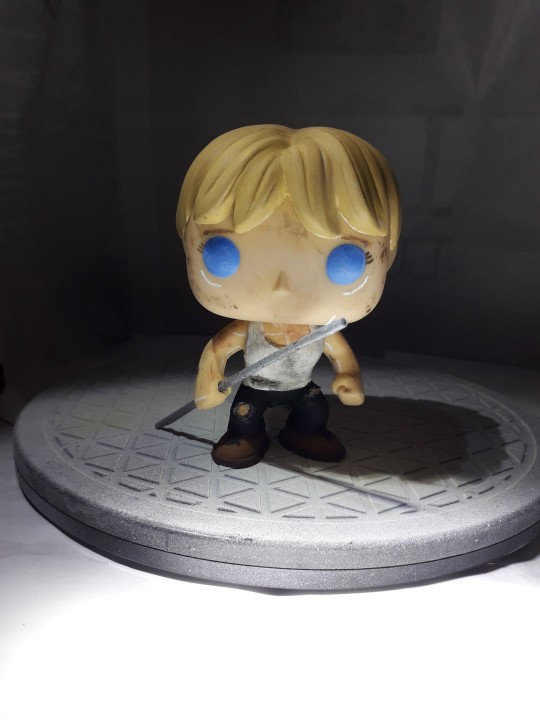
I painted Grace's eyes blue coz Grace is extra and so am I. I threw a lil bit of pearl powder in there to add a subtle shimmer, as I thought going full metallic blue might be a bit too extra.
Lady Funkos have eyelashes. Don't forget the eyelashes.
(I nearly forgot the eyelashes).
A fine tipped Posca pen comes in handy here if you've got one.
Ditto the eyebrows, tho those aren't just for the ladies obvs.
For Grace's augmentation scars, again I recommend a Posca pen but a brush will do.
DO NOT PAINT THE NECK POST. Don't even varnish the neck post. Keep that bitch masked up until you're ready to reattach the head. Like, you can get away with painting the very bottom if you're worried the bare plastic will show even with the head attached, but that's it. Any more will be making a rod for your own back.
You have a choice now. Whether to weather your figure. I chose to add that extra level of detail as it made sense to me. Use a combination of dark washes, dry brushing, and/or sponge stipling to add dirt, blood etc. If ya want.
When you're happy with your paint job, give everything (except the neck post!!!!) a couple of layers of clear coat.
Step Six: When it comes to reattaching the head you probably don't wanna be dunking anything in water by this point, just in case. So we're gonna soften the neck post (and around the base of the head if necessary) with hot air instead. Use a hairdryer if you don't have a heat gun. DO NOT use an industrial or decorator's heat gun for the love o' god. That shit's meant for stripping paint, not gently warming vinyl figurines. It'd be like using a nuke to shake a cherry tree, and you'd likely burn yourself. A hairdryer is more than capable of doing the job.
Why did we not use the hairdryer for Step One? To be honest there's nothing stopping you if that's what you wanna do, but as you don't have direct access to the bits that need softening at that point you will have to wait for the heat to penetrate. You could be doing other things in that time by letting a water bath do the work for you.
Now, however, you do have direct access, so you'll probably find you only need to blast the hot air for 10 seconds or so.
Step Seven: So, you've got the head re-attached, and your paint job is finished and clear coated. That means it's time to add the rebar. If you went a bit too far with the drilling or sanding now's the time to get your glue on. As an final extra touch you can spiral some thin jeweller's wire around the length of the rebar to make it look more rebar-y. I didn't do this bit as the wire I had in my possession at the time was too thick for my tastes.
But whether you opt for that or not, congratulations on making your very own Grace Funko Pop!
I'm still planning on making security guard and future war versions of Grace, and at least one version of Dani. Yeah, I've been saying that for the last two years, but it's still absolutely happening, trust me.
Anyway. That'll do it. If you have any questions, or you need further explanations or recommendations etc. y'all know where to find me.
8 notes
·
View notes
Text
Edit Wikipedia! Even if you're not good at writing, there's a lot of little things you can do such as fixing formatting issues, reversing vandalism, using webarchive to preserve or fix dead links, or helping a wiki project to categorize and assess articles. If you're bilingual, you can also help translate articles between languages.
Read Wikipedia outloud! If you have a decent quality microphone on your phone/computer and a clear voice, you can volunteer for the Spoken Wikipedia Wikiproject. Screen readers are far from perfect, and often mispronounce scientific terms, place names, or people names. This Wikiproject relies on volunteers to record themselves reading wikipedia articles so people who can't read (or can't read English) can still access the information.
Hunt for exoplanets! I'm not kidding, this is actually something you can do. It's called Zooniverse Planet Hunters, and it's a citizen science project where you can look at data from the Kepler Space telescope and help find exoplanets. Zooniverse has a lot of other space related projects as well, and it's a really fun thing that pretty much anybody can do. Also, they have projects related to art, history, and the natural world.
Fix furniture. Okay, so I haven't done this one myself, but when my dad was a kid this was basically how he spent all his summers in the 60s and 70s. He'd get furniture his neighbors had thrown out, fix it with second hand tools, maybe buy paint or stainer from the sale aisle or borrow it from neighbors(paint being one of the things many people save but rarely use) and then give or sell it back to them. This one can be expensive, but there's a lot you can do without any form of power tools. Just be careful with older furniture, because some of that might have lead in the paint.
Upcycling/ hand tailoring clothes. One of my current projects that I've been working on for a few years is embroidering on a pair of thrift store jeans-but you could hot glue rhinestones to bags, draw on caps with fabric markers, or add ribbons and sew darts or add gussets to a cute top. Go to your thrift store or raid your own closet and let your creativity run wild!
Beading! Thrift store beads, sale thread and some beading needles. Beading is an art form found in basically every culture, so you're almost guaranteed to find a style that suits your fancy.
Patchwork! My sister thinks you have to be rich to quilt. You do not. Quilting the way we think of it is a very American art form which was basically born from people trying to save every last scrap of fabric, while also being artistic. You can hand quilt old pieces of tshirts together to make a bag, for example, or doll/teddy clothes for the children you know.
Learn a Kpop dance! I know, I know, but it's fun and there's so many free tutorials for easy dances on Youtube.
Playing with plasticine or polymer clay is another really fun idea. You can get the supplies on sale or even find youtube tutorials to make your own clay, but this stuff is so fun. You dont even need any fancy tools-just clay, or many an oven if you want to make your polymer clay creation permanent.
Learn math! Its fun and society tries to tell us, specially us women, that's it's too difficult to ever be fun. However, that is a devious lie. Math is just puzzle solving and you can do it at whatever pace you need. There's so many free resources out there on youtube and the internet for learning all branches of math.
Geneology. It doesnt even have to be your own family history. This one is a bit variable from what country you're from, unfortunately. However, many old records and newspapers are free, so you can literally spend years on this one.
Learn to program! You find find tutorials on YouTube (FreeCodeAcadamy is my favourite) and learn how to build something on your own computer or tablet. Python is a great one to start off with.
Listen to audiobooks or audio dramas! This one goes hand in band with the very first suggestion to read books, but sometimes physically reading something isn't happening for you. Instead, you can get free audiobooks from your library, or check r/audiodrama for recommendations for free audio dramas or podcasts to listen to.
Every fun post on here that encourages people to have hobbies/be creative always gets an avalanche of "Some people are poor Karen" type reactions and respectfully, you're all super annoying. I've never lived above the poverty line and this is a list of hobbies I have that were cheap or entirely free:
Read books: Go to the library, lend a book from a friend
knitting, crochet, embroidery: Get some needles from the bargan store and ask around, people have leftovers from projects they'll happily give you. Thrift stores also often carry leftover fabric and other supplies. And talk about your hobby loud enough and an old lady will show up and gift you their whole collection, because there are way more old ladies with a closet full of wool than there are grandchildren who want to take up the hobby.
Origami/paper crafts: get some scrap paper and scissors, watch a youtube tutorial
walking: put on shoes open door
pilates/yoga/etc: get a mat or just use your carpet, watch a youtube tutorial
Houseplants: look online for people that swap plant cuttings. There are always people giving out stuff for free to get you started. If you're nice enough you'll probably get extra
gardening: You're gonna need some space for this one of course but you can just play around with seeds and cuttings from your grocery vegetables.
aquarium keeping is a bit of an obscure one but I got most of my stuff second hand for cheap or free and now I have a few thousand euro worth of material and plants.
drawing/art: You get very far just playing with bargan store materials. I did my entire art degree with mostly those.
writing: Rotate a cow in your head for free
cooking: again one you can make very expensive, but there are many budget recipes online for free. Look for African or Asian shops to get good rice and cheap spices.
Join a non-profit: Cities will have creative organisations who let you use woodworking machines or screen presses or laser cutters or 3D printers etc etc etc for a small fee. Some libraries also lend out materials.
candle making: You need some molds (cheap), wick, two old cooking pots for au bain marie melting and a ton of scrap candles, ask people to keep them aside for you.
a herbarium, flower pressing: Leaves are free, wildflowers too, ask if you can take from peoples gardens.
puzzles: thrift stores, your grandma probably
Citizen science: look for projects in your area or get the iNaturalist app
And lastly and most importantly: Share! Share your supllies, share your knowledge. Surround yourself with other creative people and before you know it someone will give you a pot of homemade jam and when you want to paint your kabinet someone will have leftover paint in just the right color and you can give them a homemade candle in return and everyone is having fun and building skills and friendships and not a cent is exchanged. We have always lived like this, it's what humans are build to do.
And all of it sure beats sitting behind a computer going "No stranger, I refuse to let myself have a good time."
Anyway I'm logging off bc I'm making some badges for a friend who cooked for me and then I'm going to fix some holes in everyones clothes.
20K notes
·
View notes
Video
youtube
POLYMER CLAY BASICS -Tips, Terms, and Tools
In case you had questions, I have answers.
1 note
·
View note
Text
i’m really about to go to michael’s and buy fondant and fondant tools and make some little fondant succulents i will do absolutely nothing with just so i can say i’ve worked with fondant on my resume
#ive literally never done anything w fondant but im watching tutorials on youtube and it looks both fun and easy#like it's basically just edible clay and i LOVE polymer clay#truly the one form of art i am actually talented at
0 notes
Text
Clay Pride Pin Tutorial!
Again, since this kind of long the rest of it is under the cut.
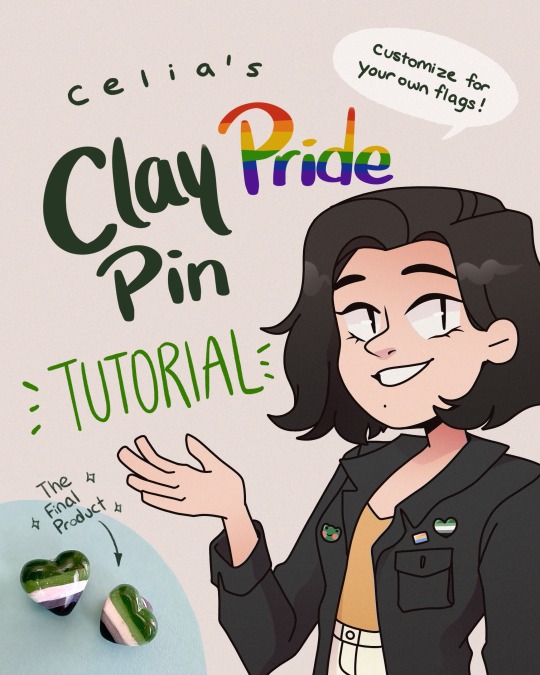


A fun and (hopefully) straightforward tutorial on how I make my clay pride pins! 💚💚💚The reason I made this tutorial is becuase I know how hard it is to find pride merch sometimes, given costs of buying from stores online and shipping too (I've heard one too many horror stories of customs fees when buying from the states) 😭😭 If you're in a position like that, or if for whatever reason you just can't buy pride themed items, you can still make your own in a really subtle way! It's also a great craft if you want to make a few extra pins while you're at it for friends 💚💚✨ On my notes from the tutorial itself: Sandpaper - Personally, I have a lot of sanding tools because of my degree, but by no means do you need to have all the bells and whistles to be able to make pins! You can definitely get some sandpaper from the dollar store or similar places if you or nobody you know has any. But, if you are like me and value *craftsmanship* 😤😂 I'd totally recommend getting a dremel or small files if you have them/can borrow, and really go to town on sanding down the pins. It's not the end of the world if you don't, but you can get a REALLY smooth, rounded form that looks fantastic. Paint - Again, it's one of those things where if you have the nice stuff (acryla gouache), that's fantastic, but you definitely don't need to go out and spend a lot of money on it! You can buy a far cheaper and still REALLY good crafter's acrylic at most craft stores, or even the dolalr store. They're generally a dollar or two for a bottle, and you really only need black/white plus the basic colours in your flag. Alright that's it, if you're somehow still reading I hope you like it! 🥺🥺 Let me know if you have questions, I'll do my best to answer!! 💚💚💚 And I'll be back next week with the usual stuff 🐸
[Image Description:
Slide 1: Cover Slide. Title reads: “Celia’s Clay Pride Pin Tutorial”. Celia is pictured wearing a black jean jacket adorned with heart shaped pan and aro pins, as well as a frog. She gestures to the title, and she says “Customize for your own flags!”. In the corner is a photo of the pins in real life, with a note that says “The final product”.
Slide 2: [Note: All of the tutorial from here on out might be a bit text heavy, so I will paste the original script with necessary descriptions]
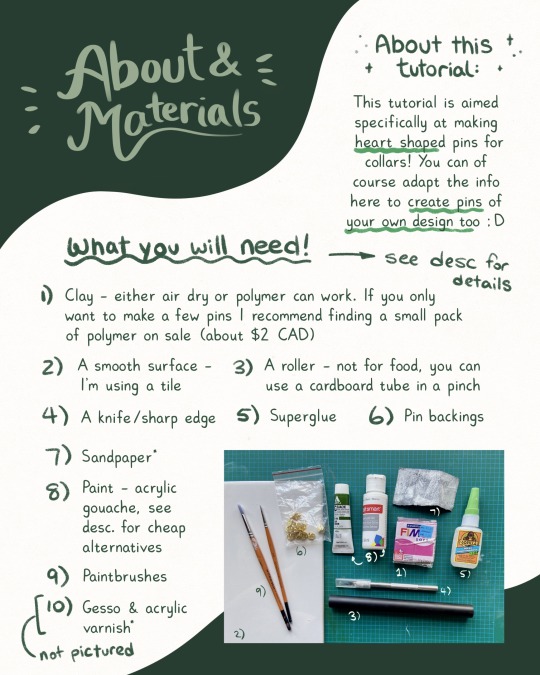
About & Materials:
About - “This Tutorial is aimed specifically at making heart shaped pins for collars! You can of course adapt the info here to create pins of your own design too”
What you will need:
Clay - either air dry or polymer can work. If you only want to make a few pins I recommend finding a small pack of polymer on sale (about two dollars canadian).
A smooth surface - I’m using a tile
A roller - not for food, you can use a cardboard tube in a pinch
A knife/sharp edge
Superglue
Pin Backings
Sandpaper (note: please check description for more thoughts)
Paint - acrylic gouache, see description for cheaper alternatives
Paintbrushes
Gesso and Acrylic varnish
In the bottom right a picture of most of these materials, save for the gesso and acrylic varnish, are pictured.
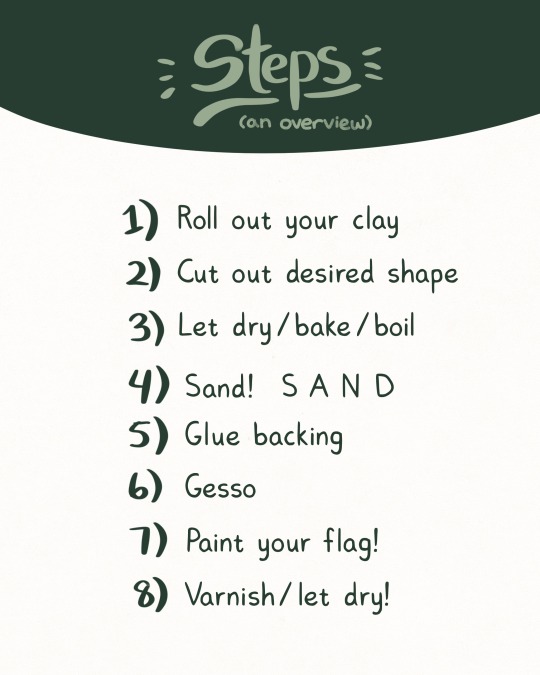
Slide 3: Steps, an Overview
Roll out your clay
Cut out desired shape
Let dry/bake/boil
Sand! (the word sand is written out again, spaced out, for dramatic effect)
Glue backing
Gesso
Paint your flag!
Varnish/Let Dry!
Slide 4: Step 1: Roll out clay [A photo of Celia rolling out the clay, with an accompanying photo showing her measuring the slab she rolls out. It is 0.5 cm thick]. “I recommend using 0.5 cm thickness for this design”
Step 2: Cut out shapes [Photo of celia cutting out heart shape with an exacto knife, then her holding up the finished heart shape to show viewer]. “Pretty straightforward [shrug emoji] you can cut out a paper template to be extra precise”
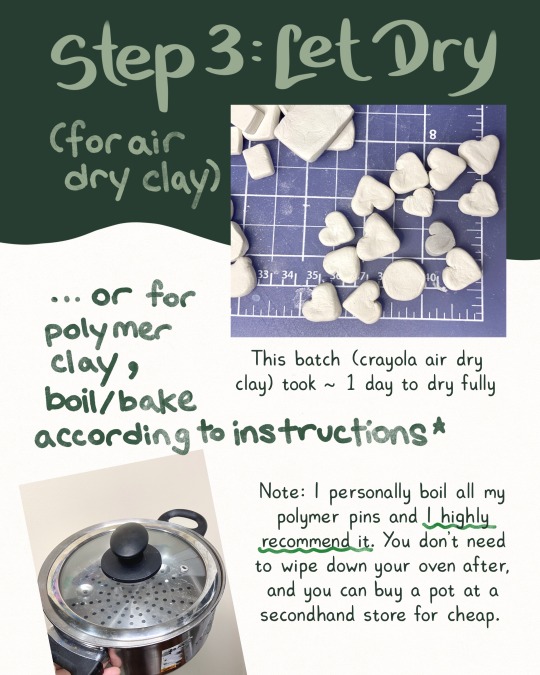
Slide 5: Step 3: Let dry (for air dry clay) [A picture of dried air dry clay hearts made from crayola brand air dry clay is shown; it apparently took around 1 day to dry]
… or for polymer clay, boil/bake according to instructions.
A note from Celia: I personally boil all my polymer pins and I highly recommend it. You don’t need to wipe down your oven after, and you can buy a pot specifically for this purpose for cheap from a secondhand store.
Slide 6: Step 4: Sand!
A few pictures of Celia sanding down the pins are shown. Her process is 1) And down the front/back to smooth, then rounding down the sides with a file and sandpaper.
Text: “... I could ramble a lot about sanding [sweat drop emoji], but I’ll spare y’all the rant. Just smooth down any imperfections to get a shape you like, I recommend 220 grit sandpaper. If you have some files, or a dremel, use them!”
Slide 7: Steps 5 and 6: Glue pin backing and Gesso (... pretty self explanatory).
A series of photos showing Celia gluing down the pin backing to a sanded pin, then her holding the pin with said backing as she applies gesso.
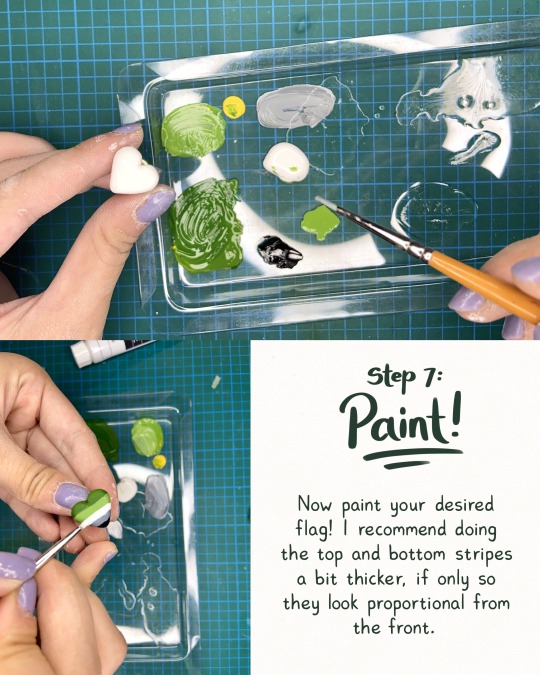
Slide 8: Step 7: Paint! A few photos showing Celia with a blank pin and some aro flag colours mixed out, then another photo showing her applying the paint to the pin.
Text: “Now paint your desired flag! I recommend doing the top and bottom stripes a bit thicker, if only so they look proportional from the front.È
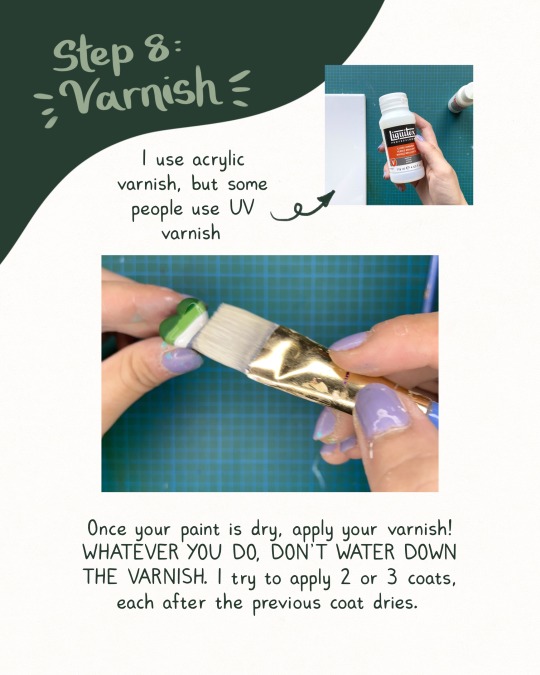
Slide 9: Step 8: Varnish
A photo of Celia holding up a bottle of liquitex gloss varnish, and a note pointing to it that says I use acrylic varnish, but some people use UV varnish.
Another photo of Celia applying varnish to a pin. Text says: “Once your paint is dry, apply your varnish! Whatever you do, don’t water down the varnish. I try to apply 2 to 3 coats, after each previous coat dries.”
Slide 10: … and you’re done!
A photo of Celia wearing the pins in real life on a jean jacket. She has a pan and aro pin, and on the other side an aro flag painted on a rainbow shape.
495 notes
·
View notes
Text
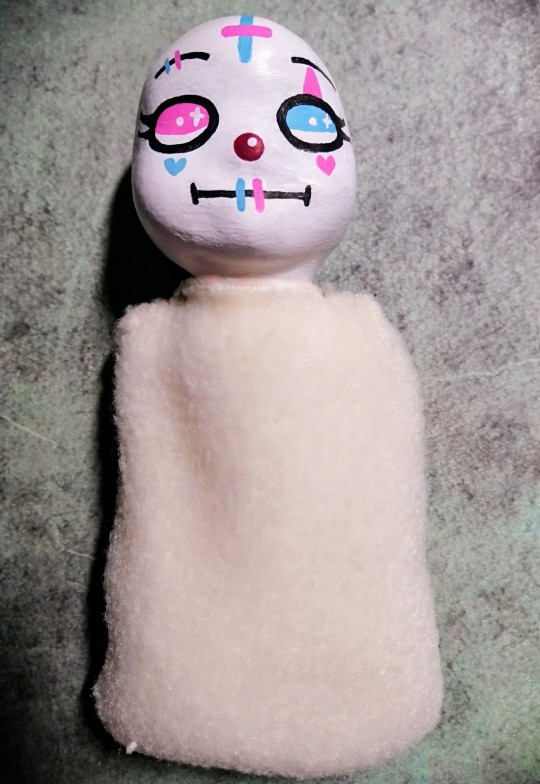
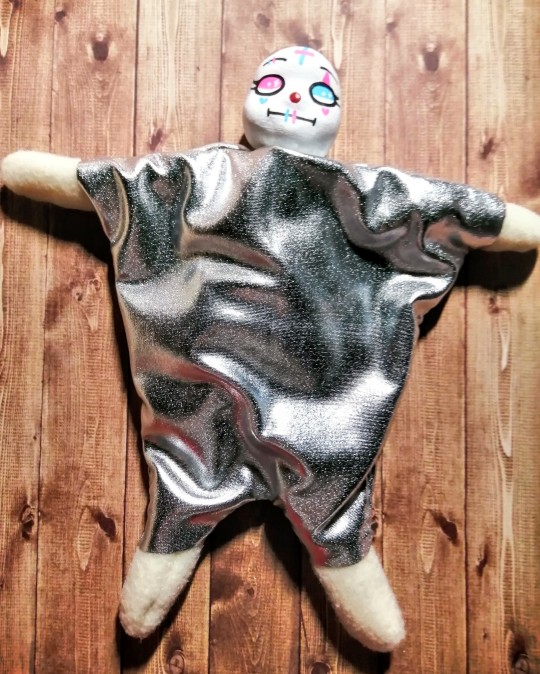
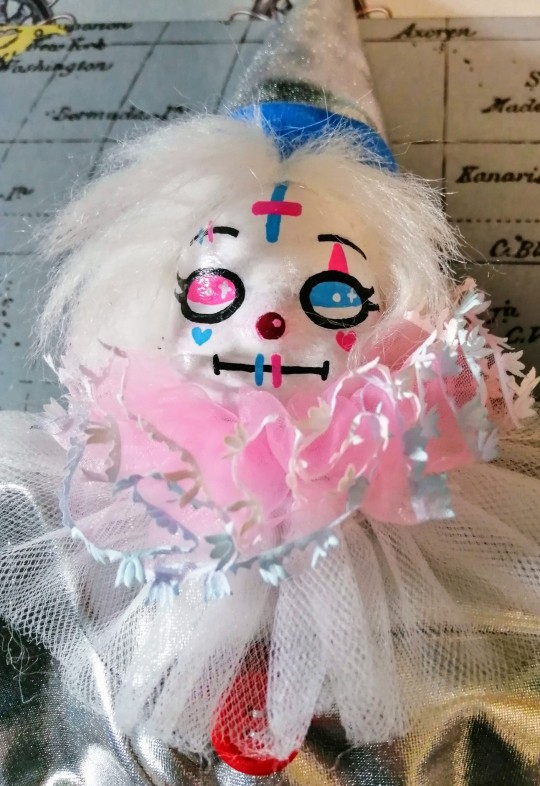
How To Make Your Own Clown Doll ! (A Guide)
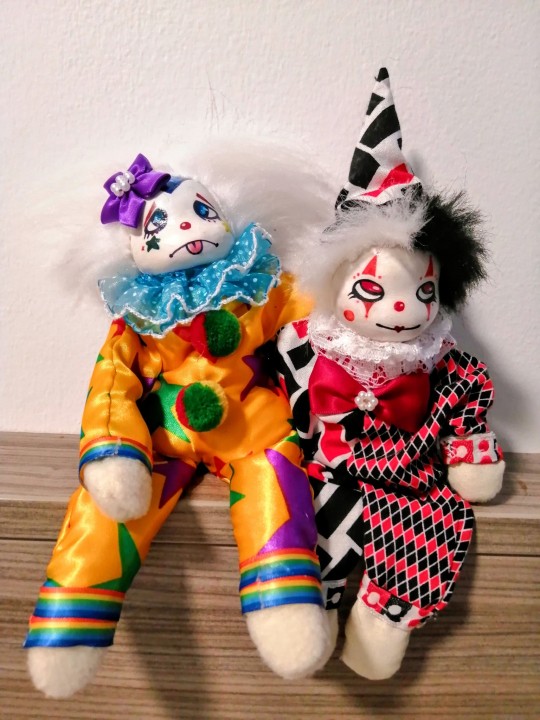
Hello good people !!
I have made a few clown dolls before, and someone submitted a question asking if I followed any guide for them or had a guide myself. I sorta made it up as I went for the first doll, but I have learned better methods of doing things since then!
Here is my guide on how to make some dudes for yourself!
You will need:
Fabric for the body - I used an off-white fleece for the torso and limbs for this one, but have previously used a thin off-white sorta cotton fabric, which works better if you want floppier/thinner limbs!
Fabric for the clothes - Use whatever you want, honestly! I used some cool stretchy silver-metallic fabric for mine but have previously used cotton and polyester patterned fabrics !
Polymer clay - I used Sculpey III for this one, but for my previous two I used some other kind of Sculpey that was very very light and airy, which made it hard to sculpt properly without squishing it! If you want to add any detail to the face shape, use some firm polymer clay !
Posca pens (optional) and acrylic paints - Acrylics are used for the base coat on the head. I used the paints for the details too previously, but used posca pens on this one which was much easier to do the face details with! Either works just fine, though : )
Faux fur - for hair! If you want a bald clown or one with just a hat without hair, you don't need this!
Decorative trims and such - I used some pink frilly elastic trim, blue dotted non-elastic trim, white elastic frilly mesh, buttons, a silver bell and some blue velvet ribbon for this guy! You can literally use whatever you want (ribbons, bows, pom-poms, lace, etc) to make your clown look cute!!
Varnish - Use spray varnish if you can! It'll help prevent the face paint from smudging (all 3 of mine have had this happen using varnish with a brush). It is possible to use varnish with a brush on them but be careful with it! I used sculpey gloss varnish.
Tin/aluminium foil
Basic sewing supplies (needles, thread, pins, scissors)
Steps
1. Make a ball out of the foil, a little smaller than the size you want the finished head.
2. Cover it in a layer of Sculpey and sculpt the face shape you want. Include a pretty thick neck with the base at the bottom WIDER than the rest of the neck. This will be how the head is anchored to the body!
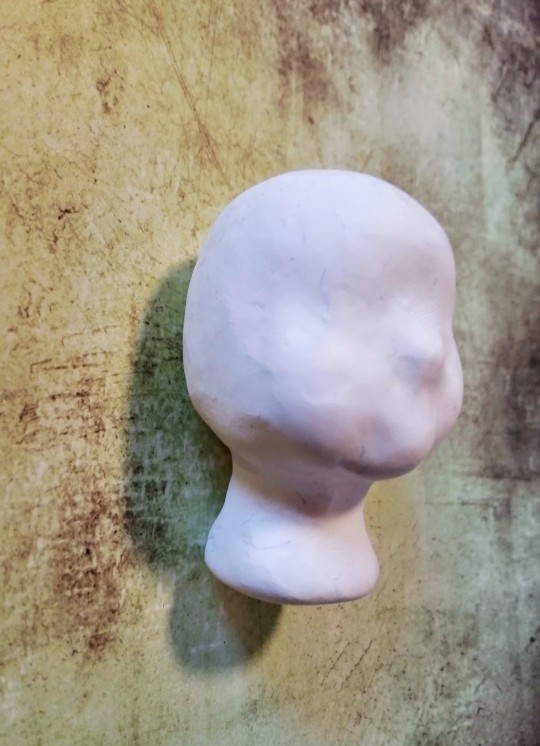
3. Bake the clay, let it cool, and sand it down so that it is nice and even without any finger-prints!
4. Paint a base coat on it with acrylic paints!
5. Paint/draw on whatever face details you want using acrylics or posca pens! Let your creativity flow!!
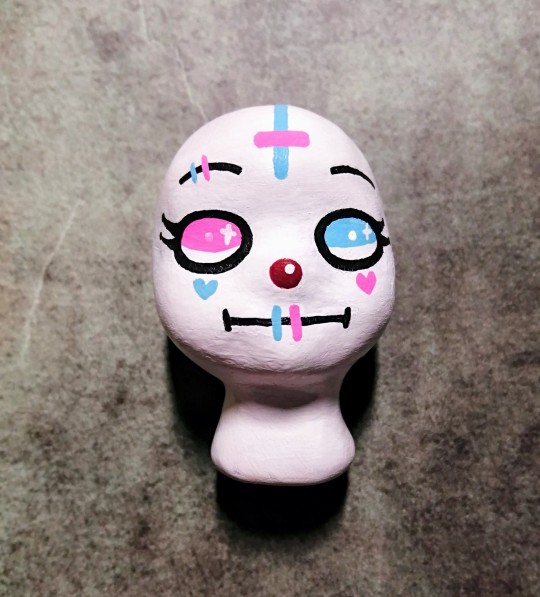
6. Varnish it!
7. Draw out the body pieces (torso and limbs) on your body fabric. You'll need two torso pieces, four leg pieces and four arm pieces. Honestly there's no method to what shape to draw, just draw what shapes you want them to be! (Remember to reverse each second piece though so that they match up when sewing them together). I used a rounded rectangle for the torso, and chose to make the legs on mine very long!
8. Cut out all the pieces and sew them together with the CORRECT sides facing INWARDS and the WRONG sides facing outwards. Once sewn, flip them inside out. MAKE SURE TO LEAVE THE TOP SIDE OF THE TORSO UN-SEWN TO INSERT THE HEAD!
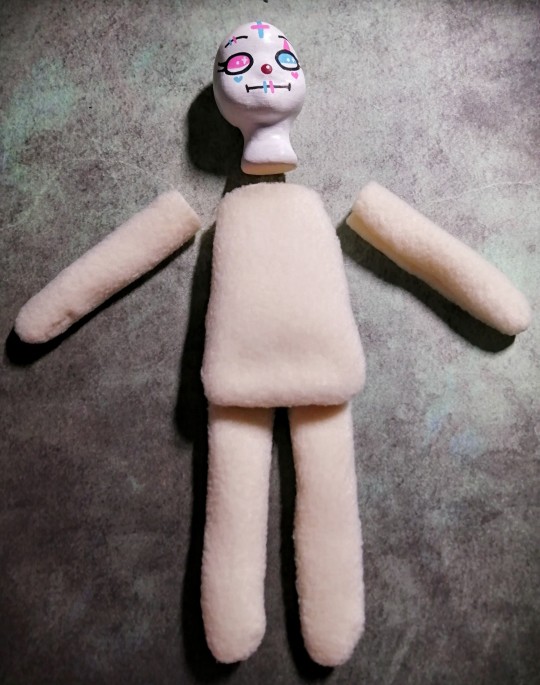
9. Almost fully fill the body with plastic pellets, and only partially fill the limbs (I filled them about 1/4 full)! If you don't have those, use dry rice like I did (or dry lentils) or sand! If you use sand, ensure sure you make your stitches REALLY close together so sand doesn't come out of any gaps! If you want the limbs to be chunkier, fill them with more pellets OR stuff the rest of them with poly-fill or cotton wool!
10. Insert the neck into the torso and sew the opening tight around it, like this! The wide base of the neck stops the head from coming out : )
11. Sew on the limbs! The stitching doesn't have to be perfect here since the clothes will hide it!
12. Make the clothes! You can make whatever kind of clothing you like; I just made a baggy little jumpsuit sorta thing for my guy! To do this, I laid the clown out on the fabric and roughly drew the shape for clothes around him based on what I wanted! Flip it, lay it down in the fabric again and then trace this to get the second jumpsuit piece!

13. Use the same method of sewing the pieces together with the CORRECT sides facing each other so the WRONG sides are facing outwards. Then turn the clothes inside-out so that the right sides are now facing outwards! MAKE SURE TO LEAVE OPENINGS FOR THE HEAD AND LIMBS TO COME OUT THROUGH!
14. Put the clothes on the clown!!
15. (Optional) Glue fake fur on the top of the head in the style you want it! I used hot glue because I didn't have anything else, but fabric glues and all-purpose glues would be good too! If you don't want hair, just skip this step!
16. (Optional) Hat!! Cut out a wide triangle shape, sew the opposite sides together and then sew a circle to the base if you want a pointy hat like my dude's one (I don't have photos of this sadly but I'm sure there's a tutorial out there of how to sew a cone)! Then glue the base to the top of the head.
16. And finally, add all the trims and extra bits you want to make them look super cute !!! I just sewed on some ribbon to the base of the hat and around the ankles, sewed some frilly elastic trims around the neck, added a little silver bell to the hat, sewed frilly trim around the wrists and ankles and then sewed two buttons onto the front of his clothes!
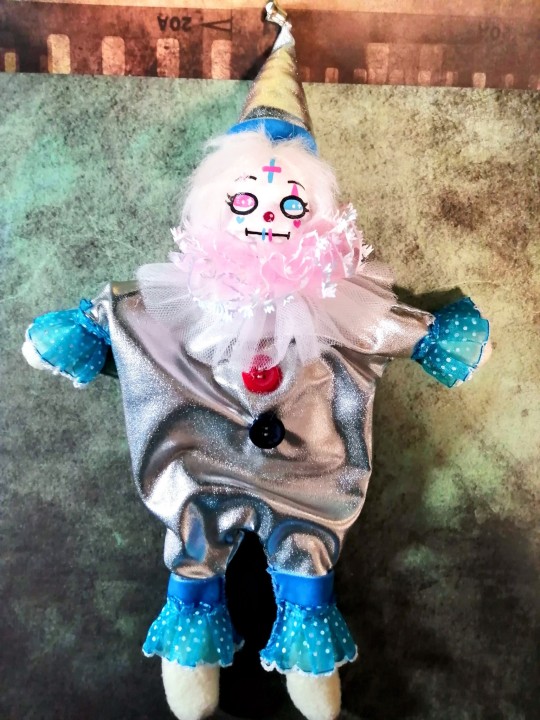

And then, your little clown is done !!!
I hope this comes in handy to anyone wanting to make their own clown dude!
I would appreciate any reblogs and such of this to help spread the clown joy !!
Have fun !!!
(Small note! I would appreciate if you didn't copy any of my clowns directly! Please use this as more of a guide than an exact tutorial to make this specific clown! Being creative with yours is much more fun!! :•D)
#clown doll#aesthetic#circus#kidcore#ooak doll#clownblr#clowncore#sculpture#doll#clown#circuscore#clowndoll#porcelain clown#small but knowing clown#ooak art doll#art doll#artdoll#tutorial#clownart#clown art#sewing#custom#art#plushie#sculpted#ooak
13K notes
·
View notes
Photo
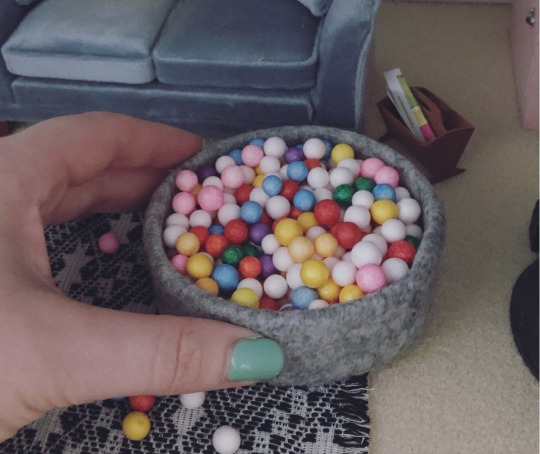
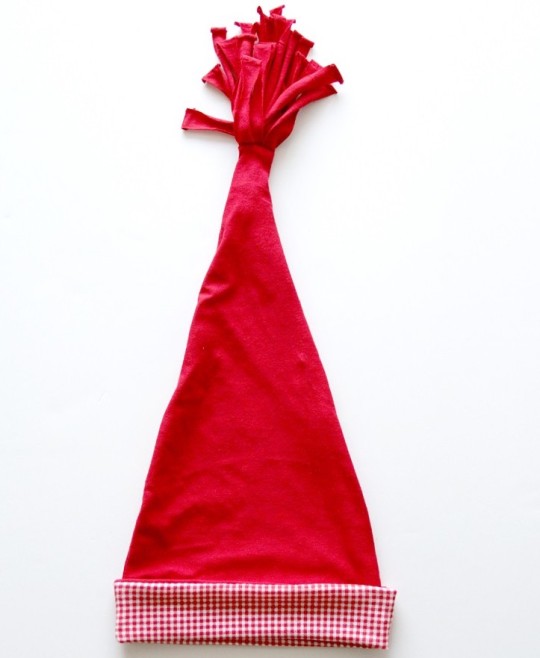


Kin Crafts for Daycare Attendant / Moon from Five Nights at Freddys: Security Breach - Easy to Medium
1) Mini Ball Pit (⭐️⭐️): this model is meant to be for a dollhouse, but it would also be super cute just as a decoration, pincushion, or jewelry holder! [X]
2) Nightcap (⭐️⭐️): as the daycare enforcer of bedtime, get ready for a good night’s sleep with your signature hat! if you can’t sew, no worries - you can use fabric glue, iron adhesive, or even hot glue if youre careful. these two simple tutorials can be easily adjusted for your own head size and design. [X]
3) Ball Pit Lights (⭐️): i couldn’t find an official source or tutorial for these, but basically just make a small x-cut in each plastic ball pit ball and press an ordinary string of lights inside for an awesome feature [X]
4) Night Sky slime (⭐️): this is supposed to be for little kids but like. slime is awesome for everyone. so relieve some stress with this pretty starry goop :) [X]
5) Moon Phase clay (⭐️): using just polymer clay, theres tons of cool crafts and decor you can make. this source makes a lovely wall hanging with some string, but you could also make coasters, jewelry, magnets, or pins with the same first steps! [X]
#i had all the links ready yesterday but im at my parents house now that the semmeowster ended and#i canNOT log onto this website with them around#yikies#but anyway#fnaf moon#fnaf kin#daycare attendant kin#fnaf moon kin#five nights at freddy's kin#moondrop kin#sewing#lighting#clay#other crafts#fictionkin#kin crafts#kin blog#kin requests#requests#⭐️#⭐️⭐️#tw horror
7 notes
·
View notes
Text
Stunning Heart Shape Earrings: A Complete Guide to Styles
#are polymer clay fumes toxic#beginning polymer clay#burning polymer clay#easy polymer clay#getting started with polymer clay#how to bake polymer clay#how to polymer clay#how to use polymer clay#polymer#polymer clay#polymer clay basics#polymer clay crackle#polymer clay earrings#polymer clay for beginners#polymer clay hacks#polymer clay how to#polymer clay jewelry#polymer clay techniques#polymer clay tutorial#starting polymer clay
0 notes
Text
For Holiday Time 2020, I challenged myself to make polymer clay gifts for my friends. I've got a bad track record for finishing these types of things (and I'm not gonna lie, I did want to give up with the self-soothing thought that I hadn't *told* anyone I was making something for everyone), but I saw this one through to the end.
Two of my four sculptures are for two women who have taught me a great deal about myself. They are my rainbow sisters, through and through, and I tried to honor that sentiment in their gifts, which I will be archiving to this blog today (day 5) and Friday (day seven).
This first sculpture is for my Morningstar, who told me her favorite mythical creature was Pegasus. The thought downright intimidated me lol I didn't know HOW I was going to make something of such majesty that would do our friendship justice. But, I looked for references and figured out a basic shape to get going, and decided that a simpler sculpture that conveyed her spirit (gold dust and rainbows) would be my best bet of success. I did get stuck on the wings. I had my rainbow canes ready to go, and I looked up tutorials. I noticed a lot of artists either sculpted full wings out of much firmer clay than I was using/on much larger projects that would later be painted, or they used a mold. I looked up the molds, ready to support an artist on etsy....however, a great deal of them looked suspiciously like some earrings I bought at hot topic long long ago. I don't have silicone mold making supplies, but have seen some polymer clay artists make simple molds made out of polymer clay itself (obligatory clay-ception joke). So I dug out those earrings that my hoarder-at-heart self kept for over a decade, and created a clay mold. I used silver mica powder as a replacement to corn starch mold release, and it did the trick beautifully. If I could go back, I would have used a thicker piece of clay to make the mold so I could have pressed the earrings further for a more robust mold. Otherwise, the final product turned out better than I was expecting. I also didn't have any plain black beads that I could find in my main storage area - until I located some nearly-black hematite beads from a bracelet that I broke (again, years ago, but I don't think I have ever let go of something I thought I could use in art, and sometimes my packrat-at-heart self comes in handy). I guess Morningstar will learn that the eyes are magnetic if she ever sees this post ;)
To summarize, this golden rainbow goddess with just a hint of attitude perfectly captures my dear friend's self, and I am exceedingly proud to have brought it into existence for her as a token of my friendship.
To many more sculptures in many more years of friendship for us all :)


#accountability#sculpture#polymerclay#Pegasus#rainbow#wings to fly#100 days of creativity#day five#too bad i missed day 4 lol
3 notes
·
View notes
Text
Custom Funko Pop Tutorial
@xirayn asked for a tutorial, so I made one!
Tools you’ll need:
Craft paints
Paint brushes (small)
Primer
Sealant
Sandpaper (400 - 800 grit, sold in hardware stores and automotive)
Sculpting tools
X-Acto blade
Milliput (epoxy clay)
* Airbrush
* Masking tape/painter’s tape
* Dremel
* Acetone (nail polish remover)
* Optional
Make sure you buy small detail brushes. The largest I use are about the width of a pencil eraser (though slightly larger ones are good for big fill areas like hair). For the finest lines and details, look for brushes specifically made for painting tabletop miniatures.
For paints, any acrylic hobby paint will do, but I am hugely fond of Formula P3 paints (the kind made for tabletop minis). They’re heckin’ expensive, but they come in a million shades so you don’t have to mix colors and then later find a spot you missed but the original color you mixed has all dried and you’ll never be able to get the exact same shade again x_x And I really do think they don’t chip/scratch as easily as other paints.
...but I started out painting Warmachine minis so I might be a little biased.

Step 1: Choose Base Model
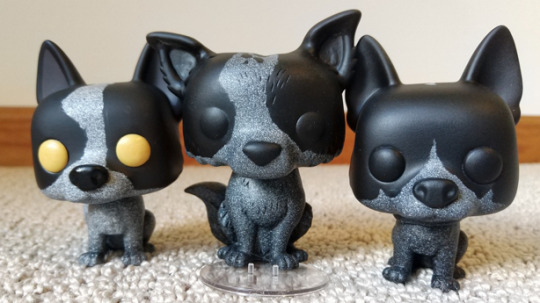
Think about the character you want to make. What is the closest existing Funko Pop model you can find? The closer you can get, the less work you’ll have to do! Sometimes a simple head-swap or re-paint is all that’s needed.
When you look for base models, look at things like pose, expression, and unique features (like bared teeth). Look past the character a model represents, and think of how you could transform it into the character you want to make. The bubbliest, cutest Pop could be the ideal base model for your horrifying monster custom!

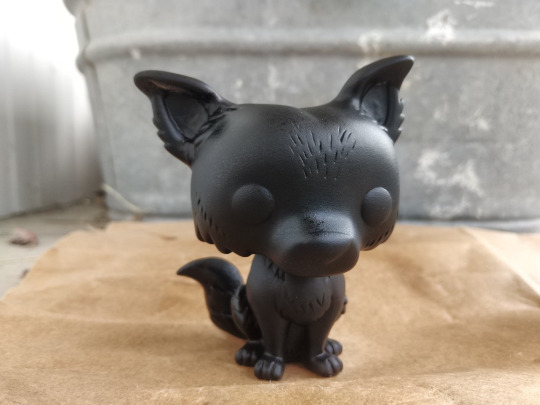
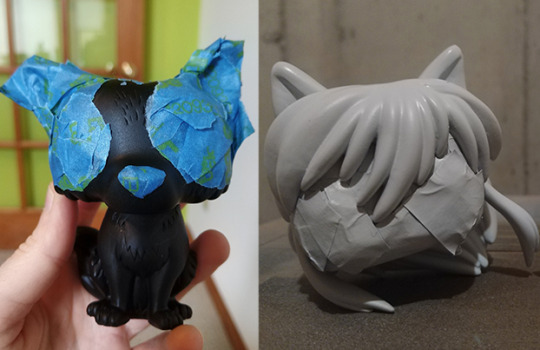
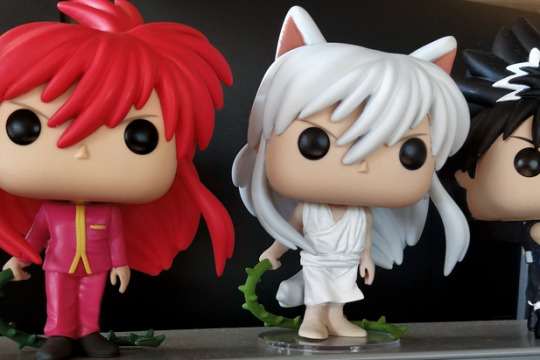
Kurama will become Yoko Kurama

Ghost will become Wash the cattle dog
Step 2 (Optional): Decapitate
If you’re doing a head-swap, this step is critical. If you’re just sculpting and painting, this is still a good step to make your life easier (just try sculpting in the crevices of a character’s shoulders underneath their hair!)
Put a small pot on the stove, filled with enough water to cover the head and neck when you dunk your pop in upside down. Bring the heat up to not-quite boiling, and drown the *#$%er gently bathe it in hot water.
The rubber will soften and make it easier to pull off. Use a hand-towel to grab the head (it will be hot), and pull until it comes off. Some are easier than others. Some people skip the heating step altogether and just yank the head right off!
Step 3: Sculpt
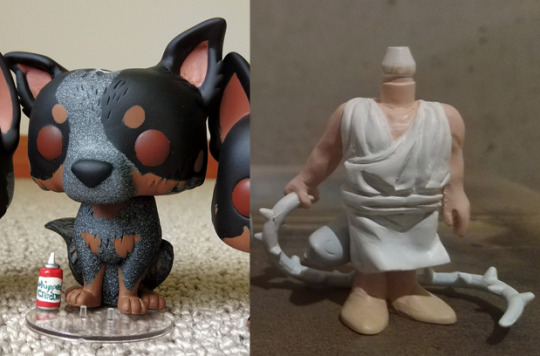
Wash has floppy ears, and there are no Funko Pop models with ears quite like his. So, to get the angle right, I cut the model’s ears off with an exacto knife, then re-attached them at a floppier angle.
I worked one ear at a time on Wash, letting the first ear harden in place first, because I am extremely clumsy.

Kurama needed a significant amount of material removed for his straighter hair, bare arms, and short pants. I used an X-Acto blade and Dremel with a sanding bit.

Depending on your project, you may need to use acetone to remove paint (ex. facial hair).
After you’ve carved everything down as much as you need, and finished prepping the basic shape, it’s time for additive sculpting! I use Milliput, but you can also use Apoxie Sculpt, or air-dry clay. I’ve even heard of people using polymer clay and hardening it carefully with low heat, but an epoxy clay will give the most durable and detailed result.

Wash needed floppy ear-tips to complete the look, and Yoko needs robes. Again, I work a section at a time, letting each section harden before continuing.
Step 4: Sand
After the sculpting has hardened, sand any imperfections. The Dremel is your friend when taking off lots of material. For less extreme sanding, I use 400-grit and 800-grit sandpaper. You may need to add fresh material to fill and smooth any gaps.
Step 5: Prime

Once you’re happy with how your model looks, it’s time to paint! I mix Golden Adhesion Medium with black or white paint if I’m hand priming, or use a spray primer, but you can use whatever you prefer.
For an aerosol primer, choose a ventilated area (I like to work outside in the summer), and place the figure on top of a cardboard box for height, and so you can rotate it easily. If you’re inside, you should also set up a back-splash so you don’t paint the walls.
Do a few test sprays on the cardboard first to make sure it’s spraying evenly. Then spray in light coats following the instructions on the can, rotating to get all angles, and letting each coat dry before putting on the next coat.
(Here’s a good tutorial just on priming!)
Step 6: Paint
You’ll never get as smooth a finish as using an airbrush! A decent airbrush kit and mini air compressor aren’t too expensive, and a great investment if you want a professional-looking finish! (I was afraid of the airbrush for a long time and now I hate working without it!).
Get some painter’s tape or masking tape, cover every part of the model you don’t want to get paint on, then airbrush in your color!
You can also do cool tricks with the airbrush, like reducing air pressure to create a stippled effect!
When hand-painting, make sure you thin your paints and apply multiple thin coats instead of trying to get full coverage in one thick coat. You’ll reduce visible brush-strokes that way, and the paint will adhere better, too.
Even if you have an airbrush, chances are you’ll be doing some hand-painting anyway. I did Wash’s brown spots, inner ears, and Yoko’s entire body by hand, because masking all those tiny details would be a pain in the booty.
Step 7: Seal
Once you’re done painting, a good sealant will prevent your work from chipping, or from fading in the sun if you use a sealant with UV protection. It can also hide imperfections in the finish (ex. I spot-painted a few areas the airbrush missed, and even though it was the same color, you could see the difference in texture. Matte sealant made it look completely uniform again!)
Sealant can also be used in between coats of paint when masking if you’re worried about the tape pulling paint off.
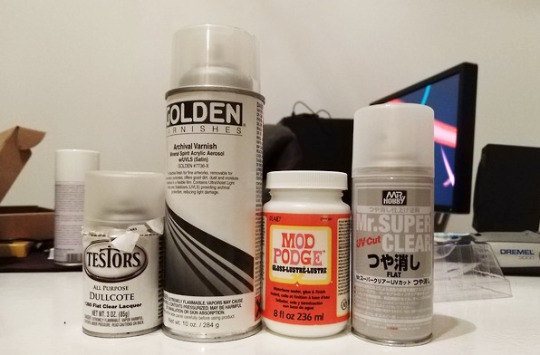
I use Golden Archival Varnish - Satin Finish, Testor’s Dullcote, or Mr. Super Clear. They’ve all worked well for me (though Mr. Super Clear is the most expensive and the most aggressively matte). Apply the same way you would a primer.
A thin layer of Mod-Podge adds shine back to the eyes after applying a matte sealant.
Finished!
#custom funko pop#funko pop#custom funko#custom pop#tutorial#customizing a funko pop#I hope this is helpful!!!
23 notes
·
View notes
Photo

Welcome!
This is a new concept for me, blogging. So bear with me as we get the hang of things here.
So I’m a newly found adorer of polymer clay. I have worked with it a little bit years back, but recently I started to get more hooked and now I don’t see it slowing down anytime soon! Fairy garden accessories have been my latest passion, and I am hoping maybe by displaying my work and talking about my experiences with clay I can spread the love for it! It occupies hours of my time and gives me a creative outlet that I definitely need.
This blog will serve multiple purposes. I will be using it to display the steps of my work, tutorials, tips and tricks, reviews, and just overall keeping track of where I am with my projects. It will be fun to share the work I spend so much time on!
Polymer clay is a really easy hobby to pick up. You can make countless projects! I started with a few colors and basic tools, and now my crafts have taken over a small corner of my dining room! On that note though, to my first tip!
Tip #1
Polymer clay can be quite expensive, but their are ways to save money! If you have a local Michael’s, you can purchase your clay from them and have them price match your clay to www.sculpeyproducts.com prices. So instead of almost 3 dollars a package, you get them for $1.60 a package roughly! That’s a huge deal!
I hope to bring many more tips to this blog, and hopefully some tutorials as well! So please, stay tuned!
Lotus
1 note
·
View note
Note
I need to learn how to make my own Grimoire 😍😍. I really want to have a go but I have no idea where to start. Do you know of any good tutorials online?
I sure do! Though my inspiration comes from a whole bunch of places, I get the basics of book making from Sea Lemon! Her tutorials are incredibly easy to follow! If you want anything else as per grimoire making, please let me know!
Here are ones in particular I often follow:Kettle StitchCoptic StitchDIY Text BlockDIY Hard Cover (Kettle Stitch)DIY Hard Cover (Coptic Stitch)Best GluesBook Press DIYPicking Paper
And here’s some grimoire inspiration:Mini Spell BookEpic TomeLong Stitch BookbindingCustom Leather Book CoverDIY Vintage BookPolymer Clay CoverAlchemy Themed Book CoverGarden Grimoire Flip ThroughInteractive Grimoire
I hope that helps, nonnie! Share pictures with your grimoire, if you wanna! (I’d absolutely love to seeee)
104 notes
·
View notes
Text
Camping Baldi + Cloudy Copter Baldi's Basics - Field Trip demo: Camping Polymer clay Tutorial
Camping Baldi + Cloudy Copter Baldi’s Basics – Field Trip demo: Camping Polymer clay Tutorial

View On WordPress
0 notes