#beautiful designs website templates
Text


Fall Skincare Canva Landing Page Template
Welcome to the Fall Skincare Canva Landing Page Template, designed to help you create a stunning, luxurious online presence for your skincare business, blog, or personal brand. This beautiful fall-inspired template, featuring warm nude and earthy tones, is perfect for skincare brands that embrace natural beauty and luxurious self-care. - DesignByRobinSade
#aesthetic#design by robin sade#luxury#style#fashion#canva#social media#influencer#instagram template#beauty#skincare products#skincare#linkinbio#website#canva template#templates#template#beige#beige moodboard#beige aesthetic#beige tones#beige icons#beige layouts#landingpage#branding#social marketing#small business
2 notes
·
View notes
Text

Create a high-converting product page effortlessly with our Carrd templates
#carrd#carrd templates#template for card#carrd template#carrd theme#template#landing page#profile#website#barbershop#market#buyers#content seller#landingpage#business#startup#electronics#product design#beauty products#health products#trending#free carrd template#web resources#webdesign#web design#web development#tech#content creator
1 note
·
View note
Text

Nail Salon Website Template, Canva Website Template, Digital Nail Website Template, Modern Nail Salon Editable Website, Instant Download
Our Nail Salon Website Template is tailored to meet the needs of today's digital salons. With this friendly design, you can easily create a stunning website that reflects the unique personality of your nail salon. This template covers all the essential elements needed for an engaging web presence, from service menus to booking forms and gallery presentations to customer testimonials.
Our Canva Website Template is fully customizable for flexibility and customization. Customize every part of your website, from colors and fonts to images and layouts. Whether you want to highlight your latest nail art designs or promote special offers, our template makes it easy to customize your website to your specific needs.
With our Nail Salon Website Template, you don't need to be a tech expert to create a professional website. Canva's intuitive drag-and-drop interface ensures that you can easily update and manage your website without any hassle.
Say goodbye to long development times and expensive web designers - the instant download feature lets you build your website instantly. Simply download the template, customize it to match your brand, and publish it to your website to instantly attract and engage customers.
Set your nail for online success with our nail salon website template. Create a sleek and modern website that will set you apart from the competition and attract new customers with ease. Get ready to showcase your nail salon's creativity and professionalism with our easy-to-use and fully customizable template. Download now and start building your perfect website today!
🌟 How It Works 🌟
.: Purchase the template.
.: Download the PDF using the Canva link.
.: Open the link and edit the template in Canva.
.: Save and print your personalized planner or use it digitally.
#nail salon near me#nail design#nail salon#beauty salon#pretty nails#website templates#canva design#canva template#website design
1 note
·
View note
Text
Photoshop Portfolio Website Template (only 6$)
#photoshop#art#website#photoshop portfolio website template#photoshop edit#photography#design#business#developers & startups#education#architecture#digitalspex#portfolio#portfolio website template#portfolio website photoshop template#design template#beautiful portfolio website#portfolio website hosting#ux#ui#ux/ui design#website design#beautiful design#jobs#important for jobs#customizable templates#customizable portfolio website template
1 note
·
View note
Text
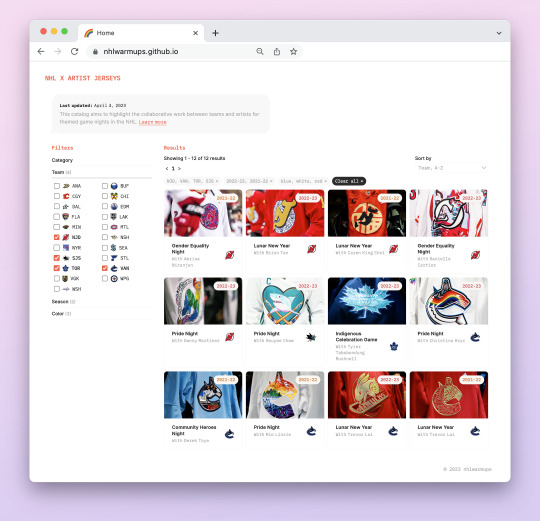
have you ever asked yourself: “hey, wouldn’t it be nice if i could quickly browse all the special warm-up jerseys that nhl teams have worn in collaboration with local or independent artists?” the answer to this is probably no so Don’t answer that, but... if you were ever to randomly stumble upon this train of thought, you would now be able to do so @ nhlwarmups.github.io!
i created this website out of personal interest and an enduring love for beautiful jersey designs; i love art in all forms and really just love looking at it, so in my inability to find an existing project that fulfilled my desire of browsing through all these jerseys in a centralized location i somehow... singlehandedly motivated myself to take on the task? LOL but otherwise i also wanted to make this database because... well, i feel like even though a lot of league-wide inclusion initiatives ultimately rely on/benefit teams’ commercial interests, and even though it feels like there’s recently been an overabundance of dialogue re: player action or inaction, theme-night dissent and sociocultural pressure, the culminating breaking points of bisected fandom, etc.... art still kind of matters! to me, to the designers, to real people who attend games and who coordinate events and who run media platforms and do what small facets of work can still be done.
Anyway. this site itself is sort of meaningless and doesn’t really accomplish much at the end of the day, but i guess i wanted to (try to) refocus the concept of a “warm-up jersey” back on the people who actually create them, and ultimately to reattach the positive components of theme nights in a way that felt slightly tangible and concrete. the site itself isn’t very complicated so hopefully it’s fairly self-navigable, but some quick notes on content and functionality:
as of april 4, 2023, this database displays 82 special jerseys from 21 different nhl teams
i’ve currently only included special jerseys designed with a highlighted artist in my set. that is, while some teams have worn different pride/heritage night/etc. jerseys with either stock-template designs or artwork otherwise created in-house, those jerseys weren’t logged unless an artist was specifically named. for example, the penguins pride jersey from 2022-23 isn’t included but the ducks lunar new year jersey (which was created by a ducks graphic designer) from 2022-23 is.
there are different sidebar options to help quickly search for a specific type or style of jersey: you can sort by team/event/date and filter by category/team/season/base color
lastly, clicking on one of the preview cards will bring you to a details page with additional information on each jersey, including social media links to support the artist, notes on charity benefits, an image gallery of the design, and embedded tweets highlighting the artist when available:

that’s basically it! this was a labor of love so i tried my best to not make the entire experience a functional piece of garbage, but at the end of the day i am Just Some Guy and i never know what i’m doing so please lmk if anything is super wonky. and also if your team has a past design that fits the criteria but i missed it :)
#Is This Anything (← guy who only does completely useless things)#idk but it did force me to learn javascript so there's that#hockey stuff#code#*m
259 notes
·
View notes
Note
Hi!! I saw your blog and it's beautiful! I'd like to ask if you could share some tips about editing posts, specifically changing the font color and doing that cool effect where it has more than one color on the same font ☺ if you're not comfortable teaching that's okay too! Have a good night

Hello Siren,
Thank you for the compliment. Yes, I can teach you. Just follow a tip from Auntie here: do it because you genuinely like the aesthetic. The time you spend writing the post is sometimes the same as editing it, and in my experience, this won't necessarily translate into more likes or reblogs. So, do it because you think it's beautiful.
As comical as it sounds, I won't be using HTML in this post because using the codes could cause problems. I've seen some tutorials, but I just really learned when I searched on my own.. I also do all my editings on my notebook. So, here's everything I use:

Websites I use for editing:
HTML Code Editor: While you're creating your HTML, you can simultaneously see if it's working
BBcode & HTML Text Colorizer: This is where you'll create the gradient
Browserling: I use this site to make the gradient code compatible for Tumblr
Aesthetic Symbols: this is for that cute symbols
Piliapp: more copy/paste symbols
Fontes e Letras: copy/paste fonts
Canva: This is where I create some of my designs. I also use Photoshop
Deviantart: a lot of material for Photoshop like templates, PSDs and Renders (PNG image with a good resolution), you can see the ones I use the most in my sources
@animatedglittergraphics-n-more: dividers
@saradika: dividers
@engrampixel: cute material
Color Hunt: if you don't have a color pallete in mind, here you can find a lot of options
Adobe Color: if you want to create your own HTML color palette this site can help
DaFont: where I download my fonts, the ones I use the most are: Betterfly, Arcadepix, Starborn, Lemon Milk, Cursive Sans and BubbleGum
EmojiTerra: as I use tumblr on my notebook, this is where I get my emojis
HTML Text Editing
Important:
Go use the HTML Code Editor in this part and your life will be way easier.
Some things I do right here in the tumblr editor, like putting the images and different fonts like Lucille.
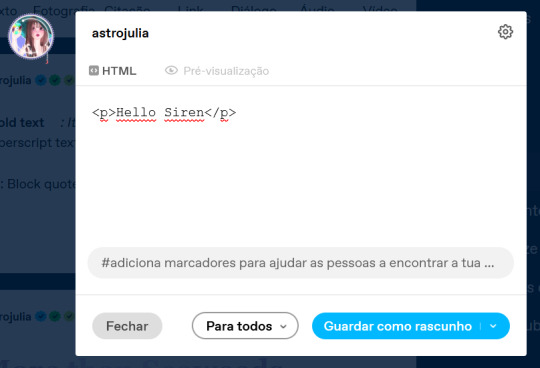
All HTML code starts with < > and ends with , that is, when you start a paragraph you will write <p> and when you finish you will write </p> (HTML Code Editor ends your coding automatically)
I'm teaching all this because if you want to make gradients in your entire text and not just in the title, you'll need to know about html
To start your HTML you will need to go to the gear that appears on the right side when you are writing your post, go to the bottom until you find the Text Editor and switch to HTML.

The Codes
<p> start a paragraph </p>
<br> to make a space between text less than a paragraph (good to use in indented text) you don't need to put </br>
<b> make the text bold </b>
<i> leave the text in italics</i>
<strike> leave the text crossed out </strike>
<small> make the text small like this </small>
<h1> make the text large like this </h1>
<h2> make the text large like this </h2>
<ul> Create unordered list (dotted) </ul>
<ol>Create lists with order (numeric) </ol>
*instead of making paragraphs you will create new items in the list using the code <li> </li>
<blockquote class="npf_indented"> make the text indented </blockquote>
<span style="color: #HTML"> Code to color your texts, pay attention that it uses (") instead of (') and doesn't use (;) </span>
Tutorial on creating invisible spaces, just like I use to do the navigation, if I put it here everything bugs. PT-BR
<a href="URL">Link Text</a>: Creates a hyperlink
Making your Gradient
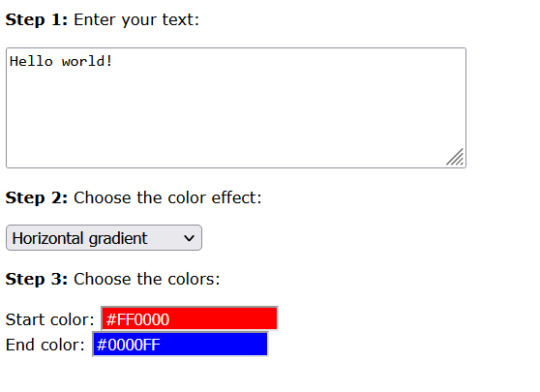
Go to BBCode and HTML already with your HTML text and colors in hand. Write or copy your text in the box, choose the gradient type (I use middle) and select your colors (from one to three different colors)

Now copy the text in the "HTML code for this text: (To use on your website)" box and go to the Browseling, you will replace the (') to (") and the (;) for nothing
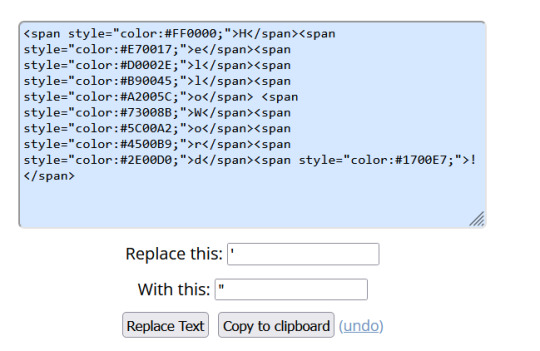
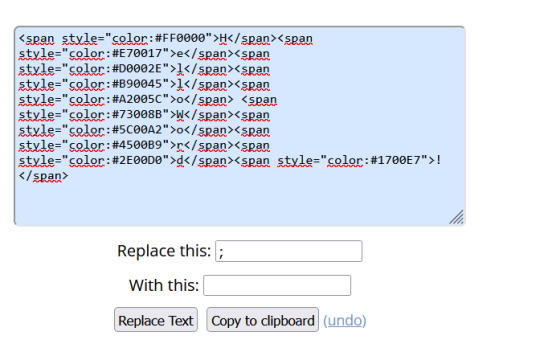
Copy and paste your new code direct in your tumblr post editor or in the HTML Code Editor. Success!!
I think that's all. Kisses from the Sea! 🐚
166 notes
·
View notes
Text
also my semi-professional website is a very nice little example of minimal design with hand-written frameworkless CSS (i use sass but only for nesting selectors and spreading it across a few files), hand-written HTML templates that are still readable even without CSS, and a couple hundred KB of tasteful custom fonts (set to font-display: swap of course). responsive design so it works on wide and narrow screens. no JS aside from maybe if i want to implement a manual light/dark mode toggle once I actually implement light mode (with it defaulting to your browser/OS preferences, of course). you can still make beautiful web sites without all this fucking cruft.
i'd show it off but if I linked it here you could doxx me so I'm not doing that
21 notes
·
View notes
Text
Websites to practice Front-End
(22/02/2023)
Today I wanted to share websites to practice your frontend skills.
Front-end is complicated for my head (ask me to solve an algorithm with structure while but not to center a div HUEHHUE).
BUT at the same time I love a well done and coded design/ui. That's why today I want to share resources to help you train
1- Front-End Practice
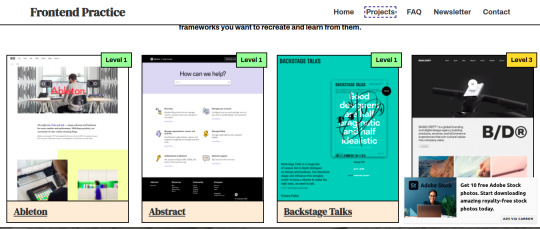
They have 3 levels, beginner, intermediate and advanced. There's no "answer" so you can't copy the code, it's just you trial and error until you get to the template (which really is a website that exists)

One thing I thought was really cool here was that it tells you what you're going to practice the most in the exercise, color palette and search features.
It's very interesting for a front-end not to be dependent on a tutorial, because from what I've seen in interviews, they ask you to make a layout and you won't be able to make one yourself if you don't learn to break down a single layout from the beginning and try and making mistakes until it's perfect.
2- DevChallenges

I find the projects not only beautiful visually but also interesting to practice. Here you already have the solutions that other people recommend, but again I think it's best for us to try and make mistakes until we get similar.And it also sorts the levels.
Here an example:
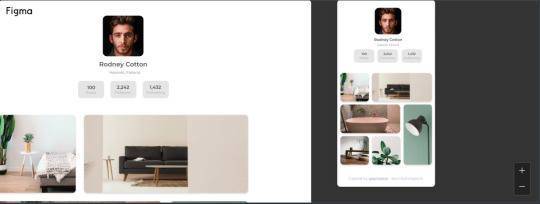
Cool huh? Well, I hope this helps someone who is looking for projects to practice with. We can invest a lot of time trying to make a layout, so having something ready I know helps a lot.
I wish you good studies and a great Wednesday, drink water.
#front end#frontenddevelopment#html css#html5#full stack developer#static website design tools#css3#javascript#reactjs#software engineer#practice#studyblr#studyblog#codeblr#resour#study tips
280 notes
·
View notes
Text
10 Digital Products to Turn Your Dreams into Dollars! 💰 #MelaninMogul Edition
Hey #MelaninMarketers, ever wondered how to turn your passions into profits? The answer might be simpler than you think!
Digital products are the new goldmine, and we're spilling the tea on 10 products that could potentially generate $500 DAILY!
Notion Templates: Organize your life and business with customizable templates.
Social Media Planners: Help others conquer their content calendar with pre-made planners.
Fitness Trackers: Tap into the wellness market with personalized fitness guides.
Travel Guides: Share your love for exploration with curated travel itineraries.
Self-Help Ebooks: Inspire and empower others with your wisdom and expertise.
Printable Wall Art: Decorate homes with beautiful and inspiring designs.
Online Courses: Share your knowledge and skills with a wider audience.
Membership Communities: Build a loyal following with exclusive content and networking opportunities.
Digital Art Prints: Showcase your artistic talents and sell high-quality prints.
Stock Photos: Create a library of stunning images that people will love to use.
Ready to turn your ideas into income?
Head over to our website (link in bio) for more tips on creating and selling digital products. We've got your back every step of the way!
Let's chat in the comments!
Which of these digital products sparks your interest?
What other digital product ideas do you have?
Together, let's build a community of empowered Black entrepreneurs who are dominating the digital product market! ✊
#melanin#black tumblr#black excellence#affiliatemarketing#black owned#digital marketing#digitalmarketingforblackbusiness#digital products#black entrepreneurship#blackbusiness
6 notes
·
View notes
Text
miss cackle's cardies

apparently this was a THING on the cbbc website - titled "Miss Cackle's Cardies" and linking to a pdf template. but like 80% of the fandom doesn't have access to that because of region locking (thanks, homophobes)
THIS (i shit you not) is the acursèd cardigan template??

the BUTTONS are not even centred to her face, nor to each other, and the bottom one is just floating off to the right??? irl these would be enOrmous. it doesn't even look like she's wearing it. even as a child i would have been insulted and i am NOT good at art
anyway it's obviously For The Kids, but over on tww discord we embrace chaos 😎 and wanted to try our hand at making the most ridiculous designs. so post your designs as a fun little minimum effort september back-to-school art event, tagged miss cackle's cardies. (if you want to do your own template or inspired art absolutely feel free!!)
(also can we appreciate the beauty of the promo image being hackle standing next to each other, and the mental image of them JUDGING the entries together??? i'm on the floor screaming)
36 notes
·
View notes
Text
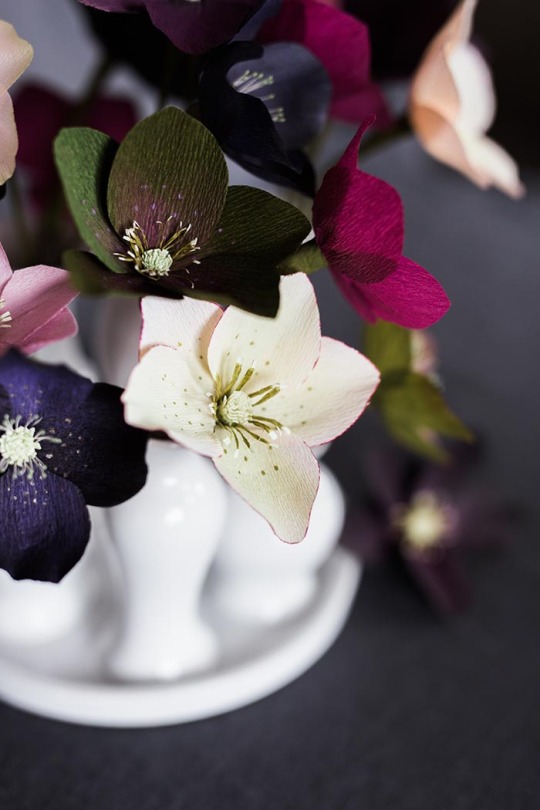
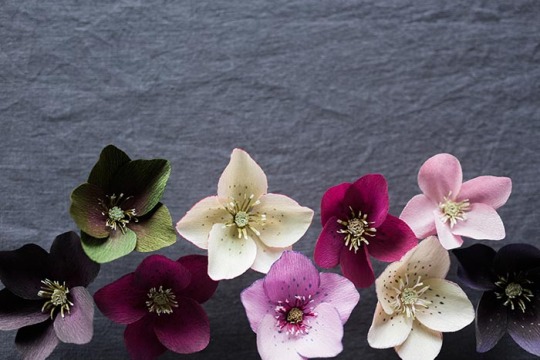
DIY Paper Hellebore
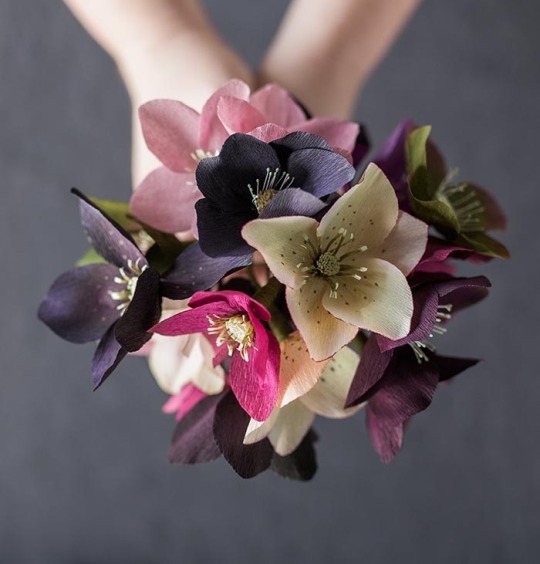
Project by Kate Alarcón:
When I had the opportunity to prepare a flower-making workshop for a Carpe Diem Collective event in Seattle, I knew the hellebore would be perfect. It grows beautifully in the Pacific Northwest, but still feels a little bit exotic and unexpected. Its subtle yet rich colors seem sophisticated in a way that struck me as ideal for the design-savvy makers whom I knew would be attending. But what was most exciting to me were the opportunities the hellebore presented to play with color and pattern. Rather than prescribing one specific variety for everyone to make, I taught several techniques, and everyone played with variations. As the new flower-makers worked, I found myself continually surprised and delighted by the varieties that sprung to life around the table.
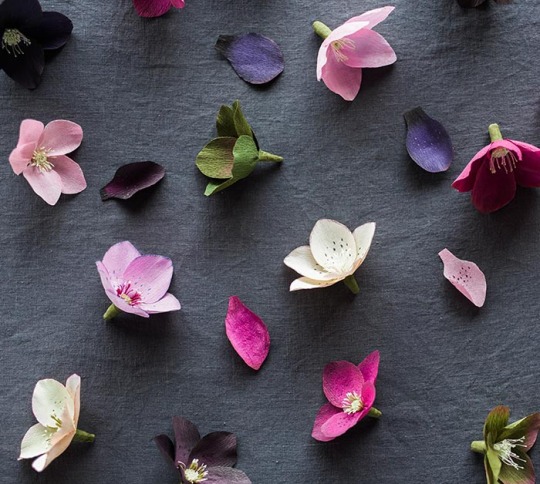
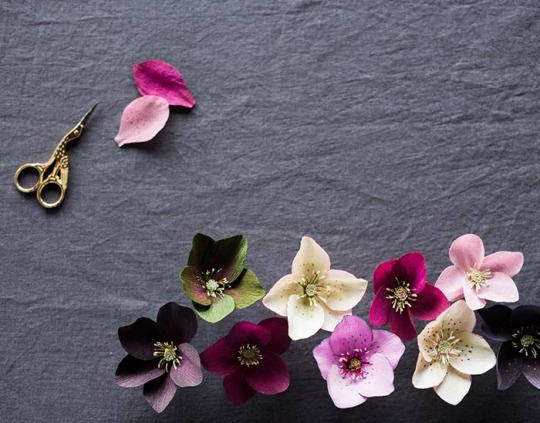
In that spirit, the instructions that follow demonstrate techniques for construction and for adding color and detail. I hope you’ll spend some time observing the hellebores blooming around you right now (or on Pinterest!) and combine these techniques to please your own artist’s eye. And special thanks to the women who attended the hellebore workshop and whose creativity inspired the hellebores I’ve made here. —Kate
Photos and styling by Grace Kim
About Kate: Kate Alarcón makes delicate and unusual paper plants and flowers just outside Seattle. Kate chose the cobra lily — a carnivorous plant native to the West Coast — as her business name and spirit “animal” because she finds so much inspiration in its eccentric, otherworldly beauty. She takes custom orders via her website, and teaches flower-making workshops in the Pacific Northwest. You can see her newest work on Instagram @cobralilyshop.
About Grace: Grace Kim is dedicated to capturing and creating beauty and helping people live life to the fullest. You can find her work at GH Kim Photography and Carpe Diem Collective. Follow her on Instagram @graceperdiem.

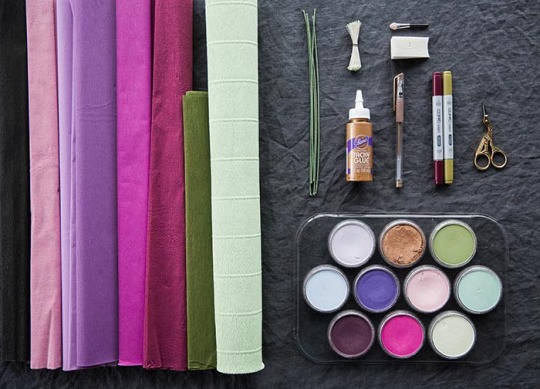
Supplies
For flower construction:
• hellebore templates (download here)
• Aleene’s Original Tacky Glue
• fine or doublette crepe paper (black, white, dark red, pinks, violets, and greens are all suitable) plus olive green to wrap the stem
• pale green or yellow florist crepe for the flower center
• 1 10-inch length of 18-gauge, cloth-covered stem wire
• paper scissors
• optional: small green or yellow millinery stamens
For adding color and detail:
• Copic Sketch or Ciao Markers. I find the following colors especially nice for hellebores: RV69, V15, V12, V91, YG95, and YG03, G20, 0.
• PanPastels. If I were to buy just one color for this project, it would be 430.5 Magenta, which creates a very rich, deep pink when swiped over black crepe paper. Other nice additions would be: 470.5 Violet, 930.5 Bronze, 430.1 Magenta Extra Dark, 680.3 Bright Yellow Green Shade, 640.8 Permanent Green Tint, , 340.8 Permanent Red Tint, 220.8 Hansa Yellow Tint, 520.8 Ultramarine Blue Tint, 470.8 Violet Tint
• cosmetic wedge sponge
• eye-shadow brush with a sponge-tip applicator or cotton swab
• gold gel pen
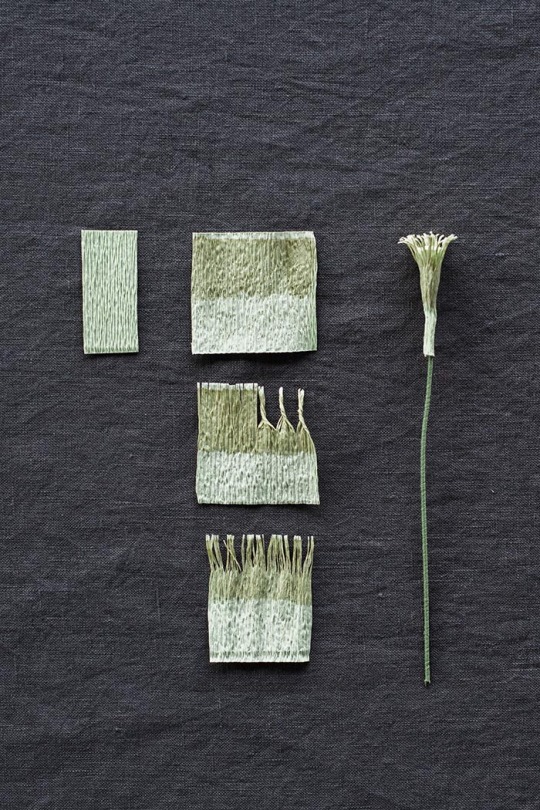
Creating the center:
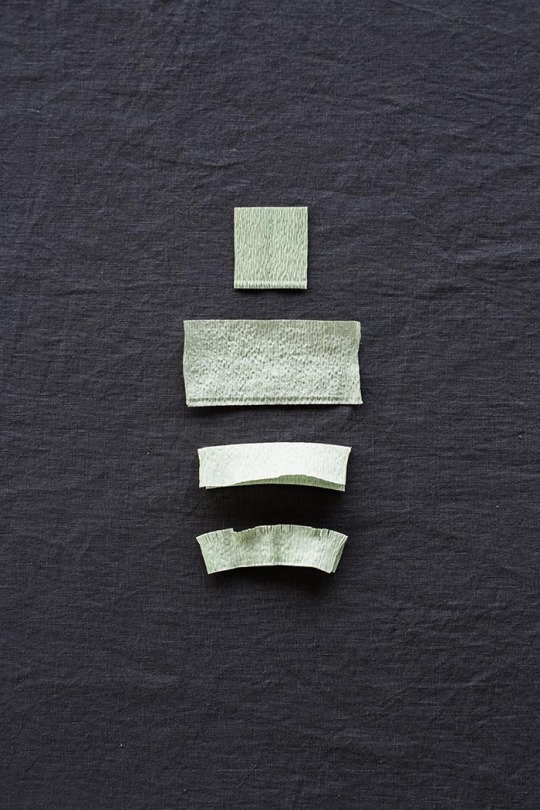
Image above: Each piece represents one step in the process of making the hellebore center.
Using template A, cut out a rectangle from the pale green crepe.
Stretch this piece against the grain, pulling out all the tiny folds so that you have a long rectangle. Fold the rectangle in half lengthwise.
Create a short fringe along the fold by making a row of small cuts very close together (roughly 1/16th of an inch apart).
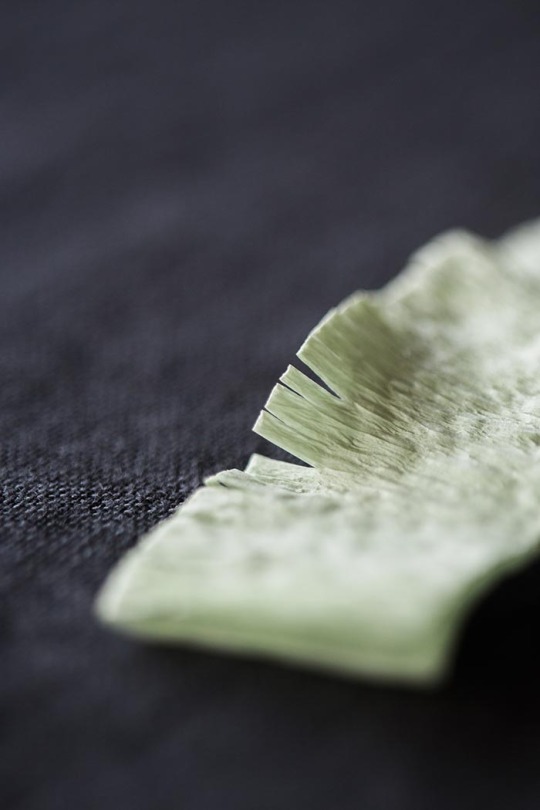
Image above: The short fringe along the fold of the rectangle.
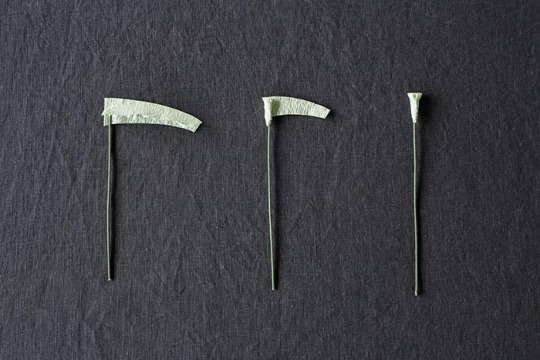
Image above: Rolling the center around the stem.
Using template B as a guide, cut the folded rectangle so that it tapers toward one end of the rectangle. (This will help create a smooth transition between the flower center and the stem.) Dot glue inside the fold along the whole length of the rectangle, just below the fringe. Insert the tip of your stem wire into the fold on the wider end of the rectangle just below the fringe, and use your finger to press the fold closed. Let this dry for a minute.
Then dot glue along one side of the rectangle beneath the fringe, and roll the rectangle up around the wire. The fringes should be even, creating a flat, circular plane at the top of your center.
Adding stamens:
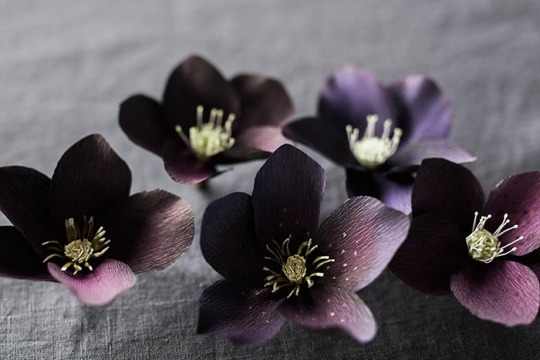
Image above: The flower on the right has millinery stamens; the middle and left, DIY paper stamens.
You can purchase double-headed millinery stamens from Castle in the Air or Rose Mille (see suppliers below). To attach, you just fold or cut them in half and glue them around your center, so that the stamen tip extends about a half inch beyond the top of your fringed center. You don’t need to be too precise about the number of stamens you add to each flower — some variation will look more natural.
To make your own paper stamens, use template C to cut a small rectangle from the pale green crepe. Stretch this rectangle all the way out across the grain. Use a green marker (Copic YG 95 is perfect, but almost any type of marker is suitable for this step) to color in a very wide stripe about 1/8th inch from the top to about an inch from the bottom. If you find that the uncolored strip across the top is too wide, just trim it with your scissors.
Create a fringe across the grain by making a series of ¾ inch cuts very close together. Then, working in small sections, gently but firmly twist these stamens together in one direction and then in the other.
Untwist all the stamens and use your fingers to straighten them. If they resist finger-straightening, use your scissors to very gently scrape the length of the stamens on one side and then the other.
Finally, scrape the tips of the stamens between your thumb and scissor blade to curl them slightly.
Dot glue in a zigzag along the lower half of this strip of stamens, and then wrap it around the green center, so that the tips of the stamens extend about ½ inch past the top of the center. (If you’d like a fuller set of stamens, use the whole strip, which should wrap around twice. For a wispier set, snip the strip of stamens after you’ve wrapped the center once, and save the other half for another flower.)
Insert your finger into the middle of the stamens and very gently press them outward so that they slightly lean away from the center. Gently separate any stamens that are sticking together, and touch up your curled ends if necessary. Let this center dry while you cut and color your petals.
For the petals:
A note about grain:
The grain of the crepe paper runs parallel to the roll or fold. Crepe paper stretches horizontally, but not vertically, so you will almost always cut petals with the grain, placing the template so that the tiny wrinkles in the paper run up and down the template, not across.
Use any of the petal templates to cut out five petals for each flower. I’ve included three templates so you have the option to create some variation among your hellebores, but you’ll only use one template to cut all five of the petals for each flower.
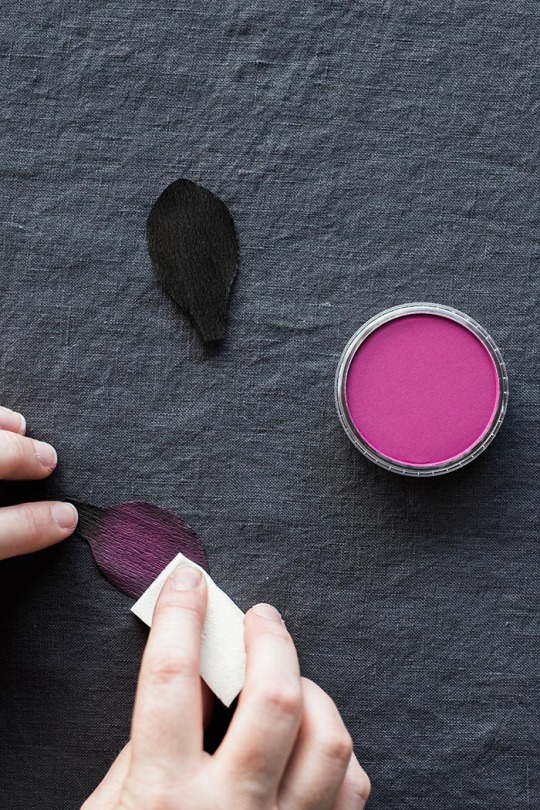
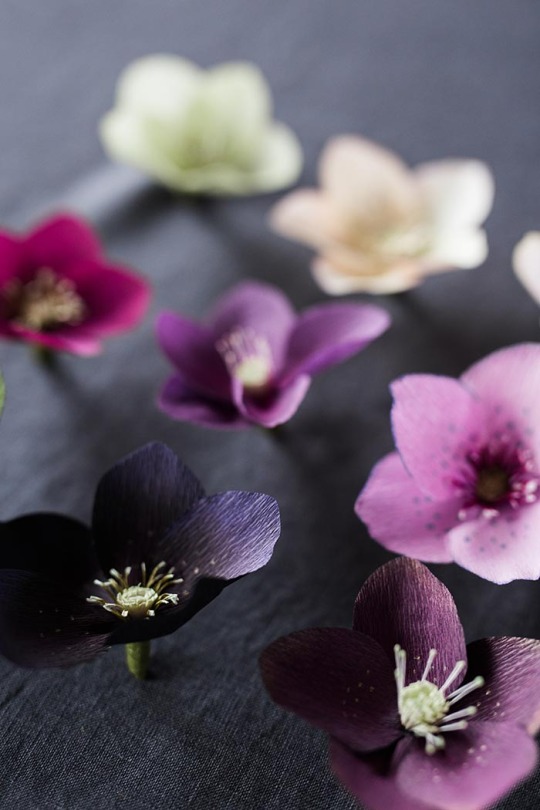
Image above: Applying a “wash” of PanPastel.
The PanPastels can add details like darkened petal edges or gradient color, but I like them best for adding a “wash” of color to the whole petal, which helps to recreate the hellebore’s subtle, complex coloring. I find that an inexpensive cosmetic wedge sponge works fine for this. A cotton swab or eye shadow brush is also suitable for finer detail, like a colored edge.
To create the very dark hellebores, use black crepe for the petals and then gently swipe on a layer of any of the darker, richer colors. My favorite is the 430.5 Magenta.
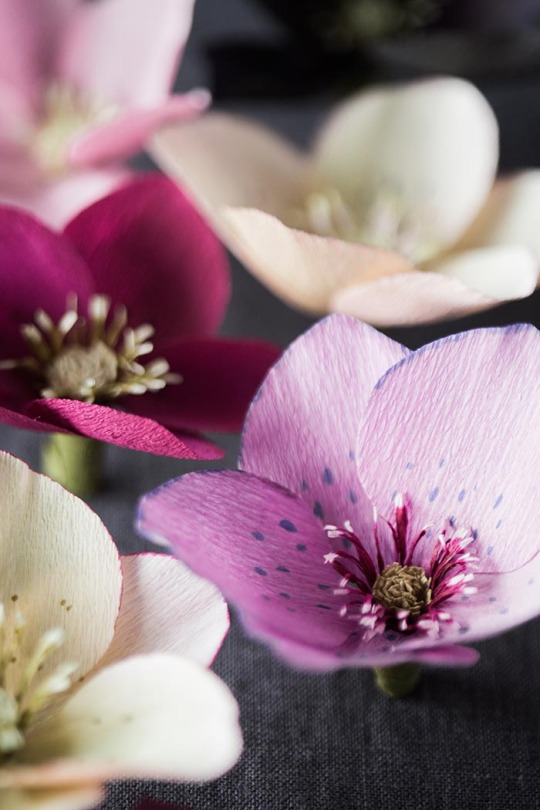
Image above: The PanPastels can add some subtlety to crepe paper colors that are a little too pure and bright to be suitable for a hellebore. Here, I’ve used a soft pink to tone down a bright violet.
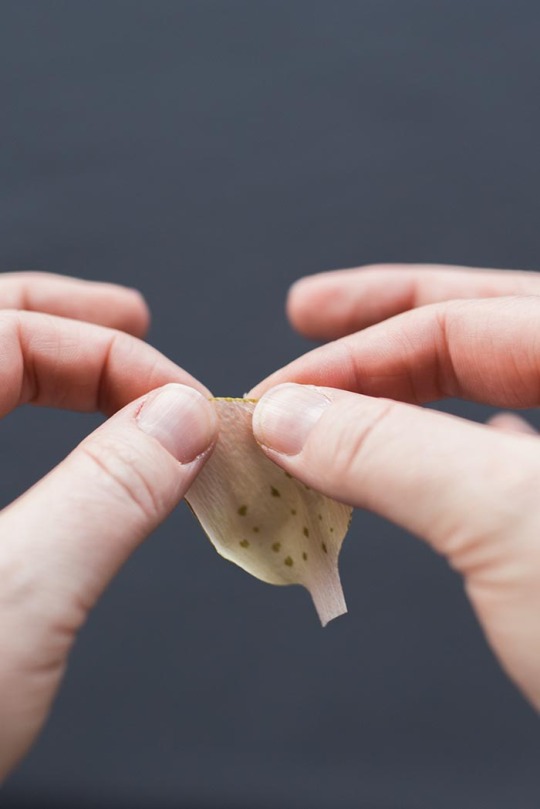
The Copic markers can be used to add color to an entire petal, to create speckles near the petal’s base, or to darken its outer edge. You can also use multiple markers that are the same hue but different intensities to create a gradient effect, beginning with the darkest color at the base of the petal and ending with the lightest at the top edge. The colorless blender can help to blend any hard lines between the different colors.
For dots, just barely touch the fine tip of the marker to the petal, lifting immediately. If the dots look too stark, a very light layer of PanPastel over the top can help them “sink in” to the petal and look more natural.
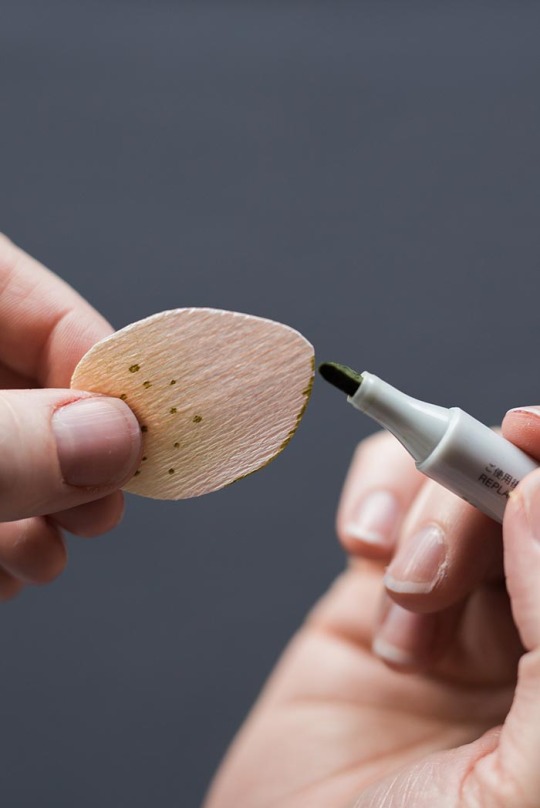
To color the edges, barely touch the broad tip of the marker to the very edge of the petal, rather than trying to draw a very thin line on the front of the petal.
Gel pens: I use a gold gel pen to add speckles to my black hellebores — I like how they add a subtle twinkle.
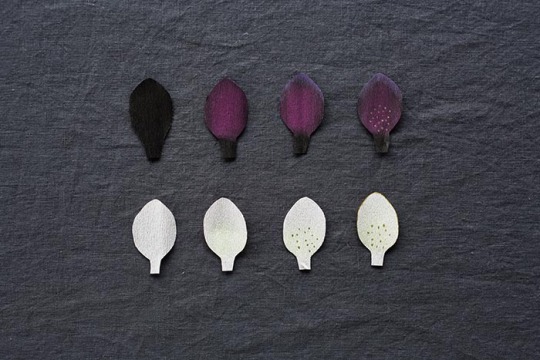
Image above: Steps for two sample petal variations.
For the deep magenta petal, first swipe the 430.5 Magenta PanPastel over the entire black petal. Next, use a small makeup brush or cotton swab to apply 470.5 Violet PanPastel just along the edge of the petal. Then, use the gold gel pen to add dots on the bottom third of the petal.
For the pink petal, swipe 220.8 Hansa Yellow Tint PanPastel over the bottom third of the petal. Next, use the fine tip of Copic YG95 to add dots along the bottom of the petal. Then, use the square tip of this same marker to add color to the edge of the petal.
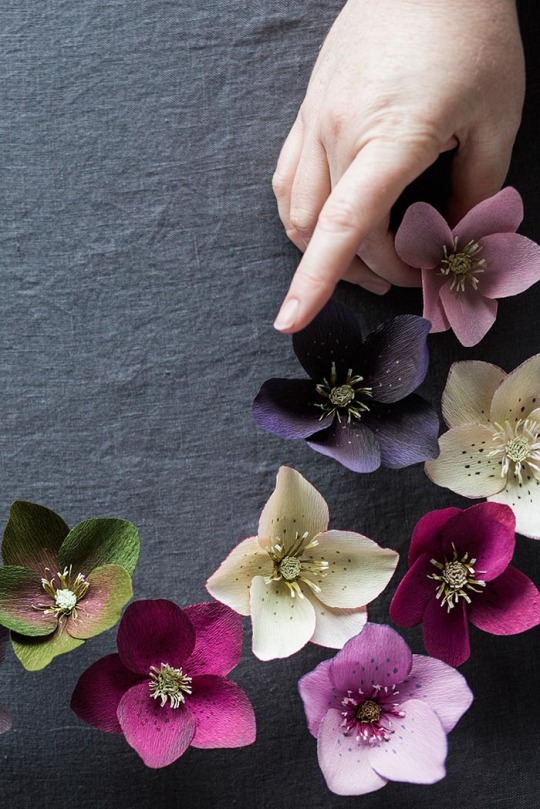
I’ve included nine other hellebore petal “recipes” at the end of the tutorial.
Shaping the petals:
To make the petals more lifelike, you can gently cup them near the base, curl them slightly by scraping them gently between your thumb and the edge of a pair of scissors, and stretch the petal edge gently to create a slight frill. Before you accidentally tear your beautifully decorated petals, practice on some blank petals to get a feel for the point at which the paper rips. It doesn’t take much shaping to mimic a hellebore petal, so you can afford to be gentle.
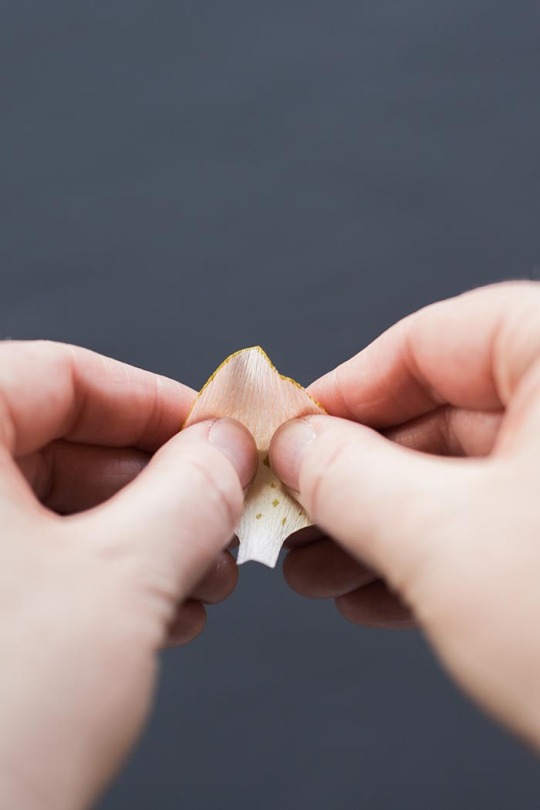
To cup the base of the hellebore petal, hold it gently with two hands, thumbs in front, and gently stretch by pushing your thumbs slightly forward and pulling back and outward with your index fingers. Hellebore petals don’t require very deep cups.
Frill your edge slightly by gently stretching it.
Building the flower:
Place the base of the petal between your thumb and the blade of your scissors, and gently scrape the underside of the bottom of the petal, so that it curls slightly. This will help the petals to lie flat, rather than standing up and covering your center.
Dot a small amount of glue on the base of a petal and press it against the edge of your stamen-covered center. Then do the same with the next petal, placing it to the left of and slightly behind the first petal.
Directly across from the point where the first two petals overlap, place your third petal.
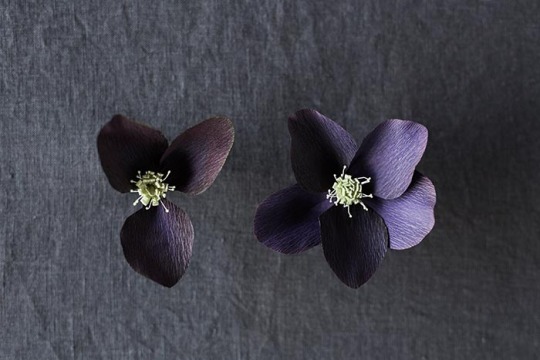
Image above: The flower on the left shows placement of the first three petals. The gaps on either side are where you’ll place your remaining two petals.
Now you’ll have a space on either side of this last petal. In the space between this petal and your first petal, place your fourth petal. In the remaining space, place your final petal.
Let the glue dry completely.
Finishing the flower:
Cut an 8-inch-long and 1/3” wide strip of olive green fine crepe across the grain. Apply very small dots of glue along the length of this strip and attach it to the part of the wire that is covered by the base of your petals. With your left hand, hold the strip at a 45-degree angle to the wire and gently stretch as you twirl the wire with your right hand.

Wrap to the bottom of the wire, and snip the excess strip. Gently adjust the petals and stamens if needed. But there’s no need to be too fussy — paper hellebores are at their most charming when they’re allowed to be a little bit quirky.
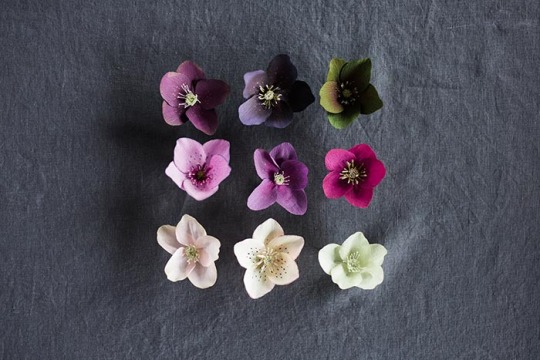
Additional hellebore recipes:
Row 1:
1. Black fine crepe, a wash of 430.5 Magenta PanPastel, 930.5 Bronze PanPastel edges, gold dots, and millinery stamens.
2. Black fine crepe, a wash of 430.1 Magenta Extra Dark PanPastel, a 470.5 Violet PanPastel edge, gold dots, and paper stamens
3. Deep olive doublette crepe, 430.5 Magenta PanPastel on the bottom third of the petal, and paper stamens
Row 2:
1. Lavender doublette crepe, Copic BV01 dots and petal edging, and paper stamens (for these I used Copic RV69 to make the stamens maroon instead of green.)
2. Sangria fine crepe, 430.5 Magenta PanPastel on the bottom third of the petals, gold dots, and millinery stamens
3. Cherry fine crepe, 430.5 Magenta PanPastel on the bottom third of the petals, gold dots, and paper stamens.
Row 3:
1. Pink fine crepe, a wash of 340.8 Permanent Red Tint PanPastel, and millinery stamens
2. Pink doublette crepe, 220.8 Hansa Yellow Tint PanPastel, Copic RV69 dots, dark maroon PanPastel on the edges, and paper stamens (for these stamens, I just colored the tips with a pale yellow.)
3. White fine crape, a wash of 680.3 Bright Yellow Green Shade PanPastel, and millinery stamens.
Sources for supplies:

Castle in the Air: crepe paper, stem wire, stamens
Rose Mille: crepe paper, stamens
Dick Blick Art Materials: PanPastels
Aaron Brothers: PanPastels
Michaels Craft Stores: 18 gauge floral wire
Impress Cards and Crafts: If you live in the Seattle area, Impress has crepe paper in three different weights, Aleene’s glue, and a great selection of Copic Markers and gel pens.


16 notes
·
View notes
Text

BEAUTY EXPERT (carrd template)
Share this template with your nail tech! 😉
https://best-templates.carrd.co/
#carrd#carrd templates#template for card#carrd template#carrd theme#template#landing page#profile#website#barbershop#pink nails#nails#nail polish#cute nails#manicure#nail design#landingpage#template website#beauty#free carrd template#carrd.co#carrd resources#carrd graphics#carrd stuff#carrd inspo#web resources
1 note
·
View note
Text
Introducing New Website Builder For Beginners 2024, Which is called SITE123

So, when it comes to building a website, the options can be overwhelming, especially if you are new. Many other website building platforms promises simplicity, but Site123 promises you good way of building your website.
What is Site123?
Site123 is a website builder that simplifies the process of creating a website. It offers a smooth user experience, with drag and drop interface and a variety of pre-designed templates, and advanced features. Whether you have technical skills or not, Site123 makes it easy for anyone to build a beautiful, functional website quickly and in a easy way.
Key Features of Site123
1. Easy to Use: Site123 provides smooth and easy interface making it easy for you to start building your website, the platform guides you through step by step.
2. Responsive Design: All templates provided by Site123 are mobile-friendly, ensuring ot looks great on your device.
3. Free Domain and Hosting: When you sign up with Site123, you will get a free domain and hosting services.
4. 24/7 support
5. SEO tools
Why Site123 is Perfect For Beginners?
Site123 takes the stress out of website creation by offering a platform that is both powerful and easy to use. Unlike other website builders that may require a steep learning curve, Site123 is straightforward, allowing you to focus on what matters most ,creating content and growing your online presence.
Ready to get started? Click sign up to get started with Site123 today and see how easy it is to build your website.
Please note: this post contains affiliate links; I will gain a commission from them, and it will also help me bring more updates to you.
2 notes
·
View notes
Text

Which Page Builder Plugin is the Best: Elementor, Beaver Builder, or Divi?
Are you ready to build a stunning website but feeling overwhelmed by the choices of page builder plugins? You're not alone! Let's dive into the world of WordPress page builders and uncover which one might be your perfect match.
The Big Three: Elementor, Beaver Builder, and Divi
Before we start our showdown, let's meet our contenders:
Elementor: The new kid on the block that's taken the WordPress world by storm.
Beaver Builder: A reliable veteran known for its stability and ease of use.
Divi: The Swiss Army knife of page builders, packed with features and design options.
Battle of the Builders: Pros and Cons
Let's break down the strengths and weaknesses of each:
Elementor
Pros:
Intuitive drag-and-drop interface
Huge library of templates and widgets
Active community and frequent updates
Cons:
Can slow down your site if overused
Premium version required for advanced features
Beaver Builder
Pros:
Clean, bloat-free code
Excellent for team collaborations
Consistent updates and stability
Cons:
Fewer fancy effects compared to competitors
Slightly higher learning curve for beginners
Divi
Pros:
All-in-one theme and builder solution
Vast array of design options
Lifetime pricing option available
Cons:
Can be overwhelming for newcomers
Potential lock-in to the Divi ecosystem
Introducing Element Pack: The Dark Horse
While the big three dominate discussions, let's not overlook a rising star - Element Pack by BdThemes. This Elementor addon brings some unique advantages to the table:
Performance-Focused: Optimized code that doesn't bog down your site
Versatile Widgets: Adds functionality without the need for multiple plugins
Regular Updates: Constantly evolving with new features and improvements
Compared to standalone builders, Element Pack enhances Elementor's capabilities without the learning curve of a completely new system. It's like supercharging your car instead of buying a new one!
How to Choose the Right Page Builder for Your Project
Selecting the perfect page builder isn't one-size-fits-all. Here's how to make the right choice:
Assess Your Skill Level: Beginners might prefer Elementor or Divi's user-friendly interfaces.
Consider Your Budget: Beaver Builder and Element Pack offer great value for professionals.
Evaluate Your Needs: Complex designs? Divi or Elementor with Element Pack might be your best bet.
Think Long-term: Consider the ecosystem and potential for growth.
Test Drive: Most offer free versions or trials. Give them a spin!
Remember, the best page builder is the one that helps you create beautiful, functional websites efficiently. Whether you choose the versatility of Elementor, the stability of Beaver Builder, the all-in-one approach of Divi, or decide to supercharge your experience with Element Pack, you're on your way to website building success!
Ready to start creating? Explore these options, and don't forget to check out Element Pack for that extra boost of functionality and performance!
#PageBuilderComparison#ElementorVsBeaverBuilder#DiviPageBuilder#BestPageBuilder#WordPressPlugins#WebDesignTools#DragAndDropBuilder#PageBuilderShowdown#WebsiteBuildingMadeEasy#DesigningWithEase
2 notes
·
View notes
Text
WebX Review: Create Gorgeous Websites Effortlessly in No Time!

In today’s fast-paced digital world, having a stunning and functional website is essential for anyone looking to make an impact online. WebX promises to simplify this process with its user-friendly website builder. Let’s dive into what makes WebX a great choice for creating beautiful websites quickly and efficiently.
1. Introduction to WebX
WebX is an innovative website builder designed to cater to both beginners and experienced users. It offers an intuitive drag-and-drop interface, making the process of building a website as easy as pie. Whether you’re a small business owner, a freelancer, or just someone looking to create a personal blog, WebX provides a range of tools and features to help you achieve your goals.
2. User-Friendly Interface
One of WebX's standout features is its user-friendly interface. The drag-and-drop functionality allows users to customize their website effortlessly. With a wide range of pre-designed templates and elements, you can build a professional-looking site without any coding knowledge.
3. Template Library
WebX offers an extensive library of templates tailored to various industries and purposes. Whether you need a portfolio, a blog, or an e-commerce site, you can find a template that suits your needs. The templates are fully customizable, allowing you to modify colors, fonts, and layouts to match your brand’s identity.
4. Responsive Design
In today’s mobile-first world, having a website that looks great on all devices is crucial. WebX ensures that all websites built with its platform are fully responsive, meaning they will automatically adjust to fit any screen size, whether it’s a smartphone, tablet, or desktop.
5. SEO and Analytics Tools
To help you get the most out of your website, WebX includes built-in SEO and analytics tools. These features enable you to optimize your site for search engines and track its performance with detailed reports. This means you can make data-driven decisions to improve your site’s visibility and user engagement.
6. Customer Support
WebX provides excellent customer support to assist you with any issues or questions you might have. Their support team is available via chat and email, and they offer a comprehensive knowledge base with tutorials and guides to help you get the most out of the platform.
7. Pricing Plans
WebX offers several pricing plans to cater to different needs and budgets. From a basic plan for individuals to more advanced options for businesses, there’s a plan that will fit your requirements. Each plan provides access to a range of features and support to help you build and maintain your website.
8. Conclusion
In summary, WebX is a powerful and user-friendly website builder that makes creating a beautiful and functional website quick and easy. With its range of templates, responsive design, SEO tools, and excellent customer support, it’s a great choice for anyone looking to establish an online presence.
If you’re in the market for a website builder that combines ease of use with powerful features, WebX is definitely worth considering.
>>Grab the WebX Now With Discount Price<<
2 notes
·
View notes
Note
I love your merch! As someone who’s bought a lot of pierces and loves the quality of everything, do you have any tips for someone also looking into making stickers, pins, etc? What sites/manufacturers should be avoided? Which do you like best?
i don't know about who should be avoided & i'm always learning new things when it comes to making my own merch because in my mind i'm still pretty new at this but i'll do my best to send you some recs!
for stickers i use stickerapp! their templates are really user-friendly and their colours print so vibrantly even when you kick them over RBG files like i constantly do. i've printed a set of pride stickers and the colours all came back really true to what i wanted (purple prints a TAD dark). you can also ask them for special things in the notes like if you want their UV ink or you want the space between the design and cut line to be a different colour. their MOQ (minimim order quantity) is also pretty low, usually somewhere between 20-30 depending on the size & material of the sticker. the quality is also top-notch. their vinyl stickers really hold up.
for pins i go through alibaba which can be kind of an overwhelming experience. luckily, one of the more popular manufacturers made their own website and it looks more "cute artsy con-goer" than "mass manufacturer" and that is vograce! if you want to dive into alibaba and start sending out RFQs (requests for quotes) to manufacturers go for it! there are so many! but vograce is a much more beginner friendly exprience.
(also, hannako knows everything there is to know about making enamel pins. buy their book here)
if you're interested in books, i use mixam. they make beautiful books, are based in canada (huge boon for me, as a canadian beholden to duty fees) and are happy to hold your hand through the prepress process. they also have templates and their uploading process is very clean and again, in my opinion, beginner friendly!
those are all my recs i can think of right now. i'm currently poking my head into POD services for my dog comic, and know very little about it all. merch feels like a constant learning experience haha.
20 notes
·
View notes
Last Seen Blogs

wearetheweirdosman69
We are the Weirdos..


ancorealm
The lore library

johesym
jothesy

faithandprotection
Fé e proteção ☯✌