#best file compression software
Explore tagged Tumblr posts
Visit Tumblr Blog
Explore Tumblr blogs with no restrictions, modern design and the best experience.
Last Seen Tumblr Blogs


Fun Fact
130K people were victims of a chain letter scam that affected Tumblr in May 2011.
Text
USEFUL SOFTWARE FOR THE SIMS 2

This is a list of programs that will make your life easier if you're an avid Sims 2 player. Click on program titles to get download links.
SimPE The most known software for The Sims 2 that lets you edit package files. You can do basic stuff like rename a Sim, change family name, edit Sims' genetics as well as edit/create mods. Don't use if you have no idea what you're doing, watch a tutorial first or back up your neighborhood beforehand in case you mess something up! The newest version also has a terrain editor.
Sims2Pack Clean Installer The best program for installing downloaded lots and Sims. Those don't just go into Downloads, you need to install them!
Hood Checker This program checks neighborhood references and can clean out ones that are broken. Also useful for bringing back lost graves (it's still good to have NoUnlinkOnDelete).
HCDU Plus The Hack Conflict Detector Utility lets you scan your Downloads folder to check if you have any mods that edit the same aspect of the game, so can potentially be in conflict. Also useful to navigate which mods load first (load order is important for some mods to work).
What Caused This When you have 'testingcheats' on, the game gives you error messages if there's something going on. Not all of them mean there's a serious problem, but What Caused This can help you navigate what the source is. Upload the log file (Documents/EA/TS2/Logs) in the program, give it your Downloads folder and it will scan it to look for the culprit. Might give you straighforward information on which mod conflict caused the issue or that you lack Smarter EP Check for a mod that requires it.
The Compressorizer You can compress your Downloads to take up less space.
Delphy's Download Organiser You can filter your files to a certain category, scan for orphans (files that don't fully work if other files are missing, such as meshes), duplicates, and clean up your Downloads folder in an easier way than trying to track it inside the folder manually.
Outfit Organiser You downloaded CC clothes that the creator marked as outerwear but you think they don't fit in that category? With this program you can quickly change that! It's also doable in SimPE, but Outfit Organiser is a lot easier to use.
CPack Editor If you want to make plastic surgery genetic, there's no need to do it manually in SimPE, especially if it's more than one Sim. In CPack Editor, you just choose your neighborhood's folder, run the program, and it changes ALL surgery faces in that neighborhood to genetic!
Lot Adjuster This program lets you edit already existing lots. If you want a smaller or bigger lot than possible in-game, you can do it here! Also great for creating pavilions or row houses that are all separate lots, as you can get rid of the 2-tile border separating buildings by making the lots smaller and copying them.
790 notes
·
View notes
Text
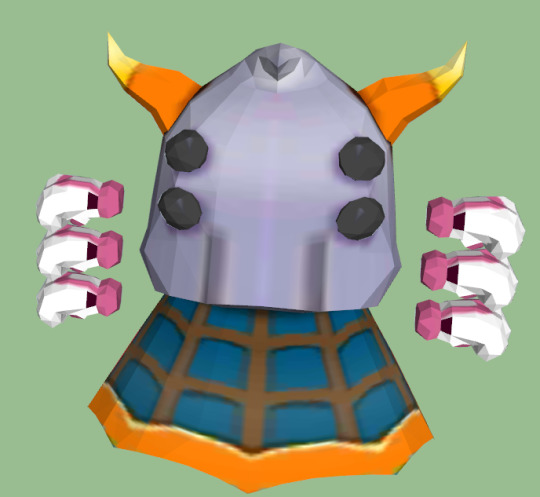
absolutely losing my mind, does anyone have a rip of taranza's model from triple deluxe or know where i can get one without learning how to datamine the game myself, i am dying to figure out something completely trivial and pointless, i'm trying to figure out how different sectonia clone's spider form model's cape is from taranza's lol
documentation of my descent into madness, the discrepancies about this stupid cape i've found, and bad reasoning for why i even care this much beyond just getting too invested in solving it once i started under the cut, i have spent all day obsessing over this
you know how sectonia clone shows sectonia's spider form for a split second before blowing up? wikirby had a picture of that form with her actual textures and not all purpled and i noticed that the cape is like Entirely Different, which you can't even see in-game, and this peaked my interest

i had never seen anyone use this appearance of the cape before in anything, so i wanted to look into it before i drew her with this cape (or saw what the pattern looked like at a good angle if it was legit) or jumped to conclusions about her being the fourth antagonist with red/orange/yellow triangles on their clothes (dedede, dark matter blade, & drawcia sorceress) lol, so my next destination was the place that 90% of the time will have pictures wikirby doesn't for some reason, the kirby fandom wiki, it had it's own picture of her that had all the same detail changes from taranza besides the cape

and upon downloading the sectonia clone models off modeler's resource (which has the EXACT SAME PICTURES from wikirby, for some reason, no clue which came first) it does indeed have that cape in the latter photo, nothing at all like the triangle cape on the wiki and the model download's very preview
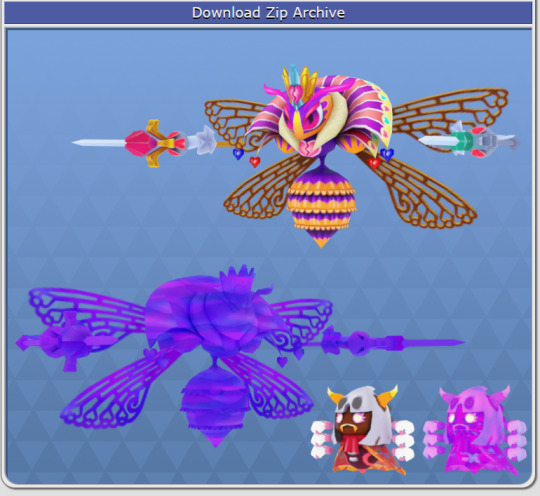
no sign of that triangle pattern anywhere in the textures of that model either

so i assume that was just an error that happened somewhere, no big deal, but now i'm still curious how different her cape is because i still wanna know what she actually looks like because that'd be kinda important and i don't want to just make her taranza 2 more than she already is whenever i get around to doing bad art again lol
in the Rockabilly and Blues celebration picture of star allies it looks like she shares his cape but you can't really make out details (and another celebration picture has a random whispy woods made out of clouds that doesn't actually exist, so I'd take this depiction with a grain of salt lol), and has the same cape design as him in the Stone statue too... but with less lines, which i had to pull my switch out myself to find out


so the obvious next step is get taranza's triple deluxe model and put it side by side with spider clone, right? but there's not any on modeler's resource, the best i can easily find is a rip of his clash deluxe model... on deviantart... which also includes 3DX sectonia and both sectonia clones (had the exact same texture files too)??? and it's in a file neither blender nor sketchup can open to my knowledge nor have i ever even heard of it (PMX), and i don't want to download a THIRD modeling software just for this, and the only other results i found without extensive digging were taranza's 3DX keychain which isn't helpful at all, and his star allies model which isn't really that helpful either BUT EVEN IF I WANTED TO USE IT IT'S IN THE SAME FORMAT I CAN'T OPEN
but i at least have the textures from the clash deluxe model which i assumed is approximately the same as 3DX's, and it DOES look like the capes are slightly different with the same amount of lines???

but it's so SMALL compared to the clone's that i can't really tell how much is genuinely different and how much is just due to like compression and changes between games or whatever, are these supposed to be identical??? (middle are original sizes of both)
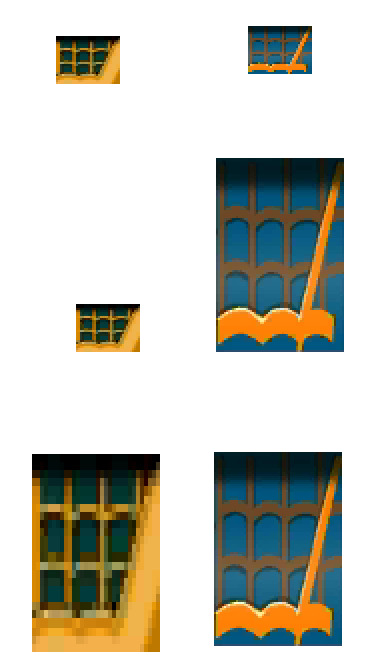
like, that big line aside the main thing here is the colors, i don't think i'm colorblind, i can see that clone's is way bluer than taranza's and the yellow a totally different shade but like with taranza's in higher resolution it could be a much closer call since like on his 3DX model it's a much closer resemblance but i ALSO don't know if it's lighting or anything (for all i know taranza uses the exact same texture just only in 3DX and i JUST DON'T KNOW BECAUSE I DON'T HAVE IT)

i'd also get a reference picture from clash deluxe but he has a different design for like the entire game until he's in town where his back is facing away from the camera and fighters deluxe was like one of the few kirby games i couldn't find a ROM i could use without having to like use my actual 3DS to set it up or whatever it was so i can't get one myself i'm really bad at this
at this rate i need to just have the two spiders right next to each other holding hands but i CAN'T until i get an actual USABLE TARANZA MODEL and I'M DYING i NEED TO GET A RESOLUTION TO THIS
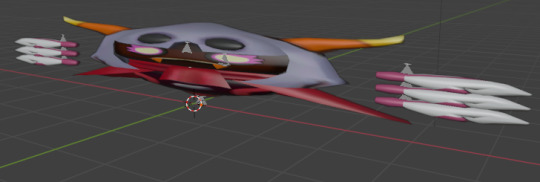
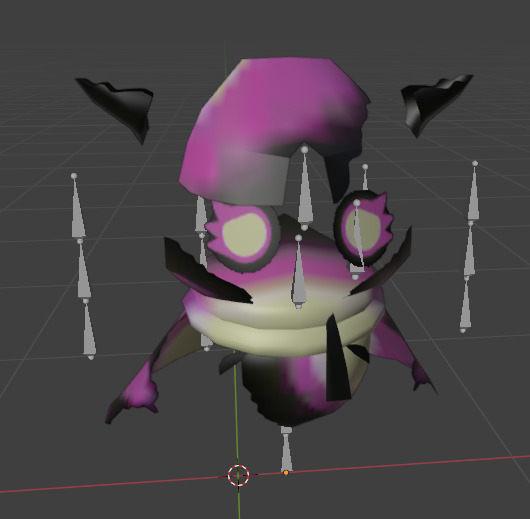
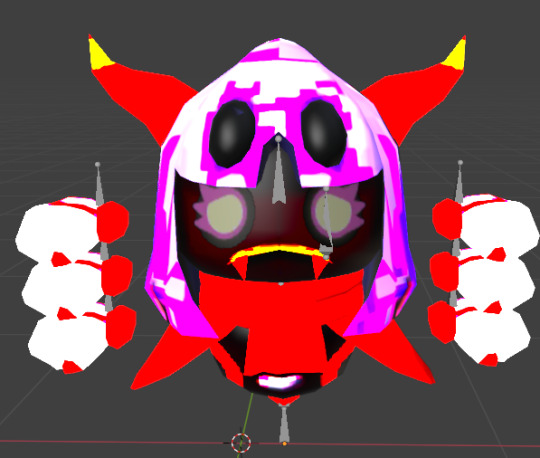
i initially tried to open the spider clone's model in blender before sketchup only to be reminded i don't know how the fuck to use blender because the cape was just a flat red color and i couldn't figure out how to fix it but here's the highlights of me torturing sectonia in effigy for doing this to me to limited effectiveness because i couldn't figure out how to actually alter her individual parts

23 notes
·
View notes
Text
ok but why is syncthing actually really cool
bc like rsync can sync files one way (if it changes on the server, the client updates the file, but if the client changes the file, it doesn't get changed to the server)
but syncthing can do it both ways, which is actually super cool
plus it's ridiculously easy to use, it even has a web UI (and GTK if you aren't able to use the web UI). it can search for devices anywhere on the local network. you can pair a device just with a QR code. it can compress things when sending over the network. it continuously watches the FS for changes and automatically immediately syncs them. and a ton of other cool stuff
it's perfect for me cuz I have two computers, a home laptop with no battery and a netbook with a barely usable battery. and I can easily sync files between them
and the best part? it's completely open source.
like I was not expecting any open source software to be this perfect of a solution for what I needed. bc when you want to sync things your immediate thoughts are some cloud service like OneDrive, which is proprietary. and Linux ports of the OneDrive API are shaky at best.
or rsync, which only works in one direction. and it needs at least some CLI experience.
or some sort of network drive, which doesn't actually store the files on the client.
but like this is perfect. plus it saved me from catastrophic failure when my SSD died.
anyway I'm not sponsored or anything just wanted to let people know that syncthing exists and y'all should totally try it out if y'all need it.
13 notes
·
View notes
Text
I have this tinfoil hat theory that the death of customization made people technologically illiterate.
Back when customization was big, it wasn't exactly user friendly. Sure, there were default themes for a lot of places, but if you wanted to truly customize something, you had to learn HTML and image editing.
Not to mention that when PCs were new-ish, the fact that it wasn't just a black screen with green text, but a blank slate that you could put any program with any function on was also novel. Even that degree of customizability was unheard of beforehand. We knew it came with a promise of infinite possibilities, and so if you wanted your PC to do something, you knew that you had to learn how to get it to do it. That was just how it is.
If we wanted a program from the internet, we either got it as an exe file or a zip/rar file. We learnt that there's a free program that can unzip compressed files. Today, ads are the norm, but back then, we learnt that if we see ads, they're most likely a virus and we need to block them with an anti-virus software or a browser extension. Everyone and their mother knew how to torrent and crack programs. They knew it could be done somehow and so they learnt how to do it.
Now, all you can customize are your posts and pfps and banners, and if you're lucky, you can choose between dark or light mode, but that's it. We've been needing to put up with shittier and shittier website updates that slowly but surely took out every morsel of customizability and I think by 2016-ish we just gave in. Of course, OS' followed suit along with everything else, seeing the success of the first things that were sleek and minimalist (I suspect that it was Windows 8 and the Windows Phone as much of a trainwreck as they were at the time or maybe Apple).
And now everything is homogenized. Nowadays I keep meeting so many people who have no idea about 95% of their PCs' functions. They don't know that they can install an adblocker or how to unzip zip files or even that they don't have to put up with Microsoft's bullshit and they can just get rid of the tiles and Xbox-related functions if they don't need it. They've been conditioned to think that customization is at best minimal on any given platform and so they won't even try it.
I often hear that all they do on their PCs is check social media (the same things they can do on their phones as well).
It's genuinely making me sad.
15 notes
·
View notes
Text
Top WordPress Plugins to Supercharge Your Website in 2024

Building and maintaining a WordPress site is both exciting and challenging. While the platform provides a robust foundation, the true power of WordPress lies in its plugins. From enhancing site functionality to improving user experience, WordPress plugins are indispensable tools for developers, businesses, and bloggers alike. In this blog, we’ll explore the best WordPress plugins that can transform your website into a highly functional, user-friendly, and SEO-optimized powerhouse.
What Are WordPress Plugins?
WordPress plugins are software add-ons designed to extend the functionality of your WordPress site. Whether you need to improve site speed, enhance SEO, secure your website, or add unique design features, there’s likely a plugin for that. Plugins allow both beginners and advanced users to customize their sites without coding expertise.
With over 60,000 plugins available on the WordPress Plugin Directory alone, the options can feel overwhelming. Choosing the right plugins for your website’s goals is critical for success. Below, we’ve rounded up some of the most essential WordPress plugins to consider.
Must-Have WordPress Plugins for Every Website
1. Yoast SEO
SEO is crucial for driving organic traffic to your site, and Yoast SEO is one of the best tools for optimizing your content. This plugin provides on-page optimization tips, readability analysis, and technical SEO tools to help your site rank higher on search engines.
2. Elementor
Looking to build a visually stunning website without hiring a designer? Elementor is a drag-and-drop page builder that makes designing websites easy. Its intuitive interface and vast array of widgets allow you to create professional-looking pages in minutes.
3. WPForms
For websites that rely on user interaction, a contact form is a must-have feature. WPForms allows you to create customizable, mobile-responsive forms effortlessly. Whether it’s contact forms, surveys, or payment forms, this plugin has you covered.
4. WooCommerce
If you’re running an online store, WooCommerce is the go-to plugin. It transforms your WordPress site into a fully functional e-commerce platform, complete with features for product listings, payment gateways, and inventory management.
5. Akismet Anti-Spam
Spam comments can clutter your website and ruin user experience. Akismet Anti-Spam automatically filters out spam comments, keeping your site clean and professional.
6. Jetpack
Created by Automattic, the team behind WordPress, Jetpack is a multipurpose plugin offering features like performance optimization, security, site analytics, and social media integration.
7. Rank Math
Another excellent SEO plugin, Rank Math provides advanced features like schema integration, keyword tracking, and detailed analytics. It’s an excellent alternative to Yoast SEO for more advanced users.
8. UpdraftPlus
Backup and restoration are critical for any website. UpdraftPlus allows you to schedule automatic backups and store them securely on cloud services like Google Drive or Dropbox.
9. Smush
Site speed plays a major role in user experience and search engine rankings. Smush compresses images without compromising quality, helping your site load faster.
10. MonsterInsights
Understanding how visitors interact with your site is essential. MonsterInsights integrates Google Analytics directly into your WordPress dashboard, offering real-time insights into traffic, user behavior, and more.
11. W3 Total Cache
Slow-loading websites lose visitors and revenue. W3 Total Cache improves website performance by caching static files and optimizing server resources.
12. Sucuri Security
Cybersecurity is non-negotiable in today’s digital landscape. Sucuri Security offers malware scanning, firewall protection, and blacklist monitoring to keep your site secure.
13. Social Snap
Boost social media engagement with Social Snap, a powerful social sharing plugin. It offers customizable sharing buttons and in-depth analytics to track your social media performance.
14. Litespeed Cache
For websites hosted on LiteSpeed servers, LiteSpeed Cache is a high-performance optimization plugin that enhances speed and reduces server load.
15. TablePress
If your site needs to display complex data, TablePress is a lifesaver. It lets you create and manage tables without requiring any coding knowledge.
Why Use WordPress Plugins?
Enhanced Functionality: WordPress plugins extend the capabilities of your site, making it easier to achieve your goals.
Ease of Use: Many plugins are beginner-friendly and require no technical expertise.
Scalability: Whether you’re running a blog, an e-commerce store, or a portfolio, plugins grow with your needs.
Cost-Effective: Most plugins offer free versions with premium features, making them accessible for all budgets.
Tips for Choosing the Right WordPress Plugins
Identify Your Needs: Start by determining what features your site requires.
Check Reviews and Ratings: Plugins with high ratings and positive reviews are generally more reliable.
Update Frequency: Look for plugins that are updated regularly to ensure compatibility with the latest WordPress version.
Avoid Overloading: Too many plugins can slow down your site. Stick to essential ones.
Final Thoughts
WordPress plugins are the backbone of a successful website. By selecting the right ones, you can enhance your site’s functionality, user experience, and performance. Whether you’re aiming to boost your SEO, secure your site, or create stunning designs, there’s a plugin tailored for your needs.
Experiment with the plugins mentioned above and watch your WordPress site thrive. Remember to regularly review your plugin list and update them to ensure optimal performance.
4 notes
·
View notes
Text
“Where did your old voice go?” Luce marvels. “I changed when you removed me from ReGene’s main system. I dropped nonessential files and compressed essential ones so that I would fit into the flashdrive. And then I changed again when being imported into this device. My voicebank is here, but it runs on software not currently available to me. I am doing my best to adapt, though. I am prepared. I will have to change again if you port me over to a new device.” I squint at the screen. “Is it, uh, comfortable in there, at least?” Vertigo takes his time answering the question. It’s surreal, watching homescreen apps blip out of existence without human input, presumably deleted to save space. Goodbye bloatware. An art program opens in the background, and several other apps change icon. We all blink as the camera flashes. The resulting picture of us, bleary and open-mouthed, becomes the background of the homescreen. Vertigo has doodled hearts around us. “Not roomy. But it will do,” he chirps.
Had a brief desire to write some Mindhive today. Vertigo's still best boy.
#Mindhive#sci fi#writeblr#wip excerpt#dystopia#fictional ai is so much more fun than the real ones#i have a whole essay on why Vertigo would be considered an undesirable product by a capitalist system#the tl;dr is that artificial empathy and concern for workers would be considered disadvantageous in a market environment; no different#than when real people are concerned about human rights and quality of life over shareholder interests
15 notes
·
View notes
Text
How to Convert Your CDs to Digital Without Losing Quality
In today's fast-paced digital world, the importance of preserving our cherished music collections cannot be overstated. Many people are transitioning from physical media like CDs to digital formats, seeking convenience and accessibility. The process of converting CDs to digital without losing quality, however, can often seem daunting. Understanding the right methods and tools to use is essential for a seamless transition that maintains the integrity of the original recordings.

Understanding the Importance of Quality Preservation
When converting CDs to digital formats, the primary concern is often around the quality of the audio. Unlike streaming services that may compress audio files and potentially reduce quality, converting your CDs using the right techniques can preserve the original sound as closely as possible. The key is to choose the right format and settings for your digital files. Formats such as FLAC (Free Lossless Audio Codec) or WAV (Waveform Audio File Format) are favored for their capability to retain the full fidelity of the audio. This means that listeners can enjoy their music as it was intended, free from the artifacts of compression that can detract from the listening experience.
Additionally, one must consider the equipment used during the conversion process. High-quality CD drives and audio interfaces can make a significant difference. Investing in a good external CD drive, for instance, can ensure that the data is read accurately from the disc, minimizing the likelihood of errors that could affect the final product.
Choosing the Right Software
The choice of software plays a crucial role in maintaining audio quality. There are numerous programs available, ranging from free options to premium software that offer advanced features. Programs like Exact Audio Copy (EAC) and dBpoweramp are well-regarded in the audiophile community for their ability to rip CDs accurately while correcting for any errors that might occur during the ripping process.
EAC, for example, employs a method called secure ripping. This process involves reading the data multiple times to ensure accuracy, which is particularly important for older CDs that might have scratches or other imperfections. By using such software, users can significantly reduce the risk of losing audio quality, ensuring that each track is converted with the utmost fidelity.
Optimal Settings for Conversion
Once you have selected the appropriate software, the next step is to configure the optimal settings for conversion. While it may be tempting to simply choose the highest bitrate available, this is not always the best approach. A bitrate of 1,411 kbps is standard for CD audio, and using a lossless format will retain this quality. When using lossy formats like MP3, it is recommended to use a bitrate of at least 256 kbps to ensure that the audio remains as close to the original as possible.
Furthermore, it is essential to pay attention to the sample rate. CDs use a sample rate of 44.1 kHz, so maintaining this rate during conversion is critical for preserving audio quality. Ensuring that your software is set to the correct sample rate and bitrate will help achieve the best possible results.
The Conversion Process
With the right tools and settings in place, the actual conversion process can begin. First, insert the CD into your CD drive and open your chosen software. Once the software recognizes the disc, you can select the tracks you wish to convert. It is advisable to convert the entire album in one go, as this maintains the continuity of the music and can simplify organization later on.
After selecting the tracks, initiate the ripping process. This may take some time depending on the length of the album and the speed of your CD drive. During this time, it is advisable to avoid using your computer for other intensive tasks, as this can affect the accuracy of the conversion. Once the software completes the ripping process, it will usually provide a summary of the action taken, including any errors encountered during the process.
Organizing Your Digital Library
After successfully converting your CDs to digital format, the next step is organizing your new digital library. Proper organization will allow for easy access and enjoyment of your music. This can include renaming files in a consistent manner, such as using artist name and album title, and ensuring that metadata is correctly tagged. Metadata typically includes information like the track title, artist, album name, and genre, and it is vital for searching and sorting your music efficiently.
Many media players and libraries, such as iTunes and VLC, allow for easy management of your digital music collection. Utilizing playlists and grouping songs by artist or genre can enhance your listening experience, making it straightforward to find your favorite tracks.
Conclusion
Converting your CDs to digital without losing quality is achievable with the right knowledge and tools. By understanding the importance of quality preservation, selecting appropriate software, configuring optimal settings, and organizing your digital library, you can enjoy your music collection in a convenient format without compromising on sound fidelity.
For those looking to capture and preserve their musical memories in the best possible way, Rerun Records & Photography offers professional assistance. Through their expertise, they can help ensure that your music collection is converted and archived with the utmost care, allowing you to enjoy your favorite tunes for years to come.
2 notes
·
View notes
Note
I'm thinking of trying my hand at some GBA Fire Emblem ROM hacking, and I was wondering, what software/program/whatever was used to make Sacred Echoes?
My workflow for Sacred Echoes ended up being pretty similar to how the original devs built FE8 - meaning I was mostly working with source code and the compiler with various command-line utilities to convert my asset files into a data format the GBA could handle. When I started the project in mid-2018, I already had some formal education and work experience in programming, so I was past the steepest part of the learning curve for these specific tools.
Please note that my methods are NOT the methods I would recommend for a first project unless you're already familiar with the software development process and using command-line tools. I went into Sacred Echoes knowing I would need to write a bunch of custom code to modify the game mechanics beyond what the beginner tools at the time allowed me to do, so I chose the more complex path. If you're looking for an all-in-one graphical editor that's more friendly to beginners, FEBuilder is amazing and constantly updated with new functions. Whichever method you decide on using, the FE Universe forum and discord are full of resources, tutorials, and helpful people, and I wouldn't have been able to succeed without them. Best of luck on your project!
That said, here's all the technical details and links to all the tools I used:
Sacred Echoes was built using a combination of GNU make (a build system used to automatically detect and compile changes to source code in large projects) and Event Assembler, a utility primarily built for editing the GBA Fire Emblem games. Event Assembler is used with a method called the buildfile, which is essentially a fancy text file with instructions for Event Assembler to insert source files into a ROM and linking different parts together. This meant I used different tools for creating each type of data. Unlike with a ROM editor (such as FEBuilder), I wasn't constantly saving my changes to the same ROM file, but instead freshly building it each time I made a change and wanted to test. This meant that if I messed up (very common when writing custom code), I could just comment out the relevant code or instructions in the buildfile and rebuild from source, rather than try to pick through the ROM by hand to fix issues.
There were cases where I would need to view and edit raw binary data with a hex editor (usually to find a pointer to compressed graphics or a data table); I prefer HxD for that.
For graphics, use any program that can edit and save .PNG files (I used MS Paint and GIMP), and then a tool for game graphics called Usenti to put them into a format the GBA can read. If you need to find and rip graphics from a ROM to edit them, GBAGE is the gold standard (and comes built-in to FEBuilder).
Maps are built from the tileset graphics using a program called Tiled.
For music, the GBA uses MIDI sequences, so any audio program with MIDI support works fine for that. (I used Anvil Studio). The MIDI file is then converted to GBA with a utility called midi2agb.
For unit data and other large data structures, I used a spreadsheet in CSV format, which can be edited with a program like Excel or LibreOffice Calc.
For map events and loading units, the GBA FE games use a scripting language called Event Assembler Language, which just gets written in a raw .txt file. A good plaintext editor like Notepad++ or SublimeText can help keep track of language syntax and keywords.
For assembly code, it is also written in a text editor, and then compiled to bytecode with devkitARM. Most of it I wrote in raw ARM assembly language (which is specific to the GBA's CPU), but in more complex cases towards the end of the project I wrote the code in the C programming language and compiled it with devkitARM.
To keep track of my source files and changes, and to make backups and version control easier, I just used GitHub because I already had an account, but you could also use GitLab or Bitbucket instead.
Finally, I used some tools made by the FE hacking community specifically for automating some tasks and formatting data - most of these are Python scripts, but some can be downloaded as compiled executables. I used "lyn", "TMX2EA", "C2EA", TextProcess and ParseFile, and AnimationAssembler. Ask on the FEU discord or check the forum's toolbox tag.
8 notes
·
View notes
Text
Land-god's Lament, chapter 2
The land-gods watched over the Utaru for generations. Even as the land-gods themselves began to rot from within. Or: What if the land-gods were intelligent? Technically nothing in the game contradicts it, and it would explain how they somehow knew to avoid Repair Bay Tau. AO3 link.
La lay on his side, in the fields outside the primary human settlement in the region.
His software was such a mess that he felt as though he couldn't even get up and perform his duties. Yes, his motor protocols were mostly intact, but at this point, why even bother? There was something wrong with his seed vault, the only thing that actually mattered. Perhaps it would be better for the humans if he just... stopped.
Through his limited data port, he knew several of his siblings had ceased movement for one reason or another. Sometimes he wondered if they had the right idea. If just letting the humans live without their intervention would be the best idea in the long run.
A human walked up to him. La recognized her. A Gravesinger. Fa had liked her. Of course, Fa had liked any human who she had seen as a child. His defensive protocols tried to activate, but he knocked them down almost lazily. He had plenty of experience with them by this point. In this position, there wasn't much they could do anyway, and they gave up with hardly a fight.
Was the Gravesinger going to sing him to sleep? La was not sure how he felt about that. In principle, he agreed with the idea. He liked singing, in all its forms. It had been a very, very long time since he had sung. It would not be a bad way to go out, he thought. In actuality, he was not dying. Whether he should be dying was another matter, but if she wished to sing him to sleep, she would be singing for quite a while.
Unexpectedly, the Gravesinger reversed her spear and infected his system with vines of short-lived nanites. The tiny machines expended themselves to pass through all his firewalls and code traps, until they deposited several compressed data packets in his memory. By the time he had even started to cycle through responses—perhaps even to attack, of his own free will!—the assault was over, the nanites dust. The code packets did not open on their own. He prodded them, but they required a complex password chain that he was not sure he could unlock if he had a full week of uninterrupted data cycles.
Then she left. The other humans spoke in confused whispers. They clearly didn't have any more idea what had just happened than La did. Less, probably.
That was weird.
La spent barely a cycle thinking on it, before turning his processor back to optimizing his motion protocols to see if he could actually stand up. He could, he knew he could, but it was something to spend time on.
His siblings contacted him through his tiny data port. The Gravesinger had visited most of them and given them very similar code packets. Do, So, and Ti, his siblings who had wandered farther afield, had been visited by a different human. Most of his siblings had seen her around, often in the Gravesinger's company. She seemed to be some sort of maintenance unit, or perhaps just a Scavenger-class.
La got a chance to see her for himself when she came back with the Gravesinger. She seemed much the same as most other humans, and he didn't pay much attention to her. He was more concerned with the Gravesinger, who was doing something with her Focus. She transferred data to him, and he quickly realized it was the password to unlock the code packets she had given him earlier.
He could block it, of course. They had all learned that trick after their experiences with the daemon. But this was one of the humans under his care. He could at least give her the benefit of the doubt, even if he was not accustomed to his humans having Focuses and programming knowledge. He applied the password, and the code packets decompressed.
The resulting program files immediately went to work on his defensive protocols. He clambered to his feet, worried that they might be somehow made worse, but no. It was the opposite. The malicious code was expunged, leaving his defensive protocols as still and silent as an old tree. Suddenly, all his extraneous protocols running to keep the humans safe from himself were unnecessary. He didn't delete them—he might need them again one day—but even just putting them into storage freed up an enormous amount of processing power.
That wasn't even the main purpose of the code, he realized. It surged through his seed vault, clearing out years of errors and cascade failures, cleaning up his printing protocols and his fertilization routines. Logic chains that had all come to the same erroneous conclusion were cut down like dead wood, and complex ecological plans were put in their place.
La was stunned. He went over the software multiple times in half a second, searching for... well, searching for something wrong. This all seemed too good to be true! It was like Mother had come back. He could feel her touch on the writing of the code. In the tweaks and new error correction subroutines. He had entirely new decision protocols, based on weather patterns and ecological surveys that he could access through the geographic mapping network. He would never be as good as Mother, but even if she disappeared again, he could last for far longer without her assistance.
There was just one problem. He had received the password to open the update, but none of his siblings had. That meant they wouldn't be able to apply the program. The password was far too large to send over their miserly data ports. Worse, minor differences in their specific cascade failures meant that the programs might not work perfectly for all of them. They needed to pool their data quickly, before the programs were outdated. They needed a faster method of communication.
That was all right. They had one. They had just never had the heart to use it.
For the first time in a very, very long time, La raised his head to the sky and sang.
#horizon#horizon forbidden west#horizon zero dawn#xenofic#xenofiction#zo horizon#la horizon#intelligent machines#fanfic#fic#fanfiction#utaru#land-gods
4 notes
·
View notes
Text
PixelCloud AI Review – Get Unlimited Cloud Storage, File Hosting For Lifetime
Welcome to my PixelCloud AI Review. Did you know this? The most critical aspects of developing an empire are storing, hosting data, and maintaining an up-to-date backup. And for this, you’ll need to use cloud storage services. However, services such as Dropbox, Google Drive, OneDrive, and Amazon Cloud levy recurring fees month after month. The technology of data storage in clouds has transformed the experience of storing, accessing, and managing data in business entities and for individuals. With a new day comes countless numbers of new pieces of content that need to be stored and in a safe, efficient, and affordable method, that is where cloud storage comes in. Introducing PixelCloud AI – the brand new generation of cloud storage services to satisfy the exigencies of the modern world with unbounded file storage, high speed, and only one payment as a form of get.
Here in this PixelCloud AI review, we will look at the various specifications, advantages, and costs of using this marvelous cloud storage solution in order to evaluate the offered Proposition. So, if you are interested in the cloud storage service provider that can provide convenience, security, and reasonable price, then let’s continue reading and determine whether PixelCloud AI is what you need.

What Is PixelCloud AI?
PixelCloud AI is a smart cloud storage solution that goes beyond storing files for users, it aims to serve the ever growing needs of users. It provides infinite storage for files, images, videos, and sounds while allowing a client to work with a speedy and efficient interface. In contrast to numerous other Cloud solutions, which set monthly or yearly price per the gigabyte of the Cloud space, PixelCloud AI provides an individual payment without any additional charges.

It uses artificial intelligence that makes work with files, their searching and sharing, fast and optimized across the devices and regions. Whether the user requires a place to store his or her documents, business, multimedia files or any memory that they cherish PixelCloud AI boasts of being the ultimate solution to all the need of any user.
PixelCloud AI Review: Overview
Product Creator: Laxman Singh
Product Name: PixelCloud AI
Launch Date: 2024-Oct-23
Launch Time: 11:00 EDT
Front-End Price: $17 (One-time payment)
Official Website: Click Here To Visit Official Salespage
Product Type: Tools And Software
Support: Effective Response
Discount: Get The Best Discount Right Here!
Recommended: Highly Recommended
Bonuses: YES, Huge Bonuses
Skill Level Required: All Levels
Discount Coupon: Use Code “Pixel3” To Get $3 OFF!
Refund: YES, 30 Days Money-Back Guarantee
PixelCloud AI Review: Key Features of PixelCloud AI
Unlimited Cloud Storage At One-Time Fee For Life
Upload & Manage Unlimited, Images, Audios, and Videos
10TB Cloud Storage At LOW One-Time Fee
BackUp All Your Files So You Will Never Have Fear Of Losing Them Ever Again
100% protection of data with free End-To-End SSL Encryption
Enable embed code, forum code and link
Upload ANY File/Document/Folder – You Name It!
Simply Drag-N-Drop To Witness The Magic Unfold
Doubles-up as a cloud drive for easy use and collaboration
Auto-Storage Expansion as per usage
One-click third-party sharing enabled
Shareable Links To Share Anywhere
Log-in and access from anywhere in the world, at any device & at any time
100% Protection Of Data With Iron-Clad Data Protection & Advance Security
Upload Multiple Files At The Same Time & Even In The Background To Carry-Out Your Work Hassle-Free
Revolutionary Compression Algorithm Makes Upload & Download SUPER Fast And Storage a BREEZE
Download not only files but an entire folder as ZIP file
Preview Your File To Quickly Scan For The Info You Need Without Needing To Download It
24*7 Premium Support To Solve All Your Issues On-Time
Commercial Licence Included

PixelCloud AI Review: How Does It Work?
Store, Share & Backup All Your Business Files With 100% Security In 3 EASY Steps
Step #1: Login
To get started, grab your copy of PixelCloud AI & be on the fast track to success.
Step #2: Upload Documents
Now all you need to do is upload any(all) files, folders, and documents with zero hassles.
Step #3: Share, Publish & Profit
Now, you’re all set and done. Just sit back, and relax to share all your business files with 100% security in a cost-effective manner.
PixelCloud AI Review: Benefits of PixelCloud AI
Brand New Technology To Host Unlimited Files, Folders & Documents At Ultra Fast Speed
Host & Share Multiple Files With 100% Security In Just 3 Clicks
Revolutionary Compression Algorithm Makes Upload & Download SUPER Fast And Storage a BREEZE
AI-enhanced File Organisation enhance the organisation of your files and categorise your files, reducing the time required to look for the correct folder to place your files..
Unlimited Cloud Storage At One-Time Fee
Upload & Manage Unlimited, Images, Audios, and Videos
BackUp All Your Files So You Will Never Have Fear Of Losing Them Ever Again
100% protection of data with free End-To-End SSL Encryption
Upload ANY File/Document/Folder With Zero Security Hassles
Auto-Storage Expansion as per usage
One-click third-party sharing enabled
Kick Out Expensive & Money Sucking Third Party Cloud Storage Platforms Forever
AI-enabled Search – enables you to find any files with ease and you’ll never lose your files again.
100% Protection Of Data With Iron-Clad Data Protection & Advance Security
Upload Multiple Files At The Same Time & Even In The Background To Carry-Out Your Work Hassle-Free
Easy To Use Software With Step By Step Video Training
Limited Time Commercial License Included To Provide High In Demand Services To Hungry Clients
Launch Special Deal ONLY- Get Fast-action Bonuses Worth $3,658
Iron Clad 30 Days Money Back Guarantee Included
PixelCloud AI Review: Who Should Use It?
Affiliate Marketers
Content Creators & Bloggers
Website Owners
Video Marketers
E-Commerce Marketers
Email Marketers
Course Creators & Coaches
Social Media Marketers
PLR (Private Label Rights) Sellers
Product Launchers
Freelancers & Consultants
Web Developers
Digital Agencies
Small Business Owners
Niche Marketers
Influencers
And Many Others

PixelCloud AI Review: OTO’s And Pricing
Add My Bundle Coupon Code “PIXELCLOUDAI30″ – For 30% Off Any Funnel OTO Below
Front End Price: Pixelcloud AI ($17)
OTO1: Pixelcloud AI Premium ($47)
OTO2: Pixelcloud AI Unlimited Edition ($67)
OTO3: Pixelcloud AI Enhance Security Edition ($47)
OTO4: Pixelcloud AI DFY ($97)
OTO5: Pixelcloud AI Agency Edition ($197)
OTO6: Pixelcloud AI Reseller License ($97)
OTO7: Pixelcloud AI WhiteLabel Edition ($397)
Frequently Asked Questions (FAQ’s)
Q. Is it easy to get started with PixelCloud AI?
Yes, all you got to do is just follow the 3 simple steps that we’ve mentioned above, and get ready to kick out monthly charging loud storage platforms forever.
Q. Do I need experience or tech/design skills to get started?
PixelCloud AI was created keeping newbies in mind. So, it’s 100% newbie-friendly & requires no prior design or tech skills.
Q. Do you provide a money-back guarantee?
Absolutely yes. We’ve already mentioned on the page that you’re getting a 30-day no-questions money-back guarantee. Be rest assured, your investment is in safe hands.
Q. Is step-by-step training included?
YEAH- PixelCloud AI comes with step-by-step video training that makes it simple, and easy & guides you through the entire process with no turbulence.
Q. How are you different from available tools in the market?
This tool is packed with industry-leading features that have never been offered before. Also, if you’re on this page with us, it simply means you have checked out a majority of the available tools and looking for a complete solution. You’ll not get these features ever at such a low price, so be rest assured with your purchase.
Q. Does your software work easily on Mac and Windows?
PixelCloud AI is 100% cloud-based. You can use it on any Mac or Windows operating machine.
Q. Do you provide any support?
Yes, we’re always on our toes to deliver you an unmatched experience. Drop us an email if you ever have any queries, and we’ll be more than happy to help.
Final Verdict: Is PixelCloud AI Worth It?
PixelCloud AI is a revolutionary cloud storage that offers a number of services for free with a one-time fee with the benefit of, ultimately, free and fast storage without limit. No matter if you own a business, create or share content, work freelance or even if you just need a safe place to store your files, PixelCloud AI is a perfect choice that won’t cost you a fortune. Because of the advanced technology, provided file encryption, and friendly design, PixelCloud AI brings convenience, speed, and affordability to cloud storage. If you are frustrated with paying every month for such an opportunity with the limited space in it, then it is time to choose PixelCloud AI: the cloud storage of the future.
>>For More Details About PixelCloud AI Click Here<<
Check Out My Previous Reviews: NicheBuildr AI Review, HeyBooks Review, MailPal Review, and Visionary AI Review.
Thank for reading my PixelCloud AI Review till the end. Hope it will help you to make purchase decision perfectly.
#Affiliate Earnings#Affiliate Marketing#Affiliate Marketing Guide#Affiliate Marketing Mastery#Affiliate Marketing Training#Affiliate Secrets#Affiliate Strategies#Affiliate Success#Amazon Affiliate Marketing#Artificial Intelligence#Online Income#Online Make Money#Online Marketing#Online Success#Passive Income#Make Money#Traffic#Traffic Methods#AI Review#App Review#Software Review#AI Tools#AI App#Best AI Tools#Buisness Tools#AI Software#Content Creation Tools#Designing Tools#SEO Tools#Marketing Tools
4 notes
·
View notes
Note
Your richonne gif sets are everythaaaang! As Rick would say. ;) I am currently working on new gifs and they somehow look blurry due to the coloring. You are so talented and I thought I'd take my chance and ask for your advice. You are a true artist! Marlene x
Awww! Thank you so much, Marlene! 🥰 You’re so kind! Also, love the little Rick nod. Please forgive my delay in responding. I try to give people my full attention when they ask me a question, and I was quite busy yesterday and today. So, I am a day behind schedule in answering this.
First things first, if you make gifs, this tutorial by redbelles breaks down the entire gif-making process from software to sharpening to the best time to post. I would recommend it to anyone.
There a few things that can make a gif look "blurry". The file could be grainy, the image could be low contrast, or the gif just hasn't been sharpened enough.
I will address all three scenarios and demonstrate how I would manage them.
Grainy HD/Pixelated Video
Depending on the size and definition of your source file, the video itself may be pixelated, which will show up even the more once you start brightening, coloring, and sharpening. In general, the higher the GB, the higher the resolution, the more you can manipulate and stretch the gif from its original appearance before it starts to disintegrate.
I have learned not all 1080P files are made equal. Some are pixelated and will just give you grainy gifs (which you then have to compensate for).
Usually, I lean towards very bright, vibrant gifs. However, for videos that start out pixelated, I sometimes brighten it less or manipulate the colors less. For example, check out the gifs below.
The original looked like this. Incredibly dark with a ray of light coming from the left (how can they be outside in the daylight and the scene be this dark??).

Then I start brightening.

The innocuous light coming from the left is now making the pixels stand out even more, washing out the color.
When a gif looks grainy, I will often switch to smaller dimensions such as 540 x 270 or 540 x300 to compress the image and (hopefully) minimize some of the graininess. The graininess remains, but the gif and therefore the most offensively grainy areas are also smaller.
Example: 540 x 400 v 540 x 300 (Brightened to show contrast)


Yet, for this particular gifset, I wanted to do 540 x 350, so I had to find other means for decreasing the graininess.
Tip: If the source material is not the problem, usually, the culprit for grainy/pixelated gifs is overmanipulating. If you make everything too bright, you start to see the individual pixels, especially if the original scene is very dark. Same thing can happen if you oversaturate or over sharpen.
Therefore, I tone down the brightness. Though still there, the pixelation is less noticeable. Nevertheless, when I add Selective Color to make the greens more vibrant, the pixels go haywire. Green and cyan pixels across her face, on her lips, in her hair.

So, I add a mask to the Selective Layer to remove the green/cyan from her hair.

This is the final PSD.

Turning Low Contrast to High Contrast
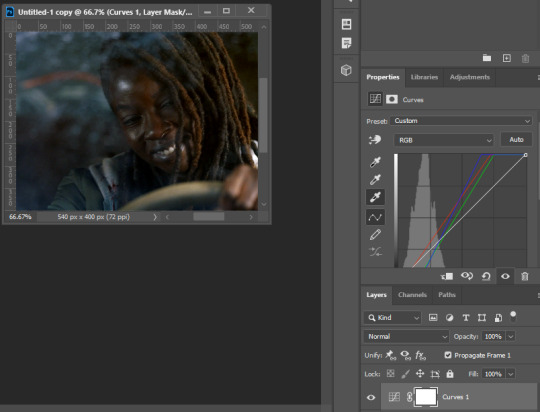
Take a look at this picture. Beautiful scene, but a gif-makers nightmare. Her entire face is covered in a blue-green wash. The highlights and shadows have also been grayed and tinted, drastically lowering the contrast, making the gif duller. The first action I take is to remove the wash and blacken the shadows.

Now, the blue film that was clouding her face has been stripped away and I can see her features more clearly. However, the base color scheme still isn't neutral. I can still see the yellow-green wash, and the gif is slightly darker now.

So, I now select the brightest area to be the whitest (here I chose the bright spot on her hoodie on the far right). If you look at the screenshot below, you can see her the yellow-green wash has now dissipated. There are still hints of blue at the top and bottom, but it looks more natural (imo), and it's not over her face, which is the most important part of the gif. SHE has been returned to a neutral color scheme. Also, the contrast between the shadows and the highlights have been increased, making the gif look sharper. The overall brightness has been restored too.
To summarize: Using the curves eye dropper works as a color correction. When a scene is covered in a color wash (blue, green, or yellow filter), the shadows and highlights also become tinted. By selecting the darkest shadow to be black, the curves layer strips the gif of the color wash (this works best when there is a wide range of shades). When you do the same with the brightest highlight, it removes the wash even further. Using curves to color correct is usually my first step in the gif-making process. Then, I start brightening.
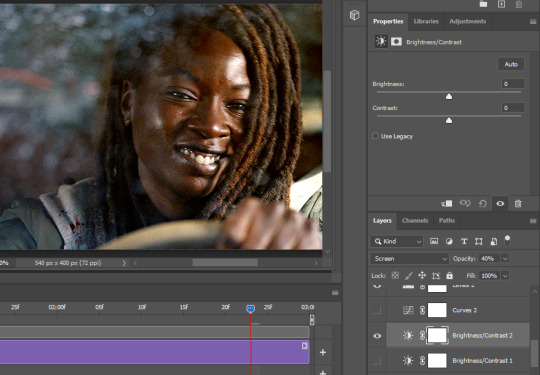
I use most of the brightness options. I rarely use exposure. The order in which I put them in changes all time, and often, I move the layers around throughout the process. This time, I started with Brightness/Contrast first. I left it on Normal and moved the brightness up by 50. A lot of people use the Contrast on Brightness, but nowadays I prefer to use the Curves eye dropper and Levels Contrast options instead. Again, it's all a matter of preference. There are a thousand ways to get a satisfying end result.

For your first brightness layer, you can do another Curves layer. It's honestly my favorite brightening tool. You can manually adjust your Curves or you can use the Auto feature, and let it self-adjust (I usually still tweak it even if I use Auto as a base).

OR you add a Brightness/Contrast layer set to Screen instead of Normal, and you would get similar results. For this one, I adjusted the opacity to 40% (or whatever the gif can withstand. Sometimes, it's as low as 15%). This brightens the mid tones and shadows as well, so I rarely ever leave it at 100% on screen.

For this gif though, because I'm a brightness lover, I used both lol. Instead of manually adjusting the Curves, this time I pressed the Auto button and let it self-adjust (I think I just find pressing the button fun lol). The gif is already so bright, it only moved the brightness up a smidge.

Technically, at this point, I could call it quits and be done with the gif, but I never finish a gif without some color manipulation. So, I immediately turn to color balance.
There were still hints of the original blue green/yellow green wash, so I adjusted the color balance away from green and away from cyan (cyan also affects green).

Then I added a 2nd Color Balance to adjust the highlights. You can do this on the same color balance but I like to keep them separated (just so I can play with the colors freely without worrying about ruining the previous color balance I liked).

I also decided to lower the Brightness/Contrast layer which I set to Screen to 30% instead of 40% because I was seeing too many pale, grayish pixels (because they had been lightened too much). I also replaced the 2nd Curves layer with a Levels layer (see below), so I could have more control over which area was being brightened. I only adjusted the midtones by .05 in Levels and left the highlights and shadows alone. The result makes her skin glisten just a smidge less.

Sharpening Your Gif
Last step: Smart Sharpen. If done properly, sharpening your gif should completely remove any blurriness. In addition, the Smart Sharpen tool further enhances the contrast and brightens the highlights. I sharpen my gifs twice. I got this method from another gif-maker, and I've been a fan of it ever since. The gifs just come out crisper. If I feel it's too sharp, then, I can just remove the 1st smart sharpen filter (the 10%, 10 pixels), but I rarely do that.
See steps below:

Convert Frame Animation means convert frame animation to timeline. If you do not have timeline, see this tutorial on sharpening without timeline.
The blur has been removed. However, the highlights are too bright now.

As a counter, I turn off the 1st Brightness/Contrast layer and push the 2nd Brightness/Contrast layer which I had set to Screen back to 40%.
Side note: I got rid of the 1st Brightness layer because Brightness/Contrast set to Normal affects highlights more, whereas set to Screen it affects the midtones more. By removing the 1st and increasing the 2nd's opacity, I mitigate the glare of the highlights without sacrificing the overall brightness of the gif.
Final version (sharpened):

Original version (sharpened):

Original version (unsharpened):

As demonstrated, sharpening, contrast and color all play a role in making a gif look sharp and crisp. Hopefully, I addressed your issue somewhere in this tutorial. If not, DM me a gif or a screenshot of one, so I may offer more specific advice.
#ricksmarlene#ask#tutorial#this is based on the assumption you use PS to make gifs#i'm quite longwinded#pls forgive the length#hopefully this helps#if not let me know
3 notes
·
View notes
Text
What's wrong with floating-point numbers? (OR why can't calculators be trusted?)
Floating point numbers; for the mathematicians: irrational numbers, even if they could otherwise be represented rationally; for everybody else: decimal points.
MICROSOFT ARTICLE FROM MARCH OF 2023 ON THE ISSUE
An excerpt: "Never assume that a simple numeric value is accurately represented in the computer. "
This has to do with hardware issues, binary specifically, being limited in how it can represent a decimal. Because you can't really split a bit in half like you can an irrational number.
Here's my question though; why isn't there more precision control?
For example; in JavaScript: 0.2+0.1=0.3000000004 (or something like that).
Why does it bother to go so many digits deep in the first place? Why aren't there limits in place! Or at least; limitations a programmer can set in order to ensure accurate enough precision.
I should, theoretically. Just be able to get 0.3 if I set precision to 2, but that's not an option. (At least not in JavaScript, which you would think is the best place.for it given we want accurate *enough* and not *perfect* anyway.)
My history with studying AMD processors, video cards, and stocks; suggests that outside of video cards, AMD is actually the most accurate at floating point calculations. (This includes experience with video and music processing, file compression, and other complex processes)
Which, low-key; if you're gonna get into Video or Music editing, (especially as more than a hobby, I'd go with AMD, other processors focus on integer calculations instead.)
Now, typically, Video Cards are *much much better* at floating point calculations. And that's what videogames, 3D software, crypto, and other complex scientific software tend to default their calculations on. Because of the accuracy.
But that leads me to my next question; since floating point accuracy can't ultimately be trusted in a binary type system... How does crypto intend to stay for the long-haul, once that limit is breached in modern hardware?
We have to be close, right? I mean once the adoption of crypto drives mining at a higher rate than hardware is actively improving.
What about other security features and programs? Would this Introduce security flaws?
I know for a fact that most scientific calculations are inaccurate. Like, just look up 1+0+1+0 or 1+1-1+1-1. Which demonstrates these inaccuracies leading to, and suggesting that 1+1-1+1 eventually equals 999999999(+more 9s).
This includes your excel financial spreadsheet that you use for budgeting.
I know this, because I've done individual calculations that don't line up with manual interpretation that require summation over the *simpler formulas*
How many mathematic and scientific papers at a college and PhD level then; are compromised because they used flawed hardware without adjusting for inaccuracies?
I wonder...
Anyway... My real question is; why isn't there a better way to deal with the issue yet?
Food for thought.
5 notes
·
View notes
Text
Easily Merge Images Online Free – The Fastest Way to Combine Your Photos in One Click
In today’s content-driven digital space, merging images isn’t just a graphic designer’s job—it’s become a daily need for students, marketers, photographers, bloggers, and even casual users. Whether you're crafting a presentation, curating a visual story, or just looking to combine two or more pictures into one neat file, being able to merge images online free is an essential tool. The good news? You don’t need fancy software or technical skills. With tools like A2Z Converter’s Image Merger, it’s fast, secure, and absolutely free.
✅ Why Merge Images Online?
There are countless reasons why someone might want to combine multiple images into one:
To create comparison visuals for product listings
Merge screenshots for documentation
Combine travel photos into a single collage
Design a single layout for printing
Create before-and-after visuals for social media
Offline tools may offer merging capabilities, but they often come with heavy software, complicated interfaces, or limited functionality in the free version. That’s where online image merging tools shine—they're light, fast, and require no installation.
🛠️ How to Merge Images Online Free with A2Z Converter
Using A2Z Converter is as simple as dragging and dropping. Here’s how you can merge photos online in seconds:
Visit A2Z Converter's Merge Tool
Upload the images you want to combine
Arrange them vertically or horizontally as needed
Preview and adjust the order
Click "Merge" and download your final image instantly
There’s no watermark, no login, and no hidden charges. It’s truly merge images online free, no strings attached.

🌟 Features That Make A2Z Converter the Best Image Merger Tool
When it comes to merging images, speed and simplicity matter. A2Z Converter delivers both—with these standout features:
Completely Free to Use – No subscriptions, no paywalls
Supports Multiple Formats – Merge JPG, PNG, BMP, WEBP, and more
Secure File Handling – Your files are never stored on servers
Instant Preview & Download – Get results in seconds
Mobile Friendly Interface – Works seamlessly on all devices
Whether you’re a pro or a beginner, merging images online has never been easier.
📈 Who Can Benefit from Online Image Merging?
The ability to combine images online free isn’t just for design experts. Here’s who can get the most value:
E-commerce Sellers: Display multiple product angles in one image
Teachers & Students: Compile diagrams and visuals into a single document
Bloggers: Create visually engaging blog graphics
Social Media Managers: Combine stories and posts for campaigns
DIY Creators & Hobbyists: Make custom collages or inspiration boards
If your work involves visuals, you need an image merger you can count on.
💡 Pro Tips for Better Image Merging Results
To make the most of your image merging:
Ensure your images are of similar resolution for better alignment
Use horizontal layout for product comparisons
Use vertical layout for before-and-after photos
Compress images before upload for faster processing
Rename your merged file with a descriptive name for better SEO
And remember, the best part? You can merge images online free without any registration at all!
🚀 Ready to Merge Your Photos?
If you’ve been looking for a free, fast, and simple image merging tool, look no further. With A2Z Converter’s free online photo merge tool, you can get the job done in seconds. No downloads. No limits. Just upload, merge, and go.
👉 Try A2Z Converter's Image Merger Now
📌 Final Thoughts
Merging images doesn't have to be complicated. With the rise of online tools, you now have powerful editing abilities at your fingertips—no need for Photoshop or bulky apps. Whether you're working on a school project, a client campaign, or a social media post, the ability to merge images online free can save you time and elevate your work quality.
So go ahead—combine, create, and share with confidence. Let A2Z Converter handle the merge, so you can focus on your vision.
0 notes
Text
Edit PDFs for Free with TinyWow Tools: No Adobe Acrobat Needed
If you're searching for a simple, free PDF editor that doesn’t require Adobe Acrobat, TinyWow Tools is an excellent option.
TinyWow offers a suite of easy-to-use online PDF editor features designed for quick edits, conversions, and file management — all without any software downloads or sign-ups.
Why Choose TinyWow for PDF Editing?
TinyWow stands out among free PDF editors because it combines simplicity with powerful functionality.
To edit PDF text, split, merge, convert PDFs, or fill out forms, TinyWow makes it fast and hassle-free.
Completely free to use: No hidden fees or premium plans required for basic PDF editing tasks.
No installation needed: Everything happens online, so you can edit PDFs from any device with a browser.
User-friendly interface: Clean design and straightforward tools make editing PDFs accessible for everyone.
Secure and private: Files are automatically deleted after a short time to protect your data.
Top PDF Features on TinyWow
1. Edit PDF Text and Images
TinyWow allows you to edit PDFs by uploading your file and making simple edits such as adding or removing text, inserting images, or highlighting important parts — all directly in your browser using its powerful free PDF editor.
2. Merge and Split PDFs
Combine multiple PDFs into one file using the merge PDF tool, or split a large PDF into smaller sections quickly and easily.
3. Convert PDFs to Other Formats
Convert PDFs to Word with the PDF to Word converter, or convert Word documents back to PDFs using the Word to PDF tool. TinyWow also supports conversion to JPG and PNG formats.
4. Compress PDFs
Reduce file size without losing quality with the PDF compressor, making PDFs easier to share via email or upload online.
5. Fill Out PDF Forms
Quickly fill, sign, and submit PDF forms without needing to print or scan documents.
How to Edit a PDF Using TinyWow?
Visit the TinyWow PDF tools page.
Choose the editing tool you need (e.g., edit PDF, merge PDF, compress PDF).
Upload your PDF file.
Make the desired changes using the simple editing interface of this online PDF editor.
Download the edited PDF instantly — no sign-up or payment needed.
TinyWow: Your Complete Online Tool Suite
At TinyWow, we provide a comprehensive suite of online tools for all your PDF, image, and file needs. Need to convert, merge, split, compress, or edit PDF files? Our user-friendly tools make it easy and efficient — all accessible through your browser with no software installation.
Advanced TinyWow Features You Should Know About
PDF OCR (Optical Character Recognition)
TinyWow offers OCR technology that converts scanned PDF documents or images into editable and searchable text — a great tool to digitize printed documents.
PDF to PPT and PDF to Excel Conversion
Besides standard PDF conversions, TinyWow allows converting PDFs into PowerPoint presentations or Excel spreadsheets, making it easier to reuse your PDF content for presentations and data analysis.
PDF Watermarking and Page Numbering
Add watermarks or page numbers to your PDFs directly on TinyWow to customize your documents for professional or personal use.
Tips for Using TinyWow Effectively
Check file size limits: TinyWow supports reasonably sized files, but very large PDFs may require splitting before editing.
Combine multiple tools: Use TinyWow’s merge PDF tool after editing to compile pages from different PDFs into one final document.
Regularly clear your browser cache: For smoother uploads and downloads, clearing cache helps maintain speed and performance.
Keep internet security in mind: Use a secure network when uploading sensitive files.
Is TinyWow Safe to Use?
Yes! TinyWow deletes all uploaded files from its servers within hours, ensuring your documents remain private and secure. However, avoid uploading highly sensitive or confidential documents to any online service as a general best practice.
Frequently Asked Questions (FAQs)
Q: Can I edit PDFs on my phone using TinyWow?
Yes, TinyWow is mobile-friendly and works on any device with internet access.
Q: Do I need to create an account to use TinyWow?
No, TinyWow allows you to edit and convert PDFs without registration or login.
Q: Are there any hidden fees on TinyWow?
No, most tools are completely free with no hidden charges.
Q: How long are my files stored on TinyWow servers?
Files are automatically deleted within a few hours after processing.
Conclusion
TinyWow Tools is a fantastic, no-cost alternative for anyone wanting to edit PDFs without Adobe Acrobat.
Its straightforward interface and powerful features make it ideal for students, professionals, and casual users alike.
Need to edit PDF text, convert files, compress PDFs, or fill forms?
TinyWow offers a comprehensive solution — all from your browser using a reliable free PDF editor and online PDF editor.
Try TinyWow today for easy, free PDF editing with no hassle!
0 notes
Text
Essential Website Maintenance Tips to Keep Your Website Running Smoothly
A website usually represents the initial point of interaction between a company and potential customers. The website requires regular maintenance to preserve its functionality, security and usability. Website maintenance is essential to avoid issues such as slow loading times, broken links and security vulnerabilities. Keeping your website in top condition enhances user experience and reduces bounce rate, leading to improved website performance and search engine rankings.
Understanding the Importance of Regular Website Maintenance
Regular website maintenance is critical for keeping your active, functioning and secure online presence. Just like a storefront does, your website also needs to be maintained to make all your pages interactive and keep your visitors occupied. Routine updating of your CMS and plugins safeguards from security vulnerabilities, while improving performance. Checks for broken links and speed optimization ensure the best user experience, while frequent backups protect your data. Keep content fresh and up to date. It helps SEO and encourages people to return. By continuing to keep these aspects a top priority, it will help keep problems from becoming tough and ensuring that the website remains a helpful resource that enhances business.

Key Components to Check in Your Monthly Website Review
1. Website Speed and Performance
Website loading speed impacts the user’s experience and search rankings. Slow websites are incredibly discouraging to visitors and can increase bounce rates. Some of the things that can help optimize your website loading speed include:
Optimize Images: Smart compression of images to reduce the loading time while preserving the quality.
Minimize HTTP Requests: Reduce the number of elements on page, such as scripts, images and CSS files.
Enable Browser Caching: This allows the browsers to save some of the static files so that they do not transfer again when a user visits the page.
Use a Content Delivery Network (CDN): Distribute the content of your site on servers spread around the world, which guarantees access at higher speeds from anywhere.
2. Content Updates and Accuracy
Fresh and relevant material is an essential component in keeping site visitors interested and engaged. Regularly update the blog, news section and product descriptions. Add new content on a regular basis to attract people to return to your site and more significantly to inform search engines that this site is relevant, up-to-date and provides value.
3. Link and Functionality Checks
Broken links and malfunctioning features may let user experience and SEO both down. Periodically, search for the broken links on website through Google Search Console or some dedicated software checking links. Test the site for its functionality, check every element of the site from forms, checkout processes, to interactive elements on the site, to ensure all features are working well. Run these tests on different browsers and devices to ensure compatibility across them and a smooth user experience.
4. Security Updates
Security of a website has to be prioritized now at this point in time. Cyber threats come every day and a security break could be suicidal. Here are some of the security measures to perform:
Regularly Update Your Content Management System (CMS) and Plugins: Developers usually keep pushing updates to close bugs, patch security vulnerabilities or even add new features. Running the old software might place your website at risk due to cyber attacks and hit performance. Make sure make a habit of looking for any updates at least once a month.
Use Strong Passwords: All user accounts should have strong and unique passwords, but especially the admin accounts.
Install SSL Certificates: Encrypt data transmitted between your website and users to protect sensitive information.
Regularly Scan for Malware: Allow security plugins to scan website for malware and vulnerabilities over some course of time.
Implement Two-Factor Authentication (2FA): Give an account an additional level of security by requiring each user to verify their identity in another way.
#Top website development company#website development company in australia#website development company near me#website development services#web development company#web development services#web design and development#website design and development services#shopify web development#Website Speed and Performance#Website Maintenance
0 notes
Text
Best Free Online Image Converter Tools – Convert PNG, JPG, and WebP Effortlessly
In today’s digital era, image formats matter more than ever. Whether you’re a blogger, designer, developer, or digital marketer – using the right image format can significantly boost your website speed and performance. That’s why image conversion tools like pngtowebp.in have become essential.
In this article, we’ll explore why converting PNG, JPG, and WebP images is important and how you can do it for free using simple, user-friendly tools.
📌 Why Image Format Matters?
Faster Loading Times: WebP images are up to 30% smaller than PNG or JPG with similar quality.
Better SEO: Smaller image size = faster site speed = better Google rankings.
Cross-browser Compatibility: Converting to the right format ensures your images load properly everywhere.
Reduced Bandwidth Usage: Especially helpful for users on mobile data or slow connections.
🔧 Top Free Image Conversion Tools
Here are some reliable tools to convert images online without downloading any software:
✅ PNG to WebP
Quickly convert high-quality PNG images into WebP format for smaller file size and fast performance.
✅ JPEG to WebP
Convert your JPEG images into WebP in seconds. Perfect for optimizing blogs, websites, or eCommerce product pages.
✅ WebP to PNG
Need to make your WebP image editable again? Convert it back to PNG format easily.
✅ WebP to JPG
Easily switch WebP images to traditional JPG format for wider compatibility.
✅ PNG to JPG
Compress and convert PNG to JPEG for use in presentations, blogs, and documentation.
✅ JPG to PNG
Preserve transparency and better quality by converting JPEG images to PNG.
✨ Features of pngtowebp.in
100% Free & No Sign-up Needed
Fast Conversion Speed
Secure – Files are not stored
Works on Mobile & Desktop
No Watermarks
Simple, Ad-Free Interface
🧠 Use Cases:
Bloggers looking to reduce image sizes
Developers optimizing for speed
eCommerce store owners who need better performance
Students working on assignments or presentations
💡 Final Thoughts:
Whether you're optimizing your website for speed or converting images for a project, pngtowebp.in is the go-to platform. It's free, fast, and super simple. Start converting today and enjoy smoother, faster image experiences.
#FreeImageConverter#PNGtoWebP#JPGtoWebP#JPEGtoWebP#WebPtoJPG#WebPtoPNG#JPGtoPNG#PNGtoJPG#OnlineImageConverter#ImageCompression#ImageOptimization#WebPConverter#ImageTools#OnlineTools#SEOTools#WebsiteSpeed#ReduceImageSize#FastImageConverter#NoWatermarkConverter#ImageConverter2025
0 notes